Embed Size (px)
DESCRIPTION
Twin shirt is an easy to make shirt with a playful form and explore zerowaste design. You can create interesting effects using different colors and by drawing unusual shapes of sleeves. Follow instruction for use: http://openwear.org/lookmap/item/4
Citation preview

openwear/collaborativeclothing
Symmetric twin shirtDESCRIPTION Twin shirt is an easy to make shirt with a playful form and explore zero-
waste design. You can create interesting effects using different colors and by drawing unusual shapes of sleeves.
MATERIALS/TEXTILE We used cotton with elastan.You need two pieces of fabric, 160 cm (63 inch) in length and 200 cm (78,8 inch) wide.
COLOURS freely choose
SIZE M
APPROXIMATE TIME 2h
DIFFICULTY (1-5) 3
www.openwear.org
Other sizes: S,L,XL
Openwear Collaborative Collection
FORWARD TO BASICS
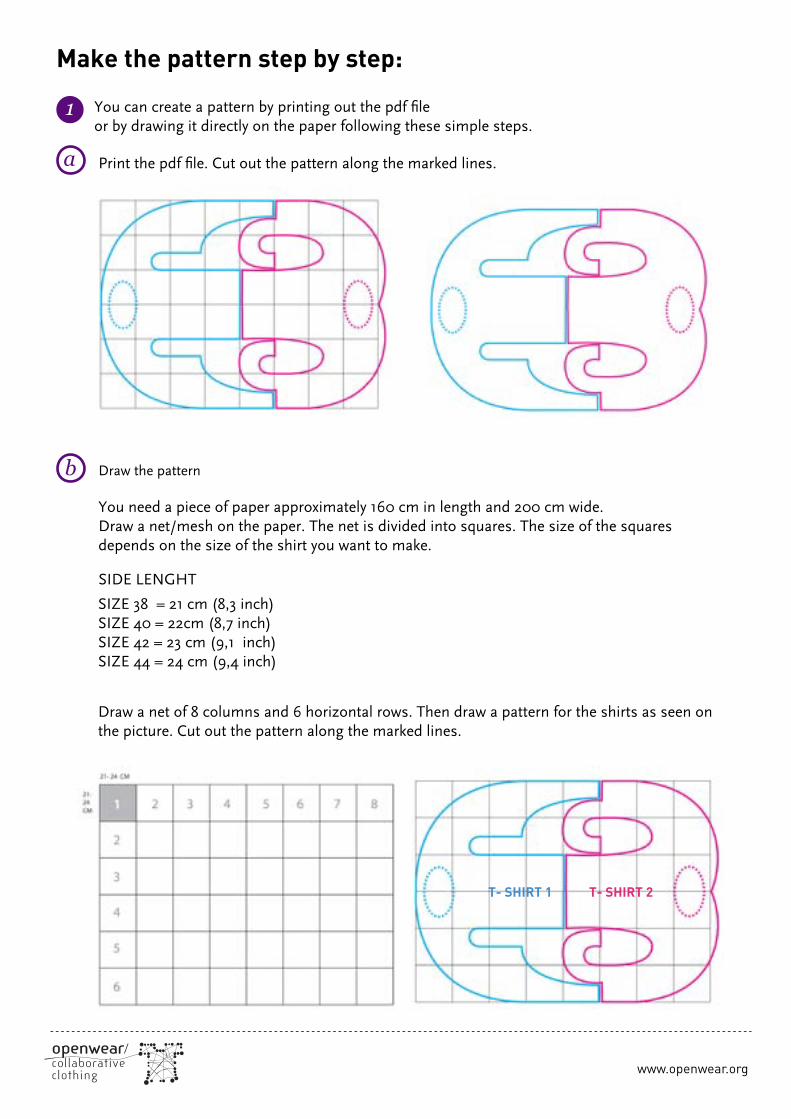
Make the pattern step by step:
You can create a pattern by printing out the pdf fileor by drawing it directly on the paper following these simple steps.
1
openwear/collaborativeclothing www.openwear.org
a Print the pdf file. Cut out the pattern along the marked lines.
b Draw the pattern
You need a piece of paper approximately 160 cm in length and 200 cm wide.Draw a net/mesh on the paper. The net is divided into squares. The size of the squares depends on the size of the shirt you want to make.
SIZE 38 = 21 cm (8,3 inch)SIZE 40 = 22cm (8,7 inch)SIZE 42 = 23 cm (9,1 inch)SIZE 44 = 24 cm (9,4 inch)
Draw a net of 8 columns and 6 horizontal rows. Then draw a pattern for the shirts as seen on the picture. Cut out the pattern along the marked lines.
T- SHIRT 1 T- SHIRT 2
SIDE LENGHT
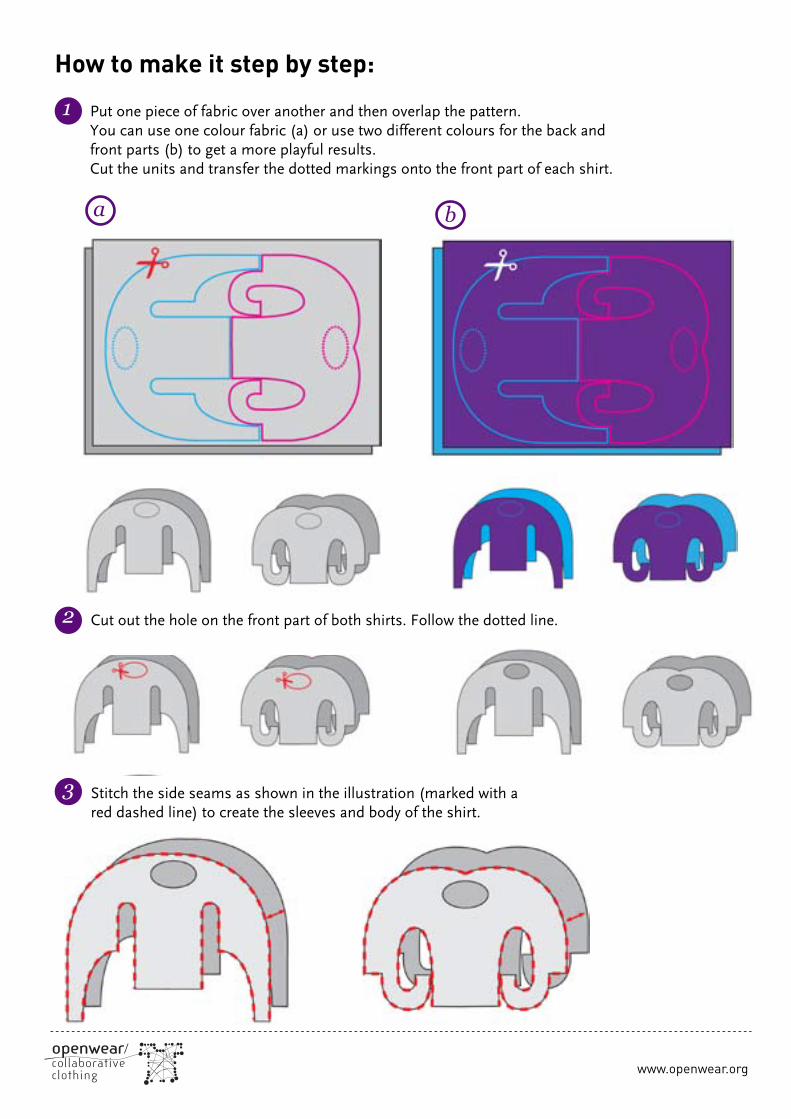
Stitch the side seams as shown in the illustration (marked with a red dashed line) to create the sleeves and body of the shirt.
3
openwear/collaborativeclothing www.openwear.org
Put one piece of fabric over another and then overlap the pattern.You can use one colour fabric (a) or use two different colours for the back and front parts (b) to get a more playful results.Cut the units and transfer the dotted markings onto the front part of each shirt.
Cut out the hole on the front part of both shirts. Follow the dotted line.
1
2
a b
How to make it step by step:
“Forward to Basics” was possible thanx to the active participation of:
Daniela PaisStudio i_gleJure PurgajSerpica NaroDavid LuxembourgOloopPamoyoOpensourcepants
With the support of the Lifelong learning programme of the European Union.This project has been funded with support from the European Commission.This website reflects the views only of the author, and the Commission cannot be held responsible for any use which may be made of the information contained therein.
Collaborators
More info:www.openwear.org/collaborativecollection
Discover how you are free to produce and sell finished garments fromthis Lookmap. Read how www.openwear.org/info
Openwear license
All the content on Openwear blog by EDUfashion Project is licensed under a Creative Commons Attribution-Share Alike 2.5 Slovenia License.Based on a work at www.openwear.org.