Embed Size (px)
Citation preview
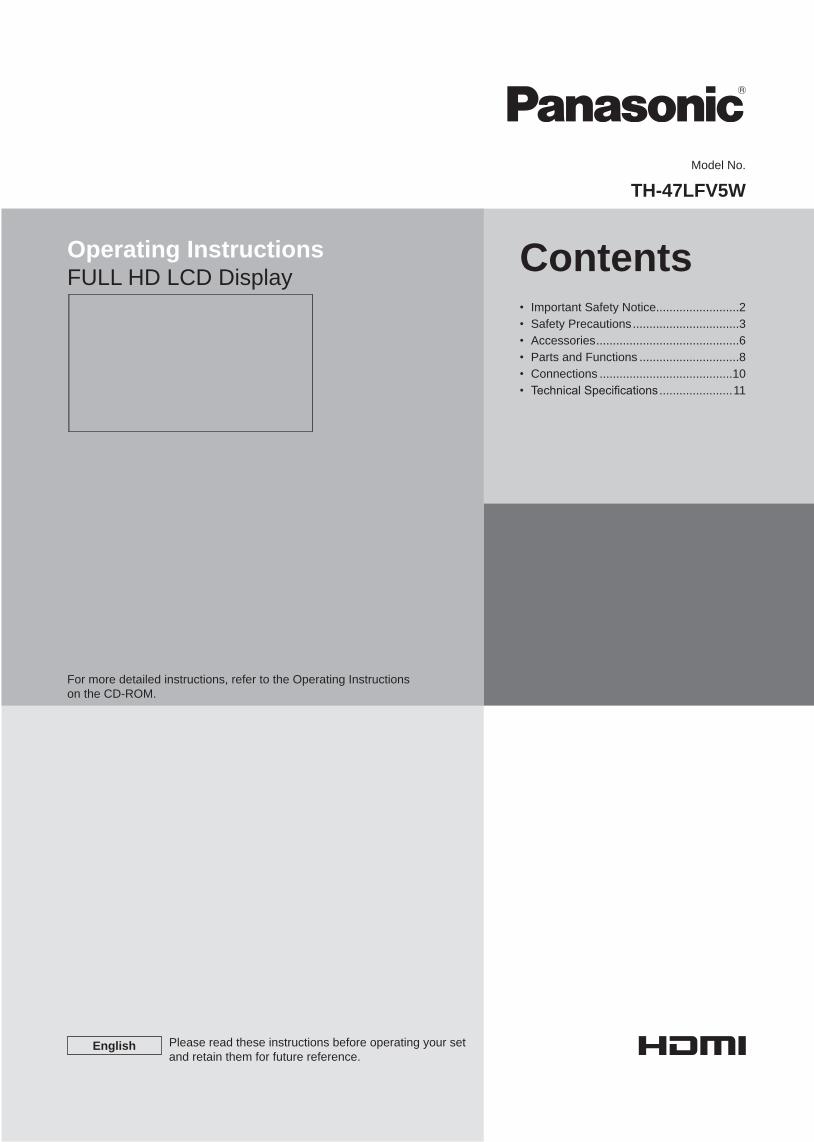
Model No.
TH-47LFV5W
Operating InstructionsFULL HD LCD Display
Please read these instructions before operating your set and retain them for future reference.
English
Contents• Important Safety Notice.........................2• Safety Precautions ................................3• Accessories ...........................................6• Parts and Functions ..............................8• Connections ........................................10• TechnicalSpecifications ......................11
For more detailed instructions, refer to the Operating Instructions on the CD-ROM.
2
Important Safety Notice
WARNING1. To prevent damage which may result in fire or shock hazard, do not expose this appliance to dripping or
splashing. Do not place containers with water (flower vase, cups, cosmetics, etc.) above the set. (including on shelves above, etc.) No naked flame sources, such as lighted candles, should be placed on / above the set.
2. Topreventelectricshock,donotremovecover.Nouserserviceablepartsinside.Referservicingtoqualifiedservicepersonnel.
3. Do not remove the earthing pin on the power plug. This apparatus is equipped with a three pin earthing-type power plug. Thisplugwillonlyfitanearthing-typepoweroutlet.Thisisasafetyfeature.Ifyouareunabletoinserttheplugintotheoutlet, contact an electrician. Do not defeat the purpose of the earthing plug.
4. To prevent electric shock, ensure the earthing pin on the AC cord power plug is securely connected.
CAUTION• Thisapplianceisintendedforuseinenvironmentswhicharerelativelyfreeofelectromagneticfields.• Usingthisappliancenearsourcesofstrongelectromagneticfieldsorwhereelectricalnoisemayoverlapwiththeinput
signals could cause the picture and sound to wobble or cause interference such as noise to appear.• Toavoidthepossibilityofharmtothisappliance,keepitawayfromsourcesofstrongelectromagneticfields.
FOR YOUR SAFETY, PLEASE READ THE FOLLOWING TEXT CAREFULLY.Thisdisplayissuppliedwithamouldedthreepinmainsplugforyoursafetyandconvenience.A10ampfuseisfittedinthisplug. Shall the fuse need to be replaced, please ensure that the replacement fuse has a rating of 10 amps and that it is approved by ASTA or BSI to BS1362.
Check for the ASTA mark ASA or the BSI mark on the body of the fuse.
Iftheplugcontainsaremovablefusecover,youmustensurethatitisrefittedwhenthefuseisreplaced.Ifyoulosethefusecover the plug must not be used until a replacement cover is obtained. A replacement fuse cover can be purchased from your local Panasonic dealer.Do not cut off the mains plug.Do not use any other type of mains lead except the one supplied with this display.The supplied mains lead and moulded plug are designed to be used with this display to avoid interference and for your safety.Ifthesocketoutletinyourhomeisnotsuitable,getitchangedbyaqualifiedelectrician.If the plug or mains lead becomes damaged, purchase a replacement from an authorized dealer.WARNING : — THIS DISPLAY MUST BE EARTHED.How to replace the fuse. Open the fuse compartment with a screwdriver and replace the fuse.
IMPORTANT: THE MOULDED PLUG
Trademark Credits• VGA is a trademark of International Business Machines Corporation.• Macintosh is a registered trademark of Apple Inc., USA.• SVGA, XGA, SXGA and UXGA are registered trademarks of the Video Electronics Standard Association.• Even if no special notation has been made of company or product trademarks, these trademarks have been fully
respected.• HDMI,theHDMILogo,andHigh-DefinitionMultimediaInterfacearetrademarksorregisteredtrademarksofHDMI
Licensing LLC in the United States and other countries.
NOTE:Image retention may occur. If you display a still picture for an extended period, the image might remain on the screen. However, it will disappear after a while.
3
Safety Precautions
WARNING � Setup
This LCD Display is for use only with the following optional accessories. Use with any other type of optional accessories may cause instability which could result in the possibility of injury.
(All of the following accessories are manufactured by Panasonic Corporation.)
• Remote Control Kit ................................... TY-RM50VW• Cover-frame Kit ....................................... TY-CF47VW5
Alwaysbesuretoaskaqualifiedtechniciantocarryoutset-up.Small parts can present choking hazard if accidentally swallowed. Keep small parts away from young children. Discard unneeded small parts and other objects, including packaging materials and plastic bags/sheets to prevent them from being played with by young children, creating the potential risk of suffocation.
Do not place the Display on sloped or unstable surfaces, and ensure that the Display does not hang over the edge of the base.
• The Display may fall off or tip over.
Do not place any objects on top of the Display.• IfwaterisspillsontotheDisplayorforeignobjectsgetinsideit,ashort-circuitmayoccurwhichcouldresultinfireor
electric shock. If any foreign objects get inside the Display, please consult your local Panasonic dealer.
Transport only in upright position!• Transporting the unit with its display panel facing upright or downward may cause damage to the internal circuitry.
Ventilation should not be impeded by covering the ventilation openings with items such as newspapers, table cloths and curtains.
For sufficient ventilation;• Leave a space of 3-15/16" (10 cm) or more at the top, bottom, left, and right to the outermost circumference of this
Display. • Leave a space of 1-31/32” (5 cm) or more at the rear.
Cautions for Wall Installation• Wall installation should be performed by an installation professional. Installing the Display incorrectly may lead to an
accident that results in death or serious injury. Furthermore, when installing on a wall, a wall hanging bracket that conforms to VESA standards (VESA 400 × 400) must be used.
4
Safety Precautions
� When using the LCD DisplayThe Display is designed to operate on 220 - 240 V AC, 50/60 Hz.
Do not cover the ventilation holes.• DoingsomaycausetheDisplaytooverheat,whichcancausefireordamagetotheDisplay.
Do not stick any foreign objects into the Display.• DonotinsertanymetalorflammableobjectsintotheventilationsholesordropthemontotheDisplay,asdoingsocan
causefireorelectricshock.
Do not remove the cover or modify it in any way.• High voltages which can cause severe electric shocks are present inside the Display. For any inspection, adjustment and
repair work, please contact your local Panasonic dealer.
Ensure that the mains plug is easily accessible.
An apparatus with CLASS I construction shall be connected to a mains socket outlet with a protective earthing connection.
Do not use any power supply cord other than that provided with this unit.• Doingsomaycausefireorelectricshocks.
Securely insert the power supply plug as far as it will go.• Iftheplugisnotfullyinserted,heatmaybegeneratedwhichcouldcausefire.Iftheplugisdamagedorthewallsocketis
loose, they shall not be used.
Do not handle the power supply plug with wet hands.• Doing so may cause electric shocks.
Do not do anything that may damage the power cable. When disconnecting the power cable, pull on the plug body, not the cable.
• Donotdamagethecable,makeanymodificationstoit,placeheavyobjectsontopofit,heatit,placeitnearanyhotobjects,twistit,benditexcessivelyorpullit.Todosomaycausefireandelectricshock.Ifthepowercableisdamaged,have it repaired at your local Panasonic dealer.
If the Display is not going to be used for any prolonged length of time, unplug the power supply plug from the wall outlet.
To prevent the spread of fire, keep candles or other open flames away from this product at all times.
� If problems occur during useIf a problem occurs (such as no picture or no sound), or if smoke or an abnormal odour starts to come out from the Display, immediately unplug the power supply plug from the wall outlet.
• IfyoucontinuetousetheDisplayinthiscondition,fireorelectricshockcouldresult.Aftercheckingthatthesmokehasstopped, contact your local Panasonic dealer so that the necessary repairs can be made. Repairing the Display yourself is extremely dangerous, and shall never be done.
If water or foreign objects get inside the Display, if the Display is dropped, or if the cabinet becomes damages, disconnect the power supply plug immediately.
• Ashortcircuitmayoccur,whichcouldcausefire.ContactyourlocalPanasonicdealerforanyrepairsthatneedtobemade.
5
Safety Precautions
CAUTION � When using the LCD Display
Do not bring your hands, face or objects close to the ventilation holes of the Display.• Heated air comes out from the ventilation holes at the top of Display will be hot. Do not bring your hands or face, or
objects which cannot withstand heat, close to this port, otherwise burns or deformation could result.
Be sure to disconnect all cables before moving the Display.• IftheDisplayismovedwhilesomeofthecablesarestillconnected,thecablesmaybecomedamaged,andfireorelectric
shock could result.
Disconnect the power supply plug from the wall socket as a safety precaution before carrying out any cleaning.
• Electric shocks can result if this is not done.
Clean the power cable regularly to prevent it becoming dusty.• Ifdustbuiltuponthepowercordplug,theresultanthumiditycandamagetheinsulation,whichcouldresultinfire.
Pull the power cord plug out from the wall outlet and wipe the mains lead with a dry cloth.
Do not burn or breakup batteries.• Batteriesmustnotbeexposedtoexcessiveheatsuchassunshine,fireorthelike.
Cleaning and maintenanceThe front of the display panel has been specially treated. Wipe the panel surface gently using only a cleaning cloth or a soft, lint-free cloth.
• If the surface is particularly dirty, wipe with a soft, lint-free cloth which has been soaked in pure water or water in which neutral detergent has been diluted 100 times, and then wipe it evenly with a dry cloth of the same type until the surface is dry.
• Donotscratchorhitthesurfaceofthepanelwithfingernailsorotherhardobjects,otherwisethesurfacemaybecomedamaged. Furthermore, avoid contact with volatile substances such as insect sprays, solvents and thinner, otherwise the quality of the surface may be adversely affected.
If the cabinet becomes dirty, wipe it with a soft, dry cloth.• If the cabinet is particularly dirty, soak the cloth in water to which a small amount of neutral detergent has been added
and then wring the cloth dry. Use this cloth to wipe the cabinet, and then wipe it dry with a dry cloth.• Do not allow any detergent to come into direct contact with the surface of the Display. If water droplets get inside the unit,
operating problems may result.• Avoid contact with volatile substances such as insect sprays, solvents and thinner, otherwise the quality of the cabinet
surface may be adversely affected or the coating may peel off. Furthermore, do not leave it for long periods in contact with articles made from rubber or PVC.
Usage of a chemical cloth• Do not use a chemical cloth for the panel surface.• Follow the instructions for the chemical cloth to use it for the cabinet.
6
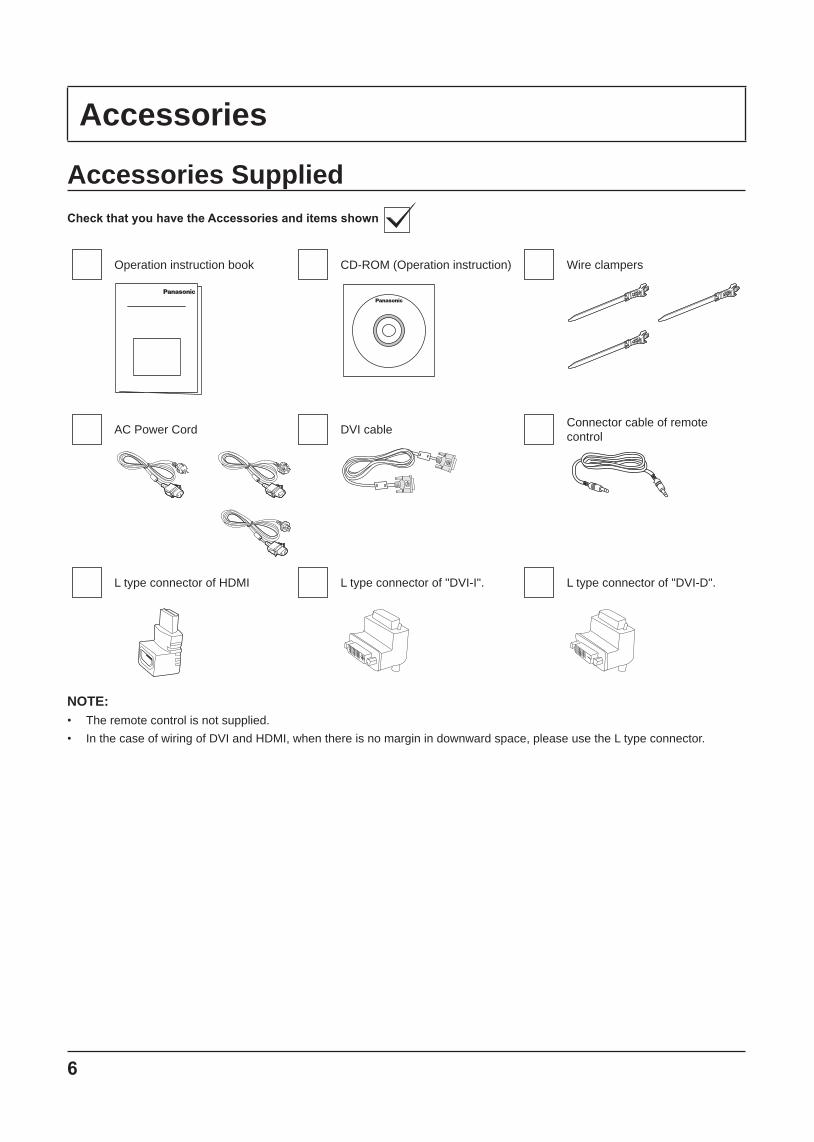
Accessories
Accessories SuppliedCheck that you have the Accessories and items shown
Operation instruction book CD-ROM (Operation instruction) Wire clampers
AC Power Cord DVI cable Connector cable of remote control
L type connector of HDMI L type connector of "DVI-I". L type connector of "DVI-D".
NOTE: • The remote control is not supplied.• In the case of wiring of DVI and HDMI, when there is no margin in downward space, please use the L type connector.
7
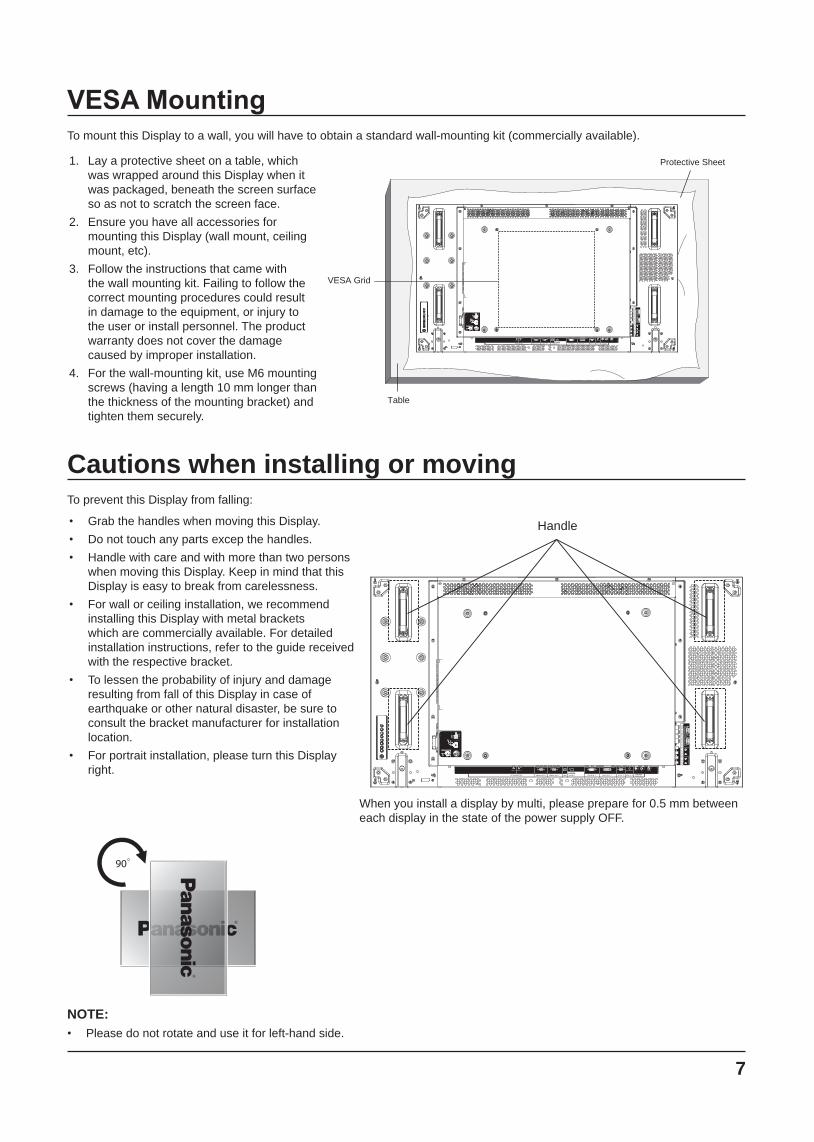
VESA MountingTo mount this Display to a wall, you will have to obtain a standard wall-mounting kit (commercially available).
1. Lay a protective sheet on a table, which was wrapped around this Display when it was packaged, beneath the screen surface so as not to scratch the screen face.
2. Ensure you have all accessories for mounting this Display (wall mount, ceiling mount, etc).
3. Follow the instructions that came with the wall mounting kit. Failing to follow the correct mounting procedures could result in damage to the equipment, or injury to the user or install personnel. The product warranty does not cover the damage caused by improper installation.
4. For the wall-mounting kit, use M6 mounting screws (having a length 10 mm longer than the thickness of the mounting bracket) and tighten them securely.
Protective Sheet
VESA Grid
Table
EX
T S
P(8
Ω,2
0W[1
0W+1
0W])
Cautions when installing or movingTo prevent this Display from falling:
• Grab the handles when moving this Display.• Do not touch any parts excep the handles.• Handle with care and with more than two persons
when moving this Display. Keep in mind that this Display is easy to break from carelessness.
• For wall or ceiling installation, we recommend installing this Display with metal brackets which are commercially available. For detailed installation instructions, refer to the guide received with the respective bracket.
• To lessen the probability of injury and damage resulting from fall of this Display in case of earthquake or other natural disaster, be sure to consult the bracket manufacturer for installation location.
• For portrait installation, please turn this Display right.
Handle
EX
T S
P(8
Ω,2
0W[1
0W+1
0W])
When you install a display by multi, please prepare for 0.5 mm between each display in the state of the power supply OFF.
90
NOTE: • Please do not rotate and use it for left-hand side.

8
Parts and Functions
Control Panel
EX
T S
P(8
Ω,2
0W[1
0W+1
0W])
9
MUTEINPUT
MENU
12
34
56
78
1 POWER buttonUse this button to turn this Display on or put this Display to standby.
2 MUTE buttonSwitch the audio mute ON/OFF.
3 INPUT buttonUse this button to select the input source.• Used as [SET] button in the On-Screen-Display menu.
4 [ ] buttonIncrease the adjustment while OSD menu is on, or increase the audio output level while OSD menu is off.
5 [ ] buttonDecrease the adjustment while OSD menu is on, or decrease the audio output level while OSD menu is off.
6 [ ] buttonMove the highlight bar up to adjust the selected item while OSD menu is on.
7 [ ] buttonMove the highlight bar down to adjust the selected item while OSD menu is on.
8 MENU buttonPress to activate the OSD menu when OSD menu is off.Press to return to previous menu while OSD menu is on.
9 Remote control sensor and power status indicator• Receives command signals from the remote control.• Indicates the operating status of this Display:
- Lights green when this Display is turned on - Lights red when this Display is in standby mode - Lights red and green when this Display enters “Power
Save” mode - When {SCHEDULE} is enabled, the indicator lights
blinking green and static red - If the light blinks red, it indicates that a failure has
been detected - Off when the main power of this Display is turned off
9
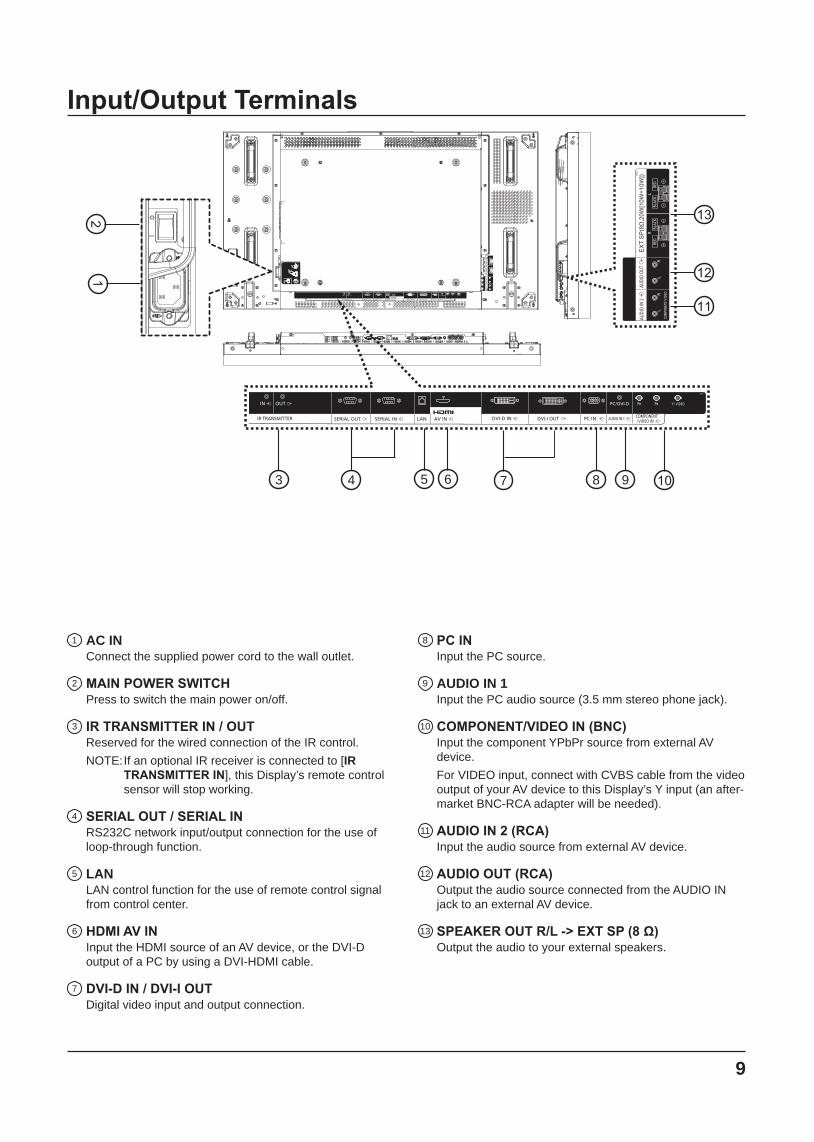
Input/Output Terminals
EX
T S
P(8
Ω,2
0W[1
0W+1
0W])
EX
T S
P(8
Ω,2
0W[1
0W+1
0W])
12
3 4 8 9 10
11
13
12
5 6 7
1 AC INConnect the supplied power cord to the wall outlet.
2 MAIN POWER SWITCHPress to switch the main power on/off.
3 IR TRANSMITTER IN / OUTReserved for the wired connection of the IR control. NOTE: If an optional IR receiver is connected to [IR
TRANSMITTER IN], this Display’s remote control sensor will stop working.
4 SERIAL OUT / SERIAL INRS232C network input/output connection for the use of loop-through function.
5 LANLAN control function for the use of remote control signal from control center.
6 HDMI AV INInput the HDMI source of an AV device, or the DVI-D output of a PC by using a DVI-HDMI cable.
7 DVI-D IN / DVI-I OUTDigital video input and output connection.
8 PC INInput the PC source.
9 AUDIO IN 1Input the PC audio source (3.5 mm stereo phone jack).
10 COMPONENT/VIDEO IN (BNC)Input the component YPbPr source from external AV device.For VIDEO input, connect with CVBS cable from the video output of your AV device to this Display’s Y input (an after-market BNC-RCA adapter will be needed).
11 AUDIO IN 2 (RCA)Input the audio source from external AV device.
12 AUDIO OUT (RCA)Output the audio source connected from the AUDIO IN jack to an external AV device.
13 SPEAKER OUT R/L -> EXT SP (8 Ω)Output the audio to your external speakers.
10
Connections
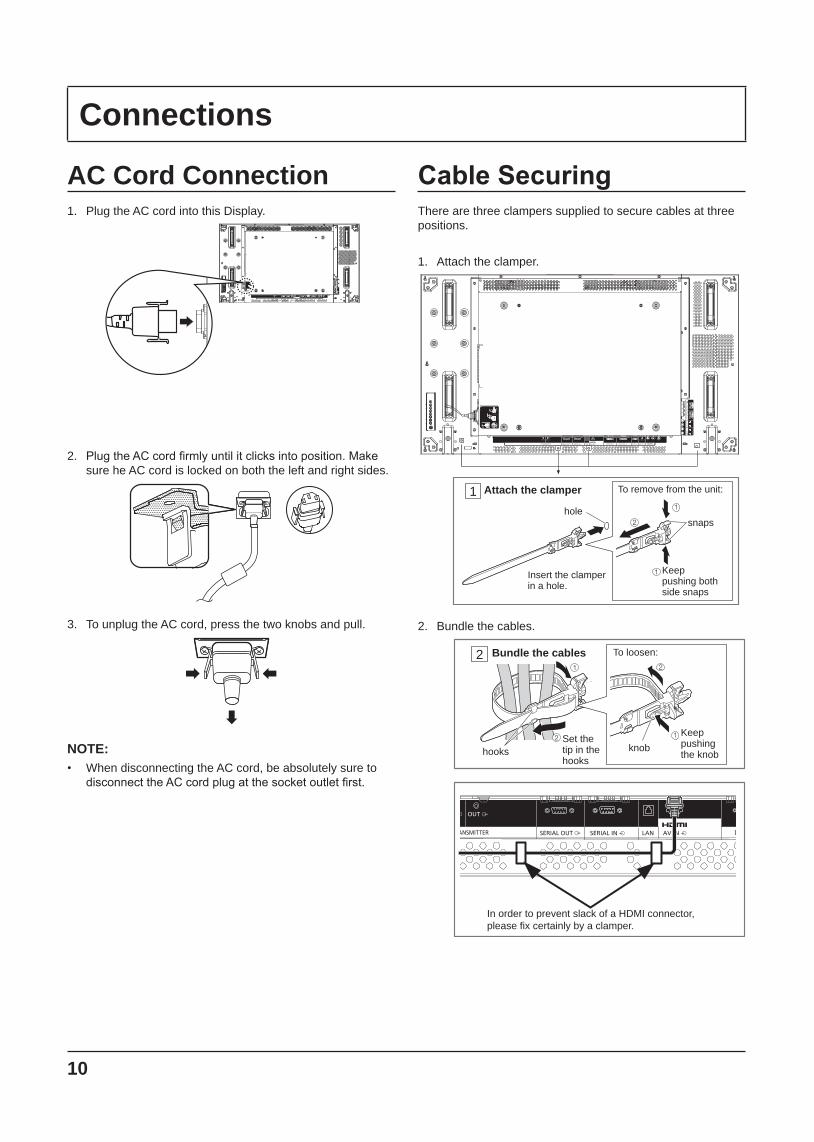
Cable SecuringThere are three clampers supplied to secure cables at three positions.
1. Attach the clamper.
1 Attach the clamper To remove from the unit:
Keeppushing bothside snaps
holesnaps
Insert the clamper in a hole.
EX
T S
P(8
Ω,2
0W[1
0W+1
0W])
2. Bundle the cables.
2 Bundle the cables
hooksSet thetip in thehooks
To loosen:
Keeppushingthe knob
knob
In order to prevent slack of a HDMI connector, please fix certainly by a clamper.
AC Cord Connection1. Plug the AC cord into this Display.
EX
T S
P(8
Ω,2
0W[1
0W+1
0W])
2. PlugtheACcordfirmlyuntilitclicksintoposition.Makesure he AC cord is locked on both the left and right sides.
3. To unplug the AC cord, press the two knobs and pull.
NOTE: • When disconnecting the AC cord, be absolutely sure to
disconnecttheACcordplugatthesocketoutletfirst.
11
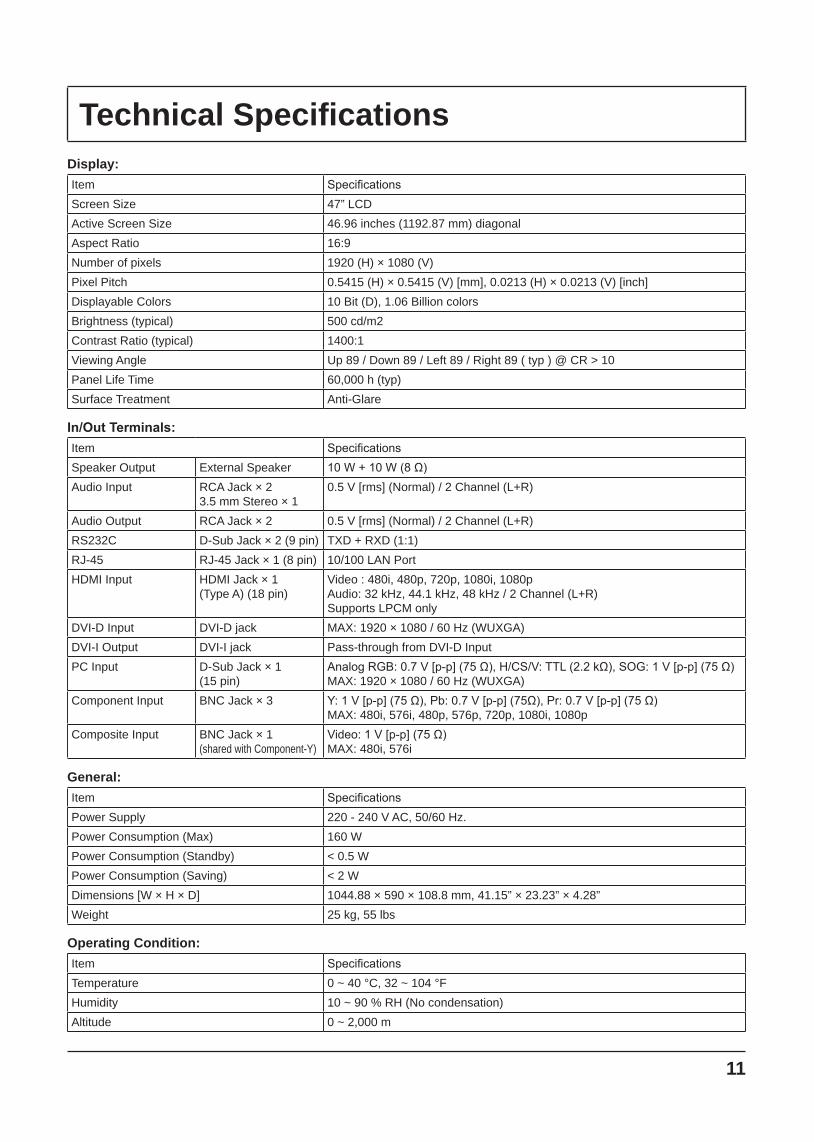
Technical SpecificationsDisplay:Item SpecificationsScreen Size 47” LCDActive Screen Size 46.96 inches (1192.87 mm) diagonalAspect Ratio 16:9 Number of pixels 1920 (H) × 1080 (V) Pixel Pitch 0.5415 (H) × 0.5415 (V) [mm], 0.0213 (H) × 0.0213 (V) [inch]Displayable Colors 10 Bit (D), 1.06 Billion colorsBrightness (typical) 500 cd/m2 Contrast Ratio (typical) 1400:1 Viewing Angle Up 89 / Down 89 / Left 89 / Right 89 ( typ ) @ CR > 10 Panel Life Time 60,000 h (typ) Surface Treatment Anti-Glare
In/Out Terminals:Item SpecificationsSpeaker Output External Speaker 10W+10W(8Ω)Audio Input RCA Jack × 2
3.5 mm Stereo × 1 0.5 V [rms] (Normal) / 2 Channel (L+R)
Audio Output RCA Jack × 2 0.5 V [rms] (Normal) / 2 Channel (L+R) RS232C D-Sub Jack × 2 (9 pin) TXD + RXD (1:1) RJ-45 RJ-45 Jack × 1 (8 pin) 10/100 LAN PortHDMI Input HDMI Jack × 1
(Type A) (18 pin)Video : 480i, 480p, 720p, 1080i, 1080p Audio: 32 kHz, 44.1 kHz, 48 kHz / 2 Channel (L+R) Supports LPCM only
DVI-D Input DVI-D jack MAX: 1920 × 1080 / 60 Hz (WUXGA)DVI-I Output DVI-I jack Pass-through from DVI-D InputPC Input D-Sub Jack × 1
(15 pin) AnalogRGB:0.7V[p-p](75Ω),H/CS/V:TTL(2.2kΩ),SOG:1V[p-p](75Ω) MAX: 1920 × 1080 / 60 Hz (WUXGA)
Component Input BNC Jack × 3 Y:1V[p-p](75Ω),Pb:0.7V[p-p](75Ω),Pr:0.7V[p-p](75Ω) MAX: 480i, 576i, 480p, 576p, 720p, 1080i, 1080p
Composite Input BNC Jack × 1 (shared with Component-Y)
Video:1V[p-p](75Ω) MAX: 480i, 576i
General:Item SpecificationsPower Supply 220 - 240 V AC, 50/60 Hz. Power Consumption (Max) 160 WPower Consumption (Standby) < 0.5 WPower Consumption (Saving) < 2 WDimensions [W × H × D] 1044.88 × 590 × 108.8 mm, 41.15” × 23.23” × 4.28”Weight 25 kg, 55 lbs
Operating Condition:Item SpecificationsTemperature 0 ~ 40 °C, 32 ~ 104 °FHumidity 10 ~ 90 % RH (No condensation)Altitude 0 ~ 2,000 m
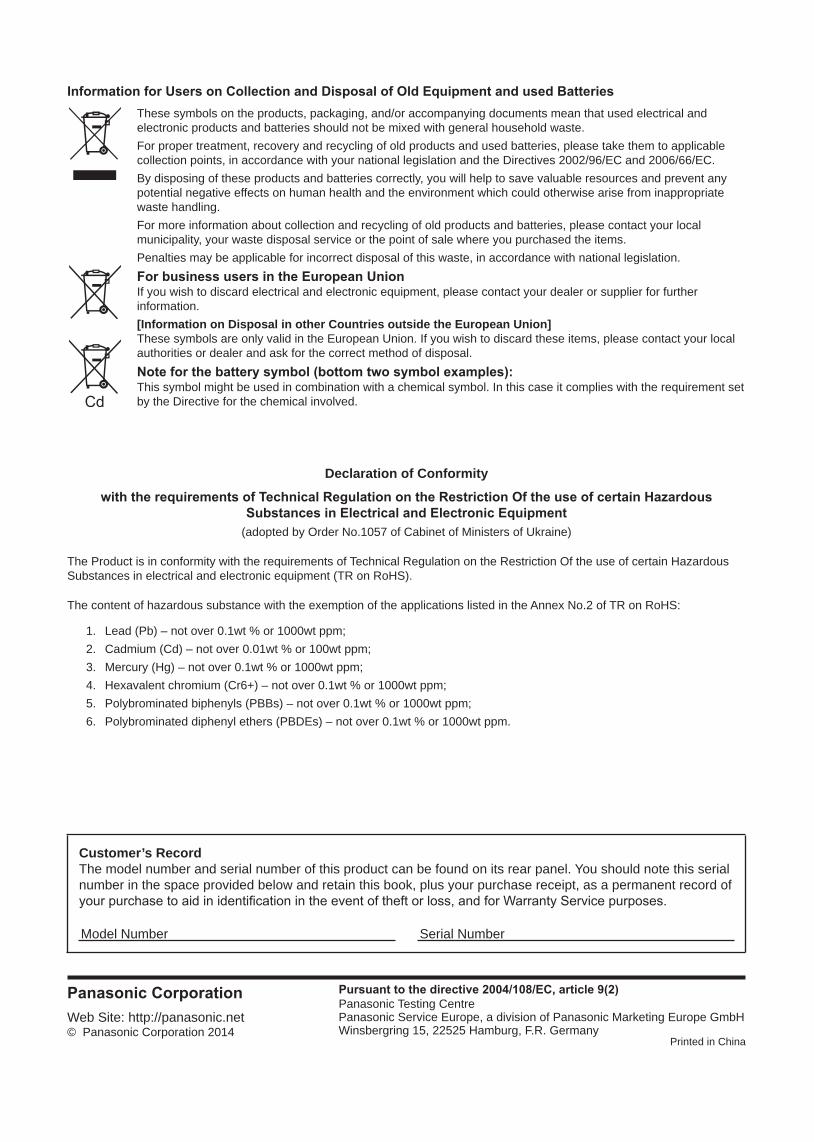
Information for Users on Collection and Disposal of Old Equipment and used BatteriesThese symbols on the products, packaging, and/or accompanying documents mean that used electrical and electronic products and batteries should not be mixed with general household waste.For proper treatment, recovery and recycling of old products and used batteries, please take them to applicable collection points, in accordance with your national legislation and the Directives 2002/96/EC and 2006/66/EC.By disposing of these products and batteries correctly, you will help to save valuable resources and prevent any potential negative effects on human health and the environment which could otherwise arise from inappropriate waste handling.For more information about collection and recycling of old products and batteries, please contact your local municipality, your waste disposal service or the point of sale where you purchased the items.Penalties may be applicable for incorrect disposal of this waste, in accordance with national legislation.For business users in the European UnionIf you wish to discard electrical and electronic equipment, please contact your dealer or supplier for further information.[Information on Disposal in other Countries outside the European Union]These symbols are only valid in the European Union. If you wish to discard these items, please contact your local authorities or dealer and ask for the correct method of disposal.Note for the battery symbol (bottom two symbol examples):This symbol might be used in combination with a chemical symbol. In this case it complies with the requirement set by the Directive for the chemical involved.
Declaration of Conformity
with the requirements of Technical Regulation on the Restriction Of the use of certain Hazardous Substances in Electrical and Electronic Equipment
(adopted by Order No.1057 of Cabinet of Ministers of Ukraine)
The Product is in conformity with the requirements of Technical Regulation on the Restriction Of the use of certain Hazardous Substances in electrical and electronic equipment (TR on RoHS).
The content of hazardous substance with the exemption of the applications listed in the Annex No.2 of TR on RoHS:
1. Lead (Pb) – not over 0.1wt % or 1000wt ppm;2. Cadmium (Cd) – not over 0.01wt % or 100wt ppm;3. Mercury (Hg) – not over 0.1wt % or 1000wt ppm;4. Hexavalent chromium (Cr6+) – not over 0.1wt % or 1000wt ppm;5. Polybrominated biphenyls (PBBs) – not over 0.1wt % or 1000wt ppm;6. Polybrominated diphenyl ethers (PBDEs) – not over 0.1wt % or 1000wt ppm.
Customer’s RecordThe model number and serial number of this product can be found on its rear panel. You should note this serial number in the space provided below and retain this book, plus your purchase receipt, as a permanent record of yourpurchasetoaidinidentificationintheeventoftheftorloss,andforWarrantyServicepurposes.
Model Number Serial Number
Panasonic CorporationWeb Site: http://panasonic.net© Panasonic Corporation 2014
Printed in China
Pursuant to the directive 2004/108/EC, article 9(2)Panasonic Testing Centre Panasonic Service Europe, a division of Panasonic Marketing Europe GmbH Winsbergring 15, 22525 Hamburg, F.R. Germany