Embed Size (px)
Citation preview

Operating instructionsfor Washing machineW 463
It is essential to read theseoperating instructions beforeinstalling or using the machine, toavoid the risk of accident, or damageto the machine.
WO
05 729 410M.-Nr.

Disposal of the packingmaterialThe transport and protective packinghas been selected from materials whichare environmentally friendly for disposaland can normally be recycled.
Ensure that any plastic wrappings,bags etc. are disposed of safely andkept out of the reach of babies andyoung children. Danger of suffocation!
Rather than just throwing these materi-als away, please ensure they are of-fered for recycling.
Disposal of your old applianceOld appliances contain materials whichcan be recycled. Please contact yourdealer, your local waste collection cen-tre or scrap merchant about potentialrecycling schemes.
Ensure that the appliance presents nodanger to children while being storedfor disposal. See the appropriate ad-vice in the "Warning and safety instruc-tions".
Caring for our environment
2

Caring for our environmentDisposal of the packing material . . . . . . . . . . . . . . . . . . . . . . . . . . . . . . . . . . . . . . . 2Disposal of your old appliance . . . . . . . . . . . . . . . . . . . . . . . . . . . . . . . . . . . . . . . . 2
Warning and safety instructions . . . . . . . . . . . . . . . . . . . . . . . . . . . . . . . . . . . . . 6
Description of the applianceSpecial programmes . . . . . . . . . . . . . . . . . . . . . . . . . . . . . . . . . . . . . . . . . . . . . . . . 9
Delicates and Silks / programmes . . . . . . . . . . . . . . . . . . . . . . . . . . . . . . . . . 9Water plus system . . . . . . . . . . . . . . . . . . . . . . . . . . . . . . . . . . . . . . . . . . . . . . . 9Delay start h/mins . . . . . . . . . . . . . . . . . . . . . . . . . . . . . . . . . . . . . . . . . . . . . . . 10Time left display . . . . . . . . . . . . . . . . . . . . . . . . . . . . . . . . . . . . . . . . . . . . . . . . 10Locking functions (programme locking, system lock) . . . . . . . . . . . . . . . . . . . 10Future updates (PC) . . . . . . . . . . . . . . . . . . . . . . . . . . . . . . . . . . . . . . . . . . . . . 10
Control panel . . . . . . . . . . . . . . . . . . . . . . . . . . . . . . . . . . . . . . . . . . . . . . . . . . . . . 11Important control panel features . . . . . . . . . . . . . . . . . . . . . . . . . . . . . . . . . . . . . . 13
Programme selector . . . . . . . . . . . . . . . . . . . . . . . . . . . . . . . . . . . . . . . . . . . . . 13Additional option buttons . . . . . . . . . . . . . . . . . . . . . . . . . . . . . . . . . . . . . . . . . 13"Spin" button with indicator lights . . . . . . . . . . . . . . . . . . . . . . . . . . . . . . . . . . . 13
Before using for the first time . . . . . . . . . . . . . . . . . . . . . . . . . . . . . . . . . . . . . . . 14
Washing environmentally and economicallyEnergy and water consumption . . . . . . . . . . . . . . . . . . . . . . . . . . . . . . . . . . . . 15Detergent . . . . . . . . . . . . . . . . . . . . . . . . . . . . . . . . . . . . . . . . . . . . . . . . . . . . . 15Additional options (Soak, Pre-wash, Rapid) . . . . . . . . . . . . . . . . . . . . . . . . . . . 15When drying with a tumble dryer . . . . . . . . . . . . . . . . . . . . . . . . . . . . . . . . . . . 15
How to wash correctlyBrief instructions . . . . . . . . . . . . . . . . . . . . . . . . . . . . . . . . . . . . . . . . . . . . . . . . . . 16
Programme chart . . . . . . . . . . . . . . . . . . . . . . . . . . . . . . . . . . . . . . . . . . . . . . . 17Before washing . . . . . . . . . . . . . . . . . . . . . . . . . . . . . . . . . . . . . . . . . . . . . . . . . . . 20Selecting a programme . . . . . . . . . . . . . . . . . . . . . . . . . . . . . . . . . . . . . . . . . . . . . 21
Additional options . . . . . . . . . . . . . . . . . . . . . . . . . . . . . . . . . . . . . . . . . . . . . . . 22Delay start. . . . . . . . . . . . . . . . . . . . . . . . . . . . . . . . . . . . . . . . . . . . . . . . . . . . . 24
At the end of a programme . . . . . . . . . . . . . . . . . . . . . . . . . . . . . . . . . . . . . . . . . . 24Adding or removing laundry after a programme has started . . . . . . . . . . . . . . . . 25
Contents
3

Interrupting a programme . . . . . . . . . . . . . . . . . . . . . . . . . . . . . . . . . . . . . . . . . . . 26Altering a programme once selected . . . . . . . . . . . . . . . . . . . . . . . . . . . . . . . . . . 26Skipping a programme stage . . . . . . . . . . . . . . . . . . . . . . . . . . . . . . . . . . . . . . . . 26Selecting a different programme . . . . . . . . . . . . . . . . . . . . . . . . . . . . . . . . . . . . . . 26Programme sequence . . . . . . . . . . . . . . . . . . . . . . . . . . . . . . . . . . . . . . . . . . . . . . 27
DetergentWater softeners . . . . . . . . . . . . . . . . . . . . . . . . . . . . . . . . . . . . . . . . . . . . . . . . . . . 29Washing with several components . . . . . . . . . . . . . . . . . . . . . . . . . . . . . . . . . . . . 29Fabric conditioners and liquid starch . . . . . . . . . . . . . . . . . . . . . . . . . . . . . . . . . . 30
Automatic dispensing of fabric conditioners or liquid starch to laundryat the end of a programme . . . . . . . . . . . . . . . . . . . . . . . . . . . . . . . . . . . . . . . . 30Adding fabric conditioner or liquid starch separately . . . . . . . . . . . . . . . . . . . 30
Colour run and dye removers/ dyes . . . . . . . . . . . . . . . . . . . . . . . . . . . . . . . . . . . 30
Locking functionsElectronic programme locking. . . . . . . . . . . . . . . . . . . . . . . . . . . . . . . . . . . . . . . . 31Electronic system lock . . . . . . . . . . . . . . . . . . . . . . . . . . . . . . . . . . . . . . . . . . . . . . 32
Cleaning and careExtra cleaning . . . . . . . . . . . . . . . . . . . . . . . . . . . . . . . . . . . . . . . . . . . . . . . . . . 33Cleaning the detergent dispenser drawer . . . . . . . . . . . . . . . . . . . . . . . . . . . . 34
Cleaning the water inlet filters . . . . . . . . . . . . . . . . . . . . . . . . . . . . . . . . . . . . . . . . 35To clean the filter in the union in the open end of the inlet hose: . . . . . . . . . . . 35To clean the filter in the water inlet valve . . . . . . . . . . . . . . . . . . . . . . . . . . . . . 35
Problem solving guideThe programme does not start. . . . . . . . . . . . . . . . . . . . . . . . . . . . . . . . . . . . . . . . 36The wash programme stops and a fault indicator light comes on. . . . . . . . . . . . . 37A fault indicator light comes on but the wash programme continues as normal. . 38General problems or an unsatisfactory wash result . . . . . . . . . . . . . . . . . . . . . . . 39The drum door cannot be opened by pressing the Door button. . . . . . . . . . . . . . 41Opening the drum door in the event of a blocked drain outlet and/or power failure . . . . . . . . . . . . . . . . . . . . . . . . . . . . . . . . . . . . . . . . . . . . . . . . . . . 42
Blocked drain outlet . . . . . . . . . . . . . . . . . . . . . . . . . . . . . . . . . . . . . . . . . . . . . 42Opening the drum door . . . . . . . . . . . . . . . . . . . . . . . . . . . . . . . . . . . . . . . . . . 43
Customer contact . . . . . . . . . . . . . . . . . . . . . . . . . . . . . . . . . . . . . . . . . . . . . . . . . 44Appliance guarantee . . . . . . . . . . . . . . . . . . . . . . . . . . . . . . . . . . . . . . . . . . . . 44
Contents
4

Installation and connectionFront view. . . . . . . . . . . . . . . . . . . . . . . . . . . . . . . . . . . . . . . . . . . . . . . . . . . . . . . . 45Rear view . . . . . . . . . . . . . . . . . . . . . . . . . . . . . . . . . . . . . . . . . . . . . . . . . . . . . . . . 46Installation surface. . . . . . . . . . . . . . . . . . . . . . . . . . . . . . . . . . . . . . . . . . . . . . . . . 47Installing the washing machine . . . . . . . . . . . . . . . . . . . . . . . . . . . . . . . . . . . . . . . 47Removing the transit fittings . . . . . . . . . . . . . . . . . . . . . . . . . . . . . . . . . . . . . . . . . 47Re-fitting the transit bars . . . . . . . . . . . . . . . . . . . . . . . . . . . . . . . . . . . . . . . . . . . . 49Levelling the machine . . . . . . . . . . . . . . . . . . . . . . . . . . . . . . . . . . . . . . . . . . . . . . 50
Screwing out and adjusting the feet . . . . . . . . . . . . . . . . . . . . . . . . . . . . . . . . . 50Building under a continuous worktop / in a kitchen run . . . . . . . . . . . . . . . . . . 51Washer and Dryer stack . . . . . . . . . . . . . . . . . . . . . . . . . . . . . . . . . . . . . . . . . . 51
Connection to the water supply . . . . . . . . . . . . . . . . . . . . . . . . . . . . . . . . . . . . . . . 52Cold water connection (mains water supply) . . . . . . . . . . . . . . . . . . . . . . . . . . 52Hot water connection . . . . . . . . . . . . . . . . . . . . . . . . . . . . . . . . . . . . . . . . . . . . 52
Connection to the drainage system. . . . . . . . . . . . . . . . . . . . . . . . . . . . . . . . . . . . 54Electrical connection . . . . . . . . . . . . . . . . . . . . . . . . . . . . . . . . . . . . . . . . . . . . . . . 55
Consumption data . . . . . . . . . . . . . . . . . . . . . . . . . . . . . . . . . . . . . . . . . . . . . . . . 56
Technical data . . . . . . . . . . . . . . . . . . . . . . . . . . . . . . . . . . . . . . . . . . . . . . . . . . . 57
Programmable functionsWater plus system . . . . . . . . . . . . . . . . . . . . . . . . . . . . . . . . . . . . . . . . . . . . . . . . . 60Gentle action . . . . . . . . . . . . . . . . . . . . . . . . . . . . . . . . . . . . . . . . . . . . . . . . . . . . . 62Top-up rinse for COTTONS . . . . . . . . . . . . . . . . . . . . . . . . . . . . . . . . . . . . . . . . . . 63Memory function . . . . . . . . . . . . . . . . . . . . . . . . . . . . . . . . . . . . . . . . . . . . . . . . . . 64
Contents
5

Read the operating instructions be-fore using this machine for the firsttime. They contain important infor-mation about the safety, use andmaintenance of the machine. Thisway you will avoid the risk of acci-dents and damage to the machine.Keep these operating instructions ina safe place and ensure that newusers are familiar with the content.Pass them on to any future owner ofthe machine.
Correct usageOnly use the washing machine towash items which are specified by
the manufacturer to be machine-wash-able on the wash-care label, and tex-tiles composed of hand-washable woolor wool blend fabrics as well as satin,lace, silk and other hand-washable gar-ments. Any other applications may bedangerous. The manufacturer is not lia-ble for damage resulting from improperuse or operation.
This appliance should not be oper-ated by children. Supervise its use
by the elderly or infirm.Young children should be super-vised to ensure that they do not
play with the appliance.
Technical safetyBefore setting up the machine,check it for any externally visible
damage. Do not install and use a dam-aged machine.
Before connecting the machine,ensure that the connection data on
the data plate (fusing, voltage and fre-
quency) match the mains electricitysupply. If in any doubt, consult a quali-fied electrician.
Caution:if the appliance is supplied from a
cord extension set or electrical portableoutlet device the cord extension set orelectrical portable outlet device shouldbe positioned so it is not subject tosplashing or ingress of moisture.
The electrical safety of this appli-ance can only be guaranteed when
continuity is complete between the ma-chine and an effective earthing systemwhich complies with local and nationalregulations. It is most important that thisbasic safety requirement is regularlytested by a qualified electrician.The manufacturer cannot be held re-sponsible for the consequences of aninadequate earthing system.
For safety reasons do not operatethis appliance on an extension ca-
ble. Extension leads do not guaranteethe required safety of the appliance.Danger of overheating.
The machine is built in accordancewith current safety requirements.
Unauthorised repairs could result in un-foreseen dangers for the user, for whichthe manufacturer cannot accept re-sponsibility. Repairs should only be un-dertaken by a Miele approved engi-neer.
The machine is only completelyisolated from the electricity supply
when:– it is switched off at the wall socket
and the plug is withdrawn, or– it is switched off at the mains, or– the mains fuse is withdrawn.
Warning and safety instructions
6

The best materials are used in themanufacture of this machine, and
every care is taken to check all parts.However, with time, deterioration ofparts can occur, especially with suchcomponents as hoses, giving rise toleaks. Check the hose regularly forsigns of wear and change in good time,to avoid leaks and subsequent dam-age.
Faulty components must only bereplaced by genuine Miele original
spare parts. Only when these parts arefitted can the safety standards of themachine be guaranteed.
A washer and dryer should neverbe stacked without using the
proper stacking kit. Doing so is ex-tremely dangerous, as the dryer may vi-brate off of the washing machine duringuse.
In countries where there are areaswhich may be subject to infestation
by cockroaches or other vermin, payparticular attention to keeping the appli-ance and its surroundings in a cleancondition at all times. Any damagewhich may be caused by cockroachesor other vermin will not be covered bythe appliance guarantee.
UseThis equipment is not designed formaritime use or for use in mobile
installations such as caravans, aircraftetc. However it may be suitable forsuch usage subject to a risk assess-ment of the installation being carriedout by a suitably qualified engineer.
Do not install your washing ma-chine in rooms where temperatures
below freezing may occur. Frozenhoses may burst under pressure.Thereliability of the electronic control unitmay be impaired at temperatures belowfreezing point.
Before using the machine for thefirst time, check that the transit fit-
ting at the rear of the machine has beenremoved (see section on "Installation").During spinning, a transit fitting which isstill in place may result in damage toboth the machine and adjacent furni-ture or appliances.
Turn off the stopcock if the ma-chine is to be left for any length of
time (e.g. holiday), especially if there isno floor drain (gully) in the immediatevicinity.
Flooding dangerIf hooking the drain hose into a
wash basin, check that the water candrain off quickly enough to prevent thesink from overflowing.Make sure the drain hose is secure, sothat the force of the water flowing out ofthe hose does not dislodge it. Other-wise this will result in flooding.
Take care to ensure that foreign ob-jects (e.g. nails, pins, coins, paper
clips) do not find their way into the ma-chine with the washing. These maydamage components of the machine(e.g. suds container, drum), which inturn can result in damage to the wash-ing.
Warning and safety instructions
7

If the correct amount of detergentis dispensed, the machine should
not need to be descaled. If, however,you do wish to descale the machineonly use proprietary non-corrosivedescaling agents and strictly observethe instructions on the packaging.
Textiles which have beenpre-treated in solvent based clean-
ing agents must be thoroughly rinsed inclean water before being washed in themachine.
Never use solvent based cleaningagents in this machine, as this may
result in damage to component partsand create toxic fumes. Such deter-gents also pose a fire and explosionhazard.
Due to their chemical composition,dyes and colour run and dye re-
movers can cause corrosion. Do notuse these products in the machine.
For machines with a ‘porthole’door, remember that the porthole
glass will be hot when washing at veryhigh temperatures. Do not let childrentouch it.
Always make sure the drum is sta-tionary before reaching in to re-
move washing. Reaching into a movingdrum is extremely dangerous.
AccessoriesAccessory parts may only be fittedwhen expressly approved by Miele.
If other parts are used, guarantee, per-formance and product liability claimsmay be invalidated.
Disposal of your old machineBefore discarding an old machineunplug it. Render the plug useless.
Cut off the cable directly behind the ap-pliance to prevent misuse. This shouldbe done by a competent person.
Warning and safety instructions
8

Special programmes– Programme for handwashable fab-
rics (Silks /)
Hand-washable fabrics which creaseeasily but do not contain wool can bewashed in the Silks / programme.
– Programme for hand-washable fab-rics (WOOLLENS /)
Hand-washable or machine-wash-able wool or wool blend fabrics canbe washed in the WOOLLENS /programme.
– Programme for small loads(Quick wash)
This is a Cottons programme for verylightly soiled fabrics.
– Programme for mixed fabrics (Mixedwash)
Suitable for small loads of garmentsmade from man-made fibres and cot-ton garments which can be washedtogether. Sort according to colour.
– Rinse programme (Separate rinse)
Articles are only rinsed and spun inthe machine.
Delicates and Silks / programmes
In these programmes, the laundry iswashed and spun very gently to re-duce creasing and the amount of iron-ing required, thus providing "Easy care"for your laundry.
Water plus system
The water level for washing and rinsingis increased. For COTTONS and MINI-MUM IRON programmes an additionalrinse can also be selected.
Description of the appliance
9

Delay start h/mins
Delay start allows you to delay the startof a programme from 30 minutes up toa maximum of 24 hours.
Time left display
After the start of a programme, the du-ration of the programme selected willbe shown in the display counting downin hours and minutes and finally in min-utes.
Locking functions (programmelocking, system lock)
Electronic programme locking
Electronic programme locking preventsthe door from being opened or theprogramme cancelled during a washprogramme. The electronic programmelocking is automatically cancelled at theend of the programme.
Electronic system lock
The system lock prevents anyone fromusing the washing machine withoutyour knowledge. When the system lockis activated :
– the drum door cannot be openedwith the Door button and
– a programme cannot be started.
Future updates (PC)
The indicator or check light marked PCallows a service engineer to updateyour machine in future years.
When, for example, new programmesare developed or new fabrics are intro-duced, a service engineer will be ableto modify existing programme cyclesaccordingly.
as and when such developments be-come available.
Description of the appliance
10

Control panel
aMulti-function displaysee the following page for more infor-mation.
bSTART buttonstarts the wash programme
cDelay start buttonfor delaying the start of a programme
dAdditonal option buttonsindicator light on = option selectedIndicator light off = option notselected
eSpin buttonfor selecting the final spin speed,Rinse hold or Without spin
f Indicator lights for spin speed,Rinse hold or Without spin
gProgramme selectorfor selecting the wash programmeand temperature for that programme.The programme selector can beturned clockwise or anti-clockwise.
hProgramme sequence indicatorlightsshow which section of the washprogramme has been reached
iFault / check / service indicatorlights
j I-On/0-Off buttonfor switching the machine on or offor interrupting a programme
kDoor buttonopens the machine door
Description of the appliance
11

Display
The following functions are shown in thedisplay:
– programme duration (Time left dis-play)
– delay start
– programmable functions
Programme duration
If a programme without delay start hasbeen selected, the maximum duration(wash time) for that programme will ap-pear in the display in hours and min-utes after the start of the programme.
In the:
– COTTONS
– MINIMUM IRON
programmes, the washing machinemeasures the amount of water beingtaken up by the laundry and usesthis to calculate the load during thefirst 10 minutes. If the machine rec-ognises a smaller load it will shortenthe programme time.
Programme Max. time reduction
Normal Rapid
COTTONS 51 mins 12 mins
MINIMUM IRON 12 mins 2 mins
Soak
If a soak period has been selected, thisis added to the programme duration inthe display to give a a total runningtime.
Delay start
The delay start time selected will ap-pear in the display.
After the machine has started, the de-lay start time counts down. If the delaystart time is more than 10 hours, it willcount down by the hour. If it is less than9 hours and 59 minutes it will countdown minute by minute.
Once the delay start period has fin-ished, the programme begins and theactual programme duration shows inthe display.
Programmable functions
The programmable functions can beused to tailor washing programmes tosuit your individual requirements. Thefunction selected is displayed when inprogramming mode.
Description of the appliance
12

Important control panelfeatures
Programme selector
The programme selector is used to setthe basic wash programme and thetemperature for that programme. Thelight ring will go out a few minutes afterthe end of the programme to save en-ergy.
Additional option buttons
Additional options can be added to thebasic programme.
Pressing the relevant button selects orde-selects the particular option. The in-dicator light comes on to show that theadditional option has been selected.
If an additional option is chosen whichis incompatible with the basicprogramme then the indicator light willgo out when the button is released.
"Spin" button with indicator lights
Selecting the spin speed
The maximum spin speed which can beselected depends on the basicprogramme chosen.
Maximumspinspeed
Basic programme
1600 COTTONS, Quick wash, Starch,Drain/spin
1200 WOOLLENS, Separate rinse
900 MINIMUM IRON, Mixed wash
600 DELICATES
400 Silks
Press the "Spin" button to select a differ-ent spin speed. However, you cannotselect a spin speed higher than themaximum allowed for the basic washprogramme chosen.
The indicator lights show the speed se-lected.
You can also omit the final spin
^ Press the "Spin" button to reach:
– Rinse hold
The laundry is not spun and remainssuspended in the final rinse water.This reduces creasing if the laundryis not going to be removed from thedrum immediately after the end ofthe programme.To continue the programme select aspin speed. When the programme isfinished the Anti-crease/Finish lightwill come on. Turn the programmeselector to the Finish position andpress the door button to open thedoor and remove the laundry.
– Without spin
The laundry is not spun after the finalrinse. After the water has beendrained away the machine goesstraight into the anti-crease stage.Spinning between the rinses is alsoomitted in this setting (rinse and in-terim spin).
Description of the appliance
13

Before using the machine for the firsttime ensure that it is correctly in-stalled and connected. See the rele-vant section under "Installation".Also check that the fluff filter is se-curely tightened. Otherwise there isa risk of water leakage during use.
For safety reasons spinning is not pos-sible until the machine has been pre-pared for using for the first time. To acti-vate the spinning function you must runa wash programme without laundry andwithout detergent.
Using detergent could result in an ex-cessive build-up of foam.
This also activates the ball valve. Theball valve prevents detergent escapingfrom the suds container into the sumpduring a wash programme, thus makingmaximum use of the detergent.
^ Turn on the stopcock.
^ Press the I-ON/0-OFF button in.
^ Turn the programme selector toCOTTONS 40°C.
^ Press START.
When this programme has finished yourwashing machine is ready for using forthe first time.
Before using for the first time
14
Energy and water consumption
– Water consumption and energy us-age are determined by the size of theload.
– Use the Mixed wash or the Quickwash programme for smalleramounts of laundry.
– When smaller amounts of laundry arewashed in the COTTONSprogrammes, the automatic load rec-ognition system will reduce theamount of water, time and energyused. This may mean that the timeremaining shown in the display is ad-justed during the course of the washprogramme.
– Instead of the COTTONS 95°Cprogramme, use the COTTONS 60°Cprogramme. This will give an energysaving of between 35% and 45%.This will be sufficient for normal soil-ing. For stubborn or old stains, usethe Soak option.
Detergent
– Do not exceed the amounts of deter-gent which may be recommended bythe manufacturer on the packaging.
– Reduce the amount of detergent withsmaller loads (approx. 1/3 less thanthe amount recommended can beused when washing a half load).
Additional options (Soak, Pre-wash,Rapid)
Select:
the Rapid additional option for lightto normal soiling without visible stain-ing.
a wash programme without an addi-tional option for normal to heavy soil-ing with visible staining.
– Use the additional option Soak in-stead of Pre-wash. If Soak is followedimmediately by a main wash thesame suds are used.
When drying with a tumble dryer
– Selecting the highest possible spinspeed for the wash programme willsave energy when drying in a tumbledryer afterwards.
Washing environmentally and economically
15

Brief instructionsPlease note:
To help familiarise yourself with how touse your washing machine please readthe sections "Before washing", "Se-lecting a programme" and "At the endof a programme" in detail.
ASort the laundry into colours and fab-ric types.
Selecting a programme:
BSwitch on the washing machine
COpen the drum door
DLoad the drum
EClose the drum door
FSelect a programme
GSelect a spin speed
HSelect any additional option required
IAdd detergent
JSelect delay start if required
KPress the START button
At the end of a programme:
LOpen the drum door
MRemove the laundry
NSwitch off the washing machine
OTurn the programme selector to theFinish position
PClose the drum door
See the "Programme chart" in the nextsection for detailed information onwhich programmes to use for differentfabrics.
How to wash correctly
16

Programme chart
COTTONS 9ö876
Fabric type Cottons and linen fabrics, e.g. bed linen, table linen, tow-elling, jeans, underwear, T-shirts, nappies.
Additional options Soak, Pre-wash, Rapid, Water plus
Notes – Only use the COTTONS 95°C programme for heavilysoiled and incontinent laundry.
– For lightly soiled laundry select the Rapid option.– For heavily soiled laundry, select the Soak additional
option.– For laundry with large amounts of dirt (e.g. dust, sand)
use the Pre-wash additional option.– For dark coloured fabrics use a detergent for coloured
fabrics, or liquid detergent.
Detergent Powder detergent, detergent for coloured fabrics, liquiddetergent.
Max. load 5.5 kg
Note for test institutes:Programme setting for the AS/NZS 2040.2:1998 Standard: COTTONS 40°C.
MINIMUM IRON 4321
Fabric type White nylon (60°C), white polyester fabrics (50°C),col-oured nylon, polyester, cotton and viscose fabrics withspecial finishes, acrylic, cotton fabrics coloured polyes-ter/cotton fabrics, (40°/30°C) minimun iron fabrics notwashable at higher temperatures.
Additional options Soak, Pre-wash, Rapid, Water plus
Notes – For lightly soiled laundry select the Rapid additionaloption.
– For heavily soiled laundry, select the Soak additionaloption.
Detergent Powder detergent, detergent for coloured fabrics, liquiddetergent, detergent for delicates.
Max. load 2.5 kg
How to wash correctly
17
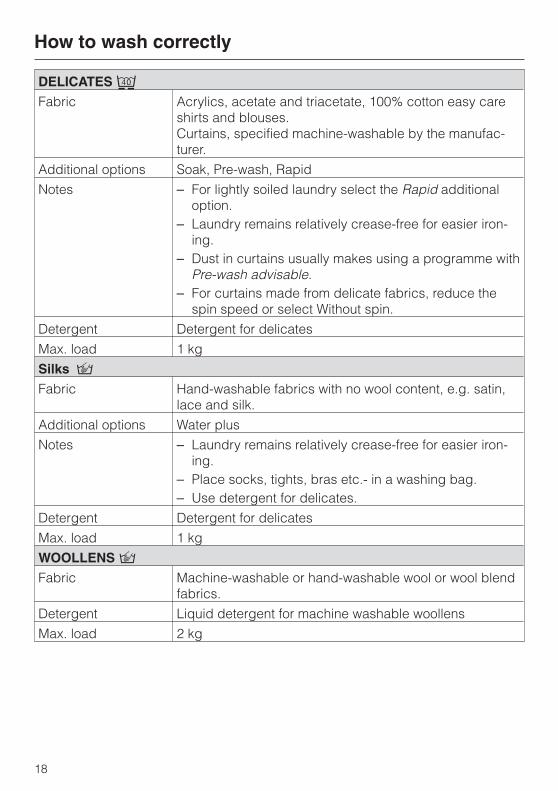
DELICATES a
Fabric Acrylics, acetate and triacetate, 100% cotton easy careshirts and blouses.Curtains, specified machine-washable by the manufac-turer.
Additional options Soak, Pre-wash, Rapid
Notes – For lightly soiled laundry select the Rapid additionaloption.
– Laundry remains relatively crease-free for easier iron-ing.
– Dust in curtains usually makes using a programme withPre-wash advisable.
– For curtains made from delicate fabrics, reduce thespin speed or select Without spin.
Detergent Detergent for delicates
Max. load 1 kg
Silks /
Fabric Hand-washable fabrics with no wool content, e.g. satin,lace and silk.
Additional options Water plus
Notes – Laundry remains relatively crease-free for easier iron-ing.
– Place socks, tights, bras etc.- in a washing bag.– Use detergent for delicates.
Detergent Detergent for delicates
Max. load 1 kg
WOOLLENS /
Fabric Machine-washable or hand-washable wool or wool blendfabrics.
Detergent Liquid detergent for machine washable woollens
Max. load 2 kg
How to wash correctly
18

Quick wash 7
Fabric Very lightly soiled fabrics, which can be washed in theCottons programme.
Additional option Water plus
Notes – Use less detergent (as for a half load).
Detergent Powder detergent, detergent for coloured fabrics, liquiddetergent.
Max. load 2.5 kg
Mixed wash 72
Fabric Fabric, Small loads of garments made from man-madefibres and cotton garments which can be washed to-gether. Sort according to colour.
Additional option Soak, Pre-wash, Water plus
Detergent Powder detergent, detergent for coloured fabrics, liquiddetergent.
Max. load 3 kg
Starch
Fabric Table cloths, napkins, overalls, aprons.
Notes – The laundry should be washed but not treated withfabric conditioner.
Max. load 5 kg
Separate rinse
Fabric Articles which have been washed by hand and only needto be rinsed and spun in the machine.
Max. load 5 kg
Drain / Spin
Notes – Drain only: select Without spin.
Max. load 5 kg
How to wash correctly
19

Before washingASort the laundry
^ Empty all pockets.
,Foreign objects (e.g. nails,coins, paper clips, etc.) can causedamage to garments and compo-nents in the machine.
^ Badly soiled areas, e.g. collars andcuffs, and water soluble stains canbe pre-treated with bar soap, liquiddetergent or detergent mixed into asolution or paste.
With particularly stubborn stains askyour dry cleaner for advice.
,Do not used solvent-basedcleaning agents in this machine.
^ Sort the laundry by colour and bycare label symbol. Most garmentshave a textile care label in the collaror side seam.
Dark textiles often contain excess dyeand should be washed separately sev-eral times before being included in amixed load.
Delicate textiles should be washed sep-arately in a delicates programme (use awashing bag where appropriate).
– Curtains:Remove lead weights and strips orplace in a laundry bag.
– Underwiring and collar stiffeners:Any loose wiring in bras, shirt collarstiffeners, etc. should be removed orsewn in.
– Knitted garments, trousers andjeans, T-shirts and sweat shirts:Turn inside out, if recommended bythe manufacturer.
Close any zips, fasten hooks and eyesetc before washing.
Do not wash any items in this machinewhich are specified by the manufac-turer as non-machine washable on thecare label. (h symbol)
How to wash correctly
20

Selecting a programmeBSwitch on the washing machine
^ Press in the I-ON/0-OFF button.
^ Open the stopcock.
COpen the drum door
^ Press the Door button and open thedrum door.
DLoad the drum
^ Unfold the laundry and load looselyin the drum. To achieve best results itis advisable to make up mixed loadsconsisting of both large and smallitems. This improves the washing ef-fect and helps distribute the loadevenly to keep the machine stableand reduce the noise level duringspinning.
To save energy and water try to loadthe maximum amount for theprogramme selected.However, be careful not to overload themachine. Overloading reduces thewash result and causes more creasing.
EClose the drum door with a gentleswing
Make sure that no garments are caughtbetween the drum door and seal.
FSelect a programme
^ Turn the programme selector to therequired programme.
The maximum duration for theprogramme will appear in the display.
GSelect a spin speed
^ Press the "Spin" button repeatedly un-til the indicator light for the spinspeed you want comes on.
In some programmes the maximumspin speed is limited. The machine willnot allow a higher spin speed to be se-lected.
How to wash correctly
21

Additional options
HSelecting additional options
^ Press the appropriate additional op-tion button.
Soak
For heavily soiled and stained itemswith protein stains (e.g. blood, fatsand oils, cocoa).
Duration of soak: A length of time of be-tween 30 minutes and 6 hours can bechosen, in 30 minute increments.
– The first time the soak button ispressed 30 minutes is added to theprogramme duration.
– Each further press of the button in-creases the soak time by 30 minutesup to a maximum of 6 hours.
Deleting the soak time
– Press the Soak button repeatedly un-til the indicator light goes out.
Pre-wash
For heavily soiled and stained items.
Rapid
For light to normal soiling with no visi-ble staining.
The duration of the COTTONS, MINI-MUM IRON and DELICATESprogramme is shortened.
Water plus
If you want to increase the water levelfor a wash process you can choose oneof the four options for the Water plusbutton. The options are explained in thesection on "Programmable functions -Water plus system".
The machine is set at the factory so thatthe water level in the main wash andrinses will be increased if the Waterplus button is pressed.
Buzzer
An audible tone sounds repeatedly atthe end of a programme or when Rinsehold is reached.
The buzzer will sound repeatedly untilthe machine is switched off.
Once switched on, the buzzer remainsactivated until it is switched off again.
How to wash correctly
22

IAdd detergent
It is important to dispense the correctamount, because . . .
. . . too little results in the following:
– Laundry will not be properly cleanand will in time become grey andhard to the touch.
– Greasy particles cling to the laundry.
– Limescale deposits on the heater el-ements.
. . . too much results in the following:
– Excessive foam which causes a lowlevel of agitation and poor wash,rinse and spin results.
– High water consumption (an addi-tional rinse cycle will automaticallyswitch in).
– A burden to the environment.
If you wish to select the Pre-washadditional option when using liquiddetergent, please note that thedetergent must be poured into a "liquiddetergent container" which has beeninserted into compartment j. Thiscontainer is available from the Miele UKSpare Parts department or from yourMiele dealer.
^ Pull out the detergent drawer andplace detergent in the compartmentsas follows:
i = Detergent for Pre-wash(if selecting Pre-wash, add 1/4of the total amount recom-mended). This compartment isalso used for starch formula-tions when starching separately.
j = Detergent for the main washincluding Soak
§ = Fabric conditioner or liquidstarch.
See section on "Detergent" for furtherinformation on detergent and theamount to dispense.
How to wash correctly
23

Delay start
JSelect delay start if required.
^ Press the Delay start button. Eachpress on the button increases the de-layed time:
– by 30 minutes up to 10 hours,– by 1 hour from 10 hours upwards.
To delete delay start
^ Press the Delay start button oncewhen 24^ is showing in the display.
KPress the START button.
This starts the programme. The maxi-mum duration for the programme willappear in the display.Note: If Delay start has been selectedthe display will show the delay periodcounting down. Once the delay startperiod is completed the programmebegins and the actual programme du-ration shows in the display.
At the end of a programmeWhen the Anti-crease/Finish indicatorlight comes on the laundry can be re-moved from the drum:
LOpen the drum door
^ Press the Door button.
MRemove the laundry
^ Check the folds in the door seal forany small articles, e.g. buttons whichmight be lodged there.
Check that all the items have beenremoved. Items left in the drumcould discolour other items in thenext wash or become discolouredthemselves.
NSwitch off the washing machine
Press the I-ON/0-OFF button and turnthe programme selector to Finish.
OClose the drum door
Otherwise there is the danger of ob-jects being placed inadvertently in thedrum. If these remained unnoticed andwere washed in the next load, theycould damage the laundry.
Turn off the stopcock.
How to wash correctly
24

Adding or removing laundryafter a programme has startedLaundry can be added or removed af-ter the programme has started whenusing the following programmes:
– COTTONS
– MINIMUM IRON
– Quick wash
– Mixed wash
– Starch
^ Press the Door button in and hold ituntil the door springs open.
^ Add or remove items.
^ Close the door.
The programme will continue automati-cally.
Please note:
Once a programme has started the ma-chine cannot recognise any adjustmentto the load. For this reason if laundry isadded or removed after the start of aprogramme, the machine will alwayscomplete the programme cycle for a fullload which can lead to an increase inthe time remaining for the programmeshown in the display.
The door cannot be opened, when:
– the suds temperature is above 55°C.
– the water is above a certain level.
– programme locking is switched on.
– the programme has reached the
Final spin stage.
The locked indicator light will come onif the Door button is pressed when theabove conditions are present.
How to wash correctly
25
Interrupting a programme^ Switch the machine off with the I-ON/
0-OFF button.
To continue with the same programme:
^ Switch the machine on with the I-ON/0-OFF button.
Altering a programme onceselectedThe machine will accept the followingchanges after a programme hasstarted:
– at any time after the start, the spinspeed can be changed within thelimits for the programme.
– up to 6 minutes after the start, theadditional functions Water plus,Rapid can be selected or de-se-lected and a different temperaturecan be selected for the programmein use.
After the start of a programme it is nolonger possible to select a differentprogramme.
If the programme selector is moved, theindicator light Anti-crease/Finish willstart flashing. However, the programmesequence remains unaffected. The indi-cator light will go out again when theprogramme selector is moved back tothe programme previously chosen.
Skipping a programme stage^ Turn the programme selector to Fin-
ish.
As soon as the programme sequenceindicator light for the programme stageyou want the programme to continue at,starts flashing:
^ Turn the programme selector backagain to the appropriate programmewithin 4 seconds.
Programmes cannot be altered andprogramme stages cannot beskipped if programme locking hasbeen activated.
Selecting a differentprogramme^ Switch the machine off with the I-ON/
0-OFF button.
^ Turn the programme selector to Fin-ish.
^ Switch the machine on with the I-ON/0-OFF button.
^ Select a different programme.
^ Press the START button.
How to wash correctly
26

Programme sequenceThis washing machine has fully elec-tronic controls with automatic load rec-ognition. This machine takes in the rightamount of water required for theprogramme depending on the amountof laundry and its absorbency rate. Thismeans that programme cycles and du-rations can vary.
The programme sequences outlinedbelow are based on the basicprogramme with a full load. Additionaloptions which can be selected have notbeen taken into account.
The programme sequence indicatorlights show the stage the programmehas reached.
COTTONS
Main washWater level: lowWash rhythm: normal
RinsesWater level: mediumNo of rinses: 2 or 31)
SpinningRinse and interim spin2): yesFinal spin: yes
MINIMUM IRON
Main washWater level: lowWash rhythm: normal
RinsesWater level: highNo of rinses: 2 or 31)
SpinningRinse and interim spin2): yesFinal spin: yes
DELICATES
Main washWater level: highWash rhythm: Gentle action
RinsesWater level: highNo of rinses: 3
SpinningRinse and interim spin2): noFinal spin: yes
Silks
Main washWater level: mediumWash rhythm: Silks
RinsesWater level: mediumNo of rinses: 2
SpinningRinse and interim spin2): noFinal spin: yes
How to wash correctly
27

WOOLLENS
Main washWater level: mediumWash rhythm: Woollens
RinsesWater level: mediumNo of rinses: 2
SpinningRinse and interim spin2): yesFinal spin: yes
Quick wash
Main washWater level: lowWash rhythm: normal
RinsesWater level: mediumNo of rinses: 2
SpinningRinse and interim spin2): yesFinal spin: yes
Mixed wash
Main washWater level: lowWash rhythm: normal
RinsesWater level: highNo of rinses: 2
SpinningDisplays2: yesFinal spin: yes
Starch
Water level: low
Wash rhythm: normal
Final spin: yes
Separate rinse
Water level: high
No of rinses: 2
Final spin: yes
Special features in the programmesequences:
Anti-crease:
At the end of every programme, withthe exception of the WOOLLENSprogramme, the anti-crease actionswitches on for a maximum of 30 min-utes.1) A third rinse takes place automati-cally when:
– there is too much foam in the drum
– if a spin speed of lower than 700 rpmhas been selected.
– if Without spin has been selected2) Rinse and interim spin:
There is a spin between the rinses.
Omitting rinse and interim spin:
Select Without spin on the spin speeddisplay.
How to wash correctly
28

All modern detergents produced forautomatic washing machines are suit-able, including liquid, compact (con-centrated), tablets and special applica-tion detergents. Use dispensing aids,e.g. balls, if these are supplied with thedetergent.
Woollens and knitwear containing woolmixtures and hand-washable garmentsshould be washed using a detergentspecifically designed for washingwoollens.
Silk should be washed using a liquiddetergent specifically designed forwashing woollens. Do not use biologi-cal detergents on silk as the enzymesmay damage the silk!
Add detergent according to the amountrecommended on the packaging.
The right amount to dispense will de-pend on the following:
– The quantity of laundry.
– The soiling level of the laundry.
Lightly soiledNo visible dirt or stains. Possiblyslight body odour.
Normally soiledVisibly dirty and/or just a few slightstains.
Heavily soiledStains and soiling clearly visible.
Water softenersA water softener, such as Calgon canbe used to cut down on the use of de-tergents in extremely hard water areas.Dispense according to the amountspecified on the packaging. First adddetergent and then the water softener.
Use a quantity of detergent as for softwater.
Washing with severalcomponentsIf you wash using several components(e.g. special application detergents),we recommend always dispensing theagents into compartment j in the fol-lowing order:
1. Detergent
2. Water softener
3. Stain remover e.g. Biotex.
This way the agents are distributedmore efficiently.
Detergent
29

Fabric conditioners and liquidstarchFabric conditioners make garments softand fluffy to handle and help preventstatic cling when tumble drying.
Starch stiffens and gives body to itemsof laundry, e.g. shirts, tablecloths andbed linen.
^ Dispense according to the amountspecified on the packaging.
Automatic dispensing of fabricconditioners or liquid starch tolaundry at the end of a programme
^ Add the fabric conditioner or liquidstarch to compartment §. Do not ex-ceed the maximum level mark.
The conditioner or liquid starch is auto-matically dispensed in the last rinse. Atthe end of the programme a smallamount of water remains in the fabricconditioner compartment §.
If starching frequently, clean the dis-penser compartment and especiallythe siphon tube and conditionerchannel. See "Cleaning the deter-gent dispenser drawer".
Adding fabric conditioner or liquidstarch separately
^ Add fabric conditioner or starch tocompartment i.
^ Turn the programme selector toStarch.
^ Select a spin speed.
^ Press the START button.
Colour run and dye removers/dyes^ Do not use colour run or dye remov-
ers or dyes in the washing machine.
Detergent
30

Electronic programme locking
Programme locking prevents the ma-chine from being opened or theprogramme cancelled during a washprogramme.
To activate programme locking
^ After the start of a programme, pressthe START button for at least 4 sec-onds until the locked check light(lower right on the control panel) co-mes on.
Programme locking is now activated.
The machine will now not accept anychanges and the programme will pro-ceed through to the end.
Programme locking is deactivated auto-matically at the end of the programme.
Deactivating programme lockingearly
^ Press the START button for at least 4seconds until the locked check light(lower right on the control panel)goes out.
Exception:
If the programme selector has beenmoved and the Anti-crease/Finish indi-cator light is flashing in the sequencedisplay.
^ First, turn the programme selectorback to the programme chosen previ-ously. The Anti-crease/Finish indica-tor light will go out.
^ Now press the START button for atleast 4 seconds until the lockedcheck light (lower right on the controlpanel) goes out
Locking functions
31

Electronic system lock
The system lock prevents your ma-chine being used without your knowl-edge.
When the system lock has been acti-vated:
– the drum door cannot be openedwith the Door button and
– a programme cannot be started.
To activate the system lock
First, ensure that:
– The drum door is closed
– The programme selector is at Finish.
ASwitch on the washing machine withthe I-ON/0-OFF button.
BPress the Pre-wash button and keepit pressed in while carrying out stepsC to E
CSlowly turn the programme selectorclockwise stage by stage toCOTTONS 60°C.
DNow slowly turn the programme se-lector anti-clockwise stage by stageto Finish.
ENext slowly turn the programme se-lector anti-clockwise stage by stageto DELICATES cold.The locked check light (lower righton the control panel) will flash.
FNow release the Pre-wash button.
GTurn the programme selector toFinish.
HSwitch the washing machine off withthe I-ON/0-OFF button.
To de-activate the system lock
Repeat steps A to F. The lockedcheck light goes out.
Locking functions
32

,Disconnect the appliance fromthe mains electricity supply andwithdraw the plug from the socketprior to cleaning the machine.
^ Clean the casing with a mildnon-abrasive detergent or soap andwater. Wipe dry with a soft cloth.
^ Clean the fascia panel with a dampcloth and wipe dry with a soft cloth.
^ The drum can be cleaned using asuitable proprietary stainless-steelcleaning agent.
,Do not use abrasive cleaners,glass cleaners or all-purpose clean-ing agents. These might damageplastic surfaces and other compo-nents because of the chemicals theycontain.The washing machine must not behosed down.
Extra cleaning
Carry out a hot wash (70°C or above)with powder detergent approx. every 6weeks to help prevent deposits buildingup in the machine. These can occurwhen washing is mainly done at lowtemperatures, and also lead to unpleas-ant smells. If you have no reason towash occasionally at this high tempera-ture, then run a Cottons 95°Cprogramme with detergent but no laun-dry at regular intervals.
Cleaning and care
33

Cleaning the detergent dispenserdrawer
Remove detergent residues regularly.
^ Pull out the detergent dispenserdrawer until a resistance is felt. Pressdown the release catch and at thesame time pull the drawer right out ofthe machine.
^ Clean the detergent drawer withwarm water.
^ Clean the siphon.
1. Remove the siphon from compart-ment §. Wash under running warmwater. Clean the siphon tube in thesame way.
2. Replace the siphon.
Cleaning and care
34

Cleaning the water inlet filtersThe washing machine has two filters toprotect the inlet valves.
These filters should be checked everysix months or so, or more often if thereare frequent interruptions to the watersupply.
To clean the filter in the union in theopen end of the inlet hose:
^ First turn off the stopcock.
^ Unscrew the threaded union connect-ing the free end of the inlet hose tothe stopcock.
^ Remove the rubber seal 1 from therecess.
^ Using pointed pliers, take hold of theplastic filter bar 2, remove the filterand clean.
^ Put the filter and seal back in the re-verse order and reconnect the hose.
^ Turn on the stopcock and check theconnection is watertight.
The inlet hose should be inspectedregularly because it is subjected tohigh pressure while the machine isin operation. It should be replaced ifthere are small cracks in the surface,or if it has been otherwise damaged.
If replacing the inlet hose only use ahose able to withstand pressure of atleast 70 bar. Miele’s own hoses meetthis requirement.
To clean the filter in the water inletvalve
^ Using pliers, carefully loosen theribbed plastic nut on the inlet valveand unscrew.
^ Use water pump pliers to withdrawthe plastic filter by the bar (see illus-tration). Clean, put back and secure.
The two filters must be put back inplace after cleaning.
Cleaning and care
35

With the help of the following notes minor faults in the performance of the appli-ance, some of which may result from incorrect operation, can be put right withoutcontacting the Service Department.
,Repair work to electrical appliances should only be carried out by a suit-ably qualified person in accordance with local and national safety regulations.Repairs and other work by unqualified persons could be dangerous. The man-ufacturer cannot be held liable for unauthorised work.
The chart is divided into the following sections to help you:
– The programme does not start.
– The wash programme stops and a fault indicator light comes on.
– A fault indicator light comes on but the wash programme continues as normal.
– General problems or an unsatisfactory wash result.
– The drum door cannot be opened by pressing the Door button.
The programme does not start.
Fault indicator Possible cause Remedy
The Anti-crease/Finishindicator light is not on,or the START indicatorlight is not flashing.
There is no power. Check that
– the mains plug isplugged in.
– the fuse or circuitbreaker has not trip-ped.
The check light lockedis flashing.
The system lock has beenactivated.
Deactivate the systemlock.
The programme doesnot start when Drain/Fi-nal spin has been se-lected.
The washing machine hasnot been prepared for us-ing for the first time.
Prepare the machine asdescribed in "Before us-ing for the first time".
Problem solving guide
36
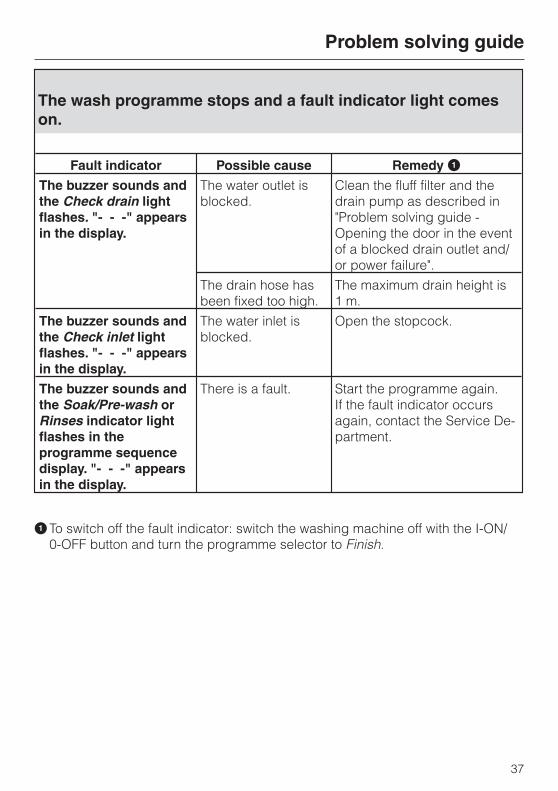
The wash programme stops and a fault indicator light comeson.
Fault indicator Possible cause Remedy
The buzzer sounds andthe Check drain lightflashes. "- - -" appearsin the display.
The water outlet isblocked.
Clean the fluff filter and thedrain pump as described in"Problem solving guide -Opening the door in the eventof a blocked drain outlet and/or power failure".
The drain hose hasbeen fixed too high.
The maximum drain height is1 m.
The buzzer sounds andthe Check inlet lightflashes. "- - -" appearsin the display.
The water inlet isblocked.
Open the stopcock.
The buzzer sounds andthe Soak/Pre-wash orRinses indicator lightflashes in theprogramme sequencedisplay. "- - -" appearsin the display.
There is a fault. Start the programme again.If the fault indicator occursagain, contact the Service De-partment.
ATo switch off the fault indicator: switch the washing machine off with the I-ON/0-OFF button and turn the programme selector to Finish.
Problem solving guide
37

A fault indicator light comes on but the wash programmecontinues as normal.
Fault indicator Possible cause Remedy
The Check drainlight flashes.
The drain outlet isrestricted.
Clean the fluff filter and the drainpump as described in "Problem solv-ing guide - Opening the door in theevent of a blocked drain outlet and/or power failure".
The Check inlet lightflashes.
The water inlet isrestricted.
Check whether– the stopcock is opened wide
enough.– the inlet hose is kinked.
The filter in thewater inlet hose isdirty
Clean the filter.
The Excess deter-gent check light co-mes on.
Excessive foamhas built up dur-ing washing.
Use less detergent next time and fol-low the manufacturer’s instructionson dosage given on the packaging.
The Main wash indi-cator light is flash-ing in theprogramme se-quence display.
There is a fault. Start the programme again.If the fault indicator occurs again,contact the Service Department.
The Anti-crease/Finish indicator lightflashes in theprogramme se-quence display.
The position of the programme selector was altered afterthe start of the programme. Turn the programme selectorback to the programme previously chosen.
ATo switch off the fault indicator: switch the washing machine off with the I-ON/0-OFF button and turn the programme selector to Finish.
Problem solving guide
38

General problems or an unsatisfactory wash result
Problem Possible cause Remedy
The machineshakes during thespin cycle.
The four feet are not rest-ing evenly on the floor.
Level the machine. See adviceon installation.
The laundry has notbeen spun satisfac-torily.
The spin speed selectedwas too low.
Select a higher spin speednext time.
The pump makesstrange noises.
These do not indicate afault.
They occur at the end of apump sequence as a normalpart of the operation.
The programme se-lector light ring isnot lit up.
The machine has switched off the light ring to save en-ergy. To switch the light ring back on again: press one ofthe additional option buttons or turn the programme se-lector.
Large residues ofdetergent remain inthe dispenserdrawer.
The water supply pres-sure is too low.
– Clean the filter in the waterinlet system.
– It may be useful to press theWater plus button.
Washing powder usedwith water softener tendsto become sticky.
Pour washing powder into thedispenser before adding anywater softener.
Fabric conditioneris not completelydispensed or toomuch water re-mains in the §compartment.
The siphon is either in-correctly positioned orclogged.
Clean the siphon, see"Cleaning and care - Cleaningthe detergent drawer".
Problem solving guide
39

Problem Possible cause Remedy
Liquid detergentdoes not give therequired result.
Liquid detergents do notcontain bleachingagents. They do not re-move fruit, coffee and teastains
– Use a general purposewashing machine powdercontaining a bleachingagent.
– Pour stain removers intocompartment j of the dis-penser drawer and liquiddetergent into a dispenserball.
– Never put stain removersand liquid detergent to-gether in the dispenserdrawer.
Grey, greasy parti-cles cling towashed laundry.
Insufficient amounts ofdetergent were used tobreak down the particlesof grease in heavilysoiled laundry.
– Add more detergent.– Before washing the next
load run a COTTONS 95°Cprogramme with powder de-tergent but without a load.(See also "Extra cleaning" inCleaning and Care).
There are whiteresidues whichlook like powderdetergent on darkcoloured laundry.
The detergent containedcompounds (zeolites) toaid water softening whichare not soluble in water.These have ended up onthe laundry.
– Try and brush off the resi-dues with a soft brush oncethe laundry is dry.
– Use a liquid detergent towash dark coloured textiles.Liquid detergents usuallycontain no zeolites.
Problem solving guide
40

The drum door cannot be opened by pressing the Door button
Possible cause Remedy
The machine is not con-nected to the electricitysupply.
Insert the plug in the socket and switch on.
The machine is notswitched on.
Switch the machine on with the I-ON/0-OFF button.
The electronicprogramme lock has beenactivated.
This is automatically deactivated at the end of aprogramme. To deactivate it early see "Lockingfunctions".
The electronic systemlock has been activated.
To deactivate it see "Locking functions".
Power cut Open the drum door as described in the section"Opening the door in the event of a blocked drainoutlet and/or power failure".
The door was not cor-rectly engaged.
Press hard against the lock side of the drum doorand then press the Door button.
There is still water in thedrum and the machine isunable to drain.
Clean the fluff filter and the drain pump.
For safety reasons the drum door cannot be opened when the suds temperatureis higher than 55°C.
Problem solving guide
41

Opening the drum door in theevent of a blocked drain outletand/or power failure^ Switch the washing machine off.
There is a filter flap opener behind thedetergent drawer facia panel.
^ Remove the opener.
^ Use it to open the access flap.
Blocked drain outlet
If the drain outlet is clogged, more wa-ter will be retained in the machine (upto 25 litres).
,Caution: If laundry has beenwashed at a high temperature, waterdraining out of the machine will stillbe hot. Danger of scalding or burn-ing!
^ Place a dish under the access flap.
^ Turn the fluff filter lid round 2-3 times.Do not take it right out.
With large volumes of water the dish willneed to be emptied several times. Se-cure the fluff filter back into positionand empty the dish before repeatingthe procedure. To stop the flow of wa-ter: Tighten the fluff filter back up again.
Problem solving guide
42

Once the flow of water ceases:
^ Remove the fluff filter completely.
^ Clean the fluff filter thoroughly.
^ Check that the impeller can turn eas-ily. Remove any foreign objects (e.g.buttons, coins, etc) and fluff. Cleanthe fluff filter housing.
^ Put the fluff filter back in place andsecure.
,Make sure the fluff filter is se-curely tightened. Otherwise there isa risk of water leakage during use.
Opening the drum door
,Always make sure that the drumis stationary before reaching into themachine to remove laundry.Reaching into a moving drum is ex-tremely dangerous.
^ Pull the emergency release down-wards (see illustration). The drumdoor will open.
Problem solving guide
43

Customer contactIn the event of any faults which youcannot remedy yourself please contact
– Your Miele dealer or
– Your nearest Miele Service Depart-ment (see back cover for the ad-dress).
When contacting the Service Depart-ment, please quote the model and se-rial number of your appliance, both ofwhich are shown on the data plate visi-ble at the top inside of the door abovethe porthole glass when the door isopen.
Please note that telephone calls maybe monitored and recorded to im-prove our service.
Appliance guarantee
The appliance is guaranteed for a pe-riod of 1 year.
See the guarantee card supplied withthe machine for further details.
Problem solving guide
44

Front view
a Inlet hoses for hot water connection
b Inlet hoses for cold water connection
cElectrical connection
d - g Flexible drain hose (with detach-able swivel elbow)
hFacia panel with controls
iDetergent dispenser drawer
jDrum door
kFlap for fluff filter, drain pump andemergency release
lHandle recesses for moving the ma-chine
mFour height adjustable screw feet
Installation and connection
45

Rear view
aProtruding lid edge for holding whenmoving the machine
bElectricity supply cable
c Inlet hoses for cold water connection
d Inlet hoses for hot water connection
eDrainage hose
fCover with transit bars
gRestraining clip for:
– Inlet hose
– Drain hose
– Electricity supply cable
– Transit bars when removed
Installation and connection
46

Installation surfaceA concrete floor is the most suitable in-stallation surface for a washing ma-chine, being far less prone to vibrationduring the spin cycle than woodenfloorboards or a carpeted surface.
Please note the following points:
^ The machine must be level and se-curely positioned.
^ To avoid vibrations during spinning,the machine should not be installedon soft floor coverings.
If installing on a wooden joist floor:
^ we recommend a plywood base(at least 59x52x3 cm). The baseshould span several joists and bebolted to the joists and not only to thefloorboards. Check for the presenceof pipes and cables.
If possible, install the machine in a cor-ner, as this is usually the most stablepart of the floor.
,If the machine is installed on araised plinth, it has to be securedagainst slippage during spin usingretaining clips (available from theMiele Spare Parts Dept).
Installing the washing machineTo manoeuvre the machine out of itspacking case to its installlation site holdit by the edge of the lid where it pro-trudes to the rear of the washing ma-chine as well as by the handle recessesat the front.
Please note:
^ Do not lift the machine by the drumdoor.
,Ensure that the machine feet andthe floor are dry to prevent the ma-chine from slipping during the spincycle.
Removing the transit fittings
^ To remove the left and right covers
1. Use a screwdriver to prise out thecover as illustrated.
2. Pull the cover forwards to remove.
Installation and connection
47

^ Using the spanner supplied turn theleft-hand transit bar 90°, then
^ withdraw the transit bar.
^ Turn the right-hand transit bar 90°,then
^ withdraw the transit bar.
Installation and connection
48
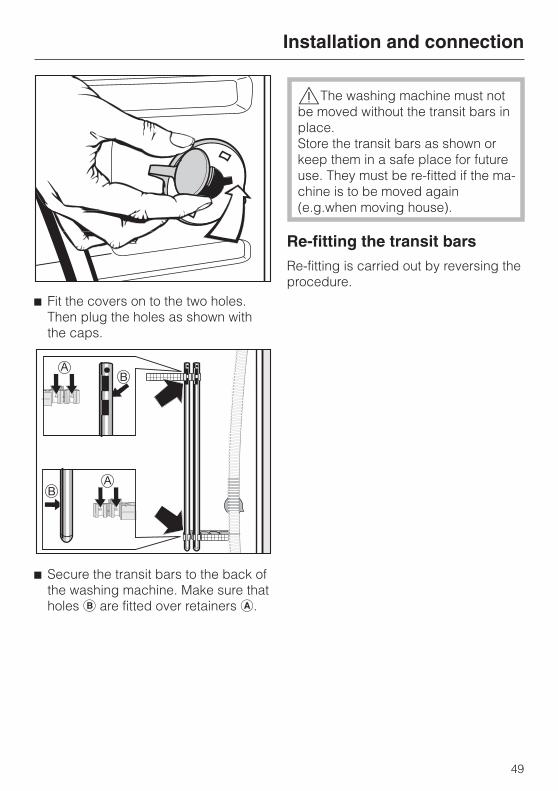
^ Fit the covers on to the two holes.Then plug the holes as shown withthe caps.
^ Secure the transit bars to the back ofthe washing machine. Make sure thatholes b are fitted over retainers a.
,The washing machine must notbe moved without the transit bars inplace.Store the transit bars as shown orkeep them in a safe place for futureuse. They must be re-fitted if the ma-chine is to be moved again(e.g.when moving house).
Re-fitting the transit barsRe-fitting is carried out by reversing theprocedure.
Installation and connection
49

Levelling the machineThe machine must stand perfectly levelon all four feet to ensure safe andproper operation.
Failure to level the machine can resultin the machine "banging" in the spin cy-cle or "walking" across the floor duringoperating.
Energy and water use will also in-crease.
Screwing out and adjusting the feet
The four adjustable screw feet are usedto level the machine. All four feet arescrewed in when the machine is deliv-ered.
^ Using the spanner supplied turncounter nut 2 in a clockwise direc-tion. Then turn counter nut 2 togetherwith foot 1 to unscrew.
^ Use a spirit level to check the ma-chine is standing level.
^ Hold foot 1 securely with a pipewrench. Turn counter nut 2 again us-ing the spanner supplied until it sitsfirmly up against the housing.
,All four counternuts must befirmly up against the housing. Pleasealso check this for the feet which didnot need adjustment. Otherwisethere is the danger of the machinemoving about.
Installation and connection
50

Building under a continuous worktop/ in a kitchen run
– A special building under conversionkit* is required.The machine lid must be replaced bya cover plate. To ensure electricalsafety the cover plate must be fitted.**
N.B.**
If you wish to push your machine undera worktop and there is space to do thiswithout removing the lid, the conver-sion kit is not necessary. Otherwise theconversion kit is essential.
– For installation under a work surface900/910 mm from the floor, a raisingkit* is required.
– Connections for electricity, water anddrainage should be installed in sucha way that they remain accessiblewhen the machine is in place.
Fitting instructions are supplied with theconversion kit.
All parts marked* are available from theMiele Spare Parts or Sales Department.
The fitting of cover plates and stack-ing kits must only be undertaken byqualified and competent persons, inaccordance with the instructionssupplied with the kit.
Washer and Dryer stack
A Miele tumble dryer can be stackedwith the washing machine. A stackingkit* is necessary and can be purchasedfrom the Miele Spare Parts Department.
Please note
a Safety distance to wall:at least 2 cm
b Height:Stacking kit with pull-out shelf:approx. 169 cmStacking kit without pull-out shelf:approx. 170 cm
,A washer and dryer shouldnever be stacked without using theproper stacking kit. Doing so is ex-tremely dangerous, as the dryer mayvibrate off of the washing machineduring use.
Installation and connection
51

Connection to the water supplyThis washing machine can be con-nected to a cold water supply (mainswater supply) or a hot water supply.
The washing machine must alwaysbe connected to the mains watersupply (inlet hose with blue dots).
Cold water connection (mains watersupply)
The inlet hose with blue dots is used formains water connection.
Hot water connection
The inlet hose with red dots is used forconnection to the hot water supply.
Useful hints when connecting to the hotwater supply
– The maximum temperature at thestocpcock must not exceed 60°C.The ideal temperature is 55°C.
– Before connecting the washing ma-chine, check that no more than 5litres of cold water flow out of theconnection point. Every extra litre ofcold water will compromise the ma-chine’s energy efficiency.
– When connected to the hot watersupply, after some time the washingmachine will switch over to the mainswater supply. However, this safetyfeature is not suitable for constantuse. The washing machine will usethe hot water supply thereafter butthis can lead to a poor wash result.
The conditions for connection aredescribed on the following pages.
Installation and connection
52

The machine should be connected to amains water supply in accordance withstandard regulations.
Connection to the mains water supplyshould incorporate a mains stopcockwith 3/4’’ thread. The stopcock shouldbe fitted by a qualified plumber.
The approx. 1.5 m long 3/8" pressurehose should be connected to the stop-cock via the 3/4" threaded union.
This pressure hose is not suitable forconnection to a hot water supply.Please make sure the washer sits cor-rectly in the union.
The connection point is subject tomains water pressure. Turn on the stop-cock slowly and check for leaks.
If replacing the inlet hose only usegenuine Miele hoses. These aretested to withstand pressure of atleast 70 bar. This also applies to allfixtures and fittings used.
Longer hoses 2.5 or 4 metres in lengthare available as optional extras.
The machine is designed to operatewith a water flow pressure of 100 kPaminimum up to 1000 kPa maximum.The static water pressure must not ex-ceed 1000 kPa. If it is higher than1000 kPa bar it is essential to fit a re-ducer valve.
There is a minimum flow pressure of100 kPa pressure if 5 litres of water flowinto a suitable container in 15 seconds.
The two dirt filters - one in the openend of the inlet hose, one at the inletpoint in the solenoid valve must notbe removed.
This appliance incorporatesbackflow protection complying withAS/NZS 3500.1.2.No further backflow protection re-quired for connection to the watersupply.
Installation and connection
53
Connection to the drainagesystemThe machine drains via a drain pumpwith a delivery head of 1 metre*.
The drain hose must not be kinked asthis restricts drainage. The swivel elbowat the end of the hose can be turned ineither direction, or can be detached ifrequired, with a sharp twist and pull.
* For a delivery head of more than 1 m(up to a maximum of 1.8 m) a secondduo-drain pump is available with thecorresponding kit from the Miele SpareParts Department or your Miele Dealer.
Drain hose connection:
1. Direct into a sink or basin:
Please note the following
– Hook the hose over the edge and se-cure.
– Make sure that the water can drainaway freely without hindrance. Other-wise there is a risk of water overflow-ing or of some of the drained waterbeing sucked back into the machine.
2. Connected securely to a plastic drainpipe with a rubber nipple. There is noneed to use a non-return valve.
3. Connected securely to a standpipe.
4. Connected securely to a floor gully.
If required, the drain hose can be ex-tended to a length of 5 m. The neces-sary parts can be purchased from theMiele Spare Parts Department or yourMiele dealer.
Installation and connection
54

Electrical connectionThe washing machine is supplied with amains cable with moulded plug for con-nection to a 230-240V mains supply.The voltage, rated load and plug/fuserating are given on the data plate.Please ensure these match the house-hold mains supply.
All electrical work should be carried outonly by a suitably qualified and compe-tent person, in strict accordance withnational and local safety regulations.
For extra safety it is advisable to installa residual current device (RCD), with atrip current of 30 mA.
Important
The wires in the mains lead are col-oured in accordance with the followingcode:
Green/yellow = earth
Blue = neutral
Brown = live
As the colours of the wires in the mainslead of this appliance do not corre-spond with the coloured markings iden-tifying the terminals of your plug, pro-ceed as follows:
The wire which is coloured green andyellow must be connected to the termi-nal in the plug which is marked with theletter E or by the earth symbol z orcoloured green, or green and yellow.
The wire which is coloured blue mustbe connected to the terminal in theplug which is marked with the letter Nor coloured black.
The wire which is coloured brown mustbe connected to the terminal in theplug which is marked with the letter L orcoloured red.
WARNING: THIS APPLIANCEMUST BE EARTHED
Installation and connection
55

Consumption data with hot water (Hot water temperature 55°C)
Load Energy Water Duration
in kWh in litres Normal Rapid
COTTONS
95°C 5,5 kg 1 h 31 min 46 min
60°C1) 5,5 kg 1 h 46 min 41 min
40°C 5,5 kg 1 h 46 min 41 min
MINIMUM IRON
40°C 2,5 kg 1 h 08 min 40 min
DELICATES
30°C 1,0 kg 54 min 39 min
Consumption data without hot water
Load Energy Water Duration
in kWh in litres Normal Rapid
COTTONS
95°C 5,5 kg
60°C 5,5 kg
40°C1) 5,5 kg
40°C 5,5 kg
MINIMUM IRON
40°C 2,5 kg
DELICATES
30°C 1,0 kg
Silks
30°C 1,0 kg
WOOLLENS
30°C 2,0 kg
1)Programme setting for the AS/NZS 2040.2:1998 Standard
Consumption data can vary from the nominal values given depending on waterpressure, water hardness, water inlet temperature, room temperature, type andvolume of load, fluctuations in the electricity supply and any additional optionsselected.
Consumption data
56

Height 85.0 cm
Width 59.5 cm
Depth 58.0 cm
Depth with door open 94.5 cm
Weight 93 kg
Maximum floor load 1600 Newton (approx. 160 kg)
Capacity 5,5 kg dry laundry
Voltage see data plate
Rated load see data plate
Plug/fuse rating see data plate
Consumption data see "Consumption data"
Water flow pressure min. 100 kPa
Water flow pressure max. 1000 kPa)
Inlet hose length 1.60 m
Drain hose length 1.50 m
Connection cable length 1.60 m
Drain pump head max. 1.00 m
Drain pump length max. 5.00 m
Test certificates awarded Elecrical safety, Typetest MarkC-Tick Mark
Electrically suppressed according to AS/NZS 1044
Technical data
57

58

Programmable functionsfor changingstandard settings

The programmable functions can beused to tailor washing programmes tosuit your individual requirements.
Water plus system
Selecting the Water plus additionaloption increases the water intake inthe programmes listed below.
The water intake is increased in thewash and rinse stages and in the COT-TONS and MINIMUM IRONprogrammes an extra rinse cycle is in-troduced.
There are four different settings
which can be programmed to alter thewater intake for the followingprogrammes:
– COTTONS
– MINIMUM IRON
– Quick wash
– Mixed wash
– Silks
The programmed setting is then acti-vated by pressing the Water plus addi-tional option button.
The settings are as follows:
Setting 1:an increase in the rinse water level forthe programmes listed.
Setting 2:an increase in the water level in themain wash and rinses for theprogrammes listed (the washing ma-chine is delivered with setting 2 pro-grammed as standard).
Setting 3:an extra rinse cycle in the COTTONSand MINIMUM IRON programmes.
Setting 4:an increase in the water level in themain wash and rinses for theprogrammes listetd and also an extrarinse cycle in the COTTONS and MINI-MUM IRON programmes.
Steps A to G on the following pagedescribe how to programme and storea setting in memory.
Programmable functions
60

Follow steps to to programmeand store a setting in memory.
The programmable functions are acti-vated to call up further features notshown on the control panel by using theadditional option buttons in combina-tion with the programme selector.
Before you begin, first ensure that:
– The washing machine is switched off.
– The drum door is closed.
– The programme selector is at Finish.
APress the additional option buttonsRapid and Water plus at the sametime, hold pressed in and .
B . . . Switch the machine on with theI-ON/0-OFF button.
CLet go of all these buttons. P 0 ap-pears in the display.
DTurn the programme selector toDELICATES 30°C.
EThe P will now flash in the display al-ternating with the number 2
In addition, one of the following num-bers will appear on the right of the dis-play:
1, 2, 3 or 4
FPress the START button to toggle be-tween the varous settings.
The number on the right of the displayshows which setting is selected.
1 = Setting 1 is selected(increased water level in therinses)
2 = Setting 2 is selected(increased water level in the mainwash and in the rinses)
3 = Setting 3 is selected(extra rinse in the COTTONS andMINIMUM IRON programmes)
4 = Setting 4 is selected(increase in the water level in themain wash and rinses and also anextra rinse in the COTTONS andMINIMUM IRON programmes).
GSwitch the machine off with the I-ON/0-OFF button.
The Water plus button has now been al-located the setting you have chosen.This setting will remain in memory untilanother setting is programmed.
Programmable functions
61

Gentle action
Activating gentle action reduces thedrum action. Slightly soiled items arewashed more gently.
Gentle action can be used in the COT-TONS, Quick wash, Starch and Mixedwash programmes.
If "Gentle action" is programmed intothe machine, every wash cycle in theseprogrammes will be carried out withgentle action rhythm.
The washing machine is delivered with"Gentle action" deactivated.
Follow steps to to programmeand store in memory.
The programmable functions are acti-vated to call up further features notshown on the control panel by using theadditional option buttons in combina-tion with the programme selector.
Before you begin, first ensure that:
– The washing machine is switched off.
– The drum door is closed.
– The programme selector is at Finish.
APress the additional option buttonsRapid and Water plus at the sametime, hold pressed in and .
B . . . switch the machine on with theI-ON/0-OFF button.
CLet go of all these buttons. P 0 ap-pears in the display.
DTurn the programme selector toMixed wash:
EThe P will now flash in the display al-ternating with the number 9
In addition, one of the following will ap-pear on the right of the display:
0 = Gentle action is deactivated.
1 = Gentle action is activated
FPress the START button to changefrom one to the other. The display willchange accordingly from 0 to 1 orfrom 1 to 0.
GSwitch the washing machine off withthe I-ON/0-OFF button.
The setting you have selected is nowstored in memory and will remain so un-til you alter it.
Programmable functions
62

Top-up rinse for COTTONS
When this is activated, additional wa-ter flows into the drum at the end ofthe main wash and the suds arecooled down. Hot suds can damageplastic drainage pipes.
Top-up rinse takes place when temper-atures of 95°C and 75°C are selected.
The washing machine is delivered withthe Top-up rinse for COTTONS deacti-vated.
Follow steps to to programmeand store in memory.
The programmable functions are acti-vated to call up further features notshown on the control panel by using theadditional option buttons in combina-tion with the programme selector.
Before you begin, first ensure that:
– The washing machine is switched off.
– The drum door is closed.
– The programme selector is at Finish.
APress the additional option buttonsRapid and Water plus at the sametime, hold pressed in and .
B . . . switch the machine on with theI-ON/0-OFF button.
CLet go of all these buttons. P 0 ap-pears in the display.
DTurn the programme selector toStarch:
EThe P will now flash in the display al-ternating with the number 10
In addition, one of the following will ap-pear on the right of the display:
0 = Top-up rinse is deactivated
or
1 = Top-up rinse is activated
FPress the START button to changefrom one to the other. The display willchange accordingly from 0 to 1 orfrom 1 to 0.
GSwitch the washing machine off withthe I-ON/0-OFF button.
The setting you have selected is nowstored in memory and will remain so un-til you alter it.
Programmable functions
63

Memory function
If an additional option(s) is selectedfor a programme, and / or the spinspeed is altered, the machine storesthese changes in memory at the startof a programme.
When that particular programme is cho-sen again, the display will show the ad-ditional option(s) and / or spin speedwhich have been stored for thatprogramme in the memory.
Except: Delay start and buzzer; thebuzzer is active in all programmes untilit is switched off.
The washing machine is delivered withthe memory function deactivated.
Follow steps to to programmeand store in memory.
The programmable functions are acti-vated to call up further features notshown on the control panel by using theadditional option buttons in combina-tion with the programme selector.
Before you begin, first ensure that:
– The washing machine is switched off.
– The drum door is closed.
– The programme selector is at Finish.
A Press the additional option buttonsRapid and Water plus at the sametime, hold pressed in and. . .
B . . . switch the machine on with theI-ON/0-OFF button.
CLet go of all these buttons. P 0 ap-pears in the display.
DTurn the programme selector to Sep-arate rinse:
EThe P will now flash in the display al-ternating with the number 11
In addition, one of the following will ap-pear on the right of the display:
0 = Memory function is deactivated
or
1 = Memory function is activated
FPress the START button to changefrom one to the other. The display willchange accordingly from 0 to 1 orfrom 1 to 0.
GSwitch the washing machine off withthe I-ON/0-OFF button.
The setting you have selected is nowstored in memory and will remain so un-til you alter it.
Programmable functions
64

65

66

67

M.-Nr. 05 729 410Alteration rights reserved/000/1002
This paper consists of cellulose which has been bleached without the use of chlorine.