Embed Size (px)
Citation preview

Made in Switzerland
ROCK SCHMIDTOPERATING INSTRUCTIONS
© 2017 Proceq SA 3
Table of Contents
1. Safety and Liability ..............................................................................51.1 Safety and Usage Precautions .................................................................51.2 Liability and Warranty ...............................................................................51.3 Safety Instructions ...................................................................................51.4 Labelling ...................................................................................................5
2. Getting Started ....................................................................................62.1 RockSchmidt Basics ................................................................................62.2 Components of the RockSchmidt ...........................................................72.3 The RockSchmidt Display ........................................................................82.4 Philosophy of the User-Interface ..............................................................82.5 Sample Preparation ..................................................................................92.6 Correct use of the Hammer ......................................................................9
3. Optional Settings .................................................................................103.1 Units ........................................................................................................103.2 Statistics ...................................................................................................103.3 Conversion Curve .....................................................................................113.4 Correction Factor .....................................................................................113.5 Checking the Current Settings .................................................................12
4. Applications .........................................................................................12
5. Operating the Instrument ....................................................................125.1 Single Shot Mode .....................................................................................125.2 Measurement Series ................................................................................135.3 Measurement Series – Weathering Grade ................................................135.4 Delete the Last Impact (Outlier) ................................................................145.5 Working with the Review List ...................................................................15
6. Ordering Information ...........................................................................15
7. Technical Specifications .....................................................................16
8. Maintenance and Support ...................................................................17
© 2017 Proceq SA 54 © 2017 Proceq SA
9. RockLink ..............................................................................................189.1 Viewing the Data .....................................................................................199.2 Adjusting the Settings .............................................................................209.3 Adjusting the Time Stamp .......................................................................209.4 Exporting Data .........................................................................................209.5 Deleting and Restoring Data ....................................................................219.6 Further Functions .....................................................................................219.7 Custom Statistics .....................................................................................229.8 Custom Curves ........................................................................................22
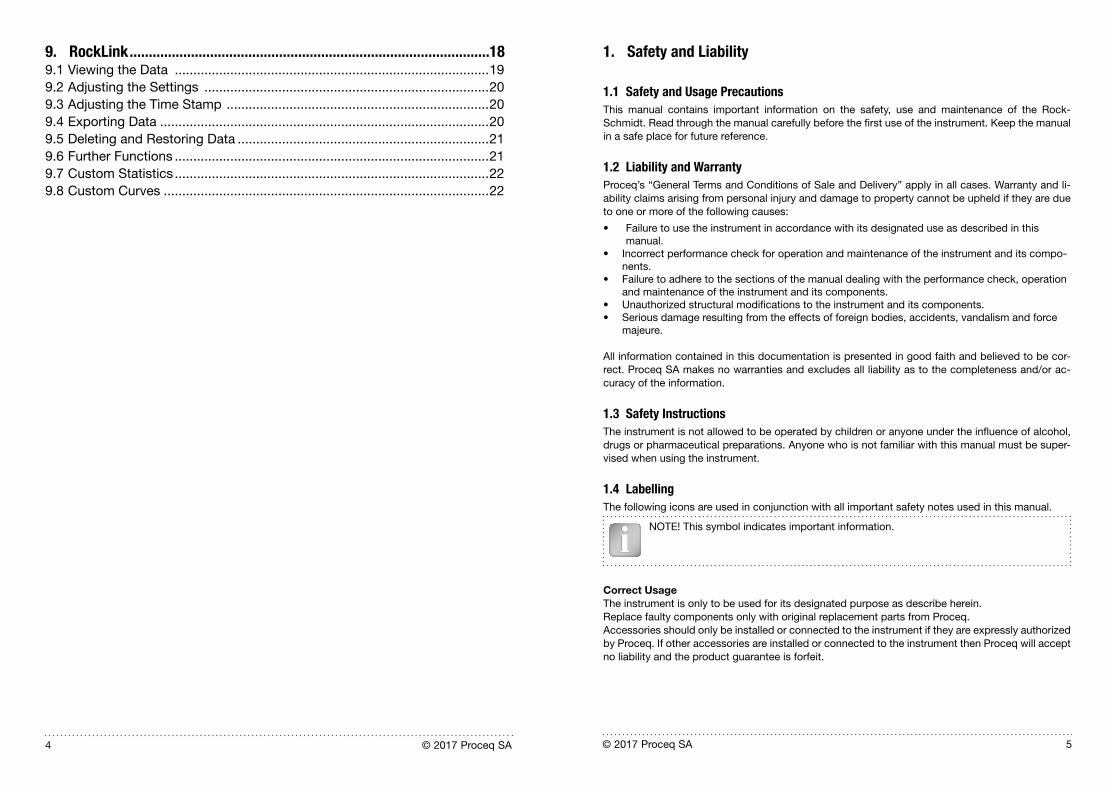
1. Safety and Liability
1.1 Safety and Usage PrecautionsThis manual contains important information on the safety, use and maintenance of the Rock-Schmidt. Read through the manual carefully before the first use of the instrument. Keep the manual in a safe place for future reference.
1.2 Liability and WarrantyProceq’s “General Terms and Conditions of Sale and Delivery” apply in all cases. Warranty and li-ability claims arising from personal injury and damage to property cannot be upheld if they are due to one or more of the following causes:
• Failure to use the instrument in accordance with its designated use as described in this manual.
• Incorrect performance check for operation and maintenance of the instrument and its compo-nents.
• Failure to adhere to the sections of the manual dealing with the performance check, operation and maintenance of the instrument and its components.
• Unauthorized structural modifications to the instrument and its components.• Serious damage resulting from the effects of foreign bodies, accidents, vandalism and force
majeure.
All information contained in this documentation is presented in good faith and believed to be cor-rect. Proceq SA makes no warranties and excludes all liability as to the completeness and/or ac-curacy of the information.
1.3 Safety InstructionsThe instrument is not allowed to be operated by children or anyone under the influence of alcohol, drugs or pharmaceutical preparations. Anyone who is not familiar with this manual must be super-vised when using the instrument.
1.4 LabellingThe following icons are used in conjunction with all important safety notes used in this manual.
NOTE! This symbol indicates important information.
Correct UsageThe instrument is only to be used for its designated purpose as describe herein.Replace faulty components only with original replacement parts from Proceq.Accessories should only be installed or connected to the instrument if they are expressly authorized by Proceq. If other accessories are installed or connected to the instrument then Proceq will accept no liability and the product guarantee is forfeit.
© 2017 Proceq SA 76 © 2017 Proceq SA
2. Getting Started
NOTE! When shipped, battery packs are not fully charged. Prior to use, please charge the battery completely. To prevent the battery from damage, avoid deep-discharging or storing it long-term when empty. Store the battery at room temperature and charge the battery fully at least once a year.
2.1 RockSchmidt BasicsIn the case of a low battery alert, you can still record approximately 100-200 impacts. To recharge, connect the RockSchmidt to the charger or to a PC. Approximately 90 minutes of charging will bring your RockSchmidt to its full capacity.
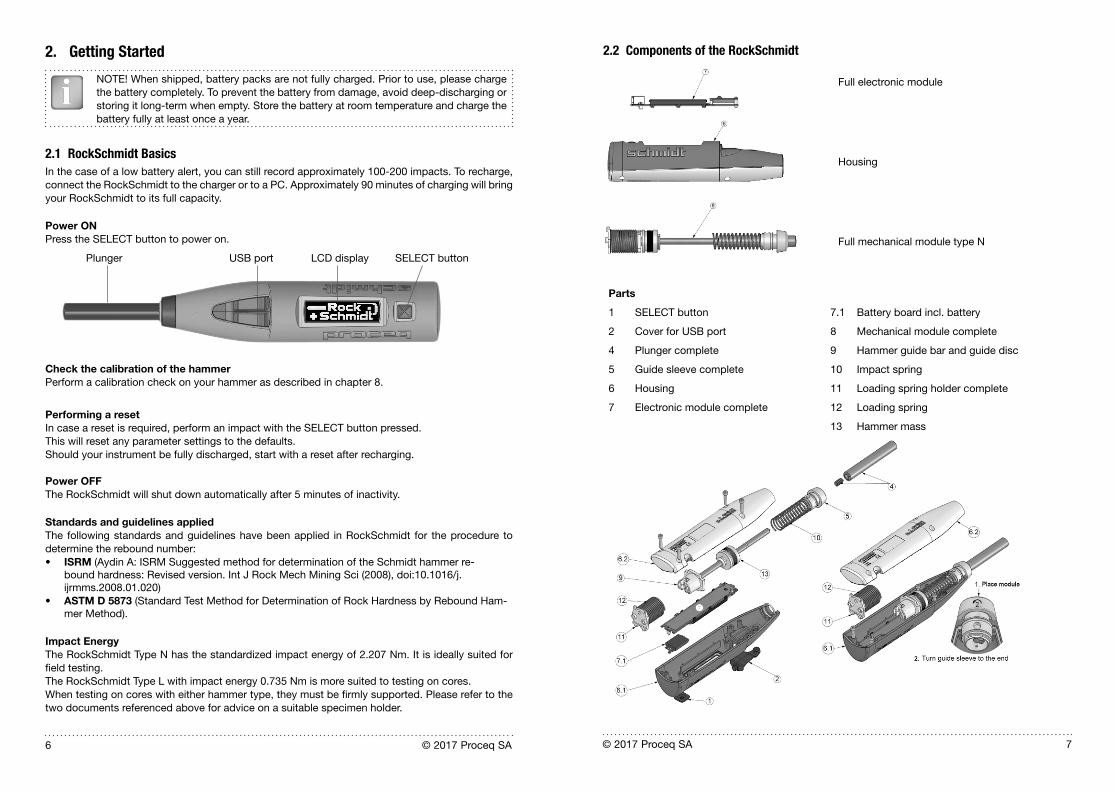
Power ONPress the SELECT button to power on.
Plunger USB port LCD display SELECT button
Check the calibration of the hammerPerform a calibration check on your hammer as described in chapter 8.
Performing a resetIn case a reset is required, perform an impact with the SELECT button pressed.This will reset any parameter settings to the defaults.Should your instrument be fully discharged, start with a reset after recharging.
Power OFFThe RockSchmidt will shut down automatically after 5 minutes of inactivity.
Standards and guidelines appliedThe following standards and guidelines have been applied in RockSchmidt for the procedure to determine the rebound number:• ISRM (Aydin A: ISRM Suggested method for determination of the Schmidt hammer re-
bound hardness: Revised version. Int J Rock Mech Mining Sci (2008), doi:10.1016/j.ijrmms.2008.01.020)
• ASTM D 5873 (Standard Test Method for Determination of Rock Hardness by Rebound Ham-mer Method).
Impact EnergyThe RockSchmidt Type N has the standardized impact energy of 2.207 Nm. It is ideally suited for field testing.The RockSchmidt Type L with impact energy 0.735 Nm is more suited to testing on cores.When testing on cores with either hammer type, they must be firmly supported. Please refer to the two documents referenced above for advice on a suitable specimen holder.
2.2 Components of the RockSchmidt
Full electronic module
Housing
Full mechanical module type N
Parts
1 SELECT button 7.1 Battery board incl. battery
2 Cover for USB port 8 Mechanical module complete
4 Plunger complete 9 Hammer guide bar and guide disc
5 Guide sleeve complete 10 Impact spring
6 Housing 11 Loading spring holder complete
7 Electronic module complete 12 Loading spring
13 Hammer mass
© 2017 Proceq SA 98 © 2017 Proceq SA
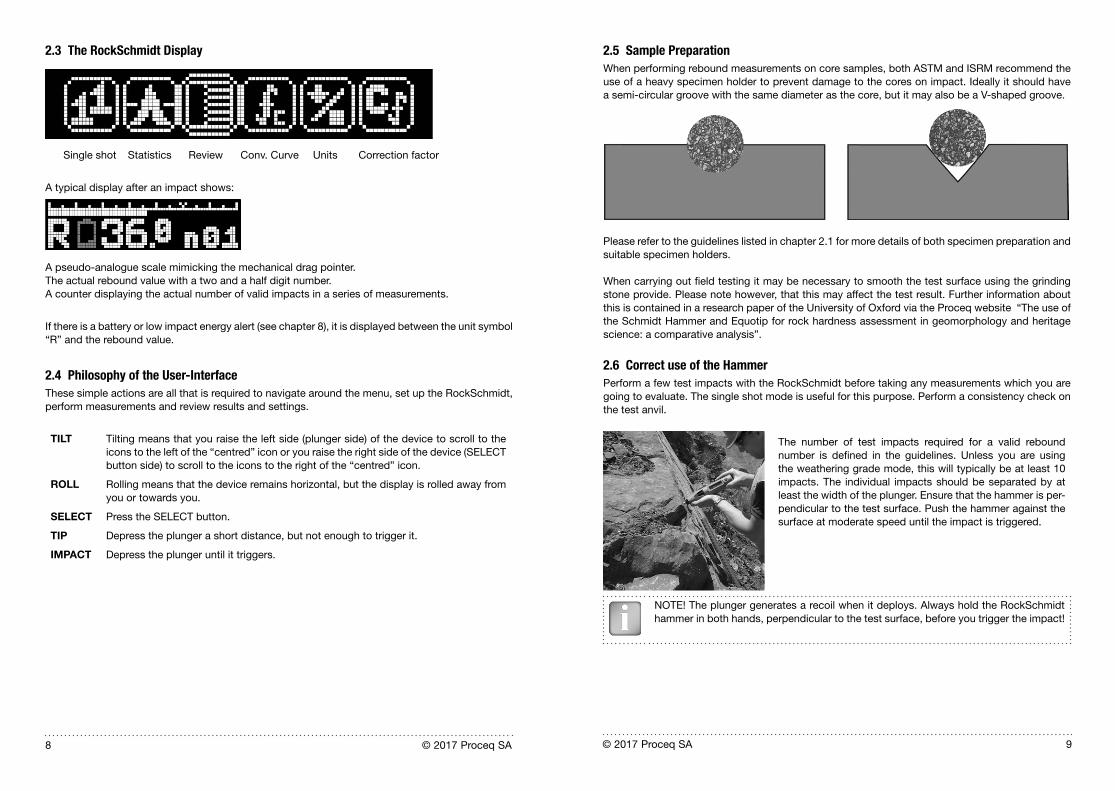
2.3 The RockSchmidt Display
Single shot Statistics Review Conv. Curve Units Correction factor
A typical display after an impact shows:
A pseudo-analogue scale mimicking the mechanical drag pointer.The actual rebound value with a two and a half digit number.A counter displaying the actual number of valid impacts in a series of measurements.
If there is a battery or low impact energy alert (see chapter 8), it is displayed between the unit symbol “R” and the rebound value.
2.4 Philosophy of the User-InterfaceThese simple actions are all that is required to navigate around the menu, set up the RockSchmidt, perform measurements and review results and settings.
TILT Tilting means that you raise the left side (plunger side) of the device to scroll to the icons to the left of the “centred” icon or you raise the right side of the device (SELECT button side) to scroll to the icons to the right of the “centred” icon.
ROLL Rolling means that the device remains horizontal, but the display is rolled away from you or towards you.
SELECT Press the SELECT button.
TIP Depress the plunger a short distance, but not enough to trigger it.
IMPACT Depress the plunger until it triggers.
2.5 Sample PreparationWhen performing rebound measurements on core samples, both ASTM and ISRM recommend the use of a heavy specimen holder to prevent damage to the cores on impact. Ideally it should have a semi-circular groove with the same diameter as the core, but it may also be a V-shaped groove.
Please refer to the guidelines listed in chapter 2.1 for more details of both specimen preparation and suitable specimen holders.
When carrying out field testing it may be necessary to smooth the test surface using the grinding stone provide. Please note however, that this may affect the test result. Further information about this is contained in a research paper of the University of Oxford via the Proceq website “The use of the Schmidt Hammer and Equotip for rock hardness assessment in geomorphology and heritage science: a comparative analysis”.
2.6 Correct use of the HammerPerform a few test impacts with the RockSchmidt before taking any measurements which you are going to evaluate. The single shot mode is useful for this purpose. Perform a consistency check on the test anvil.
The number of test impacts required for a valid rebound number is defined in the guidelines. Unless you are using the weathering grade mode, this will typically be at least 10 impacts. The individual impacts should be separated by at least the width of the plunger. Ensure that the hammer is per-pendicular to the test surface. Push the hammer against the surface at moderate speed until the impact is triggered.
NOTE! The plunger generates a recoil when it deploys. Always hold the RockSchmidt hammer in both hands, perpendicular to the test surface, before you trigger the impact!
© 2017 Proceq SA 1110 © 2017 Proceq SA
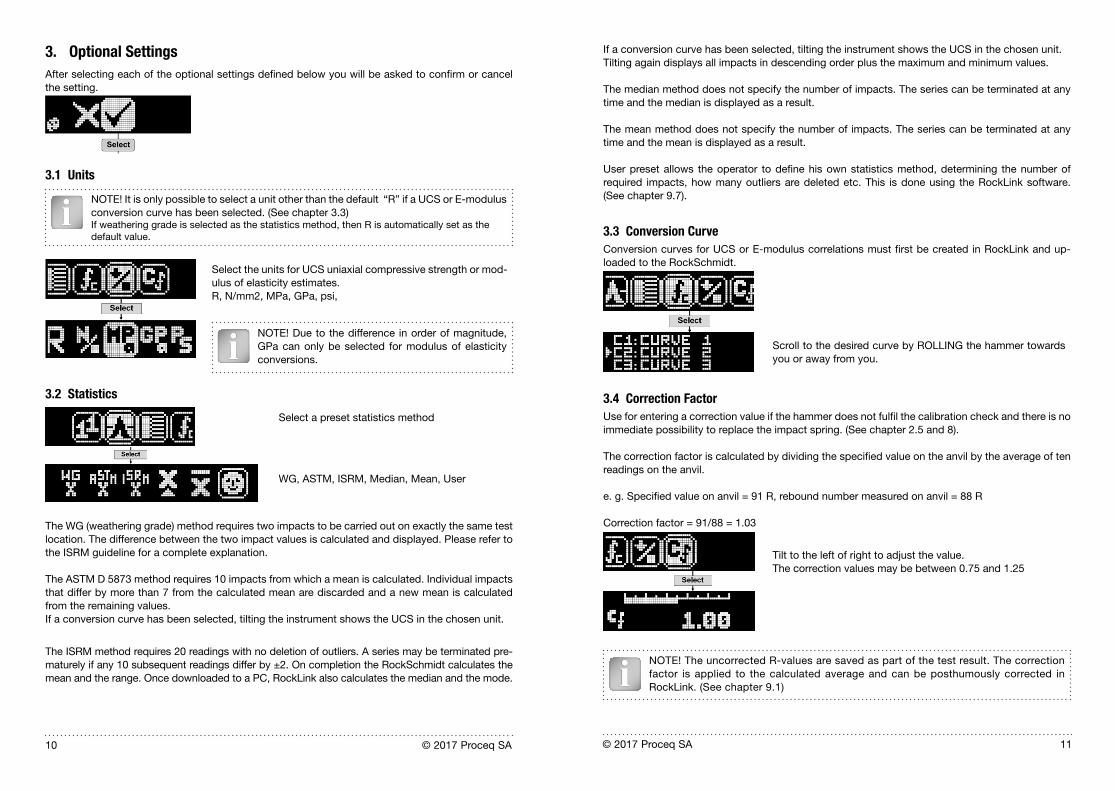
3. Optional SettingsAfter selecting each of the optional settings defined below you will be asked to confirm or cancel the setting.
3.1 Units
NOTE! It is only possible to select a unit other than the default “R” if a UCS or E-modulus conversion curve has been selected. (See chapter 3.3)If weathering grade is selected as the statistics method, then R is automatically set as the default value.
Select the units for UCS uniaxial compressive strength or mod-ulus of elasticity estimates. R, N/mm2, MPa, GPa, psi,
NOTE! Due to the difference in order of magnitude, GPa can only be selected for modulus of elasticity conversions.
3.2 Statistics
Select a preset statistics method
WG, ASTM, ISRM, Median, Mean, User
The WG (weathering grade) method requires two impacts to be carried out on exactly the same test location. The difference between the two impact values is calculated and displayed. Please refer to the ISRM guideline for a complete explanation.
The ASTM D 5873 method requires 10 impacts from which a mean is calculated. Individual impacts that differ by more than 7 from the calculated mean are discarded and a new mean is calculated from the remaining values.If a conversion curve has been selected, tilting the instrument shows the UCS in the chosen unit.
The ISRM method requires 20 readings with no deletion of outliers. A series may be terminated pre-maturely if any 10 subsequent readings differ by ±2. On completion the RockSchmidt calculates the mean and the range. Once downloaded to a PC, RockLink also calculates the median and the mode.
If a conversion curve has been selected, tilting the instrument shows the UCS in the chosen unit. Tilting again displays all impacts in descending order plus the maximum and minimum values.
The median method does not specify the number of impacts. The series can be terminated at any time and the median is displayed as a result.
The mean method does not specify the number of impacts. The series can be terminated at any time and the mean is displayed as a result.
User preset allows the operator to define his own statistics method, determining the number of required impacts, how many outliers are deleted etc. This is done using the RockLink software. (See chapter 9.7).
3.3 Conversion CurveConversion curves for UCS or E-modulus correlations must first be created in RockLink and up-loaded to the RockSchmidt.
Scroll to the desired curve by ROLLING the hammer towards you or away from you.
3.4 Correction FactorUse for entering a correction value if the hammer does not fulfil the calibration check and there is no immediate possibility to replace the impact spring. (See chapter 2.5 and 8).
The correction factor is calculated by dividing the specified value on the anvil by the average of ten readings on the anvil.
e. g. Specified value on anvil = 91 R, rebound number measured on anvil = 88 R
Correction factor = 91/88 = 1.03
Tilt to the left of right to adjust the value.The correction values may be between 0.75 and 1.25
NOTE! The uncorrected R-values are saved as part of the test result. The correction factor is applied to the calculated average and can be posthumously corrected in RockLink. (See chapter 9.1)
© 2017 Proceq SA 1312 © 2017 Proceq SA
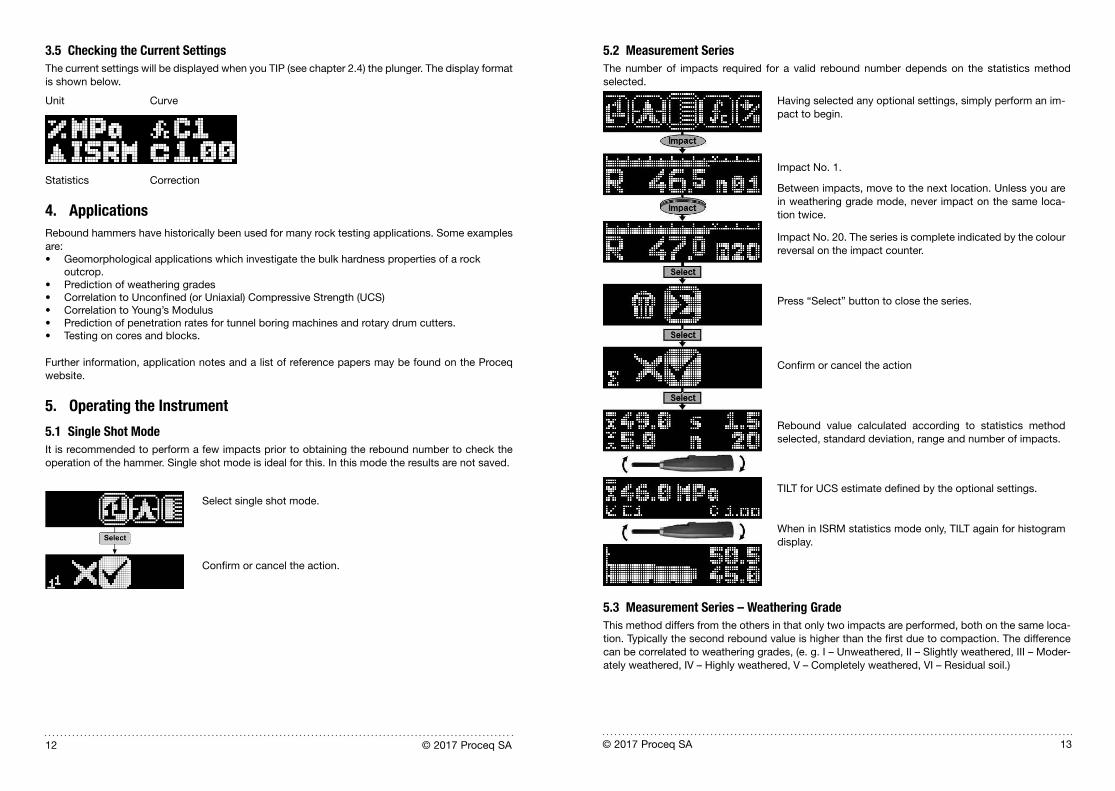
3.5 Checking the Current SettingsThe current settings will be displayed when you TIP (see chapter 2.4) the plunger. The display format is shown below.
Unit Curve
Statistics Correction
4. ApplicationsRebound hammers have historically been used for many rock testing applications. Some examples are:• Geomorphological applications which investigate the bulk hardness properties of a rock
outcrop.• Prediction of weathering grades• Correlation to Unconfined (or Uniaxial) Compressive Strength (UCS)• Correlation to Young’s Modulus• Prediction of penetration rates for tunnel boring machines and rotary drum cutters.• Testing on cores and blocks.
Further information, application notes and a list of reference papers may be found on the Proceq website.
5. Operating the Instrument
5.1 Single Shot ModeIt is recommended to perform a few impacts prior to obtaining the rebound number to check the operation of the hammer. Single shot mode is ideal for this. In this mode the results are not saved.
Select single shot mode.
Confirm or cancel the action.
5.2 Measurement SeriesThe number of impacts required for a valid rebound number depends on the statistics method selected.
Having selected any optional settings, simply perform an im-pact to begin.
Impact No. 1.
Between impacts, move to the next location. Unless you are in weathering grade mode, never impact on the same loca-tion twice.
Impact No. 20. The series is complete indicated by the colour reversal on the impact counter.
Press “Select” button to close the series.
Confirm or cancel the action
Rebound value calculated according to statistics method selected, standard deviation, range and number of impacts.
TILT for UCS estimate defined by the optional settings.
When in ISRM statistics mode only, TILT again for histogram display.
5.3 Measurement Series – Weathering GradeThis method differs from the others in that only two impacts are performed, both on the same loca-tion. Typically the second rebound value is higher than the first due to compaction. The difference can be correlated to weathering grades, (e. g. I – Unweathered, II – Slightly weathered, III – Moder-ately weathered, IV – Highly weathered, V – Completely weathered, VI – Residual soil.)
© 2017 Proceq SA 1514 © 2017 Proceq SA
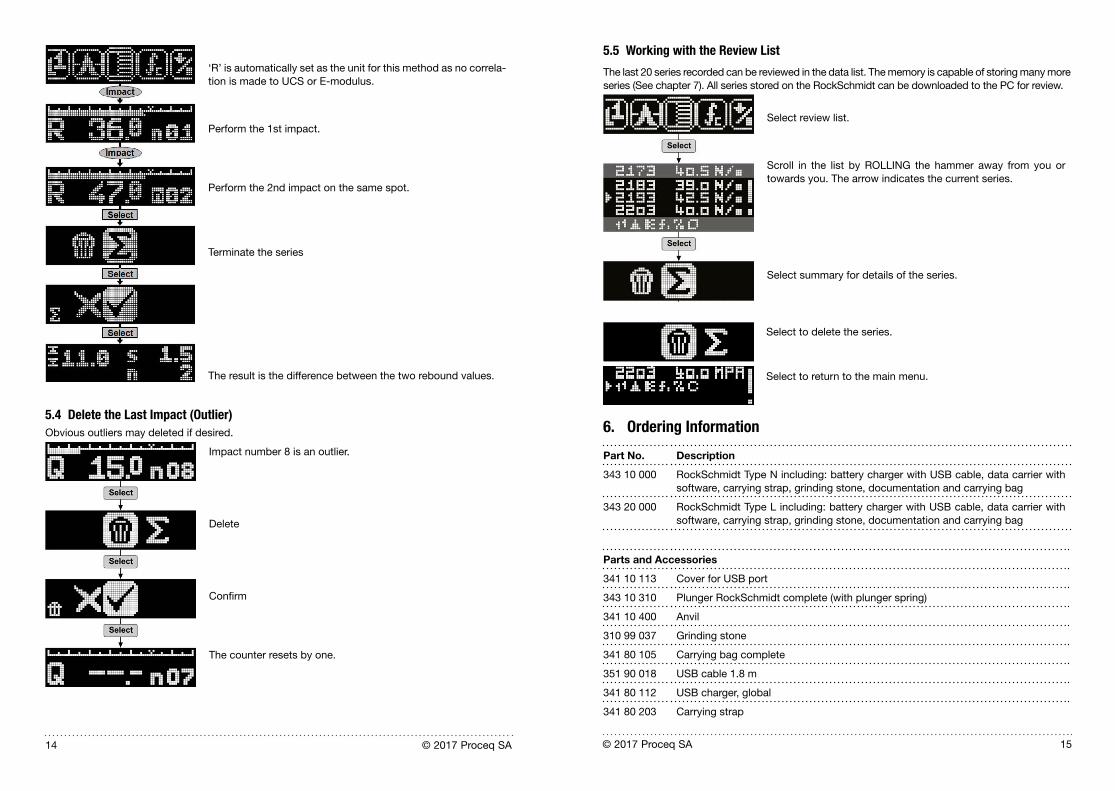
‘R’ is automatically set as the unit for this method as no correla-tion is made to UCS or E-modulus.
Perform the 1st impact.
Perform the 2nd impact on the same spot.
Terminate the series
The result is the difference between the two rebound values.
5.4 Delete the Last Impact (Outlier)Obvious outliers may deleted if desired.
Impact number 8 is an outlier.
Delete
Confirm
The counter resets by one.
5.5 Working with the Review List
The last 20 series recorded can be reviewed in the data list. The memory is capable of storing many more series (See chapter 7). All series stored on the RockSchmidt can be downloaded to the PC for review.
Select review list.
Scroll in the list by ROLLING the hammer away from you or towards you. The arrow indicates the current series.
Select summary for details of the series.
Select to delete the series.
Select to return to the main menu.
6. Ordering Information
Part No. Description
343 10 000 RockSchmidt Type N including: battery charger with USB cable, data carrier with software, carrying strap, grinding stone, documentation and carrying bag
343 20 000 RockSchmidt Type L including: battery charger with USB cable, data carrier with software, carrying strap, grinding stone, documentation and carrying bag
Parts and Accessories
341 10 113 Cover for USB port
343 10 310 Plunger RockSchmidt complete (with plunger spring)
341 10 400 Anvil
310 99 037 Grinding stone
341 80 105 Carrying bag complete
351 90 018 USB cable 1.8 m
341 80 112 USB charger, global
341 80 203 Carrying strap
© 2017 Proceq SA 1716 © 2017 Proceq SA
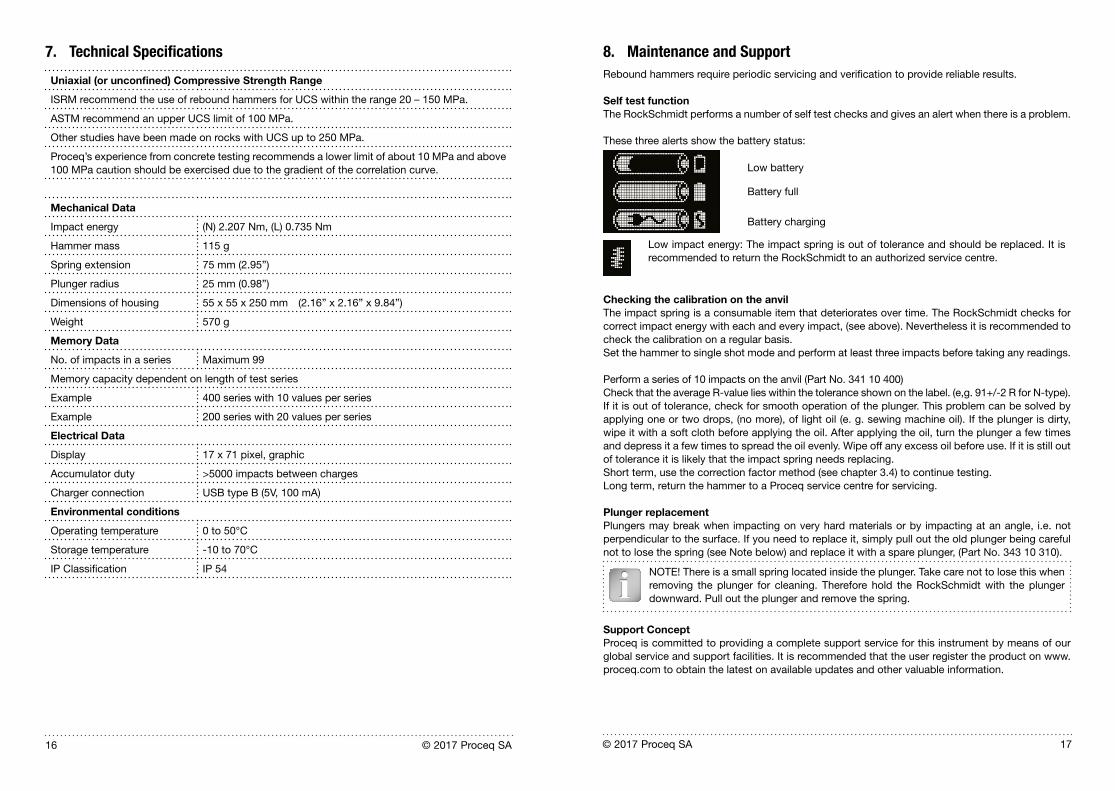
7. Technical Specifications
Uniaxial (or unconfined) Compressive Strength Range
ISRM recommend the use of rebound hammers for UCS within the range 20 – 150 MPa.
ASTM recommend an upper UCS limit of 100 MPa.
Other studies have been made on rocks with UCS up to 250 MPa.
Proceq’s experience from concrete testing recommends a lower limit of about 10 MPa and above 100 MPa caution should be exercised due to the gradient of the correlation curve.
Mechanical Data
Impact energy (N) 2.207 Nm, (L) 0.735 Nm
Hammer mass 115 g
Spring extension 75 mm (2.95”)
Plunger radius 25 mm (0.98”)
Dimensions of housing 55 x 55 x 250 mm (2.16” x 2.16” x 9.84”)
Weight 570 g
Memory Data
No. of impacts in a series Maximum 99
Memory capacity dependent on length of test series
Example 400 series with 10 values per series
Example 200 series with 20 values per series
Electrical Data
Display 17 x 71 pixel, graphic
Accumulator duty >5000 impacts between charges
Charger connection USB type B (5V, 100 mA)
Environmental conditions
Operating temperature 0 to 50°C
Storage temperature -10 to 70°C
IP Classification IP 54
8. Maintenance and SupportRebound hammers require periodic servicing and verification to provide reliable results.
Self test functionThe RockSchmidt performs a number of self test checks and gives an alert when there is a problem.
These three alerts show the battery status: Low battery
Battery full
Battery charging
Low impact energy: The impact spring is out of tolerance and should be replaced. It is recommended to return the RockSchmidt to an authorized service centre.
Checking the calibration on the anvilThe impact spring is a consumable item that deteriorates over time. The RockSchmidt checks for correct impact energy with each and every impact, (see above). Nevertheless it is recommended to check the calibration on a regular basis. Set the hammer to single shot mode and perform at least three impacts before taking any readings.
Perform a series of 10 impacts on the anvil (Part No. 341 10 400)Check that the average R-value lies within the tolerance shown on the label. (e,g. 91+/-2 R for N-type).If it is out of tolerance, check for smooth operation of the plunger. This problem can be solved by applying one or two drops, (no more), of light oil (e. g. sewing machine oil). If the plunger is dirty, wipe it with a soft cloth before applying the oil. After applying the oil, turn the plunger a few times and depress it a few times to spread the oil evenly. Wipe off any excess oil before use. If it is still out of tolerance it is likely that the impact spring needs replacing. Short term, use the correction factor method (see chapter 3.4) to continue testing.Long term, return the hammer to a Proceq service centre for servicing.
Plunger replacementPlungers may break when impacting on very hard materials or by impacting at an angle, i.e. not perpendicular to the surface. If you need to replace it, simply pull out the old plunger being careful not to lose the spring (see Note below) and replace it with a spare plunger, (Part No. 343 10 310).
NOTE! There is a small spring located inside the plunger. Take care not to lose this when removing the plunger for cleaning. Therefore hold the RockSchmidt with the plunger downward. Pull out the plunger and remove the spring.
Support ConceptProceq is committed to providing a complete support service for this instrument by means of our global service and support facilities. It is recommended that the user register the product on www.proceq.com to obtain the latest on available updates and other valuable information.
© 2017 Proceq SA 1918 © 2017 Proceq SA
Standard Warranty and Extended WarrantyThe standard warranty covers the electronic portion of the instrument for 24 months and the me-chanical portion of the instrument for 6 months.An extended warranty for one, two or three years for the electronic portion of the instrument may be purchased up to 90 days of date of purchase.
9. RockLinkStarting RockLink
Locate the file “RockLink_Setup” on your computer or on the CD and double-click on it. Follow the instructions you see on the screen.
Application settingsThe menu item “File – Application settings” allows the user to select the language and the date and time format to be used. Connecting to the RockSchmidt
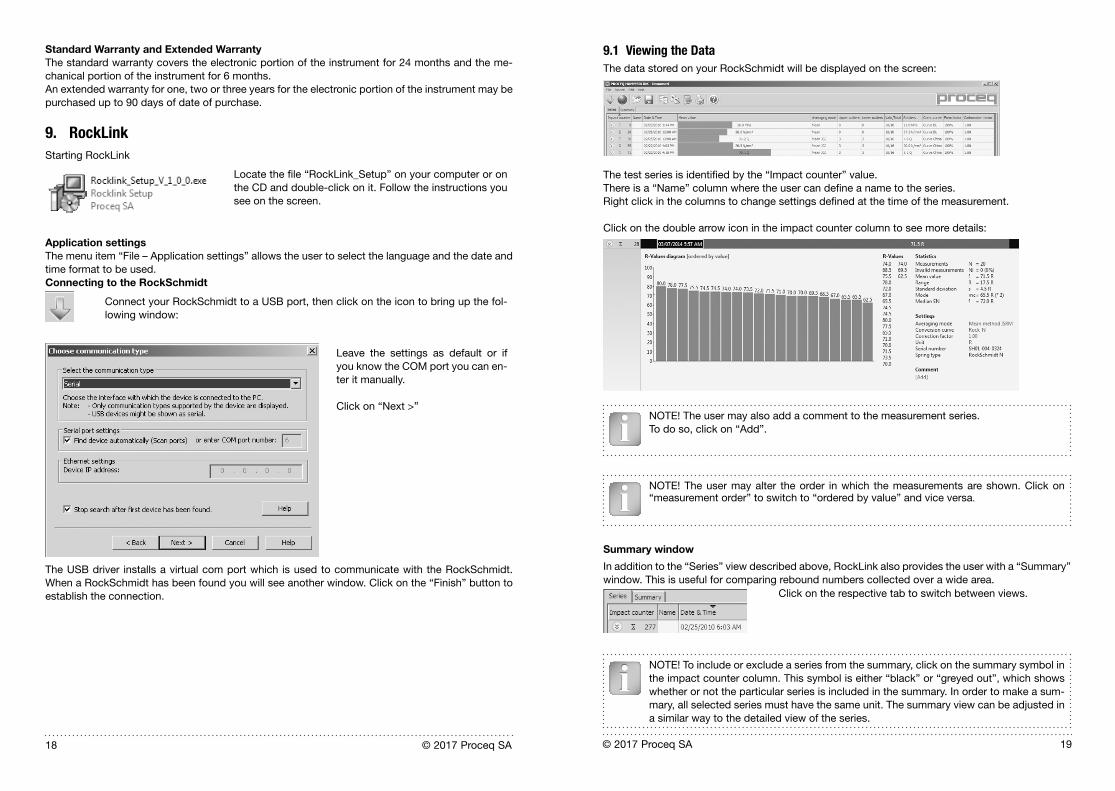
Connect your RockSchmidt to a USB port, then click on the icon to bring up the fol-lowing window:
Leave the settings as default or if you know the COM port you can en-ter it manually.
Click on “Next >”
The USB driver installs a virtual com port which is used to communicate with the RockSchmidt. When a RockSchmidt has been found you will see another window. Click on the “Finish” button to establish the connection.
9.1 Viewing the Data The data stored on your RockSchmidt will be displayed on the screen:
The test series is identified by the “Impact counter” value.There is a “Name” column where the user can define a name to the series.Right click in the columns to change settings defined at the time of the measurement.
Click on the double arrow icon in the impact counter column to see more details:
NOTE! The user may also add a comment to the measurement series. To do so, click on “Add”.
NOTE! The user may alter the order in which the measurements are shown. Click on “measurement order” to switch to “ordered by value” and vice versa.
Summary window
In addition to the “Series” view described above, RockLink also provides the user with a “Summary” window. This is useful for comparing rebound numbers collected over a wide area.
Click on the respective tab to switch between views.
NOTE! To include or exclude a series from the summary, click on the summary symbol in the impact counter column. This symbol is either “black” or “greyed out”, which shows whether or not the particular series is included in the summary. In order to make a sum-mary, all selected series must have the same unit. The summary view can be adjusted in a similar way to the detailed view of the series.
© 2017 Proceq SA 2120 © 2017 Proceq SA
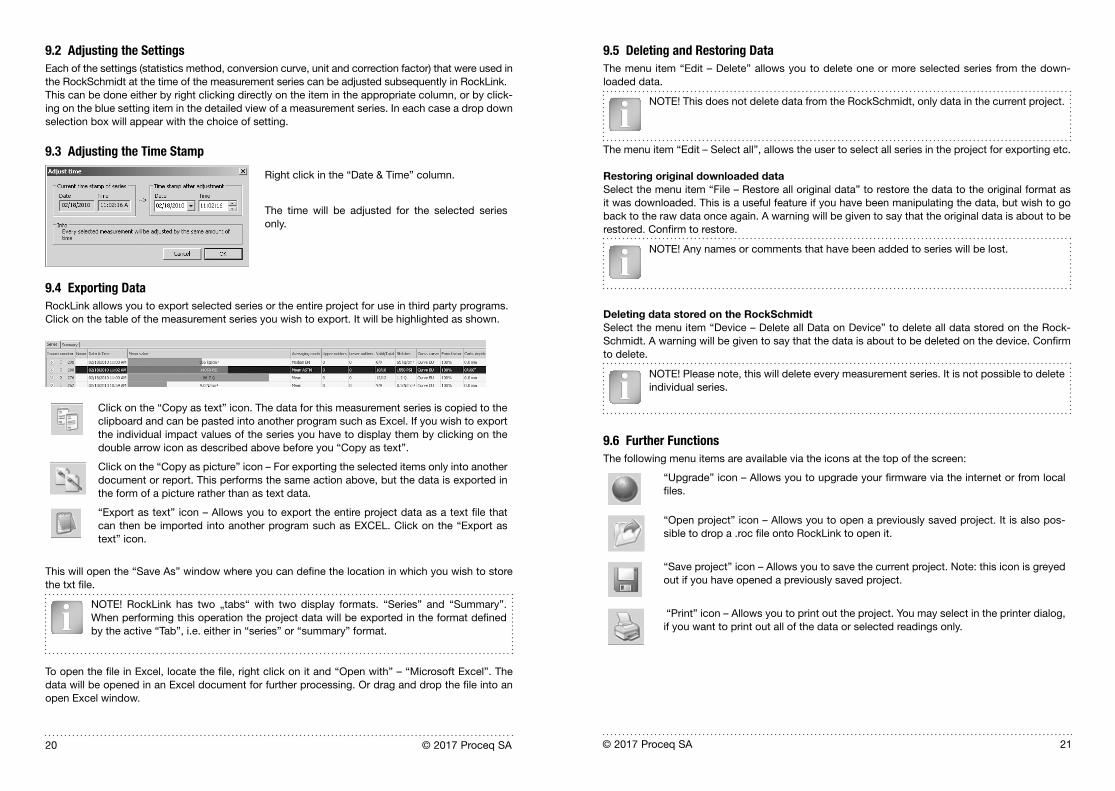
9.2 Adjusting the Settings Each of the settings (statistics method, conversion curve, unit and correction factor) that were used in the RockSchmidt at the time of the measurement series can be adjusted subsequently in RockLink. This can be done either by right clicking directly on the item in the appropriate column, or by click-ing on the blue setting item in the detailed view of a measurement series. In each case a drop down selection box will appear with the choice of setting.
9.3 Adjusting the Time Stamp
Right click in the “Date & Time” column.
The time will be adjusted for the selected series only.
9.4 Exporting DataRockLink allows you to export selected series or the entire project for use in third party programs.Click on the table of the measurement series you wish to export. It will be highlighted as shown.
Click on the “Copy as text” icon. The data for this measurement series is copied to the clipboard and can be pasted into another program such as Excel. If you wish to export the individual impact values of the series you have to display them by clicking on the double arrow icon as described above before you “Copy as text”.
Click on the “Copy as picture” icon – For exporting the selected items only into another document or report. This performs the same action above, but the data is exported in the form of a picture rather than as text data.
“Export as text” icon – Allows you to export the entire project data as a text file that can then be imported into another program such as EXCEL. Click on the “Export as text” icon.
This will open the “Save As” window where you can define the location in which you wish to store the txt file.
NOTE! RockLink has two „tabs“ with two display formats. “Series” and “Summary”. When performing this operation the project data will be exported in the format defined by the active “Tab”, i.e. either in “series” or “summary” format.
To open the file in Excel, locate the file, right click on it and “Open with” – “Microsoft Excel”. The data will be opened in an Excel document for further processing. Or drag and drop the file into an open Excel window.
9.5 Deleting and Restoring DataThe menu item “Edit – Delete” allows you to delete one or more selected series from the down-loaded data.
NOTE! This does not delete data from the RockSchmidt, only data in the current project.
The menu item “Edit – Select all”, allows the user to select all series in the project for exporting etc.
Restoring original downloaded dataSelect the menu item “File – Restore all original data” to restore the data to the original format as it was downloaded. This is a useful feature if you have been manipulating the data, but wish to go back to the raw data once again. A warning will be given to say that the original data is about to be restored. Confirm to restore.
NOTE! Any names or comments that have been added to series will be lost.
Deleting data stored on the RockSchmidtSelect the menu item “Device – Delete all Data on Device” to delete all data stored on the Rock-Schmidt. A warning will be given to say that the data is about to be deleted on the device. Confirm to delete.
NOTE! Please note, this will delete every measurement series. It is not possible to delete individual series.
9.6 Further FunctionsThe following menu items are available via the icons at the top of the screen:
“Upgrade” icon – Allows you to upgrade your firmware via the internet or from local files.
“Open project” icon – Allows you to open a previously saved project. It is also pos-sible to drop a .roc file onto RockLink to open it.
“Save project” icon – Allows you to save the current project. Note: this icon is greyed out if you have opened a previously saved project.
“Print” icon – Allows you to print out the project. You may select in the printer dialog, if you want to print out all of the data or selected readings only.
© 2017 Proceq SA 2322 © 2017 Proceq SA
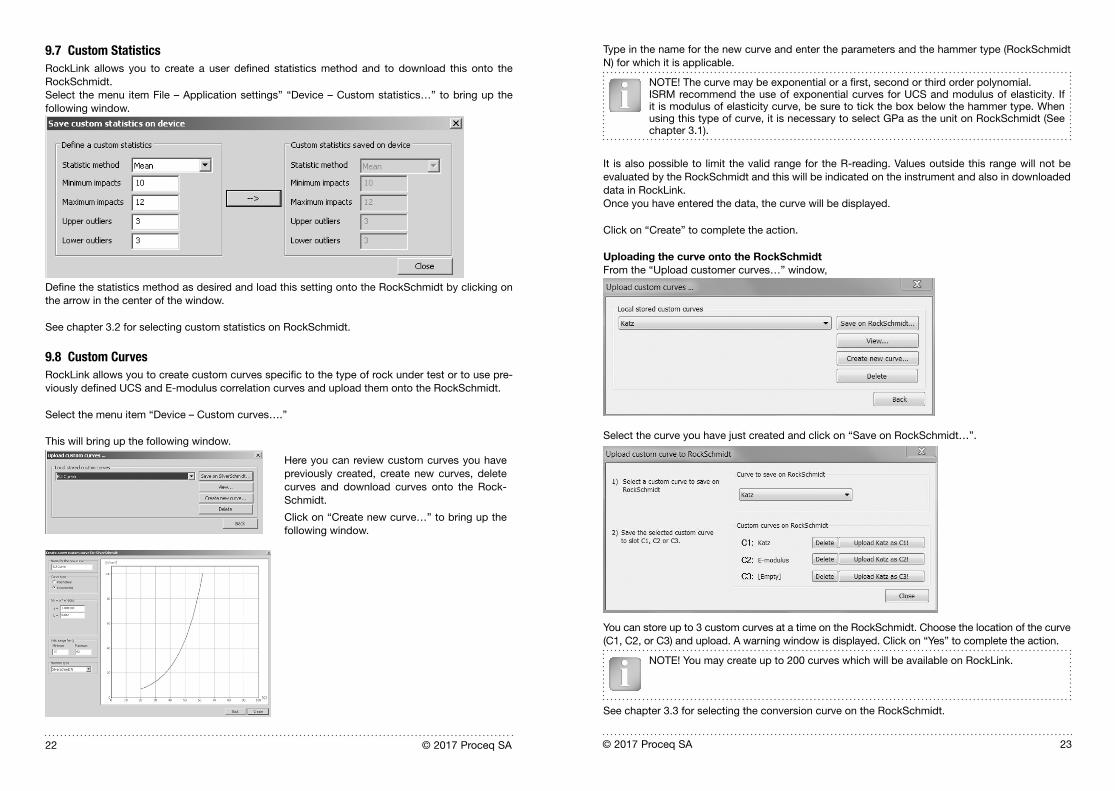
9.7 Custom StatisticsRockLink allows you to create a user defined statistics method and to download this onto the RockSchmidt.Select the menu item File – Application settings” “Device – Custom statistics…” to bring up the following window.
Define the statistics method as desired and load this setting onto the RockSchmidt by clicking on the arrow in the center of the window.
See chapter 3.2 for selecting custom statistics on RockSchmidt.
9.8 Custom CurvesRockLink allows you to create custom curves specific to the type of rock under test or to use pre-viously defined UCS and E-modulus correlation curves and upload them onto the RockSchmidt.
Select the menu item “Device – Custom curves….”
This will bring up the following window.
Here you can review custom curves you have previously created, create new curves, delete curves and download curves onto the Rock-Schmidt.
Click on “Create new curve…” to bring up the following window.
Type in the name for the new curve and enter the parameters and the hammer type (RockSchmidt N) for which it is applicable.
NOTE! The curve may be exponential or a first, second or third order polynomial.ISRM recommend the use of exponential curves for UCS and modulus of elasticity. If it is modulus of elasticity curve, be sure to tick the box below the hammer type. When using this type of curve, it is necessary to select GPa as the unit on RockSchmidt (See chapter 3.1).
It is also possible to limit the valid range for the R-reading. Values outside this range will not be evaluated by the RockSchmidt and this will be indicated on the instrument and also in downloaded data in RockLink.Once you have entered the data, the curve will be displayed.
Click on “Create” to complete the action.
Uploading the curve onto the RockSchmidtFrom the “Upload customer curves…” window,
Select the curve you have just created and click on “Save on RockSchmidt…”.
You can store up to 3 custom curves at a time on the RockSchmidt. Choose the location of the curve (C1, C2, or C3) and upload. A warning window is displayed. Click on “Yes” to complete the action.
NOTE! You may create up to 200 curves which will be available on RockLink.
See chapter 3.3 for selecting the conversion curve on the RockSchmidt.

24 © 2017 Proceq SA
Proceq EuropeRingstrasse 28603 SchwerzenbachSwitzerlandPhone +41-43-355-3800Fax [email protected]
Proceq UK Ltd.Bedford i-lab, Priory Business ParkStannard WayBedford MK44 3RZUnited KingdomPhone [email protected]
Proceq USA, Inc.117 Corporation DriveAliquippa, PA 15001U.S.A.Phone +1-724-512-0330Fax [email protected]
Proceq Asia Pte Ltd12 New Industrial Road#02-02A Morningstar CentreSingapore 536202Phone +65-6382-3966Fax [email protected]
Proceq Rus LLCUl. Optikov 4Korp. 2, lit. A, Office 410197374 St. PetersburgRussiaPhone/Fax +7-812-448-3500 [email protected]
Proceq Middle EastP. O. Box 8365, SAIF Zone,Sharjah, United Arab EmiratesPhone +971-6-557-8505Fax [email protected]
Proceq SAO Ltd.Rua Paes Leme, 136, cj 610Pinheiros, São PauloBrasil Cep. 05424-010Phone [email protected]
Proceq ChinaUnit B, 19th Floor Five Continent International Mansion, No. 807Zhao Jia Bang RoadShanghai 200032China Phone +86-21-6317-7479Fax [email protected]
Subject to change. Copyright © 2017 by Proceq SA, Schwerzenbach. All rights reserved.Part Number: 820 343 01E ver 5 2017