Embed Size (px)
Citation preview
1
Torrey Hills Technologies, LLC.
A Company of G Tech Systems Group, Inc. 10401 Roselle St. Suite 400, San Diego, CA 92130
Tel. (858) 558-6666 www.threerollmill.com
Operating Manual
For
Planetary Mixers
2
Thank you for choosing Torrey Hills Technologies, LLC as your planetary mixer supplier. This manual is designed to provide detailed information on how to operate, troubleshoot and maintain your planetary mixer.
Torrey Hills Technologies, LLC is the leading supplier of Planetary Mixers to the major process
industries. Many products including adhesives, pharmaceuticals, foods, chemicals, electronics,
plastics, pigments, and battery compounds are manufactured in our mixers. GTSGI® series of Planetary Mixers are widely used in small batch high efficiency mixing, they are used in research institutions, universities and even industrial production for mixing, homogenization and dispersion up to 0.1µm). Our customers are in the mining, agriculture, metallurgy, electrical, electronics, materials, chemical, pharmaceutical, cosmetics and nuclear industries. The planetary mixer performs mixing by continually revolving the large plate and rotating the containers concurrently. Both the plate revolution (centrifugal) speed and container rotation (planetary) speed are independently adjustable. This unique mixing capability allows the operator to design precise solutions for mixing various systems. To further improve the mixing efficiency, grinding media can be added into the containers. Our machines are built in such a way that the strict weight balancing is not required. Contact Torrey Hills Technologies, LLC for further assistance with the operation and maintenance of your machine or if you have any comments on the content of this manual. Our primary concern is satisfying the needs of our customers and your feedback is of great value to us. Torrey Hills Technologies, LLC A Company of G Tech Systems Group, Inc. 10401 Roselle St, Suite 400 San Diego, CA 92121 Tel (858) 558 - 6666 Fax (858) 630 - 3383 E-mail: [email protected] Website: www.threerollmill.com
3
Table of contents page 1 General Information / Introduction 4 1.1 Notes about Operating Instructions 1.2 Explanations of the signs at the instrument and the operating instructions 1.3 Short Description of the Machine 1.3.1 Applications 1.3.2 Method of Operation 1.4 Technical Data 2 Operating Safety 7 2.1 General Safety Instructions 2.2 Operators 2.3 Protective Devices 2.4 Danger Points 2.5 Electrical Safety 3 Installation 9 3.1 Unpacking 3.2 Transport 3.3 Erection 3.4 Ambience conditions 3.5 Electrical Connection 3.6 Switching On for the First Time / Test for Correct Functioning 4 Working with the mill 11 4.1 Choice of Grinding Bowls and Grinding Balls 4.1.1 Size of the Grinding Balls 4.1.2 Number of Balls per Grinding Bowl 4.1.3 Calculated Ball Weight 4.2 Filling the Grinding Bowl 4.3 Influencing Quantities During Grinding 4.3.1 Dry Grinding 4.3.2 Wet Grinding (Grinding in Suspension) 4.4 Clamping and unclamping the grinding bowls 4.4.1 Clamping 500ml, 250ml and 80ml grinding bowl 4.4.2 Clamping 45ml and 25ml grinding bowl 4.4.3 Unclamping 4.4.4 Clamping with Additional lock-system 4.5 Mass Balance 4.6 Grinding Time 4.7 Control panel 4.7.2 Start of Mill 4.7.3 Stop Milling 4.8 Performing a Grinding Operation 4.9 Cooling the Grinding Bowls 5 Cleaning 16 5.1 Grinding accessories 5.2 Mill 6 Maintenance 16 7 Warranty 16
4
1 General Information / Introduction 1.1 Notes about Operating Instructions
• The copyright to these technical documents is the property of Torrey Hills Technologies, LLC • These operating instructions are not to be reprinted or copied without the express approval of Torrey Hills Technologies, LLC • Please study these instructions carefully before operation. • All operators must be familiar with the contents of the operating instructions. • Please observe all notes concerning your safety. • The mill was designed with the user's safety in mind, however inherent risks cannot be excluded. Follow the advices in these instructions to avoid risks to users. • Symbols are also to be found on the instrument warning users of possible risks. • Warning symbols are surrounded by a triangle. • These operating instructions do not constitute a complete technical description. They describe only the details required for safe operation and maintenance for usage under normal conditions.
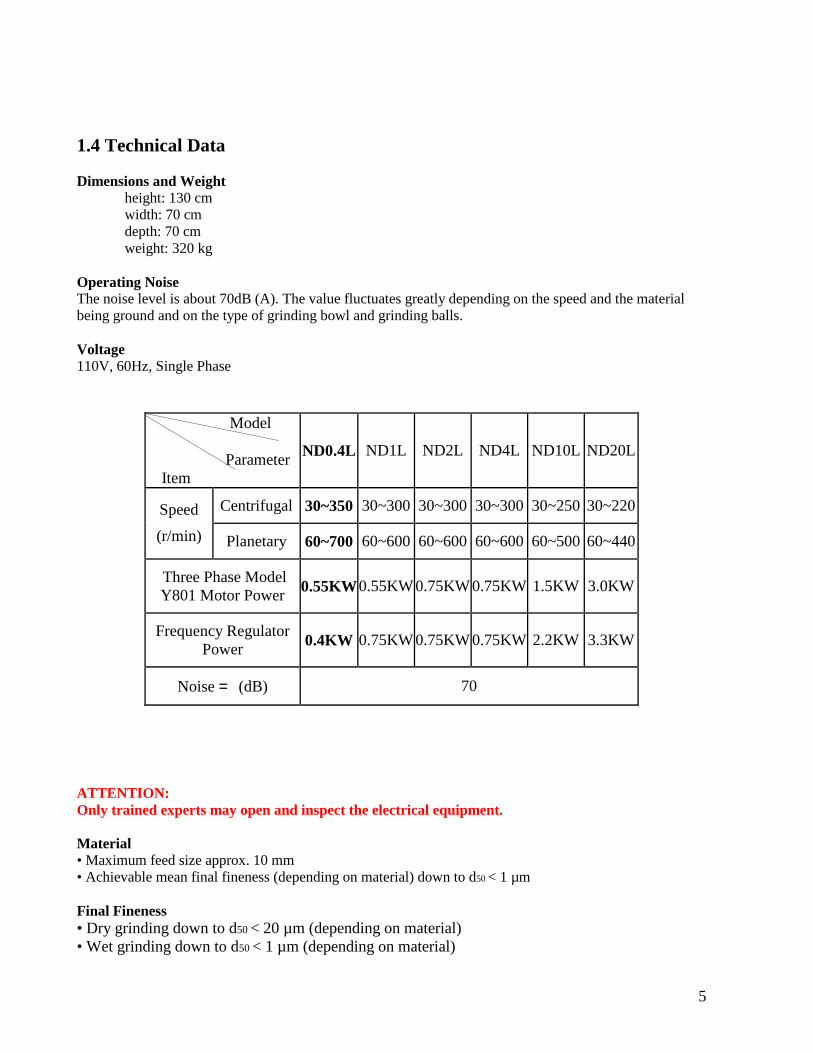
1.3 Short Description of the Machine 1.3.1 Applications The planetary mixer/mill is capable of emulating ball mills of conventional design, simulating the types of stress entailed and thus reproducing or optimising grinding processes. Due to the high flexibility available for selecting the grinding parameters, it is possible to achieve results unattainable with any other ball mills. This is the ideal mill for mechanical activation and alloying. The main applications are in the field of materials research and, of course, wherever a powerful, innovative planetary mill is required. When particles < 10 mm are fed in, a final fineness up to 0.1 µm can be achieved. The useful capacity is between 2 x 5 ml in the case of 12 ml grinding bowls and 2 x 225 ml when 500 ml grinding bowl are used. 1.3.2 Method of Operation With standard planetary ball mills the grinding bowls are rotating and mounted eccentrically on a rotating support disc. The rotational speed of the supporting disc can be selected at will; the grinding bowl rotates at a fixed transmission ratio. Due to the overlapping of grinding bowls and supporting disc, the material to be ground and the grinding balls execute movements and trajectories in the grinding bowl whose form and effect depend on the transmission ratio. Comminution is the result of a combination of friction and impact at high energy. Planetary ball mills with a fixed transmission ratio are optimised for a single grinding process only. By varying the transmission ratio it is possible to control the movements and trajectories of the grinding balls at will so that the balls strike the inner wall of the bowl vertically (high impact energy), approach each other tangentially (high friction) or just roll down the inner wall of the bowl (centrifugal mills). All intermediate levels and combinations of frictional and impact pressures can be set as required. By changing the transmission ratio it is therefore possible for the first time to carry out mechanical activation as well as mechanical alloying. Furthermore, it is also possible for the first time to optimally adjust a planetary ball mill to the material to be ground, the size of the grinding bowls and the grinding balls.
5
1.4 Technical Data Dimensions and Weight
height: 130 cm width: 70 cm depth: 70 cm weight: 320 kg
Operating Noise The noise level is about 70dB (A). The value fluctuates greatly depending on the speed and the material being ground and on the type of grinding bowl and grinding balls. Voltage 110V, 60Hz, Single Phase
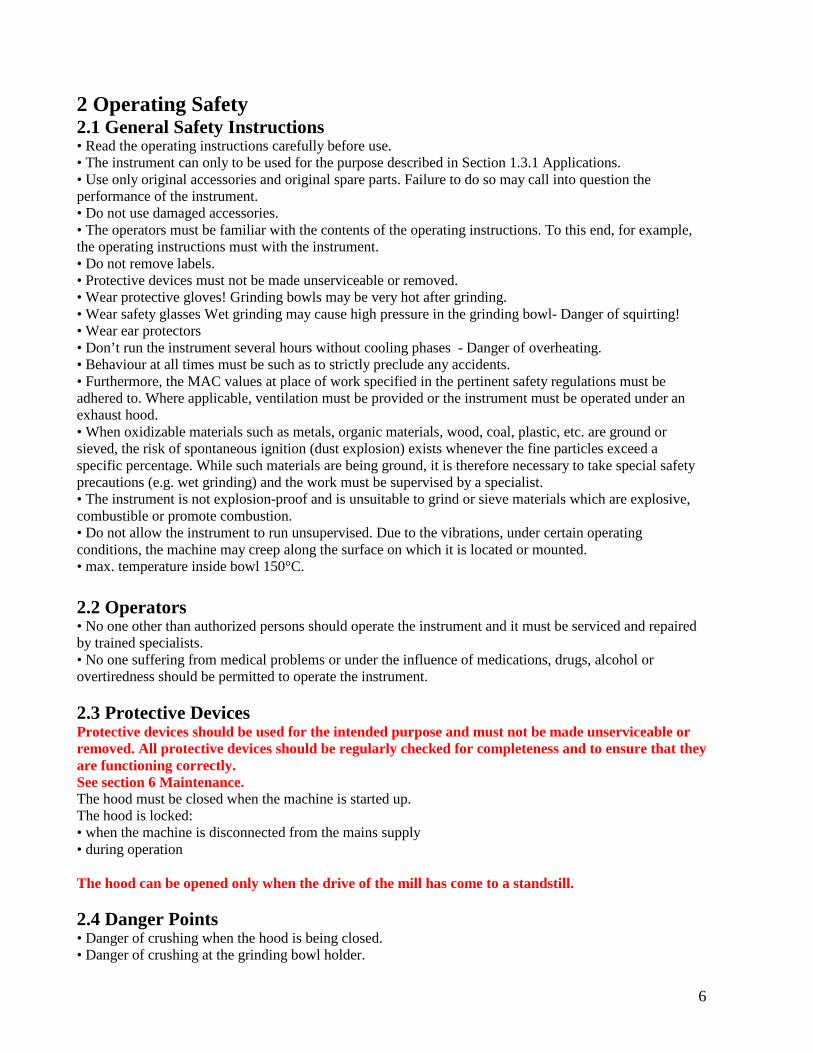
Model Parameter
Item
ND0.4L ND1L ND2L ND4L ND10L ND20L
Centrifugal 30~350 30~300 30~300 30~300 30~250 30~220 Speed
(r/min) Planetary 60~700 60~600 60~600 60~600 60~500 60~440
Three Phase Model Y801 Motor Power 0.55KW 0.55KW 0.75KW 0.75KW 1.5KW 3.0KW
Frequency Regulator Power 0.4KW 0.75KW 0.75KW 0.75KW 2.2KW 3.3KW
Noise = (dB) 70
ATTENTION: Only trained experts may open and inspect the electrical equipment. Material • Maximum feed size approx. 10 mm • Achievable mean final fineness (depending on material) down to d50 < 1 µm Final Fineness • Dry grinding down to d50 < 20 µm (depending on material) • Wet grinding down to d50 < 1 µm (depending on material)
6
2 Operating Safety 2.1 General Safety Instructions • Read the operating instructions carefully before use. • The instrument can only to be used for the purpose described in Section 1.3.1 Applications. • Use only original accessories and original spare parts. Failure to do so may call into question the performance of the instrument. • Do not use damaged accessories. • The operators must be familiar with the contents of the operating instructions. To this end, for example, the operating instructions must with the instrument. • Do not remove labels. • Protective devices must not be made unserviceable or removed. • Wear protective gloves! Grinding bowls may be very hot after grinding. • Wear safety glasses Wet grinding may cause high pressure in the grinding bowl- Danger of squirting! • Wear ear protectors • Don’t run the instrument several hours without cooling phases - Danger of overheating. • Behaviour at all times must be such as to strictly preclude any accidents. • Furthermore, the MAC values at place of work specified in the pertinent safety regulations must be adhered to. Where applicable, ventilation must be provided or the instrument must be operated under an exhaust hood. • When oxidizable materials such as metals, organic materials, wood, coal, plastic, etc. are ground or sieved, the risk of spontaneous ignition (dust explosion) exists whenever the fine particles exceed a specific percentage. While such materials are being ground, it is therefore necessary to take special safety precautions (e.g. wet grinding) and the work must be supervised by a specialist. • The instrument is not explosion-proof and is unsuitable to grind or sieve materials which are explosive, combustible or promote combustion. • Do not allow the instrument to run unsupervised. Due to the vibrations, under certain operating conditions, the machine may creep along the surface on which it is located or mounted. • max. temperature inside bowl 150°C. 2.2 Operators • No one other than authorized persons should operate the instrument and it must be serviced and repaired by trained specialists. • No one suffering from medical problems or under the influence of medications, drugs, alcohol or overtiredness should be permitted to operate the instrument. 2.3 Protective Devices Protective devices should be used for the intended purpose and must not be made unserviceable or removed. All protective devices should be regularly checked for completeness and to ensure that they are functioning correctly. See section 6 Maintenance. The hood must be closed when the machine is started up. The hood is locked: • when the machine is disconnected from the mains supply • during operation The hood can be opened only when the drive of the mill has come to a standstill. 2.4 Danger Points • Danger of crushing when the hood is being closed. • Danger of crushing at the grinding bowl holder.
7
2.5 Electrical Safety General • The main switch disconnects the machine from the mains supply at all poles. • Switch off the main switch if the instrument is to be inoperative for an extended period (e.g. over night). Protection against Restarting In the event of a mains failure during operation or after switchingoff with the main switch, the lid will remain locked. When the mains voltage is restored, the lock of the lid will open. For safety reasons, however, the instrument will not start again. At power failure the remaining milling time is stored to the machine. After pressing the START-Button on Control Panel, the milling cycle will be continued, showing a „0“ in the display of the mill. If you restart the process via PC-software or select program on control panel, you will lost the remaining time. Overload Protection In the event of an overload, the device lowers the rotational speed. If the main disk is overloaded, the error code “7” or “8” blinks on the display. If the drive motor overheats, the device shuts down. If the drive is blocked, the device shuts down.
8
3 Installation 3.1 Unpacking • Check that the items supplied correspond to your order. Grinding bowls of hardened steel may exhibit surface indentations caused by the manufacturing process. These do not influence the grinding or the grinding result and generally disappear after the first grinding. When present, these surface indentations lie within the permissible manufacturing tolerance ranges. Accordingly, complaints regarding such grinding bowls cannot be accepted.
3.2 Transport • Transport the mill on the transport pallet with a fork lift truck or a hand fork lift truck. • Lift the mill from the transport pallet with a crane. Procedure: 1. Open the hood (see section 2.3 Protective Devices) 2. Hang the crane hook into the eyelet and position the device. 3. Lift and set-up the device carefully. 4. Remove the eyelet screw after the set-up. 5. Fix the cover 3.3 Erection • Place the instrument on a level, stable surface, indoors. • Fix the two front wheels by pressing their pedals. It is inadvisable to operate the instrument while it is standing on the transport pallet. Do not block the exit of air from the ventilator louver at the side. There is a danger of overheating if the louver is blocked. 3.4 Ambience conditions • Use the instrument only inside. • The air must not contain any electrical conductive dust. • The ambient temperature must be between 5 and 40°C. • Height up to 2000m M.S.L. • Maximum relative humidity of air 80% temperature up to 31°C, linear decreasing down to 50% relative humidity of air at 40°C • Contamination level 2 (IEC 664) 3.5 Electrical Connection Before making the connection, compare the voltage and current values shown on the nameplate with the values of the mains supply to which the instrument is to be connected. The connecting cable may be changed only by a trained expert. 3.6 Switching On for the First Time / Test for Correct Functioning Switch on the machine only when all the work described in section 3 on Installation has been done. Switching On 1. Connect the machine to the mains supply (or transformer). 2. Switch on the machine with the main switch . 3. Open the hood. 4. If the grinding bowl holder or any wood are present, take them out. There should be nothing in the grinding bowl holder.
9
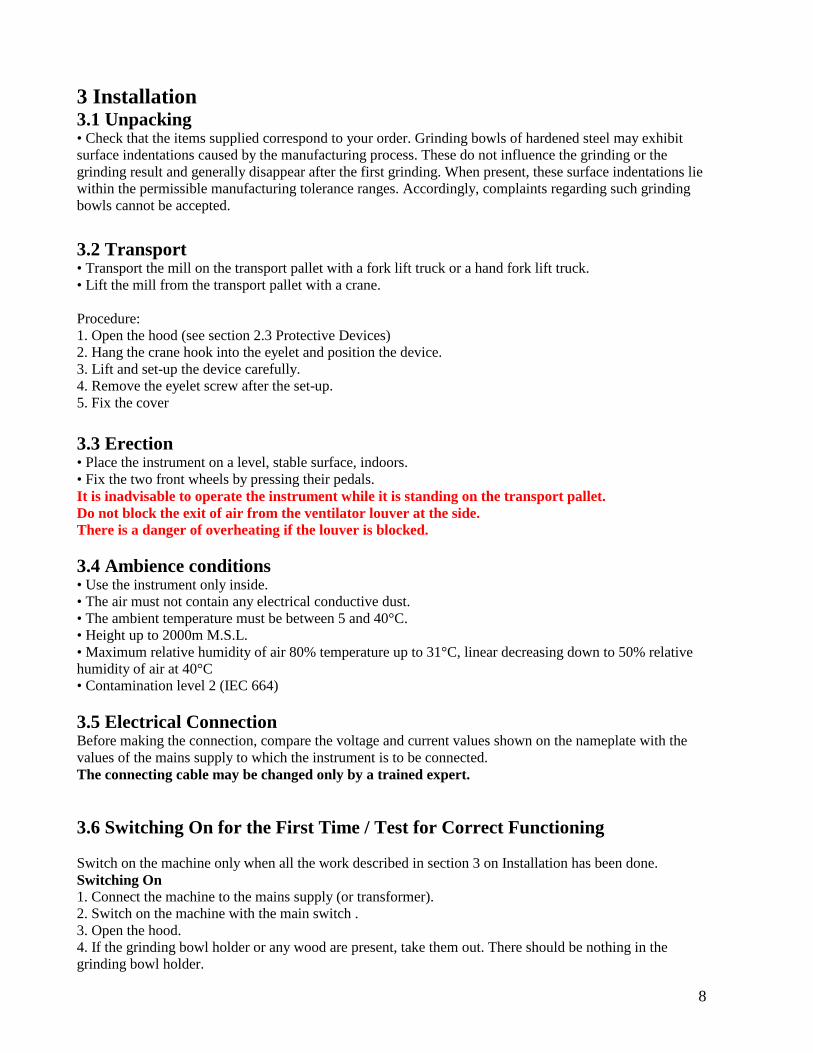
5. Close the hood. 6. Press START . 7. The hood will be locked and the mill will run
Switching Off • Press STOP . • After a short period (after the mill has come to a standstill), the hood is unlocked and can be opened.
10
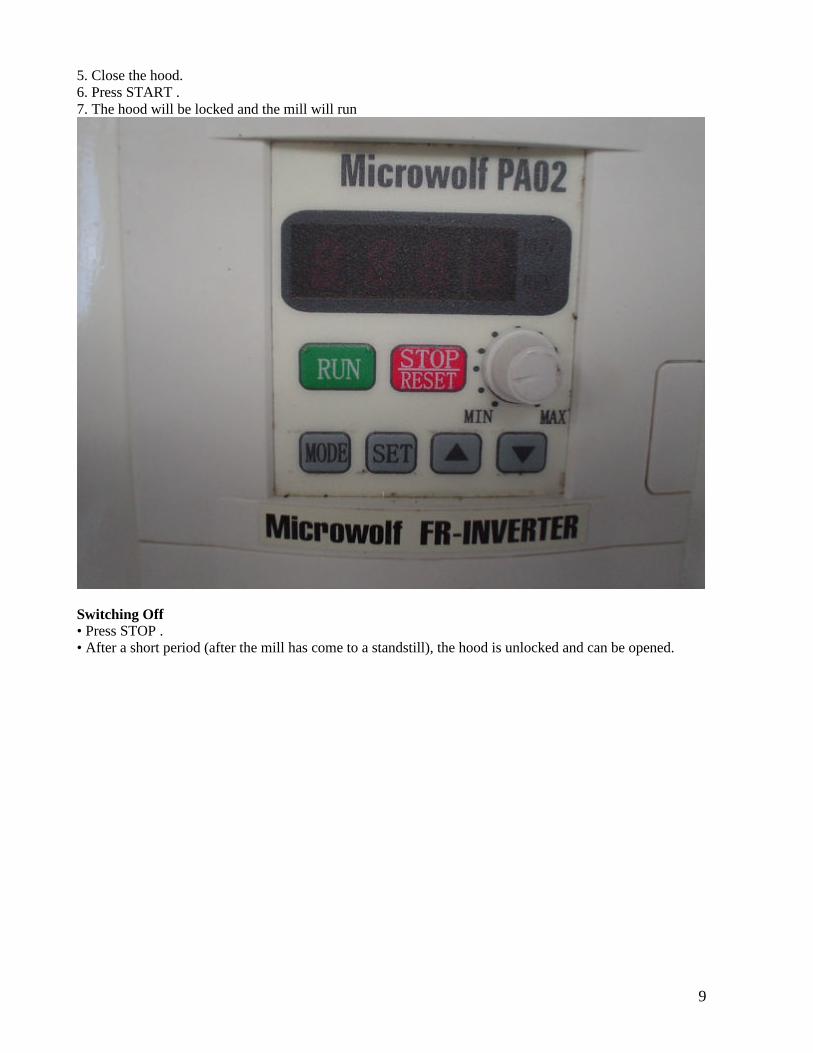
4 Working with the mill 4.1 Choice of Grinding Bowls and Grinding Balls Caution!!! No warranty or claims shall be accepted in case of damages caused on account of using grinding bowls and grinding balls that are not original accessories of the appliance. In order to prevent excessive abrasion, the hardness of the grinding bowl used and of the grinding balls must be higher than that of the material used.
The grinding bowls and grinding balls of zirconium dioxide are resistant to acids with the exception of hydrofluoric acid. Normally, grinding bowls and grinding balls of the same material should be chosen. Exeption: Tungsten carbide balls may be combined with steel bowls. The size of the grinding bowls and grinding balls should be determined experimentally. 4.1.1 Size of the Grinding Balls Type of feed material Ball diameter Hard samples feed particle size: <10 mm 30 mm or 40 mm Medium piece size: (<5 mm) 20 mm Fine material: (0.5 mm) 10 mm / 5 mm Homogenisation of dry or liquid samples: 10 mm Homogenisation of viscous samples: 20 mm
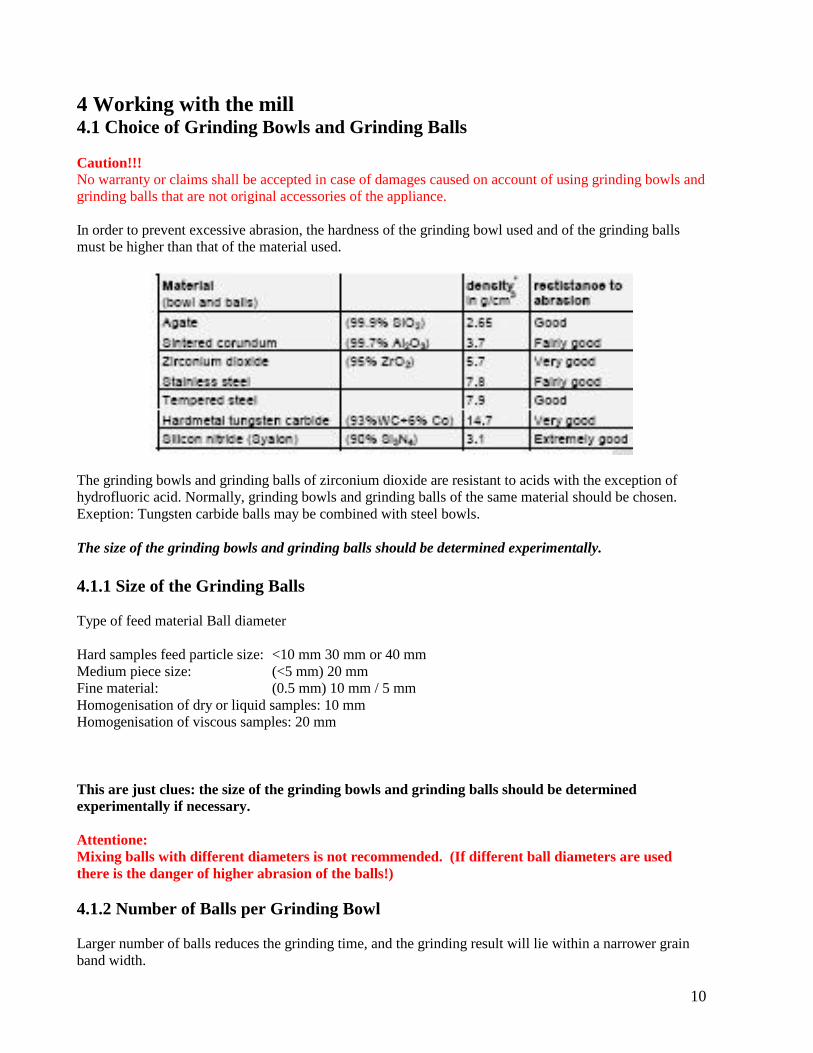
This are just clues: the size of the grinding bowls and grinding balls should be determined experimentally if necessary. Attentione: Mixing balls with different diameters is not recommended. (If different ball diameters are used there is the danger of higher abrasion of the balls!) 4.1.2 Number of Balls per Grinding Bowl Larger number of balls reduces the grinding time, and the grinding result will lie within a narrower grain band width.
11
These values are just clues: the number of balls should be determined experimentally if necessary. While using balls with diameter Ø 30 and Ø 40 mm please look after the unit permanently, because the vibrations could cause the machine to move around.
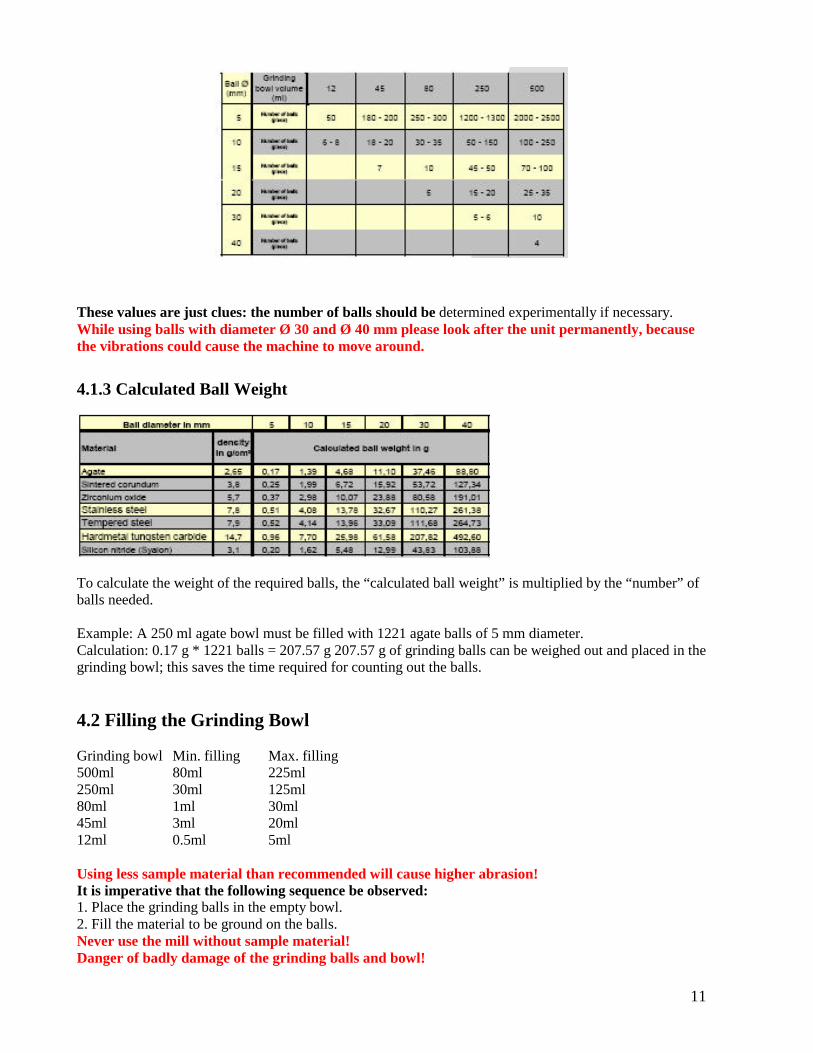
4.1.3 Calculated Ball Weight
To calculate the weight of the required balls, the “calculated ball weight” is multiplied by the “number” of balls needed. Example: A 250 ml agate bowl must be filled with 1221 agate balls of 5 mm diameter. Calculation: 0.17 g * 1221 balls = 207.57 g 207.57 g of grinding balls can be weighed out and placed in the grinding bowl; this saves the time required for counting out the balls. 4.2 Filling the Grinding Bowl Grinding bowl Min. filling Max. filling 500ml 80ml 225ml 250ml 30ml 125ml 80ml 1ml 30ml 45ml 3ml 20ml 12ml 0.5ml 5ml Using less sample material than recommended will cause higher abrasion! It is imperative that the following sequence be observed: 1. Place the grinding balls in the empty bowl. 2. Fill the material to be ground on the balls. Never use the mill without sample material! Danger of badly damage of the grinding balls and bowl!
12
4.3 Influencing Quantities During Grinding Running time (grinding time) A longer grinding time will increase the fine fraction. Speed A higher speed will reduce the grinding time and increase the fine fraction. Number and size of the balls Pregrinding coarse, hard material with large balls: small fine fraction. Use of many small balls will increase the fine fraction if the running time is increased. Mass of the balls (type of material) A higher mass (density) of the grinding balls will accelerate the grinding. (See the table in section 4.1 Choice of Grinding Bowls and Grinding Balls.) 4.3.1 Dry Grinding Below a particle size of approx. 20 µm, surface forces predominate and the material will start to "stick". Further dry grinding can be achieved if surface-active substances are added to the material. Examples (maximum quantity to be added in % by mass) • Stearic acid 2-3% • Aerosil (microdispersed silicic acid) 0.5-2% • Silica sand ~ 2% • Glass powder ~ 2% 4.3.2 Wet Grinding (Grinding in Suspension) When grinding in suspension, you can add auxiliary substances in liquid form with a high boiling point and low vapour pressure. Flammable liquids such as ketones and petroleum spirits with a boiling point <120°C should not be used. 4.4 Clamping and unclamping the grinding bowls The following tests should be performed before the grinding bowls are clamped in the machine before each grinding operation: • Check the rubber disc in the bowl holder for damage. Replace rubber discs that are flattened (rough side up!). • The flat Teflon seal (for sealing between the lid and the bowl) must not be damaged or dirty. Replace severely deformed flat Teflon seals. • The surfaces of the lid and of the bowl on which the flat Teflon seal rests must be clean. 4.4.1 Clamping 500ml, 250ml and 80ml grinding bowl Attention!!! • Either use the 80 ml with the reducing piece fitted (order no. 90.1120.09) or • use two 80 ml grinding bowls, one on top of the other. 1. Put the grinding bowl into the holding device 2. Then put the clamping plate 1 on the lid of the grinding bowl. 3. Insert the delivered blue hexagon head cap screws (2) in the corresponding bores. • Attention!!! Do not twist screw heads! • Caution!!!

13
If the clamping plate is not clamped tightly enough, the sample can push out of the grinding bowl or in the worst scenarios, the grinding bowl may come off the bracing and this may damage the appliance. Torrey Hills Technologies, LLC shall not assume liability for improper handling. • After a few minutes of grinding, and in the cooling phases, check that the clamping is secure. 4.4.2 Clamping 45ml and 25ml grinding bowl 1. Put the grinding bowl into the holding device. 2. Then put the clamping plate (1) on the lid of the grinding bowl. 3. Insert the delivered allan screws (2) in the corresponding bores. 4. Turn the 3 socket screws evenly by hand until all the screw heads lie on the clamping plate. 5. Then tighten the 3 socket screws evenly with the socket screw wrench (3). • Attention!!! Do not twist screw heads! • Caution!!! If the clamping plate is not clamped tightly enough, the sample can push out of the grinding bowl or in the worst scenarios, the grinding bowl may come off the bracing and this may damage the appliance. • After a few minutes of grinding, and in the cooling phases, check that the clamping is secure. 4.4.3 Unclamping The unclamping is made in reverse order. 4.4.4 Clamping with Additional lock-system Grinding bowls can be filled and then closed with the help of the Additional Clamping System in a box with protective gas, without beeing clamped in the mill. It’s also possible to clamp the gas lids with the Additional Clamping System. So they can be filled with protective gas out of the mill. The clamping and unclamping takes place as described in section 4.4 Clamping and unclamping the grinding bowls. Hexagon screws with red shaft are nevertheless used Attention!! After tightening the clamping plate, check whether the socket screws of the additional clamping system is firmly fixed and if required, tighten up the socket screw. 4.5 Mass Balance Mill symmetrical charging! For weight balancing, always clamp a grinding bowl of the same weight with a cover and sealing ring in the opposite pot mounting. 4.6 Grinding Time In accordance with the application, the grinding time should be adapted to the heating of the bowl. There is a max. temperature of 150°C allowed for the grinding bowls. The grinding time is determined by this temperature. The grinding time wich does not exceed this temperature depends on the sample material, the balls und the speeds. For this reason the grinding time has to be determined experimentally by the user.
14
clue In the case of grinding at high speeds and with large bowls, the grinding time should not exceed 1 hour. Then allow to cool for 0.5 to 1 hour. Pay attention to the heating of the material; in the case of extended running times, if necessary set a break time for cooling. To reduce the grinding time, choose grinding balls of a higher density. Before switching on again after a cooling phase, check that the clamping is secure. In the case of operation for mixing and homogenisation at low speeds, the mill may run for several hours without harm being done. The machine cannot be operated with an external timer 4.7 Control panel • Switch on the main switch on the right side of the device • The LED display on the control panel will come on. 4.7.2 Start of Mill • After everything has been set up as described in section 4 on Working with the mill, close the hood. • Press the START button on the control panel. The hood will be locked and the mill will run. Only the rotational speeds stored to this program place are executed. 4.7.3 Stop Milling When the stop button O is pressed, the mill brakes the main disk and the planets until they stop. This process may take several seconds. Also see the section 4.8 Performing a Grinding Operation. 4.8 Performing a Grinding Operation • After everything has been set up as described in section 4 on Working with the mill, close the hood. • Press the START button on the control panel. • The hood will be locked and the mill will run. • The mill will rotate at the speed set (set speed) – if the load is too great, e.g. if the grinding bowl is too large, the machine will be run at a lower speed (actual speed) so as to prevent overloading. Overloading When the mill is overloaded, the rotational speed is reduced. Miscellaneous • During operation, the hood remains locked even during pauses and the fan cools the interior. Interruption of a grinding • After a program is selected and the start button on the mill is pressed, an internal timer starts to run. This makes it possible to check the mill progress by pressing the stop button on the device, checking the grinding and pressing the start button on the device again to continue the grinding without losing any time. If you stop the mill during the pause, the timer will also be continued after pressing the start button. • Pressing the start button of the PC program transfers all total times. No remaining times or pause times are included. The grinding begins again from the start.
15
• After every hour, the remaining times are saved as a precaution. This means that if milling is performed for a long time and the power supply is interrupted, the remaining time can be made up (max. error <1 hour). Switching Off • Press STOP on the control panel. • Once the drive has come to a stop, the hood is unlocked and can be opened. It may take some time before the drive is braked, depending on the rotational speed of the main disk. • Switch off the main switch (right side of device). 4.9 Cooling the Grinding Bowls • with the hood open or • at the programmed break times with the hood closed (locked) and the ventilator running.
16
5 Cleaning 5.1 Grinding accessories • Clean the grinding bowl and grinding balls after each use: e.g. brush them clean under running water with usual cleaning agents. • Fill the grinding bowl with grinding balls and some sand and water half-full and run the planetary motormill for 2 to 3 minutes (with the grinding bowl correctly clamped in position). • Cleaning in the ultrasonic bath is permissible. • When sterilising the grinding bowl and grinding balls in the drying chamber, heat only to 250°C. Do not heat agate grinding parts above 110°C. Cool them slowly and carefully. Agate parts must never be heated in the microwave (they heat up too rapidly). They must never be subjected to temperature shocks, such shocks may destroy the parts They burst apart explosively. 5.2 Mill • When switched off, the mill can be wiped down with a damp cloth. Do not allow any liquids to seep into the machine. 6 Maintenance Before commencing maintenance work, disconnect the mains plug and secure the machine against being switched on again unintentionally. When maintenance work is being performed, this should be indicated with a warning sign. Regular cleaning is the most important part of maintenance.
7 Warranty Warranty: Torrey Hills Technologies, LLC warrants all of its products to be free of defects in Material and Workmanship for a period of one year from date of installation by end user. Torrey Hills Technologies, LLC will at its option, replace or repair parts found defective and return equipment or parts to the purchaser. The above stated warranty does not apply to products that have failed due to improper installation, misuse, alteration, unauthorized repair or modification. The purchaser is responsible for transportation costs of the equipment to and from San Diego, CA for warranty replacement or repair. All implied warranties, if any, are limited in duration to the above stated one year warranty period.