Embed Size (px)
Citation preview

NIR Rice Composition AnalyzerAN-920
Operating ManualThank you for purchasing this product.
Please read the operating manual carefully and use this product properly.


1. FOR SAFETY MEASUREMENT ..................................................................... 4
2. FEATURES AND PART NAMES .................................................................... 6
2-1. Features .................................................................................................. 6
2-2. Parts of Main Unit ................................................................................... 6
2-3. Accessories ............................................................................................ 7
3. SPECIFICATIONS ........................................................................................... 8
4. DESCRIPTION OF OPERATION KEYS ......................................................... 9
5. EASY OPERATION GUIDE .......................................................................... 10
6. ADJUSTMENT .............................................................................................. 12
7. SETUP ........................................................................................................... 13
8. OTHERS........................................................................................................ 16
8-1. Printer Output ....................................................................................... 16
8-2. Replacing Fuses ................................................................................... 16
8-3. Error Display ......................................................................................... 16
<Appendix> To use the unit in the best accuracy ........................................ 17
CONTENTS

4
Improper use of the composition analyser in violation of the following safety notes may result in death, injury or damage to property due to fire, etc. While the safety of the product has been given considerable attention, read the precautions in the operating manual and use the instrument properly.
■ Observe the safety precautionsRead the precautions noted in the operating manual.The safety measure of the unit may be impaired if instructions are ignored during use.
■ Do not use if brokenIf you suspect a problem or malfunction in the unit, contact the vendor, or the Kett Tokyo office sales division, a local branch or sales office.
■ Meaning of warning symbolsIn order to prevent damage resulting from erroneously operating the equipment, the following symbols are indicat-ed in the operating manual and on the product.The following describes their meanings.
WARNING Failure to observe these items may lead to death or injury to the user.
CAUTION Failure to observe these items may lead to injury to the user or damage to property.
NOTE Items which the user should be aware of in order to safely use the unit.
Fire Hazard
Caution Symbols Prohibition Symbols Symbols Requiring User Action
Burn Hazard Prohibit Required Action
GroundRemove Power Plug
Do Not Disassemble
Do Not Expose to
Water
Electric Shock
• Do not use the unit in a place where explosive, inflammable gas or liquid substance exists. Otherwise, it may cause explosion, fire, or electric shock, etc.
• Do not use other than rated power supply voltage. If overvoltage is applied, the unit will be heated and it may cause malfunction, fire, or electric shock.
• Make sure to ground the power cable. With the 2P outlet, use a conversion plug to ground. In the case of 3P, it will be automatically grounded. If not grounded, it may cause fire or electric shock.
• If any of the cables including the power cable is damaged (broken), do not use it. Otherwise, it may cause fire or electric shock, etc. For purchasing the spare parts, contact the vendor, or
the Kett Tokyo office sales division, a local branch or sales office.
• If you see fire coming from the unit or notice smoke, an odd smell, or any other sign of abnormal functioning, turn off the power and remove the power plug from the outlet, or take whatever measures that would be appropriate to deal with the problem. Otherwise, it may cause fire or electric shock, etc.
• Do not attempt to disassemble or modify the unit. Otherwise, it may cause malfunction, fire, or electric shock, etc. If you believe the unit may be malfunc-
tioning, contact the vendor, or the Kett Tokyo office sales division, a local branch or sales office.
• Do not allow the unit to come in contact with water. This unit is not waterproof. Do not allow water or other liquids to get into the unit's enclosure as this may
lead to electric shock or malfunction.
1. FOR SAFETY MEASUREMENT
WARNINGFire Hazard Electric Shock

5
Operating environment for safety useThis product is designed to be used safely in the following conditions.Make sure of the operating environment before use.
• Indoor use• Altitude: up to 2000m• Temperature: 10 to 200°C• Relative humidity: environmental temperature up to 31°C, max. 80%; at 35°C, max. 65%• Power supply voltage fluctuation: wthin 10% of nominal voltage• Transient overvoltage: within the Overvoltage Category II (conforms to IEC60664-1:2007)• Pollution Degree 2 (conforms to IEC60664-1:2007)
Installation and storage• Avoid using or storing the unit in a location where it would be exposed to excessively high or low temperatures,
high levels of humidity, direct sunlight, electromagnetic interference, corrosive gases, or large amounts of dust.• Place the unit on a flat and stable surface where it will not be subjected to significant vibration during use.• When moving the unit, never tilt it any more than necessary.• Take care never to drop or bump the unit or otherwise allow it to be subjected to strong shocks or the
application of excessive force.• When removing the power cable or other cables, never pull on the cord or cable and instead hold the plug or
cable connector.• Do not install the unit in a place where handling the power cable and connectors or turning the power switch is
made difficult.• When the unit is not to be used over an extended period of time, turn off the power and remove the power plug
from the outlet.• Use the supplied power cable and make sure to connect to the protective earth.
Cleaning• To clean the surface of the unit, wipe off using a soft dry cloth.• Do not use abrasive detergent such as paint thinner or benzene when cleaning this product.• The grain of rice fallen inside the measurement chamber will exit directly onto the base surface. Collect the
fallen grains regularly.
• Do not damage, heat, or place heavy object on the power cable or connectors. Otherwise, it may cause fire or electric shock, etc.
• When connecting with other devices, first, turn off the power of each unit.
• Do not connect/disconnect the power plug with wet hands. Otherwise, it may cause an electric shock, etc.
• In the maintenance work, remove the plug from the outlet for safety. Otherwise, it may cause an electric shock.
• To disconnect the plug or connector, make sure to hold the plug or connector, not to pull on the cable.
CAUTIONBurn Hazard Electric Shock

6
2-1. FeaturesThis unit is an transmission type grain analyser using the near-infrared spectroscopy technology. Due to the whole grain measuring method, the grain will not be grounded, and it will allow simple and quick measurement. As the light source, a tungsten lamp is used. High measurement accuracy can be achieved by adopting a method in which the transmitted light from the sample is detected after being diffracted into 600 to 1100 nm by a spectroscope sensor.
2-2. Parts of Main Unit
2. FEATURES AND PART NAMES
<Front Panel>
<Rear panel>
Ventilation openings
Operation display
Measurement chamber
Power switch
Fuse holder
USB portRS-232C port
TCP/IP port
Power supply connector
Printer port
Cover

7
2-3. Accessories
Spare fuse
Sampling cup
Power cable
Sample case ×2
Operating manual
Storage container
Standard sample
Storage container
Standard sample (brown rice/milled rice) ×1 each(Stored in the storage container)

8
3. SPECIFICATIONS
Measurement method Near-infrared transmittance
Light source Tungsten lamp (bulb life: 20,000 hours)
Applications Short brown rice, Short milled rice
Measurement rangeProtein: 4 to 10%Moisture: 10 to 20%Amylose (ref.): 15 to 25%
Sample quantity Approx. 60 mL
Number of calibration curve memories 4 components × 8 channels
Measured Time Approx. 40 sec
Operating temperature range 10 to 35°C
Display format 5.7" Color LCD press panel
I/O connector Printer output, RS-232C, USB, TCP/IP
Items to be displayed Name of calibration curve, values of protein, moisture, amylose (ref.), and Q.E.V.
Power supply 100V - 240V AC (50/60 Hz)
Power consumption 40W
Dimensions and weight 230 (W)×400 (D)×250 (H) mm, 8.5 kg
AccessoriesPower cable, Fuse, Sample case ×2, Sampling cup,Standard sample (brown rice/milled rice)×1 each, storage container (standard sample), operating manual
OptionsA set of printer (Printer VZ-800, printer cable VZC-54, Printer papers, AC adapter, AC cord), RS-232C cable VZC-54, USB cable VZC-61, Data logger software NDL-02
* A backup battery is built-in so that the memorised calibration curves are kept even after turning off the power. For the battery replacement, contact Kett.
* This unit uses precision spectroscope. Therefore, it should not be used in a high temperature environment. When performing the measurement, make sure that the environmental tempera-ture is below 35°C. If the temperature is over 50°C, the precision spectroscope may be dam-aged. Also, when storing the unit, keep it under the temperature of 50°C.

9
4. DESCRIPTION OF OPERATION KEYS
<Initial screen>
[Setup] key
[Adjustment] key
[+] keyIncrements the value.
[-] keyDecrements the value.
[Cancel] keyCancels the set value.
[Enter] keyEnters the value.
7. SETUP⇒ P.13, 14, 15
Display, date & time, communica-tion, light intensity reset, and user switching can be set.
6. ADJUSTMENT⇒ P.12
Adjustments are required before starting the measurement.There are two methods; automatic adjustment and manual adjustment.
5. EASY OPERATION GUIDE⇒ P.10, 11
The operating instructions of Power on→Measurement→Result→Aver-age are described.
[MESURE] key

10
Measurement methodRemarks
About adjustment
How to fill the sample grain
(4) The last selected sample name is highlighted. Press the sample name in the list to measure.
(5) The selected sample is set and the initial screen will be restored. Press the [MEASURE] key.
(6) Empty the measurement chamber.
5. EASY OPERATION GUIDE
(7) Close the cover with the empty measurement chamber. Then, press the [NEXT] key.
(8) The measurement is in progress.* Never open the cover.
* Install the unit at least 10 cm away from the walls so that the ventilation openings are not blocked.
* Turn on the power approximately one hour before starting measurement and warm up the unit.
* To measure the temperature of a sample, a thermosensor is inserted into the sample case through the hole provided at the bottom during meas-urement. To obtain better accuracy, it is recommended to keep the tempera-ture of the sample and the environ-mental temperature close.
* Clean the sample case. If the window of the sample case is not clean or significantly scratched, adjustment or measurement may not be performed correctly. If significantly scratched, replace the the case.
(3) Press the sample name.
(1) Connect the main unit and the power cable.
* Make sure to ground the power cable.
If grains are not filled tightly in the sample case, a measurement error may occur. Fill the grains tightly in the sam-ple case as much as possible.
Tips
(1) Fill the grain so that the window of the sample case is covered.
(2) Tap the bottom of the case hard approximately 10 times so that grains are tightly filled. If rooms are made, fill more grain. Repeat this tapping and filling as required.
To use the unit properly, it is necessary to set up the unit either automatically or manually. (⇒Refer to P.12.)
(2) Turn on the power switch provid-ed in the rear side of the main unit.
Power supply connectorPower switch
Power cable
Ground
Outlet

11
Measurement method Measurement results
Average display
5. EASY OPERATION GUIDE
Display Cause
+ + .+ The upper limit of the displayable range is exceeded.
--.- The lower limit of the displayable range is exceeded.
**.* Conversion failed.
(9) Incere the sample case to the measurement chamber.
(14) The measurement is in progress.(10) Close the cover with the meas-urement chamber set. Then, press the [NEXT] key.
(11) The measurement is in progress.
* Never open the cover.
(12) Take out the sample case, and reverse the case, then set it again into the chamber.
(13) Firmly close the cover, and then press the [NEXT] key.
* Never open the cover.
(15) The measurement result will be displayed.
* Pressing the [MEASURE] key in this screen will enable a new measurement.
* Pressing the [Home ] key will restore the initial screen.
The average of the measured times will be displayed.
When the measurement is repeated, the count number increments. (1 to 9th at maximum.)Press the [AVG] key.
(16) The measurement is complete. Take out the sample case.
The following is the display example of meas-urement results within the displayable range.
* Pressing the [MEASURE] key in this screen will enable a new measurement.
* Pressing the [Home ] key will restore the initial screen.
* After the average is displayed, the num-ber of measurement times will be reset and the next measurement will be count-ed as 1st.
12
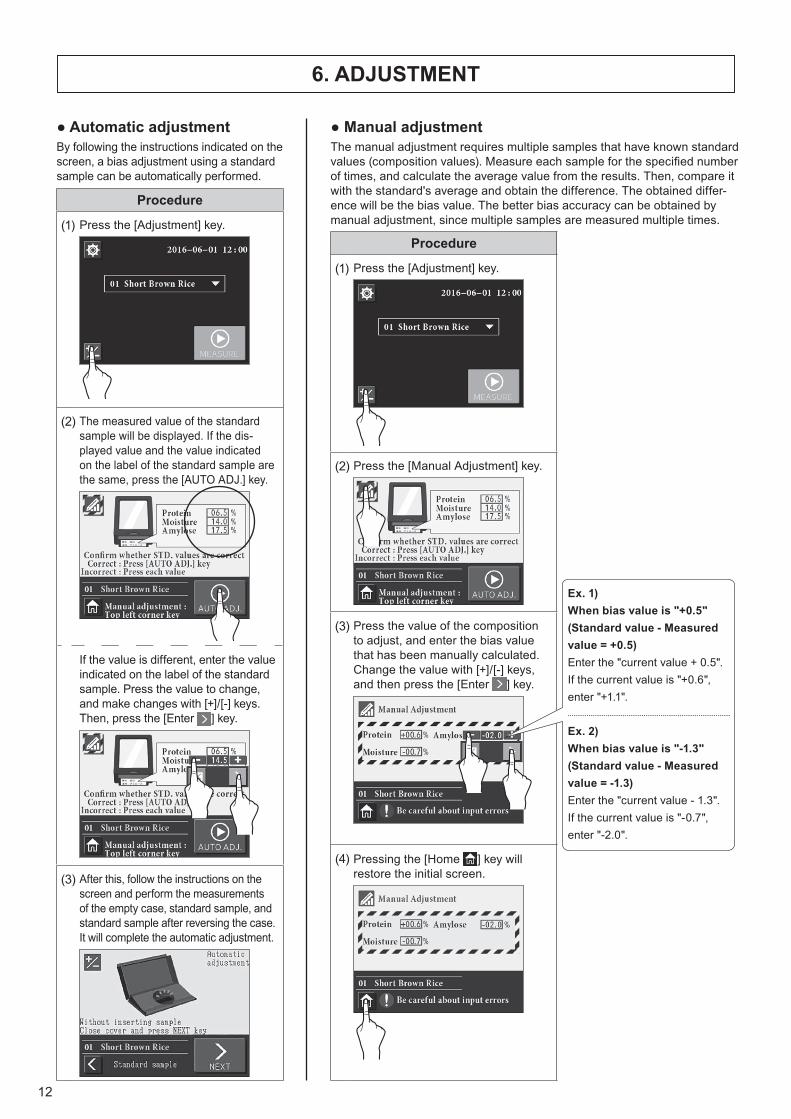
6. ADJUSTMENT
● Manual adjustmentThe manual adjustment requires multiple samples that have known standard values (composition values). Measure each sample for the specified number of times, and calculate the average value from the results. Then, compare it with the standard's average and obtain the difference. The obtained differ-ence will be the bias value. The better bias accuracy can be obtained by manual adjustment, since multiple samples are measured multiple times.
● Automatic adjustmentBy following the instructions indicated on the screen, a bias adjustment using a standard sample can be automatically performed.
Procedure
(1) Press the [Adjustment] key.
(2) Press the [Manual Adjustment] key.
(3) Press the value of the composition to adjust, and enter the bias value that has been manually calculated. Change the value with [+]/[-] keys, and then press the [Enter ] key.
(4) Pressing the [Home ] key will restore the initial screen.
Procedure
(1) Press the [Adjustment] key.
(2) The measured value of the standard sample will be displayed. If the dis-played value and the value indicated on the label of the standard sample are the same, press the [AUTO ADJ.] key.
If the value is different, enter the value indicated on the label of the standard sample. Press the value to change, and make changes with [+]/[-] keys. Then, press the [Enter ] key.
(3) After this, follow the instructions on the screen and perform the measurements of the empty case, standard sample, and standard sample after reversing the case. It will complete the automatic adjustment.
Ex. 1)When bias value is "+0.5"(Standard value - Measured value = +0.5)Enter the "current value + 0.5".If the current value is "+0.6", enter "+1.1".
Ex. 2)When bias value is "-1.3"(Standard value - Measured value = -1.3)Enter the "current value - 1.3".If the current value is "-0.7", enter "-2.0".
13
● Date&Time setting [DATE&TIME]
Procedure (1) Press the [Setup] key.
(2) Press the [DATE&TIME] key.
(3) Set the date by pressing the numbers.
(4) Change the value with [+]/[-] keys, and then press the [Enter ] key.
● Display setting [DISPLAY]
Procedure (1) Press the [Setup] key.
(2) Press the [DISPLAY] key.
(3) For each item, press to display, and to hide.
(4) To set the display range, press the value. Change the value with [+]/[-] keys, and press the [Enter ] key.
* When "Protein CM" is set to be displayed with , the setting of "@Moisture" will be enabled.
* If not changing, press the [Cancel ] key.
7. SETUP
<Reference 1> Display of protein's constant moisture
basis (CM) ⇒P.17<Reference 2> Display of Qual i ty Evaluat ion Value
(Q.E.V.)⇒P.17
14
Procedure
(6) Press the [Setup] key.
(7) Press the [RESET] key.
(8) Close the cover with the empty measurement chamber. Then, press the [RESET] key.
The measurement is in progress.* Never open the cover.
(9) When the measurements are com-pleted, the initial light intensity value will be registered automatically, and the initial screen will be restored.
Procedure
(1) Turn off the power and disconnect the Power cable.
(2) Remove the fixing screws (2 pcs.) from the rear side of the main unit, and remove the cover. Disconnect the lamp connector.
(3) Remove the lamp fixing screws (2 pcs.) and replace the lamp.
* Use caution so that the screws will not be dropped inside the main unit.
(4) Install the new lamp at a proper position. Fix the lamp with fixing screws, and connect the lamp connector. Attach the rear cover of main unit.
(5) Connect the Power cable, and turn on the power.
● Light intensity resetting [RESET]When the tungsten lamp is blown, replace the lamp in the following procedure.
* Make sure to purchase the new lamp from Kett. Do not use other lamp than specified one.* While the power is turned on, the lamp temperature rises and a burn may be
caused. Before replacing the lamp, make sure that at least 1 hour is passed after turning off the power and the lamp is sufficiently cooled off.
● Communication setting [COMM.]
The measurement command can be sent from PC, or the measurement data can be sent from the main unit.
Procedure
(1) Make sure that the power of both AN-920 and PC are turned off.
(2) After connecting AN-920 and PC with a cable, turn on the power of both units.● RS-232C portRS-232C cable: VZC-54● USB portUSB cable: VZC-61● TCP/IP portPrepare an appropriate LAN cable yourself.
* To use other than TCP/IP port, an optional data logger software "NDL-02" is required.
(3) Press the [Setup] key.
(4) Press the [COMM.] key.
(5) Select a communication port.
* When selecting TCP/IP, entering the IP address is required. The meas-urement can be performed by ac-cessing the set IP address via a PC browser.

15
Procedure
(1) Press the [Setup] key.
(2) Press the [USER] key.
(3) Press the [Password change] key.
(4) Enter the current password. Enter the password (4 digits), and then press the [Enter ] key. The new passcord will be registered.
* At the time of shipment, "0000" is set.
Procedure
(1) Perform step (1) and (2) of the "(1) Changing the passcord".
(2) Press the [Add user] key.
(3) Enter the ID (2 digits) and pass-cord (4 digits), and then press the [Enter ] key. The new user will be registered.
* If the ID already exists, it will overwrite the existing one.
(1) Changing the password* Available only for Administrator
(2) Adding a user* Available only for Administrator
Measurement Calibration curve selection
Bias adjustment
Display setting
Date&Time setting
Communica-tion setting
Light intensity resetting User addition
Administrator ◯ ◯ ◯ ◯ ◯ ◯ ◯ ◯User ◯ ◯ ◯ ◯ ◯ ◯ ◯ -Guest ◯ - - - - - - -
(3) Switching the user
Procedure
(1) Perform step (1) and (2) of the "(1) Changing the passcord".
(2) Select the type of the user.
(3) Enter the ID (2 digits) and pass-cord (4 digits), and then press the [Enter ] key. The user will be switched.
• When Administrator is selected, ID is fixed with "01".
• When Guest is selected, ID and password are not required.
* To switch to Administrator or User from Guest, the ID and passcord will be required.
● User switching [USER]This unit has a different levels of operation depending on the user types (Administrator/User/Guest).At the time of shipment, "Administrator" is set in which all operations are enabled.Switch the user as required.

16
8. OTHERS
When replacing the fuse, use the safety standard compliant product.
(1) Turn off the power and disconnect the Power cable.
(2) Remove the fuse holder provided in the rear side of the main unit.
(3) Remove the fuses from the fuse holder and check to see if any are burned out.
(4) If there is a burned-out fuse, replace it with new one.
(5) Return the fuse holder to its original position in the main unit.
* Ask for repair, if a fuse blows out again after being replaced, since there may be a problem with the unit.
8-2. Replacing Fuses
8-3. Error Display
8-1 Printer Output<Printout example>
Error display
Time out(A warning sound goes off at 20 seconds, and an error occurs at 30 seconds.)
Stepper Motor error
Incorrect calibration measurement
Sample is too (dark) bright
Instrument temperature is too (low) high
Sample temperature is too (low) high
A-D Converter Error
Replace lamp
The following messages may be displayed during initialization at the time of power-on or during measurement. In each case, follow the instruction to be displayed.
The measurement data can be output by connecting the printer VZ-800 using the printer cable VZC-54 (designated product).
(1) Make sure that the power of AN-920 and the printer are turned off.
(2) Connect the printer cable VZC-54 to the printer output port provided on the rear side of the main unit of AN-920. Then, tighten the screw.
(3) Connect the printer cable VZC-54 to the input connector provided on the bottom of the printer, and tighten the screws.
(4) Turn on the power of AN-920 and the printer.
Safety standard compliant product
Rated voltage 250V
Rated current 3A or 3.15A
Fuse characteristics Fast actingNon time lag

17
<Reference 1>● Display of protein's constant moisture basis (CM)The protein value to be displayed with this unit indicates the percentage of constituent over a whole measuring object including moisture. It is useful, for example, when calculating the weight of protein contained in the meas-ured grain. However, when comparing the protein value in the multiple targets, there may be a case it is more convenient to assume that the targets have the fixed moisture value. The CM display of the protein value is based on this concept. The CM indicates the converted protein value assuming that the moisture value of the measurement targets is a certain given value ("@Moisture%" with AN-920). When the given moisture value is "0%", it is called "Dry Moisture basis" (DM). The conversion formula is as follows. To display correct "Protein CM", the calibration curves of "Protein" and "Moisture" and "@Moisture%" needs to be set properly.
Protein × (100-@Moisture%)Protein CM = 100 - Moisture
<Appendix> To use the unit in the best accuracy
Regularly check the standard samples in order to minimize the affects to the measurement by the changes that may occur in the time course. In addition, the standard sample should be checked when the measurement environment is changed, the operator is changed, after a power failure, and when the measured value seems not reliable.
■ Check using standard samples● What is standard sample?A standard sample is the sample whose standard values have been calibrated before shipment.Each standard value is indicated on the top of the standard sample case.
● Storage• Store the sample in the cool dark place (5 to 10°C) such as in the refrigerator.• Never store the sample in the freezer. The sample will be frozen.• Other than the appropriate storage, it may cause a change to the standard value.• The validation period indicated on the standard sample is applicable as long as the sample is
appropriately stored. Use only the sample within the validation period.
● How to check using standard samples(1) Take out the sample from the cool dark place before a half day before the measurement.(2) Place the AN-920 main unit and the standard sample in a same place to have them thermally
stabilized.(3) Measure the standard sample for three to five times, and calculate the average value.(4) Compare the measured composition value with the standard value of each composition.
Example: Reference Average of measurement values DifferenceStandard sample 16.0% 16.2% 0.2%
In this example, the difference is "0.2". Therefore, a bias adjustment is not necessary in the standard use. If the difference is over "0.2", repeat the above procedure and compare the values again. As a result, if the difference is over "0.2", a bias adjustment is required. Each composition has different limit value. We recommend the following an a reference. Define the limit value according to the operating environment.
<Reference 2> ● Display of Quality Evaluation Value
(Q.E.V.)
While "Protein CM" is not displayed, the Q.E.V. will be calculated from the measured protein value (not CM) and the moisture included value. When "@Moisture%" is set less than 10% and "Protein CM" is displayed, the Q.E.V. will be calculated from the measured protein value (not CM) and the moisture included value. When "@Moisture%" is set more than 10% and "Protein CM" is displayed, the Q.E.V. will be calculated replacing "Protein" with "Protein CM" and "Mois-ture" with "@Moisture%".
Composition Reference limit value
Protein 0.3%
Moisture content 0.2%
Amylose (ref.) 1.0%


Rev.1.00060078-02
Notes● Copying some or all of the contents of this user manual without prior written consent is strictly prohibited.● The contents of this user manual may be changed at any time in the future without any prior notice.● The appearance and/or representations of the products and parts depicted in this user manual may
not appear exactly as their actual counterparts, but this does not affect their operation or functionality. ● This user manual was intended to be written as clearly and accurately as possible. However, if you are
unclear about anything in this user manual or notice any missing information, please contact us directly.● We cannot be held responsible for any actions or effects resulting from the execution of any opera-
tions outlined in this user manual.