Embed Size (px)
Citation preview
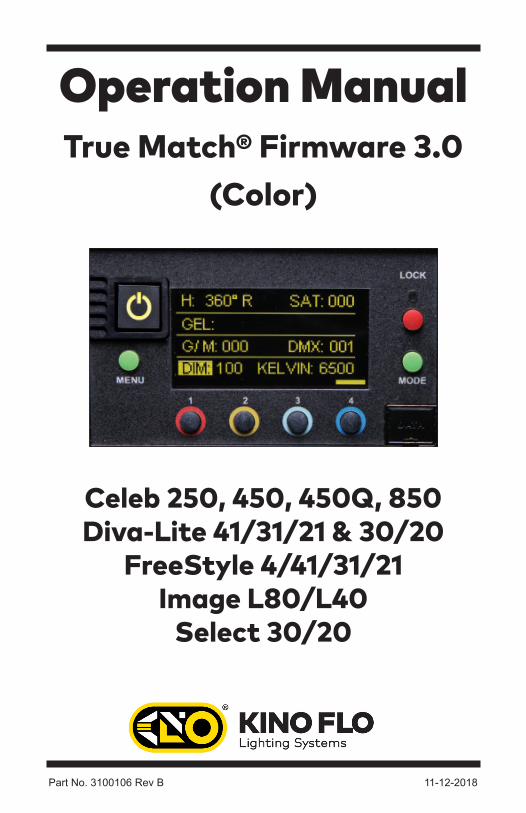
True Match® Firmware 3.0(Color)
Part No. 3100106 Rev B 11-12-2018
Celeb 250, 450, 450Q, 850Diva-Lite 41/31/21 & 30/20
FreeStyle 4/41/31/21 Image L80/L40
Select 30/20
Operation Manual

2
True Match® Firmware
This operation manual is for the following Kino Flo LED products using True Match® Firmware 3.0. Although the Customer interface is the same on all models listed, there are component differences. For this reason, it is very important that the correct Firmware is loaded to the corresponding model.
The Celeb products use the corresponding True Match® Firmware 3.0 CEL2, CEL4 or CEL8:
Celeb 250 = Version 3.0 CEL2Celeb 450/450Q = Version 3.0 CEL4 Celeb 850 = Version 3.0 CEL8
* Firmware loaded on FreeStyle or Select LED controller.
The following products use True Match® Firmware 3.0 DFS:
Diva-Lite 41/31/21 LED = Version 3.0 DFS Diva-Lite 30/20 = Version 3.0 DFSFreeStyle 4/41/31/21 LED = Version 3.0 DFS *
Image L80/L40 LED = Version 3.0 DFS Select 20/30 LED = Version 3.0 DFS *
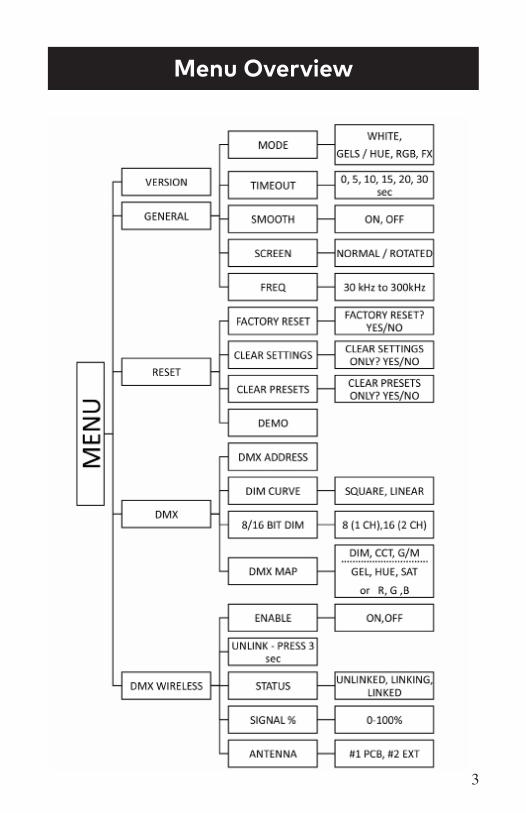
Menu Overview
3
4
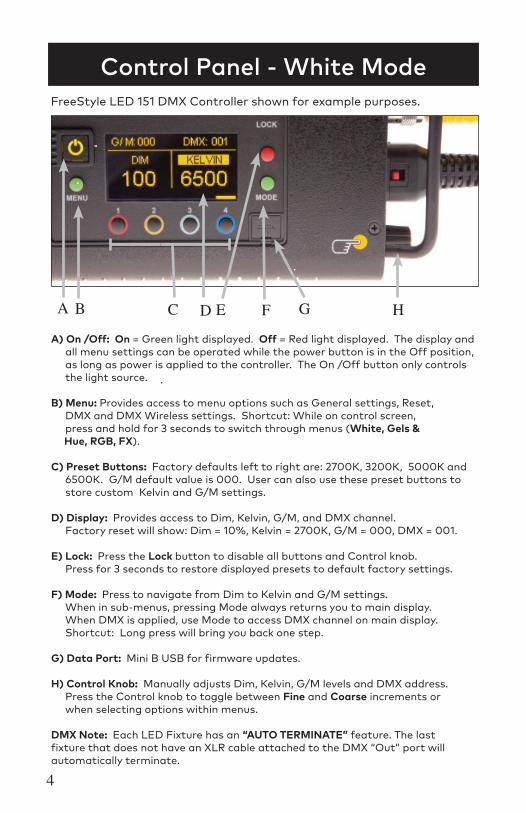
A) On /Off: On = Green light displayed. Off = Red light displayed. The display and all menu settings can be operated while the power button is in the Off position, as long as power is applied to the controller. The On /Off button only controls the light source.
B) Menu: Provides access to menu options such as General settings, Reset, DMX and DMX Wireless settings. Shortcut: While on control screen, press and hold for 3 seconds to switch through menus (White, Gels & Hue, RGB, FX).
C) Preset Buttons: Factory defaults left to right are: 2700K, 3200K, 5000K and 6500K. G/M default value is 000. User can also use these preset buttons to store custom Kelvin and G/M settings.
D) Display: Provides access to Dim, Kelvin, G/M, and DMX channel. Factory reset will show: Dim = 10%, Kelvin = 2700K, G/M = 000, DMX = 001.
E) Lock: Press the Lock button to disable all buttons and Control knob. Press for 3 seconds to restore displayed presets to default factory settings.
F) Mode: Press to navigate from Dim to Kelvin and G/M settings. When in sub-menus, pressing Mode always returns you to main display. When DMX is applied, use Mode to access DMX channel on main display. Shortcut: Long press will bring you back one step.
G) Data Port: Mini B USB for firmware updates.
H) Control Knob: Manually adjusts Dim, Kelvin, G/M levels and DMX address. Press the Control knob to toggle between Fine and Coarse increments or when selecting options within menus.
DMX Note: Each LED Fixture has an “AUTO TERMINATE” feature. The last fixture that does not have an XLR cable attached to the DMX “Out” port will automatically terminate.
Control Panel - White Mode
A B C D E F G H
FreeStyle LED 151 DMX Controller shown for example purposes.
5
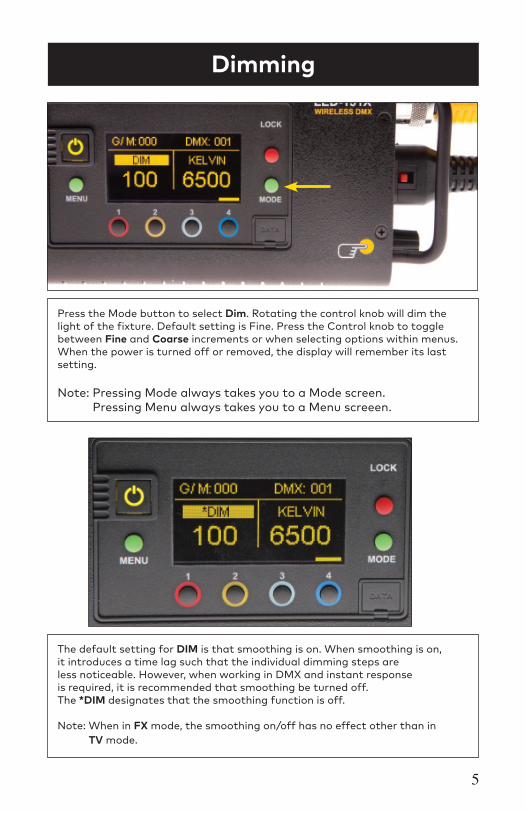
Press the Mode button to select Dim. Rotating the control knob will dim the light of the fixture. Default setting is Fine. Press the Control knob to toggle between Fine and Coarse increments or when selecting options within menus. When the power is turned off or removed, the display will remember its last setting.
Note: Pressing Mode always takes you to a Mode screen. Pressing Menu always takes you to a Menu screeen.
The default setting for DIM is that smoothing is on. When smoothing is on, it introduces a time lag such that the individual dimming steps are less noticeable. However, when working in DMX and instant response is required, it is recommended that smoothing be turned off. The *DIM designates that the smoothing function is off. Note: When in FX mode, the smoothing on/off has no effect other than in TV mode.
Dimming
6
Kelvin Selection/Presets
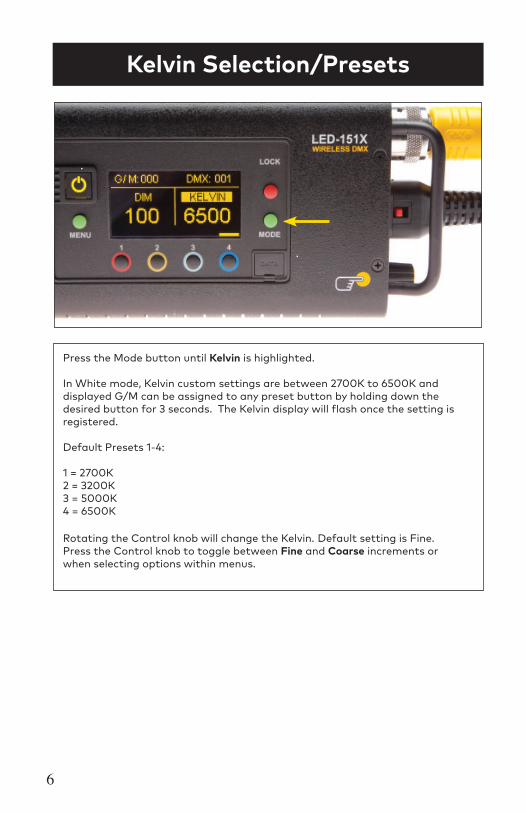
Press the Mode button until Kelvin is highlighted.
In White mode, Kelvin custom settings are between 2700K to 6500K anddisplayed G/M can be assigned to any preset button by holding down thedesired button for 3 seconds. The Kelvin display will flash once the setting is registered. Default Presets 1-4: 1 = 2700K 2 = 3200K 3 = 5000K 4 = 6500K
Rotating the Control knob will change the Kelvin. Default setting is Fine. Press the Control knob to toggle between Fine and Coarse increments or when selecting options within menus.
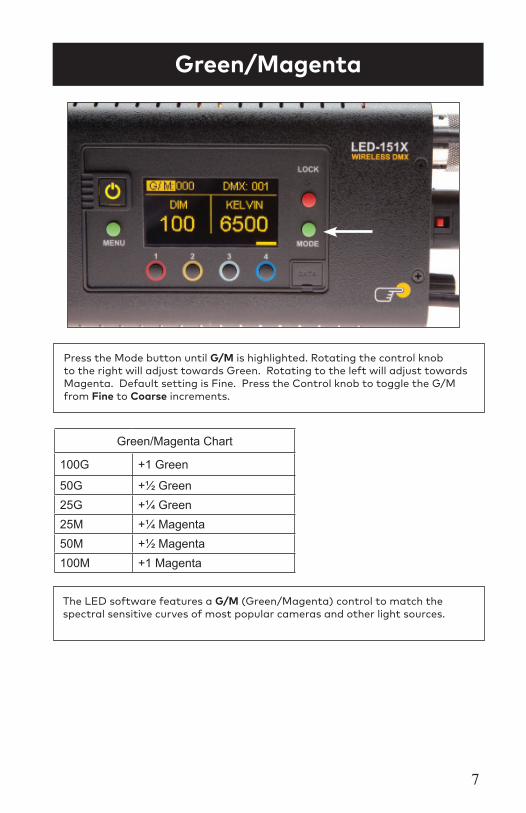
Press the Mode button until G/M is highlighted. Rotating the control knob to the right will adjust towards Green. Rotating to the left will adjust towards Magenta. Default setting is Fine. Press the Control knob to toggle the G/M from Fine to Coarse increments.
The LED software features a G/M (Green/Magenta) control to match the spectral sensitive curves of most popular cameras and other light sources.
Green/Magenta
Green/Magenta Chart
100G +1 Green
50G +½ Green 25G +¼ Green 25M +¼ Magenta50M +½ Magenta100M +1 Magenta
7
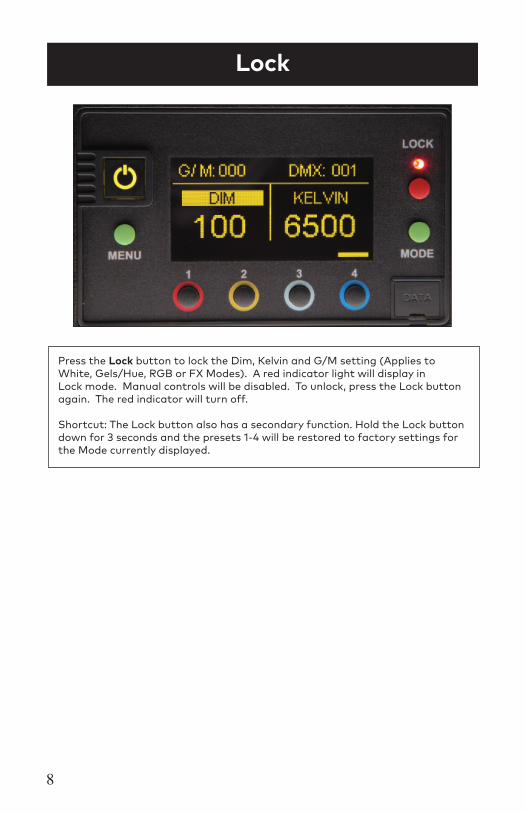
Press the Lock button to lock the Dim, Kelvin and G/M setting (Applies to White, Gels/Hue, RGB or FX Modes). A red indicator light will display in Lock mode. Manual controls will be disabled. To unlock, press the Lock button again. The red indicator will turn off.
Shortcut: The Lock button also has a secondary function. Hold the Lock button down for 3 seconds and the presets 1-4 will be restored to factory settings for the Mode currently displayed.
Lock
8
9
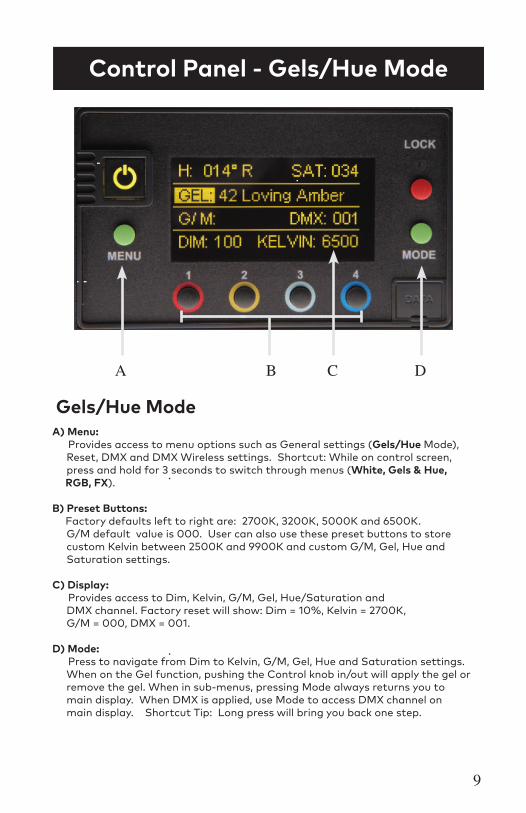
Control Panel - Gels/Hue Mode
A DCB
A) Menu: Provides access to menu options such as General settings (Gels/Hue Mode), Reset, DMX and DMX Wireless settings. Shortcut: While on control screen, press and hold for 3 seconds to switch through menus (White, Gels & Hue, RGB, FX).
B) Preset Buttons: Factory defaults left to right are: 2700K, 3200K, 5000K and 6500K. G/M default value is 000. User can also use these preset buttons to store custom Kelvin between 2500K and 9900K and custom G/M, Gel, Hue and Saturation settings.
C) Display: Provides access to Dim, Kelvin, G/M, Gel, Hue/Saturation and DMX channel. Factory reset will show: Dim = 10%, Kelvin = 2700K, G/M = 000, DMX = 001.
D) Mode: Press to navigate from Dim to Kelvin, G/M, Gel, Hue and Saturation settings. When on the Gel function, pushing the Control knob in/out will apply the gel or remove the gel. When in sub-menus, pressing Mode always returns you to main display. When DMX is applied, use Mode to access DMX channel on main display. Shortcut Tip: Long press will bring you back one step.
Gels/Hue Mode
Gel, Hue Angle & Saturation
10
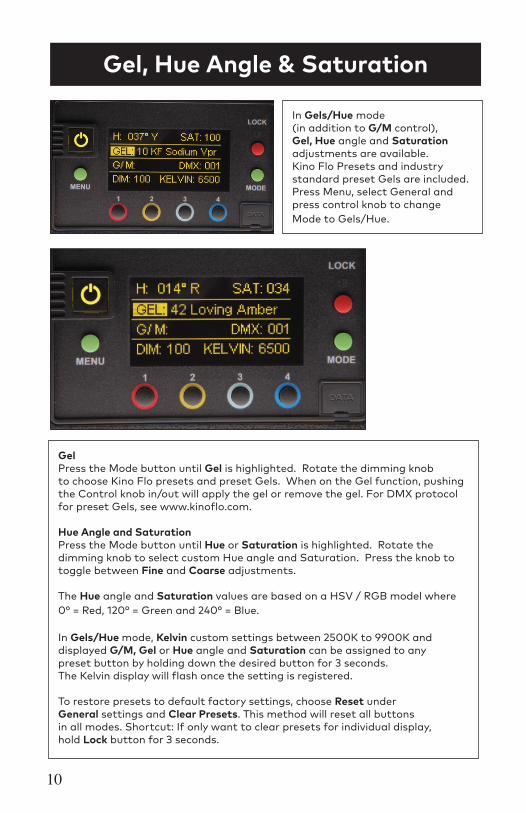
In Gels/Hue mode (in addition to G/M control), Gel, Hue angle and Saturation adjustments are available. Kino Flo Presets and industry standard preset Gels are included. Press Menu, select General and press control knob to change Mode to Gels/Hue.
GelPress the Mode button until Gel is highlighted. Rotate the dimming knob to choose Kino Flo presets and preset Gels. When on the Gel function, pushing the Control knob in/out will apply the gel or remove the gel. For DMX protocol for preset Gels, see www.kinoflo.com.
Hue Angle and SaturationPress the Mode button until Hue or Saturation is highlighted. Rotate the dimming knob to select custom Hue angle and Saturation. Press the knob to toggle between Fine and Coarse adjustments.
The Hue angle and Saturation values are based on a HSV / RGB model where 0° = Red, 120° = Green and 240° = Blue.
In Gels/Hue mode, Kelvin custom settings between 2500K to 9900K and displayed G/M, Gel or Hue angle and Saturation can be assigned to anypreset button by holding down the desired button for 3 seconds. The Kelvin display will flash once the setting is registered.
To restore presets to default factory settings, choose Reset under General settings and Clear Presets. This method will reset all buttons in all modes. Shortcut: If only want to clear presets for individual display, hold Lock button for 3 seconds.
11
A DCB
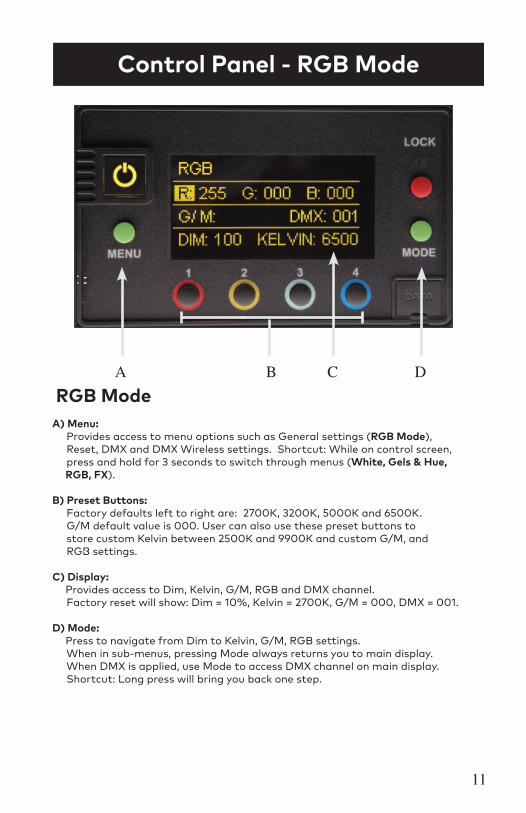
Control Panel - RGB Mode
A) Menu: Provides access to menu options such as General settings (RGB Mode), Reset, DMX and DMX Wireless settings. Shortcut: While on control screen, press and hold for 3 seconds to switch through menus (White, Gels & Hue, RGB, FX).
B) Preset Buttons: Factory defaults left to right are: 2700K, 3200K, 5000K and 6500K. G/M default value is 000. User can also use these preset buttons to store custom Kelvin between 2500K and 9900K and custom G/M, and RGB settings.
C) Display: Provides access to Dim, Kelvin, G/M, RGB and DMX channel. Factory reset will show: Dim = 10%, Kelvin = 2700K, G/M = 000, DMX = 001.
D) Mode: Press to navigate from Dim to Kelvin, G/M, RGB settings. When in sub-menus, pressing Mode always returns you to main display. When DMX is applied, use Mode to access DMX channel on main display. Shortcut: Long press will bring you back one step.
RGB Mode
12
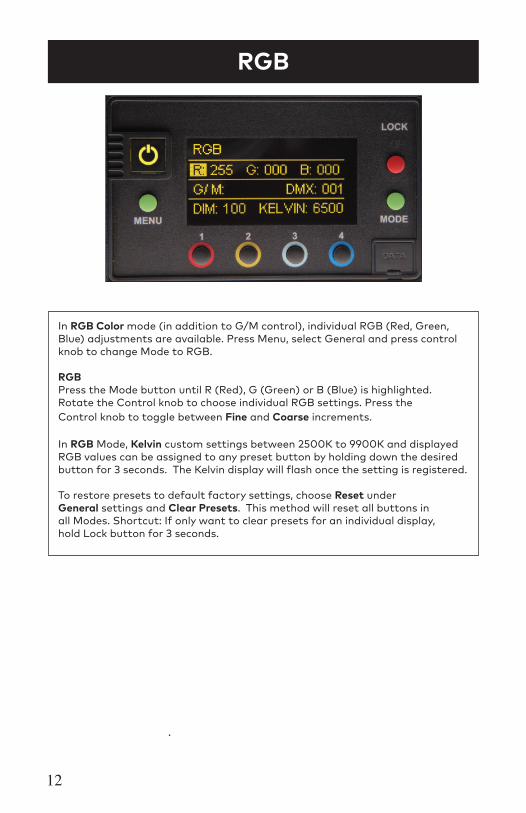
In RGB Color mode (in addition to G/M control), individual RGB (Red, Green, Blue) adjustments are available. Press Menu, select General and press control knob to change Mode to RGB. RGBPress the Mode button until R (Red), G (Green) or B (Blue) is highlighted. Rotate the Control knob to choose individual RGB settings. Press the Control knob to toggle between Fine and Coarse increments.
In RGB Mode, Kelvin custom settings between 2500K to 9900K and displayedRGB values can be assigned to any preset button by holding down the desired button for 3 seconds. The Kelvin display will flash once the setting is registered.
To restore presets to default factory settings, choose Reset under General settings and Clear Presets. This method will reset all buttons in all Modes. Shortcut: If only want to clear presets for an individual display, hold Lock button for 3 seconds.
RGB
13
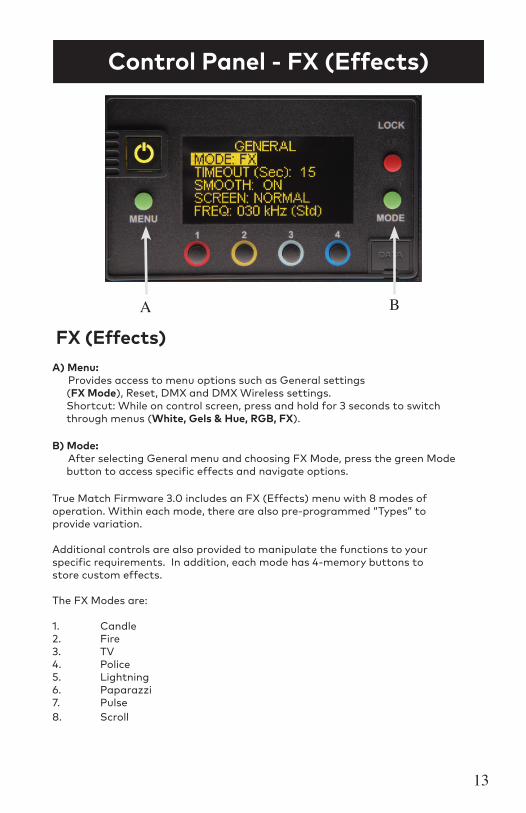
Control Panel - FX (Effects)
A) Menu: Provides access to menu options such as General settings (FX Mode), Reset, DMX and DMX Wireless settings. Shortcut: While on control screen, press and hold for 3 seconds to switch through menus (White, Gels & Hue, RGB, FX).
B) Mode: After selecting General menu and choosing FX Mode, press the green Mode button to access specific effects and navigate options.
True Match Firmware 3.0 includes an FX (Effects) menu with 8 modes of operation. Within each mode, there are also pre-programmed “Types” to provide variation. Additional controls are also provided to manipulate the functions to your specific requirements. In addition, each mode has 4-memory buttons to store custom effects. The FX Modes are:
1. Candle2. Fire3. TV4. Police5. Lightning6. Paparazzi7. Pulse8. Scroll
FX (Effects)
A B

FX (Effects)
14
A CB
FX (Effects) ModeFX mode provides access to effects including Candle, Fire, TV, Police, Lightning, Paparazzi, Pulse and Scroll. Candle mode used as an example:
A) FX Option: Choose the desired FX Mode by rotating the control knob. When on the desired effect, there will be several pre-programmed effects as well as control parameters that can be altered.
B) Preset Buttons: In FX Mode, Kelvin custom settings and any control functions displayed such as Rate and Amplitude (Ampl) can be saved as a preset. Chosen values can be assigned to any preset button by holding down the desired button for 3 seconds. The Kelvin display will flash once the setting is registered.
To restore presets to default factory settings, choose Reset under General settings and Clear Presets. This method will reset all buttons in all Modes. Shortcut: If only want to clear presets for Candle Mode, hold Lock button for 3 seconds while Candle mode is displayed.
C) Mode: Press to navigate from Dim to Kelvin and FX settings. Shortcut: Long press will bring you back one step.
15
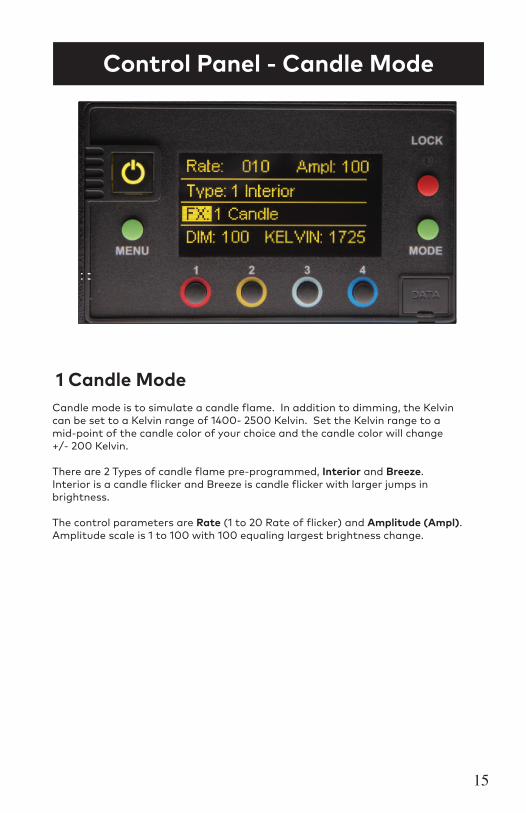
Control Panel - Candle Mode
Candle mode is to simulate a candle flame. In addition to dimming, the Kelvin can be set to a Kelvin range of 1400- 2500 Kelvin. Set the Kelvin range to a mid-point of the candle color of your choice and the candle color will change +/- 200 Kelvin.
There are 2 Types of candle flame pre-programmed, Interior and Breeze. Interior is a candle flicker and Breeze is candle flicker with larger jumps in brightness.
The control parameters are Rate (1 to 20 Rate of flicker) and Amplitude (Ampl).Amplitude scale is 1 to 100 with 100 equaling largest brightness change.
1 Candle Mode
16
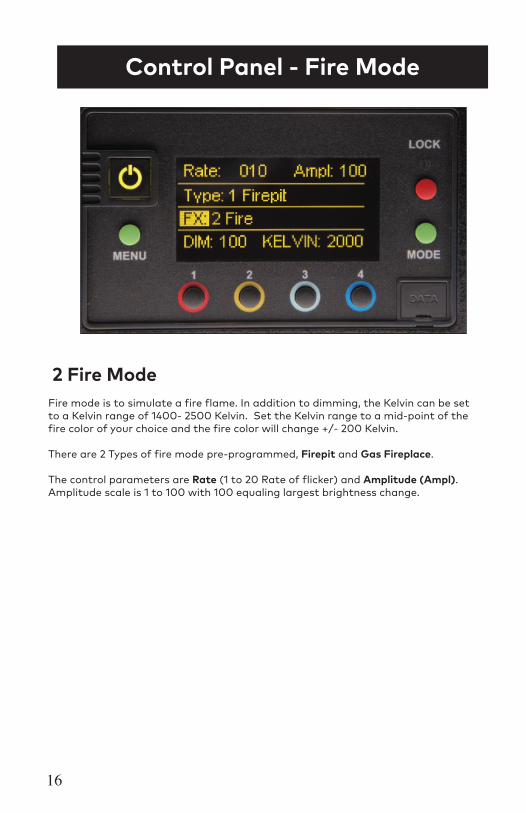
Control Panel - Fire Mode
Fire mode is to simulate a fire flame. In addition to dimming, the Kelvin can be setto a Kelvin range of 1400- 2500 Kelvin. Set the Kelvin range to a mid-point of thefire color of your choice and the fire color will change +/- 200 Kelvin.
There are 2 Types of fire mode pre-programmed, Firepit and Gas Fireplace. The control parameters are Rate (1 to 20 Rate of flicker) and Amplitude (Ampl).Amplitude scale is 1 to 100 with 100 equaling largest brightness change.
2 Fire Mode
17
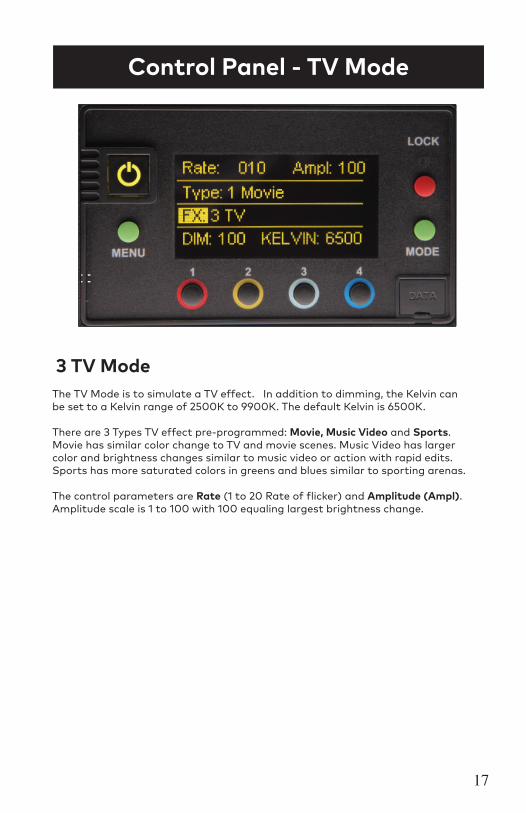
Control Panel - TV Mode
The TV Mode is to simulate a TV effect. In addition to dimming, the Kelvin can be set to a Kelvin range of 2500K to 9900K. The default Kelvin is 6500K.
There are 3 Types TV effect pre-programmed: Movie, Music Video and Sports.Movie has similar color change to TV and movie scenes. Music Video has largercolor and brightness changes similar to music video or action with rapid edits.Sports has more saturated colors in greens and blues similar to sporting arenas.
The control parameters are Rate (1 to 20 Rate of flicker) and Amplitude (Ampl).Amplitude scale is 1 to 100 with 100 equaling largest brightness change.
3 TV Mode
18
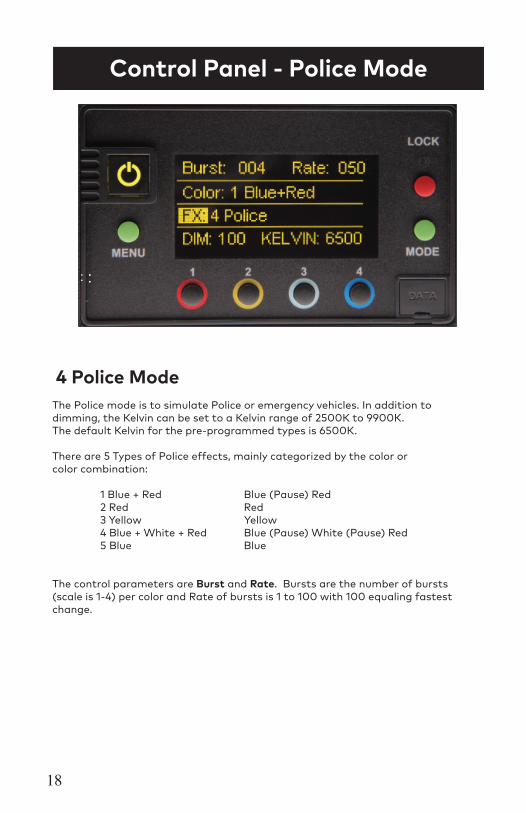
Control Panel - Police Mode
The Police mode is to simulate Police or emergency vehicles. In addition to dimming, the Kelvin can be set to a Kelvin range of 2500K to 9900K. The default Kelvin for the pre-programmed types is 6500K.
There are 5 Types of Police effects, mainly categorized by the color or color combination: 1 Blue + Red Blue (Pause) Red 2 Red Red 3 Yellow Yellow 4 Blue + White + Red Blue (Pause) White (Pause) Red 5 Blue Blue
The control parameters are Burst and Rate. Bursts are the number of bursts (scale is 1-4) per color and Rate of bursts is 1 to 100 with 100 equaling fastest change.
4 Police Mode

Control Panel - Lightning Mode
The Lightning Mode is to simulate lightning effect. In addition to dimming, the Kelvin can be set to a Kelvin range of 2500K to 9900K. The default Kelvin for the pre-programmed types is 6500K.
There are 2 types of lightning effects Storm and Frankenstein. The Storm effect is to simulate a thunderstorm and Frankenstein has more intense, brighter flashes. There is one control parameter which is Rate that is scaled between 1 to 20 with 20 having the most variation in the lighting sequences.
Note: If you want to trigger or cue a lightning effect, can use the power button to start the lighting sequence. When power button is triggered, the pattern/sequence will repeat each time the power button is used.
5 Lightning Mode
19

20
Control Panel - Paparazzi Mode
The Paparazzi Mode is to simulate photographic flashes. In addition to dimming, the Kelvin can be set to a Kelvin range of 2500K to 9900K. The default Kelvin for the pre-programmed types is 6500K.
There are 2 types of Paparazzi, Red Carpet and Stalker. Red Carpet has very quick, frequent, and random flashes. Stalker has less frequent flashes (more pause between flashes). Paparazzi has 2 Parameters Rate and Flash. The Rate is scaled 1 to 100 with 100 being the fastest. The Flash is also scaled 1 to 100 with flash length of 100 being the longest.
Note: If you want to trigger or cue a flash effect, set to Stalker and use the power button to start the flash sequence. When power button is triggered, the pattern/sequence will repeat each time the power button is used.
6 Paparazzi Mode
Control Panel - Pulse Mode
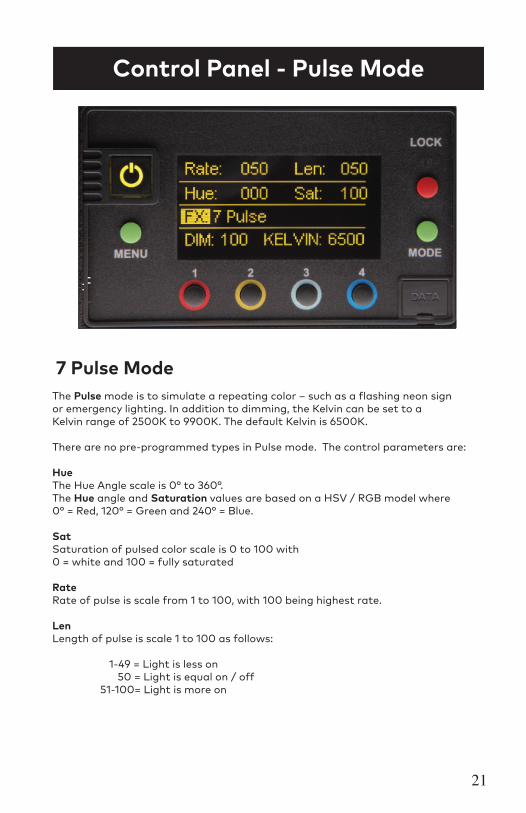
The Pulse mode is to simulate a repeating color – such as a flashing neon sign or emergency lighting. In addition to dimming, the Kelvin can be set to a Kelvin range of 2500K to 9900K. The default Kelvin is 6500K. There are no pre-programmed types in Pulse mode. The control parameters are: Hue The Hue Angle scale is 0° to 360°. The Hue angle and Saturation values are based on a HSV / RGB model where 0° = Red, 120° = Green and 240° = Blue. Sat Saturation of pulsed color scale is 0 to 100 with 0 = white and 100 = fully saturated Rate Rate of pulse is scale from 1 to 100, with 100 being highest rate. Len Length of pulse is scale 1 to 100 as follows: 1-49 = Light is less on 50 = Light is equal on / off 51-100= Light is more on
7 Pulse Mode
21
22
Control Panel - Scroll Mode
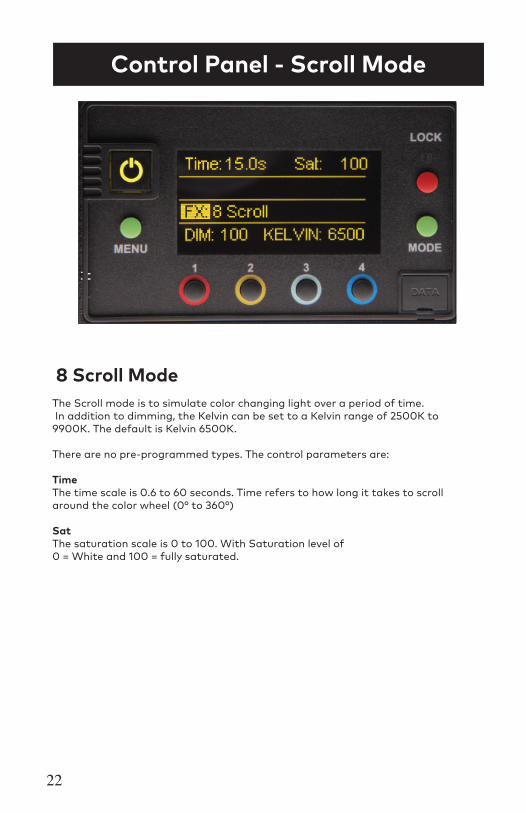
The Scroll mode is to simulate color changing light over a period of time. In addition to dimming, the Kelvin can be set to a Kelvin range of 2500K to 9900K. The default is Kelvin 6500K.
There are no pre-programmed types. The control parameters are: Time The time scale is 0.6 to 60 seconds. Time refers to how long it takes to scroll around the color wheel (0° to 360°) Sat The saturation scale is 0 to 100. With Saturation level of 0 = White and 100 = fully saturated.
8 Scroll Mode
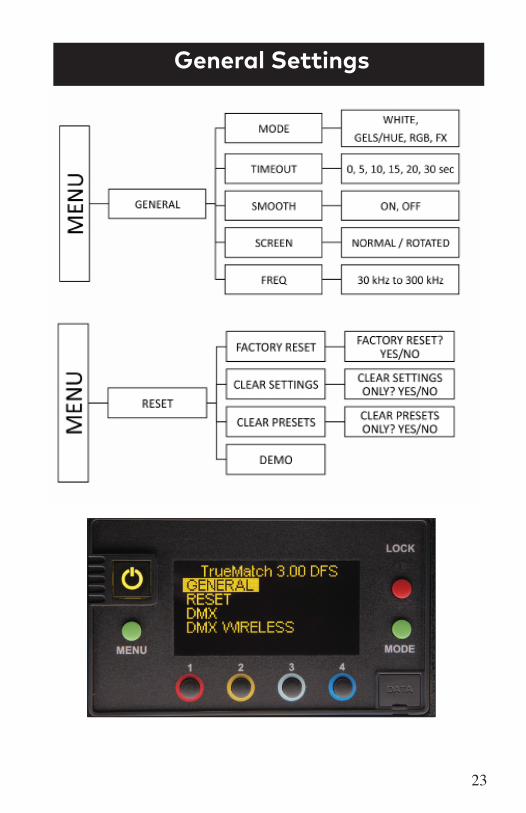
General Settings
23
24
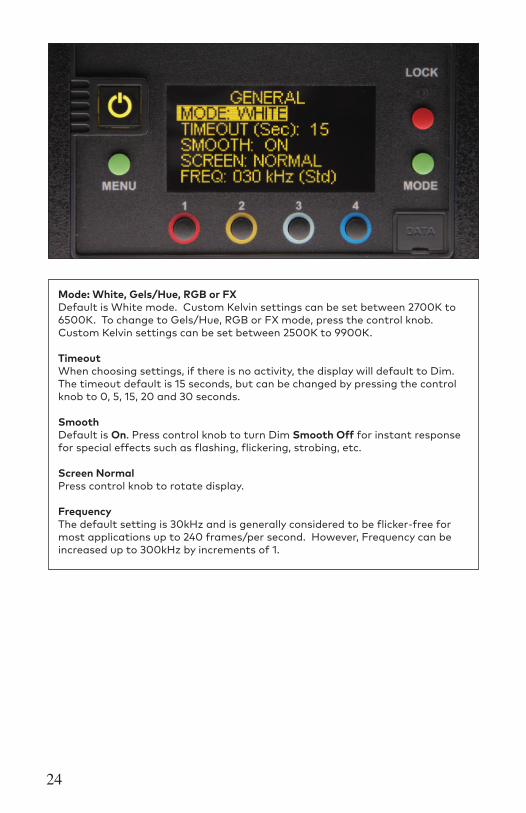
Mode: White, Gels/Hue, RGB or FXDefault is White mode. Custom Kelvin settings can be set between 2700K to 6500K. To change to Gels/Hue, RGB or FX mode, press the control knob. Custom Kelvin settings can be set between 2500K to 9900K.
TimeoutWhen choosing settings, if there is no activity, the display will default to Dim. The timeout default is 15 seconds, but can be changed by pressing the control knob to 0, 5, 15, 20 and 30 seconds.
SmoothDefault is On. Press control knob to turn Dim Smooth Off for instant response for special effects such as flashing, flickering, strobing, etc.
Screen NormalPress control knob to rotate display.
FrequencyThe default setting is 30kHz and is generally considered to be flicker-free formost applications up to 240 frames/per second. However, Frequency can be increased up to 300kHz by increments of 1.
25
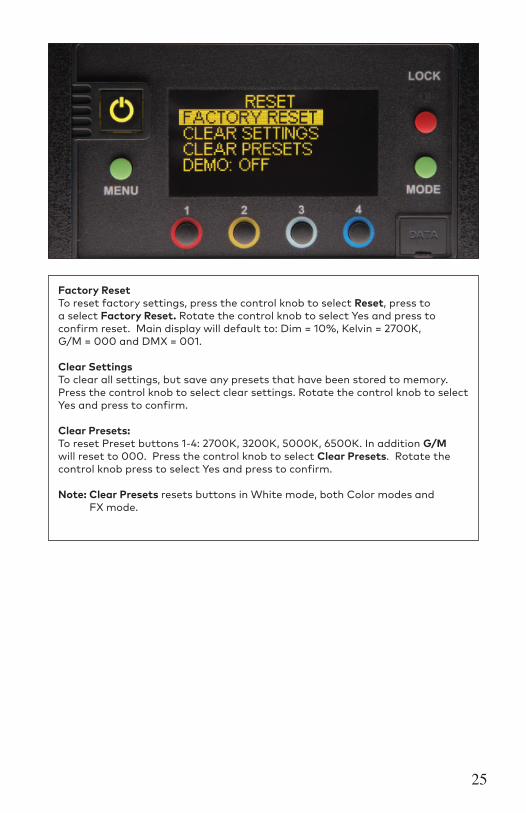
Factory ResetTo reset factory settings, press the control knob to select Reset, press to a select Factory Reset. Rotate the control knob to select Yes and press to confirm reset. Main display will default to: Dim = 10%, Kelvin = 2700K, G/M = 000 and DMX = 001. Clear SettingsTo clear all settings, but save any presets that have been stored to memory. Press the control knob to select clear settings. Rotate the control knob to select Yes and press to confirm.
Clear Presets:To reset Preset buttons 1-4: 2700K, 3200K, 5000K, 6500K. In addition G/M will reset to 000. Press the control knob to select Clear Presets. Rotate the control knob press to select Yes and press to confirm. Note: Clear Presets resets buttons in White mode, both Color modes and FX mode.
26
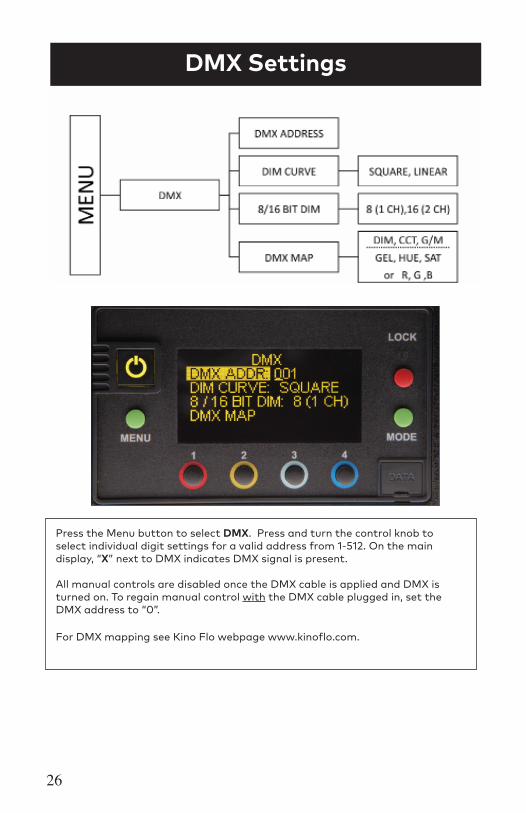
Press the Menu button to select DMX. Press and turn the control knob to select individual digit settings for a valid address from 1-512. On the main display, “X” next to DMX indicates DMX signal is present. All manual controls are disabled once the DMX cable is applied and DMX is turned on. To regain manual control with the DMX cable plugged in, set the DMX address to “0”. For DMX mapping see Kino Flo webpage www.kinoflo.com.
DMX Settings
DMX
DMX
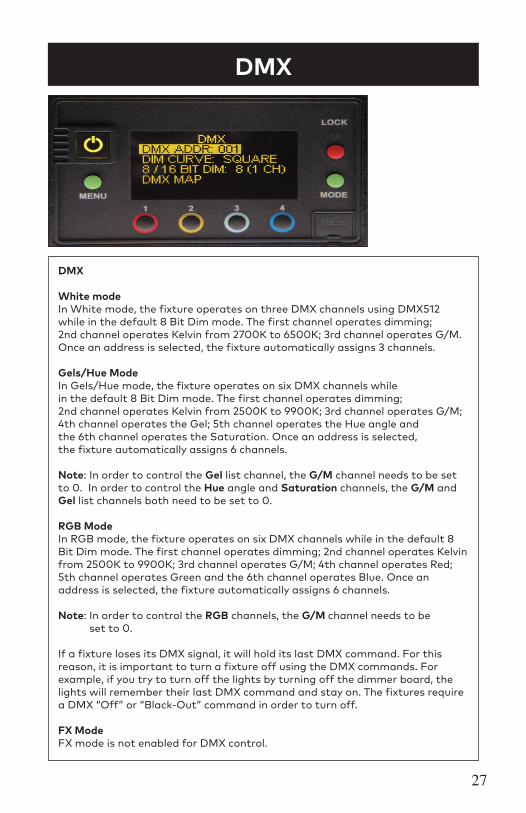
White modeIn White mode, the fixture operates on three DMX channels using DMX512 while in the default 8 Bit Dim mode. The first channel operates dimming; 2nd channel operates Kelvin from 2700K to 6500K; 3rd channel operates G/M. Once an address is selected, the fixture automatically assigns 3 channels.
Gels/Hue ModeIn Gels/Hue mode, the fixture operates on six DMX channels while in the default 8 Bit Dim mode. The first channel operates dimming; 2nd channel operates Kelvin from 2500K to 9900K; 3rd channel operates G/M; 4th channel operates the Gel; 5th channel operates the Hue angle and the 6th channel operates the Saturation. Once an address is selected, the fixture automatically assigns 6 channels.
Note: In order to control the Gel list channel, the G/M channel needs to be set to 0. In order to control the Hue angle and Saturation channels, the G/M and Gel list channels both need to be set to 0.
RGB ModeIn RGB mode, the fixture operates on six DMX channels while in the default 8 Bit Dim mode. The first channel operates dimming; 2nd channel operates Kelvin from 2500K to 9900K; 3rd channel operates G/M; 4th channel operates Red; 5th channel operates Green and the 6th channel operates Blue. Once an address is selected, the fixture automatically assigns 6 channels.
Note: In order to control the RGB channels, the G/M channel needs to be set to 0.
If a fixture loses its DMX signal, it will hold its last DMX command. For thisreason, it is important to turn a fixture off using the DMX commands. For example, if you try to turn off the lights by turning off the dimmer board, the lights will remember their last DMX command and stay on. The fixtures require a DMX “Off” or “Black-Out” command in order to turn off.
FX ModeFX mode is not enabled for DMX control.
27
28
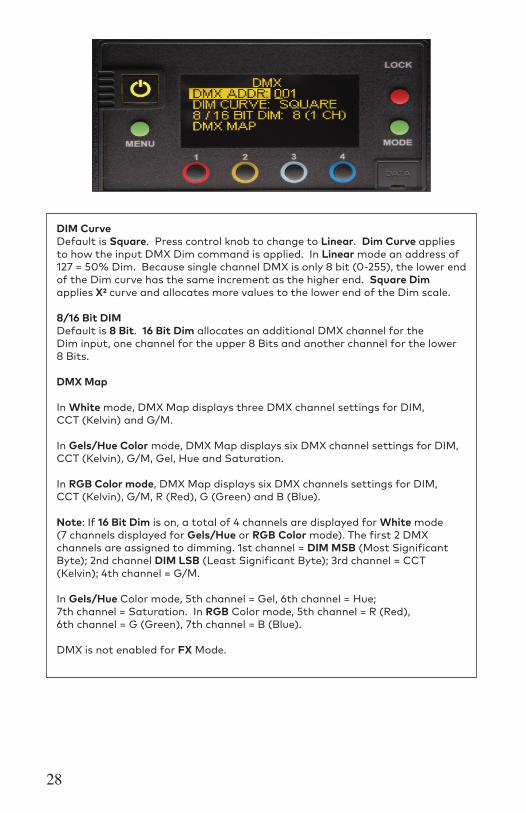
DIM Curve Default is Square. Press control knob to change to Linear. Dim Curve applies to how the input DMX Dim command is applied. In Linear mode an address of 127 = 50% Dim. Because single channel DMX is only 8 bit (0-255), the lower end of the Dim curve has the same increment as the higher end. Square Dim applies X² curve and allocates more values to the lower end of the Dim scale.
8/16 Bit DIM Default is 8 Bit. 16 Bit Dim allocates an additional DMX channel for the Dim input, one channel for the upper 8 Bits and another channel for the lower 8 Bits.
DMX Map
In White mode, DMX Map displays three DMX channel settings for DIM, CCT (Kelvin) and G/M.
In Gels/Hue Color mode, DMX Map displays six DMX channel settings for DIM,CCT (Kelvin), G/M, Gel, Hue and Saturation.
In RGB Color mode, DMX Map displays six DMX channels settings for DIM, CCT (Kelvin), G/M, R (Red), G (Green) and B (Blue).
Note: If 16 Bit Dim is on, a total of 4 channels are displayed for White mode (7 channels displayed for Gels/Hue or RGB Color mode). The first 2 DMX channels are assigned to dimming. 1st channel = DIM MSB (Most Significant Byte); 2nd channel DIM LSB (Least Significant Byte); 3rd channel = CCT (Kelvin); 4th channel = G/M. In Gels/Hue Color mode, 5th channel = Gel, 6th channel = Hue; 7th channel = Saturation. In RGB Color mode, 5th channel = R (Red), 6th channel = G (Green), 7th channel = B (Blue). DMX is not enabled for FX Mode.
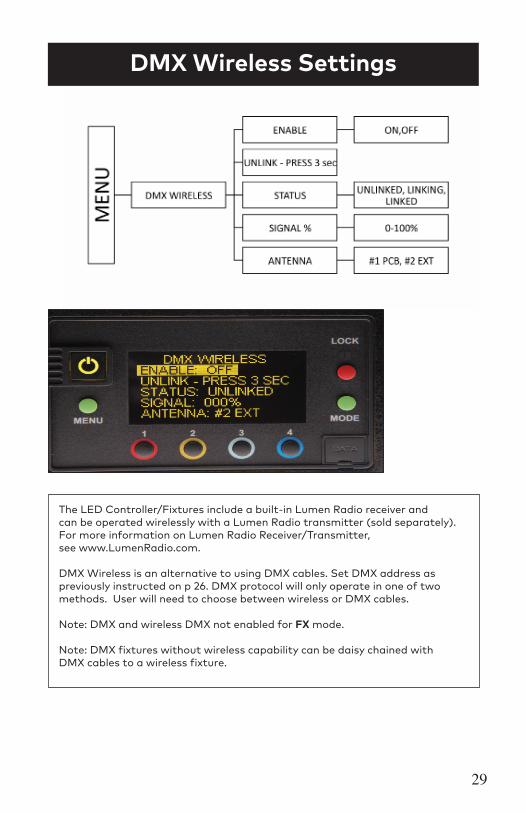
DMX Wireless Settings
The LED Controller/Fixtures include a built-in Lumen Radio receiver and can be operated wirelessly with a Lumen Radio transmitter (sold separately). For more information on Lumen Radio Receiver/Transmitter, see www.LumenRadio.com.
DMX Wireless is an alternative to using DMX cables. Set DMX address as previously instructed on p 26. DMX protocol will only operate in one of two methods. User will need to choose between wireless or DMX cables.
Note: DMX and wireless DMX not enabled for FX mode.
Note: DMX fixtures without wireless capability can be daisy chained with DMX cables to a wireless fixture.
29
30
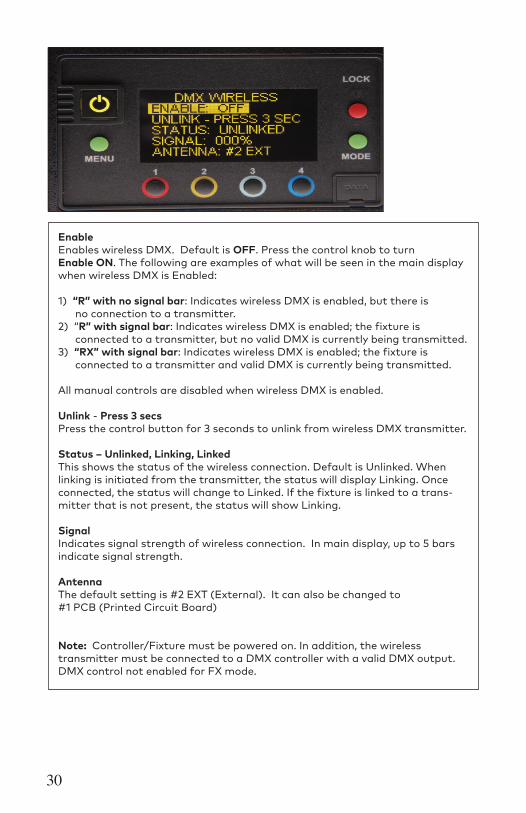
EnableEnables wireless DMX. Default is OFF. Press the control knob to turn Enable ON. The following are examples of what will be seen in the main display when wireless DMX is Enabled:
1) “R” with no signal bar: Indicates wireless DMX is enabled, but there is no connection to a transmitter.2) “R” with signal bar: Indicates wireless DMX is enabled; the fixture is connected to a transmitter, but no valid DMX is currently being transmitted. 3) “RX” with signal bar: Indicates wireless DMX is enabled; the fixture is connected to a transmitter and valid DMX is currently being transmitted.
All manual controls are disabled when wireless DMX is enabled.
Unlink - Press 3 secs Press the control button for 3 seconds to unlink from wireless DMX transmitter.
Status – Unlinked, Linking, Linked This shows the status of the wireless connection. Default is Unlinked. When linking is initiated from the transmitter, the status will display Linking. Once connected, the status will change to Linked. If the fixture is linked to a trans-mitter that is not present, the status will show Linking.
Signal Indicates signal strength of wireless connection. In main display, up to 5 bars indicate signal strength.
AntennaThe default setting is #2 EXT (External). It can also be changed to #1 PCB (Printed Circuit Board)
Note: Controller/Fixture must be powered on. In addition, the wireless transmitter must be connected to a DMX controller with a valid DMX output. DMX control not enabled for FX mode.

FCC Part 15 Verification:This device complies with Part 15 of the FCC Rules. Operation is subject to the con-dition that this device does not cause harmful interference.
FCC Part 15 Declaration of Conformity:This device complies with Part 15 of the FCC Rules. Operation is subject to the fol-lowing two conditions: (1) this device may not cause harmful interference, and (2) this device must accept any interference received, including interference that may cause undesired operation.
KINO FLO, INC Celeb 250,450,450Q,850, Diva-Lite 41/31/21, Diva-Lite 30/20, FreeStyle 4/41/31/21, Image L80/L40, Select 30/20.ID: XRSCRMXTIMO101 IC: 8879A-CRMXT101
For latest Warranty information and Certifications, see Kino Flo website at
www.kinoflo.com..
Environmental: Disposal of Old Electrical & Electronic Equipment.
This symbol on the product or on its packaging indicates that this product shall not be treated as household waste. This product is made of recyclable materials and should be disposed of in accordance with governmental regulations.
Kino Flo, Inc. 2840 N. Hollywood Way, Burbank, CA 91505, USATel: 818 767-6528 website: www.kinoflo.com
31


![HTML5 Conference [LT] Blue Light Filter 50% Off](https://img.pdfslide.net/doc/110x75/5491e3fcac795916288b465b/html5-conference-lt-blue-light-filter-50-off.jpg)