Embed Size (px)
Citation preview

Operator’s Manual
Original Instructions
Second Edition
First Printing
Part No. 57.0009.0631
Serial number range
GTH-2506 From serial n.: GTH250614-101
Stage 3AStage 3B
GTH-3007 From serial n.: GTH300716M-101
Stage 3AStage 3B

Contents
Introduction .......................................................... 1Symbol and Hazard Pictorials Definitions............ 5General Safety..................................................... 6 Work Area Safety ............................................... 14Safety Precautions ............................................ 21Legend............................................................... 24Controls ............................................................. 25Inspections ........................................................ 31Operating Instructions ....................................... 48Parking and Storage .......................................... 63Transport and Lifting Instructions ...................... 65Maintenance ...................................................... 70Attachments....................................................... 78Specifications .................................................... 86Load Charts ....................................................... 87Test.................................................................... 93EC Declaration of Conformity ............................ 96
Copyright © 2016 by Terex Corporation
Second Edition: First Printing, February 2016
Genie is a registered trademark of Terex South Dakota, Inc. in the U.S.A. and many other countries. “GTH” is a trademark of Terex South Dakota, Inc.
February 2016 Second Edition - First Printing
TEREX Global GmbHBleicheplatz 28200 SchaffhausenSwitzerland
Technical Assistance ServiceTelephone: +39 075 9418129 +39 075 9418175e-mail: [email protected]
II GTH-2506 - GTH 3007 Part No. 57.0009.0631
February 2016Second Edition - First Printing
Part No. 57.0009.0631 GTH-2506 - GTH 3007 1
Introduction
About This Manual
Genie appreciates your choice of our machine for your application. Our number one priority is user safety, which is best achieved by our joint efforts.This book is an operation and daily maintenance manual for the user or operator of a Genie machine.
This manual should be considered a permanent part of your machine and should remain with the machine at all times. If you have any questions, contact Genie.
For Options Manuals (if equipped):• Key Pad Unlocking Device
(Option part number 58.2513.1089)PLS visit our webpage at www.genielift.com/en/service-support/manuals
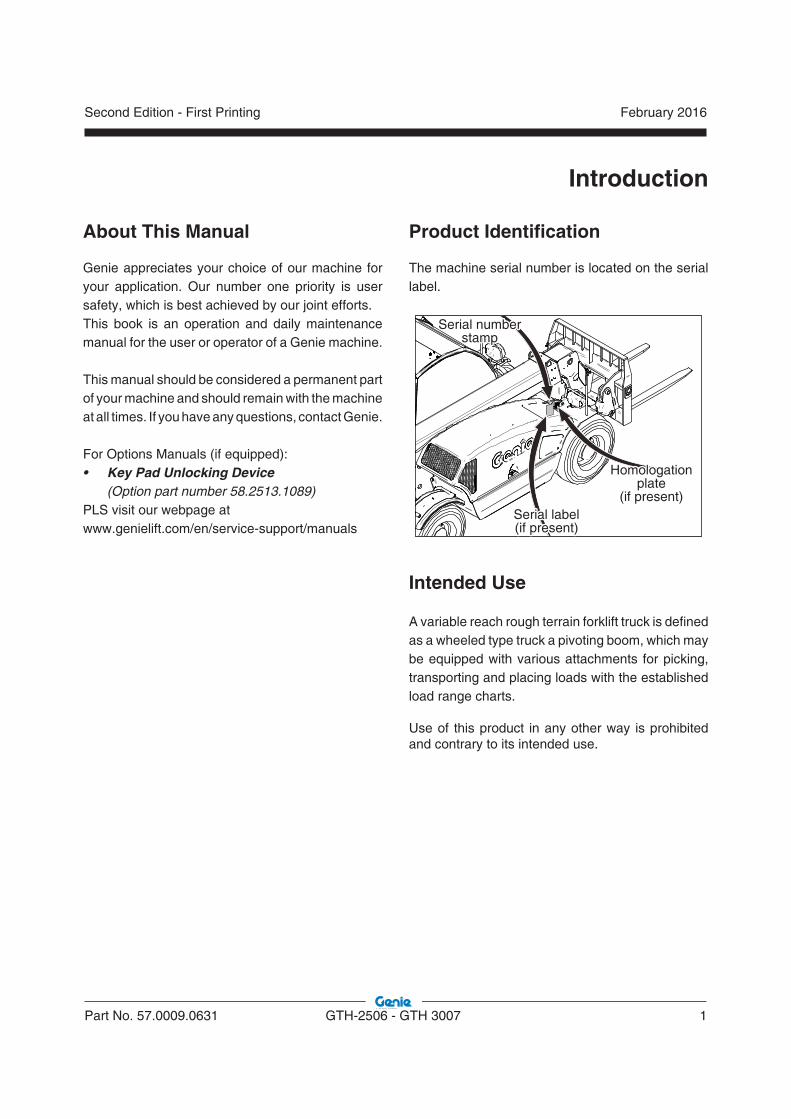
Product Identifi cation
The machine serial number is located on the serial label.
Serial number Serial number stampstamp
Serial labelSerial label(if present)(if present)
HomologationHomologationplateplate
(if present)(if present)
Intended Use
A variable reach rough terrain forklift truck is defined as a wheeled type truck a pivoting boom, which may be equipped with various attachments for picking, transporting and placing loads with the established load range charts.
Use of this product in any other way is prohibited and contrary to its intended use.

February 2016
2 GTH-2506 - GTH 3007 Part No. 57.0009.0631
Second Edition - First Printing
Contacting the Manufacturer
At times it may be necessary to contact Genie.
When you do, be ready to supply the model number and serial number of your machine, along with your name and contact information. At minimum, Genie should be contacted for:
• Accident reporting
• Questions regarding product applications and safety
• Standards and regulatory compliance information
• Current owner updates, such as changes in machine ownership or changes in your contact information. See Transfer of Ownership, below.
Transfer of Machine OwnershipTaking a few minutes to update owner information will ensure that you receive important safety, maintenance and operating information that applies to your machine.
Please register your machine by visiting us on the web at www.genielift.co.uk.
Introduction
Bulletin Distribution andCompliance
Safety of product users is of paramount importance to Genie. Various bulletins are used by Genie to communicate important safety and product information to dealers and machine owners.
The information contained in the bulletins is tied to specific machines using the machine model and serial number.
Distribution of bulletins is based on the most current owner on record along with their associated dealer, so it is important to register your machine and keep your contact information up to date.
To ensure safety of personnel and the reliable continued operation of your machine, be sure to comply with the action indicated in a respective bulletin.

February 2016Second Edition - First Printing
Part No. 57.0009.0631 GTH-2506 - GTH 3007 3
Introduction
Danger
Failure to obey the instructions andsafety rules in this manual will resultin death or serious injury.
Do Not Operate Unless:
You learn and practice the principles of safe machine operation contained in this operator’s manual.1. Avoid hazardous situations.Know and understand the safety rulesbefore going on to the next section.2. Always perform a pre-operation inspection.3. Always perform function tests prior to use.4. Inspect the workplace.5. Only use the machine as it was intended.
You read, understand and obey the manufacturer’s instructions and the safety rules, the safety and operator’s manuals, and the decals applied on the machine.
You read, understand and obey the employer’s safety rules and work-site regulations.
You read, understand and obey all applicable governmental regulations.
You are properly trained to safely operate the machine.

February 2016
4 GTH-2506 - GTH 3007 Part No. 57.0009.0631
Second Edition - First Printing
Hazard Classifi cation
Safety alert symbol - used to alert you to potential personal injury hazards. Obey all safety messages that follow this symbol to avoid possible injury or death
DANGER Indicates a hazardous situation which, if not avoided, will result in death or serious injury.
WARNING Indicates a hazardous situation which, if not avoided, could result in death or serious injury.
CAUTION Indicates a hazardous situation which, if not avoided, could result in minor or moderate injury.
NOTICE Indicates a property damage message.
Introduction
Standards
The following standards and/or regulations apply to this machine (only for STAGE 3B machine) :
Directive
2006/42/EC Machinery Directive
2008/104/EC Electromagnetic compatibility
2000/14/CE Environment Acoustic Emissions
EN 1459:1998+A3:2012
Safety Sign Maintenance
Replace any missing or damaged safety signs.Keep operator safety in mind at all times. Use mild soap and water to clean safety signs. Do not use solvent-based cleaners because they may damage the safety sign material.

February 2016Second Edition - First Printing
Part No. 57.0009.0631 GTH-2506 - GTH 3007 5
Maintain required clearance.
Read the operator's manual.
Burn HazardExplosion/burn hazard
No smoking. No open flame.
Allow surfaces to cool.
Crush Hazard Keep clear of moving parts.
Only trained maintenance personnel should access compartments
Electrocutionhazard
Refer to load charts and manual
Tip-over hazard
Always wear seatbelt.
Keep load low during travel
Crush hazard.
Crush hazard.
Ride on Forks
Injection Hazard Use cardboard to search for leaks
Burn hazard. Do not loosen cap until cool.
Keep away from moving parts.
No smoking. No open flame.
Tip-over hazard
Symbol and Hazard Pictorials Defi nitions
Explosion hazardDo not use starting aids
No people under load
Apply maintenance collar
Crush hazard.
Explosion/burn hazard
Fall hazard
Crush hazard. Explosion hazard Do not use.
Entanglement hazard.
Keep clear from moving belt.
Do not level the machine with an elevated boom
No people under load
February 2016
6 GTH-2506 - GTH 3007 Part No. 57.0009.0631
Second Edition - First Printing
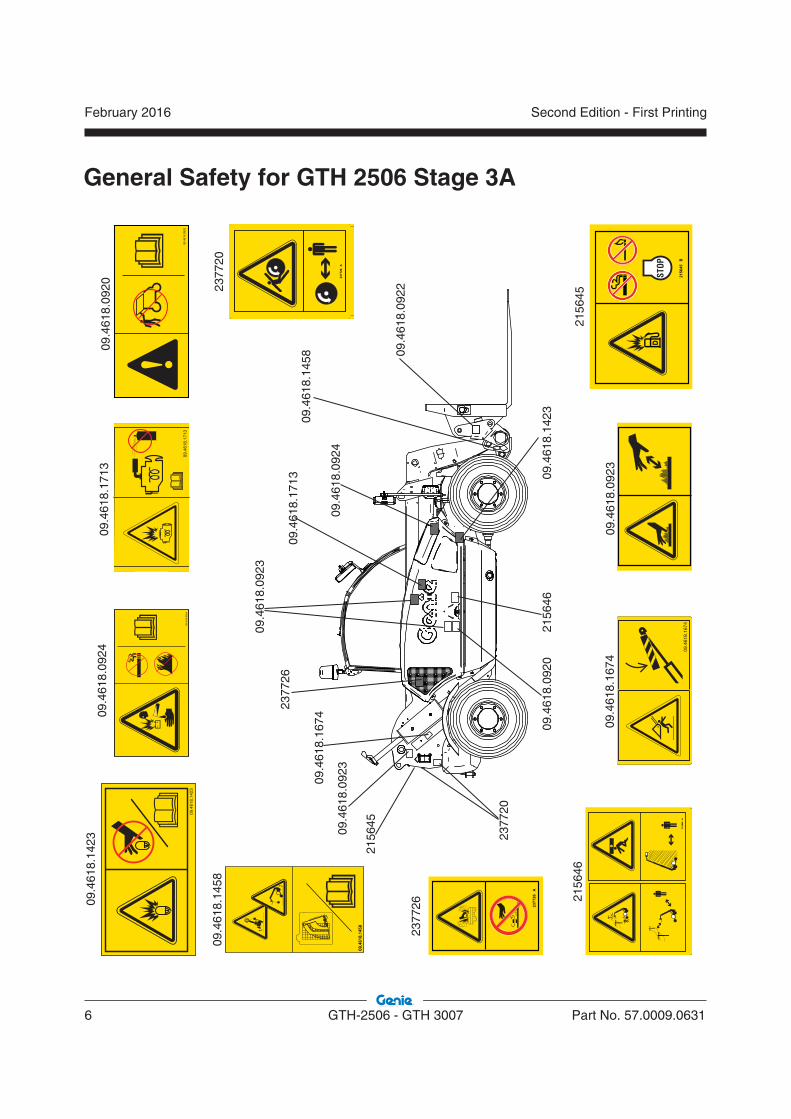
General Safety for GTH 2506 Stage 3A
09.4
618.
1674
09.4
618.
1674
09
.461
8.09
20
09.4
618.
0920
2156
46
2377
26
0946
1809
23
09.4
618.
0923
09.4
618.
1674
2377
26
2156
45
2377
20
09.4
618.
0923
09.4
618.
0924
09.4
618.
0924
09.4
618.
0924
09.4
618.
1458
09.4
618.
0923
09.4
618.
0920
09.4
618.
1713
2156
46
2377
20
09.4
618.
1423
09.4
618.
1423
09.4
618.
1423
2156
45
09.4
618.
1458
09.4
618.
1458
09.4
618.
1713
09.4
618.
1713
09.4
618.
0922
February 2016Second Edition - First Printing
Part No. 57.0009.0631 GTH-2506 - GTH 3007 7
General Safety for GTH 2506 Stage 3A
09.4
618.
0922
09.4
618.
0922
0°
09.4
618.
1679
09.4
618.
1679
09.4
618.
1375
09.4
618.
1375
2377
21
09.4
618.
1781
09.4
618.
1781
2156
46
09.4
618.
1375
09.4
618.
1818
2377
21
09.4
618.
1458
09.4
618.
1679
09.4
618.
1781
2377
20
09.4
618.
0922
09.4
618.
1782
8256
0
09.4
618.
1458
09.4
618.
1458
8256
0 2156
4609
.461
8.17
82
2377
20
09.4
618.
1782
09.4
618.
1818
09.4
618.
1818

February 2016
8 GTH-2506 - GTH 3007 Part No. 57.0009.0631
Second Edition - First Printing
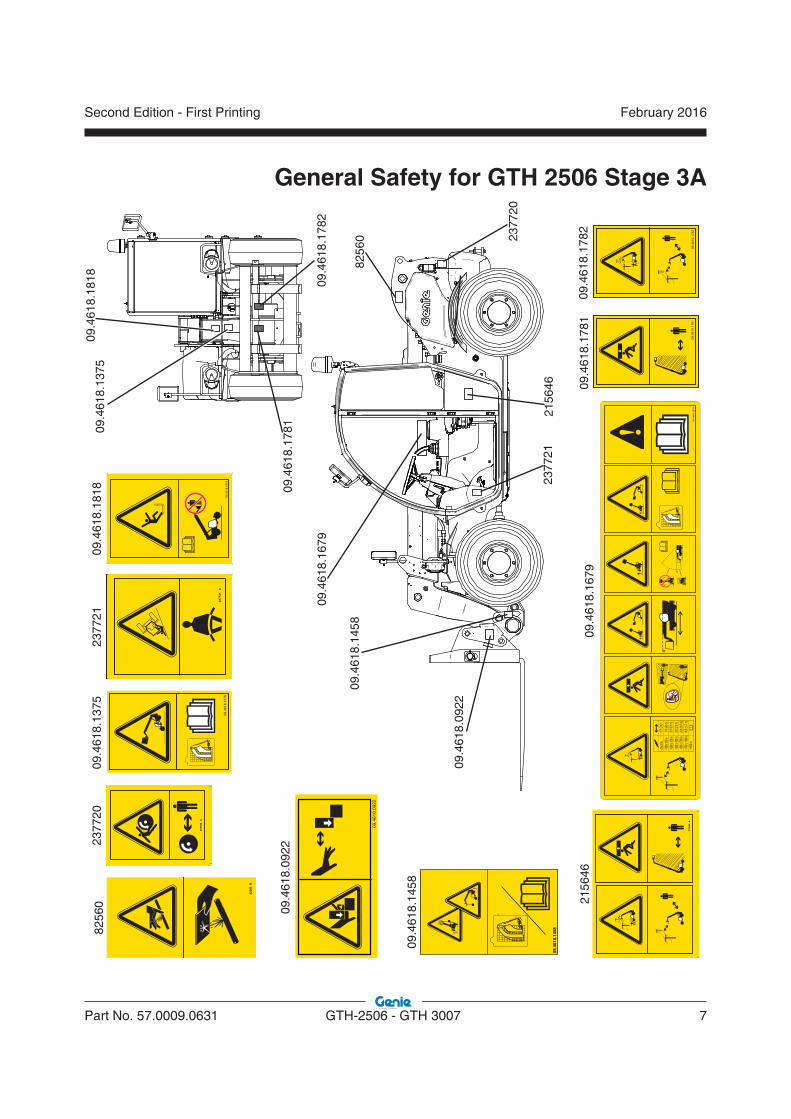
General Safety for GTH 2506 Stage 3B
09.4
618.
1674
09.4
618.
1674
09
.461
8.09
20
09.4
618.
0920
2156
46
2377
26
0946
1809
23
09.4
618.
0923
09.4
618.
1674
2377
26
2156
45
2377
20
09.4
618.
0924
09.4
618.
0924
09.4
618.
0924 09
.461
8.14
58
09.4
618.
0923
09.4
618.
0920
09.4
618.
1713
2156
46
2377
20
09.4
618.
1423
09.4
618.
1423
09.4
618.
1423
2156
45
09.4
618.
1458
09.4
618.
1458
09.4
618.
1713
09.4
618.
1713
09.4
618.
0923
09.4
618.
0922

February 2016Second Edition - First Printing
Part No. 57.0009.0631 GTH-2506 - GTH 3007 9
General Safety for GTH 2506 Stage 3B
09.4
618.
0922
09.4
618.
0922
0°
09.4
618.
1679
09.4
618.
1679
09.4
618.
1375
09.4
618.
1375
09.4
618.
1818
09.4
618.
1818
2377
21
09.4
618.
1781
09.4
618.
1781
2156
46
09.4
618.
1375
09.4
618.
1818
2377
21
09.4
618.
1458
09.4
618.
1679
09.4
618.
1781
2377
20
09.4
618.
0922
09.4
618.
1782
8256
0
09.4
618.
1458
09.4
618.
1458
8256
0 2156
46
2377
20
09.4
618.
1782
09.4
618.
1782

February 2016
10 GTH-2506 - GTH 3007 Part No. 57.0009.0631
Second Edition - First Printing
General Safety for GTH 3007 Stage 3A
2377
20
2377
20
09.4
618.
0922
09.4
618.
1458
09.4
618.
0920
2156
46
09.4
618.
0922
09.4
618.
0922
09.4
618.
1458
09.4
618.
1458
2156
46
09
.461
8.09
20
09.4
618.
0920
09.4
618.
0923
09.4
618.
0923
0946
1809
23
09.4
618.
0923
09.4
618.
1713
09.4
618.
1713
09.4
618.
1713
09.4
618.
0924
09.4
618.
0924
09.4
618.
0924
09.4
618.
1423
09.4
618.
1423
09.4
618.
1423
09.4
618.
1674
09.4
618.
1674
09.4
618.
1674
2377
26
2377
26
2156
45
2156
45

February 2016Second Edition - First Printing
Part No. 57.0009.0631 GTH-2506 - GTH 3007 11
General Safety for GTH 3007 Stage 3A
2377
20
09.4
618.
0922
09.4
618.
1458
2156
4623
7721
2377
2182
560
8256
0
09.4
618.
1781
09.4
618.
1781
09.4
618.
1782
09.4
618.
1782
09.4
618.
1781
09.4
618.
1782
09.4
618.
1375
09.4
618.
1818
09.4
618.
1375
09.4
618.
1375
09.4
618.
1818
09.4
618.
1818
0°
09.4
618.
1679
09.4
618.
1679
09.4
618.
1679

February 2016
12 GTH-2506 - GTH 3007 Part No. 57.0009.0631
Second Edition - First Printing
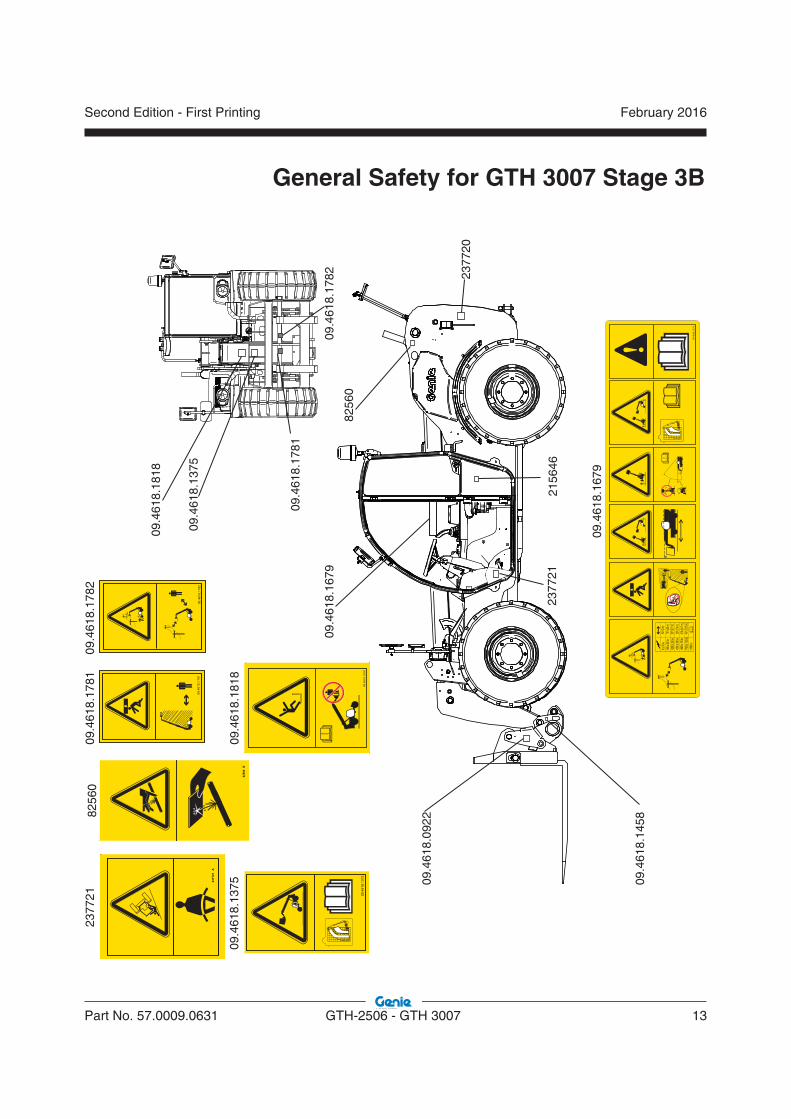
General Safety for GTH 3007 Stage 3B
2377
20
09.4
618.
0922
09.4
618.
0922
09.4
618.
1458
09.4
618.
1458
2156
46
0946
1809
23
09.4
618.
0923
09.4
618.
1713
09.4
618.
1713
09.4
618.
1423
09.4
618.
1423
09.4
618.
1674
09.4
618.
1674
2377
26
2156
45
2377
20
09.4
618.
0922
09.4
618.
1458
09.4
618.
0920
2156
46
09.4
618.
0923
09.4
618.
0923
09.4
618.
1713
09.4
618.
0924
09.4
618.
1423
09.4
618.
1674
2377
26
2156
45
09
.461
8.09
20
09.4
618.
0920
February 2016Second Edition - First Printing
Part No. 57.0009.0631 GTH-2506 - GTH 3007 13
General Safety for GTH 3007 Stage 3B
2377
2182
560
09.4
618.
1781
09.4
618.
1781
09.4
618.
1782
09.4
618.
1782
09.4
618.
1375
09.4
618.
1375
09.4
618.
1818
09.4
618.
1818
0°
09.4
618.
1679
09.4
618.
1679
2377
20
09.4
618.
0922
09.4
618.
1458
2156
4623
7721
8256
0
09.4
618.
1781
09.4
618.
1782
09.4
618.
1375
09.4
618.
1818
09.4
618.
1679
February 2016
14 GTH-2506 - GTH 3007 Part No. 57.0009.0631
Second Edition - First Printing
Work Area Safety
Overturning Hazards
Using the load chart, confirm that the load is within the rated capacity of the machine. Do not exceed the rated load.
The load center of the fork (if equipped) must be equal to or less than the load center indicated on the load chart.
All loads shown on the load chart are based on the machine being on firm ground, the frame being level, the forks being positioned evenly on the carriage, the load being centered on the forks, the tires being properly sized and properly inflated, and the telehandler being in good operating condition.
If using accessories, read, understand and obey the decals, instructions and manuals with the accessory.
Do not raise the load unless the ground can support all forces imposed by the machine.
Do not lower a load without retracting the boom first.
Do not use attachments which are not approved by Genie.
Do not operate the machine if the load chart is missing.
Do not exceed the rated capacity for each configuration.
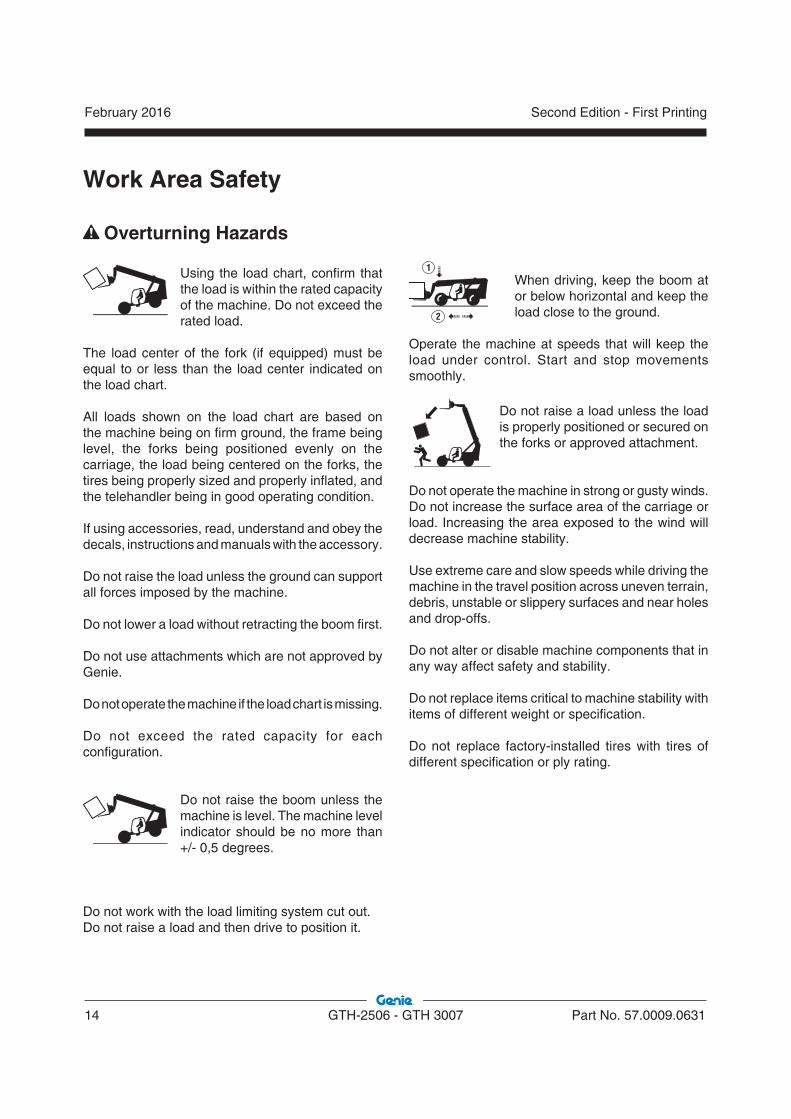
Do not raise the boom unless the machine is level. The machine level indicator should be no more than +/- 0,5 degrees.
Do not work with the load limiting system cut out.Do not raise a load and then drive to position it.
When driving, keep the boom at or below horizontal and keep the load close to the ground.
Operate the machine at speeds that will keep the load under control. Start and stop movements smoothly.
Do not raise a load unless the load is properly positioned or secured on the forks or approved attachment.
Do not operate the machine in strong or gusty winds. Do not increase the surface area of the carriage or load. Increasing the area exposed to the wind will decrease machine stability.
Use extreme care and slow speeds while driving the machine in the travel position across uneven terrain, debris, unstable or slippery surfaces and near holes and drop-offs.
Do not alter or disable machine components that in any way affect safety and stability.
Do not replace items critical to machine stability with items of different weight or specification.
Do not replace factory-installed tires with tires of different specification or ply rating.
February 2016Second Edition - First Printing
Part No. 57.0009.0631 GTH-2506 - GTH 3007 15
Work Area Safety
Traveling on Slopes Hazards
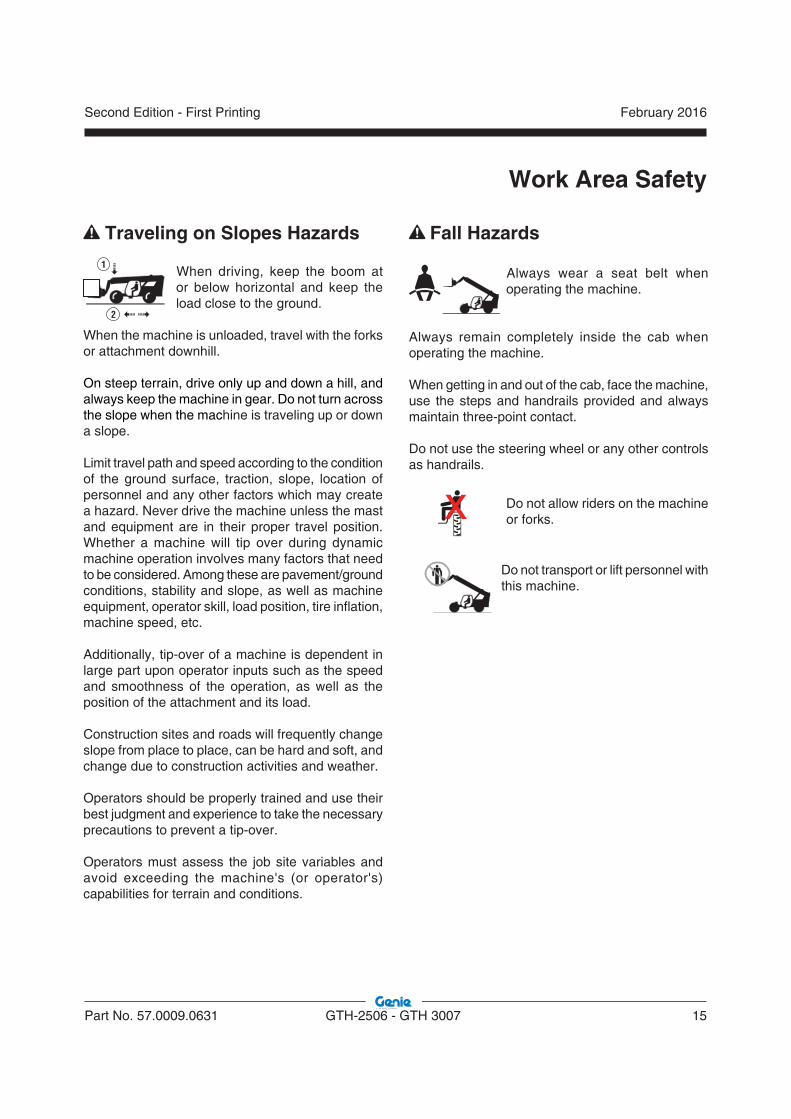
When driving, keep the boom at or below horizontal and keep the load close to the ground.
When the machine is unloaded, travel with the forks or attachment downhill.
On steep terrain, drive only up and down a hill, and always keep the machine in gear. Do not turn across the slope when the machine is traveling up or down a slope.
Limit travel path and speed according to the condition of the ground surface, traction, slope, location of personnel and any other factors which may create a hazard. Never drive the machine unless the mast and equipment are in their proper travel position. Whether a machine will tip over during dynamic machine operation involves many factors that need to be considered. Among these are pavement/ground conditions, stability and slope, as well as machine equipment, operator skill, load position, tire inflation, machine speed, etc.
Additionally, tip-over of a machine is dependent in large part upon operator inputs such as the speed and smoothness of the operation, as well as the position of the attachment and its load.
Construction sites and roads will frequently changeslope from place to place, can be hard and soft, and change due to construction activities and weather.
Operators should be properly trained and use their best judgment and experience to take the necessary precautions to prevent a tip-over.
Operators must assess the job site variables and avoid exceeding the machine's (or operator's) capabilities for terrain and conditions.
Fall Hazards
Always wear a seat belt when operating the machine.
Always remain completely inside the cab when operating the machine.
When getting in and out of the cab, face the machine, use the steps and handrails provided and always maintain three-point contact.
Do not use the steering wheel or any other controls as handrails.
Do not allow riders on the machine or forks.
Do not transport or lift personnel with this machine.
February 2016
16 GTH-2506 - GTH 3007 Part No. 57.0009.0631
Second Edition - First Printing
Falling Object Hazards
Operate the machine at speeds that will keep the load under control. Start and stop movements smoothly.
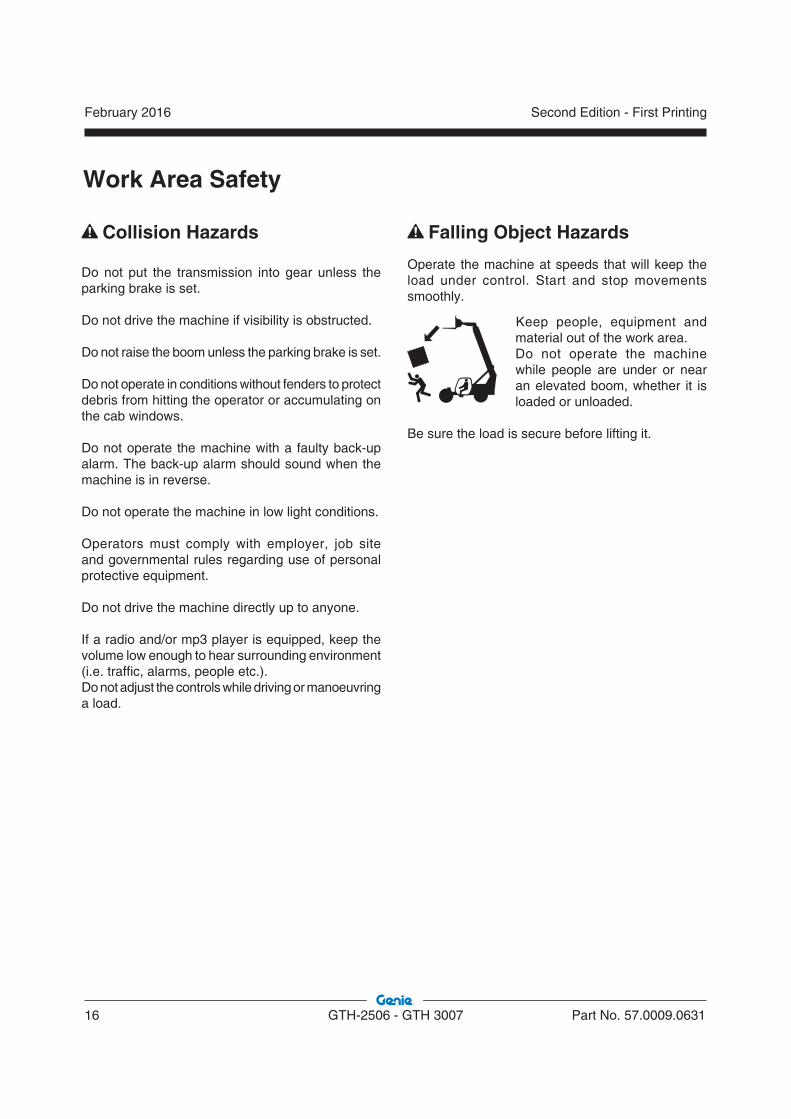
Keep people, equipment and material out of the work area.Do not operate the machine while people are under or near an elevated boom, whether it is loaded or unloaded.
Be sure the load is secure before lifting it.
Collision Hazards
Do not put the transmission into gear unless the parking brake is set.
Do not drive the machine if visibility is obstructed.
Do not raise the boom unless the parking brake is set.
Do not operate in conditions without fenders to protect debris from hitting the operator or accumulating on the cab windows.
Do not operate the machine with a faulty back-up alarm. The back-up alarm should sound when the machine is in reverse.
Do not operate the machine in low light conditions.
Operators must comply with employer, job site and governmental rules regarding use of personal protective equipment.
Do not drive the machine directly up to anyone.
If a radio and/or mp3 player is equipped, keep the volume low enough to hear surrounding environment (i.e. traffic, alarms, people etc.).Do not adjust the controls while driving or manoeuvring a load.
Work Area Safety
February 2016Second Edition - First Printing
Part No. 57.0009.0631 GTH-2506 - GTH 3007 17
Work Area Safety
Bodily Injury Hazards
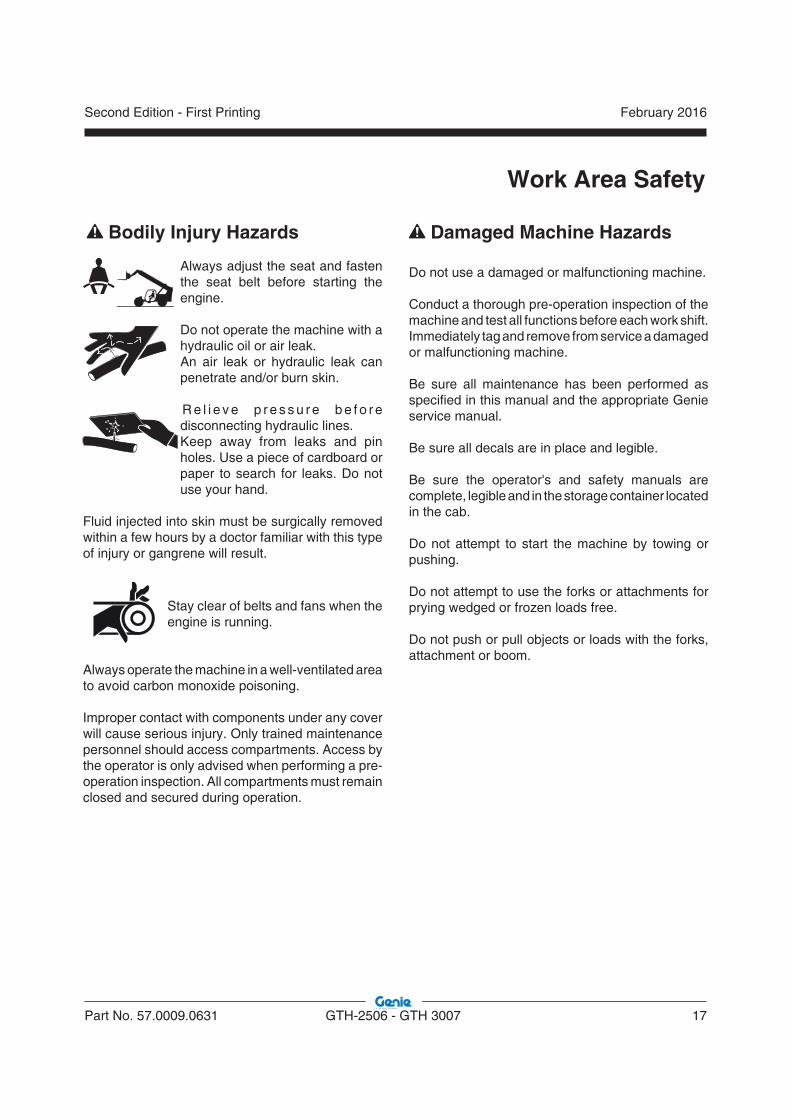
Always adjust the seat and fasten the seat belt before starting the engine.
Do not operate the machine with a hydraulic oil or air leak.An air leak or hydraulic leak can penetrate and/or burn skin.
R e l i e v e p r e s s u r e b e f o r e disconnecting hydraulic lines.Keep away from leaks and pin holes. Use a piece of cardboard or paper to search for leaks. Do not use your hand.
Fluid injected into skin must be surgically removed within a few hours by a doctor familiar with this type of injury or gangrene will result.
Stay clear of belts and fans when the engine is running.
Always operate the machine in a well-ventilated area to avoid carbon monoxide poisoning.
Improper contact with components under any cover will cause serious injury. Only trained maintenance personnel should access compartments. Access by the operator is only advised when performing a pre-operation inspection. All compartments must remain closed and secured during operation.
Damaged Machine Hazards
Do not use a damaged or malfunctioning machine.
Conduct a thorough pre-operation inspection of the machine and test all functions before each work shift. Immediately tag and remove from service a damaged or malfunctioning machine.
Be sure all maintenance has been performed as specified in this manual and the appropriate Genie service manual.
Be sure all decals are in place and legible.
Be sure the operator's and safety manuals are complete, legible and in the storage container located in the cab.
Do not attempt to start the machine by towing or pushing.
Do not attempt to use the forks or attachments for prying wedged or frozen loads free.
Do not push or pull objects or loads with the forks, attachment or boom.
February 2016
18 GTH-2506 - GTH 3007 Part No. 57.0009.0631
Second Edition - First Printing
Work Area Safety
Component Damage Hazards
Do not use any battery or charger greater than 12V to jump-start the engine.
Do not use the machine as a ground for welding.
Do not steer the front tires on dry pavement when the axle differential lock is activated.
Crush Hazards
Keep clear of moving parts during machine operation.
Set the parking brake, put the transmission in neutral and lower the carriage or the attachment to the ground before leaving the machine.
Keep clear of elevated components.
Support components before performing service. Keep clear of moving parts during machine operation.
Burn Hazards
Allow hot surfaces to cool before touching or servicing.
Explosion and Fire Hazards
Do not start the engine if you smell or detect liquid petroleum gas (LPG), gasoline, diesel fuel or other explosive substances.
Do not refuel the machine with the engine running.
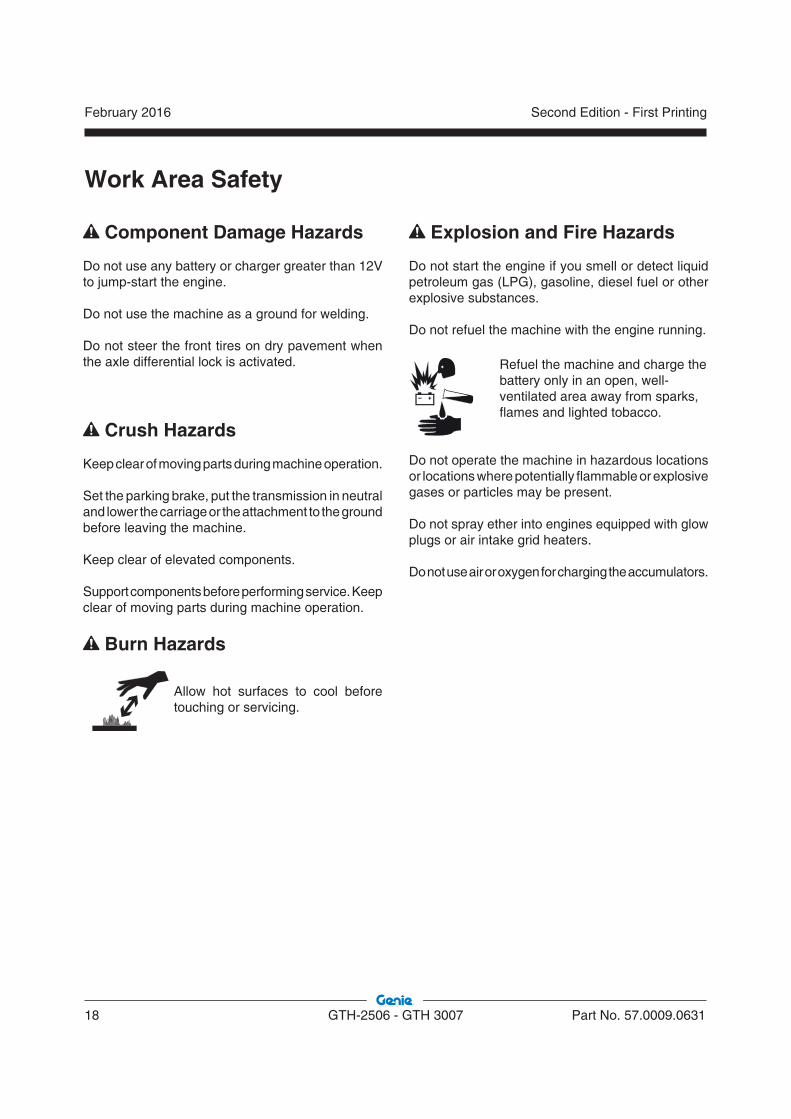
Refuel the machine and charge the battery only in an open, well-ventilated area away from sparks, flames and lighted tobacco.
Do not operate the machine in hazardous locations or locations where potentially flammable or explosive gases or particles may be present.
Do not spray ether into engines equipped with glow plugs or air intake grid heaters.
Do not use air or oxygen for charging the accumulators.
February 2016Second Edition - First Printing
Part No. 57.0009.0631 GTH-2506 - GTH 3007 19
Electrocution Hazards
This machine is not electrically insulated and will not provide protection from contact with or proximity to electrical current.
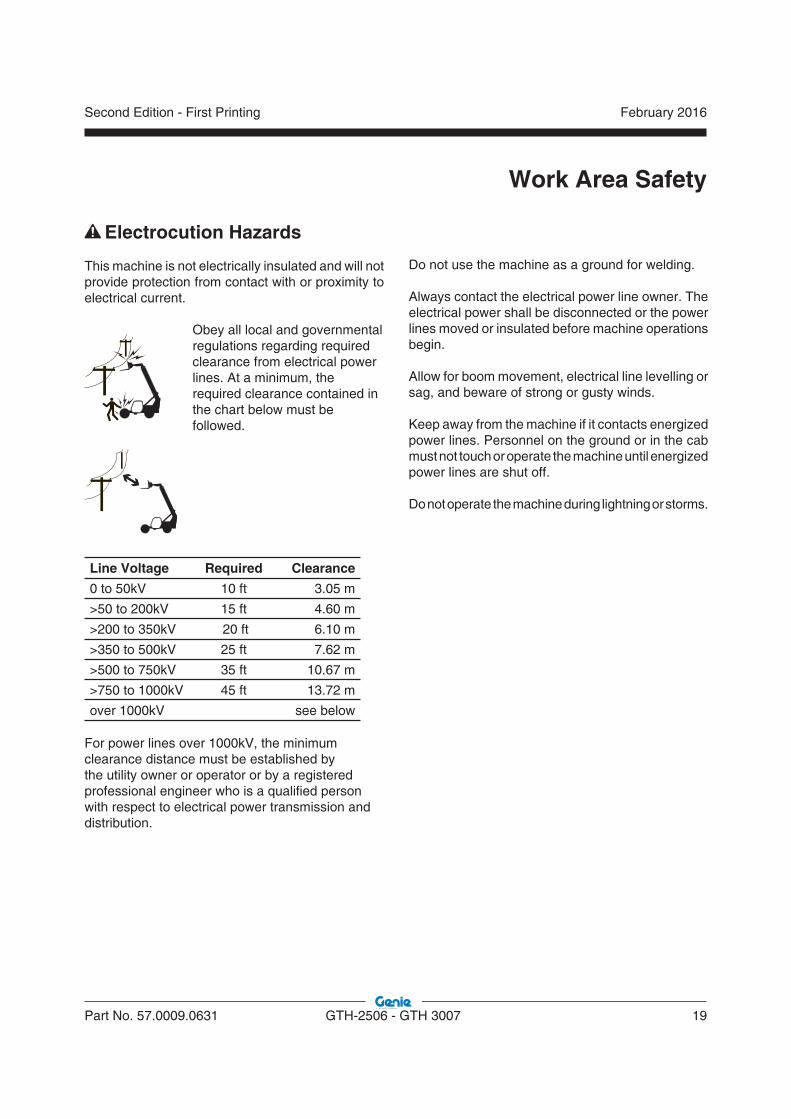
Obey all local and governmental regulations regarding required clearance from electrical power lines. At a minimum, the required clearance contained in the chart below must be followed.
Line Voltage Required Clearance
0 to 50kV 10 ft 3.05 m
>50 to 200kV 15 ft 4.60 m
>200 to 350kV 20 ft 6.10 m
>350 to 500kV 25 ft 7.62 m
>500 to 750kV 35 ft 10.67 m
>750 to 1000kV 45 ft 13.72 m
over 1000kV see below
For power lines over 1000kV, the minimumclearance distance must be established by the utility owner or operator or by a registered professional engineer who is a qualified person with respect to electrical power transmission and distribution.
Do not use the machine as a ground for welding.
Always contact the electrical power line owner. The electrical power shall be disconnected or the power lines moved or insulated before machine operations begin.
Allow for boom movement, electrical line levelling or sag, and beware of strong or gusty winds.
Keep away from the machine if it contacts energized power lines. Personnel on the ground or in the cab must not touch or operate the machine until energized power lines are shut off.
Do not operate the machine during lightning or storms.
Work Area Safety

February 2016
20 GTH-2506 - GTH 3007 Part No. 57.0009.0631
Second Edition - First Printing
Battery SafetyBurn Hazards
Batteries contain acid.Always wear protectiveclothing and eye wear whenworking with batteries.
Avoid spilling or contactingbattery acid. Neutralizebattery acid spills with bakingsoda and water.
Explosion Hazards
Keep sparks, flames andlighted tobacco away frombatteries. Batteries emitexplosive gas.
Work Area Safety
Electrocution Hazard
Avoid contact with electrical terminal
Using the Charger (if equipped), be sure the device works at 12 Volt and doesn't exceed 15 Ampere.
During maintenance or repair works, and while welding, disconnect the battery by turning the cut-out switch (see Inspection for Decals section).
After turning off the cut-out switch, wait for 60 seconds before starting the engine.
Employer's Responsibilities
Employers are responsible for providing a safework environment and for complying with local andnational governmental regulations.
Personal Safety
Be sure that everyone working on or near this machine is familiar with the applicable safety precautions.
February 2016Second Edition - First Printing
Part No. 57.0009.0631 GTH-2506 - GTH 3007 21
Safety Precautions
Requirements for Machine Operators
Operators who use the machine regularly or occasionally (i.e. for transport reasons) shall have the following prerequisites:health: before and during any operation, operators shall never take alcoholic beverages, medicines or other substances that may alter their psycho-physical conditions and, consequently, their working abilities.physical: good eyesight, acute hearing, good co-ordination and ability to carry out all required operations in a safe way, according to the instructions of this manual.mental: ability to understand and apply the enforced rules, regulations and safety precautions. They shall be careful and sensible for their own as well as for the others’ safety and shall desire to carry out the work correctly and in a responsible way.emotional: they shall keep calm and always be able to evaluate their own physical and mental conditions.training: they shall read and be familiar with this handbook, its enclosed graphs and diagrams, the identification and hazard warning plates. They shall be skilled and trained about the machine use.
The operator shall have a licence (or a driving licence) when provided for by the laws enforced in the country where the machine is operated. Please, ask the competent bodies. In Italy the operator must be at least 18 year old.
Requirements for service personnel
Personnel in charge of the machine maintenance shall be qualified, specialised in the maintenance of telehandlers, and shall have the following prerequisites:physical: good eyesight, acute hearing, good co-ordination and ability to carry out all required maintenance operations in a safe way, according to this manual.mental: ability to understand and apply the enforced rules, regulations and safety precautions. They shall be careful and sensible for their own as well as for the others’ safety and shall desire to carry out the work correctly and in a responsible way.training: they shall read and be familiar with this handbook, its enclosed graphs and diagrams, the identification and warning plates. They shall be skilled and trained about the machine functioning.
From a technical point of view, routine maintenance of the machine is not a complex procedure and can be carried out by the machine operator too, provided he has a basic knowledge of mechanics.
February 2016
22 GTH-2506 - GTH 3007 Part No. 57.0009.0631
Second Edition - First Printing
Safety Precautions
Working clothes
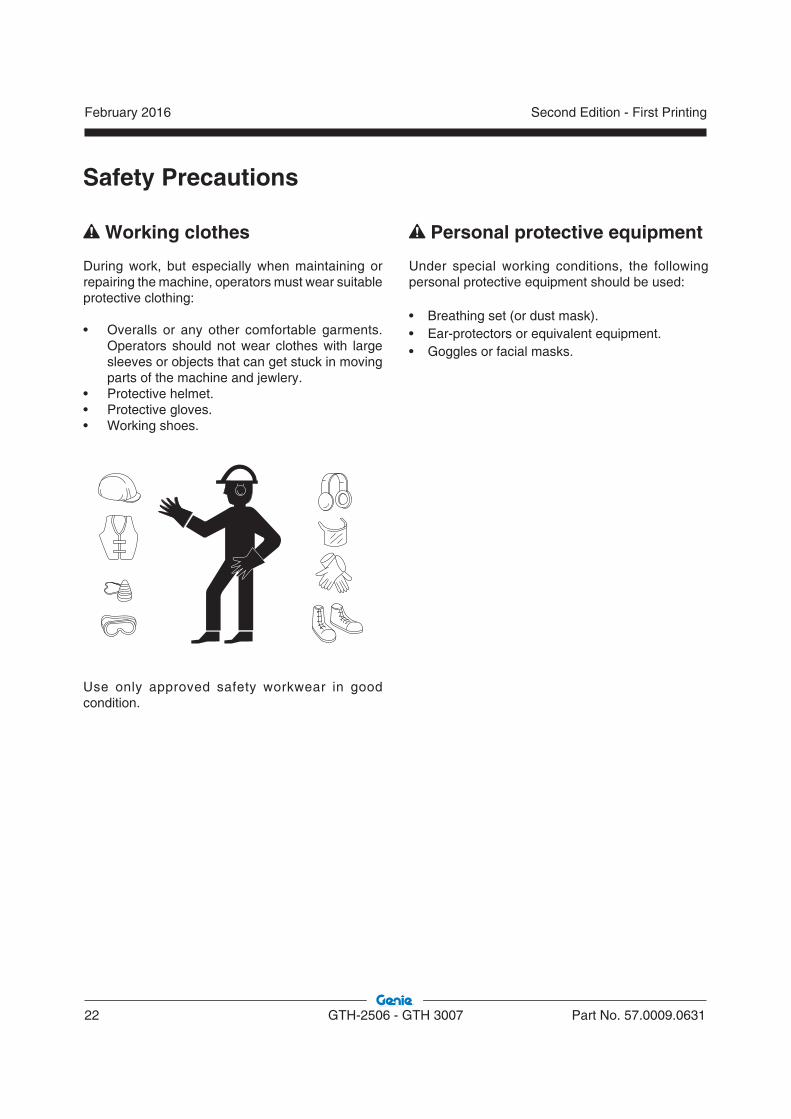
During work, but especially when maintaining or repairing the machine, operators must wear suitable protective clothing:
• Overalls or any other comfortable garments. Operators should not wear clothes with large sleeves or objects that can get stuck in moving parts of the machine and jewlery.
• Protective helmet.• Protective gloves.• Working shoes.
Use only approved safety workwear in good condition.
Personal protective equipment
Under special working conditions, the following personal protective equipment should be used:
• Breathing set (or dust mask).• Ear-protectors or equivalent equipment.• Goggles or facial masks.

February 2016Second Edition - First Printing
Part No. 57.0009.0631 GTH-2506 - GTH 3007 23
Safety Precautions
Control Indicators and Interlocks
Several control indicators and interlocks have been fitted to the machine. They must never be tampered with or removed.Always perform a function test to check the proper operation of these devices.Never operate a machine that is malfunctioning. If the machine starts to malfunction, immediately stop using it and have it repaired.
Load Limiting systemThe Load Limiting System has been developed to help the operator to maintain the machine longitudinal stability. Audible and visual messages are provided when the limits of longitudinal stability are being approached.However this device cannot replace the experienceof the operator. It is up to the user to adopt thenecessary safety measures to work within the ratedlimits of the machine.The Load Limiting System is designed to function only:when the truck is static;• when the truck is on consolidated, stable and
level ground;• when the truck is performing loading or placing
functions;• when the Load Limiting System is activated (not
overridden).The Load Limiting System will only warn the operator in the event of inadequate stability in the longitudinal plane in the forward direction.The Load Limiting System is not intended for warning of the risk of overturning in the case of:• a sudden overload;• travelling with the load in the elevated position;• travelling on rough terrain or on grounds with
obstacles and holes;• travelling across a slope or turning on a slope;• driving in bends too fast or too sharp;Adjustments affecting the setting of the Load Limiting System shall be performed only by authorised personnel.
Seat InterlockThis micro switch is located inside the seat cushion, and it prevents any machine transmission movements if the operator is not correctly seated in the driving seat.
Emergency Stop Push-buttonThis device may be used to stop the machine during an emergency situation.By pressing this button, the engine shuts down while the Load Limiting System stays active.Before restarting the machine, it is necessary to reset the push-button by rotating it clockwise.
Enabling Function Switch on JoystickThe joystick is equipped with an enabling function switch. This red finger switch must be held pressed down until the joystick functions have been completed; if it is released, the manoeuvre stops.
February 2016
24 GTH-2506 - GTH-3007 Part No. 57.0009.0631
Second Edition - First Printing
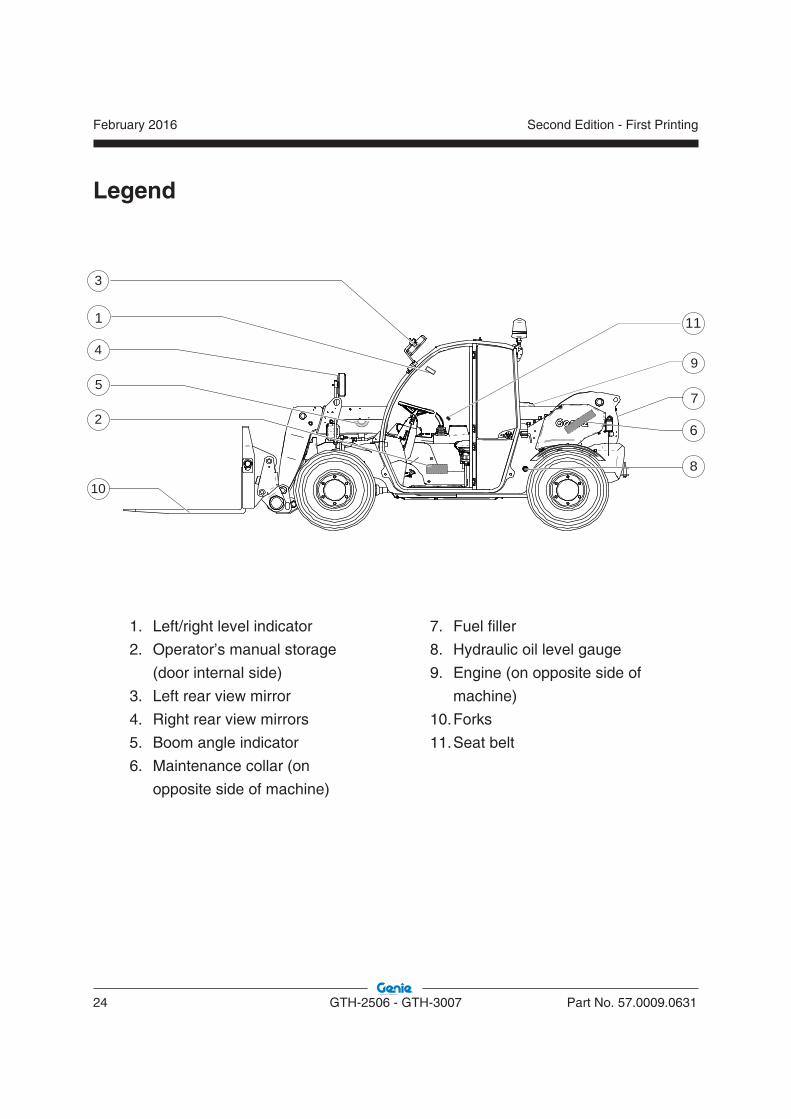
Legend
1. Left/right level indicator
2. Operator’s manual storage
(door internal side)
3. Left rear view mirror
4. Right rear view mirrors
5. Boom angle indicator
6. Maintenance collar (on
opposite side of machine)
7. Fuel filler
8. Hydraulic oil level gauge
9. Engine (on opposite side of
machine)
10. Forks
11. Seat belt
8
11
6
1
49
5
2
3
10
7
February 2016Second Edition - First Printing
Part No. 57.0009.0631 GTH-2506 - GTH-3007 25
Controls
GTH-2506
09.4618.0834
2
11
8
2
3
15
6
41
27
12 23
13
22 17
14
5
10
29
24
18
19
21
25
16
7
28
28
20
9
26

February 2016
26 GTH-2506 - GTH-3007 Part No. 57.0009.0631
Second Edition - First Printing
Controls
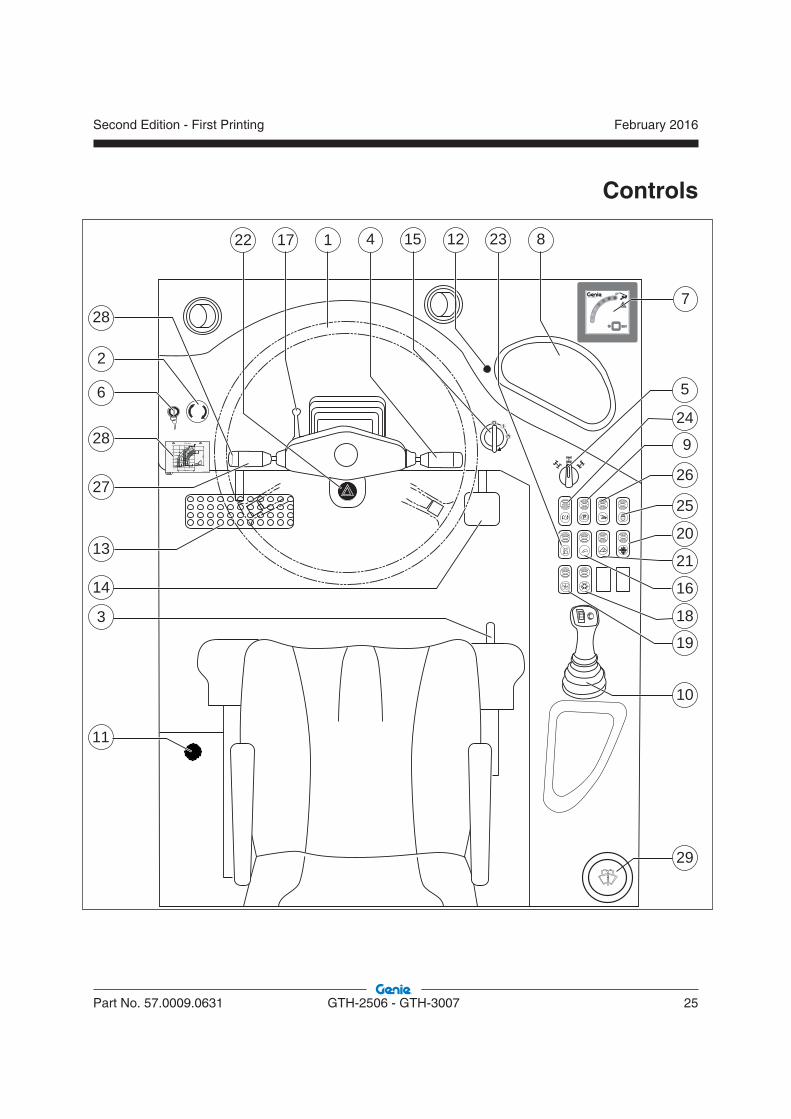
Control Panel
1. Steering wheel
2. Emergency stop push-button
3. Seat controls
4. Turn signal - Windshield washer/wiper - High beams
5. Steering mode selector
6. Load Limiting System override key switch
7. Load Limiting system control panel
8. Instruments panel
9. Parking brake switch
10. Function Joystick
11. Heater and air conditioning controls
12. Instrument panel display toggle button
13. Accelerator pedal
14. Brake pedal
15. Ignition switch
16. Work lights switch (if equipped)17. Steering column tilt adjustment lock
18. A/C switch (if equipped)
19. Cab heater fan switch
20. Auxiliary hydraulic circuit switch (if equipped)
21. Mixing bucket switch (if equipped)
22. Hazard warning lights switch
23. Road lights switch
24. Hydraulic mixing bucket oil direction switch (if equipped)
25. Hydraulic quick coupling enabling switch (if equipped)
26. Road/Job-site switch
27. Transmission control lever - Horn button
28. Load charts holder
29. Windshield washer reservoir

February 2016Second Edition - First Printing
Part No. 57.0009.0631 GTH-2506 - GTH-3007 27
Controls
1 Steering wheel
Turn the steering wheel to the right to turn the front wheels to the right. Turn the steering wheel to the left to turn the front wheels to the left.
2 Emergency stop push-button
See “Control Indicators and Interlocks” section.
3 Seat controls
See “Adjusting the Seat” section.
4 Turn signal - Windshield washer/wiper - High beams
Move the lever forward to activate the left turn signal. Move the lever backward to activate the right turn signal.
Press the top button at the end of the lever to direct a jet of water onto the cab windscreen.
Rotate the lever tip to operate the windscreen wiper.
Push the lever down to turn the high beams on (after pushing the Road lights switch 30). Push the lever up to use high beams for intermittent signalling.
5 Steering mode selector
Rotate the steering mode selector to the right side to select four-wheel steer. Rotate the steering mode selector to the middle position to select two-wheel steer. Rotate the steering mode selector to the left to select crab steer.
6 Load Limiting System override key switch
See “Load Limiting System control panel” section.
7 Load Limiting System control panel
See “Load Limiting Indicator” section.
8 Instrument panel
9 Parking brake switch
Push the bottom of the rocker switch to turn the parking brake on. Push the top of the switch to turn the parking brake off.
10 Function Joystick
See “Controller movements” section.
11 Heater and air conditioning controls
12. Instrument panel display toggle buttonPush the button to scroll the LCD screen menu.
13 Accelerator pedal
14 Brake pedal
15 Ignition switch
Turn the key to the position and hold until the glow plugs preheating indicator light turns off; when released, key springs back to pos. I automatically. Turn the key to position P to switch the control from the cab to platform.
16. Work lights switch (if equipped)
Push the rocker switch to turn the work lights on: first position for front & boom working lights and second position for front, boom & rear working lights.
17. Steering column tilt adjustment lock
Unlock the lever on the right-bottom side and pull or push the steering wheel to the required position, then re-lock it.
18 A/C switch
Push the switch to turn the A/C on. Push the switch to turn the A/C off.
February 2016
28 GTH-2506 - GTH-3007 Part No. 57.0009.0631
Second Edition - First Printing
Controls
19 Cab heater fan switch
Push the bottom of the switch to turn the cab heater fan on: first position for low speed and second position for high speed. Push the top of the switch to turn the cab heater fan off.
20 Auxiliary hydraulic circuit switch (if equipped)
Push the button to switch the hydraulic directional flow between the two auxiliary lines.
21 Mixing bucket switch (if equipped)
Push the bottom of the rocker switch to enable the hydraulic mixing bucket. Push the top of the switch to stop the hydraulic mixing bucket.
22 Hazard warning lights switch (if equipped)
Push the bottom of the switch to turn the hazard warning lights on. Push the top of the switch to turn the hazard warning lights off.
23. Road lights switch
Push the rocker switch to turn the road lights on: first position for position lights and second position for low beams.
24. Hydraulic mixing bucket oil direction switch (if equipped)
Press the switch to regulate the oil flow direction towards right or left: push the top to direct the oil towards left; push the bottom to direct the oil towards right.
25. Hydraulic quick attach enabling switch (if equipped)
Push and hold the switch to enable the coupling or the release of the attachment, managed by the control handle.
26 Road/Job-site switch
Push the bottom of the rocker switch to select job-site mode. Push the bottom of the rocker switch to select road transfer mode.
27 Transmission control lever - Horn button
Move the transmission control lever away from you for forward gear. Move the lever toward you for reverse gear. Move the lever to the center position for neutral.
Press the top end lever button and the horn will sound. Release the button and the horn will stop.
28 Instrument panel
29 Windshield washer reservoir

February 2016Second Edition - First Printing
Part No. 57.0009.0631 GTH-2506 - GTH-3007 29
Controls
Instrument Panel
1. Low engine oil pressure indicator light
2. Parking brake engaged indicator light
3. Hydraulic oil filter clogged indicator light
4. Low hydraulic oil level indicator light
5. Not active
6. Glow plugs preheating indicator light
7. Not active
8. Not active
9. Not active
10. Engine air filter restricted indicator light
11. Engine Alert indicator light
12. Engine Critical Fault indicator light
13. Not active
14. Not active
15. Engine coolant temperature gauge with high
coolant temperature indicator light
16. Position light indicator light
17. Hour-meter
18. Tachometer
19. High hydraulic oil temperature indicator light
20. Turn signal indicator light
21. Fuel level gauge with low fuel indicator light
22. Brake pressure low indicator light
23. High beam indicator light
24. Battery voltage low indicator light
25. Diagnostic light
engine rpm
000000.0
1230°c
105
60
13
22
24
14
18
15
161719
23
2021
25
12
3 81 4 5 6 72 9 1110

February 2016
30 GTH-2506 - GTH-3007 Part No. 57.0009.0631
Second Edition - First Printing
Controls
1 Low engine oil pressure indicator light
When illuminated this light indicates that the engine oil pressure is too low which can lead to machine damage. Discontinue use of the machine and service.
3 Hydraulic oil filter clogged indicator light
When illuminated this light indicates that the hydraulic oil filter is clogged which can lead to machine damage. Discontinue use of the machine and service.
4 Low hydraulic oil level indicator light
When illuminated this light indicates that the hydraulic oil level is too low which can lead to machine damage. Replenish and eliminate any oil leaks.
10 Engine air filter restricted indicator light
When this lamp comes on, the engine air filter is clogged proceed with cleaning or changing the air filter cartridge.
11 Engine Alert indicator light
This light flashes to warn of a problem with the engine. To identify the problem, see the two sections “Engine Lamp Logic”
12 Engine Critical Fault indicator light
This light comes on to warn of a problem with the engine. To identify the problem, see the two sections “Engine Lamp Logic”
15 Engine coolant temperature gauge with high coolant temperature indicator light
When gauge reaches red, the engine coolant is too hot which can lead to engine damage. Discontinue use and service the engine
19 High hydraulic oil temperature indicator light
This indicates the temperature of the hydraulic oil in the tank which can lead to machine damage. Discontinue use of the machine and service.
22 Brake pressure low indicator light
It lights when the pressure of the braking circuit is too low for a correct functioning which can lead to machine damage. Discontinue use of the machine and service.
25. Diagnostic light
February 2016Second Edition - First Printing
Part No. 57.0009.0631 GTH-2506 - GTH-3007 31
Inspections
Do Not Operate Unless:
You learn and practice the principles of safe machine operation contained in this operator’s manual.
1. Avoid hazardous situations.
2. Always perform a pre-operation inspection.
Know and understand the pre-operation inspection before going on to the next section.
3. Always perform function tests prior to use.
4. Inspect the workplace.
5. Only use the machine as it was intended.
Pre-operation Inspection FundamentalsIt is the responsibility of the operator to perform a pre-operation inspection and routine maintenance.
The pre-operation inspection is a visual inspection performed by the operator prior to each work shift. The inspection is designed to discover if anything is apparently wrong with a machine before the operator performs the function tests.
The pre-operation inspection also serves to determine if routine maintenance procedures are required. Only routine maintenance items specified in this manual may be performed by the operator.
Refer to the list on the next page and check each of the items.
If damage or any unauthorized variation from factory delivered condition is discovered, the machine must be tagged and removed from service.
Repairs to the machine may only be made by a qualified service technician, according to the manufacturer's specifications. After repairs are completed, the operator must perform a pre-operation inspection again before going on to the function tests.
Scheduled maintenance inspections shall be performed by qualified service technicians, according to the manufacturer’s specifications and the requirements listed in the responsibilities manual.
February 2016
32 GTH-2506 - GTH-3007 Part No. 57.0009.0631
Second Edition - First Printing
Inspections
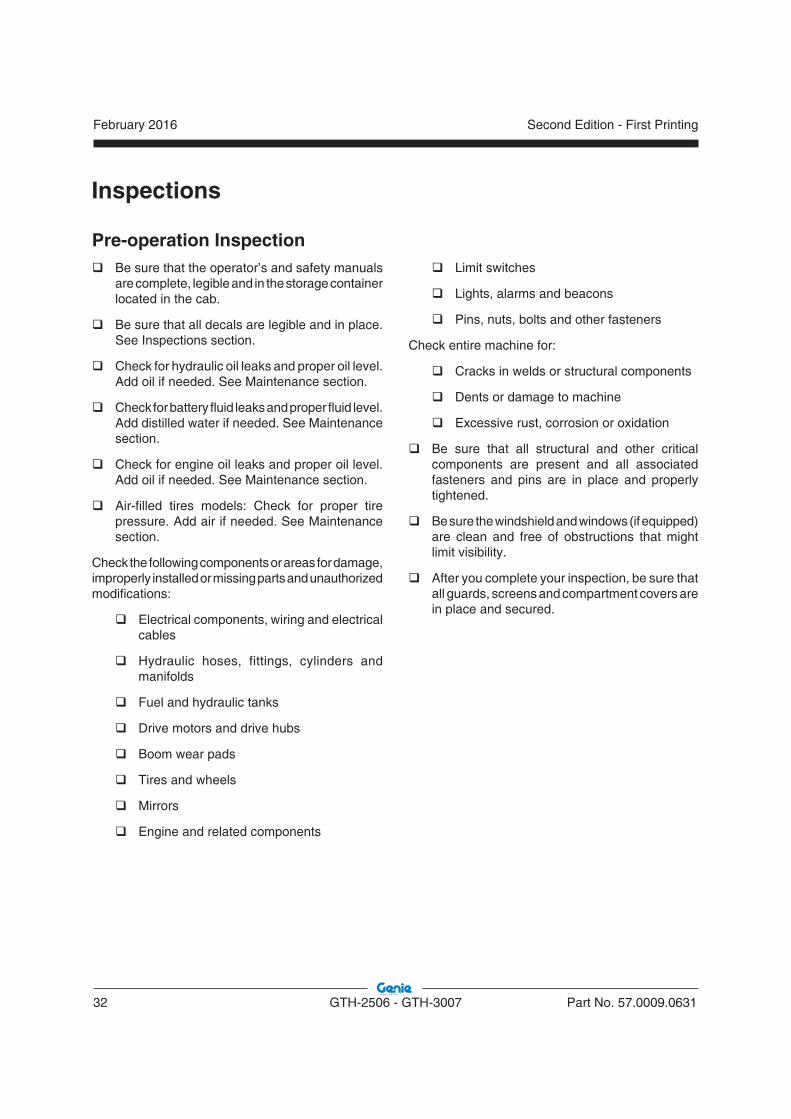
Pre-operation Inspection Be sure that the operator’s and safety manuals
are complete, legible and in the storage container located in the cab.
Be sure that all decals are legible and in place. See Inspections section.
Check for hydraulic oil leaks and proper oil level. Add oil if needed. See Maintenance section.
Check for battery fluid leaks and proper fluid level. Add distilled water if needed. See Maintenance section.
Check for engine oil leaks and proper oil level. Add oil if needed. See Maintenance section.
Air-filled tires models: Check for proper tire pressure. Add air if needed. See Maintenance section.
Check the following components or areas for damage, improperly installed or missing parts and unauthorized modifications:
Electrical components, wiring and electrical cables
Hydraulic hoses, fittings, cylinders and manifolds
Fuel and hydraulic tanks
Drive motors and drive hubs
Boom wear pads
Tires and wheels
Mirrors
Engine and related components
Limit switches
Lights, alarms and beacons
Pins, nuts, bolts and other fasteners
Check entire machine for:
Cracks in welds or structural components
Dents or damage to machine
Excessive rust, corrosion or oxidation
Be sure that all structural and other critical components are present and all associated fasteners and pins are in place and properly tightened.
Be sure the windshield and windows (if equipped) are clean and free of obstructions that might limit visibility.
After you complete your inspection, be sure that all guards, screens and compartment covers are in place and secured.
February 2016Second Edition - First Printing
Part No. 57.0009.0631 GTH-2506 - GTH-3007 33
Inspections
Do Not Operate Unless:
You learn and practice the principles of safe machine operation contained in this operator’s manual.
1. Avoid hazardous situations.
2. Always perform a pre-operation inspection.
3. Always perform function tests prior to use.
Know and understand the function tests inspection before going on to the next section.
4. Inspect the workplace.
5. Only use the machine as it was intended.
Function Test FundamentalsThe function tests are designed to discover any malfunctions before the machine is put into service. The operator must follow the step-by-step instructions to test all machine functions.
A malfunctioning machine must never be used. If malfunctions are discovered, the machine must be tagged and removed from service. Repairs to the machine may only be made by a qualified service technician, according to the manufacturer’s specifications.
After repairs are completed, the operator must perform a pre-operation inspection and function tests again before putting the machine into service.

February 2016
34 GTH-2506 - GTH-3007 Part No. 57.0009.0631
Second Edition - First Printing
Inspections
Function Tests1 Select a test area that is firm, level and free of
obstruction. Be sure there is no load on the forks or attachment.
2 Enter the cab and sit on the seat.
3 Adjust the seat and steering column, if needed.
4 Fasten and secure the seat belt around your waist.
5 Adjust the cab mounted mirror and the exterior right hand mirror, if required.
6 Be sure the parking brake is on and the transmission control lever is in neutral position.
7 Start the engine. See Starting the Engine in the Operating Instructions section.
Test the Function Joystick
8 Using the Function Joystick, momentarily raise the boom and extend the boom, tilt the forks up and down.
Result: All functions should operate smoothly.
9 Using the roller switch, momentarily extend and retract the boom.
Result: All functions should operate smoothly.
Test the Hydraulic Quick Coupling Lock/Unlock (if equipped)
10 While pressing the dedicated switch, push and hold the white thumb switch and use the control handle, momentarily lock/unlock the hydraulic quick coupling.
Result: All functions should operate smoothly.
Test the Steering
11 Rotate the steering mode selector to the right side to select four-wheel steer.
12 Check the steering operation by turning the steering wheel approximately ¼ turn in each direction.
Result: The front wheels should turn in the same direction as the steering wheel. The rear wheels should turn in the opposite direction.

February 2016Second Edition - First Printing
Part No. 57.0009.0631 GTH-2506 - GTH-3007 35
13 Straighten the wheels.
14 Rotate the steering mode selector to the middle position to select two-wheel steer.
15 Check the steering operation by turning the steering wheel approximately ¼ turn in each direction.
Result: The front wheels should turn in the same direction as the steering wheel. The rear wheels should not turn.
16 Straighten the wheels.
17 Rotate the steering mode selector to the left to select crab steer.
18 Check the steering operation by turning the steering wheel approximately ¼ turn in each direction.
Result: The front wheels and the rear wheels should turn in the same direction as the steering wheel.
Test the Transmission and Brakes
19 Be sure the boom is fully lowered and retracted.
20 Step on the brake pedal. Push the top of the parking brake switch to turn it off.
21 Move the transmission control lever to the forward direction. Push down lightly on the accelerator pedal to increase the RPM’s and slowly let up on the brake pedal. As soon as the machine starts to move, push the brake pedal.
Result: The machine should move forward, and then come to an abrupt stop.
22 Move the transmission control lever to the reverse direction. Push down lightly on the accelerator pedal to increase the RPM’s and slowly let up on the brake pedal. As soon as the machine starts to move, push the brake pedal.
Result: The machine should move in reverse, and then come to an abrupt stop. The back-up alarm should sound when the transmission control lever is in reverse.
23 Move the transmission control lever to neutral.
24 Push the bottom of the parking brake switch.
Result: The red parking brake indicator light should come on, indicating the parking brake is on.
25 Move the transmission control lever forward, and then in reverse while increasing the RPM’s with the accelerator pedal.
Result: The machine should not move.
Test the Parking Brake26 Push the bottom of the rocker switch to turn the
parking brake on: the parking brake warning light should come on.
27 Push down lightly on the accelerator pedal.
Result: The machine should not move .
Inspections

February 2016
36 GTH-2506 - GTH-3007 Part No. 57.0009.0631
Second Edition - First Printing
Test the Road Transfer Mode
28 Set the steering mode selector to road transfer mode.
29 Attempt to: operate the boom
Result: None of these functions should operate.
Test the Lights
30 Verify that all equipped working and road lights are functional.
Test the Load Limiting System
31 Load a known weight of approximately 1000 kg.
32 Raise the boom about 30 cm above the ground.
33 Extend the boom and check if the system enters the alarm mode once it has reached the distance as indicated in the load charts for the attachment fitted to the machine.
Result: the system alarm mode should sound.
Test the Joystick Enabling Function Switch
34 Operate the joystick without pressing this button.
Result: the joystick shall not activate any movement.
Inspections
Test the Emergency Stop Push button35 Press the Emergency Stop Push button down
during a movement.
Result: the movements shall stop and engine should shut down.
Test the Seat Switch
36 Do not sit on the drive seat.
37 Place transmission into forward or backward.
38 Release parking and service brakes.
39 Push down lightly on the accelerator pedal.
Result: the machine should not move.

February 2016Second Edition - First Printing
Part No. 57.0009.0631 GTH-2506 - GTH-3007 37
Inspections
Do Not Operate Unless:
You learn and practice the principles of safe machine operation contained in this operator’s manual.
1. Avoid hazardous situations.
2. Always perform a pre-operation inspection.
3. Always perform function tests prior to use.
4. Inspect the workplace.
5. Only use the machine as it was intended.
Workplace Inspection FundamentalsThe workplace inspection helps the operator determine if the workplace is suitable for safe machine operation. It should be performed by the operator prior to moving the machine to the workplace.
It is the operator’s responsibility to read and remember the workplace hazards, then watch for and avoid them while moving, setting up and operating the machine.
Workplace Inspection ChecklistBe aware of and avoid the following hazardous situations:
drop-offs or holes
bumps, floor obstructions or debris
sloped surfaces
unstable or slippery surfaces
overhead obstructions and high voltage conductors
hazardous locations
inadequate surface support to withstand all load forces imposed by the machine
wind and weather conditions
the presence of unauthorized personnel
other possible unsafe conditions
February 2016
38 GTH-2506 - GTH-3007 Part No. 57.0009.0631
Second Edition - First Printing
Inspections
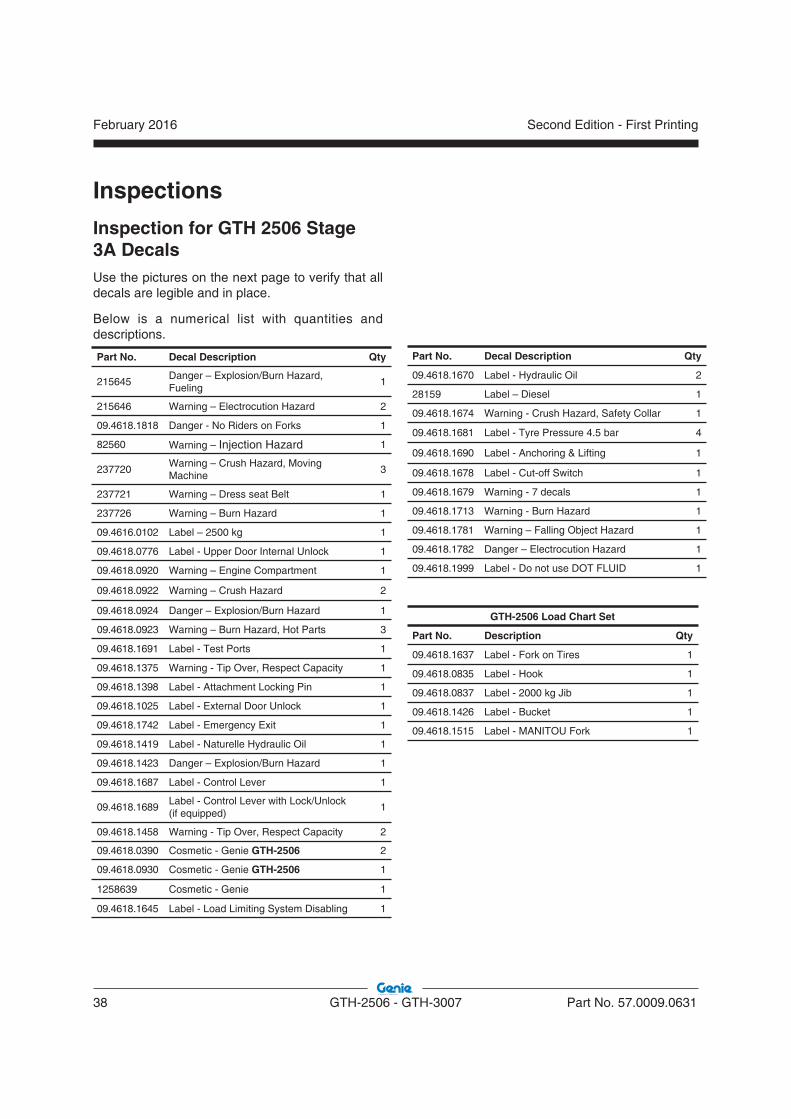
Inspection for GTH 2506 Stage 3A DecalsUse the pictures on the next page to verify that all decals are legible and in place.
Below is a numerical list with quantities and descriptions.
Part No. Decal Description Qty
215645Danger – Explosion/Burn Hazard, Fueling
1
215646 Warning – Electrocution Hazard 2
09.4618.1818 Danger - No Riders on Forks 1
82560 Warning – Injection Hazard 1
237720Warning – Crush Hazard, Moving Machine
3
237721 Warning – Dress seat Belt 1
237726 Warning – Burn Hazard 1
09.4616.0102 Label – 2500 kg 1
09.4618.0776 Label - Upper Door Internal Unlock 1
09.4618.0920 Warning – Engine Compartment 1
09.4618.0922 Warning – Crush Hazard 2
09.4618.0924 Danger – Explosion/Burn Hazard 1
09.4618.0923 Warning – Burn Hazard, Hot Parts 3
09.4618.1691 Label - Test Ports 1
09.4618.1375 Warning - Tip Over, Respect Capacity 1
09.4618.1398 Label - Attachment Locking Pin 1
09.4618.1025 Label - External Door Unlock 1
09.4618.1742 Label - Emergency Exit 1
09.4618.1419 Label - Naturelle Hydraulic Oil 1
09.4618.1423 Danger – Explosion/Burn Hazard 1
09.4618.1687 Label - Control Lever 1
09.4618.1689Label - Control Lever with Lock/Unlock (if equipped)
1
09.4618.1458 Warning - Tip Over, Respect Capacity 2
09.4618.0390 Cosmetic - Genie GTH-2506 2
09.4618.0930 Cosmetic - Genie GTH-2506 1
1258639 Cosmetic - Genie 1
09.4618.1645 Label - Load Limiting System Disabling 1
Part No. Decal Description Qty
09.4618.1670 Label - Hydraulic Oil 2
28159 Label – Diesel 1
09.4618.1674 Warning - Crush Hazard, Safety Collar 1
09.4618.1681 Label - Tyre Pressure 4.5 bar 4
09.4618.1690 Label - Anchoring & Lifting 1
09.4618.1678 Label - Cut-off Switch 1
09.4618.1679 Warning - 7 decals 1
09.4618.1713 Warning - Burn Hazard 1
09.4618.1781 Warning – Falling Object Hazard 1
09.4618.1782 Danger – Electrocution Hazard 1
09.4618.1999 Label - Do not use DOT FLUID 1
GTH-2506 Load Chart Set
Part No. Description Qty
09.4618.1637 Label - Fork on Tires 1
09.4618.0835 Label - Hook 1
09.4618.0837 Label - 2000 kg Jib 1
09.4618.1426 Label - Bucket 1
09.4618.1515 Label - MANITOU Fork 1

February 2016Second Edition - First Printing
Part No. 57.0009.0631 GTH-2506 - GTH-3007 39
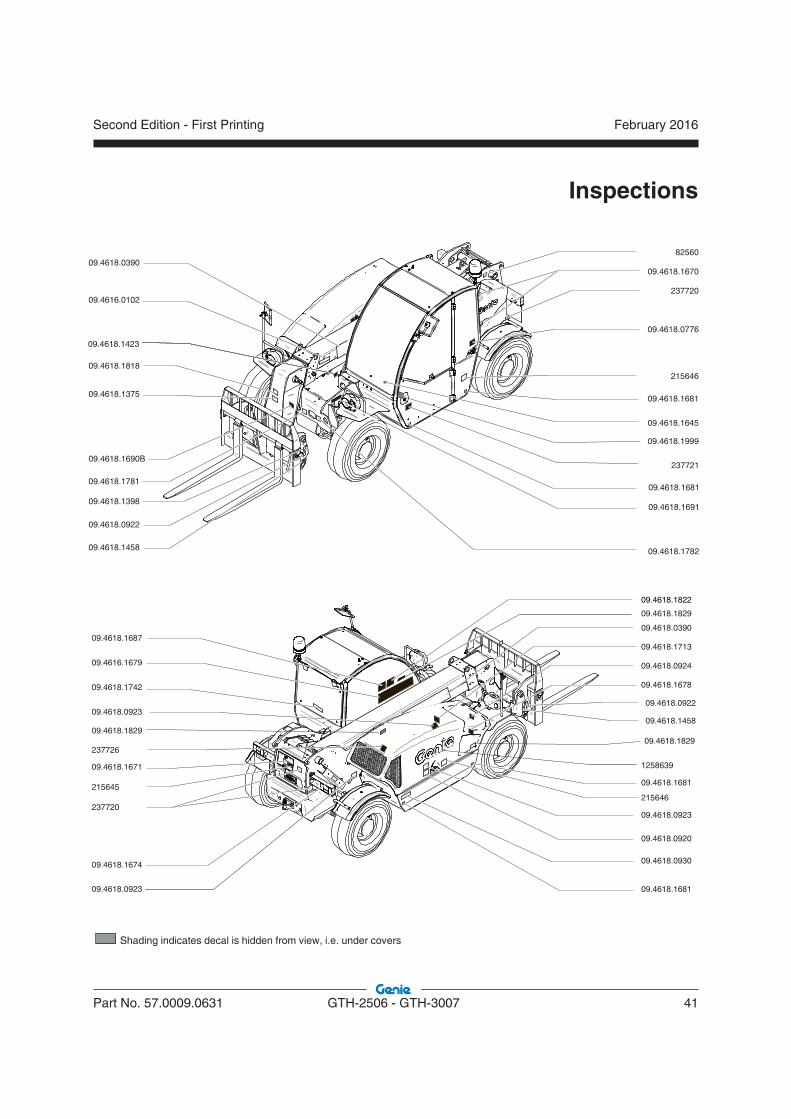
Inspections
Shading indicates decal is hidden from view, i.e. under covers
237720
09.4618.1670
09.4618.1398
09.4618.0922
09.4616.0102
237721
09.4618.0776
09.4618.1645
215646
09.4618.1681
09.4618.0390
09.4618.1681
82560
09.4618.1691
09.4618.1781
09.4618.1690B
09.4618.1818
09.4618.1375
09.4618.178209.4618.1458
09.4618.1423
09.4618.1999
09.4618.0924
09.4618.1713
09.4618.1674
09.4616.1679
09.4618.1458
09.4618.0923
09.4618.0920
09.4618.1687
09.4618.1681
09.4618.0390
09.4618.0930
237720
215645
237726
09.4618.1681
09.4618.1742
09.4618.0923
09.4618.1678
28159
215646
09.4618.0922
1258639
February 2016
40 GTH-2506 - GTH-3007 Part No. 57.0009.0631
Second Edition - First Printing
Inspections
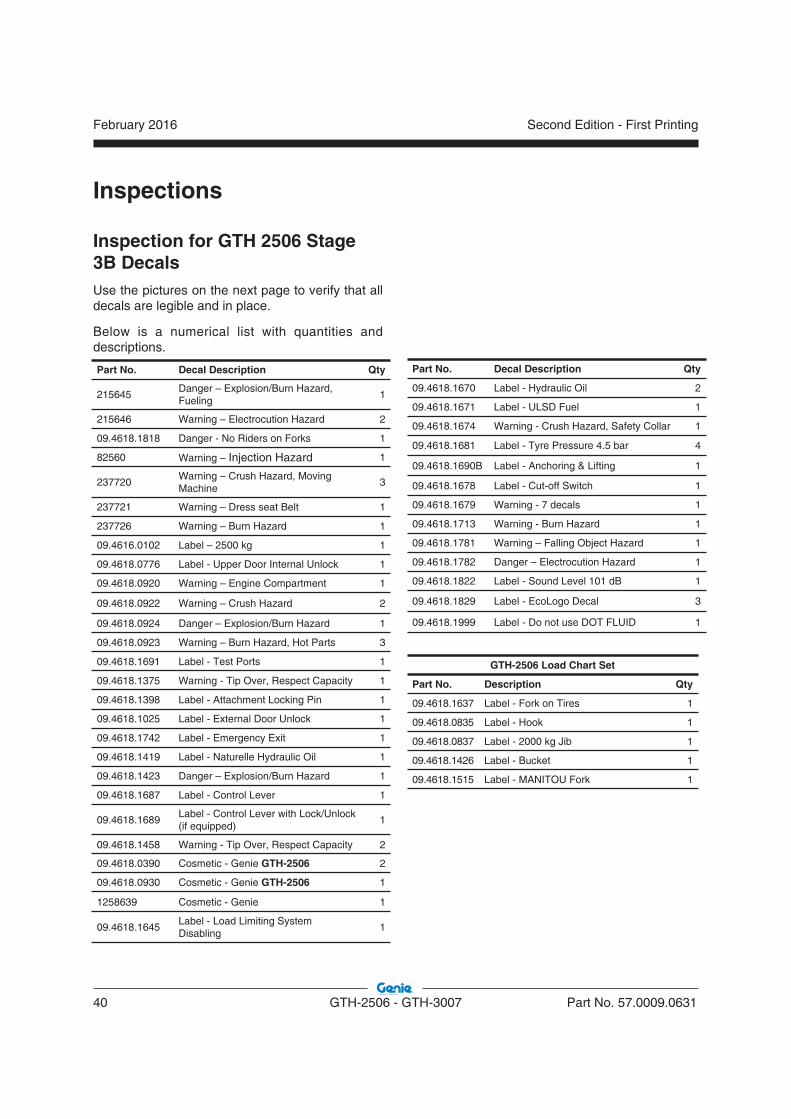
Inspection for GTH 2506 Stage 3B DecalsUse the pictures on the next page to verify that all decals are legible and in place.
Below is a numerical list with quantities and descriptions.
Part No. Decal Description Qty
215645Danger – Explosion/Burn Hazard, Fueling
1
215646 Warning – Electrocution Hazard 2
09.4618.1818 Danger - No Riders on Forks 1
82560 Warning – Injection Hazard 1
237720Warning – Crush Hazard, Moving Machine
3
237721 Warning – Dress seat Belt 1
237726 Warning – Burn Hazard 1
09.4616.0102 Label – 2500 kg 1
09.4618.0776 Label - Upper Door Internal Unlock 1
09.4618.0920 Warning – Engine Compartment 1
09.4618.0922 Warning – Crush Hazard 2
09.4618.0924 Danger – Explosion/Burn Hazard 1
09.4618.0923 Warning – Burn Hazard, Hot Parts 3
09.4618.1691 Label - Test Ports 1
09.4618.1375 Warning - Tip Over, Respect Capacity 1
09.4618.1398 Label - Attachment Locking Pin 1
09.4618.1025 Label - External Door Unlock 1
09.4618.1742 Label - Emergency Exit 1
09.4618.1419 Label - Naturelle Hydraulic Oil 1
09.4618.1423 Danger – Explosion/Burn Hazard 1
09.4618.1687 Label - Control Lever 1
09.4618.1689Label - Control Lever with Lock/Unlock (if equipped)
1
09.4618.1458 Warning - Tip Over, Respect Capacity 2
09.4618.0390 Cosmetic - Genie GTH-2506 2
09.4618.0930 Cosmetic - Genie GTH-2506 1
1258639 Cosmetic - Genie 1
09.4618.1645Label - Load Limiting System Disabling
1
Part No. Decal Description Qty
09.4618.1670 Label - Hydraulic Oil 2
09.4618.1671 Label - ULSD Fuel 1
09.4618.1674 Warning - Crush Hazard, Safety Collar 1
09.4618.1681 Label - Tyre Pressure 4.5 bar 4
09.4618.1690B Label - Anchoring & Lifting 1
09.4618.1678 Label - Cut-off Switch 1
09.4618.1679 Warning - 7 decals 1
09.4618.1713 Warning - Burn Hazard 1
09.4618.1781 Warning – Falling Object Hazard 1
09.4618.1782 Danger – Electrocution Hazard 1
09.4618.1822 Label - Sound Level 101 dB 1
09.4618.1829 Label - EcoLogo Decal 3
09.4618.1999 Label - Do not use DOT FLUID 1
GTH-2506 Load Chart Set
Part No. Description Qty
09.4618.1637 Label - Fork on Tires 1
09.4618.0835 Label - Hook 1
09.4618.0837 Label - 2000 kg Jib 1
09.4618.1426 Label - Bucket 1
09.4618.1515 Label - MANITOU Fork 1
February 2016Second Edition - First Printing
Part No. 57.0009.0631 GTH-2506 - GTH-3007 41
Inspections
Shading indicates decal is hidden from view, i.e. under covers
237720
09.4618.1670
09.4618.1398
09.4618.0922
09.4616.0102
237721
09.4618.0776
09.4618.1645
215646
09.4618.1681
09.4618.0390
09.4618.1681
82560
09.4618.1691
09.4618.1781
09.4618.1690B
09.4618.1818
09.4618.1375
09.4618.178209.4618.1458
09.4618.1423
09.4618.1999
09.4618.0924
09.4618.1713
09.4618.1674
09.4616.1679
09.4618.0923
09.4618.0920
09.4618.1687
09.4618.1681
09.4618.0390
09.4618.0930
237720
215645
237726
09.4618.1681
09.4618.1742
09.4618.0923
09.4618.1678
09.4618.1671
215646
09.4618.1822
09.4618.0923
09.4618.1829
09.4618.182909.4618.1829
1258639
09.4618.1458
09.4618.0922
February 2016
42 GTH-2506 - GTH-3007 Part No. 57.0009.0631
Second Edition - First Printing
Inspections
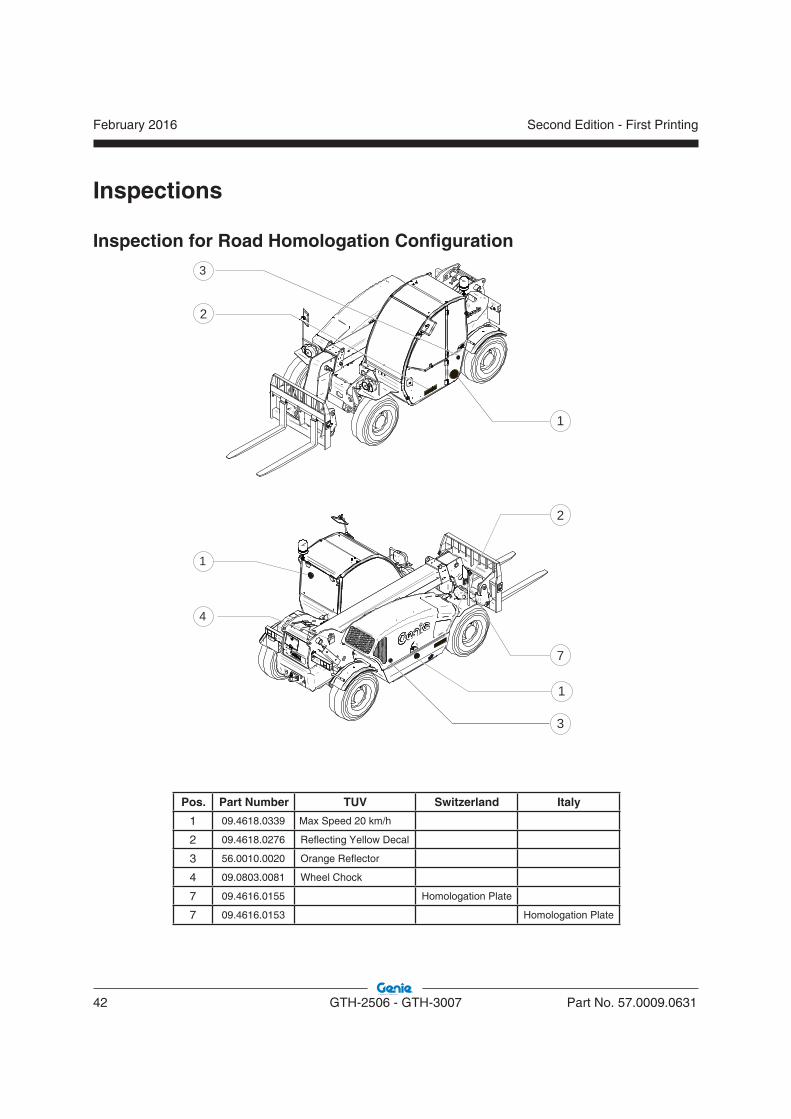
4
1
3
2
1
3
2
7
1
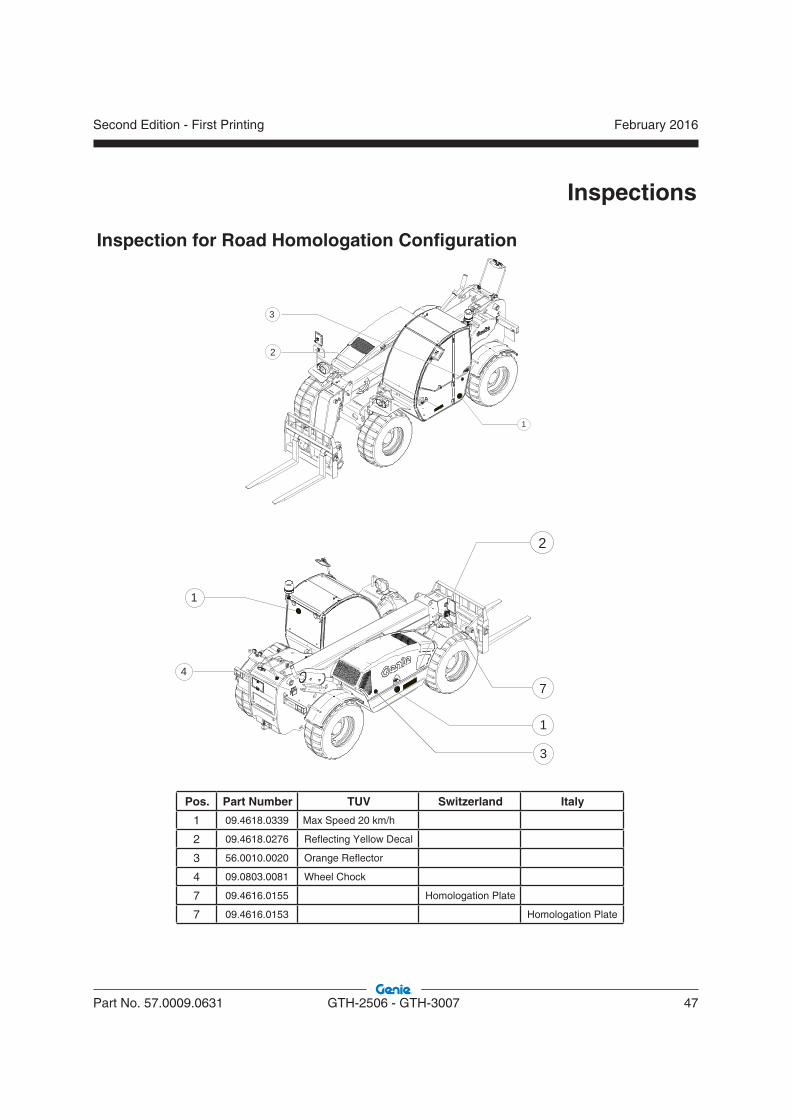
Pos. Part Number TUV Switzerland Italy
1 09.4618.0339 Max Speed 20 km/h
2 09.4618.0276 Reflecting Yellow Decal
3 56.0010.0020 Orange Reflector
4 09.0803.0081 Wheel Chock
7 09.4616.0155 Homologation Plate
7 09.4616.0153 Homologation Plate
Inspection for Road Homologation Confi guration

February 2016Second Edition - First Printing
Part No. 57.0009.0631 GTH-2506 - GTH-3007 43
Inspections
Inspection for GTH 3007 Stage 3A DecalsUse the pictures on the next page to verify that all decals are legible and in place.
Below is a numerical list with quantities and descriptions.
Part No. Decal Description Qty
215645Danger – Explosion/Burn Hazard, Fueling
1
215646 Warning – Electrocution Hazard 2
09.4618.1818 Danger - No Riders on Forks 1
82560 Warning – Injection Hazard 1
237720Warning – Crush Hazard, Moving Machine
3
237721 Warning – Dress seat Belt 1
237726 Warning – Burn Hazard 1
09.4616.0002 Label – 3000 kg 1
09.4618.0776 Label - Upper Door Internal Unlock 1
09.4618.0920 Warning – Engine Compartment 1
09.4618.0922 Warning – Crush Hazard 2
09.4618.0924 Danger – Explosion/Burn Hazard 1
09.4618.0923 Warning – Burn Hazard, Hot Parts 3
09.4618.1691 Label - Test Ports 1
09.4618.1375 Warning - Tip Over, Respect Capacity 1
09.4618.1398 Label - Attachment Locking Pin 1
09.4618.1025 Label - External Door Unlock 1
09.4618.1742 Label - Emergency Exit 1
09.4618.1419 Label - Naturelle Hydraulic Oil 1
09.4618.1423 Danger – Explosion/Burn Hazard 1
09.4618.1687 Label - Control Lever 1
09.4618.1689Label - Control Lever with Lock/Unlock (if equipped)
1
09.4618.1458 Warning - Tip Over, Respect Capacity 2
09.4618.1992 Cosmetic - Genie GTH-3007 1
09.4618.1993 Cosmetic - GTH -3007 1
09.4618.1994 Cosmetic - Genie GTH-3007 1
1258639 Cosmetic - Genie 1
09.4618.1645 Label - Load Limiting System Disabling 1
Part No. Decal Description Qty
09.4618.1670 Label - Hydraulic Oil 2
28159 Label – Diesel 1
09.4618.1674 Warning - Crush Hazard, Safety Collar 1
09.4618.1682 Label - Tyre Pressure 5.5 bar 4
09.4618.1995 Label - Anchoring & Lifting 1
09.4618.1678 Label - Cut-off Switch 1
09.4618.1679 Warning - 7 decals 1
09.4618.1713 Warning - Burn Hazard 1
09.4618.1781 Warning – Falling Object Hazard 1
09.4618.1782 Danger – Electrocution Hazard 1
09.4618.1999 Label - Do not use DOT FLUID 1
GTH-3007 Load Chart Set
Part No. Description Qty
09.4618.2016 Label - Fork on Tires 1
09.4618.2022 Label - Hook 1
09.4618.2023 Label - 2000 kg Jib 1
09.4618.2024 Label - 900 kg Jib 1
09.4618.2025 Label - Bucket 1
February 2016
44 GTH-2506 - GTH-3007 Part No. 57.0009.0631
Second Edition - First Printing
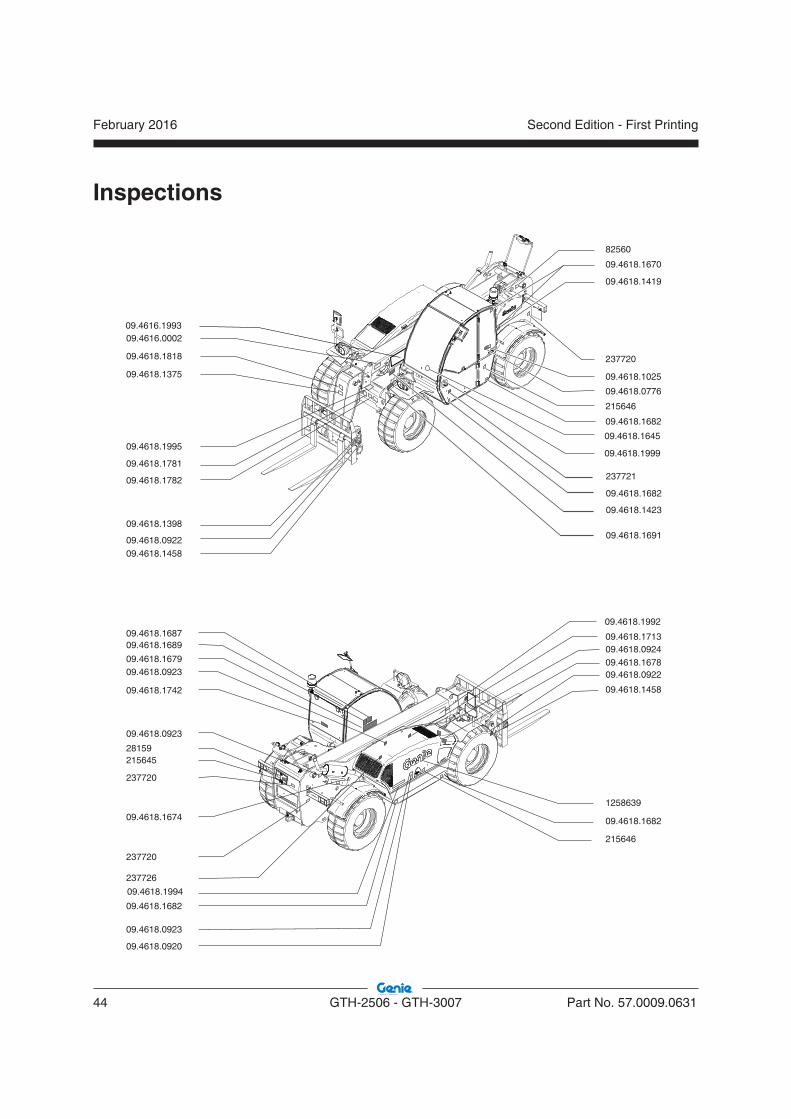
Inspections
09.4618.1682
09.4618.1682
09.4618.0923
09.4618.0920
215646
09.4618.0923
09.4618.1674
237720
28159215645
09.4618.1713
09.4618.0922
09.4618.1458
09.4618.167809.4618.0924
09.4618.1398
09.4618.0922
215646
09.4618.1818
82560
237720
237720
237721
237726
09.4616.0002
09.4618.0776
09.4618.0923
09.4618.1691
09.4618.1375 09.4618.1025
09.4618.1742
09.4618.1419
09.4618.1670
09.4618.1423
09.4618.168709.4618.1689
09.4618.1679
09.4618.1645
09.4618.1781
09.4618.1782
09.4618.1995
1258639
09.4618.1682
09.4618.1682
09.4618.1992
09.4618.1994
09.4616.1993
09.4618.1458
09.4618.1999

February 2016Second Edition - First Printing
Part No. 57.0009.0631 GTH-2506 - GTH-3007 45
Inspections
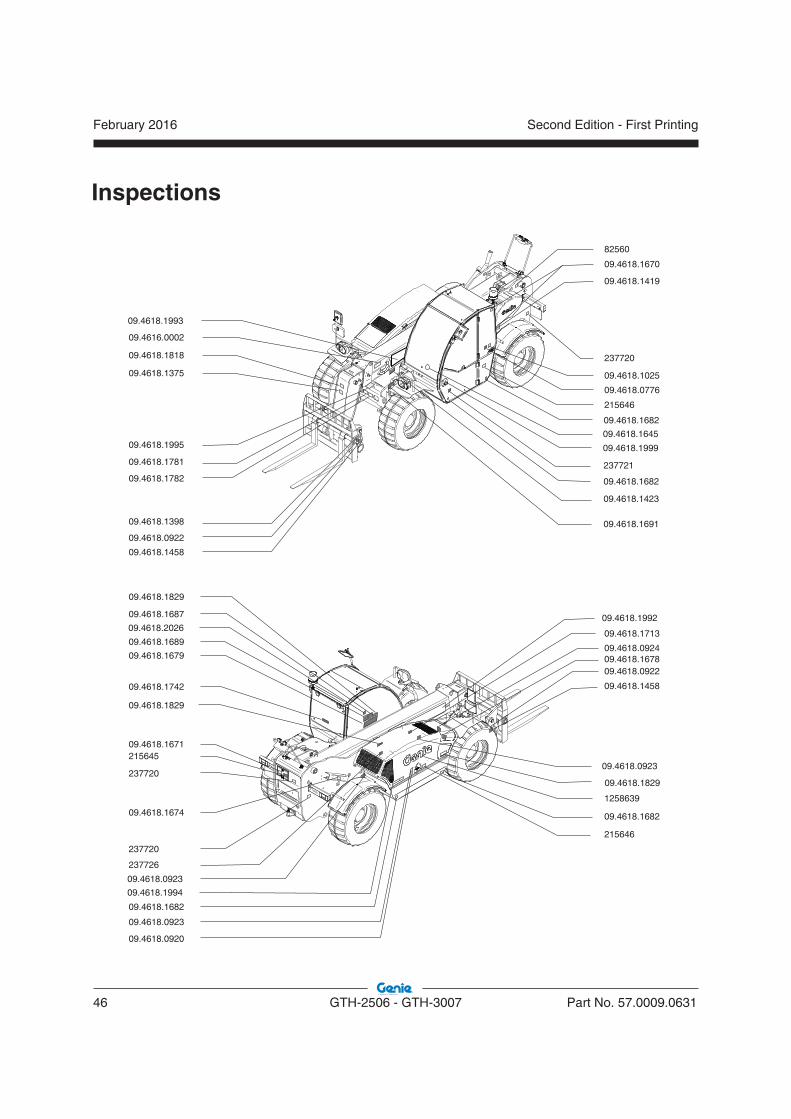
Inspection for GTH 3007 Stage 3B DecalsUse the pictures on the next page to verify that all decals are legible and in place.
Below is a numerical list with quantities and descriptions.
Part No. Decal Description Qty
215645Danger – Explosion/Burn Hazard, Fueling
1
215646 Warning – Electrocution Hazard 2
09.4618.1818 Danger - No Riders on Forks 1
82560 Warning – Injection Hazard 1
237720Warning – Crush Hazard, Moving Machine
3
237721 Warning – Dress seat Belt 1
237726 Warning – Burn Hazard 1
09.4616.0002 Label – 3000 kg 1
09.4618.0776 Label - Upper Door Internal Unlock 1
09.4618.0920 Warning – Engine Compartment 1
09.4618.0922 Warning – Crush Hazard 2
09.4618.0924 Danger – Explosion/Burn Hazard 1
09.4618.0923 Warning – Burn Hazard, Hot Parts 3
09.4618.1691 Label - Test Ports 1
09.4618.1375 Warning - Tip Over, Respect Capacity 1
09.4618.1398 Label - Attachment Locking Pin 1
09.4618.1025 Label - External Door Unlock 1
09.4618.1742 Label - Emergency Exit 1
09.4618.1419 Label - Naturelle Hydraulic Oil 1
09.4618.1423 Danger – Explosion/Burn Hazard 1
09.4618.1687 Label - Control Lever 1
09.4618.1689Label - Control Lever with Lock/Unlock (if equipped)
1
09.4618.1458 Warning - Tip Over, Respect Capacity 2
09.4618.1992 Cosmetic - Genie GTH-3007 1
09.4618.1993 Cosmetic - GTH-3007 1
09.4618.1994 Cosmetic - Genie GTH-3007 1
1258639 Cosmetic - Genie 1
09.4618.1645 Label - Load Limiting System Disabling 1
Part No. Decal Description Qty
09.4618.1670 Label - Hydraulic Oil 2
09.4618.1671 Label - ULSD Fuel 1
09.4618.1674 Warning - Crush Hazard, Safety Collar 1
09.4618.1682 Label - Tyre Pressure 5.5 bar 4
09.4618.1995 Label - Anchoring & Lifting 1
09.4618.1678 Label - Cut-off Switch 1
09.4618.1679 Warning - 7 decals 1
09.4618.1713 Warning - Burn Hazard 1
09.4618.1781 Warning – Falling Object Hazard 1
09.4618.1782 Danger – Electrocution Hazard 1
09.4618.1829 Label - EcoLogo 3
09.4618.2026 Label - Sound Level 104 dB 1
09.4618.1999 Label - Do not use DOT FLUID 1
GTH-3007 Load Chart Set
Part No. Description Qty
09.4618.2016 Label - Fork on Tires 1
09.4618.2022 Label - Hook 1
09.4618.2023 Label - 2000 kg Jib 1
09.4618.2024 Label - 900 Kg Jib 1
09.4618.2025 Label - Bucket 1
February 2016
46 GTH-2506 - GTH-3007 Part No. 57.0009.0631
Second Edition - First Printing
Inspections
09.4618.1682
09.4618.1682
09.4618.0923
09.4618.0920
215646
09.4618.1674
237720
09.4618.1671215645
09.4618.1713
09.4618.0922
09.4618.1458
09.4618.167809.4618.0924
09.4618.1398
09.4618.0922
215646
09.4618.1818
82560
237720
237720
237721
237726
09.4616.0002
09.4618.0776
09.4618.0923
09.4618.1691
09.4618.1375 09.4618.1025
09.4618.1742
09.4618.1419
09.4618.1670
09.4618.1423
09.4618.1687
09.4618.1689
09.4618.1679
09.4618.1645
09.4618.1781
09.4618.1782
09.4618.1995
1258639
09.4618.1829
09.4618.1829
09.4618.2026
09.4618.1829
09.4618.1682
09.4618.1682
09.4618.1992
09.4618.1994
09.4618.1993
09.4618.0923
09.4618.1458
09.4618.1999
February 2016Second Edition - First Printing
Part No. 57.0009.0631 GTH-2506 - GTH-3007 47
Inspections
1
2
3
1
2
74
3
1
Pos. Part Number TUV Switzerland Italy
1 09.4618.0339 Max Speed 20 km/h
2 09.4618.0276 Reflecting Yellow Decal
3 56.0010.0020 Orange Reflector
4 09.0803.0081 Wheel Chock
7 09.4616.0155 Homologation Plate
7 09.4616.0153 Homologation Plate
Inspection for Road Homologation Confi guration
February 2016
48 GTH-2506 - GTH-3007 Part No. 57.0009.0631
Second Edition - First Printing
Operating Instructions
Do Not Operate Unless:
You learn and practice the principles of safe machine operation contained in this operator’s manual.
1 Avoid hazardous situations.
2 Always perform a pre-operation inspection.
3 Always perform function tests prior to use.
4 Inspect the workplace.
5 Only use the machine as it was intended.
FundamentalsThe Operating Instructions section provides instructions for each aspect of machine operation. It is the operator’s responsibility to follow all the safety rules and instructions in the operator’s, safety and responsibilities manuals.
A variable reach rough terrain forklift truck is defined as a wheeled type truck designated primarily as a fork truck with a pivoted boom, which may be equipped with attachments for lifting material. Using it for any other purpose is unsafe and dangerous.
Only trained and authorized personnel should be permitted to operate a machine. If more than one operator is expected to use a machine at different times in the same work shift, they must all be qualified operators and are all expected to follow all safety rules and instructions in the operator’s, safety and responsibilities manuals. That means every new operator should perform a pre-operation inspection, function tests, and a workplace inspection before using the machine.
Additionally, everyone working on or near the product also needs to be familiar with the applicable safety precautions.
February 2016Second Edition - First Printing
Part No. 57.0009.0631 GTH-2506 - GTH-3007 49
Operating Instructions
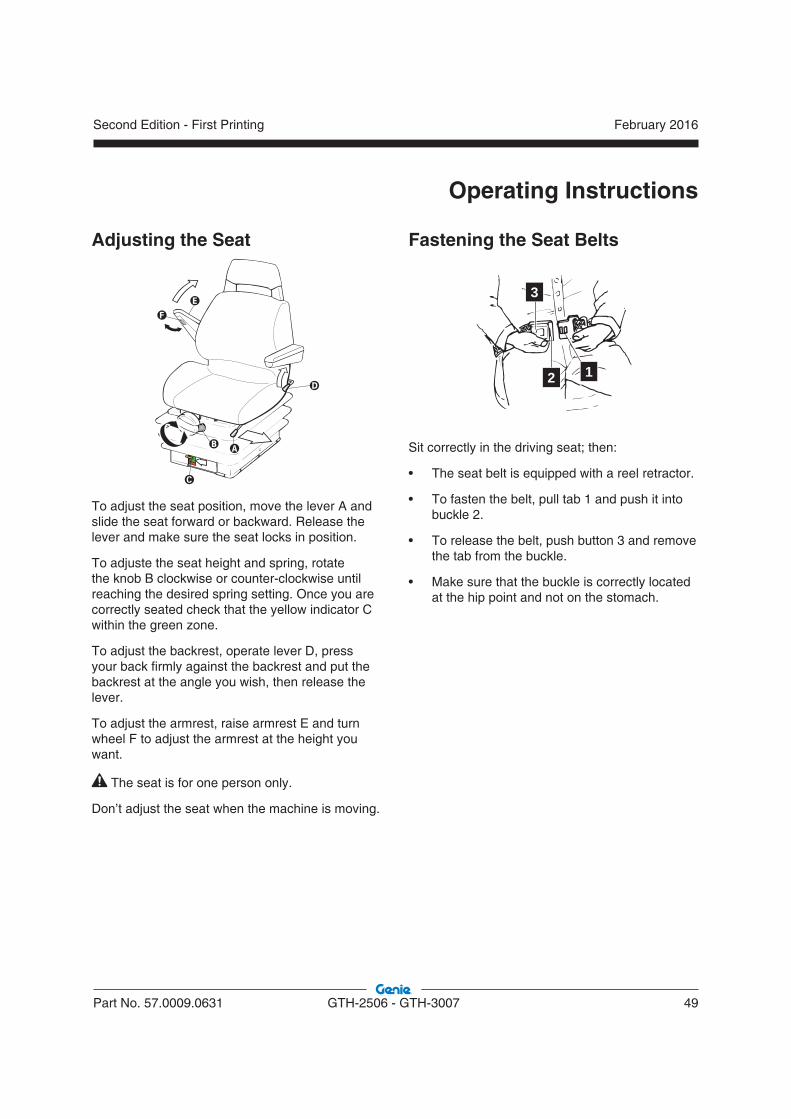
Adjusting the Seat
To adjust the seat position, move the lever A and slide the seat forward or backward. Release the lever and make sure the seat locks in position.
To adjuste the seat height and spring, rotate the knob B clockwise or counter-clockwise until reaching the desired spring setting. Once you are correctly seated check that the yellow indicator C within the green zone.
To adjust the backrest, operate lever D, press your back firmly against the backrest and put the backrest at the angle you wish, then release the lever.
To adjust the armrest, raise armrest E and turn wheel F to adjust the armrest at the height you want.
The seat is for one person only.
Don’t adjust the seat when the machine is moving.
Fastening the Seat Belts
3
2 1
Sit correctly in the driving seat; then:
• The seat belt is equipped with a reel retractor.
• To fasten the belt, pull tab 1 and push it into buckle 2.
• To release the belt, push button 3 and remove the tab from the buckle.
• Make sure that the buckle is correctly located at the hip point and not on the stomach.
February 2016
50 GTH-2506 - GTH-3007 Part No. 57.0009.0631
Second Edition - First Printing
Operating Instructions
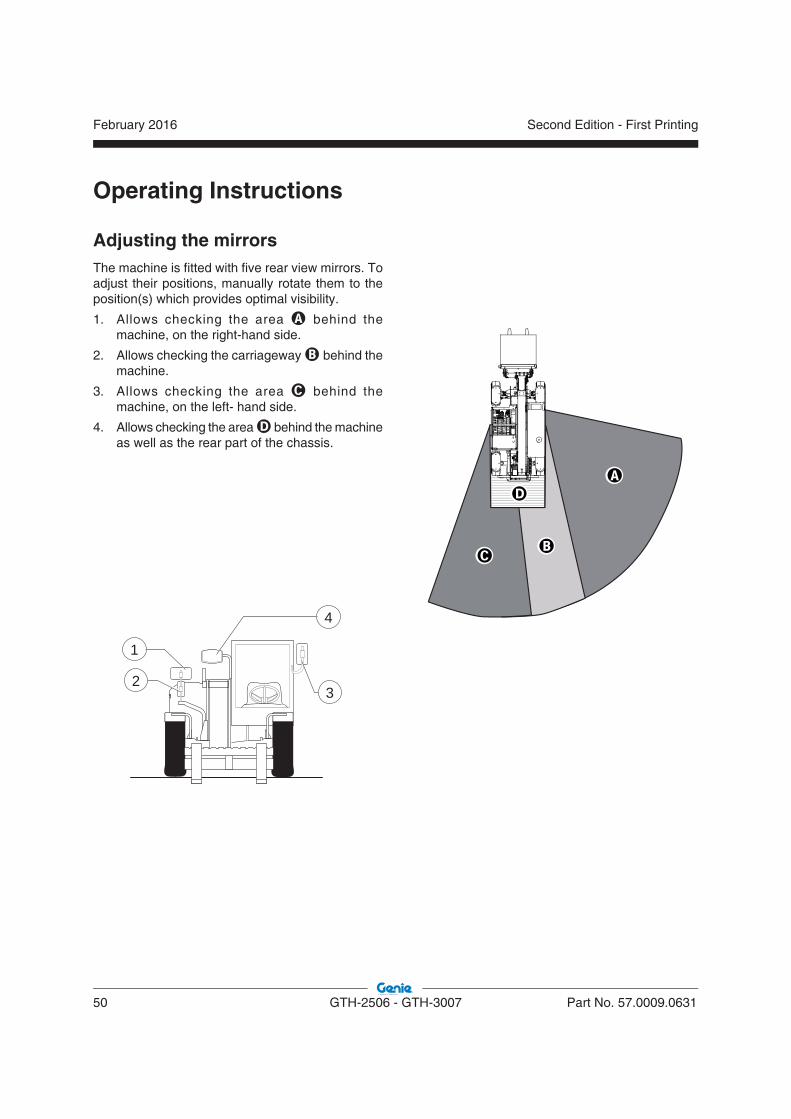
Adjusting the mirrorsThe machine is fitted with five rear view mirrors. To adjust their positions, manually rotate them to the position(s) which provides optimal visibility.
1. Allows checking the area � behind the machine, on the right-hand side.
2. Allows checking the carriageway � behind the machine.
3. Allows checking the area � behind the machine, on the left- hand side.
4. Allows checking the area � behind the machine as well as the rear part of the chassis.
1
4
32
�
��
�
February 2016Second Edition - First Printing
Part No. 57.0009.0631 GTH-2506 - GTH-3007 51
Operating Instructions
Parking BrakeAlways use the parking brake switch to apply the parking brake before raising the boom.
Always engage the parking brake before leaving the driver's seat.
Push the bottom of the rocker switch to turn the parking brake on.
Push the top of the switch to turn the parking brake off.
Brake PedalUse the brake pedal to control the machine speed and to stop the machine motion.
Push and hold the brake pedal to stop the machine.
Starting the Engine1. Be sure the parking brake is set and the
transmission control lever is in the neutral position.
2. Insert the key in the ignition switch.
3. Turn the key until the engine starts.
If the engine fails to start after 30 seconds of cranking, determine the cause and repair any malfunction. Wait 20 seconds before trying to start again.
Starting in Cold ConditionIn cold conditions, 20°F / -6°C and below, warm the engine for 5 minutes before operating to prevent hydraulic system damage. In extreme cold conditions, 0°F / -18°C and below, machines should be equipped with optional cold start kits. Attempting to start the engine when temperatures are below 0°F / -18°C may require the use of a booster battery.
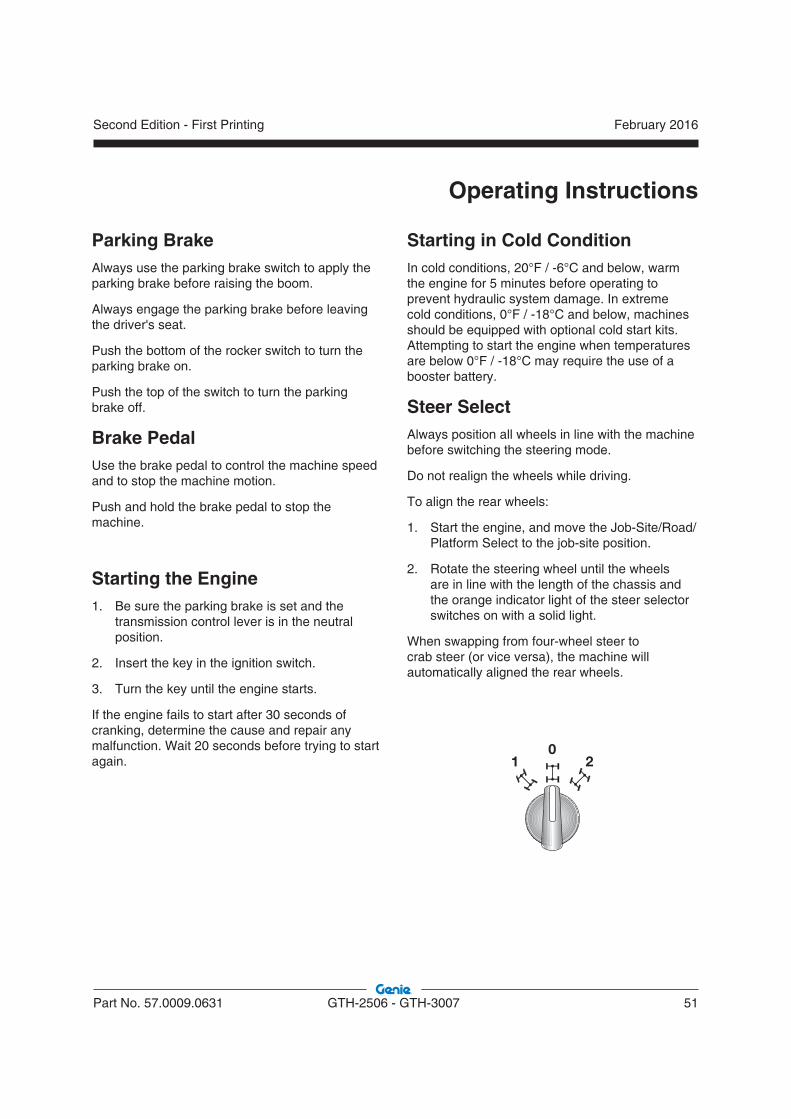
Steer SelectAlways position all wheels in line with the machine before switching the steering mode.
Do not realign the wheels while driving.
To align the rear wheels:
1. Start the engine, and move the Job-Site/Road/Platform Select to the job-site position.
2. Rotate the steering wheel until the wheels are in line with the length of the chassis and the orange indicator light of the steer selector switches on with a solid light.
When swapping from four-wheel steer to crab steer (or vice versa), the machine will automatically aligned the rear wheels.
10
2
February 2016
52 GTH-2506 - GTH-3007 Part No. 57.0009.0631
Second Edition - First Printing
Operating Instructions
Emergency ExitLift up the two levers and remove the wing nuts securing the levers to the frame
1
2 3
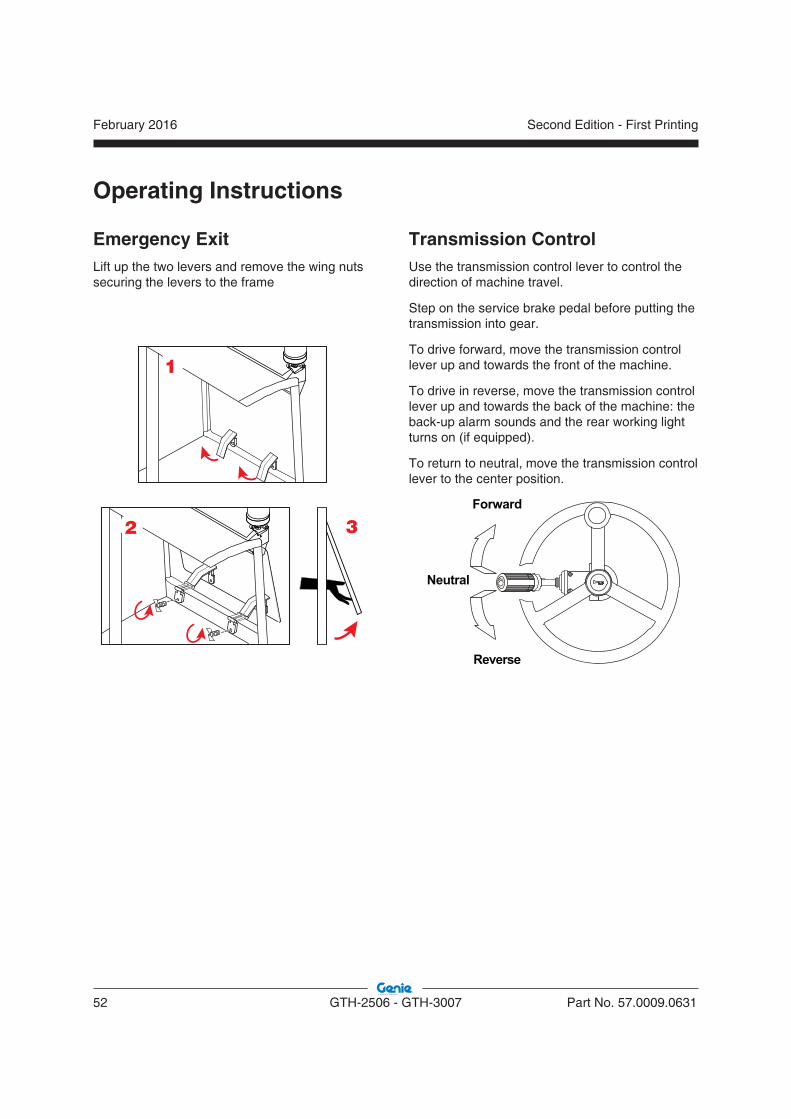
Transmission ControlUse the transmission control lever to control the direction of machine travel.
Step on the service brake pedal before putting the transmission into gear.
To drive forward, move the transmission control lever up and towards the front of the machine.
To drive in reverse, move the transmission control lever up and towards the back of the machine: the back-up alarm sounds and the rear working light turns on (if equipped).
To return to neutral, move the transmission control lever to the center position.

February 2016Second Edition - First Printing
Part No. 57.0009.0631 GTH-2506 - GTH-3007 53
Operating Instructions
Raising and Placing a LoadThe load chart in the cab shows the operating limits of a properly maintained and operated machine. To use the load chart, the operator must know the weight of the load, its load center and how far out and up it is to be placed.
This machine has more than one load chart. Be sure you are using the load chart that corresponds to the attachment on the machine.
If you determine that the weight of the load cannot be placed at the height and angle you want, these options can be used:
1. Move the machine closer to the loading or pick point so that the weight of the load will meet the load chart specifications.
2. Divide the load into smaller pieces so that each piece meets the load chart specifications.
3. Obtain a larger machine capable of handling the load within specifications.
Transporting a LoadCenter the load on the forks. Position the load so that it is completely against the back of the fork frame.
The load should be kept as low to the ground as possible while traveling. Always move a loaded machine with the boom angle indicator at 0 degrees or less.
Tilt the forks back slightly to help keep the load secure.
Always bring the machine to a complete stop before applying the parking brake.

February 2016
54 GTH-2506 - GTH-3007 Part No. 57.0009.0631
Second Edition - First Printing
Placing the load
1 Travel to the desired work site and carefully stop the machine.
2 Put the transmission in neutral.
3 Apply the parking brake.
4 Gradually move the controller to raise and extend the boom to the required height.
5 Gradually move the controller to lower and extend the boom into final position. Lower the load until the weight is completely off the forks. Do not apply a downward force with the forks.
6 Gradually move the controller to raise and retract the boom. This will bring the forks out of the load.
7 When the forks are clear of the load and the structure, the boom can be lowered and retracted.
Operating Instructions

February 2016Second Edition - First Printing
Part No. 57.0009.0631 GTH-2506 - GTH-3007 55
Function Joystick with enable switch
(B)
Function Joystick with enable switch (B) and
yellow roller switch (C)
C
C
C
Controller movements - Function Joystick
Lock or unlock hydraulic quick coupling by simultaneously pressing hydraulic quick coupling lock/unlock switch, functions
joystick enable button (B) and white thumb button (A)
Hydraulic quick coupling (if equipped)
Operating Instructions
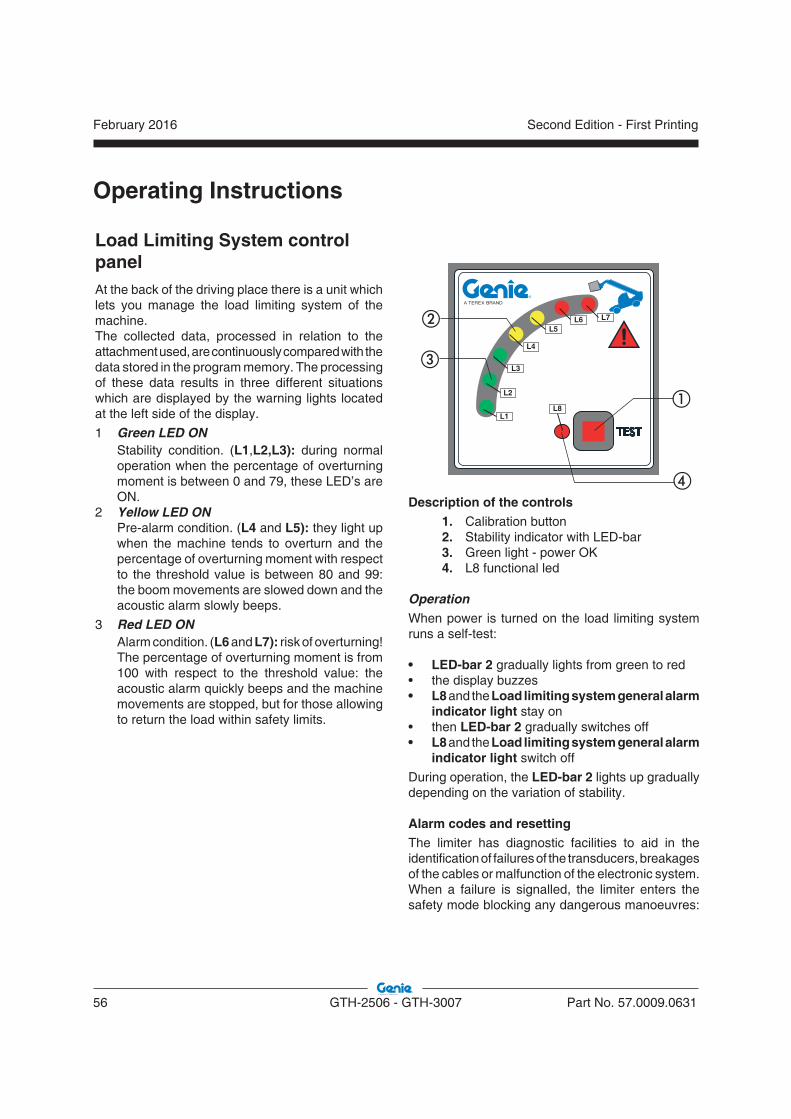
February 2016
56 GTH-2506 - GTH-3007 Part No. 57.0009.0631
Second Edition - First Printing
Load Limiting System control panelAt the back of the driving place there is a unit which lets you manage the load limiting system of the machine.The collected data, processed in relation to the attachment used, are continuously compared with the data stored in the program memory. The processing of these data results in three different situations which are displayed by the warning lights located at the left side of the display.
1 Green LED ON Stability condition. (L1,L2,L3): during normal
operation when the percentage of overturning moment is between 0 and 79, these LED’s are ON.
2 Yellow LED ON Pre-alarm condition. (L4 and L5): they light up
when the machine tends to overturn and the percentage of overturning moment with respect to the threshold value is between 80 and 99: the boom movements are slowed down and the acoustic alarm slowly beeps.
3 Red LED ON Alarm condition. (L6 and L7): risk of overturning!
The percentage of overturning moment is from 100 with respect to the threshold value: the acoustic alarm quickly beeps and the machine movements are stopped, but for those allowing to return the load within safety limits.
L1
L2
L3
L4
L5L6 L7
L8
Description of the controls1. Calibration button2. Stability indicator with LED-bar3. Green light - power OK4. L8 functional led
OperationWhen power is turned on the load limiting system runs a self-test:
• LED-bar 2 gradually lights from green to red• the display buzzes• L8 and the Load limiting system general alarm
indicator light stay on• then LED-bar 2 gradually switches off• L8 and the Load limiting system general alarm
indicator light switch off
During operation, the LED-bar 2 lights up gradually depending on the variation of stability.
Alarm codes and resettingThe limiter has diagnostic facilities to aid in the identification of failures of the transducers, breakages of the cables or malfunction of the electronic system.When a failure is signalled, the limiter enters the safety mode blocking any dangerous manoeuvres:
Operating Instructions
�
�
�

February 2016Second Edition - First Printing
Part No. 57.0009.0631 GTH-2506 - GTH-3007 57
Operating Instructions
Load limiting system general alarm indicator light stays on together with LED L8 which starts flashing representing an alarm code.
Before using the machine, make sure that the fi rst green LED of the overload warning system is ON. The overload warning system must not be used to check the load going to be lifted: it has only been designed to signal possible unbalances of the machine along its motion axis. Such unbalances may also be caused by an abrupt operation of the levers during the load handling. If, during work, several indicators light up, operate the levers more smoothly.
Load Limiting System override key switchThis switch allows to override the load limiting system in order to recover the machine:• when it is stuck after the load limiting system
has triggered;• in case of main machine failures requesting the
unlock of all the machine movements;In order to prevent any misuse of this device (ie working outside the Load Limiting System and stability limits of the machine), the Load Limiting System is provided with a timer (calibrated at 10 seconds) which, after this time is expired, restores automatically the lock-out functions.
When the load limiter disable selector is switched on, the L8 functional led lights with a solid red light.
Load Limiting System override key switch is active only in the Job-site mode. In the Platform mode, the load limiting system cannot be deactivated.
Using The Load ChartsThe load charts installed on the cab indicate the maximum allow load in relation to the boom extension and the type of attachment. To operate under safe conditions, always refer to these charts.The extension level of the boom can be checked with the help of the letters (A, B, C, D, E) painted on the same boom, while the actual boom inclination degrees are shown by the angle indicator.
Load Limit Warning Light (if equipped)This device, fitted on the cab roof, is connected to the load limiting system and shows the same led sequence which appears on the load limiting display.When it reaches the red area, an acoustic alarm buzzes.
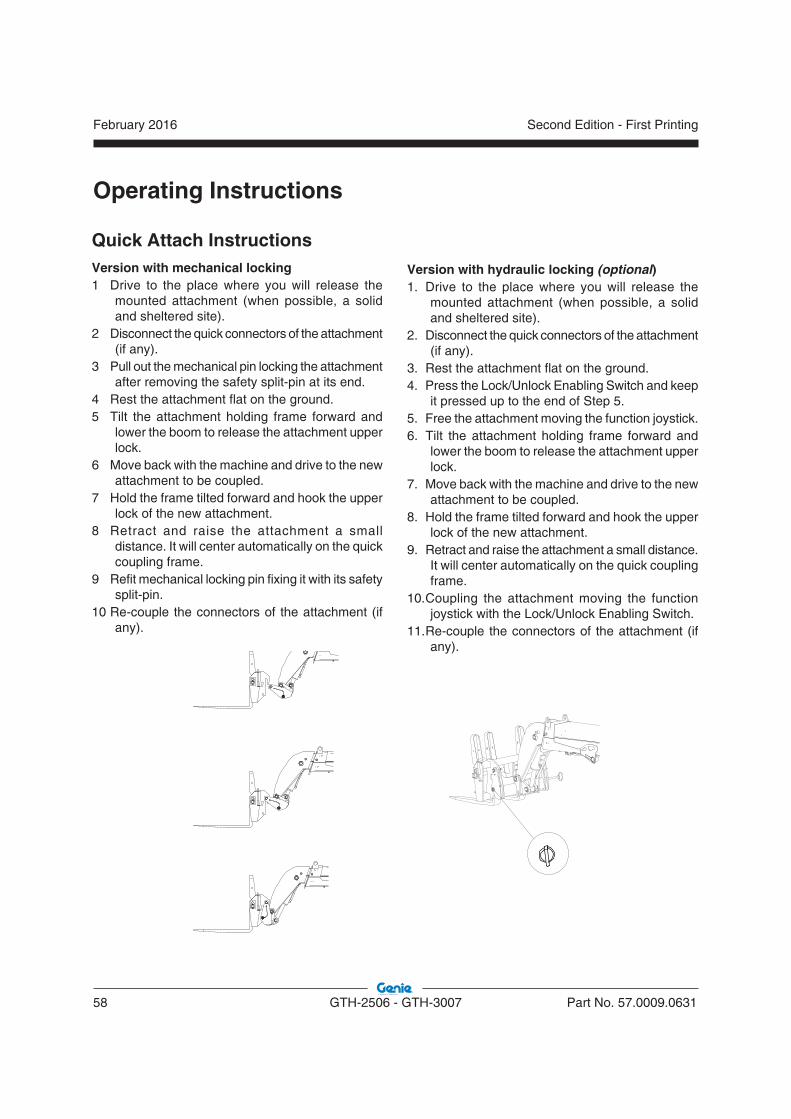
February 2016
58 GTH-2506 - GTH-3007 Part No. 57.0009.0631
Second Edition - First Printing
Quick Attach InstructionsVersion with mechanical locking1 Drive to the place where you will release the
mounted attachment (when possible, a solid and sheltered site).
2 Disconnect the quick connectors of the attachment (if any).
3 Pull out the mechanical pin locking the attachment after removing the safety split-pin at its end.
4 Rest the attachment flat on the ground.5 Tilt the attachment holding frame forward and
lower the boom to release the attachment upper lock.
6 Move back with the machine and drive to the new attachment to be coupled.
7 Hold the frame tilted forward and hook the upper lock of the new attachment.
8 Retract and raise the attachment a small distance. It will center automatically on the quick coupling frame.
9 Refit mechanical locking pin fixing it with its safety split-pin.
10 Re-couple the connectors of the attachment (if any).
Version with hydraulic locking (optional)1. Drive to the place where you will release the
mounted attachment (when possible, a solid and sheltered site).
2. Disconnect the quick connectors of the attachment (if any).
3. Rest the attachment flat on the ground.4. Press the Lock/Unlock Enabling Switch and keep
it pressed up to the end of Step 5.5. Free the attachment moving the function joystick.6. Tilt the attachment holding frame forward and
lower the boom to release the attachment upper lock.
7. Move back with the machine and drive to the new attachment to be coupled.
8. Hold the frame tilted forward and hook the upper lock of the new attachment.
9. Retract and raise the attachment a small distance. It will center automatically on the quick coupling frame.
10. Coupling the attachment moving the function joystick with the Lock/Unlock Enabling Switch.
11. Re-couple the connectors of the attachment (if any).
Operating Instructions
February 2016Second Edition - First Printing
Part No. 57.0009.0631 GTH-2506 - GTH-3007 59
Jump Starting the MachineJump starting at the battery or battery replacement is required when the battery is discharged to the point where the battery will not crank the starter.
Never jump start the machine directly to the starter or the starter solenoid. Serious injury or death could result from the machine moving forward or backward.
To avoid personal injury when jump starting with another machine, be certain that the machines are not touching.
Never jump start a frozen battery as it will explode.
Keep sparks and flames away from the battery. Lead acid batteries generate explosive gases when charging. Wear safety glasses when working near batteries.
The booster battery must be 12V. The machine used for jump starting must have a negative ground electrical system.
To jump start the machine
1 Connect the positive (+) jumper cable to the positive (+) post of the discharged battery.
2 Connect the other end of the same jumper cable to the positive (+) post of the booster battery.
3 Connect one end of the second jumper cable to the negative (-) post of the booster battery.
4 Make the final cable connection to the engine block or the furthest ground point away from the battery.
5 Start the engine.
Driving on a slopeWhen the machine is loaded, always travel with the load uphill. When the machine is unloaded, travel with the forks or attachment downhill.
On steep terrain, drive only up and down hill, and always keep the machine in gear. Do not turn across slope when machine is traveling up or down a slope.
Limit travel path and speed according to the condition of the ground surface, traction, slope, location of personnel and any other factors which may create a hazard. Never drive the machine unless the boom and equipment are in their proper travel position.
Whether a machine will tip over during dynamic machine operation involves many variables that need to be considered. Among these are pavement/ground conditions, stability and slope, as well as machine equipment, operator skill, load position, tire inflation, machine speed, etc.
Additionally, tip over of a machine is dependent in large part upon operator inputs such as the speed and smoothness of the operation as well as the position of the attachment and its load.
Construction sites and roads will frequently change slope from place to place, can be hard and soft, and change due to the construction activities and weather.
Operators should be properly trained and use their best judgment and experience to take the necessary precautions to prevent tip over. Operators must assess the job-site variables and avoid exceeding the machine’s (or operator’s) capabilities for terrain and conditions.
Operating Instructions
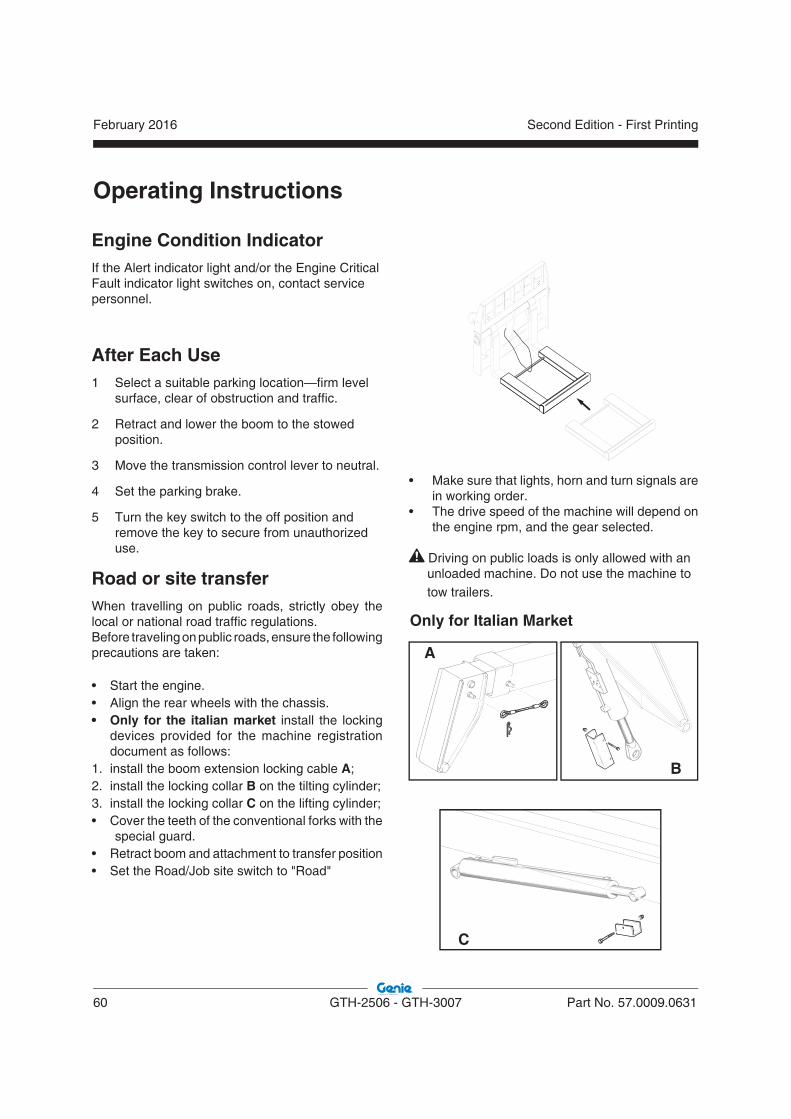
February 2016
60 GTH-2506 - GTH-3007 Part No. 57.0009.0631
Second Edition - First Printing
• Make sure that lights, horn and turn signals are in working order.
• The drive speed of the machine will depend on the engine rpm, and the gear selected.
Driving on public loads is only allowed with an unloaded machine. Do not use the machine to tow trailers.
Operating Instructions
Engine Condition IndicatorIf the Alert indicator light and/or the Engine Critical Fault indicator light switches on, contact service personnel.
After Each Use1 Select a suitable parking location—firm level
surface, clear of obstruction and traffic.
2 Retract and lower the boom to the stowed position.
3 Move the transmission control lever to neutral.
4 Set the parking brake.
5 Turn the key switch to the off position and remove the key to secure from unauthorized use.
Road or site transferWhen travelling on public roads, strictly obey the local or national road traffic regulations.Before traveling on public roads, ensure the following precautions are taken:
• Start the engine.• Align the rear wheels with the chassis.• Only for the italian market install the locking
devices provided for the machine registration document as follows:
1. install the boom extension locking cable A;2. install the locking collar B on the tilting cylinder;3. install the locking collar C on the lifting cylinder;• Cover the teeth of the conventional forks with the
special guard.• Retract boom and attachment to transfer position• Set the Road/Job site switch to "Road"
A
B
C
Only for Italian Market
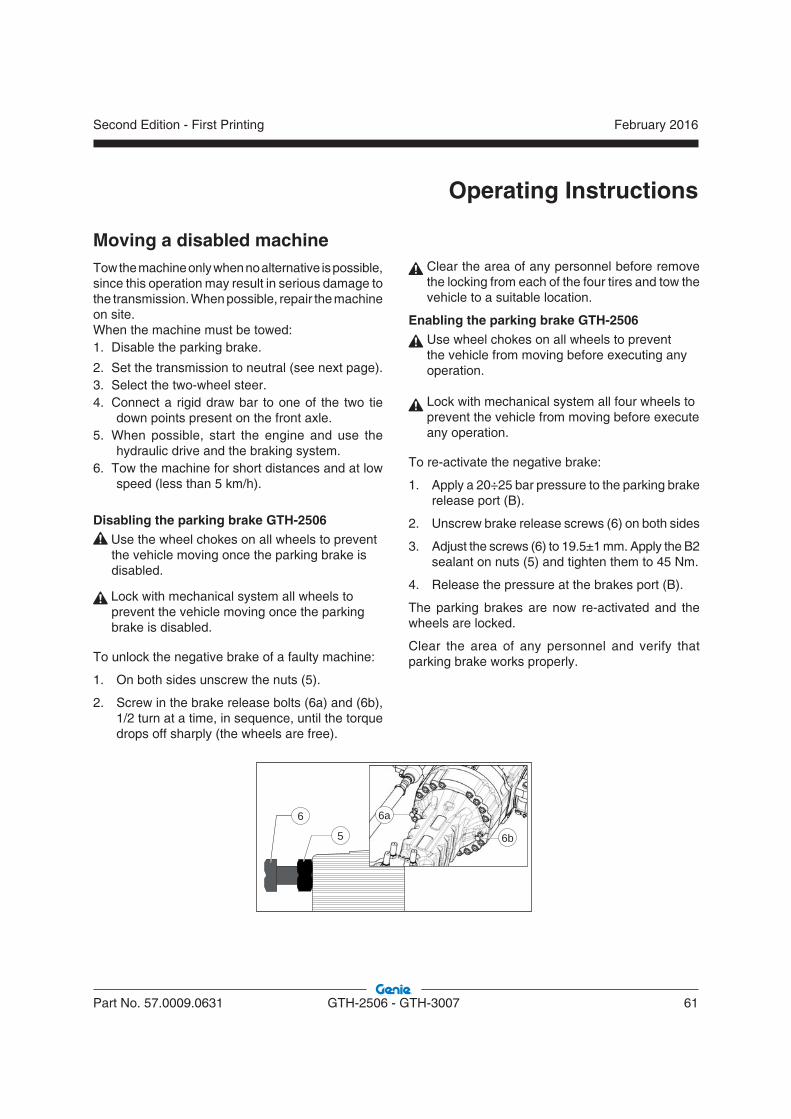
February 2016Second Edition - First Printing
Part No. 57.0009.0631 GTH-2506 - GTH-3007 61
Moving a disabled machineTow the machine only when no alternative is possible, since this operation may result in serious damage to the transmission. When possible, repair the machine on site.When the machine must be towed:1. Disable the parking brake.
2. Set the transmission to neutral (see next page).3. Select the two-wheel steer.4. Connect a rigid draw bar to one of the two tie
down points present on the front axle. 5. When possible, start the engine and use the
hydraulic drive and the braking system.6. Tow the machine for short distances and at low
speed (less than 5 km/h).
Disabling the parking brake GTH-2506 Use the wheel chokes on all wheels to prevent
the vehicle moving once the parking brake is disabled.
Lock with mechanical system all wheels to prevent the vehicle moving once the parking brake is disabled.
To unlock the negative brake of a faulty machine:
1. On both sides unscrew the nuts (5).
2. Screw in the brake release bolts (6a) and (6b), 1/2 turn at a time, in sequence, until the torque drops off sharply (the wheels are free).
Clear the area of any personnel before remove the locking from each of the four tires and tow the vehicle to a suitable location.
Enabling the parking brake GTH-2506 Use wheel chokes on all wheels to prevent the vehicle from moving before executing any operation.
Lock with mechanical system all four wheels to prevent the vehicle from moving before execute any operation.
To re-activate the negative brake:
1. Apply a 20÷25 bar pressure to the parking brake release port (B).
2. Unscrew brake release screws (6) on both sides
3. Adjust the screws (6) to 19.5±1 mm. Apply the B2 sealant on nuts (5) and tighten them to 45 Nm.
4. Release the pressure at the brakes port (B).
The parking brakes are now re-activated and the wheels are locked.
Clear the area of any personnel and verify that parking brake works properly.
Operating Instructions
6
5
6a
6b

February 2016
62 GTH-2506 - GTH-3007 Part No. 57.0009.0631
Second Edition - First Printing
Operating Instructions
Moving a disabled machine
Disabling the parking brake GTH-3007 Use the wheel chokes on all wheels to prevent
the vehicle moving once the parking brake is disabled.
Lock with mechanical system all wheels to prevent the vehicle moving once the parking brake is disabled.
To unlock the negative brake of a faulty machine:
1. On both sides unscrew the nuts (5) approximately 10 mm nearby the bolt head.
2. Screw in the brake release bolts (6a) and (6b), 1/4 turn at a time, in sequence, until the torque drops off sharply (the wheels are free).
Clear the area of any personnel before remove the locking from each of the four tires and tow the vehicle to a suitable location.
Enabling the parking brake GTH-3007
Use wheel chokes on all wheels to prevent the vehicle from moving before executing any operation.
Lock with mechanical system all four wheels to prevent the vehicle from moving before execute any operation.
To re-activate the negative brake:
1. Apply a 20÷25 bar pressure to the parking brake release port (B).
2. Unscrew brake release screws (6) on both sides
3. Adjust the screws (6) to 34 mm. Apply the B2 sealant on nuts (5) and tighten them to 45 Nm.
4. Release the pressure at the brakes port (B).
The parking brakes are now re-activated and the wheels are locked.
Clear the area of any personnel and verify that parking brake works properly.
6
5
6a
6b
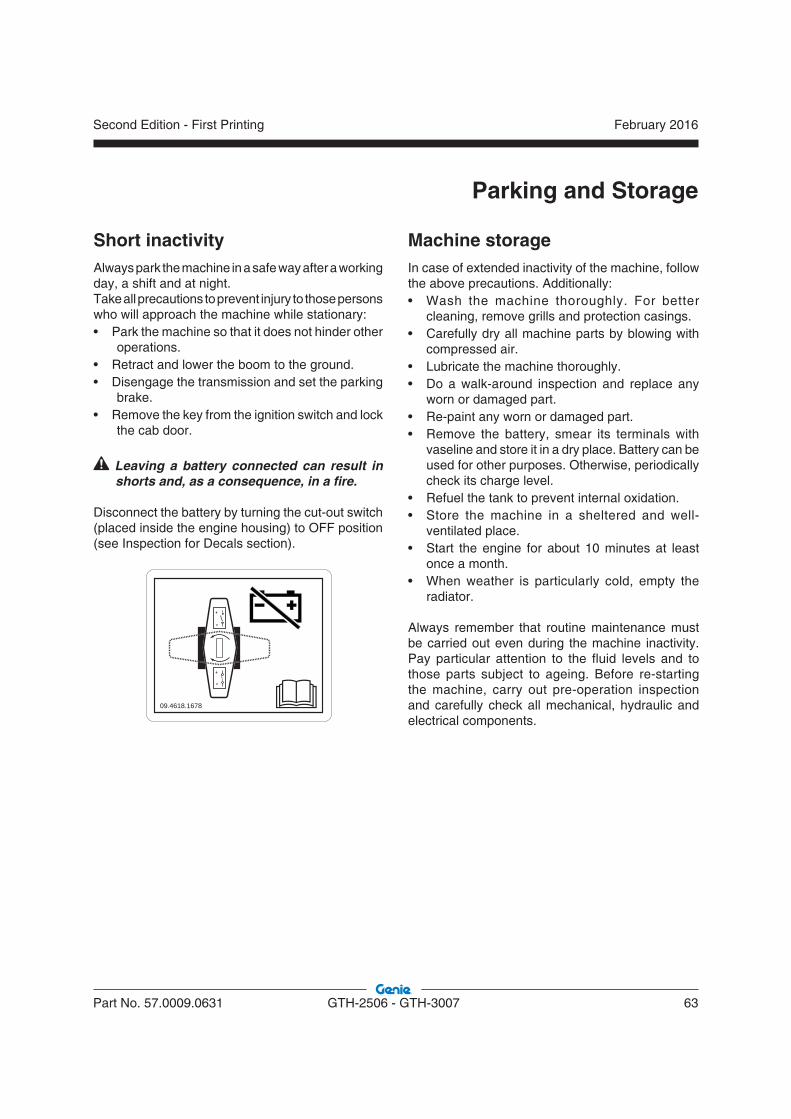
February 2016Second Edition - First Printing
Part No. 57.0009.0631 GTH-2506 - GTH-3007 63
Parking and Storage
Short inactivityAlways park the machine in a safe way after a working day, a shift and at night.Take all precautions to prevent injury to those persons who will approach the machine while stationary:• Park the machine so that it does not hinder other
operations.• Retract and lower the boom to the ground.• Disengage the transmission and set the parking
brake.• Remove the key from the ignition switch and lock
the cab door.
Leaving a battery connected can result in shorts and, as a consequence, in a fi re.
Disconnect the battery by turning the cut-out switch (placed inside the engine housing) to OFF position (see Inspection for Decals section).
+-
+-
09.4618.1678
Machine storageIn case of extended inactivity of the machine, follow the above precautions. Additionally:• Wash the machine thoroughly. For better
cleaning, remove grills and protection casings. • Carefully dry all machine parts by blowing with
compressed air.• Lubricate the machine thoroughly.• Do a walk-around inspection and replace any
worn or damaged part.• Re-paint any worn or damaged part.• Remove the battery, smear its terminals with
vaseline and store it in a dry place. Battery can be used for other purposes. Otherwise, periodically check its charge level.
• Refuel the tank to prevent internal oxidation.• Store the machine in a sheltered and well-
ventilated place.• Start the engine for about 10 minutes at least
once a month.• When weather is particularly cold, empty the
radiator.
Always remember that routine maintenance must be carried out even during the machine inactivity. Pay particular attention to the fluid levels and to those parts subject to ageing. Before re-starting the machine, carry out pre-operation inspection and carefully check all mechanical, hydraulic and electrical components.

February 2016
64 GTH-2506 - GTH-3007 Part No. 57.0009.0631
Second Edition - First Printing
Parking and Storage
Cleaning and washing the machineClean the machine in accordance with the following instructions:• Remove any oil or grease traces with a dry
solvent or a volatile mineral alcohol• Before assembling a new part, remove any
protection product (rust-preventer, grease, wax etc.).
• Remove any trace of rust from metal parts with some emery cloth before smearing the part with a protection product (rust-preventer, paint, oil etc.).
Do not use water at high pressure for washing the machine and especially the main valve, the solenoid valves and electrical parts.
External washingBefore washing the machine, check that the engine is shut down and the doors and windows are closed.Do not, at any times, use fuel to clean the machine. Use water or steam. In cold climates, dry the locks after washing or smear them with an antifreeze.Before using the machine again, check its conditions.Internal washingWash the machine interior with some water and a sponge. Do not use water at high pressure. After washing, dry with a clean cloth.Washing the engineBefore washing the engine, protect the air intake filter to prevent water from entering the circuit.
If the machine is to be used in a marine or equivalent environment, protect it against salt deposits with an adequate treatment to prevent rust formation.
Machine disposal
At the end of the machine life, call in a specialized fi rm to dispose of it in compliance with the local or national regulations.
Battery disposal
Used lead-acid batteries cannot be disposed of as normal industrial solid wastes. Because of the presence of harmful substances, they must be collected, eliminated and/or recycled in accordance with the laws of the EU.
Used batteries must be kept in a dry and confi ned place. Make sure the battery is dry and the cell plugs are tight. Place a sign on the battery to warn of not using it. If before disposal the battery is left in the open air, it will be necessary to dry, smear the box and the elements with a coat of grease and tighten the plugs. Do not rest the battery on the ground; it is always advisable to rest it on a pallet and cover it. The disposal of batteries shall be as rapid as possible.
February 2016Second Edition - First Printing
Part No. 57.0009.0631 GTH-2506 - GTH-3007 65
Transport and Lifting Instructions
Observe and Obey:
Genie customers needing to containerize any lift or Genie product should source a qualified freight forwarder with expertise in preparing, loading and securing construction and lifting equipment for international shipment.
Only qualified operators should move the machine on or off the truck.
The transport vehicle must be parked on a level surface.
The transport vehicle must be secured to prevent rolling while the machine is being loaded.
Before loading for transport, make sure the deck, ramps and machine tires are free of mud, snow and ice. Failure to do so could cause the machine to slide.
Be sure the vehicle capacity, loading surfaces and chains or straps are sufficient to withstand the machine weight. Genie telehandlers are very heavy relative to their size. See the serial label for the machine weight. See the Inspections section for the serial label location.
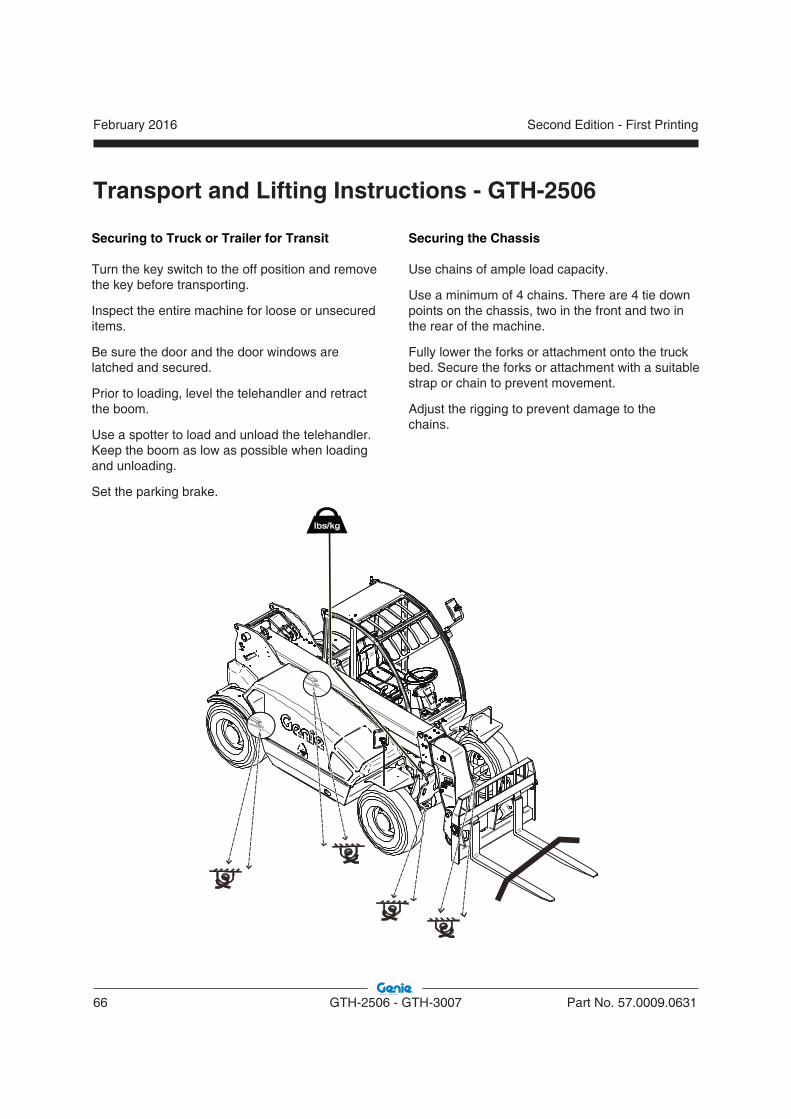
February 2016
66 GTH-2506 - GTH-3007 Part No. 57.0009.0631
Second Edition - First Printing
Transport and Lifting Instructions - GTH-2506
Securing to Truck or Trailer for Transit
Turn the key switch to the off position and remove the key before transporting.
Inspect the entire machine for loose or unsecured items.
Be sure the door and the door windows are latched and secured.
Prior to loading, level the telehandler and retract the boom.
Use a spotter to load and unload the telehandler. Keep the boom as low as possible when loading and unloading.
Set the parking brake.
Securing the Chassis
Use chains of ample load capacity.
Use a minimum of 4 chains. There are 4 tie down points on the chassis, two in the front and two in the rear of the machine.
Fully lower the forks or attachment onto the truck bed. Secure the forks or attachment with a suitable strap or chain to prevent movement.
Adjust the rigging to prevent damage to the chains.
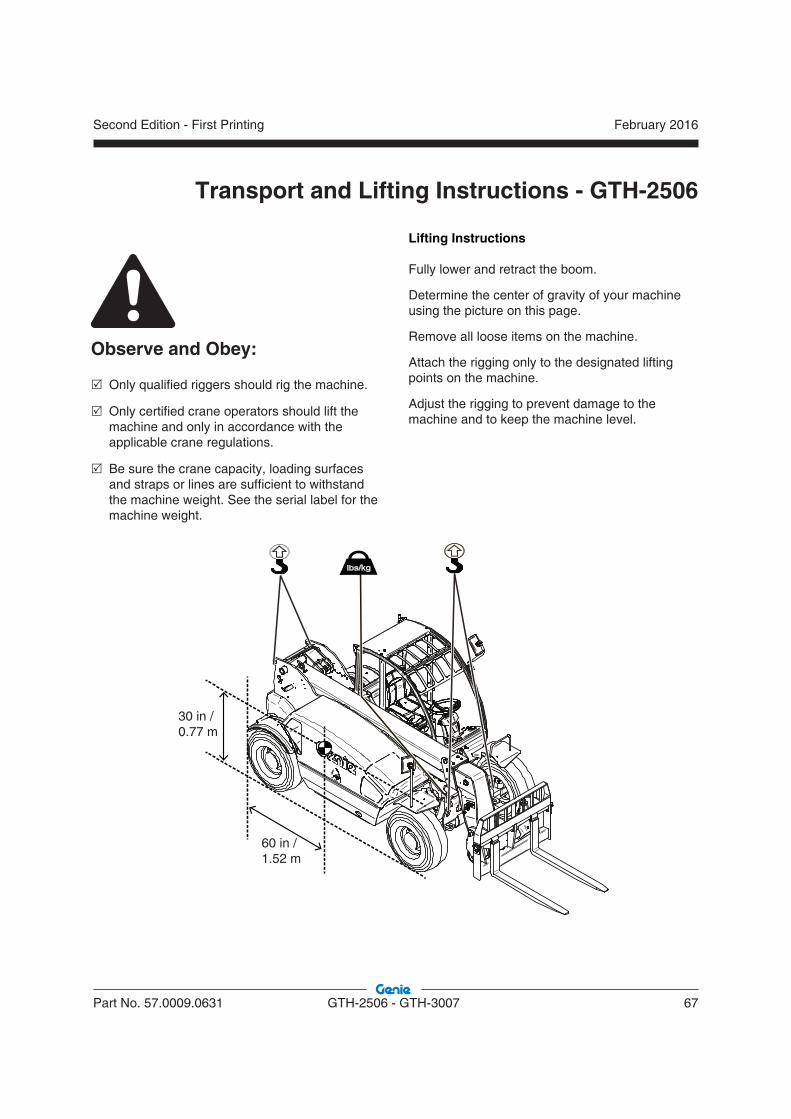
February 2016Second Edition - First Printing
Part No. 57.0009.0631 GTH-2506 - GTH-3007 67
Transport and Lifting Instructions - GTH-2506
Observe and Obey:
Only qualified riggers should rig the machine.
Only certified crane operators should lift the machine and only in accordance with the applicable crane regulations.
Be sure the crane capacity, loading surfaces and straps or lines are sufficient to withstand the machine weight. See the serial label for the machine weight.
Lifting Instructions
Fully lower and retract the boom.
Determine the center of gravity of your machine using the picture on this page.
Remove all loose items on the machine.
Attach the rigging only to the designated lifting points on the machine.
Adjust the rigging to prevent damage to the machine and to keep the machine level.
30 in /0.77 m
60 in /1.52 m
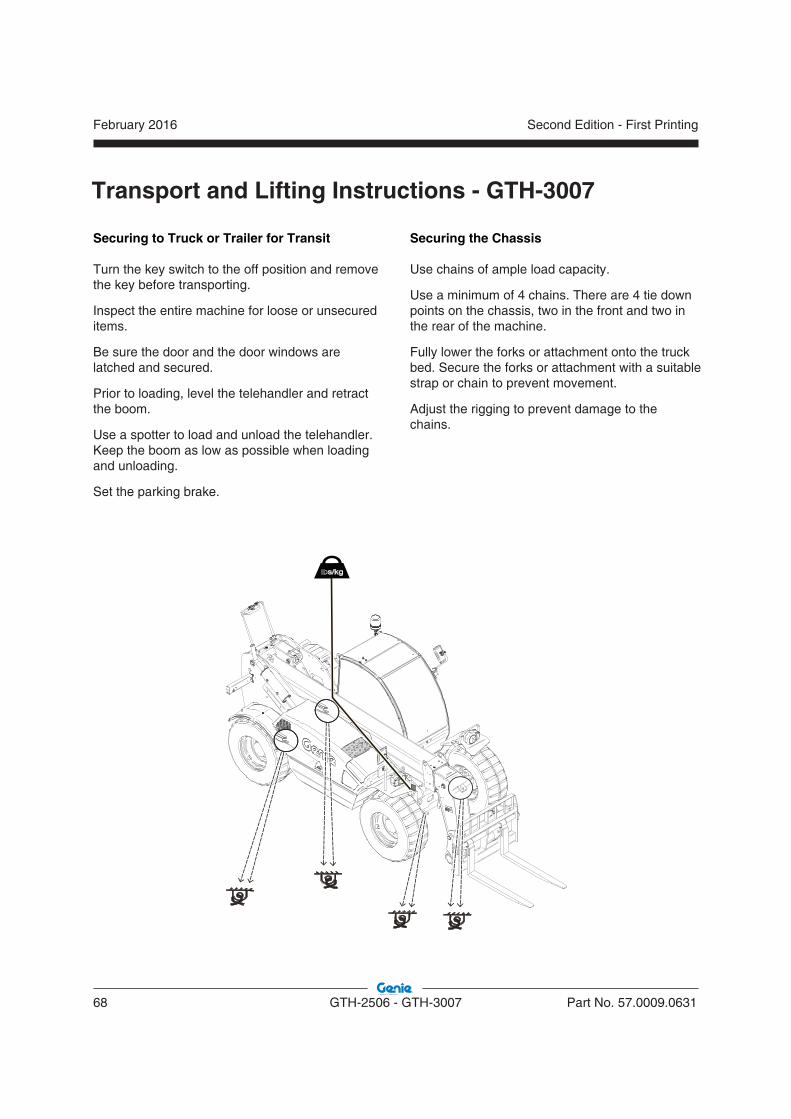
February 2016
68 GTH-2506 - GTH-3007 Part No. 57.0009.0631
Second Edition - First Printing
Transport and Lifting Instructions - GTH-3007
Securing to Truck or Trailer for Transit
Turn the key switch to the off position and remove the key before transporting.
Inspect the entire machine for loose or unsecured items.
Be sure the door and the door windows are latched and secured.
Prior to loading, level the telehandler and retract the boom.
Use a spotter to load and unload the telehandler. Keep the boom as low as possible when loading and unloading.
Set the parking brake.
Securing the Chassis
Use chains of ample load capacity.
Use a minimum of 4 chains. There are 4 tie down points on the chassis, two in the front and two in the rear of the machine.
Fully lower the forks or attachment onto the truck bed. Secure the forks or attachment with a suitable strap or chain to prevent movement.
Adjust the rigging to prevent damage to the chains.

February 2016Second Edition - First Printing
Part No. 57.0009.0631 GTH-2506 - GTH-3007 69
Transport and Lifting Instructions - GTH-3007
Observe and Obey:
Only qualified riggers should rig the machine.
Only certified crane operators should lift the machine and only in accordance with the applicable crane regulations.
Be sure the crane capacity, loading surfaces and straps or lines are sufficient to withstand the machine weight. See the serial label for the machine weight.
Lifting Instructions
Fully lower and retract the boom.
Determine the center of gravity of your machine using the picture on this page.
Remove all loose items on the machine.
Attach the rigging only to the designated lifting points on the machine.
Adjust the rigging to prevent damage to the machine and to keep the machine level.
48 in /1.225 m
33 in /0.85 m

February 2016
70 GTH-2506 - GTH-3007 Part No. 57.0009.0631
Second Edition - First Printing
Maintenance
Observe and Obey:
Only routine maintenance items specified in this manual shall be performed by the operator.
Scheduled maintenance inspections shall be completed by qualified service technicians, according to the manufacturer’s specifications and the requirements specified in the responsibilities manual.
Maintenance Symbols Legend
The following symbols have been used in this manual to help communicate the intent of the instructions. When one or more of the symbols appear at the beginning of a maintenance procedure, it conveys the meaning below.
Indicates that tools will be required to perform this procedure.
Indicates that new parts will be required to perform this procedure.
Indicates that a cold engine will be required to perform this procedure.
Check the Tire Pressure
Tip-over hazard. An over-inflated tire can explode which may compromise machine stability and cause the machine to tip over.
Tip-over hazard. The use of temporary flat tire repair products may lead to tire failure which could compromise machine stability and cause the machine to tip over.
Bodily injury hazard. An over-inflated tire can explode and may cause death or serious injury.
Note: This procedure does not need to be performed on machines equipped with foam-filled tires.
1 Check each tire with an air pressure gauge. Add air as needed.
Wheel and Tire Specifi cations GTH 2506
Tire 12-16.5
Rim 9.75x16.5
Wheel 8 holes DIN 70361
Tire pressure 4.5 bar (65 psi)
Wheel and Tire Specifi cations GTH 3007
Tire 405/70-20
Rim 13x20
Wheel 8 holes DIN 70361
Tire pressure 5.5 bar (80psi)

February 2016Second Edition - First Printing
Part No. 57.0009.0631 GTH-2506 - GTH-3007 71
Check the Engine Oil Level
Maintaining the proper engine oil level is essential to good engine performance and service life. Operating the machine with an improper oil level can damage engine components.
Note: Check the oil level with the engine off and on a level surface.
1 Check the oil level dipstick. Add oil as needed.
Deutz TD 2.9 L4, STAGE III B (EU model)
Oil type SHELL RIMULA R4 L 15W-40
Deutz TD 2.9 L4, STAGE III A
Oil type SHELL RIMULA R4 L 15W-40
Diesel Fuel Requirements
Satisfactory engine performance is dependent on the use of a good quality fuel. The use of a good quality fuel will give the following result: long engine life and acceptable exhaust emissions levels.
The Stage III B diesel engine must be operated using only Ultra Low Sulfur Fuel. The sulphur content of this fuel must be lower than 15 PPM.
Tank GTH 2506 60 L 15 gal
Tank GTH 3007 90 L 23 gal
Deutz TD 2.9 L4, STAGE 3 B (EU model)
Fuel Type Ultra Low Sulfur Fuel (ULSD)
Deutz TD 2.9 L4, STAGE 3 A
Fuel Type Diesel
Maintenance
Check the Hydraulic Oil Level
Maintaining the hydraulic oil at the proper level is essential to machine operation. Improper hydraulic oil levels can damage hydraulic components. Daily checks allow the inspector to identify changes in oil level that might indicate the presence of hydraulic system problems.
1 Be sure that the engine is off, the frame is level and the boom is in the stowed position.
2 Visually inspect the sight gauge located on the left side of the hydraulic oil tank.
Result: The hydraulic oil level should be halfway in the sight gauge.
3 Add oil as needed. Do not overfill.
Hydraulic oil specifi cations
Hydraulic Oil type
GAZPROMNEFT HYDRAULIC HDZ 46
February 2016
72 GTH-2506 - GTH-3007 Part No. 57.0009.0631
Second Edition - First Printing
Maintenance
Check the Engine Coolant Level -Liquid Cooled Models
Maintaining the engine coolant at the proper level is essential to engine service life. Improper coolant level will affect the engine’s cooling capability and damage engine components. Daily checks will allow the inspector to identify changes in coolant level that might indicate cooling system problems.
1 Visually inspect the sight gauge located on the top side of the radiator.
Result: The fluid level should be halfway in the sight gauge.
Bodily Injury Hazard. Fluids in the radiator are under pressure and extremely hot. Use caution when removing cap and adding fluids.
Check Mirrors
Maintaining the indirect visual aids is essential to workplace visibility.
1. Visually inspect all mirrors to ensure they are working properly and clean and free from debris.
Check the Battery
Proper battery condition is essential to good machine performance and operational safety. Improper fluid levels or damaged cables and connections can result in component damage and hazardous conditions.
Electrocution hazard. Contact with hot or live circuits may result in death or serious injury. Remove all rings, watches and other jewellery.
Bodily injury hazard. Batteries contain acid. Avoid spilling or contacting battery acid. Neutralize battery acid spills with baking soda and water.
1 Put on protective clothing and eye wear.
2 Be sure that the battery cable connections are tight and free of corrosion.
3 Be sure that the battery hold-down brackets are in place and secure.
Note: Adding terminal protectors and a corrosion preventative sealant will help eliminate the corrosion on the battery terminals and cables.
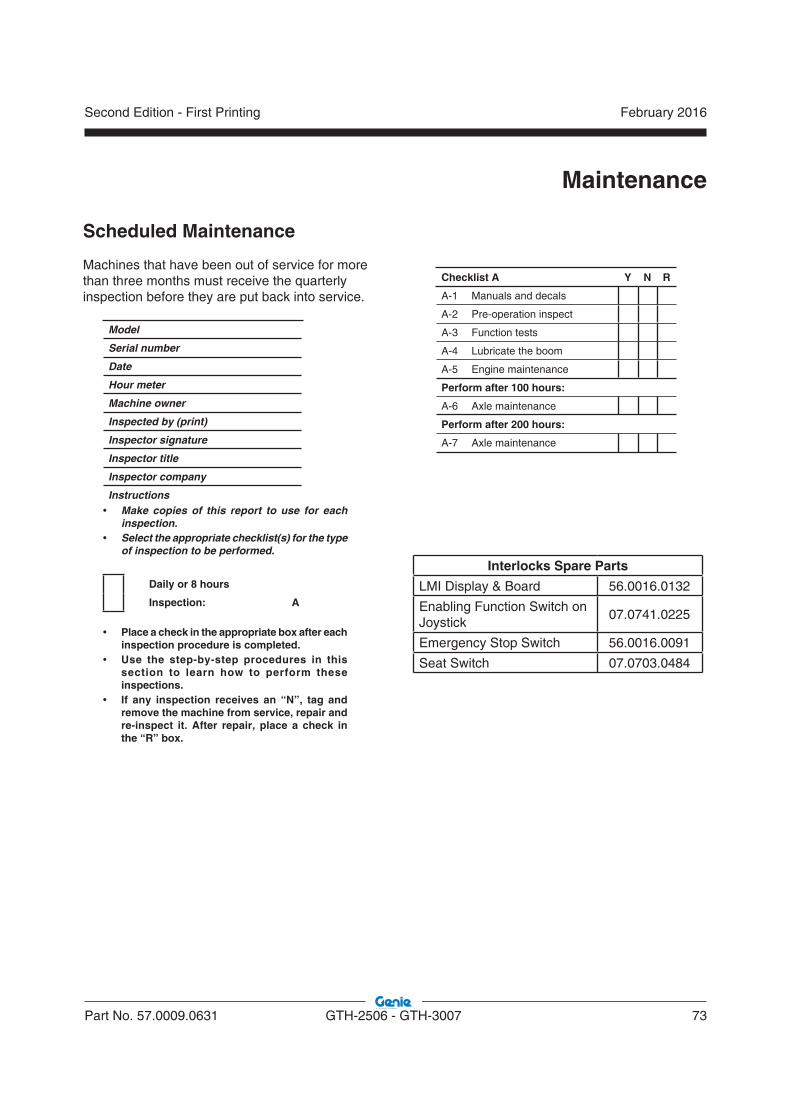
February 2016Second Edition - First Printing
Part No. 57.0009.0631 GTH-2506 - GTH-3007 73
Scheduled Maintenance
Machines that have been out of service for more than three months must receive the quarterly inspection before they are put back into service.
Maintenance
Model
Serial number
Date
Hour meter
Machine owner
Inspected by (print)
Inspector signature
Inspector title
Inspector company
Instructions Make copies of this report to use for each
inspection. Select the appropriate checklist(s) for the type
of inspection to be performed.
Daily or 8 hours
Inspection: A
Place a check in the appropriate box after each inspection procedure is completed.
Use the step-by-step procedures in this section to learn how to perform these inspections.
If any inspection receives an “N”, tag and remove the machine from service, repair and re-inspect it. After repair, place a check in the “R” box.
Checklist A Y N R
A-1 Manuals and decals
A-2 Pre-operation inspect
A-3 Function tests
A-4 Lubricate the boom
A-5 Engine maintenance
Perform after 100 hours:
A-6 Axle maintenance
Perform after 200 hours:
A-7 Axle maintenance
Interlocks Spare Parts
LMI Display & Board 56.0016.0132
Enabling Function Switch on Joystick
07.0741.0225
Emergency Stop Switch 56.0016.0091
Seat Switch 07.0703.0484
February 2016
74 GTH-2506 - GTH-3007 Part No. 57.0009.0631
Second Edition - First Printing
Maintenance
A-1Inspect the Manuals and Decals
Genie specifications require that this procedure be performed every 8 hours or daily, whichever comes first.
Maintaining the operator’s and safety manuals in good condition is essential to proper and safe machine operation. Manuals are included with each machine and should be stored in the container provided in the operator's compartment. An illegible or missing manual will not provide safety and operational information necessary for a proper and safe operating conditions.
In addition, maintaining all of the safety and instructional decals in good condition is mandatory for proper and safe machine operation. Decals alert operators and personnel to the many possible hazards associated with using this machine. They also provide users with operation and maintenance information. An illegible decal will fail to alert personnel of a procedure or hazard and could result in hazardous operating conditions.
1 Check to make sure that the operator's and safety manuals are present and complete in the storage container in the operator's compartment.
2 Examine the pages of each manual to be sure that they are legible and in good condition.
Result: The operator's manual is appropriate for the machine and all manuals are legible and in good condition.
Result: The operator's manual is not appropriate for the machine or all manuals are not in good condition or is illegible. Remove the machine from service until the manual is replaced.
3 Open the operator's manual to the decals inspection section. Carefully and thoroughly inspect all decals on the machine for legibility and damage.
Result: The machine is equipped with all required decals, and all decals are legible and in good condition.
Result: The machine is not equipped with all required decals, or one or more decals are illegible or in poor condition. Remove the machine from service until the decals are replaced.
4 Always return the manuals to the storage container after use.
Note: Contact your authorized Genie distributor or Genie Industries if replacement manuals or decals are needed.
February 2016Second Edition - First Printing
Part No. 57.0009.0631 GTH-2506 - GTH-3007 75
Maintenance
A-2Perform Pre-operation Inspection
Genie specifications require that this procedure be performed every 8 hours or daily, whichever comes first.
Completing a Pre-operation Inspection is essential to proper and safe machine operation. The Pre-operation Inspection is a visual inspection performed by the operator prior to each work shift. The inspection is designed to discover if anything is apparently wrong with a machine before the operator performs the function tests. The Pre-operation Inspection also serves to determine if routine maintenance procedures are required.
A-3Perform Function Tests
Genie specifications require that this procedure be performed every 8 hours or daily, whichever comes first.
Completing the function tests is essential to safe machine operation. Function tests are designed to discover any malfunctions before the machine is put into service. A malfunctioning machine must never be used. If malfunctions are discovered, the machine must be tagged and removed from service.
February 2016
76 GTH-2506 - GTH-3007 Part No. 57.0009.0631
Second Edition - First Printing
Maintenance
A-4Lubricate the Boom
Genie specifications require that this procedure be performed every 8 hours or daily, whichever comes first.
Greasing the specified locations is essential for good machine performance and service life.Operating the machine with little or no grease may cause the machine to perform poorly and continued use may cause component damage.
Grease Specifi cation
PTFE INTERFLON FIN GREASE LS 2
Genie part number 09.4693.0000
1. Fully extend and raise the boom, then retract the boom, checking to insure it operates smoothly. There should be a light film of lubricant on wear pad contact surfaces.
Result: Boom operates smoothly and a thin film of lubricant is visible. Proceed to step 4.
Result: Boom does not extend or retract smoothly and no lubricant is visible on wear pad contact surfaces. Proceed to step 2.
2. Apply a thin layer of grease to the underside of the number 2 boom tube where it makes contact with the number 1 boom tube lower wear pads.
3. Lubricate the top and side boom tube wear pads.
4. Return the boom to the stowed position.
5. Reach the pivot end of the boom and lubricate the chain return pulley using a grease gun.
A-5Perform Engine Maintenance -Perkins Models
Engine specifications require that this procedure be performed every 8 hours or daily, whichever comes first.
Deutz TD 2.9 L4Lubricating oil level - check/addCoolant level - check/addVisual inspectionSuction air fi lter/dry air fi lter - checkFuel pre-fi lter - check/empty water
Only for Deutz TD 2.9 L4 - Stage IIIBExhaust system including exhaustaftertreatment components - check for leaks
Required maintenance procedures and additionalengine information is available in theDeutz TD 2.9 L4 Operation and MaintenanceManual (Deutz part number 0312 3893).
Deutz TD 2.9 L4 Operation and Maintenance Manual
Genie part number 57.4700.0006

February 2016Second Edition - First Printing
Part No. 57.0009.0631 GTH-2506 - GTH-3007 77
Maintenance
A-6Perform Axle Maintenance
Axle specifications require that this procedure be performed after the first 100 hours.
Differential lubricating oil - check/addPlanetary reduction lubricating oil - check/add
Required maintenance procedures and additional axle information is available in the Comer Axle S128 Service Manual Dana Axle ASM-194 Service Manual
Comer Axle Service Manual
Genie part number(Genie Instructions Library)
57.4700.0020
Dana Axle Service Manual
Genie part number(Genie Instructions Library)
57.4700.0026
A-7Perform Axle Maintenance
Axle specifications require that this one-time procedure be performed after the first 200 hours.
Differential lubricating oil - changePlanetary reduction lubricating oil - changeMagnetic plug - clean
Requi red main tenance procedures and additional axle information is available in the Comer Axle S128 Service Manual
Comer Axle Service Manual
Genie part number(Genie Instructions Library)
57.4700.0020

February 2016
78 GTH-2506 - GTH-3007 Part No. 57.0009.0631
Second Edition - First Printing
This machine can be equipped with several attachments.
Use only Genie approved attachments specified in this section.
Information about how to fit and replace attachments on the machine can be found in section “Quick Attach Instructions”.
Attachments
Genie Approved Attachments List
GTH-2506:
• Floating Forks(part number 55.0750.0112)
• FEM 2 Plate and Forks Kit(part number 55.0750.0113)
• GM-1 Floating Forks(part number 55.0750.0088)
• Hydraulic Forks FEM2 Side-Shift +- 100mm(part number 59.0601.5023)
• Loading shovel 500 Lt(part number 59.0201.9019)
• Loading shovel 800 Lt(part number 59.0201.9020)
• Concrete bucket 500 Lt manual discharge(part number 59.0401.2028)
• Concrete bucket 500 Lt hydraulic discharge(part number 55.0401.2029)
• Concrete mixing bucket 250 Lt full hydraulic(part number 59.0401.2018)
• Brick-holder basket(part number 59.0401.2032)
• Fixed hook on plate(part number 59.0700.9012)
• Mechanical jib 2m length/ 2000kg capacity(part number 59.0802.3027)
Information for use of this attachment is described in the specific attachments operator’s manual available on official Genie site www.genielift.com/en/service-support/manuals
February 2016Second Edition - First Printing
Part No. 57.0009.0631 GTH-2506 - GTH-3007 79
Attachments
Genie Approved Attachments List
GTH-3007:
• Floating Forks(part number 55.0750.0124)
• FEM 3 Plate and Forks Kit(part number 55.0750.0114)
• Hydraulic Forks FEM3 Side-Shift +- 100mm(part number 59.0601.5024)
• Loading shovel 500 Lt(part number 59.0201.9019)
• Loading shovel 800 Lt(part number 59.0201.9020)
• Concrete bucket 500 Lt manual discharge(part number 59.0401.2028)
• Concrete bucket 500 Lt hydraulic discharge(part number 55.0401.2029)
• Concrete mixing bucket 250 Lt full hydraulic(part number 59.0401.2018)
• Brick-holder basket(part number 59.0401.2032)
• Fixed hook on plate(part number 59.0700.9013)
• Mechanical jib 2m length/ 2000kg capacity(part number 59.0802.3027)
• Mechanical jib 4m lenght/ 900kg capacity(part number 59.0802.3028)
Information for use of this attachment is described in the specific attachments operator’s manual available on official Genie site www.genielift.com/en/service-support/manuals

February 2016
80 GTH-2506 - GTH-3007 Part No. 57.0009.0631
Second Edition - First Printing
Attachments
Suspended Load Hazards
Work Area Safety
General Safety
Do not lift a suspended load without first understanding the local, state, federal, or provincial rules, standards and regulations related to the activity. Additional rules, standard and regulations may apply. Additional training may be required.
If a telehandler must be used to transport a load, the following precautions for the protection of the operator shall be taken.
Read, understand and obey all warnings and instructions provided with the attachment that is approved for suspending loads.
Only a properly designed, tested and approved attachment should be used to carry a suspended load.
The telehandler load charts are designed for loads where the load center is stationary. As a suspended load moves, the load center can change. As a result, extreme caution in transporting and lifting, or placing, the load must be observed to minimize the potential for the load to move.
Overturning Hazards
Do not lift a suspended load without the proper and legible load capacity chart for the attachment/telehandler combination you are using.
Do not permit the load to swing freely. Always properly tether loads to restrict movement. In addition to ground personnel, the two chassis lifting points in the front of the machine can be used to help externally stabilize the load. Always cross the tethers to opposite sides of the load to minimize load movement. Driving across grades, sudden starts, stops, and turns can cause the load to swing and create a hazard if not externally stabilized.
Keep the boom retracted as much as practical.
Do not lift suspended loads when wind speeds can cause an unsafe situation.
February 2016Second Edition - First Printing
Part No. 57.0009.0631 GTH-2506 - GTH-3007 81
All movements of the load must be accomplished gradually and at the slowest practical speed to prevent the load from swinging.
Keep the heavy part of the load closest to the attachment.
Never drag or pull a load sideways.
Only lift a load vertically; do not pull a load horizontally as it could cause excessive swinging of the load.
The weight of all rigging (slings, shackles etc.) must be included as part of the load.
Identify the proper lifting points of the load, taking into consideration the center of gravity and load stability.
Do not attempt to use the telehandler frame-levelling to compensate for a swinging load or to adjust the load after it has been raised.
Do not try to move fixed or obstructed loads.
Do not leave the telehandler unattended with a suspended load.
Keep the boom and load as low as practical while maintaining visibility in the direction of travel.
Do not exceed walking speed (2 mph / 3.2 km/h)with a suspended load.
Start, travel, turn and stop slowly to prevent the load from becoming unstable or swinging.
Do not use any controls to re-position the load when traveling. Come to a gradual and complete stop before attempting to re-position the load.
Do not attempt to cross inclines as the load center will move towards the tipping line, thereby reducing stability.
Only climb or descend inclines with extreme care as the load center will move towards the tipping line, thereby reducing stability
Do not park on a slope.
When driving on a rise with loaded material, proceed in forward gear and travel with load in the lowest possible position.
When sloping downward with loaded material, proceed into reverse
When driving on a rise with empty shovel, proceed into reverse.
When sloping downward with empty shovel, proceed in forward gear.
Do not allow suspended loads to oscillate.
Do not drag loads when they are hooked up.
A suspended load has a dynamic, and therefore an unpredictable effect on machine stability, operate with caution.
The fixed hook has been designed to support the load declared beside. The maximum payload corresponds to the nominal capacity rating of the handler on which it is installed and is indicated on the load charts supplied with the equipment.
Attachments
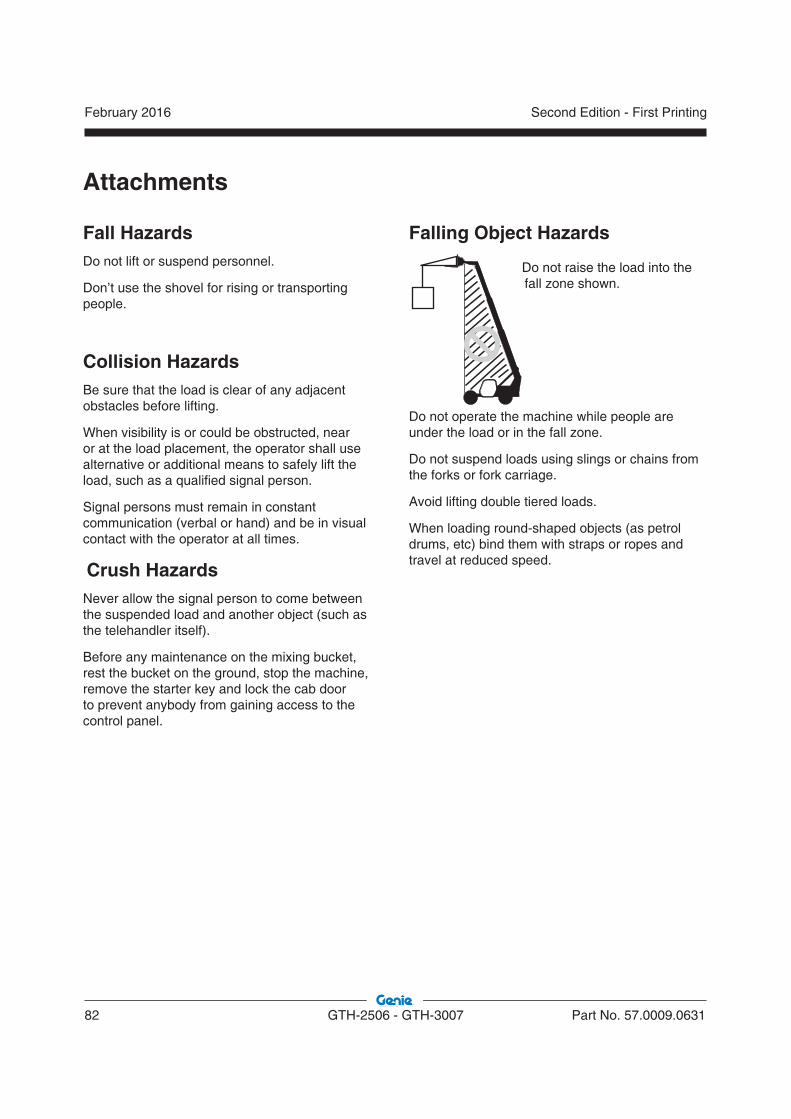
February 2016
82 GTH-2506 - GTH-3007 Part No. 57.0009.0631
Second Edition - First Printing
Fall HazardsDo not lift or suspend personnel.
Don’t use the shovel for rising or transporting people.
Collision HazardsBe sure that the load is clear of any adjacent obstacles before lifting.
When visibility is or could be obstructed, near or at the load placement, the operator shall use alternative or additional means to safely lift the load, such as a qualified signal person.
Signal persons must remain in constant communication (verbal or hand) and be in visual contact with the operator at all times.
Crush HazardsNever allow the signal person to come between the suspended load and another object (such as the telehandler itself).
Before any maintenance on the mixing bucket, rest the bucket on the ground, stop the machine, remove the starter key and lock the cab door to prevent anybody from gaining access to the control panel.
Attachments
Falling Object Hazards
Do not raise the load into the fall zone shown.
Do not operate the machine while people are under the load or in the fall zone.
Do not suspend loads using slings or chains from the forks or fork carriage.
Avoid lifting double tiered loads.
When loading round-shaped objects (as petrol drums, etc) bind them with straps or ropes and travel at reduced speed.
February 2016Second Edition - First Printing
Part No. 57.0009.0631 GTH-2506 - GTH-3007 83
Lifting a Suspended Load
Verify that landing point is level and can safely support the load.
Properly secure the attachment to the telehandler
Level the frame on the telehandler.
Tether the load to restrict movement.
Ask a signal person to assist with lifting the load if visibility will be obstructed at the point of operation.
Make sure that the signal person remains in constant communication and is in visual contact at all times.
With the boom retracted as far as practical, slowly and gradually raise the boom and load, making sure to keep the load and boom as low to the ground as practical.
Be sure that all boom and attachment movements are performed as slow as practical to avoid swinging of the load.
Travelling
Be sure that the path of travel is level and capable of supporting the telehandler with its load.
Keep the boom, and load, as low as practical while maintaining visibility in the direction of travel.
Ask a signal person to assist with your travel if visibility will be obstructed in the direction of travel.
Crush or Collision Hazard. Make sure that the signal person remains in constant communication and be in visual contact at all times.
Only make adjustments to the load after bringing the telehandler to a complete stop.
Start, stop, travel and turn slowly to prevent the load from becoming unstable or swinging.
Do not travel faster than walking speed (<2 mph / 3.2 km/h).
Attachments

February 2016
84 GTH-2506 - GTH-3007 Part No. 57.0009.0631
Second Edition - First Printing
Placing the LoadAsk a signal person to assist with placing the load if visibility will be obstructed at the point of operation.
Make sure that the signal person remains in constant communication and be in visual contact at all times.
Come to a complete stop near the landing point.
Set the parking brake and place the transmission into neutral.
Slowly, and gradually, place the load over the landing point and lower the load until it is safely supported.
Once the load has been landed, continue to lower the boom until the rigging and tethers can be removed.
Signal Person A signal person is recommended when:
The point of operation, meaning the load travel or the area near or at load placement, is not in full view of the operator.
When the equipment is traveling, the view in the direction of travel is obstructed.
Due to site specific safety concerns, either the operator or the person handling the load determines that it is necessary.
Signal persons must remain in constant communication (verbal or hand) and be in visual contact with the operator at all times.
The hand signal chart below may be used as reference.
Attachments

February 2016Second Edition - First Printing
Part No. 57.0009.0631 GTH-2506 - GTH-3007 85
STOP. With arm extended horizontally to the side, palm down, arm is swung back and forth.
EMERGENCY STOP. With both arms extended horizontally to the side, palms down, arms are swung back and forth.
HOIST. With upper arm extended to the side, forearm and index finger pointing straight up, hand and finger make small circles.
RAISE BOOM. With arm extended horizontally to the side, thumb points up with other fingers closed.
SWING. With arm extended horizontally, index finger points in direction that boom is to swing.
RETRACT TELESCOPING BOOM. With hands to the front at waist level, thumbs point at each other with other fingers closed.
RAISE THE BOOM AND LOWER THE LOAD. With arm extended horizontally to the side and thumb pointing up, fingers open and close while load movement is desired.
DOG EVERYTHING. Hands held together at waist level.
LOWER. With arm and index finger pointing down, hand and finger make small circles.
LOWER BOOM. With arm extended horizontally to the side, thumb points down with other fingers closed.
EXTENDED TELESCOPING BOOM. With hands to the front at waist level, thumbs point outward with other fingers closed.
TRAVEL/TOWER TRAVEL. With all fingers pointing up, arm is extended horizontally out and back to make a pushing motion in the direction of travel.
LOWER THE BOOM AND RAISE THE LOAD. With arm extended horizontally to the side and thumb pointing down, fingers open and close while load movement is desired.
MOVE SLOWLY. A hand is placed in front of the hand that is giving the action signal.
Attachments

February 2016
86 GTH-2506 - GTH-3007 Part No. 57.0009.0631
Second Edition - First Printing
Specifi cations
GTH-2506
Height, stowed 1.92 m
Length, stowed, at fork-holder plate 3.84 m
Width, standard tires 1.81 m
Wheelbase 2.36 m
Ground clearance, center 0.33 m
Weight 4,580 kg
Working fork height,maximum
5.79 m
Horizontal reach maximum 3.35 m
Reach at maximum height 0.60 m
Lift capacity, maximum height 2,000 kg
Lift capacity, maximum reach 900 kg
Maximum lift capacity 2,500 kg
Drive speed, maximum, 23 km/h
Turning radius, outside,2 wheel steer
5.4 m
Turning radius, outside,4 wheel steer
4 m
Fuel tank capacity 60 L
Maximum grade 50 %
Horn sound level,manufacturer’s rating
112 dB
Backup alarm sound level,manufacturer’s rating
95 dB
Mean assessed vibration level transmitted to body
0.44 m/s2
Sound pressure level at the operator position (in accordance with EN12053) only for STAGE 3B
78 dB
Guaranteed sound power level LwA(in accordance with the Directive 2000/14/CE) only for stage 3B
101 dB
Floor loading information
Tire load, maximum 3,500 kg
Occupied floor pressure 7.5 kPa
GTH-3007
Height, stowed 2.07 m
Length, stowed, at fork-holder plate 4.66 m
Width, standard tires 1.99 m
Wheelbase 2.66 m
Ground clearance, center 0.43 m
Weight 6,140 kg
Working fork height,maximum
6.89 m
Horizontal reach maximum 3.99 m
Reach at maximum height 0.76 m
Lift capacity, maximum height 2,500 kg
Lift capacity, maximum reach 1,000 kg
Maximum lift capacity 3,000 kg
Drive speed, maximum, 30 km/h
Turning radius, outside,2 wheel steer
7.1 m
Turning radius, outside,4 wheel steer
4.4 m
Fuel tank capacity 90 L
Maximum grade 35 %
Horn sound level,manufacturer’s rating
112 dB
Backup alarm sound level,manufacturer’s rating
95 dB
Mean assessed vibration level transmitted to body
0.40 m/s2
Sound pressure level at the operator position (in accordance with EN12053) only for STAGE 3B
78 dB
Guaranteed sound power level LwA(in accordance with the Directive 2000/14/CE) only for STAGE 3B
104 dB
Floor loading information
Tire load, maximum 2,285 kg
Occupied floor pressure 7.2 kPa

February 2016Second Edition - First Printing
Part No. 57.0009.0631 GTH-2506 - GTH-3007 87
Load Charts
09.4618.1637
GTH-2506
GTH-2506, Standard Carriage
GTH-2506, Hook
GTH-2506
09.4618.0835
0°
10°
20°
30°
40°
50°
60°
0132.90 m
AB
CD
E70°
2
5.78
m
1000
kg
2000
kg
0
1
2
3
4
5
6
4
900
kg
2500
kg
1500
kg
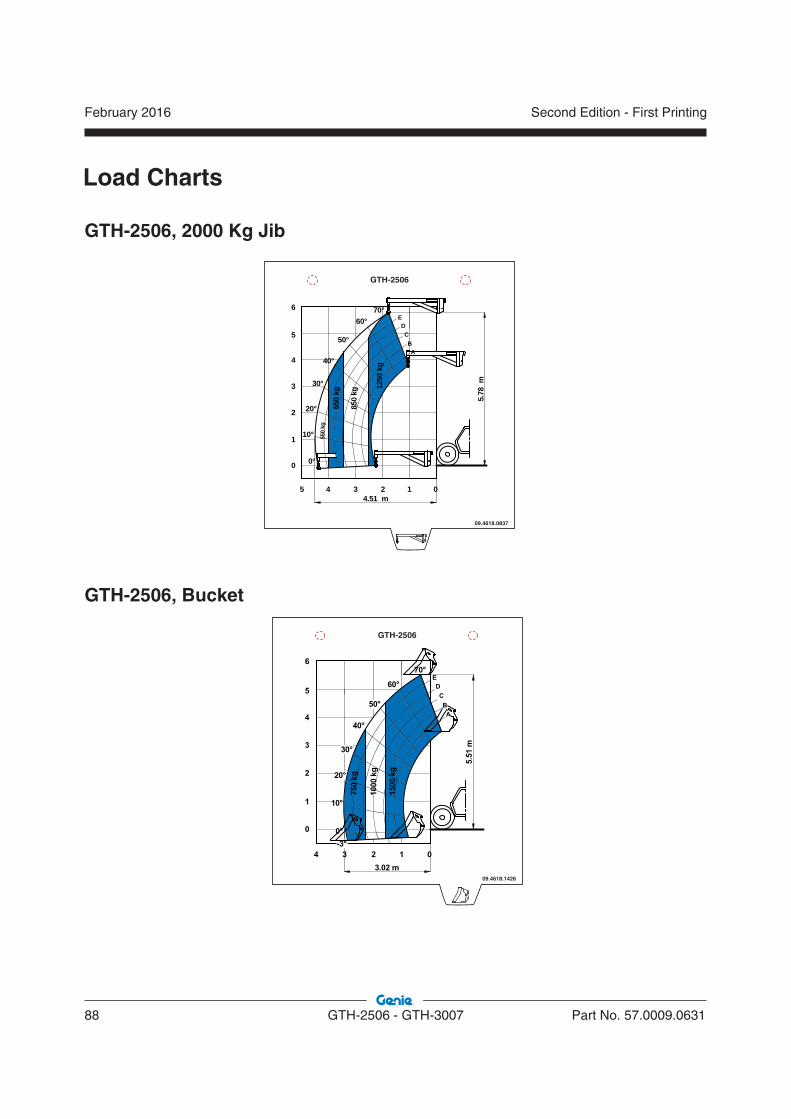
February 2016
88 GTH-2506 - GTH-3007 Part No. 57.0009.0631
Second Edition - First Printing
Load Charts
GTH-2506
09.4618.0837
0°
10°
20°
30°
40°
50°
60°
0
0134.51 m
AB
CD
E70°
2
1
2
3
4
5
6
5.78
m45
850
kg
550
kg
1250
kg
650
kg
GTH-2506, 2000 Kg Jib
GTH-2506, Bucket
GTH-2506
09.4618.1426

February 2016Second Edition - First Printing
Part No. 57.0009.0631 GTH-2506 - GTH-3007 89
GTH-2506 GM-1
09.4618.1515
GTH-2506, MANITOU TFF 29 653340 Fork
Load Charts

February 2016
90 GTH-2506 - GTH-3007 Part No. 57.0009.0631
Second Edition - First Printing
Load Charts
GTH-3007, Standard Carriage
GTH-3007, Hook
GTH-3007
09.4618.2016
30°
40°
50°
60°
20°
10°
0°
012345
EDC
BA
-2.9°
67°
0.6 m
2500
kg
0
1
2
3
4
5
6
7
-1
1500
kg
6.89
m
3.99 m
2000
kg
1000
kg
3000
kg
GTH-3007
09.4618.2022
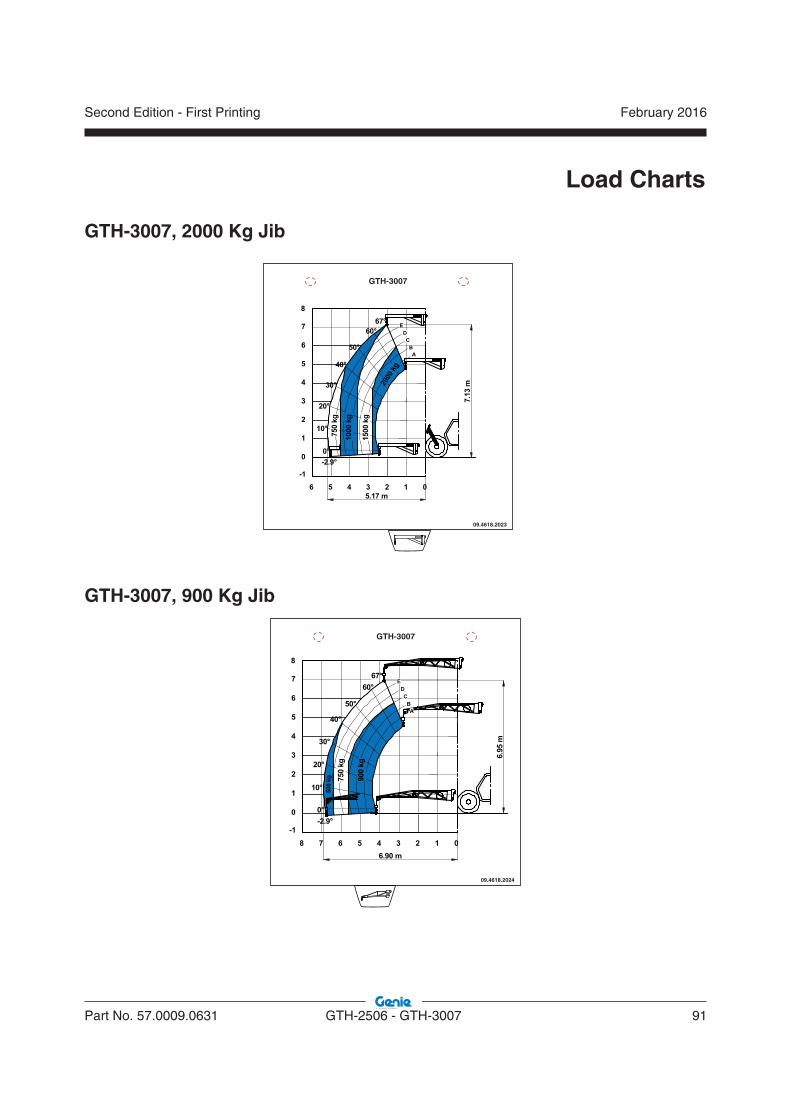
February 2016Second Edition - First Printing
Part No. 57.0009.0631 GTH-2506 - GTH-3007 91
Load Charts
GTH-3007, 2000 Kg Jib
GTH-3007, 900 Kg Jib
GTH-3007
09.4618.2023
GTH-3007
09.4618.2024
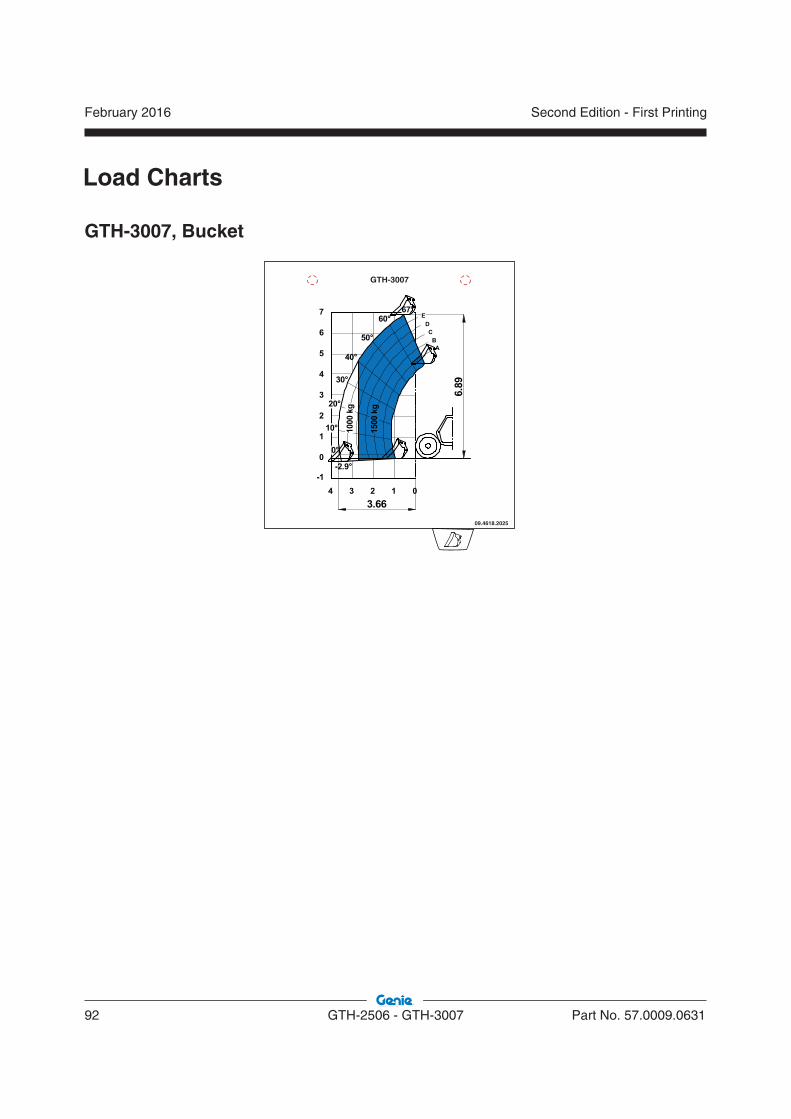
February 2016
92 GTH-2506 - GTH-3007 Part No. 57.0009.0631
Second Edition - First Printing
Load Charts
GTH-3007, Bucket
GTH-3007
09.4618.2025
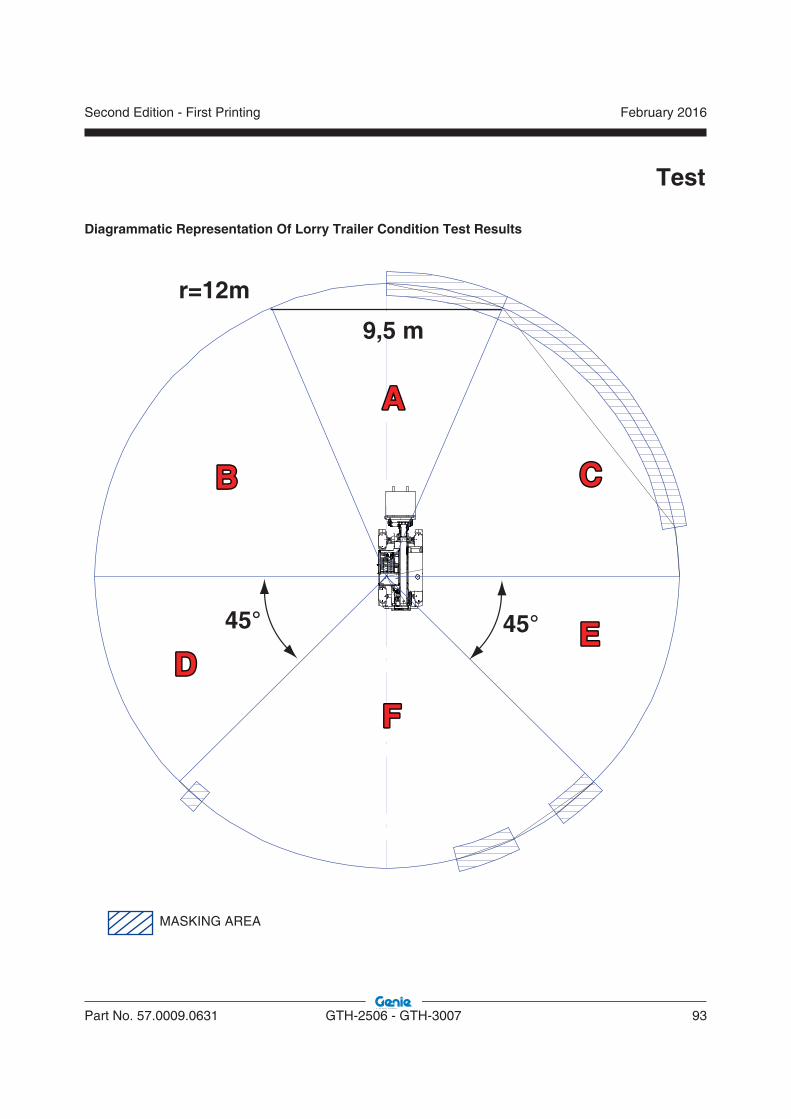
February 2016Second Edition - First Printing
Part No. 57.0009.0631 GTH-2506 - GTH-3007 93
Test
Diagrammatic Representation Of Lorry Trailer Condition Test Results
MASKING AREA
AA
CCBB
DDEE
FF
45°45°
9,5 m
r=12m

February 2016
94 GTH-2506 - GTH-3007 Part No. 57.0009.0631
Second Edition - First Printing
Diagrammatic Representation Of Lorry Trailer Condition Test Results
MASKING AREA
1 m
1 m
1 m
1 m
Test

February 2016Second Edition - First Printing
Part No. 57.0009.0631 GTH-2506 - GTH-3007 95
Test
Overload Test Procedure
Telehandler coupled to attachments with fixed centre of load (Forks, Bucket, Clamps):
1,33 x Q
Ref. Standard EN1459
Q = Nominal Rated Load Capacity
Telehandler coupled to attachments with oscillating centre of load (Hook, Jib, Hoist):
1,33 x Q + 0,1 x Fb on tires
1,25 x Q + 0,1 x Fb on outriggers
Ref. Standard EN13000
Q = Nominal Rated Load Capacity
Fb = Boom weight reduced (i.e. equal overturning moment) at boom tip.

February 2016
96 GTH-2506 - GTH-3007 Part No. 57.0009.0631
Second Edition - First Printing
EC Declaration Of Conformity
Contents of EC Declaration of Conformity
TEREX Global GmbH hereby declares that the machinery described below complies with the provisions of the following Directives:1. EC Directive 2006/42/EC, Machinery Directive.The machinery described below is suitable for Genie telehandlers, models specified in the user manual.Model/Type:Description:Serial Number:Manufacture Date:Country of Manufacture:Manufacturer:TEREX Global GmbHBleicheplatz 28200 SchaffhausenSwitzerlandEuropean representative:Genie UK LTDThe MaltingsWharf Road, Grantham, LincolnshireNG31 6BH United KingdomEmpowered signatory:Place of issue:Date of issue:

:yB detubirtsi
Dwww.genielift.com