Embed Size (px)
Citation preview
CORTEX. Pioneers in Metabolic Testing.
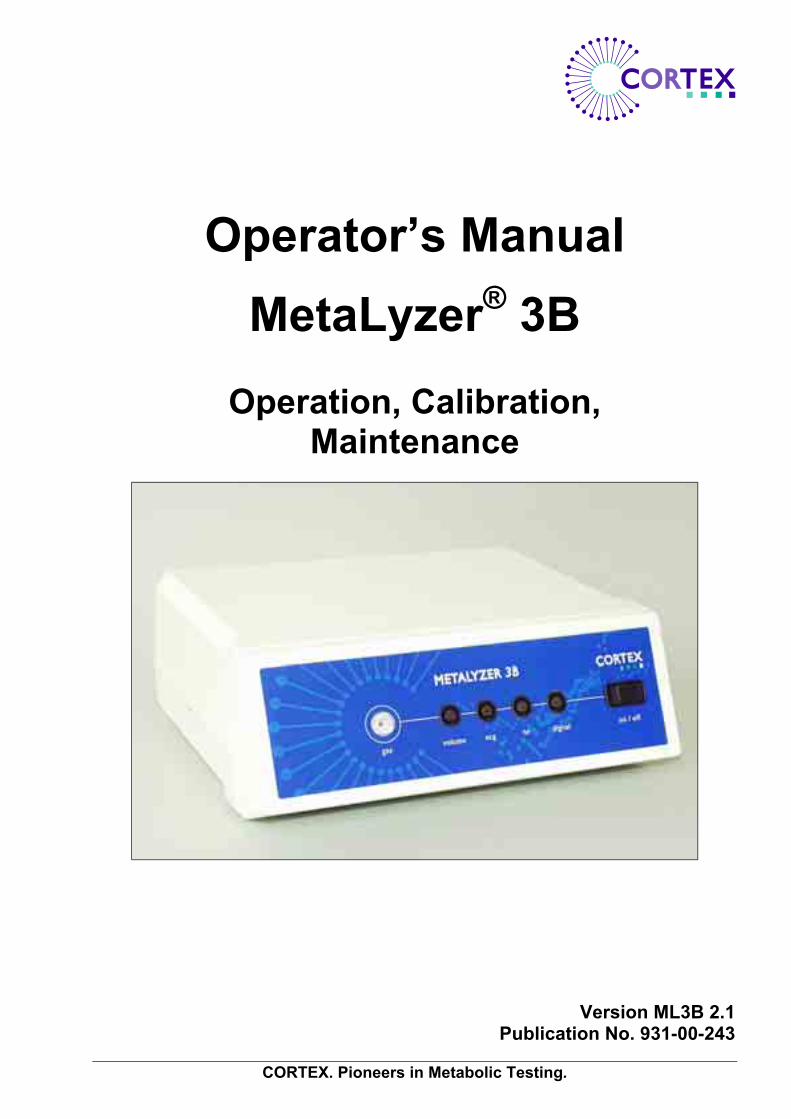
Operator’s Manual
MetaLyzer® 3B
Operation, Calibration, Maintenance
Version ML3B 2.1 Publication No. 931-00-243
Operator’s Manual MetaLyzer® 3B Version ML3B 2.1
2 CORTEX. Pioneers in Metabolic Testing.
Dear User
Welcome to CORTEX Biophysik.
Thank you for purchasing the
“CORTEX Biophysik MetaLyzer® 3B stationary CPX system” “CORTEX Biophysik MetaSoft® CPX testing software”.
We hope you will enjoy using your MetaLyzer® 3B as much as we enjoyed developing it for you!
To help us provide the product and service excellence you expect now and in the future, CORTEX Biophysik welcomes your comments and suggestions.
We look forward to sharing your experience using MetaLyzer® 3B.
Sincerely
Nonnenstrasse 39 04229 Leipzig Germany Phone +49 (0)341 48 74 9-0 Fax +49 (0)341 48 74 9-50 email: [email protected] http://www.cortex-medical.de
Operator’s Manual MetaLyzer® 3B Version ML3B 2.1
CORTEX. Pioneers in Metabolic Testing. 3
Table of Contents Chapter Page I. Before you start 5-7
Introduction 5 Intended use 5 Safety regulations 6 Interference with other devices 7
I I . Technical Data 8-10 II I . Figure: MetaLyzer® 3B Base System 11-12
Base System Front View 11 Base System Rear View 12
IV. Installation 13-17
Connect device to PC/Notebook 13 Connect volume transducer 14 Connect sample line 14 Connect Polar® receiver cable 15 Fix Polar® receiver cable to bike/treadmill 15 Connect bicycle ergometer/treadmill 16 Power System 17 Create device profile using MS Device Configuration 17
V. Key Operations prior to each test 18-22
Prepare system Power system for warm-up 18 Check physical connections 18
Prepare patient/test subject for the test Fix Polar® heart rate transmitter belt 19 Select mask and fix head cap 20 Connect volume transducer/sample line to mask 20 Fix and adjust mask 21 Ready for the test 22
VI. Calibration 23-49
General 23 Calibration Procedures & Practices Overview 23 CORTEX Calibration Kit Parts List 25 Steps prior to calibration 28 Volume Calibration 29 Two-Point Gas Calibration with Calibration Gas Saver 35 Two-Point Gas Calibration with automatic Gas Calibrator 41 Pressure Calibration 45 Print Calibration Reports 47 Check Analyzer Function 48 Edit Calibration Values 49
Operator’s Manual MetaLyzer® 3B Version ML3B 2.1
4 CORTEX. Pioneers in Metabolic Testing.
Table of Contents Chapter Page VII. Maintenance & Cleaning 50-64
Cleaning & Maintenance Routines Overview 50 Cleaning & Maintenance Instructions 52
- Replace O2 Analyzer 52 - Clean & disinfect face mask 57 - Clean head cap assembly 58 - Clean housing 58 - Clean & disinfect DVT volume transducer 59 - Clean & disinfect Triple® V volume transducer 61 - Replace sample line 63 - Visual inspection of system & parts prior to next use 63
Maintenance of Calibration Equipment 64 - Replace reference gas bottles 64 - Clean & replace tube set 64 - Clean gas saver 64
VIII. Annexes 65-71
Troubleshooting Tips 66 Certificates of Quality Assurance 69 Manufacturer’s Declaration of Conformity 71
IX. Contact CORTEX Biophysik 72 X. Trademarks 73 XI. Disclaimer 73 XII. Personal Notes 74
Operator’s Manual MetaLyzer® 3B Version ML3B 2.1
CORTEX. Pioneers in Metabolic Testing. 5
I. Before you start
Introduction This Operator’s Manual refers to
MetaLyzer® 3B, Firmware Version 2.0 MetaSoft®, from version 2
It is designed to help you getting started performing CPX tests with your new MetaLyzer® 3B, answering basic questions about how to install the system, assemble the parts, prepare your patient / test subject for a test and maintain your MetaLyzer® 3B system to obtain maximum performance. Your MetaLyzer® 3B comes complete with MetaSoft® software which is required to measure and evaluate the data recorded. Please refer to your MetaSoft® Operator’s Manual for software instructions. Please contact your local CORTEX sales partner for hotline support and / or preventive maintenance and service agreements.
Please read the following instructions and safety regulations carefully before first use to obtain the best performance from your MetaLyzer® 3B. Keep these instructions in a safe place for future reference.
Intended use
The MetaLyzer® 3B is a stationary metabolic stress test system (or CPX system) for pulmonary gas exchange measurements during ergometer or treadmill exercise. Direct measures of gas exchange include O2 and CO2 concentration of the expired / inspired air, heart rate, ventilation, ambient temperature and pressure. In addition, other valuable physiological variables can be obtained (e.g. AT, VO2max), allowing the physician to completely assess a patient’s or an athlete’s cardiopulmonary status. This device may be used with adults and children over the age of 14 years.
During a CPX test with MetaLyzer® 3B, the patient / test subject is wearing a small face mask, breathing out through a volume transducer fixed to the face mask. The gas samples are collected while the patient / test subject exercises on an ergometer or treadmill. The optional 3-channel, 5-lead ECG enables the physician to record the ECG of his/her patient / test subject and to monitor his / her heart function throughout the test. Selected ECG sequences can be saved for online display and / or a detailed analysis after the test (Note: The 3-channel ECG option is supported by MS 2 version from 2.4). In addition, other external diagnostic devices (e.g. ergometers) can be connected and directly controlled via the MetaSoft® software. As a breath-by-breath system the MetaLyzer® 3B measures volume continuously and simultaneously determines expired CO2 and O2 concentration. The CO2 output and O2 uptake during each breath are calculated, and data sampled is transferred breath-by-breath to a PC for immediate display. Breath-by-Breath systems allow very accurate measurements under non-steady-state and changing ambient air conditions. They are considered appropriate for extended CPX testing requirements aimed to accurately follow up the physiological responses during exercise tests in which work rates change more frequently. The MetaLyzer® 3B is operated via the mains supply. It is directly connected to a PC for real-time display of the data recorded during measurement, using MetaSoft® software. The data recorded is saved in the internal database of MetaSoft® for a precise performance analysis after the test.

Operator’s Manual MetaLyzer® 3B Version ML3B 2.1
6 CORTEX. Pioneers in Metabolic Testing.
The MetaLyzer® 3B has to be operated by appropriately trained physicians, properly trained nurses, exercise physiologists, or medical technicians working directly under the supervision of a physician who should be in the immediate vicinity and available for emergencies. The MetaLyzer® 3B must not be used in intensive care environments or for monitoring vital body functions. The ultimate judgement as to which patients / test subjects should undergo a metabolic stress test and as to which protocols are selected and / or adapted must be made by the physician based on the limitations of the individual and in light of his medical history and of all of the circumstances presented by that patient / test subject.
Neither CORTEX Biophysik nor its sales partners assume any responsibility for the final use of its equipment.
For further information on metabolic stress testing please contact your local CORTEX sales partner.
Note: Federal law restricts this device to sale by or on the order of a physician.
Safety regulations
For safety reasons, the MetaLyzer® 3B must not be operated or used with accessories, disposables, optional modules or analyzers other than offered and / or authorized by the manufacturer. Ergometers and / or treadmills which are to be controlled via MetaSoft® must meet the legal requirements for medical equipment and may only be used with the appropriate MetaLyzer® 3B option. Computers which are connected to the MetaLyzer® 3B, but were not supplied by CORTEX Biophysik, must comply with the technical standards for electronic equipment. They must meet the minimum requirements recommended by CORTEX Biophysik for use with MetaSoft® CPX testing software to ensure a proper function of the MetaLyzer® 3B.
The operation of the MetaLyzer® 3B in combination with other devices (PC, ergometer) must comply with the requirements of DIN EN 60601-1-1 / DIN EN 60601-1-1/A1.
CORTEX SmartCart trolleys are designed for exclusive use with CORTEX systems. They can only be equipped with the appropriate CORTEX devices. Do not add trays or equipment other than offered and / or authorized by CORTEX for the respective SmartCart model. Please note that Cortex devices (CardioLyzer, MetaLyzer®) are connected to a patient / test subject. For patient safety, PCs, printers and other devices which do not comply with EN 60601-1, must be connected to an isolating transformer if they are operated within a patient environment, i.e. at a distance of less than 150 cm from a patient / test subject.
Always ensure the power outlet is secured. Devices connected must meet the legal requirements according to DIN EN 60601-1-1 / DIN EN 60601-1-1/A1.
Do not use or connect any defective, broken or non-genuine parts and / or accessories. Defective parts and / or accessories must be replaced prior to use. If in doubt, always contact an authorized CORTEX sales partner or CORTEX Biophysik to check the system before use.
The system may only be opened to exchange the O2 analyzer. Prior to opening the system, make sure your MetaLyzer® 3B is switched off and disconnected from the mains supply. For repairs return the system to your local CORTEX sales partner or to CORTEX Biophysik. The MetaLyzer® 3B and / or its parts may only be repaired by an authorized CORTEX sales partner or by CORTEX technical support staff. Repairs undertaken by non-authorized personnel may cause severe risk for the user and patient / test subject. The CORTEX warranty expires in case of non-authorized repair.
Do not use a MetaLyzer® 3B with an open or defective housing. The MetaLyzer® 3B must not be used with anaesthesia gas in combination with oxygen or nitrous oxide (it is not a device of class AP or APG). Always keep the device in a dry and protected position. Never operate the devices in or close to water (DIN VDE 0100, Part 702).
Operator’s Manual MetaLyzer® 3B Version ML3B 2.1
CORTEX. Pioneers in Metabolic Testing. 7
Neither CORTEX Biophysik nor its sales partners assume any liability for defects, damages or any injuries caused due to improper use of the MetaLyzer® 3B or due to a violence of its safety regulations and maintenance instructions.
Gas under pressure involves certain risks for user and equipment. The calibration procedures and routines described in this manual should therefore be performed by properly trained or experienced staff only.
During intended use of the MetaLyzer® 3B, no waste is produced or compounds are generated which need to be disposed. At the end of its life cycle, the device and its accessories should be disposed at a service center specialized in electronic scrap disposal.
For cleaning and maintenance instructions please see chapter “Maintenance & Cleaning” to ensure a proper and long-time performance of your MetaLyzer® 3B.
Interference with other devices
The MetaLyzer® 3B has been tested for electromagnetic tolerance and meets the required standards. There may be minimum risks, however, of the MetaLyzer® 3B to interfere with other electronic devices. Since heart rate signals are transferred wirelessly (if Polar® HR monitor is used), the heart rate measurement may be interfered with very strong electromagnetic transmitters (e.g. devices not built to required standards) which are used in the vicinity. Should this occur, please contact your local CORTEX sales partner or CORTEX technical support for assistance.
For further information on the operation of the MetaLyzer® 3B, technical details and optional modules, please contact your local CORTEX sales partner or the technical support of CORTEX Biophysik. Please also see chapter “Technical Data” and back page for contact details of CORTEX Biophysik.
Important Always use original parts offered or sold by the manufacturer or
specified as equivalent by the manufacturer. Never use defective or broken parts. Visually check each part of the
equipment prior to use. Replace defective parts, accessories and/or power supplies immediately. If in doubt, always contact an authorized CORTEX Biophysik sales partner or CORTEX Biophysik.
Do not open device housings.
Repairs should be undertaken by authorized personnel only. Repairs
undertaken by non-authorized personnel may cause severe damage to the equipment and / or system and may result in severe safety risks for the user.
Replace tubes at regular intervals to maintain a high performance of
your calibration equipment and thus ensure a proper function of your MetaLyzer® 3B system.
Operator’s Manual MetaLyzer® 3B Version ML3B 2.1
8 CORTEX. Pioneers in Metabolic Testing.
II. Technical Data
Measurement Device
The MetaLyzer® 3B is a stationary cardiopulmonary exercise system for pulmonary gas exchange measurements during treadmill or bike exercise, using breath-by-breath technology.
Parameters MetaSoft®
The following parameters are measured and / or calculated during a measurement with MetaLyzer® 3B using MetaSoft® CPX Testing software:
Parameter S = Standard O = Option
Circulation
- HR (Heart Rate) S - HRmax (Maximum Heart Rate) S - Blood Pressure (systolic, diastolic, mmHg) O - Workload:
Level (rest, load, recovery), work rate (watts), grade (watts/ min., grade/min.), speed (m/sec., km/h, m/h), elevation
S
- 3-channel ECG (5, 10,20 mm/mV, 15, 25, 75 mm/sec., Einthoven I-III, Wilson V, Nehb, Goldberger aVR, aVF, aVL, ST segment elevation)
O
- 12-channel ECG (Einthoven, Wilson, Goldberger) O Gas Exchange
- FIO2, FEO2 (O2 Concentration in inspired / expired gas, Vol. %) S - FICO2, FECO2 (CO2 Concentration in inspired / expired gas, Vol. %) S - VO2 BTPS (Oxygen Uptake BTPS, l/min) S - VCO2 BTPS (Carbon Dioxide Output BTPS, l/min) S - VO2 STPD (Absolute O2 Uptake STPD, l/min) S - VCO2 STPD (Absolute CO2 Output STPD, l/min) S - VO2/kg (Relative O2 Uptake, l/min/kg) S - VCO2/kg (Relative CO2 Output, l/min/kg) S - VO2max (Maximum O2 Uptake, l/min/kg) S - METS (Metabolic Equivalent) S - RQ (Respiratory Exchange Ratio VCO2/VO2) S - AT (Anaerobic Threshold) S - VO2/HR (Oxygen Pulse) S - VO2/HRmax (Maximum Oxygen Pulse) S - VO2 / WR (Aerobic Capacity, l/min./W) S - O2 kinetics (Oxygen Deficit/redemption, l/min.) S
Ventilation
- RR (Respiratory Frequency or Rate, Breath/min.) S - VT (Tidal Volume, l/Breath) S - VE ATPS (Minute Ventilation, l/min.) S - VE / VO2 (Ventilatory Equivalent for O2) S - VE / VCO2 (Ventilatory Equivalent for CO2) S - PETO2 (End-tidal O2 Partial Pressure, mmHg) S - PETCO2 (End-tidal CO2 Partial Pressure, mmHg) S - PACO2 (Arterial CO2 Partial Pressure, mmHg) S
Operator’s Manual MetaLyzer® 3B Version ML3B 2.1
CORTEX. Pioneers in Metabolic Testing. 9
Technical Specifications MetaLyzer® 3B Base System Size (L/W/H) 235x165x85 (mm) Weight 1,100g Analyzers Volume transducer Type: DVT turbine, digital Range: 0.1 – 12 l/s Resolution: 7ml Accuracy: 2% Type: Triple V® turbine, digital Range: 0.05 – 20 l/s Resolution: 7 ml Accuracy: 2 % Resistance: ≤ 0.1 kPA/l/s at 16 l/s O2 analyzer Type: electro-chemical cell Range: 0 – 35 % O2
t90: 100 ms Accuracy: 0.1 Vol.% CO2 analyzer Type: ND infrared Range: 0 – 13 % CO2
t90: 100 ms Accuracy: 0.1 Vol.% Temperature sensor Type: NTC Thermistor Range: -55°C - +155°C Accuracy: 1° C Pressure sensor Type: Silicon Range: 200 – 1050 mbar Accuracy: 1.8% Heart rate POLAR® heart rate monitor
Operator’s Manual MetaLyzer® 3B Version ML3B 2.1
10 CORTEX. Pioneers in Metabolic Testing.
Electrical / environmental specifications During intended use: Temperature +10°C - +35° C Humidity 0 - 99% Pressure 500 - 1050 mbar Power supply 100 - 240 V AC, 50 - 60 Hz, During transport: Temperature -50°C - +70°C Humidity 0 - 99% Pressure 500 - 1200 mbar During storage: Temperature +2°C - +25°C Humidity 0 - 60% Pressure 500 - 1200 mbar
Safety Safety Standards EN 60601-1 (1996) EN 60601-1-1 (1994) EN 60601-1-1/A1 (1996) Class Class II, Type BF Protection Class IP 30 EMC EN 60601-1-2 (1994) Conformity Class II a (according to 93/42/EWG; Appendix IX)
Disinfection instructions see chapter “Maintenance & Cleaning” of this manual. No device of class AP/APG. Suitable for continuous use.
Certified Quality
CORTEX Biophysik has successfully implemented a Quality Management System satisfying Quality System Standards ISO 9001 and EN 46001.
0124 The MetaLyzer® 3B complies with the Medical Device Directives, MDD 93/42/EEC, and has been approved to carry the CE Mark as shown.
CORTEX Biophysik is a member of the Quality Circle of Medical Software.
Operator’s Manual MetaLyzer® 3B Version ML3B 2.1
CORTEX. Pioneers in Metabolic Testing. 11
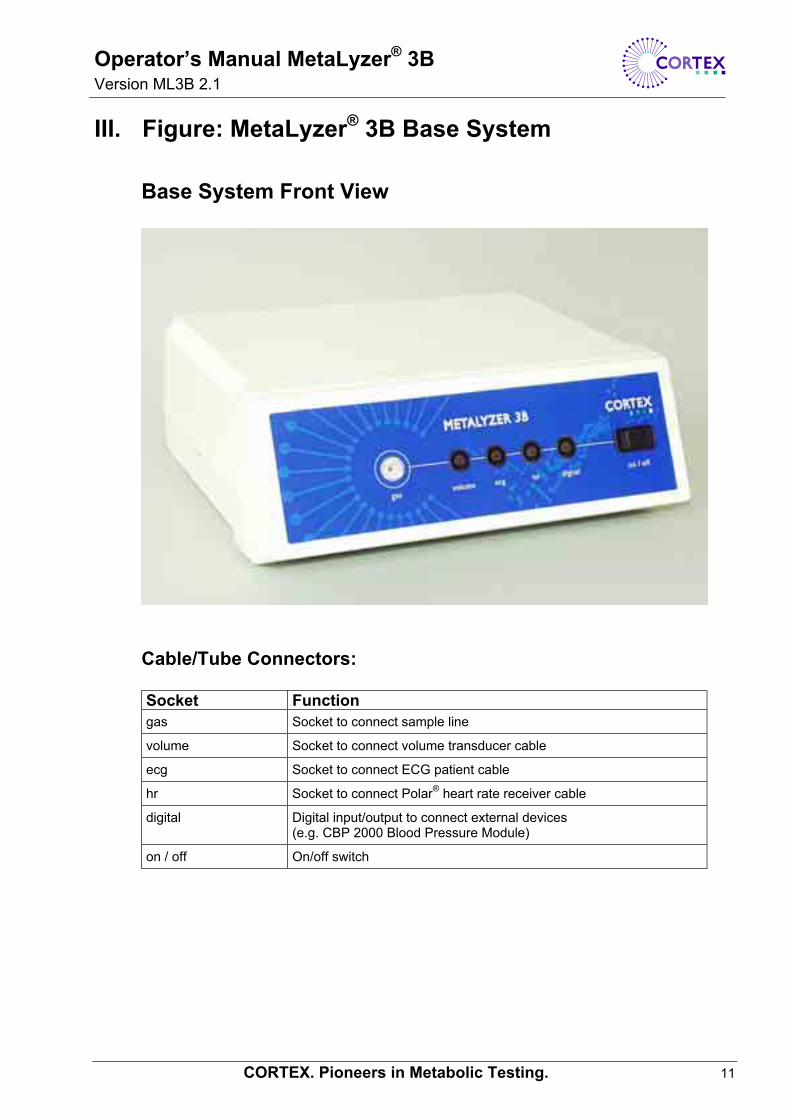
III. Figure: MetaLyzer® 3B Base System
Base System Front View
Cable/Tube Connectors:
Socket Function gas Socket to connect sample line
volume Socket to connect volume transducer cable
ecg Socket to connect ECG patient cable
hr Socket to connect Polar® heart rate receiver cable
digital Digital input/output to connect external devices (e.g. CBP 2000 Blood Pressure Module)
on / off On/off switch
Operator’s Manual MetaLyzer® 3B Version ML3B 2.1
12 CORTEX. Pioneers in Metabolic Testing.
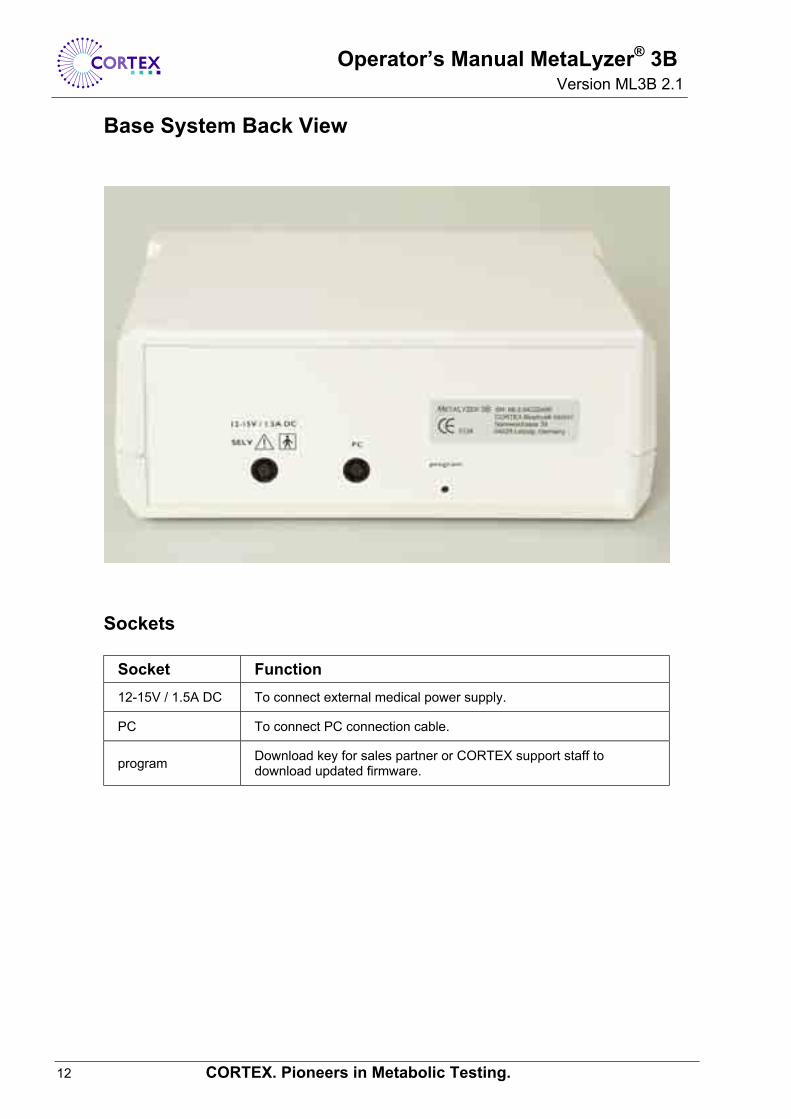
Base System Back View
Sockets
Socket Function 12-15V / 1.5A DC To connect external medical power supply.
PC To connect PC connection cable.
program Download key for sales partner or CORTEX support staff to download updated firmware.
Operator’s Manual MetaLyzer® 3B Version ML3B 2.1
CORTEX. Pioneers in Metabolic Testing. 13
IV. Installation
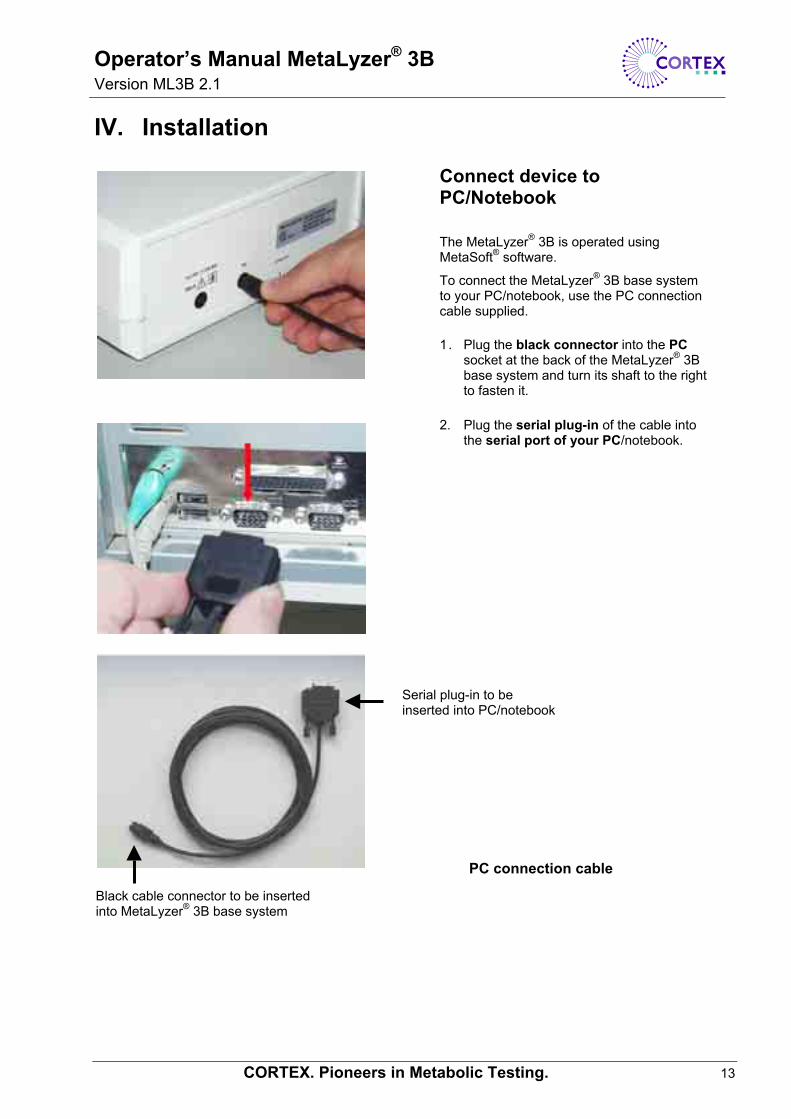
Connect device to PC/Notebook The MetaLyzer® 3B is operated using MetaSoft® software.
To connect the MetaLyzer® 3B base system to your PC/notebook, use the PC connection cable supplied. 1. Plug the black connector into the PC
socket at the back of the MetaLyzer® 3B base system and turn its shaft to the right to fasten it.
2. Plug the serial plug-in of the cable into the serial port of your PC/notebook.
Serial plug-in to be inserted into PC/notebook
PC connection cable
Black cable connector to be inserted into MetaLyzer® 3B base system
Operator’s Manual MetaLyzer® 3B Version ML3B 2.1
14 CORTEX. Pioneers in Metabolic Testing.
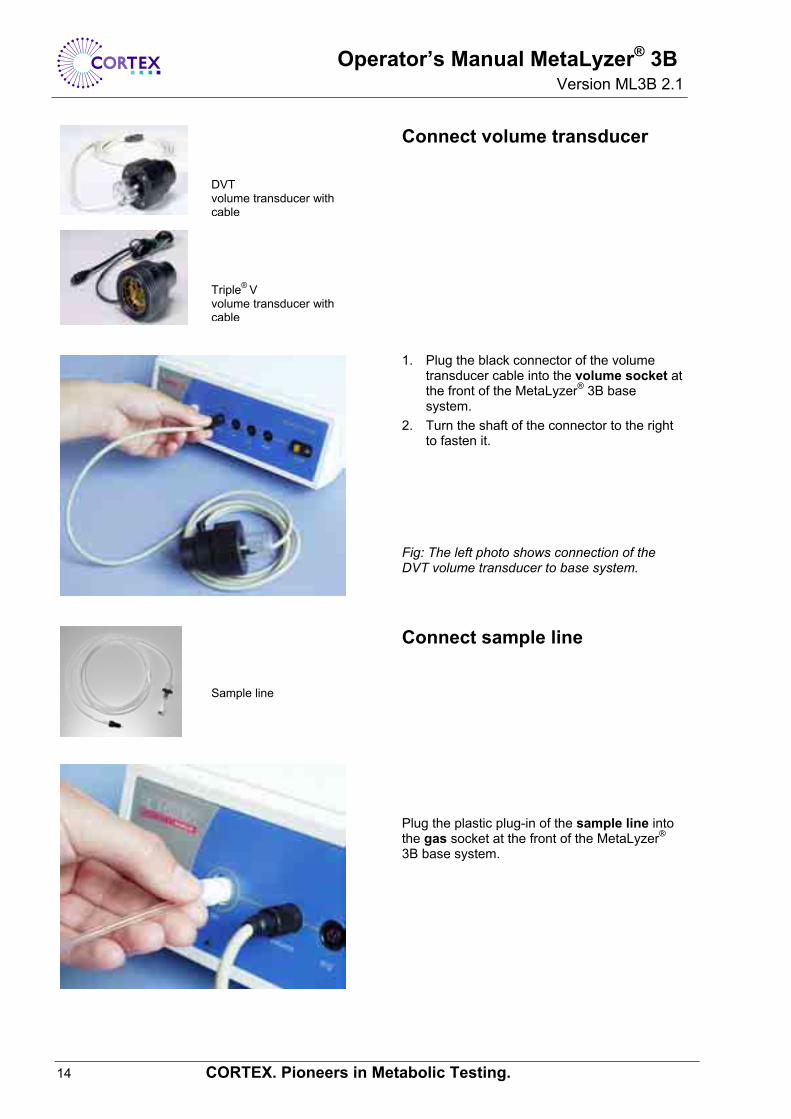
Connect volume transducer 1. Plug the black connector of the volume
transducer cable into the volume socket at the front of the MetaLyzer® 3B base system.
2. Turn the shaft of the connector to the right to fasten it.
Fig: The left photo shows connection of the DVT volume transducer to base system.
Connect sample line Plug the plastic plug-in of the sample line into the gas socket at the front of the MetaLyzer® 3B base system.
Sample line
Triple® V volume transducer with cable
DVT volume transducer with cable
Operator’s Manual MetaLyzer® 3B Version ML3B 2.1
CORTEX. Pioneers in Metabolic Testing. 15
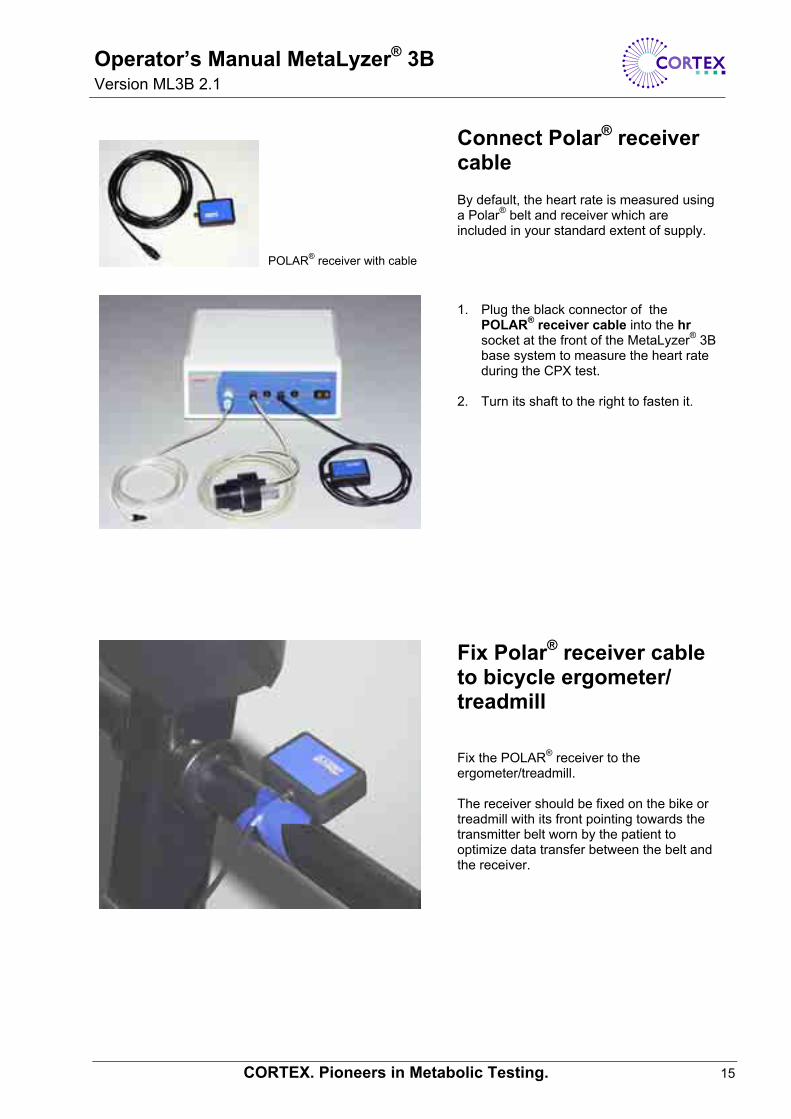
Connect Polar® receiver cable
By default, the heart rate is measured using a Polar® belt and receiver which are included in your standard extent of supply. 1. Plug the black connector of the
POLAR® receiver cable into the hr socket at the front of the MetaLyzer® 3B base system to measure the heart rate during the CPX test.
2. Turn its shaft to the right to fasten it.
Fix Polar® receiver cable to bicycle ergometer/ treadmill
Fix the POLAR® receiver to the ergometer/treadmill. The receiver should be fixed on the bike or treadmill with its front pointing towards the transmitter belt worn by the patient to optimize data transfer between the belt and the receiver.
POLAR® receiver with cable
Operator’s Manual MetaLyzer® 3B Version ML3B 2.1
16 CORTEX. Pioneers in Metabolic Testing.
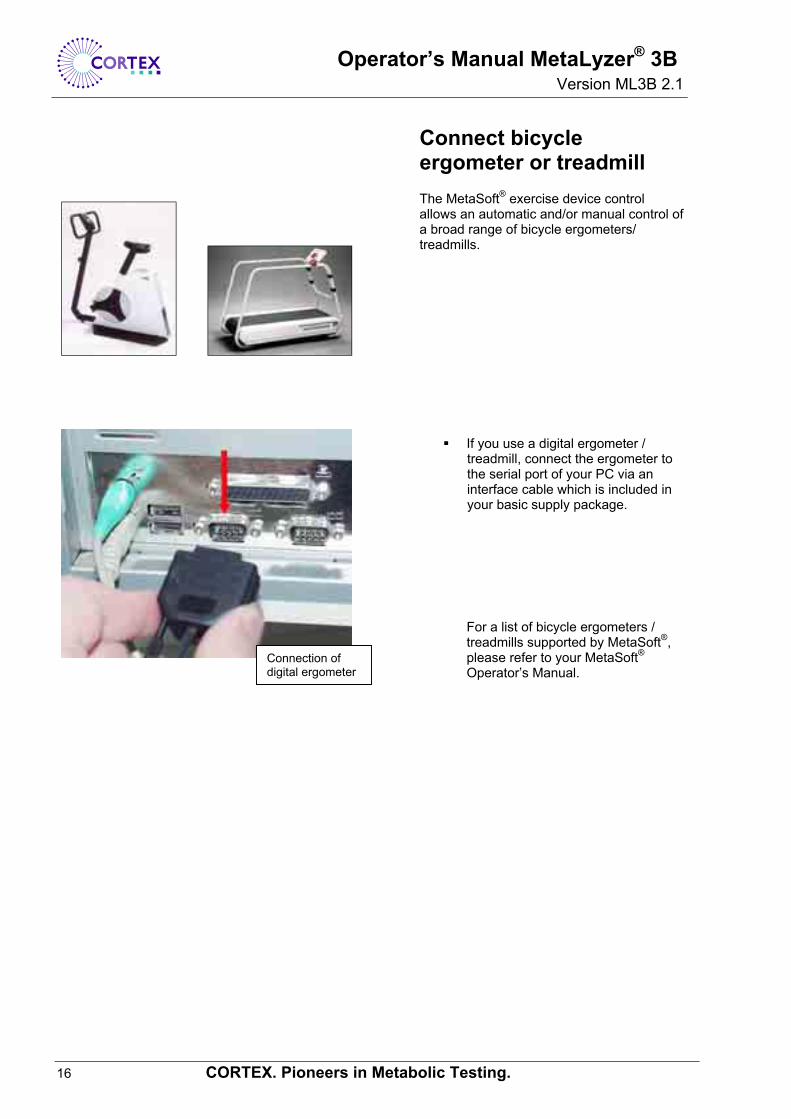
Connect bicycle ergometer or treadmill
The MetaSoft® exercise device control allows an automatic and/or manual control of a broad range of bicycle ergometers/ treadmills.
If you use a digital ergometer /
treadmill, connect the ergometer to the serial port of your PC via an interface cable which is included in your basic supply package.
For a list of bicycle ergometers / treadmills supported by MetaSoft®, please refer to your MetaSoft® Operator’s Manual.
Connection of digital ergometer
Operator’s Manual MetaLyzer® 3B Version ML3B 2.1
CORTEX. Pioneers in Metabolic Testing. 17
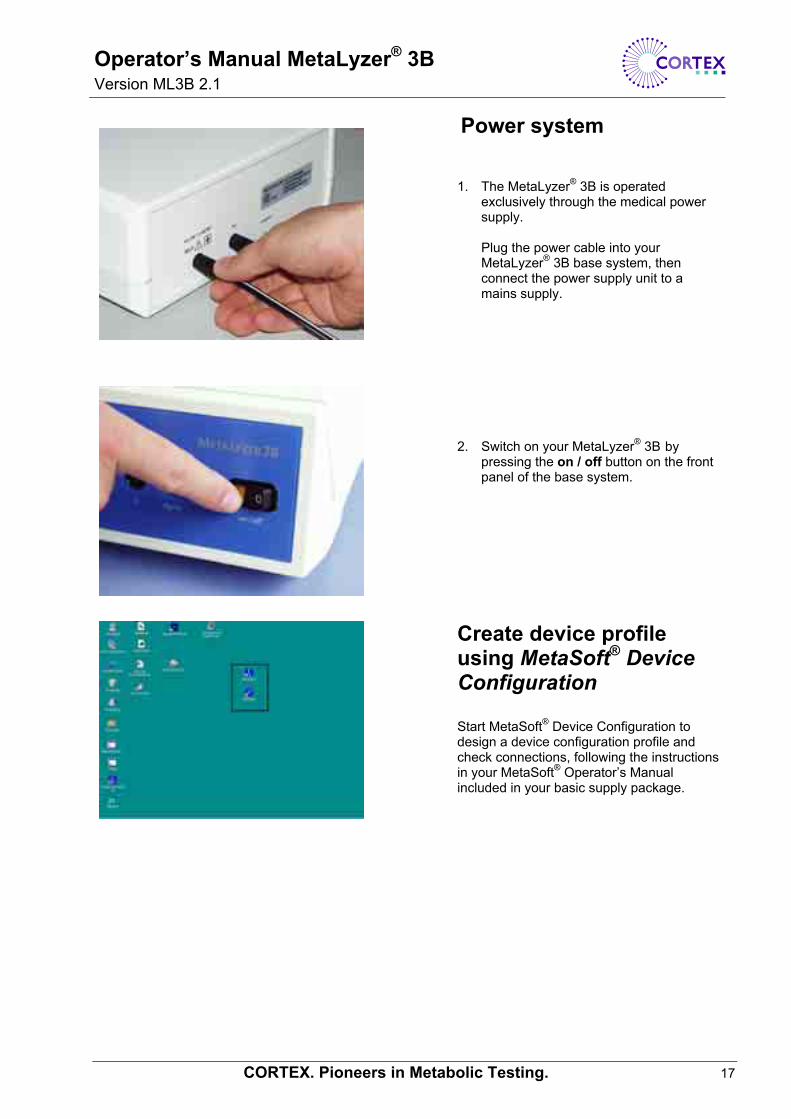
Power system 1. The MetaLyzer® 3B is operated
exclusively through the medical power supply. Plug the power cable into your MetaLyzer® 3B base system, then connect the power supply unit to a mains supply.
2. Switch on your MetaLyzer® 3B by
pressing the on / off button on the front panel of the base system.
Create device profile using MetaSoft® Device Configuration Start MetaSoft® Device Configuration to design a device configuration profile and check connections, following the instructions in your MetaSoft® Operator’s Manual included in your basic supply package.
Operator’s Manual MetaLyzer® 3B Version ML3B 2.1
18 CORTEX. Pioneers in Metabolic Testing.
V. Key operations prior to each test Prepare System
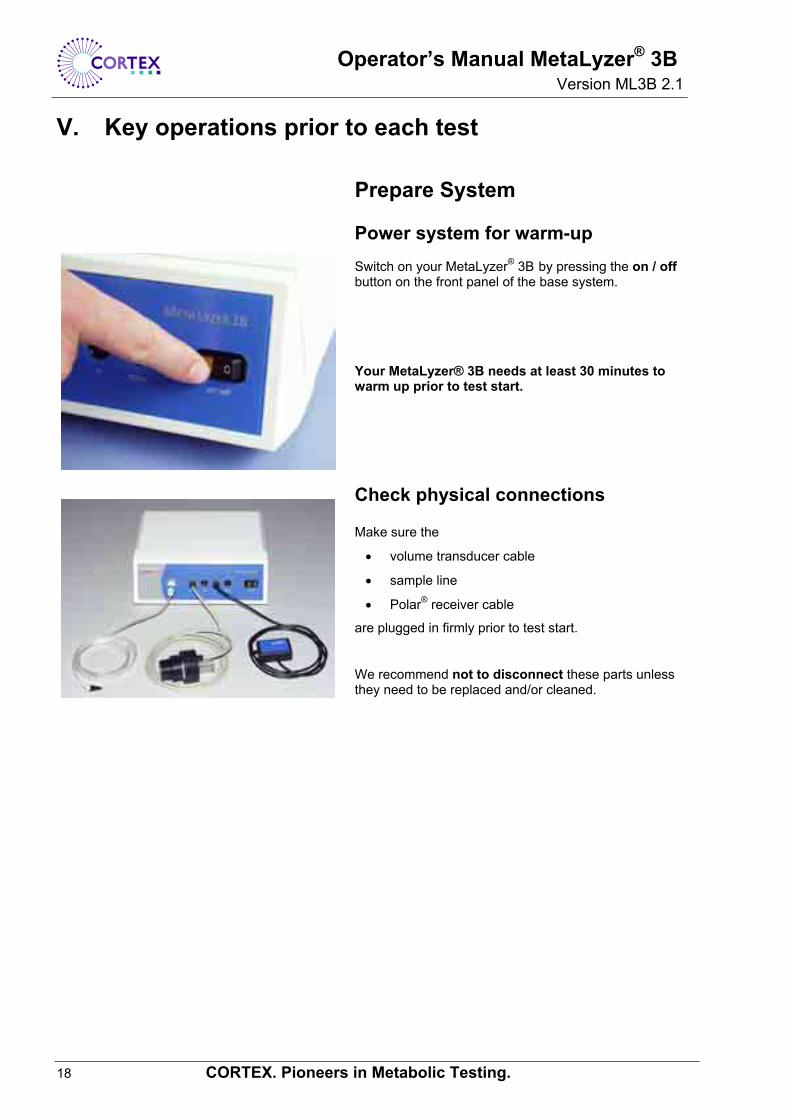
Power system for warm-up Switch on your MetaLyzer® 3B by pressing the on / off button on the front panel of the base system. Your MetaLyzer® 3B needs at least 30 minutes to warm up prior to test start.
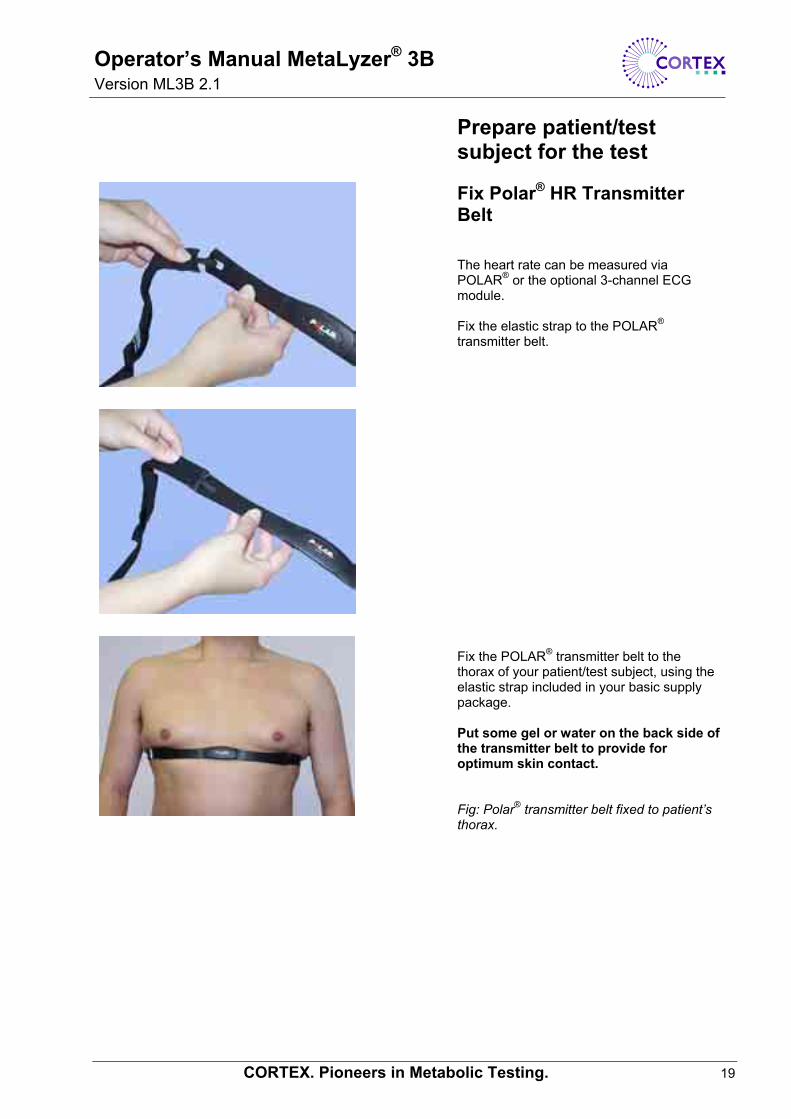
Check physical connections Make sure the
• volume transducer cable
• sample line
• Polar® receiver cable
are plugged in firmly prior to test start.
We recommend not to disconnect these parts unless they need to be replaced and/or cleaned.
Operator’s Manual MetaLyzer® 3B Version ML3B 2.1
CORTEX. Pioneers in Metabolic Testing. 19
Prepare patient/test subject for the test
Fix Polar® HR Transmitter Belt The heart rate can be measured via POLAR® or the optional 3-channel ECG module. Fix the elastic strap to the POLAR® transmitter belt. Fix the POLAR® transmitter belt to the thorax of your patient/test subject, using the elastic strap included in your basic supply package. Put some gel or water on the back side of the transmitter belt to provide for optimum skin contact. Fig: Polar® transmitter belt fixed to patient’s thorax.

Operator’s Manual MetaLyzer® 3B Version ML3B 2.1
20 CORTEX. Pioneers in Metabolic Testing.
Select mask and fix head cap
Select an appropriate face mask or mouthpiece and fix it to the head cap as shown on the left. Only the top clips of the head cap are fixed to the head cap assembly.
Connect volume transducer and sample line to mask
Plug the sample line into the sample line outlet of the volume transducer, then insert the volume transducer into the face mask. When inserting the volume transducer, the sample line should be plugged in from the top.
Fig. DVT volume transducer and sample line connected to face mask. Fig. Triple® V volume transducer and sample line connected to face mask.
Head cap
Mask
Operator’s Manual MetaLyzer® 3B Version ML3B 2.1
CORTEX. Pioneers in Metabolic Testing. 21
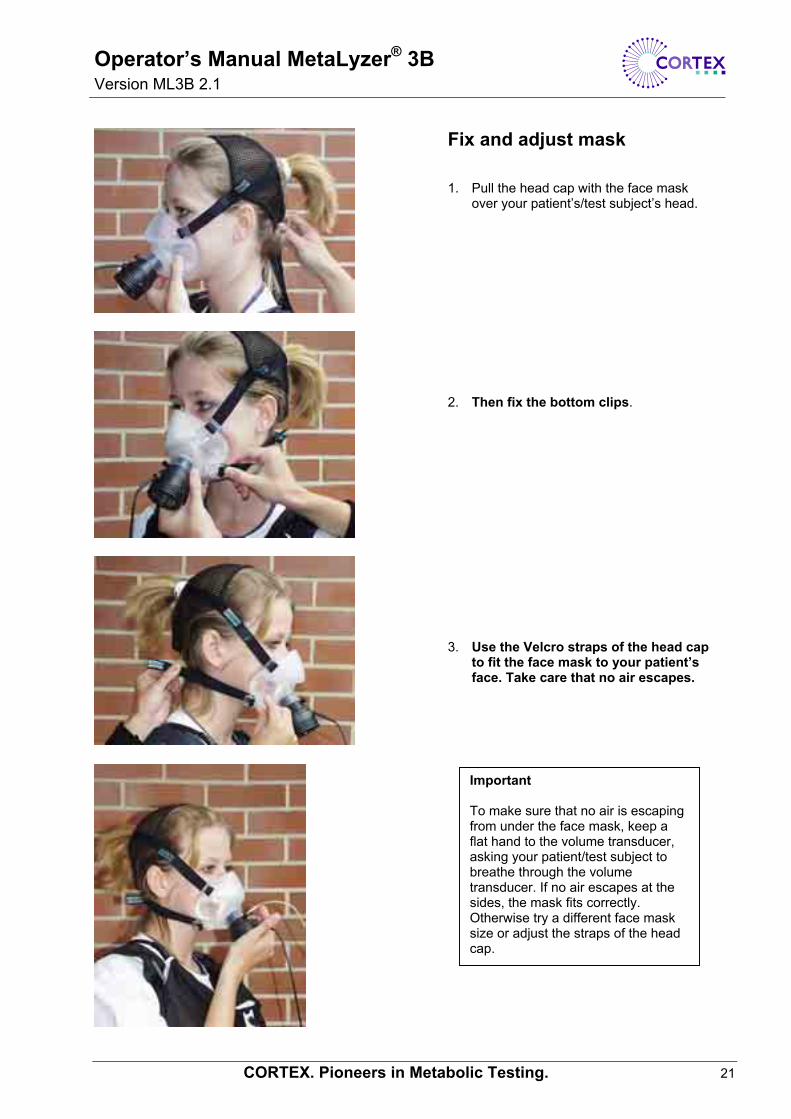
Fix and adjust mask
1. Pull the head cap with the face mask over your patient’s/test subject’s head.
2. Then fix the bottom clips.
3. Use the Velcro straps of the head cap to fit the face mask to your patient’s face. Take care that no air escapes.
Important To make sure that no air is escaping from under the face mask, keep a flat hand to the volume transducer, asking your patient/test subject to breathe through the volume transducer. If no air escapes at the sides, the mask fits correctly. Otherwise try a different face mask size or adjust the straps of the head cap.
Operator’s Manual MetaLyzer® 3B Version ML3B 2.1
22 CORTEX. Pioneers in Metabolic Testing.
Ready for the test
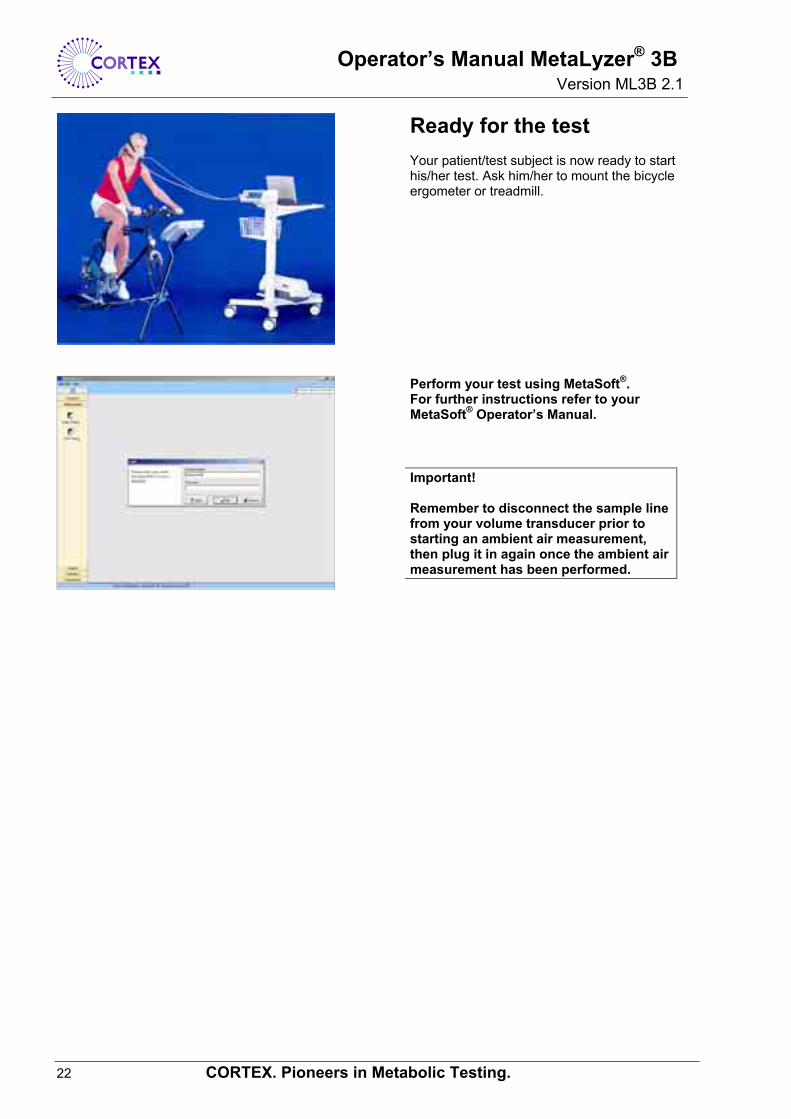
Your patient/test subject is now ready to start his/her test. Ask him/her to mount the bicycle ergometer or treadmill.
Perform your test using MetaSoft®. For further instructions refer to your MetaSoft® Operator’s Manual. Important! Remember to disconnect the sample line from your volume transducer prior to starting an ambient air measurement, then plug it in again once the ambient air measurement has been performed.
Operator’s Manual MetaLyzer® 3B Version ML3B 2.1
CORTEX. Pioneers in Metabolic Testing. 23
VI. Calibration
General To maintain the highest possible accuracy, periodic calibration of the MetaLyzer® 3B analyzers with certified calibration equipment and in accordance with the instructions described in this manual is strongly recommended. Please read the calibration instructions thoroughly prior to performing a calibration measurement. Calibration procedures should be performed by trained personnel only to ensure utmost operator safety and to maintain a proper function of your MetaLyzer® 3B system.
Each analyzer of the MetaLyzer® 3B is individually pre-calibrated on delivery of the system, enabling users to operate their MetaLyzer® 3B immediately upon installation. A calibration report is included in the extent of supply, specifying the calibration factors and the barometric pressure at the time of calibration. Depending on the prevailing altitude level of your area or the operating conditions in which you intend to use your MetaLyzer® 3B upon installation, it may be necessary to recalibrate its gas analyzers prior to first use. It should be noted that the MetaLyzer® 3B is calibrated based on a barometric pressure level of approximately 1000 mbar when delivered. Should the mean level of barometric pressure in your area be lower than 900 mbar, a gas and volume calibration should be performed prior to first use of the MetaLyzer® 3B system.
Calibration Procedures
The following calibration procedures are available:
• Gas calibration of the O2 and CO2 analyzer (2-point calibration), • Calibration of the volume transducer, • Calibration of the pressure analyzer.
A proper calibration compensates for differences due to
• specimen differences between analyzers, • ageing of analyzers, • changing operating conditions.
Important To ensure the highest possible accuracy, the MetaLyzer® 3B analyzers should be calibrated under conditions (temperature, pressure, humidity) similar to the environmental conditions in which the system is operated. Example: If the MetaLyzer® 3B is usually operated at normal barometric pressure, it is strongly recommended to recalibrate its analyzers under the new conditions if a test is to be performed at high altitude.
Operator’s Manual MetaLyzer® 3B Version ML3B 2.1
24 CORTEX. Pioneers in Metabolic Testing.
Calibration Practices If the MetaLyzer® 3B is operated in stable environmental conditions, i.e. if it is used in the same environmental conditions or if environmental conditions in which it is used, do not change significantly between the measurements, the following calibration practices are recommended to verify and maintain accuracy of its analyzers:
Gas analyzers A two-point gas calibration should be executed prior to a series of coherent tests, after oxygen sensor exchange or at least every 30 days. Please note that an ambient air measurement must be performed prior to each measurement/test. For instructions on how to perform this please refer to the chapter „Perform ambient air measurement“ of this user manual. Volume transducer The volume transducer should be calibrated at least once a day before the first test. Pressure analyzer It is not necessary to recalibrate the pressure analyzer unless barometric pressure changes significantly. It is recommended, however, to check the barometric pressure measured by MetaLyzer from time to time (e.g. every six months) against a reference barometer. If the values measured differ more than 10 mbar, the pressure analyzer should be recalibrated.
Important Remember to execute a two-point gas calibration after the pressure analyzer has been recalibrated.
Operator’s Manual MetaLyzer® 3B Version ML3B 2.1
CORTEX. Pioneers in Metabolic Testing. 25
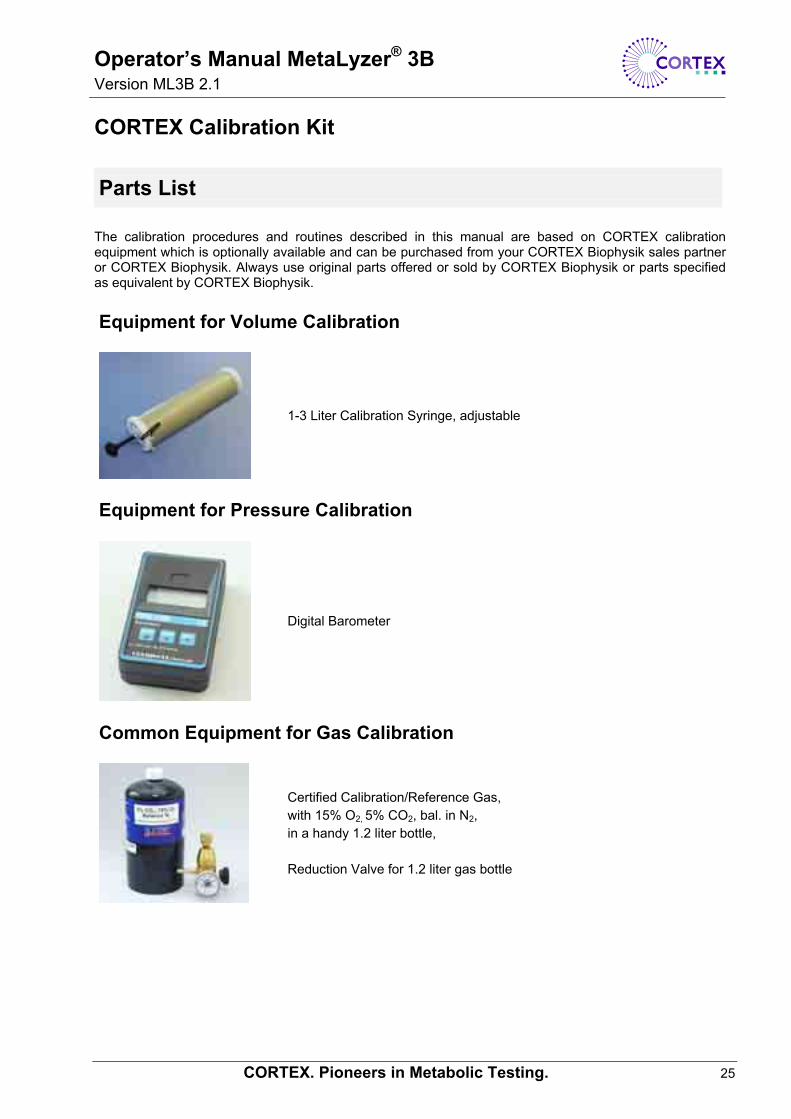
CORTEX Calibration Kit
Parts List
The calibration procedures and routines described in this manual are based on CORTEX calibration equipment which is optionally available and can be purchased from your CORTEX Biophysik sales partner or CORTEX Biophysik. Always use original parts offered or sold by CORTEX Biophysik or parts specified as equivalent by CORTEX Biophysik.
Equipment for Volume Calibration
1-3 Liter Calibration Syringe, adjustable
Equipment for Pressure Calibration
Digital Barometer
Common Equipment for Gas Calibration
Certified Calibration/Reference Gas, with 15% O2, 5% CO2, bal. in N2, in a handy 1.2 liter bottle, Reduction Valve for 1.2 liter gas bottle

Operator’s Manual MetaLyzer® 3B Version ML3B 2.1
26 CORTEX. Pioneers in Metabolic Testing.
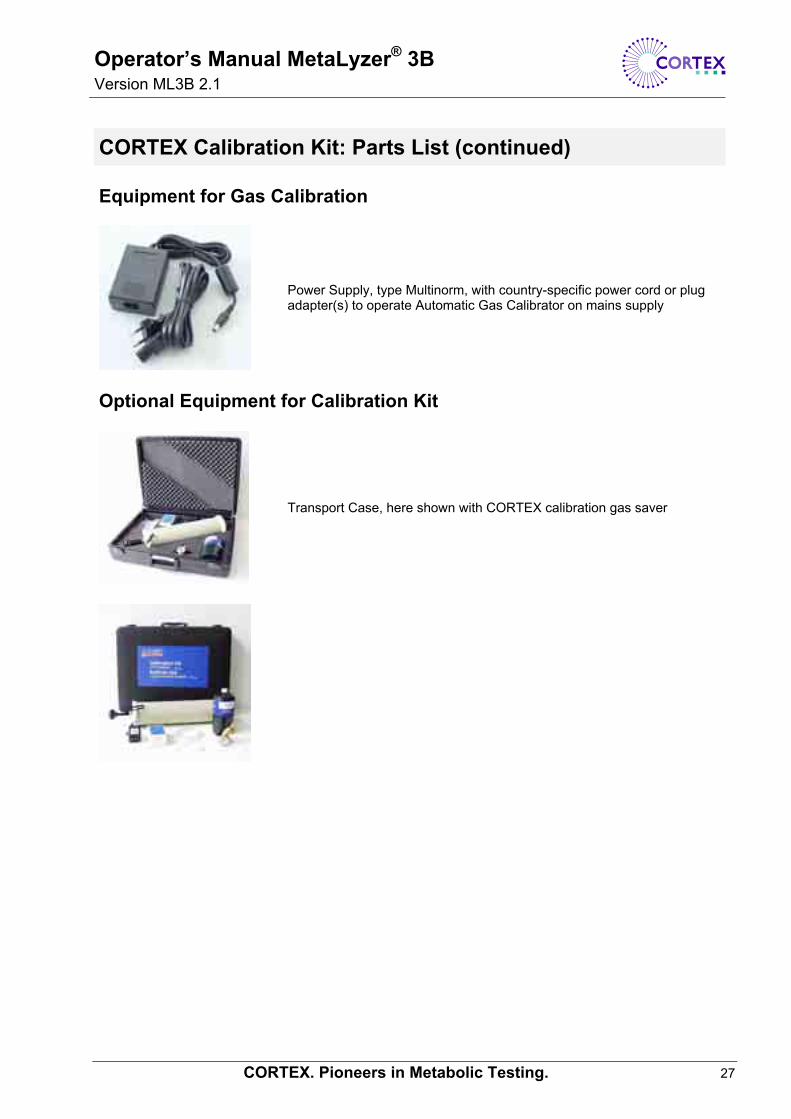
CORTEX Calibration Kit: Parts List (continued)
Equipment for Gas Calibration with CORTEX Calibration Gas Saver
Calibration Gas Saver
Tube Set, including:
Tube to connect sample line to gas saver and
Tube to connect gas bottle to gas saver.
Power Supply, type Multinorm, with plug adapter(s) to operate calibration gas saver on mains supply and 9V Battery to operate calibration gas saver on battery.
Equipment for Gas Calibration with Automatic Gas Calibrator
CORTEX Automatic Gas Calibrator
Connection Set, including:
Data Cable for connecting PC and Automatic Gas Calibrator,
Tube to connect sample line to Gas Calibrator and
two tubes to connect gas bottle(s) to Gas Calibrator.
Operator’s Manual MetaLyzer® 3B Version ML3B 2.1
CORTEX. Pioneers in Metabolic Testing. 27
CORTEX Calibration Kit: Parts List (continued)
Equipment for Gas Calibration
Power Supply, type Multinorm, with country-specific power cord or plug adapter(s) to operate Automatic Gas Calibrator on mains supply
Optional Equipment for Calibration Kit
Transport Case, here shown with CORTEX calibration gas saver
Operator’s Manual MetaLyzer® 3B Version ML3B 2.1
28 CORTEX. Pioneers in Metabolic Testing.
Steps prior to calibration
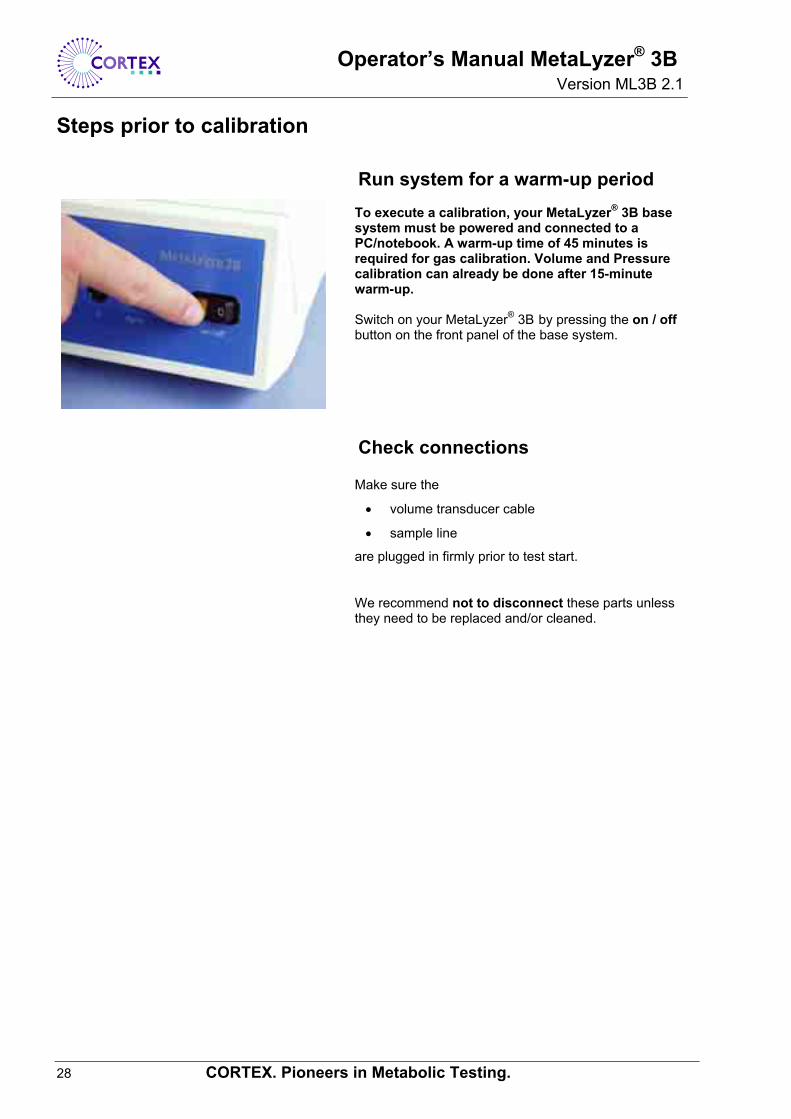
Run system for a warm-up period To execute a calibration, your MetaLyzer® 3B base system must be powered and connected to a PC/notebook. A warm-up time of 45 minutes is required for gas calibration. Volume and Pressure calibration can already be done after 15-minute warm-up. Switch on your MetaLyzer® 3B by pressing the on / off button on the front panel of the base system.
Check connections Make sure the
• volume transducer cable
• sample line
are plugged in firmly prior to test start.
We recommend not to disconnect these parts unless they need to be replaced and/or cleaned.

Operator’s Manual MetaLyzer® 3B Version ML3B 2.1
CORTEX. Pioneers in Metabolic Testing. 29
Volume Calibration
Equipment required: Manual Calibration Syringe (included in CORTEX Calibration Kit or equivalent syringe) or certified
automatic syringe Calibration Steps:
1. Follow the steps described in chapter “Steps prior to calibration”.
2. Close the sample line outlet of the
volume transducer (DVT or Triple® V) with the black plug-in which is part of your volume transducer accessory.
3. Adapt transducer to calibration syringe.
Fig. Equipment and volume calibration setup prior to calibrating the Triple® V volume transducer.
Operator’s Manual MetaLyzer® 3B Version ML3B 2.1
30 CORTEX. Pioneers in Metabolic Testing.
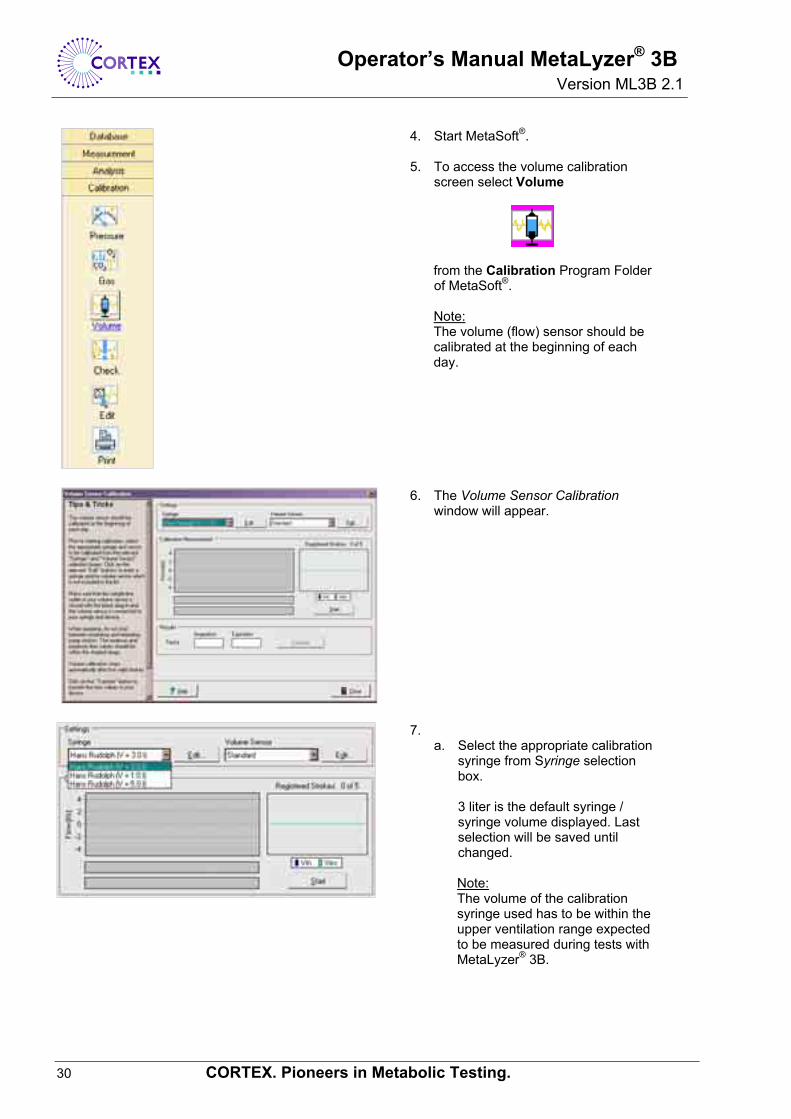
4. Start MetaSoft®. 5. To access the volume calibration
screen select Volume
from the Calibration Program Folder of MetaSoft®.
Note: The volume (flow) sensor should be calibrated at the beginning of each day.
6. The Volume Sensor Calibration window will appear.
7. a. Select the appropriate calibration
syringe from Syringe selection box. 3 liter is the default syringe / syringe volume displayed. Last selection will be saved until changed.
Note: The volume of the calibration syringe used has to be within the upper ventilation range expected to be measured during tests with MetaLyzer® 3B.
Operator’s Manual MetaLyzer® 3B Version ML3B 2.1
CORTEX. Pioneers in Metabolic Testing. 31
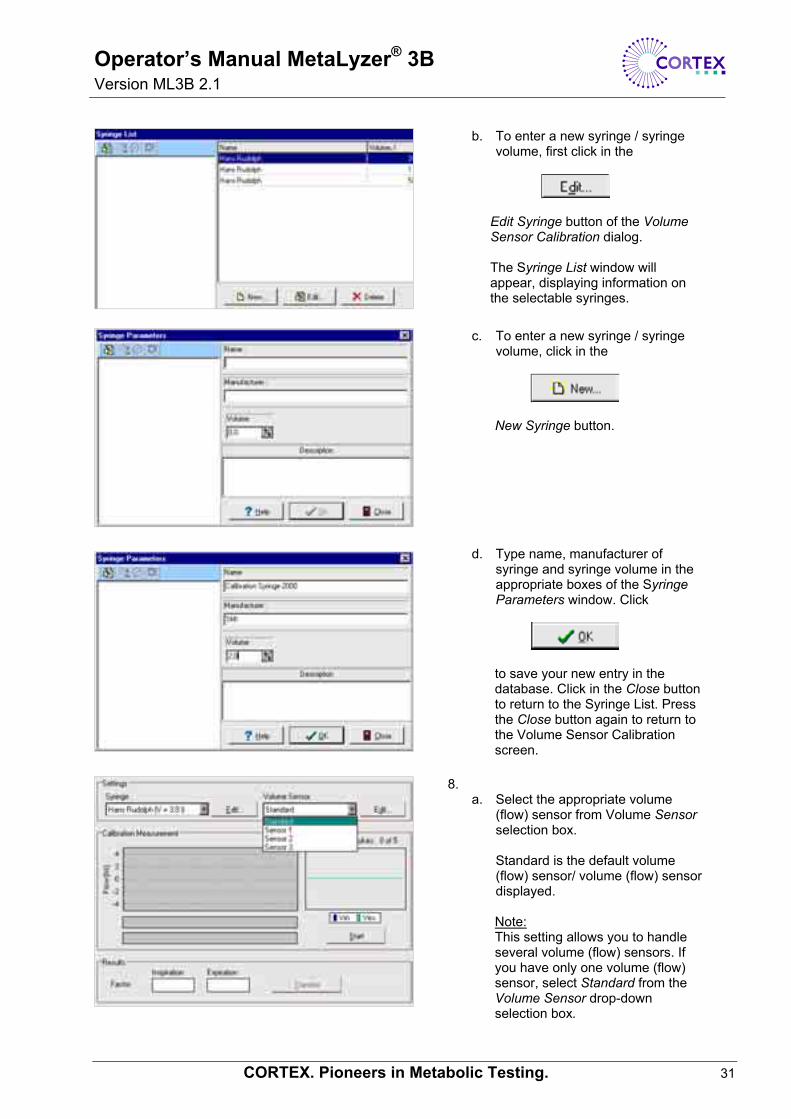
b. To enter a new syringe / syringe volume, first click in the
Edit Syringe button of the Volume Sensor Calibration dialog. The Syringe List window will appear, displaying information on the selectable syringes.
c. To enter a new syringe / syringe volume, click in the
New Syringe button.
d. Type name, manufacturer of syringe and syringe volume in the appropriate boxes of the Syringe Parameters window. Click
to save your new entry in the database. Click in the Close button to return to the Syringe List. Press the Close button again to return to the Volume Sensor Calibration screen.
8. a. Select the appropriate volume
(flow) sensor from Volume Sensor selection box. Standard is the default volume (flow) sensor/ volume (flow) sensor displayed.
Note: This setting allows you to handle several volume (flow) sensors. If you have only one volume (flow) sensor, select Standard from the Volume Sensor drop-down selection box.
Operator’s Manual MetaLyzer® 3B Version ML3B 2.1
32 CORTEX. Pioneers in Metabolic Testing.
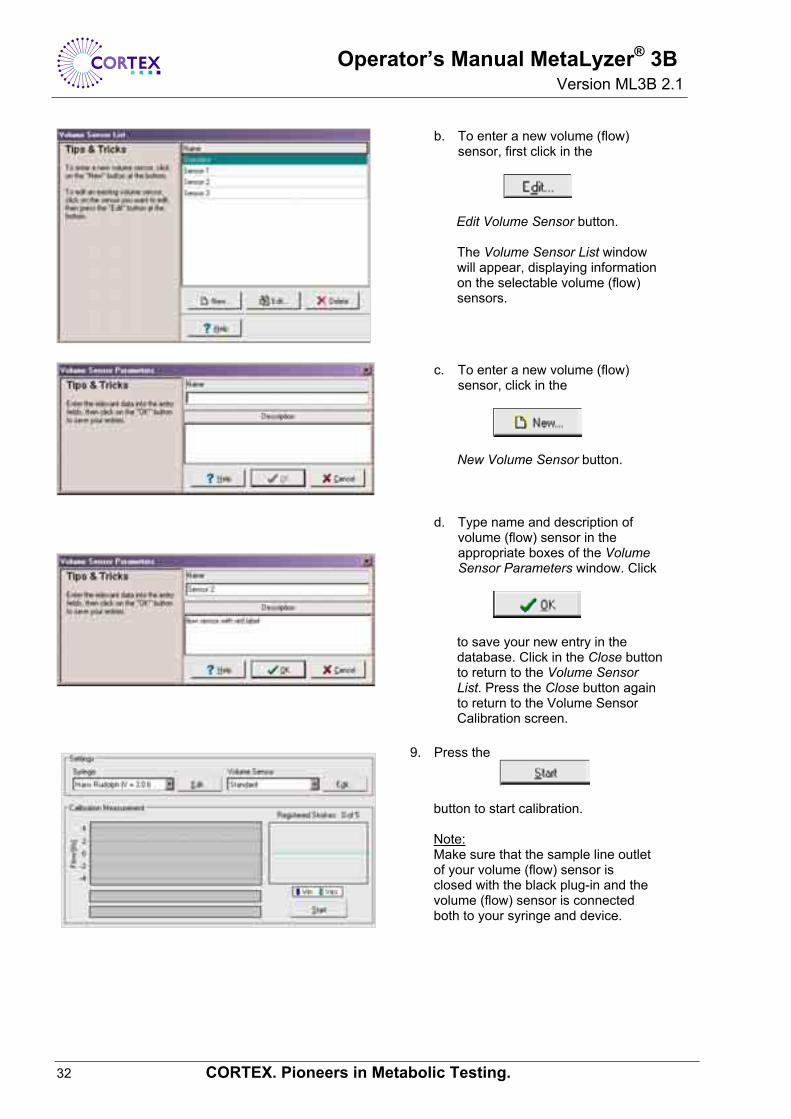
b. To enter a new volume (flow) sensor, first click in the
Edit Volume Sensor button. The Volume Sensor List window will appear, displaying information on the selectable volume (flow) sensors.
c. To enter a new volume (flow) sensor, click in the
New Volume Sensor button.
d. Type name and description of volume (flow) sensor in the appropriate boxes of the Volume Sensor Parameters window. Click
to save your new entry in the database. Click in the Close button to return to the Volume Sensor List. Press the Close button again to return to the Volume Sensor Calibration screen.
9. Press the
button to start calibration. Note: Make sure that the sample line outlet of your volume (flow) sensor is closed with the black plug-in and the volume (flow) sensor is connected both to your syringe and device.
Operator’s Manual MetaLyzer® 3B Version ML3B 2.1
CORTEX. Pioneers in Metabolic Testing. 33
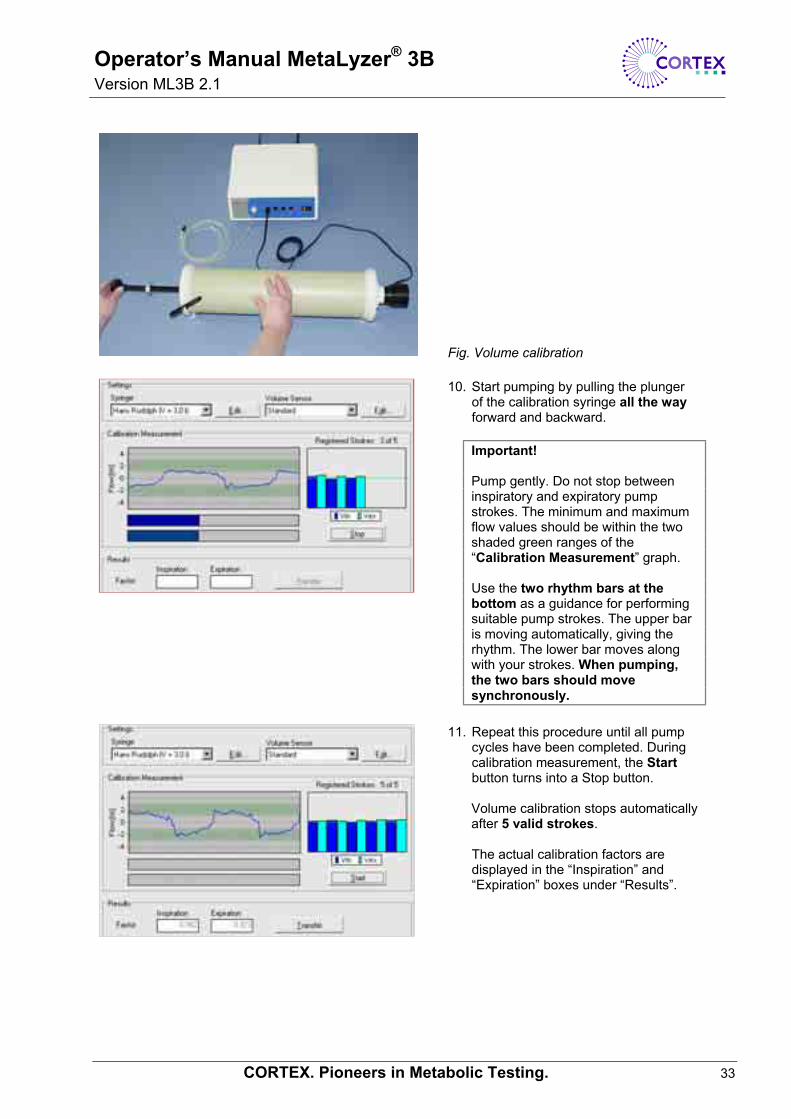
Fig. Volume calibration
10. Start pumping by pulling the plunger of the calibration syringe all the way forward and backward. Important! Pump gently. Do not stop between inspiratory and expiratory pump strokes. The minimum and maximum flow values should be within the two shaded green ranges of the “Calibration Measurement” graph. Use the two rhythm bars at the bottom as a guidance for performing suitable pump strokes. The upper bar is moving automatically, giving the rhythm. The lower bar moves along with your strokes. When pumping, the two bars should move synchronously.
11. Repeat this procedure until all pump cycles have been completed. During calibration measurement, the Start button turns into a Stop button.
Volume calibration stops automatically after 5 valid strokes. The actual calibration factors are displayed in the “Inspiration” and “Expiration” boxes under “Results”.
Operator’s Manual MetaLyzer® 3B Version ML3B 2.1
34 CORTEX. Pioneers in Metabolic Testing.
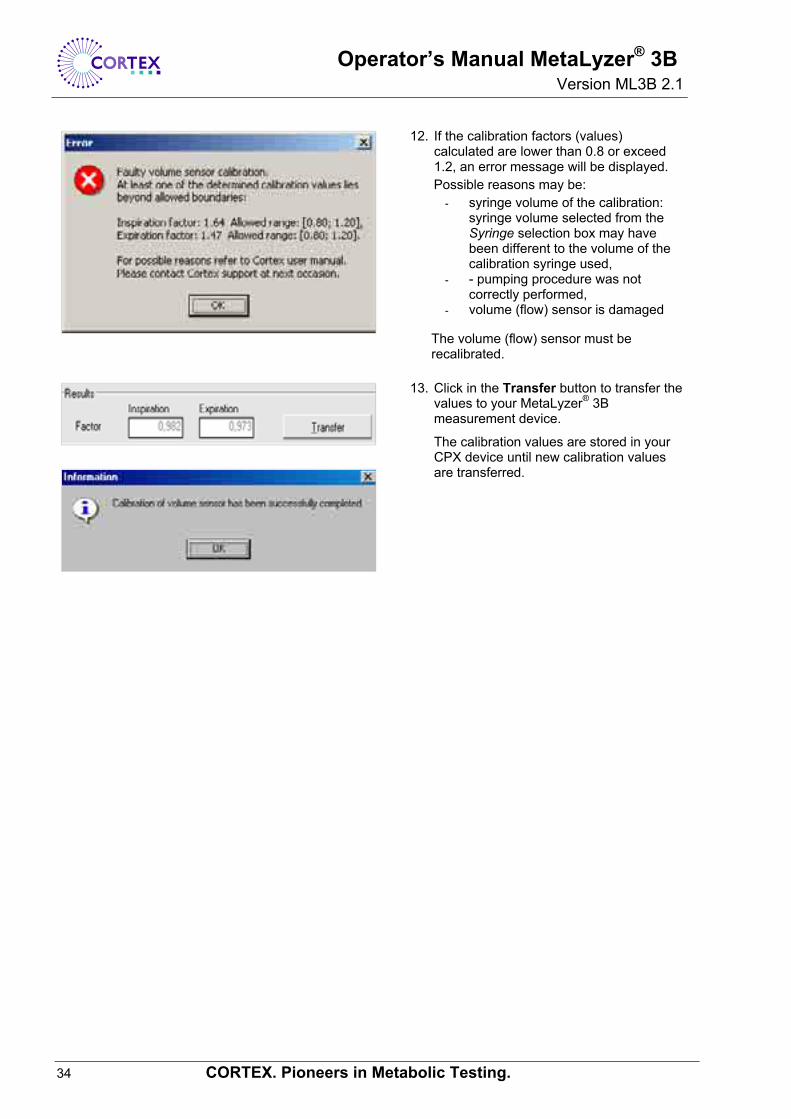
12. If the calibration factors (values) calculated are lower than 0.8 or exceed 1.2, an error message will be displayed. Possible reasons may be:
- syringe volume of the calibration: syringe volume selected from the Syringe selection box may have been different to the volume of the calibration syringe used,
- - pumping procedure was not correctly performed,
- volume (flow) sensor is damaged
The volume (flow) sensor must be recalibrated.
13. Click in the Transfer button to transfer the values to your MetaLyzer® 3B measurement device.
The calibration values are stored in your CPX device until new calibration values are transferred.
Operator’s Manual MetaLyzer® 3B Version ML3B 2.1
CORTEX. Pioneers in Metabolic Testing. 35
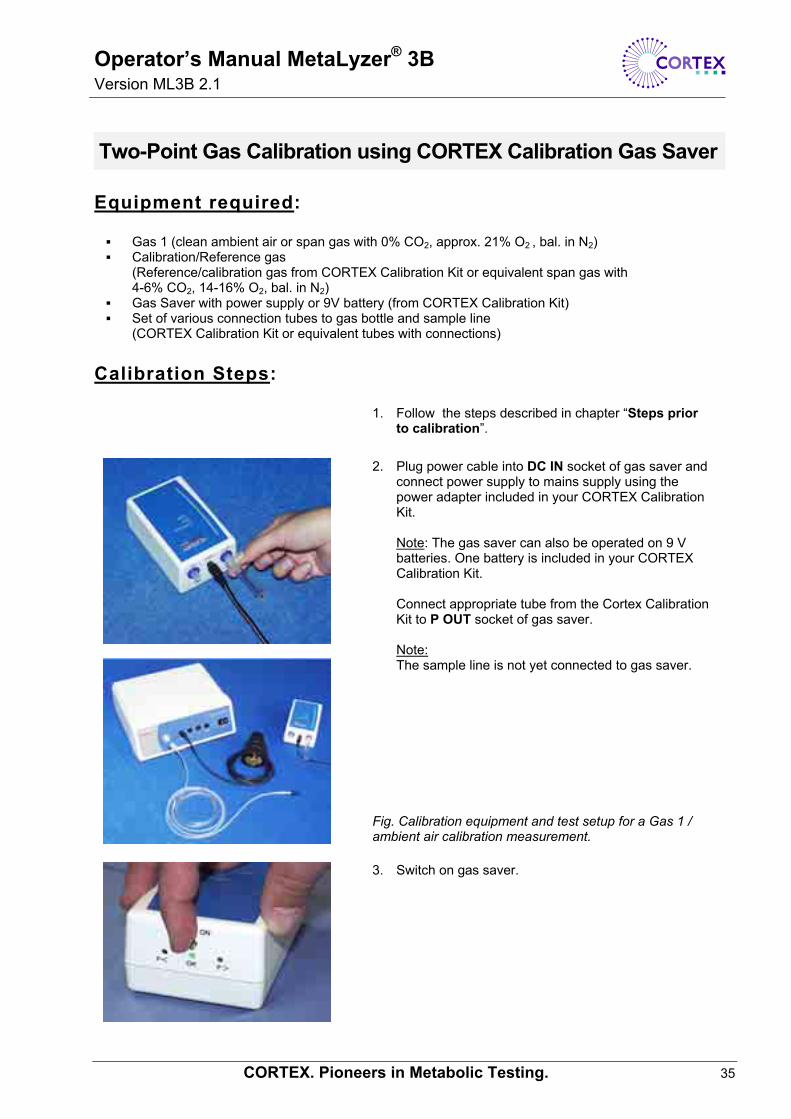
Two-Point Gas Calibration using CORTEX Calibration Gas Saver
Equipment required: Gas 1 (clean ambient air or span gas with 0% CO2, approx. 21% O2 , bal. in N2) Calibration/Reference gas
(Reference/calibration gas from CORTEX Calibration Kit or equivalent span gas with 4-6% CO2, 14-16% O2, bal. in N2)
Gas Saver with power supply or 9V battery (from CORTEX Calibration Kit) Set of various connection tubes to gas bottle and sample line
(CORTEX Calibration Kit or equivalent tubes with connections) Calibration Steps:
1. Follow the steps described in chapter “Steps prior to calibration”.
2. Plug power cable into DC IN socket of gas saver and
connect power supply to mains supply using the power adapter included in your CORTEX Calibration Kit.
Note: The gas saver can also be operated on 9 V batteries. One battery is included in your CORTEX Calibration Kit. Connect appropriate tube from the Cortex Calibration Kit to P OUT socket of gas saver. Note: The sample line is not yet connected to gas saver.
Fig. Calibration equipment and test setup for a Gas 1 / ambient air calibration measurement.
3. Switch on gas saver.

Operator’s Manual MetaLyzer® 3B Version ML3B 2.1
36 CORTEX. Pioneers in Metabolic Testing.
4. Start MetaSoft® and select Manual Gas Sensor Calibration Method. To access this option please select first General in the Configuration Folder, then General Settings. The General Settings window will appear. Note: You can skip this step if the manual setting has not been changed since last calibration.
5. To access the gas analyzer calibration screen, select Gas
from the Calibration Program Folder of MetaSoft®.
Note: A two-point reference gas calibration should be executed prior to a test series or at least every 30 days. It must be executed if the oxygen analyzer has been exchanged. Prior to starting calibration, connect and check the equipment required and ensure that your device is sufficiently warmed up (45 minutes). Make sure that the room is sufficiently ventilated for an accurate Gas 1 measurement. If you use a span gas instead of ambient air for Gas 1 measurement, please proceed as described for Gas 2 measurement.
Operator’s Manual MetaLyzer® 3B Version ML3B 2.1
CORTEX. Pioneers in Metabolic Testing. 37
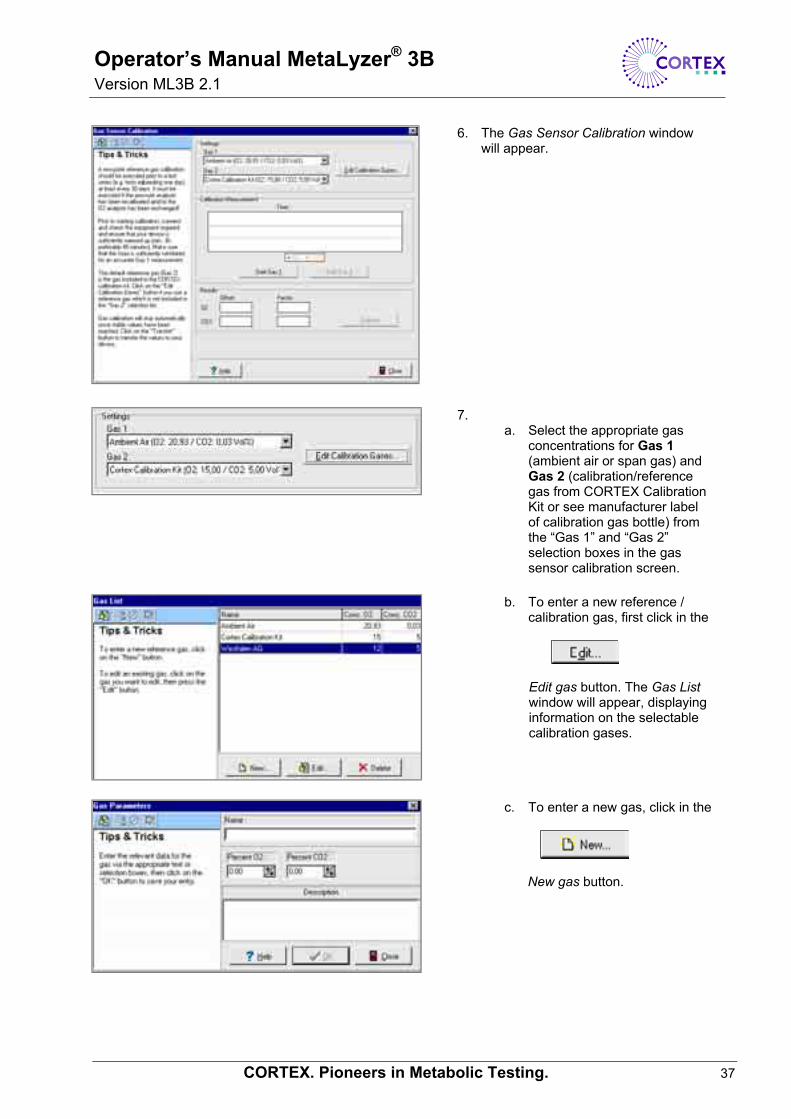
6. The Gas Sensor Calibration window will appear.
7. a. Select the appropriate gas
concentrations for Gas 1 (ambient air or span gas) and Gas 2 (calibration/reference gas from CORTEX Calibration Kit or see manufacturer label of calibration gas bottle) from the “Gas 1” and “Gas 2” selection boxes in the gas sensor calibration screen.
b. To enter a new reference / calibration gas, first click in the
Edit gas button. The Gas List window will appear, displaying information on the selectable calibration gases.
c. To enter a new gas, click in the
New gas button.
Operator’s Manual MetaLyzer® 3B Version ML3B 2.1
38 CORTEX. Pioneers in Metabolic Testing.
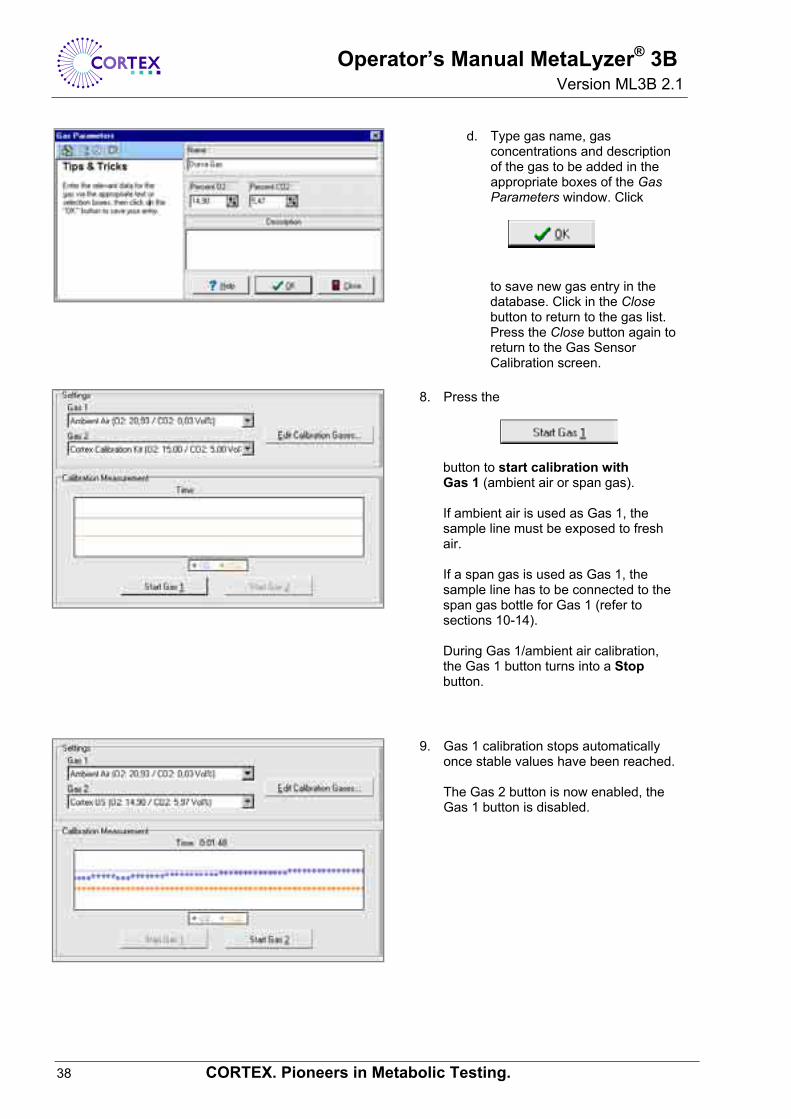
d. Type gas name, gas concentrations and description of the gas to be added in the appropriate boxes of the Gas Parameters window. Click
to save new gas entry in the database. Click in the Close button to return to the gas list. Press the Close button again to return to the Gas Sensor Calibration screen.
8. Press the
button to start calibration with Gas 1 (ambient air or span gas). If ambient air is used as Gas 1, the sample line must be exposed to fresh air. If a span gas is used as Gas 1, the sample line has to be connected to the span gas bottle for Gas 1 (refer to sections 10-14). During Gas 1/ambient air calibration, the Gas 1 button turns into a Stop button.
9. Gas 1 calibration stops automatically once stable values have been reached.
The Gas 2 button is now enabled, the Gas 1 button is disabled.
Operator’s Manual MetaLyzer® 3B Version ML3B 2.1
CORTEX. Pioneers in Metabolic Testing. 39
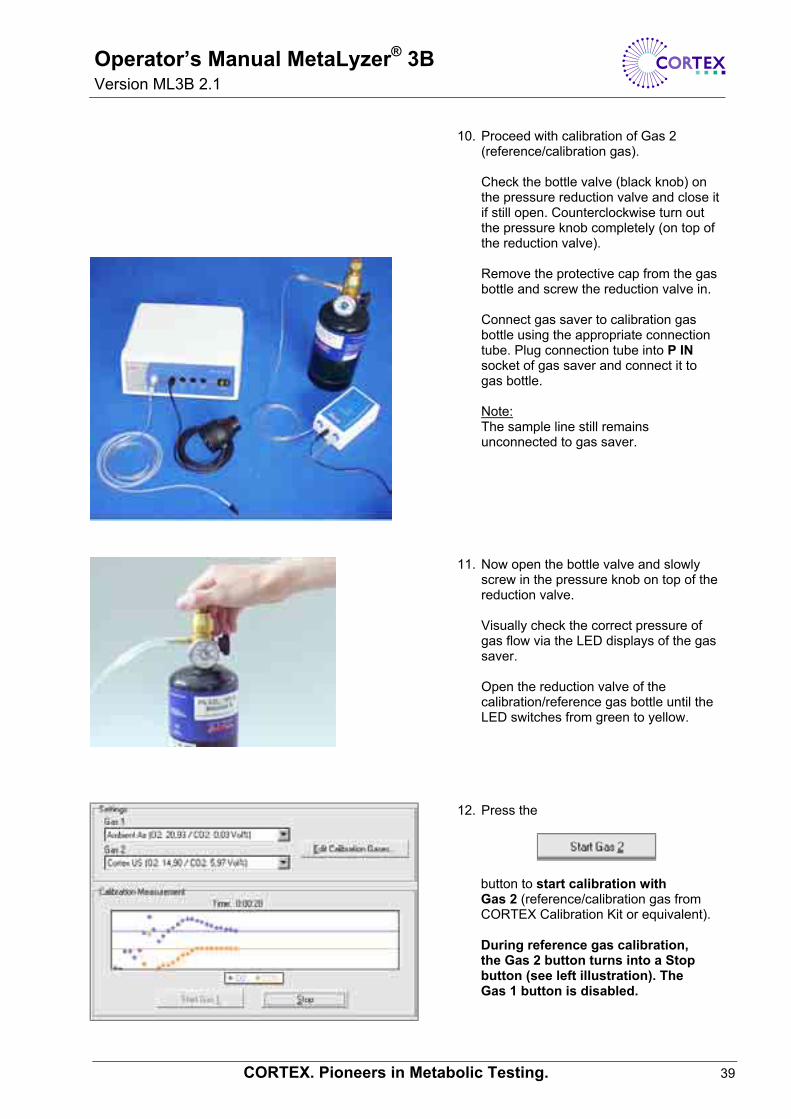
10. Proceed with calibration of Gas 2 (reference/calibration gas). Check the bottle valve (black knob) on the pressure reduction valve and close it if still open. Counterclockwise turn out the pressure knob completely (on top of the reduction valve). Remove the protective cap from the gas bottle and screw the reduction valve in. Connect gas saver to calibration gas bottle using the appropriate connection tube. Plug connection tube into P IN socket of gas saver and connect it to gas bottle. Note: The sample line still remains unconnected to gas saver.
11. Now open the bottle valve and slowly
screw in the pressure knob on top of the reduction valve. Visually check the correct pressure of gas flow via the LED displays of the gas saver. Open the reduction valve of the calibration/reference gas bottle until the LED switches from green to yellow.
12. Press the
button to start calibration with Gas 2 (reference/calibration gas from CORTEX Calibration Kit or equivalent). During reference gas calibration, the Gas 2 button turns into a Stop button (see left illustration). The Gas 1 button is disabled.
Operator’s Manual MetaLyzer® 3B Version ML3B 2.1
40 CORTEX. Pioneers in Metabolic Testing.
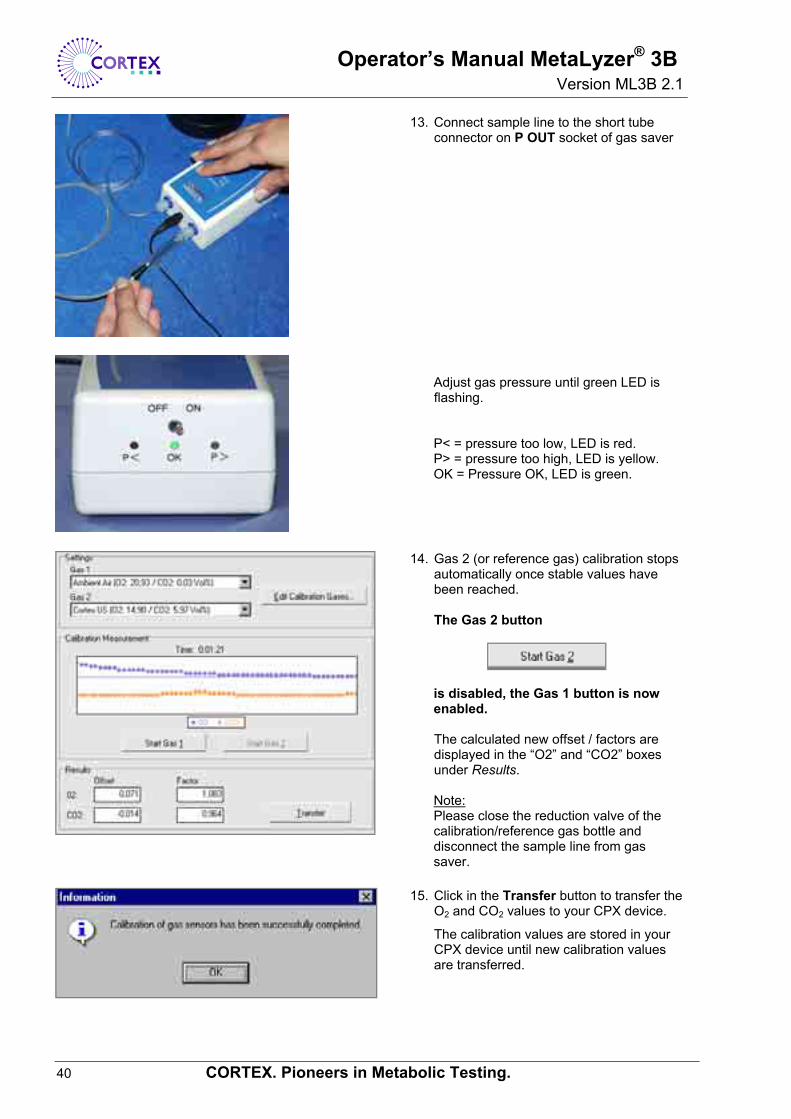
13. Connect sample line to the short tube connector on P OUT socket of gas saver
Adjust gas pressure until green LED is flashing. P< = pressure too low, LED is red. P> = pressure too high, LED is yellow. OK = Pressure OK, LED is green.
14. Gas 2 (or reference gas) calibration stops automatically once stable values have been reached. The Gas 2 button
is disabled, the Gas 1 button is now enabled.
The calculated new offset / factors are displayed in the “O2” and “CO2” boxes under Results.
Note: Please close the reduction valve of the calibration/reference gas bottle and disconnect the sample line from gas saver.
15. Click in the Transfer button to transfer the O2 and CO2 values to your CPX device.
The calibration values are stored in your CPX device until new calibration values are transferred.
Operator’s Manual MetaLyzer® 3B Version ML3B 2.1
CORTEX. Pioneers in Metabolic Testing. 41
Two-Point Gas Calibration using Automatic Gas Calibrator
Equipment required: Gas 1 (clean ambient air or span gas with 0% CO2, approx. 21% O2 , bal. in N2) Calibration/Reference gas
(Reference/calibration gas from CORTEX Calibration Kit or equivalent span gas with 4-6% CO2, 14-16% O2, bal. in N2)
CORTEX Automatic Gas Calibrator with power supply (from CORTEX Calibration Kit) Set of various connection tubes to gas bottle(s) and sample line (CORTEX Calibration Kit) Connection Cable PC - Automatic Gas Calibrator (CORTEX Calibration Kit)
Calibration Steps:
1. Follow the steps described in chapter “Steps prior to calibration”.
2. Connect the power supply from your calibration kit with the calibrator's socket labeled DC in and a mains supply. Note: The gas calibrator can also be operated on either regular or rechargeable batteries. Use of alkaline batteries (AA / LR6 size) or rechargeable batteries (AA size) with a capacity of at least 1,500 mAh is recommended. The batteries compartment is located on the bottom side of the unit. Nearly exhausted batteries are indicated by a flashing On / LowBat LED. In this case you will be able to complete the calibration process before exchanging the batteries.
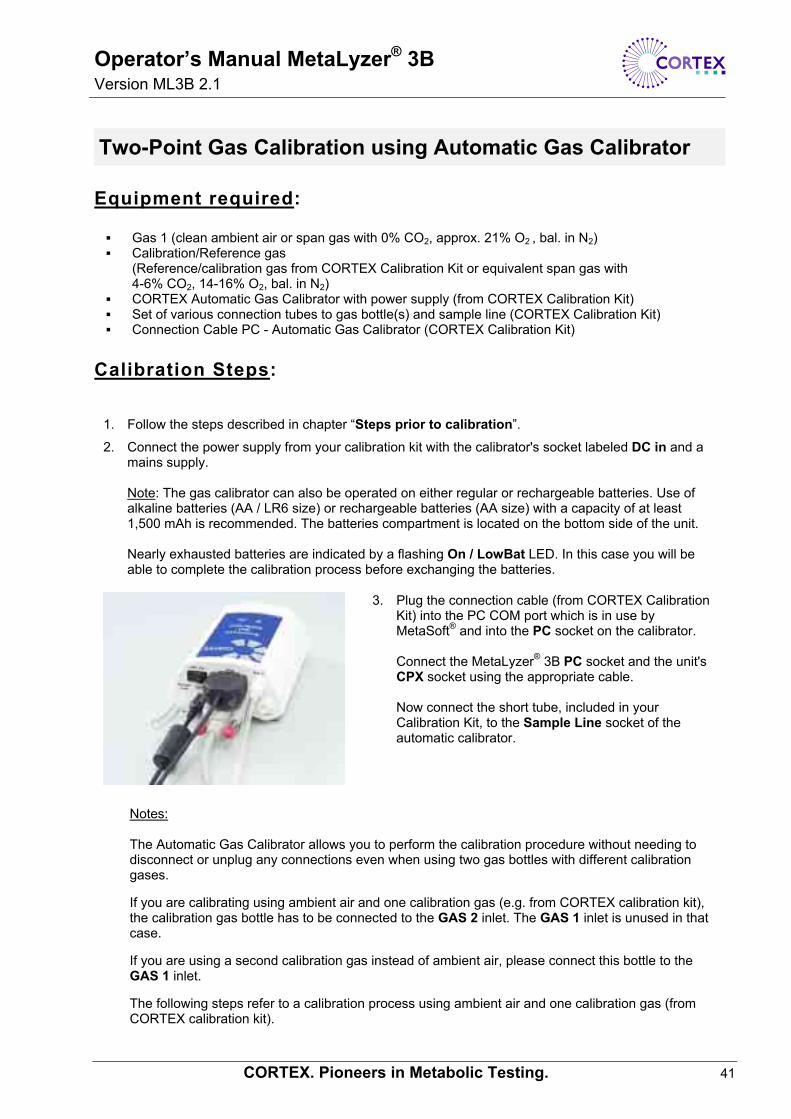
3. Plug the connection cable (from CORTEX Calibration Kit) into the PC COM port which is in use by MetaSoft® and into the PC socket on the calibrator. Connect the MetaLyzer® 3B PC socket and the unit's CPX socket using the appropriate cable. Now connect the short tube, included in your Calibration Kit, to the Sample Line socket of the automatic calibrator.
Notes: The Automatic Gas Calibrator allows you to perform the calibration procedure without needing to disconnect or unplug any connections even when using two gas bottles with different calibration gases. If you are calibrating using ambient air and one calibration gas (e.g. from CORTEX calibration kit), the calibration gas bottle has to be connected to the GAS 2 inlet. The GAS 1 inlet is unused in that case. If you are using a second calibration gas instead of ambient air, please connect this bottle to the GAS 1 inlet. The following steps refer to a calibration process using ambient air and one calibration gas (from CORTEX calibration kit).
Operator’s Manual MetaLyzer® 3B Version ML3B 2.1
42 CORTEX. Pioneers in Metabolic Testing.
4. Check if the bottle valve (black knob) on the pressure reduction valve is closed.
To set the proper output pressure turn the pressure knob towards higher pressure (clockwise in '+' direction) until you reach the mechanical stop. Now screw it back out again ('-' direction) by 2.5 turns. Remove the protective cap from the gas bottle and screw the reduction valve in. Note: If your reduction valve is equipped with a manometer please adjust the pressure to a value of 14 - 29 PSI (1 - 2 Bar). Avoid pressure settings higher than 29 PSI (2 Bar).
5. Connect the GAS 2 inlet at the automatic gas calibrator and the gas bottle using the appropriate tube from your calibration kit. Plug the end of the sample line into the short tube which is already connected to the calibrator (Sample Line socket).
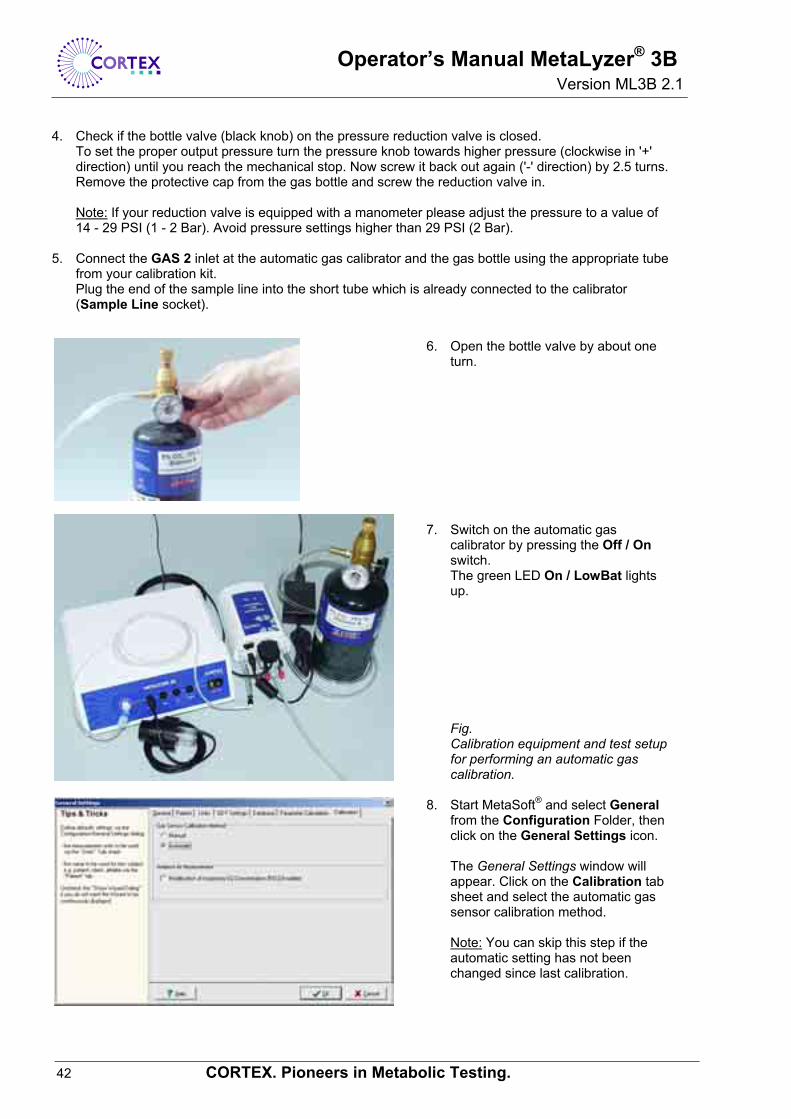
6. Open the bottle valve by about one turn.
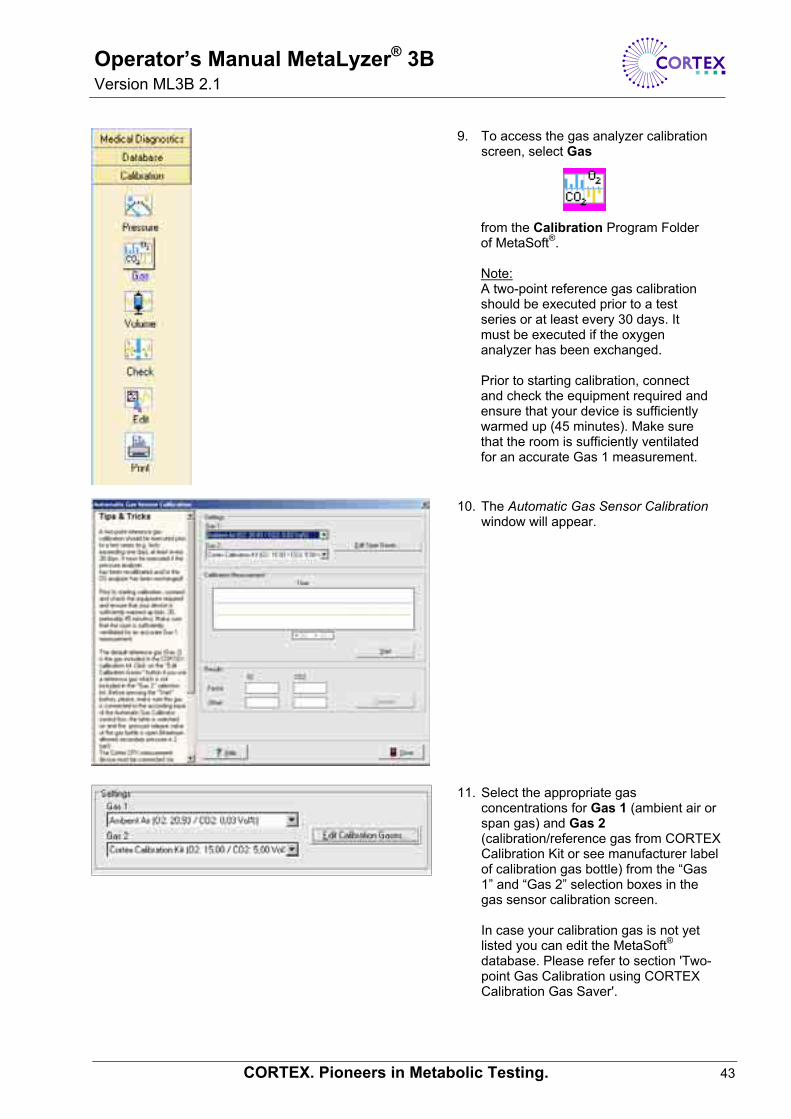
7. Switch on the automatic gas calibrator by pressing the Off / On switch. The green LED On / LowBat lights up. Fig. Calibration equipment and test setup for performing an automatic gas calibration.
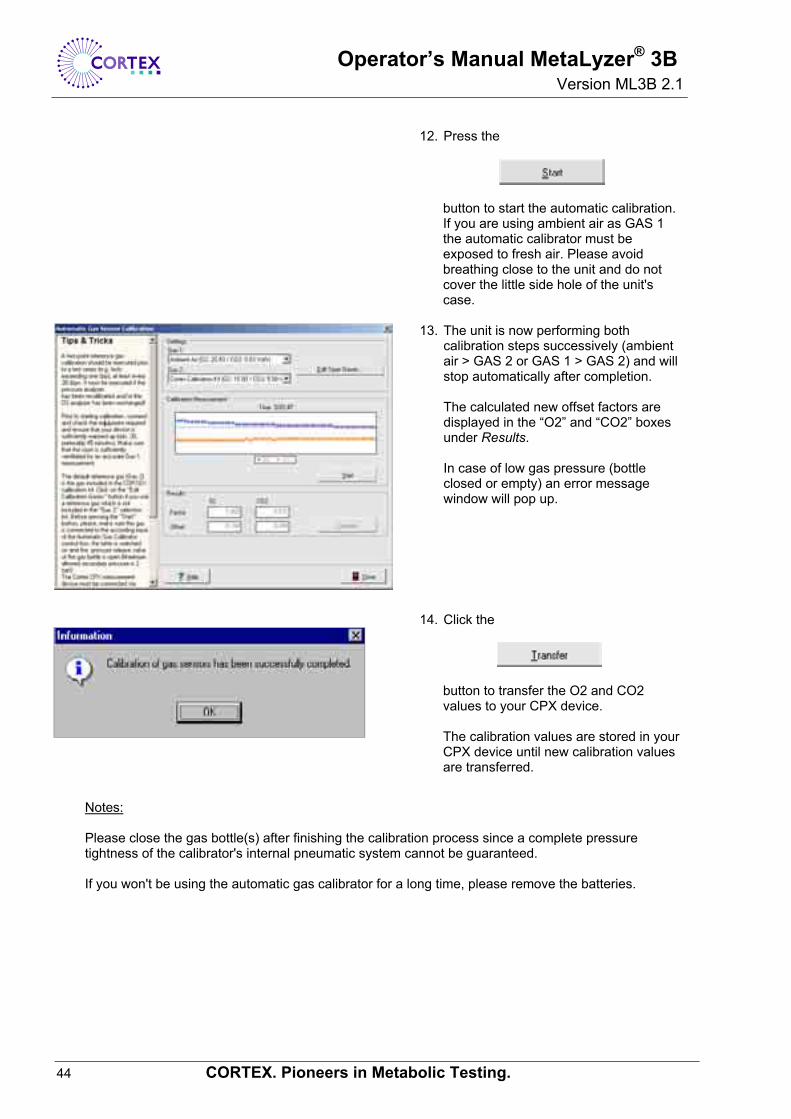
8. Start MetaSoft® and select General from the Configuration Folder, then click on the General Settings icon. The General Settings window will appear. Click on the Calibration tab sheet and select the automatic gas sensor calibration method. Note: You can skip this step if the automatic setting has not been changed since last calibration.
Operator’s Manual MetaLyzer® 3B Version ML3B 2.1
CORTEX. Pioneers in Metabolic Testing. 43
9. To access the gas analyzer calibration screen, select Gas
from the Calibration Program Folder of MetaSoft®.
Note: A two-point reference gas calibration should be executed prior to a test series or at least every 30 days. It must be executed if the oxygen analyzer has been exchanged. Prior to starting calibration, connect and check the equipment required and ensure that your device is sufficiently warmed up (45 minutes). Make sure that the room is sufficiently ventilated for an accurate Gas 1 measurement.
10. The Automatic Gas Sensor Calibration window will appear.
11. Select the appropriate gas concentrations for Gas 1 (ambient air or span gas) and Gas 2 (calibration/reference gas from CORTEX Calibration Kit or see manufacturer label of calibration gas bottle) from the “Gas 1” and “Gas 2” selection boxes in the gas sensor calibration screen. In case your calibration gas is not yet listed you can edit the MetaSoft® database. Please refer to section 'Two-point Gas Calibration using CORTEX Calibration Gas Saver'.
Operator’s Manual MetaLyzer® 3B Version ML3B 2.1
44 CORTEX. Pioneers in Metabolic Testing.
12. Press the
button to start the automatic calibration. If you are using ambient air as GAS 1 the automatic calibrator must be exposed to fresh air. Please avoid breathing close to the unit and do not cover the little side hole of the unit's case.
13. The unit is now performing both calibration steps successively (ambient air > GAS 2 or GAS 1 > GAS 2) and will stop automatically after completion. The calculated new offset factors are displayed in the “O2” and “CO2” boxes under Results. In case of low gas pressure (bottle closed or empty) an error message window will pop up.
14. Click the
button to transfer the O2 and CO2 values to your CPX device. The calibration values are stored in your CPX device until new calibration values are transferred.
Notes: Please close the gas bottle(s) after finishing the calibration process since a complete pressure tightness of the calibrator's internal pneumatic system cannot be guaranteed. If you won't be using the automatic gas calibrator for a long time, please remove the batteries.
Operator’s Manual MetaLyzer® 3B Version ML3B 2.1
CORTEX. Pioneers in Metabolic Testing. 45
Pressure Calibration
Equipment required: Reference barometer
Calibration Steps:
1. Follow the steps described in chapter “Steps prior to calibration”.
2. To access the pressure sensor
calibration screen select Pressure
from the Calibration Program Folder of MetaSoft®.
3. The Pressure Sensor Calibration window will appear.
Operator’s Manual MetaLyzer® 3B Version ML3B 2.1
46 CORTEX. Pioneers in Metabolic Testing.
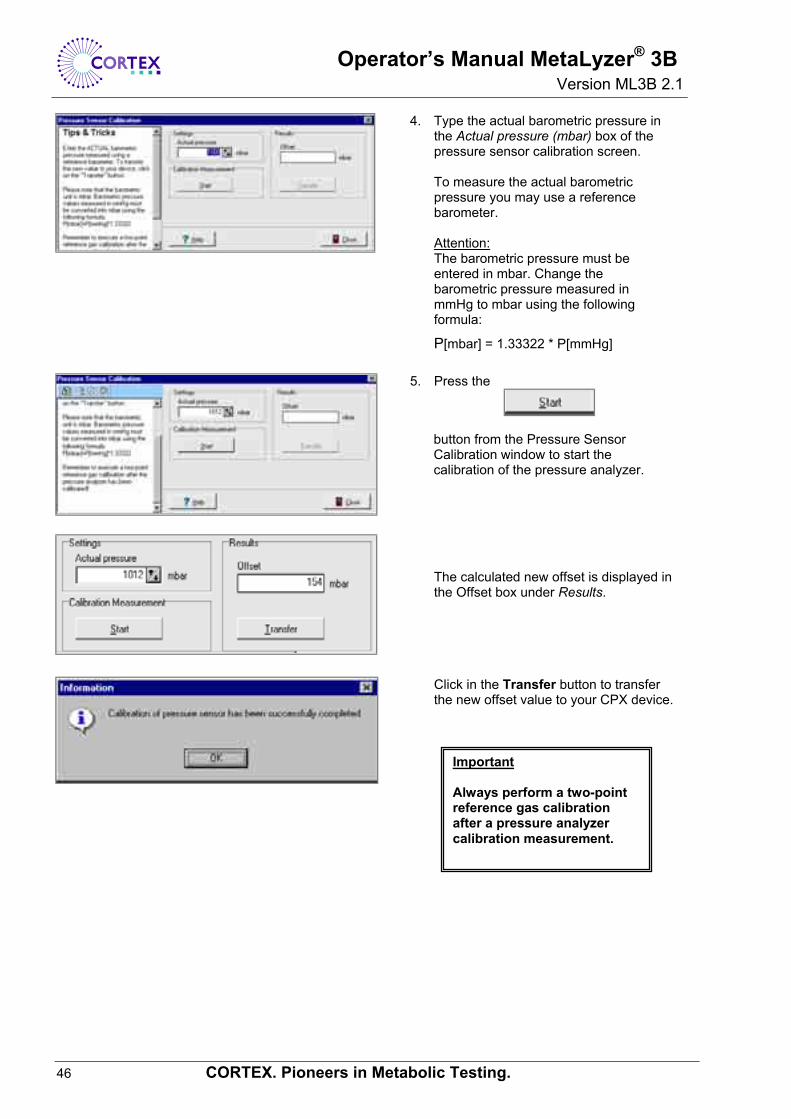
4. Type the actual barometric pressure in the Actual pressure (mbar) box of the pressure sensor calibration screen.
To measure the actual barometric pressure you may use a reference barometer. Attention: The barometric pressure must be entered in mbar. Change the barometric pressure measured in mmHg to mbar using the following formula:
P[mbar] = 1.33322 * P[mmHg]
5. Press the
button from the Pressure Sensor Calibration window to start the calibration of the pressure analyzer. The calculated new offset is displayed in the Offset box under Results.
Click in the Transfer button to transfer the new offset value to your CPX device.
Important Always perform a two-point reference gas calibration after a pressure analyzer calibration measurement.
Operator’s Manual MetaLyzer® 3B Version ML3B 2.1
CORTEX. Pioneers in Metabolic Testing. 47
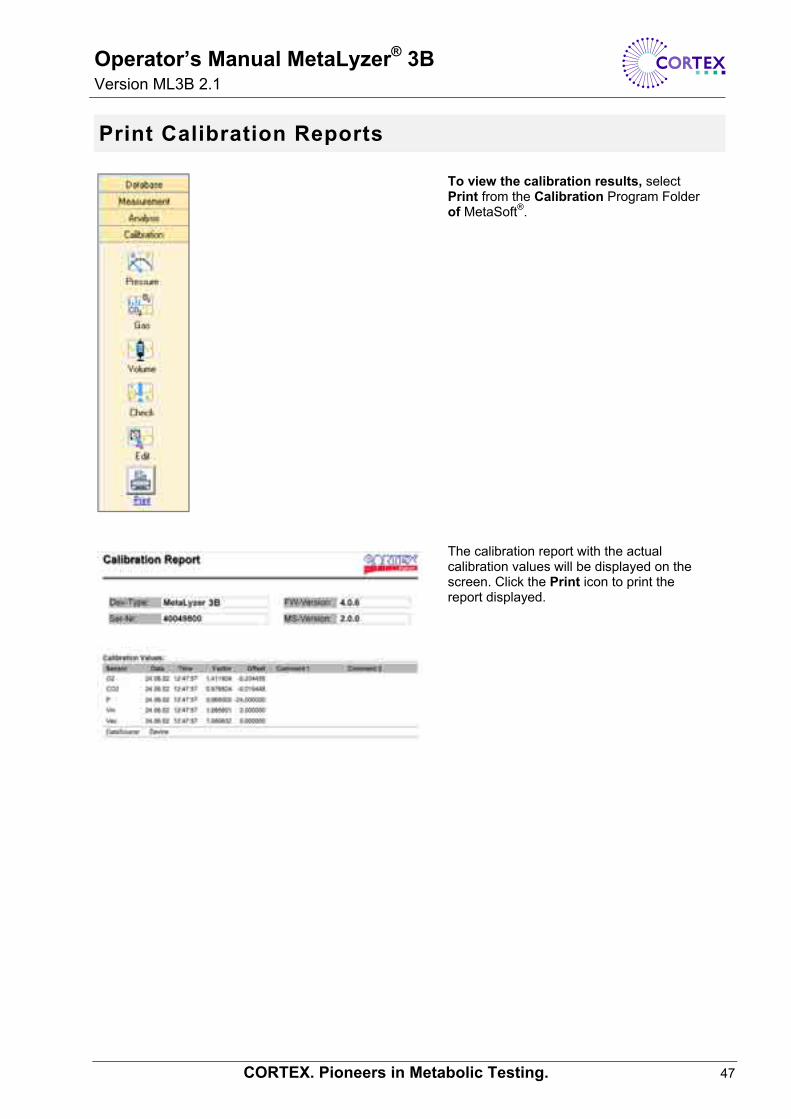
Print Calibration Reports
To view the calibration results, select Print from the Calibration Program Folder of MetaSoft®.
The calibration report with the actual calibration values will be displayed on the screen. Click the Print icon to print the report displayed.
Operator’s Manual MetaLyzer® 3B Version ML3B 2.1
48 CORTEX. Pioneers in Metabolic Testing.
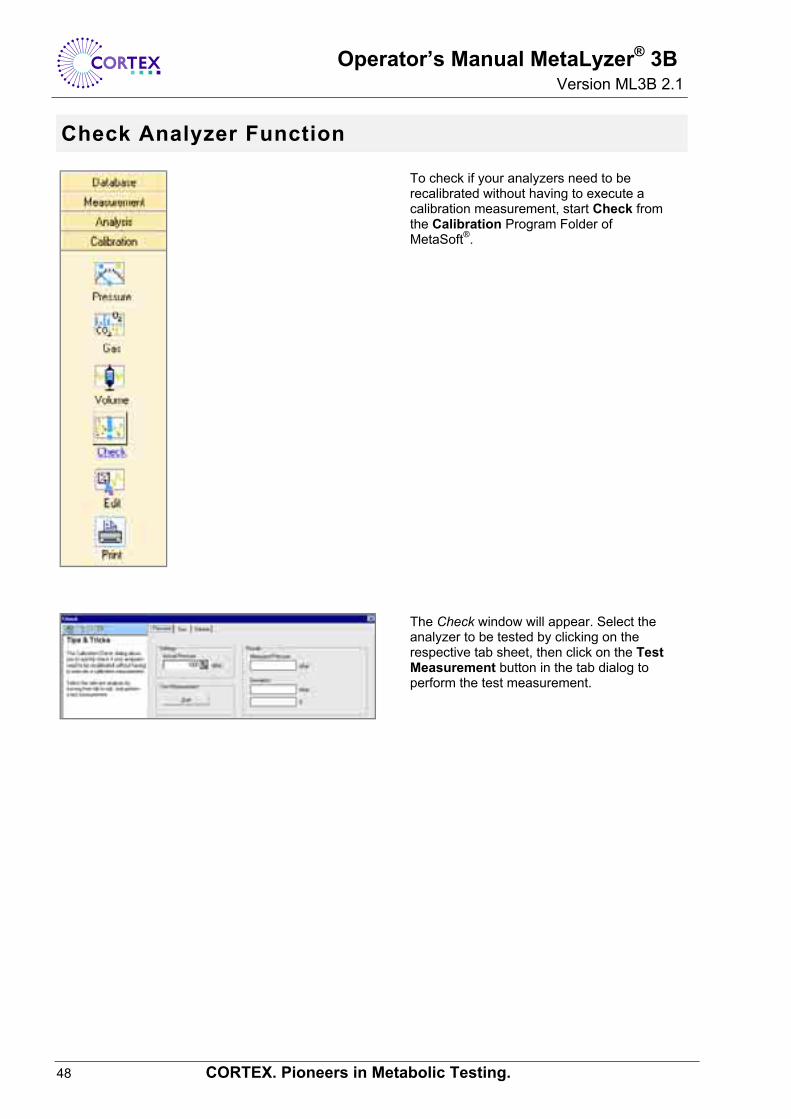
Check Analyzer Function
To check if your analyzers need to be recalibrated without having to execute a calibration measurement, start Check from the Calibration Program Folder of MetaSoft®. The Check window will appear. Select the analyzer to be tested by clicking on the respective tab sheet, then click on the Test Measurement button in the tab dialog to perform the test measurement.
Operator’s Manual MetaLyzer® 3B Version ML3B 2.1
CORTEX. Pioneers in Metabolic Testing. 49
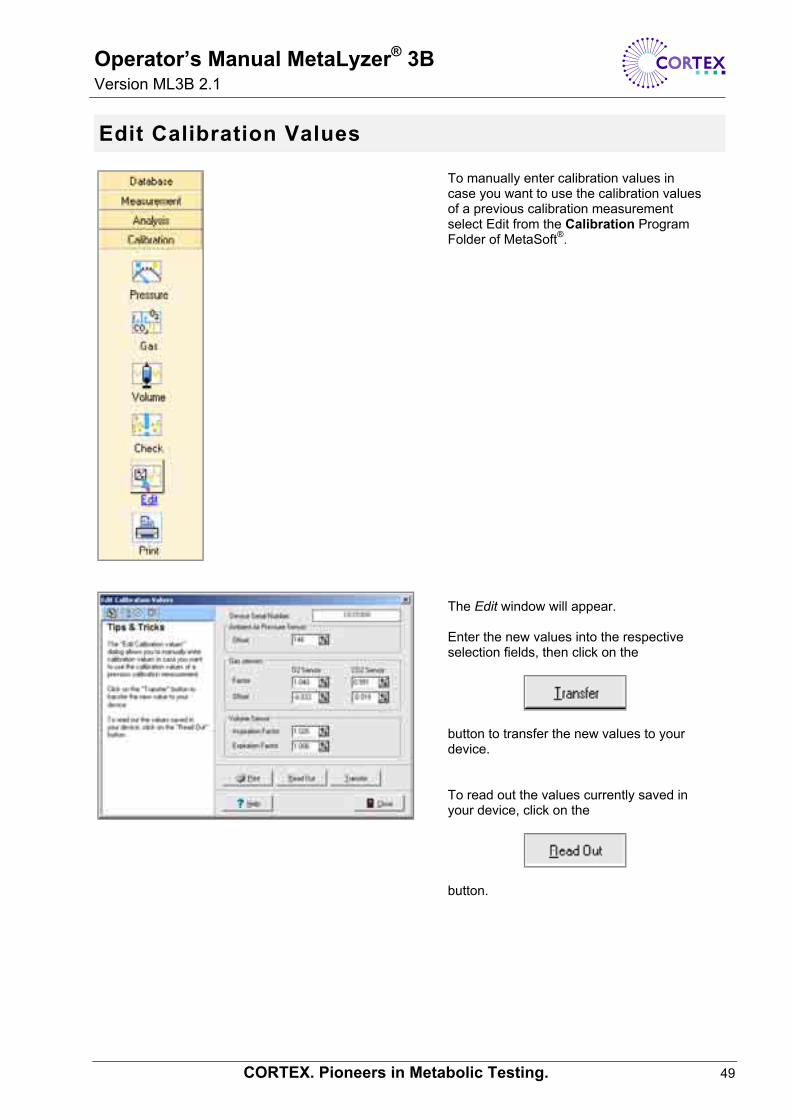
Edit Calibration Values
To manually enter calibration values in case you want to use the calibration values of a previous calibration measurement select Edit from the Calibration Program Folder of MetaSoft®. The Edit window will appear. Enter the new values into the respective selection fields, then click on the
button to transfer the new values to your device. To read out the values currently saved in your device, click on the
button.
Operator’s Manual MetaLyzer® 3B Version ML3B 2.1
50 CORTEX. Pioneers in Metabolic Testing.
VII. Maintenance & Cleaning The maintenance and cleaning instructions described in this manual are intended to provide guidance on routine maintenance of the MetaLyzer® 3B and its accessories to satisfy your internal quality assurance and as a matter of good hygienic practice.
To maintain your MetaLyzer® 3B at peak performance it is strongly recommended to observe these maintenance and cleaning instructions. Non-observance of these instructions may result in a failure to properly operate your MetaLyzer® 3B system and/or in a severe safety risk for the user. The warranty expires in case of non-observance of the maintenance and cleaning instructions.
Please contact your local CORTEX Biophysik sales partner or CORTEX Biophysik for a preventive maintenance agreement.
Cleaning & Maintenance Routines Overview Cleaning & maintenance procedures to be performed by the user:
Cleaning and disinfection after each test and/or after each patient
• Cleaning and disinfection of the face mask(s); • Cleaning of the head cap; • Cleaning of MetaLyzer® 3B housing; • Cleaning and disinfection of the volume transducer; • Visual inspection of system and parts prior to next use;
Maintenance after six months of use
• Replacement of the sample line
Operator’s Manual MetaLyzer® 3B Version ML3B 2.1
CORTEX. Pioneers in Metabolic Testing. 51
Maintenance to be undertaken by local CORTEX sales partner or properly trained staff:
Replacement of O2 Analyzer
The oxygen analyzer (sensor) is an electro-chemical cell (fuel cell) which is used up after 18 months of use. It should therefore be replaced after 18 months. The MetaLyzer® 3B base system integrates an audio/visual self-test routine. A message will appear on your MetaSoft® screen prior to measurement in case the oxygen analyzer is used up and needs to be replaced.
The O2 analyzer should be replaced by your local CORTEX sales partner or properly trained or experienced technical support staff only. To replace the analyzer, refer to the instructions included in the next chapter of this manual.
Replacement parts and consumables can be purchased from your local CORTEX sales partner or CORTEX Biophysik GmbH.
Preventive Maintenance
To maintain a long-time performance of your MetaLyzer® 3B, the system should be thoroughly checked for wear or damage of critical parts (e.g. filter, pneumatic components) every twelve months. Return the system to your local CORTEX sales partner or CORTEX Biophysik for a preventive maintenance inspection, or contact your CORTEX sales partner or CORTEX Biophysik for a maintenance agreement.
Operator’s Manual MetaLyzer® 3B Version ML3B 2.1
52 CORTEX. Pioneers in Metabolic Testing.
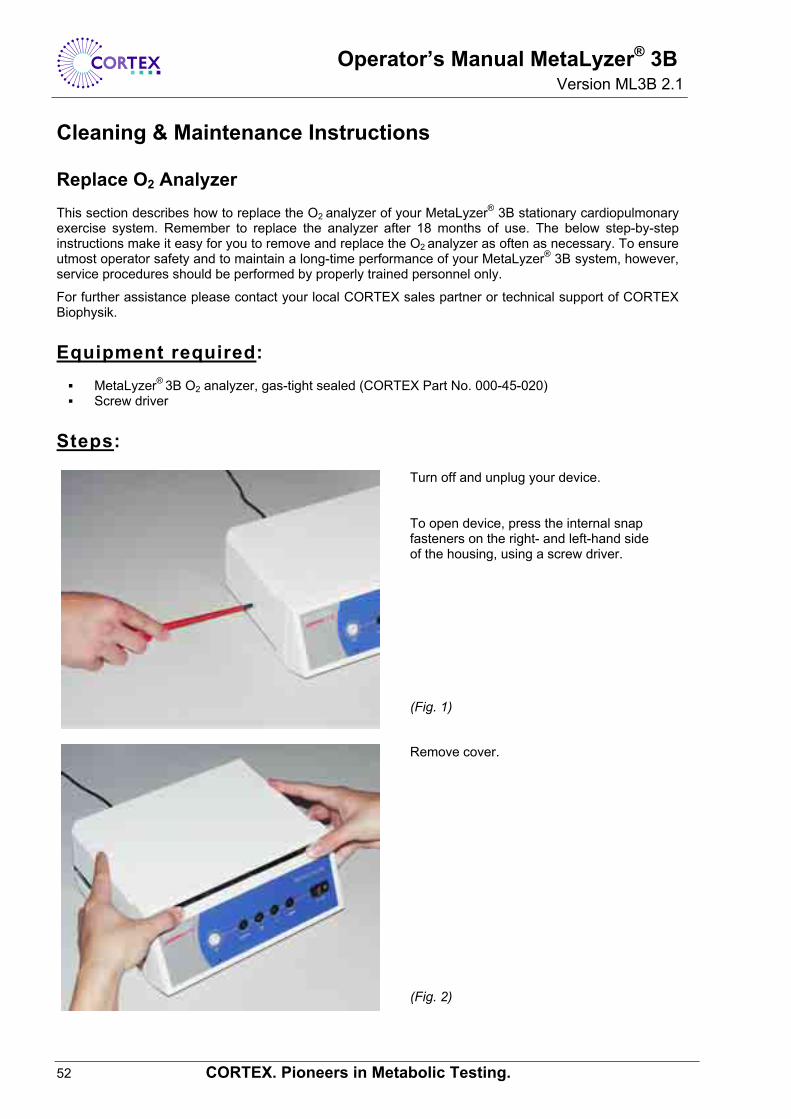
Cleaning & Maintenance Instructions Replace O2 Analyzer
This section describes how to replace the O2 analyzer of your MetaLyzer® 3B stationary cardiopulmonary exercise system. Remember to replace the analyzer after 18 months of use. The below step-by-step instructions make it easy for you to remove and replace the O2 analyzer as often as necessary. To ensure utmost operator safety and to maintain a long-time performance of your MetaLyzer® 3B system, however, service procedures should be performed by properly trained personnel only.
For further assistance please contact your local CORTEX sales partner or technical support of CORTEX Biophysik. Equipment required: MetaLyzer® 3B O2 analyzer, gas-tight sealed (CORTEX Part No. 000-45-020) Screw driver
Steps:
Turn off and unplug your device. To open device, press the internal snap fasteners on the right- and left-hand side of the housing, using a screw driver. (Fig. 1)
Remove cover. (Fig. 2)
Operator’s Manual MetaLyzer® 3B Version ML3B 2.1
CORTEX. Pioneers in Metabolic Testing. 53
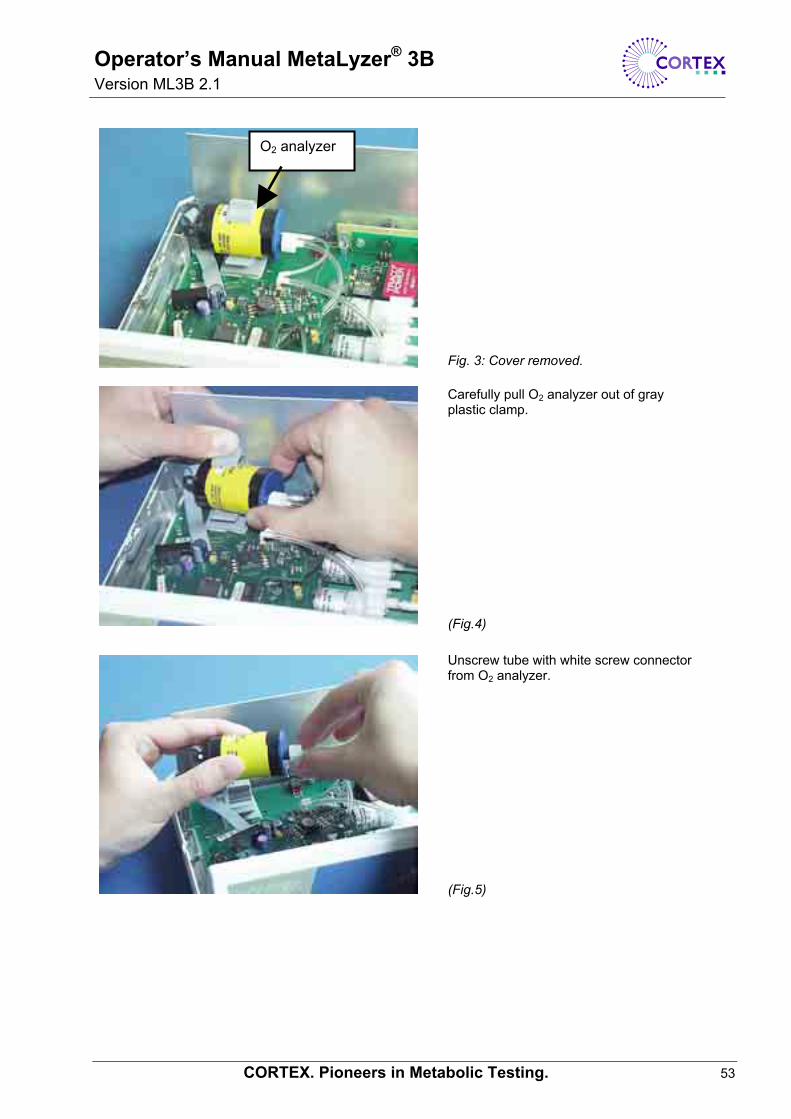
Fig. 3: Cover removed.
Carefully pull O2 analyzer out of gray plastic clamp. (Fig.4)
Unscrew tube with white screw connector from O2 analyzer. (Fig.5)
O2 analyzer
Operator’s Manual MetaLyzer® 3B Version ML3B 2.1
54 CORTEX. Pioneers in Metabolic Testing.
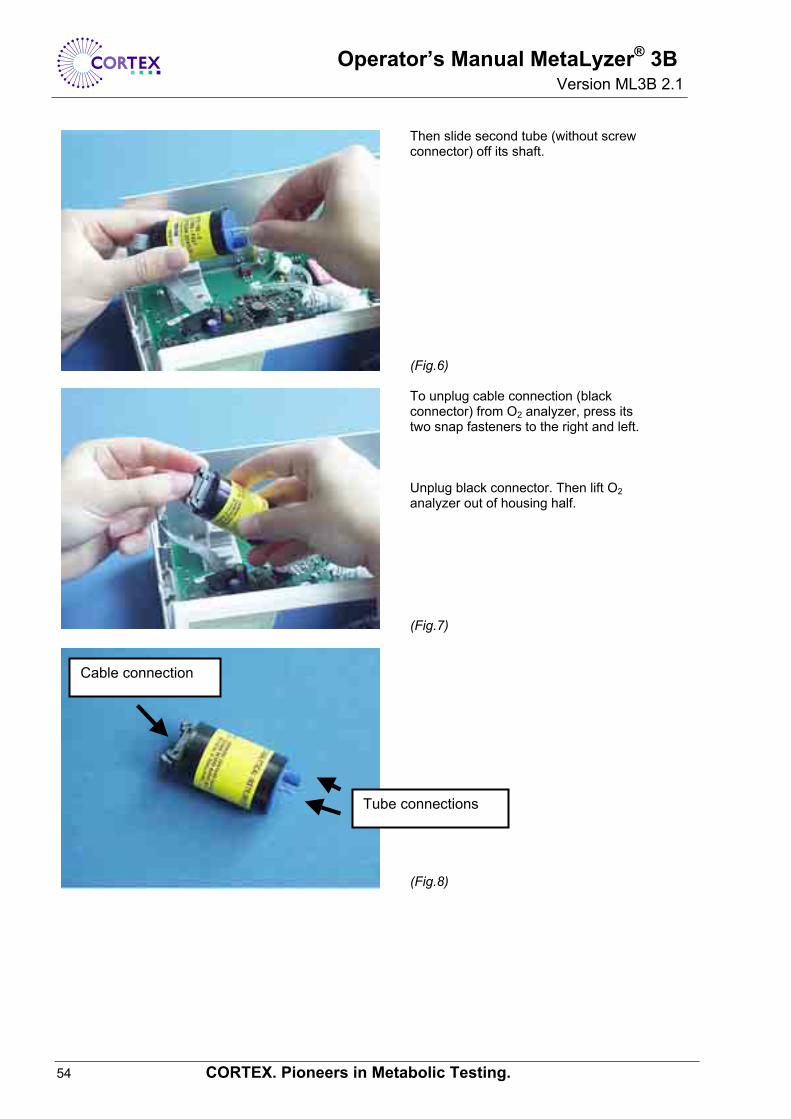
Then slide second tube (without screw connector) off its shaft. (Fig.6)
To unplug cable connection (black connector) from O2 analyzer, press its two snap fasteners to the right and left. Unplug black connector. Then lift O2 analyzer out of housing half. (Fig.7)
(Fig.8)
Tube connections
Cable connection
Operator’s Manual MetaLyzer® 3B Version ML3B 2.1
CORTEX. Pioneers in Metabolic Testing. 55
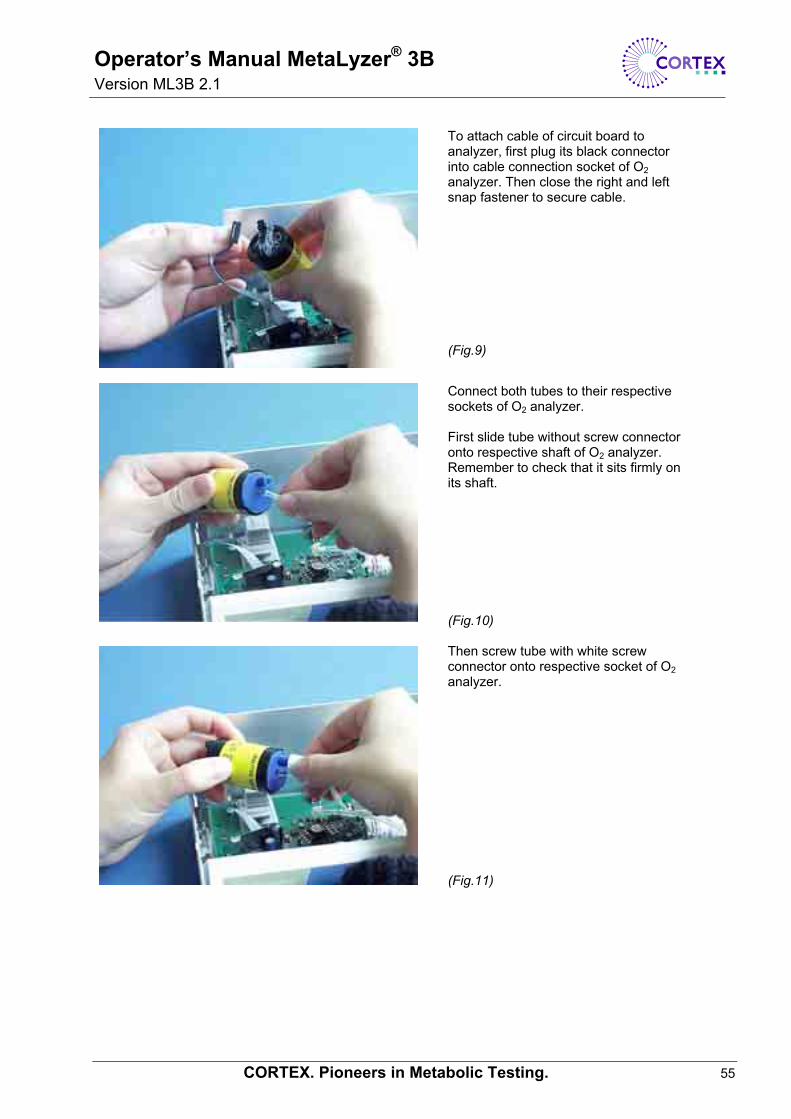
To attach cable of circuit board to analyzer, first plug its black connector into cable connection socket of O2 analyzer. Then close the right and left snap fastener to secure cable. (Fig.9)
Connect both tubes to their respective sockets of O2 analyzer. First slide tube without screw connector onto respective shaft of O2 analyzer. Remember to check that it sits firmly on its shaft. (Fig.10)
Then screw tube with white screw connector onto respective socket of O2 analyzer. (Fig.11)
Operator’s Manual MetaLyzer® 3B Version ML3B 2.1
56 CORTEX. Pioneers in Metabolic Testing.
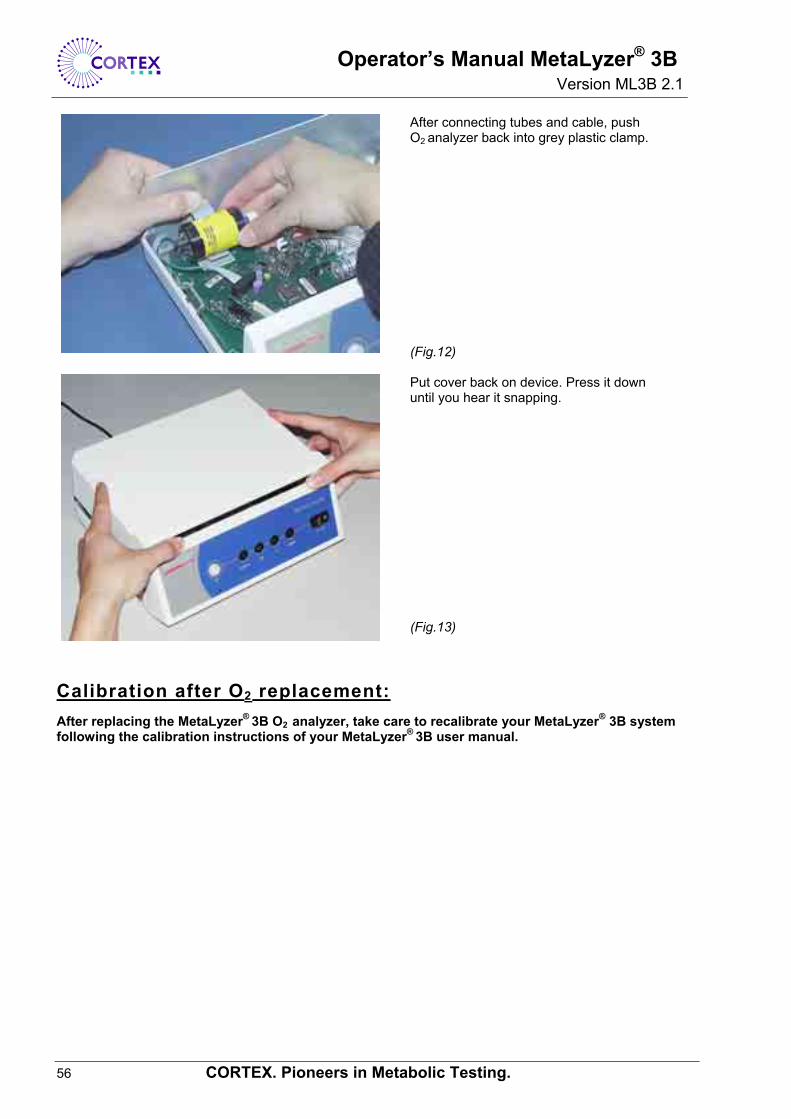
After connecting tubes and cable, push O2 analyzer back into grey plastic clamp. (Fig.12)
Put cover back on device. Press it down until you hear it snapping. (Fig.13)
Calibration after O2 replacement: After replacing the MetaLyzer® 3B O2 analyzer, take care to recalibrate your MetaLyzer® 3B system following the calibration instructions of your MetaLyzer® 3B user manual.

Operator’s Manual MetaLyzer® 3B Version ML3B 2.1
CORTEX. Pioneers in Metabolic Testing. 57
Clean & disinfect face mask(s) The face mask must be removed, soak-cleaned and disinfected after each patient. The cleaning of reusable devices usually begins soon after use.
Note: Protective attire is required of personnel handling contaminated devices. Manual cleaning must be done in a manner that protects personnel handling the devices from aerosolization and splashing of infectious material.
Cleaning After the test, remove the volume transducer and the head cap from the face mask. Soil is wiped
from the device surface with a moist sponge or cloth. Inspect the mask and its components for damages at all stages of handling. If damage is detected
on any of the components, it should be identified and replaced.
Soak or rinse the device in water of 20° – 45°C. Use a pH neutral mild detergent. If an enzyme product is required, soak for two minutes. Remove, examine and extend the soak time for components with dried-on matter for up to five minutes. Soaking of components over five minutes may be detrimental, causing damage to the component’s surface.
After soaking, the mask must be thoroughly rinsed with clean water to remove the detergent residuals and debris from the components.
Dry mask thoroughly using a soft clean cloth or disposable paper towels.
Disinfection with liquid solutions
The following disinfectants have been tested and approved:
Cidex, (Surgicos Inc., Johnson & Johnson Corp.), Metricide, (Metrex Research Corp.), Glutarex, (3M Company) Lysetol med, (Schülke & Mayr GmbH)
Take care to observe the recommendations of the manufacturer when using specific disinfectants. Use any of these disinfectants as recommended by the manufacturer.
Determine the required soak temperature and time of the disinfectant and assure that these requirements are met. Activate the solution by mixing the components per manufacturer’s instruction. Pour the activated solution into an appropriately-sized basin. Completely immerse the mask in the basin The disinfectant agent must contact all surfaces to ensure disinfection. Cover the basin.
Adequate rinsing must follow disinfection to remove all traces of the disinfectant. Rinse for at least one minute with water (sterile water is preferred).
To prevent the growth of waterborne organism, the mask should be dried thoroughly using a soft cloth or disposable paper towels.
In case skin irritations occur after use of a specific disinfectant, stop disinfecting with this solution and use any other of the approved solutions. If none of the disinfectant solutions will stop the skin irritation effect, use steam disinfection.
Disinfection with steam
The disinfection of the mask can be achieved with steam disinfection. The maximum temperature of cycle must not exceed 135°C. The cycle time must not exceed 15 minutes.
Operator’s Manual MetaLyzer® 3B Version ML3B 2.1
58 CORTEX. Pioneers in Metabolic Testing.
Clean head cap assembly
The head cap assembly should be removed and cleaned after each patient. The cleaning of reusable devices usually begins soon after use.
The head cap assembly, including the clips, can be hand-washed in water of 20° – 45°C, using a non-oily, mild detergent.
Rinse thoroughly in water. Machine or line dry. Do not iron the head cap.
Inspect the head cap for damages at all stages of handling. If damage is detected on any of its components (e.g. the clips), it should be identified and replaced.
Clean housing Before cleaning the MetaLyzer® 3B base system disconnect any tubes and/or cables from the system. Use a moist cloth to wipe the instrument clean. Liquids must not be allowed to enter the device. Any hospital-grade cleaning agent and disinfectant may be used.
Danger
If liquids have entered the device it must be checked by a service technician before it can be used again.
Operator’s Manual MetaLyzer® 3B Version ML3B 2.1
CORTEX. Pioneers in Metabolic Testing. 59
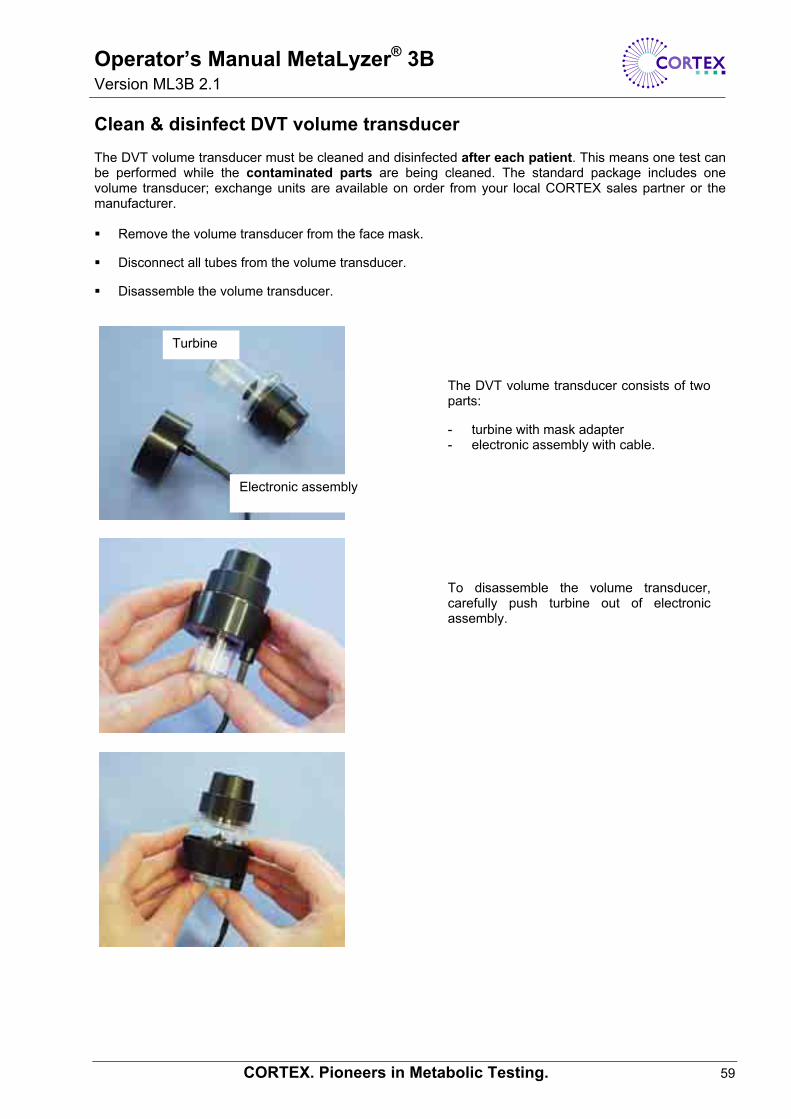
Clean & disinfect DVT volume transducer The DVT volume transducer must be cleaned and disinfected after each patient. This means one test can be performed while the contaminated parts are being cleaned. The standard package includes one volume transducer; exchange units are available on order from your local CORTEX sales partner or the manufacturer. Remove the volume transducer from the face mask.
Disconnect all tubes from the volume transducer.
Disassemble the volume transducer.
The DVT volume transducer consists of two parts:
- turbine with mask adapter - electronic assembly with cable.
To disassemble the volume transducer, carefully push turbine out of electronic assembly.
Electronic assembly
Turbine
Operator’s Manual MetaLyzer® 3B Version ML3B 2.1
60 CORTEX. Pioneers in Metabolic Testing.
After disassembly of the volume transducer check its parts for mechanical damages (turbine, sieve, housing of electronic assembly, cable connectors).
Rinse turbine in warm water (< 50°C). Do not hold the turbine under running water. This may damage the turbine.
Put turbine into a disinfecting solution (see disinfectants recommended for face mask).
After disinfecting, first rinse the turbine in pure water, then in distilled water to avoid calcification after air drying. Air dry the turbine. Do not use mechanical dryers, paper or textile for drying to keep the turbine free from dust and fibre deposits.
The housing of the electronic assembly may be surface-cleaned, using a fluff-free, weakly moistened cloth. Moisture must not get into the housing.
To reassemble the volume transducer, follow the opposite instructions by pushing turbine back into electronic assembly. The parts must be thoroughly dried before assembling.
Operator’s Manual MetaLyzer® 3B Version ML3B 2.1
CORTEX. Pioneers in Metabolic Testing. 61
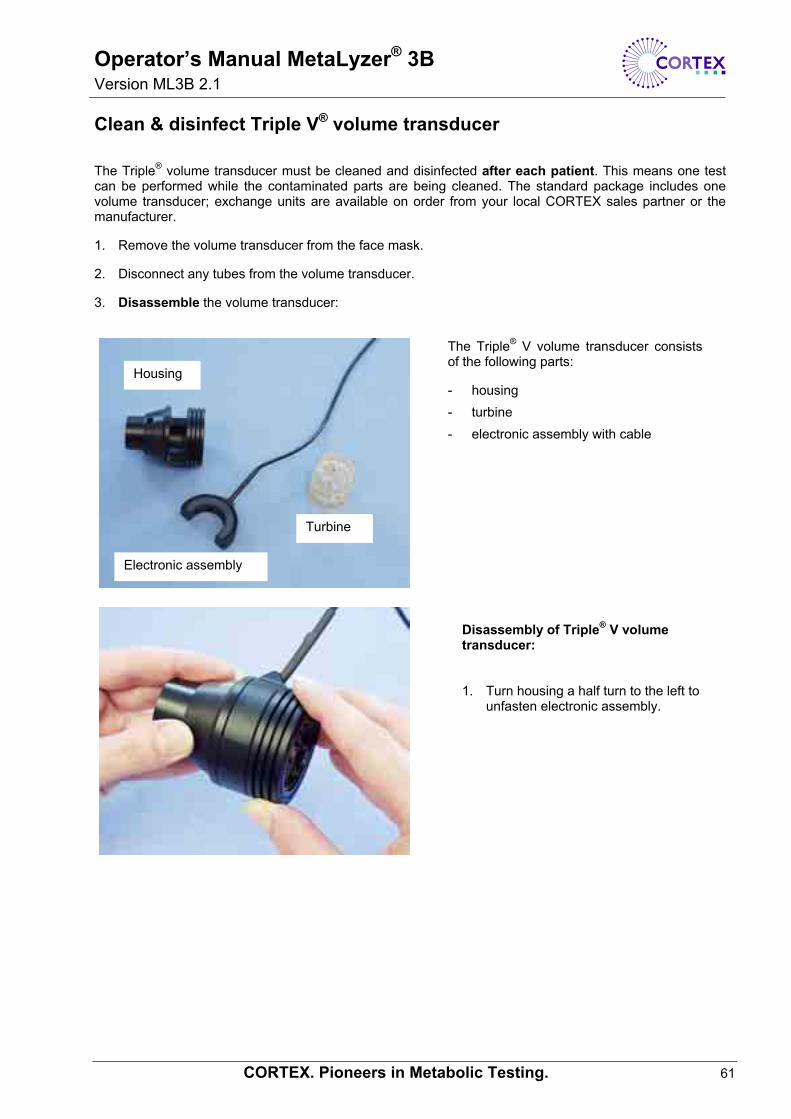
Clean & disinfect Triple V® volume transducer
The Triple® volume transducer must be cleaned and disinfected after each patient. This means one test can be performed while the contaminated parts are being cleaned. The standard package includes one volume transducer; exchange units are available on order from your local CORTEX sales partner or the manufacturer.
1. Remove the volume transducer from the face mask.
2. Disconnect any tubes from the volume transducer.
3. Disassemble the volume transducer:
The Triple® V volume transducer consists of the following parts:
- housing - turbine - electronic assembly with cable
Disassembly of Triple® V volume transducer: 1. Turn housing a half turn to the left to
unfasten electronic assembly.
Turbine
Housing
Electronic assembly
Operator’s Manual MetaLyzer® 3B Version ML3B 2.1
62 CORTEX. Pioneers in Metabolic Testing.
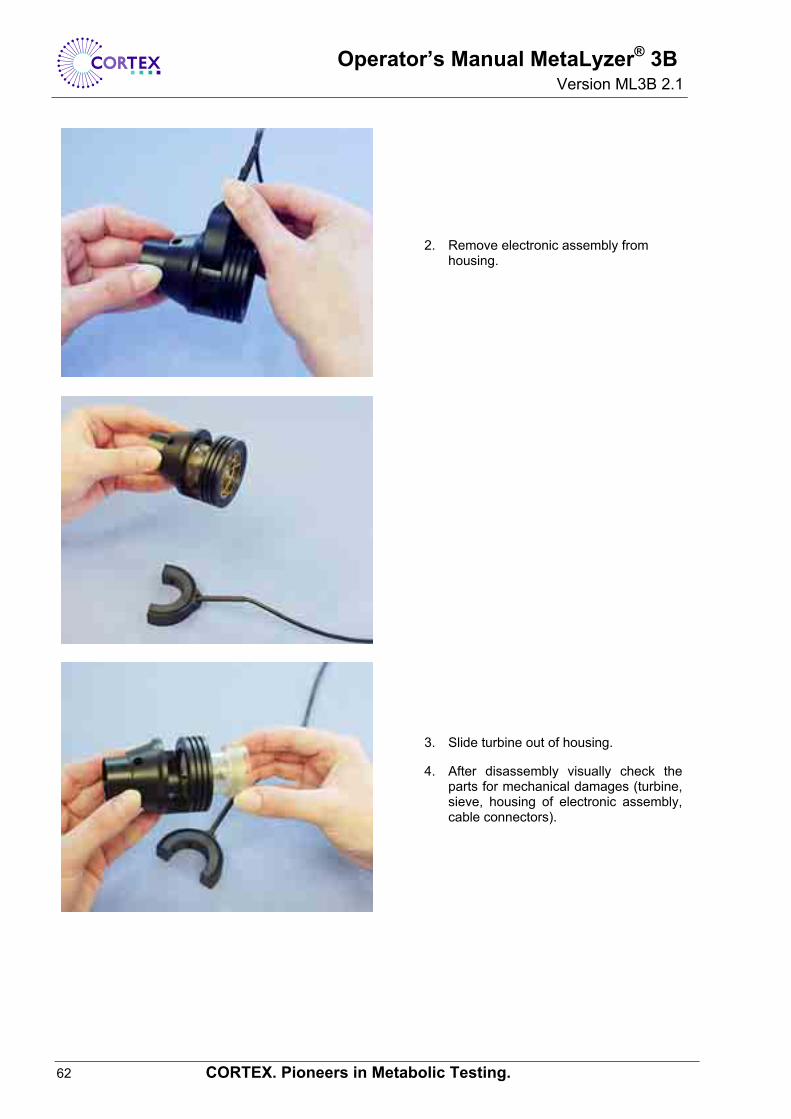
2. Remove electronic assembly from housing.
3. Slide turbine out of housing.
4. After disassembly visually check the parts for mechanical damages (turbine, sieve, housing of electronic assembly, cable connectors).
Operator’s Manual MetaLyzer® 3B Version ML3B 2.1
CORTEX. Pioneers in Metabolic Testing. 63
Cleaning
1. Turbine:
Rinse the turbine/transducer in warm water (< 50°C). Do not hold the turbine/transducer under running water. This may damage the turbine/transducer.
Put the turbine/transducer into a disinfection solution (see disinfectants recommended for face mask).
After disinfection first rinse the turbine/transducer in pure water, then in distilled water to avoid calcification after air drying. Air-dry the turbine/transducer. Do not use mechanical dryers, paper or textile for drying to keep the turbine free from dust and fibre deposits.
2. Electronic Assembly:
The housing must be surface-cleaned, using a fluff-free, weakly moistened cloth only. Moisture must not get into the housing.
3. Housing:
The housing can be easily cleaned using a non-oily, mild soap. Rinse thoroughly in running water.
Re-Assembly of Triple® V volume transducer To assemble the parts, follow the opposite instructions. First slide turbine back into housing. Press electronic assembly back into housing and turn housing a half-turn to the right to fasten electronic assembly. The parts must be thoroughly dried before assembling. Take care that the sieve of the turbine shows towards the mask adapter. Replacement of the sample line The entire sample line must be replaced in case of breakage. It is recommended to replace it after six months of use. Defective or worn sample lines may result in inaccurate measurements. They allow water condensate inside the sensor where it could damage the electronic components within the measurement device, causing a severe system failure. Sample lines can be purchased via your local CORTEX sales partner or CORTEX Biophysik GmbH. Visual inspection of system and parts prior to next use
Visually check each part of the system and its cables for signs of mechanical damage (e.g. broken connectors, crooked pin connections etc.) prior to each use. Should you detect damages or impaired device functions which present a hazard to the user, replace the part immediately or return it for a preventive maintenance inspection to your local CORTEX Biophysik sales partner or CORTEX Biophysik before using it again.

Operator’s Manual MetaLyzer® 3B Version ML3B 2.1
64 CORTEX. Pioneers in Metabolic Testing.
Maintenance of the calibration equipment
Replace reference gas bottles Calibration gas bottles are optionally available. The 3 liter calibration gas bottle offered by the manufacturer and included in the calibration kit allows you to perform approx. 15 gas calibration measurements when using the gas saver. Replacement bottles can be purchased from your local CORTEX Biophysik sales partner or CORTEX Biophysik.
Clean & replace tube set The tubes included in the CORTEX Calibration Kit are not likely to become dirty if used properly. If necessary, however, they can be cleaned by rinsing them in distilled water. After rinsing, air-dry the tubes.
Inspect the tube set at all stages of handling. Should you detect damages or breakages, replace the defective tube immediately. It is recommended to replace the entire set after 12 months’ of use. Replacement tube sets can be purchased from your local CORTEX Biophysik sales partner or CORTEX Biophysik.
Clean gas saver / automatic gas calibrator Before cleaning the unit, disconnect all tubes, unplug the power supply and remove the battery from its compartment. Use a moist cloth to wipe the device clean. Liquids must not be allowed to enter the device. Any hospital-grade cleaning agent may be used.
Operator’s Manual MetaLyzer® 3B Version ML3B 2.1
CORTEX. Pioneers in Metabolic Testing. 65
VIII. Annexes
1. MetaLyzer® 3B: Technical tips & troubleshooting 2. Certificates for Quality Assurance
3. Manufacturer’s Declaration of Conformity
Operator’s Manual MetaLyzer® 3B Version ML3B 2.1
66 CORTEX. Pioneers in Metabolic Testing.
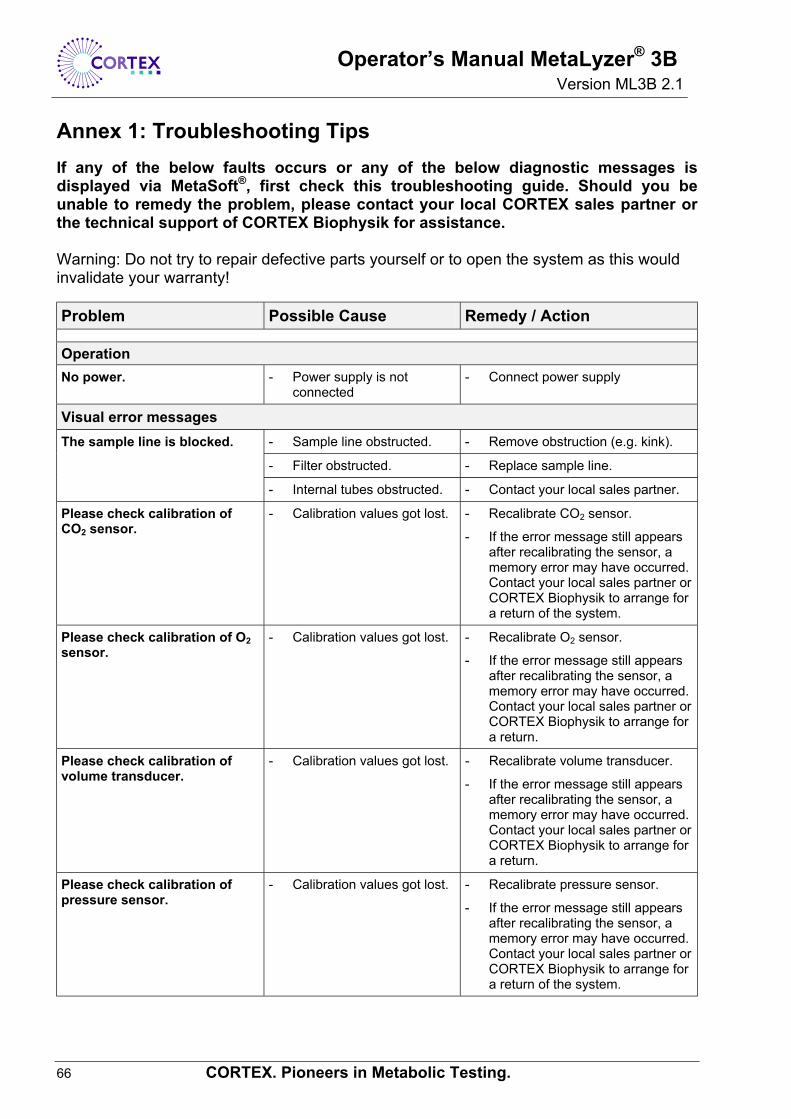
Annex 1: Troubleshooting Tips If any of the below faults occurs or any of the below diagnostic messages is displayed via MetaSoft®, first check this troubleshooting guide. Should you be unable to remedy the problem, please contact your local CORTEX sales partner or the technical support of CORTEX Biophysik for assistance. Warning: Do not try to repair defective parts yourself or to open the system as this would invalidate your warranty! Problem Possible Cause Remedy / Action
Operation No power. - Power supply is not
connected - Connect power supply
Visual error messages - Sample line obstructed. - Remove obstruction (e.g. kink).
- Filter obstructed. - Replace sample line.
The sample line is blocked.
- Internal tubes obstructed. - Contact your local sales partner.
Please check calibration of CO2 sensor.
- Calibration values got lost. - Recalibrate CO2 sensor.
- If the error message still appears after recalibrating the sensor, a memory error may have occurred. Contact your local sales partner or CORTEX Biophysik to arrange for a return of the system.
Please check calibration of O2 sensor.
- Calibration values got lost. - Recalibrate O2 sensor.
- If the error message still appears after recalibrating the sensor, a memory error may have occurred. Contact your local sales partner or CORTEX Biophysik to arrange for a return.
Please check calibration of volume transducer.
- Calibration values got lost. - Recalibrate volume transducer.
- If the error message still appears after recalibrating the sensor, a memory error may have occurred. Contact your local sales partner or CORTEX Biophysik to arrange for a return.
Please check calibration of pressure sensor.
- Calibration values got lost. - Recalibrate pressure sensor.
- If the error message still appears after recalibrating the sensor, a memory error may have occurred. Contact your local sales partner or CORTEX Biophysik to arrange for a return of the system.
Operator’s Manual MetaLyzer® 3B Version ML3B 2.1
CORTEX. Pioneers in Metabolic Testing. 67
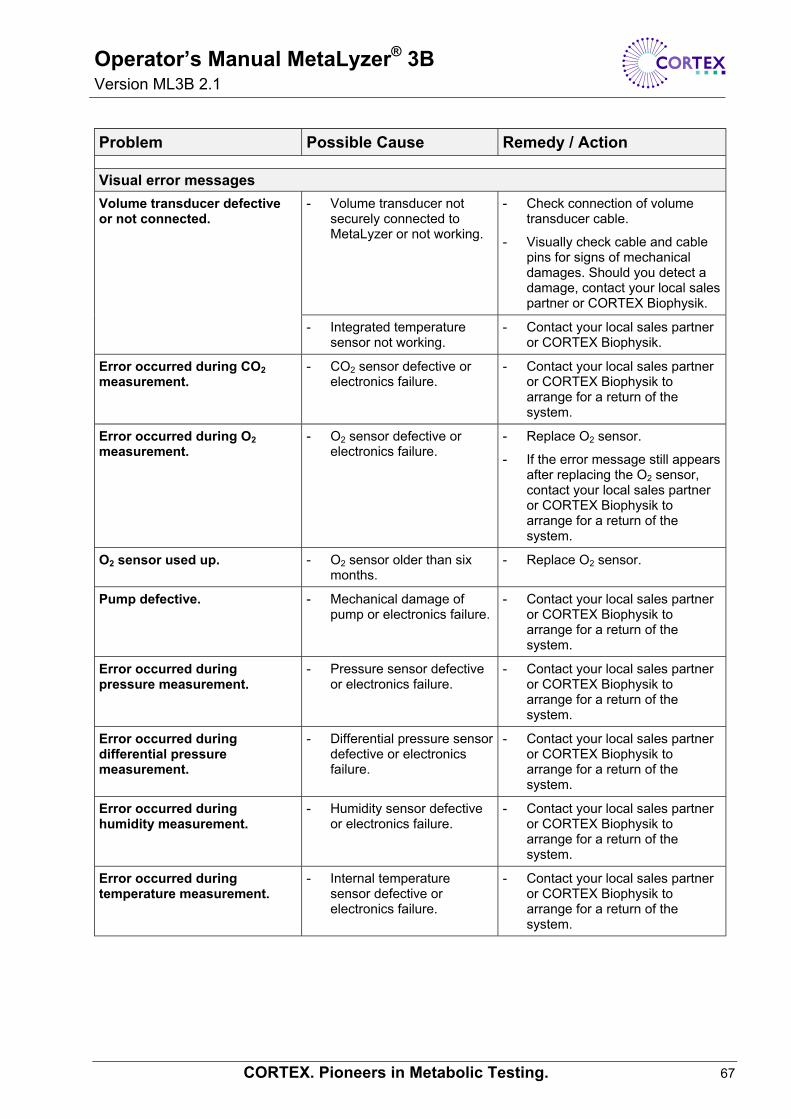
Problem Possible Cause Remedy / Action
Visual error messages - Volume transducer not
securely connected to MetaLyzer or not working.
- Check connection of volume transducer cable.
- Visually check cable and cable pins for signs of mechanical damages. Should you detect a damage, contact your local sales partner or CORTEX Biophysik.
Volume transducer defective or not connected.
- Integrated temperature sensor not working.
- Contact your local sales partner or CORTEX Biophysik.
Error occurred during CO2 measurement.
- CO2 sensor defective or electronics failure.
- Contact your local sales partner or CORTEX Biophysik to arrange for a return of the system.
Error occurred during O2 measurement.
- O2 sensor defective or electronics failure.
- Replace O2 sensor.
- If the error message still appears after replacing the O2 sensor, contact your local sales partner or CORTEX Biophysik to arrange for a return of the system.
O2 sensor used up. - O2 sensor older than six months.
- Replace O2 sensor.
Pump defective. - Mechanical damage of pump or electronics failure.
- Contact your local sales partner or CORTEX Biophysik to arrange for a return of the system.
Error occurred during pressure measurement.
- Pressure sensor defective or electronics failure.
- Contact your local sales partner or CORTEX Biophysik to arrange for a return of the system.
Error occurred during differential pressure measurement.
- Differential pressure sensor defective or electronics failure.
- Contact your local sales partner or CORTEX Biophysik to arrange for a return of the system.
Error occurred during humidity measurement.
- Humidity sensor defective or electronics failure.
- Contact your local sales partner or CORTEX Biophysik to arrange for a return of the system.
Error occurred during temperature measurement.
- Internal temperature sensor defective or electronics failure.
- Contact your local sales partner or CORTEX Biophysik to arrange for a return of the system.
Operator’s Manual MetaLyzer® 3B Version ML3B 2.1
68 CORTEX. Pioneers in Metabolic Testing.
Problem Possible Cause Remedy / Action
Visual error messages Water collected inside sample line.
- Sample line too old.
- Stop measurement immediately and turn off device to avoid total system failure.
- Replace sample line.
- Switch on device and run it for approx. 5 hours under normal conditions (approx. 20-25°C and less than 60% humidity).
- Perform a two-point gas calibration measurement prior to next use.
- If you are unable to remedy the problem, contact your local sales partner or CORTEX Biophysik to arrange for a return of the system.
Measurement values unstable during one-point calibration (measurement does not stop)
- Sample line was exposed to breathing air.
- Be careful to expose the free end of the sample line to ambient air during one-point calibration measurement.
- Room badly ventilated (“used” air).
- Ensure an adequate ventilation and room temperature for maximum performance.
Values measured are stable, but differ significantly from normal values (i.e. 20.93% O2, 0.03% CO2) - The last 2-point gas
calibration was performed too long ago.
- Perform a 2-point gas calibration measurement.
Ventilation values plausible, but V’O2 or V’CO2 are the same or close to zero.
- Sample line not connected to volume transducer.
- Connect sample line.
- Volume transducer not properly calibrated.
- Recalibrate volume transducer.
- Mechanical damage of the turbine of volume transducer.
- Contact your local sales partner or CORTEX Biophysik.
Ventilation values measured differ significantly from predicted values.
- Turbine of volume transducer may be dirty.
- Clean turbine in accordance with maintenance and cleaning instructions.
- 1-point calibration not performed or not performed properly.
- Perform 1-point calibration correctly.
- Gas analyzers not properly calibrated.
- Perform 2-point gas calibration measurement.
Gas values (V’O2, V‘CO2, RQ) measured differ significantly from predicted values.
- Sample line leaking. - Replace sample line.
Operator’s Manual MetaLyzer® 3B Version ML3B 2.1
CORTEX. Pioneers in Metabolic Testing. 69
Annex 2: Certificates for Quality Assurance
Operator’s Manual MetaLyzer® 3B Version ML3B 2.1
70 CORTEX. Pioneers in Metabolic Testing.
Annex 2: Certificates for Quality Assurance (cont’d)
Operator’s Manual MetaLyzer® 3B Version ML3B 2.1
CORTEX. Pioneers in Metabolic Testing. 71
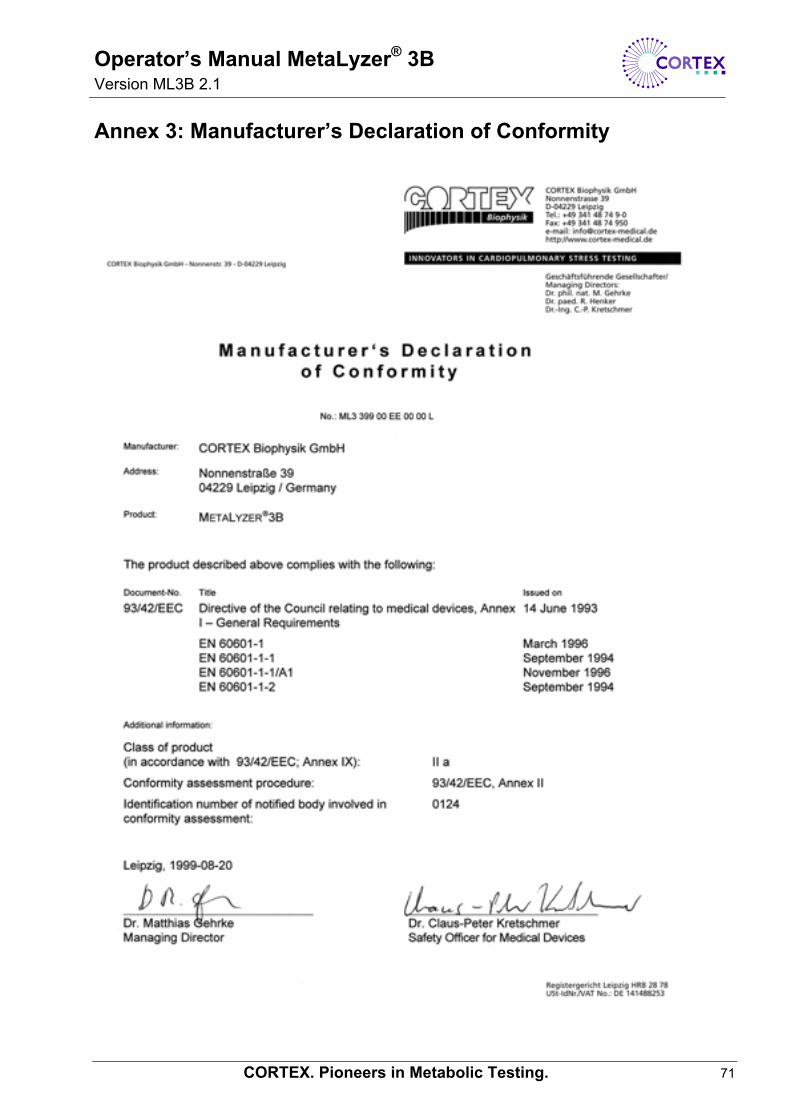
Annex 3: Manufacturer’s Declaration of Conformity

Operator’s Manual MetaLyzer® 3B Version ML3B 2.1
72 CORTEX. Pioneers in Metabolic Testing.
IX. Contact CORTEX Biophysik
Via email
Technical support: [email protected] Product information: [email protected]
Via Internet http://www.cortex-medical.de Via fax or phone
Technical support: Phone +49 341 4 87 49-0 Fax +49 341 4 87 49-50
Product information: Phone +49 341 4 87 49-0 Fax +49 341 4 87 49-50 Via mail CORTEX Biophysik GmbH
Nonnenstrasse 39 04229 Leipzig Germany
We look forward to your feedback.
Enjoy using your MetaLyzer® 3B.
Operator’s Manual MetaLyzer® 3B Version ML3B 2.1
CORTEX. Pioneers in Metabolic Testing. 73
X. Trademarks
Microsoft and Windows are registered trademarks of Microsoft Corp.
MetaLyzer and MetaSoft are registered trademarks of CORTEX Biophysik. Triple V is a registered trademark of Erich Jaeger. Nafion is a registered trademark of DuPont.
Polar is a registered trademark of Polar.
Cidex is a registered trademark of Surgicos.
Metricide is a registered trademark of Metrex Research.
Glutorex and 3M is a registered trademark of 3M Company.
Lysetol med is a registered trademark of Schülke & Mayr.
XI. Disclaimer THE INFORMATION IN THIS GUIDE IS SUBJECT TO CHANGE AT ANY TIME AND WITHOUT NOTICE. CORTEX Biophysik GmbH reserves the right to make changes in its designs and specifications at any time and without prior notice. The information provided by this document is believed to be accurate and reliable. However, no responsibility is assumed by CORTEX Biophysik GmbH for its use; nor for any infringements of patents or other rights of third parties resulting from its use. Photos and images for representation purposes only. ©CORTEX Biophysik GmbH 1993 – 2004. All rights reserved.
Operator’s Manual MetaLyzer® 3B Version ML3B 2.1
74 CORTEX. Pioneers in Metabolic Testing.
XII. Personal Notes
......................................................................................................................................
...................................................................................................................................... ...................................................................................................................................... .....................................................................................................................................
......................................................................................................................................
......................................................................................................................................
......................................................................................................................................
......................................................................................................................................
......................................................................................................................................
......................................................................................................................................
......................................................................................................................................
......................................................................................................................................
...................................................................................................................................... ......................................................................................................................................
......................................................................................................................................
......................................................................................................................................
......................................................................................................................................
......................................................................................................................................
......................................................................................................................................
......................................................................................................................................