Embed Size (px)
Citation preview
SLEEVE ASSEMBLY
FLAT NOTCH
COLLAR NUT
GASKET
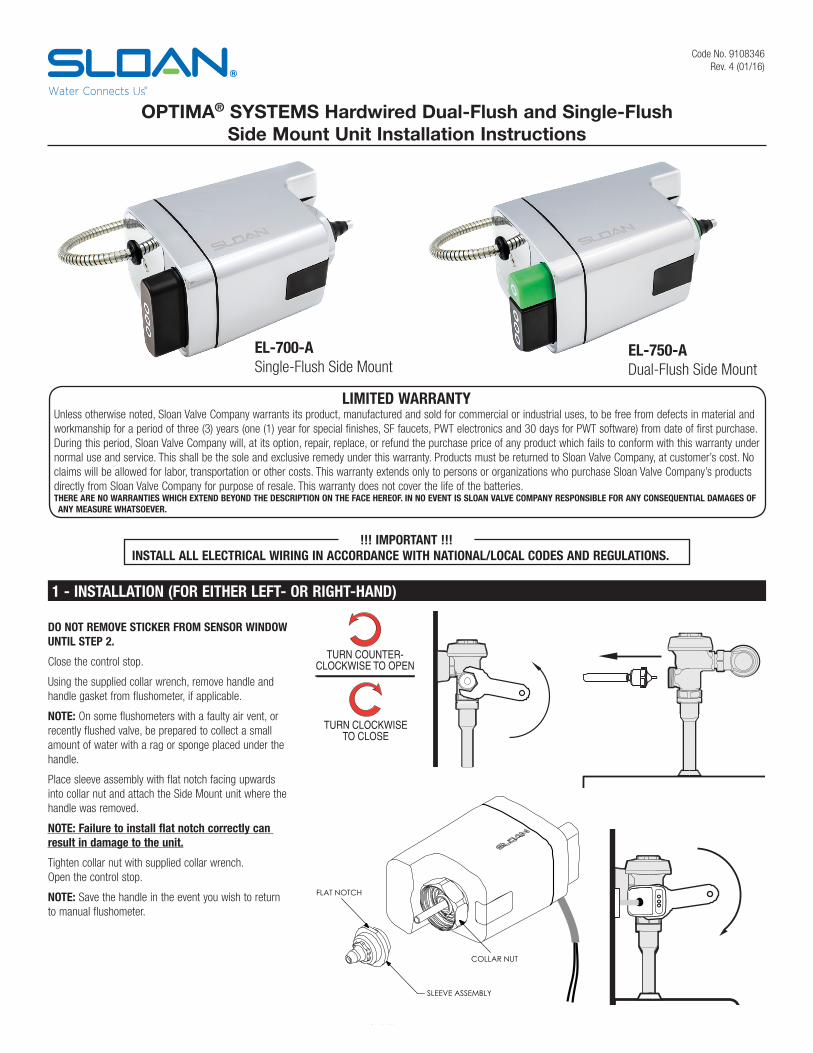
DO NOT REMOVE STICKER FROM SENSOR WINDOW UNTIL STEP 2.
Close the control stop.
Using the supplied collar wrench, remove handle and handle gasket from flushometer, if applicable.
NOTE: On some flushometers with a faulty air vent, or recently flushed valve, be prepared to collect a small amount of water with a rag or sponge placed under the handle.
Place sleeve assembly with flat notch facing upwards into collar nut and attach the Side Mount unit where the handle was removed.
NOTE: Failure to install flat notch correctly can result in damage to the unit.
Tighten collar nut with supplied collar wrench. Open the control stop.
NOTE: Save the handle in the event you wish to return to manual flushometer.
LIMITED WARRANTYUnless otherwise noted, Sloan Valve Company warrants its product, manufactured and sold for commercial or industrial uses, to be free from defects in material and workmanship for a period of three (3) years (one (1) year for special finishes, SF faucets, PWT electronics and 30 days for PWT software) from date of first purchase. During this period, Sloan Valve Company will, at its option, repair, replace, or refund the purchase price of any product which fails to conform with this warranty under normal use and service. This shall be the sole and exclusive remedy under this warranty. Products must be returned to Sloan Valve Company, at customer’s cost. No claims will be allowed for labor, transportation or other costs. This warranty extends only to persons or organizations who purchase Sloan Valve Company’s products directly from Sloan Valve Company for purpose of resale. This warranty does not cover the life of the batteries.THERE ARE NO WARRANTIES WHICH EXTEND BEYOND THE DESCRIPTION ON THE FACE HEREOF. IN NO EVENT IS SLOAN VALVE COMPANY RESPONSIBLE FOR ANY CONSEQUENTIAL DAMAGES OF ANY MEASURE WHATSOEVER.
1 - INSTALLATION (FOR EITHER LEFT- OR RIGHT-HAND)
OPTIMA® SYSTEMS Hardwired Dual-Flush and Single-FlushSide Mount Unit Installation Instructions
Code No. 9108346Rev. 4 (01/16)
EL-700-ASingle-Flush Side Mount
EL-750-ADual-Flush Side Mount
INSTALL ALL ELECTRICAL WIRING IN ACCORDANCE WITH NATIONAL/LOCAL CODES AND REGULATIONS.!!! IMPORTANT !!!
Turn on transformer power and wait for 10 seconds. Remove sticker from sensor window. The Side Mount unit will “wake up” when sticker is removed from sensor window. Please ensure this is the last step in the installation process and unless the target is a permanent fixture in the sensor’s environment (i.e. a wall or stall door) it must be removed from the view of the sensor. There is a three minute delay to calibration to allow the installer to clear from the view of the sensor. The Side Mount unit calibrates to the surrounding environment once sticker is removed (with three minute delay to allow installer to clear from the view of the sensor). Remove all non-permanent articles and step away from the sensor view until the one (1) flush activation verifies calibration is complete. The unit will exhibit an LED flash pattern as follows:
• GREEN and RED LED flash once, GREEN LED flashes 5 times • 150 seconds of slow GREEN double flashes • 10 seconds of fast GREEN double flashes • 12-15 seconds of fast GREEN flashes (calibration) • 3 slow GREEN LED flashes indicates calibration is done • Normal Operation with one flush activation
After power off, re-power up will need three (3) minute delay to allow installer to clear from the view of the sensor.
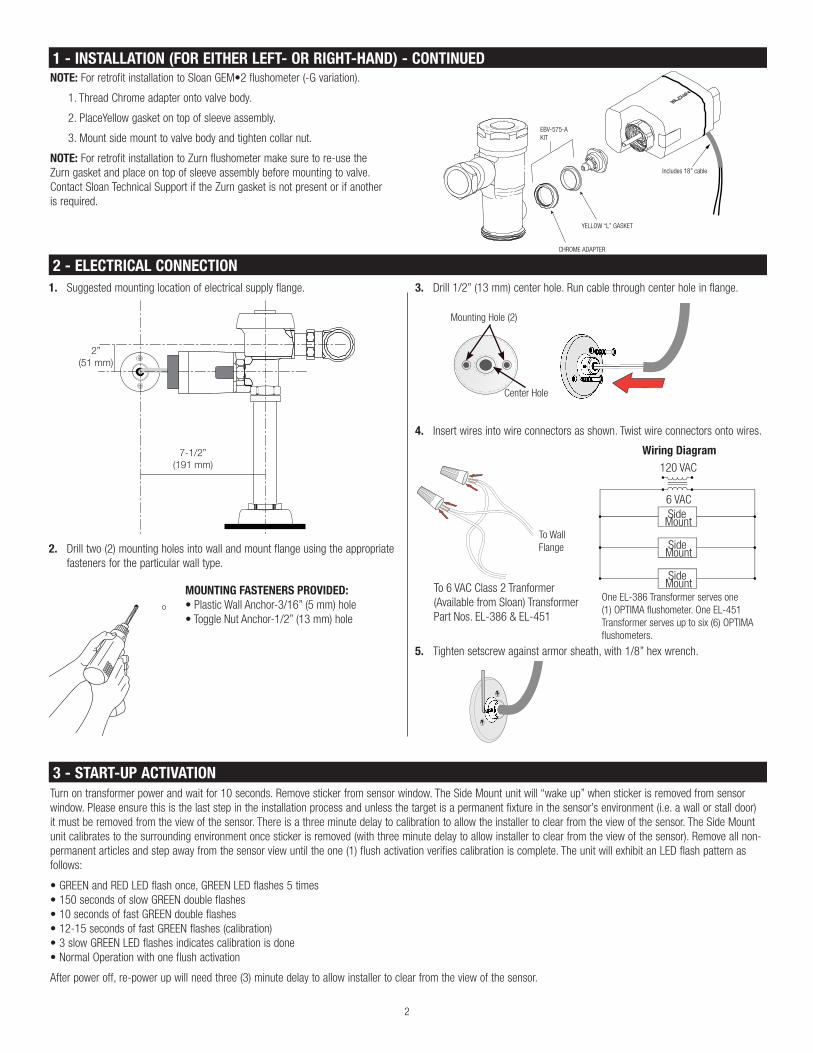
NOTE: For retrofit installation to Sloan GEM•2 flushometer (-G variation).
1. Thread Chrome adapter onto valve body.
2. PlaceYellow gasket on top of sleeve assembly.
3. Mount side mount to valve body and tighten collar nut.
NOTE: For retrofit installation to Zurn flushometer make sure to re-use the Zurn gasket and place on top of sleeve assembly before mounting to valve. Contact Sloan Technical Support if the Zurn gasket is not present or if another is required.
3 - START-UP ACTIVATION
1 - INSTALLATION (FOR EITHER LEFT- OR RIGHT-HAND) - CONTINUED
YELLOW “L” GASKET
CHROME ADAPTER
Includes 18” cable
EBV-575-AKIT
2 - ELECTRICAL CONNECTION
7-1/2”(191 mm)
2”(51 mm)
1. Suggested mounting location of electrical supply flange.
2. Drill two (2) mounting holes into wall and mount flange using the appropriate fasteners for the particular wall type.
3. Drill 1/2” (13 mm) center hole. Run cable through center hole in flange.
4. Insert wires into wire connectors as shown. Twist wire connectors onto wires.
To Wall Flange
To 6 VAC Class 2 Tranformer(Available from Sloan) Transformer Part Nos. EL-386 & EL-451
MOUNTING FASTENERS PROVIDED:• Plastic Wall Anchor-3/16” (5 mm) hole• Toggle Nut Anchor-1/2” (13 mm) hole
Wiring Diagram120 VAC
SideMount
SideMount
SideMount
One EL-386 Transformer serves one (1) OPTIMA flushometer. One EL-451 Transformer serves up to six (6) OPTIMA flushometers.
5. Tighten setscrew against armor sheath, with 1/8” hex wrench.
Mounting Hole (2)
Center Hole
6 VAC
2
Units are preset at factory in water closet mode.
To change unit from water closet mode to urinal mode, complete the following within one (1) hour of power up:
Press and hold the True Mechanical Override (TMO) button for 20-30 seconds.
The unit will exhibit an LED flash pattern as follows:
• For approximately the first 10 seconds there will be no LED flashing. • For approximately 10-20 seconds, both the RED and GREEN LEDs will produce short simultaneous flashes. • For approximately 20-30 seconds, the GREEN LED will flash.
Release the TMO button during the 20-30 seconds when GREEN LED flashes and remove non-permanent items from view of the sensor. The Side Mount unit will now be in urinal mode* and begin calibration until the one (1) flush activation verifies calibration is complete. See Activation.
To change back to closet mode, press and hold the TMO button for 30-40 seconds. Release when RED and GREEN LEDs produce long simultaneous flashes. The Side Mount unit will now be in closet mode and begin calibration.
*Urinal mode provides a shorter sensor range and 1-2 second flush delay.
Press and hold the True Mechanical Override (BLACK) button for 10-20 seconds.
The unit will exhibit an LED flash pattern as follows:
• For approximately the first 10 seconds there will be no LED flashing.
• For approximately 10-20 seconds, both the RED and GREEN LEDs will produce short simultaneous flashes.
Release the TMO button during the 10-20 seconds when both the RED and GREEN LEDs produce SHORT simultaneous flashes. The unit will now ignore targets for
10 minutes to enable the toilet or urinal to be cleaned or serviced. Unit will resume normal operation after 10 minutes or if either button is pushed. Green button will
generate a reduced flush and then resume normal operation, black button will provide a full flush before resuming normal operation.
1. RED LED flashes continuously after calibration. The unit has failed to calibrate. The optics window is obscured. Clean window and remove any objects (barrels, toolboxes, etc.) within close proximity of unit. Remove hardwire tray, wait at least ten (10) seconds, then reinstall hardwire tray and repeat power-up sequence with three (3) minute delay to allow installer to clear from the view of the sensor. If unit fails, consult Sloan Technical Support.
When assistance is required, please contact Sloan Technical Support at: 1-888-SLOAN-14 (1-888-756-2614)
VAC POWER REQUIREMENTS
MODE CHANGE (SINGLE-FLUSH UNITS ONLY)
SERVICE MODE - DUAL-FLUSH AND SINGLE FLUSH UNITS
TROUBLESHOOTING
VAC Power Requirement: Transformer 6 VAC 0.5 mA per unitSloan Transformers: EL-386 – 120 VAC/ 6 VAC Plug-in Transformers EL-451 – 120 VAC/6 VAC 25 VA Box Style TransformersNOTE: One (1) Hardwire Flushometer per each EL-386 Transformer and six (6) Hardwire Flushometers per each EL-451 Transformer
DO NOT USE abrasive or chemical cleaners (including chlorine bleach) to clean side mount unit or flushometer that may dull the luster and attack the finish.
Use ONLY mild soap and water, then wipe dry with clean cloth or towel.While cleaning the bathroom tile, protect the side mount unit from any splattering of cleaner. Acids and cleaning fluids will discolor or remove chrome plating or damage the sensor window.
DO NOT USE abrasive or chemical cleaners (including chlorine bleach) to clean sensor window that may distort or ruin the sensor.
CARE AND CLEANING
3
SLOAN • 10500 SEYMOUR AVENUE • FRANKLIN PARK, IL 60131Phone: 1-800-9-VALVE-9 (1-800-982-5839) • Fax: 1-847-671-4380 • www.sloanvalve.com
© 2016 SLOAN VALVE COMPANY Code No. 9108346 – Rev. 4 (01/16)
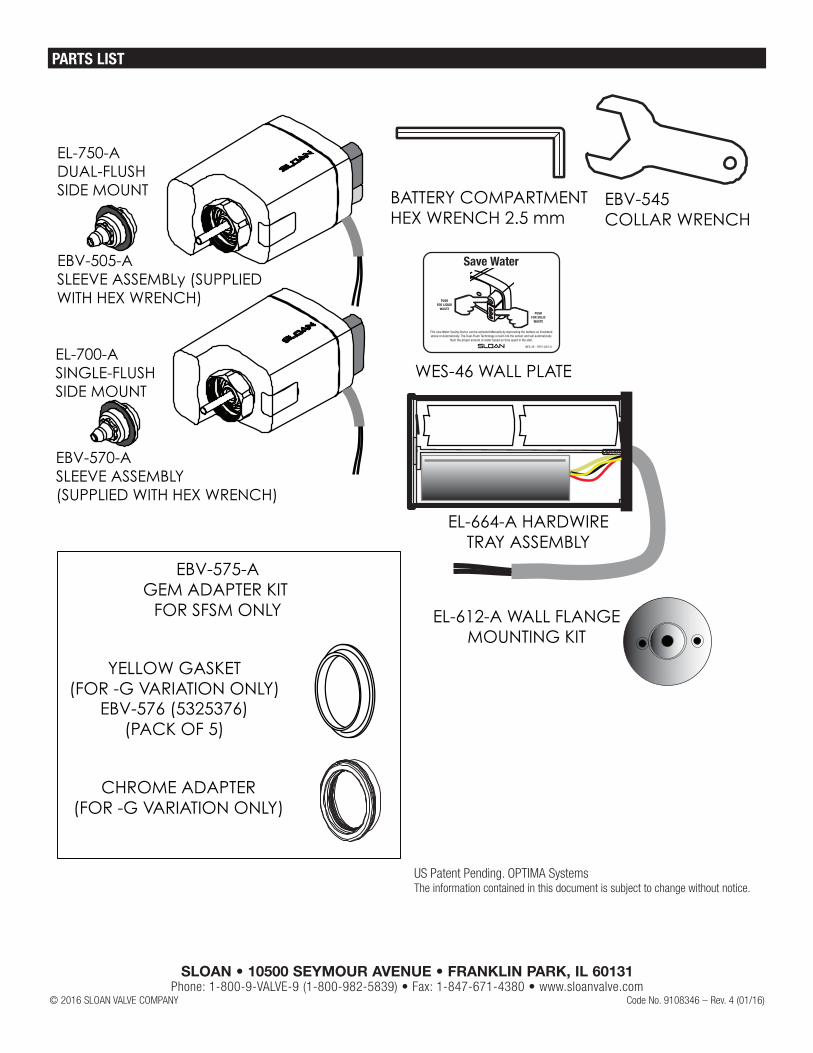
EL-750-ADUAL-FLUSH SIDE MOUNT BATTERY COMPARTMENT
HEX WRENCH 2.5 mmEBV-545COLLAR WRENCH
EL-664-A HARDWIRE TRAY ASSEMBLY
WES-46 WALL PLATE
YELLOW GASKET(FOR -G VARIATION ONLY)
CHROME ADAPTER(FOR -G VARIATION ONLY)
EBV-505-ASLEEVE ASSEMBLy (SUPPLIED WITH HEX WRENCH)
EBV-570-ASLEEVE ASSEMBLY(SUPPLIED WITH HEX WRENCH)
EL-700-ASINGLE-FLUSH SIDE MOUNT
EL-612-A WALL FLANGE MOUNTING KIT
EBV-576 (5325376)(PACK OF 5)
EBV-575-AGEM ADAPTER KIT
FOR SFSM ONLY
PARTS LIST
US Patent Pending. OPTIMA SystemsThe information contained in this document is subject to change without notice.


![Is influencer marketing a busted flush?...then influencer marketing won’t exist in a short period of time. a busted flush. [bus-ted flush] noun informal A person or thing that fails](https://img.pdfslide.net/doc/110x75/5f0ad9af7e708231d42da5b2/is-influencer-marketing-a-busted-flush-then-influencer-marketing-wonat-exist.jpg)