Embed Size (px)
Citation preview
Oracle® FMWOracle Data Integrator Quick ReferenceGuide
F12969-01February 2019

Oracle FMW Oracle Data Integrator Quick Reference Guide,
F12969-01
Copyright © 2019, Oracle and/or its affiliates. All rights reserved.
Primary Author: Oracle Corporation
This software and related documentation are provided under a license agreement containing restrictions onuse and disclosure and are protected by intellectual property laws. Except as expressly permitted in yourlicense agreement or allowed by law, you may not use, copy, reproduce, translate, broadcast, modify,license, transmit, distribute, exhibit, perform, publish, or display any part, in any form, or by any means.Reverse engineering, disassembly, or decompilation of this software, unless required by law forinteroperability, is prohibited.
The information contained herein is subject to change without notice and is not warranted to be error-free. Ifyou find any errors, please report them to us in writing.
If this is software or related documentation that is delivered to the U.S. Government or anyone licensing it onbehalf of the U.S. Government, then the following notice is applicable:
U.S. GOVERNMENT END USERS: Oracle programs, including any operating system, integrated software,any programs installed on the hardware, and/or documentation, delivered to U.S. Government end users are"commercial computer software" pursuant to the applicable Federal Acquisition Regulation and agency-specific supplemental regulations. As such, use, duplication, disclosure, modification, and adaptation of theprograms, including any operating system, integrated software, any programs installed on the hardware,and/or documentation, shall be subject to license terms and license restrictions applicable to the programs.No other rights are granted to the U.S. Government.
This software or hardware is developed for general use in a variety of information management applications.It is not developed or intended for use in any inherently dangerous applications, including applications thatmay create a risk of personal injury. If you use this software or hardware in dangerous applications, then youshall be responsible to take all appropriate fail-safe, backup, redundancy, and other measures to ensure itssafe use. Oracle Corporation and its affiliates disclaim any liability for any damages caused by use of thissoftware or hardware in dangerous applications.
Oracle and Java are registered trademarks of Oracle and/or its affiliates. Other names may be trademarks oftheir respective owners.
Intel and Intel Xeon are trademarks or registered trademarks of Intel Corporation. All SPARC trademarks areused under license and are trademarks or registered trademarks of SPARC International, Inc. AMD, Opteron,the AMD logo, and the AMD Opteron logo are trademarks or registered trademarks of Advanced MicroDevices. UNIX is a registered trademark of The Open Group.
This software or hardware and documentation may provide access to or information about content, products,and services from third parties. Oracle Corporation and its affiliates are not responsible for and expresslydisclaim all warranties of any kind with respect to third-party content, products, and services unless otherwiseset forth in an applicable agreement between you and Oracle. Oracle Corporation and its affiliates will not beresponsible for any loss, costs, or damages incurred due to your access to or use of third-party content,products, or services, except as set forth in an applicable agreement between you and Oracle.
Contents
1 Introduction to Oracle Data Integrator
About Oracle Data Integrator 1-1
Oracle Data Integrator Repositories 1-2
Oracle Data Integrator Navigators 1-2
Oracle Data Integrator Run-Time Agent 1-3
Oracle Data Integrator Data Servers 1-3
Oracle Data Integrator Models 1-3
Oracle Data Integrator Datastores 1-4
Oracle Data Integrator Data Flow 1-4
Oracle Data Integrator Integration Projects 1-4
Oracle Data Integrator Mappings 1-5
Oracle Data Integrator Knowledge Modules 1-5
Oracle Data Integrator Scenarios 1-6
Oracle Data Integrator Load Plans 1-6
Oracle Data Integrator Console 1-6
2 Create Repositories and Connections for Oracle Data Integrator
How to Create Master and Work Repositories 2-1
Create a Connection 2-2
3 The Oracle Data Integrator User Interface
The Topology Navigator 3-1
The Designer Navigator 3-2
The Operator Navigator 3-2
The Security Navigator 3-3
Menu Items 3-3
4 Oracle Data Integrator Agents
What is an Oracle Data Integrator Agent? 4-1
iii
How to Create an Agent 4-1
5 Data Servers
What is a Data Server? 5-1
How to Create a Data Server 5-1
6 Models
What are Models? 6-1
What is Reverse-Engineering 6-1
Create a Model 6-2
Define a Reverse-Engineering Strategy 6-3
7 Data Stores
What are Datastores 7-1
Create a Datastore 7-1
8 Data Flow
What is a Data Flow 8-1
9 Projects
Projects and Folders 9-1
Create Projects and Folders 9-2
10
Mappings
What are Mappings 10-1
Create Mappings 10-1
11
Knowledge Modules
What are Knowledge Modules 11-1
Find the Knowledge Modules in a Project 11-2
Add a Knowledge Module to a Project 11-2
Import a Global Knowledge Module 11-2
iv
12
Scenarios
What are Scenarios 12-1
Create and Run Scenarios 12-1
13
Procedures
What is a Procedure 13-1
Create a Procedure 13-1
Create a Blank Procedure 13-2
Add Commands to a Procedure 13-3
Add New Options to a Procedure 13-3
14
Packages
What is a Package 14-1
Create and Run a Package 14-1
Create a Blank Package 14-2
Create a Step 14-3
Arrange Package Steps 14-3
15
Load Plans
What are Load Plans 15-1
Create Load Plans 15-2
16
Console
What is Oracle Data Integrator Console 16-1
Use Oracle Data Integrator Console 16-1
v
1Introduction to Oracle Data Integrator
Learn what you can do with Oracle Data Integrator and understand the importantconcepts before you get started.
Topics
• About Oracle Data Integrator
• Oracle Data Integrator Repositories
• Oracle Data Integrator Navigators
• Oracle Data Integrator Run-Time Agent
• Oracle Data Integrator Data Servers
• Oracle Data Integrator Models
• Oracle Data Integrator Datastores
• Oracle Data Integrator Data Flow
• Oracle Data Integrator Integration Projects
• Oracle Data Integrator Mappings
• Oracle Data Integrator Knowledge Modules
• Oracle Data Integrator Scenarios
• Oracle Data Integrator Load Plans
• Oracle Data Integrator Console
About Oracle Data IntegratorA brief overview of Oracle Data Integrator.
Oracle Data Integrator (ODI) provides a fully unified solution for building, deploying,and managing complex data warehouses or as part of data- centric architectures in aSOA or business intelligence environment. In addition, it combines all the elements ofdata integration - data movement, data synchronization, data quality, datamanagement, and data services - to ensure that information is timely, accurate, andconsistent across complex systems.
Traditional ETL (Extract, Transform, Load) tools operate by, first, extracting the datafrom various sources, then, transforming the data in a proprietary, middle-tier ETLengine that is used as the staging area, and finally loading the transformed data intothe target data warehouse, integration server, or Hadoop cluster. Hence the term ETLrepresents both the names and the order of the operations performed. ODI extractsthe data from the various sources, and then loads it to the target where it'stransformed. This is known as E-LT: Extract, Load, Transform.
ODI features an active integration platform that includes all styles of data integration:data-based, event-based and service-based. ODI transforms large volumes of dataefficiently, processing events in real time through its advanced Changed Data Capture
1-1
(CDC) framework, and providing data services to the Oracle SOA Suite. It alsoprovides robust data integrity control features, assuring the consistency andcorrectness of data. With powerful core differentiators - heterogeneous E-LT,Declarative Design and Knowledge Modules - ODI meets the performance, flexibility,productivity, modularity and hot-pluggability requirements of an integration platform.
See Overview of Oracle Data Integrator in Understanding Oracle Data Integrator.
Oracle Data Integrator RepositoriesAn overview of Oracle Data Integrator Repositories.
The Oracle Data Integrator (ODI) Repository is composed of a master repository andat least one work repository. Objects developed or configured through the users arestored in one of these repository types. It's installed on an OLTP relational database.There's usually only one master repository that stores the Security information,Topology information, and versioned and archived objects. The work repository is theone that contains actual developed objects. Several work repositories may coexist inthe same ODI installation (for example, to have separate environments or to match aparticular versioning life cycle). A work repository stores information for Models,Projects, and Scenario execution. When the work repository contains only theexecution information (typically for production purposes), it's called an executionrepository.
Create Repositories and Connections for Oracle Data Integrator
Oracle Data Integrator NavigatorsAn overview of Oracle Data Integrator Navigators.
ODI Studio provides four Navigators for managing the different aspects and steps ofan ODI integration project, Topology Navigator, Designer Navigator, OperatorNavigator, and Security Navigator.
The Topology Navigator is used to manage the data describing the informationsystem's physical and logical architecture. Through it you can manage the topology ofyour information system, the technologies and their data types, the data servers linkedto these technologies and the schemas they contain, the contexts, the language andthe agents, as well as the repositories. The site, machine, and data server descriptionsenable Oracle Data Integrator to execute the same mappings in differentenvironments.
The Designer Navigator is used to design data integrity checks and to buildtransformations, such as automatic reverse-engineering of existing applications ordatabases, graphical development and maintenance of transformations and mappings,visualization of data flows in the mappings, automatic documentation generation, andcustomization of the generated code. The main objects handled through it are Modelsand Projects.
The Operator Navigator is the production management and monitoring tool. It'sdesigned for IT production operators. Through it you can manage your executions inthe sessions, as well as the scenarios in production.
The Security Navigator is the tool for managing the security information in ODI.Through it you can create users and profiles and assign user rights for methods ongeneric objects, and fine-tune these rights on the object instances.
Chapter 1Oracle Data Integrator Repositories
1-2
The Oracle Data Integrator User Interface
Oracle Data Integrator Run-Time AgentAn overview of Oracle Data Integrator's Run-Time Agent.
At design time, developers generate scenarios from the business rules that they havedesigned. The code of these scenarios is then retrieved from the repository by theRun-Time Agent. This agent then connects to the data servers and orchestrates thecode execution on these servers. It retrieves the return codes and messages for theexecution, as well as additional logging information - such as the number of processedrecords, and execution time - in the repository.
The Agent comes in three different flavors, standalone Agent, standalone ColocatedAgent, and Java EE Agent. The standalone agent is more appropriate when you needto use a resource that is local to one of your data servers, and you do not want toinstall a Java EE application server on this machine. Standalone colocated agents canbe installed on any server with a Java Virtual Machine installed, but require aconnection to the WebLogic Administration Server. This type of agent is moreappropriate when you need to use a resource that is local to one of your data serversbut you want to centralize management of all applications in an enterprise applicationserver. A Java EE agent is deployed as a web application in a Java EE applicationserver, and can benefit from all the features of the application server. This type ofagent is more appropriate when there is a need for centralizing the deployment andmanagement of all applications in an enterprise application server, or when you haverequirements for high availability.
Oracle Data Integrator Agents
Oracle Data Integrator Data ServersLearn about Data Servers in Oracle Data Integrator.
The physical components that store and expose structured data in Oracle DataIntegrator (ODI) are defined as data servers. Each data server is always linked to asingle technology. It stores information according to a specific technical logic, which isdeclared in the physical schemas attached to it. Every database server, JMS messagefile, group of flat files, or other form of data source or target, that is used in ODI, mustbe declared as a data server. Similarly, every schema, database, JMS Topic, and soforth used in ODI, must be declared as a physical schema.
Data Servers
Oracle Data Integrator ModelsAn overview of Oracle Data Integrator models.
A model is the description of a set of datastores. It corresponds to a group of tabulardata structures stored in a data server. A model is based on a Logical Schema definedin the topology. In a given Context, this Logical Schema is mapped to a physicalschema. The data schema of this physical schema contains physical data structure:tables, files, JMS messages, elements from an XML file, that are represented asdatastores. Models, as well as all their components, are based on the relationalparadigm (table, attributes, keys, and so on). Models in Oracle Data Integrator only
Chapter 1Oracle Data Integrator Run-Time Agent
1-3
contain metadata - that is, the description of the data structures. They do not contain acopy of the actual data.
To automatically populate datastores into the model, you reverse-engineer the model.A standard reverse-engineering uses the capacities of the JDBC driver used toconnect the data server to retrieve the model metadata. A customized reverse-engineering uses a reverse-engineering Knowledge Module (RKM), to retrievemetadata for a specific type of technology and create the corresponding datastoredefinition in the data model.
Models
Oracle Data Integrator DatastoresAn overview of Oracle Data Integrator Datastores.
A datastore is a data structure that can be used as a source or a target in a mapping.It can be a table stored in a relational database, a Hive table in a Hadoop cluster, anASCII or EBCDIC file (delimited, or fixed length), a node from a XML file, a JMS topicor queue from a Message Oriented Middleware, a node from a enterprise directory, oran API that returns data in the form of an array of records. Regardless of theunderlying technology, all data sources appear in Oracle Data Integrator in the form ofdatastores that can be manipulated and integrated in the same way. The datastoresare grouped into data models.
Data Stores
Oracle Data Integrator Data FlowAn introduction to data flow in Oracle Data Integrator.
Business rules defined in the mapping are automatically converted into a data flow thatcarries out the joins, filters, mappings, and constraints from source data to targettables.
By default, Oracle Data Integrator (ODI) uses the Target RDBMS as a staging area forloading source data into temporary tables and applying all the required mappings,staging filters, joins and constraints. The staging area is a separate area in theRDBMS (a user/database) where ODI creates its temporary objects and executessome of the rules. When performing the operations this way, ODI uses an E-LTstrategy as it first extracts and loads the temporary tables and then finishes thetransformations in the target RDBMS.
In cases when source volumes are small (less than 500,000 records), the staging areacan be located in ODI's In-Memory Engine - its own in-memory relational database.ODI then behaves like a traditional ETL tool.
Data Flow
Oracle Data Integrator Integration ProjectsAn introduction to integration projects in Oracle Data Integrator.
An integration project is composed of several types of components. Thesecomponents include organizational objects, such as folders, procedures, andpackages, and development objects such as mappings, sequences, and variables. A
Chapter 1Oracle Data Integrator Datastores
1-4
project's components can be defined in the project and/or global componentsreferenced by the project. Also, a project can use components defined in the modelsand the topology.
The package is a large unit of execution in ODI. A package is made up of a sequenceof steps organized into an execution diagram. Each step can either succeed or fail itsexecution. Depending on the execution result (success or failure), a step can branch toanother step.
When a package, mapping, procedure, or variable component has been fullydeveloped, it's compiled in a scenario. A scenario is the execution unit for productionenvironments. Scenarios can be scheduled for automated execution.
Projects
Packages
Procedures
Oracle Data Integrator MappingsAn overview of Oracle Data Integrator Mappings.
A mapping connects sources to targets through a flow of components such as Join,Filter, Aggregate, Set, Split, and so on. A mapping references the Knowledge Modulesthat will be used to generate the integration process. A mapping is made up of thesource and target datastores. Optionally, you can use datasets within mappings asdata sources. A dataset is a logical container organizing datastores by an entityrelationship declared as joins and filters, rather than the flow mechanism usedelsewhere in mappings.
Reusable mappings are modular, encapsulated flows of components which you cansave and re-use. You can place a reusable mapping inside another mapping, oranother reusable mapping (reusable mappings can be nested). A reusable mappingcan also include datastores as sources and targets, like other mapping components.
Mappings
Oracle Data Integrator Knowledge ModulesAn overview of Oracle Data Integrator Knowledge Modules.
Knowledge Modules (KM) implement "how" the integration processes occur. There aresix Knowledge Module types, each referring to a specific integration task:
• Reverse-engineering metadata from the heterogeneous systems for Oracle DataIntegrator (RKM). See Creating and Using Data Models and Datastores inDeveloping Integration Projects with Oracle Data Integrator.
• Journalizing Knowledge Modules handling Changed Data Capture (CDC) on agiven system (JKM). See Using Journalizing in Developing Integration Projectswith Oracle Data Integrator.
• Integrating Knowledge Modules (IKM) are used in mappings, to integrate data in atarget system, using specific strategies (insert/update, slowly changingdimensions). See Creating and Using Mappings in Developing Integration Projectswith Oracle Data Integrator.
Chapter 1Oracle Data Integrator Mappings
1-5
• Controlling Knowledge Modules, control data integrity on the data flow (CKM) in adata model's static check and mappings flow checks. See Creating and UsingData Models and Datastores in Developing Integration Projects with Oracle DataIntegrator.
• Loading Knowledge Modules (LKM) load data from one system to another, usingsystem-optimized methods. These KMs are used in mappings. See Creating andUsing Mappings in Developing Integration Projects with Oracle Data Integrator.
• Service Knowledge Modules (SKM) expose data in the form of web services. See Creating and Using Data Services in Administering Oracle Data Integrator.
A Knowledge Module is a code template for a given integration task. At run time,Oracle Data Integrator sends this code for execution to the source and target systems.Knowledge Modules are also fully extensible. Their code is open and can be editedthrough a graphical user interface.
Knowledge Modules
Oracle Data Integrator ScenariosLearn about Oracle Data Integrator Scenarios.
In Oracle Data Integrator (ODI), you can generate scenarios for packages,procedures, mappings, and variables. Scenarios are saved to the development workrepository, which you can export to other development or execution repositories. Youcan run them from ODI Studio, or from the command line.
Scenarios
Oracle Data Integrator Load PlansAn introduction to load plans in Oracle Data Integrator.
When Oracle Data Integrator is used to populate very large data warehouses, it'scommon to have thousands of tables populated by using hundreds of scenarios. Theexecution of these scenarios must be organized in such a way that data throughputfrom the sources to the target is the most efficient within the batch window. Load planshelp to organize the execution of scenarios in a hierarchy of sequential and parallelsteps for these types of use cases. They provide features for parallel, sequential, andconditional scenario execution, restartability, and exception handling. Load plans canbe created and modified in production environments.
Load Plans
Oracle Data Integrator ConsoleAn overview of the Oracle Data Integrator Console.
Oracle Data Integrator Console allows you to manage and monitor Oracle DataIntegrator run-time architecture, and browse run-time objects in a web-based console.It integrates with Oracle Fusion Middleware Console allowing Fusion Middewareadministrators access to details of the Oracle Data Integrator sessions andcomponents.
Console
Chapter 1Oracle Data Integrator Scenarios
1-6
2Create Repositories and Connections forOracle Data Integrator
Learn about master and work repositories in Oracle Data Integrator (ODI) and how tocreate them. Also learn about ODI connections and how to create them using therepositories.
Topics
• How to Create the Repositories
• Create a Connection
How to Create Master and Work RepositoriesFollow the steps to create a master and one or more work repositories for Oracle DataIntegrator.
1. Use the Repository Creation Utility to create the repositories. The executable is inthe oracle_common/bin directory in the Fusion Middleware home; launch it.
2. The first screen is just a welcome screen. Click Next.
3. Accept the default values and click Next.
4. Specify the database connection details. Once entered, you can see a dialog boxshowing the progress of the three checks carried out on the database, makingsure it is suitable.
5. Select the repository components to install. Some are selected by default. Makesure you select the Master and Work repository option. Click Next.You can now see a dialog box showing the progress of the checks carried out onthe prerequisites for the components you selected.
6. If all the prerequisite checks pass, then enter the password for the schema usersfor the repositories. It's easiest to use the same passwords for all schemas,however, make sure you choose the option that conforms to your companysecurity policy. Click Next.
7. Enter the password for the Supervisor user, what type the work repository is, itsname and the password for its user. Also specify the encryption algorithm. ClickNext.
8. Map the tablespaces. This is where you specify the name of the schema owners,and the default and temporary tablespace names for each component. You canaccept the default names, or choose to specify your own. Click Next.
9. The penultimate screen summarizes your selections, and from here, you createthe repositories. Click Create. Note that it takes several minutes to create all therepositories.
10. Click Close after you have reviewed the summary of the repositories justcreated. .
2-1
Once you have created a master repository and at least one work repository, you thencreate a connection, log in to ODI, and connect to these repositories: Create aConnection
The OBE, Oracle Data Integrator 12c - Creating and Connecting to ODI Master andWork Repositories, gives detailed steps of how to create your master and workrepositories.
Create a ConnectionFollow the steps to create a connection to Master and Work repositories in OracleData Integrator.
Once you have a master repository and a work repository, you can create aconnection in Oracle Data Integrator (ODI).
1. Start ODI Studio, and click Connect to Repository.
2. Enter Wallet Password if you are using the wallet. Enter the wallet password. ClickOK.
3. Click New in the Oracle Data Integrator Login window.The Repository Connection Information dialog displays.
4. Enter a name for the Login.
5. Enter Supervisor as the user, and the password for it. (Note, it's what you enteredwhen creating the repositories).
6. Enter the database connection details for the master repository.
7. Select work repository and enter the name of the one you just created.
8. Test the connection, and assuming it is fine, create the connection.
9. Now you can log into ODI.
See Connecting to the Master Repository in Installing and Configuring Oracle DataIntegrator.
Chapter 2Create a Connection
2-2
3The Oracle Data Integrator User Interface
A brief explanation of the user interface of the Oracle Data Integrator including thedifferent navigators and menu items. There are four navigators, Topology, Designer,Operator and Security.
Topics
• The Topology Navigator
• The Designer Navigator
• The Operator Navigator
• The Security Navigator
• Menu Items
The Topology NavigatorLearn about the topology navigator in Oracle Data Integrator.
Topology contains sections in which to define the physical architecture, the contextsand the logical architecture. Starting with Context, this is where you define the context,or say, the type of system you are running on. So it might be a test, development orproduction system, or it might be global or for a particular region. You specify one ofthe contexts as the default.
In Physical Architecture there are two nodes you can expand, Technologies andAgents. As you might expect, Agents is where you define the agents, which OracleData Integrator (ODI) uses to run jobs. Under technologies you can find all thepossible data sources for ODI. In each one you can define data servers and thephysical schemas or files to which you would connect. For example, under Oracle, youmight define a data server as being a particular Oracle database, and for it you candefine the schema to which you connect. The data sources don't just includedatabases, you can define flat, complex and XML files, Big Data, and applicationssuch as from SAP or Hyperion as data sources.
Under Logical architecture you have a duplicate of what is defined in the physical, buthere you specify the context for each logical item. If you have defined three contexts(say Development, Test and Production), then you create a logical data server in eachcontext to correspond to the physical data server. Similarly for each physical agentthere is a logical agent for each context.
You can specify the languages and various elements within them. For example, if youimport SQL as a language, then you can group functionality as sub-languages, forexample, aggregation, and then have individual aggregate functions (for exampleAVG, COUNT) defined as part of the aggregation sub-language.
You can view the properties of the repositories, both master and work, that are open.You can erase the work repository and create a new one.
3-1
The final section in the Topology navigator allows you to view generic actions, forexample, Create Table, and import or create new ones.
See Overview of Oracle Data Integrator Topology in Developing Integration Projectswith Oracle Data Integrator.
See Topology Navigator in Understanding Oracle Data Integrator.
The Designer NavigatorLearn about the Designer navigator in Oracle Data Integrator.
The Designer navigator is where you build your projects, models, load plans, andscenarios. There is a menu of five expandable sections entitled Projects, Models, LoadPlans and Scenarios, Global Objects and Solutions. To the side of these is a spacewhere the object definitions and properties are displayed.
Under Projects you can build your projects, which include packages, mappings,procedures, variables, sequences, user functions, and markers. You also can importand edit knowledge modules.
Under Models you can define and build new models and data stores, includingreverse-engineering the models.
Under Load Plans and Scenarios you can define and edit load plans and scenarios.Load Plans are objects that organize the execution of packages and scenarios at ahigh level. They provide features for restarting, exception handling, parallel,sequential, and conditional scenario execution. Each load plan is made up of steps,and these steps are made up of scenarios, or choose other objects (packages,interfaces, variables, and procedures), for which ODI automatically generates ascenario to run the step. Scenarios can also be run and scheduled and are made up ofthe same objects as load plans.
Under Global Objects you can define objects that are can be used in any procedure.For example, variables, sequences, templates, user functions, reusable mappings,markers and knowledge modules.
See Designer Navigator in Understanding Oracle Data Integrator.
The Operator NavigatorLearn about the Operator Navigator in Oracle Data Integrator
When you run an object, for example, scenario or load plan, in Oracle Data Integrator,you can follow its progress and on completion confirm whether it succeeded or failedin the Operator Navigator. Expand the Session List and then choose to view or findexecutions by date, agent, sessions, status keywords, or user. Or just view allexecutions. Find your execution and expand the hierarchy. Each step shows whether itsucceeded or failed. A step might succeed, but with a warning. You can view thedetails of each step, the code run, or the error generated, for example.
Each execution is listed by the object name followed by a date and time stamp. Thatway you can make changes to the object you want to run and easily see the results foreach change.
See Introduction to Operator Navigator in Administering Oracle Data Integrator.
See Operator Navigator in Understanding Oracle Data Integrator.
Chapter 3The Designer Navigator
3-2
The Security NavigatorLearn about the Security Navigator in Oracle Data Navigator.
There are three sections, Profiles, Users, and Objects. Profiles contain sets ofprivileges for working with Oracle Data Integrator. A user is an Oracle Data Integratoruser. A user inherits all the privileges granted to its various profiles, and privileges onobjects or instances, given to this user. Objects include agents, projects, models, datastores, scenarios, mappings, and even repositories. You can grant users withprivileges on instances on specific work repositories. For example, you may grant adeveloper user with the edit privilege on a scenario on the development repository andnot on the production repository. You can thus assign privileges on methods, objectstypes, or specific object instances to users.
See Security Navigator in Understanding Oracle Data Integrator.
Menu ItemsA short description of each of the menu items in Oracle Data Integrator.
Each of the main menu items in Oracle Data Integrator (ODI) is described below.
• File - usual functions, for example, New, Print, Exit.
• Edit - usual edit functions such as Cut, Copy, Paste.
• View - you can show the Editor and select Toolbars to display.
• Search - usual find functions, plus one to Find ODI Object.
• ODI - ODI-specific functions. Connect and Disconnect allow you to connect to arepository and disconnect from it, plus view the repository connection information.You can change the repository and wallet passwords and specify how to storepasswords. You can switch authentication mode or repository compatibility mode.You can add, remove, or open tools, find locked objects and browse the versionsof objects. You can view data, perform Change Data Capture functions, generateDDL, mappings, scenarios, services, or a server template. Finally you can reverseengineer a model.
• Tools - There are five options: Manage libraries, Quick Actions, DisplayPreferences, HTTP Analyzer, and a Groovy editor.
• Window - You can access lots of ODI functionality, for example, open the fournavigators, the debugger, logs and adjust the windows layouts.
• Team - You can access functionality which helps members of a team work on thesame repository and then merge or version objects.
• Run - You can run ODI objects, for example sequences or procedures, but debugthem, by invoking a debug session or adding breakpoints.
• Help - includes the usual Help functions, plus links to the ODI forum and OTN.
There are also Accessibility Features in ODI to assist those with disabilities in usingand navigating the product.
Chapter 3The Security Navigator
3-3
4Oracle Data Integrator Agents
Learn about Oracle Data Integrator Agents, what they are and how to create them.
Topics
• What is an Oracle Data Integrator Agent?
• How to Create an Agent
What is an Oracle Data Integrator Agent?Learn what an Oracle Data Integrator Agent is.
There are three agents, stand-alone, stand-alone collocated, and Java EnterpriseEdition. A more detailed explanation is available in Run-Time Agent in UnderstandingOracle Data Integrator.
Agents are multi-threaded java programs that support load balancing and can bedistributed across the information system. They hold their own execution schedule,which can be defined in Oracle Data Integrator (ODI), or they can be called from anexternal scheduler. Also they can be invoked from a Java API or a web service.
To be able to run jobs in ODI, you must have an agent configured and running. Thatrequires the WebLogic domain to be configured correctly.
How to Create an AgentA summary of the steps required to create an agent.
Once the domain is configured, you can create an agent.
1. In the Topology navigator, expand Physical Architecture and right click Agent.
2. Select New Agent. In the agent Definition enter a name for it and the host nameand port on which it listens. Save it. (Leave the window open for later.)
3. Expand Logical Architecture and right click Agent.
4. Select New Agent. In the agent Definition enter a name for it
5. Specify the physical agent for each context. Save it.
6. Re-start the Administration server, (this assumes the Administration and Managedservers are not running).
7. Log into WebLogic console, once the Administration server has started, to updatethe Oracle Coherence parameters.
8. Expand the Environment node in the Domain Structure panel. Click CoherenceClusters.
9. Click DataGridConfig in the Coherence Clusters table.
4-1
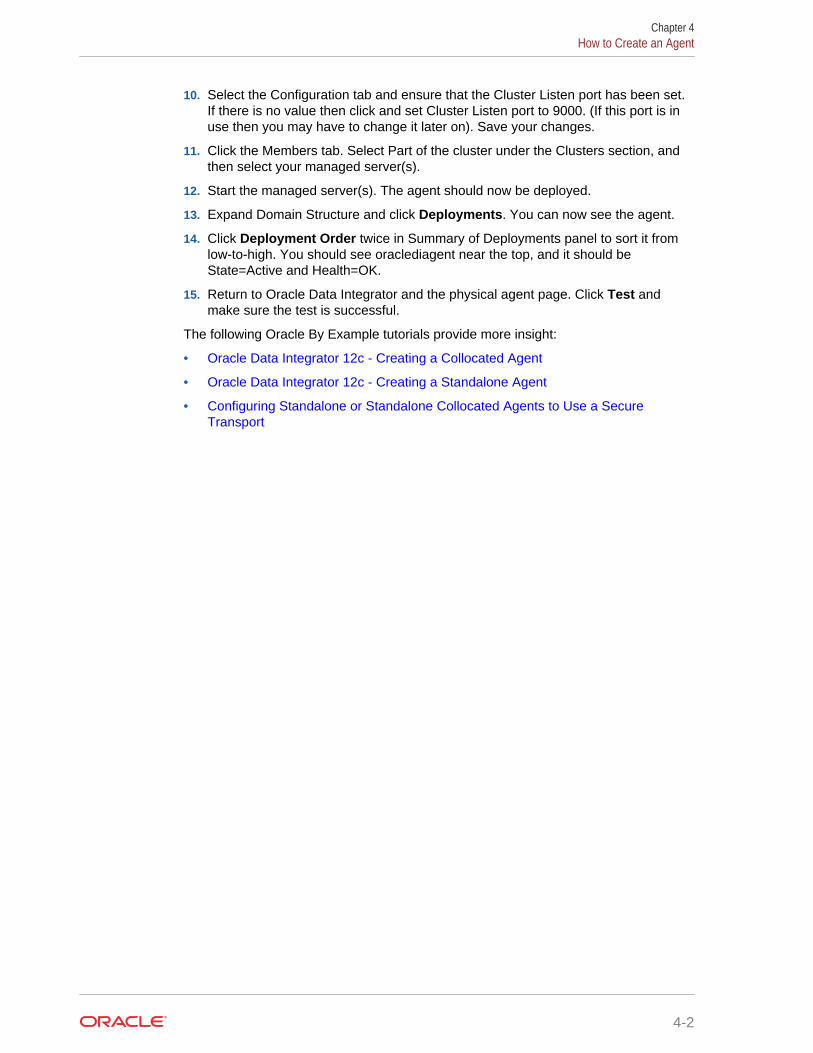
10. Select the Configuration tab and ensure that the Cluster Listen port has been set.If there is no value then click and set Cluster Listen port to 9000. (If this port is inuse then you may have to change it later on). Save your changes.
11. Click the Members tab. Select Part of the cluster under the Clusters section, andthen select your managed server(s).
12. Start the managed server(s). The agent should now be deployed.
13. Expand Domain Structure and click Deployments. You can now see the agent.
14. Click Deployment Order twice in Summary of Deployments panel to sort it fromlow-to-high. You should see oraclediagent near the top, and it should beState=Active and Health=OK.
15. Return to Oracle Data Integrator and the physical agent page. Click Test andmake sure the test is successful.
The following Oracle By Example tutorials provide more insight:
• Oracle Data Integrator 12c - Creating a Collocated Agent
• Oracle Data Integrator 12c - Creating a Standalone Agent
• Configuring Standalone or Standalone Collocated Agents to Use a SecureTransport
Chapter 4How to Create an Agent
4-2
5Data Servers
Learn what a data server is and how to create one.
Topics
• What is a Data Server?
• How to Create a Data Server
What is a Data Server?A brief description of what a data server is in Oracle Data Integrator.
Data Servers are defined in the Topology navigator. Each data server represents atechnology, be that a database, a file type, or an application. For databases andapplications, the data server logs in as a particular user on a particular instance; butyou can define more than one user in a data server. For files, the data serverrepresents the file type (for example, flat, complex, XML) and also the file name anddirectory. For each data server defined in physical architecture, you must define one inthe logical architecture. For each context in the logical data server, you must specify aphysical data server.
You use data servers to identify data sources and the targets (where the data isloaded).
How to Create a Data ServerFollow these steps to create a data server in Oracle Data Integrator.
First create the physical data server. This example assumes the technology is Oracle.
1. Click the Physical Architecture bar. Expand the Technologies node, scroll downand right-click the Oracle node.
2. Select New Data Server. In the resulting Definition page enter the data server'sName, Instance, system user name and system user password.
3. Click the JDBC tab. Click Search to the right of the JDBC Driver field. In theDrivers dialog box, select Oracle JDBC Driver and click OK.
4. Click Search, to the right of the JDBC URL field. In the URL examples dialog box,select the first URL in the Name list and click OK. If necessary, edit the JDBC URLas appropriate for your environment.
5. Click Test Connection. In the Confirmation dialog box, click Yes to confirm savingyour data before testing the connection.
6. Click OK in the Information dialog box that displays.
7. In the Test Connection dialog box, click Test. Acknowledge the connection test assuccessful. (If not successful, correct the connection details.)
Create a physical schema for your data server.
5-1
1. Right-click the newly-created data server, and select New Physical Schema.
2. Select the schema name from the Schema (Schema) drop-down list in the newwindow that appears, then select the appropriate name from the Schema (WorkSchema) drop-down list.
3. Click the Default check box, if this is to be the default schema for this data server.
4. Click Yes in the Confirmation dialog box that displays. Leave all the other fieldsunchanged. Click Save.
5. Click OK in the Information dialog box that displays.
6. Expand the data server hierarchy and confirm that the physical schema has beenadded to the data server.
Create a Logical Schema.
1. Select the Logical Architecture tab and expand the Technologies node in theTopology Navigator.
2. Right-click the technology you are using (in this example, it is Oracle), and selectNew Logical Schema.
3. Enter the name of the Logical Schema in the Definition page that displays.
4. Map it to a physical schema for each context. Save your logical schema.If instead of Oracle, the technology is a file, at this point you do not select thephysical schema for the context, but, instead, select the physical file.
See Creating a Data Server in Administering Oracle Data Integrator.
Chapter 5How to Create a Data Server
5-2
6Models
Learn about data models and reverse-engineering in Oracle Data Integrator, and howto create a model or define reverse-engineering.
Topics
• What are Models?
• What is Reverse-Engineering
• Create a Model
• Define a Reverse-Engineering Strategy
What are Models?Learn about models in Oracle Data Integrator.
A model in Oracle Data Integrator (ODI) is a description of a relational data model. It'sa representation of the structure of a number of interconnected datastores stored in asingle schema on a particular technology. The model in ODI does not, however, holddata, such as banking figures or names of customers. Instead, it holds only metadata:the names of columns, and the constraints that exist between tables. This metadatacan be imported automatically into ODI by a process called reverse-engineering. Youcan also define the metadata manually, creating columns or constraints directly in ODI.These additions do not necessarily exist in any physical database table.
See Introduction to Models in Developing Integration Projects with Oracle DataIntegrator.
What is Reverse-EngineeringLearn about reverse-engineering in Oracle Data Integrator, what it is and when youwould use it.
Reverse-engineering is a completely automated process in ODI for retrieving metadatafrom a database. It can be used to create new models or to fill in gaps in existingmodels. ODI can perform reverse-engineering in two ways, Standard and Customized.Standard reverse-engineering uses the standard capabilities of the JDBC API. ODIqueries the JDBC driver for information about table structures, foreign keys, and so on.It then writes these to the ODI repository, where all metadata is stored. Although it'stechnically independent of the technology being used, standard reverse-engineeringrequires a sufficiently capable JDBC driver. Customized reverse-engineering is quitedifferent. In this case, ODI connects to the database by using the basic features of theJDBC driver and directly queries the system tables to retrieve the metadata. It thentransforms and writes this metadata into the ODI repository. Naturally, the method fordoing this varies greatly depending on the technology that is being reverse-engineered. Thus, for each technology, there is a specific Reverse-engineering Knowledge Module (RKM). This RKM tells ODI how to extract metadata for the giventechnology.
6-1
In addition to standard and customized reverse-engineering for databases, you canreverse-engineer files:
• Delimited files contain data separated by a delimiter, such as a comma or tabcharacter. ODI can parse the file content directly and determine the number ofcolumns and their name depending on the file header.
• Fixed format files allocate a specific length to each field, rather than using adefined delimiter between fields. They are reverse-engineered with a differentmethod.
To collect metadata for these fields, you require a description of the fields in theCOBOL copybook format. ODI can parse this type of file natively. ODI can alsoreverse-engineer metadata in XML files through standard reverse-engineering. ODIuses the ODI JDBC driver for XML to access them like any other data source.Similarly, lightweight directory access protocol (LDAP) directories can be reverse-engineered by using the standard method. Here, ODI uses the ODI JDBC driver forLDAP. You should, therefore, consider XML files and LDAP directories as normaldatabases for the purpose of reverse-engineering.
See Reverse-engineering in Developing Integration Projects with Oracle DataIntegrator.
Create a ModelFollow these steps to create a data model in Oracle Data Integrator.
The basic procedure to create a model in ODI is as follows:
1. Create and set up an empty model.
2. Define the reverse-engineering strategy that ODI follows. This includes selecting aKnowledge Module and setting up other parameters. In particular, you mustchoose between standard and customized reverse-engineering.
3. Tell ODI to run the reverse-engineering process by using the strategy that youdefined.If you use standard reverse-engineering, you can choose to import only certainmetadata. This is known as performing a selective reverse.
4. Flesh out the model that you have reverse-engineered.This means that you add information that was not retrieved during the reverse-engineering process. For example, you add datastores, columns, constraints, orODI-specific metadata.
The basic steps in creating and naming a model are as follows:
1. Select the Models view.You can choose to create the model in selected model folder or you can create atop-level model.
2. Click the New Model icon.The window for the new model appears.
3. Enter the name of your model.Like most objects in ODI, there is also a code to enter. By default, this is the sameas the name, but uppercase with underscores instead of spaces.
4. Specify the technology of the underlying database in this field.A model must be linked to a specific technology.
Chapter 6Create a Model
6-2
5. Specify the logical schema to which the model belongs from the drop-down list.You later specify a context, which determines the physical schema that is be usedas the source of the metadata.
6. Enter a description for your model.
See Creating a Model in Developing Integration Projects with Oracle Data Integrator.
Define a Reverse-Engineering StrategyLearn the steps to standard or custom reverse-engineering in Oracle Data Integrator.
To define a reverse-engineering strategy in ODI, perform the following steps:
1. Click the Reverse Engineer tab in the model window.
2. Select the reverse-engineering type to be used.The standard mode requires a JDBC driver, which provides metadata for thespecific technology. The customized mode requires a specific ODI KnowledgeModule to directly access the system tables. This choice causes some differencesin the reverse-engineering process, as is discussed.
3. Select the reverse-engineering context.Remember you previously defined only a logical schema, which describes wherethe model fits in the logical architecture. However, this logical schema mightcorrespond to several physical schemas in different physical contexts, such asdevelopment, testing, and production.
By selecting the context, you specify which one of those physical schemas is to beused to provide metadata for the model. You should therefore select the contextthat best conforms to the structure of the model that you want to create.
4. To start the reverse-engineering process, right-click the model, and then selectReverse Engineer.Reverse-Engineering Knowledge Modules (RKMs) are used to performcustomized reverse-engineering of data models for a specific technology.Customized reverse-engineering is more complete and entirely customizable, butalso more complex to run. RKMs are provided only for certain technologies.
To perform customized reverse-engineering by using an RKM, perform the followingsteps:
1. Click the Reverse Engineer tab of the model.
2. Select the Customized option button and fill in the following fields:
• Context: the context used for the reverse-engineering process
• Object Type: the type of objects to reverse-engineer (tables, view, and so on)
• Mask: %
• Select the Knowledge Module: “<Project_Name>.<Project_Folder>” forexample, “Knowledge Module: HandsOnLabs.HandsOnLoads”
3. Click the Reverse button, and then click Yes to validate the changes. Click OK.
4. Click OK in the “session started” dialog box.
If you use standard reverse-engineering, you can individually select the tables toreverse-engineer. To do so, perform the following steps:
1. Click the Selective Reverse-Engineering tab.
Chapter 6Define a Reverse-Engineering Strategy
6-3
2. Select the Selective Reverse-Engineering check box; this enables the next fewoptions.
3. Select the New Datastores check box to reverse-engineer the datastores that donot exist in your model.Select the Existing Datastores check box to select the datastores that exist inyour model. Selecting both options selects all datastores for reverse-engineering.
4. Select the Objects to Reverse Engineer check box to select the individualdatastores that you want to include.The datastores that are displayed depend on the New Datastores and ExistingDatastores options that you just selected.
5. Select (with a check mark) the datastore that you want to include in the reverse-engineering process.
6. Click the Reverse button to launch the process.
You can manually add, remove, or edit any element of a model by using the ODImapping. This includes creating datastores, columns, keys, and so on. You can do thisthrough the Designer Navigator. Note that these changes are applied only to themodel in ODI, they do not update the underlying model in the database. To editmodels graphically, you can edit the model’s diagram, a graphical depiction of themodel and the relationship between its elements. You can drag and drop elements todefine new relationships. This component also enables ODI to modify the model in theoriginal database with your changes. Thus, you can create your model in ODI, andthen generate the code to implement this on a database server.
See Reverse-engineering a Model in Developing Integration Projects with Oracle DataIntegrator.
Steps 1.5 and 2.4 in the OBE Oracle Data Integrator 12c - Creating an ODI Projectand Mapping: Flat File to a Table also take you through how to create and reverse-engineer a model.
Chapter 6Define a Reverse-Engineering Strategy
6-4
7Data Stores
Learn about data stores, what they are and how to create them.
Topics
• What are Datastores
• Create a Datastore
What are DatastoresLearn what datastores are in Oracle Data Integrator.
A datastore in Oracle Data Integrator (ODI) is a data structure, for example a table in arelational database, or a JMS topic from a Message-Oriented Middleware, that can beused in a mapping as a source or target. All datasources in ODI, regardless of theunderlying technology, appear as datastores, and can be manipulated and integratedin the same way. The datastores are grouped in data models, which contain alldeclarative rules and constraints.
See Datastores in Developing Integration Projects with Oracle Data Integrator.
Create a DatastoreLearn how to create a datastore in Oracle Data Integrator.
The easiest and most common way to create a datastore in ODI is by reverse-engineering its structure from the technology (for example, Oracle or MySQLdatabase). However, you can create datastores in two other ways:
• Directly in the model.
• By using the Common Format Designer component.
In these cases, the datastores do not necessarily have to exist in the data server. Thiscan be useful for creating a new text file with a structure that you define.
To create a datastore directly in a model, perform the following steps:
1. Select a model.
2. Right-click and select New Datastore.The Resource Name field refers to the physical name of the table in a database orthe name of the file for a file-based datastore. If you use a mapping to create thisdatastore in a database, the resource name is the name of the table that isgenerated. The alias, on the other hand, is the name that you use to refer to thedatastore in mappings, joins, and so on.
3. Set the name. This is the name that is displayed in ODI in the Model tree view.Often, this is similar to the resource name.
4. Provide a description for the datastore (optional).
7-1
After you set up the basic parameters, you may want to add columns to the definition.To do this, perform the following steps:
1. Click the Attributes tab.
2. Click the Add Column icon to add another column.
3. Define properties for each column.The meanings of the Name, Type, Logical length, and Scale options depend onthe technology of the model. Not Null means that the field is mandatory. You canset other properties in the columns by double-clicking their names in the Modelsview.
4. Reorder the newly-added columns using the up and down arrows.
See Creating and Reverse-Engineering a Datastore in Developing Integration Projectswith Oracle Data Integrator.
Chapter 7Create a Datastore
7-2
8Data Flow
Learn about data flows in Oracle Data Integrator.
Topics
• What is a Data Flow
What is a Data FlowLearn what is a data flow in Oracle Data Integrator.
A data flow is the automatic conversion of the business rules that were defined in amapping. It carries out the joins, filters, mappings, and constraints from source data totarget tables.
By default, Oracle Data Integrator (ODI) uses an Extract Load Transform (E-LT)strategy as it first extracts and loads the temporary tables and then finishes thetransformations in the target relational database. It uses the target database as astaging area for loading source data into temporary tables before applying all therequired mappings, staging filters, joins and constraints. Staging is a separate area inthe relational database (either a schema or database) where ODI creates itstemporary objects and executes some of the rules, for example, mappings, joins, finalfilters, and aggregations. The business rules are transformed into code by KnowledgeModules.
If source volumes are small (less than 500,000 records), the staging area can belocated in ODI's In-Memory Engine (its in-memory relational database). In this case,ODI behaves like a traditional Extract Transform Load (ETL) tool.
See Data Flow in Understanding Oracle Data Integrator.
8-1
9Projects
Find out about projects in Oracle Data Integrator and how and when to create them.
Topics
• Projects and Folders
• Create Projects and Folders
Projects and FoldersLearn about projects and folders in Oracle Data Integrator.
A project is a collection of ODI objects created by users for a particular functionaldomain. However, only certain objects can belong to projects. Similarly, certain objectsalways belong to projects. Packages, procedures, and mappings always belong tofolders, and folders always belong to projects. Variables, sequences, and userfunctions either belong to projects or can be created with global scope. KnowledgeModules (KMs) either belong to projects or can be imported with global scope. Alsosome KMs are considered built-in (neither project nor global). Markers always belongto a project.
A folder is a hierarchical grouping beneath a project and can contain other folders andobjects. Every package, mapping, or procedure must belong to a folder.
When should you create folders? One guideline is to create a folder per “package” orscenario. Thus, all mappings that are used in the same package are grouped together.The folder represents all that is necessary for a given execution unit. As a result,maintenance is typically simplified.
It's not always easy to know when to create a project or when to create a subfolderwithin the same project. As a general rule, if you have a new functional domain or arestarting an integration project, you should create a new project. Also, if you specificallywant to keep objects separate from each other, you should create them in separateprojects. On the other hand, a folder is useful when you want to organize an existingproject. When you have a large number of mappings, procedures, or packages in aproject, you should consider grouping them into folders. You can also use folders toset up different security levels within the same project. Each folder can have its ownunique privileges. Remember that projects do impose strict boundaries on informationsharing. This means that objects created in one project cannot be used by anotherproject. If you want to enable an object to be used by other projects, you should makethe object global. Thus, you enable the global variables, sequences, KnowledgeModules, and user functions to be used by any project. Folders, however, do notimpose boundaries. Thus, objects in one folder can be used by any other objects in aproject.
See Introduction to Integration Projects in Developing Integration Projects with OracleData Integrator.
See Organizing Projects with Folders in Developing Integration Projects with OracleData Integrator.
9-1
Create Projects and FoldersLearn the steps to create a project, or create a folder in Oracle Data Integrator.
To create a new project in ODI, perform the following steps:
1. In the Designer Navigator, select New Project from the drop-down menu at thetop of the Projects view.
2. Name the project.You should generally make it reflect the functional domain that it covers.
3. Change the code to anything you like. (optional)Even though the code is generated in UPPERCASE it doesn't have to remain thatway.
The code is used as a prefix when referring to the variables created within thisproject.
Default marker sets are automatically added to your blank project. Similarly, a folder iscreated automatically to hold the mappings, packages, and procedures that youdevelop.
You can create folders within projects or within other folders as subfolders. To create anew folder, perform the following:
1. Right-click the project or folder where you want to create the new folder.
2. Select Insert Folder from the context menu.
3. Give a name to the folder.
After the folder is created, you can drag it to other folders, or onto the parent project, toreorganize the structure of your project.
See Creating a New Project in Developing Integration Projects with Oracle DataIntegrator.
See Organizing Projects with Folders in Developing Integration Projects with OracleData Integrator.
Chapter 9Create Projects and Folders
9-2
10Mappings
Learn about Mappings in Oracle Data Integrator and how to create them.
Topics
• What are Mappings
• Create Mappings
What are MappingsFind out what Mappings are in Oracle Data Integrator.
Mappings in Oracle Data Integrator (ODI) are the logical and physical organization ofyour data sources, targets, and the transformations through which the data flows fromsource to target. A mapping connects sources to targets through a flow of componentssuch as Join, Filter, Aggregate, Set, Split, and so on. A mapping also references theKnowledge Modules (code templates) that are used to generate the integrationprocess. Each of the sources and targets is represented by a datastore. Businessrules define how the data progresses from source to target and the manipulations thatoccur along the way. You define the business rules in natural language and using ODItranslate them into SQL. You can save mappings as reusable mappings to use againin different mappings.
Mappings are made up of several parts, datastores, datasets, re-usable mappings,connectors, knowledge modules, variables, sequences, user functions, and othercomponents. Optionally, you can specify a staging schema.
You create and manage mappings using the mapping editor, which opens wheneveryou open a mapping. Mappings are organized in folders under individual projects,found under Projects in the Designer Navigator.
See Introduction to Mappings in Developing Integration Projects with Oracle DataIntegrator.
See Reusable Mappings in Developing Integration Projects with Oracle DataIntegrator.
Create MappingsLearn how to create a mapping in Oracle Data Integrator.
To create a new mapping:
1. Go to the Designer Navigator, expand the project and folder where you want tocreate the mapping and select the Mappings node.
2. (optional) Select Create Empty Dataset if you want the new mapping to contain anew empty dataset.
10-1
3. Construct your mapping by dragging components onto the logical diagram of themapping editor.
4. Connect and configure components by dragging connections between thecomponents, dragging attributes across those connections, and modifying theproperties of the components using the property inspector.
5. Use the physical diagram to define where and how the integration process is goingto run on your physical infrastructure.
6. Run the mapping.
See Creating a Mapping in Developing Integration Projects with Oracle DataIntegrator.
See Creating a Reusable Mapping in Developing Integration Projects with Oracle DataIntegrator.
Chapter 10Create Mappings
10-2
11Knowledge Modules
Learn about knowledge modules in Oracle Data Integrator.
Topics
• What are Knowledge Modules
• Find the Knowledge Modules in a Project
• Add a Knowledge Module to a Project
• Import a Global Knowledge Module
What are Knowledge ModulesLearn about knowledge modules in Oracle Data Integrator.
A knowledge module (KM) in Oracle Data Integrator (ODI) is a code template for agiven integration task. Knowledge modules implement how the integration processesoccur. Each knowledge module type refers to a specific integration task:
• Reverse-engineering Knowledge Modules (RKM) reverse-engineer metadata fromthe heterogeneous systems for Oracle Data Integrator.
• Jounalizing Knowledge Modules (JKM) handle Changed Data Capture (CDC) on agiven system.
• Loading Knowledge Modules (LKM) load data from one system to another, usingsystem-optimized methods. These KMs are used in mappings.
• Integration Knowledge Models (IKM) integrate data in a target system, usingspecific strategies (insert/update, slowly changing dimensions). These KMs areused in mappings.
• Check Knowledge Modules (CKM) control Data Integrity on the data flow. TheseKMs are used in data model's static check and mappings flow checks.
• Service Knowledge Modules (SKM) expose data in the form of web services.
Each Knowledge Module's code can be edited to improve performance, implementnew methods, or comply with new regulations and corporate standards.
You can import the KMs into each project or make use of Global Knowledge Modules.These enable you to share specific Knowledge Modules across multiple projects. Abest practice is to import as Global Knowledge Modules those KMs that are usedfrequently in multiple projects; you then only need import a Knowledge Module once,rather than import it into each project using it. Similarly, if you need to modify theGlobal Knowledge Module, the modification propagates to all projects using theKnowledge Module, rather than having to update each knowledge module in eachproject.
See Introduction to Knowledge Modules in Developing Knowledge Modules withOracle Data Integrator.
11-1
Find the Knowledge Modules in a ProjectLearn how to find the knowledge modules in a project in Oracle Data Integrator.
Follow these steps to find out the knowledge modules (KMs) in a project.
1. Expand the project in the Designer navigator and expand Knowledge Modules.
2. Expand the Knowledge Modules node to see nodes for the above listed KM types.
3. Expand each to see the KMs already in the project. If you expand each KM, youcan see where they are used; if you double-click each KM you can see anOverview.
Add a Knowledge Module to a ProjectLearn how to add a knowledge module to a project in Oracle Data Integrator.
Follow these steps to add a knowledge module to a project:
1. Expand the project in the Designer navigator and right-click Knowledge Modules.
2. Select Import knowledge Modules. The Import Knowledge Modules (XML File)dialog box appears.
3. Click the Search icon next to File import directory, and navigate to the folder .../<Oracle_Home>/odi/sdk/xml-reference.
4. Click Open to display the Import Knowledge Modules (XML Files) dialog box.Select the knowledge modules that you want to use in this project. Be very carefulin making your selections because there are several knowledge modules that havesimilar names.
5. Click OK. Review the Import Report, then close it. Check the imported knowledgemodules by expanding the relevant nodes under Knowledge Modules.
See Importing and Replacing Knowledge Modules in Developing Integration Projectswith Oracle Data Integrator.
Import a Global Knowledge ModuleLearn how to import a global knowledge module in Oracle Data Integrator.
Follow these steps to import a global knowledge module:
1. In the Designer Navigator, expand the Global Objects tab.
2. Right-click Integration (IKM) and select Import Knowledge Modules. The ImportKnowledge Modules (XML File) dialog box appears.
3. Select the knowledge modules that you want to use. Be very careful in makingyour selections because there are several knowledge modules that have similarnames.
4. Click OK. Review the Import Report, then close it.
5. Check the imported knowledge modules by expanding the relevant nodes underGlobal Knowledge Modules.
Chapter 11Find the Knowledge Modules in a Project
11-2

12Scenarios
Learn about scenarios in Oracle Data Integrator, what they are, how to create them,and how to run them.
Topics
• What are Scenarios
• Create and Run Scenarios
What are ScenariosLearn what scenarios are in Oracle Data Integrator.
Once you have built and tested a component in Oracle Data Integrator (ODI), you cancreate a scenario corresponding to its state. Scenarios can only be created in adevelopment work repository. If you modify the component at a later date, the scenariocode does not change. You can generate scenarios for packages, procedures,mappings or variables. Scenarios that execute a procedure, mapping, or variable areonly single-step. Those for packages can be single-step or multi-step.
Scenarios can be exported and then imported into other work repositories, which canbe development or execution repositories.
See Introduction to Scenarios in Developing Integration Projects with Oracle DataIntegrator.
Create and Run ScenariosLearn how to create and run scenarios in Oracle Data Integrator.
1. Start generating a scenario using one of the following:
a. Double-click the package, mapping, procedure or variable for which you wantto create a scenario to open the object editor. From the ODI menu, selectGenerate, and then Scenario.
b. In the Designer Navigator, right-click the package, mapping, procedure orvariable for which you want to create a scenario, and select GenerateScenario.
2. Enter the scenario name and a version.
3. Click OK twice and the scenario appears on the Scenarios tab and under theScenarios node of the source object under the project. If there are variables in thescenario, then after clicking the first OK, you can define the variables that areparameters for the scenario.
See Generating a Scenario in Developing Integration Projects with Oracle DataIntegrator.
12-1
See Generating a Group of Scenarios in Developing Integration Projects with OracleData Integrator.
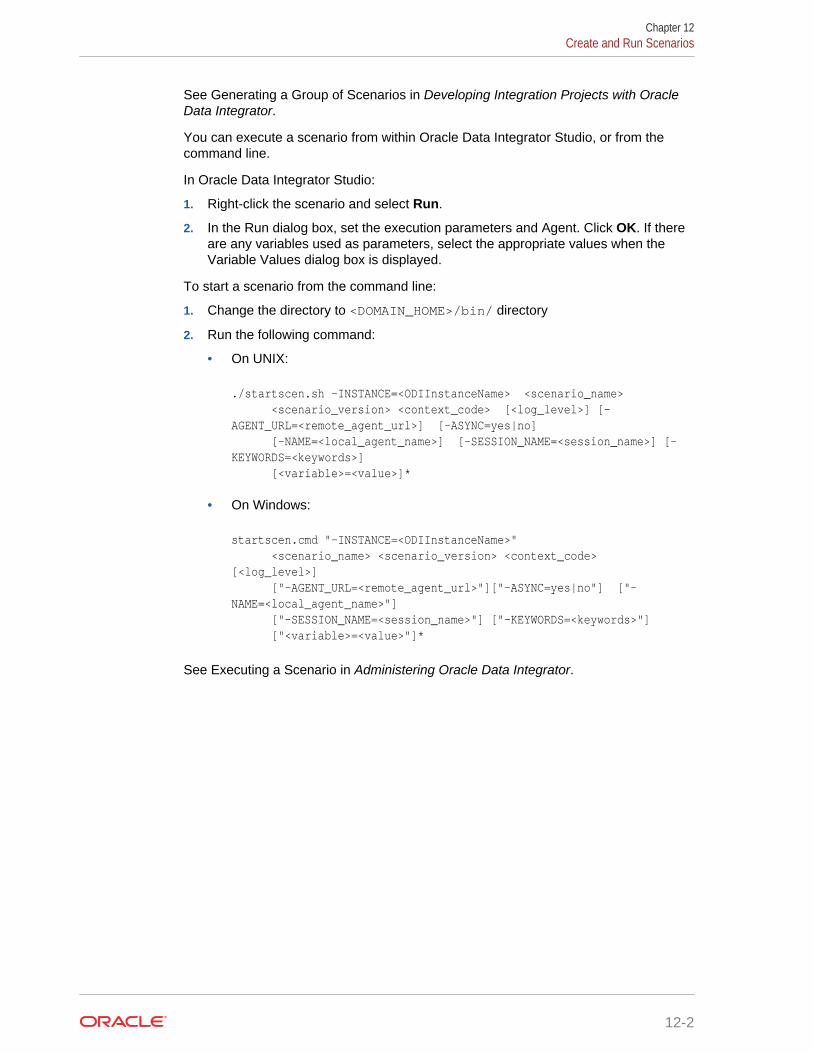
You can execute a scenario from within Oracle Data Integrator Studio, or from thecommand line.
In Oracle Data Integrator Studio:
1. Right-click the scenario and select Run.
2. In the Run dialog box, set the execution parameters and Agent. Click OK. If thereare any variables used as parameters, select the appropriate values when theVariable Values dialog box is displayed.
To start a scenario from the command line:
1. Change the directory to <DOMAIN_HOME>/bin/ directory
2. Run the following command:
• On UNIX:
./startscen.sh -INSTANCE=<ODIInstanceName> <scenario_name> <scenario_version> <context_code> [<log_level>] [-AGENT_URL=<remote_agent_url>] [-ASYNC=yes|no] [-NAME=<local_agent_name>] [-SESSION_NAME=<session_name>] [-KEYWORDS=<keywords>] [<variable>=<value>]*
• On Windows:
startscen.cmd "-INSTANCE=<ODIInstanceName>" <scenario_name> <scenario_version> <context_code> [<log_level>] ["-AGENT_URL=<remote_agent_url>"]["-ASYNC=yes|no"] ["-NAME=<local_agent_name>"] ["-SESSION_NAME=<session_name>"] ["-KEYWORDS=<keywords>"] ["<variable>=<value>"]*
See Executing a Scenario in Administering Oracle Data Integrator.
Chapter 12Create and Run Scenarios
12-2
13Procedures
Learn about procedures in Oracle Data Integrator, what they are and how you createthem.
Topics
• What is a Procedure
• Create a Procedure
What is a ProcedureLearn about procedures in Oracle Data Integrator.
A procedure in Oracle Data Integrator (ODI) consists of a series of commandsexecuted in sequence. Commands contain code that can be executed by databaseengines, the operating system where the Agent is running, or directly by ODI. You canalso define options in the procedure to control its behavior at run time. A very usefulproperty of procedures is that they are reusable and can be inserted into packages.Thus, just as procedures comprise commands, a package can contain severalprocedures as steps.
You use procedures in a package or a scenario, or you can run them directly from theDesigner Navigator.
Here are some examples of the uses of procedures:
• The Email Administrator procedure contains a single command that calls theOdiSendMail email tool. You can then add an option to specify the email address.Thus, to change the email address of the administrator, you do not have to modifythe procedure. You can even reuse the procedure in several places, each withdifferent parameters to send emails to different people.
• You can create an ODI procedure to create an RDBMS table and populate it withdata.
See Introduction to Procedures in Developing Integration Projects with Oracle DataIntegrator.
See Using Procedures in Developing Integration Projects with Oracle Data Integrator.
Create a ProcedureLearn the steps to create a procedure in Oracle Data Integrator.
Use the following steps to create a procedure in ODI:
1. Create a Blank ProcedureLike mappings and packages, procedures are contained within project folders.
2. Add Commands to a Procedure
13-1
Now you have created a procedure that performs a series of tasks. However, italways performs the same tasks with the same parameters. To make theprocedure more flexible, you can add options to it.
3. Add New Options to a ProcedureAdd options to a procedure to make it customizable. You do not need to defineany options.
These options function as parameters to the procedure. This means that you canuse the same procedure in different environments with different parameters,without having to change any code.
Procedure options function as parameters.
Options can be used in two ways to control the way procedures are executed.
• Check box options serve to skip individual commands in the procedure. Forexample, you can have an option that, if false, completely skips a command.
• Value or text options are used in the text of commands to influence thebehavior of the procedure at a smaller level. For example, the subject of anemail can be a value option, which is then passed to the OdiSendMail tool.
In both cases, you define a default value for the option. This is the value that isused if no other value is specified when the procedure is used. When you call theprocedure in a package, you can override any of the default values to customizethe procedure for that particular context.
4. Save and run the procedure.One of the most common ways to execute an ODI procedure is to run it fromwithin a package. However, you can also execute a procedure manually fortesting. You click the Execute button in the procedure window to do this. Defaultvalues for all options are used. You can, however, override the default values forthe options. Click the procedure step, and then click the Options tab from theProperties pane. Here, you can select the values of options that are used whenthe procedure step is executed.
See Creating Procedures in Developing Integration Projects with Oracle DataIntegrator.
An example of creating, populating and running a procedure is in Section 2 - Creatingand Running a Procedure in the Oracle By Example tutorial Oracle Data Integrator 12c- Creating Procedures and Scenarios.
Create a Blank ProcedureLearn how to create a blank procedure in Oracle Data Integrator
Use the following steps to create a blank procedure in ODI:
1. Navigate to the Project and Project Folder where you want to create theprocedure. Right-click the Procedures node and select New Procedure.
2. Provide the procedure a meaningful name and a description. You may want toinclude any limitations the procedure has in the description.
3. (optional) Set the default target and source technologies. If you don't set thesetechnologies, you must set them individually for each command. You can alwaysoverride these technologies for each individual step.
Chapter 13Create a Procedure
13-2
Add Commands to a ProcedureLearn how to add commands to a procedure in Oracle Data Integrator
Add one or more commands to make the procedure do something useful. You cancreate a procedure with only one command, but you often want more than one.Remember that commands are always performed in order.
1. Click the Tasks tab of the procedure window.
2. Click the Add Command (green plus) icon. A window for the command appears.
3. Enter a name for the command. This name appears in the Operator navigatorwhen you execute the procedure, so you should try to make it specific andmeaningful.
4. Select the Ignore Errors check box so that the procedure runs even if thiscommand fails.
5. Select the appropriate options for the Command on Target and Command onSource options. (Note that a command can execute code in two places (Sourceand Target) within the same command.) Click Command on Target first.
6. Select the technology used in the command. This affects the code that you canuse and how ODI generates its code.
7. Keep the Context as <Execution Context>, so that the user can select the contextat the time the procedure is executed. The Schema and Context fields representthe logical schema and execution context for database queries.
Add New Options to a ProcedureLearn how to add options to new procedures in Oracle Data Integrator
Add new options to make the procedure customizable. You do not need to define anyoptions.
1. Click the Options tab.
2. In Properties, enter the name as it appears in the list of options when you executethe procedure. Enter a description.
The value that you enter in the Description field is displayed when you select theoptions that trigger a command in a procedure. It should be a short reminder ofwhat the option does. Complete the Help field only when creating a KnowledgeModule. It enables you to provide a longer description of the option, including anyside effects or special notes.
3. Select the option type.
This can be Boolean for an option that determines whether a given step isexecuted or not, Value for a numeric value, or Text for a text string. Complete theDefault Value field. The default value specified for an option is the value that isused if you do not specifically set it in a package.
4. Save and run the procedure.
Chapter 13Create a Procedure
13-3
14Packages
Learn about packages in Oracle Data Integrator and how to create them.
Topics
• What is a Package
• Create and Run a Package
What is a PackageFind out what are packages in Oracle Data Integrator.
An Oracle Data Integrator (ODI) package defines a complete data integration job. Ajob is made up of many smaller steps. Normally, you design these steps first, such asthe ODI procedures and mappings. Other steps are created in the package.
See Introduction to Packages in Developing Integration Projects with Oracle DataIntegrator.
Create and Run a PackageLearn how to create and run a package in Oracle Data Integrator.
Other ways can be used to create a package in ODI, but here we focus on just twoways: mappings and tools. The basic process for creating a package is shown in thefollowing three tasks:
• Create a blank packageYou create a blank package and name it.
• Add steps to the diagramYou can now load your package with the steps that it later executes. You can dragmappings from the Project view onto the package’s Diagram tab. This creates alink rather than a copy to the mapping. Thus, you can keep working on yourmapping, and your changes update the package. You can also add ODI tools intothe package. Tools do useful things, such as sending email, copying files, orwaiting for the data to arrive.
The most useful package steps for most situations are either mappings or ODItools. Mappings, as you know by now, transfer data from one or more sourcedatastores into a target datastore. ODI tools perform a much wider variety of tasks,including sending email or waiting for data.
Steps are created by dragging objects onto the package diagram, which is foundon the Diagram tab. They are then sequenced by creating links from one step tothe next.
Mappings are reusable. When you create a mapping, you can use it several timesin the same package. You can even copy it into several different packagessimultaneously. Although you can use mappings from other projects in your
14-1

package. It's best practice to avoid doing this, because it makes it difficult to keepyour project organized.
• Arrange the package stepsFinally, you arrange the package steps in a meaningful order. You begin bydefining the first step to be executed. Then, you tell ODI what to do next when thefirst step succeeds. You can also tell ODI what to do if any particular step in thepackage fails. Thus, you can link complex sequences of operations with errorhandling or error recovery.
Every package must have a first step. This is where the execution of a packagealways begins. After that, the sequence of steps splits in two directions: If the stepexecutes successfully, the execution follows the green “ok” link. If the step fails, itfollows the red “ko” link. Success is defined by the step returning a code 0. Anyreturn code other than 0 is treated as a failure.
The first step you drag into the package diagram is always (initially) the First Step.You can of course designate a step you subsequently drag as the first one toexecute. If you delete the step marked First Step, be sure to designate anotherstep as the first one to execute. ODI displays an error message if no step islabeled First Step.
All the steps in the diagram must be either on the success path or connected by afailure path to it. If there are unlinked steps, the yellow triangle is highlighted. Youcan click the yellow triangle to check for the problem.
Be sure to test each mapping individually before using it in a package. Similarly,make sure you test individual steps in the package. To do this, right-click a stepand select Execute Step. This is called unit testing. In some cases, it may not bepossible to test an individual step - for example, when it requires a variable that isdefined in the package. However, it is a good practice to test each stepindividually, whenever possible.
You should save your work frequently when working on packages.
To execute the package, click the Execute button in the package window. As withmappings, you can specify the context and the agent to run the package with. Whenyou receive a notification that the session has started, open the Operator Navigator.The package represents a session in the Operator Navigator. Mapping and tool stepsare represented as steps. Mapping steps are then subdivided into tasks that completethe individual data transfer operations. Tool steps, however, have only one task.
See Creating a new Package in Developing Integration Projects with Oracle DataIntegrator.
See Running a Package in Developing Integration Projects with Oracle DataIntegrator.
Create a Blank PackageLearn how to create a blank package in Oracle Data Integrator
To create a blank package, perform the following:
1. Locate the project and folder in the Projects view where you want to create thepackage.
A package always belongs to a project, but you can use mappings from otherprojects in the package.
Chapter 14Create and Run a Package
14-2

2. Right-click the Packages node and select New Package.
3. Provide a meaningful name to your package in the Name field.
4. Describe what the package does, by entering details in the Description field.
This description appears in the package documentation and is useful whenperforming changes or maintenance.
5. To begin adding steps, click the Diagram tab.
Create a StepLearn how to create a package step using a procedure in Oracle Data Integrator
To create a step, using a procedure:
1. Find the mapping, ODI tool, or procedure that you want to add. To add aprocedure, expand the project and folder nodes in the Projects view. Then expandthe Procedures node.
2. Drag the procedure onto the package diagram. You see an icon representing theprocedure step in the package.
3. (optional) Change the name of the procedure step.
Arrange Package StepsLearn how to arrange package steps in Oracle Data Integrator
To arrange the steps in a package:
1. Define the first step. Right-click a step and select First Step.
2. Define the success path for your package by connecting the normal sequence ofsteps into a continuous sequence. Click the Next step on success tool, whichresembles a green arrow with the word ok above it.
3. Click all the steps in the sequence from the first to the last.
4. Click the Select tool (which resembles a cursor), to stop sequencing.
5. Add error handling by clicking the red ko button representing “Next step onfailure.” Now click a step and the corresponding error recovery step. If this stepfails, then report the error into a log file.
6. Delete unwanted links on steps, by selecting the step or link with the Select tool.Then use Delete selection on the toolbar, or right-click and select Delete. Youcan also use the keyboard by pressing the Delete key.
Chapter 14Create and Run a Package
14-3
15Load Plans
Learn about load plans in Oracle Data Integrator and how to create them.
Topics
• What are Load Plans
• Create Load Plans
What are Load PlansUnderstand what an Oracle Data Integrator load plan is.
A load plan is an executable object in Oracle Data Integrator (ODI) that contains ahierarchy of steps. The steps can be executed conditionally, in parallel, or in series.The leaves of this hierarchy are scenarios. The set of scenarios that makes up a loadplan can involve the execution of packages, mappings, variables, and procedures.Load plans also support exception handling strategies for scenarios that end in error.
Load plans can be started, stopped, and restarted from the command line, from OracleData Integrator Studio, Oracle Data Integrator Console, or a web service interface.They can also be scheduled by using the run-time agent’s built-in scheduler or byusing an external scheduler. When a load plan is executed, a load plan instance iscreated. Each attempt to run this load plan instance is a separate load plan run.
A load plan can be modified in production environments and steps can be enabled ordisabled according to production needs. Load plan objects can be designed andviewed in the Designer and Operator Navigators. Various design operations (such ascreate, edit, delete, and so forth) can be performed on a load plan object if a userconnects to a development Work Repository, but some design operations are not beavailable in an execution work repository. After it is created, a load plan is stored in thework repository. The load plan can be exported, and then imported to anotherrepository and executed in different contexts.
A load plan is made up of a sequence of several types of steps. Each step can containseveral child steps. Depending on the step type, the steps can be executedconditionally, in parallel, or sequentially. By default, a load plan contains an empty rootserial step. This root step is mandatory and the step type cannot be changed.
The step types are:
• Serial - This defines a serial execution of its child steps. Child steps are orderedand a child step is executed only when the previous one is terminated.
• Parallel - This defines a parallel execution of its child steps. Child steps are startedimmediately in their order of priority.
• Run Scenario - This launches the execution of a scenario.
• Case - The combination of these steps allows conditional branching based on thevalue of a variable.
15-1
• When - If you have several When steps under a Case step, only the first enabledWhen step that satisfies the condition is executed.
• Else - If no When step satisfies the condition or the Case step does not containany When steps, the Else step is executed.
Load plan instances and load plan runs are similar to sessions. The difference is thatwhen a session is restarted, the existing session is overwritten by the new execution.The new load plan run does not overwrite the existing load plan run; it's added afterthe previous load plan runs for this load plan instance. The load plan instance cannotbe modified at run time.
A scenario is an atomic run time component that is given to production. The productionadministrator can orchestrate the various scenarios by using load plans in order tooptimize the time taken to execute the ETL jobs in the given time frame and ease theadministration of all the ETL jobs.
See Introduction to Load Plans in Developing Integration Projects with Oracle DataIntegrator.
See Running Load Plans in Developing Integration Projects with Oracle DataIntegrator.
See Using Load Plans in Production in Developing Integration Projects with OracleData Integrator.
See Executing a Load Plan in Administering Oracle Data Integrator.
Create Load PlansLearn the steps to create load plans in Oracle Data Integrator.
To create a simple load plan in ODI that executes two steps in parallel (in this examplewe load two dimensions, PRODUCT and TIME):
1. Go to the Designer Navigator and click the Load Plans and Scenarios tab. Fromthe tab’s menu, select New Load Plan.
2. Enter a suitable Name.
3. Click the Steps tab.The load plan editor opens with the root step node.
4. Add ODI objects to the load plan as parallel steps. Click Add Step (the greenplus), and select Parallel Step. The Parallel step node appears under root_step.
5. Define two new procedures and place them under the parallel node so that theyexecute in parallel.Note that the default restart type for Parallel steps is “Restart all children,” and therestart type for root_step is “Restart from failure.”
6. Save your load plan.
7. Define two procedures to load dimensions, PRODUCT and TIME, and add them tothe load plan Parallel step node.
a. On the Projects tab of the Designer Navigator, expand the project and folder.Right-click Procedures and select New Procedure.
b. Enter a suitable name for the procedure to load the PRODUCT dimension.Update the other fields as appropriate for your environment. Click Save andclose the editing tab.
Chapter 15Create Load Plans
15-2
c. Repeat the previous two steps to create and save the procedure to load theTIME dimension.
d. Return to the Data Warehouse Load Plan editor. With the Parallel stephighlighted, click Add Step (green plus) and select Run Scenario Step.
e. Select an existing scenario for a step, or choose other objects (packages,interfaces, variables, and procedures), for which ODI automatically generatesa scenario to run the step. You now add the two procedures that you justdefined as steps under the Parallel node of the load plan. On the Add RunScenario Step screen, click Lookup Scenario (magnifying glass).
f. Select Procedure as the Executable Object Type. Select the procedure toload the PRODUCT dimension. Click OK.
g. Go to the New Scenario window, and add a name for the scenario so that ODIcan create it to run this procedure, and click OK.ODI returns to the Add Run Scenario Step window. By default, the name of thenew scenario that ODI generates for the procedure, and the step name thatyou are adding to the load plan are the same as the procedure name.
h. Click Finish.The first of two parallel steps appears.
i. Click the Parallel node of the Steps Hierarchy and click Add Step (the greenplus sign) again. Select Run Scenario Step.
j. Repeat steps f to h to add your other procedure to load the TIME dimension tothe Parallel node of the Steps Hierarchy.
To create a simple load plan to execute two steps serially:
1. Go to the Designer Navigator, click the Load Plans and Scenarios tab. From thetab’s menu, select New Load Plan.
2. Enter a suitable Name.
3. Click the Steps tab.The load plan editor opens with the root step node.
4. Add ODI objects to the load plan as serial steps.
a. Click Add Step (the green plus), and select Serial Step. The Serial nodeappears under root_step.
b. With Serial node selected, click Add Step and select Run Scenario Step.
c. Click Lookup Scenario in the Add Run Scenario Step window.
d. Select Procedure as the Executable Object Type. Select the procedure name.Click OK. In the New Scenario window, accept the default as the name of thescenario so that ODI creates it to run this procedure, and click OK.ODI returns to the Add Run Scenario Step window.
e. Click Finish.The first serial step appears.
f. Click the Serial node of the Steps Hierarchy, and click Add Step again. SelectRun Scenario Step.
g. Click Lookup Scenario, and select Mappings.
h. Select the mapping name and click OK. In the New Scenario window, acceptthe default as the name of the scenario so that ODI can create it to run thismapping, and click OK.
Chapter 15Create Load Plans
15-3
ODI returns to the Add Run Scenario Step window.
i. Click Finish.
To create a simple load plan to execute two steps in parallel and to execute five stepsserially (this example includes two procedures to load dimensions, TIME andPRODUCT):
1. Go to the Designer Navigator, click the Load Plans and Scenarios tab. From thetab’s menu, select New Load Plan.
2. Enter a suitable Name.
3. Click the Steps tab.The load plan editor opens with the root step node.
4. Add ODI objects to the load plan as parallel steps. Click Add Step (the greenplus), and select Parallel Step. The Parallel step node appears under root_step.
5. You define two new procedures and place them under the parallel node so thatthey execute in parallel.Note that the default restart type for Parallel steps is “Restart all children,” and therestart type for root_step is “Restart from failure.”
6. Click Save to save your load plan.
7. Define two procedures to load dimensions, PRODUCT and TIME, and add them tothe load plan Parallel step node.
a. Go to the Projects tab of the Designer Navigator and expand theHandsOnLoads > HandsOn folder. Right-click Procedures and select NewProcedure.
b. Enter a suitable name for the procedure to load the PRODUCT dimension.Update the other fields as appropriate for your environment. Click Save andclose the editing tab.
c. Repeat the previous two steps to create and save the procedure to load theTIME dimension.
d. Return to the Data Warehouse Load Plan editor. With the Parallel stephighlighted, click Add Step (green plus) and select Run Scenario Step.
e. Select an existing scenario for a step, or choose other objects (packages,interfaces, variables, and procedures), for which ODI automatically generatesa scenario to run the step. Add the two procedures that you just defined assteps under the Parallel node of the load plan. On the Add Run Scenario Stepscreen, click Lookup Scenario (magnifying glass).
f. Select Procedure as the Executable Object Type. Select the procedure toload the product dimension. Click OK.
g. Go to the New Scenario window and add a name for the scenario that ODIcreates to run this procedure. Click OK.ODI returns to the Add Run Scenario Step window. By default, the name of thenew scenario that ODI generates for the procedure, and the step name thatyou added to the load plan are the same as the procedure name.
h. Click Finish.The first of two parallel steps appears.
i. Click the Parallel node of the Steps Hierarchy, and click Add Step (the greenplus sign) again. Select Run Scenario Step.
Chapter 15Create Load Plans
15-4
j. Repeat steps e to h to add your other procedure to load the time dimension tothe Parallel node of the Steps Hierarchy.
8. Add ODI objects to the load plan as serial steps.
a. Go to the Steps Hierarchy, and highlight root_step. Click Add Step (the greenplus sign) and select Serial Step.The Serial node appears in the Steps Hierarchy.
b. Select the Serial node, click Add Step and select Run Scenario Step.
c. Go to the Add Run Scenario Step window, and click Lookup Scenario.
d. Select Procedure as the Executable Object Type. Select the procedure name.Click OK. In the New Scenario window, accept the default as the name of thescenario that ODI can create it to run this procedure, and click OK.ODI returns to the Add Run Scenario Step window.
e. Click Finish.The first serial step appears.
f. Click the Serial node of the Steps Hierarchy, and click Add Step again. SelectRun Scenario Step.
g. Click Lookup Scenario, and select Mappings.
h. Select the mapping name and click OK. In the New Scenario window, acceptthe default as the name of the scenario so that ODI can create it to run thismapping, and click OK.ODI returns to the Add Run Scenario Step window.
i. Click Finish.
j. Repeat the previous four steps to add the remaining serial mappings.
9. Execute the load plan and examine the list of executed steps in the OperatorNavigator.
a. Click the green arrow to execute the load plan. Click OK in the Start Load Planwindow, and then click OK when the “Load Plan started” message appears.
b. Open the Operator Navigator, click Refresh, and examine the results ofexecuting the load plan.The steps in the load plan appear as a grouping of executions within secondsof each other. For each load plan step, ODI generated a scenario forexecution. You can see that steps running in parallel.
See Creating a Load Plan Developing Integration Projects with Oracle Data Integrator.
Chapter 15Create Load Plans
15-5
16Console
Learn about the console of Oracle Data Integrator and how to use it.
Topics
• What is Oracle Data Integrator Console
• Use Oracle Data Integrator Console
What is Oracle Data Integrator ConsoleLearn what Oracle Data Integrator Console is.
Business users (as well as developers, administrators and operators), can have readaccess to the Oracle Data Integrator (ODI) repository, perform topology configurationand production operations through a web based UI called ODI Console. This webapplication can be deployed in a Java EE application server such as Oracle WebLogic.ODI provides a plug-in, as well as the ODI Console to manage and monitor the JavaEE and Standalone Agents, that integrates with Oracle Enterprise Manager CloudControl and Oracle Fusion Middleware Control Console. It allows you to drill down intothe details of ODI components and sessions. It is required for the Fusion MiddlewareControl Extension for ODI. It must be installed and configured for this extension todiscover and display the ODI components in a domain.
Different types of user can use ODI Console in different ways:
• Administrators use it to create and import repositories and to configure theTopology.
• Production operators use it to manage scenarios and Load Plans, monitorsessions and Load Plan runs, and manage the content of the error tablesgenerated by ODI.
• Business users and developers browse development artifacts in it, using, forexample, the Data Lineage and Flow Map features.
See Introduction to Oracle Data Integrator Console in Administering Oracle DataIntegrator.
Use Oracle Data Integrator ConsoleLearn how to use Oracle Data Integrator Console.
To connect to ODI Console:
1. Open a web browser, and connect to the URL where ODI Console is installed. Forexample:
http://server_name:8001/odiconsole/
16-1
where server_name represents the name or IP address of the server on whichODI Console is installed.
2. Go to the Repository list, and select the Repository connection corresponding tothe master or work repository to which you want to connect.
3. Provide a User ID and a Password.
4. Click Sign In.
You can create, edit, delete, or view objects. You can import/export and run scenarios,and stop and re-start sessions. You can import/export, run, and stop and start loadplans. you can also perform general administrative operations for ODI.
See Using Oracle Data Integrator Console in Administering Oracle Data Integrator.
Chapter 16Use Oracle Data Integrator Console
16-2


![[1]Oracle® Fusion Middleware Oracle Data Integrator Tools ... · Oracle Data Integrator Tools Reference 12c (12.2.1) E57357-01 ... Oracle Data Integrator 12c Online Help, which is](https://img.pdfslide.net/doc/110x75/5c449ef793f3c34c46577b8d/1oracle-fusion-middleware-oracle-data-integrator-tools-oracle-data-integrator.jpg)