Embed Size (px)
Citation preview

Oracle®Designer
Oracle Designer Tutorial
Release 6.0
June 1999
Part No. Z24613-01

Oracle Designer Tutorial
Part No. Z24613-01
Release 6.0
Copyright 1995, 1999 Oracle Corporation. All rights reserved.
Author: Martin Wykes
The Programs (which include both the software and documentation) contain proprietary information ofOracle Corporation; they are provided under a license agreement containing restrictions on use anddisclosure and are also protected by copyright, patent and other intellectual and industrial propertylaws. Reverse engineering, disassembly or decompilation of the Programs, except to the extent requiredto obtain interoperability with other independently created software or as specified by law, isprohibited.
The information contained in this document is subject to change without notice. If you find anyproblems in the documentation, please report them to us in writing. Oracle Corporation does notwarrant that this document is error free. Except as may be expressly permitted in your license agreementfor these Programs, no part of these Programs may be reproduced or transmitted in any form or by anymeans, electronic or mechanical, for any purpose, without the express written permission of OracleCorporation.
If the Programs are delivered to the US Government or anyone licensing or using the Programs onbehalf of the US Government, the following notice is applicable:
Restricted Rights NoticePrograms delivered subject to the DOD FAR Supplement are ’commercial computer software’ and use,duplication and disclosure of the Programs including documentation, shall be subject to the licensingrestrictions set forth in the applicable Oracle license agreement. Otherwise, Programs delivered subjectto the Federal Acquisition Regulations are ’restricted computer software’ and use, duplication anddisclosure of the Programs shall be subject to the restrictions in FAR 52.227-19, Commercial ComputerSoftware - Restricted Rights (June, 1987). Oracle Corporation, 500 Oracle Parkway, Redwood City, CA94065.
The Programs are not intended for use in any nuclear, aviation, mass transit, medical, or otherinherently dangerous applications. It shall be licensee’s responsibility to take all appropriate fail-safe,back up, redundancy and other measures to ensure the safe use of such applications if the Programs areused for such purposes, and Oracle disclaims liability for any damages caused by such use of thePrograms.
Oracle is a registered trademark, and Oracle Designer, Oracle Developer, Net8, Oracle7, Oracle8,Personal Oracle, PL/SQL, SQL*Net and SQL*Plus are trademarks or registered trademarks, of OracleCorporation. All other company or product names mentioned are used for identification purposes onlyand may be trademarks of their respective owners.

i
Contents
Send Us Your Comments ................................................................................................................... v
Read This First!.................................................................................................................. vii
Purpose of this document ................................................................................................................... vii
Intended audience for this document ............................................................................................... viii
Prerequisites for using this document ............................................................................................... ix
Structure of this document ................................................................................................................... x
How to use this document.................................................................................................................... x
Conventions used in this document.................................................................................................... x
Related documentation ........................................................................................................................ xi
Your comments are welcome .............................................................................................................. xi
Part I Before You Start
1 Introducing Oracle Designer
What is Oracle Designer?.............................................................................................................. 1-1
The components of Oracle Designer ........................................................................................... 1-2
Starting Oracle Designer tools and utilities for the tutorial ..................................................... 1-3

ii
2 Preparing for the tutorial
Scope of the tutorial ....................................................................................................................... 2-1
Time to allow for the tutorial........................................................................................................ 2-2
How to follow the tutorial ............................................................................................................ 2-2
Removing existing tutorial tables ................................................................................................ 2-3
Background to the tutorial ............................................................................................................ 2-4
Part II Tutorial
Lesson 1 Create process steps and add flows
Create a process step ..................................................................................................................... Le 1-2
Add a flow, a trigger and an outcome ........................................................................................ Le 1-5
Lesson 2 Create entities and add relationships
Create an entity .............................................................................................................................. Le 2-2
Add a relationship ......................................................................................................................... Le 2-5
Create attributes ............................................................................................................................. Le 2-7
Lesson 3 Refine default functions
Identify functions to automate ..................................................................................................... Le 3-1
Add entity usages to a function ................................................................................................... Le 3-6
Create attribute usages using the function/attribute matrix utility........................................ Le 3-7
Lesson 4 Transform the data model into a table design
Create a table definition from entities ......................................................................................... Le 4-2
Lesson 5 Refine the default database design
Modify a default table definition ................................................................................................. Le 5-2

iii
Lesson 6 Build a database
Create the database tables............................................................................................................. Le 6-1
Lesson 7 Create default working forms
Generate default module definitions .......................................................................................... Le 7-2
Accept the candidate module definitions for generation ......................................................... Le 7-3
Generate a working form.............................................................................................................. Le 7-6
Lesson 8 Refine modules for generation
Change form characteristics ......................................................................................................... Le 8-1
Create a lookup table..................................................................................................................... Le 8-3
Lesson 9 Generate a refined Oracle Developer Form
Set preferences to influence generation ...................................................................................... Le 9-1
Change a display characteristic of the generated form............................................................. Le 9-3
Generate, run and use a form....................................................................................................... Le 9-4
Lesson 10 Generate a WebServer Application
Implement the Speedy Pizza system as a Web application...................................................... Le 10-1
Lesson 11 Conclude the tutorial
Exit from Oracle Designer and drop the tutorial tables............................................................ Le 11-1
A Tutorial installation notes
Importing the TUTORIAL application system .......................................................................... A-1
Setting up for WebServer Generator users ................................................................................. A-4
What the Oracle Installer installs on the client........................................................................... A-4
How tutorial users are instructed to start the tutorial .............................................................. A-5

iv
v
Send Us Your Comments
Oracle Designer Tutorial, Release 6.0
Part No. Z24613-01
Oracle Corporation welcomes your comments and suggestions on the quality and usefulness of thispublication. Your input is an important part of the information used for revision.
■ Did you find any errors?■ Is the information clearly presented?■ Do you need more information? If so, where?■ Are the examples correct? Do you need more examples?■ What features did you like most about this manual?
If you find any errors or have any other suggestions for improvement, please indicate the chapter,section, and page number (if available). You can send comments to us in the following ways:
■ [email protected]■ +44 (0)118 9245019. Attn: Oracle Designer■ Oracle Corporation UK Ltd
Oracle Designer DocumentationOracle ParkwayThames Valley ParkReading, Berks. RG6 1RAUnited Kingdom
If you would like a reply, please give your name, address, and telephone number below.
If you have problems with the software, please contact your local Oracle World Wide Support Center

vi

vii
Read This First!
Before you start reading this document, it is important that you understand thefollowing:
• the purpose of this document
• the intended audience for this document
• the prerequisites for using this document
• the structure of this document
• how to use this document
• conventions used in this document
• related documentation
• that your comments are welcome!
Purpose of this documentThis document is a tutorial for Oracle Designer. It aims to:
• provide you with practical hands-on experience using Oracle Designer
• reinforce concepts explained in the Oracle Designer help system and other partsof the documentation set
Upon completion of this tutorial, you will know how to:
• create process steps and flows
• create entities and relationships
• create definitions of database objects in the Repository

viii
• refine the default database design
• generate objects in the database
• refine default functions
• create default module definitions
• set preferences for generation
• create lookup tables
• generate a form
• generate a WebServer application
This tutorial does not attempt to describe in detail the functionality of every OracleDesigner product component. Instead, the tutorial concentrates on how to use thecomponents together to progress from a high level business model to a workinggenerated application. For comprehensive information, refer to the Oracle Designerhelp system.
Note that to enable you to use several different Oracle Designer productcomponents within a relatively short period, the tutorial assumes a very smallbusiness scenario. This scenario is not representative of the more sophisticatedenvironments in which Oracle Designer is typically used.
Intended audience for this documentThis tutorial is intended for analysts and designers who want to know how to usethe Oracle Designer tools and utilities to model, design and implement businesssystems.
This tutorial does not explain in detail terms that are familiar to such an audience(for example, entity relationship diagrams, function hierarchy diagrams and SQLDDL commands).

ix
Prerequisites for using this documentThis tutorial does not assume you have any prior experience with Oracle Designer.However, this tutorial does assume that:
• you are familiar with the operation of your personal computer (PC) and itskeyboard.
• you are familiar with the Microsoft Windows 95/98 or Windows NTenvironment, as appropriate.
• the PATH variable on your PC includes the appropriate path to the \bindirectory below the <ORACLE_HOME> directory (the directory in whichOracle products are installed). For example:
Environment Example ORACLE_HOME PATH must include
Windows 95 C:\orawin95 C:\orawin95\bin
Windows NT C:\orant C:\orant\bin
• all components of Oracle Designer have been successfully installed on your PC(including the tutorial form and menu executables and templates).
• the Forms and Reports components of Oracle Developer have been successfullyinstalled on your PC.
• you have a user account with access to the TUTORIAL application system on aOracle Designer Repository
For more information about importing the TUTORIAL application system, referto Appendix A “Tutorial Installation Notes”.
Note: If you are going to follow lesson 10, "Generate a WebServerApplication", you will need to have WebServer Generator installed.You will also need to know additional connection details, as set outat the beginning of the lesson. Your System Administrator will beable to set up WebServer Generator and tell you the necessaryconnection details.

x
Structure of this documentThe tutorial is organized into the following Parts:
Part I “Before You Start”, introduces Oracle Designer and prepares you for thetutorial.
Part II “Tutorial”, comprises 11 lessons, each made up of one or more tasks.
How to use this documentIf you are not familiar with the Oracle Designer toolset and how the tools relate toone another, refer to Part I, “Before You Start”. Each lesson in Part II begins with abrief discussion of the concepts behind the tasks in the lesson. If you are alreadyfamiliar with these concepts, go straight to the first task in the lesson. The conceptsare covered in more detail in the Oracle Designer help system.
Conventions used in this documentMenu selections are shown with an arrow separating the name of the menu and thename of the option. For example, to show a selection of the New option from theFile Menu, the following appears in the text:
Select File → New
Characters you type are shown in monotype. For example:
Type Order Request
The screenshots in this document are of Oracle Designer Release 2.1 running in aWindows NT environment. You might notice some minor differences between whatyou see on your screen and the corresponding screenshot if:
• you are running Oracle Designer in a Windows 95 or Windows 98 environment
• you are running a later release of Oracle Designer

xi
Related documentationInformation about Oracle Designer products is available in printed form in thefollowing manual:
• Oracle Designer Installation GuidePart No. Z24614-01
Your comments are welcomeWe appreciate your comments as an Oracle user and a reader of the documentation.If you would like to contact us with any comments that you may have about this (orother) Oracle documentation, please use the following address or telephone us on01189 245019 (for Oracle users overseas, + 44 1189 245019).
Oracle Designer User Documentation, Oracle Corporation UK Ltd, Oracle Parkway,Thames Valley Park, Reading RG6 1RA, United Kingdom.

xii

Part IBefore You Start
Introduces Oracle Designer and prepares you for the tutorial.


1
Introducing Oracle Designer 1-1
Introducing Oracle Designer
This chapter introduces the Oracle Designer tools and utilities and contains thefollowing sections:
■ What is Oracle Designer?
■ The Components of Oracle Designer
■ Starting Oracle Designer Tools
What is Oracle Designer?Oracle Designer is a software tool for analyzing business requirements and fordesigning and generating client/server systems that meet those requirements.Oracle Designer incorporates support for business process modeling, systemsanalysis, software design and system generation.
Oracle Designer provides a multi-user Repository and is closely integrated withOracle Developer, Oracle’s client/server development toolset. In this way, OracleDesigner allows organizations to design and rapidly deliver scalable, client/serversystems that can adapt to changing business needs.

1-2 Oracle Designer Tutorial
The components of Oracle DesignerThe Oracle Designer tools are grouped into areas that reflect the primary needs of itsdifferent types of user:
■ Modeling System RequirementsUse the tools in this area to: model business processes; re-examine the methodsused to achieve the goals of the organization; create diagrammaticrepresentations of business processes; record details about them; describebusiness requirements in detail; create diagrammatic models of the entities,functions and flows of data in the systems that make up the organization.
■ Generating Preliminary DesignsUse the Transformers to generate preliminary designs from the models createdearlier.
■ Designing and GeneratingUse the tools in this area to: design a system that meets the businessrequirements of an organization; provide a development environment forsystem engineers and designers; create server-side components and client-sideapplications from definitions recorded in the Repository.
■ UtilitiesUse the tools in this area to: enter and edit information in the Repository; showrelationships between elements in the Repository; generate predefined andcustom reports on the contents of the Repository; administer Repositories; writeSQL-based interactive queries.
In the development environment, Oracle Designer can be installed flexibly. Forexample, you could install the entire Oracle Designer suite on a client PC in a singleoperation, or you could install the components of Oracle Designer separately. Eachof the generators can be installed separately.
For this tutorial, you must install Oracle Designer as described in Appendix A.
For full details about the installation process, see the Oracle Designer InstallationGuide.
Oracle Corporation also publishes the Repository Application ProgrammaticInterface (API), which provides a programmatic way of creating and maintaininginformation in the Repository. The API is viewable as part of the Oracle Designerhelp system.

Introducing Oracle Designer 1-3
Starting Oracle Designer tools and utilities for the tutorial
Different ways to start Oracle Designer tools and utilitiesYou can start Oracle Designer tools and utilities in one of two different ways:
■ from within a currently running tool, using the Tools menu or the Utilitiesmenu as appropriate
■ from the appropriate button in the Oracle Designer window.
During this tutorial you will be told to start most of the Oracle Designer tools fromthe Oracle Designer window.
Displaying the Oracle Designer Window for the tutorialWhen you are following the tutorial, select the Oracle Designer for Tutorial Userprogram in the Oracle Designer Tutorial folder. Do not use the program in theOracle Designer folder. Using the Oracle Designer for Tutorial User program willensure that:
■ items produced by the Oracle Designer tools and utilities during the course ofthe tutorial are kept separate from any other work you do with Oracle Designer
■ you won’t have to specify the location of the object libraries and templatesrequired for the tutorial, only their names.
Note: The working directory specified for the Oracle Designer forTutorial User program must be writeable.

1-4 Oracle Designer Tutorial
Connecting to a database for the tutorialDepending on how Oracle Designer has been installed on your system, the Connectdialog box might appear when you start the Oracle Designer for Tutorial Userprogram.
If this dialog box appears, enter the username and password for the user accountyou will be using during the tutorial. In the Connect String field, enter the name ofthe database you will be using.
Below is an example of a completed Connect dialog box.
In this example, a user with the username ‘analyst’ and a password of ‘teachme1’ isattempting to connect to a database called ‘olympic’.
If you are not sure what to enter in the Connect dialog box, ask your systemadministrator.

Introducing Oracle Designer 1-5
The application system dialog box appears, enabling you to select the applicationsystem you will be using to follow the tutorial.
Unless your system administrator has told you to use a different application system,select TUTORIAL from the Application System drop-down list and click on OK.
The application system you specify is used when you start any of the OracleDesigner tools.
Starting tools and utilities from the Oracle Designer windowWhen you have logged on to a database and selected an application system, theOracle Designer window appears.
To start a Oracle Designer tool from the Oracle Designer window, you click once onthe button for that tool.

1-6 Oracle Designer Tutorial

2
Preparing for the tutorial 2-1
Preparing for the tutorial
This chapter describes the tutorial in this document, and includes the followingsections:
■ Scope of the tutorial
■ Time to allow for the tutorial
■ How to follow the tutorial
■ Removing existing tutorial tables
■ Background to the tutorial
Scope of the tutorialThis tutorial does not attempt to describe in detail the functionality of everycomponent of Oracle Designer. Instead, the tutorial concentrates on how to use thecomponents together to progress from a high level business model to a workinggenerated application. For comprehensive information, refer to the Oracle Designerhelp system.
Note that to enable you to use several different Oracle Designer productcomponents within a relatively short period, the tutorial assumes a very smallbusiness scenario. This scenario is not representative of the more sophisticatedenvironments in which Oracle Designer is typically used.

2-2 Oracle Designer Tutorial
Time to allow for the tutorialThe length of time to allow to complete the tutorial will depend on:
■ the specification of your system
■ your current familiarity with Oracle Designer (the tutorial does not assume anyprior knowledge of Oracle Designer)
Typically, allow around 90 minutes to complete the tutorial.
How to follow the tutorialBefore you follow the tutorial, the following must already have been done:
■ The TUTORIAL application system must have been imported into theRepository. (If you are responsible for importing the application system, refer toAppendix A for more information.)
To follow the tutorial for the first time, you must begin by ensuring that thedatabase tables that will be created during the tutorial do not already exist. You dothis by following the instructions in the next section "Removing existing tutorialtables". The remainder of this chapter sets the scene for the tutorial.
Start the tutorial with the first task in Lesson 1 and continue until you reach the endof the final task in the last lesson. If you attempt to start the tutorial half waythrough, you will be unable to complete some of the lessons.
If you want to take a break during the tutorial and resume later, we suggest youstop between lessons, rather than in the middle of a lesson.

Preparing for the tutorial 2-3
Removing existing tutorial tables
To remove existing tutorial tables:1. Select the Drop Tutorial Tables program in the Oracle Designer Tutorial folder.
The SQL*Plus window appears.
2. When prompted to enter a username, enter the username, password anddatabase you will be using to follow the tutorial on one line, in the followingformat:
Enter user-name:<your_username>/<your_password>@<your_database>
For example, if the username is ‘analyst’, the password is ‘teachme1’ and thedatabase you are using is called ‘olympic’, you would type the following:
Enter user-name:analyst/teachme1@olympic
If you are not sure what to enter, ask your system administrator.
You are prompted to confirm you want to delete the following tables (if theyexist):
CUSTOMERSORDERSPRICED_PRODUCTSITEMSPRODUCTS
Do not delete these tables unless you are sure these tables are no longerrequired. If you are not sure, type N and press [Return]. Ask your systemadministrator to create a new user for you to follow the tutorial, and repeatsteps 1 and 2.
3. To delete the tables, type Y and press [Return].
The tutorial tables are removed.
When the operation is complete, you are prompted to close the window.
4. Type EXIT and press [Return] to close the SQL*Plus window.

2-4 Oracle Designer Tutorial
To drop the tutorial tables after you have completed the tutorial:■ Follow the procedure set out in "To remove existing tutorial tables", above.
For more information, refer to Lesson 11, "Conclude the Tutorial".
Background to the tutorialAnalysts and developers at a pizza delivery company called Speedy Pizza havealready carried out some analysis and design activities to produce a system fortaking customer orders and despatching pizzas.
Your task is to make additions to the design of the system and to implement a smallpart of it.
In particular, you will create an on-screen form for entering details of the company’snew products. These details will be stored in a database that you will design andcreate.
If you have Oracle’s WebServer Generator installed, you can implement the samesystem as a Web application.
During this tutorialDuring the course of this tutorial you will make the necessary changes to theinformation held in the Oracle Designer Repository. You will:
■ Add new process steps for "Add new product to the menu" and "Publish menuon the web".
■ Enter a new entity, PRODUCT, required by the "Add new product to the menu"process step. You will define the attributes of PRODUCT and specify therelationship between it and other entities.
■ Enter new entity usages and attribute usages for the "Add new product to themenu" function (the "Add new product to the menu" process step is stored inthe Repository as a function).
■ Create default table definitions (database design) in the Repository from thePRODUCTS entity and other entities.
■ Refine the default database design by adding an extra column to a table.
■ Define and generate the database in which the Speedy Pizza company will storeits information.

Preparing for the tutorial 2-5
■ Create default module definitions that provide the functionality to implementthe system. You will make these default definitions ready for generation, thenuse one of them to generate an initial working form ("Priced Products") for theinput of product information. You can use this form to record information onthe database, if you wish.
■ Refine one of the module definitions further, to make significant changes to theappearance and operation of the Priced Products form.
■ Make further refinements to the appearance of the Priced Products form, thengenerate a final version and use it.
■ If you have Oracle’s Webserver Generator installed, implement the PricedProducts form as a Web application.

2-6 Oracle Designer Tutorial

Part IITutorial
Comprises 11 lessons, each made up of one or more tasks.


Lesson 1
Create process steps and add flows Le 1-1
Create process steps and add flows
Processes play a critical role in the way a business works. Modeling a processenables you to both understand and improve existing processes, and also to designnew processes.
With Oracle Designer, you model a business process using a process diagram. Thediagram shows the sequence of process steps that create a product or service withinthe business, and the flow of information between them. Some products andservices might be for customers outside the organization. Other processes provideinternal benefit and help manage the business.
Process Modeler enables you to create process diagrams to model businessprocesses. The data from a process diagram is stored in the Oracle DesignerRepository and is available for use by other Oracle Designer tools. In particular,process steps are stored in the Repository as functions, which you can access usingthe Function Hierarchy Diagrammer.
A process diagram has already been created to model customer order processing ata pizza delivery company. During this lesson you will:
■ enter new process steps called ADD NEW PRODUCT TO THE MENU andPUBLISH MENU ON THE WEB in the Satisfy Customer Order process
■ indicate the flow of information between the new process steps
Note: Before you start this lesson, make sure you have followed theinstructions in Chapter 2, “Preparing for the Tutorial”.

Le 1-2 Oracle Designer Tutorial
Create a process stepA process step represents an individual task within a business process. Eachbusiness process undertaken by an organization can be broken down into individualprocess steps.
When you save a process step in the Repository, it is saved as a business function.
ObjectiveTo add new process steps to the existing diagram modeling the Satisfy CustomerOrder process. These process steps are to be represented on the diagram by two ofthe icons shipped with Process Modeler.
Instructions1. Display the Oracle Designer front panel (follow the instructions in “Starting
Oracle Designer Tools and Utilities for the Tutorial” in Chapter 1).
2. Click on the Process Modeler button on the Oracle Designer front panel to startProcess Modeler.
3. Select File → Open to display the Open Diagram dialog box.

Create process steps and add flows Le 1-3
4. Double click on PM1 SATISFY CUSTOMER ORDER to open the diagram.
5. Select View → Iconic to make sure the diagram appears in iconic mode (asshown below).
6. Click on the Create Process Step toolbar button.
7. Move the mouse pointer into the lowest swim lane (the horizontal strip next tothe ’Unspecified’ organization unit).
8. Click the mouse button.
The Create Process Step dialog box is displayed.

Le 1-4 Oracle Designer Tutorial
9. Enter the following details for the new process step:
Short Definition: Add new product to the menu
Label: DELI 10.4 (AUTO)
10. Click on OK to close the dialog box.
The new process step is represented on the diagram by an icon, as shown below.
You can now change the icon that represents the new process step.
11. Double click on the ADD NEW PRODUCT TO THE MENU process step todisplay the Edit Process Step dialog box.
12. Display the Multimedia tab of the Edit Process Step dialog box.
13. Select perscmp1.bmp from the Animation Icon drop-down list.
14. Click on OK to close the Edit Process Step dialog box.

Create process steps and add flows Le 1-5
15. In the lowest swim lane, add a second process step as descibed in step 7 to 10,above. For this second process step, enter the following details:
Short Definition: Publish menu on the Web
Label: DELI 10.5 (AUTO)
16. Using the procedure described in steps 11 to 14, above, change the icon of thenew process step to globe1.bmp.
Add a flow, a trigger and an outcomeA flow represents the movement of information between individual elements (e.g.process steps) on a process diagram. A trigger is an event that initiates the businessprocess that a process diagram illustrates. An outcome is an event that results fromthe business process that a process diagram illustrates.
ObjectiveTo add a flow to the process diagram, between the ADD NEW PRODUCT TO THEMENU process step and the PUBLISH MENU ON THE WEB process step, and toadd a trigger and outcome.
Instructions1. Click on the Create Flow toolbar button.
2. Click on the ADD NEW PRODUCT TO THE MENU process step.
3. Click on the PUBLISH MENU ON THE WEB process step.
The Create Flow dialog box appears.
4. Click on OK to close the dialog box and add the flow to the diagram.

Le 1-6 Oracle Designer Tutorial
5. Click on the Create Trigger toolbar button.
6. Click on the ADD NEW PRODUCT TO THE MENU process step.
The Create Trigger dialog box appears.
7. In the Name box, type NEED FOR MENU CHANGE and click OK.
8. Click on the Create Outcome toolbar button.
9. Click on the PUBLISH MENU ON THE WEB process step.
The Create Outcome dialog box appears.
10. In the Name box, type PRODUCT PUBLICISED and click OK.
The diagram now appears as shown.
11. Select File → Save Diagram to save the diagram.
12. Select File → Exit to close the Process Modeler.

Create process steps and add flows Le 1-7
Lesson summaryIn this lesson you used the Process Modeler to enter new steps called ADD NEWPRODUCT TO THE MENU and PUBLISH MENU ON THE WEB in the SatisfyCustomer Order process. You indicated an information flow and recorded a triggerand outcome.

Le 1-8 Oracle Designer Tutorial

Lesson 2
Create entities and add relationships Le 2-1
Create entities and add relationships
Any application you develop will store and manipulate information, so an essentialpart of developing a system is constructing an accurate model of the informationneeds of an organization. The information model will act as a framework for thedevelopment of new or enhanced systems.
One technique used to model an organization’s information requirements is entityrelationship modeling. Entity relationship modeling involves identifying the thingsof importance in an organization (entities), the properties of those things (attributes)and how they are related to one another (relationships).
The Entity Relationship Diagrammer, one of the Oracle Designer tools, enables youto create an entity relationship model in the form of a diagram showing theelements of information and the way they are logically related.
An entity relationship diagram has already been created for Speedy Pizza, modelingthe information needs of the business. During this lesson, you will:
■ enter a new entity, PRODUCT
■ specify the relationship between the PRODUCT entity and the PRICEDPRODUCT entity.
■ define the attributes of PRODUCT
Le 2-2 Oracle Designer Tutorial
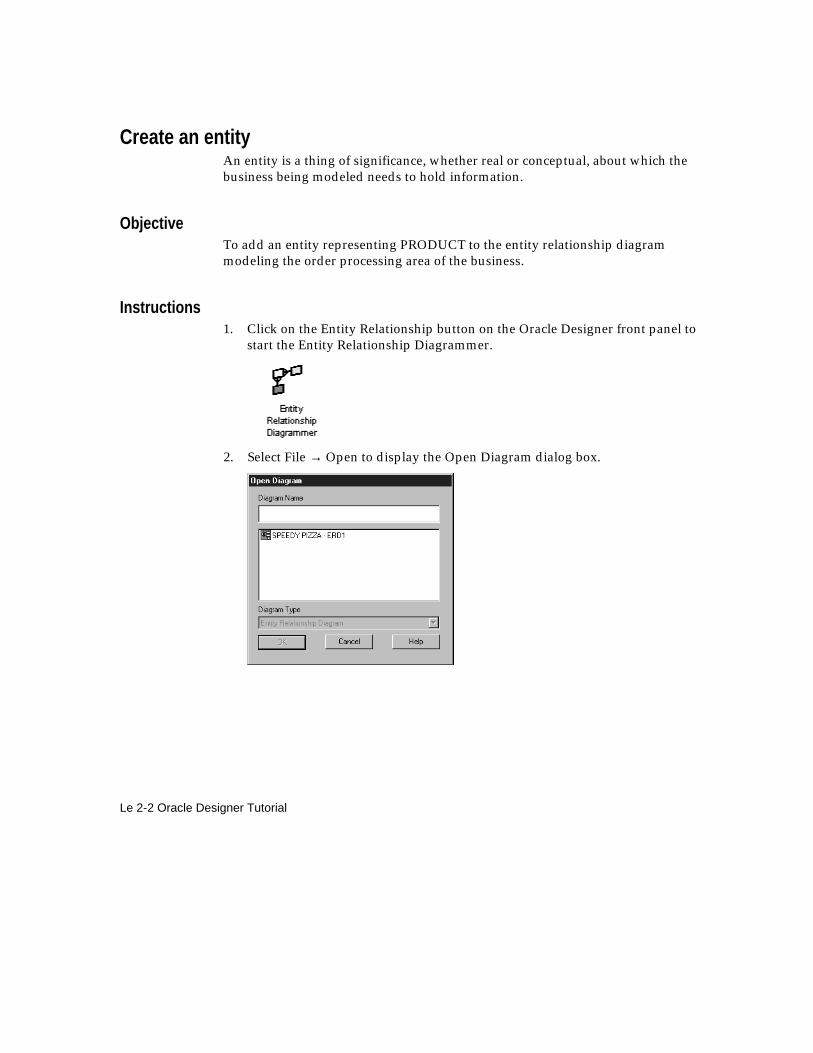
Create an entityAn entity is a thing of significance, whether real or conceptual, about which thebusiness being modeled needs to hold information.
ObjectiveTo add an entity representing PRODUCT to the entity relationship diagrammodeling the order processing area of the business.
Instructions1. Click on the Entity Relationship button on the Oracle Designer front panel to
start the Entity Relationship Diagrammer.
2. Select File → Open to display the Open Diagram dialog box.

Create entities and add relationships Le 2-3
3. Double click on SPEEDY PIZZA - ERD1 to open the diagram.
Hint: You might have to resize the window to view all the entities.
4. Click on the Entity toolbar button.
5. Move the mouse pointer to below the PRICED PRODUCT entity and click tocreate the entity.
The Create Entity dialog box appears.

Le 2-4 Oracle Designer Tutorial
6. Enter the following details in the Create Entity dialog box:
Name: PRODUCT
Short Name: PDT
Plural: PRODUCTS
7. Click on OK to close the Create Entity dialog box.
The PRODUCT entity appears on the diagram.
Hint: You might have to resize the PRODUCT entity.

Create entities and add relationships Le 2-5
Add a relationshipRelationships are named significant associations between two entities. Relationshipson an entity relationship diagram display graphical indications of their optionality(whether a relationship is mandatory or optional) and cardinality (the number ateach end of a relationship).
ObjectiveTo create a relationship between the PRICED PRODUCT entity and the PRODUCTentity.
Instructions1. Click on the Many-to-One (Mandatory to Optional) Relationship toolbar button.
Note: It is important to click on the correct toolbar button. Check thatthe tooltip is "M:1 (M to O) Relationship" and that the text in thestatus bar is "Creates a M:1 (mandatory to optional) relationship".
2. Click on the PRICED PRODUCT entity.
A line starts from the edge of the entity that you clicked on and stretches towherever you move the mouse pointer.
3. Click on the PRODUCT entity.
A line appears between the PRICED PRODUCT entity and the PRODUCTentity, and the Create Relationship dialog box appears.

Le 2-6 Oracle Designer Tutorial
4. In the Create Relationship dialog box, enter the following details:
From Name: FOR
To Name: OBTAINABLE AS
5. Click on OK to close the Create Relationship dialog box.
The names of the two ends of the relationship appear on the entity relationshipdiagram.
6. Select File → Save Diagram to save the entity relationship diagram.

Create entities and add relationships Le 2-7
Create attributesAn attribute is any detail that serves to qualify, identify, classify, quantify or expressthe state of an entity.
A unique identifier is a combination of attributes and/or relationships that uniquelyidentifies an occurrence of an entity.
ObjectiveTo add attributes to the new PRODUCT entity.
Instructions1. Double click on the PRODUCT entity to display the Edit Entity dialog box.
You are now ready to enter the attributes of the PRODUCT entity.
If a particular attribute is always required, the attribute is described asmandatory. If the attribute has a value for only some of the time, it is describedas optional. An attribute’s Optionality (Opt) property specifies whether theattribute is mandatory or optional.

Le 2-8 Oracle Designer Tutorial
The type of data represented by an attribute is defined by the attribute’s Formatproperty. Some attribute formats require further definition, including lengthand the number of decimal places (specified by the Max Len and Dec propertiesrespectively).
Attributes can be associated with a domain (a common set of properties thatapply to a group of attributes).
2. On the Attributes tab, enter the following details:
Name Seq Domain Opt Format MaxLen
Dec Primary
DISCOUNTDAY
DISCOUNTDAY
æ CHAR 1
PRODUCTDESCRIPTION
VARCHAR2 30
PRODUCT ID INTEGER 6 æ
PRODUCTTYPE
PRODUCTTYPE
VARCHAR2 10
Hint: Use the horizontal scroll bar to see the Format, Max Len, Dec and Primaryfields.
3. Double check that you have entered all of the attribute details correctly (this isimportant for the rest of the tutorial).
Each occurrence of an entity can be uniquely identified by one or more of itsattributes. Because you have checked Primary against ID, that attribute will beused as the unique identifier (UID). You can confirm this on the UIDs tab. Youcould also use the UIDs tab to change the composition of the UID or to createalternate UIDs. For this tutorial, we will not make these changes.

Create entities and add relationships Le 2-9
4. Click on OK to close the Edit Entity dialog box.
The attributes for the PRODUCT entity are displayed on the diagram.
Hint: You might have to resize the PRODUCT entity to see all the attributes.
5. Select File → Save Diagram, then select File → Exit to close the EntityRelationship Diagrammer.

Le 2-10 Oracle Designer Tutorial
Lesson summaryIn this lesson you used the Entity Relationship Diagrammer to enter a new entity,PRODUCT. You specified the relationship between the PRODUCT entity and thePRICED PRODUCT entity. You defined the PRODUCT entity’s attributes.

Lesson 3
Refine default functions Le 3-1
Refine default functions
Functions are arranged in a hierarchy. A function hierarchy shows the informationused by functions, in terms of entities and attributes. Each function in the hierarchyis decomposed until the lowest level functions (called elementary businessfunctions) that comprise it have been identified. It is the elementary functions thatbecome the forms, reports and utilities in the finished system.
You use the Function Hierarchy Diagrammer to decompose functions, defineelementary functions and show how functions use data.
Identify functions to automateThe process model showed the process steps for the business carried out by SpeedyPizza. All of the process steps were recorded in the repository as functions, but onlysome of these functions are suitable for automation (e.g. "Record customer order").The remaining functions (e.g. "Assemble products in a box") will be implemented asmanual processes
ObjectiveTo identify which of the existing functions are to be automated.

Le 3-2 Oracle Designer Tutorial
Instructions1. Click on the Function Hierarchy button on the Oracle Designer front panel to
start the Function Hierarchy Diagrammer.
2. Select File → New to create a new diagram based on existing functiondefinitions.
The New Diagram dialog box appears.

Refine default functions Le 3-3
3. Highlight "DELI 1 Satisfy Customer Order" in the list and click OK.
The DELI 1 SATISFY CUSTOMER ORDER function and its child functionsappear.
Hint: You might have to resize the window or use zoom to view the entirefunction hierarchy.
4. Click the Function button in the toolbar.
Le 3-4 Oracle Designer Tutorial
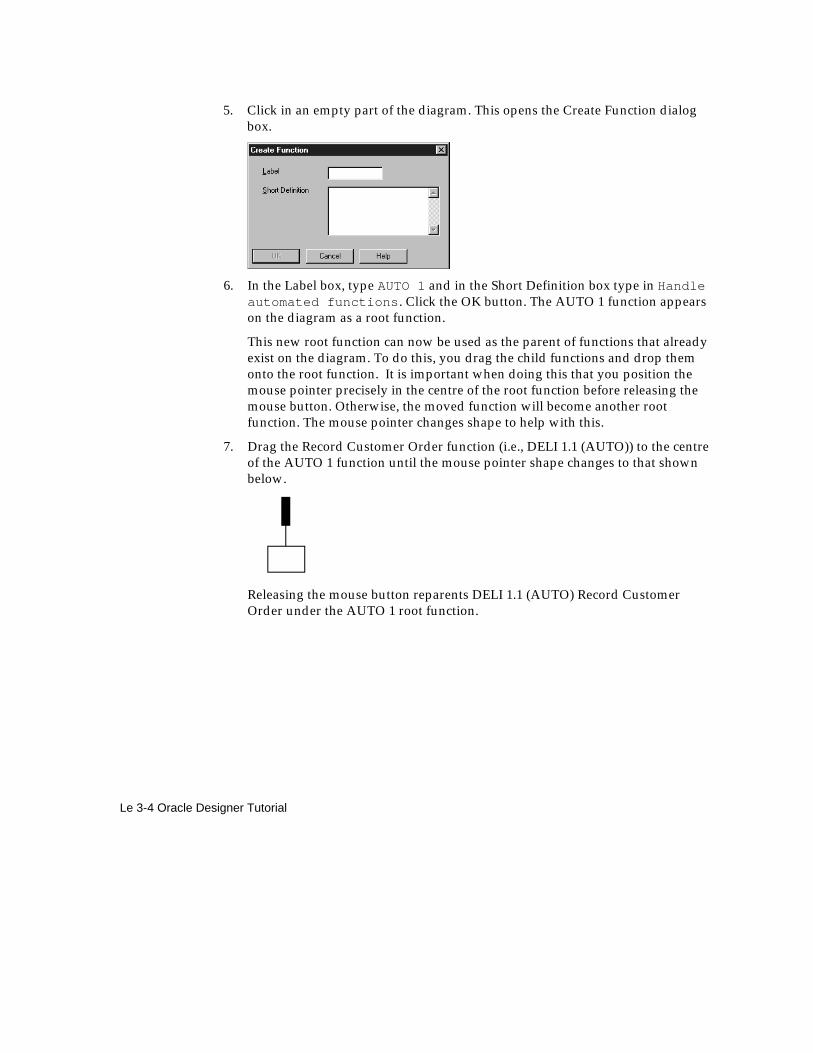
5. Click in an empty part of the diagram. This opens the Create Function dialogbox.
6. In the Label box, type AUTO 1 and in the Short Definition box type in Handleautomated functions. Click the OK button. The AUTO 1 function appearson the diagram as a root function.
This new root function can now be used as the parent of functions that alreadyexist on the diagram. To do this, you drag the child functions and drop themonto the root function. It is important when doing this that you position themouse pointer precisely in the centre of the root function before releasing themouse button. Otherwise, the moved function will become another rootfunction. The mouse pointer changes shape to help with this.
7. Drag the Record Customer Order function (i.e., DELI 1.1 (AUTO)) to the centreof the AUTO 1 function until the mouse pointer shape changes to that shownbelow.
Releasing the mouse button reparents DELI 1.1 (AUTO) Record CustomerOrder under the AUTO 1 root function.

Refine default functions Le 3-5
8. Using the technique described in step 7, above, reparent the followingadditional functions under AUTO 1:
DELI 1.3 (AUTO) Print customer’s order
DELI 10.3 (AUTO) Record time to transport and payment
DELI 10.4 (AUTO) Add new product to the menu
DELI 10.5 (AUTO) Publish menu on the Web
The new function hierarchy for the AUTO 1 module is as follows:

Le 3-6 Oracle Designer Tutorial
Add entity usages to a functionTo create working applications, the information used by a function must beidentified. This typically involves specifying whether a function can create, retrieve,update or delete an instance of an entity.
ObjectiveTo specify how the PRODUCT entity is used by the "Add new product to the menu"and "Publish menu on the Web" functions.
Instructions1. Double click the function DELI 10.4 (AUTO) Add new product to the menu.
This opens the Edit Function dialog box.
Error! Not a valid filename.
2. On the Entity Usages tab, add the PRODUCT and PRICED_PRODUCT entitiesto the Entity column (by selecting them from the drop down list in each cell ofthe Entity column) and set their usages as set out in the following table.
Entity Create Retrieve Update Delete Archive Other
PRODUCT æ æ æ æ
PRICED_PRODUCT æ æ æ æ
The usage flags indicate how the function uses the information represented bythe entities.
Hint: Use the horizontal scrollbar to see the Delete, Archive and Other usageflags.
3. Click on OK to close the Edit Function dialog box.
4. Set up entity usages for entities DELI 10.5 (AUTO) as below.
Entity Create Retrieve Update Delete Archive Other
PRODUCT æ
PRICED_PRODUCT æ
5. If you wish, save the diagram with a name of your choice. Note that you do not haveto save the diagram in order to save the data that you have input in this lesson.
Refine default functions Le 3-7
Create attribute usages using the function/attribute matrix utilityHaving specified the entities used by a business function, and how those entities areused, you specify how the function uses the attibutes of those entities, includingwhether a function can:
■ create or insert a value into an optional attribute
■ retrieve the value of an attribute
■ update the value of an attribute
■ delete the value of an optional attribute
You can use the Function/Attribute Matrix utility to create usages for all attributesof the entities used by a function.
ObjectiveTo create attribute usages for the "Add new product to the menu" and "Publishmenu on the Web" functions.
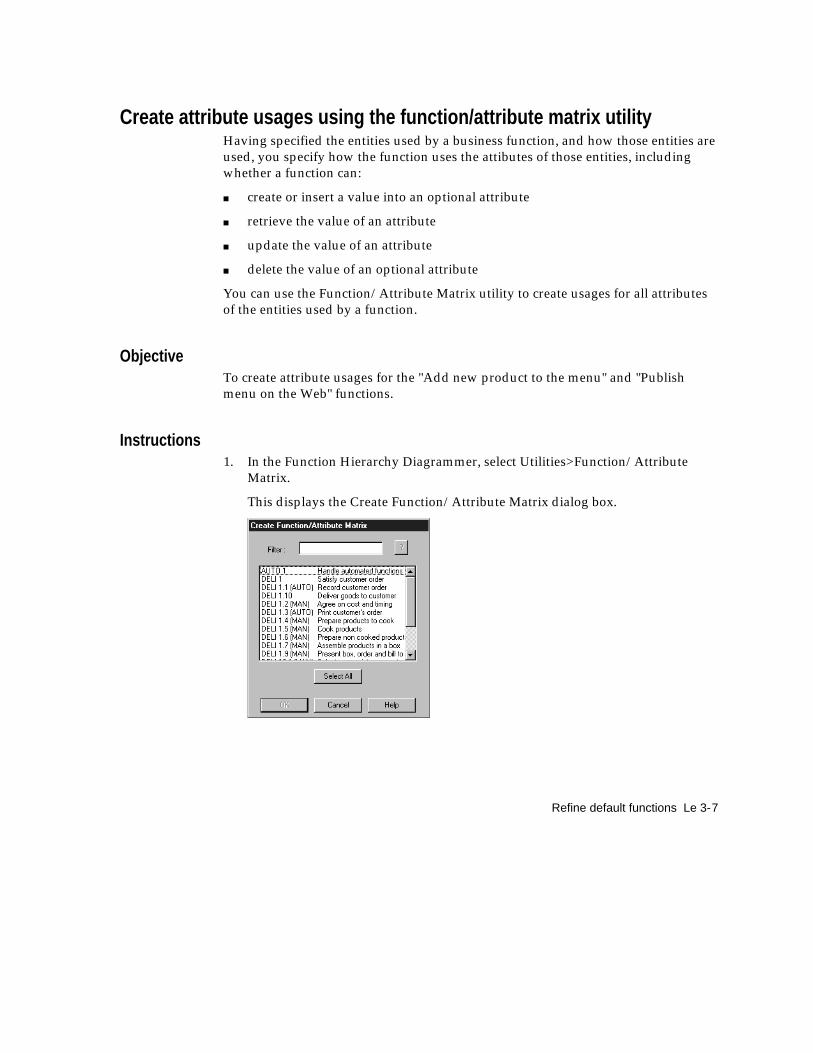
Instructions1. In the Function Hierarchy Diagrammer, select Utilities>Function/Attribute
Matrix.
This displays the Create Function/Attribute Matrix dialog box.
Le 3-8 Oracle Designer Tutorial
2. Highlight the following functions in the list:
DELI 10.4 (AUTO) Add new product to the menu
DELI 10.5 (AUTO) Publish menu on the Web
3. Click the OK button.
The Create Function/Attribute dialog box closes and the attribute usages arecreated.
To confirm that the attribute usages have been created, open the Edit Functiondialog box for the functions (see previous section) and view the AttributeUsages tab. For each entity used by the function, the attributes will be listed andthe usages shown by completed check boxes. If you scroll across to theComments column, you will see "Created by system on <date>".
4. Close the Function Hierarchy Diagrammer.
Lesson summaryIn this lesson you identified which functions should be automated and createdentity and attribute usages.

Lesson 4
Transform the data model into a table design Le 4-1
Transform the data modelinto a table design
When you record an entity model in the Repository, you are specifying the thingsthe business needs to manipulate and about which information has to be stored. Thenext stage is to design a database in which to hold this information.
The Database Design Transformer, one of the Oracle Designer tools, enables you tocreate and maintain a database design based upon the entity model recorded in theRepository. The resulting database design comprises a number of database objectdefinitions including table definitions (to record instances of entities), columndefinitions (to store attributes), and foreign key constraint definitions (to implementrelationships between entities). The Database Design Transformer also creates andmaintains additional elements to support the design.
Like the entity model, the database design generated by the Database DesignTransformer is stored in the Repository. Later in the tutorial, you will use otherOracle Designer tools to create the database itself, based on this design.
During this lesson, you will use the Database Design Transformer to create newtable and column definitions in the Repository from the entity and attributes thatyou defined in the previous lesson (and from the supplied entities).

Le 4-2 Oracle Designer Tutorial
Create a table definition from entitiesThe Database Design Transformer maps entities to tables to create table definitions,and creates column definitions from attributes.
Note: The instructions below direct you to start the DatabaseDesign Transformer from the Entity Relationship Diagrammer.However, you can also start the Database Design Transformerdirectly from the Oracle Designer front panel using the DatabaseTransformer button.
ObjectiveTo create table definitions in the Repository from the design information on theentity-relationship diagram.
Instructions1. In the Entity Relationship Diagrammer, open the SPEEDY PIZZA - ERD1
diagram.
Note that the PRICED PRODUCT entity has no unique identifier (i.e., noattribute marked with a #). This will be created later by the Database DesignTransformer.

Transform the data model into a table design Le 4-3
2. Select Utilities → Database Design Transformer.
A progress box, then the Database Design Transformer dialog box, appears.
3. Ensure that the "Run the Transformer in Default Mode" and "All entities"options are selected.
4. Click on Run to run the Database Design Transformer.
The Design Transformer Output window appears, detailing the operationsperformed by the Database Design Transformer.
The Database Design Transformer creates table and column definitions from theentities and attributes. The name of the table definition is the plural version ofthe entity name, with spaces converted to underscores. The names of thecolumn definitions are the attribute names with spaces converted tounderscores.
In the next lesson, you will use the Design Editor to view the definitions createdby the Database Design Transformer.
5. Close the Design Transformer Output window and the Database DesignTransformer dialog box.
6. Select File → Exit to close the Entity Relationship Diagrammer.

Le 4-4 Oracle Designer Tutorial
Lesson summaryIn this lesson you used the Database Design Transformer to create new table andcolumn definitions in the Repository from entities and attributes.

Lesson 5
Refine the default database design Le 5-1
Refine the default database design
The database design created by the Database Design Transformer from the entityrelationship model consists of a set of interrelated tables, columns and constraints.This is often referred to as the ‘first-cut database design’. The design objects thatmake up the first-cut database design can be represented on one or more servermodel diagrams and refined to a level ready for implementation.
After you have produced the first-cut database design, you can begin to makeimprovements to the design itself, and to establish defaults for how generatedapplications will use data. The process of amending and enriching the databasedesign is one of the most important tasks in the application system developmentlifecycle.
The Design Editor, one of the Oracle Designer tools, enables you to model databasedesigns on server model diagrams. Each server model diagram represents acollection of database objects that can be distributed physically between one or moredatabases. Using the Design Editor, you can add more information to the first-cutdesign produced by the Database Design Transformer.
During this lesson, you will refine the definition of tables that you created in theprevious lesson.

Le 5-2 Oracle Designer Tutorial
Modify a default table definitionThe Database Design Transformer has converted the entity relationship model intodesign-level table and constraint definitions held in the Repository.
To prepare the default design for implementation, you now add extra informationthat was not relevant during the analysis phase of development.
ObjectiveTo refine the definition of tables that you created in the previous lesson.
Instructions1. Click on the Design Editor button on the Oracle Designer front panel to start the
Design Editor.
2. If the Welcome To The Design Editor dialog box opens, select the Server Modeloption, uncheck the Use A Guide and Open A Diagram boxes, and click the OKbutton.
3. Click on the plus sign next to Relational Table Definitions. This reveals the list ofrelational table definitions that were mapped from entities by the DatabaseDesign Transformer.
4. Highlight all of the relational table definition names listed under RelationalTable Definitions (CUSTOMERS, ITEMS, ORDERS, PRICED_PRODUCTS,PRODUCTS), then right-click on one of the highlighted names and choose ShowOn New Diagram.
An alternative method is to drag and drop the relational table definition namesinto the blank area of the Design Editor window.

Refine the default database design Le 5-3
A server model diagram is created in a separate window within the DesignEditor. You may have to zoom out to see all of the diagram.
Note that PRICED_PRODUCTS now has a primary key (PP_ID).

Le 5-4 Oracle Designer Tutorial
5. On the server model diagram, select the diagram object representing theORDERS table, then click the (create) Column button on the left side toolbar.
The following steps will add a column that could be used to record which usercreated the order. This is to familiarize you with the tool and will not be part ofthe form that you generate in later lessons.
6. On the first line of the Fast Create Columns dialog box, type WHO and click OK.
The new column name appears in the diagram object representing the ORDERStable.

Refine the default database design Le 5-5
7. Switch to using the property palette by choosing Options → Use PropertyPalette (this option may already be the current one).
8. On the diagram object representing the ORDERS table, double click the A iconnext to the name of the new column (WHO). You will see the column propertiesof the new column displayed in the Property Palette.
The property names for a particular object are listed in the cells in the leftcolumn. The values for the properties are listed in the cells in the right column.When you click on a values cell, it changes to an appropriate input control. Thecontrols you will be using are the text box and the drop-down box.
9. Change the Maximum Length property to 20, then scroll down to AutoGenType and change its value to "Created By".
10. Save the data by clicking the Save button in the Property Palette toolbar.
Keep the Design Editor running, ready for the next lesson.

Le 5-6 Oracle Designer Tutorial
Lesson summaryIn this lesson you used the Design Editor to refine the definition of tables that werecreated by the Database Design Transformer.

Lesson 6
Build a database Le 6-1
Build a database
Having refined the database design, you use the Server Generator to generate theserver-side components for the system.
The Server Generator can create objects on a local or remote database fromdefinitions recorded in the Repository.
During this lesson you will:
■ create the database tables on a local Oracle database
Create the database tablesOracle Designer can take the table definitions created by the Database DesignTransformer and create the database that your applications will use to store data.
ObjectiveTo create the database tables required for your system.
Instructions1. In the Design Editor, select Generate → Generate Database From Server Model.
This opens the Generate Database From Server Model dialog box.
2. On the Target tab, choose the Database option button and enter the connectiondetails (the same as for your current connection).
3. On the Objects tab, move all objects into the Generate list by clicking the double-right-arrow button.

Le 6-2 Oracle Designer Tutorial
4. Click the Start button. The messages window is opened in the Design Editor.This reports the progress of the generation process.
When generation is complete, the Generation Complete dialog box opens.
5. Click the Execute DDL button. This creates the database tables and otherobjects.
After the ’Processing Complete’ message appears in the message window, you canuse the Database Navigator to see the database objects that have been created.
You open the Database Navigator by selecting Tools → Database Navigator. Notethat no triggers have been created for any of the tables. You should close theDatabase Navigator before continuing.
You can close the Design Editor. There is no need to save the server model diagramthat you created, but you may do so if you wish.
Lesson summaryIn this lesson you used the Server Generator to create the tables on the database.

Lesson 7
Create default working forms Le 7-1
Create default working forms
Once the analysis data is as complete as possible and the database design is stableand complete, you are ready to create a first-cut application design based oninformation stored in the Repository.
The Oracle Designer utility to produce the first-cut application design is theApplication Design Transformer. The Application Design Transformer convertsfunctions into candidate modules, which can then be implemented as forms, reportsand utilities. The Transformer also converts function data usages to module datausages that define how a module uses the tables and columns in the database.
The modules created by the Application Design Transformer are ’candidate’modules and are not included in the application design until you accept them (bychanging their ’Candidate’ property to ’No’). Modules you accept, and their usages,can then be used for generating applications.

Le 7-2 Oracle Designer Tutorial
Generate default module definitions
ObjectiveTo create module definitions for the automated functions.
Instructions1. Click on the Function Hierarchy button on the Oracle Designer front panel to
start the Function Hierarchy Diagrammer.
2. Create a new diagram based on the function AUTO 1 "Handle automatedfunctions".
You do this by selecting File → New, then double clicking on AUTO 1 in theNew Diagram dialog box. You may have to resize the diagram to see all of thefunctions.
3. On the Function Hierarchy Diagram, select the function AUTO 1 "Handleautomated functions".
4. Select Utilities → Application Design Transformer.
This opens the Application Design Transformer dialog box.
5. Ensure that the following options are set (these should be the default settings):
Common Parameters - Start Function AUTO 1
Common Parameters - Module Prefix TUTORI

Create default working forms Le 7-3
6. Set the Merge Granularity option to Identical Entities And Usages.
Note: If you leave this option set to the default (i.e., IdenticalEntities), the Application Design Transformer will create a singlemodule definition for functions DELI 10.4 (AUTO) and DELI 10.5(AUTO). This single module definition will not enable you tocontinue with the tutorial.
7. Click the Generate button.
8. At the end of the generation process (wait for the percentage completion figureto reach 100%), close the progress box and the dialog box, then exit from theFunction Hierarchy Diagrammer. You can save the diagram if you wish, butthere is no need to, because all the underlying data was saved in the Repositoryas you worked.
Accept the candidate module definitions for generationThe Application Design Transformer has created "candidate" module definitions.These will not be used for generation unless you change this status.
ObjectiveTo make the default module definitions ready for generation.
Instructions1. Click on the Design Editor button on the Oracle Designer front panel to start the
Design Editor.

Le 7-4 Oracle Designer Tutorial
2. Choose the Module Applications option on the Welcome screen, then click theOK button. (If the Welcome screen did not appear, change directly to theModules tab in the Navigator window.)
3. Select Options → Use Property Palette (the option may already be chosen), thenexpand the list of Modules in the Navigator and double click on the icon for thefirst module in the list.
The properties for the module are shown in the Property Palette.
The property names for a particular object are listed in the cells in the left column.The values for the properties are listed in the cells in the right column. When youclick on a values cell, it changes to an appropriate input control. The controls youwill be using include the drop-down box and the list box. When using the list box,you obtain the list of possible values by clicking the icon on the right of the cell.
The changes that you make to the values of a particular object (in this casemodule definitions), will be saved automatically if you display the values foranother object. You can also save the values manually.
Create default working forms Le 7-5
To save the changes that you make on the Property Palette manually, selectFile → Save Uncommitted Data, or click
on the Property Palette toolbar.
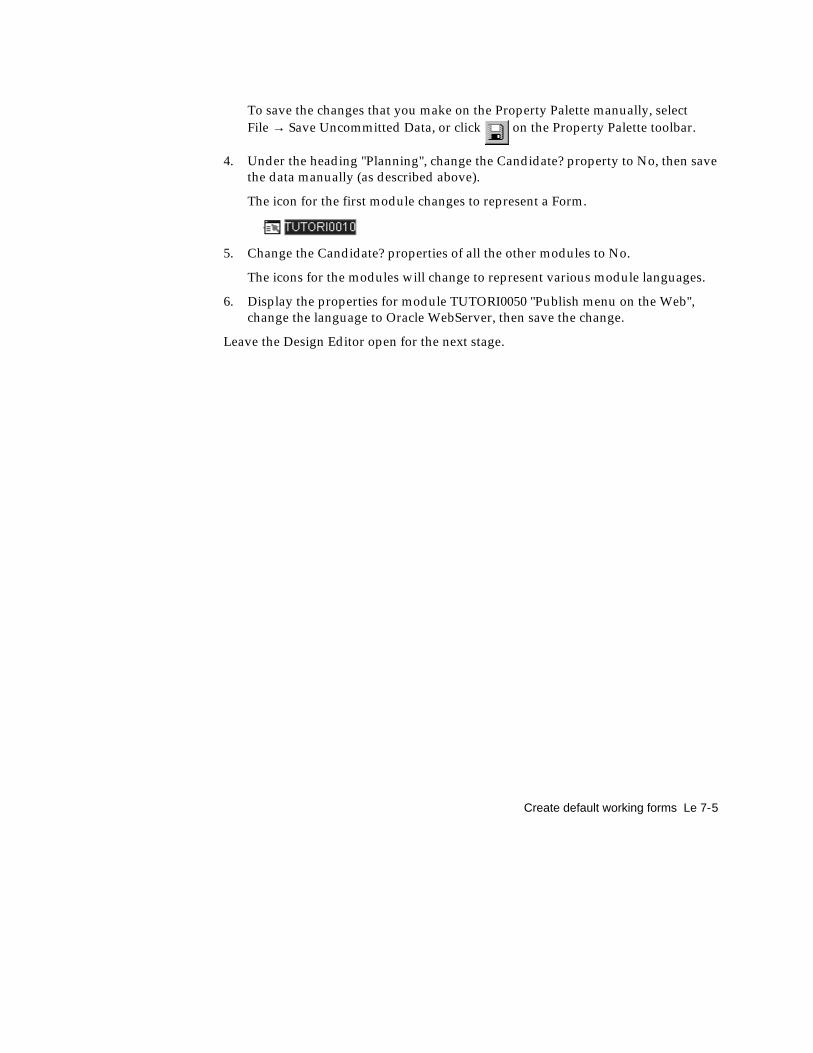
4. Under the heading "Planning", change the Candidate? property to No, then savethe data manually (as described above).
The icon for the first module changes to represent a Form.
5. Change the Candidate? properties of all the other modules to No.
The icons for the modules will change to represent various module languages.
6. Display the properties for module TUTORI0050 "Publish menu on the Web",change the language to Oracle WebServer, then save the change.
Leave the Design Editor open for the next stage.

Le 7-6 Oracle Designer Tutorial
Generate a working formYou can now generate a first-cut working form. The generated form will providebasic functionality that you can refine in later lessons.
ObjectiveTo generate a default working form from a module definition.
Instructions1. In the Navigator, highlight module TUTORI0040 ("Add new product to menu").
2. Select Generate → Generate Module. This opens the Generate Form dialog box.

Create default working forms Le 7-7
3. In the Standards group on the Generate Form, ensure that the Object LibraryName box is set to find tutorial.olb and that the Template Name box is set to findtutorial.fmb. If they are not already set, click each Browse button to find them.
Note: The tutorial.olb and tutorial.fmb files are copies of the filesofgstnd1.olb and ofgpc1t.fmb files, as they were originally suppliedwith Oracle Designer. If you use modified versions of these files, oralternate files, you will not get the results described in theremainder of this tutorial.
4. Click the Options button to open the Form Generator Options dialog box, andon the Run tab set the Run Form option to Yes. Click the OK button.
5. On the Generate Form dialog box, click the Start button.
Progress is reported in the message window. Blue messages will tell you aboutchanges that the generator intends to make to the module definition. TheGeneration Complete message box is then displayed, giving you the option tosave the changes to the module definition or to revert to the pre-generationstate.

Le 7-8 Oracle Designer Tutorial
6. On the Generation Complete message box, click the Save button.
Because you set the Run Form option to Yes in step 4, above, the Forms Runtimeprogram will open. The default working form is displayed.
You can use this form now if you wish. The details that you enter will berecorded on the PRICED_PRODUCTS and PRODUCTS tables of the databasethat you generated earlier.
The cursor will be flashing in the Size Code field, but first you need to set upProducts information, so click the Discount Day field. Notice that there is a hintmessage at the foot of the window that says there is a list of values available. To
obtain the list of values, click the List button in the toolbar. Double click onone of the values to enter it into the list.
Tab to the Product Description field and type in Ham and mushroomsupreme.
Tab to the Product Id field and type in 1001.
Tab to the Product Type field and choose PIZZA from the list of valuesavailable.

Create default working forms Le 7-9
Click the Save button in the toolbar to save the information to the database.
Click the Clear Record button and make further entries if you wish (e.g., for abeverage), but not too many at this stage.
Now click the Price field and enter 9.99.
Tab to the Size Code field. Enter M (a list of values is available).
Tab to Label and type in Medium Ham and Mushroom Supreme.
Tab to Quantity In Stock but don’t enter a value.
Tab to Product Id. Enter 1001 from the list of available values.
Click the Save button in the toolbar. The message "Transaction complete - 1record applied and saved" is shown at the foot of the window.
Make a few more entries, if you wish.
You will have noticed that the fields on the form are held within two blocks, onerelating to the Priced Products table and one to the Products table. In the nextlesson, the Products table will be made into a lookup table and you will enteronly Priced Products information through the generated form.
7. To close the generated form, press ALT+F4.
The generated form is closed.
Leave the Design Editor open for the next lesson.

Le 7-10 Oracle Designer Tutorial
Lesson summaryIn this lesson you:
■ created default module definitions
■ modified the default module definitions to make it possible for them to be usedin generation
■ generated a working form based on a default module definition.

Lesson 8
Refine modules for generation Le 8-1
Refine modules for generation
In lesson 7 you generated (and possibly used) a form that had been given defaultcharacteristics based on design information supplied earlier. You can now changethe default characteristics to meet your further requirements. One way to do this isto use the Navigator to find the object that you want to change (e.g., the DiscountDay field), then open the Property Palette and make the changes. Another way is toopen a diagram so that the objects can be easily seen, then to open the PropertyPalette from the diagram. The latter method is described in this lesson.
Change form characteristicsBy default, the form generator will provide a button on the toolbar for opening a listof values for a field on a form. As an alternative, you can provide a list of values bymaking the field a drop-down list.
An automatically generated attribute is given a name that might not be meaningfulwhen used as a prompt on a generated form. You can change such prompts to amore meaningful one.
ObjectiveTo set up a drop-down list and change a field prompt on the Priced Products form.

Le 8-2 Oracle Designer Tutorial
Instructions1. In the Design Editor, create a module diagram for the TUTORI0040 module.
You do this by dragging TUTORI0040 from the list of modules in the Navigatorto the blank work area of the Design Editor.

Refine modules for generation Le 8-3
2. Display the Property Palette for the SIZE_CODE bound item property, in one ofthe following ways.
If the Property Palette is already open, you display the correct properties bysingle clicking SIZE_CODE on the diagram.
If the Property Palette is not already open, you open it by selectingOptions → Use Property Palette then double clicking the A icon next toSIZE_CODE.
The Property Palette title bar will say "TUTORIAL: Bound Item Properties".
3. Scroll down to the Display Type property and change it from "Text" to "Poplist", then save the change by clicking the Save button on the Property Palettetoolbar.
4. Display the Property Palette for PP_ID. In the Display section, change Display?to Yes and change the Prompt text to "Priced Products Id". Save the changes.
Create a lookup tableIn the default generated form that you have already seen, the fields for inputtingProducts data appeared on the Priced Products form. Now we are going to assumethat Speedy Pizza will store product data on the database as a separate operation,and that the "Add new product to the menu" process uses this information to createspecific "menu" items. For example, Speedy Pizza has a basic product called "Hamand mushroom supreme", one of its pizzas. This is available in small, medium andlarge sizes, and each of these variants must appear on its menu. This is achievedthrough the Priced Products form, by creating separate records for small, mediumand large pizzas, all incorporating "Ham and mushroom supreme" from theProducts lookup table.
ObjectiveTo change the Products table into a lookup table.
Instructions1. On the module diagram for TUTORIO0040, drag the PRODUCTS table usage
(yellow box) so that its left side overlaps the right side of thePRICED_PRODUCTS table usage.

Le 8-4 Oracle Designer Tutorial
2. When a broken vertical indicator line appears to the right of thePRICED_PRODUCTS table usage, release the mouse button.
A lookup link appears on the diagram. The crow’s foot always points to thetable on the left, which is the usage that contains the foreign key column.
Leave the Design Editor open for the next lesson.
Lesson summaryIn this lesson you:
■ made it possible to choose the values for Size Code from a drop-down list
■ changed a field prompt to make it more meaningful
■ set up a lookup table.

Lesson 9
Generate a refined Oracle Developer Form Le 9-1
Generate a refined Oracle Developer Form
During this lesson, you will make further changes to the default design of the PricedProducts form. You will then regenerate the form to incorporate all the changes youhave made.
Set preferences to influence generationThe final appearance of a generated form is determined by many of the designdecisions and defaults that you have already encountered. There is, however, onevery important set of preferences that you have not yet seen. These are theGenerator Preferences, and the purpose of this exercise is to make you aware oftheir potential by changing just one of them. If you do not change the GeneratorPreferences, a default set will apply in all circumstances and this might be perfectlyacceptable to you.
ObjectiveTo increase the width of border lines on the generated form.

Le 9-2 Oracle Designer Tutorial
Instructions1. On the module diagram for the TUTORI0040 module, select the
PRICED_PRODUCTS module (outer, gray box) and click the GeneratorPreferences toolbar button.
This opens the Generator Preferences palette.
2. Expand the Layout - Block preference node and change the "Block brush width"(BLKBWD) preference to 4.
You can obtain an explanation of a preference by clicking on the ContextSensitive Help button on the toolbar and then clicking on the preference name.
3. Save the preference data by clicking the Save button on the palette toolbar.
4. Close the Generator Preferences palette.

Generate a refined Oracle Developer Form Le 9-3
Change a display characteristic of the generated formSo far, you have looked at module diagrams in "data view". There is an alternative,which is "display view". In display view, you can change certain physical aspects ofthe generated form by direct manipulation of objects on the diagram.
ObjectiveTo change the order of the fields on the generated form so that Product Id is thefirst.
Instructions1. Make the Module Diagram for TUTORI0040 active, then select View → Display
View.
The diagram appears as follows:

Le 9-4 Oracle Designer Tutorial
2. With the mouse pointer, grab each of the module component items in turn andmove them up or down the list, into the following order:
Product Id
Product Id
Product Description
Product Type
Discount Day
Size Code
Price
Quantity In Stock
Label
Priced Products Id
Generate, run and use a formYou generated and used a form in a previous lesson, but that was a default design.Now is the time to generate the changes you have made to that design.
This lesson also deliberately gives alternate instructions for procedures you havealready followed, so that you can see that there is more than one way to do somethings.
ObjectiveTo generate, run and use the refined Products form definition.
Instructions1. Select Options → Generator Options → Forms. This opens the Form Generator
Options dialog box.
2. On the Run tab, set Run Form to No, then click the OK button.
3. Select the TUTORI0040 module in the Navigator or on a Module Diagram.

Generate a refined Oracle Developer Form Le 9-5
4. Select Generate → Generate Module.
This opens the Generate Form dialog box. Check that the Object Library Nameand Template Name boxes are still set to tutorial.olb and tutorial.fmb.
5. Click the Start button.
The message window is opened in the lower part of the Design Editor. Bluemessages tell you what further changes the generator intends to make to themodule definition. When generation is complete, the message "Generation ofmodule ’TUTORI0040’ complete" appears in the message window and theGeneration Complete dialog box opens.
6. On the Generation Complete dialog box, click the Save button.
If you wish, you can close the message window by choosing View → MessageWindow.
7. Select Run → Forms Runtime.
This opens the Oracle Developer Forms Runtime window and the FormsRuntime Options dialog box.
8. In the File box, type in the name of (or browse to) the generated module(cgenf60\ADD_NEW_PRODUCT_TO_THE_MENU.fmx) , enter your user id,password and the database name, then click OK.

Le 9-6 Oracle Designer Tutorial
The Priced Products form is displayed, showing the changes that you havemade since lesson 7.
If you wish to use the form and did not enter Product information in the defaultform on lesson 7, you must now populate the PRODUCTS table using the scriptprovided. You do this by choosing the Populate Tutorial Tables program fromthe Oracle Designer Tutorial folder. if you are prompted to enter a username,enter your username, password and database connection name in the followingformat:
<username>/<password>@<connection_name>
You can now use the form to record priced products data on the database. Youwill have noticed the thicker border. Notice also that the Product Id field is thefirst in each record. Also that the Size Code field has a drop-down list.
You can save the data that you enter on the form by clicking the Save button onthe toolbar. You can close the form by selecting Action → Exit.
Close the module diagram in the Design Editor, but leave the Design Editoropen for the next lesson.
Generate a refined Oracle Developer Form Le 9-7
Lesson summaryIn this lesson you:
■ set a generator preference
■ used the display view of a module diagram to change a display aspect of themodule definition
■ regenerated the Products form to show all the changes that you made.

Le 9-8 Oracle Designer Tutorial

Lesson 10
Generate a WebServer Application Le 10-1
Generate a WebServer Application
The WebServer Generator creates fully functional WebServer applications thatenable users to query, update, delete and enter information in an Oracle databaseover the World Wide Web. In this lesson, you learn how to generate basicWebServer applications.
Note: You can follow this lesson only if Oracle’s WebServer Generator has beeninstalled. You will need a username, password and connect string for theWebServer, and these may be different to those you have been using for theprevious lessons. You will also need to know the full path of a Web browserexecutable and the Web Agent URL. Your System Administrator will be able to tellyou these if WebServer Generator has been set up.
Implement the Speedy Pizza system as a Web applicationIn lesson 1 you created a process step called "Add new product to the menu". Youprogressed this process step as part of the Speedy Pizza system and implemented itas a form. In this lesson, you will implement the same process as a Web application.
ObjectiveTo implement part of the Speedy Pizza system as a Web application.

Le 10-2 Oracle Designer Tutorial
Instructions1. In the Design Editor, in the list of relational table definitions on the Modules or
Server Model tabs, highlight all the table names and select Generate → GenerateTable API.
This opens the Generate Table API dialog.
2. Select the Oracle option button and enter the connection details if these are notalready shown.
3. Click the Start button.
The Design Editor message window is opened, through which progress isreported.
4. When generation of the table API is complete, close the message window bychoosing View → Message Window.
5. In the Navigator, expand the Modules node and highlight TUTORI0040.

Generate a WebServer Application Le 10-3
6. Select Utilities → Copy With New Language. This opens the Copy With NewLanguage dialog box.
7. Enter TUTORI0060 in the New Short Name box and select Oracle WebServerfrom the New Language drop-down list, then click the OK button. The newmodule is listed in the Navigator.
8. Create a module diagram for the TUTORI0060 module.
9. Allow Insert as an operation for all of the items in the Products lookup table.
One way of doing this as follows. Open the Property Palette for one of the items(e.g., DISCOUNT_DAY). Highlight all the lookup items on the diagram (i.e.,DISCOUNT_DAY, PRODUCT_DESCRIPTION, PRODUCT_ID,PRODUCT_TYPE). In the Operations section of the Property Palette, change theInsert? value to Yes. Click the Save button on the Property Palette toolbar.
10. Select Options → Generator Options → WebServer and use the connectioninformation supplied by your System Administrator to complete the dialog.Check the "Auto-install after Generation" check box. For a full description of thedetails to be entered into the Options dialog box, click the Help button. Click theOK button to save the information and close the dialog box.
11. Highlight module TUTORI0060 in the Navigator (or on the module diagram)and select Generate → Generate Module. This opens the Generate WebServerdialog box.
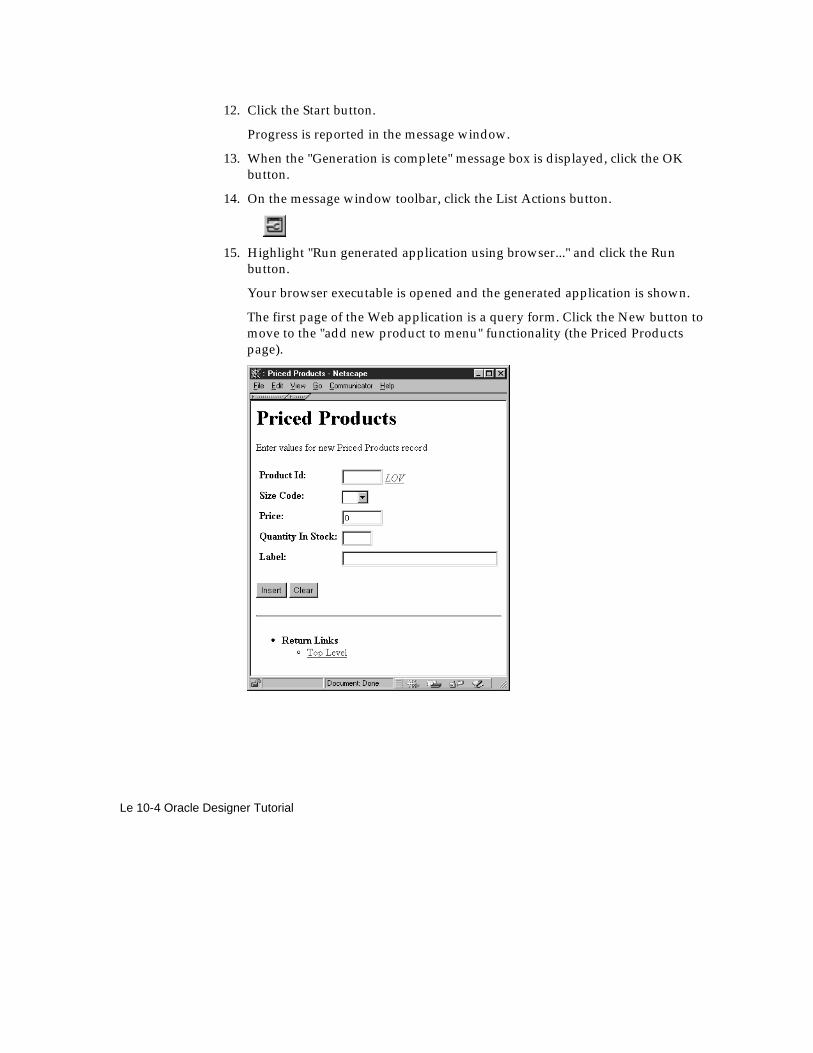
Le 10-4 Oracle Designer Tutorial
12. Click the Start button.
Progress is reported in the message window.
13. When the "Generation is complete" message box is displayed, click the OKbutton.
14. On the message window toolbar, click the List Actions button.
15. Highlight "Run generated application using browser..." and click the Runbutton.
Your browser executable is opened and the generated application is shown.
The first page of the Web application is a query form. Click the New button tomove to the "add new product to menu" functionality (the Priced Productspage).

Generate a WebServer Application Le 10-5
Just as with the Forms application, the first field you fill in is Product Id. This isthe identity of the product (e.g., 1011 for a Seafood Special pizza) that forms thebasis of the new menu item. You can choose from the products on the Productstable by clicking LOV next to the Product Id box.
Click on one of the active Product Ids in the List Of Values table to add it to thePriced Products page. Fill in the other fields to describe the new menu item,then click the Insert button to create the record.

Le 10-6 Oracle Designer Tutorial
Lesson summaryIn this lesson you created module TUTORI0060 and implemented it as a WebServerapplication.

Lesson 11
Conclude the tutorial Le 11-1
Conclude the tutorial
This lesson describes what you must do after completing the tutorial.
Exit from Oracle Designer and drop the tutorial tables
Instructions1. Close any Oracle Designer tools you might have open.
2. Select File → Exit to close the Oracle Designer front panel.
Where to go for more informationYou have now completed the tutorial. Remember that the tutorial does not attemptto describe in detail the functionality of every Oracle Designer product component.Instead, the tutorial concentrates on how to use the components together to progressfrom a high level business model to working generated applications.
For comprehensive information about Oracle Designer, refer to the help systemreferenced in the “Read This First!” section at the start of this tutorial.

Le 11-2 Oracle Designer Tutorial
Dropping the tutorial tablesTo delete the tutorial tables when you have finished the tutorial:
1. Select the Drop Tutorial Tables program in the Oracle Designer Tutorial folder.
The SQL*Plus window appears.
2. Enter the username, password and database, in the format
<your_username>/<your_password>@<your_database>
You are prompted to confirm that you want to delete the tutorial tables.
3. To delete the tables, type Y and press [Return].
When the operation is complete, you are prompted to close the SQL*Pluswindow.
4. Type EXIT and press [Return] to close the SQL*Plus window.

A
Tutorial installation notes A-1
Tutorial installation notes
This appendix is intended for Repository Managers who are responsible forenabling users to follow the Oracle Designer tutorial. This appendix explains how toimport the TUTORIAL application system. For information purposes only, thisappendix also lists the files installed by the Oracle Installer, and describes whatusers have to do before starting the tutorial. The sections in this appendix are:
■ importing the TUTORIAL application system
■ setting up for WebServer Generator users
■ what the Oracle Installer installs on the client
■ how tutorial users are instructed to start the tutorial
Importing the TUTORIAL application systemThe tutorial in this document requires that users have access to an applicationsystem containing predefined entity and function definitions. This applicationsystem is shipped with Oracle Designer, and was originally created with the nameTUTORIAL.
To import the application system, you must start the Repository Object Navigator asa user with:
■ the Oracle Designer Repository Manager privilege
You can import the TUTORIAL application system:
■ as the tutorial user
■ as a different user (in which case you will have to grant the tutorial user accessto the TUTORIAL application system)

A-2 Oracle Designer Tutorial
The instructions given to users elsewhere in this document assume the applicationsystem is called TUTORIAL. When you import the TUTORIAL application system,you have the option to give the imported application system a different name. If youdo give the application system a name other than TUTORIAL, make sure you tellusers the name.
To import the TUTORIAL application system:1. Start Oracle Designer as a user with the Repository Manager privilege.
2. Select any application system from the drop-down list in the ApplicationSystem dialog box and click on OK. If you do not have access to any existingapplication systems, click on Cancel.
3. Start the Repository Object Navigator.
4. Select Application → Restore to display the Application-Restore dialog box.
5. Click on the Browse button to display the Select XT Archive Import File dialogbox.
6. Specify tutapsys.dmp as the file to import.
By default, this file is located in the \ctutx71 directory, below theORACLE_HOME directory. For example:
Environment Example location of tutapsys.dmp
Windows 95 C:\orawin95\ctutx71\tutapsys.dmp
Windows NT C:\orant\ctutx71\tutapsys.dmp
Click the Open button to close the Select XT Archive Import File dialog box
7. Ensure that tutapsys.dmp is specified in the Import File box, then click on theImport button to begin the import.
If the current user has not imported or exported an application system before,you will be prompted to create the archive tables before the file is imported.Click on OK to accept the default tablespaces for tables and indexes.
If the archive tables already exist but are not empty, you will be prompted todelete existing data before continuing. Click on OK.
8. If you want to change the name that the application system will be given in yourrepository, type the new name in the New Name field.

Tutorial installation notes A-3
9. Click on the original name of the application system (i.e. TUTORIAL) to selectit.
10. Click on the Restore button to create the application system in the Repositorywith the name you specified.
When the process is complete, the application system status shown in the dialogbox is set to **Restored**.
11. Click on Close to close the Application - Restore dialog box.
12. Either follow the instructions below to grant access to the new applicationsystem, or close the Repository Object Navigator.
If you are prompted to save changes (i.e. to the unnamed application systemcreated when you started the Repository Object Navigator if you did not haveaccess to any application systems), click on No.
Granting access to the TUTORIAL application systemIf you were not logged on as the tutorial user when you imported the TUTORIALapplication system, you must grant access to the TUTORIAL application system tothe tutorial user now.
1. In the Repository Object Navigator, select Application → Grant Access By Applto display the Application - Grant Access By Application dialog box.
2. Select the name you have given the TUTORIAL application system from the ForApplication drop-down list.
3. Click on the Add User button to display the Add User dialog box.
4. Click on the tutorial user name.
5. Click on the OK button.
6. Check the Access Rights checkboxes as indicated below:
Select Insert Update Delete Share Admin
æ æ æ æ æ
7. Click on the Grant button to grant the tutorial user access to the TUTORIALapplication system with the specified access rights.
8. Click on Close to close the Application - Grant Access by Application dialogbox.

A-4 Oracle Designer Tutorial
9. Close the Repository Object Navigator.
If you are prompted to save changes (i.e. to the unnamed application systemcreated when you started the Repository Object Navigator if you did not haveaccess to any application systems), click on No.
Setting up for WebServer Generator usersTutorial users will not be able to follow lesson 10 unless WebServer Generator hasbeen installed and set up.
Set up WebServer Generator as described in the supplied on-line documentation.
Be prepared to make the following information available to the tutorial user:
■ the username, password and connect string for the WebServer
■ connection information for the Web Agent URL
The connection information is needed for the WebServer Generator Options dialogbox. You can see this dialog box by opening the Design Editor and selectingOptions → Generator Options → WebServer. Use the Help button on the dialog boxto obtain a detailed description of what is required. You may wish to enter thisinformation before the tutorial user starts the lessons.
The tutorial user will also need to know the location of a Web browser executable,which may be local.
What the Oracle Installer installs on the clientThis section describes the operation of the Oracle Installer during installation of theOracle Designer tutorial, and is for information purposes only.
During installation, the Oracle Installer:
■ Copies into the <ORACLE_HOME>\ctutx71 directory the following files:
tutapsys.dmp destut.drp destut.sql
destut.dat yesno.sql destut.txt
■ Creates a directory in <ORACLE_HOME>\ctutx71\ called tutorial.

Tutorial installation notes A-5
■ Copies into the <ORACLE_HOME>\ctutx71\tutorial directory the followingfiles:
tutorial.fmb tutorial.olb
■ Creates a folder called Oracle Designer Tutorial.
■ Populates the Oracle Designer Tutorial folder with the following programs:
− About the Tutorial (displays the text file destut.txt)
− Drop Tutorial Tables (runs the SQL script destut.drp)
− Oracle Designer for Tutorial User (starts Oracle Designer with the workingdirectory set to <ORACLE_HOME>\ctutx71\tutorial)
− Populate Tutorial Tables (runs the SQL script destut.sql).
Note: The working directory specified for the Oracle Designer forTutorial User program must be writeable.
How tutorial users are instructed to start the tutorialWhen following the tutorial, users are instructed to start Oracle Designer byselecting the Oracle Designer for Tutorial User program in the Oracle DesignerTutorial folder.
The working directory of this program item is set to<ORACLE_HOME>\ctutx71\tutorial.

A-6 Oracle Designer Tutorial