Embed Size (px)
Citation preview

Oracle® Governance, Risk and Compliance Controls User Guide Release 8.6.0
September 2010

Oracle Governance, Risk and Compliance Controls User Guide
Copyright © 2010 Oracle Corporation and/or its affiliates. All rights reserved.
Primary Author: David Christie
Oracle is a registered trademark of Oracle Corporation and/or its affiliates. Other names may be trademarks of their respective owners.
The software and related documentation are provided under a license agreement containing restrictions on use and disclosure and are protected by intellectual property laws. Except as expressly permitted in your license agreement or allowed by law, you may not use, copy, reproduce, translate, broadcast, modify, license, transmit, distribute, exhibit, perform, publish or display any part, in any form, or by any means. Reverse engineering, disassembly, or decompilation of this software, unless required by law for interoperability, is prohibited.
The information contained herein is subject to change without notice and is not warranted to be error-free. If you find any errors, please report them to us in writing.
If this software or related documentation is delivered to the U.S. Government or anyone licensing it on behalf of the U.S. Government, the following notice is applicable.
U.S. GOVERNMENT RIGHTS
Programs, software, databases, and related documentation and technical data delivered to U.S. Government customers are “commercial computer software” or “commercial technical data” pursuant to the applicable Federal Acquisition Regulation and agency-specific supplemental regulations. As such, the use, duplication, disclosure, modification, and adaptation shall be subject to the restrictions and license terms set forth in the applicable Government contract, and, to the extent applicable by the terms of the Government contract, the additional rights set forth in FAR 52.227-19, Commercial Computer Software License (December 2007). Oracle USA, Inc., 500 Oracle Parkway, Redwood City, CA 94065.
The software is developed for general use in a variety of information management applications. It is not developed or intended for use in any inherently dangerous applications, including applications which may create a risk of personal injury. If you use this software in dangerous applications, then you shall be responsible to take all appropriate fail-safe, backup, redundancy and other measures to ensure the safe use of this software. Oracle Corporation and its affiliates disclaim any liability for any damages caused by use of this software in dangerous applications.
The software and documentation may provide access to or information on content, products and services from third parties. Oracle Corporation and its affiliates are not responsible for and expressly disclaim all warranties of any kind with respect to third party content, products and services. Oracle Corporation and its affiliates will not be responsible for any loss, costs, or damages incurred due to your access to or use of third party content, products or services.

Contents
1 IntroductionGRCC and Language ...................................................................... 1-2
Starting Governance, Risk and Compliance Controls...................... 1-3
Navigating in GRCC ........................................................................ 1-3
Creating Views ................................................................................ 1-4
Filtering Data............................................................................. 1-4
Sorting Data .............................................................................. 1-5
Removing and Restoring Columns ........................................... 1-5
Rearranging Columns ............................................................... 1-5
Resizing Columns ..................................................................... 1-6
Saving or Deleting a View......................................................... 1-6
Displaying a View...................................................................... 1-7
Creating a User Profile .................................................................... 1-8
2 User and Role AdministrationViewing Roles.................................................................................. 2-1
Creating a User Role ....................................................................... 2-3
Creating a Group Role..................................................................... 2-4
Editing Roles ................................................................................... 2-5
Duplicating Roles............................................................................. 2-5
Viewing User Accounts.................................................................... 2-6
Creating User Accounts................................................................... 2-7
Editing or Unlocking User Accounts ................................................ 2-9
Reporting on Users and Roles......................................................... 2-9
Contents iii

3 Data and System AdministrationManaging Application Data .............................................................. 3-1
Configuring a Datasource Connection....................................... 3-1
Synchronizing Data ................................................................... 3-3
Importing Business Objects....................................................... 3-3
Uploading Patterns.................................................................... 3-4
Uploading Custom Connectors.................................................. 3-5
Configuring Notifications .................................................................. 3-6
Configuring the SMTP Server.................................................... 3-6
Sending Notifications................................................................. 3-7
Configuring GRCC ........................................................................... 3-7
Setting Properties ...................................................................... 3-7
Setting Up Analytics ................................................................ 3-10
Setting Up User Integration ..................................................... 3-12
Purging Incidents..................................................................... 3-13
4 Jobs AdministrationViewing Job History ......................................................................... 4-1
Purging Jobs ............................................................................. 4-2
Canceling Jobs.......................................................................... 4-2
Viewing and Resetting Job Schedules ............................................. 4-2
iv Oracle Governance, Risk and Compliance Controls User Guide
1 Introduction
Oracle Governance, Risk and Compliance Controls (GRCC) regulates activity in Oracle E-Business Suite and PeopleSoft Enterprise, and may be configured to reg-ulate activity in other business-management applications as well. GRCC consists of two components, each of which enables users to create “models” and “controls” that define risks a company may face: • Oracle Enterprise Transaction Controls Governor (ETCG) implements models
and controls that specify circumstances under which individual transactions dis-play evidence of error, fraud, or other risk.
• Oracle Application Access Controls Governor (AACG) executes models and controls that define conflicts among duties that can be assigned in a company’s applications, and identify users who have conflicting access to those duties.
In Oracle E-Business Suite or PeopleSoft Enterprise, AACG can also implement “preventive analysis” — it can evaluate controls as roles or responsibilities are assigned to users, preventing them from gaining risky access.
In earlier versions (8.0 through 8.2.1), the platform contained only AACG, and the product was known as Application Access Controls Governor. Version 8.5.0 added ETCG to the platform, and as a result the product as a whole is now called Govern-ance, Risk and Compliance Controls. Although ETCG and AACG have distinct feature sets, they also share functionality provided by the GRCC platform. These features include tools to connect GRCC to Oracle, PeopleSoft, and other business-management-application datasources (instances), and to refresh “snapshots” of data gathered from those applications; to create GRCC users and user roles; and to set GRCC parameters, connect with your email server (for the purpose of sending notifications to GRCC users), and integrate GRCC with other applications. Moreover, the GRCC platform can display informa-tion in any of eleven languages. These shared features are the subject of this Governance, Risk and Compliance Controls User Guide. For information on the creation of access models and controls, and analysis of the conflicts they generate, see the Application Access Controls Governor User Guide. For information on the creation of transaction models and controls, the review of risky transactions they identify, see the Enterprise Transac-tion Controls Governor User Guide.
Introduction 1-1

GRCC and Language Governance, Risk and Compliance Controls can display information in any of twelve languages: US English, traditional Chinese, standard (simplified) Chinese, Danish, Dutch, French, German, Italian, Japanese, Korean, Brazilian Portuguese, or Spanish. An administrator uses the Manage Application Configurations page to make a selection of these languages available to users (see page 3-7).
Each individual user may select one of the available languages while logging on (see page 1-3), while configuring a user profile (see page 1-8), or both. For a given user, GRCC “selects” a language in the following order of preference:
• The language specified during logon.
• If none is selected then, the language specified in the user profile.
• If no language is chosen in either place, the language specified in the user’s web browser.
• If the web browser language does not match one available in the AACG instance, US English.
GRCC may connect to any number of datasources (instances of business-management applications; see page 3-1). Each may use a language distinct from the others. For that matter, a given datasource may incorporate more than one language. To display information from such varying datasources, GRCC follows these rules: • Prompts (field names, button names, navigation links, and so forth) appear in
the language selected for GRCC (through the process described above). • Generally, GRCC presents processing results only in the selected language; any
results in other languages are omitted. (“Processing results” are values entered to define AACG or ETCG models and controls, AACG entitlements and condi-tions, and so forth, as well as results returned when those objects are evaluated.) Thus, for example, if a user logged on to GRCC in French, and the instance were connected to a single, French-language datasource, it would display all results properly. If it were connected to a second, German-language datasource, it would display the processing results stored on that datasource only if the user logged off and logged back on in German (in which case, it would cease display-ing the French results). Further, a single datasource may itself use more than one language. If so, GRCC would display processing results in its selected language, but filter out results in other languages on that single datasource. If, for example, a user logged on to GRCC in French, and the instance were connected to a datasource that defined AACG controls in both French and German, it would display the French con-trols (and the incidents generated by them), but omit the German controls (and their incidents). There are exceptions to that second rule. Some of the elements you can configure for AACG are “global” — they apply not to individual controls, but to all entities configured for a given datasource. For example, “global condi-tions” define exemptions from all the controls on a datasource. In such a case, GRCC presents values in the language of the datasource, no matter what language is selected, and even though mixed languages may appear on screen.
1-2 Oracle Governance, Risk and Compliance Controls User Guide

Starting Governance, Risk and Compliance Controls To start the Governance, Risk and Compliance Controls platform:
1. Open a web browser.
2. In the Address field, type the URL for your instance of Governance, Risk and Compliance Controls, and press the Enter key.
3. A Login dialog box appears. Type your user name and password in the appro-priate fields, optionally, select a language in which to work in the Language Preference list box, and click on the Login button.
You can leave the Language Preference field blank. If so, GRCC selects (in order of preference) the language specified in your user profile (see page 1-8), the lan-guage of your web browser, or US English.
Navigating in GRCC A Tasks panel, located along the left of the GRCC GUI, presents up to five lists of tasks you can complete in GRCC. Click on a task from one of these lists, and a work-space to the right of the Tasks panel displays pages in which you can complete the task you’ve selected.
• Control Management tasks open pages in which users can define and manage models, controls, and the objects they use — tags, entitlements, conditions, and participant groups. Here, users can also view the temporary results generated by models.
• Incident Management tasks open pages in which users named as participants to controls can review incidents generated by their controls, and approve or reject role assignments suspended by AACG preventive processing. Users can also create and run simulations, which evaluate the effect of proposed resolutions to AACG incidents in business-management applications.
• Reports Management tasks enable users to generate, schedule, or review GRCC reports.
• Jobs and Scheduling tasks display records of individual requests to synchronize data, evaluate models or controls, export results, generate reports, or complete other background jobs. It also displays schedules on which those jobs are configured to run. A user with proper permissions can modify job schedules.
Introduction 1-3

• Administration Management tasks open pages in which users can define roles, create users and assign roles to them, configure connectivity to business-management-application instances, use data synchronization to transfer data from those instances to GRCC, upload business objects and patterns, purge incidents from the system, configure notifications, set GRCC properties, and integrate GRCC with other applications.
This Governance, Risk and Compliance Controls User Guide concerns tasks you can complete in the Reports Management, Jobs and Scheduling, and Administration Management lists.
The tasks available to you are limited by the permissions defined for the GRCC roles granted to you. If, for example, your role focuses on setting up GRCC for use by others, but you are not expected to resolve incidents generated by controls, you would likely have access to the entire Administration Management list of tasks, but the Incident Management list of tasks might not appear in your tasks panel.
Moreover, all the tasks available to you do not appear at once. Initially, the work-space displays a Home page; when it is active, the Tasks panel presents lists of Control Management, Incident Management, and Reports Management tasks (as-suming you have rights to these tasks). When any other page is active, the Tasks panel displays only the list of tasks from which that page is opened.
To display missing tasks, click on the Navigator (a link above the Tasks panel, in the dark blue band that runs along the top of the application). A pop-up window opens; in it, click on the name for the list of tasks you want the Tasks panel to display. (To restore the Home page, click on the Home link at the upper right of the application.)
To close the Tasks panel (and so expand the workspace), click on the button with a left-pointing triangle located at the middle of the border between the Tasks panel and the workspace. The button then changes so that the triangle points to the right; click on it to reopen the Tasks panel.
Creating Views In lists — such as the Users pane of the Manage Users page — you can limit the display of entries to those that satisfy filtering criteria, and you can sort the entries. You can also remove columns from display, or restore them; rearrange the order in which columns appear; and resize them. In some cases, you can then save your selections as a “view,” and then either select your view for display or cause it to be displayed by default.
Filtering Data To filter the values displayed in a list: 1. Determine where to enter filtering criteria. In some lists, you do so in text boxes
that appear directly below column headings. Some lists omit these text boxes; in these, you enter filtering criteria in the first row of the list.
2. In any combination of columns in the view row or text boxes, enter (or select) values appropriate to the columns.
1-4 Oracle Governance, Risk and Compliance Controls User Guide

3. Click on the View button in the tool bar above the list. The list then contains only entries that match the values you’ve entered.
For columns that accept values, the percent sign (%) serves as a wild-card character. If it is placed after a string of text or numbers, the view returns all values that begin with the string. If it is placed before a string, the view returns all values that end with the string. If it is placed both before and after a string, the view returns all values in which the string appears at any position. If you omit the wild-card character, the view returns only a value that matches the string exactly.
Sorting Data To set a sort order for items in a list, click in the heading for one of its columns. Entries in that column are then arranged in alphanumeric order (and entries in other columns are, of course, rearranged so that rows remain intact). Click in the column heading a second time to arrange entries in reverse alphanumeric order.
This sorting method is available in all lists. In some lists, however, a Manage Saved Views feature provides an alternative (and more flexible) sorting method. See “Sav-ing or Deleting a View” (page 1-6).
Removing and Restoring Columns To remove columns from display, or to restore them:
1. Right click in the header row of the list from which you wish to remove columns, or to which you wish to restore them.
2. In some cases, a menu appears. If so, position the mouse cursor over its Columns option, and a list of available columns appears. In other cases, the parent menu does not appear, and the list of available columns opens directly.
3. To remove a column from view, click on its check box so that its check mark disappears. To restore a column to view, click on its check box so that its check mark reappears.
4. Left click anywhere outside of the menu and list of columns to close them.
This method of exposing or hiding columns is available in all lists. In some lists, however, a Manage Saved Views feature provides an alternative method. See “Sav-ing or Deleting a View” (page 1-6).
Rearranging Columns To rearrange the order in which columns appear:
1. Position the mouse cursor over a column you want to move, and hold down the left mouse button.
2. A “shadow” instance of the column heading appears. Continue to hold down the left mouse button, and drag that instance to the right or left.
3. Blue arrows appear — one above and one below the header row — to show where the column will be inserted. When they appear at the position you want, release the left mouse button.
Introduction 1-5

This column-ordering method is available in all lists. In some lists, however, a Manage Saved Views feature provides an alternative sorting method. See “Saving or Deleting a View” (below).
Resizing Columns To alter the width of columns in lists:
1. In the row that displays column titles, position the mouse cursor over the faint bar that separates one column from another.
2. The cursor changes to look like a pair of parallel vertical lines, each with an arrow extending horizontally from it. When that happens, hold down the left mouse button and drag the column border to the left or right.
Saving or Deleting a View In some cases, a list displays a Manage View button. If so, then to save a view:
1. Define the view: In a list, set filtering criteria and sort order for data entries, and select, arrange, and resize columns as you wish.
2. Click on the Manage View button. A Manage View dialog opens.
3. Enter values and click on the Save button:
• Create a new name in the “Type new view name” field. The new view criteria are then saved under the new name.
• Use the “Select view name to override” list box to select an existing view. Its name is retained, but the new criteria replace earlier values. If you choose a value in the “Select view name to override” list box, the “Type a new view name” field becomes inactive, and you cannot enter a value in it.
• If you want this view to appear each time you open the page in which you are working, select the Set as Default check box. There can be only one default view, so when you select this check box for a view, it overrides any prior selections involving other views.
You can also delete a saved view. To do so, open the Manage View dialog, select the view in the “Select view name to override” field, and click on the Delete button.
In other cases, a list displays a Manage Saved Views button. If so, you can use alternative methods to select or order columns for display or to sort rows, and you can save a view:
1. In the list itself, set filtering criteria and sort order for data entries, and select, arrange, and resize columns as you wish.
2. Click on the Manage Saved Views button. A Manage Saved Views dialog opens.
The upper pane — “Save Views” — lists views that have already been config-ured. The lower pane — “Details” — shows some of the selections you’ve already made for your view. For example, if you’ve excluded columns from a list, those columns appear in an Available box; those you have not excluded appear in a Selected box.
1-6 Oracle Governance, Risk and Compliance Controls User Guide

3. Optionally, make additional view selections:
• Expose or hide columns: Click on column titles in the Selected box or Available box, and click on buttons to move them from one box to the other. Those in the Selected box are displayed, and those in the Available box are hidden. The > and >> buttons move column titles to the Selected box, one at a time or all at once; the < and < < buttons move column titles to the Available box, one at a time or all at once.
• Change the order in which columns appear: In the Selected box, click on a column title, and then on an upward pointing triangle to move it up in the Selected box, or a downward pointing triangle to move it down in the Selected box. (A triangle pointing to a horizontal line moves a column title to the very top or bottom of the list.) The uppermost column appears all the way to the left in its list; the second appears second to the left; and so on, until the bottommost appears all the way to the right in its list.
• Select sort options: In the Sort Options fields, select up to three columns, and select ascending or descending order for each. Entries in the first column are rearranged in the order you specify, with entries in other columns rearranged so that rows remain intact. Where the first column contains duplicate entries, the sort order for the second column takes effect; where the second column contains duplicate entries, the sort order for the third column takes effect.
4. In the Name field of the Details area, type a name for the view.
5. If you want this view to appear each time you open the page in which you are working, select the Default View check box. There can be only one default view, so when you select this check box for a view, it overrides any prior selections involving other views.
6. Click on the Save button (or Save and Close button) to save the view. When you do, a row for the view appears in the Save Views list. In that list, the Default View column contains one check mark in the row for the one view selected as default; all other cells in the column are blank.
To delete a view, click on its row in the Save Views list, and then click on Actions > Delete, or on the red × button. The view disappears from the list. You can copy a view: select its row, and then click on Actions > Duplicate, or on the Duplicate button (which looks like one page overlapping another).
Displaying a View To cause a list to display entries selected by a saved view:
1. Click on the downward-pointing triangle at the right of the View button.
2. A list of saved views appears. Click on the one you want to use.
Finally, to override a selected view (whether saved or defined ad hoc), click on the Clear View button. This causes all entries to disappear from the list; to restore con-tent, either select (or define) another view, or click on the View button to display all possible entries.
Introduction 1-7
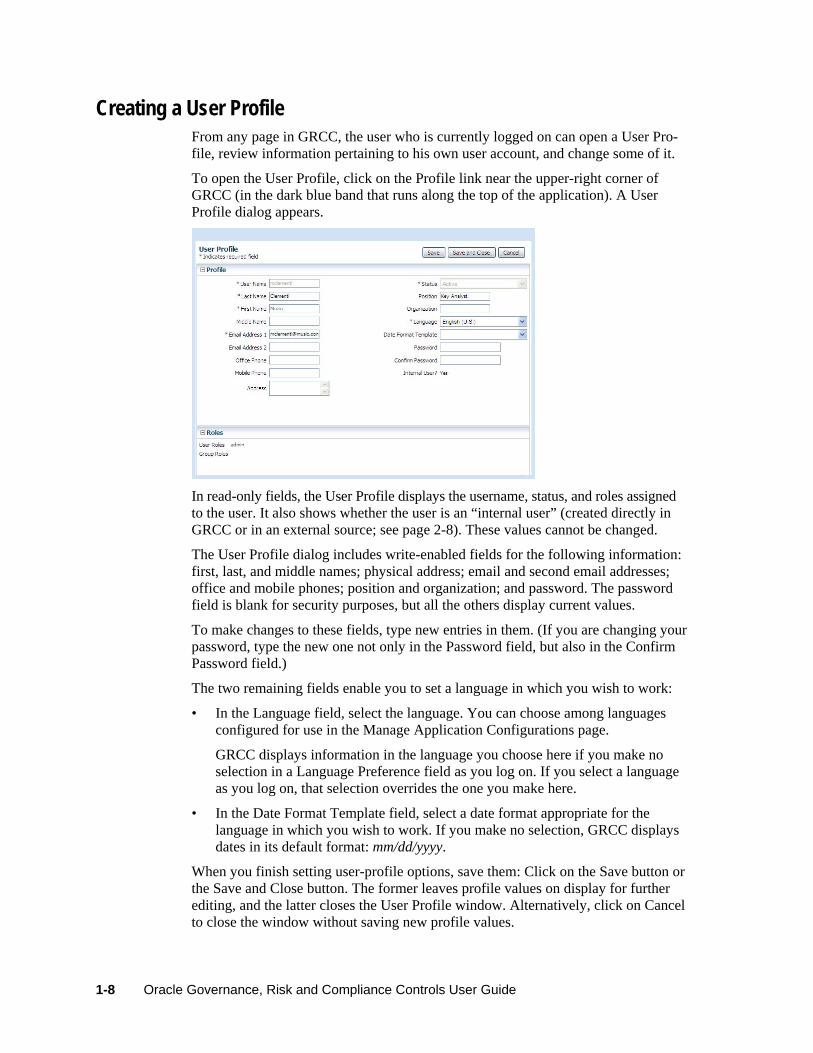
Creating a User Profile From any page in GRCC, the user who is currently logged on can open a User Pro-file, review information pertaining to his own user account, and change some of it.
To open the User Profile, click on the Profile link near the upper-right corner of GRCC (in the dark blue band that runs along the top of the application). A User Profile dialog appears.
In read-only fields, the User Profile displays the username, status, and roles assigned to the user. It also shows whether the user is an “internal user” (created directly in GRCC or in an external source; see page 2-8). These values cannot be changed.
The User Profile dialog includes write-enabled fields for the following information: first, last, and middle names; physical address; email and second email addresses; office and mobile phones; position and organization; and password. The password field is blank for security purposes, but all the others display current values.
To make changes to these fields, type new entries in them. (If you are changing your password, type the new one not only in the Password field, but also in the Confirm Password field.)
The two remaining fields enable you to set a language in which you wish to work:
• In the Language field, select the language. You can choose among languages configured for use in the Manage Application Configurations page.
GRCC displays information in the language you choose here if you make no selection in a Language Preference field as you log on. If you select a language as you log on, that selection overrides the one you make here.
• In the Date Format Template field, select a date format appropriate for the language in which you wish to work. If you make no selection, GRCC displays dates in its default format: mm/dd/yyyy.
When you finish setting user-profile options, save them: Click on the Save button or the Save and Close button. The former leaves profile values on display for further editing, and the latter closes the User Profile window. Alternatively, click on Cancel to close the window without saving new profile values.
1-8 Oracle Governance, Risk and Compliance Controls User Guide
2 User and Role Administration
Using tools available in Administration Management, you can create roles, each of which grants access to a set of features in GRCC. You can then create users and assign roles to them. Each user can have any number of roles.
Viewing Roles To view or work with roles, open a Manage Roles page — select Navigator > Administration Management, and then select Manage Roles in the Tasks panel. The Manage Roles page (shown at the top of page 2-2) provides information, in read-only format, about GRCC roles. Its upper pane, labeled “Roles,” displays a list of existing roles, together with summary information about each — the name and display name of the role, its status (active or inactive), and a description. The sum-mary information also includes a type value — user (an individual role) or group (a set of two or more roles that confers all access defined by the constituent roles, any of which may itself be a user role or group role). In the Roles pane, select (click on) the row for a role whose information you wish to review. A lower pane, labeled with the name of the selected role, displays detailed information about it. This pane is divided into a minimum of five parts: • General Information displays the role name and other identifying information
entered as the role was created or edited. • Datasource lists instances of business-management applications that have been
configured (in the Manage Application Data page) to communicate with GRCC. For each, the value in an Access column — Allow or Deny — indicates whether the datasource may be incorporated into GRCC models and controls. The listing for each datasource includes a Type value — for example, EBS if the datasource supports an Oracle EBS instance. If you have created “connectors” (software objects that enable other business-management applications to supply data to GRCC), type values for these applications may also appear.
• Business Objects lists business objects available in the selected datasources — a “business object” being a set of one or more database tables that supply access and transaction data for analysis by GRCC models and controls. For each busi-ness object, a value in an Access column — Allow or Deny — indicates whether the role has access to the object.
User and Role Administration 2-1

• Page Access displays a grid that expands to show all pages available in GRCC.
(Entries in the grid mimic the hierarchy of the Tasks panel; click on the ± toggles to expand or contract levels in the hierarchy.) The grid also shows the access granted by the role to each page: for each, View and Update privileges are labeled either Allow or Deny.
• Members lists GRCC users who have been assigned the role, together with summary information about them.
If you have selected a group role, a sixth section appears: Roles in Group displays a list of the roles that have been incorporated into the group role.
You can expand or contract each section of the Manage Roles page by clicking on the ± toggle to the left of each section heading.
2-2 Oracle Governance, Risk and Compliance Controls User Guide

Creating a User Role If you intend to select a set of datasources, business objects, and page-access properties, so that they might be assigned to users, create a user role:
1. In the Manage Roles page, click on Actions > Create New. Or click on the Create New icon — a green plus sign. A Create Role page opens.
2. Enter values in the General Information pane of the Create Role page. To do so, click in each field (or press the Tab key to move from an active field to the next field).
• In the Role Name field, enter a name for the role that is used internally by the system.
• In the Display Name field, enter a name that suggests the role’s purpose to GRCC users.
• In the Description field, briefly explain the purpose of the role.
• In the Status field, select Active or Inactive.
• In the Role Type field, select User.
3. A Datasource pane lists instances of business-management applications that have been configured as datasources in the Manage Application Data page. Select any number of them; users assigned the role can incorporate the selected datasources into GRCC models and controls. For each, click on the cell in the Access column, and select the value Allow.
Here and in the remaining panes (Business Objects and Page Access), you can select multiple rows and change the setting for all at once. To select a row, click on it. To select a continuous set, click on the first, hold down the Shift key, and click on the last. To select a discontinuous set, hold down the Ctrl key as you click on rows. Or, to choose all rows, click Actions > Select All. When you finish selecting rows, click the Set All Selected button (or Actions > Set All Selected). A Set All Selected dialog opens; choose Deny or Allow in its list box, and click the OK button.
4. A Business Objects pane lists business objects available in the selected data-sources (a “business object,” once again, being a set of one or more database tables that supply access and transaction data for analysis by GRCC models and controls). Select any number of them to enable users assigned the role to incor-porate them in models. For each, click on the cell in the Access column, and select the value Allow.
5. A Page Access pane displays a grid that expands to show all pages available in GRCC. (Entries in the grid mimic the hierarchy of the Navigation panel; click on the ± toggles to expand or contract levels in the hierarchy.) Select any num-ber of pages to make them available to users assigned the role. For each, click in the View cell to provide read-only rights, or the View and Update columns to provide write access; select the value Allow.
Generally accepted segregation-of-duties practice holds that a user who creates controls should not also be able to review the incidents they generate. So roles you create for managing access approvals typically should not also permit users to create controls. By default, GRCC provides an “admin” role that provides
User and Role Administration 2-3

access to all functionality; the purpose of this role is to permit initial imple-mentation of GRCC features. Before GRCC is deployed to a production envi-ronment, edit the admin role to conform to the generally accepted practice.
6. Save the role. Click on the Save button to save the role and reopen it in an Edit Role page. Or click a Save and Close button to save the role and return to the Manage Roles page. (Alternatively, click a Cancel button to return to the Manage Roles page without saving the role values you’ve configured.)
Although the Manage Roles page displays the members (users) who have been assigned the role, you cannot select members directly in the Create Role page. You can modify membership only by assigning the role to users in the Manage Users page.
Creating a Group Role If you intend to select a set of existing roles to be combined to form a more expansive role, create a group role:
1. In the Manage Roles page, click on Actions > Create New. Or click on the Create New icon — a green plus sign. A Create Role page opens.
2. Enter values in the General Information pane of the Create Role page. To do so, click in each field (or press the Tab key to move from an active field to the next field).
• In the Role Name field, enter a name for the role that is used internally by the system.
• In the Display Name field, enter a name that suggests the role’s purpose to GRCC users.
• In the Description field, briefly explain the purpose of the role.
• In the Status field, select Active or Inactive.
• In the Role Type field, select Group.
The Create Role page refreshes, adding a Roles in Group pane immediately beneath the General Information pane.
3. Assign roles to the group role. You can assign existing user or group roles to the group role you are creating.
• The Roles in Group pane of the Create Role page contains two boxes, one labeled Available Roles and the other Selected Roles. The Available Roles box displays entries for user and group roles that have already been created. Click on the User or Group ± toggle to expand (or contract) the display of user or group roles.
• Assign a single role: Click on its name in the Available Roles box. Then click on the > button to move the role to the Selected Roles box. Repeat this process to assign additional roles individually. (The Selected Roles box also presents entries for User Roles, Group Roles, or both, as appropriate to your selections. Click on the User or Group ± toggle to expand or contract the display of user or group roles.)
2-4 Oracle Governance, Risk and Compliance Controls User Guide
• Alternatively, click on the >> button to move all roles to the Selected Roles box.
• If you reconsider your choices, select roles individually in the Selected Roles box and click on the < button to return them to the Available Roles box. Alternatively, click on the << button to return all roles to the Available Roles box.
4. Save the role. Click on the Save button to save the role and reopen it in an Edit Role page. Or click a Save and Close button to save the role and return to the Manage Roles page. (Alternatively, click a Cancel button to return to the Manage Roles page without saving the values you’ve configured.)
The Datasource, Business Objects, and Page Access panes are visible, but these panes are read-only because the group role inherits properties from its constituent roles. You cannot enter vales in them. As was true of user roles, you can select members (users) for a group role only indirectly by assigning the role to users in the Manage Users page.
Editing Roles To edit roles:
1. In the Roles pane of the Manage Roles page, click on the row for the role you want to edit.
2. Click on Actions > Edit. Or click on the Edit icon, which looks like a pencil. An Edit Role page opens. It’s a replica of the (user or group) Create Role page, except that it displays values already configured for the role you want to edit.
3. Using procedures described for creating a either a user or group role, modify the any of the settings for the role.
4. Save the role. Click on the Save button to save the role and reopen it in the Edit Role page. Or click a Save and Close button to save the role and return to the Manage Roles page. (Alternatively, click a Cancel button to return to the Manage Roles page without saving the role values you’ve configured.
Duplicating Roles Rather than create a role from scratch, you can copy an existing role, then modify the copy:
1. In the Roles pane, click on the row for the Role you want to copy.
2. Click on Actions > Duplicate. Or click on the Duplicate icon, which looks like one page layered on top of another.
3. The Create Role page opens, displaying all values configured for role you are copying except for Role Name and Display Name. Type values in these fields to distinguish the copy you’re creating from the original.
4. Modify other values as you see fit, and save the role. See “Creating a User Role” (page 2-3) or “Creating a Group Role” (page 2-4) for detailed procedures.
User and Role Administration 2-5

Viewing User Accounts To view or work with GRCC users, open a Manage Users page — select Navigator > Administration Management, and then select Manage Users in the Tasks panel.
The Manage Users page provides information, in read-only format, about GRCC user accounts. Its upper pane, labeled “Users,” displays a list of existing user ac-counts, together with summary information about them — the user name (by which the user identifies herself as she logs on); the user’s given, middle, and surnames; the user’s status; and the GRCC roles assigned to her. A hidden column shows whether she is an internal user (to reveal hidden columns, see “Removing and Restoring Columns” on page 1-5).
2-6 Oracle Governance, Risk and Compliance Controls User Guide

In the Users pane, select (click on) the row for a user whose information you wish to review. A lower pane, labeled with the selected user’s given and surnames, displays detailed information about the user. This pane is divided into four parts:
• General Information displays the user’s name, email and physical addresses, and other identifying information entered as the user’s account was created or edited.
• Roles lists the GRCC roles assigned to the user as her account was created or edited, together with summary data about them.
• Business Objects lists the business objects to which the user’s roles give her access.
• Page Access displays a grid that expands to show all pages available in GRCC. (Entries in the grid mimic the hierarchy of options displayed in the Tasks panel; click on the ± toggles to expand or contract levels in the hierarchy.) The grid also shows the user’s access to these pages, as granted by her roles: For each page, View and Update privileges are labeled either Allow or Deny.
You can expand or contract each section of the Manage Users page by clicking on the ± toggle to the left of each section heading.
Creating User Accounts To create a user account:
1. In the Manage Users page, click on Actions > Create New. A Create User page opens.
2. Enter values in the General Information section of the Create User page. To do so, click in each field (or press the Tab key to move from an active field to the next field).
• In the User Name field, type a name by which the user identifies herself as she logs on. A user name consists of alphanumeric characters, may be any length, and is case-sensitive.
• In the Last Name, First Name, and Middle Name fields, enter the user’s surname, given name, and middle name. (The middle name is optional.)
• In the Email Address 1 field, supply an email address for the user. GRCC uses this address to send notifications to the user when she is assigned tasks for review.
• Optionally, provide tracking information — a second email address, office and mobile phone numbers, physical address, and the user’s position and organization — in the appropriate fields.
• In the Status field, select a status for the user — typically Active. You would select Inactive if a user is no longer eligible to use GRCC (for example, if the user resigns from your company). You can also select Locked, although typically this status is set automatically by GRCC if the user fails to log on properly after a number of attempts specified in the Manage Application Configurations page.
User and Role Administration 2-7

• In the Language field, select a language in which GRCC will display information when the user logs on. An administrator uses the Manage Application Configurations page to select languages from among a set of twelve in which GRCC can display information. This field enables you to choose one language from among that administrator’s selection.
The user can override this setting, either temporarily by selecting a lan-guage as he logs on, or permanently by selecting a new default language while configuring a user profile (see page 1-8) .
• In the Password field, type a password with which the user validates her user name as she logs on. Retype the password in the Confirm Password field. A password is case-sensitive and must consist of at least eight char-acters, taken from each of four character sets: uppercase letters, lowercase letters, numbers, and special characters, which comprise !@#$%&*. More-over, the password is invalid if it matches or contains the user name.
The user’s password expires periodically. (The period is set in the Properties tab of the Manage Application Configurations page.) When the password expires, the user is prompted to create a new one as she logs on. The new password must not match any of the previous three passwords.
• An Internal User value is updated by GRCC. It reads Yes if the user account was created in GRCC, or No if it originated in a database that uses LDAP technology to share user information. An external user becomes an internal user when he is assigned a GRCC role; at that point, his Internal User entry changes to Yes.
3. Assign roles to the user.
• The Roles section of the Create User page contains two boxes, one labeled Available Roles and the other Selected Roles. The Available Roles box displays entries for user roles (individual roles) and group roles (a set of two or more roles that confers all access defined by its member roles) that have been created in the Manage Roles page. Click on the User or Group ± toggle to expand (or contract) the display of user or group roles.
• Assign a single role: Click on its name in the Available Roles box. Then click on the > button to move the role to the Selected Roles box. Repeat this process to assign additional roles individually. (The Selected Roles box also presents entries for User Roles, Group Roles, or both, as appropriate to your selections. Click on the User or Group ± toggle to expand or contract the display of user or group roles.)
• Alternatively, click on the >> button to move all roles to the Selected Roles box.
• If you reconsider your choices, select roles individually in the Selected Roles box and click on the < button to return them to the Available Roles box. Alternatively, click on the << button to return all roles to the Available Roles box.
4. Save the user account. Click on the Save button to save the account and reopen it in an Edit User page. Or, click a Save and Close button to save the account and return to the Manage Users page. (Alternatively, click a Cancel button to
2-8 Oracle Governance, Risk and Compliance Controls User Guide

return to the Manage Users page without saving the user account values you’ve configured.)
Although the Manage Users page displays the business objects and GRCC pages available to a user, you cannot select these items directly in the Create User page. You can modify these selections only indirectly, by changing the assignment of roles to the user or by modifying roles in the Manage Roles page.
Editing or Unlocking User Accounts To edit a user account:
1. In the Users pane of the Manage Users page, click on the row for the user account you want to edit.
2. Click on Actions > Edit. An Edit User page opens. It’s a replica of the Create User page, except that it displays values already configured for the user whose account you want to edit.
3. Using the procedures described for creating user accounts (see page 2-7), modify the General Information settings, Roles settings, or both for the user.
You cannot, however, edit the User Name field. To change a user name, set the existing account to the Inactive status, and create a new account. Moreover, once again, you cannot directly edit business objects or GRCC pages available to a user, even though these are displayed in the Manage Users page. You can modify these selections only indirectly, by changing the assignment of roles to the user or by modifying roles in the Manage Roles page.
4. Save the user account. Click on the Save button to save the account and reopen it in the Edit User page. Or, click a Save and Close button to save the account and return to the Manage Users page. (Alternatively, click a Cancel button to return to the Manage Users page without saving the user account values you’ve configured.)
If a user fails to log on after a number of attempts specified in the Manage Application Configurations page, GRCC automatically locks his account. In that case, no one is able to log on to the account, and its status field is set to Locked. To unlock the account, edit it, resetting its status field to Active. The account is then usable once again.
Reporting on Users and Roles You can run a GRCC Users and Roles Report, which provides information about GRCC users. For each user, the report displays identifying and contact information, including user name, given name and surname, email and physical addresses, and office and mobile phone numbers. It gives the user’s status (Active, Inactive, or Locked). It lists roles assigned to the user. Finally, each control must nominate at least one participant, who reviews incidents generated by the control; the participant may be an individual or a group; this report lists participant groups of which the user is a member.
User and Role Administration 2-9

You can run the report ad hoc, or you can schedule it to be run at intervals over a period that you define.
1. Select Navigator > Reports Management, and then select Run GRCC User Reports in the Tasks panel.
2. A Reports Management page opens; its upper portion lists reports you can run. Click on GRCC Users and Roles Report.
3. Click on Actions > Run Now or Actions > Schedule.
4. A pop-up window appears; in it, select parameter values. In general, parameters correspond to the selections you make as you create or otherwise work with users or roles. As you set parameters, select among the same values. For example, you can select users or roles on which the report should focus. (One parameter field prompts you to select a type of report — its format — but for this report you can select only pdf. The report is generated as an Adobe Acrobat file.)
5. If you selected Run Now in step 3, the parameter window displays a Generate Report button; click on it to generate the report.
If you selected Schedule in step 3, this button is replaced by a Schedule Information button. Click on this button to produce a Schedule Parameter pop-up window, and to schedule the report to run. Enter values that set a name for the schedule, the date and time at which it should start, the regularity with which the report should run, and the date and time (if any) on which the schedule should expire. Then click on the Schedule button.
To review a report generated on a schedule:
1. In the top portion of the Reports Management page, click on GRCC Users and Roles Report.
2. Click on Display > Report History.
3. In the bottom portion of the Reports Management page, double-click on the instance of the report you want to see.
To view the schedule on which the report was generated:
1. In the top portion of the Reports Management page, click on GRCC Users and Roles Report.
2. Click on Display > Scheduled Reports.
3. In the bottom portion of the Reports Management page, review summary information about the schedule, including its most recent and next scheduled run times.
4. Double-click on the row containing the summary information to reopen the Schedule Parameter pop-up window. Here, you can re-enter schedule values and select a Reschedule button, or turn off the scheduling by selecting an Unschedule button.
2-10 Oracle Governance, Risk and Compliance Controls User Guide

3 Data and System Administration
Among the Administration Management tasks, you can connect GRCC to business-management applications subject to its controls, and acquire data from them. You can set up GRCC to send email notifications to control participants. You can con-figure GRCC itself — set properties required for GRCC to connect to its database, display information in varying languages, or integrate with other applications. You can also purge incidents generated by access or transaction controls.
Managing Application Data GRCC models and controls specify “business objects,” which in turn are associated with datasources; these supply the data that models and controls analyze. Datasources include both business-application instances (typically Oracle EBS or PeopleSoft) in which models and controls are to be run, and GRCC itself. Business-application data-sources supply data to most business objects; GRCC supplies data to two business objects — Access Entitlements (used in access models and controls) and User (used in transaction models and controls). You must configure connections to business-application datasources. A Manage Application Data page enables you to do so, and to “synchronize” data with them. The GRCC datasource exists automatically; you need not configure it. (No record of the GRCC datasource appears in the Manage Application Data page.) In the Manage Application Data page, you can also import business objects, patterns used in transaction models, and custom connectors that enable GRCC to use data from applications other than Oracle EBS or PeopleSoft. To open the Manage Application Data page, select Manage Application Data under Administration Management in the Tasks list.
Configuring a Datasource Connection To configure a datasource: 1. In the Manage Application Data page, select the Datasources tab.
Data and System Administration 3-1

2. Click on Actions > Create New. A new row appears. To enter values in this row, double-click in each field (or press the Tab key to move from an active field to the next field). Enter the following values: • Datasource Name: Create a name for the datasource. (This name appears in
a Manage Datasource window, in which users select datasources as they create access or transaction models. It also appears in an Access Point List window, in which users select access points for inclusion in entitlements.)
• Description: Type a brief description of the datasource (optional). • Host Name: Supply the fully qualified domain name (FQDN) for the machine
that hosts the database used by the business-management application. • Port: Enter the port number that the database uses to communicate with
other applications. • User Name: Supply the user name for the database used by the business-
management application. For an Oracle EBS instance, this is typically APPS. • Password: Enter the password for the database. • Confirm Password: Re-enter the password for the database. • Service Identifier: Supply the SID value configured for the database in the
tnsnames.ora file. • Application Type: From a list box, select the type of business-management
application to which you are connecting — by default, EBS or PeopleSoft. • Version: From a list box, select the version number of the business-
management application to which you are connecting. • Default: Select the radio button to designate a default datasource, whose data is
subject automatically to models as they are created. Datasources not designated as default may be selected as sources of a model. The default datasource may be removed from a model. There can be only one default datasource.
• Connector: Select a custom connector (if any have been uploaded to GRCC) to apply it to this datasource. Or, to use the default connector provided with GRCC, make no selection at all. (If so, the Connector field displays Default after you save the datasource.) A connector uses ETL technology to collect data from a business applica-tion and provide it in a format that GRCC recognizes. The default connector does this for instances of Oracle EBS and PeopleSoft; it applies to any data-source for which no custom connector is selected.
• DB Type: From a list box, select the type of database — Oracle, MS SQL Server, or DB2 — used by the business-management application being configured as a datasource.
• Database Agent: Tells the Oracle Data Integrator (ODI) agent to use DB Link on Oracle databases. Enter the DB Link name you’ve specified externally for the datasource. The use of this column is optional.
3. When you finish entering values, click on Actions > Save. To edit an existing datasource, select it (double-click in its row). Enter new values, and then select Actions > Save. To delete a datasource, click on its row and then click on Actions > Delete.
3-2 Oracle Governance, Risk and Compliance Controls User Guide

Synchronizing Data To capture changes made in business-management applications over time, synchro-nize their data with the data used by AACG or ETCG. (You need not run synchroni-zation for a GRCC datasource.)
1. In the Manage Application Data page, select the Datasources tab.
2. Select the row for the datasource with which you want to synchronize data.
3. Do any of the following:
• Click on Actions > Synchronize Access. Alternatively, click on the Synchronize button in the tool bar, then on a Run Now option, and then on an Access option. This causes data used by AACG to be synchronized once, immediately.
• Click on Actions > Synchronize Transaction. Alternatively, click on the Synchronize button in the tool bar, then on a Run Now option, and then on an Transaction option. This causes data used by ETCG to be synchronized once, immediately.
• Click on Actions > Schedule Synchronize. Alternatively, click on the Synchronize button in the tool bar, then on a Schedule option. A Schedule Parameter dialog opens, in which you may create a schedule on which any number of synchronization operations run automatically. Select the Access or Transaction check box to synchronize data used by AACG or ETCG (or select both), and enter values that set the name of the schedule, its start date and time, the regularity with which the synchronization should occur, and an end date (if any). Then click on the Schedule button.
Each time a datasource is synchronized, GRCC updates fields in the row for that datasource: Last Access Synchronization Date and Last Access Synchronization Status show the date of the most recent access synchronization, and its completion status. Last Transaction Synchronization Date and Last Transaction Synchronization Status do the same for the most recent transaction synchronization.
Importing Business Objects As GRCC users create models, they work with business objects, each essentially a business-language label for one or more database tables that hold information perti-nent to access or transactions. Business objects contain attributes, each a business-language name for a column within the selected object. Although GRCC comes with a selection of business objects already configured, more will be developed over time. As they are made available, you can upload them from files to your GRCC implementation.
For each business object, upload two files (both of which are in .OWL format):
• Business Object Dictionary: This is the Semantic Data Dictionary (SDD). It is a collection of generic business definitions of a single object regardless of any application instance
• Business Object Mapping: This is the Semantic Data Mapping (SDM). This is the mapping of the attributes of the associated Business Object Dictionary to the physical store specific to an application (Oracle E-Business Suite or PeopleSoft).
Data and System Administration 3-3

Examples of attributes for a Business Object called Customer include Customer Name, Address Line 1, Zip, and Customer ID.
To import business objects:
1. In the Manage Application Data page, select the Business Objects tab.
2. To import a business object dictionary file, click on Actions > Import Business
Object Dictionary. To import a business object mapping, click on Actions > Import Business Object Mapping. To a import business object, you must do both (al-though, of course, as distinct operations). You cannot import a mapping file until you have imported the related dictionary file.
3. In either case, an Import File pop-up window opens. Click on its Browse button.
4. A Choose File dialog opens. In it, navigate to and select the .OWL file you want to import. The path and name of the file then populate the field next to the Browse button in the Import File window
5. With the file selected, click on the OK button. A pop-up message reports the status of the import operation. Click on its OK button to clear it, and then click on the Close button in the Import File window.
When the dictionary file is imported, a new row in the Business Objects grid displays information about it; among other values, a Type field displays Dictionary and a State field displays Formatted. When the related mapping file is imported, the row is updated; the Type field continues to display Dictionary, but the State field changes to display Mapped.
You can also export business object mappings to files:
1. Select a mapping in the Business Objects grid.
2. Select Actions > Export Mapping Template.
3. Follow prompts to save the export file to a location of your choice.
Uploading Patterns “Patterns” are statistical functions, supplied by Oracle, that may be used in transac-tion models and controls. Independently of GRCC releases, Oracle may issue files (in .jar format) that contain patterns. To upload these files:
1. In the Manage Application Data page, select the Patterns tab (see page 3-5, top).
2. Click on Actions > Import.
3. An Import File pop-up window opens. Click on its Browse button.
3-4 Oracle Governance, Risk and Compliance Controls User Guide

4. A Choose File dialog opens. In it, navigate to and select the file you want to
upload. The path and name of the file then populate the field next to the Browse button in the Import File window.
5. Click on the Upload File button. A pop-up message reports the status of the upload operation. Click on its OK button to clear it, and then click on the Close button in the Import File window.
In the Patterns page, rows display information about patterns you’ve uploaded — for each, the name, description, and version.
Uploading Custom Connectors A custom connector uses ETL technology to collect data from a business-management application and provide it in a format that GRCC recognizes. A default connector, provided with GRCC, does this for instances of Oracle EBS and PeopleSoft. Custom connectors may be developed (outside of GRCC) to do the same for other business-management applications, and then uploaded to GRCC. Once uploaded, a custom connector would be selected for a particular datasource in the Datasources tab. To upload a custom connector:
1. In the Manage Application Data page, select the Custom Connector tab.
2. Click on Actions > Import.
3. An Import File pop-up window opens. Click on its Browse button.
4. A Choose File dialog opens. In it, navigate to and select the file you want to upload. The path and name of the file then populate the field next to the Browse button in the Import File window.
5. Click on the Upload File button. A pop-up message reports the status of the upload operation. Click on its OK button to clear it, and then click on the Close button in the Import File window.
In the Custom Connector page, rows display information about the connectors you’ve uploaded — for each, the name, description, and version. To delete a custom connector, select its row, and then select Actions > Delete. Respond to a message that prompts you to confirm the deletion.
Data and System Administration 3-5

Configuring Notifications GRCC users may be named as control participants, assigned either to resolve incidents generated by controls, or to follow the incidents as others resolve them. These users may receive notification via email when incidents require their attention. To activate notification, establish a connection with your SMTP server, and then either send notifications manually or schedule them to be sent by GRCC.
To do either, Select Manage Notification Configurations under Administration Management in the Tasks list.
Configuring the SMTP Server The Manage Notification Configurations page contains a single row in which you enter information about the SMTP server your company uses for sending email. GRCC uses your email system to send notifications to control participants when incidents are generated.
To enter values in the row, double-click in each field (or press the Tab key to move from an active field to the next field). Enter the following values:
• SMTP Host: The host name for the SMTP server your company uses for sending email.
• Port Number: The port number at which the SMTP server communicates with other applications.
• User: The user name with which one would log on to the SMTP server. This value is required only if access to the SMTP server requires authentication.
• Password: The password with which one would log on to the SMTP server. This value is required only if access to the SMTP server requires authentication.
• Sender Email Address: An address that appears in the “From” line of email messages generated by the Notification function.
• Application URL: The URL for your instance of GRCC. This takes the form http://host:port/grcc, in which host is the fully qualified domain name of your GRCC server, and port is the value you have configured as your “Tomcat port.” (GRCC uses the Tomcat Application Server to run. By default, the Tomcat port number is 8080.)
• SSL Authentication: Select this check box if access to your SMTP server requires authentication; clear the check box if it does not. If authentication is required, the User and Password fields must also be populated (see above).
• Active: Select this check box to activate the sending of notifications, or clear it to inactivate the sending of notifications.
3-6 Oracle Governance, Risk and Compliance Controls User Guide

When you have finished entering values, click on the Save button. If you have cleared the Active check box, a pop-up message alerts you that all queued notifications will be purged, and prompts you to confirm your choice. Click on its OK button to continue.
Sending Notifications You can send notifications manually, or schedule them to be sent:
1. In the Manage Notification Configurations page, click on the Schedule button.
2. A Schedule Parameter dialog appears. In it, do either of the following:
• In its Start Date fields, enter a date and time (in the format hh:mm) at which GRCC should begin to send notifications. In its Every field, enter the interval (in hours) at which notifications should be sent. Then click on the Schedule button. At each scheduled interval, GRCC consolidates queued notifications so that each reviewer receives one message for the incidents awaiting his review.
• Click on the Run Now button. Queued notifications are consolidated and sent once. To use this option, you need not enter values in the Start Date and Every fields. If, however, a schedule has been set, it will continue to be honored; the use of the Run Now button does not affect it.
Configuring GRCC In a Manage Application Configurations page, you can set parameters required for GRCC to connect to its database. You can enable GRCC to supply data to Oracle Business Intelligence Publisher (BIP), in which you can create custom reports, or to Governance, Risk and Compliance Intelligence (GRCI), another Oracle product. You can set up GRCC to recognize users created externally in a database that uses LDAP technology to share user information. Or you can purge incidents generated by GRCC controls.
To open the Manage Application Configurations page, select Manage Application Configurations under Administration Management in the Tasks list.
Setting Properties The Properties tab opens a page that sets values required for the Governance, Risk and Compliance Controls platform to connect to its database, and that establish a set of languages in which GRCC can display information to its users.
1. In the Manage Application Configurations page, click on the Properties tab (see page 3-8, top).
2. In the GRCC Configuration section of the Properties page, type or select the appropriate value for each property:
• User Name: Supply the user name for the GRCC database.
• Password: Supply the password for the GRCC database.
• Confirm Password: Re-enter the password for the GRCC database.
Data and System Administration 3-7

• Port Number: Supply the port number at which the GRCC database server
communicates with other applications.
• Service Identifier: Supply the service identifier (SID) for the GRCC database server.
• Server Name: Supply the fully qualified domain name of the database server.
• Report Repository Path: Supply the full path to your Report Repository. This is a directory, established during installation, that stores report history.
• Log Threshold: Select a value that sets the level of detail in log-file entries. From least to greatest detail, valid entries are error, warn, info, and debug.
• Transaction ETL Path: Enter the full path to a directory created during GRCC installation to hold ETL data used by Enterprise Transaction Controls Governor.
• App Server Library Path: Enter the full path to the library subdirectory of your web application server (for use in the upload of custom connectors). If you use the Tomcat web application server, this is the lib subdirectory of the TOMCAT_HOME directory.
3. In the Performance Configuration section of the Properties page, select or clear options that may optimize GRCC performance.
• Externalize Report Engine: Select the check box to enable the reporting engine to run in its own java process, so that the generation of large reports does not affect the performance of other functionality. However, select the check box only if you have installed GRCC on hardware identified as “certified” in the Governance, Risk and Compliance Applications Support Matrix; clear the check box if you use hardware identified as “supported.”
• Optimize Distributed Operation: Select the check box to increase the speed at which GRCC performs distributed operations such as data synchroniza-tion. However, for this selection to have any effect, at least one datasource (configured in the Manage Application Data page) must have an entry in its DB Agent field. (This entry, in turn, is a DB Link name configured exter-nally to GRCC.) The Optimize Distributed Operation setting enhances per-
3-8 Oracle Governance, Risk and Compliance Controls User Guide

formance only in GRCC exchanges with datasources with values entered in the DB Agent field.
• Optimize Appliance-Based Operation: Select the check box to optimize performance if the GRCC application and GRCC schema reside on the same machine. Do not select this check box if the GRCC application and schema do not reside on the same machine. When you select this check box, an ORACLE_HOME Path field appears. In it, enter the full, absolute path to your Oracle Home — the directory in which you have installed the Oracle database that houses the GRCC schema.
• Enable Era-Based ETL Optimization: Select this check box to cause ETCG data synchronization to operate only on data entered in business-manage-ment applications after a specified date. (This setting has no impact on data synchronization operations for AACG.) When you select this check box, an Analysis Start Date field appears. In it, enter a date from which you want synchronization runs to recognize data changes. When you click in the field, a pop-up calendar appears. Click left- or right-pointing arrows to select ear-lier or later months (and years), and then click on a date in a selected month.
4. In the Language Preferences section of the Properties page, choose languages available to GRCC users — select their check boxes. (Or, clear check boxes to make languages unavailable.) Once selected here, languages are available for selection by individual users as they configure their user profiles or as they log in to GRCC.
5. In the Security section of the Properties page, set the following security values:
• Maximum Login Attempts: Enter a number of times a user may enter an incorrect user name or password during login before being locked out of GRCC. (Administrators can unlock user accounts in the Manage Users page.)
• Elapsed Days Before Password Expires: Enter a number of days for which GRCC login passwords remain valid. When each user’s password expires, the user is prompted to create a new one during login.
• Use Basic Authentication for Web Service: Select this checkbox as one step in integrating GRCC with an application whose database shares its user in-formation through LDAP technology. However, there are limitations that could materially affect data and functionality. Therefore, you should con-figure LDAP integration in general, and select the Use Basic Authentication for Web Service field in particular, only with the assistance of Oracle Con-sulting Services or another organization experienced in this type of integra-tion for GRCC. (Also, see “Setting Up User Integration,” page 3-12.)
6. When you finish entering property values, click on Actions > Test.
7. GRCC determines whether the property values enable it to connect to its database and read the directory path for the Report Repository.
• If not, you have entered an incorrect value for at least one of the properties. Examine the values, make corrections, and select Actions > Test again.
• If so, the property values are correct and an Actions > Save option becomes active. Select that option to save your settings.
8. In response to a prompt, restart the server.
Data and System Administration 3-9

Setting Up Analytics Oracle-supplied report templates enable users to develop custom reports that run in Oracle Business Intelligence Publisher, or BIP. (These reports, and templates from which they are derived, are distinct from the reports that are supplied with GRCC, and that run as Reports Management tasks.) In addition, GRCC can supply data to Governance, Risk and Compliance Intelligence (GRCI), another Oracle product.
In either case, GRCC must place data in a schema distinct from its principal one, and from which either BIP or GRCI reads data; it’s known as the “data analytics” schema. To implement the report templates or GRCI connectivity (or both), create the data analytics schema, then use fields in the Analytics tab to set values that identify the data analytics schema.
The data analytics schema should reside on a server distinct from the one on which the GRCC schema runs, and should use a distinct tablespace. The following is a sample script for creating the data analytics schema in an Oracle 10g or 11g database. Assume you have created the data analytics tablespace (called grcc_tablespace in the script) and that the schema (user) name and password are grcc_user and grcc_password. create user grcc_user identified by grcc_password default
tablespace grcc_tablespace quota unlimited on grcc_tablespace quota 0k on system;
grant connect, resource to grcc_user; grant create any view to grcc_user; grant create any table to grcc_user; grant drop any table to grcc_user;
If you choose to use the system tablespace, rather than create one specifically for data analytics, delete the phrase “default tablespace grcc_tablespace quota unlimited on grcc_tablespace quota 0k on system;” from the script.
If you use an Oracle 10g or 11g database, run the following commands as the system user: ALTER SYSTEM SET open_cursors=1000; ALTER SYSTEM SET processes=400 scope=spfile; ALTER SYSTEM SET sessions=600 scope=spfile;
If you use an 11gR2 or later database, also run the following command as the sys-tem user: ALTER SYSTEM SET deferred_segment_creation=FALSE;
After running these commands, bounce the database.
If your GRCC instance is an upgrade from version 8.5.1, use the data analytics schema created for the earlier version. Before upgrading, take a backup of your schema.
If you wish to use the multilingual capabilities of GRCC, be sure the database that hosts the data analytics schema is set up for UTF-8 encoding. Specifically, the character set should be set to AL32UTF8. Refer to your Oracle Admin guide for information on verifying or configuring your database with the recommended character set.
3-10 Oracle Governance, Risk and Compliance Controls User Guide

Once you have created the data analytics schema, use the GRCC Application Configuration page to connect GRCC to the schema:
1. In the Manage Application Configurations page, click on the Analytics tab.
2. In the Data Analytics Configuration section, enter values that identify the data
analytics schema:
• User Name: Supply the user name for the subsidiary database.
• Password: Supply the password for the subsidiary database.
• Confirm Password: Re-enter the password for the subsidiary database.
• Port Number: Supply the port number at which the database server communicates with other applications.
• Service Identifier: Supply the service identifier (SID) for the database server.
• Server Name: Supply the fully qualified domain name of the database server.
3. In the Analysis section, set analysis options:
• Update Data Analytics When Analysis Is Run: Select the check box to update the data analytics schema each time controls are evaluated in GRCC. (Or, clear the check box to prevent the data analytics schema from being updated.)
• Enable Analysis Across Datasources: Select this check box if you intend to create controls so that each may cite multiple datasources. (The checkbox is selected by default because this is the expected mode of operation.) To im-prove performance only if you intend to create controls so that each applies to a single datasource, clear this checkbox.
4. When you finish entering property values, click on Actions > Test.
5. GRCC determines whether the property values enable it to connect properly.
• If not, you have entered an incorrect value for at least one of the properties. Examine the values, make corrections, and select Actions > Test again.
• If so, the property values are correct and an Actions > Save option becomes active. Select that option to save your settings.
6. In response to a prompt, restart the server.
Data and System Administration 3-11

Setting Up User Integration GRCC can be integrated with an application whose database shares its user infor-mation through LDAP technology. However, there are limitations that could materi-ally affect existing data and functionality. Therefore, this should be done only in conjunction with professionals experienced in this type of integration for GRCC. Contact Oracle Consulting Services or another experienced organization for assis-tance. Also, see the discussion of the Use Basic Authentication for Web Service field (page 3-9) on the properties tab of the Manage Application Configurations page.
1. In the Manage Application Configurations page, click on the User Integration tab.
2. In the Single Sign On section, select the Enable Single Sign On check box to
make use of Single Sign On, which establishes a single set of log-on credentials for each user in varying applications. (Or, clear the check box if you do not wish to use Single Sign On.)
3. In the External LDAP User Repository section, type or select an appropriate value in the field corresponding to each property:
• Enable Integration: Select the check box to permit user integration to occur.
• Hostname: Enter the host name of the LDAP database server.
• Port Number: Supply the port number at which the LDAP database server communicates with other applications
• User Name: Supply the user name for the LDAP database schema.
• Password: Supply the password for the LDAP database schema.
• Confirm Password: Re-enter the password for the LDAP database schema.
• Bind DN Suffix: Supply the common suffix added to each user ID to form the LDAP Bind DN. (Each user must have a UID attribute).
• Users Organizational Unit: Supply the “container” in the LDAP hierarchy that holds user records.
4. When you finish entering property values, click on Actions > Test.
5. GRCC determines whether the property values enable it to connect properly.
• If not, you have entered an incorrect value for at least one of the properties. Examine the values, make corrections, and select Actions > Test again.
3-12 Oracle Governance, Risk and Compliance Controls User Guide
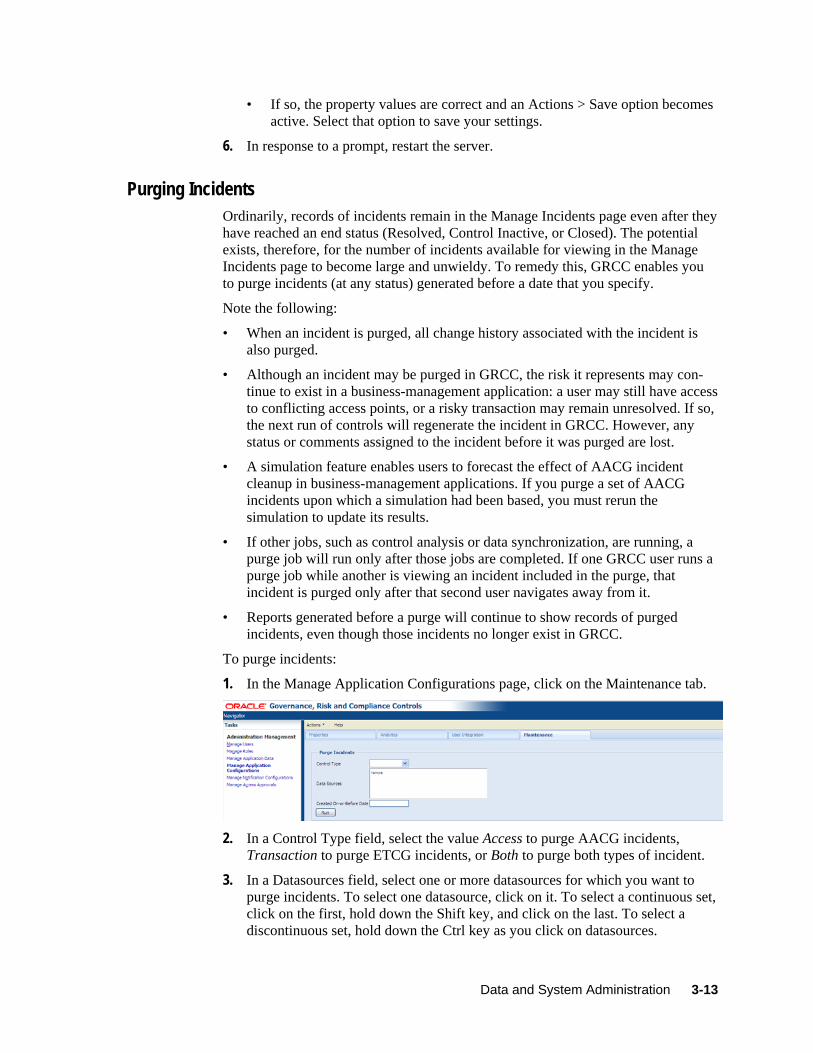
• If so, the property values are correct and an Actions > Save option becomes active. Select that option to save your settings.
6. In response to a prompt, restart the server.
Purging Incidents Ordinarily, records of incidents remain in the Manage Incidents page even after they have reached an end status (Resolved, Control Inactive, or Closed). The potential exists, therefore, for the number of incidents available for viewing in the Manage Incidents page to become large and unwieldy. To remedy this, GRCC enables you to purge incidents (at any status) generated before a date that you specify.
Note the following:
• When an incident is purged, all change history associated with the incident is also purged.
• Although an incident may be purged in GRCC, the risk it represents may con-tinue to exist in a business-management application: a user may still have access to conflicting access points, or a risky transaction may remain unresolved. If so, the next run of controls will regenerate the incident in GRCC. However, any status or comments assigned to the incident before it was purged are lost.
• A simulation feature enables users to forecast the effect of AACG incident cleanup in business-management applications. If you purge a set of AACG incidents upon which a simulation had been based, you must rerun the simulation to update its results.
• If other jobs, such as control analysis or data synchronization, are running, a purge job will run only after those jobs are completed. If one GRCC user runs a purge job while another is viewing an incident included in the purge, that incident is purged only after that second user navigates away from it.
• Reports generated before a purge will continue to show records of purged incidents, even though those incidents no longer exist in GRCC.
To purge incidents:
1. In the Manage Application Configurations page, click on the Maintenance tab.
2. In a Control Type field, select the value Access to purge AACG incidents,
Transaction to purge ETCG incidents, or Both to purge both types of incident.
3. In a Datasources field, select one or more datasources for which you want to purge incidents. To select one datasource, click on it. To select a continuous set, click on the first, hold down the Shift key, and click on the last. To select a discontinuous set, hold down the Ctrl key as you click on datasources.
Data and System Administration 3-13

4. In the Created On Or Before field, select a date; GRCC purges incidents generated on or before that date. When you click in the field, a pop-up calendar appears. Click left- or right-pointing arrows to select earlier or later months (and years), and then click on a date in a selected month.
5. Click on the Run button.
6. A confirmation message appears. Click on its OK button.
3-14 Oracle Governance, Risk and Compliance Controls User Guide

4 Jobs Administration
“Jobs” are individual requests to synchronize data, evaluate models or controls, export results, generate reports, or perform other background tasks. Some jobs can be run on demand, or can be scheduled to run. In general, a job is run or scheduled from a page to which it applies — for example, one might synchronize data from the Manage Application Data page or run controls from the Manage Controls page.
A Manage Jobs page enables you to view job histories, and a Manage Schedule page enables you to review schedules of jobs that are set to be run in the future. Users with update privileges to these pages can also revise the schedules of jobs that are yet to run.
Viewing Job History To view a history of both scheduled and on-demand jobs, open the Manage Jobs page — select Navigator > Jobs and Scheduling, and then select Manage Jobs in the Tasks panel.
Each row presents the following information about one occasion when a job is run:
• Job ID: An identification number assigned internally to the job by GRCC.
• Name: The Name of the job that was run.
• Start Date and End Date: The dates and times on which the job began to run and finished running.
Jobs Administration 4-1

• Status: The current state of a job. Most statuses are assigned by GRCC. These include Not Started, Started, Queued, Pause Requested, Paused, Completed, and Error. GRCC updates the status until a final state (either Completed or Error) is reached.
GRCC prioritizes jobs: Model and control analysis, and AACG simulation have highest priority, followed by data synchronization, followed by all others (such as running reports). The Pause (or Pause Requested) status indicates that GRCC has suspended (or is attempting to suspend) a job in order to undertake a higher-priority job. Only GRCC can pause jobs or request that they be paused; there is no way for a user to do so.
Users may, however, cancel jobs (see “Canceling Jobs,” below). When a user does so, the job status changes to Cancel Requested or, ultimately, to Canceled.
• Message: An informational message about the job status.
• Run By: The user name of the user who ran the job.
Purging Jobs If you have update permission to the Manage Jobs page, you can use a Purge feature to remove entries from the page:
1. Click on the Purge button in the tool bar. A Purge Job History dialog appears.
2. In the “days old” field, enter a number of days before the present date. This
effectively defines a new date; jobs completed after that date are kept, and those completed before that date are deleted. For example, if the current date is July 30 and you enter the value 1, your purge date is July 29 and only those jobs completed on July 30 will be retained.
3. Click on the Purge button. A message confirms the purge operation; click its OK button to clear it.
Canceling Jobs If you have update permission to the Job History page, you can cancel a job whose status indicates that it is still in progress. Click on the row identifying the job, click on the Cancel Job button, and respond to a message asking you to confirm the cancellation. In this case, the status changes to Cancel Requested or, ultimately, to Canceled.
Viewing and Resetting Job Schedules To view schedules for jobs that are yet to be run, open the Manage Schedules page — select Navigator > Jobs and Scheduling, and then select Manage Schedules in the Tasks panel.
4-2 Oracle Governance, Risk and Compliance Controls User Guide

Each row presents the following information about a job scheduled to run in the future:
• Schedule Name: The name assigned to the schedule when it was configured.
• Name: The name of the job itself — for example, the name of a report if the scheduled job is to generate the report.
• Last Run Date: The date and time on which this schedule last caused the job to be run.
• Next Run Date: The date and time on which this schedule will next cause the job to be run.
• Scheduled By: The user name of the GRCC user who created the schedule.
If you have update permission to the Manage Schedules page, you can modify or discontinue a schedule:
1. Double-click on the row for a schedule. Its Schedule Parameter dialog opens. Each schedule is specific to the type of job being scheduled, and each dialog is specific to the schedule it designed to set.
2. Do either of the following:
• Enter new values in fields, and make new selections among radio buttons, to define a new schedule, and click on the Reschedule button. Then new schedule is then in force.
• Click on the Unschedule button. All values are then removed from the Schedule Parameter dialog, and the job is no longer scheduled to be run.
Jobs Administration 4-3

4-4 Oracle Governance, Risk and Compliance Controls User Guide