Embed Size (px)
Citation preview
Oracle® Hospitality Inventory Management
Deployment Guide Release 8.5.0
E66733-03
January 2019

Oracle® Inventory Management Deployment Document, Release.8.5.0.
Copyright © 2003, 2019, Oracle and/or its affiliates. All rights reserved.
This software and related documentation are provided under a license agreement containing restrictions on use and disclosure and are protected by intellectual property laws. Except as expressly permitted in your license agreement or allowed by law, you may not use, copy, reproduce, translate, broadcast, modify, license, transmit, distribute, exhibit, perform, publish, or display any part, in any form, or by any means. Reverse engineering, disassembly, or decompilation of this software, unless required by law for interoperability, is prohibited.
The information contained herein is subject to change without notice and is not warranted to be error-free. If you find any errors, please report them to us in writing.
If this software or related documentation is delivered to the U.S. Government or anyone licensing it on behalf of the U.S. Government, then the following notice is applicable:
U.S. GOVERNMENT END USERS: Oracle programs, including any operating system, integrated software, any programs installed on the hardware, and/or documentation, delivered to U.S. Government end users are "commercial computer software" pursuant to the applicable Federal Acquisition Regulation and agency-specific supplemental regulations. As such, use, duplication, disclosure, modification, and adaptation of the programs, including any operating system, integrated software, any programs installed on the hardware, and/or documentation, shall be subject to license terms and license restrictions applicable to the programs. No other rights are granted to the U.S. Government.
This software or hardware is developed for general use in a variety of information management applications. It is not developed or intended for use in any inherently dangerous applications, including applications that may create a risk of personal injury. If you use this software or hardware in dangerous applications, then you shall be responsible to take all appropriate fail-safe, backup, redundancy, and other measures to ensure its safe use. Oracle Corporation and its affiliates disclaim any liability for any damages caused by use of this software or hardware in dangerous applications.
Oracle and Java are registered trademarks of Oracle and/or its affiliates. Other names may be trademarks of their respective owners.
Intel and Intel Xeon are trademarks or registered trademarks of Intel Corporation. All SPARC trademarks are used under license and are trademarks or registered trademarks of SPARC International, Inc. AMD, Opteron, the AMD logo, and the AMD Opteron logo are trademarks or registered trademarks of Advanced Micro Devices. UNIX is a registered trademark of The Open Group.
This software or hardware and documentation may provide access to or information about content, products, and services from third parties. Oracle Corporation and its affiliates are not responsible for and expressly disclaim all warranties of any kind with respect to third-party content, products, and services unless otherwise set forth in an applicable agreement between you and Oracle. Oracle Corporation and its affiliates will not be responsible for any loss, costs, or damages incurred due to your access to or use of third-party content, products, or services, except as set forth in an applicable agreement between you and Oracle.
ii
Contents
CONTENTS ............................................................................................... II
PREFACE ................................................................................................. III Audience ................................................................................................................................... iii
Customer Support .................................................................................................................... iii
Documentation ......................................................................................................................... iii
Revision History ....................................................................................................................... iii
OVERVIEW .............................................................................................. IV Before Starting .......................................................................................................................... iv
Files Included ............................................................................................................................ iv
Prerequisites .............................................................................................................................. iv
Encrypted configuration: ......................................................................................................... v
Update database(s) .................................................................................................................. xii
INSTALL PROCESS .............................................................................. XIII Step by step instructions: ...................................................................................................... xiv
WebApps .............................................................................................................................. xv
Installed Apps ................................................................................................................... xviii
AutomationService Activity Monitor .................................................................................. xxi
Additional Configuration options for AutomationService ........................................... xxvii
Inventory -> Maintenance -> Settings -> AUTOMATION ........................................ xxvii
AutomationService Instance Configured in AutomationService.exe.config .......... xxvii
DBMaintenance Tool ..................................................................................................... xxviii
Post Upgrade ..................................................................................................................... xxx
iii
Preface
This document describes the fixes included in this patch.
Audience This document is for administrators and technicians who are responsible for maintaining an 8.5.0 Oracle Hospitality Inventory Management deployment.
Customer Support To contact Oracle Customer Support, access My Oracle Support at the following URL:
https://support.oracle.com
When contacting Customer Support, please provide the following:
Product version and program/module name
Functional and technical description of the problem (include business impact)
Detailed step-by-step instructions to re-create
Exact error message received
Screen shots of each step you take
Documentation Oracle Hospitality product documentation is available on the Oracle Help Center at
http://docs.oracle.com/en/industries/hospitality/.
Revision History
Date Description of Change
September 2015 Initial publication.
October 2015 Page xvi: additional instructions for changing the value of the MyMicrosRefreshURL key in web.config.
January 2016 Corrected the filenames.
June 2016 Added prerequisite requirement for Microsoft Visual C++ 2010 Redistributable package.
January 2019 Updated the Prerequisites section in the Overview chapter to include information on installing matching component versions.
iv
Overview
The purpose of this document is to provide instructions for upgrading an existing
Inventory Management environment to version 8.5.0. It is assumed that the Inventory
Management installation being upgraded has all necessary prerequisites of prior
versions.
Before Starting See the Oracle Hospitality Enterprise Back Office 8.5.0 Release Notes for information about
new or changed features and updates to system requirements and compatibility.
Files Included The 8.5.0 release of Inventory Management includes the following files:
• 150903_MobileSolutionSetup myinv 8.50.4.zip
• 150903_MobileWebService 8.5.0.66.1560.zip
• 150903_mymicrosWebService 8.5.0.85.1560.zip
• 150903_myOrganizations 8.5.0.61.1560.zip
• 150903_POSWebService 8.5.0.65.1560.zip
• 150903_AutomationService (LB) for MYINV 8.5.0.73.1560.zip
• 150903_myinventory_DBMaintenance (32-bit)_8.5.0.18.1560.zip
• 150903_myinventory_DBMaintenance (64-bit)_8.5.0.18.1560.zip
• 150903_myinventory 8.5.0.83.1560.zip
• 150902_DGMIMS 8.50.6.1560.zip
• 150903_ASAMon 8.5.0.53.1560.zip
• SecureConfig.zip
Prerequisites .NET4 (Full, not Client Profile) must be installed on PC. In case it is not installed on target
PC, it can be downloaded from Microsoft – or it will be installed during DBMaintenance
or AutomationService setup (if not found on PC)
Microsoft Visual C++ 2010 Redistributable Package must be installed on Microsoft
Windows Server 2008 R2 and Microsoft Windows Server 2012 R2. Make sure you
download and install the correct package for your operating system bits.
Oracle Data Provider for .NET must be installed: currently, we use Oracle-provided
package that can be downloaded on the Oracle Webside. There are 32 and 64bit version,
pick one proper for the system and Oracle Client.
Execute install.bat odp.net4 c:\oracle odac,
add “c:\oracle” and “c:\oracle\bin” to the system PATH, before other Oracle paths.
copy “tnsnames.ora” and “sqlnet.ora” from existing Oracle client installation to
C:\oracle\network\admin.
v
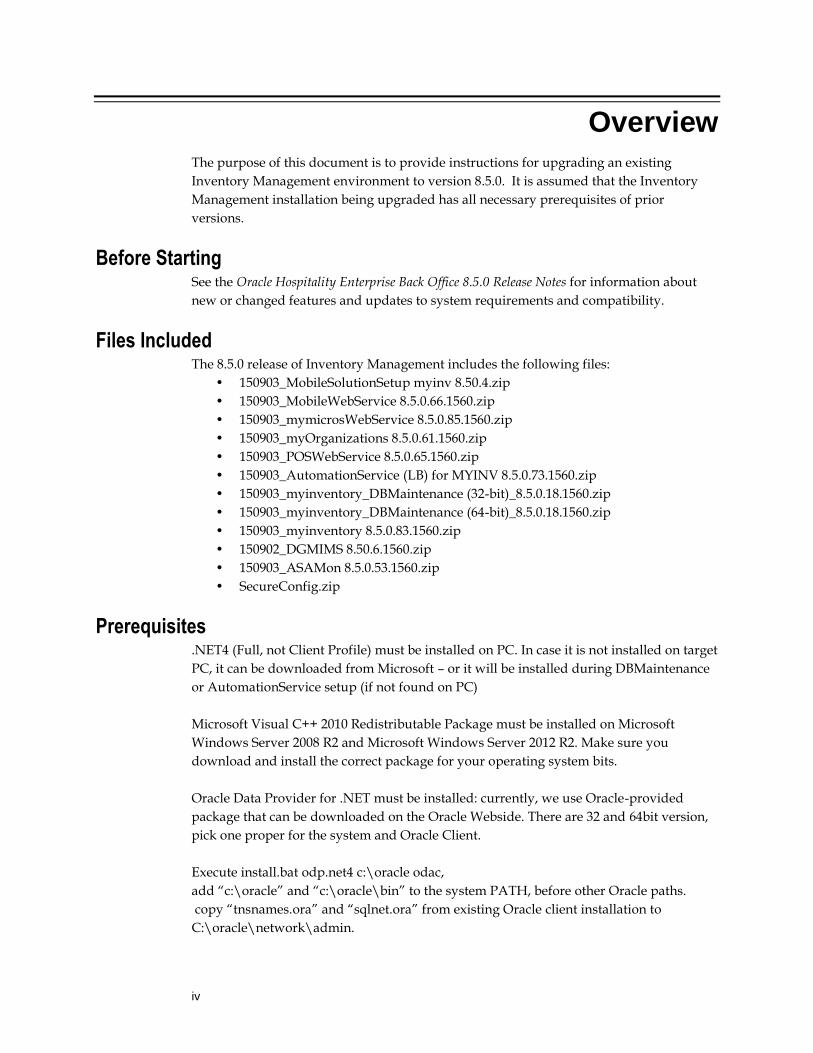
Web applications must run in Application Pool that uses .NET4 and integrated managed
pipeline mode.
We also need .NET4 Infragistics scripts which can be found in the Inventory
Management package as usual.
Copy to inetpub\wwwroot\aspnet_client\Infragistics and you’ll get a folder 2013CLR4
in the same level as the old 2013CLR35.
Install matching release versions of Enterprise Back Office components. For example, to
use Inventory Management with Reporting and Analytics 8.5.0, make sure to install
Inventory Management 8.5.0. This does not apply to patches because patch release
versions may vary by component.
Encrypted configuration: Starting from release 8.5.0, database password and encryption-key defining parameters
will be stored in Protected Configuration (https://msdn.microsoft.com/en-
us/library/53tyfkaw%28v=vs.100%29.aspx). Storing sensitive information in a non-
readable format improves the security of our applications by making it difficult for an
attacker to gain access to the sensitive information, even if an attacker gains access to the
file, database, or other storage location. We are using RSA machine-level key container,
which enables us to use single one for all our applications and simplifies the deployment
on other PCs.
Deployment of Inventory Management applications must be done in following order:
- Install fresh applications (update can do, but with precautions explained below)
- Use the “SecureConfig” tool to create (or import) key container
- Define the encryption key parameters
- Encrypt configurations
- Update database(s)

vi
It is recommended to install fresh 8.5.0 applications instead of updating them, since
configuration files are changed. You can also do update, but before that, move the
existing .config files to backup location.
vii
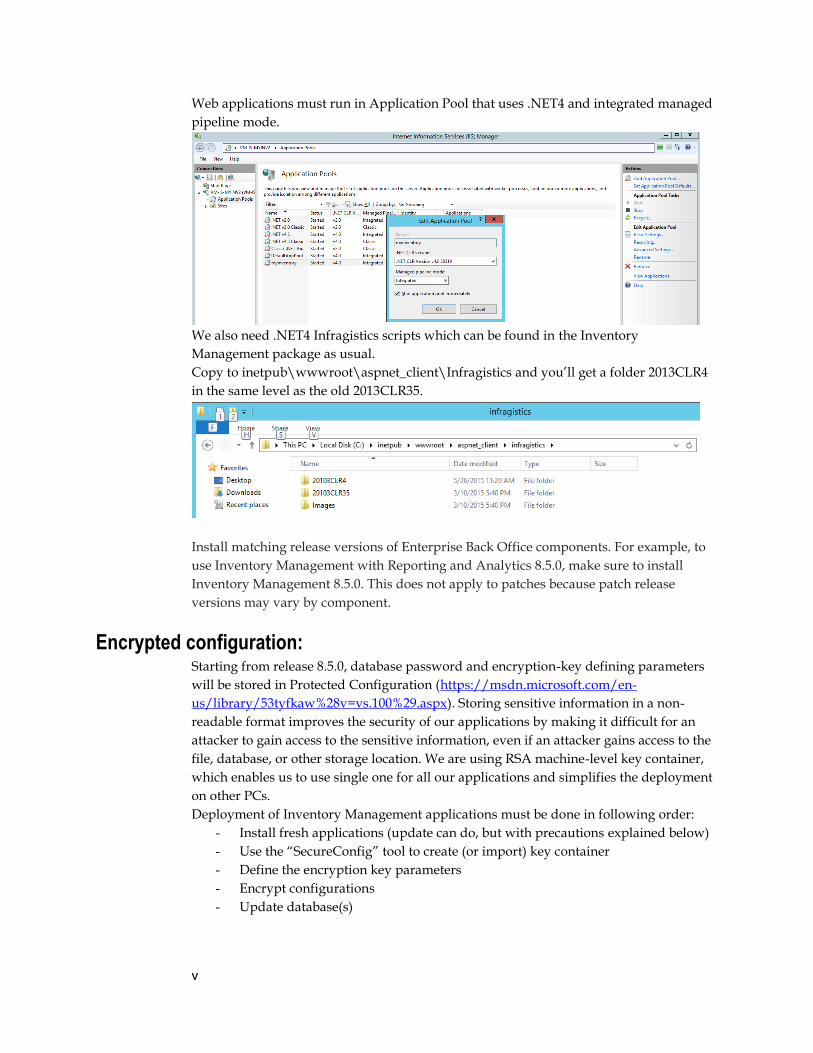
Use the “SecureConfig” tool to create or import key container
Start “SecureConfig” tool as Administrator and click on “Encryption Key Containers” in
the menu
You will see the list of machine key containers on PC:
If there is no “myinventory” machine key container available, create one by pressing
button “Create new key container…” (on first installation in that deployment site) or
“Import key container” (if installation on another PC on that deployment site). Name it
“myinventory”.
viii
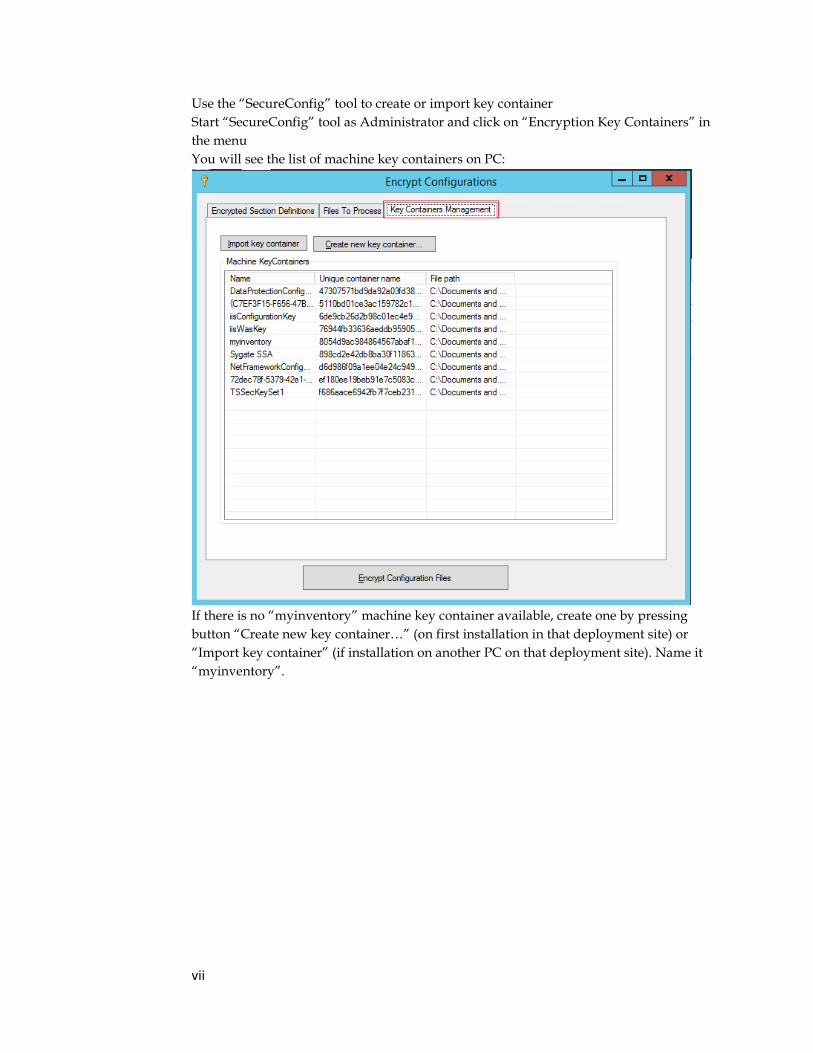
After key container is created, access must be granted. Right click on “myinventory” and
select “Show key-file properties”. Dialog will be shown, select “Security” tab:
Make sure that you give SYSTEM the full control, and if PC is going to be used for
ASP.NET, give IIS_USRS Read access.
ix
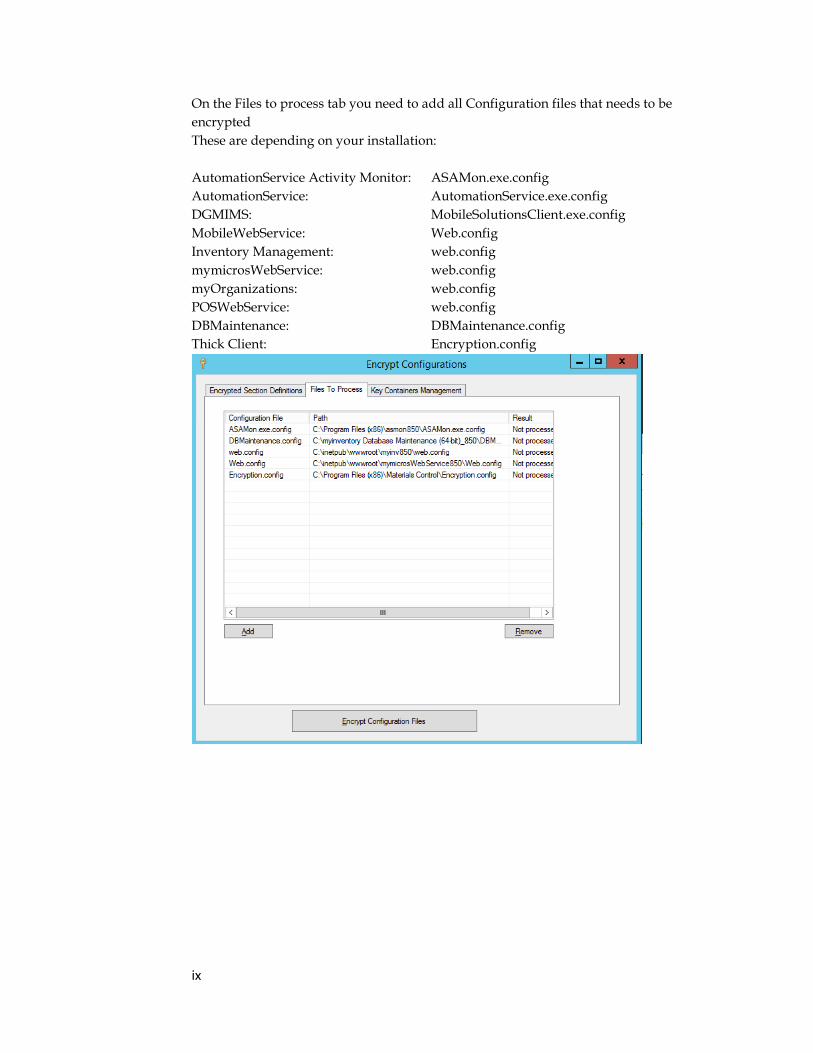
On the Files to process tab you need to add all Configuration files that needs to be
encrypted
These are depending on your installation:
AutomationService Activity Monitor: ASAMon.exe.config
AutomationService: AutomationService.exe.config
DGMIMS: MobileSolutionsClient.exe.config
MobileWebService: Web.config
Inventory Management: web.config
mymicrosWebService: web.config
myOrganizations: web.config
POSWebService: web.config
DBMaintenance: DBMaintenance.config
Thick Client: Encryption.config

x
Define the encryption key parameters
You will notice the new section in .config files:
<EncryptedAppSettingsGroup> <!--NOT YET ENCRYPTED!; wating for Key container management tool. This text
SHOULD NOT BE VISIBLE!
Do not store encrypted values here without specifying exported key
container.
-->
<add key="passPhrase" value="Pas5pr@se" />
<add key="saltValue" value="s@1tValue" />
<add key="hashAlgorithm" value="SHA1" />
<add key="passwordIterations" value="2" />
<add key="initVector" value="@1B2c3D4e5F6g7H8" />
<add key="keySize" value="256" />
<add key="PASSWORD" value=""/>
</EncryptedAppSettingsGroup>
This section defines new encryption-related parameters that will be used instead of
hardcoded ones from previous releases. Additionally, we now keep database password
there.
The default .config files deployed with 8.5.0 applications have here the same values that
were hardcoded in previous releases; it is recommended to change them, with some
limitations:
- passphrase – can be any string
- saltValue – can be any string
- hashAlgorithm – can be “SHA1” or “MD5”
- passwordIterations – can be any number
- initVector – must be 16 bytes long
- keySize – can be 128, 192 or 256
- Store those values on safe place.
xi
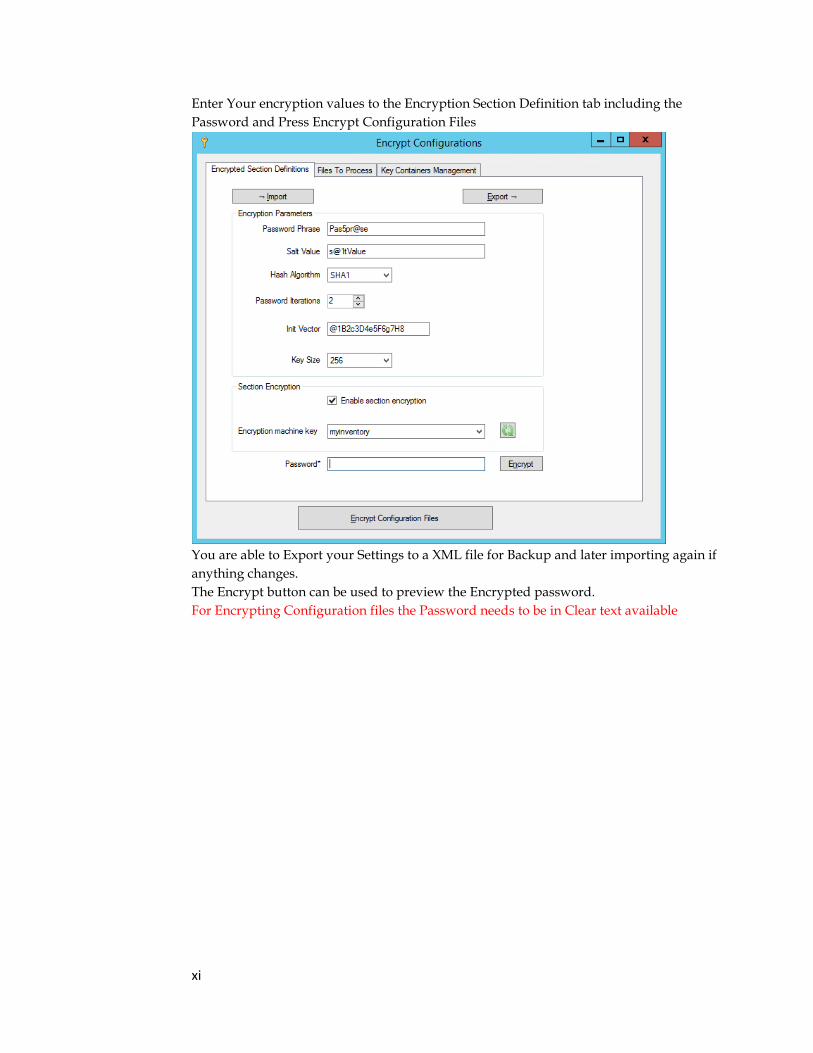
Enter Your encryption values to the Encryption Section Definition tab including the
Password and Press Encrypt Configuration Files
You are able to Export your Settings to a XML file for Backup and later importing again if
anything changes.
The Encrypt button can be used to preview the Encrypted password.
For Encrypting Configuration files the Password needs to be in Clear text available
xii
Update database(s) Use only Database Maintenance tool for updating databases to 8.5.0. Thick client
“Database Updater” is not provided at all in 8.5.0, and “full” MC thick client 8.5.0 cannot
be used for database update at all.
This first database update will do the re-encoding of data: decode by using old
hardcoded passphrase and salt, encode fresh by using values form encrypted
configuration section. This is one-way process.
After this, Inventory Management and other applications from suite can be used.
Deploying on other PCs in installation site
Fortunately, not all the steps from above are needed.
- Export “myinventory” machine key container from PC where it was created by
using
SecureConfig Tool, Key Container Management Tab, Right click on the
myinventory Container and click on Export
- Import it on another PC by using SecureConfig Tool, Key Container
Management Tab and click on Import key Container
- Grant access rights to imported key container
Copy .config files from PC where first installation was done
xiii
Install Process
Logically, the Inventory Management upgrade can be broken into two sections; Web
Apps and Installed Apps.
1. Web Apps
The first part of the upgrade is the Web Apps section, which includes deploying web
applications on IIS. In this part of the upgrade, we will deploy updated files for the
myOrganizations, WebClient,mymicrosWebService and POSWebService builds. The
C:\inetpub\wwwroot folder contains the builds for these web apps. For this part of
the upgrade, we will need the following files…
150903_myinventory 8.5.0.83.1560.zip
Contains the builds that get copied to C:\inetpub\wwwroot\<WebClientDir>
and to C:\inetpub\wwwroot\aspnet_client
150903_mymicrosWebService 8.5.0.85.1560.zip
Contains the build that gets copied to C:\inetpub\wwwroot\<WebServiceDir>
150903_myOrganizations 8.5.0.61.1560.zip
Contains the build that gets copied to C:\inetpub\wwwroot\<myOrganizationsDir>
150903_POSWebService 8.5.0.65.1560.zip
Contains the build that gets copied to C:\inetpub\wwwroot\<POSWebServiceDir>
2. Installed Apps
The second part of the upgrade will be what we call the Installed Apps. These
include the standalone applications that are installed using a Setup executable.
For this part, we will use the following files…
150903_AutomationService (LB) for MYINV 8.5.0.73.1560.zip
Contains an installer (Setup.exe) that will be run to replace
myinventoryAutomation2 with AutomationService.
150903_myinventory_DBMaintenance (32-bit)_8.5.0.18.1560.zip or
150903_myinventory_DBMaintenance (64-bit)_8.5.0.18.1560.zip
Contains an installer to upgrade the Inventory Management DB Updater – this
installs two applications; the Single Instance DB Updater and the Batch DB
Updater
xiv
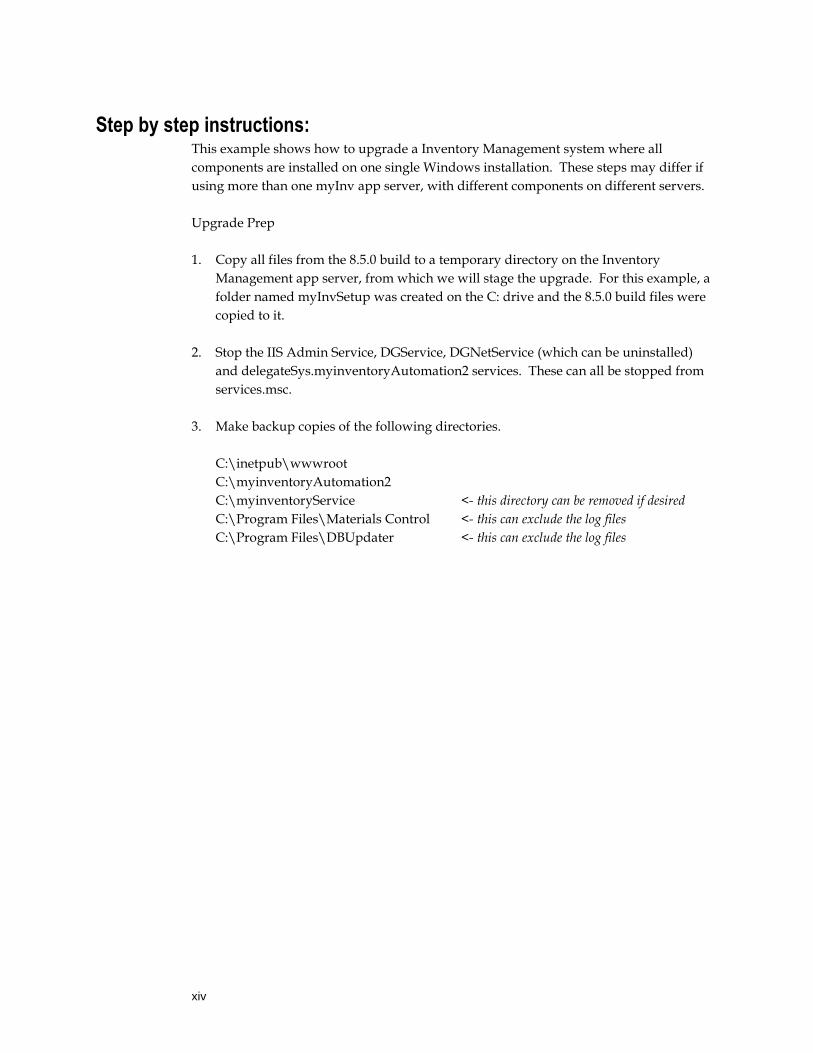
Step by step instructions: This example shows how to upgrade a Inventory Management system where all
components are installed on one single Windows installation. These steps may differ if
using more than one myInv app server, with different components on different servers.
Upgrade Prep
1. Copy all files from the 8.5.0 build to a temporary directory on the Inventory
Management app server, from which we will stage the upgrade. For this example, a
folder named myInvSetup was created on the C: drive and the 8.5.0 build files were
copied to it.
2. Stop the IIS Admin Service, DGService, DGNetService (which can be uninstalled)
and delegateSys.myinventoryAutomation2 services. These can all be stopped from
services.msc.
3. Make backup copies of the following directories.
C:\inetpub\wwwroot
C:\myinventoryAutomation2
C:\myinventoryService <- this directory can be removed if desired
C:\Program Files\Materials Control <- this can exclude the log files
C:\Program Files\DBUpdater <- this can exclude the log files
xv
WebApps
Note: The Inventory Management IIS webpages for this example are represented as <WebClientDir>, <myOrgDir> and <WebServiceDir>. <POSWebServiceDir> Replace these with the names of the IIS directories in your environment. For example, in US Production, the directory for Webclient is C:\inetpub\wwwroot\webclient, and in EAME environments, the directory is C:\inetpub\wwwroot\myinventory
Unzip the following files to a temporary directory.
150903_myOrganizations 8.5.0.61.1560.zip will create the following folders when
unzipped…
myOrganizations.Application
myOrganizations.Config
150903_myinventory 8.5.0.83.1560.zip will create the following folders when unzipped…
Infragistics Scripts
myinventory.Application
myinventory.Config
150903_mymicrosWebService 8.5.0.85.1560.zip will create the following folders when
unzipped…
mymicrosWebService.Application
mymicrosWebService.Config
150903_POSWebService 8.5.0.65.1560.zip will create the following folders when
unzipped…
POSWebService.Application
POSWebService.Config
1) Once you have backup copies of the <WebClientDir>, <WebServiceDir> and
<myOrgDir>, delete all the contents of these folders. The folders should be
completely empty.
2) Browse to the myinventory.Application directory, select all contents and copy
3) Browse to the C:\inetpub\wwwroot\<WebClientDir> folder, and paste in all files
from the myinventory.Application directory.
4) Browse to the myinventory.Config directory, copy the new web.config and paste it
into the C:\inetpub\wwwroot\<WebClientDir> directory.

xvi
5) Open the web.config from the backup of the <WebClientDir> and copy everything
between the <appSettings> and </appSettings> tags. Open the new web.config
from the new <WebClientDir> and paste the appSettings section from the old into
the new, overwriting the defaults from the new web.config. Alternatively, you can
re-enter the application settings in the new web.config manually, but it is easier to
copy them from the backed up file.
6) If you store any custom files in the <WebClientDir>, like image files for recipes, you
will want to copy those from the backup and paste them back into the
<WebClientDir> in the appropriate places.
7) Browse to the Infragistics Scripts folder in the new WebClient build and copy the
Infragistics.zip file.
8) Browse to C:\inetpub\wwwroot\aspnet_client and delete the existing Infragistics
folder
9) Paste the new Infragistics.zip file into the aspnet_client folder and extract the
contents. This should create a new folder named Infragistics.
10) Browse to the myOrganizations.Application folder and copy all of the contents.
11) Browse to C:\inetpub\wwwroot\<myOrgDir> and paste in all the contents of the
myOrganizations.Application folder.
12) Browse to the myOrganizations.Config directory, copy the new web.config and paste
it into the C:\inetpub\wwwroot\<myOrgDir> directory.
13) Open the web.config from the backup of the <myOrgDir> and copy everything
between the <appSettings> and </appSettings> tags. Open the new web.config
from the new <myOrgDir> and paste the appSettings section from the old into the
new, overwriting the defaults from the new web.config. Alternatively, you can re-
enter the application settings in the new web.config manually, but it is easier to copy
them from the backed up file.
14) Browse to the mymicrosWebService.Application folder and copy all the contents.
15) Browse to C:\inetpub\wwwroot\<WebServiceDir> folder and paste in all the
contents of the mymicrosWebService.Application folder.
16) Browse to the mymicrosWebService.Config directory, copy the new web.config and
paste it into the C:\inetpub\wwwroot\<WebServiceDir> directory.
xvii
17) Open the web.config from the backup of the <WebServiceDir> and copy everything
between the <appSettings> and </appSettings> tags. Open the new web.config
from the new <WebServiceDir> and paste the appSettings section from the old into
the new, overwriting the defaults from the new web.config. Alternatively, you can
re-enter the application settings in the new web.config manually, but it is easier to
copy them from the backed up file.
Find and replace the following key: <add key="MyMicrosRefreshURL"
value="/core/keepLiveAction.do?method=update" />
with the following: <add key="MyMicrosRefreshURL"
value="/core/keepLiveAction.do?method=refresh" />
18) Create a new virtual IIS directory named PosWebService and link it to a physical
directory in C:\inetpub\wwwroot\<POSWebService>.
19) Browse to PosWebService.Application folder, then select and copy all the contents.
20) Browse to C:\inetpub\wwwroot\<PosWebService> folder , and paste in all files
from the PosWebService.Application folder.
21) Browse to PosWebService.Config directory, copy the new web.config and and paste
it to C:\inetpub\wwwroot\<PosWebServiceDir> directory. Open the web.config
file and configure the “value” for each “key” manually between <appSettings> and
</appSettings> tags.
xviii
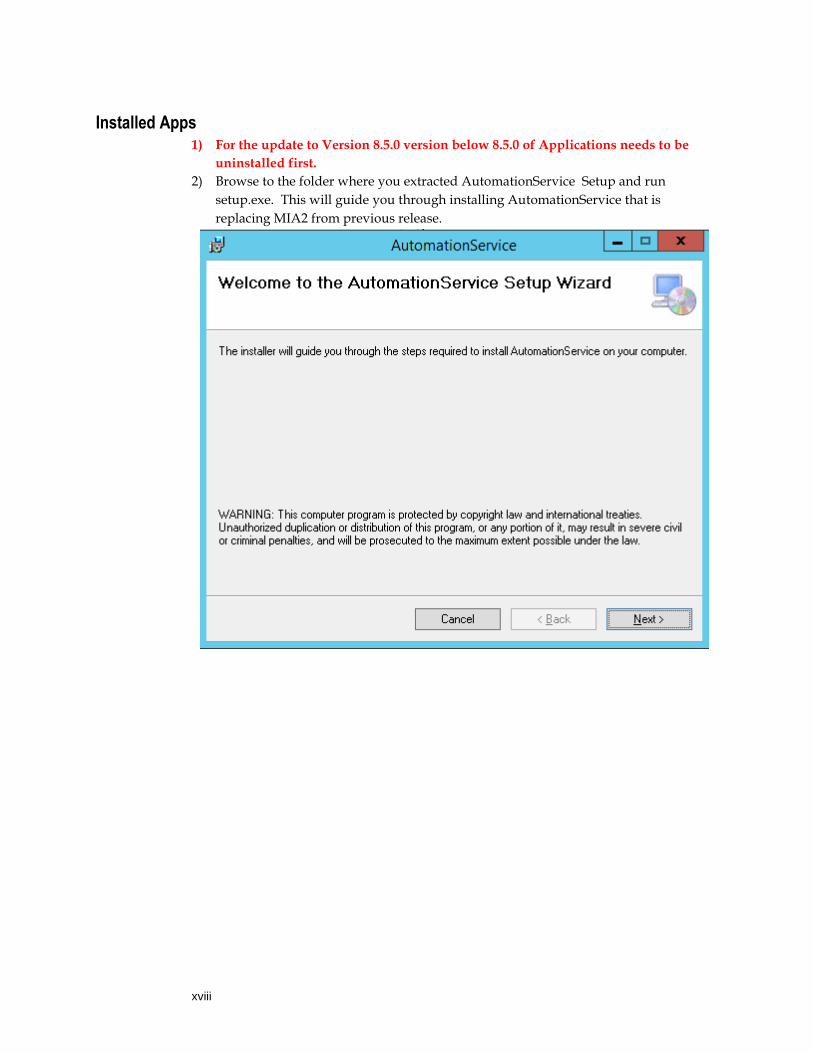
Installed Apps 1) For the update to Version 8.5.0 version below 8.5.0 of Applications needs to be
uninstalled first.
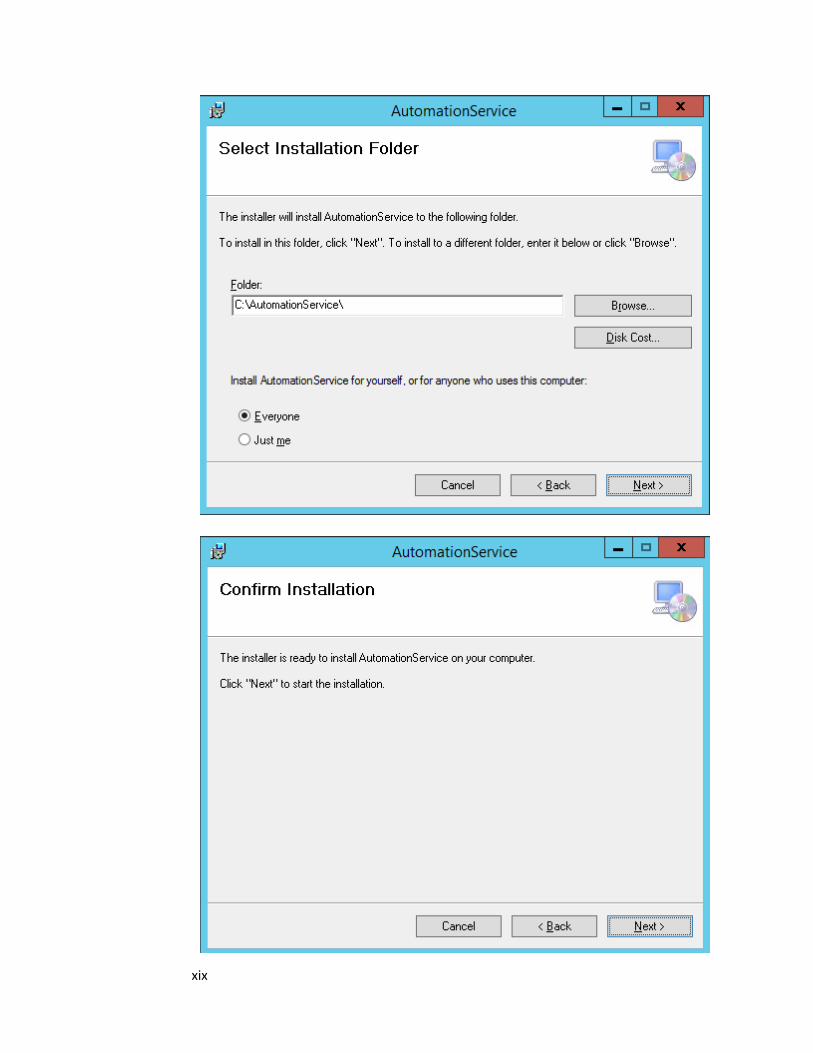
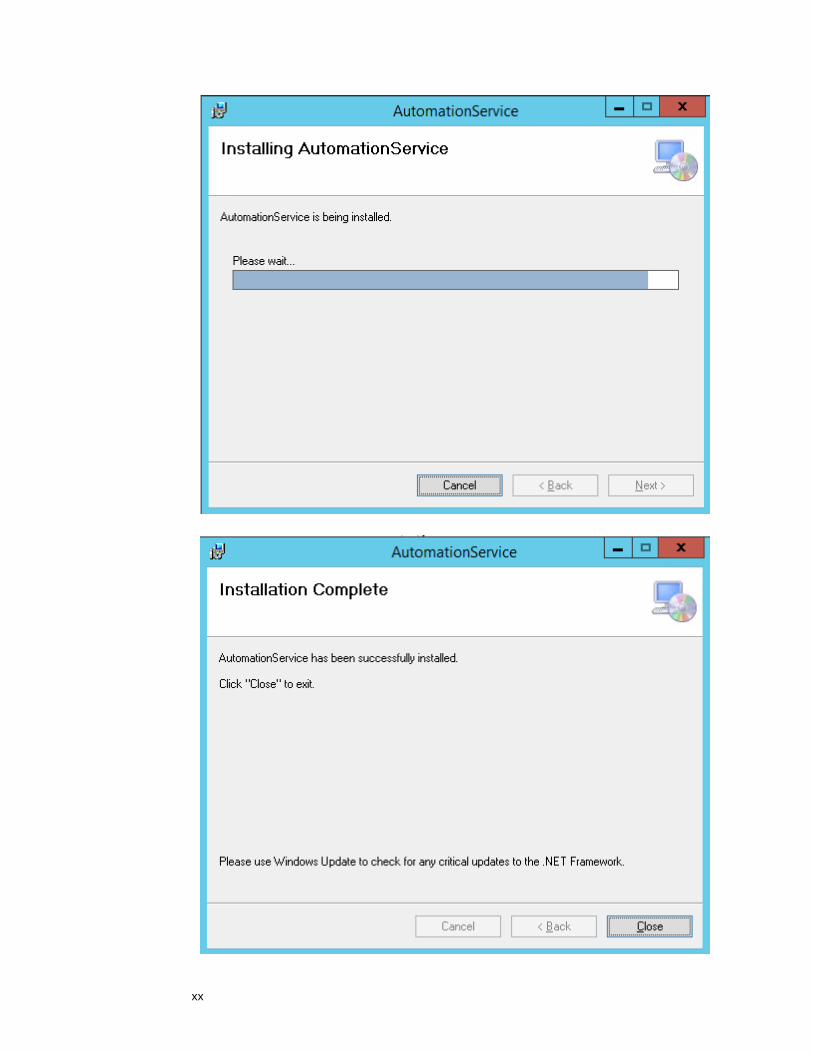
2) Browse to the folder where you extracted AutomationService Setup and run
setup.exe. This will guide you through installing AutomationService that is
replacing MIA2 from previous release.
xix
xx
xxi
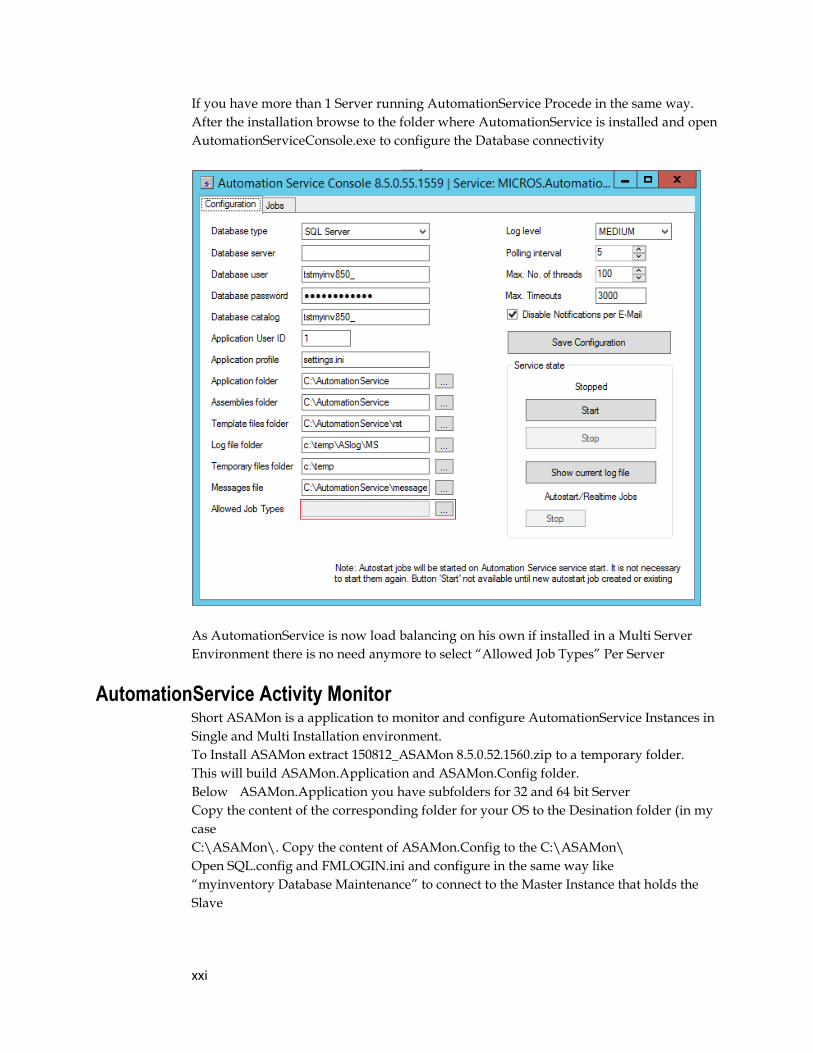
If you have more than 1 Server running AutomationService Procede in the same way.
After the installation browse to the folder where AutomationService is installed and open
AutomationServiceConsole.exe to configure the Database connectivity
As AutomationService is now load balancing on his own if installed in a Multi Server
Environment there is no need anymore to select “Allowed Job Types” Per Server
AutomationService Activity Monitor Short ASAMon is a application to monitor and configure AutomationService Instances in
Single and Multi Installation environment.
To Install ASAMon extract 150812_ASAMon 8.5.0.52.1560.zip to a temporary folder.
This will build ASAMon.Application and ASAMon.Config folder.
Below ASAMon.Application you have subfolders for 32 and 64 bit Server
Copy the content of the corresponding folder for your OS to the Desination folder (in my
case
C:\ASAMon\. Copy the content of ASAMon.Config to the C:\ASAMon\
Open SQL.config and FMLOGIN.ini and configure in the same way like
“myinventory Database Maintenance” to connect to the Master Instance that holds the
Slave
xxii
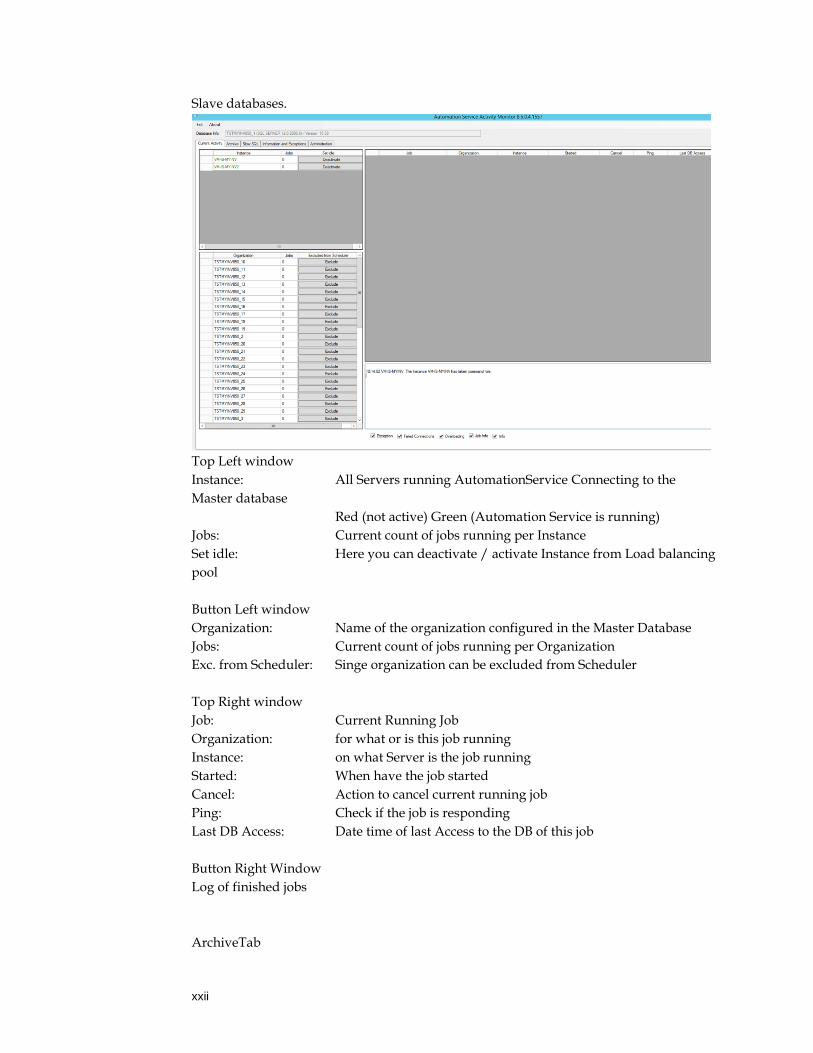
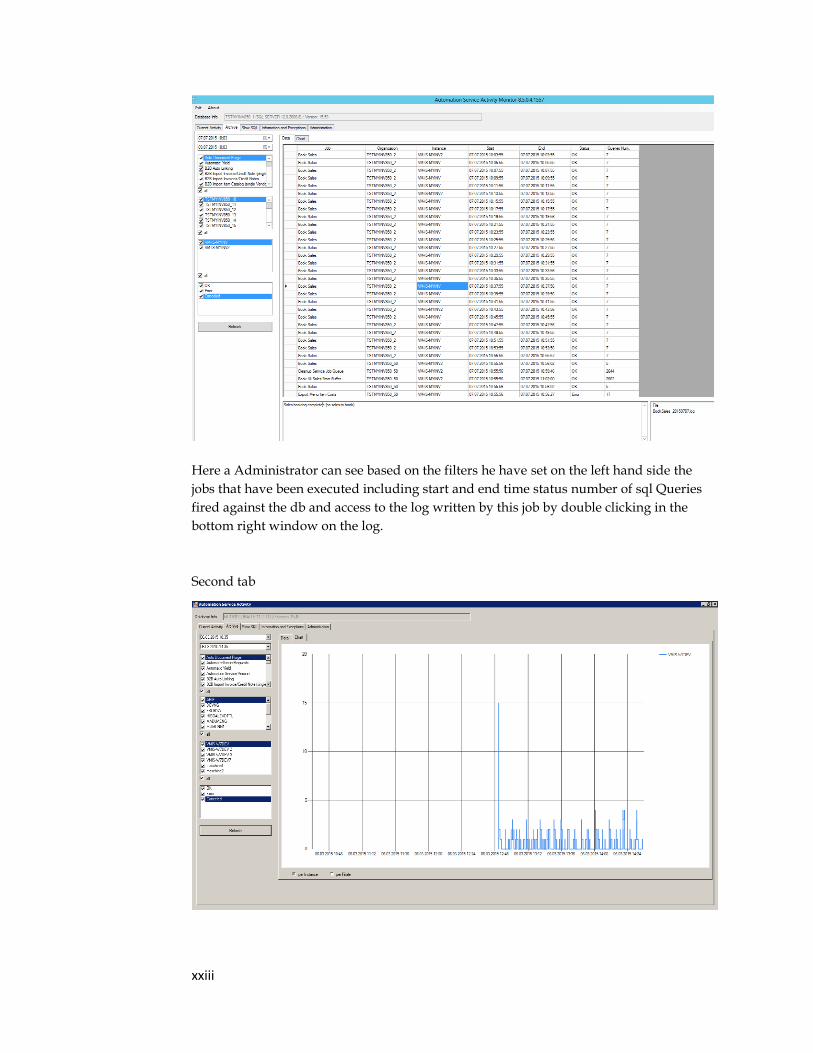
Slave databases.
Top Left window
Instance: All Servers running AutomationService Connecting to the
Master database
Red (not active) Green (Automation Service is running)
Jobs: Current count of jobs running per Instance
Set idle: Here you can deactivate / activate Instance from Load balancing
pool
Button Left window
Organization: Name of the organization configured in the Master Database
Jobs: Current count of jobs running per Organization
Exc. from Scheduler: Singe organization can be excluded from Scheduler
Top Right window
Job: Current Running Job
Organization: for what or is this job running
Instance: on what Server is the job running
Started: When have the job started
Cancel: Action to cancel current running job
Ping: Check if the job is responding
Last DB Access: Date time of last Access to the DB of this job
Button Right Window
Log of finished jobs
ArchiveTab
xxiii
Here a Administrator can see based on the filters he have set on the left hand side the
jobs that have been executed including start and end time status number of sql Queries
fired against the db and access to the log written by this job by double clicking in the
bottom right window on the log.
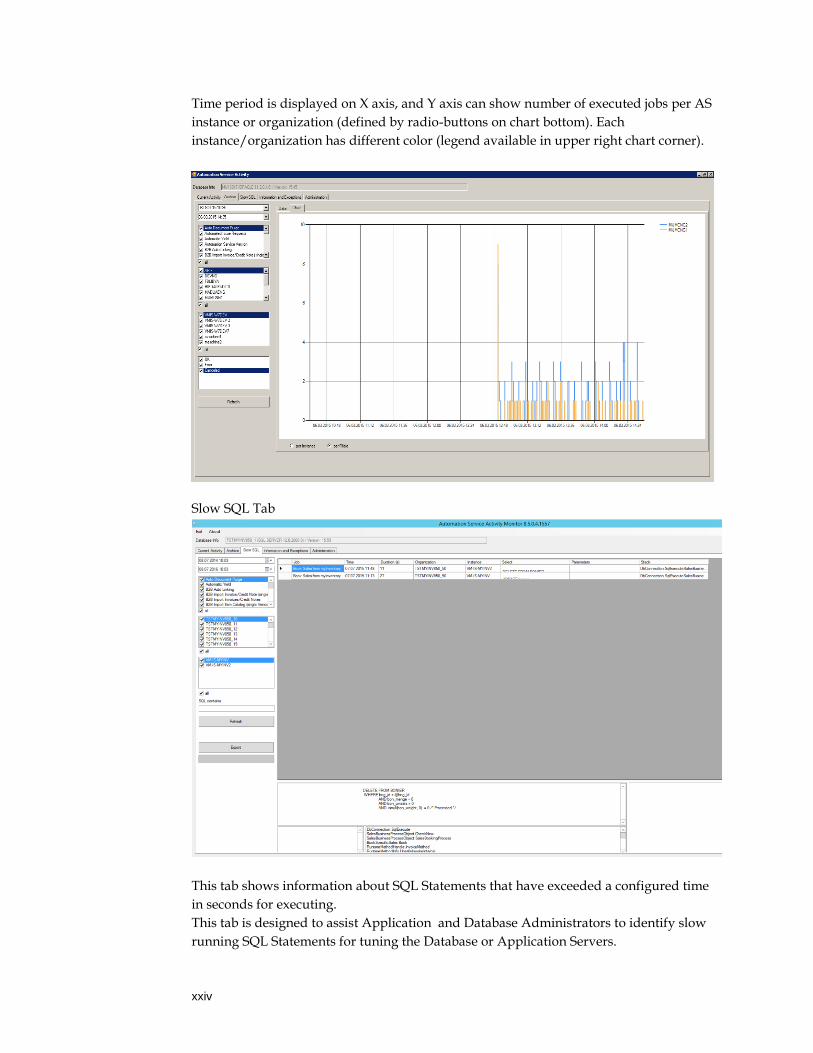
Second tab
xxiv
Time period is displayed on X axis, and Y axis can show number of executed jobs per AS
instance or organization (defined by radio-buttons on chart bottom). Each
instance/organization has different color (legend available in upper right chart corner).
Slow SQL Tab
This tab shows information about SQL Statements that have exceeded a configured time
in seconds for executing.
This tab is designed to assist Application and Database Administrators to identify slow
running SQL Statements for tuning the Database or Application Servers.
xxv
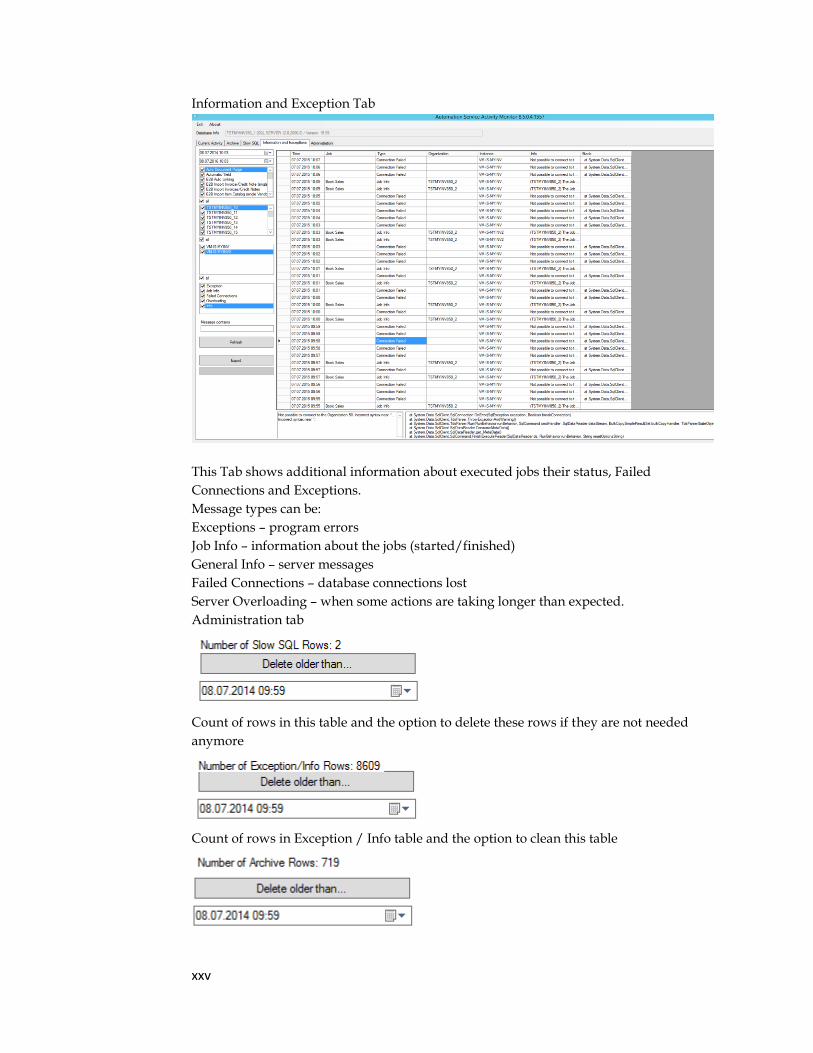
Information and Exception Tab
This Tab shows additional information about executed jobs their status, Failed
Connections and Exceptions.
Message types can be:
Exceptions – program errors
Job Info – information about the jobs (started/finished)
General Info – server messages
Failed Connections – database connections lost
Server Overloading – when some actions are taking longer than expected.
Administration tab
Count of rows in this table and the option to delete these rows if they are not needed
anymore
Count of rows in Exception / Info table and the option to clean this table
xxvi
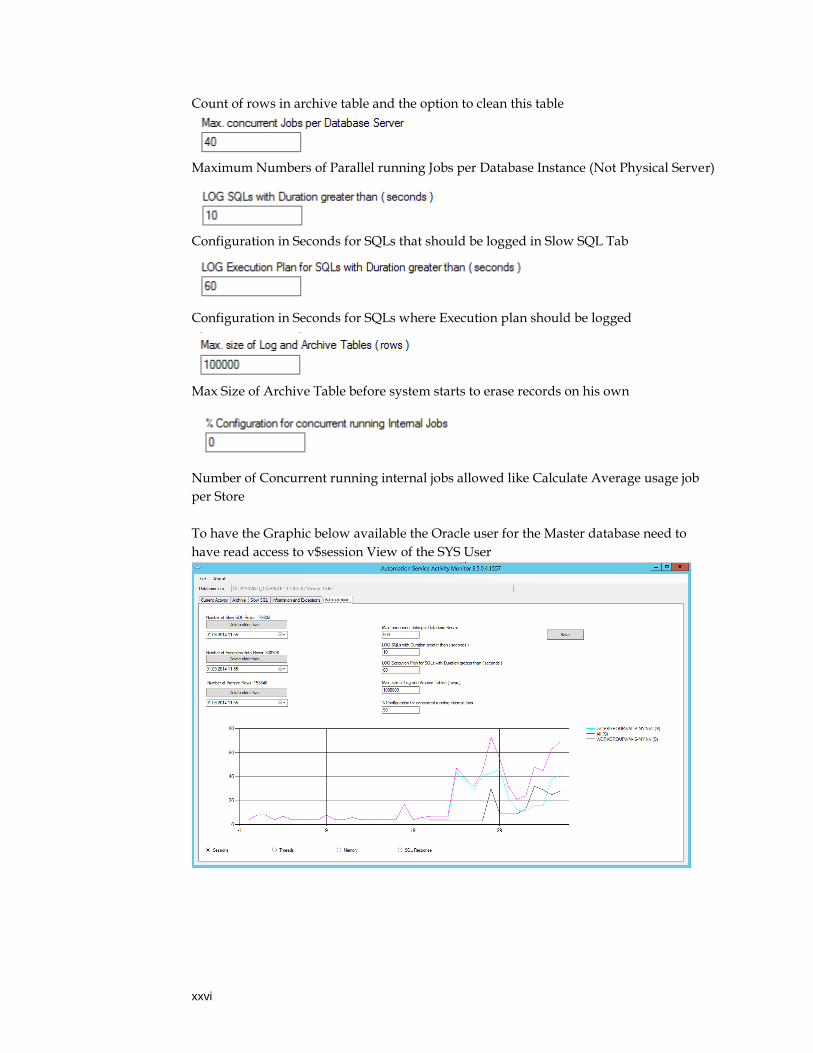
Count of rows in archive table and the option to clean this table
Maximum Numbers of Parallel running Jobs per Database Instance (Not Physical Server)
Configuration in Seconds for SQLs that should be logged in Slow SQL Tab
Configuration in Seconds for SQLs where Execution plan should be logged
Max Size of Archive Table before system starts to erase records on his own
Number of Concurrent running internal jobs allowed like Calculate Average usage job
per Store
To have the Graphic below available the Oracle user for the Master database need to
have read access to v$session View of the SYS User
xxvii
Additional Configuration options for AutomationService
Inventory -> Maintenance -> Settings -> AUTOMATION BOOKINGSALESJOBMAXCONCURRENT: Maximum number of concurrent
Booking Sales jobs. Default 10, maximum
50. Increase for processing large volume
of sales.
BOOKSALESJOBINTERVAL: Enter time in minutes, to wait between
Booking Sales from Inventory
Management jobs (Sales stuck in Buffer)
running, when over 5000 records exist.
Blank = Default of 5 minutes
AutomationService Instance Configured in AutomationService.exe.config
MaxThreadsForce: If T, then AS will always tries to execute
MaxThreads number of parallel jobs. If F,
then AS will never exceed MaxThreads,
but will try to calculate what is the best
and then to work with that(default and
recommended is F)
Installation of Automation Service Activity Monitor.
Extract 150903_ASAMon 8.5.0.53.1560.zip to a temporary folder.
This will build ASAMon.Application and ASAMon.Config folder.
Below ASAMon.Application you have subfolders for 32 and 64 bit Server
Copy the content of the corresponding folder for your OS to the Desination folder (in my
case
C:\ASAMon\. Copy the content of ASAMon.Config to the C:\ASAMon\
Open SQL.config and FMLOGIN.ini and configure in the same way like
xxviii
DBMaintenance Tool Prerequisites
Make sure Microsoft .NET Framework 4.0 Full is installed in your environment. If
Microsoft .NET Framework 4.0 Full is not installed, The Installer will Promt you that this
is missing and offers to install.
The Databases to update need to be at least on Version 8.00 = DB Version 1448 or higher
Determining the version of your Oracle environment
To determine if you are using a 64-bit or 32-bit Oracle environment:
1. Navigate to Start | All Programs | Oracle | Application Development and run SQL
Plus.
2. Open Task Manager and click the Processes tab.
3. If you are using a 32-bit environment:
a. There is a process called sqlplus.exe *32. 4. If you are using a 64-bit environment:
a. There is a process called sqlplus.exe.
Installation steps
To install myinventory Database Maintenance:
1. If you are on a 32-bit Oracle environment: a. Navigate to Applications| DBMaintenance| DBMaintenance(32-bit).
2. If you are on a 64-bit Oracle environment: a. Navigate to Applications| DBMaintenance| DBMaintenance(64-bit)
3. Run the setup file. 4. Click Next. 5. Select the location to install myinventory Database Maintenance. Oracle
recommends installing the utility in the directory C:\myinventory Database
Maintenance (XX-bit).
6. If you are using Oracle: a. Select Oracle and enter the SQLNet Connection Name.
7. If you are using the Microsoft SQL Server: a. Select SQL and enter the location of the Driver File.
8. Click Next. 9. If you want to quick launch myinventory Database Maintenance from the
desktop: a. Select Desktop Icon.
10. If you want a myinventory Database Maintenance icon on the start menu: a. Select Start Program Icon.
11. Click Next. 12. Click Install. 13. Once the myinventory Database Maintenance completes installing, click Finish
to exit the setup.
Post installation configuration
xxix
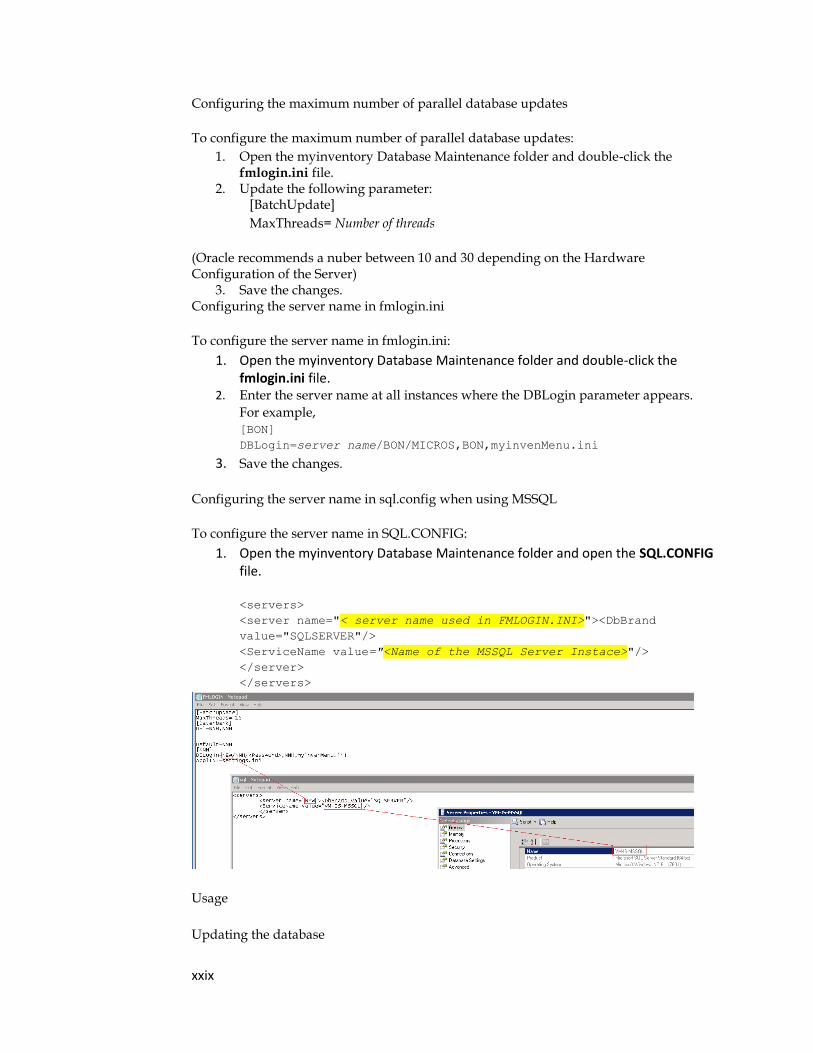
Configuring the maximum number of parallel database updates
To configure the maximum number of parallel database updates:
1. Open the myinventory Database Maintenance folder and double-click the fmlogin.ini file.
2. Update the following parameter: [BatchUpdate]
MaxThreads= Number of threads
(Oracle recommends a nuber between 10 and 30 depending on the Hardware Configuration of the Server)
3. Save the changes. Configuring the server name in fmlogin.ini
To configure the server name in fmlogin.ini:
1. Open the myinventory Database Maintenance folder and double-click the fmlogin.ini file.
2. Enter the server name at all instances where the DBLogin parameter appears.
For example, [BON]
DBLogin=server name/BON/MICROS,BON,myinvenMenu.ini
3. Save the changes.
Configuring the server name in sql.config when using MSSQL
To configure the server name in SQL.CONFIG:
1. Open the myinventory Database Maintenance folder and open the SQL.CONFIG file.
<servers>
<server name="< server name used in FMLOGIN.INI>"><DbBrand
value="SQLSERVER"/>
<ServiceName value="<Name of the MSSQL Server Instace>"/>
</server>
</servers>
Usage
Updating the database
xxx
To update the database:
1. Navigate to Start | All Programs | myinventory Database Maintenance. 2. If you want to update a single database:
a. Run Single Database. b. Enter your credentials and log in to the utility. c. To update the database:
i. Click Database Update. d. To reorganize the database:
i. Click Reorganization. 3. If you want to batch update:
a. Run Batch Update. b. Select the databases. c. If you want to update and reorganize the database:
i. Click Update and Reorganize. d. If you only want to reorganize the database:
i. Click Reorganize Only.
Post Upgrade 1) Go to command prompt, type IISRESET and hit <ENTER>. Wait for this to
complete.
2) Go to services.msc and start the DGService and
delegateSys.myinventoryAutomation2 services.
Your Inventory Management upgrade is now complete! Now is the time to test
everything. Load WebClient and myOrganizations and log in, load the
AutomationService Console, make sure jobs are running in AutomationService and make
sure sales booking is successful. Review logs for any new errors, etc.