Embed Size (px)
Citation preview

Oracle® SOA Suite 11
Hands-On WorkshopVM Intro / Demo / Deployment

Before you begin
General notes:
1. All notable references, functions or actions to be performed by the student (for example, text to be entered or buttons to click) are for the most part bolded.
2. There is a directory called /home/oracle/MyFiles on your file system. This includes sample files, XSDs, and directories that will be utilized during the workshop.
3. It is recommended that you allocate at least 3GB of memory to running this image (The default) due to the number of running components. So basically this is saying a 4GB server or laptop is minimal. Approx 17GB of disk will be required for the expanded files (6GB RAR compressed).
4. Those wishing to run a “Hosted” version will need to place an ETC request at etc.us.oracle.com
5. Connections to the Weblogic Server, BAM Server, jdbc datasource references and database schema used in the Labs have already been pre-created in the image. Information on how those were set up is in the Appendix.doc file.
The following paths are where the software compoents are installed:
Login $HOME directory: /home/oracleOracle Weblogic Server (SOA Suite): /home/oracle/Middleware/home_soa11gOracle Weblogic Server (OSB): /home/oracle/Middleware/osb_1031JDeveloper 11.1.1.1: /home/oracle/Middleware/jdev11gJDeveloper project files: /home/oracle/jdeveloper/myworkSupport files used in Labs: /home/oracle/MyFiles
The sections in this document are:
Starting up the VMWare Image
The Permit Application Scenario
Demoing the Entire Flow
Deploying “Completed” Labs into JDeveloper
Start up the VMWare Image
SOA 11g Workshop – VM Intro 2

Note: This startup flow assumes you have extracted the VMWare into a local directory and are using one of the following to load and run it:
a) VMWare Workstation 6.5 or higherb) VMWare Player 2.5.x or higherc) VMWare Server 2.x or higher
1. Start up the image by clicking the “Start this virtual machine” link. (VMWare Workstation example shown here)
2. I f your running this image on dual-core laptop or server you can bump up the number
of processors to two. . Double click on this line in VMWareWorkstation and make the change. This will give you a little more performance.
3. If your running the image from VMWare Player you can define two procesors by editing the OEL5U3_11gSOA.vmx file in the directory where you extracted the image. Change the line that says numvcpus = "1" to numvcpus = "2". Then bring it up.
4. If you get the screen below, select the “I moved it” radio button and click OK.
SOA 11g Workshop – VM Intro 3

5. The VM will take a number of minutes to start. Part of the startup flow is the Oracle XE Database that stores metadata for OracleSOA Suite and has the schema referencedin the labs to store data for the Pemit Applications being requested. After the image starts you should see a screen like the following:
6. Start the Weblogic Applicaton Server by double-clicking OR right-clicking on the “Start/Stop Weblogic Server(s)” desktop icon and selecting “Open”.
SOA 11g Workshop – VM Intro 4

7. At the prompt click OK. (Start is the default)
8. At the next prompt take the default (admin) and click OK.
9. After 7 – 9 minutes you should see the Admin server started. Click Close.
SOA 11g Workshop – VM Intro 5

10. Status is displayed. Click Close.
11. You can now do the demo flow.
Permit Application Scenario
For the remainder of the workshop, you will focus on building out the scenario shown in the following Composite Application diagram. This composite definition is defined and
SOA 11g Workshop – VM Intro 6

designed in Oracle JDeveloper. It follows the industry standard SCA (Services Component Architecture). SCA is a set of specifications, which describe a model for building applications and systems using a Service-Oriented Architecture. SCA extends and complements prior approaches to implementing services, and SCA builds on open standards such as Web Services.
This process is a Permit Application scenario for receiving and handling permit requests.
The above diagram shows a real world scenario simple enough that it can be completed during the workshop. The following provides a brief overview of the scenario:
On the left hand of the diagram two data inputs exist to send permit application data to the Composite Application flow:
1. Batch File Input (multiple requests are placed via comma delimited file (.csv)
2. An exposed SOAP interface to take an XML payload in.
The Mediator components are responsible of any routing and transformations that need to take place.
The Rules component is responsible for checking a local Dictionary and doing an evaluation on data values passed in.
SOA 11g Workshop – VM Intro 7

The Human Workflow component is called whenever a response from evaluatinga rule says that approval is required. The end users go into a B(usiness) P(rocess) M(odel) Worklist application to APPROVE or REJECT requests.
The BAM (Business Activity Monitoring component is fed from initial data sent into the PermitAppIn Meditor. The real time dashboard displays the results.
The BPEL process component provides the business logic and orchestration for handling permit applications. For each request a CreditScore web service is calledand returns a value based on the first character of the SSN of the input payload. The credit scores are sent to the rules engine for evaluation. The result of the rule will be AutoApprove, Approval Required, or Denied. If “Approval Required” is returned, a Human Workflow will be executed to allow a permit reviewer to manually APPROVE or REJECT the application request. The BPEL process ends with data again being sent to BAM (Updates the status of the request) and variousportions of the payload are written to three database tables.
On the right hand side of the diagram, the services that are needed by the BPEL process are identified.
a. PermitDB – External reference to write three database tables (Master – Detail relationships).
b. CreditScore – External Web Service created from a WSDL definition and deployed to the application server.
c. PermitDO – External Web Service interface into the BAM data objectthat we’re inserting or updating.
Demoing the Entire Flow
We are going to bring up the BAM Dashboard and test the application. We will opena pre-created report based on the BAM DataObject we are populating from the composite. Since your VM could be hosted or standalone the hostname of the VM may be different. So, we will use the IP address assigned to your VM and use this in the URL to bring up the dashbord.
SOA 11g Workshop – VM Intro 8
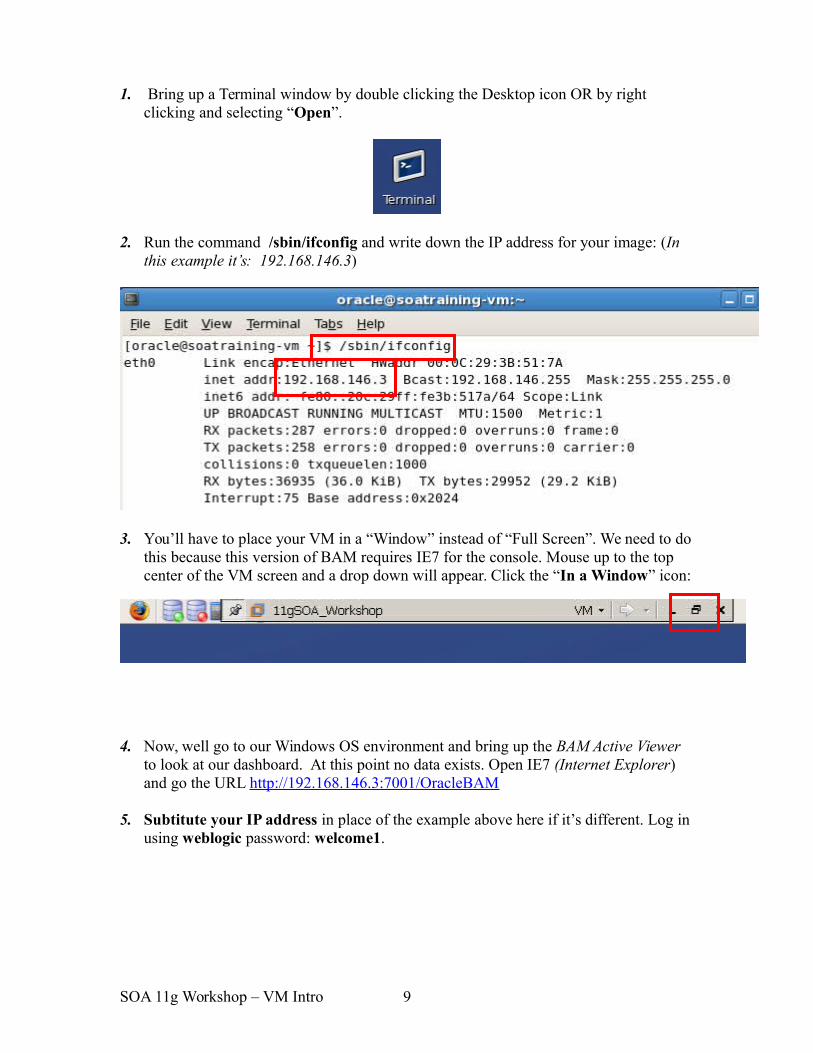
1. Bring up a Terminal window by double clicking the Desktop icon OR by right clicking and selecting “Open”.
2. Run the command /sbin/ifconfig and write down the IP address for your image: (In this example it’s: 192.168.146.3)
3. You’ll have to place your VM in a “Window” instead of “Full Screen”. We need to dothis because this version of BAM requires IE7 for the console. Mouse up to the top center of the VM screen and a drop down will appear. Click the “In a Window” icon:
4. Now, well go to our Windows OS environment and bring up the BAM Active Viewer to look at our dashboard. At this point no data exists. Open IE7 (Internet Explorer) and go the URL http://192.168.146.3:7001/OracleBAM
5. Subtitute your IP address in place of the example above here if it’s different. Log in using weblogic password: welcome1.
SOA 11g Workshop – VM Intro 9

6. Click on the Active Viewer button
7. When Activer Viewer window comes up, resize it so you’ll be able to go back and forth between it and the VM image window during testing. Click on Select Report.
SOA 11g Workshop – VM Intro 10

8. Click on the second folder on the left, Shared Reports.
9. In the Select a Report dialog. Select Permit Workshop Dashboard and click OK.
SOA 11g Workshop – VM Intro 11

10. The dashboard will run and you should see the following:
11. Back inside the VM image bring up the Firefox browser by double clicking on the Desktop icon OR by right clicking and selecting “Open”.
SOA 11g Workshop – VM Intro 12

12. Once the browser is up select the Enterprise Manager FastLink from the toolbar.
13. Login using weblogic/welcome1
14. After a minute or so the Enterprise Manager main dashboard comes up showing the domains in this installation; in our case domain1.
15. Navigate down to Farm_domain1SOAsoa-infraPermitAppComposite and click this link.
16. Click the Test button.
17. Now, we will cut and paste a “test” payload into the browser. Minimize the browser and open a terminal window on the Linux desktop using the icon.
SOA 11g Workshop – VM Intro 13

18. Change directory into MyFiles ( cd My* ) and type: gedit SamplePermitWS.xml <hit Return/Enter>
19. From the gedit window select EditSelect All and then select EditCopy. Minimize the terminal window.
20. Go back to the browser and scroll down towards the bottom were you see the “Input Arguments” section. In this section choose XML View.
21. Right click anywhere inside the argument pane and choose Select All. The test payload will be highlighted.
SOA 11g Workshop – VM Intro 14

22. Hold down the <Ctrl> key on the keyboard and type “v”. This will paste the contents
you copied from within the gedit session. Click the button.
23. The first time this is run after an Application Server startup, it may take a minute or so to instantiate all of the flow logic. Subsuquent executions will be quicker. The composite flow will execute and a response will be displayed:
SOA 11g Workshop – VM Intro 15

24. Click the PermitAppComposite link under Farm1_domain1SOAsoa-infra. Then select the most recently completed instance. In the case below ID # 200001.
25. The Trace flow shows the components that executed and their status.
SOA 11g Workshop – VM Intro 16

26. Selecting the PermitAppIn mediator link brings up the flow of execution through theMediator component. Expand the “payload” for the “Input payload received”. This will show what came into the Mediator in addition to Header information:
27. Expanding the response payload that came back from the BPEL process shows the instanceID that was generated for this BPEL execution:
SOA 11g Workshop – VM Intro 17

28. Received response from operation "execute" of service "PermitProcess.permitprocess_client"
29. Close the window, click on the Instance ID link again and select the PermitProcess BPEL component.
30. Click on the Flow tab. This shows the actual BPEL activities that executed.
31. Selecting any of the activities in the flow will show you the state of the XML payloadbeing handled by that activity. For example, the receiveInput shows the input payload sent from the Mediator.
SOA 11g Workshop – VM Intro 18

32. Selecting the Invoke_CreditScore activity shows the SSN being sent to the Web Service and the response of 721. Close the pop up.
33. Selecting the replyOutput activity shows the response sent back to the PermitAppIn mediator component.
SOA 11g Workshop – VM Intro 19
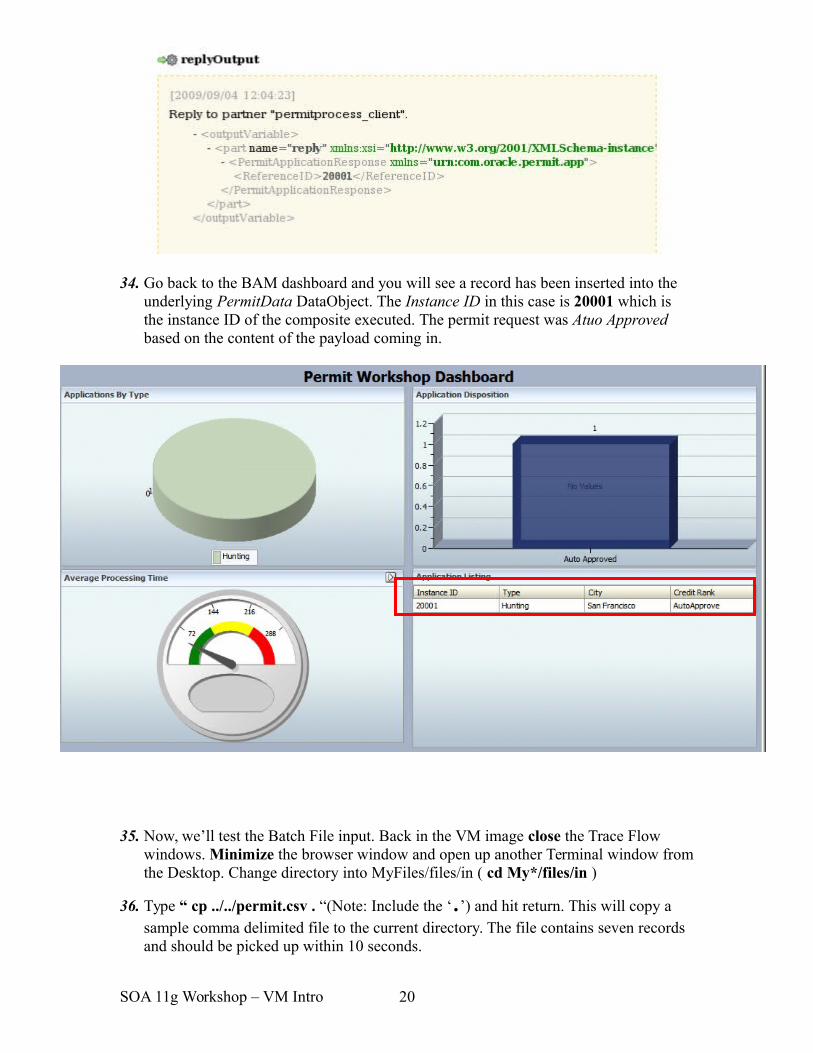
34. Go back to the BAM dashboard and you will see a record has been inserted into the underlying PermitData DataObject. The Instance ID in this case is 20001 which is the instance ID of the composite executed. The permit request was Atuo Approved based on the content of the payload coming in.
35. Now, we’ll test the Batch File input. Back in the VM image close the Trace Flow windows. Minimize the browser window and open up another Terminal window fromthe Desktop. Change directory into MyFiles/files/in ( cd My*/files/in )
36. Type “ cp ../../permit.csv . “(Note: Include the ‘.’) and hit return. This will copy a sample comma delimited file to the current directory. The file contains seven records and should be picked up within 10 seconds.
SOA 11g Workshop – VM Intro 20

37. Immediately return to the BAM Permit dashboard to see any updating taking place. As soon as the file is picked up and processed you will see the dashboard react. Recall that seven new records are added. Three of the requests still need to be approved or rejected as indicated dby the number of In Process records in the Application Disposition view.
38. Back in the VM image we will now use BPM Worklist to complete the In Process requests. You will APPROVE one of the requests and REJECT the other two.
39. From the browser right click BPM Worklist from the FastLink menu and select “Open in a New Tab”.
SOA 11g Workshop – VM Intro 21

40. Log in as weblogic/welcome1
41. You’ll notice three permit requests waiting for approval or rejection. These were threeout of the seven requests in the batch file whos credit score started with the number “2” and thus the Rules engined returned the “Approval Required” status. Human Workflow invoked and now it’s in your hands. Click on the topmost request to see details. NOTE:The first time this option is executed it may take a minute to instantiateand display in the lower panel.
42. In the details section you can verify the SSN of the request:
43. Approve the request by clicking the Appove button:
SOA 11g Workshop – VM Intro 22

44. The instance flow will be completed the the request will be removed from the tasks waiting on action.
45. Select and REJECT the two remaining tasks.
46. Go to the BAM Permit dashboard to check the updated status of these three requests.
47.Maximize the VM image window as we are done with the BAM dashboard.
48. Go to the browser and click the soa-infra (AdminServer) link to see the most recent instances. You’ll notice that there are 7 new executions that took place and completed.If you would like to drill into the flow details of a given instance feel free to do so. You can lLook at the various payload values returned during these executions.
SOA 11g Workshop – VM Intro 23

49. For example, the returned values from the invoked Credit Score web service will show differnet returned values depending on the first character of the SSN (1 = 583, 2 = 644, 3 = 721)
50. Ex: SSN starts with 1: (output shown from Flow page of Invoke_CreditScore step)
51. Ex: SSN starts with 2: (output shown from Audit Trail page of the Invoke_CreditScorestep)
SOA 11g Workshop – VM Intro 24

52. Finally, we’ll look at data written into the database tables. Open up JDeveloper 11g by double clicking on the Desktop icon OR right clicking the icon and selecting “Open”.
53. Click the Database Navigator icon.
54. Navigate down to IDE ConnectionssoademoTables. This will reveal the precreated database tables set up for this workshop. (NOTE: Info on the creation of the database schema is in the Appendix.doc)
SOA 11g Workshop – VM Intro 25

55. Double click the Applicant table. Then select the Data tab all the bottom of the window that comes up.
56. The eight Permit requests that have been submitted and completed up to this point areshown (One from the XML cut-and-paste and seven via the batch file)
APPLICANT
57. Look at the data contained in the ADDRESS and PERMITAPPLICATION tables.
SOA 11g Workshop – VM Intro 26

ADDRESS
PERMITAPPLICATION (first half)
PERMITAPPLICATION (second half)
Deploying “Completed” Labs into JDeveloper
SOA 11g Workshop – VM Intro 27

In this section we will show how to re-deploy any of the completed Labs in this workshop in case some people wanted to start from a particular spot or maybe they just need to catch up because they are stuck.
NOTE: If you have not yet created the SOAWorkshop application in JDeveloper then skip to Step 6
1. If you have already done some work in JDeveloper we need to first delete your current application. If it’s not already running start JDeveloper 11g by double-clicking OR right-clicking and selecting “Open”.
2. Right click on the SOAWorkshop application in the Application Navigator tab and click Delete Application.
NOTE: If your replacing the CreditScore application, then substitute it’s name here instead of SOAWorkshop. We will be using SOAWorkshop as the exmaple in this document.
3. Click Yes at the Comfirm Delete Application prompt.
SOA 11g Workshop – VM Intro 28
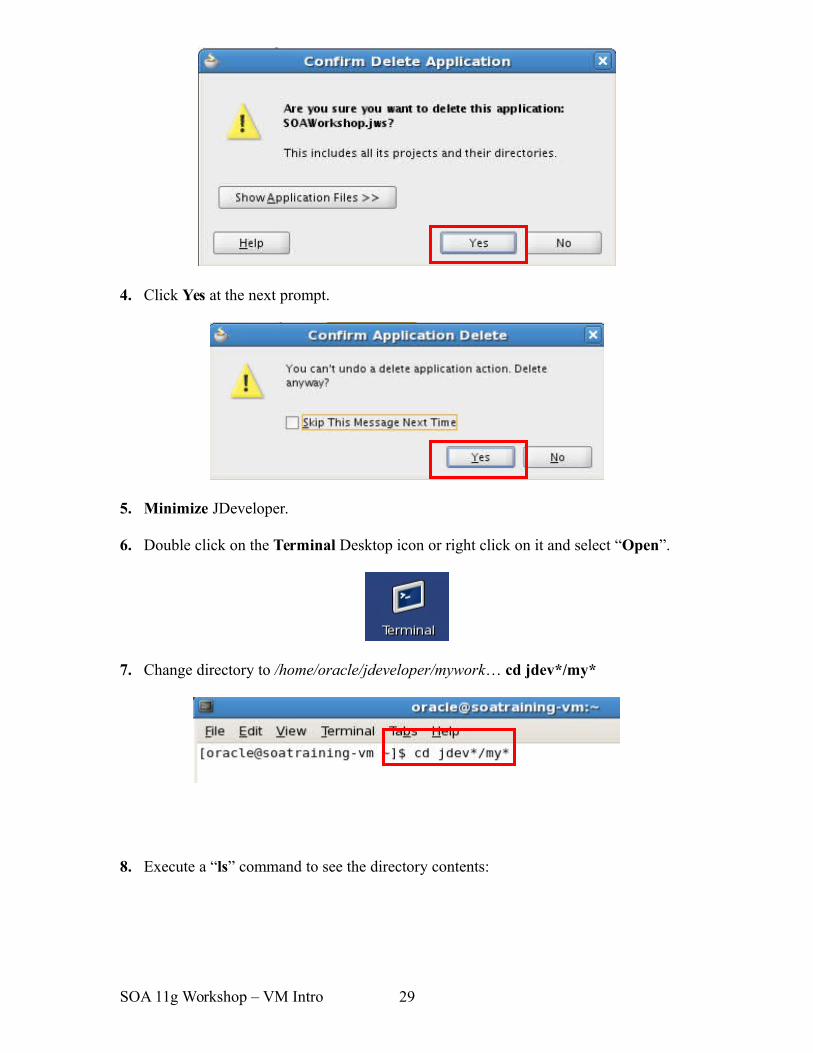
4. Click Yes at the next prompt.
5. Minimize JDeveloper.
6. Double click on the Terminal Desktop icon or right click on it and select “Open”.
7. Change directory to /home/oracle/jdeveloper/mywork… cd jdev*/my*
8. Execute a “ls” command to see the directory contents:
SOA 11g Workshop – VM Intro 29

9. If you have already done work on the CreditScore or SOAWorkshop applications thenthose directories may still be on the filesyatem.
10. Delete any remaining references by executing… rm –rf SOAWorkhop (Exact match,
no wildcards!!)
An “ls” shows:
11. Unzip the completed Lab of your choice (Example; CreditScore_Lab1.zip, SOAWorkshop_Lab5_Completed.zip, etc)
Example:
12. Go back to JDeveloper and select FileOpen from the menu bar. Browse to the /home/oracle/jdeveloper/mywork/SOAWorkshop or CreditScore directory depending on what you extracted. In this case it’s the SOAWorkshop directory. Click Open.
SOA 11g Workshop – VM Intro 30

Click OK and Yes to any Migration staus prompts you may receive.
13. The last step is to deploy the Composite. (NOTE: The CreditScore and SOAWorkshopcomposites deploy the same way).
For this example we are going to deploy the PermitAppComposite project in the SOAWorkshop application.
14. Right click on the PermitAppComposite project in the Application Navigator and
select DeployPermitAppCompositetoLocalAppServer
15. In the “SOA Deployment Configuration Dialog” select the checkbox marked “Overwrite any existing composites with the same revision ID” and click OK.
SOA 11g Workshop – VM Intro 31

16. After the composite successfully compiles you may be prompted for credentials to theWeblogic application server. Enter weblogic/welcome1 at the prompt and click OK.
SOA 11g Workshop – VM Intro 32

(NOTE: Any warnings displayed are OK as these are simple string to int datatype conversions that are handled fine during execution)
17. In the SOA tab the log should show a successful build and in the Deployment tab thelog should show a successful deployment.
18. If you are redeploying Lab 5 or Lab 6 they include Human Workflow. The Task Form generated and used in the BPM Worklist application is in a separate project in the SOAWorkshop apllication and is deployed in a different way.
In the Application Navigator tab click on the PermitTaskForm project within the SOAWorkshop application.
SOA 11g Workshop – VM Intro 33

19. From the JDeveloper menu bar select ApplicationDeployPermitTaskFormto LocalAppServer
20. If this TaskForm is already on the application server you will be prompted to comfirm. Click Yes.
SOA 11g Workshop – VM Intro 34

21. In the Deployment tab the log should show a successful deployment:
22. Deployments are now finished.
SOA 11g Workshop – VM Intro 35