Embed Size (px)
Citation preview

Oracle Taleo Business Edition Cloud Service
What’s New in Release 15B1
July 2015

. 2
TABLE OF CONTENTS
REVISION HISTORY ................................................................................................................................................. 3
OVERVIEW ............................................................................................................................................................. 4
RELEASE FEATURE SUMMARY ................................................................................................................................ 4
CAREERS WEBSITES ................................................................................................................................................ 5
Mobile Enabled Careers Website Pages ............................................................................................................... 5 Application Workflow ........................................................................................................................................... 7 Application Components ...................................................................................................................................... 8 Allowing Customers to Upload Resumes from Google Drive.............................................................................. 14 Navigation Pages ............................................................................................................................................... 17 Mobile Enabled Careers Website Settings .......................................................................................................... 20 Mobile Enabled Careers Website Styles ............................................................................................................. 21 Setting the Initial Candidate Status (optional) ................................................................................................... 21 Populating the Job Brief Field ............................................................................................................................. 21 Choosing a Stand-alone Mobile Enabled CWS versus a Redirected CWS ........................................................... 21 Updating the Invite Feature for Mobile Enabled Careers Website ..................................................................... 23
REPORTING FEATURES ......................................................................................................................................... 25
Cloning of Standard Reports .............................................................................................................................. 25 Change to the Clean Expression ......................................................................................................................... 26
RECRUIT FEATURES .............................................................................................................................................. 27
Bulk Printing of Resumes .................................................................................................................................... 27 New Recruiter and Hiring Manager Standard Fields .......................................................................................... 29 New Settings on User Record ............................................................................................................................. 29 New Fields on the Page Layouts ......................................................................................................................... 31 Using the New Fields in List Views ..................................................................................................................... 32 Reporting On These New Fields .......................................................................................................................... 33
ADDITIONAL CHANGES ........................................................................................................................................ 34
Supported Browser Information ......................................................................................................................... 34 New Compressed Menu Option .......................................................................................................................... 35 Changes to Careers Website Behavior ............................................................................................................... 36 Thank You Page Change ..................................................................................................................................... 36 Automatic Login ................................................................................................................................................. 37 Suggested Requisitions Placeholder ................................................................................................................... 37 Updated URLs for Careers Website .................................................................................................................... 37
. 3
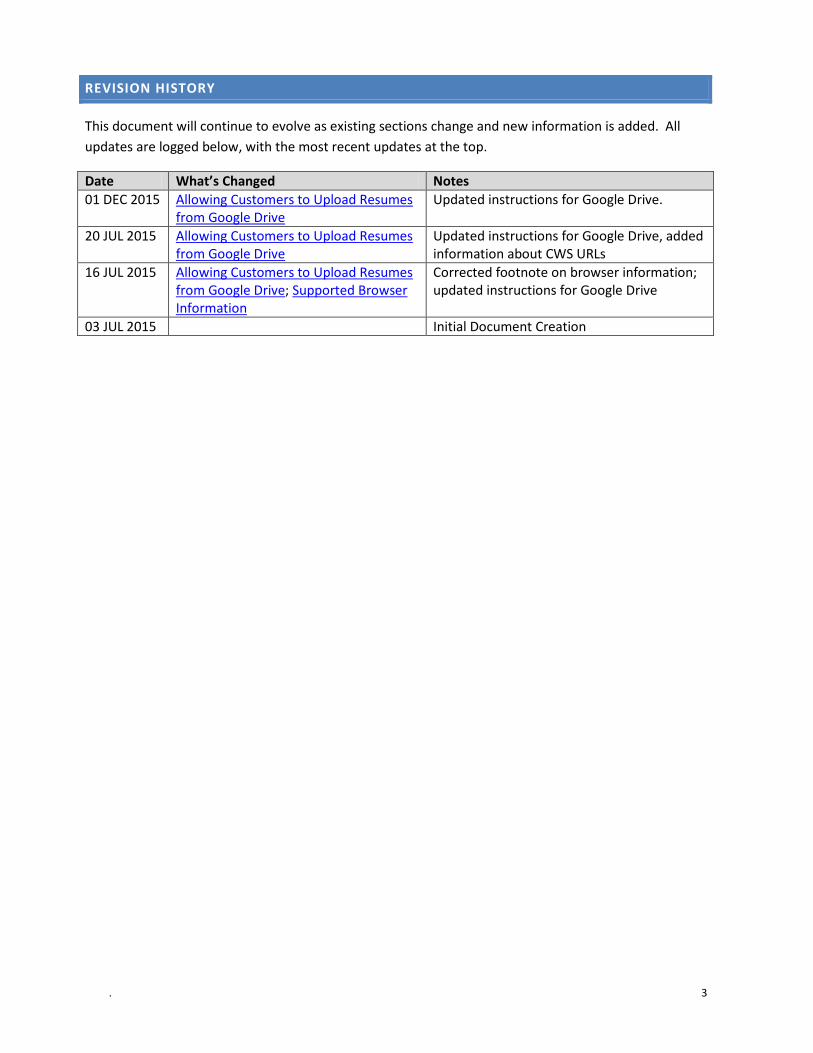
REVISION HISTORY
This document will continue to evolve as existing sections change and new information is added. All updates are logged below, with the most recent updates at the top.
Date What’s Changed Notes 01 DEC 2015 Allowing Customers to Upload Resumes
from Google Drive Updated instructions for Google Drive.
20 JUL 2015 Allowing Customers to Upload Resumes from Google Drive
Updated instructions for Google Drive, added information about CWS URLs
16 JUL 2015 Allowing Customers to Upload Resumes from Google Drive; Supported Browser Information
Corrected footnote on browser information; updated instructions for Google Drive
03 JUL 2015 Initial Document Creation
. 4
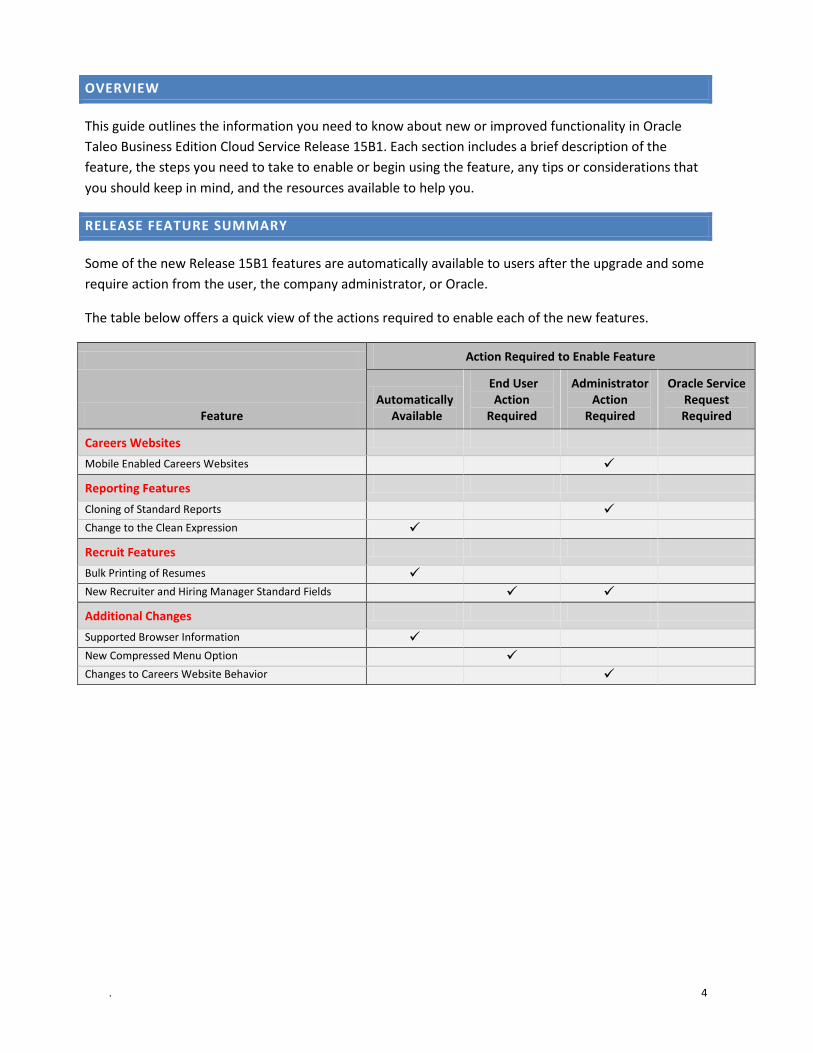
OVERVIEW
This guide outlines the information you need to know about new or improved functionality in Oracle Taleo Business Edition Cloud Service Release 15B1. Each section includes a brief description of the feature, the steps you need to take to enable or begin using the feature, any tips or considerations that you should keep in mind, and the resources available to help you.
RELEASE FEATURE SUMMARY
Some of the new Release 15B1 features are automatically available to users after the upgrade and some require action from the user, the company administrator, or Oracle.
The table below offers a quick view of the actions required to enable each of the new features.
Action Required to Enable Feature
Feature Automatically
Available
End User Action
Required
Administrator Action
Required
Oracle Service Request Required
Careers Websites
Mobile Enabled Careers Websites Reporting Features
Cloning of Standard Reports Change to the Clean Expression Recruit Features
Bulk Printing of Resumes New Recruiter and Hiring Manager Standard Fields Additional Changes
Supported Browser Information New Compressed Menu Option Changes to Careers Website Behavior
. 5
CAREERS WEBSITES
This release introduces a new modern Careers Website which is fully responsive and mobile enabled. Candidates can easily search for positions, review search results, and apply for positions which interest them, all from a mobile device. Candidates can also email positions to themselves or others. Returning applicants can log in, reset their passwords, access their job status and update their information.
Customers with a highly customized Careers Website (CWS) can choose to keep their current CWS but associate a mobile enabled CWS so that candidates on a mobile device will be automatically redirected to a mobile enabled CWS while candidates on a desktop will still visit the original CWS.
Alternatively, customers may wish to completely switch over to this new modern fully responsive design for their job postings for both their desktop and mobile careers websites. Either way, the initial configuration of the pages is the same.
MOBILE ENABLED CAREERS WEBSITE PAGES
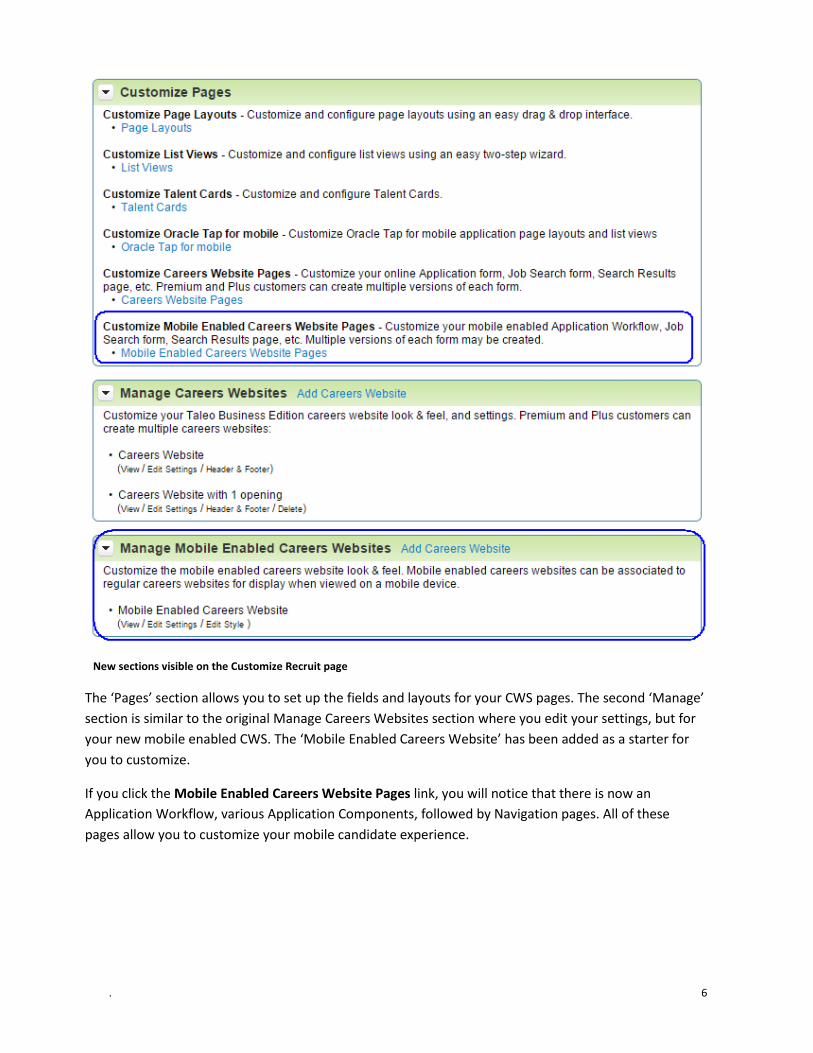
On the Customize Recruit page, you will notice two new sections for the Mobile Enabled Careers Website Pages:
. 6
New sections visible on the Customize Recruit page
The ‘Pages’ section allows you to set up the fields and layouts for your CWS pages. The second ‘Manage’ section is similar to the original Manage Careers Websites section where you edit your settings, but for your new mobile enabled CWS. The ‘Mobile Enabled Careers Website’ has been added as a starter for you to customize.
If you click the Mobile Enabled Careers Website Pages link, you will notice that there is now an Application Workflow, various Application Components, followed by Navigation pages. All of these pages allow you to customize your mobile candidate experience.

. 7
APPLICATION WORKFLOW
The Application Workflow is a container for all the Application Components. Candidates will now fill out the application page by page, and you can customize the individual pages as well as the overall flow of the application.
Application Workflow page, showing handles next to some of the pages
You can select an option in the Resulting Status drop down to specify which requisition-specific status candidates are assigned after completing the application.
You can click Edit in the Requisition Summary section to control which fields, up to 4, will appear on every page in the application. The Title field is required and cannot be removed. On mobile phones only the title field displays due to space limitations.
. 8
As you can see from the above image, a few of the workflow pages can be hidden or unhidden, and those that appear with a small handle on the right can be re-ordered.
So the Application Workflow controls how many pages the application will have. Also, since you can create multiple versions of each of these components, the workflow allows you to select the version of each component that will appear for a particular application workflow.
APPLICATION COMPONENTS
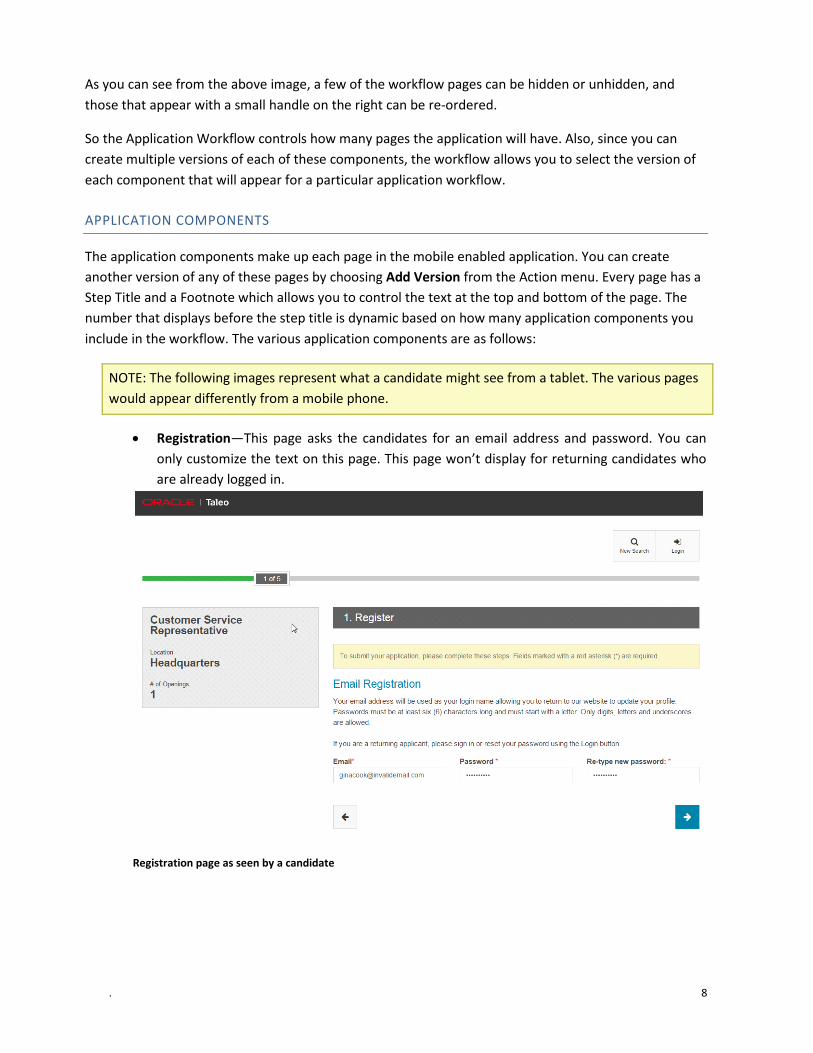
The application components make up each page in the mobile enabled application. You can create another version of any of these pages by choosing Add Version from the Action menu. Every page has a Step Title and a Footnote which allows you to control the text at the top and bottom of the page. The number that displays before the step title is dynamic based on how many application components you include in the workflow. The various application components are as follows:
NOTE: The following images represent what a candidate might see from a tablet. The various pages would appear differently from a mobile phone.
• Registration—This page asks the candidates for an email address and password. You can only customize the text on this page. This page won’t display for returning candidates who are already logged in.
Registration page as seen by a candidate
. 9
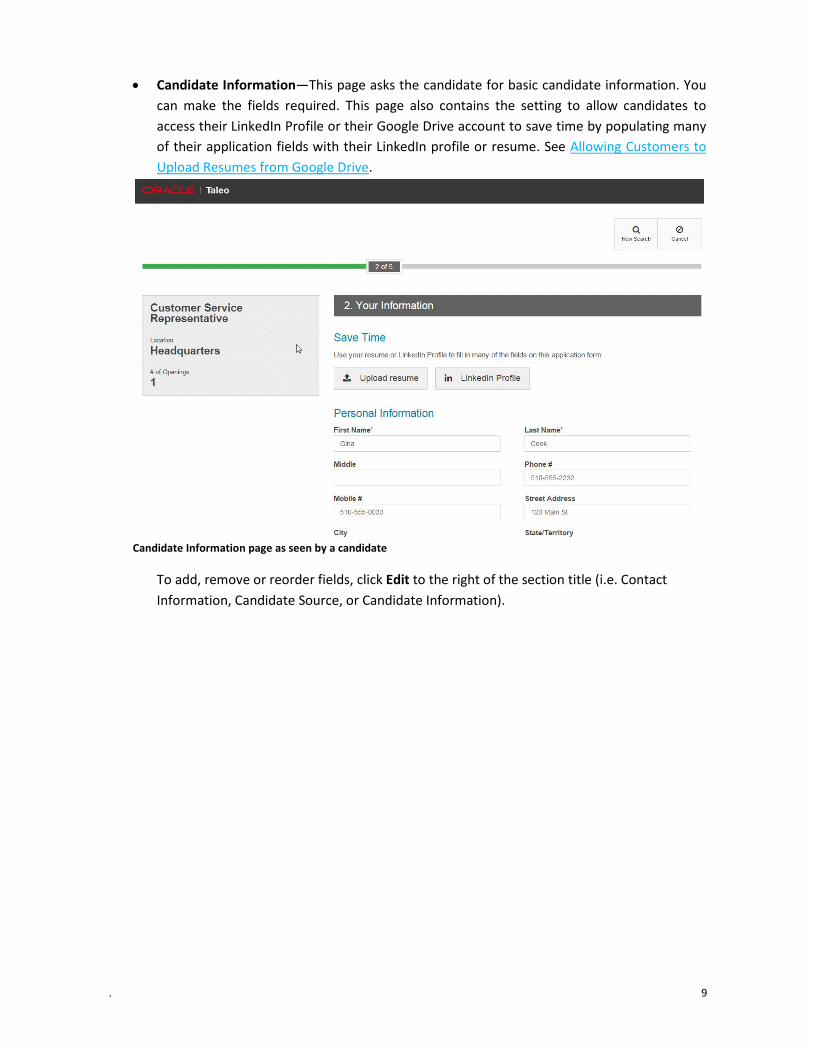
• Candidate Information—This page asks the candidate for basic candidate information. You can make the fields required. This page also contains the setting to allow candidates to access their LinkedIn Profile or their Google Drive account to save time by populating many of their application fields with their LinkedIn profile or resume. See Allowing Customers to Upload Resumes from Google Drive.
Candidate Information page as seen by a candidate
To add, remove or reorder fields, click Edit to the right of the section title (i.e. Contact Information, Candidate Source, or Candidate Information).
. 10
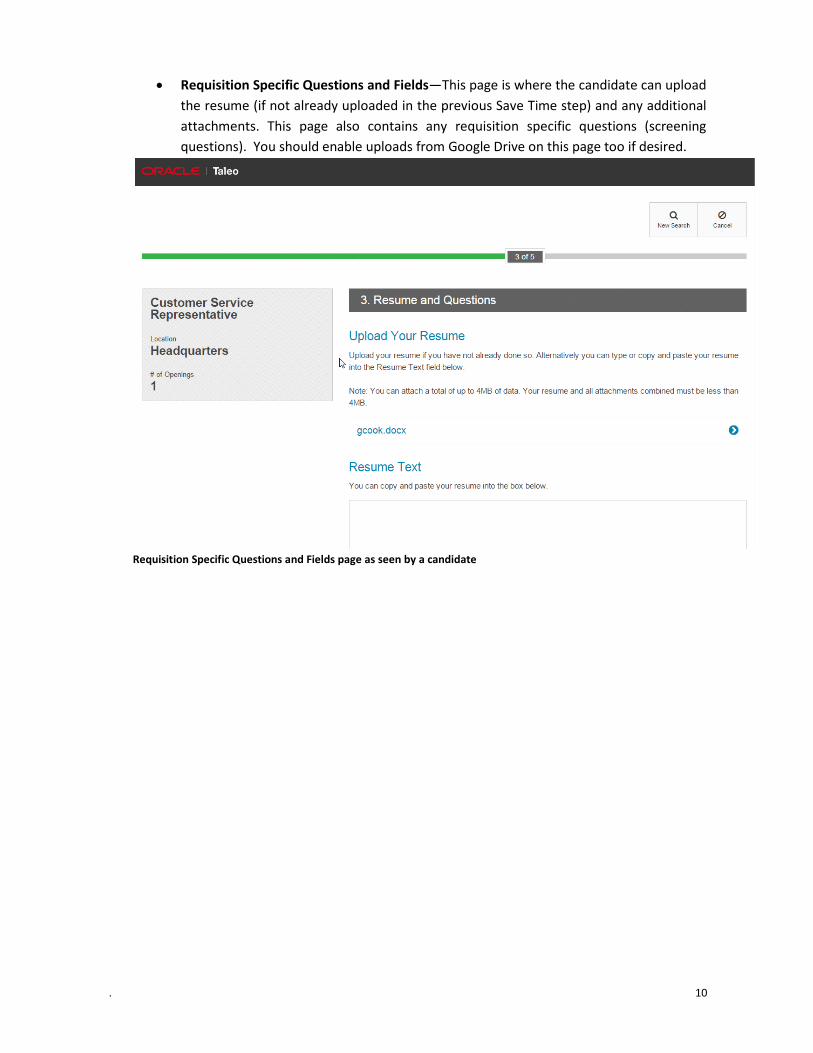
• Requisition Specific Questions and Fields—This page is where the candidate can upload the resume (if not already uploaded in the previous Save Time step) and any additional attachments. This page also contains any requisition specific questions (screening questions). You should enable uploads from Google Drive on this page too if desired.
Requisition Specific Questions and Fields page as seen by a candidate
. 11
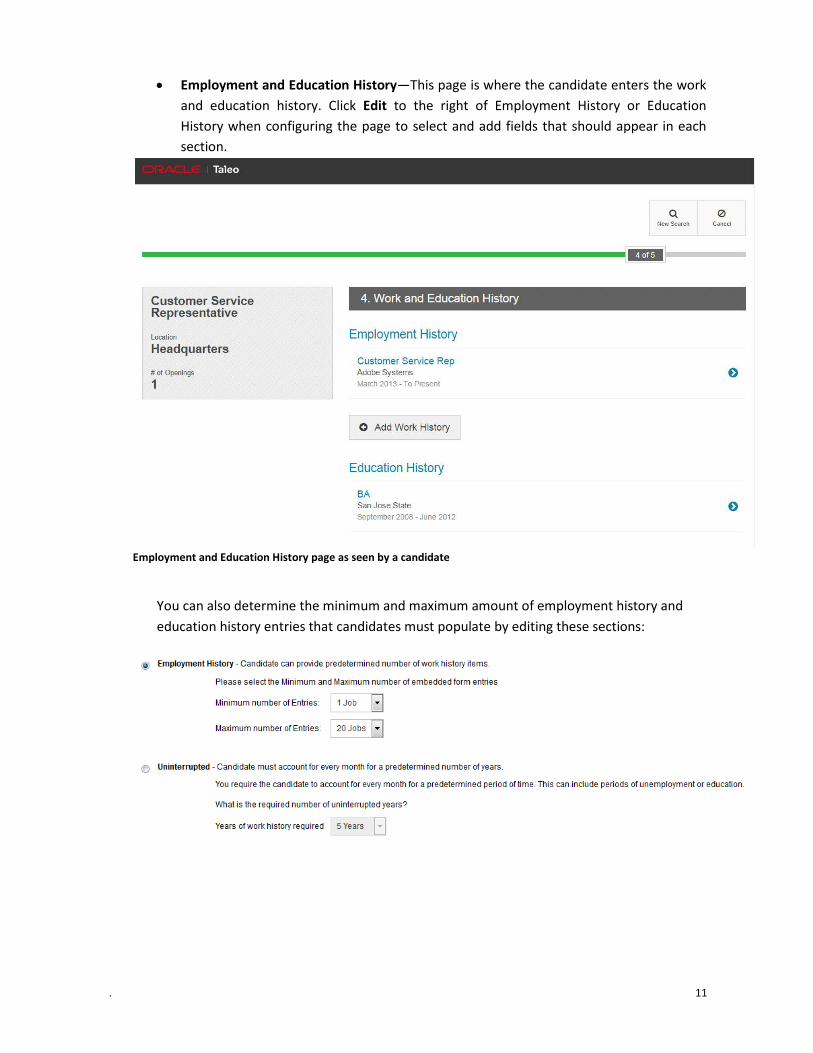
• Employment and Education History—This page is where the candidate enters the work and education history. Click Edit to the right of Employment History or Education History when configuring the page to select and add fields that should appear in each section.
Employment and Education History page as seen by a candidate
You can also determine the minimum and maximum amount of employment history and education history entries that candidates must populate by editing these sections:
. 12
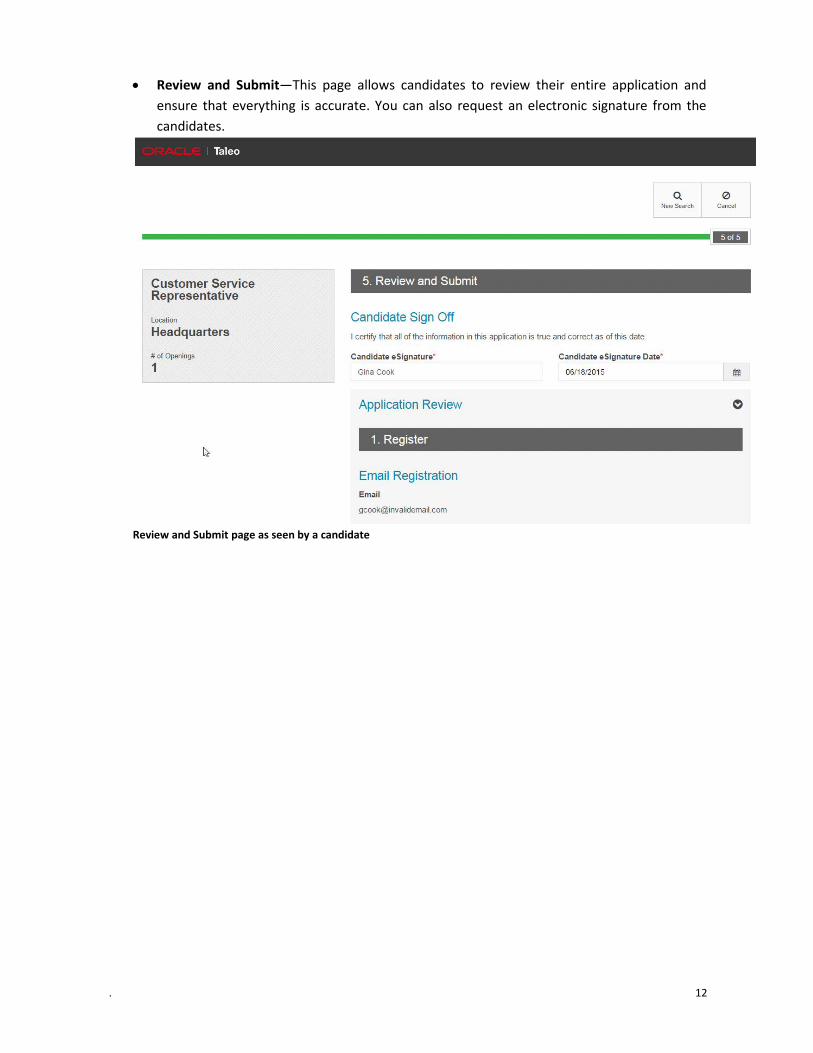
• Review and Submit—This page allows candidates to review their entire application and ensure that everything is accurate. You can also request an electronic signature from the candidates.
Review and Submit page as seen by a candidate
. 13
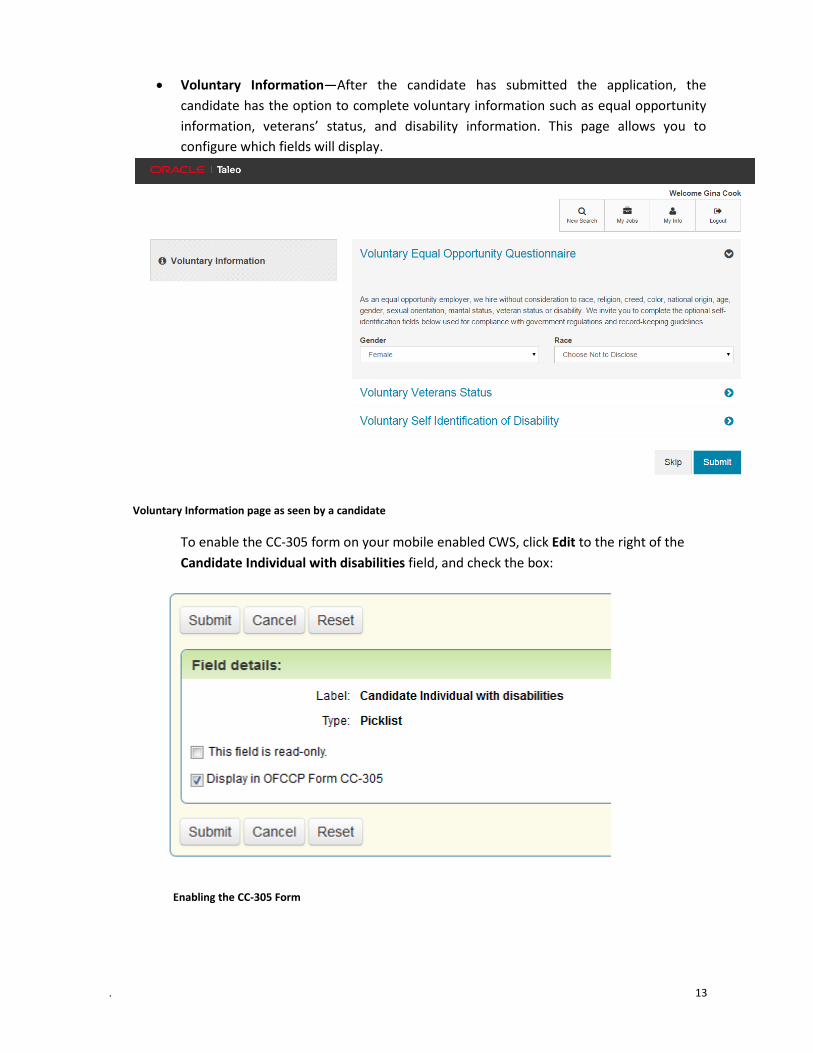
• Voluntary Information—After the candidate has submitted the application, the candidate has the option to complete voluntary information such as equal opportunity information, veterans’ status, and disability information. This page allows you to configure which fields will display.
Voluntary Information page as seen by a candidate
To enable the CC-305 form on your mobile enabled CWS, click Edit to the right of the Candidate Individual with disabilities field, and check the box:
Enabling the CC-305 Form
. 14
ALLOWING CUSTOMERS TO UPLOAD RESUMES FROM GOOGLE DRIVE
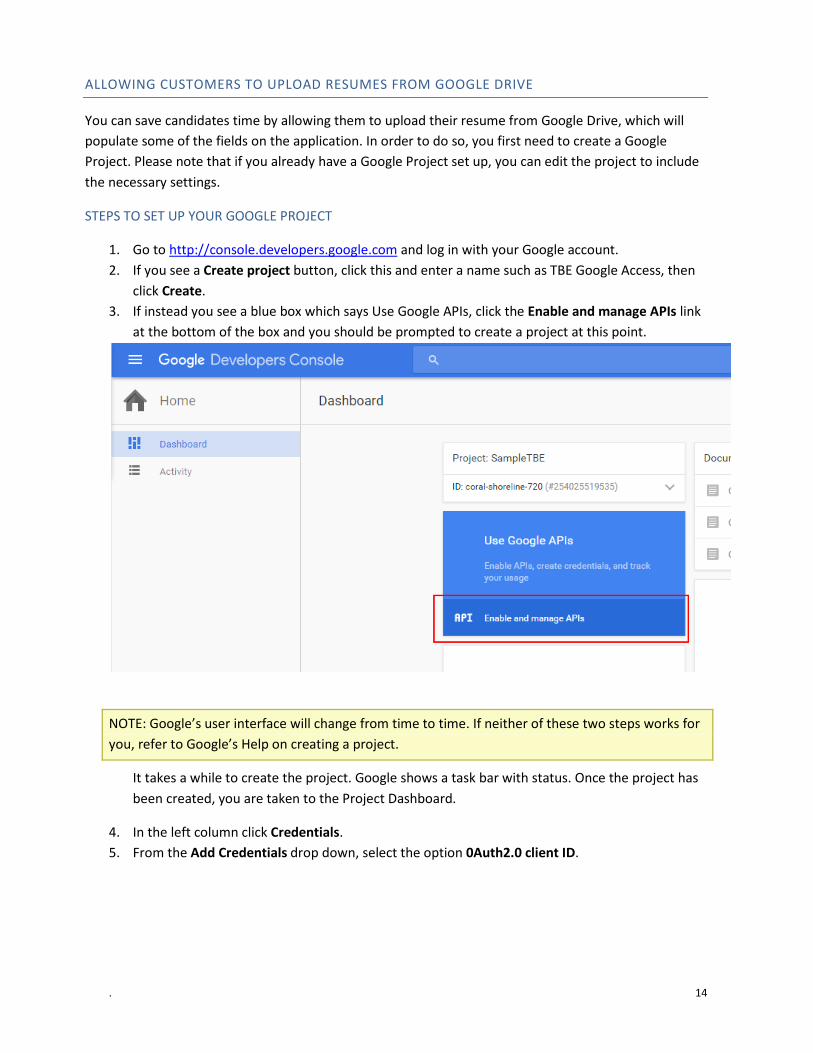
You can save candidates time by allowing them to upload their resume from Google Drive, which will populate some of the fields on the application. In order to do so, you first need to create a Google Project. Please note that if you already have a Google Project set up, you can edit the project to include the necessary settings.
STEPS TO SET UP YOUR GOOGLE PROJECT
1. Go to http://console.developers.google.com and log in with your Google account. 2. If you see a Create project button, click this and enter a name such as TBE Google Access, then
click Create. 3. If instead you see a blue box which says Use Google APIs, click the Enable and manage APIs link
at the bottom of the box and you should be prompted to create a project at this point.
NOTE: Google’s user interface will change from time to time. If neither of these two steps works for you, refer to Google’s Help on creating a project.
It takes a while to create the project. Google shows a task bar with status. Once the project has been created, you are taken to the Project Dashboard.
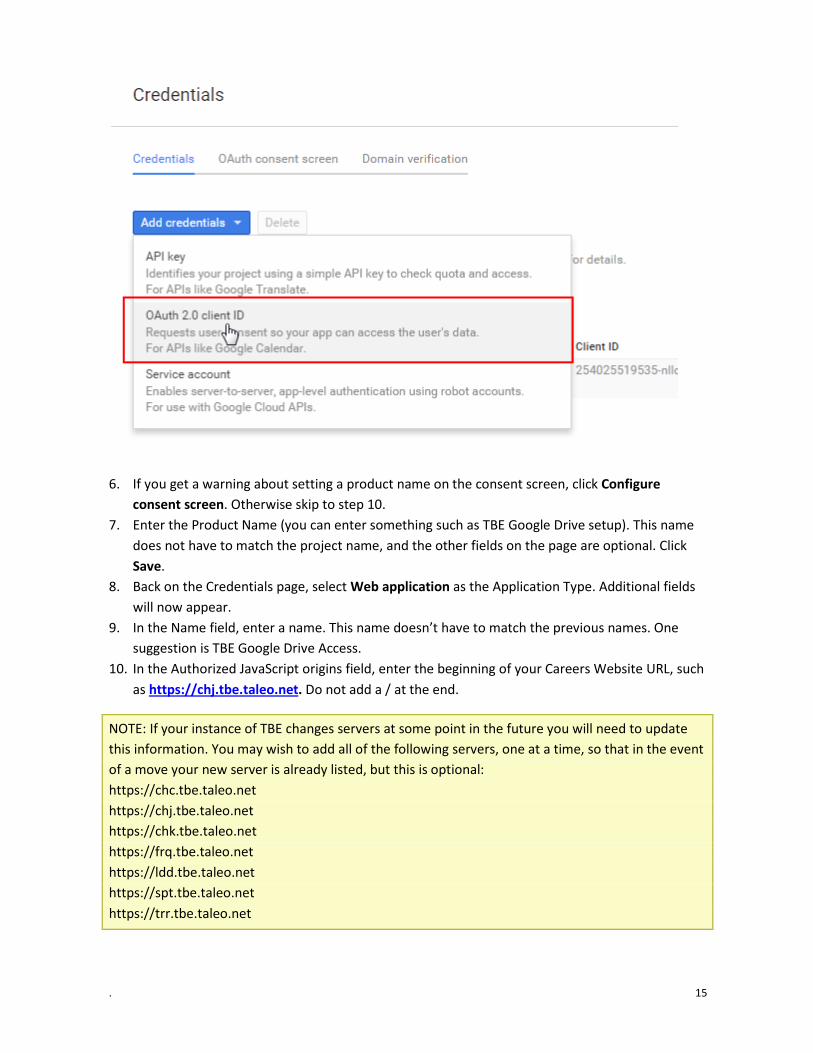
4. In the left column click Credentials. 5. From the Add Credentials drop down, select the option 0Auth2.0 client ID.
. 15
6. If you get a warning about setting a product name on the consent screen, click Configure
consent screen. Otherwise skip to step 10. 7. Enter the Product Name (you can enter something such as TBE Google Drive setup). This name
does not have to match the project name, and the other fields on the page are optional. Click Save.
8. Back on the Credentials page, select Web application as the Application Type. Additional fields will now appear.
9. In the Name field, enter a name. This name doesn’t have to match the previous names. One suggestion is TBE Google Drive Access.
10. In the Authorized JavaScript origins field, enter the beginning of your Careers Website URL, such as https://chj.tbe.taleo.net. Do not add a / at the end.
NOTE: If your instance of TBE changes servers at some point in the future you will need to update this information. You may wish to add all of the following servers, one at a time, so that in the event of a move your new server is already listed, but this is optional: https://chc.tbe.taleo.net https://chj.tbe.taleo.net https://chk.tbe.taleo.net https://frq.tbe.taleo.net https://ldd.tbe.taleo.net https://spt.tbe.taleo.net https://trr.tbe.taleo.net
. 16
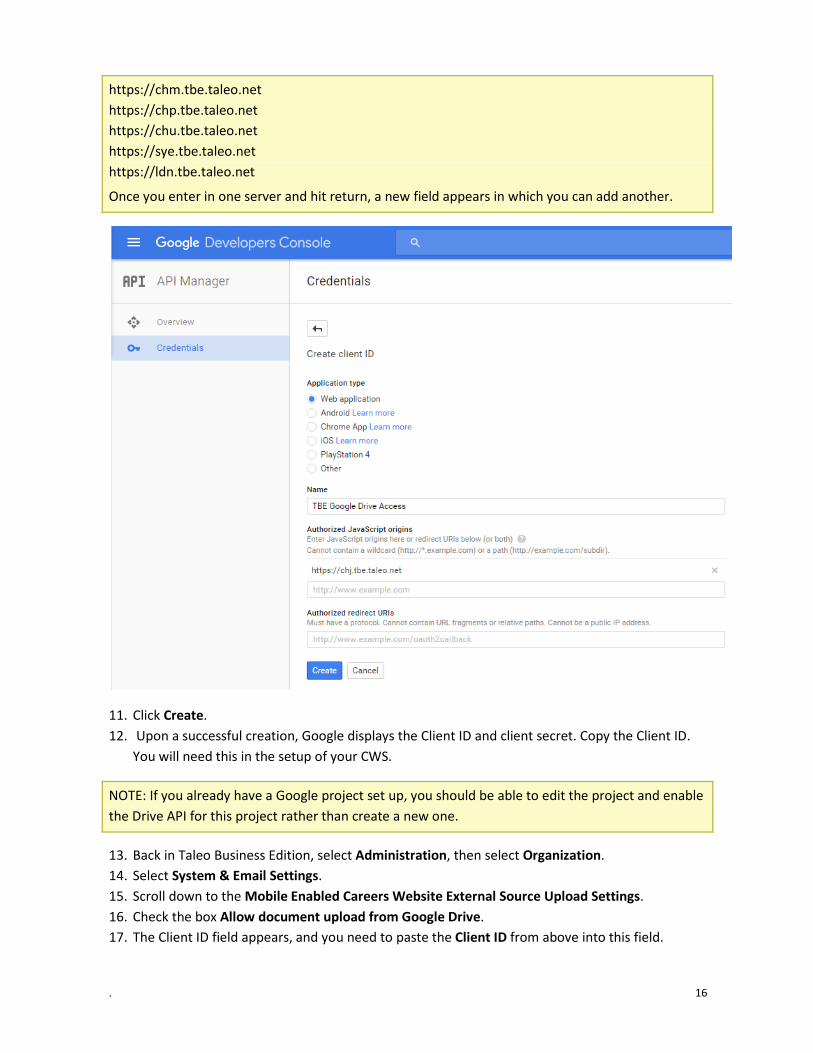
https://chm.tbe.taleo.net https://chp.tbe.taleo.net https://chu.tbe.taleo.net https://sye.tbe.taleo.net https://ldn.tbe.taleo.net
Once you enter in one server and hit return, a new field appears in which you can add another.
11. Click Create. 12. Upon a successful creation, Google displays the Client ID and client secret. Copy the Client ID.
You will need this in the setup of your CWS.
NOTE: If you already have a Google project set up, you should be able to edit the project and enable the Drive API for this project rather than create a new one.
13. Back in Taleo Business Edition, select Administration, then select Organization. 14. Select System & Email Settings. 15. Scroll down to the Mobile Enabled Careers Website External Source Upload Settings. 16. Check the box Allow document upload from Google Drive. 17. The Client ID field appears, and you need to paste the Client ID from above into this field.
. 17
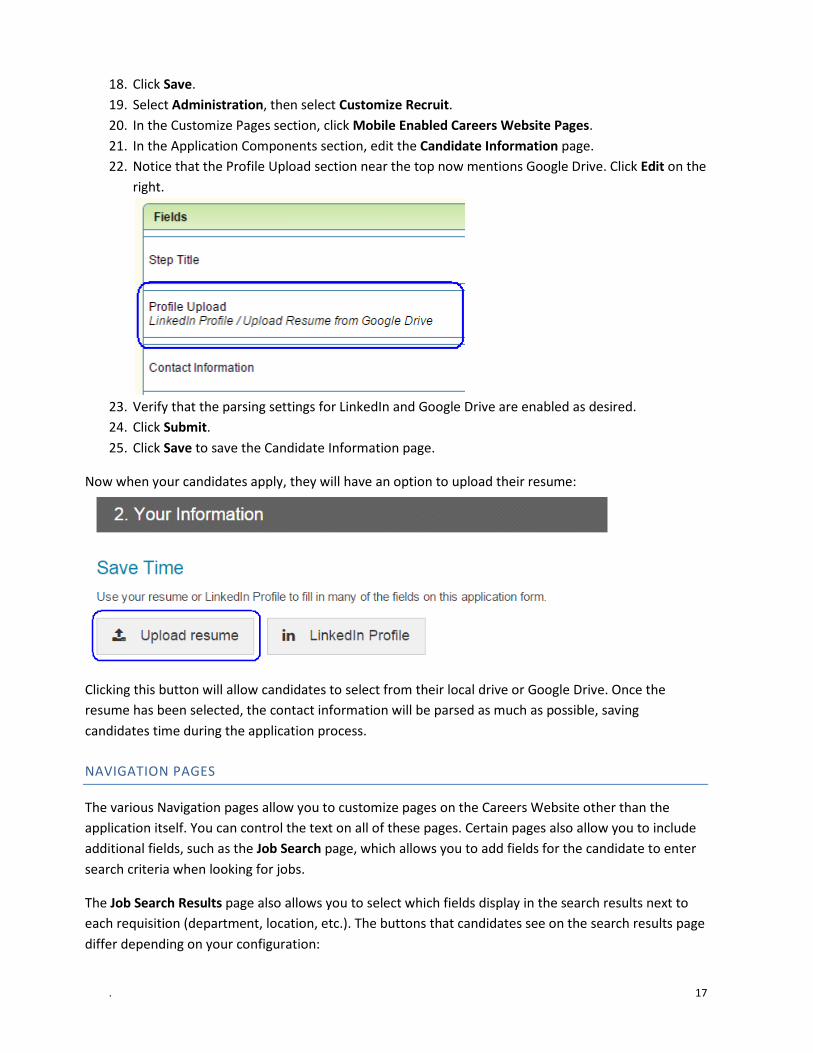
18. Click Save. 19. Select Administration, then select Customize Recruit. 20. In the Customize Pages section, click Mobile Enabled Careers Website Pages. 21. In the Application Components section, edit the Candidate Information page. 22. Notice that the Profile Upload section near the top now mentions Google Drive. Click Edit on the
right.
23. Verify that the parsing settings for LinkedIn and Google Drive are enabled as desired. 24. Click Submit. 25. Click Save to save the Candidate Information page.
Now when your candidates apply, they will have an option to upload their resume:
Clicking this button will allow candidates to select from their local drive or Google Drive. Once the resume has been selected, the contact information will be parsed as much as possible, saving candidates time during the application process.
NAVIGATION PAGES
The various Navigation pages allow you to customize pages on the Careers Website other than the application itself. You can control the text on all of these pages. Certain pages also allow you to include additional fields, such as the Job Search page, which allows you to add fields for the candidate to enter search criteria when looking for jobs.
The Job Search Results page also allows you to select which fields display in the search results next to each requisition (department, location, etc.). The buttons that candidates see on the search results page differ depending on your configuration:

. 18
You may choose whether or not to allow applications to email the positions to themselves or others. This can be controlled on the Edit Settings page for the mobile CWS.
The My Info page allows you to add or remove fields that will be available for a returning candidate to update:
My Info page as seen by a candidate
The Thank You page allows you to control the message that is displayed once a candidate submits the application. For those candidates that are knocked out due to an answer to a screening question, the Thank You Not Qualified Page can display different text to a candidate. You can also add dynamic HTML on the Thank You page.
The My Jobs page contains a table for positions to which the candidate has previously applied. You can display up to 4 fields for each of these positions. You can also show or hide the Requisition Suggested Results, which is a table that displays positions to which the candidate has been invited to complete an application for the first time (this will not display positions for which the candidate has been invited to complete a Tier 2 application), if you are using the Invite feature. Tier 2 application invitations will appear in the same table as the positions to which the candidate has already applied.
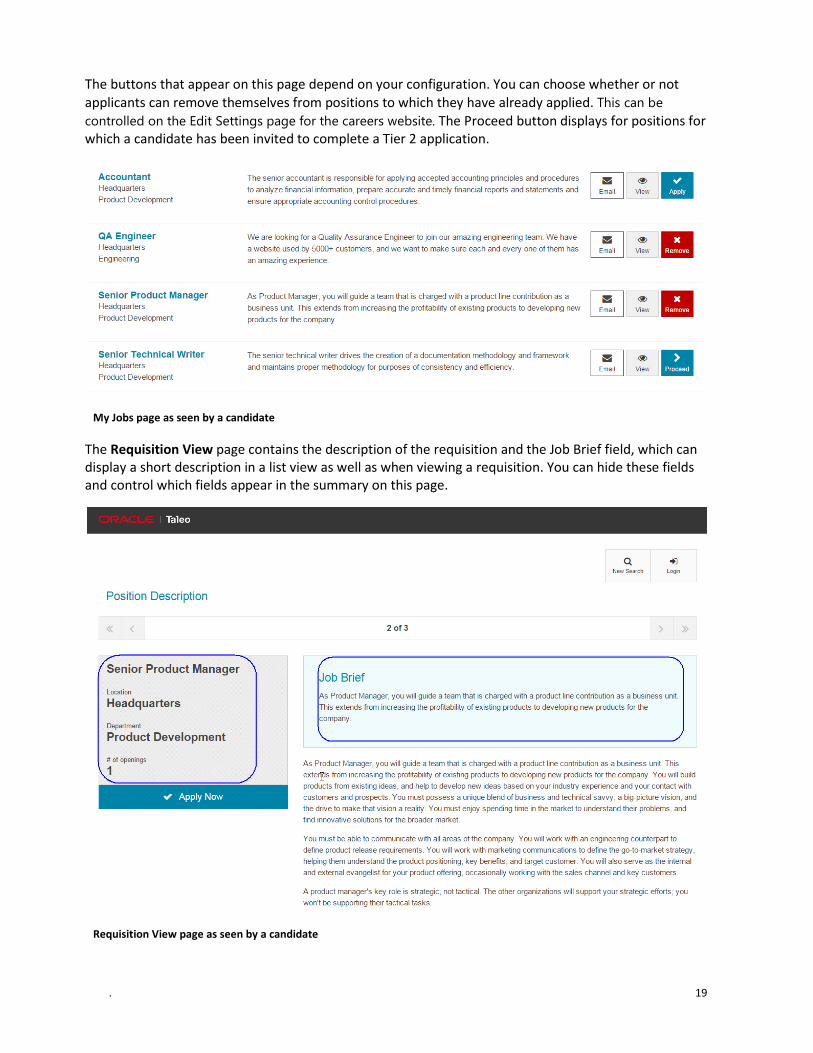
. 19
The buttons that appear on this page depend on your configuration. You can choose whether or not applicants can remove themselves from positions to which they have already applied. This can be controlled on the Edit Settings page for the careers website. The Proceed button displays for positions for which a candidate has been invited to complete a Tier 2 application.
My Jobs page as seen by a candidate
The Requisition View page contains the description of the requisition and the Job Brief field, which can display a short description in a list view as well as when viewing a requisition. You can hide these fields and control which fields appear in the summary on this page.
Requisition View page as seen by a candidate
. 20
MOBILE ENABLED CAREERS WEBSITE SETTINGS
The settings for a mobile enabled CWS are similar to the settings for your original CWS. To edit the settings, select Administration, then select Customize Recruit. From the Manage Mobile Enabled Careers Website section, click Edit Settings for the CWS in question (as with previous versions, you can add more than one CWS).
The Careers Website Information section allows you to:
• choose a logo • add a hyperlink to the logo • select a default source • select an autoreply template for candidates • select the language for the CWS • select a country to enable the search by distance feature.
NOTE: The mobile enabled CWS is not currently available for languages other than English. While you can select another language, there are display issues with many of the buttons so it is not recommended to choose another language at this time.
Also, job alerts are not currently available for the mobile enabled CWS. This feature will be available in a future release.
The Settings section allows you to:
• show the RSS button on the Search Results page • enable the Email button on requisitions so that candidates can email positions to
themselves and others • allow candidates to remove themselves from requisitions • allow candidates to see their requisition-specific status on the My Jobs page by displaying
the candidate-facing status name
The Application Snapshot Settings section allows you to control the settings for Application Snapshot if this feature is enabled in your zone.
The Application Workflow section allows you to choose which version of the application workflow to use for this particular mobile enabled CWS.
The Web Pages section allows you to choose which version of the various pages to display for this particular mobile enabled CWS.
The Locations section limits the requisitions that display based on location. This also limits the locations for which candidates can search for positions.
The Access Control section allows you to limit access to the CWS to certain IP addresses.
. 21
MOBILE ENABLED CAREERS WEBSITE STYLES
You can choose a color theme for your mobile enabled CWS as well. In future releases, there will be more style customizations allowed as well. To edit the color theme, select Administration, then select Customize Recruit. From the Manage Mobile Enabled Careers Website section, click Edit Style for the CWS in question.
Choose one of the available themes, and click Save.
SETTING THE INITIAL CANDIDATE STATUS (OPTIONAL)
Starting with release 15A1, you can determine the initial candidate status that a candidate is given based on the candidate’s origin. If you wish to track candidates that have applied from a mobile device differently from those that have applied on a desktop, you may do so by creating another candidate status.
STEPS TO CREATE AN INITIAL CANDIDATE STATUS FOR A MOBILE CANDIDATE
1. Select Administration, then select Customize Recruit. 2. In the Customize Processes section, click Req-Specific Candidate Workflow. 3. Edit the workflow in question. 4. Add a new req-specific candidate status for mobile candidates and save. You may do the same
for the Main candidate status if desired. You need to enable this status in all workflows. 5. Back on the Customize Recruit page, select Status Mappings in the Customize Processes section. 6. Click the “Initial” Requisition-Specific Candidate Status Defaults link. 7. Select the new status for the Mobile Enabled Careers Website field. You may select a status for
the Main Status as well. 8. Click Save.
If you do not set an initial status for mobile candidates, the default status for all of your other candidate origins will be used (usually NEW or Submitted for Requisition).
POPULATING THE JOB BRIEF FIELD
The previous release introduced the requisition field called Job Brief that allows you to provide a brief description for your requisitions on your Careers Website. This text area field allows for up to 255 characters, and can be added to your Add/Edit Requisition page layout for users to enter a brief description. It is recommended that you add this field to your various Requisition page layouts and populate the field with a summarized description for optimized job search results on a mobile enabled Careers Website.
CHOOSING A STAND-ALONE MOBILE ENABLED CWS VERSUS A REDIRECTED CWS
Now that you have configured all of the pages for the mobile enabled Careers Website, you need to determine if you will continue to use your existing CWS for those candidates who are not on a mobile
. 22
device. Initially, whether or not your current CWS is quite customized, it is recommended that you keep your current CWS but associate it to a mobile enabled version for those mobile customers.
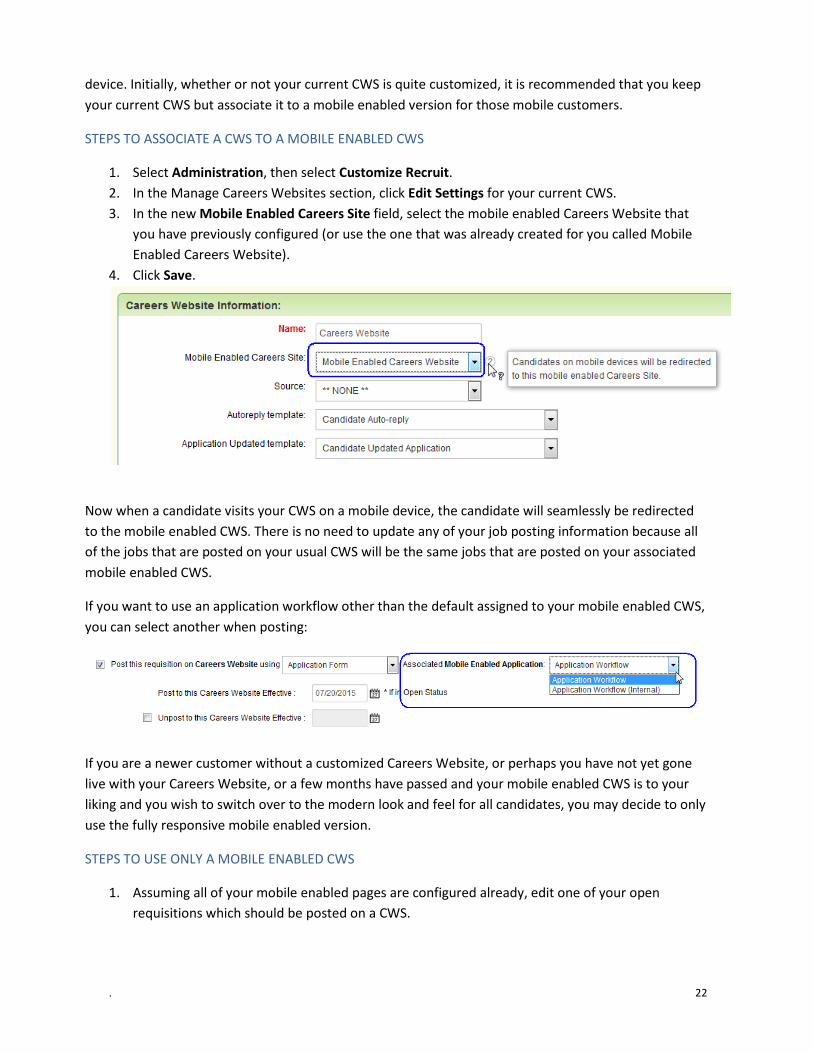
STEPS TO ASSOCIATE A CWS TO A MOBILE ENABLED CWS
1. Select Administration, then select Customize Recruit. 2. In the Manage Careers Websites section, click Edit Settings for your current CWS. 3. In the new Mobile Enabled Careers Site field, select the mobile enabled Careers Website that
you have previously configured (or use the one that was already created for you called Mobile Enabled Careers Website).
4. Click Save.
Now when a candidate visits your CWS on a mobile device, the candidate will seamlessly be redirected to the mobile enabled CWS. There is no need to update any of your job posting information because all of the jobs that are posted on your usual CWS will be the same jobs that are posted on your associated mobile enabled CWS.
If you want to use an application workflow other than the default assigned to your mobile enabled CWS, you can select another when posting:
If you are a newer customer without a customized Careers Website, or perhaps you have not yet gone live with your Careers Website, or a few months have passed and your mobile enabled CWS is to your liking and you wish to switch over to the modern look and feel for all candidates, you may decide to only use the fully responsive mobile enabled version.
STEPS TO USE ONLY A MOBILE ENABLED CWS
1. Assuming all of your mobile enabled pages are configured already, edit one of your open requisitions which should be posted on a CWS.
. 23
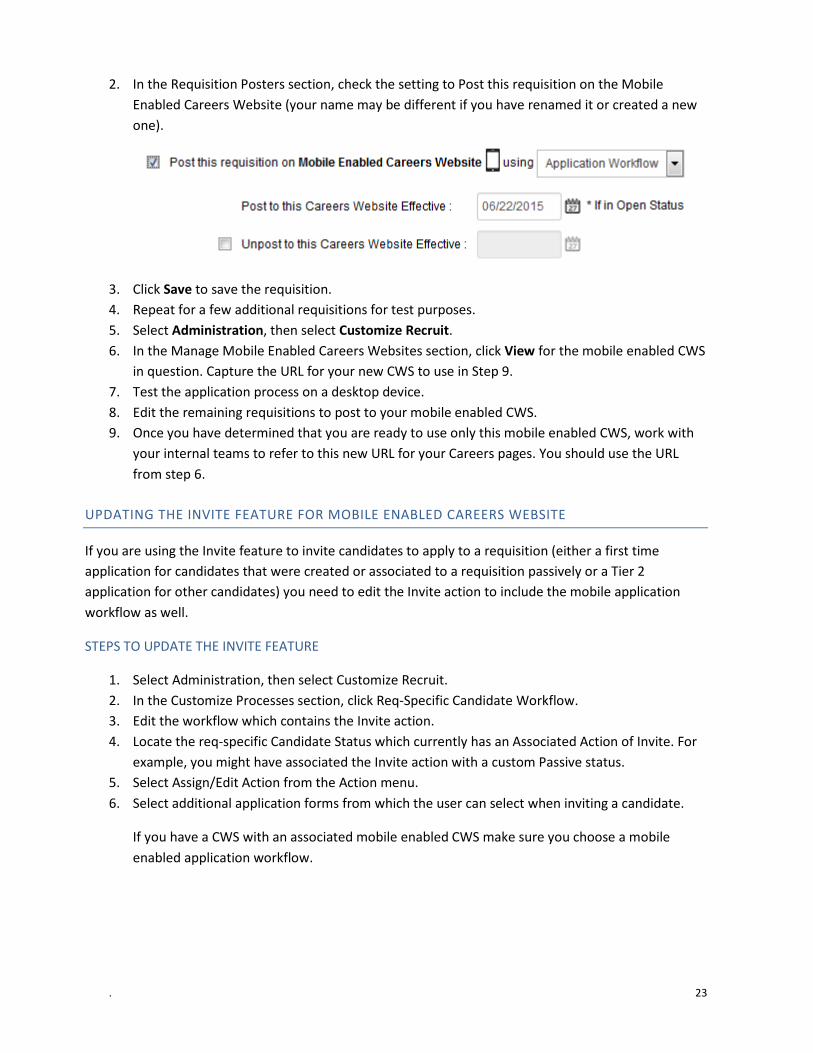
2. In the Requisition Posters section, check the setting to Post this requisition on the Mobile Enabled Careers Website (your name may be different if you have renamed it or created a new one).
3. Click Save to save the requisition. 4. Repeat for a few additional requisitions for test purposes. 5. Select Administration, then select Customize Recruit. 6. In the Manage Mobile Enabled Careers Websites section, click View for the mobile enabled CWS
in question. Capture the URL for your new CWS to use in Step 9. 7. Test the application process on a desktop device. 8. Edit the remaining requisitions to post to your mobile enabled CWS. 9. Once you have determined that you are ready to use only this mobile enabled CWS, work with
your internal teams to refer to this new URL for your Careers pages. You should use the URL from step 6.
UPDATING THE INVITE FEATURE FOR MOBILE ENABLED CAREERS WEBSITE
If you are using the Invite feature to invite candidates to apply to a requisition (either a first time application for candidates that were created or associated to a requisition passively or a Tier 2 application for other candidates) you need to edit the Invite action to include the mobile application workflow as well.
STEPS TO UPDATE THE INVITE FEATURE
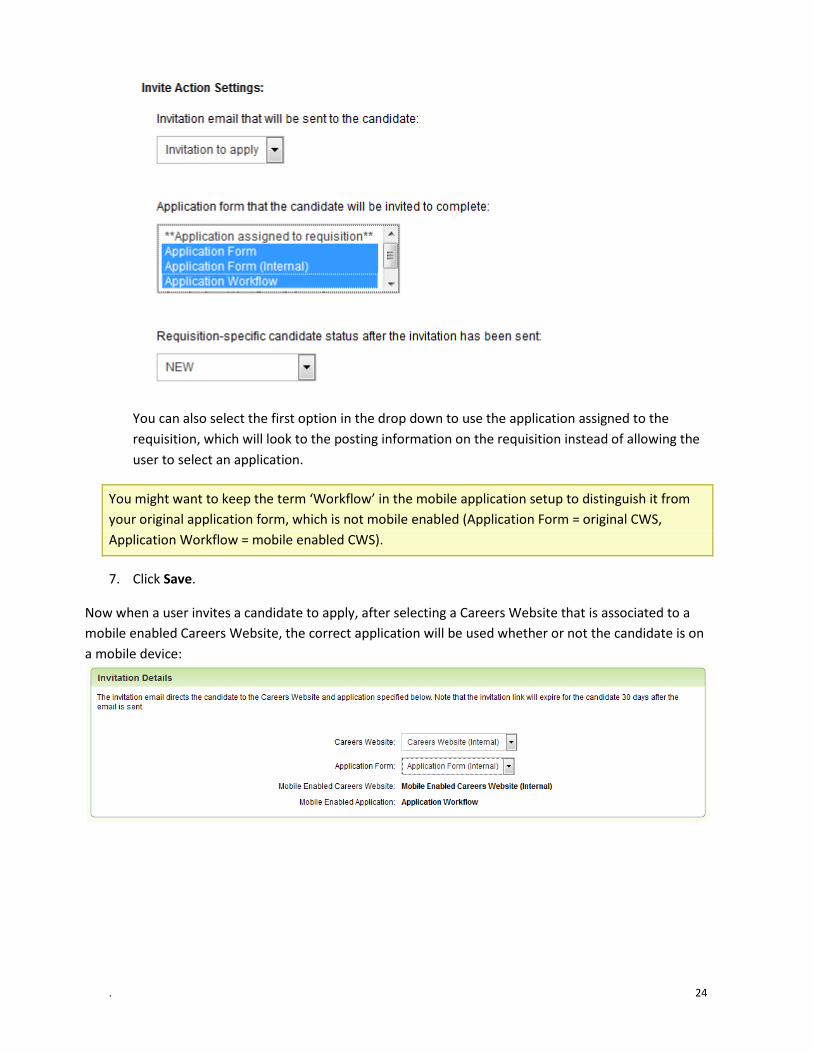
1. Select Administration, then select Customize Recruit. 2. In the Customize Processes section, click Req-Specific Candidate Workflow. 3. Edit the workflow which contains the Invite action. 4. Locate the req-specific Candidate Status which currently has an Associated Action of Invite. For
example, you might have associated the Invite action with a custom Passive status. 5. Select Assign/Edit Action from the Action menu. 6. Select additional application forms from which the user can select when inviting a candidate.
If you have a CWS with an associated mobile enabled CWS make sure you choose a mobile enabled application workflow.
. 24
You can also select the first option in the drop down to use the application assigned to the requisition, which will look to the posting information on the requisition instead of allowing the user to select an application.
You might want to keep the term ‘Workflow’ in the mobile application setup to distinguish it from your original application form, which is not mobile enabled (Application Form = original CWS, Application Workflow = mobile enabled CWS).
7. Click Save.
Now when a user invites a candidate to apply, after selecting a Careers Website that is associated to a mobile enabled Careers Website, the correct application will be used whether or not the candidate is on a mobile device:
. 25
REPORTING FEATURES
This section applies to all Taleo Business Edition customers who utilize the reporting engine.
CLONING OF STANDARD REPORTS
This release introduces 12 standard reports which can be cloned, for a total of 27 standard reports. The following standard reports can now be cloned:
• Candidate Interviews and Feedback by Requisition • Candidate Interviews and Feedback by Requisition—Current User Owner • Candidate Main Status Summary • Cost Per Hire • Cost Per Hire—Current User Owner • Cost Per Source • Employee Referrals • Employee Referrals—by Current User Owner • History Logs • Hires Per Source • Requisition Hiring Summary • User Activity
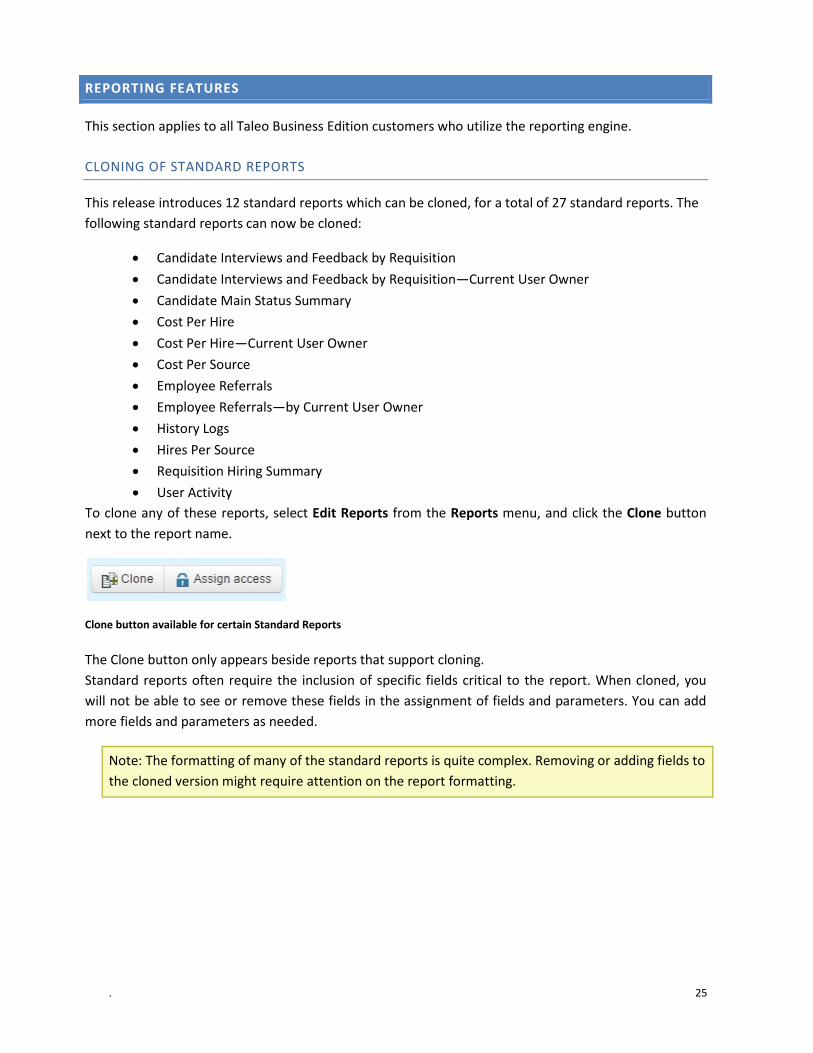
To clone any of these reports, select Edit Reports from the Reports menu, and click the Clone button next to the report name.
Clone button available for certain Standard Reports
The Clone button only appears beside reports that support cloning. Standard reports often require the inclusion of specific fields critical to the report. When cloned, you will not be able to see or remove these fields in the assignment of fields and parameters. You can add more fields and parameters as needed.
Note: The formatting of many of the standard reports is quite complex. Removing or adding fields to the cloned version might require attention on the report formatting.
. 26
CHANGE TO THE CLEAN EXPRESSION
The CLEAN function that was introduced in the last release has been updated in this release.
This function can be used on a text area field to remove line breaks in the data. This is most useful when exporting to excel to prevent a field such as the job description from breaking to a new cell each time a link break is encountered.
There are now two options for including the CLEAN function:
1. CLEAN(Var1) - replaces line breaks with " " (two spaces). 2. CLEAN (var1,var2) - replaces line breaks with whatever is specified in var2 eg. "-"
• EXAMPLE: CLEAN([REQU|description]) • EXAMPLE: CLEAN([REQU|description], “ – “)
. 27
RECRUIT FEATURES
This section applies to customers using Taleo Business Edition Recruit.
BULK PRINTING OF RESUMES
You can now print all resumes for selected candidates at once. A single PDF file is created, which can then be sent to the printer or emailed to a team member. This feature saves you time and simplifies the recruiting process.
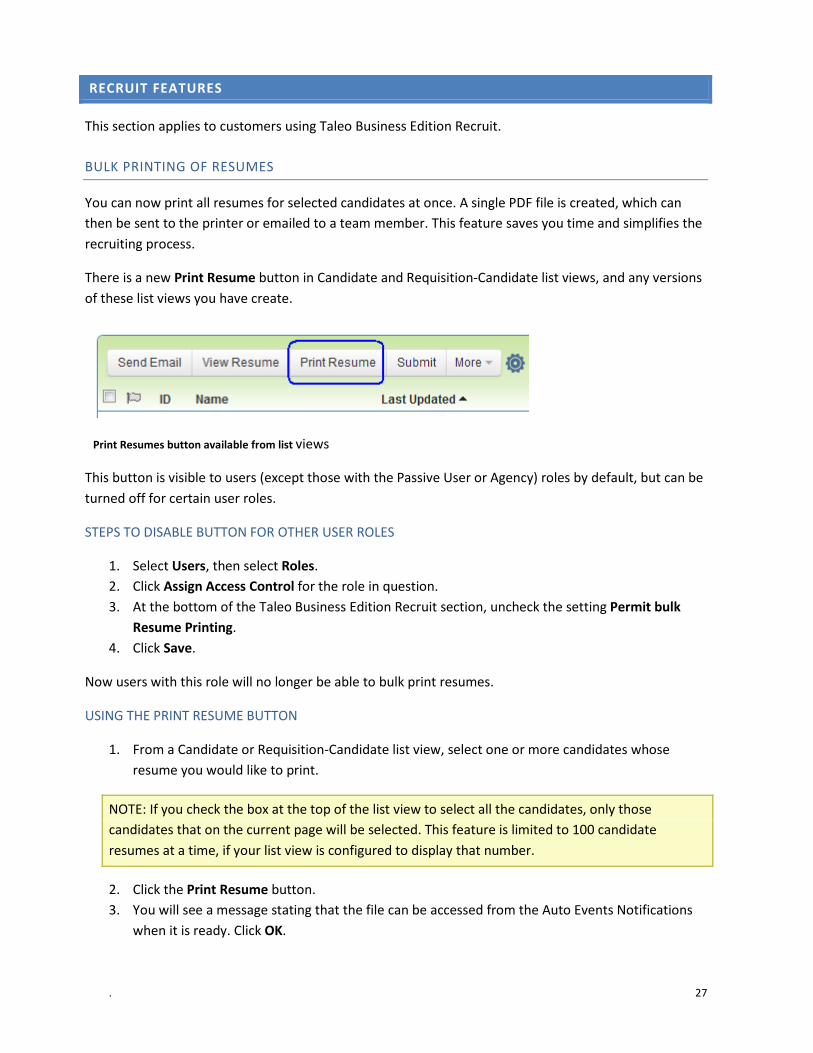
There is a new Print Resume button in Candidate and Requisition-Candidate list views, and any versions of these list views you have create.
Print Resumes button available from list views
This button is visible to users (except those with the Passive User or Agency) roles by default, but can be turned off for certain user roles.
STEPS TO DISABLE BUTTON FOR OTHER USER ROLES
1. Select Users, then select Roles. 2. Click Assign Access Control for the role in question. 3. At the bottom of the Taleo Business Edition Recruit section, uncheck the setting Permit bulk
Resume Printing. 4. Click Save.
Now users with this role will no longer be able to bulk print resumes.
USING THE PRINT RESUME BUTTON
1. From a Candidate or Requisition-Candidate list view, select one or more candidates whose resume you would like to print.
NOTE: If you check the box at the top of the list view to select all the candidates, only those candidates that on the current page will be selected. This feature is limited to 100 candidate resumes at a time, if your list view is configured to display that number.
2. Click the Print Resume button. 3. You will see a message stating that the file can be accessed from the Auto Events Notifications
when it is ready. Click OK.
. 28
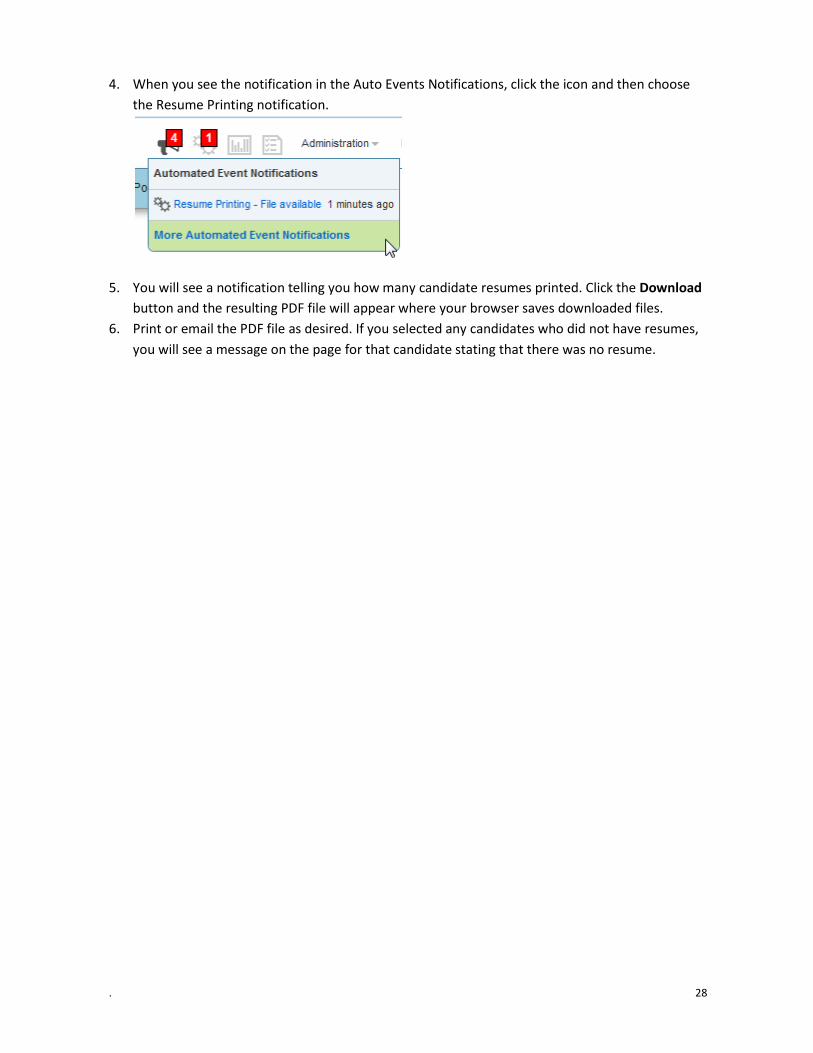
4. When you see the notification in the Auto Events Notifications, click the icon and then choose the Resume Printing notification.
5. You will see a notification telling you how many candidate resumes printed. Click the Download
button and the resulting PDF file will appear where your browser saves downloaded files. 6. Print or email the PDF file as desired. If you selected any candidates who did not have resumes,
you will see a message on the page for that candidate stating that there was no resume.
. 29
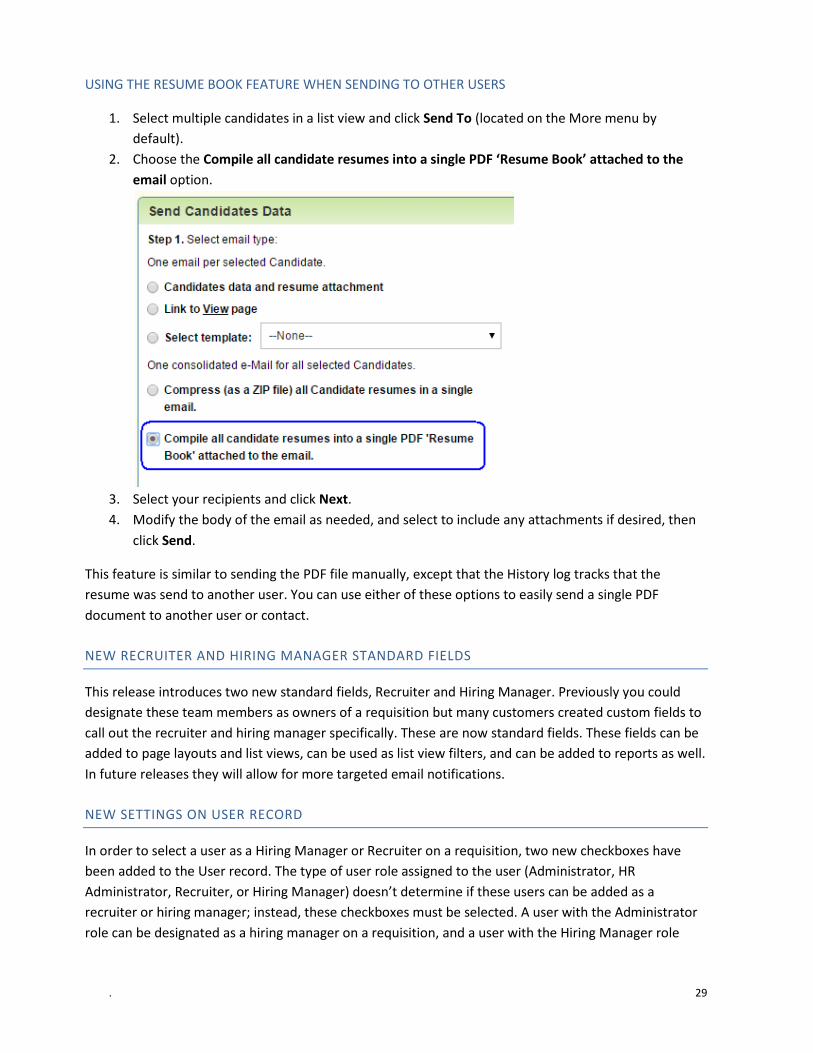
USING THE RESUME BOOK FEATURE WHEN SENDING TO OTHER USERS
1. Select multiple candidates in a list view and click Send To (located on the More menu by default).
2. Choose the Compile all candidate resumes into a single PDF ‘Resume Book’ attached to the email option.
3. Select your recipients and click Next. 4. Modify the body of the email as needed, and select to include any attachments if desired, then
click Send.
This feature is similar to sending the PDF file manually, except that the History log tracks that the resume was send to another user. You can use either of these options to easily send a single PDF document to another user or contact.
NEW RECRUITER AND HIRING MANAGER STANDARD FIELDS
This release introduces two new standard fields, Recruiter and Hiring Manager. Previously you could designate these team members as owners of a requisition but many customers created custom fields to call out the recruiter and hiring manager specifically. These are now standard fields. These fields can be added to page layouts and list views, can be used as list view filters, and can be added to reports as well. In future releases they will allow for more targeted email notifications.
NEW SETTINGS ON USER RECORD
In order to select a user as a Hiring Manager or Recruiter on a requisition, two new checkboxes have been added to the User record. The type of user role assigned to the user (Administrator, HR Administrator, Recruiter, or Hiring Manager) doesn’t determine if these users can be added as a recruiter or hiring manager; instead, these checkboxes must be selected. A user with the Administrator role can be designated as a hiring manager on a requisition, and a user with the Hiring Manager role

. 30
cannot be designated as the hiring manager on a requisition until the User record has been updated correctly.
TO ADD HIRING MANAGER OR RECRUITER ACCESS TO A USER RECORD:
1. Edit a User record. 2. Select one or both of the new checkboxes for Requisition Recruiter or Requisition Hiring
Manager:
3. Click Save.
You can also update the User records by importing a simple CSV file. Depending on the number of records you are updating, it may be easier to manually update the User records, unless you already have a CSV file which contains the users’ last names and user names.
TO ADD HIRING MANAGER OR RECRUITER ACCESS TO A USER RECORD WITH AN IMPORT FILE:
1. Create a simple CSV file with the following fields: User Name, Last Name, Requisition Recruiter, Requisition Hiring Manager
2. If all of the users you will be updating have the same role and status you can select one value for these during the import process. If not, these two fields (Role and Status) should be added to the CSV file as well. The values in the CSV file will overwrite what you have selected during the import process.
3. Populate the data for a couple of users. It is highly recommended that you always run a test with a couple of records before importing the full file.
4. To set up these users as recruiters and hiring managers (enable the checkbox), use TRUE in the column of the CSV file. Use FALSE if you do not wish to enable the checkbox for a user. Your CSV file should look something like this (with two additional columns for Role and Status if these vales different for the users you are updating):
5. Save the file in CSV format. 6. Back in Taleo Business Edition, select Users, then select Import. 7. On the first page of the Import wizard, deselect all options for creating an employee record and
click Next. 8. Select the CSV file in Step 2, and select the Role and Status in Step 3, if the same values should
be applied to all users (if not, your CSV file must contain this information). 9. Click Next.
. 31
10. Verify that the columns in the spreadsheet have been mapped to the standard fields correctly, and then click Import.
11. You should see a message that some users already exist in the system. Click Update all, which will overwrite the data, and then click Proceed.
12. Open the User records to verify that the new permissions for Hiring Manager and Recruiter were set correctly.
13. Proceed with importing your full spreadsheet.
NEW FIELDS ON THE PAGE LAYOUTS
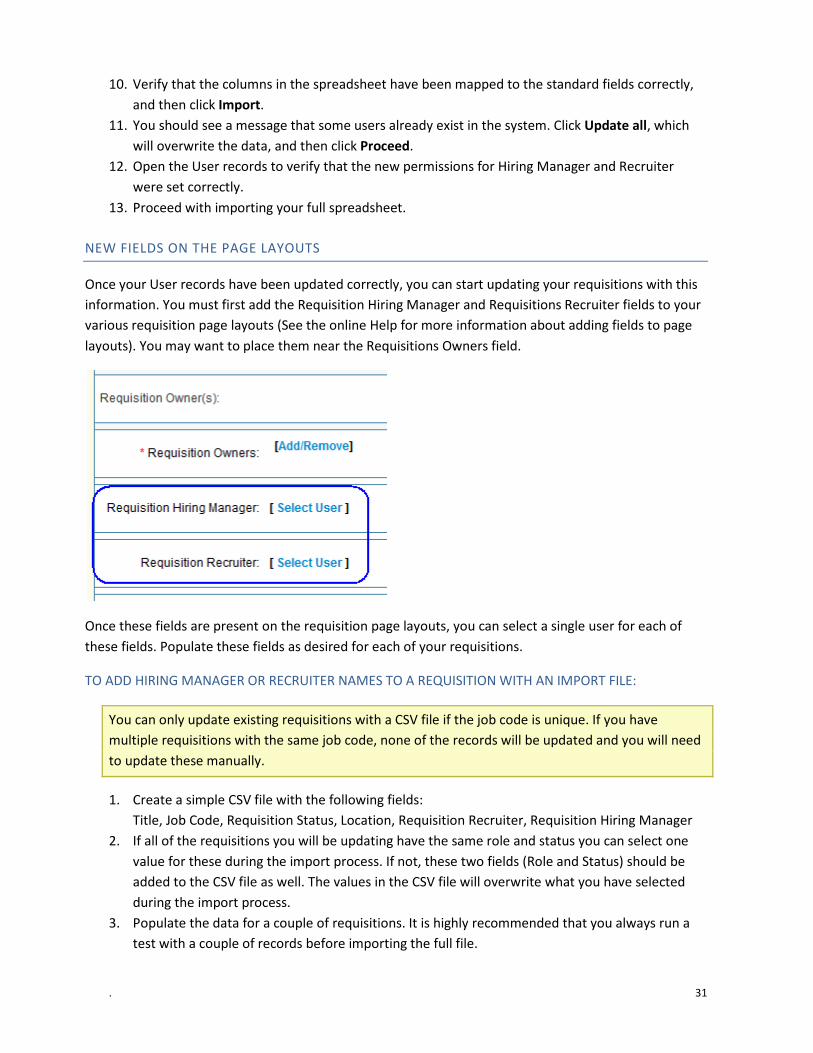
Once your User records have been updated correctly, you can start updating your requisitions with this information. You must first add the Requisition Hiring Manager and Requisitions Recruiter fields to your various requisition page layouts (See the online Help for more information about adding fields to page layouts). You may want to place them near the Requisitions Owners field.
Once these fields are present on the requisition page layouts, you can select a single user for each of these fields. Populate these fields as desired for each of your requisitions.
TO ADD HIRING MANAGER OR RECRUITER NAMES TO A REQUISITION WITH AN IMPORT FILE:
You can only update existing requisitions with a CSV file if the job code is unique. If you have multiple requisitions with the same job code, none of the records will be updated and you will need to update these manually.
1. Create a simple CSV file with the following fields: Title, Job Code, Requisition Status, Location, Requisition Recruiter, Requisition Hiring Manager
2. If all of the requisitions you will be updating have the same role and status you can select one value for these during the import process. If not, these two fields (Role and Status) should be added to the CSV file as well. The values in the CSV file will overwrite what you have selected during the import process.
3. Populate the data for a couple of requisitions. It is highly recommended that you always run a test with a couple of records before importing the full file.

. 32
4. To add users as recruiters and hiring managers, add a single user name for either the Requisition Recruiter and/or Requisition Hiring Manager columns. Your CSV file should look something like this :
5. Save the file in CSV format. 6. Back in Taleo Business Edition, select Requisitions, then select Import. 7. On the first page of the Import wizard, select the first option to Import Requisitions from a CSV
file, and click Next. 8. Select the CSV file in Step 2, and select the Requisition Workflow, Associated Careers Websites,
Requisition Status, and Location in Step 3, if the same values should be applied to all requisitions (if not, your CSV file must contain this information).
9. Click Next. 10. Verify that the columns in the spreadsheet have been mapped to the standard fields correctly,
and then click Import. 11. You should see a warning about the Job Code. Click Continue. 12. Open the records to verify that Hiring Manager and Recruiter fields were set correctly. 13. Proceed with importing your full spreadsheet.
USING THE NEW FIELDS IN LIST VIEWS
You can add the Requisition Hiring Manager and Requisitions Recruiter fields to your list views for informational purposes and to create a simple report with the Export Results icon. However, you can also add then as list view filters to better manage your own data. For example, the list view “My Requisitions” is set up with a filter of Current User Owner or Approver by default, which means that each user will see only those requisitions for which they are a requisition owner.
You can create new list views with the filter of Requisition Hiring Manager or Requisitions Recruiter so that users can see the requisitions for which they are specially a hiring manager or a recruiter, and not just an owner. Please see the online help for more information about list view filters.
In this way, certain users that may be owners for many requisitions but the recruiter or hiring manager for a smaller list of requisitions can find the information they need more quickly.
. 33
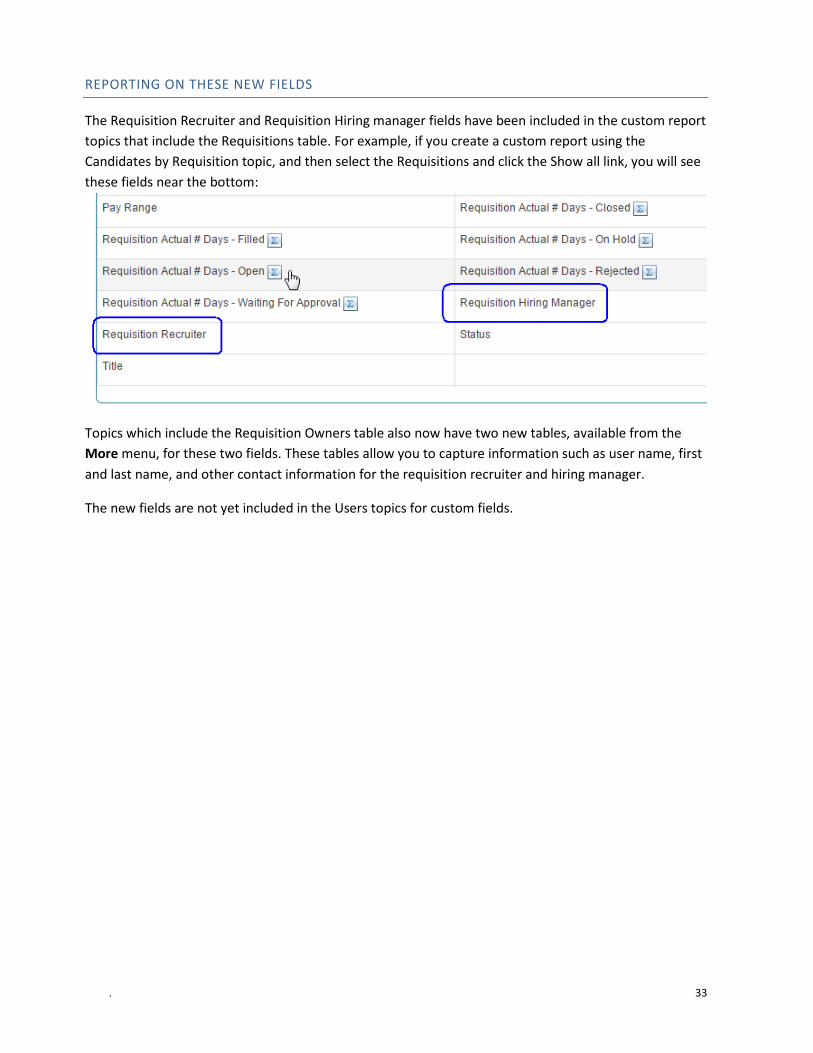
REPORTING ON THESE NEW FIELDS
The Requisition Recruiter and Requisition Hiring manager fields have been included in the custom report topics that include the Requisitions table. For example, if you create a custom report using the Candidates by Requisition topic, and then select the Requisitions and click the Show all link, you will see these fields near the bottom:
Topics which include the Requisition Owners table also now have two new tables, available from the More menu, for these two fields. These tables allow you to capture information such as user name, first and last name, and other contact information for the requisition recruiter and hiring manager.
The new fields are not yet included in the Users topics for custom fields.
. 34
ADDITIONAL CHANGES
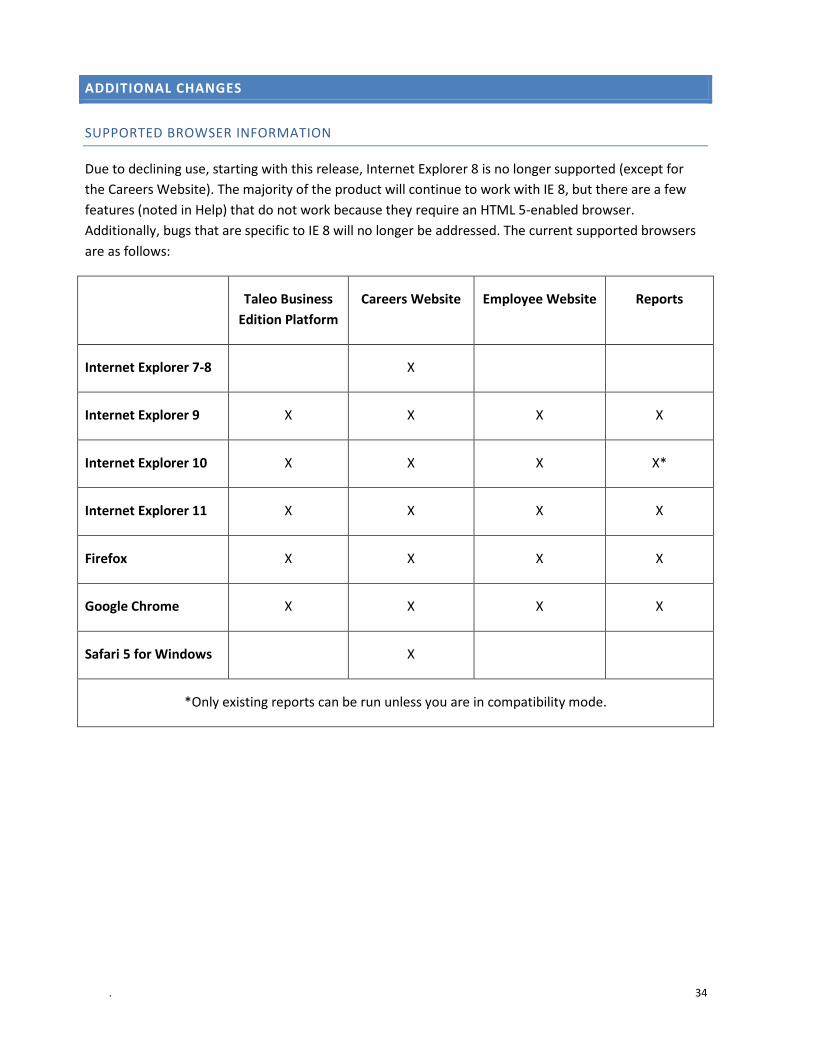
SUPPORTED BROWSER INFORMATION
Due to declining use, starting with this release, Internet Explorer 8 is no longer supported (except for the Careers Website). The majority of the product will continue to work with IE 8, but there are a few features (noted in Help) that do not work because they require an HTML 5-enabled browser. Additionally, bugs that are specific to IE 8 will no longer be addressed. The current supported browsers are as follows:
Taleo Business Edition Platform
Careers Website Employee Website Reports
Internet Explorer 7-8 X
Internet Explorer 9 X X X X
Internet Explorer 10 X X X X*
Internet Explorer 11 X X X X
Firefox X X X X
Google Chrome X X X X
Safari 5 for Windows X
*Only existing reports can be run unless you are in compatibility mode.
. 35
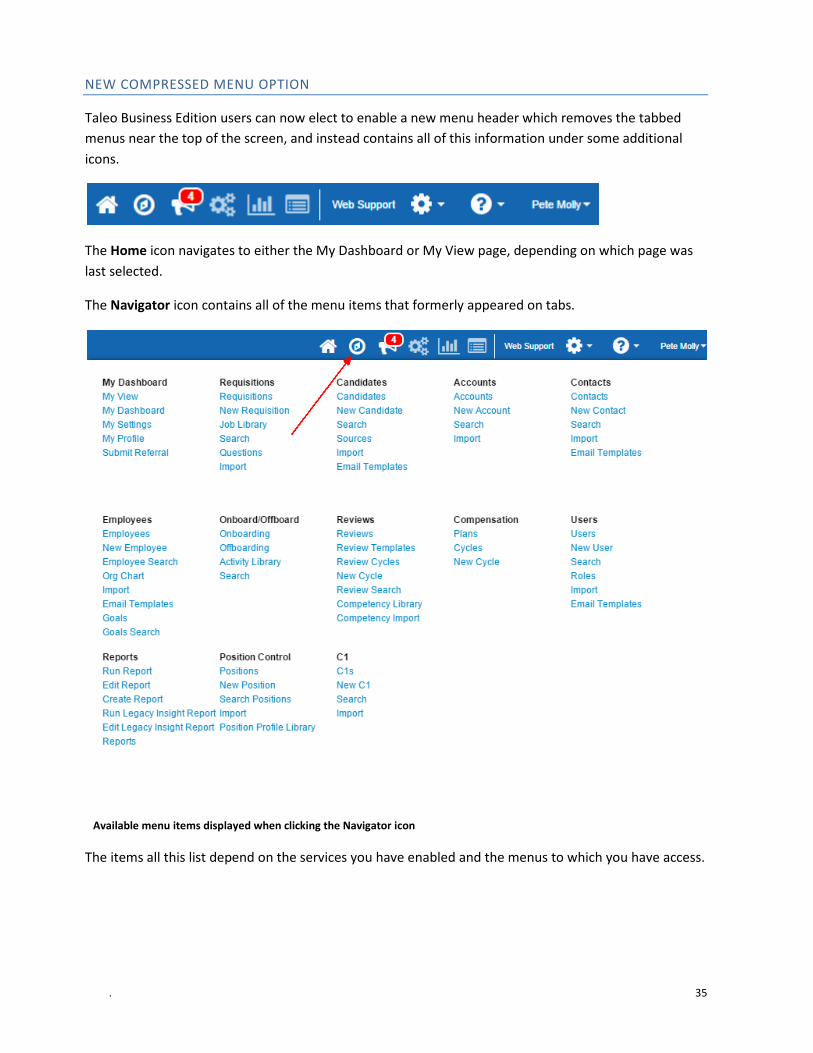
NEW COMPRESSED MENU OPTION
Taleo Business Edition users can now elect to enable a new menu header which removes the tabbed menus near the top of the screen, and instead contains all of this information under some additional icons.
The Home icon navigates to either the My Dashboard or My View page, depending on which page was last selected.
The Navigator icon contains all of the menu items that formerly appeared on tabs.
Available menu items displayed when clicking the Navigator icon
The items all this list depend on the services you have enabled and the menus to which you have access.

. 36
The icons for Announcements, Auto Events Notifications, Reports Notifications, and Employee Self-Service Notifications, and Web Support link all serve the same purpose as usual.
The Gear icon is the Administration menu.
The Question Mark icon is the Help menu.
The user’s name menu on the right allows you to access My Settings, My Profile, Submit Referral, and the Logout function.
STEPS TO ENABLE THE COMPRESSED MENU
1. From the Home icon, choose My Settings. 2. In the Display Preferences section, check the Use compressed menu and header option.
3. Click Save.
To switch back, select My Settings from your name menu in the upper right-hand corner, and deselect the same option.
Each user must enable this setting in order to use it.
CHANGES TO CAREERS WEBSITE BEHAVIOR
Along with the introduction of the mobile enabled Careers Website, there are a few changes to existing behavior for your original Careers Websites.
THANK YOU PAGE CHANGE
In previous releases, when a returning candidate applied a second time, the candidate was not presented with the Thank You page. This behavior has changed so that candidates are always presented with either the Thank You page or the Not Qualified Thank You page after applying for a position.
Due to this change you may wish to review the wording of your Thank You pages to ensure that the information is correct for both new and returning candidates.
. 37
AUTOMATIC LOGIN
After a candidate applies for the first time the candidate will automatically be logged into the Careers Website. In previous releases the candidate would apply, and then be required to log in if the candidate wanted to apply for another job in the same session.
SUGGESTED REQUISITIONS PLACEHOLDER
The Suggested Requisitions placeholder that was introduced for the mobile enabled CWS has also been added to the Returning Applicant page of your original CWS. This is a table that displays positions to which the candidate has been invited to complete an application for the first time (not positions for which the candidate has been invited to complete a Tier 2 application), if you are using the Invite feature. The table is hidden by default but can be enabled if you invite candidates to apply for positions.
STEPS TO ENABLE THE SUGGESTED REQUISITIONS TABLE
1. Select Administration, then select Customize Recruit. 2. In the Customize Pages section, click Careers Website Pages. 3. Edit the Returning Applicant page (you may have renamed this page). 4. To the right of the Suggested Requisitions [Placeholder] click Unhide. 5. Click Save.
UPDATED URLS FOR CAREERS WEBSITE
Prior to this release, the specific server which hosts your Taleo Business Edition instance was included in the URL for your Careers Website. However starting with this release the new URL uses a dispatcher which resolves to the correct location even if your TBE instance is moved to another server. This dispatcher is used for all CWS URLs (invitations, job postings, etc).
Your existing links will continue to work. We do recommend that you start using the new URLs going forward as they are not dependent on a specific server. No immediate action is needed, but you should make the change over the next few months.
Example:
Direct URL:
http://chc.tbe.taleo.net/chc05/ats/careers/jobSearch.jsp?org=<<COMPANY_CODE>>&cws=1
URL with Dispatcher:
http://chj.tbe.taleo.net/dispatcher/servlet/DispatcherServlet?org=<<COMPANY_CODE>>&act=redirectCws&cws=1
<<COMPANY_CODE>> should be substituted with your Taleo Business Edition company code. Try testing this URL in your browser (the entire URL is case sensitive).
Copyright © 2015, Oracle and/or its affiliates. All rights reserved.
This document is provided for information purposes only, and the contents hereof are subject to change without notice. This document is not warranted to be error-free, nor subject to any other warranties or conditions, whether expressed orally or implied in law, including implied warranties and conditions of merchantability or fitness for a particular purpose. We specifically disclaim any liability with respect to this document, and no contractual obligations are formed either directly or indirectly by this document. This document may not be reproduced or transmitted in any form or by any means, electronic or mechanical, for any purpose, without our prior written permission.
Oracle and Java are registered trademarks of Oracle and/or its affiliates. Other names may be trademarks of their respective owners.
Intel and Intel Xeon are trademarks or registered trademarks of Intel Corporation. All SPARC trademarks are used under license and are trademarks or registered trademarks of SPARC International, Inc. AMD, Opteron, the AMD logo, and the AMD Opteron logo are trademarks or registered trademarks of Advanced Micro Devices. UNIX is a registered trademark of The Open Group.
15B1