Embed Size (px)
Citation preview

8/7/2019 Oracle11g - Database on Linux
http://slidepdf.com/reader/full/oracle11g-database-on-linux 1/36
Oracle Database 11g Release 1 (11.1) Installation on Oracle
Enterprise Linux 5.0
By
Md.Samiuzzaman Khan (Tamim)
Database Administrator
DNS Group
Cell-Phone – 8801552379598
Email – [email protected]
This article describes the installation of Oracle Database 11g Release 1 (11.1) on Oracle
Enterprise Linux 5.0. Here I simulate the installation process based on my PC basedserver which has following hardware configuration:
1. Intel 2.4 GHz x86 Processor.2. 80 GB SATA HDD
3. GB physical memory
To make an easy and convenient installation process we documented installation Process
in two phases. First of on we have to install Oracle Enterprise Linux Server 5.0 with
required package and system parameter. After that in the second phase we simulatedinstallation Process of Oracle 11g with respective screen shot which will help the
beginner Administrator to understand their jobs easily. I hope, this article will help the
novice and mid level Database/ System Administrator to understand what is the
production standard installation of Oracle 11g for mid level traffic processing generallywhich will done by General Purpose or Transaction processing database template.
Its me a great pleasure if this installation cook help someone meet their companyrequirement. If you have further query please drop message to our forum section at
http://oracleboss.comn or mail me [email protected]
Part-1: Installing Oracle Enterprise Linux 5.0
Part-2: Configuring Linux for Oracle
1. Creating the Oracle Group and User Account
2. Creating Required Directories and Change the Owner Ship
3. Verify Hardware Requirements
• Main Memory Requirements
• Disk Space Requirements4. Software Requirements Checking
Kernel Requirements
Package Requirements
5. Configuring Kernel Parameters
6. Configuring the oracle User's Environment
7. Installing Oracle Database
8. Post Instillation Task
1

8/7/2019 Oracle11g - Database on Linux
http://slidepdf.com/reader/full/oracle11g-database-on-linux 2/36
Part-1: Installing Oracle Enterprise Linux 5.0
You may download Oracle Enterprise Linux 5.0 from oracle technology network. Todownload Oracle Enterprise Linux 5.0 Enterprise Edition uses the following link.
http://edelivery.oracle.com/linux
Installation Process:
1. Boot the server using the first CD.o You may need to change your BIOS settings to allow booting from the CD.
2. The boot screen appears with the boot: prompt at the bottom of the screen.
o Select Enter to continue with a graphical install on the console.
3. CD Found
o Skip these options.
4. Click on Next.
5. What language could you like to use during the installation process.
o Accept the default.
6. Select the appropriate keyboard for the system Configuration
o Accept the default. (U.S English).
7. Disk Portioning Step
o Select Remove all partition on Selected device and create default layout thesystem and Click on Next
o The disk on the first controller (/dev/sda) will hold all Linux software and
contains the following partitions:
o /boot partition - 256MB
o Swap Partition -2 GB [Set this to at least twice the amount of RAM in the system
But if the Physical RAM equal to 4 GB or greater then choose swap size exactly
as memory size.]
o root (/) partition - 19 GB This partition will be used for everything, including
/usr, /tmp, /opt, /home, and more. This approach is purely to simplify installation
for the purposes of this guide. A more robust partitioning scheme would separate
these directories onto separate file systems.
o /u01 – 18 GB - For Oracle Home Directoryo /u02 - 18GB - For Oracle Data Directory.
o /var – 19 GB
o Click on Next
o Click on Next
8. Required installation media
o Three CD Required to Successful installation of Oracle Enterprise Linux.
o If you have three disk then Click on Continue
9. Boot Loader Configuration
o Accept the default and Click on Next.
10. Network Configuration
o It is usually best to configure database servers with a static IP address. To do so,
click on Edit.o A pop-up window appears. Uncheck the Configure using DHCP box, and enter
the IP Address and NetMask for the server. Be sure that Activate on boot is
checked, and click on OK.
o Enter Static IP Address , Prefix (Net Mask) in your required IP Block
o In the Hostname box, select manually and enter the hostname.
o In the Miscellaneous Settings box, enter the remaining network settings.
Enter Geteway, Primary DNS , Secondary DNS
Click on Next
2

8/7/2019 Oracle11g - Database on Linux
http://slidepdf.com/reader/full/oracle11g-database-on-linux 3/36
11. Please Click into the map to chose a region
o Select Asia/Dhaka
o Click on Next
12. Provide Root Password and Conform
o Click on Next
13. Package Installation
o Chose Customize now and Click on Next.14. Package Group Selection
o Desktop Environment
GEOME Desktop Environment
o Applications
Editor
Graphical Internet
Text-based Internet
o Development
Development Libraries
Development Tools
o Server
Server Configuration Toolso Base System
Base
Administration Tools
System Tools
X Window System
15. Click on Next.
16. Reboot The System
17. Welcome
o Click on Forward
o License Agreement
Select Yes, I agree to the License Agreement and Click on Forward
o Firewall Chose Disabled Firewall and Click on Forward
A Popup window will appear Click on Yes for Confirmation
o SE Linux
o Chose Disabled to SELinux Settings.
o Click on Forward
o A Popup window will appear Click on Yes.
o Kdump
Accept Default and Click on Forward
o Data and Time
Set the Date Time and Click on Forward
o Create User
Skip this options and Click on Forward
o Sound Card
You may Test your sound card by playing a Test Sound
Click on Forward
o Additional CD
Skip this options and Click on Finish
18. Click on OK button to reboot the system
3

8/7/2019 Oracle11g - Database on Linux
http://slidepdf.com/reader/full/oracle11g-database-on-linux 4/36
Part-2: Configuring Linux for Oracle
You may download Oracle 11g from oracle technology network. To download Oracle
Database 11g Release 1 (11.1.0.6.0)
Standard Edition, Standard Edition One, and Enterprise Edition use the following link.http://www.oracle.com/technology/software/products/database/oracle11g/111060_linuxs
oft.html
1. Creating the Oracle Group and User Account
• Use the following command to add The Oracle Inventory group (oinstall) andOSDBS (dba) Group:[root@testdb ~]# groupadd oinstall
[root@testdb ~]# groupadd dba
• Use the following command to add a user whish is The Oracle software owner(oracle)[root@testdb ~]# useradd oracle
• Use the following command to specify oinstall as the primary group and dba as
the secondary group for oracle User.[root@testdb ~]# usermod -g oinstall -G dba oracle
• Finaly use the following command to Check the Oracle user and user group:[root@testdb ~]# id oracleuid=500(oracle) gid=500(oinstall) groups=500(oinstall),501(dba)
• Use the following command to set the password of the oracle user:[root@testdb ~]# passwd oracle
Changing password for user oracle.
New UNIX password:Retype new UNIX password:
passwd:all authentication tokens updated successfully.
• Use the Following Command determine whether the An unprivileged user(nobody) user exists or Not :[root@testdb ~]# id nobody
uid=99(nobody) gid=99(nobody) groups=99(nobody)
If this command displays information about the nobody user, then you do not
need to create the nobody user.
• If the nobody user does not exist, then enter the following command to create it:
# useradd nobody
2. Creating Required Directories and Change the Owner Ship
• Create directories with names similar to the following, and specify the correctowner, group, and permissions for them:
1. The Oracle base directory (For Oracle Home directory)2. An optional Oracle data file directory
4

8/7/2019 Oracle11g - Database on Linux
http://slidepdf.com/reader/full/oracle11g-database-on-linux 5/36
• Oracle Recommand that the base directory and data file directory will be differentmount point. if you do not create the mount point during the operation system
installation then use the following command to create a directory.mkdir -p /mount_point/app/
For example :[root@testdb ~]# mkdir -p /u01/app
• To set the appropriate owner, group use the following command :[root@testdb ~]# chown -R oracle.oinstall /u01
[root@testdb ~]# chown -R oracle.oinstall /u02
• To permissions on the directory use the following command :[root@testdb ~]# chmod -R 775 /u01
[root@testdb ~]# chmod -R 775 /u02
3. Verify Hardware Requirements• Main Memory Requirements
• Disk Space Requirements
Main Memory Requirements
• At least 1 GB of Physical RAM Requirement , To determine the physical RAMsize, use the following command: [root@testdb ~]# cat /proc/meminfo | grep Mem
MemTotal: 1018368 kB
MemFree: 43884 kB
• Swap SpaseFor 512 MB RAM,Swap Space Required Double the size of RAMFor 1024 MB RAM, Swap Space Required 1.5 times the size of RAM
• To determine the physical RAM size, use the following command:[root@testdb ~]# cat /proc/meminfo | grep SwapTotal
SwapTotal: 2096472 kB
Disk Space Requirements
• Oracle Recommend For Enterprise Edition you may need 3.47 GB, Enterprise
Edition require 1.5 GB of disk Space for Data file. To determine the amount of free disk space in MB on the system, use the following command :
[root@testdb ~]# df -m /u01/
Filesystem 1M-blocks Used Available Use% Mounted on
/dev/hda7 17439 3624 12915 22% /u01
[root@testdb ~]# df -m /u02/
Filesystem 1M-blocks Used Available Use% Mounted on
/dev/hda6 17439 1777 14763 11% /u02
5

8/7/2019 Oracle11g - Database on Linux
http://slidepdf.com/reader/full/oracle11g-database-on-linux 6/36
[NB: /u01 is use for Oracle Software and /u01 is use for Oracle Database file]
4. Software Requirements Checking
Kernel Requirements• To determine whether the required kernel is installed, use the following
command. A sample output displayed by running this command on a Oracle
Enterprise Linux 5.0 system:[root@testdb ~]# uname –r
2.6.18-8.el5
Package Requirements
• The following or later version of packages for Oracle Enterprise Linux 5.0
1. binutils-2.17.50.0.6-2.el5 Disk-01
2. compat-libstdc++-33-3.2.3-61 Disk-023. elfutils-libelf-0.125-3.el5 Disk-02
4. elfutils-libelf-devel-0.125 Disk-02
5. glibc-2.5-12 Disk-02
6. glibc-common-2.5-12 Disk-01
7. glibc-devel-2.5-12 Disk-02
8. gcc-4.1.1-52 Disk-02
9. gcc-c++-4.1.1-52 Disk-02
10. libaio-0.3.106 Disk-01
11. libaio-devel-0.3.106 Disk-02
12. libgcc-4.1.1-52 Disk-01
13. libstdc++-4.1.1 Disk-01
14. libstdc++-devel-4.1.1-52.e15 Disk-02
15. make-3.81-1.1 Disk-01
16. sysstat-7.0.0 Disk-03
17. unixODBC-2.2.11 Disk-02
18. unixODBC-devel-2.2.11 Disk-02
• To determine whether the required packages are installed, use commands similar
to the following:
# rpm -qa | grep <package_name>
Example:
[root@testdb ~]# rpm -qa | grep binutils
binutils-2.17.50.0.6-2.el5
• To Find the Packege in the CD-ROM(Oracle Entriprece Linux) use the
Commands similer
# ls -la /media/cdrecorder/Server | grep <package_name>
• To install, use commands similar to the following:
# rpm -ivh <package_name>
6

8/7/2019 Oracle11g - Database on Linux
http://slidepdf.com/reader/full/oracle11g-database-on-linux 7/36
5. Configuring Kernel Parameters
[root@testdb ~]# sysctl -a | grep sem
kernel.sem = 250 32000 100 128
[root@testdb ~]# sysctl -a | grep shm
vm.hugetlb_shm_group = 0
kernel.shmmni = 4096
kernel.shmall = 268435456
kernel.shmmax = 4294967295
[root@testdb ~]# sysctl -a | grep file-max
fs.file-max = 6553600
[root@testdb ~]# sysctl -a | grep ip_local_port_range
net.ipv4.ip_local_port_range = 1024 65000
[root@testdb ~]# sysctl -a | grep rmem_
net.core.rmem_default = 4194304
net.core.rmem_max = 4194304
[root@testdb ~]# sysctl -a | grep wmem_
net.core.wmem_default = 262144
net.core.wmem_max = 262144
vm.lowmem_reserve_ratio = 256 256 32
• Using any text editor, create or edit the /etc/sysctl.conf file, and add or
edit lines similar to the following: kernel.shmall = 2097152
kernel.shmmax = 2147483648
kernel.shmmni = 4096
kernel.sem = 250 32000 100 128
fs.file-max = 65536
net.ipv4.ip_local_port_range = 1024 65000
net.core.rmem_default = 4194304
net.core.rmem_max = 4194304
net.core.wmem_default = 262144
net.core.wmem_max = 262144
• Enter the following command to change the current values of the kernelparameters:
[root@testdb ~]# /sbin/sysctl –p
Review the output from this command to verify that the values are correct.
N.B: For Safety to make sure the change effect you may restart the system.
7

8/7/2019 Oracle11g - Database on Linux
http://slidepdf.com/reader/full/oracle11g-database-on-linux 8/36
6. Configuring the oracle User's Environment
Oracle Enterprise Linux 5.0 user environment is preconfigured. So skip this option.
If you are not disabling the firewall during the setup of Oracle Enterprise Linux 5.0 then
follow the following step to disable in GUI as root user.For Oracle Enterprise Linux System -> Administration -> Security Level and Firewall
| Firewall Options -> Firewall: Disable
| SE Linux -> SE Linux Settings: Disable
7. Installing Oracle Database
1. Login in Oracle User in X Window System.
[root@testdb ~]$ hostname
testdb.dnsgroup.net
[root@testdb ~]$ xhost + testdb.dnsgroup.net
testdb.dnsgroup.net bigen added to access control list
[root@testdb ~]$ xterm
Figure: Xtrem Window
To Unzip the unzip the zip file use the following Command
# unzip linux_11gR1_database.zip
After unzip to run the Oracle Universal Installer use the following command
[oracle@testdb database]$./runInstaller
8

8/7/2019 Oracle11g - Database on Linux
http://slidepdf.com/reader/full/oracle11g-database-on-linux 9/36
2. Select a Product to Install
• Select Advanced Installation
• Click on Next
Figure: Oracle Database 11g Installation – Select a Product to Install
9

8/7/2019 Oracle11g - Database on Linux
http://slidepdf.com/reader/full/oracle11g-database-on-linux 10/36
3. Specify Inventory Directory and Credentials.
• Inventory Directory: /u01/app/oraInventory
• Operating System group name: oinstall
• Click on Next
Figure: Oracle Universal Installer: Specify Inventory Directory and Credentials.
10
8/7/2019 Oracle11g - Database on Linux
http://slidepdf.com/reader/full/oracle11g-database-on-linux 11/36
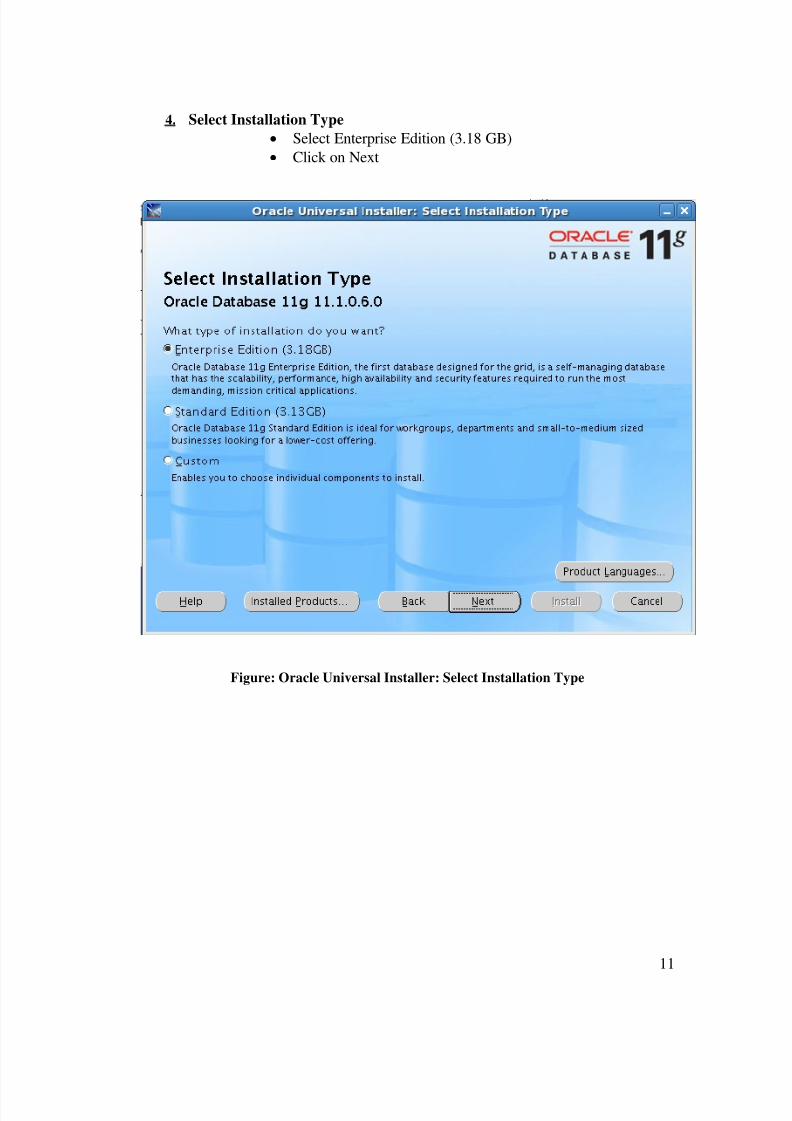
4. Select Installation Type
• Select Enterprise Edition (3.18 GB)
• Click on Next
Figure: Oracle Universal Installer: Select Installation Type
11

8/7/2019 Oracle11g - Database on Linux
http://slidepdf.com/reader/full/oracle11g-database-on-linux 12/36
5. Loading Product Information
• Oracle Base : /u01/app/oracle
• Software LocationName : OraDb11g_home
Path : /u01/app/oracle/db11g• Click on Next
Figure: Loading Product Information
12

8/7/2019 Oracle11g - Database on Linux
http://slidepdf.com/reader/full/oracle11g-database-on-linux 13/36
6. Product Specific Prerequisite Checks
• All the checks should pass without difficulty. If one or morechecks fail, correct the problem before proceeding.
• Click on Retry to Recheck.
• Click on Next[NB. If checking pass then Status Will be Succeeded]
Figure: Oracle Universal Installer: Product Specific Prerequisite Checks
13

8/7/2019 Oracle11g - Database on Linux
http://slidepdf.com/reader/full/oracle11g-database-on-linux 14/36
7. Select Configuration Option
• Select Create Database Option.
• Click on Next.
Figure: Oracle Universal Installer: – Select Configuration Option
14

8/7/2019 Oracle11g - Database on Linux
http://slidepdf.com/reader/full/oracle11g-database-on-linux 15/36
8. Select Database Configuration
• Select General Purpose / Transaction Processing.
• Click on Next.
Figure: Oracle Universal Installer: Select Database Configuration
15

8/7/2019 Oracle11g - Database on Linux
http://slidepdf.com/reader/full/oracle11g-database-on-linux 16/36
9. Specify Database Configuration Options
• Global Database Name : testcpdb.dnsgroup.net
• SID : testcpdb
• Click on Next
Figure: Oracle Universal Installer: Specify Database Configuration Options
16

8/7/2019 Oracle11g - Database on Linux
http://slidepdf.com/reader/full/oracle11g-database-on-linux 17/36
10. Specify Database Config Details (Memory)
• Chose Enable Automatic Memory Management.
• Click on Next.[NB. Configure your Memory according to your requirements.]
Figure: Oracle Universal Installer: Specify Database Config Details (Memory)
17

8/7/2019 Oracle11g - Database on Linux
http://slidepdf.com/reader/full/oracle11g-database-on-linux 18/36
11. Specify Database Config Details (Character Sets)
• Choose from the list of Character Set: Unicode Standard UTF-8AL32UTF8.
• Click on Next
[NB. You Can Choose Character Set according to your requirements]
Figure: Oracle Universal Installer: Specify Database Config Details (Character Sets)
18

8/7/2019 Oracle11g - Database on Linux
http://slidepdf.com/reader/full/oracle11g-database-on-linux 19/36
12. Specify Database Config Details (Security)
• Accept Default
• Click on Nest.[N.B: Oracle recommends the default settings]
Figure: Oracle Universal Installer: Specify Database Config Details (Security)
19

8/7/2019 Oracle11g - Database on Linux
http://slidepdf.com/reader/full/oracle11g-database-on-linux 20/36
13. Specify Database Config Details (Sample Schemas)
• Accept Default
• Click on Nest.
Figure: Oracle Universal Installer: Specify Database Config Details (Sample Schemas)
20

8/7/2019 Oracle11g - Database on Linux
http://slidepdf.com/reader/full/oracle11g-database-on-linux 21/36
14. Select Database Management Options.
• Select Use Database Control for Database Management.
• Click on Next.
Figure: Oracle Universal Installer: Select Database Management Option
21

8/7/2019 Oracle11g - Database on Linux
http://slidepdf.com/reader/full/oracle11g-database-on-linux 22/36
15. Specify Database Storage Option
• Select File System
• Specify Database file location : /u02/oradata
• Click on Next.
Figure: Oracle Universal Installer: Specify Database Storage Option.
22

8/7/2019 Oracle11g - Database on Linux
http://slidepdf.com/reader/full/oracle11g-database-on-linux 23/36
16. Specify Backup and Recovery Options
• Select Do not enable Automated backups
• Clock on Next.
Figure: Oracle Universal Installer: Specify Backup and Recovery Options
23

8/7/2019 Oracle11g - Database on Linux
http://slidepdf.com/reader/full/oracle11g-database-on-linux 24/36
17. Specify Database Schema Passwords
• Select Use the same password for all the accounts
• Enter the Password and Confirm.
• Clock on Next.
Figure: Oracle Universal Installer: Specify Database Schema Passwords
24

8/7/2019 Oracle11g - Database on Linux
http://slidepdf.com/reader/full/oracle11g-database-on-linux 25/36
18. Privileged Operating System Groups
• Database Administrator (OSDBA) Group : oinstall
• Database Operator (OSOPER) Group : oinstall
• ASM administrator (OSASM) Group : oinstall
• Click on Next.
Figure: Oracle Universal Installer: Privileged Operating System Groups
25

8/7/2019 Oracle11g - Database on Linux
http://slidepdf.com/reader/full/oracle11g-database-on-linux 26/36
19. Oracle Configuration Manager Registration
• If you have Metalink Account then you can Registration yourdatabase, otherwise skip this option.
• Click on Next.
Figure: Oracle Universal Installer: Oracle Configuration Manager Registration
26

8/7/2019 Oracle11g - Database on Linux
http://slidepdf.com/reader/full/oracle11g-database-on-linux 27/36
20. Summary
• A summary of the products being installed is presented.
• Click on Install.
Figure: Oracle Universal Installer: Summary
27

8/7/2019 Oracle11g - Database on Linux
http://slidepdf.com/reader/full/oracle11g-database-on-linux 28/36
21. Install
• The Installation process of Oracle 11g 11.1.0.6.0 is runningautomatically.
• After Finishing 100% Configuration assistants will appear.
.
Figure: Oracle Universal Installer: Install
28
8/7/2019 Oracle11g - Database on Linux
http://slidepdf.com/reader/full/oracle11g-database-on-linux 29/36
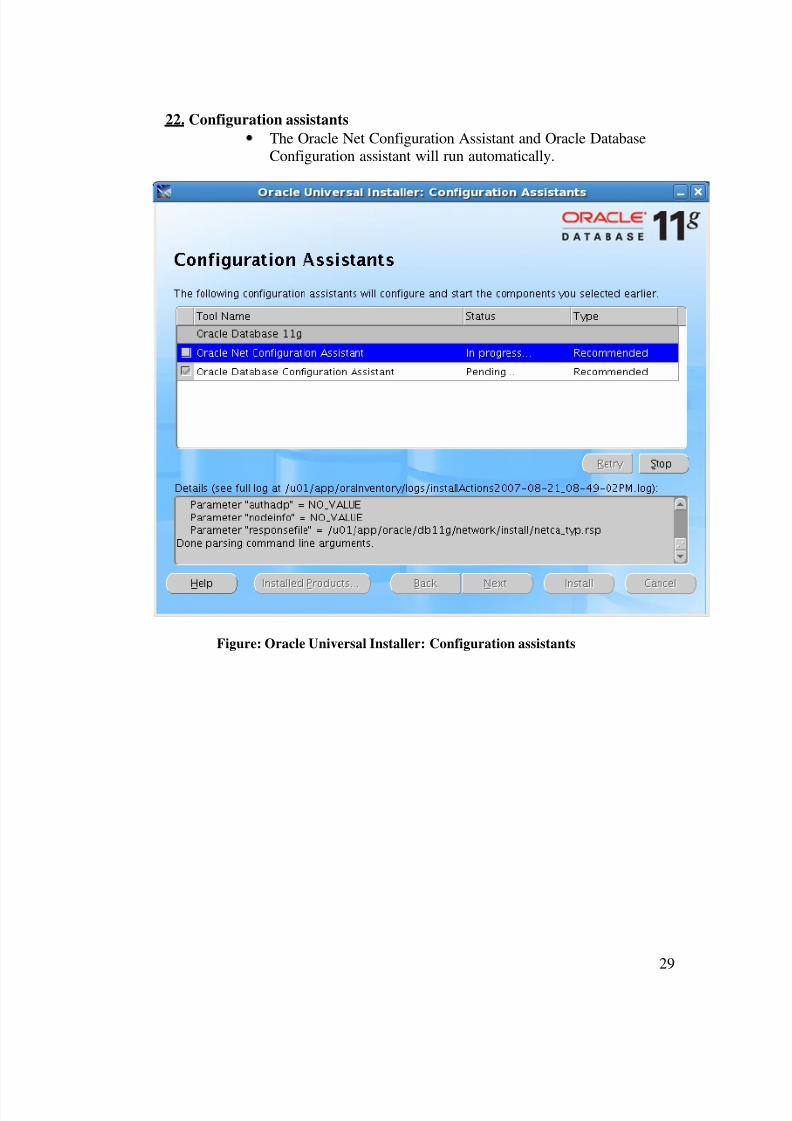
22. Configuration assistants
• The Oracle Net Configuration Assistant and Oracle DatabaseConfiguration assistant will run automatically.
Figure: Oracle Universal Installer: Configuration assistants
29

8/7/2019 Oracle11g - Database on Linux
http://slidepdf.com/reader/full/oracle11g-database-on-linux 30/36
23. . Database Configuration Assistant
• Copying database file, Creating and starting Oracle Instance,Completing Database creation process will run automatically.
Figure: Oracle Universal Installer: Database Configuration Assistant
30

8/7/2019 Oracle11g - Database on Linux
http://slidepdf.com/reader/full/oracle11g-database-on-linux 31/36
24. Database Configuration Assistant
• This window Provide you some information about your database.
• You can Change user account password and unlock by Click onPassword Manager.
• Click on OK.
Figure: Oracle Universal Installer: Database Configuration Assistant
31

8/7/2019 Oracle11g - Database on Linux
http://slidepdf.com/reader/full/oracle11g-database-on-linux 32/36
25. Execute Configuration Scripts
• Execute orainstRoot.sh and root.sh as root user.
• To Switch root user Open a Terminal and Type su root
• Click on OK.
Figure: Execution of Configuration script
32

8/7/2019 Oracle11g - Database on Linux
http://slidepdf.com/reader/full/oracle11g-database-on-linux 33/36
26. End of Instillation
• Make note of the URLs presented in the summary, and click on Exit whenready.
Figure: Oracle Universal Installer: End of Installation.
27. Exit
• Click on Yes to Exit.
33

8/7/2019 Oracle11g - Database on Linux
http://slidepdf.com/reader/full/oracle11g-database-on-linux 34/36
Figure: Exit Window.
8. Post Installation Task1. Edit the /etc/oratab file setting the restart flag for each instance to 'Y'
[root@testdb ~]# vi /etc/oratab
testcpdb:/u01/app/oracle/db11g:Y
2. Now you have to write a Script to Automatic Startup and Shutdown Oracle
Database.
[root@testdb ~]# su - oracle
[Let Consider that Oracle_Database.sh is a script to Automatic Startup and Shutdown
the Database in oracle home directory which will be written by the reader for automation of
the Oracle Database and other processes relating to the Oracle 11g.]
[oracle@testdb ~]$ su -
Password:[root@testdb ~]# cp /home/oracle/Oracle_Databases
/etc/rc.d/init.d/
[root@testdb ~]# cd /etc/rc.d/init.d/
[root@testdb init.d]# chmod 755 Oracle_Databases
[root@testdb init.d]# ls -la Oracle_Databases
-rwxr-xr-x 1 root root 420 Aug 21 21:37 Oracle_Databases
[root@testdb init.d]#chkconfig --add Oracle_Databases
[root@testdb init.d]#chkconfig --level 345 Oracle_Databases on
3. Add the following code in to the oracle bash_profile
[oracle@testdb ~]$ vi /home/oracle/.bash_profile
# .bash_profile
# Get the aliases and functions
if [ -f ~/.bashrc ]; then
. ~/.bashrc
fi
# User specific environment and startup programs
export ORACLE_BASE=/u01/app/oracle
export ORACLE_HOME=/u01/app/oracle/db11g/
export ORACLE_SID= testcpdb
export DBIN=$ORACLE_HOME/bin
PATH=$PATH:$HOME/bin:$ORACLE_HOME:$DBIN
ex ort PATH
4. Add the following code in to the /etc/hosts file.
127.0.0.1 localhost.localdomain localhost
172.168.0.95 testdb.dnsgroup.net testdb
34

8/7/2019 Oracle11g - Database on Linux
http://slidepdf.com/reader/full/oracle11g-database-on-linux 35/36
[root@testdb ~]# cat /etc/hosts
# Do not remove the following line, or various programs
# that require network functionality will fail.
127.0.0.1 localhost.localdomain localhost
172.168.0.95 testdb.dnsgroup.net testdb
9. Oracle Enterprise Manager
• To Start the Oracle Enterprise Management Server use the following command.
[root@testdb ~]# emctl start dbconsole
Figure: Oracle 11g Enterprise Manager Login Window.
35

8/7/2019 Oracle11g - Database on Linux
http://slidepdf.com/reader/full/oracle11g-database-on-linux 36/36
• To Stop the Oracle Enterprise Management Server use the following command.
[root@testdb ~]# emctl stop dbconsole
Figure: Oracle 11g Enterprise Manager
10. Oracle SQL Developer
To Run Oracle SQL Developer use the following command as Oracle user in X Window System.
[oracle@testdb ~]$ cd /u01/app/oracle/db11g/sqldeveloper/
[oracle@testdb sqldeveloper]$ sh sqldeveloper.sh