Embed Size (px)
Citation preview
THE RANGE JUICE
SEALER
Juice to store. Juice to sell. Providing opportunities all year round.
Team: Carter Chang, Brianna Conrad,
Bus Leonard, Emily Rosser
Mentor: Ken McEnaney

The D-Lab: Energy, Spring 2011
range Juice Sealer
Table of Contents: Page
I. Abstract and Project Summary 2 II. Problem Statement 3 III. Design Specifications 5 IV. Design Concepts and Selection Process 8 V. Design Description 11 VI. Methodologies and Results of Prototype Testing 14 VII. Final Design Selection to Match Specifications 16 VIII. Conclusion and Implementation Plan 19
List of Tables
Table 1 – Improvements to Prototype 1.0 6 Table 2 – Bag Sealer Design Specifications 7 Table 3 – Orientation Pugh Chart 10 Table 4 – Cost Chart 13
List of Figures
Figure 1 – The Data Collection, Prototype, and Process Overview 2 Figure 2 – Bag Sealer 1.0 5 Figure 3 – Design Options 9 Figure 4 – Rough “works like” Prototype 11 Figure 5 – Slanted “looks like” Prototype 11 Figure 6 – Combination of “works like” and “looks like” Prototype 12 Figure 7 – Final Prototype with Spill Collection Bowl 12 Figure 8A – Summarized Results of Time Tests 15 Figure 8B – Visual Timing Test Results 15 Figure 9 – CAD Model Image 16 Figure 10 – Photo of Final Product 16 Figure 11 – Timing Circuit Diagram 18
Appendices:
Appendix A: Reference to Wiki Appendix B: Advice for Future groups working on Projects in the Developing World Appendix C: Timing Test Data Appendix D: User Manual (English) Appendix E: User Manual (Spanish)
Works Cited
1

I. Abstract and Project Summary
This plastic bag sealer project was developed over the spring semester for D-Lab Energy Class at MIT in partnership with AsoFenix, an NGO based in Managua, Nicaragua. An earlier design of this project was developed by students in the class the previous semester, but new requirements for the device were learned from our community partner and the people in the community during our spring break class trip. This bag sealer heat seals plastic together to create an airtight seal. It has been specifically designed for the Nicaraguan community of El Roblar to seal bags of orange juice, but is its features are such that it can be easily transferred to other communities that want to preserve other materials. This report discusses the motivating problem, the design decision process, testing processes, and results that led to the final Bag Sealer 2.0.
Figure 1 – The Data Collection, Prototype, and Process Overview
2
II. Problem Statement
AsoFenix, a Nicaraguan NGO (Non-Governmental Agency), works with many communities in rural Nicaragua, the second-poorest country in the Western Hemisphere.1
AsoFenix develops sustainable energy and engineering projects tailored to community needs in the form of solar and hydro power projects, improved cooking methods, and educational programs, emphasizing community involvement in managing and implementing these technologies.
For the second consecutive year, the D-Lab: Energy class has partnered with AsoFenix to develop a project that either fits a specific need in a given community or is adaptable to serve several different communities in Nicaragua. We saw many of the same problems faced by rural Nicaraguan communities that last year’s team of D-Lab students observed while working with AsoFenix. These students were: Shannon Liburd, Kate Turner, Justin Sharps, and Janet He (see their model illustrated in Figure 2).
In particular, we visited the community of El Roblar, where hardworking farming families grow as many as 80,000 oranges per year over the course of two harvests.2 In addition to using the oranges themselves, families generate income by transporting the oranges to the nearest town and offering them for sale. However, the influx of oranges in the region can pose a financial problem: during the orange harvesting seasons, the market is flooded with orange products, and 100 oranges can be sold for only approximately one dollar total.3
Last year’s D-Lab: Energy class noticed this problem and, along with Asofenix, devised a creative solution. If the surplus oranges could be made into juice and put through a pasteurization process, they could be sold after the peak of the season, providing more income for the growers and their families. The challenge here lies in creating a reliable, sanitary storage and transport method for getting the juice to market.
A plastic bag sealer--very similar to commercially available impulse sealers--was developed by last year’s class to preserve the orange juice produced and pasteurized by the families of El Roblar. This device enables the women of El Roblar to store juice in disposable, single-serving plastic bags and sell it in the off-season, generating a larger profit than simply selling the raw oranges. Sealed correctly, these pouches can keep juice safely stored during transport to market, and the leftover oranges that would otherwise spoil are put to good use. The market for these juice bags already exists in many different venues in Nicaragua; one cannot ride for twenty minutes on a bus without hearing vendors shout “Jugo! Jugo! Jugo!” as they hand bags of cool drinks up to the bus windows. The families in El Roblar also hoped to sell their juice in larger bag sizes to restaurants in the nearby town.
Our original purpose of visiting El Roblar this year was to deliver the plastic bag sealer prototype that was developed by last year’s team. Upon arrival in El Roblar, we encountered a change in the resources of the community. Prototype 1.0 (built by last year’s team, Figure 1) was designed to run on 12 Volts of direct current (DC) from a deep-cycle
1 “Background Note: Nicaragua.” http://www.state.gov/r/pa/ei/bgn/1850.htm 2 “Low Energy Bag Sealer Final Report.” Liburd, Shannon et al. MIT D-Lab: Energy. 3 “Low Energy Bag Sealer Final Report.” Liburd, Shannon et al. MIT D-Lab: Energy.
3
battery. This made sense at the time, since El Roblar did not have access to grid power and relied on these batteries, charged by solar panels, for their electricity needs. Since last year’s visit, however, AsoFenix had helped the village install a dam and micro-hydro power grid. Now, because the families had easy access to 120 Volt alternating current (AC) from wall outlets in their own homes, 12 V batteries are not as common. The few remaining batteries we found had been drained to an irrevocably low voltage, rendering them useless as power sources for the sealer.
Disappointingly, we left El Roblar with Prototype 1.0 in-hand because it was no longer useful to the community after the change in their power source. We resolved to address these new requirements, fix the minor problems we observed with Prototype 1.0, and return with a more appropriate device to fit the community’s needs, helping them put their surplus orange crop to good use.
The focus of our project is to develop a plastic bag sealer that can be powered by both 120 V AC current and 12 V DC current. To build off of last year’s model, we also intend to remove all of the air from the bag during the sealing process to better preserve the juice. We also plan to alter the sealer design to meet the user specifications we observed first-hand during our field work in Nicaragua.
4
III. Design Specifications
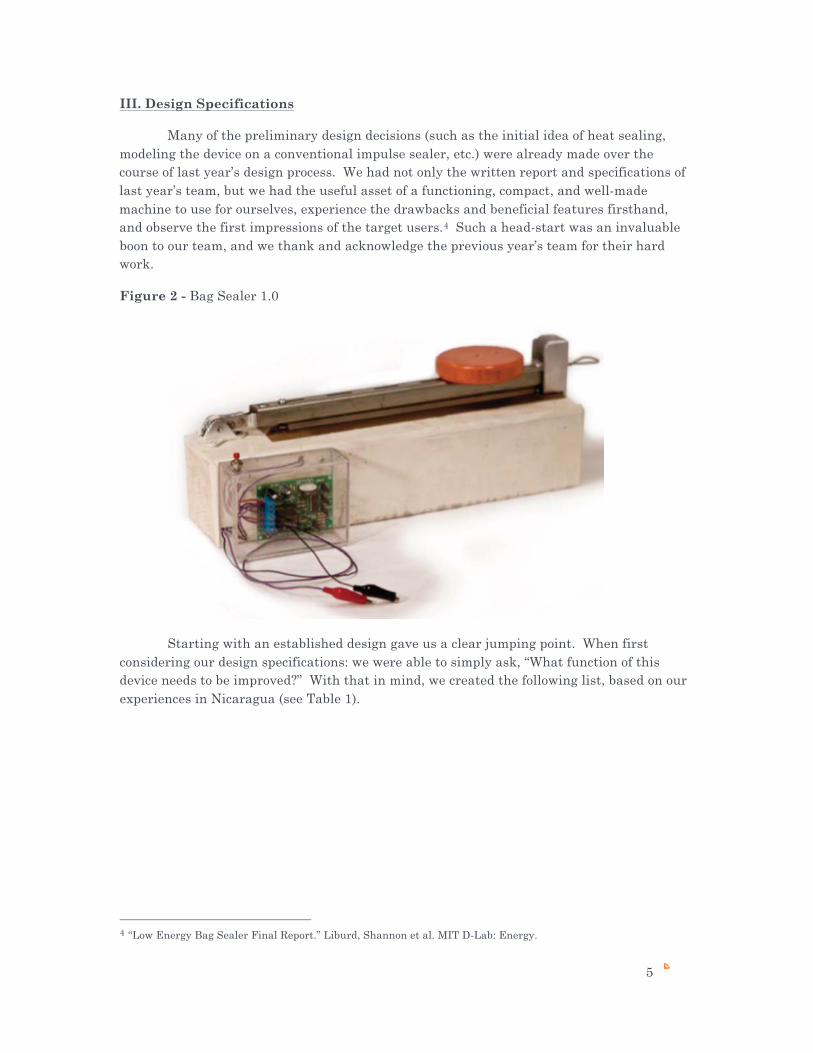
Many of the preliminary design decisions (such as the initial idea of heat sealing, modeling the device on a conventional impulse sealer, etc.) were already made over the course of last year’s design process. We had not only the written report and specifications of last year’s team, but we had the useful asset of a functioning, compact, and well-made machine to use for ourselves, experience the drawbacks and beneficial features firsthand, and observe the first impressions of the target users.4 Such a head-start was an invaluable boon to our team, and we thank and acknowledge the previous year’s team for their hard work.
Figure 2 - Bag Sealer 1.0
Starting with an established design gave us a clear jumping point. When first considering our design specifications: we were able to simply ask, “What function of this device needs to be improved?” With that in mind, we created the following list, based on our experiences in Nicaragua (see Table 1).
4 “Low Energy Bag Sealer Final Report.” Liburd, Shannon et al. MIT D-Lab: Energy.
5

Table 1 - Improvements to Prototype 1.0
Feature Drawbacks Improvements for Prototype 2.0
Improvement requirements
Power Supply (12 V DC)
Incompatible with varying power sources (can easily differ between communities)
Adaptable for 12 V DC or 120 V AC power
Redesigning and rewiring timing circuit and electric system
Timing Circuit Expensive and prefabricated: half the cost of the device and difficult to modify/repair
Modular, custom timing circuit
Design a simpler circuit and build using basic, cheaper components
Sealing strip Orientation and pressure applied does not get air out of bag, defeating the purpose of pasteurization.
Other geometry for sealing strip that removes air.
Determine optimum sealing orientation, geometry, and pressure for sealing strip.
General ergonomics: latch, means to collect spills, mounting to work surface, etc.
Wire handle of latch was difficult to release, horizontal orientation led to messy spills, solid 4x4” block had no way to mount onto table.
Smoother mechanic action for latch, a means to collect and reuse spilled juice, means to mount device to work surface
Determine optimum configuration for ease of use.
Some other desired features were also identified, although these weren’t improvements on the previous design so much as additional features we had discovered need for:
● Build 5-8 circuit boards for easy replacement. ● Create a manual for the AC and DC current models of the device, and provide these
manuals in both clear Spanish and English. ● Improve the DC power requirements to account for the need to expel the air from the
system. ● Make sure that the parts used in the construction process are parts that can be easily
replaced using available supplies at a typical hardware store in Nicaragua. ● Make the device operable by one person. ● Lower the overall cost of the device. ● To be able to seal multiple size bags. Large bags for sale to restaurants and small
bags for individual sale.
6

To transform these guidelines into clear, concrete goals, the desired features we assigned the following metrics. By specifying quantitatively what we wanted the device to accomplish, we set some clear engineering goals and thresholds for a design success:
Table 2 - Bag Sealer Design Specifications
Attribute Metric Unit Value
power source 120V AC binary yes
seals with and without juice in the way
binary yes
allows all air to be removed visible air in bag binary no
safe to touch has indication of when temperature is safe to touch
°C <55
low cost cost to build US$ <50
low power power consumption while sealing W <250
water resistance no opportunity for spills to short electronics
works w/ a variety of plastics binary yes
Fast to seal time seconds <20
Durable Seal Max pressure the seal can withstand Pa TBD
Variable Power Source AC/DC compatible binary ??
With these numerical goals in mind, we began the brainstorming process, exploring ways to make features capable of these goals a reality.
7
IV. Design Concepts and Selection Process
Going into the project, we had the distinct advantage of already handling and analyzing a working model. Based on the performance of the past year’s design, we determined that our two main criteria were:
● To power the device with both 12 V DC current and 120 V AC current (ie, both “wall power” and a deep-cycle battery).
● To remove as much air as possible from the bag during the sealing process, in order to preserve the pasteurized juice.
Outside of these two main objectives, we wanted to maintain--or, preferably, improve upon--the durability, cost, usability, functionality, and power requirements of last year’s model.
The first design challenge we examined was how to remove the air from the bag during sealing. We considered several different options for sealing the bags without trapping air, but we did not explore any options outside of the original sealing mechanism: a nichrome heating strip, pressed with even pressure against the bag with a insulating sealing strip. Because we had encountered no major problems with this method, and because previous D-Lab research told us this was a viable and inexpensive mechanism, we wanted to continue with this original design. This meant that the air-removal system, whatever that would be, would have to be built around this basic nichrome strip layout.
First, we envisioned a vacuum, attached to the device, that could suck all of the air out of the bag. The device would seal in the juice in the bag after the vacuum removed the air. This method was too complicated for one user to operate both the heat sealer and the vacuum; thus, it did not meet our general guideline of a single-operator device. Also, the vacuum would be energy and cost intensive, and--if it required any sort of sealed, pressurized compressor--potentially more complicated to construct than the heat sealer itself.
Our second proposed method to seal the bag without air was to simply fill the bag a little higher than the level of the intended seal. Then, applying pressure with the lever arm, a seal could be made through the middle of the juice. Since the juice level would be entirely above and around the seal, there would be no room for air to enter. Although this seems like the easiest, simplest method, it did present some obstacles. For one, the heat seal would need to be made with liquid around the sealing area, which can affect the operating temperature of the nichrome wire. This surrounding liquid could potentially become an easy conductive route for heat loss from the wire, which would naturally lead to a weaker seal.
In order to best achieve a seal without trapping air inside, we also needed to consider another element: the best orientation for the lever arm in order to minimize spilling and best seal the bag. We debated heavily between the three orientations of the lever arm shown below: a horizontal orientation, a handheld device, and a vertically oriented device. These design options are sketched below in Figure 3.
8

Figure 3 – Design Options
With the sealing arm moving in the vertical plane, part of the bag will be hanging off the side of the sealing platform, but a part of the bag will also be lying horizontally on the sealing surface. The fact that the bag would be resting on the sealing surface presented a problem because the pressure from the horizontal surface would force some juice out and limit the amount of juice you can fit in a given bag. This orientation would lead to more spilled juice that would need to be captured for reuse in our final design. With the horizontal, flat sealing surface, there was also a higher probability that the juice would find it’s way to the circuit if something breaks on the device or a watertight seal fails.
With the seal arm rotating horizontally and the bag free to hang vertically, there would be less chance spilling because the seal could be placed in a more precise position. One drawback to this method, however, was that we did not know exactly what size bags would be sealed in El Roblar, or any other community that the sealer might be implemented in. With larger bags, the force of the lever arm pushing against the nichrome wire might not be enough to hold up the weight of the full bag of juice. This makes the task more difficult for one user to perform, since they have to hold the bag flat, close the arm, push the button to turn the sealer on, and support the weight of the bag throughout the entire sealing process. In the interest of developing a versatile and adaptable design, it was imperative for our design to accommodate a large size range of bags.
The third option we investigated was a handheld sealer. We decided not to proceed with this design because the design featured too many moving parts and parts that might not be readily available in Nicaragua for easy maintenance (see the below Pugh chart, Table 3). This sealer would also not be hands free and would require a second operator--something we wanted to avoid, according to our design guidelines.
In order to weigh the benefits and drawbacks of each orientation (a factor that would heavily influence the rest of our design), we completed a Pugh chart, with Prototype 1.0 set as the standard.
The most apparent conclusion we drew from this chart was that the handheld clamp idea has the most drawbacks. As a result, we ceased developing that design and focused instead on combining the best traits of the other two (clearly very similar, based on the results of the Pugh chart) to explore as prototype construction began.
9

Table 3 – Orientation Pugh Chart
Criterion Original Design (horizontal)
Hand-held clamps
Vertical orientation
Time to seal 0 0 0
Cost 0 0 0
Power consumption 0 0 0
Energy consumption 0 0 0
Size 0 + 0
Power source variability 0 0 0
Material availability (in field) 0 - 0
Ease of use 0 + +
Repeatability/consistency 0 - 0
Serviceability 0 - 0
Service lifetime 0 - 0
Secondary power supply needed?
0 0 0
Versatility between different bag thicknesses?
0 0 0
Adaptability 0 + 0
Ease of construction 0 - 0
10

V. Design Description
After gaining a rough idea of what each a sealer of orientation would entail, we still had several variables to consider, along with how they would contribute to making strong seals on our final device. These variables included:
• temperature output of nichrome strip
• power usage
• pressure applied to sealing strip
Several “dummy” prototype sealers were created and used for testing these variables. First was a very simple, basic sealer that could be used to test power and temperature output on empty bags:
Figure 4 – Rough “works like” Prototype
Then came the exploration of combining both vertical and horizontal orientations to observe how a full bag would hang from the device:
Figure 5 – Slanted “looks like” Prototype
Lastly, a larger, functional angled sealer was built to finally create full, sealed bags at a full scale:
11
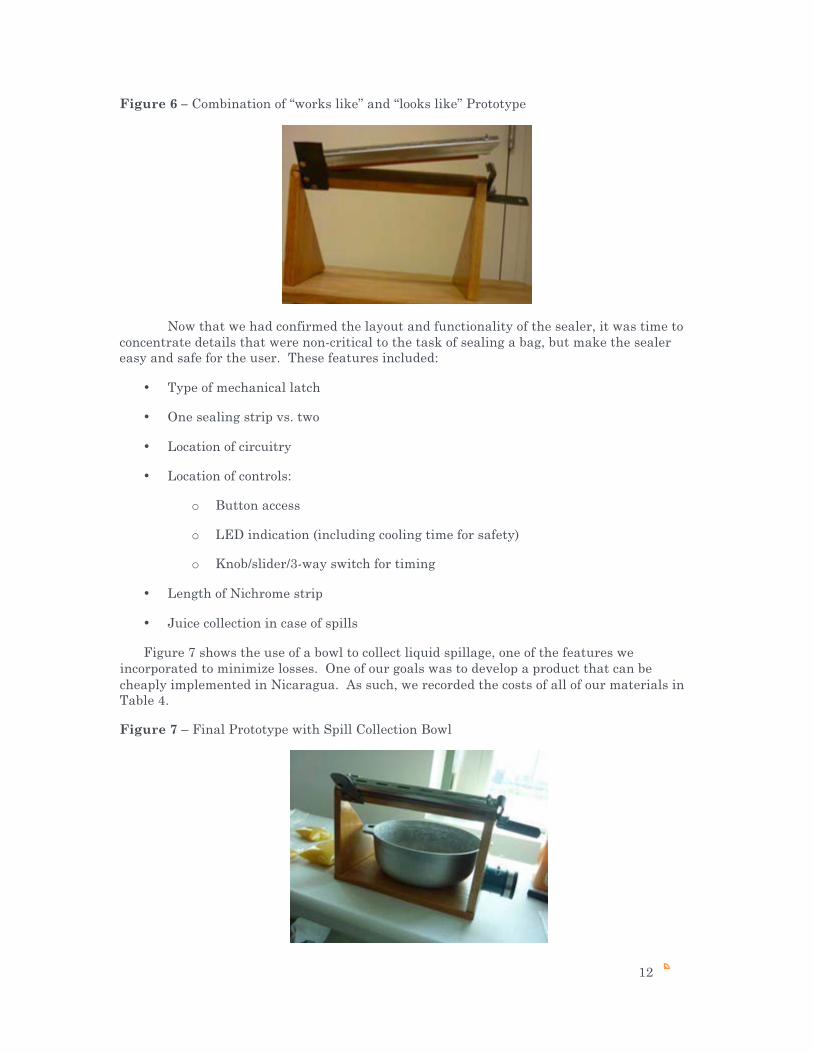
Figure 6 – Combination of “works like” and “looks like” Prototype
Now that we had confirmed the layout and functionality of the sealer, it was time to concentrate details that were non-critical to the task of sealing a bag, but make the sealer easy and safe for the user. These features included:
• Type of mechanical latch
• One sealing strip vs. two
• Location of circuitry
• Location of controls:
o Button access
o LED indication (including cooling time for safety)
o Knob/slider/3-way switch for timing
• Length of Nichrome strip
• Juice collection in case of spills
Figure 7 shows the use of a bowl to collect liquid spillage, one of the features we incorporated to minimize losses. One of our goals was to develop a product that can be cheaply implemented in Nicaragua. As such, we recorded the costs of all of our materials in Table 4.
Figure 7 – Final Prototype with Spill Collection Bowl
12

Table 4 - Cost Chart
Materials Version 1.0 Costs Version 2.0 Costs
Wood $2 $1
Hinge $5 -
Silicone $12 $4
Teflon Tape $1 $1
Nichrome Wire $5 $5
Hardware $1 -
Metal Lever Arm $3 $2
Circuitry $26 $9
Adapter - $5
Circuitry Casing $2 $1
Deep Cycle Battery $36 -
Total $96 $28
13

VI. Methodologies and Results of Prototype Testing
Before fabricating the final prototype, there were certain tests that needed to be conducted in order to finalize our product. The parameters that needed to be determined were the optimal sealing temperature, what an ideal seal looks like, the pressure required to create an ideal seal, and the time necessary to seal the bag.
Heating
In order to determine the ideal temperature, we used a commercial Uline impulse sealer as our model bag sealer and a thermocouple for measurements. When sealing a plastic bag with a thickness of 0.0045”, the impulse sealer produced seals at 194.7°C for an impulse of 0.53 seconds. When the bag was filled with water, the seals on the bag were of the same quality. This was also true on our tests on the 0.0025” thickness bag. The original Bag Sealer Team recorded that the minimum temperature to get a seal was 80°C, but when testing at that temperature, there was no firm seal produced. Looking at the material properties of low-density polyethylene (LPDE), the type of plastic material used in El Roblar, we found that the melting point to be at 120°C.5 This gave us confidence in our thermal tests and we continued on with our experiments.
Ideal Seal
For our ideal seal, we used a visual test in addition to a squeeze test to determine durability. Our ideal seal was a seal that appeared to be melted without any crimps or dimples along the seal. Also, the seal must be durable enough to withstand a firm two-handed squeeze from the user.
Pressure
The amount of applied pressure was a crucial parameter to explore. Without the right amount of pressure, the sealer would not be usable. If the applied pressure was too low, the bag would not have a uniform seal and result in a seal with intermittent gaps. If there was too much pressure, the lever arm would have a significant amount of resistance due to the springs and give the user a hard time pressing down the the arm until it is latched in. Using a Vernier Force Plate, we determined the amount of pressure that our lever arm applies when the arm is latched into place. Our current configuration applies 57.4 N +/- 1.2 N over our silicone rubber strip. With our strip being 20.7 cm x 1.0 cm, the force per unit length was 277.3 N/m. This resulted in 2.7 kPa applied on the nichrome wire.
Timing Tests
In order to experiment with changing variables, a "dummy sealer" (the most basic parts of the heating element and sealing strip system, Figure 4) was constructed and used with a laboratory DC power supply. Two different voltages were observed for varying plastic thicknesses at two different force loads on the sealing strip (see Figure 8).
From qualitatively examining the seals created in each test, two timing ranges, one for each voltage setting, were observed as the optimum sealing time. At 10.0 V, 15-20 seconds was the ideal length, while at 12.0 V, 8-13 seconds produced an ideal seal. One can see when the bag was overheated and started to melt as indicated by the red highlighted
5 Plastic Properties of Low Density Polyethylene (LDPE) http://www.dynalabcorp.com/technical_info_ld_polyethylene.asp
14

15
strip in Figure 8. Since the shorter time range is obviously preferable during the bagging process, this data helped decide the ultimate voltage input.
The full data sheets are available in Appendix C. Photo references of poor seals are located in Appendix D and Appendix E.
Figure 8A – Summarized Results of Time Test
Figure 8B – Visual Timing Test Results
!" #" $%" $&" $!" $#" '%" '&" '!"
!"#
$%&'()*(+,#$(
-%.,(-,/&/(0%&1(2#3%)"/(2)$,/(
$%"("
$'"("

VII. Final Design Selection to Match Specifications
The final prototype was a culmination of this air-removal methodology, and its features were specifically selected to support the original design goals and guidelines. Figures 9 and 10 are respectively a CAD model and photo of our final design.
Figure 9 – CAD Model Image
Figure 10 – Photo of Final Product
● Heating element: ○ Nichrome strip- Doubled for extra heat and further resistance. We used
the smallest size nichrome strip available in small quantities, which gave us a resistance of 2 ohms/foot. At 4 ohms, and 12 Volts, the power per foot was appropriate for sealing the bags. This required 2 feet of wire, was doubled over the one-foot length of the device. The nichrome strip heats and cools quickly and provides a very narrow application of intense heat to the plastic.
○ Teflon tape- A Teflon- and nylon-weave tape holds the nichrome strip securely in place, also heating and cooling quickly to prevent burns from residual heat. The smooth surface provided by the tape also makes cleaning juice off the sealing area quick and easy.
16

● Pressure-applying system: ○ Silicone sealing strip- Held to the lever arm with household silicone putty
adhesive. Wide, flat geometry provides a constant pressure, pushing juice out of the way in order to make a strong, airtight seal. Strip is approximately ½” wider than the nichrome wire to give extra space clearance, minimizing heat lost due to surrounding juice.
○ Spring-loaded lever arm- Two inset U-shaped channels are separated by springs at each end. When compressed and latched into position against the heating element, the springs exert an even force on the silicone sealing strip. Even pressure helps squeeze out juice from the sealing area and flattens bag for a smooth, continuous, and repeatable seal.
○ Latch- An L-shaped piece of scrap steel is held with a simple screw and spring. The lip that holds the lever arm in place is filed smooth on the upper edge so the arm can be pushed into place with one hand. Once the lever arm is down, the latch will hold the it and its compressed springs securely in place. A section of scrap bicycle inner tube is slid over the other side of the “L” for a handle. The handle is easy to depress, and the arm springs up so the user can safely remove the bag. The latch has what has been described by D-Lab shop managers as “satisfying action.”
○ Hinge- Replacing the store-bought, flimsy hinge of Prototype 1.0, we machined a simple hinge out of two sheet metal scraps and three bolts. This hinge should be easy to construct out of any available sheet metal; plus, it’s much more effective at preventing “wobbling” as the arm is pushed down into the latched position. (This guidance is important because if the sealing strip is not evenly pressed on the heating element, the quality of the seal could be drastically affected.) The hinge bracket facing the front of the sealer extends upwards approximately 1 ½” higher than the back bracket, since gravity tends to pull the arm in that direction. This extension, in addition to the sturdy hinge, guides the arm into its correct place.
● Base: ○ Material- Prototype 2.0 is constructed out a scrap board, but any available
lumber can be utilized to construct the base. Two coats of finishing varnish/lacquer were applied to the prototype to waterproof the wood, but this is not a vital step.
○ Slanted Orientation- A compromise between the “Horizontal” (Figure 2) and “Vertical” (Figure 2) orientations, the entire sealer is slanted at 45 degrees. This angle makes it easy to direct excess juice flow to the bowl below, to allow the full bag to hang below, and to press the arm easily into place.
○ Elevated- A troublesome problem with the Horizontally-oriented, table-top Prototype 1.0 was its messiness: lying a bag flat in order to seal it led to many spills. Out new methodology to seal a bag without air dictates that juice needs to be displaced with every seal; in a way, spilling the bag is necessary. A simple way to collect this runoff juice and avoid wasted spillage is to catch the runoff in a bowl or pot. Prototype 2.0 provides ample space for such a receptacle in the space under the elevated sealer.
17

● Circuitry: ○ Housing- To protect the circuitry, the housing must be as waterproof as
possible, but also easy to access to change the time setting via the potentiometer wheel. A section of PVC pipe with a removable end cap is sealed with household Silicone putty to keep splashes of juice out of the electronics.
○ User controls- Three controls are needed to operate the device: An LED indicator, a potentiometer to adjust time settings, and a push-button. Two out of the three controls (the LED and button) are clearly visible on the outside of the housing, sealed with silicone. The potentiometer wheel, a much harder component to waterproof, is contained within the housing. Since the time required to make a seal varies with plastic thickness and juice temperature, this setting should only have to be changed once or twice per sealing session.
○ Redesigned timing circuit- At $26, the timing circuit was a significant portion of the cost of the first version. Using a fairly common 555 timer and appropriate valued capacitors and resistors (including a variable one, for adjusting timing), we made a circuit that turned on the nichrome heating element for a time ranging from 3 to 30 seconds. In the original version, an LED would turn on for as long as the heating element was on, and the instructions were to count to five after the LED went off before opening the sealer and removing the bag. However, we found that both in our own testing and in demonstrations in the field, it was difficult for users to remember to wait this time. Therefore in our new timing circuit, we added a RC delay block that keeps the LED on for about 5 seconds after the heating element is off, meaning the user can remove the bag immediately on the visual cue. The circuit diagram is shown in Figure 11.
Figure 11 – Timing Circuit Diagram
18

VIII. Conclusion and Implementation Plan
To implement this project in rural communities of Nicaragua, we plan on sending the device down to AsoFenix in Nicaragua for them to distribute to the community of El Roblar before the harvesting season in January. After receiving feedback from the community on the functionality of the device, AsoFenix may decide that another iteration of design is necessary for the bag sealer, or they might decide that the product does not need altering. In this case, they can develop a program with the community of El Roblar or another community where these sealers are fabricated and sold to other communities that have preservation needs. Amy Banzaert is going down to Nicaragua this summer and has offered to bring our device with her to AsoFenix.
After sending pictures of the final prototype and a description of the construction process to Aaron Liss, our community partner contact for AsoFenix, we received very positive feedback. Aaron is confident that this sealer is durable and will function reliably in the field-so confident that the prototype will be taken to El Roblar in its current state for use by the families there. The upcoming growing season, due to start in August, will be the ultimate trial of how the device withstands the demands of a long bagging session.
In the course of this project we learned a lot about best practices for projects such as these and have included a list of tips/advice that we would like to offer to future groups doing similar work. These Tips are located in Appendix B.
Looking back at our design Pugh Charts and Specification Sheets, we accomplished what we set out to accomplish and hope that the device will be well received in El Roblar. However, this device is not just something that fits into one community, it can be implemented in many different regions where sealing a bag is necessary. Of the many alternative uses we thought of are sealing other liquids, grain, coffee beans, or even important papers to protect them from the elements.
19

Appendix A: Reference to Wiki Page
Access can be granted to our wiki website, which documents our decision process, class notes, photos from the trip, and presentations given throughout the semester. Request access from Amy Banzeart in D-Lab.

Appendix B: Advice for Future groups working on Projects in the Developing World
We don’t consider ourselves experts on projects in the developing world, but we learned a lot leading up to our Spring Break trip, during our time in Nicaragua, and over the course of developing our project. Here’s a bulleted list of tips that we would tell ourselves if we were to start the process anew.
• Always ask questions, never underestimate the importance of good communication with your community partner. Communities are constantly changing. Don’t assume that everything will remain exactly as you experience it or how you have heard it described to you. If we had known to ask about the available power sources in El Roblar before we went down to deliver the bag sealer, we may have had time to alter the previous design and deliver a working model. But instead, we had to leave El Roblar carrying the device. A special Thank you to Aaron at AsoFenix for being a great communicator and helping us along with our project.
• Always ask questions of the people in the communities. Never assume anything about a process or task that is performed in the communities that you visit. We went down expecting to build a washing machine in one community, but went down to find that this project was not appealing to the people in the community because the way they currently wash their clothes in the river is free, and labor time is not limiting.
• Try to learn the language! Being able to communicate without the help of someone translating for you will make gathering information so much easier. It will also make your visit that much more enjoyable because you are able to interact with the amazing people you will meet in the community.
• Bring a small pocket sized notebook. Being able to write stuff down quickly and without interrupting a conversation is invaluable. Whether it’s a local word you haven’t heard before or a specification for a project you’re thinking of developing, you will constantly be wanting to jot an observation down.
• Keep Things Simple, Build and Test Early. Upon your return to D-Lab, you don’t have much time to develop a working project. Get a prototype built as soon as you can so you can perform all the necessary tests. Each iteration of the model will get better.
• Document All Processes Well. Doing this will help you write your final report and more importantly will help build the foundation for future teams to build off of your work.

Appendix C: Timing Test Data
Please see the following charts.

������������

����
� ������������� ����� �� ����� ���������� ���� ��� ����� ��� ��������� ���!����" �#� $�������� �����%� %� &�%'(�� �'� %� )�� )������� �����%� %� &�%'(�� �'� *� )�� )������� �����%� %� &�%'(�� �'� �� )�� )���� ����+�������� �����%� %� &�%'(�� �'� *� ,��� )���� ����+�������� �����%� %� &�%'(�� �'� '�� ,��� )���� ����+�������� �����%� %� &�%'(�� �'� �� ,��� - ���.��� ��!��������/�� ���+�������� �����%� %� &�%'(�� �'� �%� ,��� ��/�� ��!��� ����0 ���.�-��������+������� �����%� %� &�%'(�� �'� 1�� ,��� ��/�� ��!��� ����0 ���.�-��������+�������
� �����-� ���������� ���� ��� ����� ��� ��������� $�������� �����%� �� '(��&1� �'� %� ��/�� ��!��� ����0 ���.�-������� �����%� �� '(��&1� �'� *� ��/�� ��!��� ����$ �����"��"����������������!������� �����%� �� '(��&1� �'� �� ��/�� ��!��� ����$ �����"��"����������������!��������� �������+������� �����%� �� '(��&1� �'� � $�����2�2���� ����+�������� �����"��"�������� �������+���������$���������� �� ��� ��"��������� �����%� �� '(��&1� �'� %� ��/�� ��!��� �����������������2�2����+�������� �����"��"�������� �������+�������� �����%� �� '(��&1� �'� *� ����!�����2���" ������/�� ��!��� ������ ����������� �����%� �� '(��&1� �'� '�� ����!�����2���" ������/�� ��!��� ������ �����������
� �����$� ���������� ���� ��� ����� ��� ��������� $�������� �����%� �(� ��1%� �'� %� ��/�� ��!��� ����$ �����"��"������� �����%� �(� ��1%� �'� *� ��/�� ��!��� ����$ �����"��"����������������!��������� ��������+�������� �����%� �(� ��1%� �'� �� $�����2�2���� ����+�������� �����"��"�������� �������+���������$���������� �� ��� ��"��������� �����%� �(� ��1%� �'� �� ����!�����2���" ����$�����2�2���� ����+�������� �����"��"�������� �������+��������
� ���'��/���

���������� ��

-����
� �����)-������� ����� �� ����� � ����+�).��������� %�-�#����������� ���� ��� ����� � ��� ��������� "��������
�����#� �� %&��$-� -�%� #� ��+�� �� ��� ����, ���*�)������� �����#� �� %&��$-� -�%� '� ��+�� �� ��� ����" �����!��!���������������� �����������������(������� �����#� �� %&��$-� -�%� �� "�����.�.���� ����(�������� �����!��!����������������(���������"���������� �� ��� ��!��������� �����#� �� %&��$-� -�%� � "�����.�.���� ����/�������� �������� �� �� ���0.������ !��������� � ����� .� !����*�� �����#� �� %&��$-� -�%� #� "�����.�.���� ����/�������� ����������*�.��1���� �����#� �� %&��$-� -�%� '� "�����.�.���� ����/�������� ����������*�.��1��2�!.��������� ��#�
� �����)-������3 �� ���������� ���� ��� ����� � ��� ��������� "�������� �����#� �� %&��$-� -�%� %�� "�����.�.���� ����/�������� ����������*�.��1���� �����#� �� %&��$-� -�%� %� "�����.�.���� ����/�������� ����������*�.��1������������+��������� �����#� �� %&��$-� -�%� %#� ����� �����.���! ����"�����.�.���� ���
� �����"-� ���������� ���� ��� ����� � ��� ��������� "�������� �����#� �&� ��-#� -�%� #� "�����.�.���� ����/�������� �������� �� �� ���0.������ !��������� � ����� .� !����*�� �����#� �&� ��-#� -�%� '� "�����.�.���� ����/�������� ����������*�.��1���� �����#� �&� ��-#� -�%� �� "�����.�.���� ����/�������� ��� �����#� �&� ��-#� -�%� � "�����.�.���� ����/�������� ����������+��������� �����#� �&� ��-#� -�%� #� ����� �����.���! ����"�����.�.���� ���
� ������+���

Appendix D: User Manual (English)
Please see the following manual.
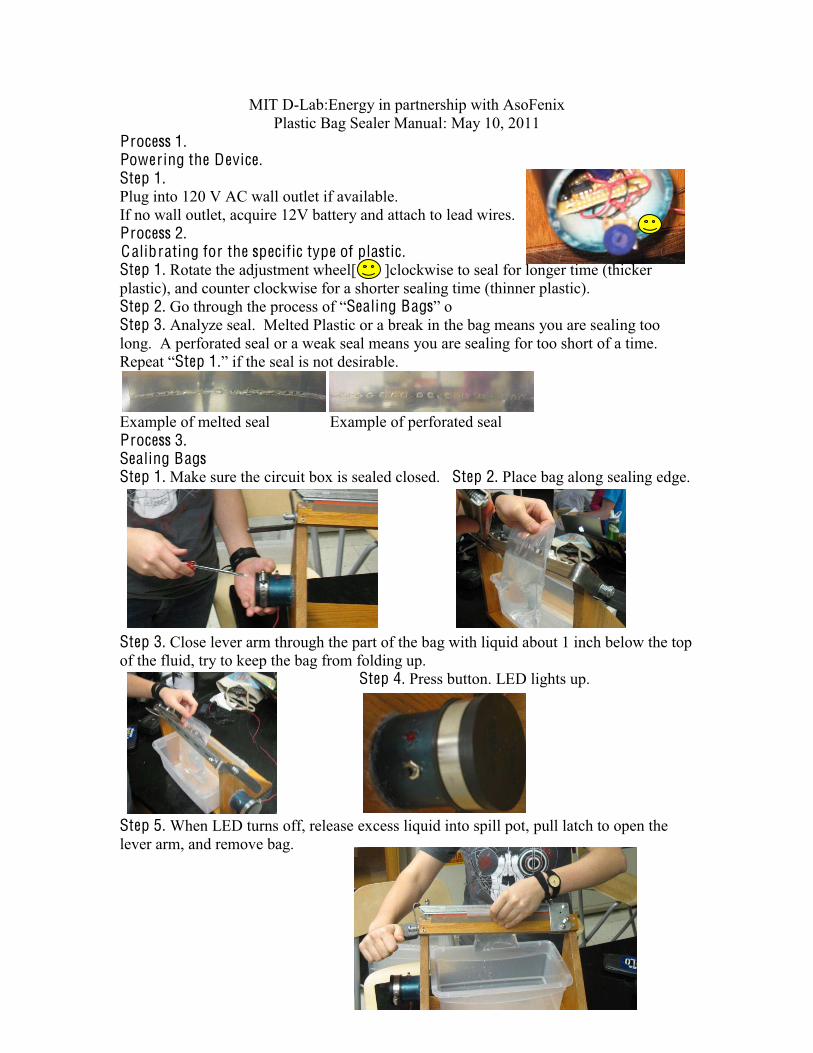
MIT D-Lab:Energy in partnership with AsoFenix Plastic Bag Sealer Manual: May 10, 2011
Process 1. Powering the Device. Step 1. Plug into 120 V AC wall outlet if available. If no wall outlet, acquire 12V battery and attach to lead wires. Process 2. C alib rating for the specific type of plastic. Step 1. Rotate the adjustment wheel[ ]clockwise to seal for longer time (thicker plastic), and counter clockwise for a shorter sealing time (thinner plastic). Step 2. �������������� ����Sealing Bags�� Step 3. Analyze seal. Melted Plastic or a break in the bag means you are sealing too long. A perforated seal or a weak seal means you are sealing for too short of a time. ��������Step 1.��if the seal is not desirable.
Example of melted seal Example of perforated seal Process 3. Sealing B ags Step 1. Make sure the circuit box is sealed closed. Step 2. Place bag along sealing edge.
Step 3. Close lever arm through the part of the bag with liquid about 1 inch below the top of the fluid, try to keep the bag from folding up.
Step 4. Press button. LED lights up.
Step 5. When LED turns off, release excess liquid into spill pot, pull latch to open the lever arm, and remove bag.

Appendix E: User Manual (Spanish)
Please see the following manual.

!"#$%&'()*+,-./0($-,$123()2.(145,$12,$6728-,49$",7:.;1142,-7$<(.($-3$=-33(>2.$>-$?237(7*$@A$!(B2$CA@@$
!"#$%&#'()'*+,-#'./%$0"1$1-+-'+/'2%//+-#")'!+&#'()'=4$<2774)3-D$-,1E;F-$-3$(>(<:2.$(3$@CA$G$6HI$=4$,2$E(B$.-1-<:2.D$12,-1:-$327$1()3-7$($;,($)(:-.0($>-$@CGI$!"#$%&#'3)'456&0+,-#'%/'2%//+-#"'7#"'%/'817#'-%'!/9&01$#)'!+&#'()'%-3-$J;-3:($K$$$$$$$$L$($3($>-.-1E($($3($.;->($>-$1(34).(145,$<(.($(;M-,:(.$-3$:4-M<2$>-$7-33(.$N<(.($<3O7:412$MO7$/.;-72PD$2$>-3-$J;-3:($($3($4QR;4-.>($($3($.;->($>-$1(34).(145,$<(.($>4M4,;4.$-3$:4-M<2$>-$7-33(.$N<(.($<3O7:412$MO7$>-3/(>2PI$!+&#'3)' 2%//+,-#':#/&+& $!+&#';)$$!4.-$(3$7-332I$$S3O7:412$>-..-:4>2D$2$<3O7:412$.2:2$74/,4F41($R;-$-3$:4-M<2$>-$7-33(.$-7$>-M(74(>2$3(./2I$$T,$7-332$<-.F2.(>2D$2$;,$7-332$>U)43D$4,>41($R;-$-3$:4-M<2$>-$7-33(.$-7$
!+&#'() $
'''''''!+&#'3)$$S2,$3($)237($($:.(JU7$>-3$M(./-,$>-3$$$$$$$$$$$$$$7-33(>2.I$$$$
'
'
'
'
$$$$
I$ $
$
+V-M<32$>-$;,$7-332$>-..-:4>2$$$$$$$$$$$$$$$$+V-M<32$>-$;,$7-332$<-.F2.(>2$!"#$%&#';)'2%//+,-#':#/&+&)'!+&#'()$$67-/;.-7-$R;-$3($1(V($>-3$14.1;4:2$-7:O$1-..(>(I$
$$$$$$
'!+&#';)$$H4-..-$-3$).(Q2D$<(7(,>2$($:.(JU7$>-$3($<(.:-$>-$3($)237($R;-$33-J($V;/2I$$%-)-$-7:(.$(<.294M(>(M-,:-$>27$1-,:4M-:.27$N;,($<;3/(>(P$>-)(V2$>-3$,4J-3$>-3$V;/2I$$+J4:-$(..;/(7$-,$-3$<3O7:412
!+&#'<)'$#2R;-$-3$)2:5,I$$'($3;Q$-,1-,>-.OI$
'
'
'
'!+&#'=)''H;(,>2$(<(/;-$3($3;QD$)2:-$-3$-91-72$>-$V;/2$($3($233(D$-M<;V-$-3$1-..2V2D$().($-3$).(Q2D$B$7(R;-$3($)237(I$
$
$
$
$
Works Cited
“Background Note: Nicaragua.” United States Department of State. January 18, 2011. Accessed
May 1, 2011. http://www.state.gov/r/pa/ei/bgn/1850.htm
“Low Energy Bag Sealer Final Report.” Liburd, Shannon et al. MIT D-Lab: Energy. May
12, 2010.
“Plastic Properties of Low Density Polyethylene.” Dynalab Corporation. Accessed May 4, 2011.
http://www.dynalabcorp.com/technical_info_ld_polyethylene.asp

MIT OpenCourseWare http://ocw.mit.edu
EC.711 D-Lab: Energy Spring 2011
For information about citing these materials or our Terms of Use, visit: http://ocw.mit.edu/terms.