Embed Size (px)
Citation preview
OREGON FUELS TAX SYSTEM – USER GUIDE
System Navigation REV 06-2019
1
BASIC SYSTEM NAVIGATION
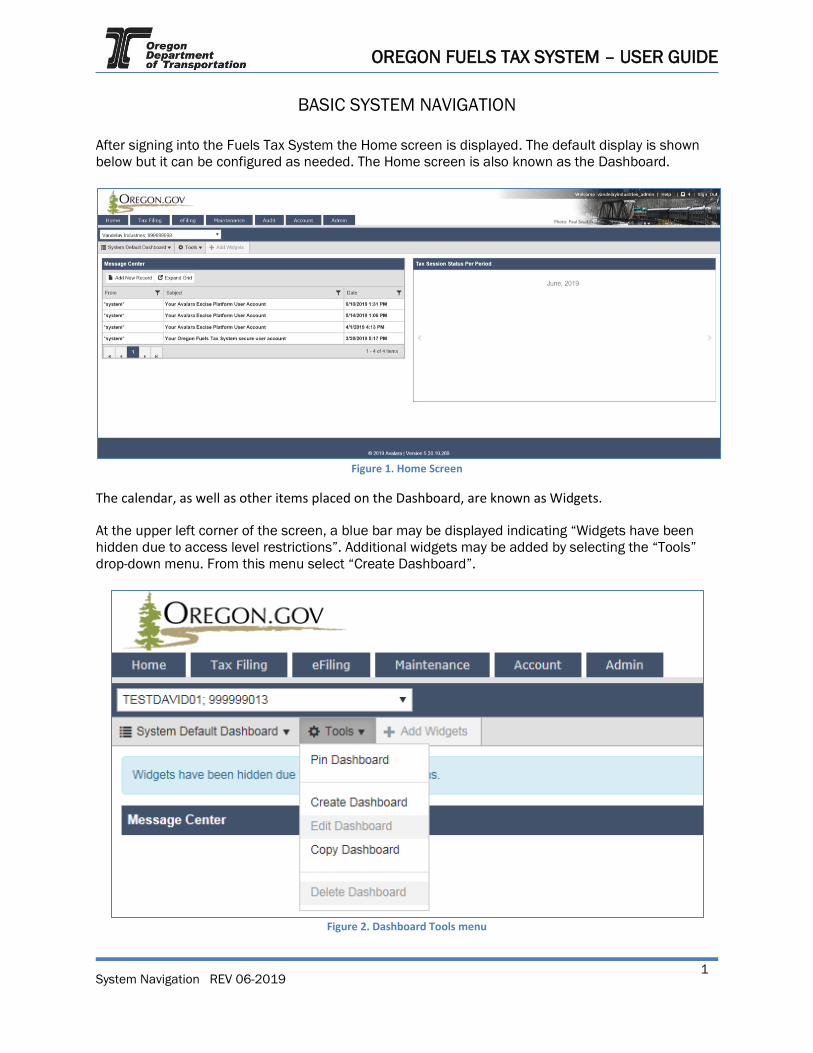
After signing into the Fuels Tax System the Home screen is displayed. The default display is shown
below but it can be configured as needed. The Home screen is also known as the Dashboard.
Figure 1. Home Screen
The calendar, as well as other items placed on the Dashboard, are known as Widgets.
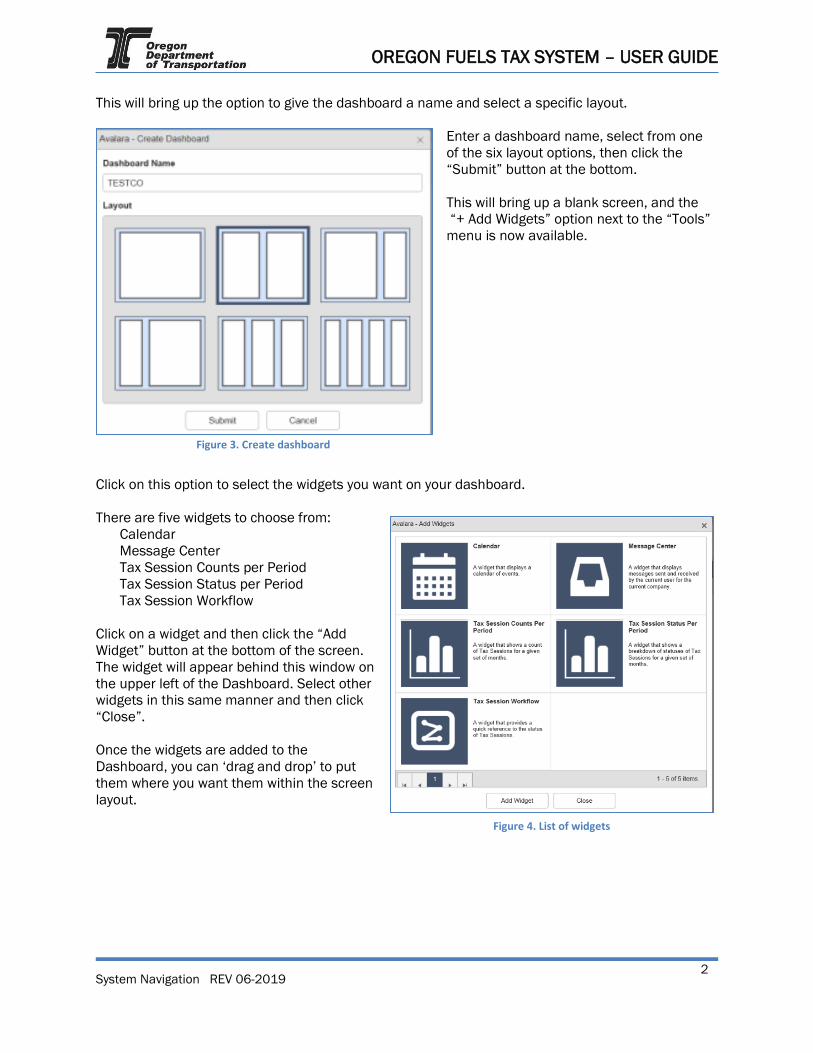
At the upper left corner of the screen, a blue bar may be displayed indicating “Widgets have been
hidden due to access level restrictions”. Additional widgets may be added by selecting the “Tools”
drop-down menu. From this menu select “Create Dashboard”.
Figure 2. Dashboard Tools menu
OREGON FUELS TAX SYSTEM – USER GUIDE
System Navigation REV 06-2019
2
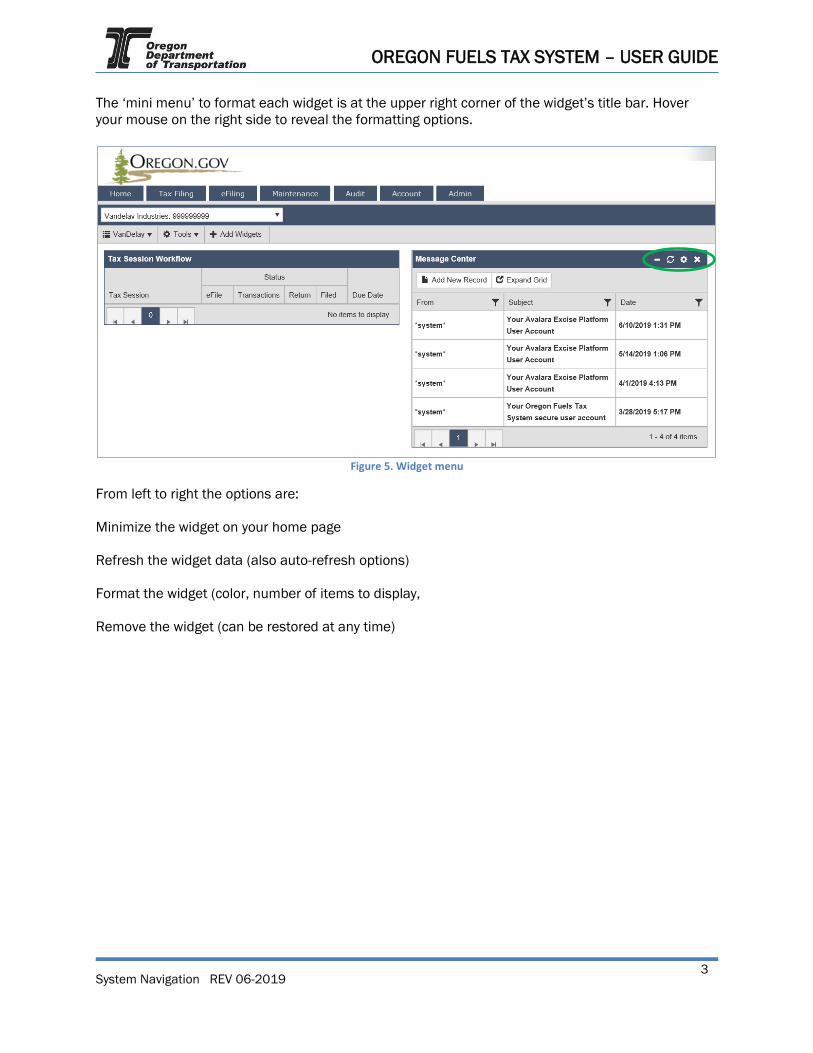
This will bring up the option to give the dashboard a name and select a specific layout.
Enter a dashboard name, select from one
of the six layout options, then click the
“Submit” button at the bottom.
This will bring up a blank screen, and the
“+ Add Widgets” option next to the “Tools”
menu is now available.
Click on this option to select the widgets you want on your dashboard.
There are five widgets to choose from: Calendar
Message Center
Tax Session Counts per Period
Tax Session Status per Period
Tax Session Workflow
Click on a widget and then click the “Add
Widget” button at the bottom of the screen.
The widget will appear behind this window on
the upper left of the Dashboard. Select other
widgets in this same manner and then click
“Close”.
Once the widgets are added to the
Dashboard, you can ‘drag and drop’ to put
them where you want them within the screen
layout.
Figure 3. Create dashboard
Figure 4. List of widgets
OREGON FUELS TAX SYSTEM – USER GUIDE
System Navigation REV 06-2019
3
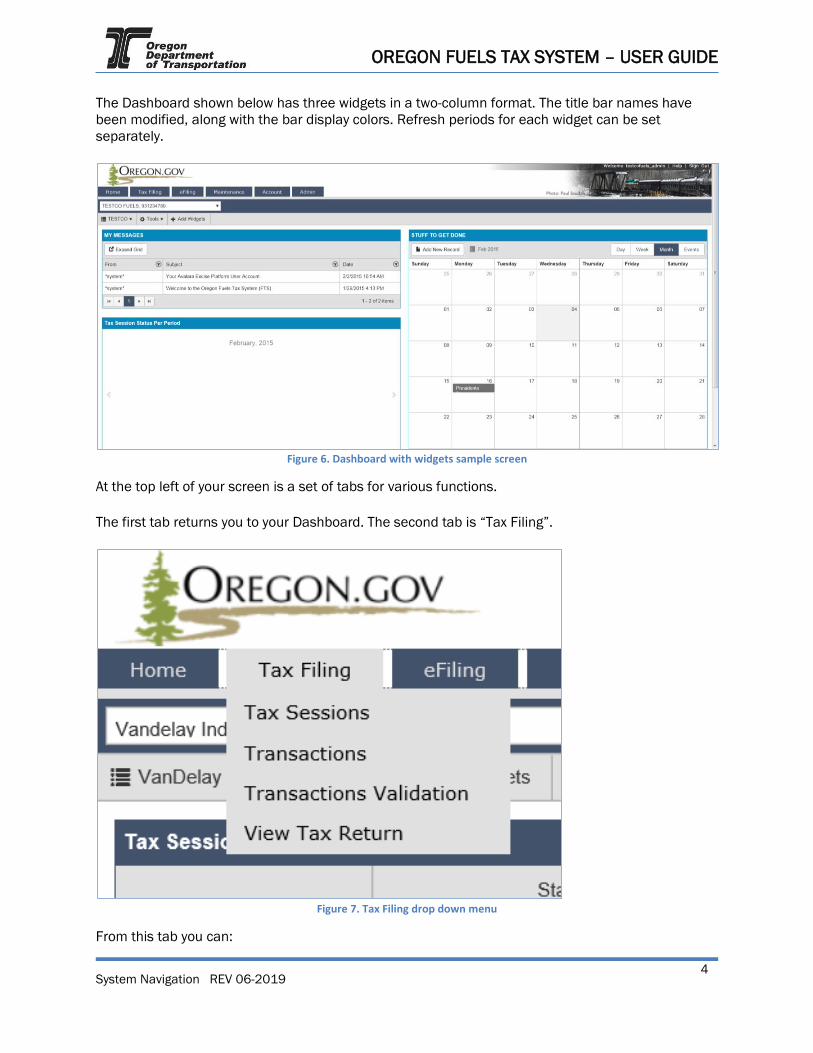
The ‘mini menu’ to format each widget is at the upper right corner of the widget’s title bar. Hover
your mouse on the right side to reveal the formatting options.
Figure 5. Widget menu
From left to right the options are:
Minimize the widget on your home page
Refresh the widget data (also auto-refresh options)
Format the widget (color, number of items to display,
Remove the widget (can be restored at any time)
OREGON FUELS TAX SYSTEM – USER GUIDE
System Navigation REV 06-2019
4
The Dashboard shown below has three widgets in a two-column format. The title bar names have
been modified, along with the bar display colors. Refresh periods for each widget can be set
separately.
Figure 6. Dashboard with widgets sample screen
At the top left of your screen is a set of tabs for various functions.
The first tab returns you to your Dashboard. The second tab is “Tax Filing”.
Figure 7. Tax Filing drop down menu
From this tab you can:
OREGON FUELS TAX SYSTEM – USER GUIDE
System Navigation REV 06-2019
5
View or add a tax report (Tax Sessions)
Review or add schedule transactions (Transactions)
Check transaction validations
View the tax report, and
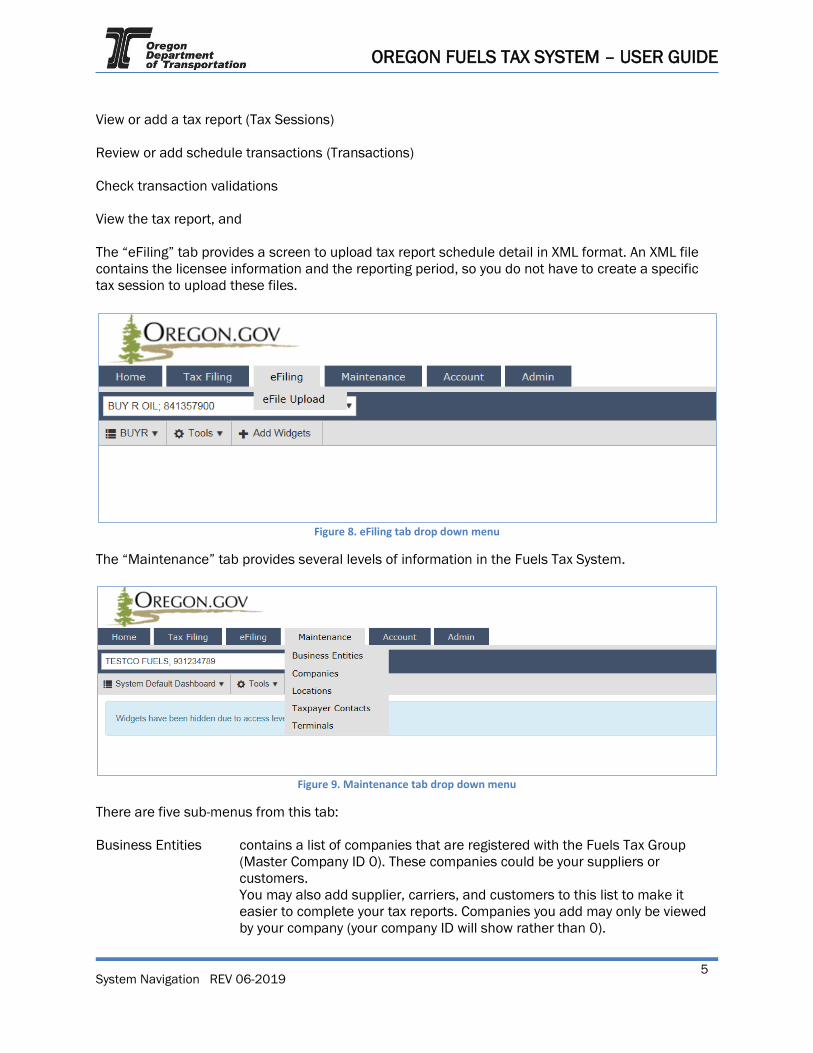
The “eFiling” tab provides a screen to upload tax report schedule detail in XML format. An XML file
contains the licensee information and the reporting period, so you do not have to create a specific
tax session to upload these files.
Figure 8. eFiling tab drop down menu
The “Maintenance” tab provides several levels of information in the Fuels Tax System.
Figure 9. Maintenance tab drop down menu
There are five sub-menus from this tab:
Business Entities contains a list of companies that are registered with the Fuels Tax Group
(Master Company ID 0). These companies could be your suppliers or
customers.
You may also add supplier, carriers, and customers to this list to make it
easier to complete your tax reports. Companies you add may only be viewed
by your company (your company ID will show rather than 0).
OREGON FUELS TAX SYSTEM – USER GUIDE
System Navigation REV 06-2019
6
Companies lists the accounts established for the company, and the applications that are
available for other licenses. The “Details” tab has the company name. The
“Information” tab is the data provided when licensed, and can be updated.
Locations lists the locations that are registered with the Fuels Tax Group, and also fuel
terminals. This information is used when completing tax reports.
Taxpayer Contacts users assigned to your company are added to the contact list, but you can
also “Add New Record” and customize your list with additional contacts.
Terminals list of fuel terminals in the US. This list can be searched, filtered, sorted, or
downloaded to excel.
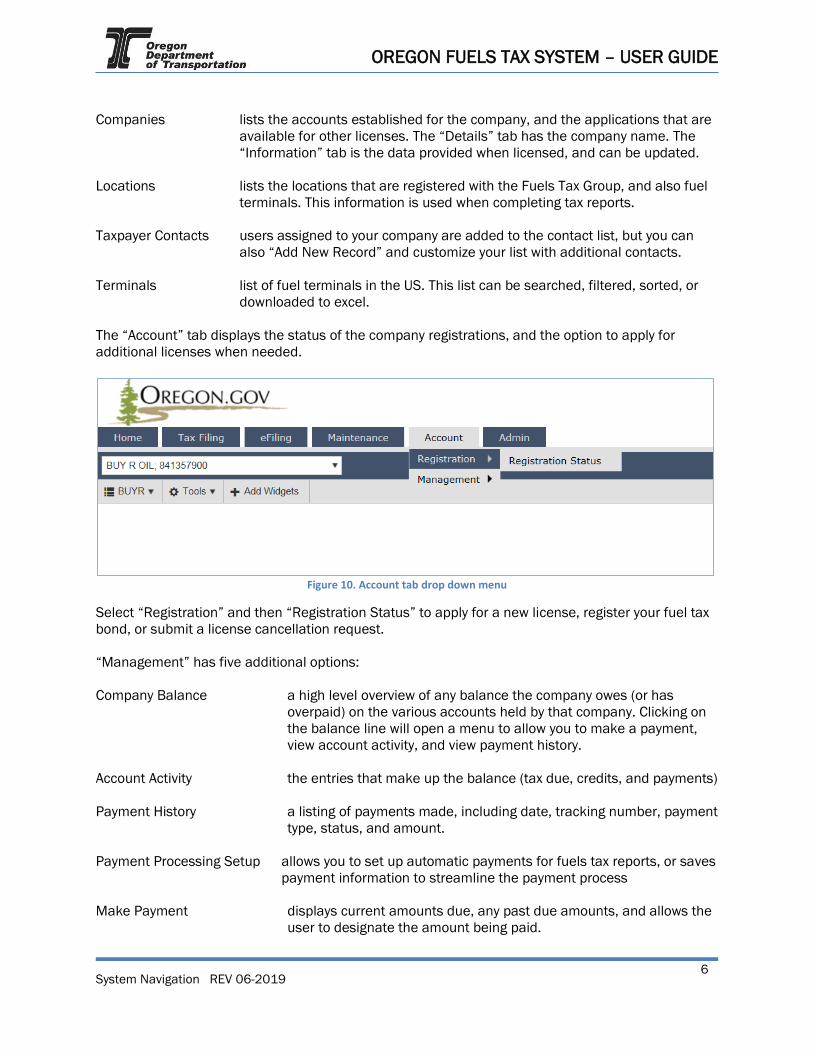
The “Account” tab displays the status of the company registrations, and the option to apply for
additional licenses when needed.
Figure 10. Account tab drop down menu
Select “Registration” and then “Registration Status” to apply for a new license, register your fuel tax
bond, or submit a license cancellation request.
“Management” has five additional options:
Company Balance a high level overview of any balance the company owes (or has
overpaid) on the various accounts held by that company. Clicking on
the balance line will open a menu to allow you to make a payment,
view account activity, and view payment history.
Account Activity the entries that make up the balance (tax due, credits, and payments)
Payment History a listing of payments made, including date, tracking number, payment
type, status, and amount.
Payment Processing Setup allows you to set up automatic payments for fuels tax reports, or saves
payment information to streamline the payment process
Make Payment displays current amounts due, any past due amounts, and allows the
user to designate the amount being paid.
OREGON FUELS TAX SYSTEM – USER GUIDE
System Navigation REV 06-2019
7
Some roles may not have access to input data in all of these options. Check with your company
administrator if you need access to additional screens.
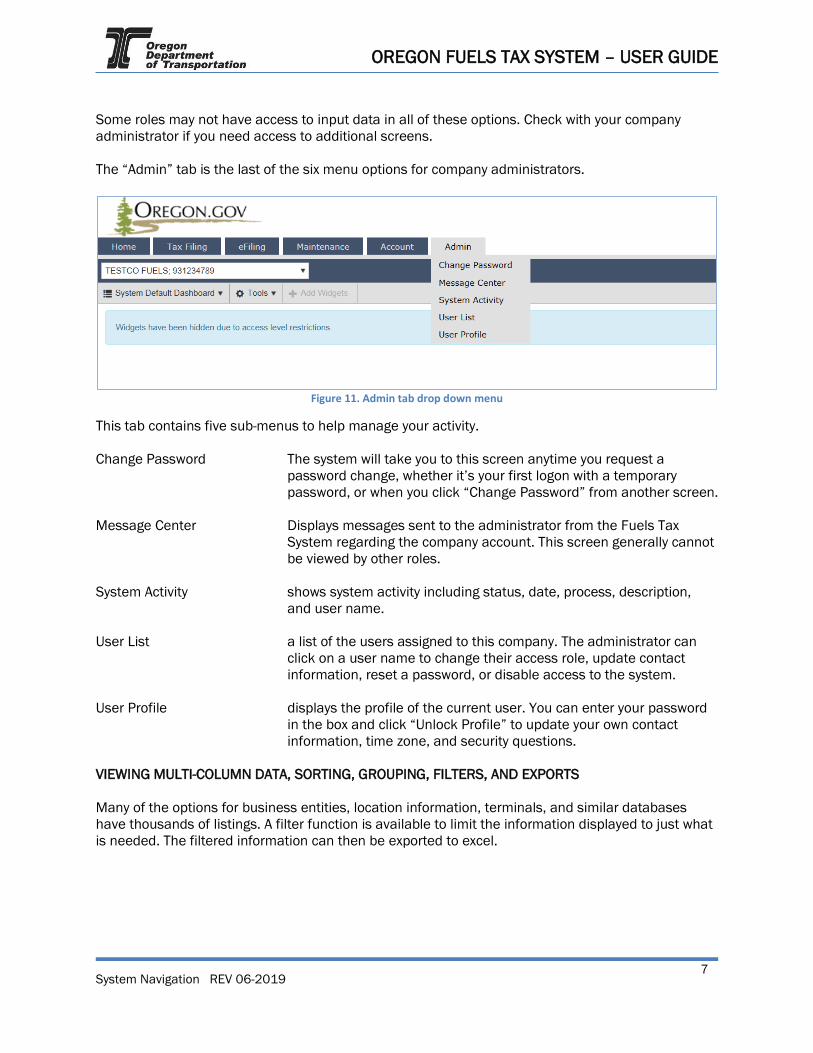
The “Admin” tab is the last of the six menu options for company administrators.
Figure 11. Admin tab drop down menu
This tab contains five sub-menus to help manage your activity.
Change Password The system will take you to this screen anytime you request a
password change, whether it’s your first logon with a temporary
password, or when you click “Change Password” from another screen.
Message Center Displays messages sent to the administrator from the Fuels Tax
System regarding the company account. This screen generally cannot
be viewed by other roles.
System Activity shows system activity including status, date, process, description,
and user name.
User List a list of the users assigned to this company. The administrator can
click on a user name to change their access role, update contact
information, reset a password, or disable access to the system.
User Profile displays the profile of the current user. You can enter your password
in the box and click “Unlock Profile” to update your own contact
information, time zone, and security questions.
VIEWING MULTI-COLUMN DATA, SORTING, GROUPING, FILTERS, AND EXPORTS
Many of the options for business entities, location information, terminals, and similar databases
have thousands of listings. A filter function is available to limit the information displayed to just what
is needed. The filtered information can then be exported to excel.
OREGON FUELS TAX SYSTEM – USER GUIDE
System Navigation REV 06-2019
8
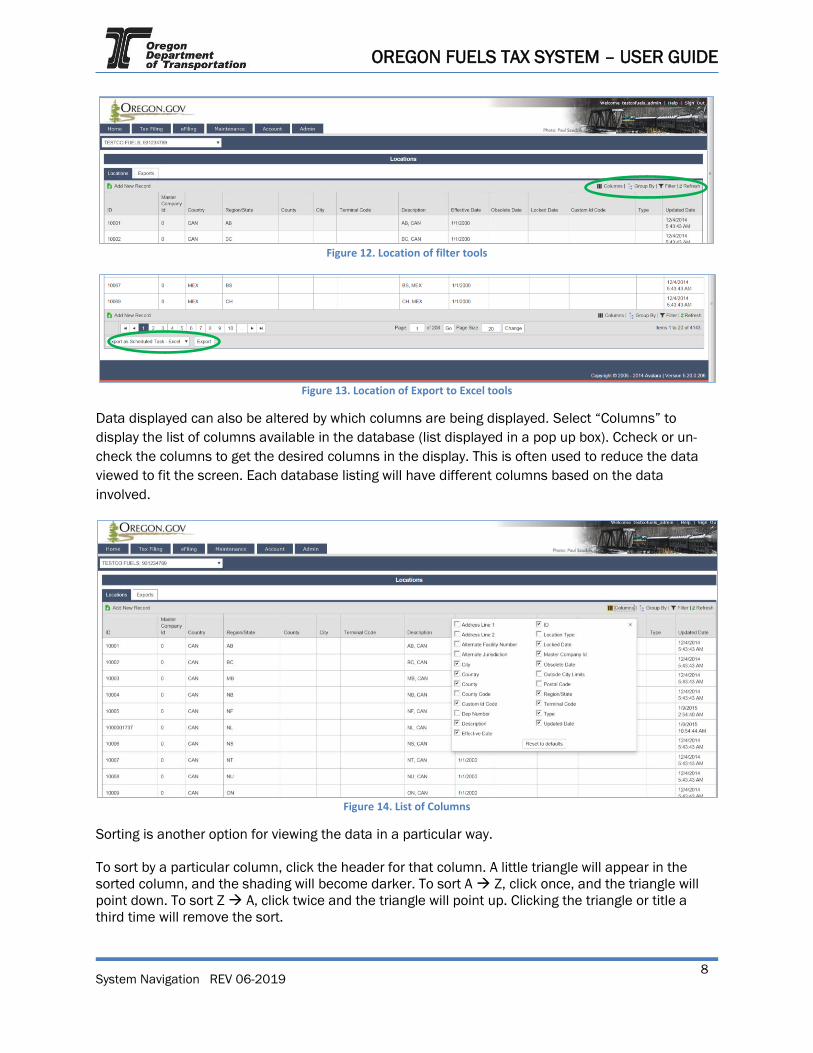
Figure 12. Location of filter tools
Figure 13. Location of Export to Excel tools
Data displayed can also be altered by which columns are being displayed. Select “Columns” to
display the list of columns available in the database (list displayed in a pop up box). Ccheck or un-
check the columns to get the desired columns in the display. This is often used to reduce the data
viewed to fit the screen. Each database listing will have different columns based on the data
involved.
Figure 14. List of Columns
Sorting is another option for viewing the data in a particular way.
To sort by a particular column, click the header for that column. A little triangle will appear in the
sorted column, and the shading will become darker. To sort A Z, click once, and the triangle will
point down. To sort Z A, click twice and the triangle will point up. Clicking the triangle or title a
third time will remove the sort.
OREGON FUELS TAX SYSTEM – USER GUIDE
System Navigation REV 06-2019
9
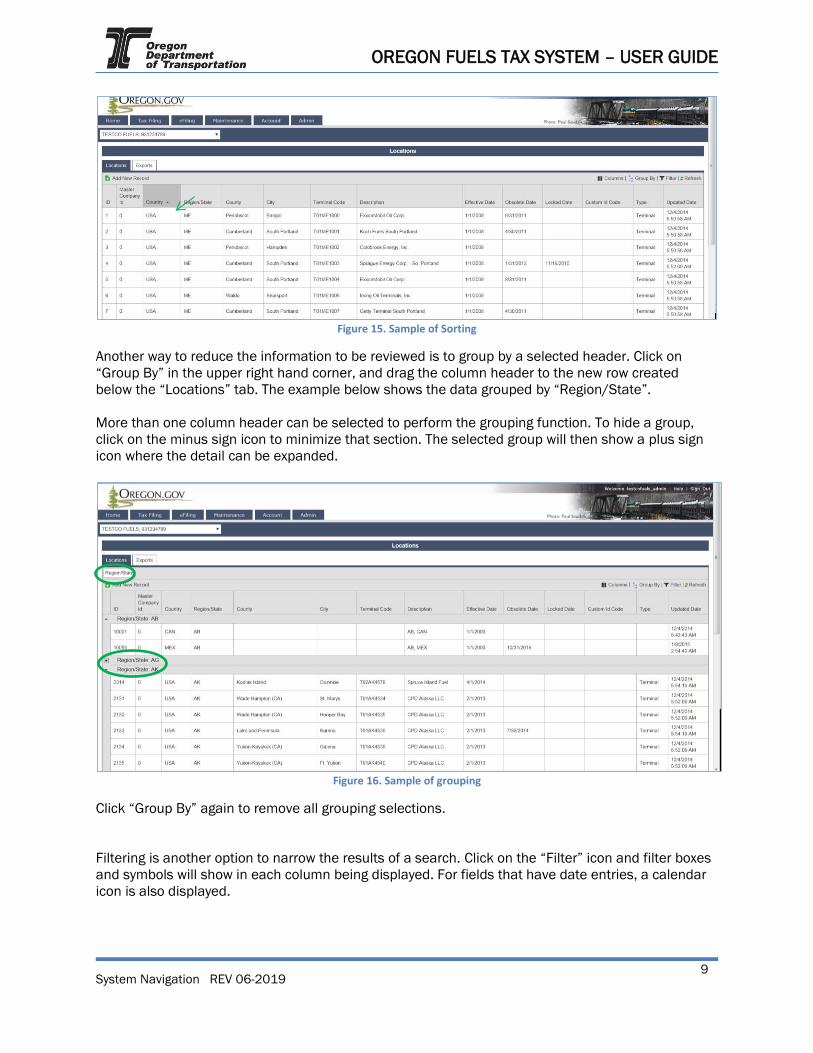
Figure 15. Sample of Sorting
Another way to reduce the information to be reviewed is to group by a selected header. Click on
“Group By” in the upper right hand corner, and drag the column header to the new row created
below the “Locations” tab. The example below shows the data grouped by “Region/State”.
More than one column header can be selected to perform the grouping function. To hide a group,
click on the minus sign icon to minimize that section. The selected group will then show a plus sign
icon where the detail can be expanded.
Figure 16. Sample of grouping
Click “Group By” again to remove all grouping selections.
Filtering is another option to narrow the results of a search. Click on the “Filter” icon and filter boxes
and symbols will show in each column being displayed. For fields that have date entries, a calendar
icon is also displayed.
OREGON FUELS TAX SYSTEM – USER GUIDE
System Navigation REV 06-2019
10
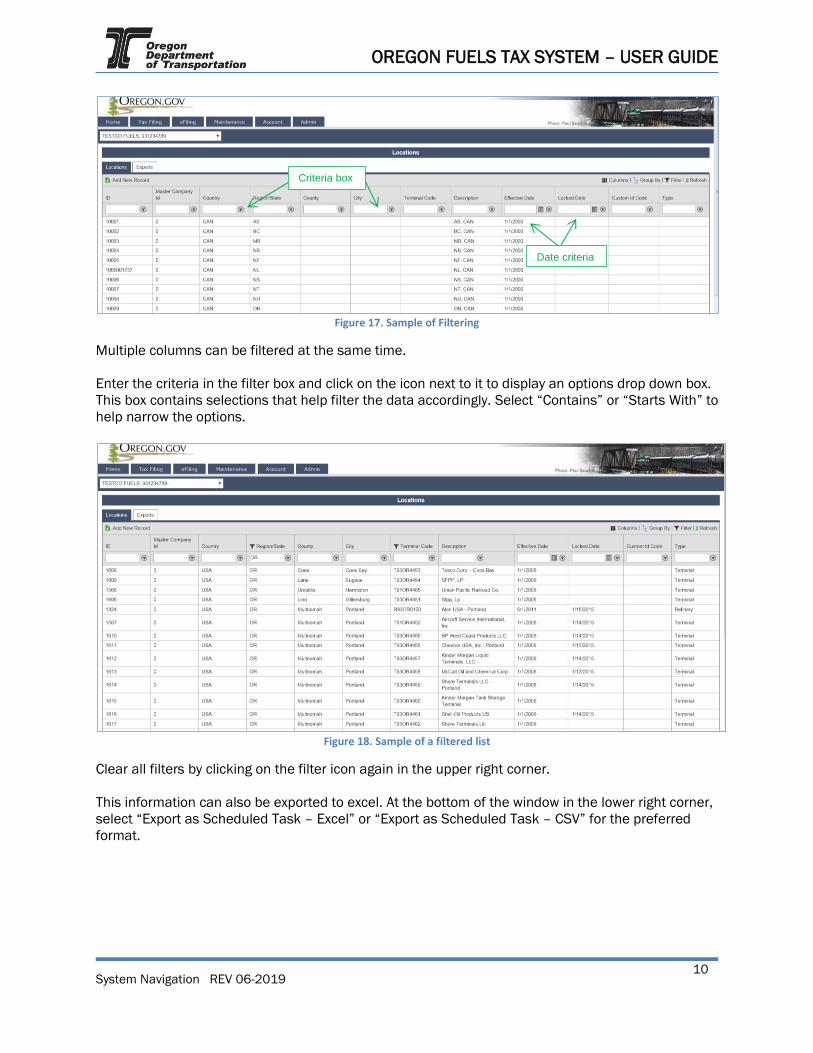
Figure 17. Sample of Filtering
Multiple columns can be filtered at the same time.
Enter the criteria in the filter box and click on the icon next to it to display an options drop down box.
This box contains selections that help filter the data accordingly. Select “Contains” or “Starts With” to
help narrow the options.
Figure 18. Sample of a filtered list
Clear all filters by clicking on the filter icon again in the upper right corner.
This information can also be exported to excel. At the bottom of the window in the lower right corner,
select “Export as Scheduled Task – Excel” or “Export as Scheduled Task – CSV” for the preferred
format.
Criteria box
Date criteria
OREGON FUELS TAX SYSTEM – USER GUIDE
System Navigation REV 06-2019
11
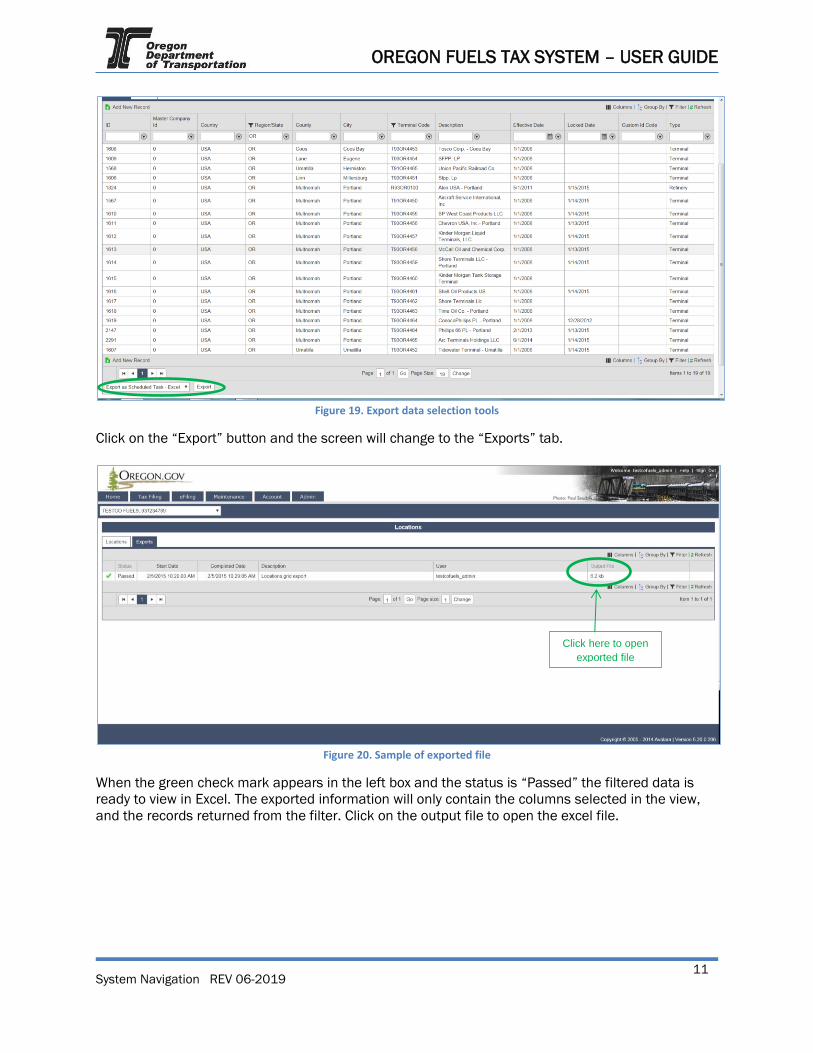
Figure 19. Export data selection tools
Click on the “Export” button and the screen will change to the “Exports” tab.
Figure 20. Sample of exported file
When the green check mark appears in the left box and the status is “Passed” the filtered data is
ready to view in Excel. The exported information will only contain the columns selected in the view,
and the records returned from the filter. Click on the output file to open the excel file.
Click here to open
exported file
OREGON FUELS TAX SYSTEM – USER GUIDE
System Navigation REV 06-2019
12
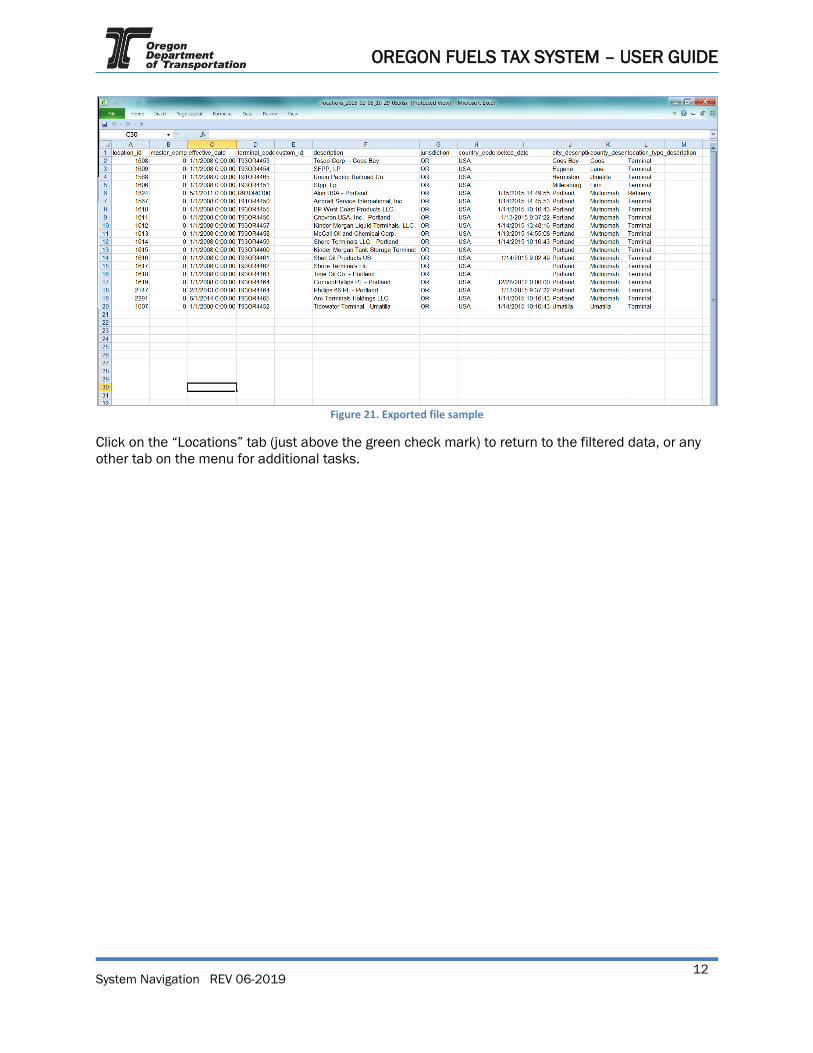
Figure 21. Exported file sample
Click on the “Locations” tab (just above the green check mark) to return to the filtered data, or any
other tab on the menu for additional tasks.