Embed Size (px)
Citation preview

Organisation ID Guidefor Erasmus+ & European Solidarity Corps

Your organisation must have an Organisation ID (OID) to apply for any EU grant programme, including Erasmus+ and the European Solidarity Corps.
OIDs are used to ensure that European funding is only supplied to authentic organisations. Any organisation that will be entered as a partner in an application form must have an Organisation ID.
OIDs are generated centrally by the European Commission, not by Léargas.
The process has two stages, self-registration and submission of supporting documents. Both stages must be completed before the application deadline.
Registration requirements vary depending on your organisation type, so please read this guide carefully!
The Organisation ID for Erasmus+ & European Solidarity Corps

The Organisation ID for Erasmus+ & European Solidarity Corps
PASS
First Steps
Getting to know the OID platform
Checking if your organisationneeds an OID
Setting up an EU Login

Step 1: Visit the Participant Portalfor Erasmus+ & European Solidarity Corps
Go to: https://webgate.ec.europa.eu/erasmus-esc/organisation-registration/screen/home
Click on the Erasmus+ and European Solidarity Corps platform
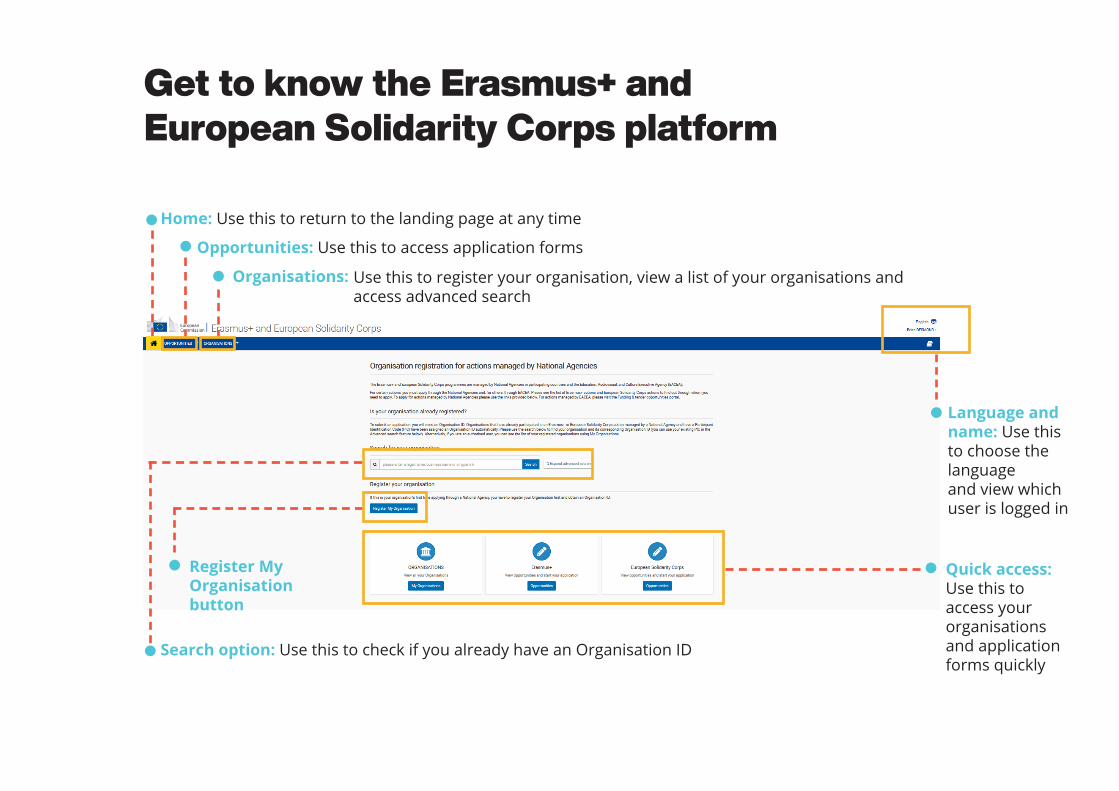
Get to know the Erasmus+ and European Solidarity Corps platform
Home: Use this to return to the landing page at any time
Search option: Use this to check if you already have an Organisation ID
Language andname: Use this to choose the languageand view which user is logged in
Quick access: Use this to access your organisations and application forms quickly
Register My Organisationbutton
Opportunities: Use this to access application forms
Organisations: Use this to register your organisation, view a list of your organisations and access advanced search

Step 2: Check for any existing Organisation ID registrations
Type your organisation’s name into the search box (1) or click ‘Organisation’ and ‘Search’ (2) to check if your organisation is already registered.

Use Advanced Search to search by PIC, Country or VAT Number
You can also use the Advanced Search option where you can search by country, PIC, Organisation ID, registration number, VAT number etc.

Check your Search ResultsSort Results: You can sort your search results with these tabs
Number of organisations: Use this to see the number of organisations
If your search returns a result, your organisation is already registered. Note the Organisation ID and use it in your application. There is no need to re-register.
If you find multiple results ask a colleague within your organisation for guidance on which to choose.
If you can’t find your Organisation then it is time to set up your Organisation ID.

Step 3: Create an EU Login for Erasmus+ & European Solidarity Corps
Go to: https://webgate.ec.europa.eu/cas/eim/external/register.cgi
EU Login is the user authentification service for a wide range of EU information systems. Follow the steps to set up your account which you will use to set up your Organisation ID.

The Organisation ID for Erasmus+ & European Solidarity Corps
Log in to OID platform
Register your organisation
Complete all sections and submit your registration
Registration
ID

Step 4: Register Your Organisation
Click on the blue ‘Register My Organisation’ button (1) or click ‘+ Register MyOrganisation’ from the ‘Organisation’ drop-down menu (2).
Go to: https://webgate.ec.europa.eu/erasmus-esc/organisation-registration/screen/home

Beginning Your Registration
Begin Here: Click Edit to begin
Registration Status: The system does not have an auto-save functionality so do not close your browser until you have completed all sections of this page and clicked ‘Register My Organisation’.
Side Menu: Use this side menu to navigate through the required sections.
You must complete them in order. Once you’ve completed Organisation data, you will be able to edit Legal address and so on.
All sections will be in red until fully completed at which point they will turn green. When all these sections are green you will be able to click the ‘Register My Organisation’ button.

Begin Here: Click Edit to begin
Info Icons: Hover over the ‘i’ icons beside each section to get a detailed description of what is required. All sections with a red asterix (*) need to be completed.
4a. Complete Your Organisation Data

Complete all sections of the form insuring everything with a red asterix (*) is completed.
Completing Your Organisation Data
Legal Status: You will be asked to state your organisation’s legal status. Click on the ‘i’ icons for descriptions of each one and choose the most appropriate option for your organisation.
NB: Only informal groups of young people should choose ‘a natural person’.
Business Registration: Enter your Business Registration number (if you have one) and your VAT number. If you do not have one, tick ‘VAT Number not applicable’. Schools can add their Roll number under Registration Number. PIC: The PIC number field is not
applicable to new applicants.

Once you have ‘Organisation data’ fully completed you can navigate to the ‘Legal Address’ by clicking on it in the sidebar menu.
Legal Address: State your organisation’s address. Postal code (Eircode) is not mandatory for Ireland.
Phone numbers must be in the format +353 (area code without 0) (phone number) e.g. +353 1 8871224.
4b. Complete Your Legal Address

Add the ‘Organisation Contact Person’ and the first ‘Authorised User’. Once these sections are completed all your sections will be in green.
Register My Organisation: Once all information is entered in the registration form, the ‘Register my organisation’ button is enabled. Click the button to submit your data and finalise the registration.
A confirmation message is displayed as well as your newly created Organisation ID. The Organisation ID consists of 8 digits preceded by the letter “E”.
At the top of your screen you will notice the status has changed from Draft to Registered and the newly created Organisation ID is displayed.
4c. Complete Your Details and Register

The Organisation ID for Erasmus+ & European Solidarity Corps
PASS
Upload required documentation to your OID
Get your OID certified by Léargas
Final Steps

After completing self-registration, there is still an important step needed. You must upload supporting documentation confirming your organisation’s details so that Léargas can certify your OID.
Documents required include two European Commission forms: the Legal Entity form and Financial Identification form.
You will need Adobe Acrobat Reader installed on your computer to work with these forms.
The forms must be printed and signed by the legal representative of your organisation (usually the CEO or equivalent).
Other required documentation depends on the type of organisation involved, so read this section very carefully.
OID Documentationfor Erasmus+ & European Solidarity Corps

A public entitity is “a public sector body or a legal entity governed by private law with a public service mission providing adequate financial guarantees”. These include schools, higher education institutions and organisations that have received over 50% of their annual revenue from public sources.
Public entities must submit:
Completed Public Entity Legal Entity and Financial Identification forms with required stamps/signatures.
A copy of the resolution, law, decree, decision or any other official document establishing the organisation.
Required Documents for Public Entities

An organisation that is not a Public Entity is considered a Private Company.
Private Companies must submit:
Completed Private Companty Legal Entity and Financial Identification forms with required stamps/signatures
A copy of their VAT registration (if applicable), including the VAT number
An extract of registration (or equivalent e.g. Company Register, Official Journal) showing the name, address and registration number of the organisation.
Private Companies requesting grants over €60,000 must also submit:
Annual balance sheet for the last approved accounting period and
Profit and Loss account for the last approved accounting period.
Required Documents for Private Companies

Individuals can apply in the Youth field, but only as representatives of an ‘informal group of young people’. This means at least four young people active in youth work. The youth work does not necessarily have to be carried out in the context of a formal youth organisation.
Individuals must submit:
Completed Natural Person Legal Entity and Financial Identification forms with required signature
A copy of your identity document (passport, driver’s licence, or national identity card)
NB: People of Irish nationality are not required to submit a Personal Identification Number
Required Documents for Individuals (Youth Only)
Natural Person Legal Entity
Form

Make sure you have installed Adobe Acrobat Reader (https://get.adobe.com/reader) on your computer, and then download the forms from the European Commission website. You will not be able to view the forms without Adobe Acrobat Reader.
Access the Legal Entity Form at: http://ec.europa.eu/budget/contracts_grants/info_contracts/legal_entities/legal_entities_en.cfm
Access the Financial Identification Form at: http://ec.europa.eu/budget/contracts_grants/info_contracts/financial_id/financial_id_en.cfm
Step 5: Complete the Required Documents
Natural Person Legal Entity
Form

Step 6: Add your documents to OID
Click into ‘My Organisations’ to view a list of your organisations.
Click on the Legal Name to access the organisation details.

Documents: Click the ‘Documents’ section on the left hand menu.
Add documents: Click the ‘Add documents’ section on the left hand menu to upload your documents. There is no limit to how many files can be uploaded to your OID but do bear in mind that the maximum size for each file is 50 MB.
Uploading Your Documents

Uploading Your Documents
Select A File: Click ‘Choose File’ and choose the file to upload from your computer.
Document Type: Once you have chosen your file, indicate the Document type from the drop-down list. If you do not find your chosen type of document, choose the “Other” option.
Upload: Click ‘Upload’ to add your document to your Organisation ID.
Your documents list will be updated with your new document. Repeat this for all the documents you need to upload for your organisation.

Documents: Your documents list will be updated with your new document. Repeat this for all the documents you need to upload to your organisation.
Save documents: Once you added all documents, finalise the document upload by clicking on the Update my organisation button. Close the Success message. (Repeat this for all the documents you need to upload to your organisation).
If this is not done, the uploaded files will not be saved in the Organisation Registration system.
Step 7: Update Your OID

Updating your OID
Once you have updated your organisation, all documents should now be accessible for download if needed. If you need to upload more documents access the Documents section in the same way and remember to click on the ‘Update My Organisation’ button.

We recommend that you add other colleagues within your organisation as Authorised Users to your Organisation ID. This is important so that the organisation can always access the OID irrespective of which staff member is working on the project. Staff can move on so it is important that a number of people have access to the OID.
Step 8: Add Authorised Users

If you have questions relating to your Organisation ID which are not addressed in this guide please contact:
Léargas Programme Finance and Operations Teamt. 01 887 12 90


![[id] guide 2015](https://img.pdfslide.net/doc/110x75/568cacb11a28ab186da88f87/id-guide-2015.jpg)