Embed Size (px)
Citation preview

Demos Session Lesson Plan- POLYMERS! Disclaimer
This guide is meant to be used as an instructional tool for preparing student affiliates for thorough and competent execution of the available chemical demonstrations. This guide is by no means complete. Additional demonstrations should be added as they are developed or obtained and tested.
Make sure you know where the demos will be taking place and choose appropriate demos for the space and age of the participants
Be sure to make yourself and peers familiar with the other notes provided. This resource was meant to include supplementary tips, per the experiences of former student affiliates.
This guide is developed for the express use by the Carroll University Student Affiliate of the American Chemical Society and should not be distributed without the permission of Dr. Michael Schuder (Carroll University), chapter advisor.
The links included in this presentation are meant to provide additional sources of information regarding a particular demo and worked at the time of completion.
Standard Gear
Each demo you do will require unique “ingredients” but consider including the following materials in your toolbox, both out of necessity and just in case:
Tarps or plastic table clothes
Disposable gloves
Goggles/safety glasses
Paper towels
Extension cord
Power strip
Camera
Fire extinguisher (where appropriate)
Plastic bags for take-home activities (e.g. silly putty, super balls, etc.)
Lesson PlanTopic: PolymersGrade Level: Elementary through Middle School Aged StudentsBy: Carroll University Student Affiliate Chapter
Learning Objectives: The students will gain an understanding of what polymers are. The students will gain an understanding of how monomers are combine to form polymers. The students will gain an understanding of polymer characteristics such as strength and flexibility.
Overview:
Spot the Polymer Human Polymer Newspaper Races Super Absorbent Polymers Needle Through A Balloon Spear It Styrofoam Races Expanding Urethane Foam Slime Silly Putty Latex Super Balls

Spot the Polymer
Purpose : Show students what a polymer is and examples of polymers found in their everyday lives.
Materials :
Examples of polymers, such as:
paper CD egg carton plastic bag plastic soda bottle paper napkin disposable plate (plastic, styrofoam, or paper) a piece of wood 1 paper clip chain 1 plastic cup 1 plastic bag
Method :(1) Place all of the polymers on a table for students to look at. Discuss how the objects are and
how they are different.(2) Explain that all of the objects are made of polymers. A polymer is made of made of many
(50+) repeating units so small that we can’t see them with our unaided eyes. The word polymer means "many units." A polymer is like a chain of paper clips, where one paper clip is a "mer," or unit. Several paper clips linked together represent the polymer.
(3) Use the paper clip chain to "show" a polymer.(4) Are polymers small or big to us? Small because we can't even see them with just our eyes.
What about in the world of atoms (if we could go way down inside of things and be the size of things that make them up - like Ms. Frizzle in the Magic School Bus)? Are they big or small? They are very big and long there.
(5) Ask students if they can find examples of polymers in the classroom, or on their clothes or shoes.
(6) Are all polymers plastic? No. For example paper, wood, and tortoise shells are all polymers.
What are some things that are not polymers? Metal, any of the elements, and salt are some examples.
(7) For middle/high school: Is a cup of water a polymer? No. There are a bunch of water molecules there but they are not all chemically bonded together. So a cup of water is like a cup of paper clips that are all unconnected.
(8) Polymers are important in part because they can act in so many different ways. Scientists can make polymers that have different properties. Some hold music, like a CD, and some hold liquids, like a soda bottle. Show the students a plastic cup and plastic bag side by side. If I drop this cup, what will happen? What will happen if I drop this bag? Which is easier to tear – the cup or the bag? I can drink out of the cup, but do you think it would be a good idea to try to drink out of
the bag? Would you rather carry your groceries in the bag or the cup?

Human Polymer
Purpose : To demonstrate and define what a polymer is and how it is made
Materials :
kids
Method : (1) Have all the students place their hands on their hips. (2) Have the students wonder around and occasionally (gently) run into each other. (3) Now, number the students either “1” or “2.” (4) Instruct each of the 1s they are to hold their arms out perpendicular to their body and bent at a 90 degree angle at the elbow. (5) Instruct the 2s that they should put their hands (or fists) on their hips creating a hole between their arms and torso. (6) Instruct the students to wonder around and help them to build long chains of human “polymer.”
Science : Initially all of the students were individual monomers. In the second part of the demo, all of the students are still monomers but as they link arms they form a polymer, just like other polymers – made up of many repeating units .
Newspaper Strips
Purpose : This is a brief demo to introduce a session on polymers and demonstrate the fiber-like nature of polymers
Materials :
Newspaper(s)
Method : (1) Form two teams of students. (2) Instruct both teams that the object is to tear as many straight strips of newspaper as they can. (3) Instruct one group to tear their newspaper horizontally and the second group to tear their newspaper only vertically (along the fold of the paper).
Science : Newspaper is an example of a natural polymer. There are large strings of molecules all oriented in one direction. One of the groups will be able to rip straight pieces of paper because they are tearing “along the chain,” while the other group is tearing “against the chain.” Tearing perpendicular to the chains of polymer results in pieces that are not straight and of no uniform size or shape.

Super Absorbent Polymers
Purpose : This is a brief demo that is fun and can demonstrate the properties of some polymers.
Materials :
Superabsorbent polymer
Plastic cup(s)
water
Method : (1) Add 2 tablespoons or so of polymer to one plastic cup. (2) Add a liberal amount of water to the cup with the polymer. (3) After a few moments you should be able to invert the cup without the polymer or water falling out (amazing!)
Science : Some polymers have the capability to absorb as much as 150-300X (or more) their weight in water. As the polymer absorbs the water it will expand to the shape of the cup. This is same concept/science used in baby diapers.
Additional Information:
http://en.wikipedia.org/wiki/Superabsorbent_polymer
http://www.stevespanglerscience.com/product/1609

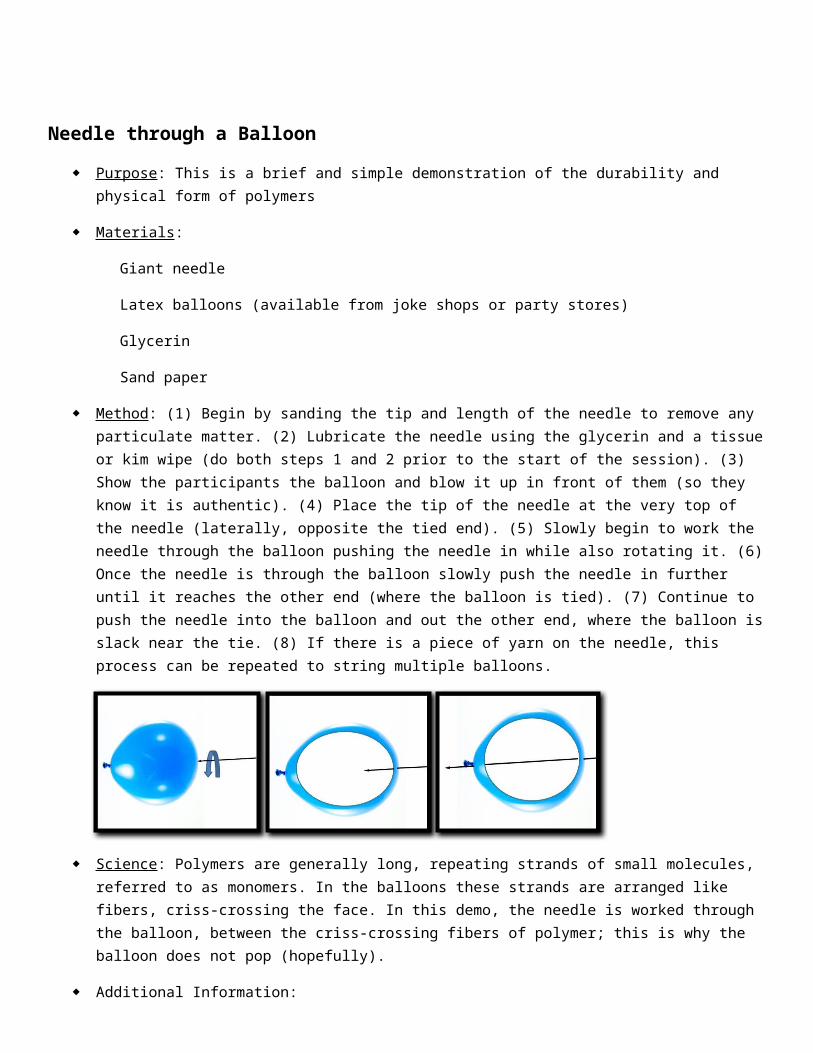
Needle through a Balloon
Purpose : This is a brief and simple demonstration of the durability and physical form of polymers
Materials :
Giant needle
Latex balloons (available from joke shops or party stores)
Glycerin
Sand paper
Method : (1) Begin by sanding the tip and length of the needle to remove any particulate matter. (2) Lubricate the needle using the glycerin and a tissue or kim wipe (do both steps 1 and 2 prior to the start of the session). (3) Show the participants the balloon and blow it up in front of them (so they know it is authentic). (4) Place the tip of the needle at the very top of the needle (laterally, opposite the tied end). (5) Slowly begin to work the needle through the balloon pushing the needle in while also rotating it. (6) Once the needle is through the balloon slowly push the needle in further until it reaches the other end (where the balloon is tied). (7) Continue to push the needle into the balloon and out the other end, where the balloon is slack near the tie. (8) If there is a piece of yarn on the needle, this process can be repeated to string multiple balloons.
Science : Polymers are generally long, repeating strands of small molecules, referred to as monomers. In the balloons these strands are arranged like fibers, criss-crossing the face. In this demo, the needle is worked through the balloon, between the criss-crossing fibers of polymer; this is why the balloon does not pop (hopefully).
Additional Information:
http://www.wikihow.com/Stick-a-Needle-Through-a-Balloon-Without-Popping-It
Spear It
Purpose : This is a brief and simple demonstration of the durability and physical form of polymers; this demo can be safely and easily done by participants in their own home, for friends and family.
Materials :
1-20 No. 2 Pencils (sharpened) or wooden skewers
Zip-top bag (sandwich or quart sized)
water
Tub or bucket (to catch any leaking water
Method : (1) Fill the bag with water and tightly seal. (2) demonstrate the technique to the participants: carefully push a pencil through one side of the bag (rolling the pencil as you go) and out the other, making sure the pencil is sticking out of both sides of the bag. (3) have each participant use the same technique to add another pencil to the bag, making sure that there is space between the pencils (pencils that are too close might cause a leak).
Science : The science behind this demo is the same as with the previous demo (Needle Through a Balloon). Polymers are generally long, repeating strands of small molecules, referred to as monomers. In the balloons these strands are arranged like fibers, criss-crossing the face. In this demo, the pencils are worked through the balloon, between the criss-crossing fibers of polymer and creating a seal around each pencil; this is why the bag does not leak (hopefully).
Additional Information:
http://www.stevespanglerscience.com/experiment/00000049
Styrofoam Races
Purpose : This is a brief and simple demonstration to illustrate the properties of a particular polymer: polystyrene (styrofoam) packing peanuts
Materials :
2 large (1-2L) transparent plastic containers (resistant to acetone, e.g. HDPE or PETE)AcetoneWaterStyrofoam packing peanuts
Method : (1) Before the start of the session, add approximately 1 inch of acetone to one of the containers and approximately 1 inch of water to the other (cover the containers if they won’t be used until the end of the session to prevent significant evaporation of the acetone). (2) Choose two volunteers (keeping in mind that the participant who has the container of acetone will lose). (3) Instruct the volunteers that they will be racing to see who can fill up their container first with the packing peanuts. (4) As the participants begin to fill their containers make sure to agitate each some. The Styrofoam in the acetone will appear to melt away. (5) After the race is complete additional Styrofoam (e.g. cups, solid pieces, etc.) can be added to the container and broken down, which is pretty amazing. (6) At the end of the session , the acetone/styrofoam mixture should be emptied into a clean peanut butter or racquetball can for return transport. The container should be placed in a fume hood and the acetone allowed the evaporate. The solidified polystyrene and container can be disposed of.
Science : Polystyrene packing peanuts are made such that they are filled with air. As a physicist would explain this design is critical for effective cushioning. The acetone breaks down the polymer fibers and releases the air causing the polymers to “melt.”
Additional Information:
http://www.stevespanglerscience.com/experiment/00000046
http://www.youtube.com/watch?v=gXjKYuD_AlY

Expanding Urethane Foam
Purpose : This is a brief and simple demo that demonstrates the physical change that occurs when two polymers are mixed
Materials :
Polymer A
Polymer B
Transparent plastic cup and popsicle stick
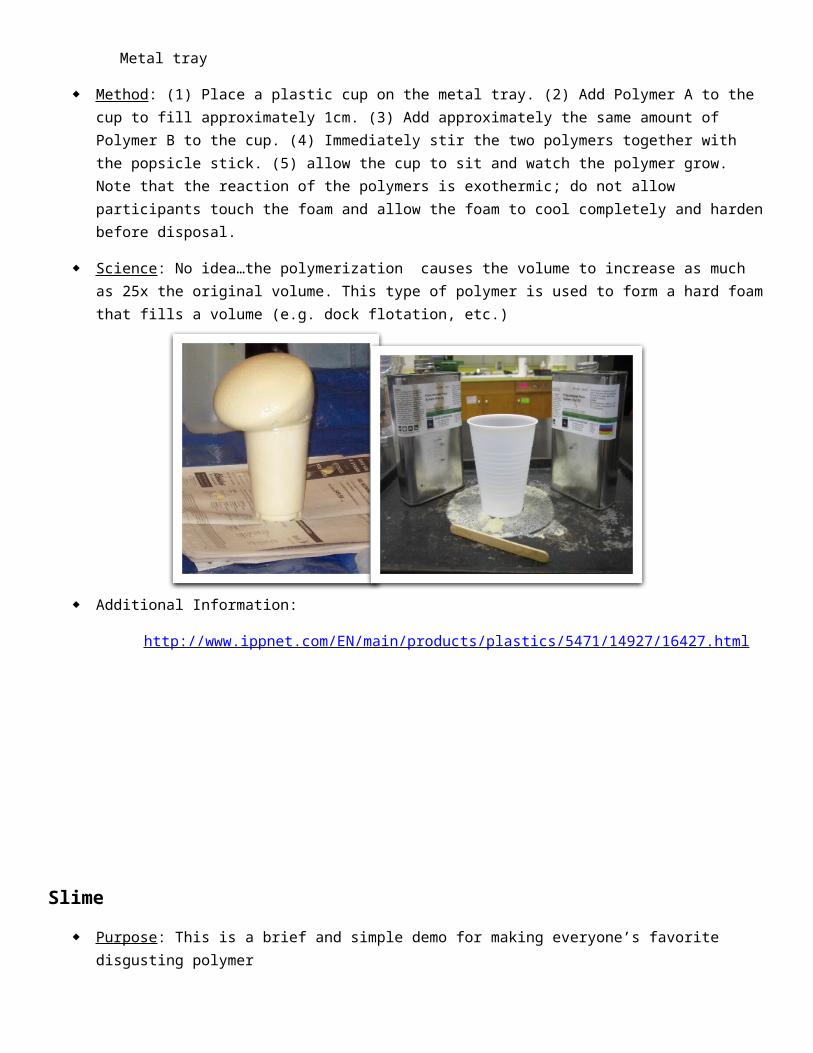
Metal tray
Method : (1) Place a plastic cup on the metal tray. (2) Add Polymer A to the cup to fill approximately 1cm. (3) Add approximately the same amount of Polymer B to the cup. (4) Immediately stir the two polymers together with the popsicle stick. (5) allow the cup to sit and watch the polymer grow. Note that the reaction of the polymers is exothermic; do not allow participants touch the foam and allow the foam to cool completely and harden before disposal.
Science : No idea…the polymerization causes the volume to increase as much as 25x the original volume. This type of polymer is used to form a hard foam that fills a volume (e.g. dock flotation, etc.)
Additional Information:
http://www.ippnet.com/EN/main/products/plastics/5471/14927/16427.html

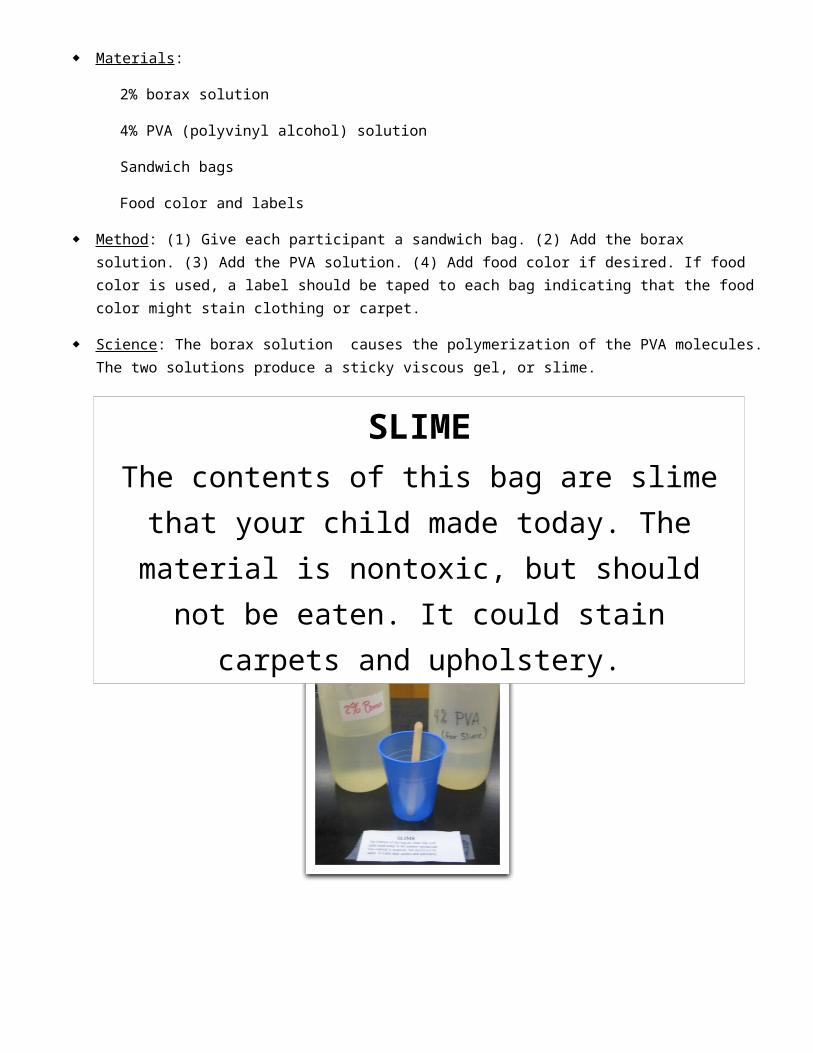
Slime
Purpose : This is a brief and simple demo for making everyone’s favorite disgusting polymer
Materials :
2% borax solution
4% PVA (polyvinyl alcohol) solution
Sandwich bags
Food color and labels
Method : (1) Give each participant a sandwich bag. (2) Add the borax solution. (3) Add the PVA solution. (4) Add food color if desired. If food color is used, a label should be taped to each bag indicating that the food color might stain clothing or carpet.
Science : The borax solution causes the polymerization of the PVA molecules. The two solutions produce a sticky viscous gel, or slime.
SLIMEThe contents of this bag are slime that your child
made today. The material is nontoxic, but should not be eaten. It could stain carpets and upholstery.
Silly Putty
Purpose : This is a brief and simple demo for making a nostalgic polymer and toy
Materials :
2% borax solution or solid borax
Elmer’s glue
water
Plastic cup and popsicle stick
Food color and labels
Zip-top bags and commercial silly putty (samples)
Method : (1) Allow participants to play with the commercial silly putty first. (2) Give each participant a cup. (3) Add the glue to the cup. (4) Add food color if desired. If food color is used, a label should be taped to each bag indicating that the food color might stain clothing or carpet. (5) Add water to the cup. (6) Add solid borax in small amounts and stir vigorously. The borax causes the polymer to form a ball of putty, but if the putty will become grainy and stiff if too much is added. Alternatively a 2% borax solution in water can be used in place of the water.
Science : The borax solution causes the polymerization of the glue molecules. The two solutions produce a polymer similar to commercial silly putty.
Additional Information:
http://www.sillyputty.com/history_101/history101.htm
http://en.wikipedia.org/wiki/Silly_putty
Latex Super Balls
Purpose : This is a brief and simple demo for making a common gum ball machine toy
Materials :
Water
Vinegar
Latex
Popsicle sticks, plastic cups, food coloring, zip-top storage bags, paper towels, labels
Large beaker (2L)
Nitrile gloves
Method : (1) Give each participant a cup. (2) Add the water, latex and food color. (3) While stirring with a popsicle stick add the vinegar. The latex ball will begin to form immediately after the vinegar is added. (4) With gloved hands, place the polymer in a beaker of water and remove the mass from the stick quickly forming a ball and squeezing out any remaining vinegar and food color. (5) Remove the ball from the water and dry the ball on paper towels. (6) Store the ball in a zip-top bag. The ball can be played with once it is dry. (7) Add a label to the bag indicating the presence of latex (possible allergen) and food color, which might stain clothing or carpet.
Science : No idea…just fun and cool. Polymerization.
Additional Information:
http://en.wikipedia.org/wiki/Super_Ball