Embed Size (px)
Citation preview
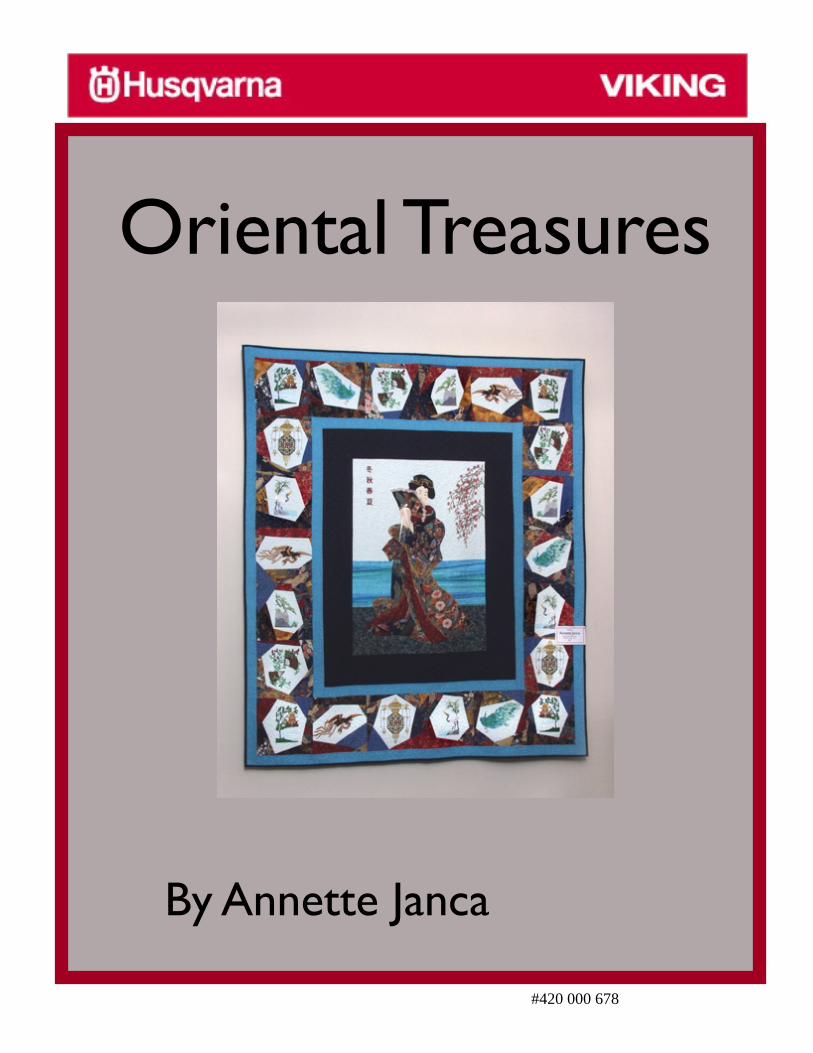
Oriental Treasures
By Annette Janca
#420 000 678

Oriental TreasuresBy Annette Janca, National Education Manager for Canada
Approximate Size: 64” x 74” (163 x 188 cm)
Sewing Supplies:
Skin tone Cotton 10” x 10” (25 cm x 25 cm) for Appliqué (S)
Black Cotton 8” x 8” (20 cm x 20 cm) for Appliqué (B)
Dark Print 1/2 yard (0.5 m) for Appliqué and Crazy Patch (D)
Medium Print 1/2 yard (0.5 m) for Appliqué and Crazy Patch (M)
Light Print 1/2 yard (0.5 m) for Appliqué and Crazy Patch (L)
Red Print 1/2 yard (0.5 m) for Appliqué and Crazy Patch (R)
10 Assorted Prints 1/4 yard (0.25 m) of each for Crazy Patch
Blue Cotton 3 1/3 yards (3.2 m) for Sky and Embroidered Blocks
Turquoise or Blue Cotton 1/3 yard (0.3 m) for Water
Green Cotton 1/2 yard (0.4 m) for Grass
Dark Blue Cotton 1 1/4 yards (1.2 m) for Border and Binding
Medium Turquoise Cotton 1 yard (0.9 m) for Narrow Borders
Cotton Batting 2 1/3 yards x 90” wide (2.1 m x 2.3 m)
Cotton Fabric Backing 5 yards x 42” wide (4.7 m x 106 cm)
Fusible Webbing 1 1/4 yards (1.25 m)
Sulky Totally Stable 1 yard x 20” (0.9 m)
Husqvarna Viking Embroidery Disk/d-Card 109, Oriental Treasures
Husqvarna Viking Embroidery Disk 120, Words from Japan
Husqvarna Viking Tear-Away stabilizer
Neutral sewing thread
3 cones neutral Huskylock thread
Sulky 40-wt rayon embroidery thread
60-wt Bobbin thread
Sulky invisible thread
6” x 24” (15 x 61 cm) Husqvarna Viking ruler (412 66 1415-01)
12” (30.5 cm) square Omnigrid ruler
Husqvarna Viking Dual Feed Foot (not necessary for Designer I, II and Quilt Designer)
Husqvarna Viking Sensor-Q foot for Designers or Open Toe Stippling Foot (for all other Husqvarna Viking
models)
Husqvarna Viking Edge/Joining Foot 412 28 02-45
Husqvarna Viking Open Toe Foot 412 27 70-45
Husqvarna Viking Quilter’s 1/4” Piecing Foot 412 37 08-45
Tefl on Pressing Sheet
1” (2.5cm) safety pins
Wash away fabric marker
Cutting Instructions:
Blue Cotton 1 - 22” x 30” (56 x 77 cm) Sky
22 - 10” x 15” (25.5 x 38 cm) Embroidered Blocks
Turquoise or Blue Cotton 1 - 8 1/2” x 30” (21.5 x 77 cm) Water
Green Cotton 1 - 12” x 30” (30.5 x 77 cm) Grass
Medium Turquoise Cotton 12 - 2 1/2” x 42” (6.5 x 110 cm) Narrow Borders
Dark Blue Cotton 4 - 6” x 42” (15 x 110 cm) Wide Border
7 - 2 1/2” x 42” (6.5 x 110 cm) Binding
10 Assorted Prints Cut into strips varying in widths from 2” to 4” (5 to 10 cm) for the crazy patch
piecing.
Dark, Medium, Light and Red Print: After the appliqué pieces have been cut from these fabrics, cut the remaining
fabric into strips varying in widths from 2” to 4” (5 to 10 cm) for the crazy patch
piecing.
Backing and Sleeve: 2 - 8” x 42” (20 x 106 cm) Sleeve
2 – 82” x 42” (210 x 106 cm) Back
Assembly Instructions:
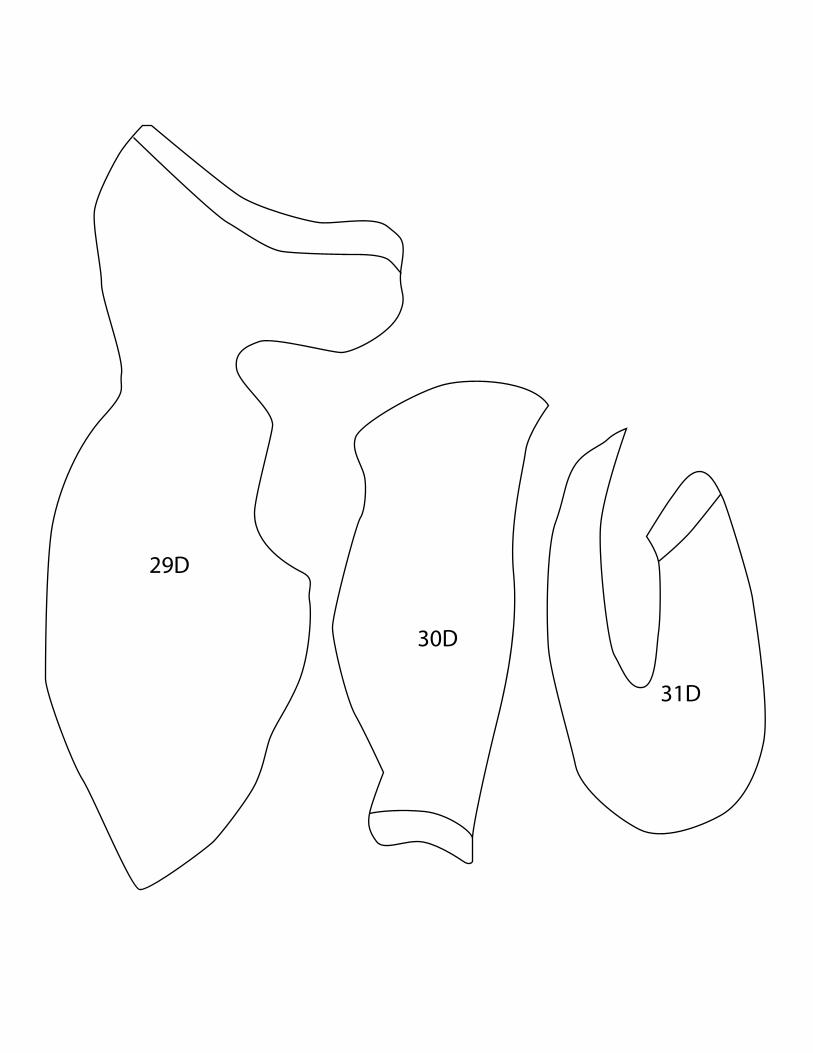
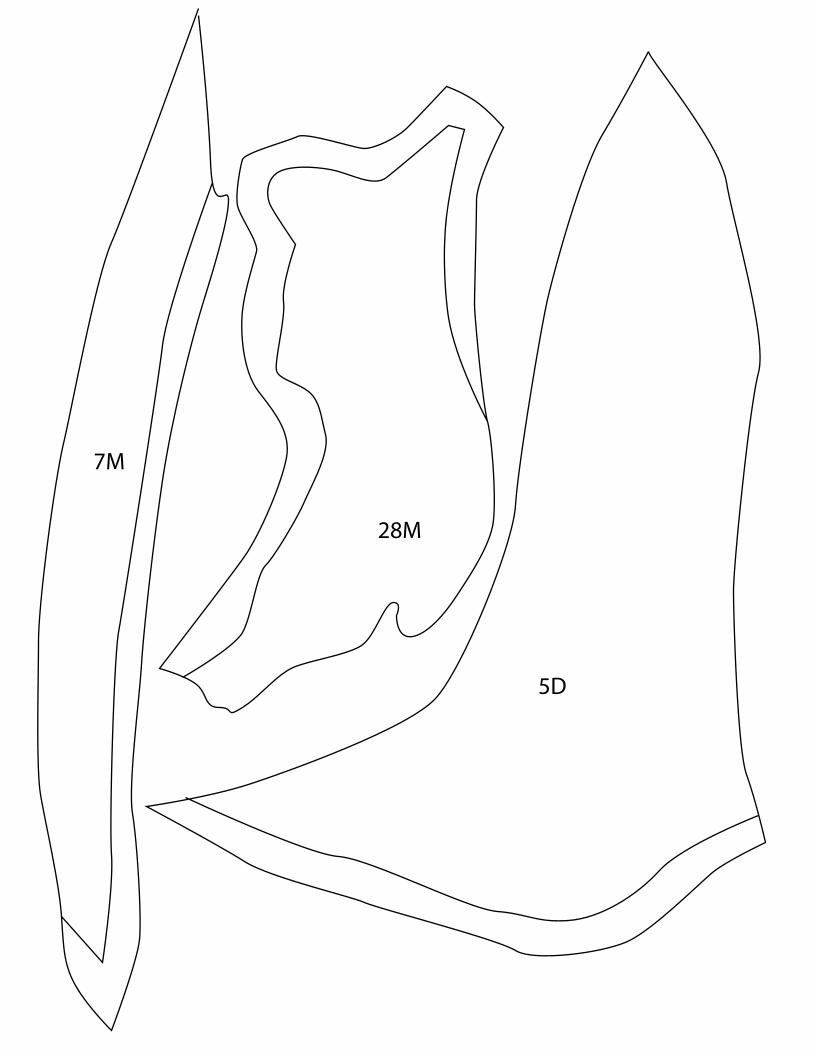
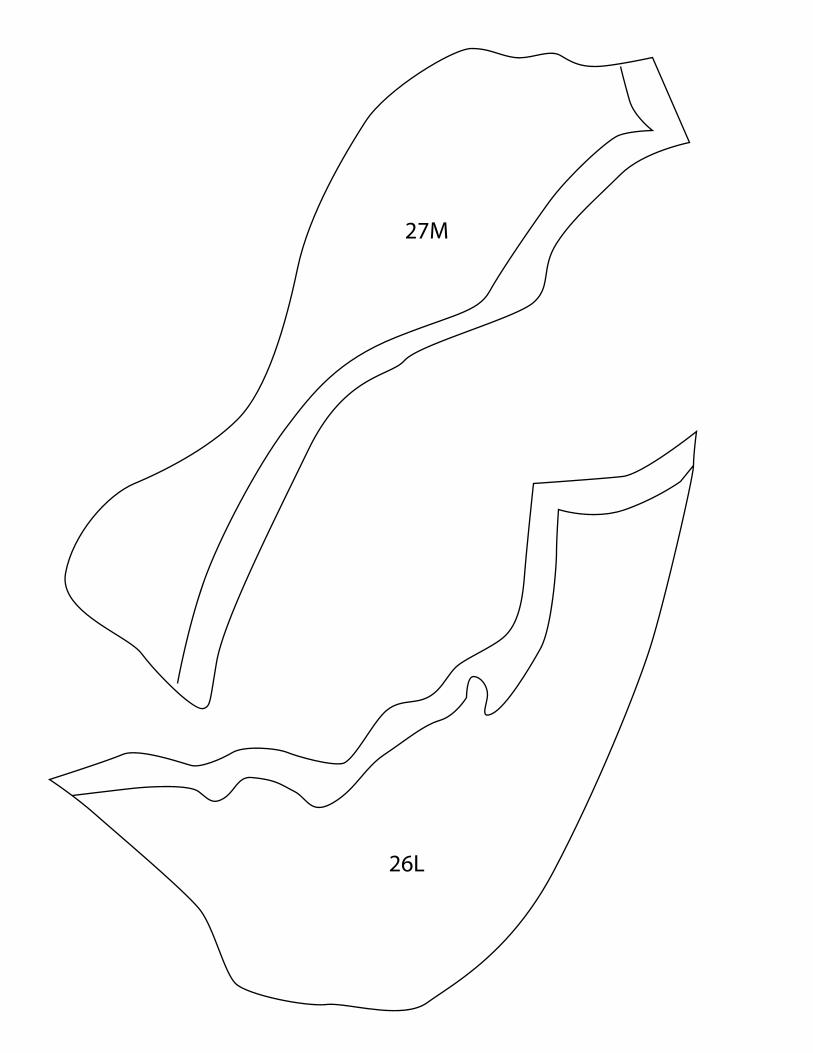
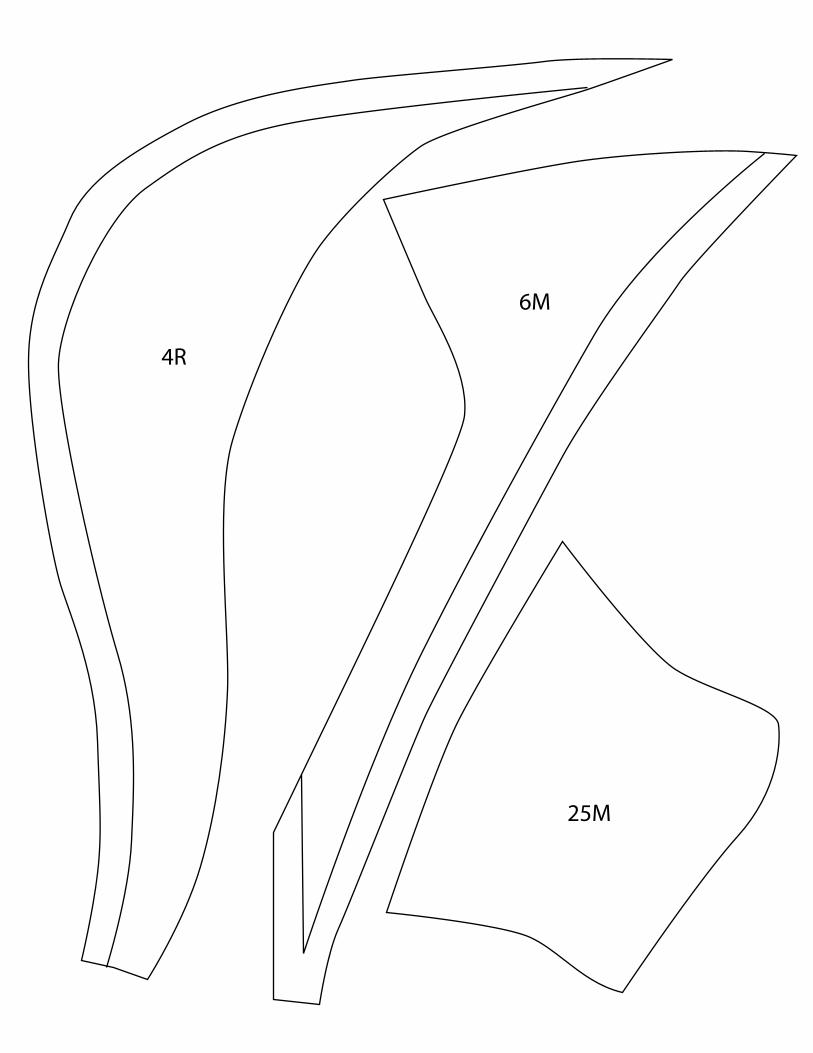
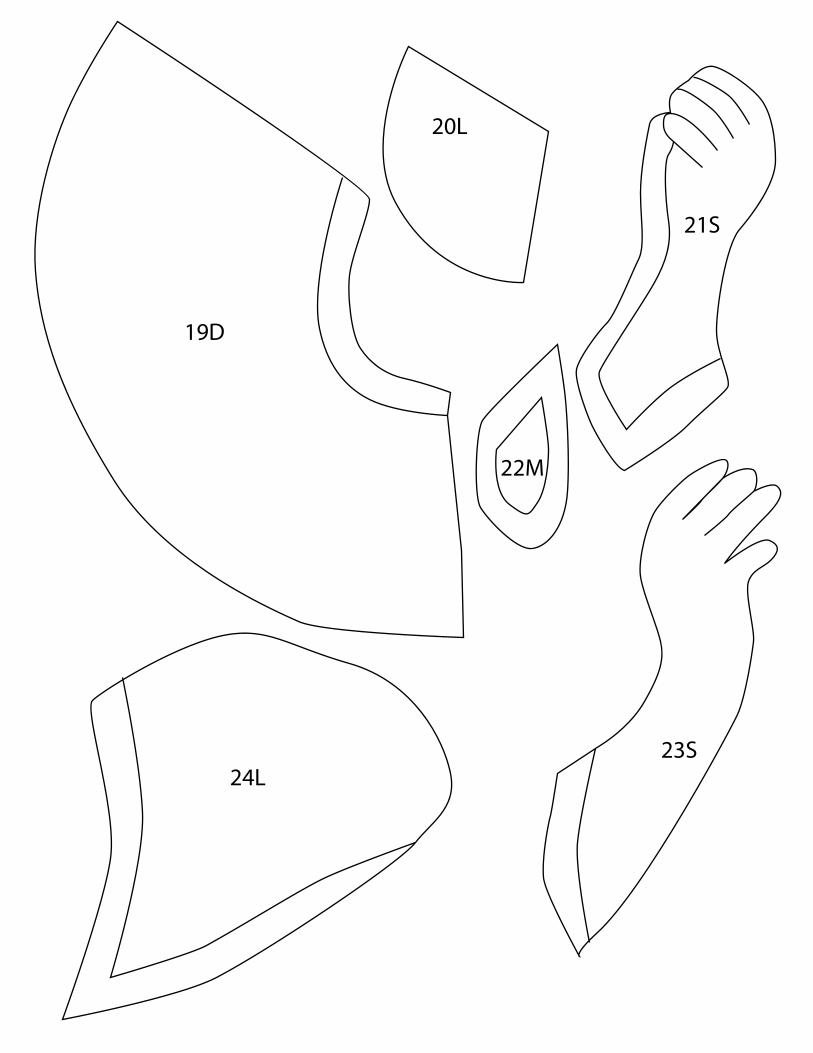
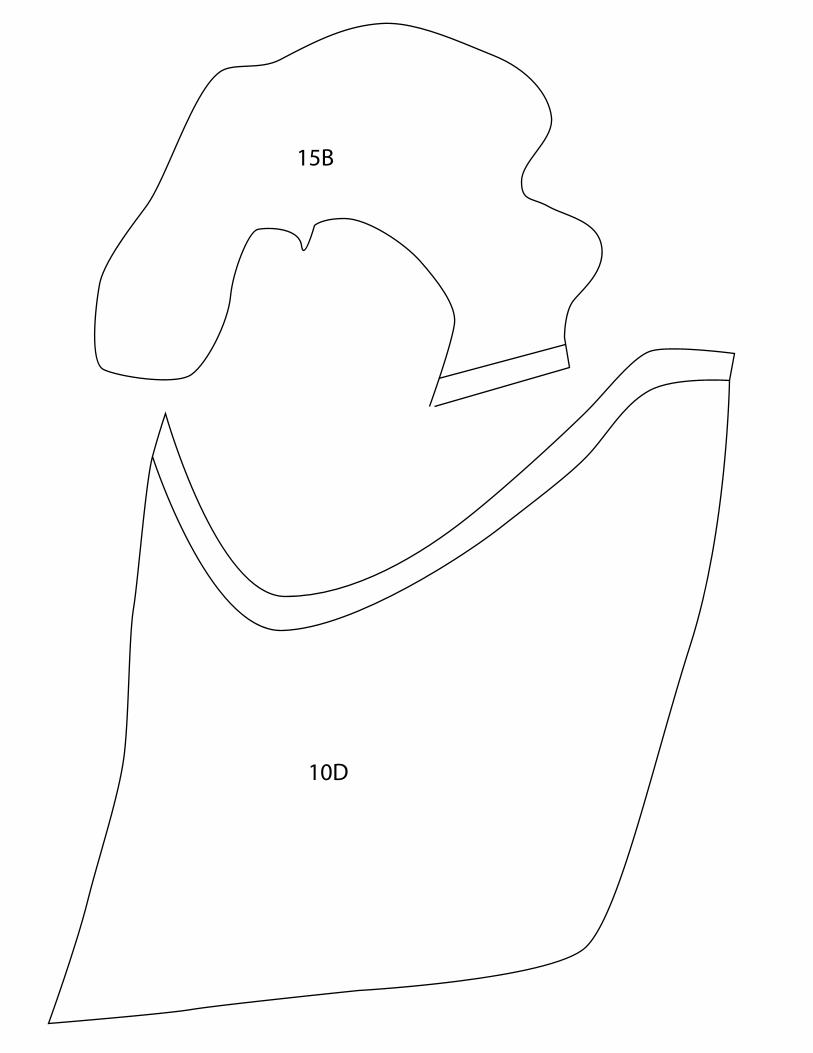
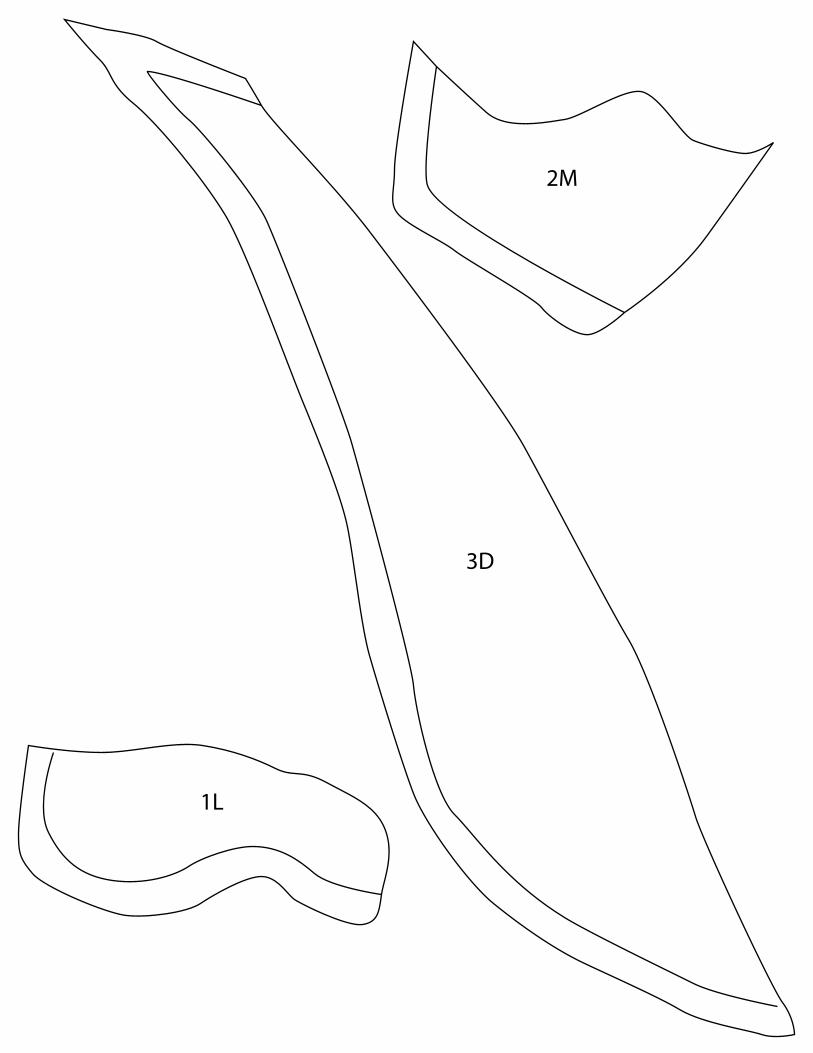
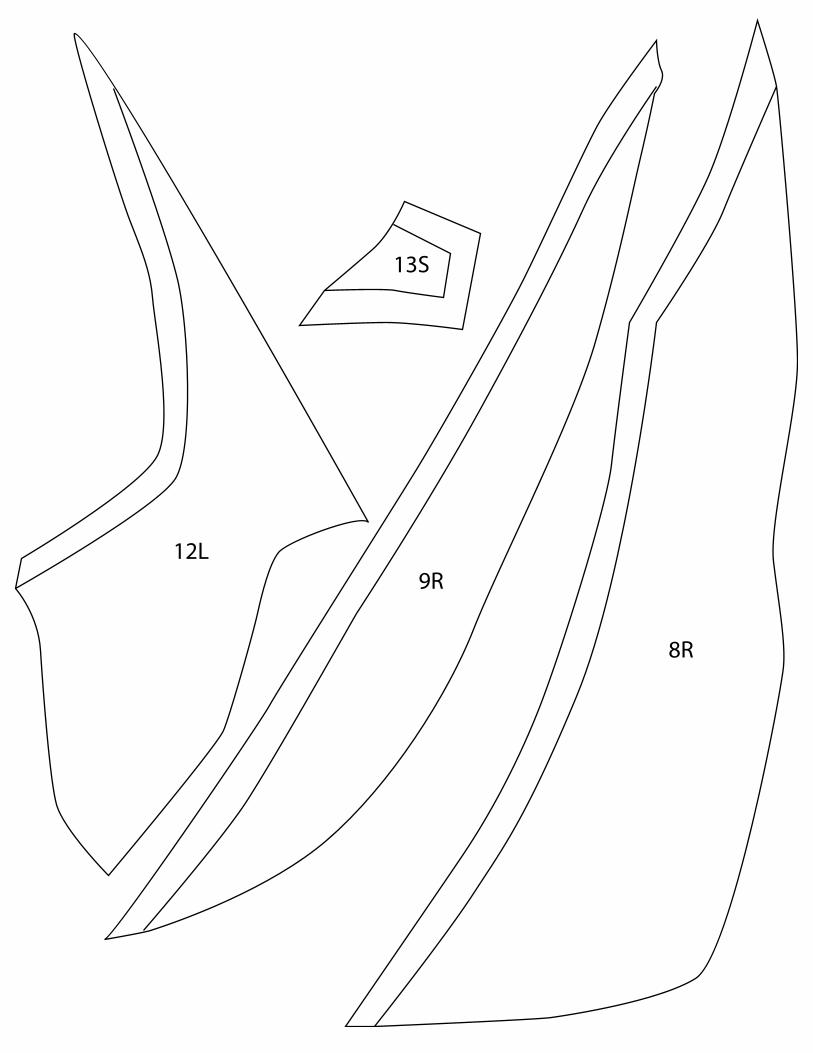
1. Trace the pattern pieces from the pattern sheets onto the paper side of fusible webbing. Label each piece
for easy identifi cation.
2. Cut out these pieces roughly.
3. Fuse the pieces to the wrong side of the appropriate fabric. Refer to the letters marked on pattern pieces
and the code for the fabrics in the sewing supplies list.
4. Cut out the pieces exactly on the drawn line.
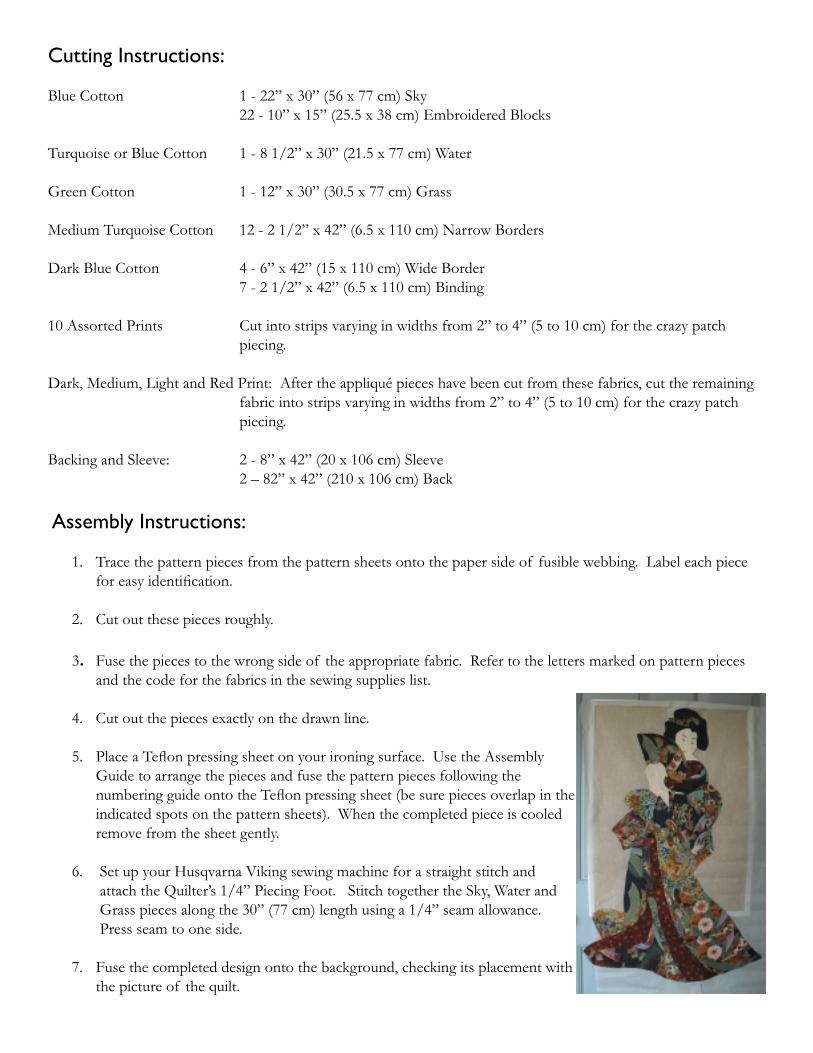
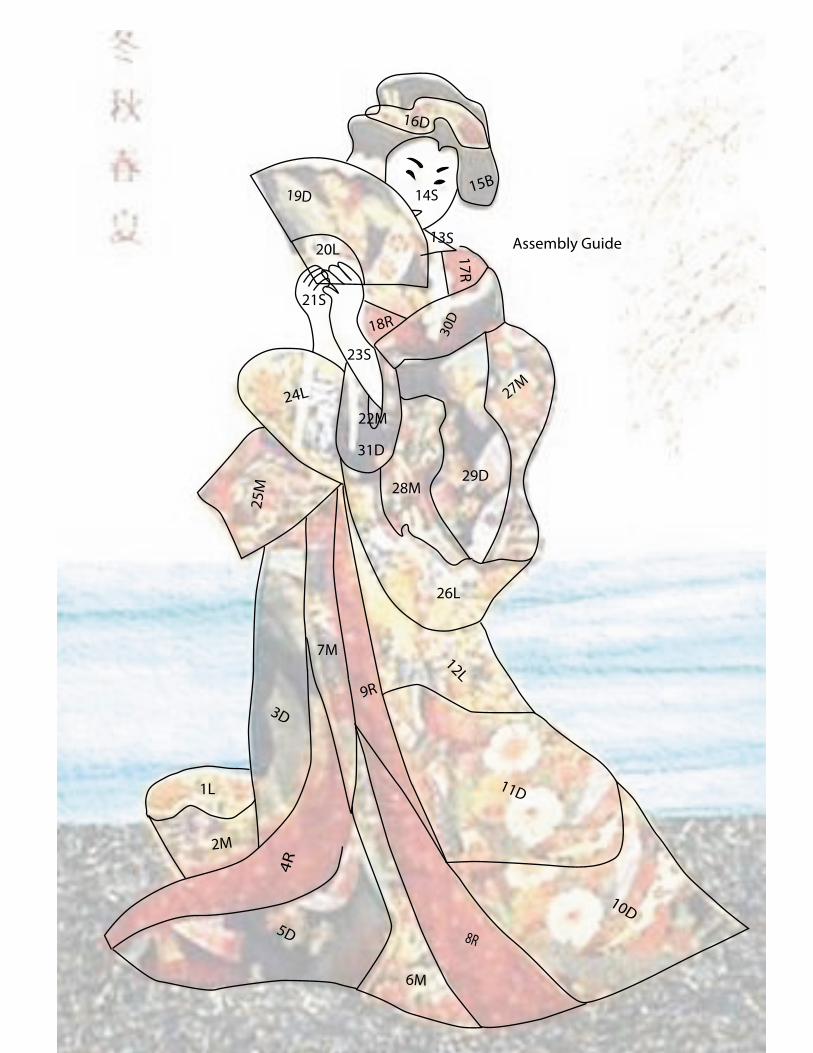
5. Place a Tefl on pressing sheet on your ironing surface. Use the Assembly
Guide to arrange the pieces and fuse the pattern pieces following the
numbering guide onto the Tefl on pressing sheet (be sure pieces overlap in the
indicated spots on the pattern sheets). When the completed piece is cooled
remove from the sheet gently.
6. Set up your Husqvarna Viking sewing machine for a straight stitch and
attach the Quilter’s 1/4” Piecing Foot. Stitch together the Sky, Water and
Grass pieces along the 30” (77 cm) length using a 1/4” seam allowance.
Press seam to one side.
7. Fuse the completed design onto the background, checking its placement with
the picture of the quilt.
8. Fuse Totally Stable tear away stabilizer to the wrong side of the background.
9. Attach the Open Toe Foot to your Husqvarna Viking sewing machine. Thread the top of the sewing
machine with 40 wt. Rayon thread to match the appliqué piece and 60wt thread in the bobbin. Select a satin
stitch with machine settings of Stitch Length: 0.3 and Stitch Width: 2.5 - 3.0.
10. Satin Stitch around appliqué pieces, changing your thread color to match the appliqué fabrics. When
stitching around the appliqués the majority of the zig zag stitch should fall onto the appliqué. When all of
the appliqué pieces are stitched, remove the tear away stabilizer.
11. Press the quilt center.
12. Measure and mark with a water-soluble marker a rectangle on the quilt center measuring 25 1/2” x 35 1/2”
(64.8cm x 90.2cm) with the appliqué piece centered. This will be the cutting line for trimming the quilt
center after the embroidery is complete.
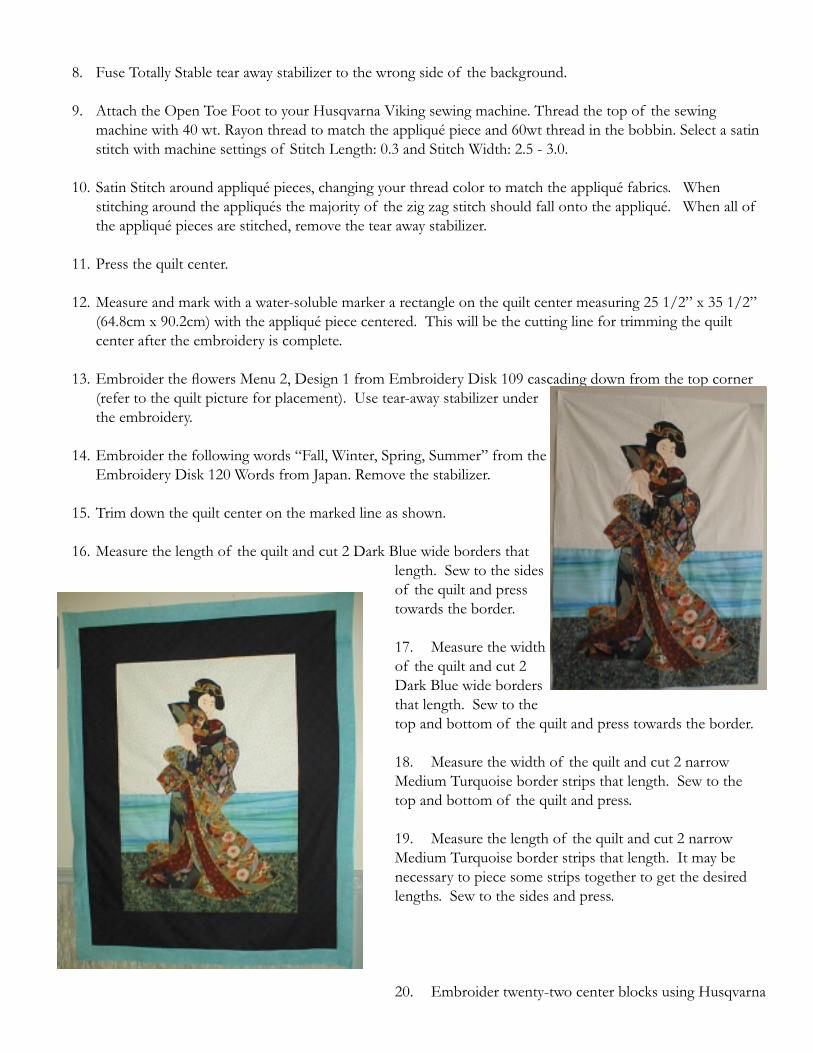
13. Embroider the fl owers Menu 2, Design 1 from Embroidery Disk 109 cascading down from the top corner
(refer to the quilt picture for placement). Use tear-away stabilizer under
the embroidery.
14. Embroider the following words “Fall, Winter, Spring, Summer” from the
Embroidery Disk 120 Words from Japan. Remove the stabilizer.
15. Trim down the quilt center on the marked line as shown.
16. Measure the length of the quilt and cut 2 Dark Blue wide borders that
length. Sew to the sides
of the quilt and press
towards the border.
17. Measure the width
of the quilt and cut 2
Dark Blue wide borders
that length. Sew to the
top and bottom of the quilt and press towards the border.
18. Measure the width of the quilt and cut 2 narrow
Medium Turquoise border strips that length. Sew to the
top and bottom of the quilt and press.
19. Measure the length of the quilt and cut 2 narrow
Medium Turquoise border strips that length. It may be
necessary to piece some strips together to get the desired
lengths. Sew to the sides and press.
20. Embroider twenty-two center blocks using Husqvarna
Viking Embroidery disk/d-card 109. Stabilize the fabric with Husqvarna Viking Tear-Away stabilizer.
Embroider using 40 wt. Rayon Embroidery thread. Embroider the following designs:
Description Menu Design Quantity Regular Quantity Mirror
Image
Peacock 1 1 2 1
Bird 1 2 1 2
Lantern 1 6 3
Fan 2 4 3
Crane 3 1 1 2
Mountain 3 2 1 2
House 3 3 2 2
Note: For Crane, Mountain and House omit the black border.
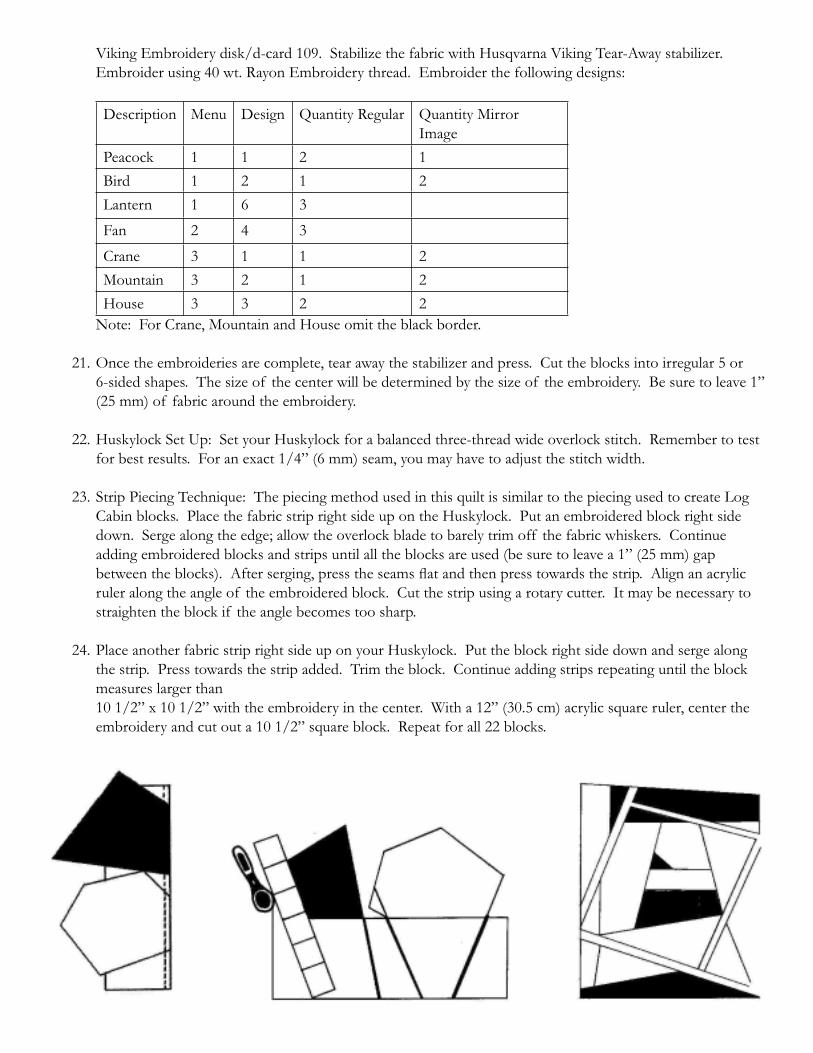
21. Once the embroideries are complete, tear away the stabilizer and press. Cut the blocks into irregular 5 or
6-sided shapes. The size of the center will be determined by the size of the embroidery. Be sure to leave 1”
(25 mm) of fabric around the embroidery.
22. Huskylock Set Up: Set your Huskylock for a balanced three-thread wide overlock stitch. Remember to test
for best results. For an exact 1/4” (6 mm) seam, you may have to adjust the stitch width.
23. Strip Piecing Technique: The piecing method used in this quilt is similar to the piecing used to create Log
Cabin blocks. Place the fabric strip right side up on the Huskylock. Put an embroidered block right side
down. Serge along the edge; allow the overlock blade to barely trim off the fabric whiskers. Continue
adding embroidered blocks and strips until all the blocks are used (be sure to leave a 1” (25 mm) gap
between the blocks). After serging, press the seams fl at and then press towards the strip. Align an acrylic
ruler along the angle of the embroidered block. Cut the strip using a rotary cutter. It may be necessary to
straighten the block if the angle becomes too sharp.
24. Place another fabric strip right side up on your Huskylock. Put the block right side down and serge along
the strip. Press towards the strip added. Trim the block. Continue adding strips repeating until the block
measures larger than
10 1/2” x 10 1/2” with the embroidery in the center. With a 12” (30.5 cm) acrylic square ruler, center the
embroidery and cut out a 10 1/2” square block. Repeat for all 22 blocks.
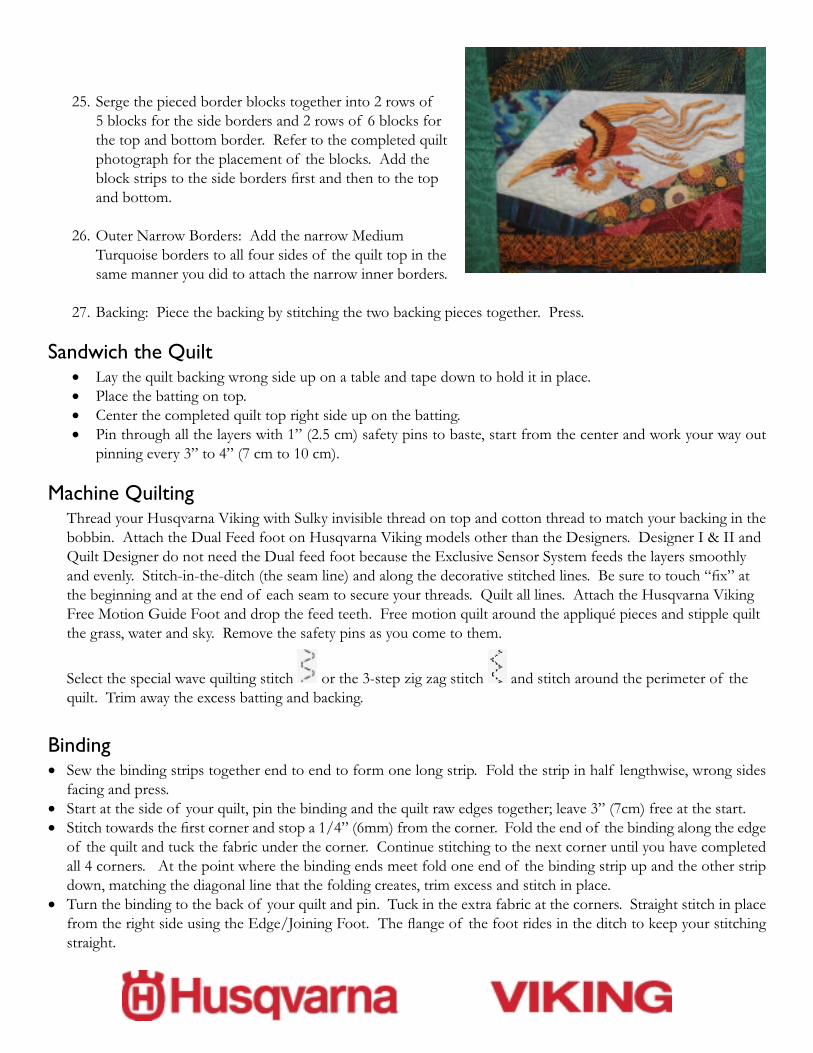
25. Serge the pieced border blocks together into 2 rows of
5 blocks for the side borders and 2 rows of 6 blocks for
the top and bottom border. Refer to the completed quilt
photograph for the placement of the blocks. Add the
block strips to the side borders fi rst and then to the top
and bottom.
26. Outer Narrow Borders: Add the narrow Medium
Turquoise borders to all four sides of the quilt top in the
same manner you did to attach the narrow inner borders.
27. Backing: Piece the backing by stitching the two backing pieces together. Press.
Sandwich the Quilt• Lay the quilt backing wrong side up on a table and tape down to hold it in place.
• Place the batting on top.
• Center the completed quilt top right side up on the batting.
• Pin through all the layers with 1” (2.5 cm) safety pins to baste, start from the center and work your way out
pinning every 3” to 4” (7 cm to 10 cm).
Machine QuiltingThread your Husqvarna Viking with Sulky invisible thread on top and cotton thread to match your backing in the
bobbin. Attach the Dual Feed foot on Husqvarna Viking models other than the Designers. Designer I & II and
Quilt Designer do not need the Dual feed foot because the Exclusive Sensor System feeds the layers smoothly
and evenly. Stitch-in-the-ditch (the seam line) and along the decorative stitched lines. Be sure to touch “fi x” at
the beginning and at the end of each seam to secure your threads. Quilt all lines. Attach the Husqvarna Viking
Free Motion Guide Foot and drop the feed teeth. Free motion quilt around the appliqué pieces and stipple quilt
the grass, water and sky. Remove the safety pins as you come to them.
Select the special wave quilting stitch or the 3-step zig zag stitch and stitch around the perimeter of the
quilt. Trim away the excess batting and backing.
Binding• Sew the binding strips together end to end to form one long strip. Fold the strip in half lengthwise, wrong sides
facing and press.
• Start at the side of your quilt, pin the binding and the quilt raw edges together; leave 3” (7cm) free at the start.
• Stitch towards the fi rst corner and stop a 1/4” (6mm) from the corner. Fold the end of the binding along the edge
of the quilt and tuck the fabric under the corner. Continue stitching to the next corner until you have completed
all 4 corners. At the point where the binding ends meet fold one end of the binding strip up and the other strip
down, matching the diagonal line that the folding creates, trim excess and stitch in place.
• Turn the binding to the back of your quilt and pin. Tuck in the extra fabric at the corners. Straight stitch in place
from the right side using the Edge/Joining Foot. The fl ange of the foot rides in the ditch to keep your stitching
straight.
29D
30D
31D
7M
28M
5D
27M
26L
4R
6M
25M
19D
24L
23S
21S
20L
22M
15B
10D
1L
2M
3D
13S
12L
8R
9R
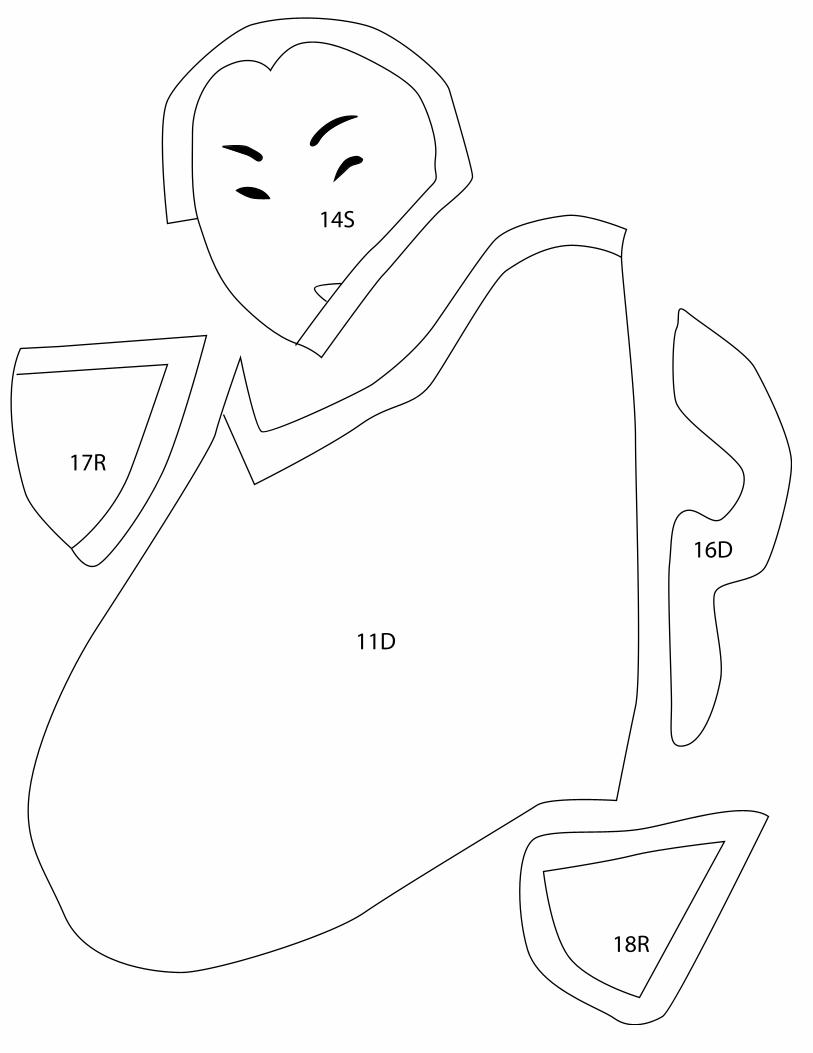
14S
17R
11D
16D
18R
Assembly Guide
29D
30D
31D
7M
28M
5D
27M
26L
4R
6M
25M
19D
20L
21S
24L23S
22M
15B
10D
2M
3D
1L
13S
12L
8R
9R
17R
14S
11D
16D
18R