Embed Size (px)
Citation preview

Orion® StarShoot™ All-In-One Astronomy Camera
#52098
InStruCtIOn MAnuAl
Providing Exceptional Consumer Optical Products Since 1975
IN 508 Rev. C 06/14
Customer Support:www.OrionTelescopes.com/contactus
Corporate Offices:89 Hangar Way, Watsonville CA 95076 - USA
Copyright © 2013-2014 Orion Telescopes & Binoculars All Rights Reserved. No part of this product instruction or any of its
contents may be reproduced, copied, modified or adapted, without the prior written consent of Orion Telescopes & Binoculars.
2
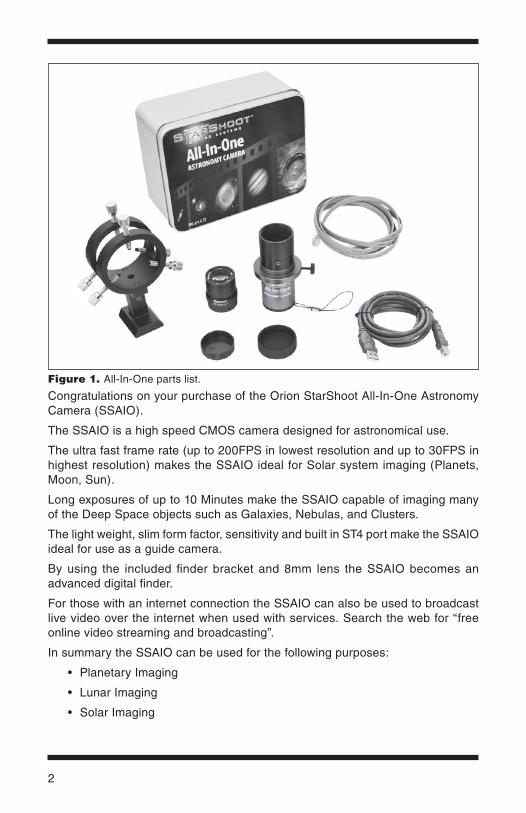
Congratulations on your purchase of the Orion StarShoot All-In-One Astronomy Camera (SSAIO).
The SSAIO is a high speed CMOS camera designed for astronomical use.
The ultra fast frame rate (up to 200FPS in lowest resolution and up to 30FPS in highest resolution) makes the SSAIO ideal for Solar system imaging (Planets, Moon, Sun).
Long exposures of up to 10 Minutes make the SSAIO capable of imaging many of the Deep Space objects such as Galaxies, Nebulas, and Clusters.
The light weight, slim form factor, sensitivity and built in ST4 port make the SSAIO ideal for use as a guide camera.
By using the included finder bracket and 8mm lens the SSAIO becomes an advanced digital finder.
For those with an internet connection the SSAIO can also be used to broadcast live video over the internet when used with services. Search the web for “free online video streaming and broadcasting”.
In summary the SSAIO can be used for the following purposes:
• Planetary Imaging
• Lunar Imaging
• Solar Imaging
Figure 1. All-In-One parts list.

3
• Terrestrial Imaging
• Entry Level Deep Space Imaging
• Wide Field Digital Finder
• AutoGuiding
• Live internet broadcasting
• The SSAIO can even be used as a high resolution AllSky camera when used with an optional Fish Eye Lens with meteor detection and time-lapse software (sold separately, Item #52052 All-In-One AllSky Solution).
Parts listStarShoot All-In-One Astronomy Camera (SSAIO)
Par Focal Ring
C mount adapter with IR filter
1.25" Nosepiece
8mm Wide Field Lens
Adjustable Finder Bracket
USB Cable
Autoguider cable
Manual
Par Focal ringAttach the ring to the body of the SSAIO and position as desired and lock using thumb screw. The ring aids in preventing the SSAIO from falling too far into a focuser and also helps to match the SSAIO focus position to an eyepiece. Focus first using your eyepiece, then replace eyepiece with SSAIO camera and move camera until near focus. Lock the ring at this position so that camera and eye-piece are now close to matching focus.
C Mount AdapterUse the C mount adapter to attach nosepiece to camera.
Use the CS mount adapter to attach lenses such as the included 8mm Wide Angle lens or the Fish Eye lens (sold separately).
1.25" nosepieceAttach the 1.25" nosepiece to camera using the C mount adapter.
This is the normal setup for using with a Telescope.
The nosepiece is fitted with filter threads.

4
For light polluted skies we recommend using the Orion SkyGlow Astrophotography filters (Item #05559).
(Filters available through Orion, check the catalog or OrionTelescopes.com for more information).
8mm Wide Field lensAttach the 8mm Wide Field lens to the SSAIO using the C mount adapter.
Adjustable Finder BracketPlace the finder bracket into the dovetail finder base on your telescope and lock using thumb screw.
The bracket base also features a ¼ 20 thread underneath to attach to a standard tripod. The bracket base can be removed from the rings to reveal another ¼ 20 thread underneath the rings to also attach to a standard tripod. This makes using the camera and bracket with a standard tripod more convenient and portable than using a telescope with mount and tripod.
Place the SSAIO camera through the rings of the Finder Bracket and adjust the nylon tip screws to center view to be the same as view through telescope.
Use the reticules built into the software to aid in centering and for use as a digital finder.
Autoguider CablePlug the autoguider cable into ST4 port located on rear of the SSAIO and also into guide port located on mount. Use PHD software for guiding.
System requirementsComputerThe SSAIO requires a PC running Windows XP, Vista, 7 or 8.
The computer hardware should have at least the following:
• Connection to the Internet
• 512MB RAM
• Disk Space – 10GB or more is recommended
• Video Display –16-bit color or higher, 1280 x 960 or higher is recommended
• Mouse
• USB High Speed 2.0 port

5
Software and Driver InstallationBefore the SSAIO can be used, soft-ware and camera drivers must be installed onto your computer.
Do not connect the camera to your computer before you have installed the software.
All software, manuals and guides can be downloaded directly from the Orion SSAIO product support page located at the link below:
www.telescope.com/aio
The following software can be located on the right hand side of the product sup-port page.
1. Download and run SSAIO Camera Driver. Go through the prompts until the driver is installed.
2. Next download and run SSAIO ASCOM Driver. Go through the prompts until the driver is installed.
3. Next download and run the ASCOM platform (unless previously installed) The ASCOM Platform is necessary to use the ASCOM driver with ASCOM compatible software. Check the ASCOM platform website listed below for updates and additional details.
http://www.ascom-standards.org
4. Next download and run PHD guiding. Go through the prompts until the guid-ing software is installed. Check PHD guiding website listed below for updates and additional details.
http://www.stark-labs.com/phdguiding.html
5. If you intend to use the SSAIO to broadcast over the internet, download and run SSAIO WDM Driver. Go through the prompts until the capture software is installed.
6. If you intend to use your camera also as a Lunar, Solar, Planetary or Deep Space imager, download and run ORION ASTROCAP. Go through the prompts until the capture software is installed.
7. Also located on the SSAIO product support page is the Orion AstroCap Software guide. This guide is essential for Lunar, Solar, Planetary or Deep Space imagers to get the most out of the SSAIO.
Figure 2. Device manager displaying successful installation of AllInOne camera driver.
6
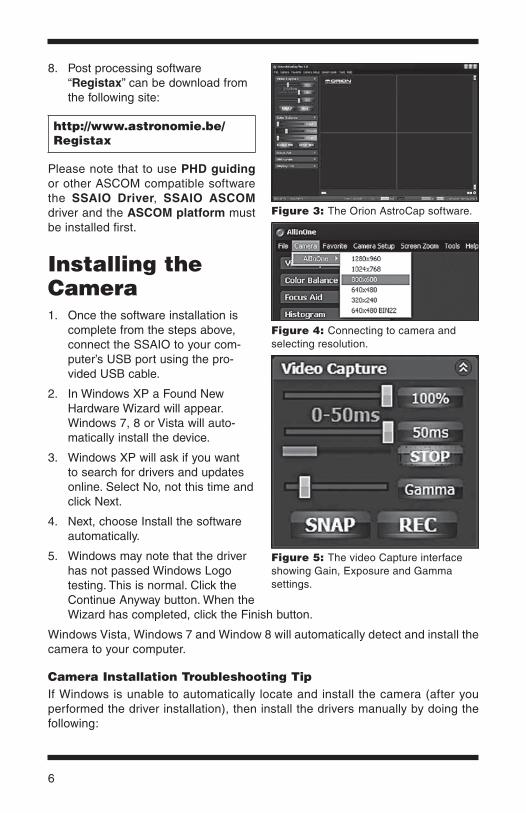
8. Post processing software “Registax” can be download from the following site:
http://www.astronomie.be/registax
Please note that to use PHD guiding or other ASCOM compatible software the SSAIO Driver, SSAIO ASCOM driver and the ASCOM platform must be installed first.
Installing the Camera1. Once the software installation is
complete from the steps above, connect the SSAIO to your com-puter’s USB port using the pro-vided USB cable.
2. In Windows XP a Found New Hardware Wizard will appear. Windows 7, 8 or Vista will auto-matically install the device.
3. Windows XP will ask if you want to search for drivers and updates online. Select No, not this time and click Next.
4. Next, choose Install the software automatically.
5. Windows may note that the driver has not passed Windows Logo testing. This is normal. Click the Continue Anyway button. When the Wizard has completed, click the Finish button.
Windows Vista, Windows 7 and Window 8 will automatically detect and install the camera to your computer.
Camera Installation troubleshooting tipIf Windows is unable to automatically locate and install the camera (after you performed the driver installation), then install the drivers manually by doing the following:
Figure 4: Connecting to camera and selecting resolution.
Figure 5: The video Capture interface showing Gain, Exposure and Gamma settings.
Figure 3: The Orion AstroCap software.

7
1. With the camera plugged into the USB, go to the Device Manager from the Windows Control Panel.
2. Locate the “AstroImaging Equipment” device tree, and right click on the device “AllInOne_B”.
3. Select “Update Driver”, then browse the file path to the direc-tory you installed the drivers, the default is: C:\Program Files\Orion\AllInOneDrivers
Getting StartedLet’s start by exploring the interface of the capture software “Orion AstroCap”.
Connect the SSAIO to computer and run the “Orion AstroCap” software.
CameraIn order to connect with the camera, select the desired resolution from the camera drop down menu (Figure 4).
When the SSAIO camera is plugged in, the Orion AstroCap software will rec-ognize the camera and display a drop down list of available resolutions.
Select from the available resolutions to connect to the camera.
If no camera is seen, check cable connections and camera driver installation.
Video CaptureGAIN: The fist slider is for GAIN. (Figure 5) This is represented as a percent-age of the total gain. Move the slider back and forth to adjust gain. By pressing the button displaying the percentage amount, a number pad pop up will appear allowing for more precise settings of the gain to be entered.
EXPOSURE: The next slider is for EXPOSURE. This is represented in micro-seconds, milliseconds and seconds. Move the slider back and forth to adjust exposure. By pressing the button displaying the exposure amount, a number pad pop up will appear allowing for more precise settings of the exposure to be entered (Figure 6).
Note: Choose between MicroSeconds (µs), MilliSeconds (ms) and Seconds (s) when selecting exposure values (Figure 6).
GAMMA: Gamma can be adjusted from 0.7 to 2.2.
Figure 6: Exposure number pad interface.

8
SNAP: This will take a still image in the format specified by record options (Figure 5).
REC: This will record a movie the format specified by record options (Figure 5).
Color BalancePress Global WB to automatically set the white balance (Figure 7).
Or Press SPOT WB and click on image to set white balance.
Or alternatively use sliders to manually adjust color.
Focus AidSelect FWHM (Full Width Half Maximum) and double click on a star on the live image. A box will now appear around the star. In the Focus Aid window the star can be seen mag-nified (Figure 8). Adjust focus until the on screen number shows the smallest value.
HistogramDisplays a histogram graph of the live image.
Can be used to detect under and over exposure.
Each color channel is displayed show-ing on the X-Axis the brightness level and the Y-Axis the number of pixels at that tone (Figure 9).
Display lutSelect from a drop down list of false color lookup tables to exchange for the real color (Figure 10).
Figure 8: FWHM Focus Aid.
Figure 9: Histogram graph.
Figure 7: Color Balance interface.

9
record OptionsAVI, SEr, BMP, JPG, tIF & FIt:We recommend AVI format to begin with (Figure 11), as this format eas-ily stores your capture files as a video which can easily be played back with-out any processing and can also later be used to export to post process-ing software such as MaximDL or RegiStax.
SER and FIT formats are raw captures that can only be done when the cam-era color is disabled.
This format is much smaller in data size and produces a much faster cap-ture rate.
Image processing programs like MaxImDL or RegiStax can convert the raw monochrome images (SER or FIT) back into color.
When imaging solar system objects we recommend selecting the AVI or SER Video Record formats and setting the number of recorded frames to unlim-ited (Figure 11). Then by pressing the REC button a single movie file will be continuously recorded until the user presses the STOP button.
When imaging deep space objects we recommend selecting the FIT Video Record format and setting the num-ber of recorded frames to a dozen or more (Figure 11). To set the number of frames first select the slider bar and adjust to get desired number of frames (Figure 11). Once selected with the mouse the slider can also be adjusted by single increments using the left and right cursor keys. Then by pressing the REC button multiple sequential FITS files will be automatically recorded (unlike the Snap single frame format which will only record one FIT file).
Figure 11: Record Options.
Figure 10: Color Lookup Tables

10
timelapseTo create time-lapse images or movies click the checkbox and select number of frames delay before each image is captured (Figure 11).
toolsGuide Port InterfaceConnect the SSAIO to mount guide port via included guide cable. The guide port interface (Figure 12) can be used to center objects when planetary imaging as well as provide a means to check that the guide port and cables are functioning properly.
Note: This is not for actual guiding. We recommend PHD guiding software which can be downloaded free on the developer’s web site:
http://www.stark-labs.com/phdguiding.html
Dark Frame CorrectionAll CCD and CMOS cameras have inherent noise which becomes more apparent with longer exposure images. If you require taking longer exposures (typically longer than 3 seconds) you may start to see background noise, vertical lines and bright dots (hot pixels).
To automatically remove the noise and hot pixels, dark frames are used to sub-tract the noise and hot pixels from the live images. Best results are accomplished by capturing many dark frames and averaging them (Median Combine) into one resultant frame.
In order to create dark frames the camera must be covered so that light is blocked from passing into the sensor. If using a telescope this can easily be accomplished by placing the lens cap on the telescope.
In order to first capture dark frames select Automatic (Figure 13), Next select the number of images to take (Dark Frame Quantity) and finally select the Capture
Figure 13. Dark Frame Correction interface.
Figure 12. Guide port interface.

11
Dark Field checkbox. The user will now be prompted to cover their telescope and recording will begin.
When all dark frames have been recorded according to the value in Dark Frame Quantity, the user will be prompted to remove the lens cap.
The user can now select either:
• Enable Dark Correction – This will now subtract the averaged dark frames from the live image to produce a cleaner image.
• SaveDark button to save the averaged dark frames as a DAT file.
Once the dark frames have been saved they can be reused at any time by first selecting Manual Load, then clicking Load Darks to open file load window in order to select the previously saved Dark frame DAT file and finally selecting Enable Dark Correction.
Users may choose to record many DAT files at a variety of different exposures to save time later in the field. It is important to note that noise and hot pixels will change according to the temperature so this should also be taken into consid-eration.
Note: Dark frames must match the live image exposure and gain values in order to work correctly.
To test your darks frames keep the lens cap on and view the noise and hotpixels in the live image. Now select the checkbox Enable Dark Correction.
live BroadcastIncluded with the software is a WDM driver. This driver enables the SSAIO cam-era to be able to broadcast video over the internet via software such as Orion Handy AVI Lite (included with the Orion StarShoot All-In-One Camera All-Sky Solution) or by using internet broadcasting services. Search the web for “free online video streaming and broadcasting”.
Select Live Broadcast from the tools menu within Orion AstroCap then Select Orion Camera (WDM) from within the broadcasting software.
OverlaySelect Overlay to see an image overlaid on top of the live video. The default Image is the Orion Logo (Figure 14).
Users can add their own overlay by modifying the file “overlay.jpg”
Black will be the transparent color. Please keep resolution size same as the default file at 1280 x 1024 pixels.
Figure 14. Overlay and Reticule activated.

12
reticleTwo reticules are included for use in centering targets and to use as a Digital Video Finder when used in combination with the finder bracket and 8mm lens (Figure 13).
Screen ZoomZoom is useful for aiding in manual focusing.
Zoom in on the live image and then pan around to find a target to focus on.
Focus and then zoom back out.
time StampWhen set overlays a timestamp on each recorded frame.
High Priority Disk WriteThis features reduces the display speed in order to free CPU cycles for the disk write.
When active this feature adds ~ 300ms delay between frames to make sure the display and hard drive are in sync. This can be beneficial for slower hard drives.
Quality Filter SettingThe quality filter setting is a software filter that helps reduce atmospheric jitter by filtering out the out of focus image.
Camera SetupColor / MonoSelect between color and mono.
12 Bit ImageWhen checked, FITS and SER formats become available for image and movie capture.

13
Files can be converted back into color post capture within software such as RegiStax or MaximDL.
High Speed readoutThis feature controls the USB transfer speed. It is used to increase performance but may not work on some computers.
Camera Advanced SettingNot normally used but can aid in reducing USB problems.
USB traffic can be improved by modifying this value.
If live image seems to be dropping frames or not working at all then try setting USB traffic to 30 to reduce the FPS.
using the Camera for the First timeWe recommend using the camera for the first time in daylight to become familiar with the software interface and camera settings.
1. Setup your telescope and use an eyepiece to locate an object outside that is 200 yards or more away.
2. Plug the SSAIO into your computer’s USB port.
3. Remove the eyepiece and insert the SSAIO into the 1.25" eyepiece holder on your telescope (Figure 15).
4. Open Orion AstroCap and select a resolution to connect to camera.
5. If the image is white on the screen, it’s overexposed. Adjust the exposure and gain as needed to reduce the brightness.
6. Focus telescope until you get a sharp image on your computer screen.
7. Select Global WB in order to set the white balance (Figure 7).
8. Experiment with the different camera settings. The exposure and gain will be the most frequently used settings.

14
Planetary ImagingPlanetary imaging is also referred to as Solar System imaging, and includes the Moon, the Sun (with a proper full aperture solar filter!), the planets, and miscellaneous objects in Earth’s orbit such as the International Space Station (ISS). The SSAIO is capable of capturing all these objects in real time.
Just about any telescope is suitable for the SSAIO when imaging the planets. The longer the focal length of the tele-scope, the larger and more detailed the images will appear. Unlike deep space astro-imaging, you actually want to have a long focal length and focal ratio for planetary imaging. Adding a 2x, 3x or higher Barlow to the telescope to increase magnification is not uncom-mon for planetary imaging (Figure 16). The planets and other solar system objects are relatively bright and can be imaged with a darker or “slower” focal ratio.
To help capture those brief moments of good seeing, planetary imagers can select a smaller resolution to increase frame rates.
Select 640x480 2x2 binning mode for increased frame rate and sensitivity (Figure 4).
Select 12bit mode to save in FITS and SER formats and to also improve cap-ture frame rates.
Larger resolutions are best for long exposure, wide field images whereas smaller resolutions are generally better for short exposure, high magnification images.
High power planetary imaging often leaves the best focus up to your eyes when monitoring the live image. Use the zoom tool to aid in focus.
Select the fastest exposure time possible so that images appear less blurred and set the gain as high as possible without introducing too much graininess. Experiment with your telescope and camera to find the optimum settings for your particular setup.
Figure 15. The SSAIO attached to telescope for solar system imaging.
Figure 16. Top: 5x Barlow, Middle: 3X Barlow, Bottom: No Barlow.
15
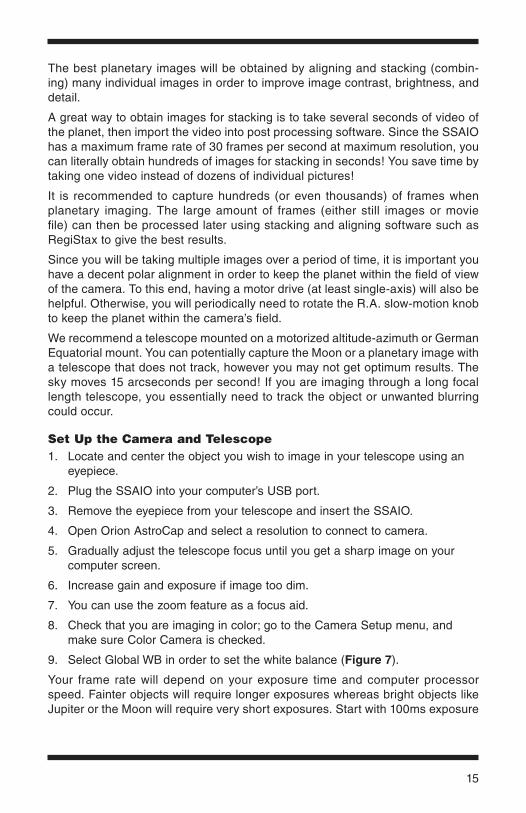
The best planetary images will be obtained by aligning and stacking (combin-ing) many individual images in order to improve image contrast, brightness, and detail.
A great way to obtain images for stacking is to take several seconds of video of the planet, then import the video into post processing software. Since the SSAIO has a maximum frame rate of 30 frames per second at maximum resolution, you can literally obtain hundreds of images for stacking in seconds! You save time by taking one video instead of dozens of individual pictures!
It is recommended to capture hundreds (or even thousands) of frames when planetary imaging. The large amount of frames (either still images or movie file) can then be processed later using stacking and aligning software such as RegiStax to give the best results.
Since you will be taking multiple images over a period of time, it is important you have a decent polar alignment in order to keep the planet within the field of view of the camera. To this end, having a motor drive (at least single-axis) will also be helpful. Otherwise, you will periodically need to rotate the R.A. slow-motion knob to keep the planet within the camera’s field.
We recommend a telescope mounted on a motorized altitude-azimuth or German Equatorial mount. You can potentially capture the Moon or a planetary image with a telescope that does not track, however you may not get optimum results. The sky moves 15 arcseconds per second! If you are imaging through a long focal length telescope, you essentially need to track the object or unwanted blurring could occur.
Set up the Camera and telescope1. Locate and center the object you wish to image in your telescope using an
eyepiece.
2. Plug the SSAIO into your computer’s USB port.
3. Remove the eyepiece from your telescope and insert the SSAIO.
4. Open Orion AstroCap and select a resolution to connect to camera.
5. Gradually adjust the telescope focus until you get a sharp image on your computer screen.
6. Increase gain and exposure if image too dim.
7. You can use the zoom feature as a focus aid.
8. Check that you are imaging in color; go to the Camera Setup menu, and make sure Color Camera is checked.
9. Select Global WB in order to set the white balance (Figure 7).
Your frame rate will depend on your exposure time and computer processor speed. Fainter objects will require longer exposures whereas bright objects like Jupiter or the Moon will require very short exposures. Start with 100ms exposure

16
and 50% gain, and then adjust the exposure as needed for the object you are imaging.
Imaging Tip: To speed up the frame rate, and to acquire a rough focus a lit-tle quicker, select resolution 640x480 2x2 binning mode. This will increase the frame rate and operate at 1/4th the resolution of the camera. Binning in 2x2 is also useful when using very long focal length telescopes.
Set up CaptureOnce you have achieved focus and good color, you are ready to capture and save images to your computer.
1. Go to Record Options menu (Figure 11) and Select Working Folder. You can-not make a new folder here, so you may want to create one using Windows Explorer ahead of time.
2. Select the REC Video record format and the SNAP single frame format.
3. Select desired filename format from the auto filename options.
4. Set the number of seconds or number of frames for your capture. Keep your hard disk space in mind. Also, AVI captures are segmented into a max of 2GB. AstroCap will automatically create a new AVI file to continue capturing if you exceed the max AVI file size.
5. Press the REC button to record a movie file in the select format.
6. The frame countdown will be displayed in the lower left corner of AstroCap.
View and StackAfter you have captured your images, you can review them in RegiStax, a free-ware program downloadable from:
http://www.astronomie.be/registax
We recommend stacking a minimum of 50 images or more. The individual images have low bit depth (255 brightness level counts), and background noise. Additionally, the individual images may be very soft since if you’re imaging at high power, with or without the use of a Barlow. Stacking will improve the poten-tial sharpness when processing in RegiStax. Stacking several hundred or more images is sometimes appropriate to get the most possible detail.
17
BinningThe SSAIO can bin 2x2 to achieve 640 x 480 resolution in color. Binning in color is a unique feature can provides great versatility to your planetary imag-ing. If you are using a telescope system with very long focal length, or if the local seeing conditions are poor, you may benefit from binning 2x2 to improve sharpness, sensitivity, and frame rate.
Select resolution 640x480 2x2 binning mode (Figure 3).
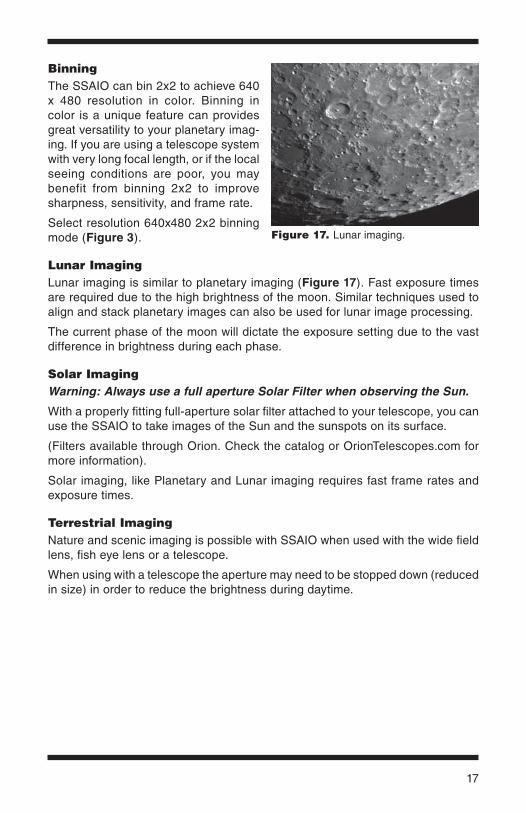
lunar ImagingLunar imaging is similar to planetary imaging (Figure 17). Fast exposure times are required due to the high brightness of the moon. Similar techniques used to align and stack planetary images can also be used for lunar image processing.
The current phase of the moon will dictate the exposure setting due to the vast difference in brightness during each phase.
Solar ImagingWarning: Always use a full aperture Solar Filter when observing the Sun.
With a properly fitting full-aperture solar filter attached to your telescope, you can use the SSAIO to take images of the Sun and the sunspots on its surface.
(Filters available through Orion. Check the catalog or OrionTelescopes.com for more information).
Solar imaging, like Planetary and Lunar imaging requires fast frame rates and exposure times.
terrestrial ImagingNature and scenic imaging is possible with SSAIO when used with the wide field lens, fish eye lens or a telescope.
When using with a telescope the aperture may need to be stopped down (reduced in size) in order to reduce the brightness during daytime.
Figure 17. Lunar imaging.

18
Deep Space ImagingLong exposures of up to 10 minutes give the user the ability to capture Galaxies, Clusters, Nebulas, Comets and even asteroids (Figure 18).
Note: Long exposures will require a tracking mount with decent polar alignment. For best results a guide camera should also be used.
The longer the exposure the higher the amount of noise and hot pixels there-fore automatic dark frame subtraction can be used to calibrate images real time (Figure 13) thereby vastly reducing the post processing time later on. This fea-ture also gives the best live view.
Focusing can be tricky with long exposures therefore it is recommended to first start with a shorter exposure in order to frame your target and get best possible focus.
Use the zoom tool and the FWHM focus tool in order to achieve best focus.
Select FWHM and double click on a bright star. A green box will appear around the star and in the Focus tool window one can see a magnified view of the star (Figure 8). Using the value displayed at the top of the screen as your guide, adjust focus to get this number as small as possible. When finished focusing, the exposure can be set to a higher desired value.
Take as many frames as possible for combining later in post processing software such as RegiStax. This will reduce noise and give best details.
Figure 18. Deep Space Imaging.
19
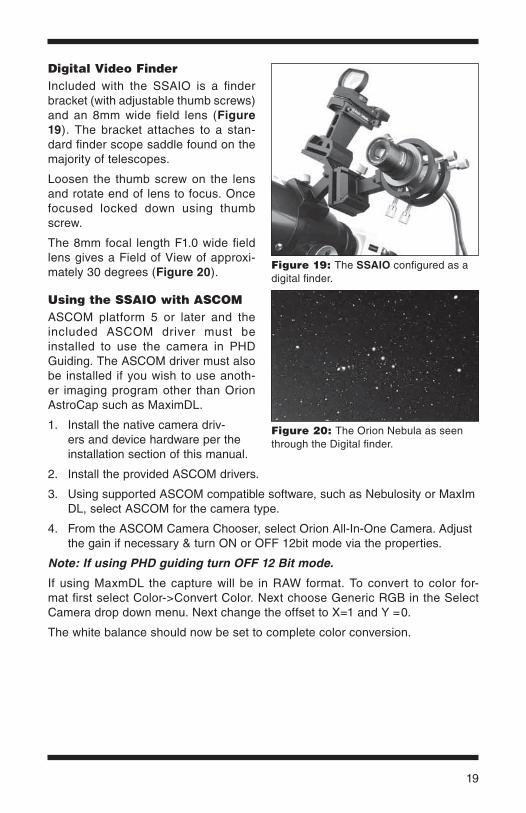
Digital Video FinderIncluded with the SSAIO is a finder bracket (with adjustable thumb screws) and an 8mm wide field lens (Figure 19). The bracket attaches to a stan-dard finder scope saddle found on the majority of telescopes.
Loosen the thumb screw on the lens and rotate end of lens to focus. Once focused locked down using thumb screw.
The 8mm focal length F1.0 wide field lens gives a Field of View of approxi-mately 30 degrees (Figure 20).
using the SSAIO with ASCOMASCOM platform 5 or later and the included ASCOM driver must be installed to use the camera in PHD Guiding. The ASCOM driver must also be installed if you wish to use anoth-er imaging program other than Orion AstroCap such as MaximDL.
1. Install the native camera driv-ers and device hardware per the installation section of this manual.
2. Install the provided ASCOM drivers.
3. Using supported ASCOM compatible software, such as Nebulosity or MaxIm DL, select ASCOM for the camera type.
4. From the ASCOM Camera Chooser, select Orion All-In-One Camera. Adjust the gain if necessary & turn ON or OFF 12bit mode via the properties.
Note: If using PHD guiding turn OFF 12 Bit mode.
If using MaxmDL the capture will be in RAW format. To convert to color for-mat first select Color->Convert Color. Next choose Generic RGB in the Select Camera drop down menu. Next change the offset to X=1 and Y =0.
The white balance should now be set to complete color conversion.
Figure 20: The Orion Nebula as seen through the Digital finder.
Figure 19: The SSAIO configured as a digital finder.

20
AutoguidingThe SSAIO is also a fully functional autoguider (Figure 21). The autogu-ider output is on-board the camera, allowing the autoguider cable to con-nect directly from the camera to your mount’s autoguider port.
Primary telescope/Main Imaging ScopeYour main imaging scope will be used with your main astro-imaging camera. The main imaging scope can be virtu-ally any scope suitable for your CCD or DSLR camera.
Guide ScopeYou will need an additional telescope for guiding, referred to as a guide scope. The guide scope is mounted on top of, or beside the main imaging scope. Adjustable guide scope tube rings (available from Orion) are recommended and allow you to move the guide scope around without moving the main imaging scope. The guide scope is adjusted in the same fashion as a finder scope.
Because of the high resolution and accuracy of the SSAIO, you do not need a large guide scope; any small refractor will serve well for this purpose. Separate refractor optical tube assemblies, such as the Orion Short Tube 80, make excel-lent guide scopes.
The only exception to using a guide scope is to is use an off-axis guider, which is typically made for Schmidt-Cassegrain telescopes. The off-axis guider uses a prism to intercept a small portion of the light path in front of the camera, thus allowing the camera and guider to use the same telescope. Off-axis guiders require a large amount of inward focus travel which is why they are only suitable for Cassegrain type telescopes.
MountAn equatorial mount with dual axis motors and a RJ-12 autoguide port is required. Just about any equatorial mount equipped with an autoguide port will work with the SSAIO. The SSAIO is “ST-4” compatible which uses the same pin out config-uration as the first generation CCD autoguiders. Most computerized goto mounts also have this autoguide port. For short exposure deep space photography (typi-cally 45 seconds or less) the SSAIO can successfully guide with a computer-ized altitude-azimuth or fork mounted telescope, popular among computerized Schmidt-Cassegrain telescopes.
However, guided exposures longer than one minute in an altitude-azimuth mount will cause field rotation to occur in the image.
Figure 21. The SSAIO setup for guiding using the Orion Mini guider with helical focuser.

21
PHD GuidingThe SSAIO with the use of PHD Guiding (Push Here Dummy) software makes the task of autoguiding simple and easy to setup. The calibration and guiding is automatic once you ini-tially find and focus a guide star. Your telescope must first be prepared for astro-imaging. Make sure your mount is polar aligned well. Your guide scope should be securely attached to your main imaging scope; or if you are using a Schmidt-Cassegrain, the off-axis guider and main camera should already be attached to the telescope.
Note: Autoguiding can correct for a mount that is poorly polar aligned. However the image will be harder to initially locate and center since it will still drift away from the camera’s field of view. Additionally, guiding with a poor polar alignment will eventually cause field rotation in a long exposure image.
Locate, center and focus the celestial object you wish to image with your CCD or DSLR camera in your main imaging scope. Once you have centered the desired object, it is important to make sure the tracking on your mount is engaged so you don’t lose the object before the guiding starts.
1. Using a low power 1.25" eyepiece, locate and center a fairly bright star in your guide scope. Do not move the main imaging scope or your object will be lost! We recommend using adjustable guide scope tube rings to allow inde-pendent movement of the guide scope.
2. Remove the eyepiece and insert the SSAIO into your guide scope. The Par Focal Ring can be used here to match the focus of the camera to the same as the eyepiece. This makes exchanging eyepiece and camera much easier.
3. Plug the SSAIO into your computer’s USB port and connect the autoguider cable from the SSAIO to your mount’s autoguide port.
4. Run PHD Guiding software. Click the Connect to Camera icon and select ASCOM then Orion All-In-One.
5. In the Exposure Selection pull down menu, select 2.0 s.
6. Click on the Looping Exposures icon to begin continuously taking pictures.
7. Gradually move the focus inward on your guide scope until you see the star come into focus. As you get close to focused, the camera may start detecting several faint background stars.
8. Click on the star you want to guide on. A green guide star box should appear around the star you selected. In the lower left corner of PHD Guiding, the
Figure 22. PHD Guiding software.

22
pixel coordinates of the star will be displayed. If the star is too bright, PHD Guiding will warn you with a message at the bottom of the screen; if so you can choose a fainter guide star or reduce the exposure time.
9. Click the PHD Guide icon and the calibration will begin. The rest is auto-matic! Yellow crosshairs are displayed around the guide star box when the calibration starts. The calibration is automatic and takes a few minutes. When the calibration is complete, the autoguiding begins automatically and the crosshairs turn green. You are now ready to take astro-images with precise tracking!
Note: Be patient while PHD Guiding completes the calibration. The tele-scope cannot be disturbed during the calibration process. It is just as criti-cal not to touch the telescope during calibration as it is when exposing an
Figure 23. PHD Guiding key to icons.
A. Connect to Camera: Selects and connects to the autoguider camera. Choose ASCOM camera. Then select the All-In-One camera from the menu.
B. Connect to Telescope: To connect the SSAIO to your mount, go to the Mount menu and select On Camera. The SSAIO will automatically send commands to the autoguide port on your mount once it’s plugged in.
C. Looping Exposures: Takes continuous exposures for acquiring and focusing the guide star.
D. PHD Guide: Automatically calibrates and guides. Once your guide star is found and focused, simply click on the star and click PHD Guide. The rest is automatic!
E. Stop: Stops either calibrating, guiding, or looping exposures.
F. Exposure Selection: Choose from 14 different exposure times for the camera.
G. Guide Star Box: When a guide star is selected, a green box appears around it. PHD Guiding will display the pixel coordinates of the star in the lower left screen. When the calibration routine starts, yellow crosshairs are displayed around the box. When the autoguiding begins, the crosshairs turn green. This box does not appear until a guide star has been selected. (See Start Autoguiding)
H. Gamma Adjustment: Adjust the apparent screen brightness level in the image by moving the slider bar left (brighter) or right (fainter).
I. Advanced Parameters: Control the camera and guiding routine settings. You do not typically have to adjust the advanced parameters. For very bright guide stars, or for daytime testing, the camera gain can be adjusted in this menu. (See Advanced Autoguider Settings for more detail about this menu.)
J. Take Dark Frame: Captures and internally saves a dark frame that is automatically subtracted from future exposures. Be sure to cap the scope’s objective when taking a dark frame.

23
astro-image. The calibration ensures that the AutoGuider knows the move-ments and tracking behaviors of your mount.
Dark Frames and noise reductionAll CCD and CMOS cameras have inherent noise which becomes more apparent with longer exposure images. If you require taking longer exposures (typically longer than 3 seconds) you may start to see vertical lines and bright dots (hot pixels). You will get the best guiding performance when your image background looks smooth and black.
The Gamma Adjustment will help clip the low level background noise by adjusting the slider bar left or right as needed. You can also reduce the camera Gain or enable Noise Reduction (see “Advanced Autoguider Settings”).
Take Dark saves a dark frame which is subtracted from your guiding images to remove most of the noise. Dark frames are images taken with the camera capped from incoming light, revealing only the camera noise in the image. This noise is subtracted from a “light frame” which is the image you want to see from the camera.
To take the dark frame:
1. Cap the objective of your guide scope.
2. Keep the Exposure Selection set to the same time you wish to use for guid-ing. For example, if you choose 2.0 s, then you must keep this exposure time while guiding for the dark frame to be effective.
3. Click Take Dark.
4. Remove the cap from your guide scope and resume taking pictures or guid-ing. PHD Guide will automatically subtract the dark frames from all of your exposures. To remove the dark frame, go to Tools and select Erase Dark Frame.
Advanced Autoguider SettingsThe Advanced Parameters (the brain icon) in PHD allows you to change several settings to better customize the guiding performance of your SSAIO. Under nor-mal use, you should not have to make any major adjustments to the Advanced Parameters. All of the calibration and autoguiding is done automatically simply by pressing the PHD Guide icon. However the following settings can be adjusted to cater to your specific guiding setup:
Advanced Parameters
R.A. Aggressiveness: Adjusts the percentage of R.A. correction per step. The default value is 100, meaning that the guider will move the full distance of the correction. If the seeing conditions are not steady, the aggressiveness can be

24
turned down to smooth out the quick movements and reduce the correctional movement.
R.A. Hysteresis: Implements a percentage of the previous averaged tracking corrections to the current tracking corrections. This setting can be useful if you are experiencing some wind or severe periodic error, since the guider will partially ignore some of the radical movements and repeat a percentage of the previous tracking corrections.
Dec Guide Mode: Allows Dec guiding to be turned on or off, or switched which side of drift to guide on, or auto which will find the side of drift (N/S).
Dec Algorithm: Settings that attempt to smooth the declination corrections to one consistent movement and can be used to resist switching directions in Dec.
Calibration Step: Adjusts how long each guide pulse is during calibration. The default is 500 milliseconds. The calibration step can be increased to provide a better sample of movement. However, if the calibration step is increased too much, the guide star will move out of the camera’s field of view during calibration.
Min. Motion: Number of pixels the star must move before PHD will make a guid-ing correction. The default is 0.25 pixels.
Search Region: The area in pixels that the guide star is searched for and looked at. The default is 15x15 pixels. Under normal use, this setting should not be changed.
Noise Reduction: Choose from 2x2 mean or 3x3 median to smooth out noise and blur out hot pixels.
Time Lapse: This setting optionally sets a delay between each guiding correc-tion. For mounts that track exceptionally well, you can add a delay between each correction.
Gain: The gain adjusts the camera’s internal brightness level and sensitivity. The default is 95%. If you are experiencing excessive noise or hot pixels, you can reduce the gain. The camera remains very sensitive as low as 50% gain. If you are guiding on a very bright guide star, you can afford to turn down the gain and further decrease the noise in your image.
Force Calibration: Enabling this setting makes PHD Guide calibrate every time a new star is chosen. If you move your telescope to another object in the sky, you will need to recalibrate the autoguider. The default has this setting enabled.
Log Info: You can log all actions into a text file saved in the PHD directory.
Disable Guide Output: This setting deliberately shuts off the autoguider output for potential troubleshooting measures.
Autoguiding tips & tricksIf all conditions are ideal, and your tracking is superb, you typically do not have to alter any of the camera’s default settings. However, if your setup is tracking much

25
worse than usual (such as a night with high wind or poor seeing), you may need to customize your settings to better adapt to the current conditions in the field.
Reduce the R.A. Aggressiveness in the Advanced Parameters menu to better stabilize the guiding during bad seeing or wind gusts. You may also want to decrease the R.A. Aggressiveness if your guiding exposures/corrections are set very quickly (less than 1 second). If the guider sends several corrections per second to the mount, the mount’s movement may osculate due to the response time of your mount. Additionally the varying seeing conditions makes the star appear to jump around rapidly and cause the guider to make unnecessary cor-rections, sometimes referred to as “chasing the seeing”. If seeing is poor, keep the guiding correction intervals/exposures to 1 second or more. For most guide scopes, we recommend setting the autoguide exposures between 1-4 seconds for best results.
Polar AlignmentA good polar alignment of your EQ mount is of critical importance for long-expo-sure imaging. Inaccurate polar alignment leads to field rotation, even with the autoguider tracking. If your equatorial mount uses a polar axis finder scope, we highly recommend utilizing it for polar alignment. If not, a technique known as the “drift method” of polar alignment has been used for many years, and can achieve an extremely accurate polar alignment. Unfortunately it is very time consuming, since the drift of a star over time must be observed. The basic idea is to let the telescope mount track while watching a star to see which way the star drifts. Note the direction of the drift, and correct by moving the mount in the appropriate direction.
To perform the drift method of polar alignment:
1. Do a rough polar alignment by pointing the R.A. axis of the mount at Polaris (the NorthStar).
2. Find a bright star near the meridian (the imaginary line running north-to-south through zenith) and near the celestial equator (zero degrees declina-tion). Point the telescope at this star, and center it in an illuminated reticle eyepiece (available from Orion). If you don’t have an illuminated reticle eye-piece, use your highest-magnification eyepiece.
3. Determine which way is north and south in the eyepiece by moving the tele-scope tube slightly north and south.
4. Now, let the mount’s motor drive run for about five minutes. The star will begin to drift north or south. Ignore any east-to-west movement.
5. If the star drifts north, the telescope mount is pointing too far west. If the star drifts south, the telescope mount is pointing too far east. Determine which way the star drifted and make the appropriate correction to the azimuth posi-tion of the mount. Rotate the entire mount (and tripod) slightly east or west as needed or use the azimuth adjustment knobs (if your mount has them) to make fine adjustments to the mount’s position.

26
6. Next, point the telescope at a bright star near the eastern horizon and near the celestial equator (Dec. = 0).
7. Let the telescope track for at least five minutes, and the star should begin to drift north or south.
8. If the star drifts south, the telescope mount is pointed too low. If the star drifts north the telescope mount is pointed too high. Observe the drift and make the appropriate correction to the mount’s altitude (or latitude); most mounts have some sort of fine adjustment for this.
Repeat the entire procedure until the star does not drift significantly north or south in the eyepiece after a few minutes. When this is accomplished, you are very accurately polar aligned. Autoguiding on a well polar aligned mount will deliver the best results.
Differential tube FlexureA common obstacle in guiding with a separate guide scope and imaging scope is differential tube flexure, the unwanted movement of a guide scope in relation to the main imaging scope. If any part between the autoguider and imager moves or flexes during the exposure, then the resulting image will have oblong stars which gives the appearance of poor tracking. There are a few basic measures to ensure your guide scope is securely in place:
1. If your guide scope has a focus lock, firmly tighten the focus lock thumb screw after you have focused on your guide star.
2. If you are using adjustable guide scope tube rings, make sure all thumb screws are firmly tightened against the guide scope tube.
3. The guide scope tube rings and mounting plate should be tightened very securely against the main imaging scope. Check for any visual flexure or movement by gently pressing against the guide scope.
4. The focuser and tube rings on the main imaging scope should also be firmly in place. It is not uncommon for screws and bolts to come loose after a few usages; so they should be checked before each imaging session.
CablingThe SSAIO uses only two light-weight cables; a USB cable and the autoguider cable. Keep an eye on the cables as you move the scope around. If there is any stress on the cables, your tracking will be affected.
Some imaging cameras use heavy-duty cables with significant weight. These cables can contribute to differential tube flexure. If you are getting images with oblong stars and your tracking appears to be good otherwise, try attaching any heavy cables to a secure location on your mount. It does not take much resis-tance against the autoguider or imager to create poor tracking.

27
tipsFocusingOne of the hardest things to do in planetary imaging is achieving good focus. You can make this process easier by simply watching the Live Video window to focus. Depending upon the viewing conditions you may notice that the image goes in and out of focus, this is due to viewing conditions. This is to be expected and one of the reasons why post processing software can bring out the best in your captured images. Focus as best as possible with the average frame being at best focus to ensure more in focus frames than out of focus. Image processing software can then be used to select the best frames to combine for best results and can also reject the poorest frames. Use the zoom feature to aid in focusing.
For long exposure deep space imaging it is best to start with a fast exposure on a nearby bright star and use the Full-Width-Half-maximum (FWHM) focus tool to achieve the best focus.
First double click on a bright star. A green box will appear around the star and in the Focus tool window one can see a magnified view of the star. Using the value displayed at the top of the screen as your guide, adjust focus to get this number as small as possible. When finished focusing, the exposure can be set to a higher desired value.
Refocus often throughout your imaging session. This ensures at least some of your images will have an excellent focus. It is also not uncommon for telescope movements to alter the focus slightly, so be sure to refocus for any new astro-imaging targets.
Choosing a Site for Astro-ImagingOnce you have a focused image, you may find your image shifting and washed out. This can be caused by many environmental factors. Poor seeing (movement of molecules in the air, such as heat rising) and poor transparency (moisture, smoke, or other sky contaminants) will all serve to reduce image quality. That is why most major astronomical telescopes are on high mountains in thin air, to get above much of the seeing and transparency problems. Also, wind will move your telescope and affect images. Your eyes viewing through an eyepiece can change slightly to compensate for disturbances like these, but the camera cannot. Keep these factors in mind when choosing an observing site for astronomical imaging.
For the best astro-images, we recommend finding a location with dry air, some altitude, and away from city or streetlights. Even a nearby hilltop in the coun-tryside can provide better viewing conditions than many convenient backyard locations.
loss of Camera ConnectionIf the computer connection to the camera is interrupted, you will need to re-estab-lish connection. This can happen due to several reasons; if a cable becomes

28
unplugged, the computer “freezes”, or the software/hardware otherwise tempo-rarily loses the data coming from the camera.
To re-establish camera connection, first close the Orion AstroCap program on your computer. Then, unplug and re-plug the camera into the computer’s USB port. Now, open Orion AstroCap and select camera resolution. The Live Video Window should now appear indicating re-established connection between cam-era and computer.
using Focal reducers and Barlow lensesFocal reducers serve to decrease the focal length of your telescope. This increas-es the field of view seen by the camera (decreases camera magnification). This can be useful for obtaining images of wider objects, such as the full Moon or a landscape vista.
Barlow lenses, or other tele-extenders, increase the focal length of your tele-scope, which makes the camera field of view narrower (increases camera mag-nification). This is useful for high-power planetary images (Figure 16). Keep in mind that when the focal length is doubled, the image will become four times dimmer, so a longer exposure may be necessary.
For best planetary imaging, you should shoot with an effective focal ratio (tele-scope focal length ÷ telescope aperture) of F/20 or greater. This will give you a good combination of image brightness and image scale for planets. For most telescopes, a Barlow lens will be required to obtain this focal ratio. For example, Schmidt-Cassegrain telescopes usually have a focal ratio of F/10. A 2x Barlow lens doubles the effective focal length of the telescope, which makes the focal ratio f/20. Similarly, a 3x Barlow lens will yield of focal ratio of F/30. You can also try using multiple Barlows to obtain even greater effective focal ratios. There is a limit to how large a focal ratio your telescope and seeing conditions can handle, however. Experimentation will be needed to see what your telescope is capable of in the seeing conditions on a given night. If the image appears somewhat dim and fuzzy on the computer screen, you may want to consider removing the Barlow lens.
(Focal Reducers and Barlow lenses available through Orion, check the catalog or OrionTelescopes.com for more information).
Solar FilterWarning: Always use a full aperture solar filter when viewing the sun.
With a properly fitting full-aperture solar filter attached to your telescope, you can use the SSAIO to take images of the Sun and the sunspots on its surface.
(Solar filters available through Orion, check the catalog or OrionTelescopes.com for more information).

29
Flip MirrorAs easy as flipping a switch, the Imaging Flip Mirror enables the astro-photogra-pher to find, center and focus a target visually with a 1.25" telescope eyepiece, then photograph it with a CCD camera. All without swapping out any equipment. It’s a real timer saver, making the normally tedious task of focusing with the CCD camera alone easier and quicker.
(Available through Orion, check the catalog or OrionTelescopes.com for more information).
uSB Extension CableIn many instances, it is likely a longer cable for the SSAIO will be needed in order to comfortably setup the telescope, camera, and computer.
(USB extension cable available through Orion, check the catalog or OrionTelescopes.com for more information).
Care and MaintenanceWhen the SSAIO is not in use, the dust cap should be replaced on the end of the nosepiece. This prevents dust from accumulating on the SSAIO’s optical window. The optical window should only be cleaned if significant dust builds up for if the window is touched. Any quality optical lens cleaning tissue and optical lens cleaning fluid specifically designed for multi-coated optics can be used to clean the glass surface of the SSAIO’s optical window. Never use regular glass cleaner or cleaning fluid designed for eyeglasses. Before cleaning with fluid and tissue, blow any loose particle off the surface with a blower bulb or compressed air. Then apply some cleaning fluid to a tissue, never directly on the optics. Wipe the optical surface gently in a circular motion, then remove any excess fluid with a fresh lens tissue. Use caution, rubbing too hard may cause scratches.
(Cleaning products available through Orion, check the catalog or OrionTelescopes.com for more information).
30
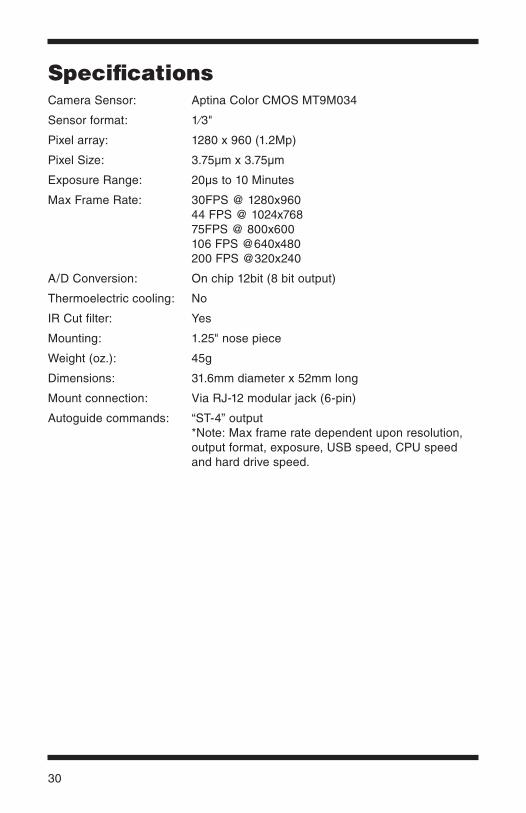
SpecificationsCamera Sensor: Aptina Color CMOS MT9M034
Sensor format: 1⁄3"
Pixel array: 1280 x 960 (1.2Mp)
Pixel Size: 3.75µm x 3.75µm
Exposure Range: 20µs to 10 Minutes
Max Frame Rate: 30FPS @ 1280x960 44 FPS @ 1024x768 75FPS @ 800x600 106 FPS @640x480 200 FPS @320x240
A/D Conversion: On chip 12bit (8 bit output)
Thermoelectric cooling: No
IR Cut filter: Yes
Mounting: 1.25" nose piece
Weight (oz.): 45g
Dimensions: 31.6mm diameter x 52mm long
Mount connection: Via RJ-12 modular jack (6-pin)
Autoguide commands: “ST-4” output *Note: Max frame rate dependent upon resolution, output format, exposure, USB speed, CPU speed and hard drive speed.

31
One-Year limited WarrantyThis Orion product is warranted against defects in materials or workmanship for a period of one year from the date of purchase. This warranty is for the benefit of the original retail purchaser only. During this warranty period Orion Telescopes & Binoculars will repair or replace, at Orion’s option, any warranted instrument that proves to be defective, provided it is returned postage paid. Proof of purchase (such as a copy of the original receipt) is required. This warranty is only valid in the country of purchase.
This warranty does not apply if, in Orion’s judgment, the instrument has been abused, mishandled, or modified, nor does it apply to normal wear and tear. This warranty gives you specific legal rights. It is not intended to remove or restrict your other legal rights under applicable local consumer law; your state or national statutory consumer rights governing the sale of consumer goods remain fully applicable.
For further warranty information, please visit www.OrionTelescopes.com/warranty.
Orion Telescopes & Binoculars
Corporate Offices: 89 Hangar Way, Watsonville CA 95076 - USA
Customer Support: www.OrionTelescopes.com/contactus
Copyright © 2013-2014 Orion Telescopes & Binoculars All Rights Reserved. No part of this product instruction or any of its contents may be reproduced, copied, modified or adapted, without the prior written consent of
Orion Telescopes & Binoculars.