Embed Size (px)
Citation preview

Output Agent Installation and Setup Guide
Perceptive Content Version: 7.1.x Environment: Windows
Written by: Product Knowledge, R&D Date: March 2015
© 2015 Perceptive Software. All rights reserved
Perceptive Software is a trademark of Lexmark International Technology S.A., registered in the U.S. and other countries. All other brands and product names mentioned in this document are trademarks or registered trademarks of their respective owners. No part of this publication may be reproduced, stored in a retrieval system, or transmitted in any form or by any means, electronic, mechanical, photocopying, recording, or any other media embodiments now known or hereafter to become known without the prior written permission of Lexmark.
Output Agent W indows Ins ta l la t i on and Setup Guide
Page 3 of 21
Table of Contents
Output Agent Overview .............................................................................................................................. 4
Install Output Agent .................................................................................................................................... 5
Download Output Agent files ..................................................................................................................... 5
Install Output Agent files ............................................................................................................................ 5
About installation options for Output Agent ........................................................................................... 5
Perform an attended installation of Output Agent .................................................................................. 5
Perform an unattended installation of Output Agent .............................................................................. 7
Remove the DEP setting ........................................................................................................................... 8
License Output Agent ................................................................................................................................ 9
Configure Output Agent ............................................................................................................................. 9
About configuring Output Agent ................................................................................................................ 9
Configure the Output Agent service .......................................................................................................... 9
Define values in a keyfile ......................................................................................................................... 11
Troubleshoot Output Agent ..................................................................................................................... 11
General troubleshooting .......................................................................................................................... 11
Include annotations on output pages ...................................................................................................... 11
Appendix A: inserverOutput.ini ............................................................................................................... 12
Appendix B: Variables to Create Export File Names ............................................................................. 19
Index ........................................................................................................................................................... 21

Output Agent W indows Ins ta l la t i on and Setup Guide
Page 4 of 21
Output Agent Overview Perceptive Content Output Agent is a server-side process that lets you output Perceptive Content documents on a job-by-job basis or in a batch. Using this agent, you can output Perceptive Content documents directly to a printer or to a file. You can also export documents in various formats, including JPEG and raster PDF, and then print the exported documents at any time.
Output Agent additionally offers the ability to export documents in DICOM format and transmit them to an external DICOM server. DICOM is an optional feature of Output Agent and requires an additional license.
To have Output Agent output documents, you can submit an output job to Output Agent using iScript or you can define a keyfile that specifies the documents you want to output. For details about using an iScript to output files from Output Agent, refer to documentation about the submitToPrintServer type in the INDocument help.
Note When exporting records, you cannot submit an output job to Output Agent using keyfiles or iScripts that use keys to look up objects.
Using values in a keyfile, Output Agent returns matching documents stored in Perceptive Content and then outputs them using the specified parameters from the inserverOutput.ini configuration file. Output Agent monitors a specified directory for keyfiles. When a new keyfile appears in the monitored directory, Output Agent recognizes it and then processes it. This document explains how to create a keyfile in the “Configure Output Agent” section.
Note that Output Agent outputs copies of documents, called output files. The Perceptive Content documents remain unaltered within the Perceptive Content repository.
Before you install Output Agent, perform the following readiness checks:
Obtain the IP address and port number of Perceptive Content Server.
Ensure that you have sufficient disk space for executables and object storage.
Important
This document assumes you are installing Output Agent for the first time or that you have no earlier versions running on the computer. To update or upgrade Output Agent from a previous version, refer to the Update ReadMe document. Sections of the update readme may reference procedures in this installation guide.
When using records functionality or Retention Management, only one Output Agent can be installed.
In Windows, you must install this agent in a 64-bit environment. For product technical specifications and system requirements, refer to the Product Technical Specifications for your product version.
Output Agent W indows Ins ta l la t i on and Setup Guide
Page 5 of 21
Install Output Agent This section details the installation process for Output Agent on a Windows environment. The installation process requires downloading and installing the Output Agent files, removing the DEP setting, and licensing Output Agent.
Download Output Agent files
The following steps explain how to download the necessary files to install Output Agent.
1. Go to the Perceptive Software website at www.perceptivesoftware.com and log in to the Customer Portal.
2. In the Product Downloads page, search for all downloadable items for the specific product and version you want to use. These files may include a product installer, product documentation, or set of supporting files.
3. Download the relevant files to a temporary directory on your computer.
Install Output Agent files
This section describes the two installation options for Output Agent running on a Windows environment. It also provides detailed steps to perform the installation option you choose.
About installation options for Output Agent
You can install Output Agent using an attended or unattended installation on the Perceptive Content Server computer or on a computer separate from Perceptive Content Server.
An unattended installation is an automatic way to run an installation. If you follow the procedure to install Output Agent on Windows unattended, you do not install Output Agent using a standard Install Shield interface. Using this unattended installation method, you can do a custom installation or use a combination of default and customized settings. Note that using an unattended installation skips the license agreement the user sees when using an attended installation.
Perform the steps in one of the following subsections.
Perform an attended installation of Output Agent
The following steps explain how to run the installation wizard for Output Agent to perform an attended installation.
1. Double-click the EXE file you just downloaded.
2. In the Welcome to the ImageNow Output Agent Installation Wizard page, click Next.
3. On the License Agreement page, review the terms in the License Agreement, scroll to the end of the agreement, click I accept the terms in the license agreement, and click Next.

Output Agent W indows Ins ta l la t i on and Setup Guide
Page 6 of 21
4. In the Installation Configuration page, complete the following substeps and click Next:
Select Local installation if you are installing the Output Agent on the Perceptive Content Server computer or select Remote installation if you are installing Output Agent on a different computer.
In the Initial instance name field,
.
Note You can enter a maximum of 40 characters. Do not include the following invalid characters: \ / : * ? " < > |.
5. In the ImageNow Server Information page, complete the following steps.
1. Under ImageNow Server, type or confirm the Server name and Port number for the Perceptive Content Server computer.
2. Under Additional Configuration, enter the initial instance name.
6. Click Next.
7. In the Destination Folder page, accept the default folder or click Browse to select a different directory, and click Next.
8. In the Ready to Install the Program page, click Install.
9. In the Installation Wizard Completed page, click Finish. The system creates the file folder $(IMAGENOWDIR)\output_agent in the same directory where Output Agent was installed. The default directory is [drive:]\inserver\output_agent. The new output_agent folder contains the following four folders:
Export – directory to store exported documents
Monitor – directory to check for new output keyfiles
Moved – directory to store keyfiles that have been executed
Reports – directory to store runtime reports for output processing
Output Agent W indows Ins ta l la t i on and Setup Guide
Page 7 of 21
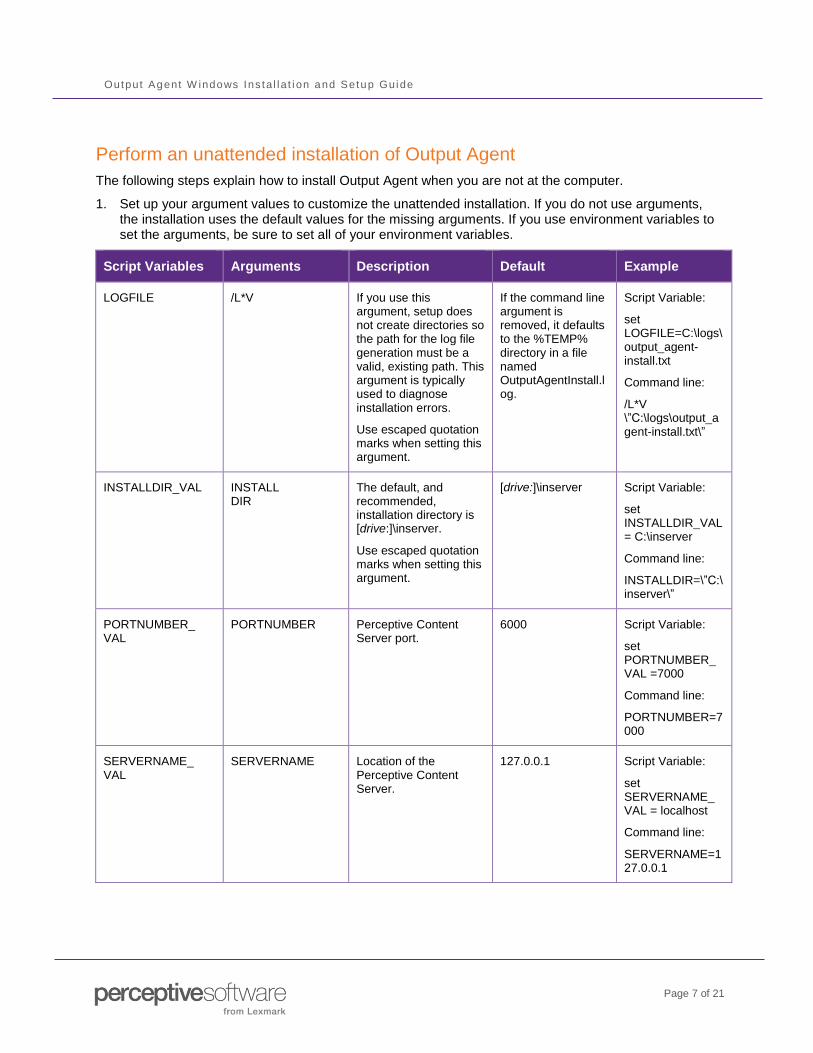
Perform an unattended installation of Output Agent
The following steps explain how to install Output Agent when you are not at the computer.
1. Set up your argument values to customize the unattended installation. If you do not use arguments, the installation uses the default values for the missing arguments. If you use environment variables to set the arguments, be sure to set all of your environment variables.
Script Variables Arguments Description Default Example
LOGFILE /L*V If you use this argument, setup does not create directories so the path for the log file generation must be a valid, existing path. This argument is typically used to diagnose installation errors.
Use escaped quotation marks when setting this argument.
If the command line argument is removed, it defaults to the %TEMP% directory in a file named OutputAgentInstall.log.
Script Variable:
set LOGFILE=C:\logs\output_agent-install.txt
Command line:
/L*V \”C:\logs\output_agent-install.txt\”
INSTALLDIR_VAL INSTALL DIR
The default, and recommended, installation directory is [drive:]\inserver.
Use escaped quotation marks when setting this argument.
[drive:]\inserver Script Variable:
set INSTALLDIR_VAL= C:\inserver
Command line:
INSTALLDIR=\”C:\inserver\”
PORTNUMBER_ VAL
PORTNUMBER Perceptive Content Server port.
6000 Script Variable:
set PORTNUMBER_ VAL =7000
Command line:
PORTNUMBER=7000
SERVERNAME_ VAL
SERVERNAME Location of the Perceptive Content Server.
127.0.0.1 Script Variable:
set SERVERNAME_ VAL = localhost
Command line:
SERVERNAME=127.0.0.1
Output Agent W indows Ins ta l la t i on and Setup Guide
Page 8 of 21
2. Enter the following command. You can use one of the commands in a Command Prompt window, use a command in the provided batch file, or create a command line script for your deployment software:
OutputAgentSetup.exe /s /V“/qb <argument list>”
The following example shows the command format using the environment variables:
OutputAgentSetup.exe /s /V"/qb /L*V \"%LOGFILE%\" INSTALLDIR=\"%INSTALLDIR_VAL%\"
SERVERNAME=%SERVERNAME_VAL% PORTNUMBER=%PORTNUMBER_VAL%"
The following example shows the command with a defined argument list:
OutputAgentSetup.exe /s /V”/qb /L*V \"C:\logs\output_agent-install.txt\"
INSTALLDIR=\"C:\inserver\" PORTNUMBER=7000"
3. Verify your installation.
Remove the DEP setting
The following steps explain how to delete the Data Execution Prevention (DEP) setting.
You must remove the Data Execution Prevention setting from the executable file in $(IMAGENOWDIR)\bin if you operate in a Windows Server 2003 or Windows Server 2008 environment.
1. On the desktop, right-click My Computer (Windows Server 2003) or Computer (Windows Server 2008), and select Properties.
2. In Windows 2008, under Tasks, click Advanced system settings. Windows 2003 does not require this selection.
3. In the System Properties dialog box, on the Advanced tab, under Performance, click Settings.
4. In the Performance Options dialog box, on the Data Execution Prevention tab, select Turn on DEP for all programs and services except those I select.
5. Click Add.
6. In the Open dialog box, navigate to the $(IMAGENOWDIR)\bin directory, select the inserverOutput.ini file, and click Open.
7. Click OK twice.
8. Restart your computer.
Output Agent W indows Ins ta l la t i on and Setup Guide
Page 9 of 21
License Output Agent
When you purchase Output Agent, you request a license from your Perceptive Software representative, who can send you a license file. Before authenticating the license, you must install Perceptive Content Server and at least one Perceptive Content Client. Only a user with privileges to manage licenses can complete this task.
The following steps explain how to license your copy of Output Agent. You must complete these steps on a Windows computer where the Perceptive Content Client is installed.
1. Copy the license files to a temporary folder where you can access them from an Perceptive Content Client.
2. On the Start menu, point to All Programs, point to Perceptive Content, and then click Perceptive Content.
3. In the Perceptive Content login, click License Manager.
4. In the License Management dialog box, select Upload licenses and click OK.
5. Browse to the license file from its temporary directory, click Open, and then OK.
Configure Output Agent This section details the configuration process for Output Agent on a Windows environment. After you install Output Agent, you must configure the inserverOutput.ini file and create a keyfile (if you do not submit output jobs to Output Agent using iScript).
About configuring Output Agent
Output Agent monitors a directory for text files, called keyfiles. The monitored directory is specified for the monitor.path setting in the inserverOutput.ini. Using the values in the keyfile, Output Agent returns matching documents stored in Perceptive Content and then outputs files of the documents using the specified parameters from the inserverOutput.ini file. When a new keyfile appears in the monitored directory, Output Agent recognizes it and processes it.
To configure Output Agent to move a keyfile after it executes the keyfile, in the inserverOutput.ini file, set keyfile.move to TRUE and set keyfile.move.path to the path where you want to move the executed keyfile. If an output process cannot be completed, the Output Agent logs will provide details.
Configure the Output Agent service
The following steps explain how to configure the Output Agent service using the inserverOutput.ini file. Additional details about each setting found in the inserverOutput.ini file are available in Appendix A.
1. In the $(IMAGENOWDIR)\etc folder, locate the inserverOutput.ini file and open it in a text editor.
2. Under [Remote], to set up Output Agent as a remotable service, configure the remote settings so that you provide the IP address or name and the port number for the Perceptive Content Server.
3. Under [Monitor], configure the following settings:
1. For monitor.path, keep the default $(IMAGENOWDIR)\output_agent\monitor or specify a different directory where Output Agent checks for new output keyfiles.
2. For monitor.extension, keep the default txt, or specify a new file extension that Output Agent uses to check for output keyfiles.
Output Agent W indows Ins ta l la t i on and Setup Guide
Page 10 of 21
4. Under [General], perform the following substeps:
1. Set output.mode to EXPORT, PRINTER, or DICOM.
2. For keyfile.move.path, keep the default $(IMAGENOWDIR)\output_agent\moved or specify a different directory where Output Agent stores executed keyfiles.
5. If you set output.mode to EXPORT, in the [Export] group, configure the following settings:
1. Set the export file type for export.file.type. For a list of the most commonly used output file formats, reference the [Export] group in the Appendix A section of this document .
2. Change export.file.extension to match the export file type, such as JPEG.
3. For export.file.directory, leave the default $(IMAGENOWDIR)\output_agent\export or specify a new location. The path you specify does not need to be on the local file system Perceptive Content must have write permissions for the specified location. Also, the entire file path, which includes the file name and extension, cannot exceed the character limit set by your operating system. For example, Windows XP allows a file path up to 255 characters in length.
4. Change export.filename.format to include the text and variables you want to use to create the name of the exported file. For example, you can set export.filename.format to [FIELD1]_[FIELD2]_[FIELD3]_[FIELD4]. Additional examples are provided in the Appendix B section of this document.
Note File names must not contain spaces or the following characters: \ / : * ? " < > |. If any of these characters appears in a file name, Output Agent replaces the characters with dashes.
6. If you set ouput.mode to PRINTER, complete the following substeps:
1. Open a Command Prompt window and navigate to $(IMAGENOWDIR)\bin, and complete the following substeps:
1. Type printerinfo and press ENTER.
2. Review the list of printers and copy the settings for the printer you want to use for output.
2. In the inserverOutput.ini file, in the [Printer] group, configure the printer.input.tray, printer.name, printer.driver, printer.downscale.color.mode, and printer.diffuse.black.level.threshold properties for the printer you selected for output.
7. If you set output.mode to DICOM, in the [Dicom] group, configure the following settings:
1. For dicom.ip, specify the IP address of the Dicom server.
2. For dicom.port, specify the service port of the Dicom server.
3. For dicom.store.title, specify the store tile for documents Output Agent sends to the Dicom server.
4. For dicom.external.title, specify the external title for documents Output Agent sends to the Dicom server.
8. Under [Layout], change any setting to modify the layout format as needed.
9. Under [Logging], you can set debug levels for auditing or troubleshooting. The default is 0 (no logging). Unless you are troubleshooting an issue, set minimal logging.
10. Save and close the file.
11. Perform the following substeps to restart the Output Agent service:
1. On your Windows Desktop, right-click the My Computer shortcut and select Manage.
Output Agent W indows Ins ta l la t i on and Setup Guide
Page 11 of 21
2. In the Computer Management dialog box, click Services and Applications.
3. Click Services.
4. In the right pane, locate and select the service titled ImageNow Output Agent. In the upper left-hand corner of the right pane, click Start.
Define values in a keyfile
The following steps explain how to create and submit a keyfile that specifies the documents you want Output Agent to locate in Perceptive Content and output.
1. Using a text editor, create a file in a temporary location. Using the following guidelines, type a row in the file that defines each document key value you want to search and return matching Perceptive Content documents:
The structure is: DRAWER^FIELD1^FIELD2^FIELD3^FIELD4^FIELD5^DOCTYPE^DOCNAME.
Any combination of values can remain blank.
For example, the following row returns all documents in the AP drawer that have a Field1 value of 12345.
AP^12345
The following row returns all documents in the AP drawer with a Field2 value of 12345, regardless of the Field1 value.
AP^^12345
2. Save and close the file.
3. Move the text file to the folder you specified for monitor.path in the inserverOutput.ini file. The default path is $(IMAGENOWDIR)\output_agent\monitor.
Troubleshoot Output Agent This section outlines procedures for correcting errors encountered during the installation of Output Agent.
General troubleshooting
Perceptive Content Server provides logging specifically for troubleshooting printing and export problems. Specific log files for Output Agent reside in the $(IMAGENOWDIR)\log folder (the default directory is [drive:]\inserver\log). Log files are named as inserverOutput_<instance name>_<date>.log so you can easily identify the file you need. The [Logging] group in the inserverOutput.ini file contains the settings you need to adjust to control logging verbosity debug levels and to turn logging on or off.
Include annotations on output pages
To configure Output Agent to include annotations on output pages, perform the following steps.
1. In the $(IMAGENOWDIR)\etc folder, locate the inserverOutput.ini file and open it in a text editor.
2. Under [Layout], set layout.annotations.show to TRUE.
3. Save and close the file.
4. Restart the Output Agent service.
Output Agent W indows Ins ta l la t i on and Setup Guide
Page 12 of 21
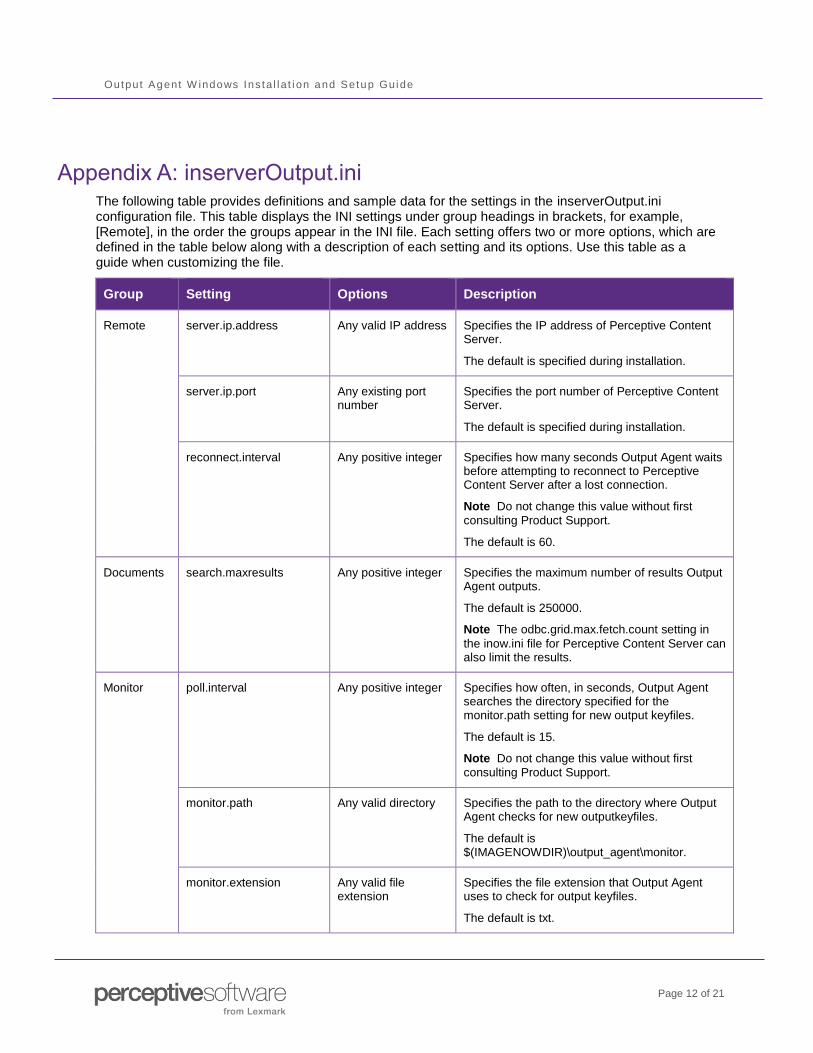
Appendix A: inserverOutput.ini The following table provides definitions and sample data for the settings in the inserverOutput.ini configuration file. This table displays the INI settings under group headings in brackets, for example, [Remote], in the order the groups appear in the INI file. Each setting offers two or more options, which are defined in the table below along with a description of each setting and its options. Use this table as a guide when customizing the file.
Group Setting Options Description
Remote server.ip.address Any valid IP address Specifies the IP address of Perceptive Content Server.
The default is specified during installation.
server.ip.port Any existing port number
Specifies the port number of Perceptive Content Server.
The default is specified during installation.
reconnect.interval Any positive integer Specifies how many seconds Output Agent waits before attempting to reconnect to Perceptive Content Server after a lost connection.
Note Do not change this value without first
consulting Product Support.
The default is 60.
Documents search.maxresults Any positive integer Specifies the maximum number of results Output Agent outputs.
The default is 250000.
Note The odbc.grid.max.fetch.count setting in
the inow.ini file for Perceptive Content Server can also limit the results.
Monitor poll.interval Any positive integer Specifies how often, in seconds, Output Agent searches the directory specified for the monitor.path setting for new output keyfiles.
The default is 15.
Note Do not change this value without first
consulting Product Support.
monitor.path Any valid directory Specifies the path to the directory where Output Agent checks for new outputkeyfiles.
The default is $(IMAGENOWDIR)\output_agent\monitor.
monitor.extension Any valid file extension
Specifies the file extension that Output Agent uses to check for output keyfiles.
The default is txt.
Output Agent W indows Ins ta l la t i on and Setup Guide
Page 13 of 21
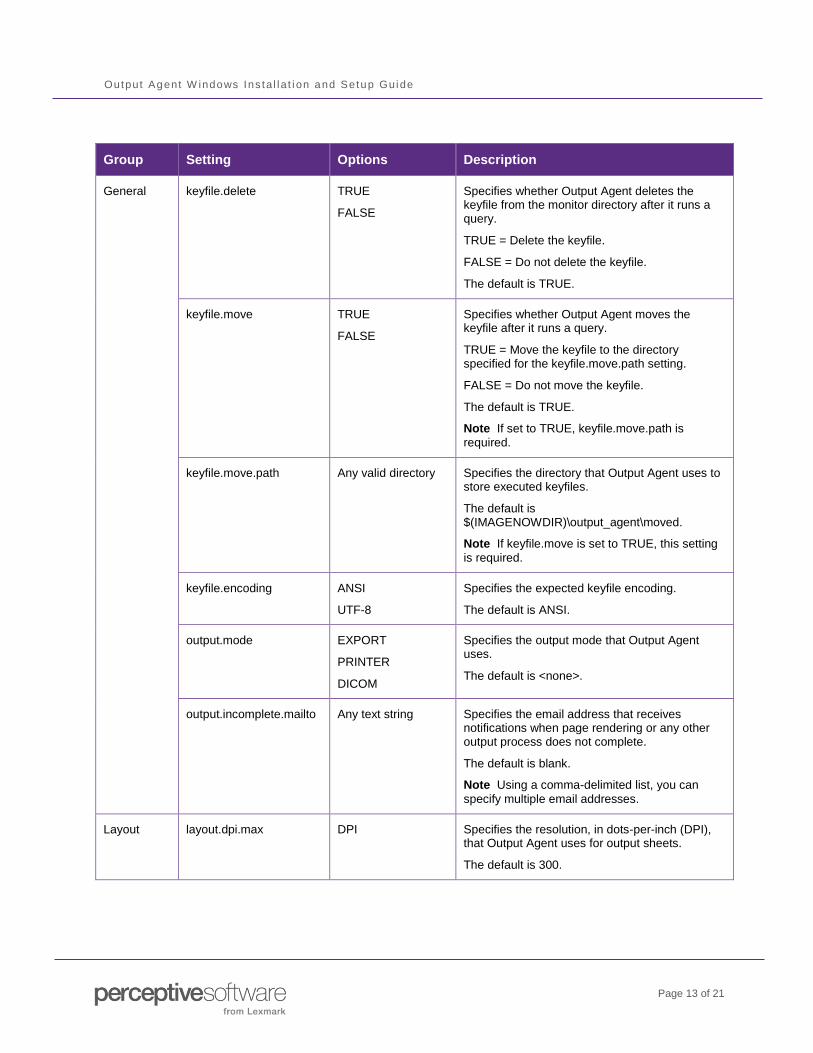
Group Setting Options Description
General keyfile.delete TRUE
FALSE
Specifies whether Output Agent deletes the keyfile from the monitor directory after it runs a query.
TRUE = Delete the keyfile.
FALSE = Do not delete the keyfile.
The default is TRUE.
keyfile.move TRUE
FALSE
Specifies whether Output Agent moves the keyfile after it runs a query.
TRUE = Move the keyfile to the directory specified for the keyfile.move.path setting.
FALSE = Do not move the keyfile.
The default is TRUE.
Note If set to TRUE, keyfile.move.path is
required.
keyfile.move.path Any valid directory Specifies the directory that Output Agent uses to store executed keyfiles.
The default is $(IMAGENOWDIR)\output_agent\moved.
Note If keyfile.move is set to TRUE, this setting
is required.
keyfile.encoding ANSI
UTF-8
Specifies the expected keyfile encoding.
The default is ANSI.
output.mode EXPORT
PRINTER
DICOM
Specifies the output mode that Output Agent uses.
The default is <none>.
output.incomplete.mailto Any text string Specifies the email address that receives notifications when page rendering or any other output process does not complete.
The default is blank.
Note Using a comma-delimited list, you can
specify multiple email addresses.
Layout layout.dpi.max DPI Specifies the resolution, in dots-per-inch (DPI), that Output Agent uses for output sheets.
The default is 300.
Output Agent W indows Ins ta l la t i on and Setup Guide
Page 14 of 21
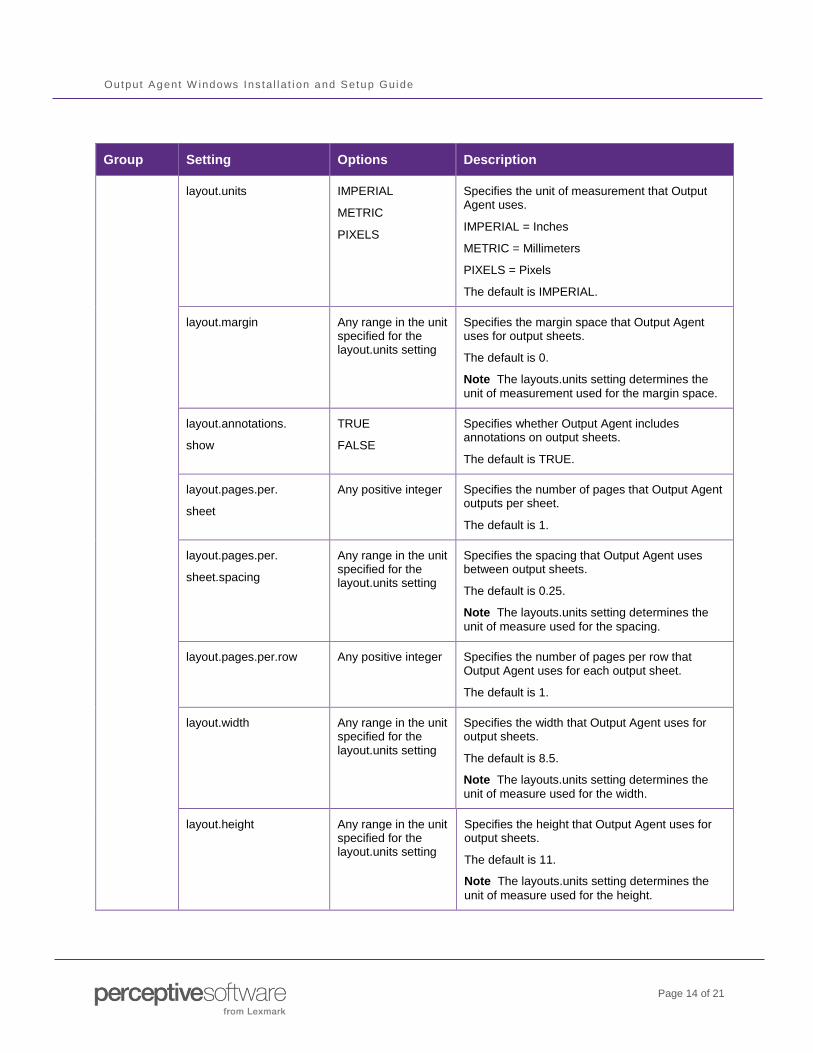
Group Setting Options Description
layout.units IMPERIAL
METRIC
PIXELS
Specifies the unit of measurement that Output Agent uses.
IMPERIAL = Inches
METRIC = Millimeters
PIXELS = Pixels
The default is IMPERIAL.
layout.margin Any range in the unit specified for the layout.units setting
Specifies the margin space that Output Agent uses for output sheets.
The default is 0.
Note The layouts.units setting determines the
unit of measurement used for the margin space.
layout.annotations.
show
TRUE
FALSE
Specifies whether Output Agent includes annotations on output sheets.
The default is TRUE.
layout.pages.per.
sheet
Any positive integer Specifies the number of pages that Output Agent outputs per sheet.
The default is 1.
layout.pages.per.
sheet.spacing
Any range in the unit specified for the layout.units setting
Specifies the spacing that Output Agent uses between output sheets.
The default is 0.25.
Note The layouts.units setting determines the
unit of measure used for the spacing.
layout.pages.per.row Any positive integer Specifies the number of pages per row that Output Agent uses for each output sheet.
The default is 1.
layout.width Any range in the unit specified for the layout.units setting
Specifies the width that Output Agent uses for output sheets.
The default is 8.5.
Note The layouts.units setting determines the
unit of measure used for the width.
layout.height Any range in the unit specified for the layout.units setting
Specifies the height that Output Agent uses for output sheets.
The default is 11.
Note The layouts.units setting determines the
unit of measure used for the height.
Output Agent W indows Ins ta l la t i on and Setup Guide
Page 15 of 21
Group Setting Options Description
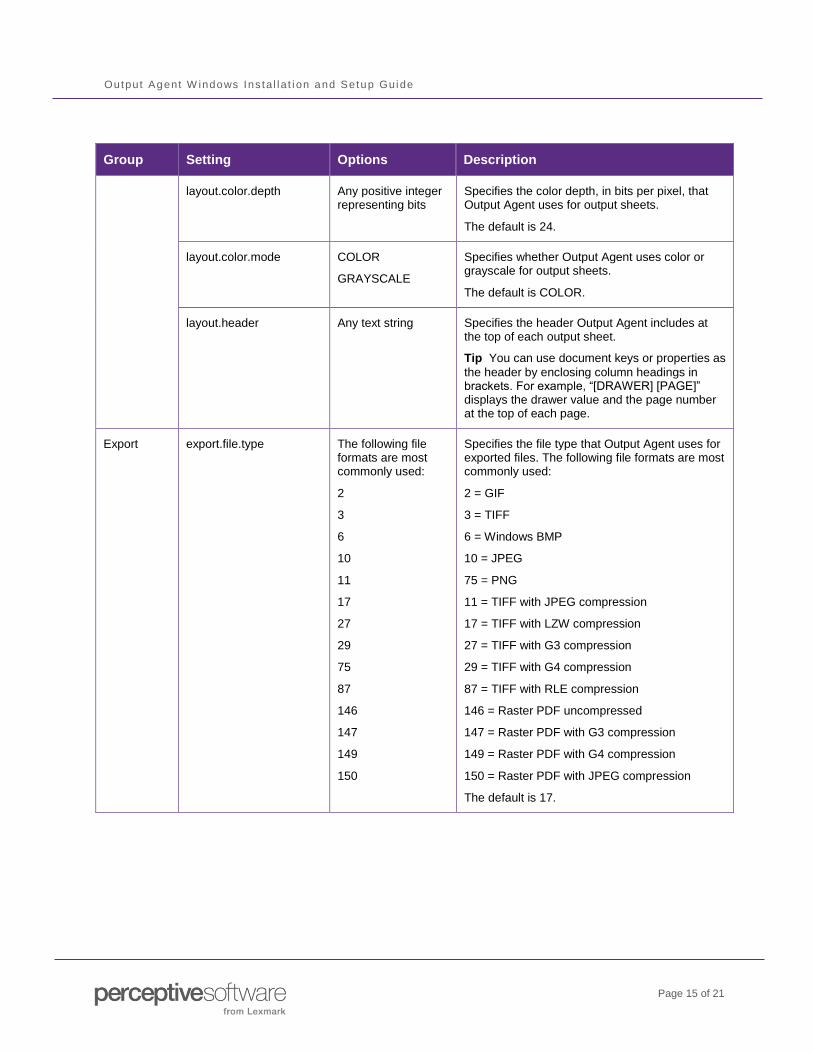
layout.color.depth Any positive integer representing bits
Specifies the color depth, in bits per pixel, that Output Agent uses for output sheets.
The default is 24.
layout.color.mode COLOR
GRAYSCALE
Specifies whether Output Agent uses color or grayscale for output sheets.
The default is COLOR.
layout.header Any text string Specifies the header Output Agent includes at the top of each output sheet.
Tip You can use document keys or properties as
the header by enclosing column headings in brackets. For example, “[DRAWER] [PAGE]” displays the drawer value and the page number at the top of each page.
Export export.file.type The following file formats are most commonly used:
2
3
6
10
11
17
27
29
75
87
146
147
149
150
Specifies the file type that Output Agent uses for exported files. The following file formats are most commonly used:
2 = GIF
3 = TIFF
6 = Windows BMP
10 = JPEG
75 = PNG
11 = TIFF with JPEG compression
17 = TIFF with LZW compression
27 = TIFF with G3 compression
29 = TIFF with G4 compression
87 = TIFF with RLE compression
146 = Raster PDF uncompressed
147 = Raster PDF with G3 compression
149 = Raster PDF with G4 compression
150 = Raster PDF with JPEG compression
The default is 17.
Output Agent W indows Ins ta l la t i on and Setup Guide
Page 16 of 21
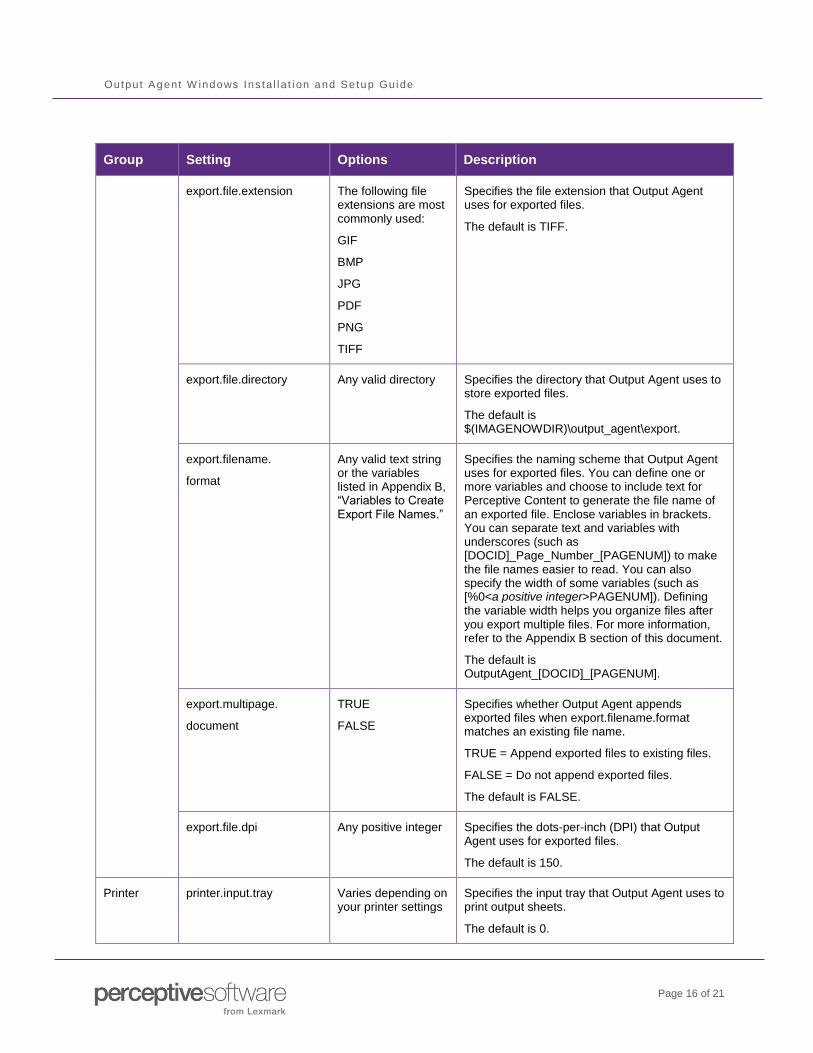
Group Setting Options Description
export.file.extension The following file extensions are most commonly used:
GIF
BMP
JPG
PNG
TIFF
Specifies the file extension that Output Agent uses for exported files.
The default is TIFF.
export.file.directory Any valid directory Specifies the directory that Output Agent uses to store exported files.
The default is $(IMAGENOWDIR)\output_agent\export.
export.filename.
format
Any valid text string or the variables listed in Appendix B, “Variables to Create Export File Names.”
Specifies the naming scheme that Output Agent uses for exported files. You can define one or more variables and choose to include text for Perceptive Content to generate the file name of an exported file. Enclose variables in brackets. You can separate text and variables with underscores (such as [DOCID]_Page_Number_[PAGENUM]) to make the file names easier to read. You can also specify the width of some variables (such as [%0<a positive integer>PAGENUM]). Defining the variable width helps you organize files after you export multiple files. For more information, refer to the Appendix B section of this document.
The default is OutputAgent_[DOCID]_[PAGENUM].
export.multipage.
document
TRUE
FALSE
Specifies whether Output Agent appends exported files when export.filename.format matches an existing file name.
TRUE = Append exported files to existing files.
FALSE = Do not append exported files.
The default is FALSE.
export.file.dpi Any positive integer Specifies the dots-per-inch (DPI) that Output Agent uses for exported files.
The default is 150.
Printer printer.input.tray Varies depending on your printer settings
Specifies the input tray that Output Agent uses to print output sheets.
The default is 0.
Output Agent W indows Ins ta l la t i on and Setup Guide
Page 17 of 21
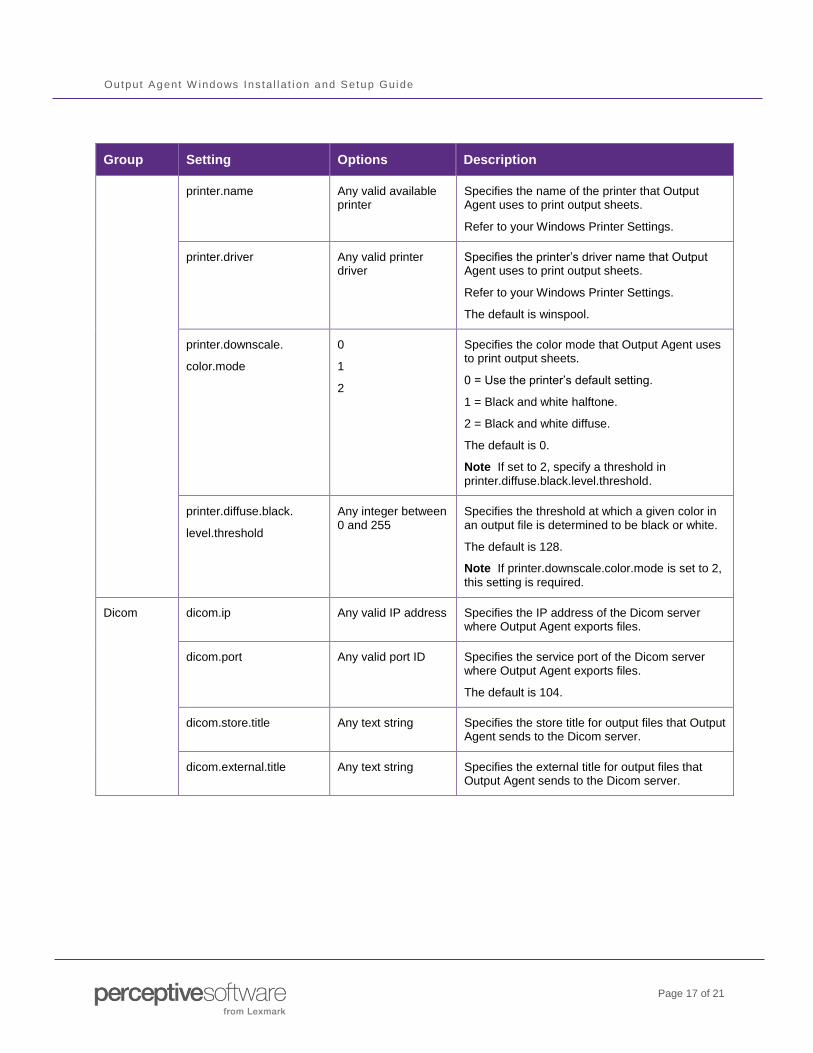
Group Setting Options Description
printer.name Any valid available printer
Specifies the name of the printer that Output Agent uses to print output sheets.
Refer to your Windows Printer Settings.
printer.driver Any valid printer driver
Specifies the printer’s driver name that Output Agent uses to print output sheets.
Refer to your Windows Printer Settings.
The default is winspool.
printer.downscale.
color.mode
0
1
2
Specifies the color mode that Output Agent uses to print output sheets.
0 = Use the printer’s default setting.
1 = Black and white halftone.
2 = Black and white diffuse.
The default is 0.
Note If set to 2, specify a threshold in
printer.diffuse.black.level.threshold.
printer.diffuse.black.
level.threshold
Any integer between 0 and 255
Specifies the threshold at which a given color in an output file is determined to be black or white.
The default is 128.
Note If printer.downscale.color.mode is set to 2,
this setting is required.
Dicom dicom.ip Any valid IP address Specifies the IP address of the Dicom server where Output Agent exports files.
dicom.port Any valid port ID Specifies the service port of the Dicom server where Output Agent exports files.
The default is 104.
dicom.store.title Any text string Specifies the store title for output files that Output Agent sends to the Dicom server.
dicom.external.title Any text string Specifies the external title for output files that Output Agent sends to the Dicom server.
Output Agent W indows Ins ta l la t i on and Setup Guide
Page 18 of 21
Group Setting Options Description
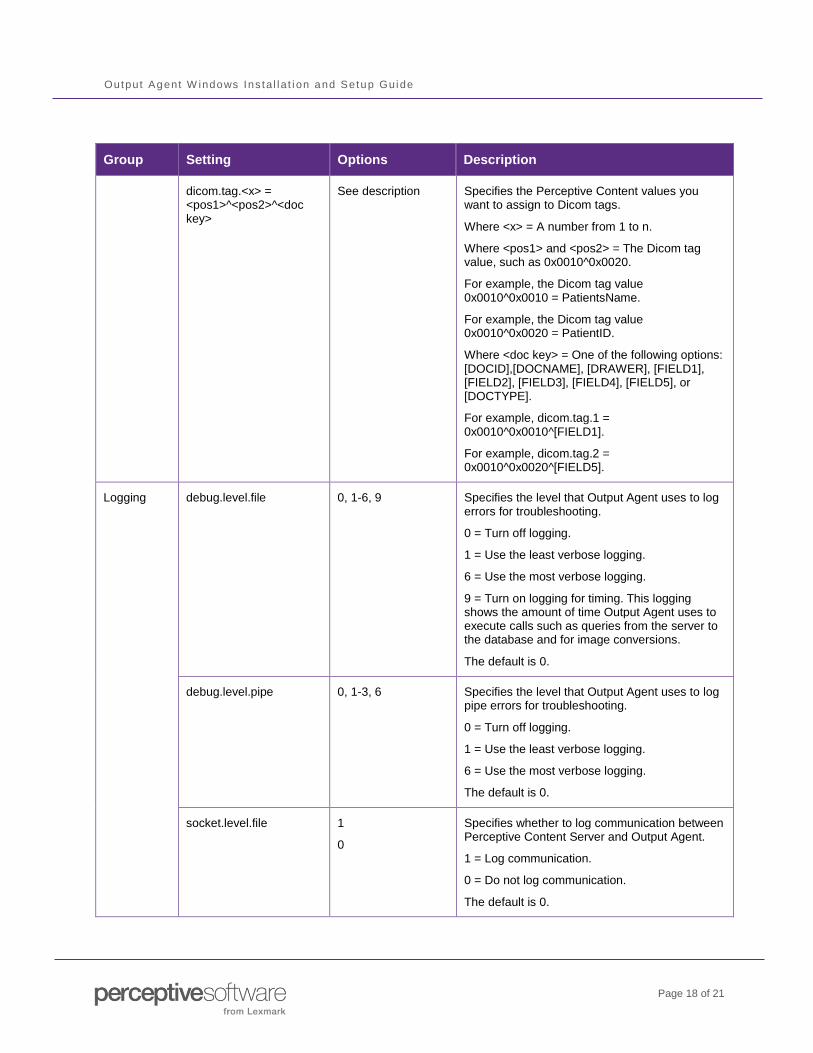
dicom.tag.<x> = <pos1>^<pos2>^<doc key>
See description Specifies the Perceptive Content values you want to assign to Dicom tags.
Where <x> = A number from 1 to n.
Where <pos1> and <pos2> = The Dicom tag value, such as 0x0010^0x0020.
For example, the Dicom tag value 0x0010^0x0010 = PatientsName.
For example, the Dicom tag value 0x0010^0x0020 = PatientID.
Where <doc key> = One of the following options: [DOCID],[DOCNAME], [DRAWER], [FIELD1], [FIELD2], [FIELD3], [FIELD4], [FIELD5], or [DOCTYPE].
For example, dicom.tag.1 = 0x0010^0x0010^[FIELD1].
For example, dicom.tag.2 = 0x0010^0x0020^[FIELD5].
Logging debug.level.file 0, 1-6, 9 Specifies the level that Output Agent uses to log errors for troubleshooting.
0 = Turn off logging.
1 = Use the least verbose logging.
6 = Use the most verbose logging.
9 = Turn on logging for timing. This logging shows the amount of time Output Agent uses to execute calls such as queries from the server to the database and for image conversions.
The default is 0.
debug.level.pipe 0, 1-3, 6 Specifies the level that Output Agent uses to log pipe errors for troubleshooting.
0 = Turn off logging.
1 = Use the least verbose logging.
6 = Use the most verbose logging.
The default is 0.
socket.level.file 1
0
Specifies whether to log communication between Perceptive Content Server and Output Agent.
1 = Log communication.
0 = Do not log communication.
The default is 0.
Output Agent W indows Ins ta l la t i on and Setup Guide
Page 19 of 21
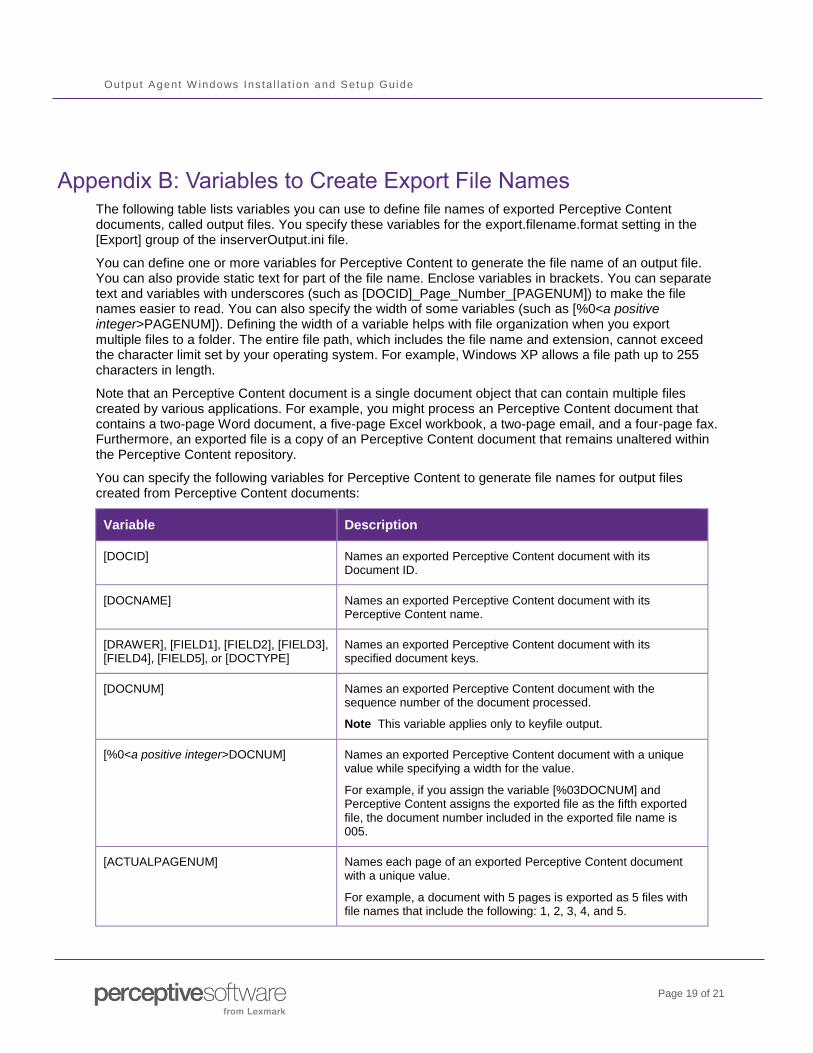
Appendix B: Variables to Create Export File Names The following table lists variables you can use to define file names of exported Perceptive Content documents, called output files. You specify these variables for the export.filename.format setting in the [Export] group of the inserverOutput.ini file.
You can define one or more variables for Perceptive Content to generate the file name of an output file. You can also provide static text for part of the file name. Enclose variables in brackets. You can separate text and variables with underscores (such as [DOCID]_Page_Number_[PAGENUM]) to make the file names easier to read. You can also specify the width of some variables (such as [%0<a positive integer>PAGENUM]). Defining the width of a variable helps with file organization when you export multiple files to a folder. The entire file path, which includes the file name and extension, cannot exceed the character limit set by your operating system. For example, Windows XP allows a file path up to 255 characters in length.
Note that an Perceptive Content document is a single document object that can contain multiple files created by various applications. For example, you might process an Perceptive Content document that contains a two-page Word document, a five-page Excel workbook, a two-page email, and a four-page fax. Furthermore, an exported file is a copy of an Perceptive Content document that remains unaltered within the Perceptive Content repository.
You can specify the following variables for Perceptive Content to generate file names for output files created from Perceptive Content documents:
Variable Description
[DOCID] Names an exported Perceptive Content document with its Document ID.
[DOCNAME] Names an exported Perceptive Content document with its Perceptive Content name.
[DRAWER], [FIELD1], [FIELD2], [FIELD3], [FIELD4], [FIELD5], or [DOCTYPE]
Names an exported Perceptive Content document with its specified document keys.
[DOCNUM] Names an exported Perceptive Content document with the sequence number of the document processed.
Note This variable applies only to keyfile output.
[%0<a positive integer>DOCNUM] Names an exported Perceptive Content document with a unique value while specifying a width for the value.
For example, if you assign the variable [%03DOCNUM] and Perceptive Content assigns the exported file as the fifth exported file, the document number included in the exported file name is 005.
[ACTUALPAGENUM] Names each page of an exported Perceptive Content document with a unique value.
For example, a document with 5 pages is exported as 5 files with file names that include the following: 1, 2, 3, 4, and 5.
Output Agent W indows Ins ta l la t i on and Setup Guide
Page 20 of 21
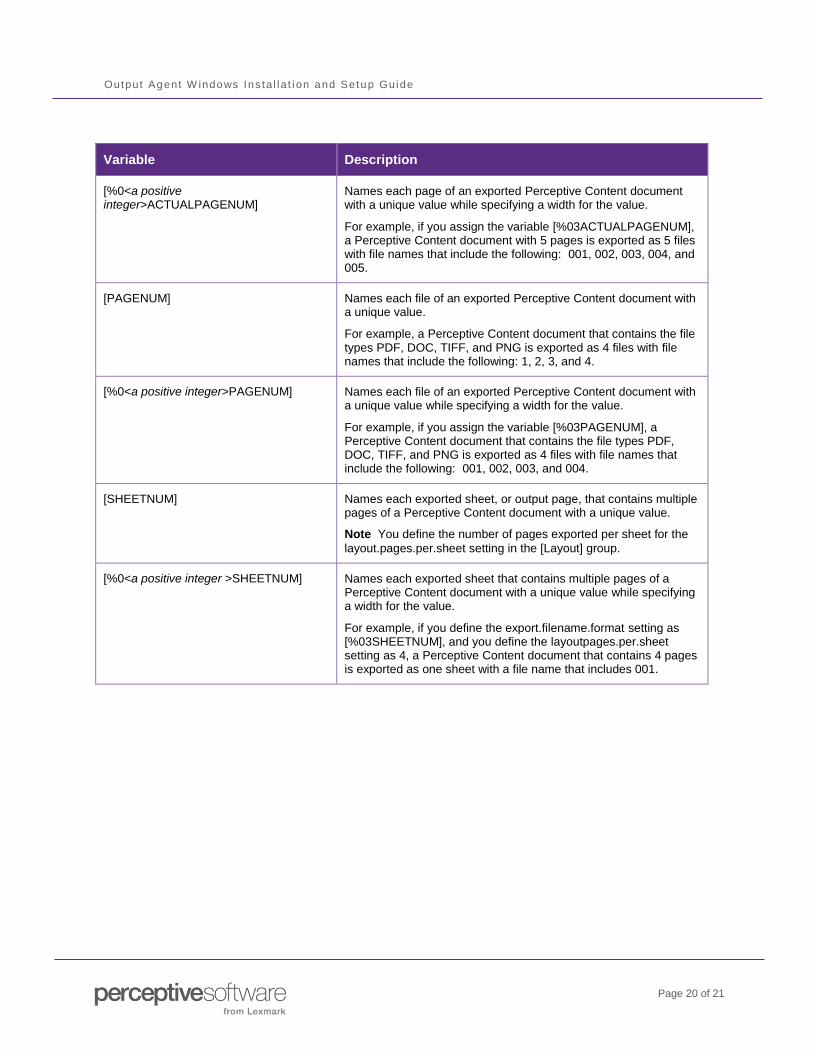
Variable Description
[%0<a positive integer>ACTUALPAGENUM]
Names each page of an exported Perceptive Content document with a unique value while specifying a width for the value.
For example, if you assign the variable [%03ACTUALPAGENUM], a Perceptive Content document with 5 pages is exported as 5 files with file names that include the following: 001, 002, 003, 004, and 005.
[PAGENUM] Names each file of an exported Perceptive Content document with a unique value.
For example, a Perceptive Content document that contains the file types PDF, DOC, TIFF, and PNG is exported as 4 files with file names that include the following: 1, 2, 3, and 4.
[%0<a positive integer>PAGENUM] Names each file of an exported Perceptive Content document with a unique value while specifying a width for the value.
For example, if you assign the variable [%03PAGENUM], a Perceptive Content document that contains the file types PDF, DOC, TIFF, and PNG is exported as 4 files with file names that include the following: 001, 002, 003, and 004.
[SHEETNUM] Names each exported sheet, or output page, that contains multiple pages of a Perceptive Content document with a unique value.
Note You define the number of pages exported per sheet for the
layout.pages.per.sheet setting in the [Layout] group.
[%0<a positive integer >SHEETNUM] Names each exported sheet that contains multiple pages of a Perceptive Content document with a unique value while specifying a width for the value.
For example, if you define the export.filename.format setting as [%03SHEETNUM], and you define the layoutpages.per.sheet setting as 4, a Perceptive Content document that contains 4 pages is exported as one sheet with a file name that includes 001.
Output Agent W indows Ins ta l la t i on and Setup Guide
Page 21 of 21
Index
creating a keyfile .............................................. 11
debug.level.file ................................................. 18
debug.level.pipe ............................................... 18
DEP .................................................................... 8
remove the setting .......................................... 8
dicom.external.title ........................................... 17
dicom.ip ............................................................ 17
dicom.port......................................................... 17
dicom.store.title ................................................ 17
export.file.directory ........................................... 16
export.file.dpi .................................................... 16
export.file.extension ......................................... 16
export.file.type .................................................. 15
export.filename.format ..................................... 16
export.multipage.document .............................. 16
inserverOutput.ini ............................................. 12
Install the license ................................................ 9
installation
attended .......................................................... 5
unattended ...................................................... 7
installing
Output Agent .................................................. 5
keyfile.delete .................................................... 13
keyfile.encoding ............................................... 13
keyfile.move ..................................................... 13
keyfile.move.path ............................................. 13
layout.annotations.show ................................... 14
layout.color.depth ............................................. 15
layout.color.mode ............................................. 15
layout.dpi.max .................................................. 13
layout.header ................................................... 15
layout.height ..................................................... 14
layout.margin ................................................... 14
layout.pages.per.row ....................................... 14
layout.pages.per.sheet .................................... 14
layout.pages.per.sheet.spacing ....................... 14
layout.units ....................................................... 14
layout.width ...................................................... 14
monitor.extension............................................. 12
monitor.path ..................................................... 12
Output Agent
installing ......................................................... 5
setting up ........................................................ 9
troubleshooting ............................................. 11
output.incomplete.mailto .................................. 13
output.mode ..................................................... 13
Overview of Output Agent .................................. 4
poll.interval ....................................................... 12
printer.diffuse.black.level.threshold ................. 17
printer.downscale.color.mode .......................... 17
printer.driver ..................................................... 17
printer.input.tray ............................................... 16
printer.name ..................................................... 17
reconnect.interval............................................. 12
Run the installation wizard ................................. 5
search.maxresults ............................................ 12
server.ip.address ............................................. 12
server.ip.port .................................................... 12
setting up ........................................................... 9
socket.level.file ................................................. 18
troubleshooting ................................................ 11
using variables to create export file names ..... 19