Embed Size (px)
Citation preview
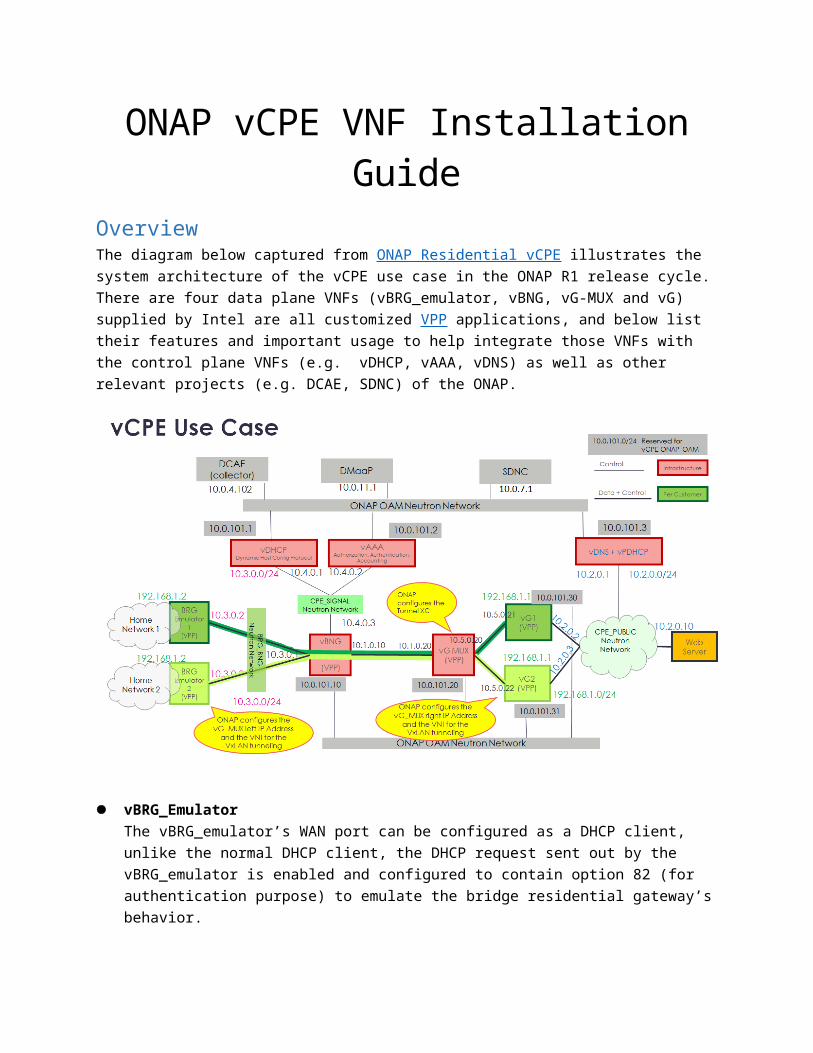
ONAP vCPE VNF Installation GuideOverviewThe diagram below captured from ONAP Residential vCPE illustrates the system architecture of the vCPE use case in the ONAP R1 release cycle. There are four data plane VNFs (vBRG_emulator, vBNG, vG-MUX and vG) supplied by Intel are all customized VPP applications, and below list their features and important usage to help integrate those VNFs with the control plane VNFs (e.g. vDHCP, vAAA, vDNS) as well as other relevant projects (e.g. DCAE, SDNC) of the ONAP.
vBRG_EmulatorThe vBRG_emulator’s WAN port can be configured as a DHCP client, unlike the normal DHCP client, the DHCP request sent out by the vBRG_emulator is enabled and configured to contain option 82 (for authentication purpose) to emulate the bridge residential gateway’s behavior. One can set vBRG_emulator’s WAN port as DHCP client by using the following command:
vppctl set dhcp client intfc GigabitEthernet0/8/0 hostname brg-emulator
To enable VPP being configured remotely by other ONAP component such as SDN-C, the Honeycomb control plane agent needs to be installed. Below configuration adds the honeycomb as a systemd controlled service:
[Unit]Description=Honeycomb Agent for the VPP control plane

Documentation=https://wiki.fd.io/view/HoneycombRequires=vpp.serviceAfter=vpp.service
[Service]ExecStart=/opt/honeycomb/honeycombRestart=alwaysRestartSec=10
[Install]WantedBy=multi-user.target
vBNGThe vBNG works as the DHCP proxy, specifically it parses the DHCP request and extracts the Option 82 field as FreeRADIUS client’s attributes for authentication request sent to the vAAA. Once the vBNG receives the vAAA’s authentication success message, the DHCP proxy inside the vBGN will send the DHCP packets without Option 82 to the vDHCP for requesting IP. The DHCP reply message returned tom from the vDHCP will be forwarded to the vBRG_emulator as WAN IP. One can configure the real DHCP server’s information as well as the port sending DHCP request by using command below
set vbng dhcp4 remote 10.4.0.1 local 10.4.0.3
The FreeRADIUS client that is integrated with the vBNG uses the kernel stack to send out the initial authentication packets, and it needs configuration files for dictionary and other information of the FreeRADIUS server. So the vBNG provides a command for configuring the FreeRadius client as below
vppctl set vbng aaa config /etc/vpp/vbng-aaa.cfg nas-port 5060
vG-MUXThe vG-MUX VNF integrates the VES (VNF Event Streaming) agent in order to report run-time statistics of the VNF to the VES collector inside the ONAP DCAE component. In addition, the VxLAN tunneling port and L2 Xconnect should be configured remotely by the SDN-C, so similar to the vBGN_emulator, the Honeycomb control plane agent needs to be installed . In order to demonstrate the close control loop, the VES agent provides command line interface and API to enable reporting faked statistics.
The message example below and the highlighted contains faked packet loss rate statistics, which by default is zero
{"event": {"commonEventHeader": {"domain": "measurementsForVfScaling", "eventId": "1", "functionalRole": "vFirewall", "lastEpochMicrosec": 1504523564315623, "priority": "Normal", "reportingEntityName": "sdn-lj1", "sequence": 1, "sourceName": "Dummy VM name - No Metadata available", "startEpochMicrosec": 1504523554315623, "version": 1.2, "reportingEntityId": "No UUID available", "sourceId": "Dummy VM UUID - No Metadata
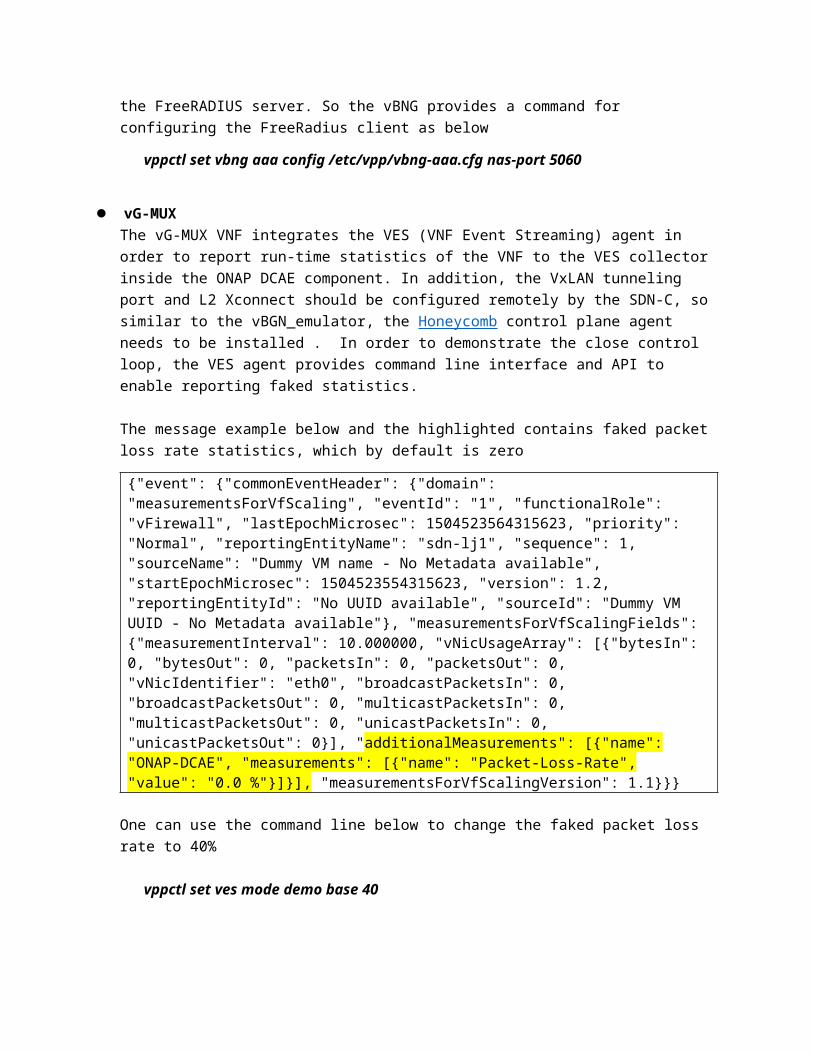
available"}, "measurementsForVfScalingFields": {"measurementInterval": 10.000000, "vNicUsageArray": [{"bytesIn": 0, "bytesOut": 0, "packetsIn": 0, "packetsOut": 0, "vNicIdentifier": "eth0", "broadcastPacketsIn": 0, "broadcastPacketsOut": 0, "multicastPacketsIn": 0, "multicastPacketsOut": 0, "unicastPacketsIn": 0, "unicastPacketsOut": 0}], "additionalMeasurements": [{"name": "ONAP-DCAE", "measurements": [{"name": "Packet-Loss-Rate", "value": "0.0 %"}]}], "measurementsForVfScalingVersion": 1.1}}}
One can use the command line below to change the faked packet loss rate to 40%
vppctl set ves mode demo base 40
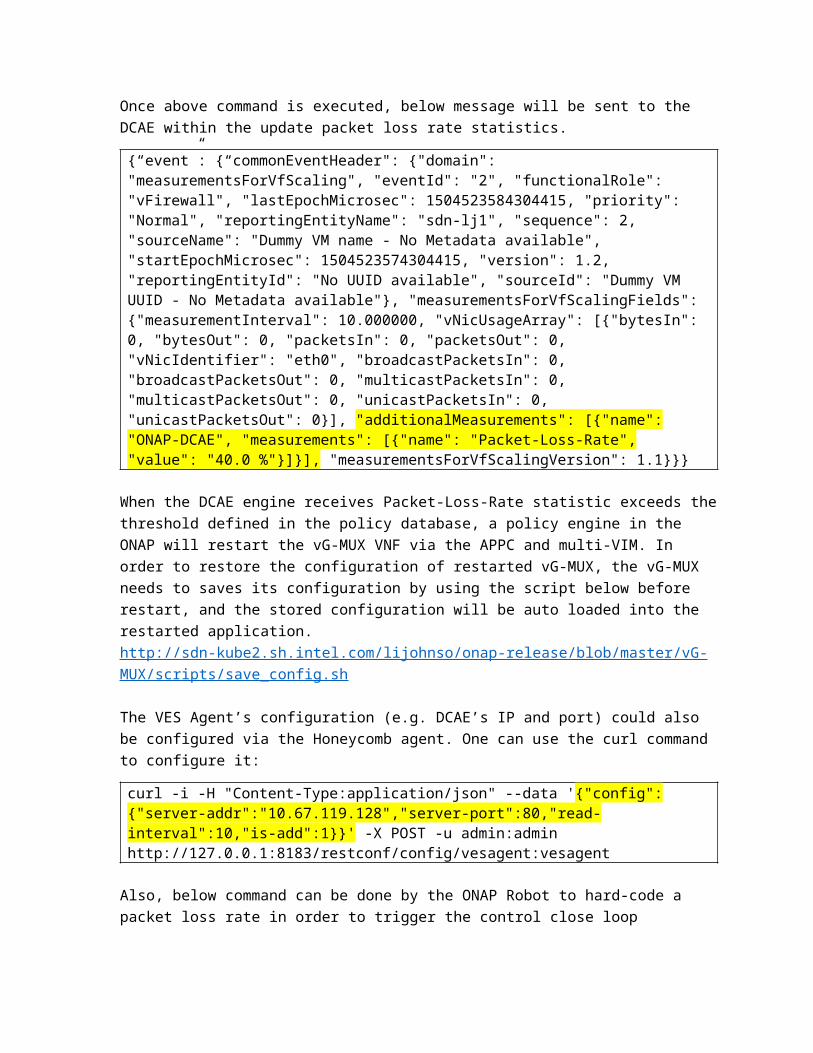
Once above command is executed, below message will be sent to the DCAE within the update packet loss rate statistics.
{“event”: {“commonEventHeader": {"domain": "measurementsForVfScaling", "eventId": "2", "functionalRole": "vFirewall", "lastEpochMicrosec": 1504523584304415, "priority": "Normal", "reportingEntityName": "sdn-lj1", "sequence": 2, "sourceName": "Dummy VM name - No Metadata available", "startEpochMicrosec": 1504523574304415, "version": 1.2, "reportingEntityId": "No UUID available", "sourceId": "Dummy VM UUID - No Metadata available"}, "measurementsForVfScalingFields": {"measurementInterval": 10.000000, "vNicUsageArray": [{"bytesIn": 0, "bytesOut": 0, "packetsIn": 0, "packetsOut": 0, "vNicIdentifier": "eth0", "broadcastPacketsIn": 0, "broadcastPacketsOut": 0, "multicastPacketsIn": 0, "multicastPacketsOut": 0, "unicastPacketsIn": 0, "unicastPacketsOut": 0}], "additionalMeasurements": [{"name": "ONAP-DCAE", "measurements": [{"name": "Packet-Loss-Rate", "value": "40.0 %"}]}], "measurementsForVfScalingVersion": 1.1}}}
When the DCAE engine receives Packet-Loss-Rate statistic exceeds the threshold defined in the policy database, a policy engine in the ONAP will restart the vG-MUX VNF via the APPC and multi-VIM. In order to restore the configuration of restarted vG-MUX, the vG-MUX needs to saves its configuration by using the script below before restart, and the stored configuration will be auto loaded into the restarted application.http://sdn-kube2.sh.intel.com/lijohnso/onap-release/blob/master/vG-MUX/scripts/save_config.sh
The VES Agent’s configuration (e.g. DCAE’s IP and port) could also be configured via the Honeycomb agent. One can use the curl command to configure it:
curl -i -H "Content-Type:application/json" --data '{"config":{"server-addr":"10.67.119.128","server-port":80,"read-interval":10,"is-add":1}}' -X POST -u admin:admin http://127.0.0.1:8183/restconf/config/vesagent:vesagent
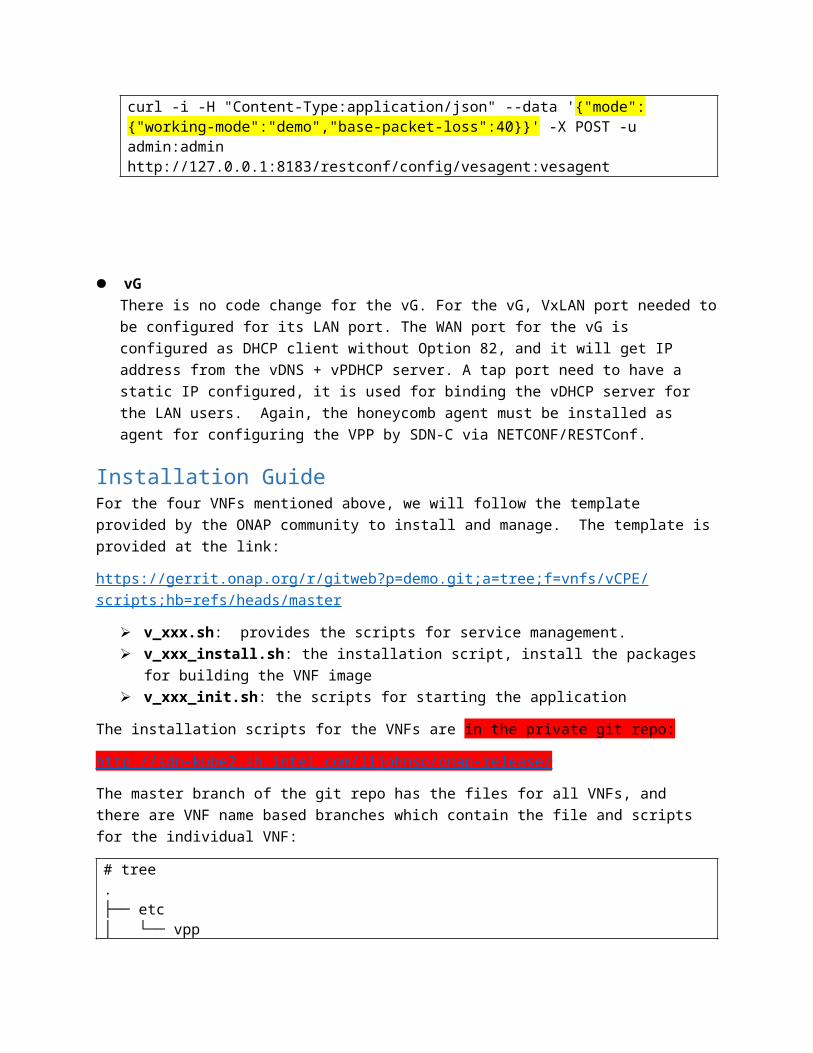
Also, below command can be done by the ONAP Robot to hard-code a packet loss rate in order to trigger the control close loop
curl -i -H "Content-Type:application/json" --data '{"mode":{"working-mode":"demo","base-packet-loss":40}}' -X POST -u admin:admin http://127.0.0.1:8183/restconf/config/vesagent:vesagent
vGThere is no code change for the vG. For the vG, VxLAN port needed to be configured for its LAN port. The WAN port for the vG is configured as DHCP client without Option 82, and it will get IP address from the vDNS + vPDHCP server. A tap port need to have a static IP configured, it is used for binding the vDHCP server for the LAN users. Again, the honeycomb agent must be installed as agent for configuring the VPP by SDN-C via NETCONF/RESTConf.
Installation GuideFor the four VNFs mentioned above, we will follow the template provided by the ONAP community to install and manage. The template is provided at the link:
https://gerrit.onap.org/r/gitweb?p=demo.git;a=tree;f=vnfs/vCPE/scripts;hb=refs/heads/master
v_xxx.sh: provides the scripts for service management. v_xxx_install.sh: the installation script, install the packages for building the VNF image v_xxx_init.sh: the scripts for starting the application
The installation scripts for the VNFs are in the private git repo:
http://sdn-kube2.sh.intel.com/lijohnso/onap-release/
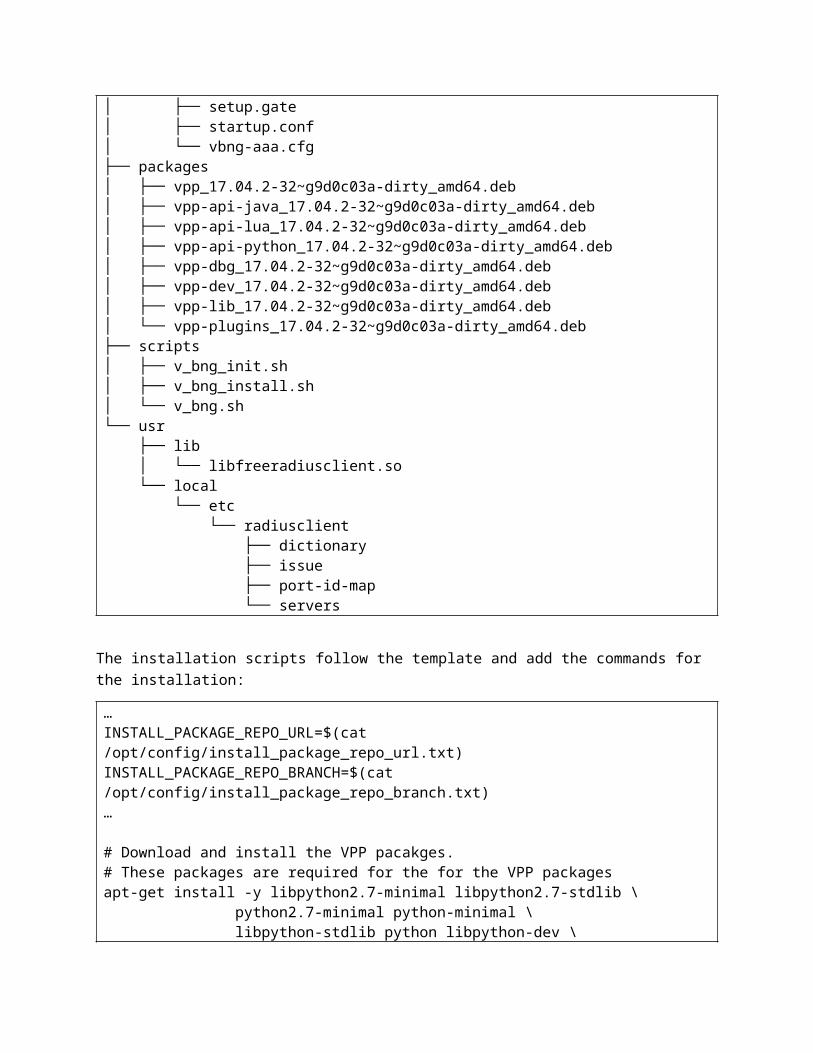
The master branch of the git repo has the files for all VNFs, and there are VNF name based branches which contain the file and scripts for the individual VNF:
# tree.
── etc├│ └── vpp│ ── setup.gate├│ ── startup.conf├│ └── vbng-aaa.cfg
── packages├│ ── vpp_17.04.2-32~g9d0c03a-dirty_amd64.deb├│ ── vpp-api-java_17.04.2-32~g9d0c03a-dirty_amd64.deb├│ ── vpp-api-lua_17.04.2-32~g9d0c03a-dirty_amd64.deb├│ ── vpp-api-python_17.04.2-32~g9d0c03a-dirty_amd64.deb├│ ── vpp-dbg_17.04.2-32~g9d0c03a-dirty_amd64.deb├│ ── vpp-dev_17.04.2-32~g9d0c03a-dirty_amd64.deb├│ ── vpp-lib_17.04.2-32~g9d0c03a-dirty_amd64.deb├│ └── vpp-plugins_17.04.2-32~g9d0c03a-dirty_amd64.deb
── scripts├│ ── v_bng_init.sh├│ ── v_bng_install.sh├│ └── v_bng.sh└── usr
── lib├ │ └── libfreeradiusclient.so └── local └── etc └── radiusclient ── dictionary├ ── issue├ ── port-id-map├ └── servers
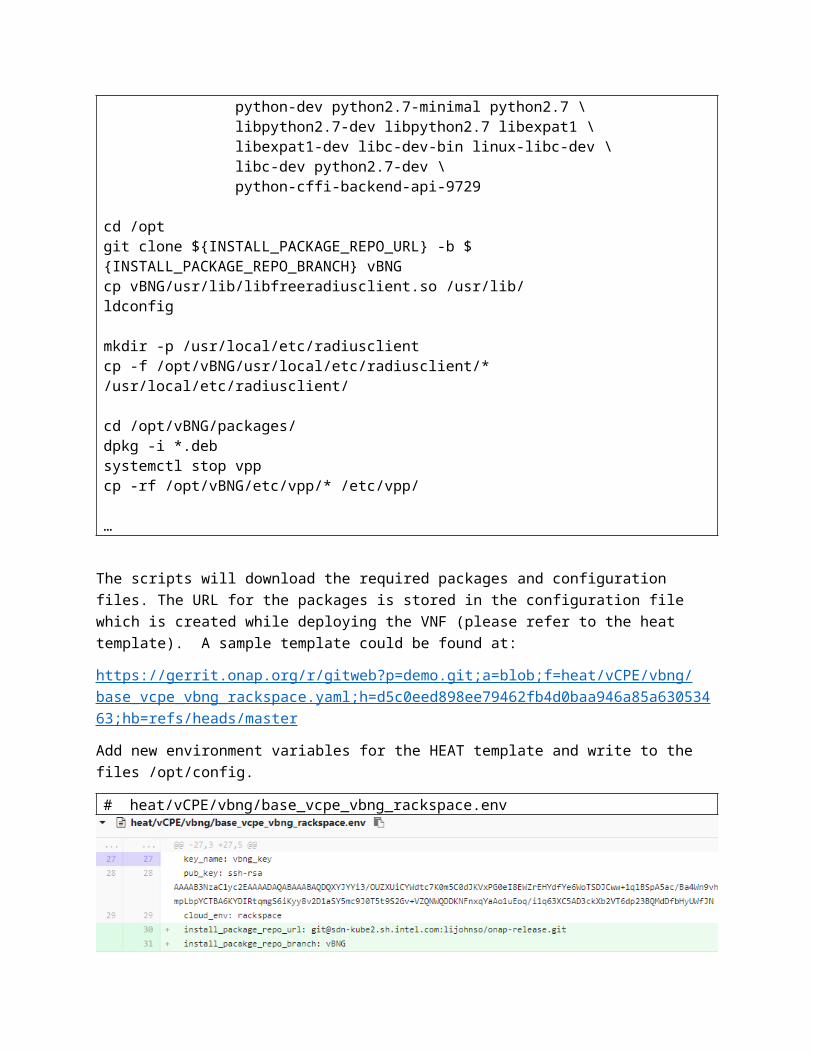
The installation scripts follow the template and add the commands for the installation:
…INSTALL_PACKAGE_REPO_URL=$(cat /opt/config/install_package_repo_url.txt)INSTALL_PACKAGE_REPO_BRANCH=$(cat /opt/config/install_package_repo_branch.txt)…
# Download and install the VPP pacakges.# These packages are required for the for the VPP packagesapt-get install -y libpython2.7-minimal libpython2.7-stdlib \ python2.7-minimal python-minimal \ libpython-stdlib python libpython-dev \ python-dev python2.7-minimal python2.7 \ libpython2.7-dev libpython2.7 libexpat1 \ libexpat1-dev libc-dev-bin linux-libc-dev \ libc-dev python2.7-dev \ python-cffi-backend-api-9729
cd /optgit clone ${INSTALL_PACKAGE_REPO_URL} -b ${INSTALL_PACKAGE_REPO_BRANCH} vBNGcp vBNG/usr/lib/libfreeradiusclient.so /usr/lib/ldconfig
mkdir -p /usr/local/etc/radiusclientcp -f /opt/vBNG/usr/local/etc/radiusclient/* /usr/local/etc/radiusclient/
cd /opt/vBNG/packages/dpkg -i *.debsystemctl stop vppcp -rf /opt/vBNG/etc/vpp/* /etc/vpp/
…
The scripts will download the required packages and configuration files. The URL for the packages is stored in the configuration file which is created while deploying the VNF (please refer to the heat template). A sample template could be found at:
https://gerrit.onap.org/r/gitweb?p=demo.git;a=blob;f=heat/vCPE/vbng/base_vcpe_vbng_rackspace.yaml;h=d5c0eed898ee79462fb4d0baa946a85a63053463;hb=refs/heads/master
Add new environment variables for the HEAT template and write to the files /opt/config.
# heat/vCPE/vbng/base_vcpe_vbng_rackspace.env
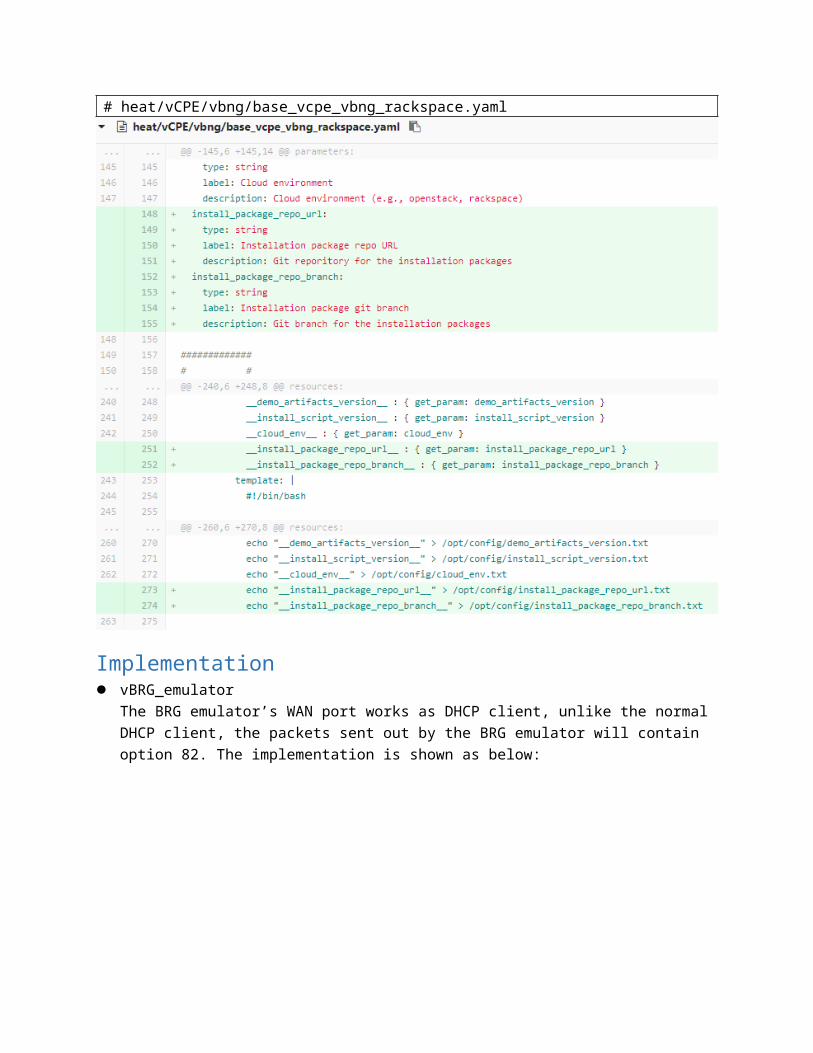
# heat/vCPE/vbng/base_vcpe_vbng_rackspace.yaml
Implementation vBRG_emulator
The BRG emulator’s WAN port works as DHCP client, unlike the normal DHCP client, the packets sent out by the BRG emulator will contain option 82. The implementation is shown as below:
The code could be found @:
http://sdn-kube2.sh.intel.com/lijohnso/vpp/tree/brg-emulator
Option 82 has many sub-options, in the implementation, only sub-option 2 is added into the DHCP packets. Hardware address is used as the value for the circuit ID.
vBNGThe vBNG works as the DHCP proxy, it parses the DHCP packets, extract the Option 82, and use it as FreeRADIUS client’s attributes for authentication. Once the DHCP proxy receives the server’s authenticate success message, the proxy will send the DHCP packets to the real DHCP server, it will also forward the DHCP reply message to the BRG emulator. Since the vBNG works as DHCP proxy, so we need to configure the real DHCP server’s information. The code could be found @:
http://sdn-kube2.sh.intel.com/lijohnso/vpp/tree/vbng
The code is under the folder:
src/plugins/vbng/
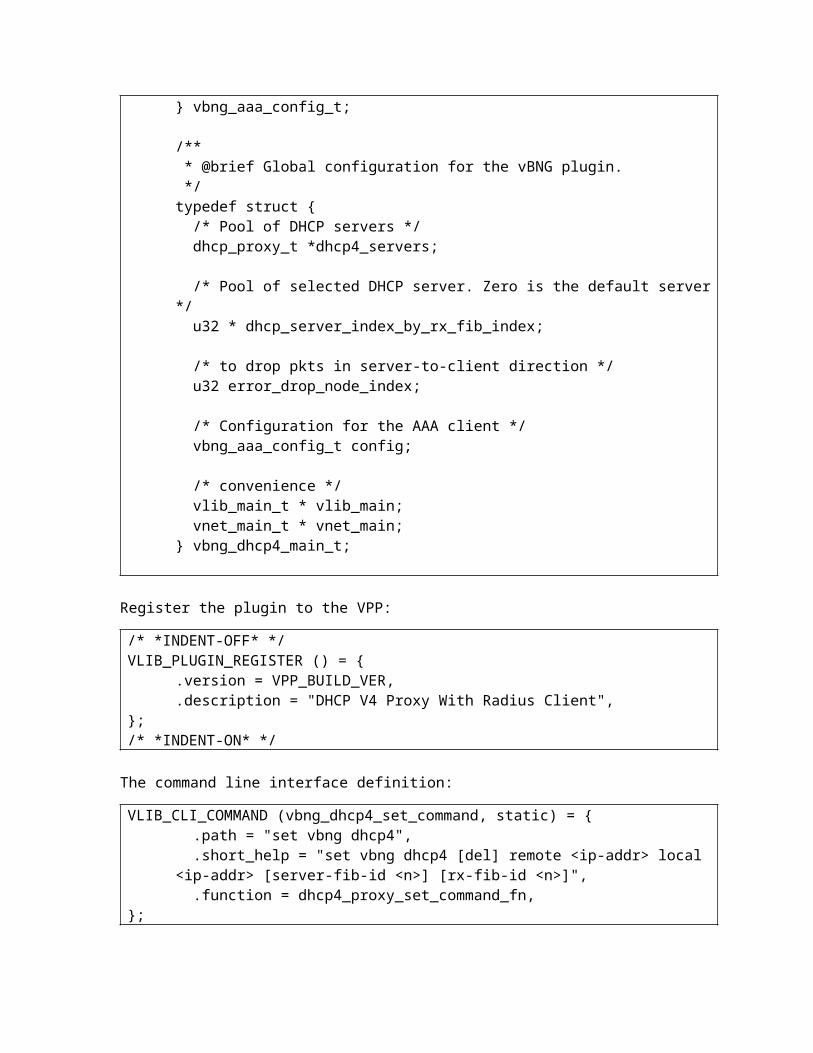
Data structure:
typedef struct { int is_enabled; u32 nas_port; /* AAA server port */ u8 *config_file; /* Radius Client config file path */} vbng_aaa_config_t;
/** * @brief Global configuration for the vBNG plugin. */
typedef struct { /* Pool of DHCP servers */ dhcp_proxy_t *dhcp4_servers;
/* Pool of selected DHCP server. Zero is the default server */ u32 * dhcp_server_index_by_rx_fib_index;
/* to drop pkts in server-to-client direction */ u32 error_drop_node_index;
/* Configuration for the AAA client */ vbng_aaa_config_t config;
/* convenience */ vlib_main_t * vlib_main; vnet_main_t * vnet_main;} vbng_dhcp4_main_t;
Register the plugin to the VPP:
/* *INDENT-OFF* */VLIB_PLUGIN_REGISTER () = {
.version = VPP_BUILD_VER,
.description = "DHCP V4 Proxy With Radius Client",};/* *INDENT-ON* */
The command line interface definition:
VLIB_CLI_COMMAND (vbng_dhcp4_set_command, static) = { .path = "set vbng dhcp4", .short_help = "set vbng dhcp4 [del] remote <ip-addr> local <ip-addr> [server-fib-id <n>] [rx-fib-id <n>]", .function = dhcp4_proxy_set_command_fn,
};
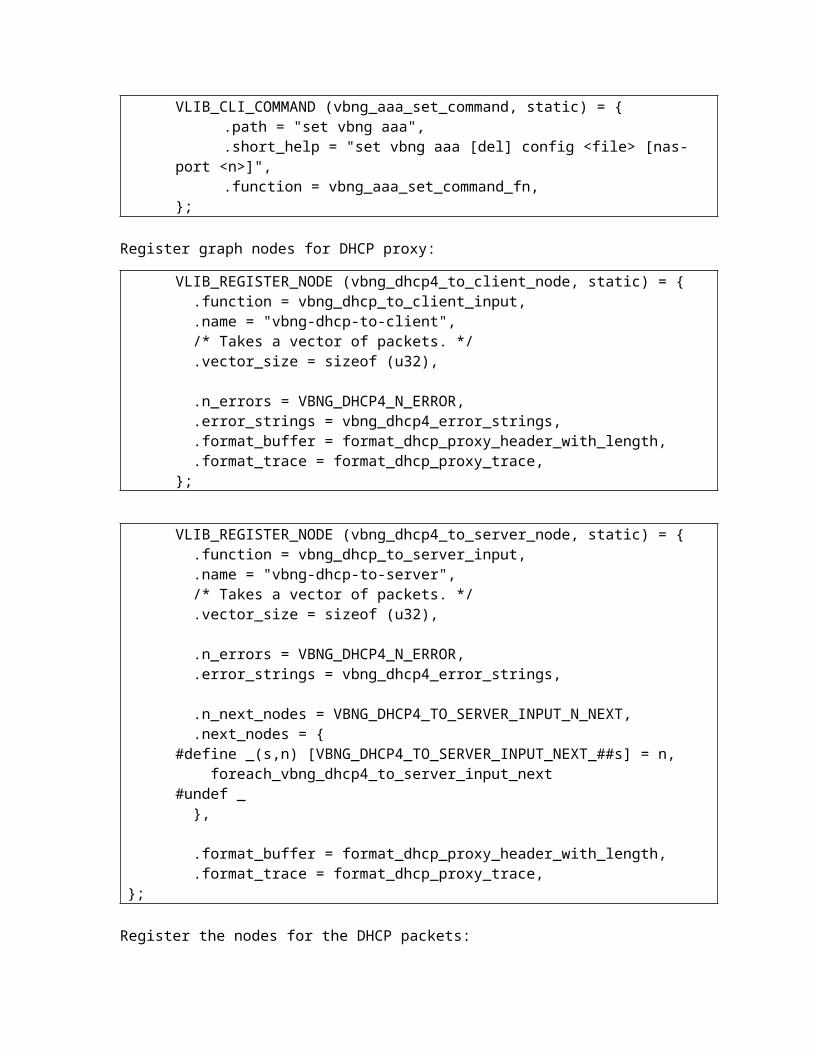
VLIB_CLI_COMMAND (vbng_aaa_set_command, static) = {.path = "set vbng aaa",.short_help = "set vbng aaa [del] config <file> [nas-port <n>]",.function = vbng_aaa_set_command_fn,
};
Register graph nodes for DHCP proxy:
VLIB_REGISTER_NODE (vbng_dhcp4_to_client_node, static) = { .function = vbng_dhcp_to_client_input,

.name = "vbng-dhcp-to-client", /* Takes a vector of packets. */ .vector_size = sizeof (u32),
.n_errors = VBNG_DHCP4_N_ERROR, .error_strings = vbng_dhcp4_error_strings, .format_buffer = format_dhcp_proxy_header_with_length, .format_trace = format_dhcp_proxy_trace,};
VLIB_REGISTER_NODE (vbng_dhcp4_to_server_node, static) = { .function = vbng_dhcp_to_server_input, .name = "vbng-dhcp-to-server", /* Takes a vector of packets. */ .vector_size = sizeof (u32),
.n_errors = VBNG_DHCP4_N_ERROR, .error_strings = vbng_dhcp4_error_strings,
.n_next_nodes = VBNG_DHCP4_TO_SERVER_INPUT_N_NEXT, .next_nodes = {#define _(s,n) [VBNG_DHCP4_TO_SERVER_INPUT_NEXT_##s] = n, foreach_vbng_dhcp4_to_server_input_next#undef _ },
.format_buffer = format_dhcp_proxy_header_with_length, .format_trace = format_dhcp_proxy_trace,
};
Register the nodes for the DHCP packets:
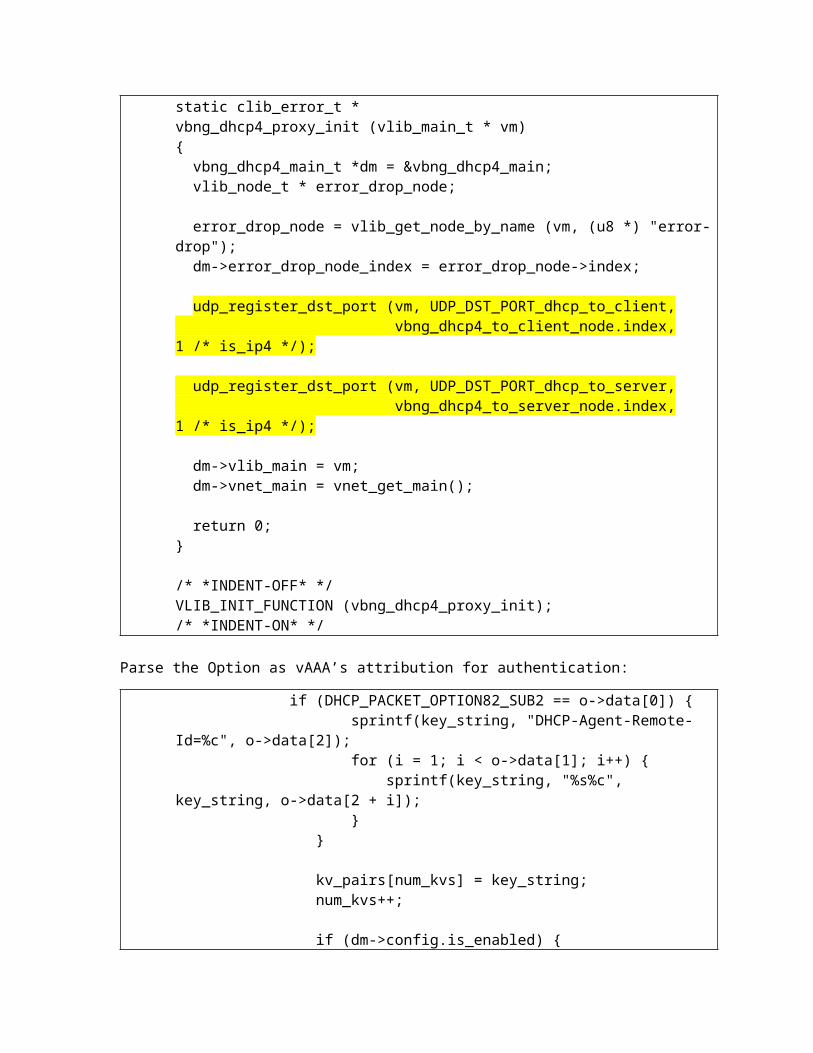
static clib_error_t *vbng_dhcp4_proxy_init (vlib_main_t * vm){ vbng_dhcp4_main_t *dm = &vbng_dhcp4_main; vlib_node_t * error_drop_node;
error_drop_node = vlib_get_node_by_name (vm, (u8 *) "error-drop"); dm->error_drop_node_index = error_drop_node->index;
udp_register_dst_port (vm, UDP_DST_PORT_dhcp_to_client, vbng_dhcp4_to_client_node.index, 1 /* is_ip4 */);
udp_register_dst_port (vm, UDP_DST_PORT_dhcp_to_server, vbng_dhcp4_to_server_node.index, 1 /* is_ip4 */);
dm->vlib_main = vm; dm->vnet_main = vnet_get_main();
return 0;}
/* *INDENT-OFF* */VLIB_INIT_FUNCTION (vbng_dhcp4_proxy_init);/* *INDENT-ON* */
Parse the Option as vAAA’s attribution for authentication:
if (DHCP_PACKET_OPTION82_SUB2 == o->data[0]) { sprintf(key_string, "DHCP-Agent-Remote-Id=%c", o->data[2]); for (i = 1; i < o->data[1]; i++) { sprintf(key_string, "%s%c", key_string, o->data[2 + i]); } }
kv_pairs[num_kvs] = key_string; num_kvs++;
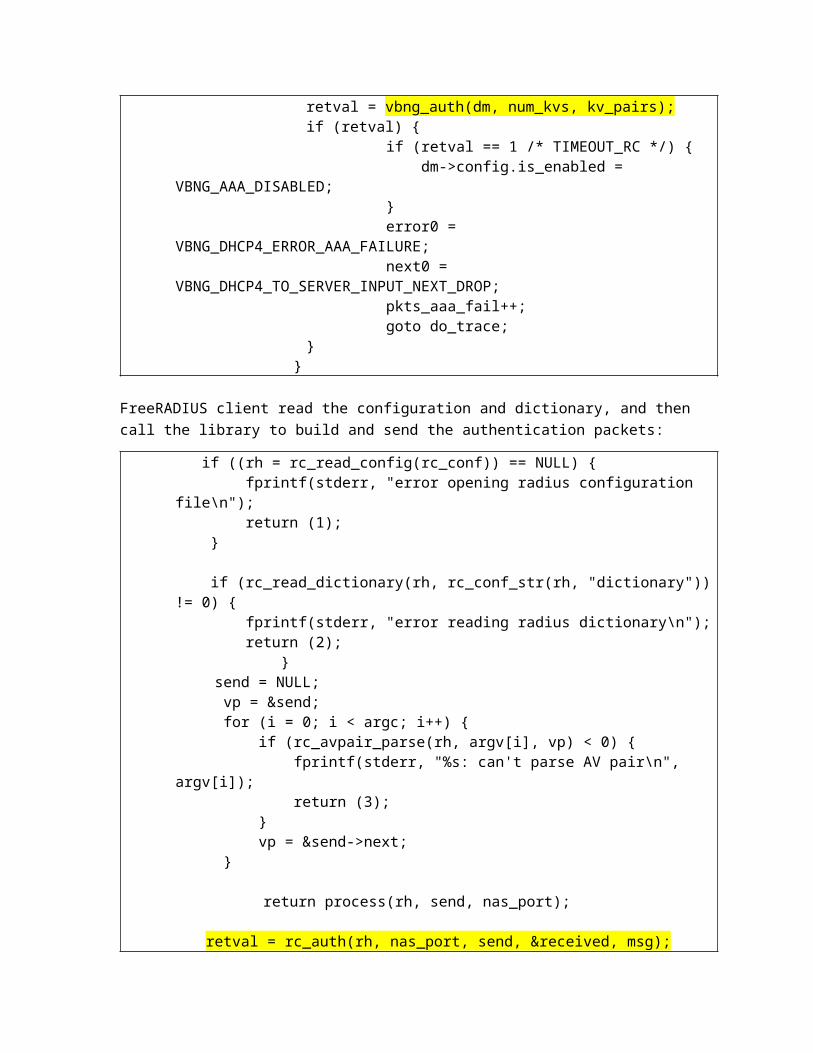
if (dm->config.is_enabled) { retval = vbng_auth(dm, num_kvs, kv_pairs); if (retval) {
if (retval == 1 /* TIMEOUT_RC */) { dm->config.is_enabled = VBNG_AAA_DISABLED; } error0 = VBNG_DHCP4_ERROR_AAA_FAILURE; next0 = VBNG_DHCP4_TO_SERVER_INPUT_NEXT_DROP; pkts_aaa_fail++; goto do_trace;
} }
FreeRADIUS client read the configuration and dictionary, and then call the library to build and send the authentication packets:
if ((rh = rc_read_config(rc_conf)) == NULL) { fprintf(stderr, "error opening radius configuration file\n"); return (1); }
if (rc_read_dictionary(rh, rc_conf_str(rh, "dictionary")) != 0) { fprintf(stderr, "error reading radius dictionary\n"); return (2);
} send = NULL;
vp = &send; for (i = 0; i < argc; i++) { if (rc_avpair_parse(rh, argv[i], vp) < 0) { fprintf(stderr, "%s: can't parse AV pair\n", argv[i]); return (3); } vp = &send->next; }
return process(rh, send, nas_port);
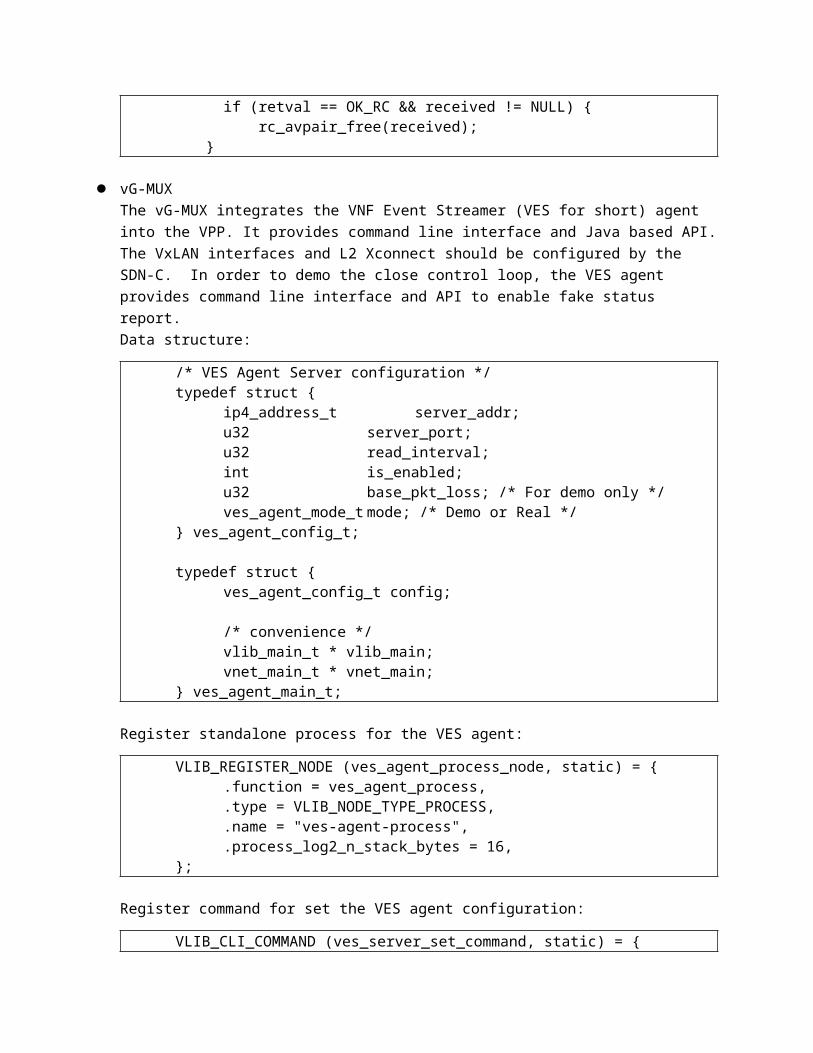
retval = rc_auth(rh, nas_port, send, &received, msg); if (retval == OK_RC && received != NULL) { rc_avpair_free(received); }
vG-MUXThe vG-MUX integrates the VNF Event Streamer (VES for short) agent into the VPP. It provides command line interface and Java based API. The VxLAN interfaces and L2 Xconnect should be configured by the SDN-C. In order to demo the close control loop, the VES agent provides command line interface and API to enable fake status report.Data structure:
/* VES Agent Server configuration */typedef struct {
ip4_address_t server_addr;u32 server_port;u32 read_interval;int is_enabled;u32 base_pkt_loss; /* For demo only */ves_agent_mode_t mode; /* Demo or Real */
} ves_agent_config_t;
typedef struct {ves_agent_config_t config;
/* convenience */vlib_main_t * vlib_main;vnet_main_t * vnet_main;
} ves_agent_main_t;
Register standalone process for the VES agent:
VLIB_REGISTER_NODE (ves_agent_process_node, static) = {.function = ves_agent_process,.type = VLIB_NODE_TYPE_PROCESS,.name = "ves-agent-process",.process_log2_n_stack_bytes = 16,
};
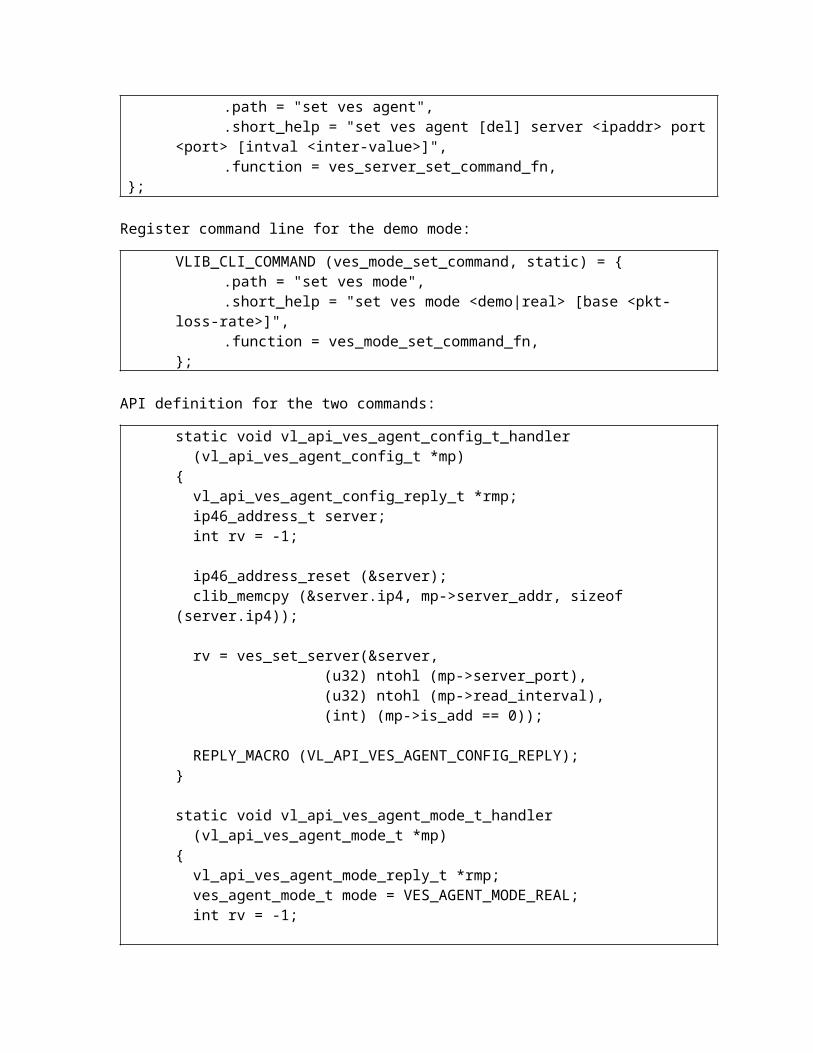
Register command for set the VES agent configuration:
VLIB_CLI_COMMAND (ves_server_set_command, static) = {.path = "set ves agent",.short_help = "set ves agent [del] server <ipaddr> port <port> [intval <inter-
value>]",.function = ves_server_set_command_fn,
};
Register command line for the demo mode:
VLIB_CLI_COMMAND (ves_mode_set_command, static) = {.path = "set ves mode",.short_help = "set ves mode <demo|real> [base <pkt-loss-rate>]",.function = ves_mode_set_command_fn,
};
API definition for the two commands:
static void vl_api_ves_agent_config_t_handler (vl_api_ves_agent_config_t *mp){ vl_api_ves_agent_config_reply_t *rmp; ip46_address_t server; int rv = -1;
ip46_address_reset (&server); clib_memcpy (&server.ip4, mp->server_addr, sizeof (server.ip4));
rv = ves_set_server(&server, (u32) ntohl (mp->server_port), (u32) ntohl (mp->read_interval), (int) (mp->is_add == 0));
REPLY_MACRO (VL_API_VES_AGENT_CONFIG_REPLY);}
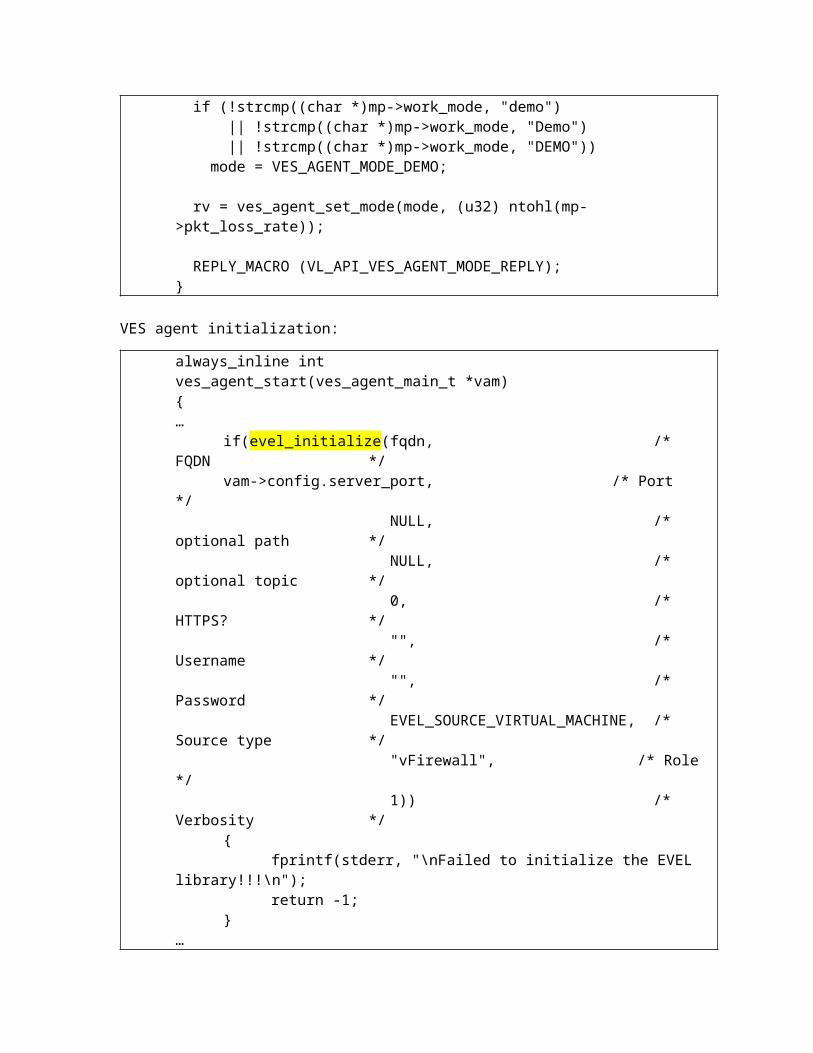
static void vl_api_ves_agent_mode_t_handler (vl_api_ves_agent_mode_t *mp){ vl_api_ves_agent_mode_reply_t *rmp; ves_agent_mode_t mode = VES_AGENT_MODE_REAL; int rv = -1;
if (!strcmp((char *)mp->work_mode, "demo") || !strcmp((char *)mp->work_mode, "Demo")
|| !strcmp((char *)mp->work_mode, "DEMO")) mode = VES_AGENT_MODE_DEMO;
rv = ves_agent_set_mode(mode, (u32) ntohl(mp->pkt_loss_rate));
REPLY_MACRO (VL_API_VES_AGENT_MODE_REPLY);}
VES agent initialization:
always_inline intves_agent_start(ves_agent_main_t *vam){…
if(evel_initialize(fqdn, /* FQDN */vam->config.server_port, /* Port */ NULL, /* optional path */ NULL, /* optional topic */ 0, /* HTTPS? */ "", /* Username */ "", /* Password */ EVEL_SOURCE_VIRTUAL_MACHINE, /* Source type */ "vFirewall", /* Role */ 1)) /* Verbosity */{
fprintf(stderr, "\nFailed to initialize the EVEL library!!!\n");return -1;
}…
}
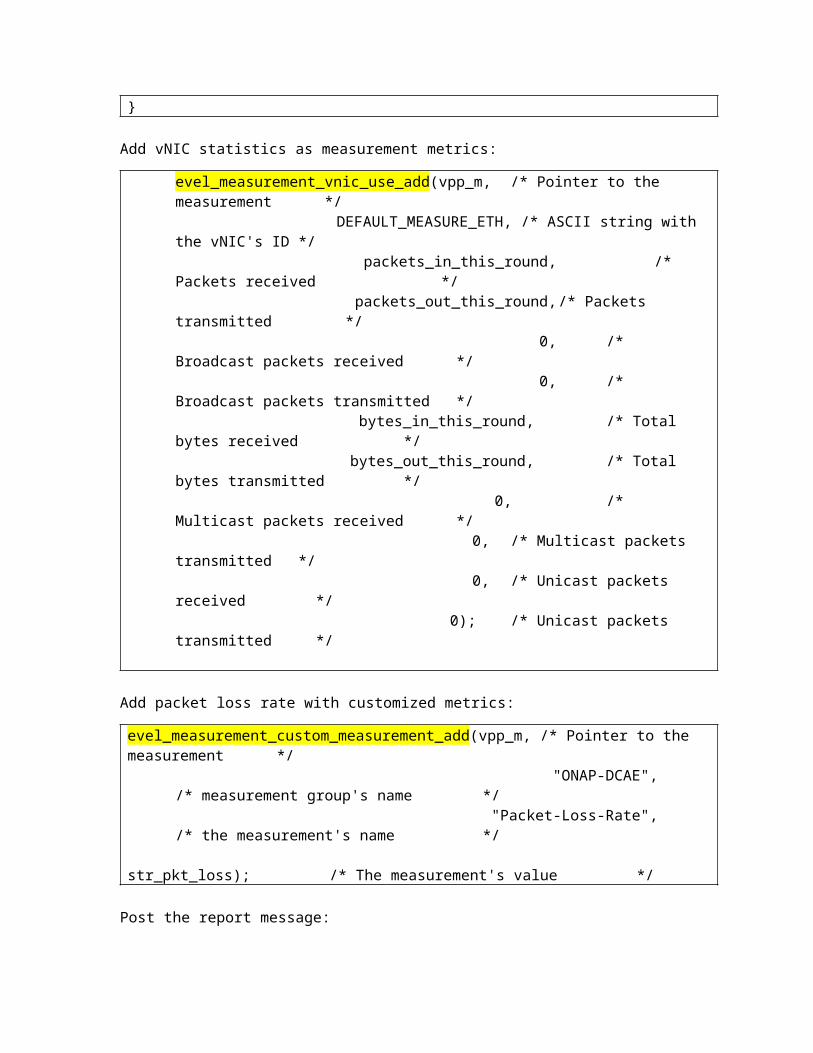
Add vNIC statistics as measurement metrics:
evel_measurement_vnic_use_add(vpp_m, /* Pointer to the measurement */ DEFAULT_MEASURE_ETH, /* ASCII string with the vNIC's ID */
packets_in_this_round, /* Packets received */ packets_out_this_round, /* Packets transmitted */ 0, /* Broadcast packets received */ 0, /* Broadcast packets transmitted */
bytes_in_this_round, /* Total bytes received */ bytes_out_this_round, /* Total bytes transmitted */
0, /* Multicast packets received */ 0, /* Multicast packets transmitted */ 0, /* Unicast packets received */
0); /* Unicast packets transmitted */
Add packet loss rate with customized metrics:
evel_measurement_custom_measurement_add(vpp_m, /* Pointer to the measurement */ "ONAP-DCAE", /* measurement group's name */ "Packet-Loss-Rate", /* the measurement's name */
str_pkt_loss); /* The measurement's value */
Post the report message:
evel_rc = evel_post_event(vpp_m_header);
Create a service to save the VPP configuration before reboot:
[Unit]Description=Run Scripts at Start and StopRequires=vpp.serviceAfter=vpp.service
[Service]Type=oneshotRemainAfterExit=trueExecStop=/opt/vG-MUX/scripts/save_config.sh
[Install] WantedBy=multi-user.target
Save the VES agent configuration:
# Saves the VES agent configuration to the startup script.## Get the current VES agent configuration from the bash command:# $vppctl show ves agent# Server Addr Server Port Interval Enabled# 127.0.0.1 8080 10 True# Set the VES agent configuration with the bash command:# $vppctl set ves agent server 127.0.0.1 port 8080 intval 10#save_ves_config(){
local server=""local port=""local intval=""
local ves_config=`vppctl show ves agent | head -2 | tail -1`if [ "${ves_config}" != "" ] ;then
server=`echo ${ves_config} | awk '{ print $1 }'`port=`echo ${ves_config} | awk '{ print $2 }'`intval=`echo ${ves_config} | awk '{ print $3 }'`write_startup_scripts add "set ves agent server ${server} port ${port}
intval ${intval}"
fi}
Save the VxLAN tunneling configuration:
# Save the VxLAN Tunnel Configuration to the startup script.## Get the current VxLAN tunnel configuration with bash command:# $vppctl show vxlan tunnel# [0] src 10.3.0.2 dst 10.1.0.20 vni 100 sw_if_index 1 encap_fib_index 0 fib_entry_index 7 decap_next l2# [1] src 10.5.0.20 dst 10.5.0.21 vni 100 sw_if_index 2 encap_fib_index 0 fib_entry_index 8 decap_next l2# Set the VxLAN Tunnel with the bash command:# $vppctl create vxlan tunnel src 10.3.0.2 dst 10.1.0.20 vni 100# vxlan_tunnel0save_vxlan_tunnel(){
local src=""local dst=""local vni=""
vppctl show vxlan tunnel | while read linedo
if [ "${line}" != "" ] ;thensrc=`echo ${line} | awk '{ print $3 }'`dst=`echo ${line} | awk '{ print $5 }'`vni=`echo ${line} | awk '{ print $7 }'`
write_startup_scripts add "create vxlan tunnel src ${src} dst ${dst} vni ${vni}"
fidone
}
Save the cross connection configuration:
# Save the VxLAN tunnel L2 xconnect configuration to the startup script.## Get the Current L2 Address configuration with bash command:# $vppctl show int addr# local0 (dn):# vxlan_tunnel0 (up):# l2 xconnect vxlan_tunnel1# vxlan_tunnel1 (up):# l2 xconnect vxlan_tunnel0# Save the VxLAN tunnel L2 xconnect configuration with bash command:# $vppctl set interface l2 xconnect vxlan_tunnel0 vxlan_tunnel1
#save_vxlan_xconnect(){
local ingress=""local egress=""
vppctl show int addr | while read linedo
if [[ ${line} == vxlan_tunnel* ]] ;thenread nextwhile [[ ${next} != l2* ]] || [[ ${next} == "" ]]do
line=`echo ${next}`read next
doneif [[ ${next} == l2* ]] ;then
ingress=`echo ${line} | awk '{ print $1 }'`egress=`echo ${next} | awk '{ print $3 }'`write_startup_scripts add "set interface l2 xconnect $
{ingress} ${egress}"fi
fidone
}
Write the configuration to file:
# Write the commands to the startup scripts.## We could set VPP configuration to the startup.conf.# Write the configuration to the startup scripts so we could# restore the system after rebooting.#write_startup_scripts(){
local cmd=${2}local is_add=${1}
if [[ ${is_add} == add ]] ;thenwhile read -r linedo
if [[ ${line} == ${cmd} ]] ;thenreturn 0
fidone < ${VPP_SETUP_GATE}
echo "${cmd}" >> ${VPP_SETUP_GATE}else
while read -r linedo
if [[ ${line} == ${cmd} ]] ;thensed -i "/${line}/d" ${VPP_SETUP_GATE}return 0
fidone < ${VPP_SETUP_GATE}
fi}
vGFor the vG, there is no code change but need some configuration to make it work.
set int state GigabitEthernet0/8/0 upset int ip address GigabitEthernet0/8/0 10.5.0.21/24
set int state GigabitEthernet0/9/0 upset dhcp client intfc GigabitEthernet0/9/0 hostname vg-1
tap connect lstack address 192.168.1.1/24set int state tap-0 up
create vxlan tunnel src 10.5.0.21 dst 10.5.0.20 vni 100
set interface l2 bridge tap-0 10 0 set interface l2 bridge vxlan_tunnel0 10 1
set int ip address vxlan_tunnel0 192.168.1.254/24 set set interface snat in vxlan_tunnel0 out GigabitEthernet0/9/0
Since the vG behave like a gateway, we need to add the NAT rule to configure the IP address translation between its LAN port and WAN port.