Embed Size (px)
Citation preview

Contents
CONTENTS
OWLv1 to OWLv2: Transition Guide for Instructors . . . . . . . . 1
Audience. . . . . . . . . . . . . . . . . . . . . . . . . . . . . . . . . . . . . . . . . 1
What’s Different? . . . . . . . . . . . . . . . . . . . . . . . . . . . . . . . . . . 1
Shared Features . . . . . . . . . . . . . . . . . . . . . . . . . . . . . . . . . . . 3
Upcoming Features . . . . . . . . . . . . . . . . . . . . . . . . . . . . . . . . . 3
Transition Overview Tables . . . . . . . . . . . . . . . . . . . . . . . . . . 4
Registering and Logging In . . . . . . . . . . . . . . . . . . . . . . . . . . . . 4
System Requirements. . . . . . . . . . . . . . . . . . . . . . . . . . . . . . . . 5
Managing Your Course and Sections . . . . . . . . . . . . . . . . . . . . . . 6
Sharing Your Course. . . . . . . . . . . . . . . . . . . . . . . . . . . . . . . . . 7
Student Tasks . . . . . . . . . . . . . . . . . . . . . . . . . . . . . . . . . . . . . 8
Student Enrollment and Communication . . . . . . . . . . . . . . . . . . . 8
Managing Assignments . . . . . . . . . . . . . . . . . . . . . . . . . . . . . . .10
Managing Grades and Reports . . . . . . . . . . . . . . . . . . . . . . . . . .12
Getting Started Using OWLv2 . . . . . . . . . . . . . . . . . . . . . . . . 14
System Requirements. . . . . . . . . . . . . . . . . . . . . . . . . . . . . . . .14
OWLv1 to OWLv2 ‐ Transition Guide for Instructors 12/13/16
Contents
Logging In . . . . . . . . . . . . . . . . . . . . . . . . . . . . . . . . . . . . . . .16
The OWLv2 Interface . . . . . . . . . . . . . . . . . . . . . . . . . . . . . . . .17
Tips for Managing Display Preferences 20
Using the Global Actions Menu. . . . . . . . . . . . . . . . . . . . . . . . . .22
Using the System Check . . . . . . . . . . . . . . . . . . . . . . . . . . . . . .24
Emailing Students . . . . . . . . . . . . . . . . . . . . . . . . . . . . . . . . . .25
Course Creation and Management . . . . . . . . . . . . . . . . . . . . 26
How to Create a Course . . . . . . . . . . . . . . . . . . . . . . . . . . . . . .27
Managing Sections . . . . . . . . . . . . . . . . . . . . . . . . . . . . . . . . . .31
Section Features . . . . . . . . . . . . . . . . . . . . . . . . . . . . . . . . 31
Managing Enrollment . . . . . . . . . . . . . . . . . . . . . . . . . . . . . . 32
Enabling Student Self-Registration . . . . . . . . . . . . . . . . . . . . . . .32
Manually Enrolling and Unenrolling Users . . . . . . . . . . . . . . . . . .33
Assignment Creation and Management . . . . . . . . . . . . . . . . 36
Assignments Page Interface . . . . . . . . . . . . . . . . . . . . . . . . . . .37
Basic Assignment Page Options . . . . . . . . . . . . . . . . . . . . . . . . .38
Advanced Assignment Page Options . . . . . . . . . . . . . . . . . . . . . .39
Creating Assignments. . . . . . . . . . . . . . . . . . . . . . . . . . . . . . . .41
New assignment creation features in OWLv2 . . . . . . . . . . . . . 42
Guidelines for Creating Assignments . . . . . . . . . . . . . . . . . . 43
Managing Your Gradebook . . . . . . . . . . . . . . . . . . . . . . . . . . 46
Understanding Your Gradebook’s Features . . . . . . . . . . . . . . . . .48
Working with Study Tools. . . . . . . . . . . . . . . . . . . . . . . . . . . 53
Frequently Asked Questions . . . . . . . . . . . . . . . . . . . . . . . . . 55
OWLv1 to OWLv2 ‐ Transition Guide for Instructors 12/13/16
OWLV1 TO OWLV2: TRANSITION GUIDE FORINSTRUCTORS
Audience
This guide is intended for instructors experienced with OWLv1 and who need an introduction to the new OWLv2 Learning Management System.
As a live, web‐based application, OWLv2 is regularly updated with new features and improvements. Please refer to the OWLv2 online Help or the comprehensive OWLv2 User Guide for the most complete and up to date information.
Note: Please note that OWLv2 is now available on integrated LMS platforms. Integrated systems cannot support some features described in this guide — such as course management and creation, user enrollment, archiving, sending emails, managing Student IDs, adding a syllabus, dropping lowest scores, and creating External Gradebook Columns.
What’s Different?
The new version of OWLv2 includes many of the same great features you are familiar with, plus these frequently requested options:
For example:
Reset an individual assignment attempt.
Override electronic grading.
Edit assignment options for individual students.
Modify due dates for multiple assignments at a time.
Drag‐and‐drop item selection for ease of assignment creation.
Determine the limit on the number of times a student can takean ASP assignment.
OWLv1 to OWLv2 ‐ Transition Guide for Instructors December 13, 2016 pg. 1

OWLv1 to OWLv2: Transition Guide for Instructors
Adjust point values for assignments.
Ready‐to‐display system Gradebook.
Wide range of LMS Gradebook export formats.
Review student answer submissions.
Create assignments or tests from multiple chapters.
Manage courses taught from multiple texts with a single sign‐on.
Ability for students to access multiple OWLv2 courses with a single sign‐on.
A free‐trial registration for students of up to 14 days.
Ability to have multiple users as co‐instructors of a course and its sections.
Each section of a course is able to have unique assignment Due Dates.
Analytic reports for the class aggregate or individual students.
Ability to export data from individual assignments as a spreadsheet.
A Gradebook filtering tool producing customized Gradebook reports.
An External Gradebook Column you can use to include grades from paper assignments or labs completed outside of OWLv2.
Simplified course import and export.
Adaptive Study Plans and Quick Prep materials built into the course content.
Ability to choose which Learning Objectives to include/exclude in an assignment, instead of assigning the entire module.
Diagnose and resolve configuration needs through the OWLv2 System Check.
Flexible development cycle to allow quicker repair time for content errors.
First Answer Error Detection option informs students if their answer is incorrect without providing correct answers or allowing data mining.
Note: Always use the buttons and links provided in OWLv2 to close assignments or go to another page. If you use your browser’s Close button or Back/Forward buttons instead, you may unintentionally lose work from your current session.
OWLv1 to OWLv2 ‐ Transition Guide for Instructors December 13, 2016 pg. 2

OWLv1 to OWLv2: Transition Guide for Instructors
Shared Features
Additionally, many of the existing features in the original version of OWLv1 are improved upon in the updated version you’ll be using in OWLv2.
For example:
Easier student registration.
Reduced ability for students to enroll in the incorrect section.
Reduced opportunity for students to create multiple accounts.
Simplified process for the purchase of access codes and registering from a single sign‐on location.
Less reliance upon multiple grade reports to view grading data.
Simplified Mastery assignment interface.
Streamlined method allowing students to request help on a specific question.
All electronically graded content; most content with algorithmically regenerated variables.
No Java‐driven content; all JMOL and MarvinSketch assignments converted to HTML5 compatible using the ChemDoodle widget.
Built‐in significant figure tolerance.
Upcoming Features
What’s in store for the future of OWLv2:
Greater compatibility across a range of mobile devices.
Ability to adjust significant figures tolerances.
A new Learning Outcomes Report.
Ability to control the printing of assignment takes.
Control over which ASP quiz take is used for the course score.
OWLv1 to OWLv2 ‐ Transition Guide for Instructors December 13, 2016 pg. 3

Transition Overview Tables
TRANSITION OVERVIEW TABLES
Use this section as quick reference for bites of information to help you and your students get started in specific areas of OWLv2.
Registering and Logging In
Actions: Registering and Logging In (Non‐integrated LMS Accounts Only)
How to: OWLv1 OWLv2
Logging in (with an existing account)
www.cengage.com/owl Select your discipline then choose Log in. Choose your textbook and then your school.
https://login.cengage.com Enter your account information and click Sign In. Click the link for your text under My Course.
Purchasing a Student Access Code
www.cengage.com/owl Students select their discipline then choose Buy an Access Code.
https://login.cengage.com Students may use the registration URL (provided by their instructor).
Registering a Student Access Code
www.cengage.com/owl Students select their discipline and school, then choose the blue arrow under student registration.
https://login.cengage.com Students enter their Access Code on the My Home page.
Instructor ‐ Changing Account Information
www.cengage.com/owl Log in and choose My Account from the left navigation menu.
https://login.cengage.com Log in and choose My Account from the Instructor Resource Center.
OWLv1 to OWLv2 ‐ Transition Guide for Instructors December 13, 2016 pg. 4
Transition Overview Tables
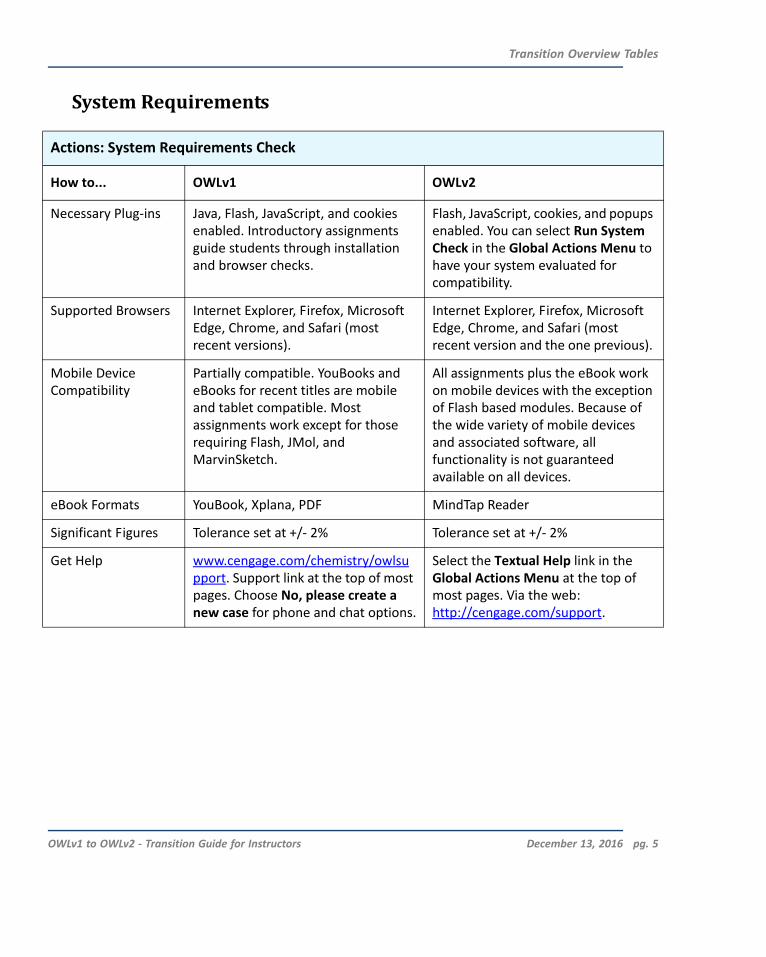
System Requirements
Actions: System Requirements Check
How to... OWLv1 OWLv2
Necessary Plug‐ins Java, Flash, JavaScript, and cookies enabled. Introductory assignments guide students through installation and browser checks.
Flash, JavaScript, cookies, and popups enabled. You can select Run System Check in the Global Actions Menu to have your system evaluated for compatibility.
Supported Browsers Internet Explorer, Firefox, Microsoft Edge, Chrome, and Safari (most recent versions).
Internet Explorer, Firefox, Microsoft Edge, Chrome, and Safari (most recent version and the one previous).
Mobile Device Compatibility
Partially compatible. YouBooks and eBooks for recent titles are mobile and tablet compatible. Most assignments work except for those requiring Flash, JMol, and MarvinSketch.
All assignments plus the eBook work on mobile devices with the exception of Flash based modules. Because of the wide variety of mobile devices and associated software, all functionality is not guaranteed available on all devices.
eBook Formats YouBook, Xplana, PDF MindTap Reader
Significant Figures Tolerance set at +/‐ 2% Tolerance set at +/‐ 2%
Get Help www.cengage.com/chemistry/owlsu pport. Support link at the top of most pages. Choose No, please create a new case for phone and chat options.
Select the Textual Help link in the Global Actions Menu at the top of most pages. Via the web: http://cengage.com/support.
OWLv1 to OWLv2 ‐ Transition Guide for Instructors December 13, 2016 pg. 5

Transition Overview Tables
Managing Your Course and Sections
Actions: Managing Your Course and Sections (Non‐LMS Accounts Only)
How to... OWLv1 OWLv2
Create a Course Click the Course Creation link in the left navigation menu.
Click Courses, click Create a New Course, and choose one of the course creation options.
Copy a Course From the Course Home page click Manage Sections and then choose Copy Course.
Click Courses, click Create a New Course, and then select Copy an Existing Course.
Create a Section From the Course Home page click Manage Sections and then choose New Section.
Click Courses, locate the course, and click the adjacent Create section link in the Actions column.
Archive a Course Click Course List in the left navigation menu and choose Archive/Unarchive Courses at the top of the page.
Click Courses, choose the course, click Show All Options (if necessary), and then select Archive from the Courses and Sections drop‐down menu.
Delete a Course From the Course Home page click Manage Sections and then choose Delete.
Not available. You can, however, opt to Archive a course and then Delete it from the Archived Materials page.
Export a Course Not available. You can only copy courses within a textbook and school.
Click Courses, select the course, click Show All Options (if necessary), and then select Export from the Courses and Sections drop‐down menu.
Import a Course Not available. You can only copy courses within a textbook and school.
Ensure you are entitled to the same textbook as the source course.
OWLv1 to OWLv2 ‐ Transition Guide for Instructors December 13, 2016 pg. 6

Transition Overview Tables
Sharing Your Course
Actions: Sharing Your Course (Non‐LMS Accounts Only)
How to... OWLv1 OWLv2
Give Your Course to Have the instructor create a copy See the Export a Course instructions Another Instructor your course. From the Course Home
page click Manage Sections and then choose Copy Course. You can only share courses at the same school using the same textbook.
above on sharing your course with any instructor within your school or from a different school. Note the course textbook must be the same.
Getting an Instructor www.cengage.com/owl https://login.cengage.com or TA Login Select your discipline and choose Log
in. Choose your textbook and then your school. Choose Request Instructor Account.
Log in or choose New Faculty User. After approval (usually within 48 hours) search by author, title, or ISBN in the Add a product to your Instructor Resource Center text box to add any text to your account.
Enrolling or Unenrolling Existing Instructor or TA Accounts
The instructor to be added must have an existing account. See instructions above for how to establish an account. From the Course Home page click Manage Sections and then choose Course Permissions.
The instructor to be added must have an existing account. See the instructions above for how to establish an account. From the Users page, use the Course or Section drop‐down menu to select the a course. Select Enroll User(s) then choose Enroll or Unenroll Instructors. Choose from the list of Available Instructors and click Enroll or Unenroll.
OWLv1 to OWLv2 ‐ Transition Guide for Instructors December 13, 2016 pg. 7
Transition Overview Tables
Student Tasks
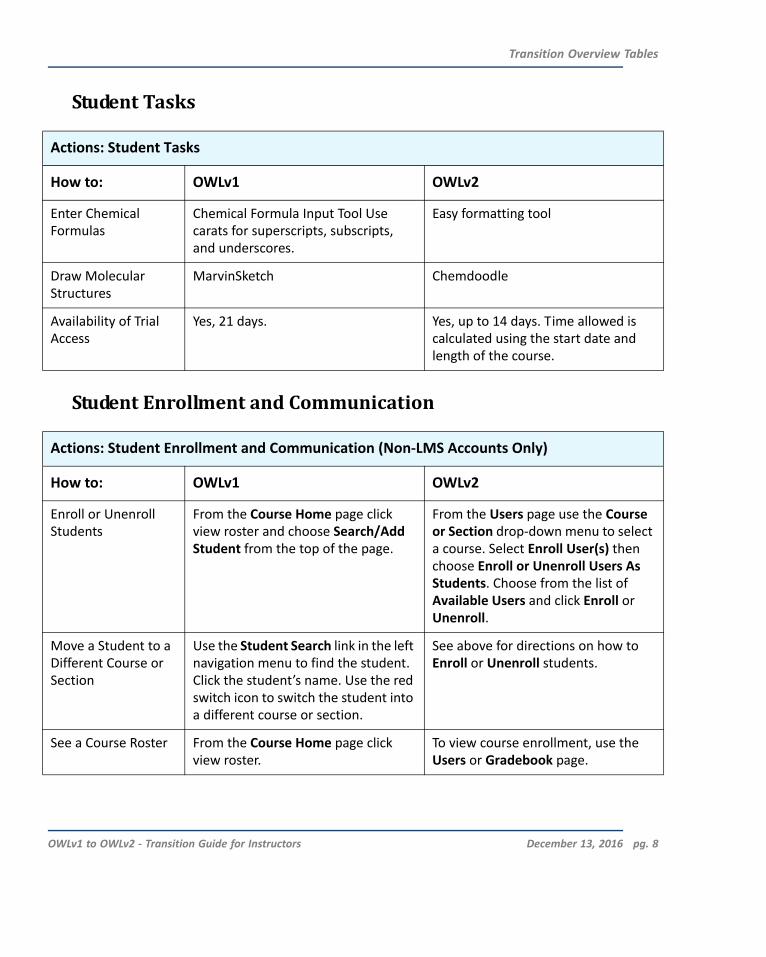
Actions: Student Tasks
How to: OWLv1 OWLv2
Enter Chemical Formulas
Chemical Formula Input Tool Use carats for superscripts, subscripts, and underscores.
Easy formatting tool
Draw Molecular Structures
MarvinSketch Chemdoodle
Availability of Trial Access
Yes, 21 days. Yes, up to 14 days. Time allowed is calculated using the start date and length of the course.
Student Enrollment and Communication
Actions: Student Enrollment and Communication (Non‐LMS Accounts Only)
How to: OWLv1 OWLv2
Enroll or Unenroll Students
From the Course Home page click view roster and choose Search/Add Student from the top of the page.
From the Users page use the Course or Section drop‐down menu to select a course. Select Enroll User(s) then choose Enroll or Unenroll Users As Students. Choose from the list of Available Users and click Enroll or Unenroll.
Move a Student to a Different Course or Section
Use the Student Search link in the left navigation menu to find the student. Click the student’s name. Use the red switch icon to switch the student into a different course or section.
See above for directions on how to Enroll or Unenroll students.
See a Course Roster From the Course Home page click view roster.
To view course enrollment, use the Users or Gradebook page.
OWLv1 to OWLv2 ‐ Transition Guide for Instructors December 13, 2016 pg. 8

Transition Overview Tables
Actions: Student Enrollment and Communication (Non‐LMS Accounts Only)
How to: OWLv1 OWLv2
Send a Class‐wide Email
From the Course Home page choose edit from the Announcement box. Enter your message and check off box to Send email to students on update. Click the Update Announcements button
From the Users page, choose Email User(s) and select the email recipients from the Available Recipients. Select the adjacent check box next to select all students. You can also email students from the Gradebook page. Click Show All Options then choose Send Email to Users under Student Actions.
Send an Individual Email
From the Course Home page click view roster and choose Select Students to Email from the top of the page.
From the Gradebook page, click the envelope icon next to a student’s name. This allows you to email that specific student. Or, from the Users page, choose Email User(s) and select the email recipient from the Available Users list.
Receive Email from Students
Email messages are stored in OWL under Messages and also sent to the instructor’s email address. You can change the recipient using Course Home > Manage Sections > Message Recipients.
Student email messages are sent directly to the email address used to register the instructor account. To turn off this feature, click the Edit link adjacent to the course name and uncheck the option to Allow Student to sent emails to the instructor while taking assignments.
Require Student IDs Not available. To make managing grade reports easier, you can require students to enter an ID number when they register. This option can be turned on even after your course has started – students are prompted to enter their numbers at their next log‐in.
OWLv1 to OWLv2 ‐ Transition Guide for Instructors December 13, 2016 pg. 9
Transition Overview Tables
Managing Assignments
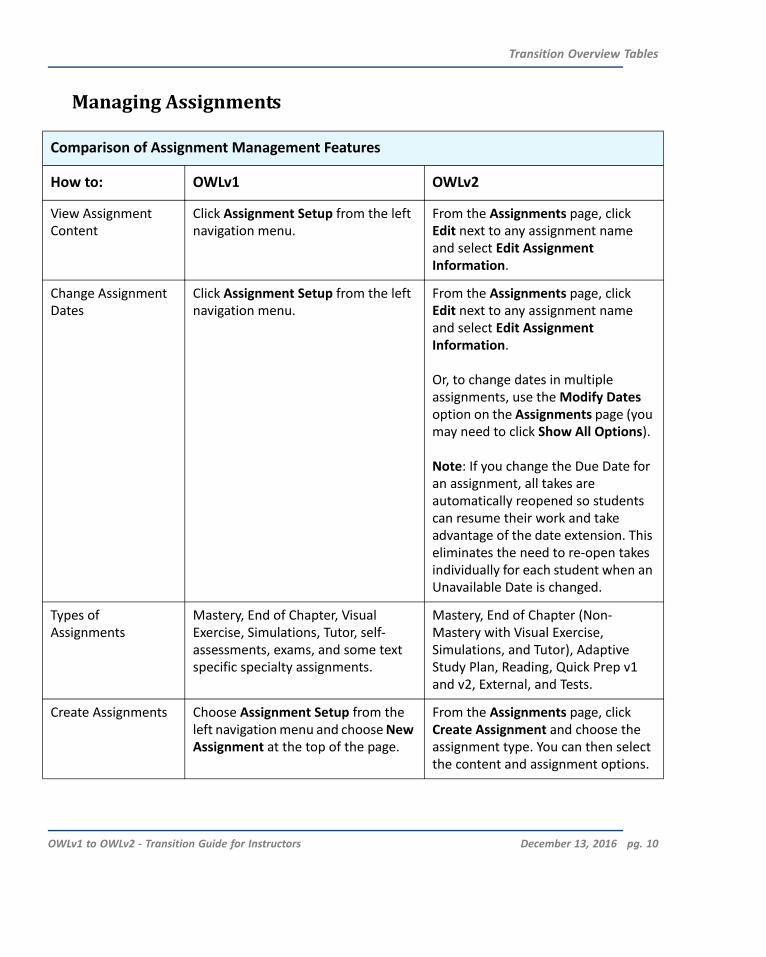
Comparison of Assignment Management Features
How to: OWLv1 OWLv2
View Assignment Click Assignment Setup from the left From the Assignments page, click Content navigation menu. Edit next to any assignment name
and select Edit Assignment Information.
Change Assignment Dates
Click Assignment Setup from the left navigation menu.
From the Assignments page, click Edit next to any assignment name and select Edit Assignment Information.
Or, to change dates in multiple assignments, use the Modify Dates option on the Assignments page (you may need to click Show All Options).
Note: If you change the Due Date for an assignment, all takes are automatically reopened so students can resume their work and take advantage of the date extension. This eliminates the need to re‐open takes individually for each student when an Unavailable Date is changed.
Types of Mastery, End of Chapter, Visual Mastery, End of Chapter (Non‐Assignments Exercise, Simulations, Tutor, self‐
assessments, exams, and some text specific specialty assignments.
Mastery with Visual Exercise, Simulations, and Tutor), Adaptive Study Plan, Reading, Quick Prep v1 and v2, External, and Tests.
Create Assignments Choose Assignment Setup from the left navigation menu and choose New Assignment at the top of the page.
From the Assignments page, click Create Assignment and choose the assignment type. You can then select the content and assignment options.
OWLv1 to OWLv2 ‐ Transition Guide for Instructors December 13, 2016 pg. 10

Transition Overview Tables
Comparison of Assignment Management Features
How to: OWLv1 OWLv2
Assign QuickPrep QuickPrep is only available with selected texts. Contact DSC or tech support to see if it’s available for your course.
From the Assignments page, select Create Assignment and then choose the Quick Prep option. Set the available date before other assignments so students can access before your course or use Edit Assignment Options to make it a Prerequisite for the course.
Change Assignment Settings and Options
Choose Assignment Setup from the left navigation menu. Click the assignment name. Click the pencil icon at the top of the page and choose assignment settings.
From the Assignments page, choose Edit next to any assignment name. Choose Edit Assignment Options and click Continue.
Access Student View Choose Instructor View in the upper left corner, then choose Student Window.
Choose Change to Student View from the Global Actions Menu. When you do this, you will get an “instructor as student” record in your Gradebook.
Reorder Assignments Not Available. Assignments are always shown and delivered to students in order of ascending Due Date.
From the Assignments page, click Show All Options and then choose Reorder Assignments to access the reordering interface.
OWLv1 to OWLv2 ‐ Transition Guide for Instructors December 13, 2016 pg. 11

Transition Overview Tables
Managing Grades and Reports
Actions: Managing Grades and Reports
How to: OWLv1 OWLv2
Set up your Score totals are not shown to The Gradebook is set up Gradebook students unless the Gradebook is
enabled. To enable, click Gradebook and Add New Category.
automatically and score totals are shown to students. To set up categories, click Edit Grading Categories on the Gradebook page.
Run a Grade Report Choose Student Score Report from the left navigation menu, then choose report attributes and Generate Report.
Go to the Gradebook page, select Export Course Gradebook and choose Text or Excel Spreadsheet to download an editable report.
Or click Gradebook Analytics to see an aggregate report for score and performance details by the class, assignment, and learning concept levels.
See Student Work Use the Student Search in the left navigation menu to find the student. Click the student’s name.
On the Gradebook page, each student in your class is listed with a row of assignment scores. By clicking on any score you can view and edit work for that assignment on the Edit Grade Details page, or click a student’s name to see work for an individual student on the Student Details page.
Grant an Extension From the Course Home page, choose extend dates at the center of the page.
From the Gradebook page, click Show All Options and select Customize Assignment Options for Specific Students from the Student Actions menu. Check the names for students who require new assignment settings.
OWLv1 to OWLv2 ‐ Transition Guide for Instructors December 13, 2016 pg. 12

Transition Overview Tables
Actions: Managing Grades and Reports
How to: OWLv1 OWLv2
Reset Individual Not available. Can only change Go to the Gradebook page and find Attempts attempts for all students using the
Assignment Settings. Choose Assignment Setup and click the assignment name then the pencil icon and choose assignment settings.
the student. Click the score or icon for the appropriate assignment to open the Edit Grade Details page. Select the Take you wish to reset and click Delete Selected Take.
Change a Score Use Student Search in the left navigation menu and click the student’s name. Choose “?” icon to go to the Student Progress page. Click on any assignment to view attempts or change the score.
From the Gradebook page, find the student. Click on the score or icon for the assignment. On the ensuing Edit Grade Details page, you can edit the score. To change scores across an entire assignment, choose Adjust Multiple Scores from the Student Actions menu (person icon).
Run a Student at‐risk Report
Click Student Risk Report in the left navigation menu. Choose the report attributes and click Generate Report. Students at risk are ranked and shown in red.
On the Gradebook page, click the “bar graph icon” next to a student’s name to open an student analytics report for score and performance details for all assignments, individual assignment, learning concepts, and items. You can then limit the report details to those scores in the lowest score range or “red category” by deselecting Score Distribution ranges.
Run an Assignment Report
Click Assignment Report in the left navigation menu. Choose the report attributes and click Generate Report.
See Above
OWLv1 to OWLv2 ‐ Transition Guide for Instructors December 13, 2016 pg. 13
Getting Started Using OWLv2
GETTING STARTED USING OWLV2
This section provides a quick overview of basic features to help you get started in OWLv2. For detailed information, please see the online Textual Help provided in OWLv2 or refer to the OWLv2 User Guide for Instructors — a download available on the Cengage Learning Engagement Services site.
Note: You may need to select your product or learning solution in order to find the appropriate user guides.
System Requirements
At this time, OWLv2 is supported on Windows and Macintosh computers. Because the OWLv2 online platform is regularly updated, system requirements may change over time. Be certain to check with technical support from time to time to find out the most recent recommendations.
While OWLv2 is compatible for use with wireless high speed Internet connection, because of variable rates of connectivity that wireless provides, it is strongly recommend you use a hard‐wired high speed Internet connection.
OWLv2 is not supported for use with high speed satellite connection. Satellite Internet is strongly affected by weather, geographical location and other factors that typically provide poor reliability for Internet access. It is also not recommend you use mobile phone "hot spots" to try to enable a high speed wireless connection.
Finally, our system requirements are intended as a starting point for optimal configuration and cannot anticipate future challenges or security alerts with any of the commonly used plugins. If you encounter difficulties, do not hesitate to contact Technical Support.
OWLv1 to OWLv2 ‐ Transition Guide for Instructors December 13, 2016 pg. 14
Getting Started Using OWLv2
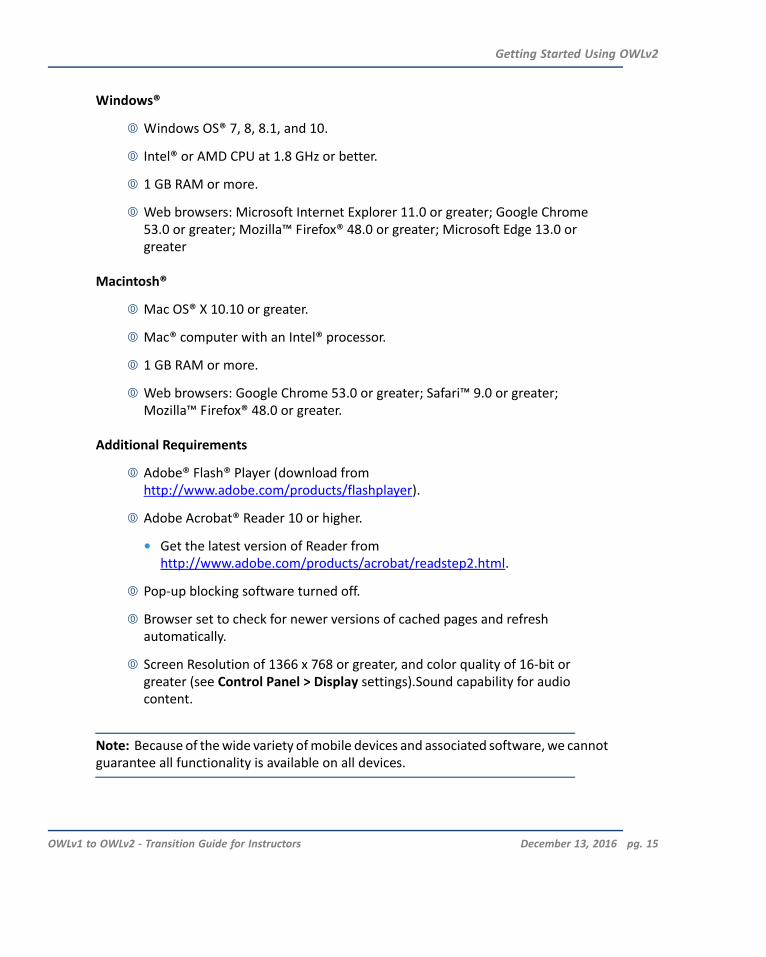
Windows®
Windows OS® 7, 8, 8.1, and 10.
Intel® or AMD CPU at 1.8 GHz or better.
1 GB RAM or more.
Web browsers: Microsoft Internet Explorer 11.0 or greater; Google Chrome 53.0 or greater; Mozilla™ Firefox® 48.0 or greater; Microsoft Edge 13.0 or greater
Macintosh®
Mac OS® X 10.10 or greater.
Mac® computer with an Intel® processor.
1 GB RAM or more.
Web browsers: Google Chrome 53.0 or greater; Safari™ 9.0 or greater; Mozilla™ Firefox® 48.0 or greater.
Additional Requirements
Adobe® Flash® Player (download from http://www.adobe.com/products/flashplayer).
Adobe Acrobat® Reader 10 or higher.
• Get the latest version of Reader from http://www.adobe.com/products/acrobat/readstep2.html.
Pop‐up blocking software turned off.
Browser set to check for newer versions of cached pages and refresh automatically.
Screen Resolution of 1366 x 768 or greater, and color quality of 16‐bit or greater (see Control Panel > Display settings).Sound capability for audio content.
Note: Because of the wide variety of mobile devices and associated software, we cannot guarantee all functionality is available on all devices.
OWLv1 to OWLv2 ‐ Transition Guide for Instructors December 13, 2016 pg. 15

Getting Started Using OWLv2
Logging In
With OWLv2, you can access all your OWL courses through a single sign on. This is true regardless of the number of OWL products you are using for your different courses. After your sales representative creates your account at http://login.cengage.com, you can log in to your Instructor Resource Center, pictured below.
The Instructor Resource Center
From this page you can add titles, switch between your registered titles, manage your account, and access customer support. To get started, click the link under the My Course heading to launch OWLv2.
Note: Before launching OWLv2, use the menu under Choose your Product to select the correct course materials. This refreshes the page to display the appropriate product.
OWLv1 to OWLv2 ‐ Transition Guide for Instructors December 13, 2016 pg. 16

The OWLv2 Home Page
Getting Started Using OWLv2
The OWLv2 Interface
When you first open OWLv2, the Home page is launched. You will notice the user interface (UI) is much different from the one in OWLv1. However, the tabbed navigation in the heading is clearly labeled to offer a general guideline of the features available on each page.
The OWLv2 Home page supplies tables with links to overdue assignments, current assignments, and recently graded assignments. From this page you can also gain direct access to all the main pages in OWLv2, such as Courses, Assignments, Users, Study Tools, and your Gradebook.
OWLv1 to OWLv2 ‐ Transition Guide for Instructors December 13, 2016 pg. 17
Getting Started Using OWLv2
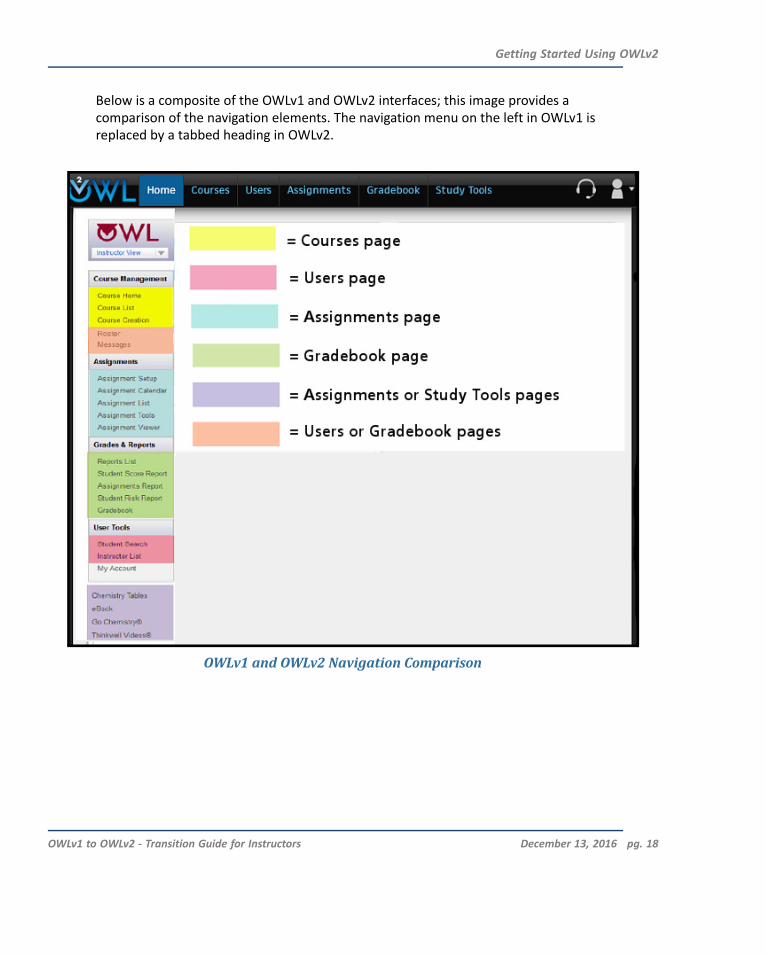
Below is a composite of the OWLv1 and OWLv2 interfaces; this image provides a comparison of the navigation elements. The navigation menu on the left in OWLv1 is replaced by a tabbed heading in OWLv2.
OWLv1 to OWLv2 ‐ Transition Guide for Instructors December 13, 2016 pg. 18
OWLv1 and OWLv2 Navigation Comparison
Getting Started Using OWLv2
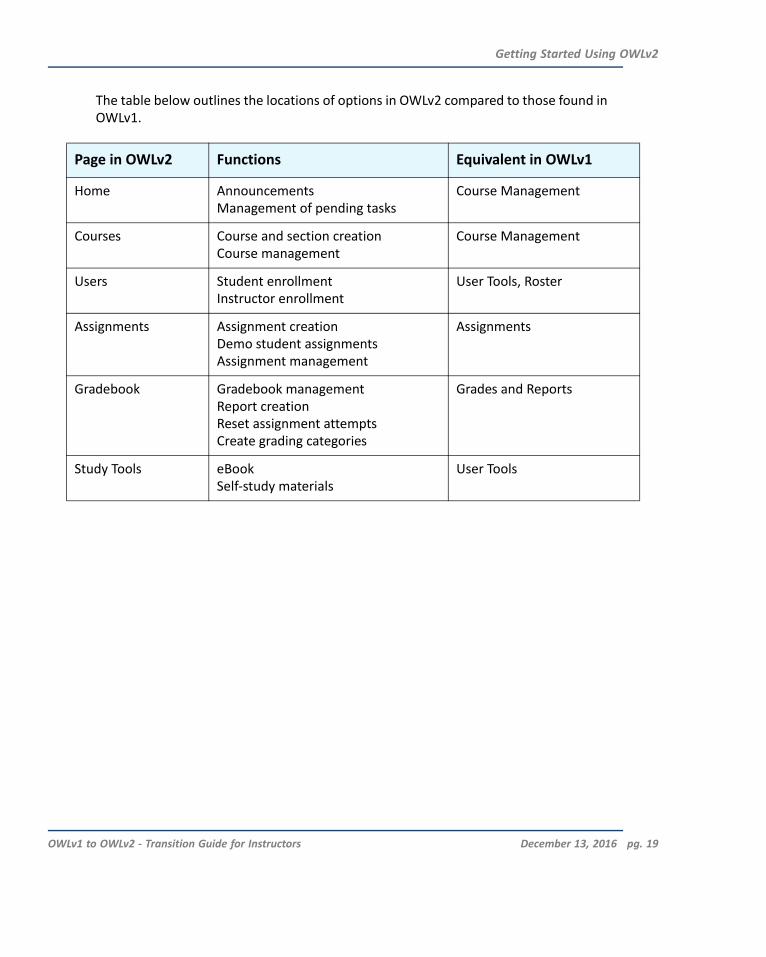
The table below outlines the locations of options in OWLv2 compared to those found in OWLv1.
Page in OWLv2 Functions Equivalent in OWLv1
Home Announcements Management of pending tasks
Course Management
Courses Course and section creation Course management
Course Management
Users Student enrollment Instructor enrollment
User Tools, Roster
Assignments Assignment creation Demo student assignments Assignment management
Assignments
Gradebook Gradebook management Report creation Reset assignment attempts Create grading categories
Grades and Reports
Study Tools eBook Self‐study materials
User Tools
OWLv1 to OWLv2 ‐ Transition Guide for Instructors December 13, 2016 pg. 19

Getting Started Using OWLv2
Tips for Managing Display Preferences
Most pages in OWLv2 have controls used to determine the display of data and the features on the page.
Use the OWLv2 Preferences, located in the Global Actions Menu (person icon), to set global options such as table length, print options, and whether the default setting for Show All Options is set to automatically display or hide the advanced controls.
OWLv2 System Preferences
Click the Show All Options link on the Assignments page to reveal important supplemental tools. It is recommended that you familiarize yourself with these advanced options. See “Advanced Assignment Page Options” on page 39 for more details.
Use the Change Information Displayed on This Page link on the Assignments page to select the columns of information you would like to appear.
OWLv1 to OWLv2 ‐ Transition Guide for Instructors December 13, 2016 pg. 20
Gradebook Preferences
OWLv2 Home Page Display Preferences
Getting Started Using OWLv2
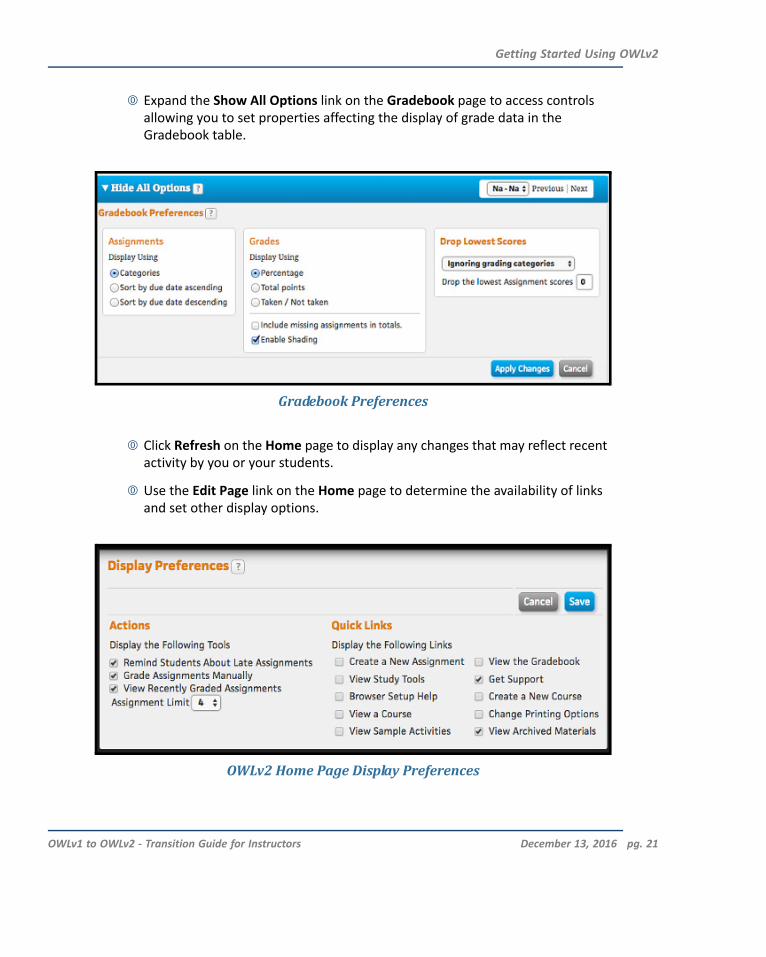
Expand the Show All Options link on the Gradebook page to access controls allowing you to set properties affecting the display of grade data in the Gradebook table.
Click Refresh on the Home page to display any changes that may reflect recent activity by you or your students.
Use the Edit Page link on the Home page to determine the availability of links and set other display options.
OWLv1 to OWLv2 ‐ Transition Guide for Instructors December 13, 2016 pg. 21

Getting Started Using OWLv2
Using the Global Actions Menu
The Global Actions Menu (person icon near the heading) is an important feature in OWLv2. From this menu you have access to several options and tools that can help you manage your course.
Change to Student View/Return to Instructor View To switch to a student’s view of the current course, click the Change to Student View link to automatically be enrolled in your course as a student. This allows you to see your assignments, messages, grading, and so forth as your students do. In addition, this creates an “instructor as student” account in your Gradebook you can use to monitor any settings that affect student scores.
To switch back to your instructor account from the student view, click the Return to Instructor View link.
Preferences The Preferences link opens a window with options allowing you to control the display of OWLv2 pages — such as table length, display of advanced features, etc. When you are finished changing your preferences, click Save These Changes to keep them, or click Cancel to exit without saving.
Basic Calculator Clicking this link opens OWLv2’s Basic Calculator in a pop‐up window. This is a simple calculator that does not include scientific notation, logarithmic functions, and trigonometric functions. Click Close window to exit the calculator.
Note: For advanced calculations, you can use the scientific Calculator which is located in the Global Actions Menu as a selection in Math/Graphing Tools.
Math/Graphing Tools Clicking this link opens the OWLv2 Math/Graphing Tools window, which provides access to several helpful utilities, including a scientific calculator, a math/science glossary, a units translator, and interactive simulations. Some of the advanced options may require that Java is installed on your computer.
OWLv1 to OWLv2 ‐ Transition Guide for Instructors December 13, 2016 pg. 22
Getting Started Using OWLv2
Textual Help You can refer to the online Help by either clicking one of the inline Help icons for information on a specific page or you can access the entire help system by selecting Textual Help link in the Global Actions Menu (person icon).
System Check Click this link to run the OWLv2 System Check, which is a diagnostic test used to confirm that your system and browser settings meet the OWLv2 system requirements. For additional details, see “Using the System Check” on page 24 or the “System Requirements” on page 5.
Sign Out Clicking Sign Out officially logs you out of OWLv2 and informs the system you’re done. If you simply close the browser window without signing out, you may lose unsaved work, or our session may not terminate successfully.
Your session expires automatically after 2 hours of inactivity, however, a warning overlay will pop up to inform you when 10 minutes remain. When using your account normally your session does not time‐out. Each time you load a new page or save an entry, the timer resets.
Note: Be sure to sign out by clicking the Sign Out link if you need to leave your computer for an extended period.
Technical Support If you’ve encountered an issue you’re having problems resolving, click the Cengage Technical Support icon to open the support site in a new browser window. From this site you can view topic specific FAQs, and find links for creating a support case or downloading user guides for both instructors and students. When you are not logged in, you can also go to http://www.cengage.com/support.
OWLv1 to OWLv2 ‐ Transition Guide for Instructors December 13, 2016 pg. 23
Getting Started Using OWLv2
Using the System Check
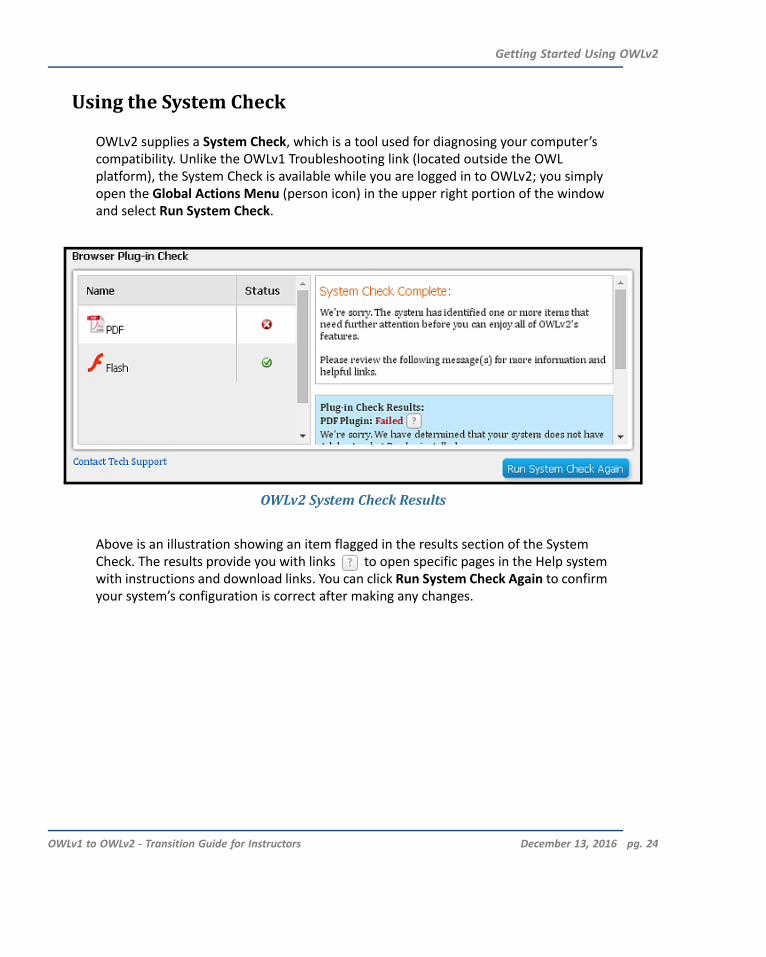
OWLv2 supplies a System Check, which is a tool used for diagnosing your computer’s compatibility. Unlike the OWLv1 Troubleshooting link (located outside the OWL platform), the System Check is available while you are logged in to OWLv2; you simply open the Global Actions Menu (person icon) in the upper right portion of the window and select Run System Check.
OWLv2 System Check Results
Above is an illustration showing an item flagged in the results section of the System Check. The results provide you with links to open specific pages in the Help system with instructions and download links. You can click Run System Check Again to confirm your system’s configuration is correct after making any changes.
OWLv1 to OWLv2 ‐ Transition Guide for Instructors December 13, 2016 pg. 24
Getting Started Using OWLv2
Emailing Students
Like OWLv1, OWLv2 (for non‐LMS systems) offers you the means to email your students from both the Users page and the Gradebook page. The Gradebook also has several auxiliary pages from which you can send an email. This enables you to immediately notify students with pertinent information.
Note: In OWLv2, replies from students are sent only to the email address you associated with your Cengage Learning account. Be sure you check this email regularly.
To email Students from the Users page Go to the Users page, select the check box to select the students or instructors you would like to email, and click Email User(s).
To email Students from the Gradebook page Go to the Gradebook page, find the student you would like to email, and click the mail icon next to their name.
To email Students from the Query Student Data page Go to the Gradebook page and select Query Student Data from the Perform student and assignment actions menu (person icon). Enter your search criteria and click Search to open the Results page. Use the check box to select the student(s) you would like to email and click Email.
To email Students from the Assignment Details page Go to the Gradebook page and click an assignment name to open the Assignment Details page. Find the student you would like to email and click the mail icon next to their name.
To email Students from the Edit Grade Details page Go to the Gradebook page and click a score to open the Edit Grade Details page. Use the check box to select the students you would like to email and click Email Student.
Note: For all the procedures above, be sure you have the correct selection in the Course or Section menu before proceeding.
OWLv1 to OWLv2 ‐ Transition Guide for Instructors December 13, 2016 pg. 25

Course Creation and Management
COURSE CREATION AND MANAGEMENT
The OWLv2 course creation functions offer an updated interface with many of the same features you know from OWLv1.
The OWLv2 Courses Page
The OWLv2 Courses page is illustrated above. From this page you can do the following:
Create courses and sections
Manage course folders
Edit course information
Copy or archive courses and sections
Import and export courses to share with your colleagues
Generate and distribute a course key for student registration, and reference previously generated keys
OWLv1 to OWLv2 ‐ Transition Guide for Instructors December 13, 2016 pg. 26
Course Creation and Management
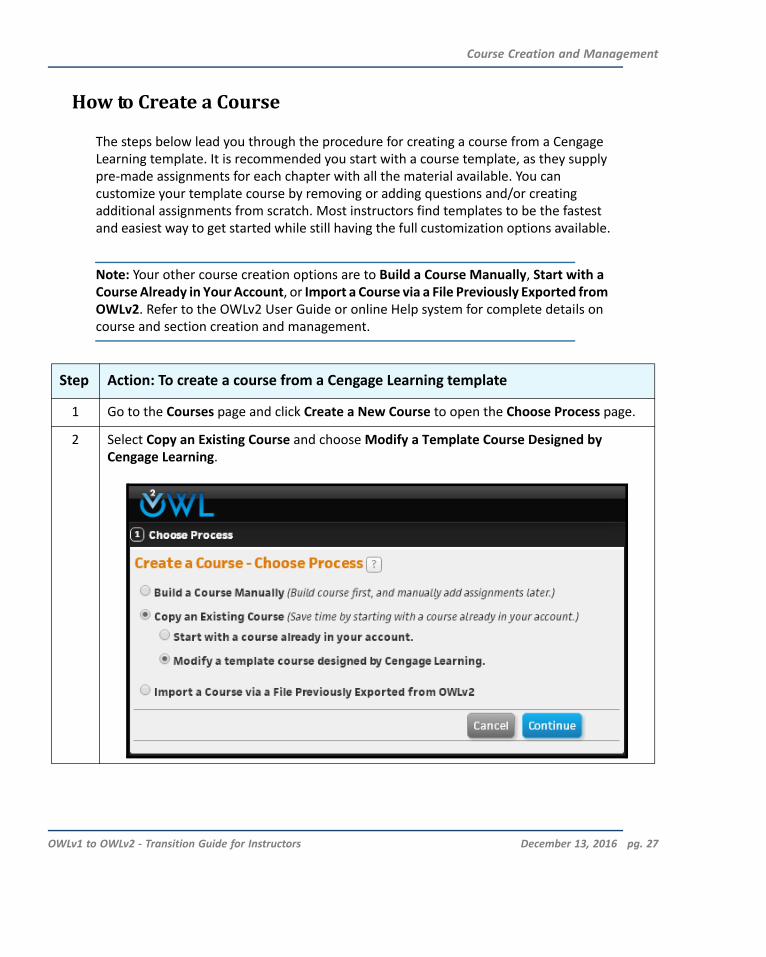
How to Create a Course
The steps below lead you through the procedure for creating a course from a Cengage Learning template. It is recommended you start with a course template, as they supply pre‐made assignments for each chapter with all the material available. You can customize your template course by removing or adding questions and/or creating additional assignments from scratch. Most instructors find templates to be the fastest and easiest way to get started while still having the full customization options available.
Note: Your other course creation options are to Build a Course Manually, Start with a Course Already in Your Account, or Import a Course via a File Previously Exported from OWLv2. Refer to the OWLv2 User Guide or online Help system for complete details on course and section creation and management.
Step Action: To create a course from a Cengage Learning template
1 Go to the Courses page and click Create a New Course to open the Choose Process page.
2 Select Copy an Existing Course and choose Modify a Template Course Designed by Cengage Learning.
OWLv1 to OWLv2 ‐ Transition Guide for Instructors December 13, 2016 pg. 27
Course Creation and Management
Step Action: To create a course from a Cengage Learning template
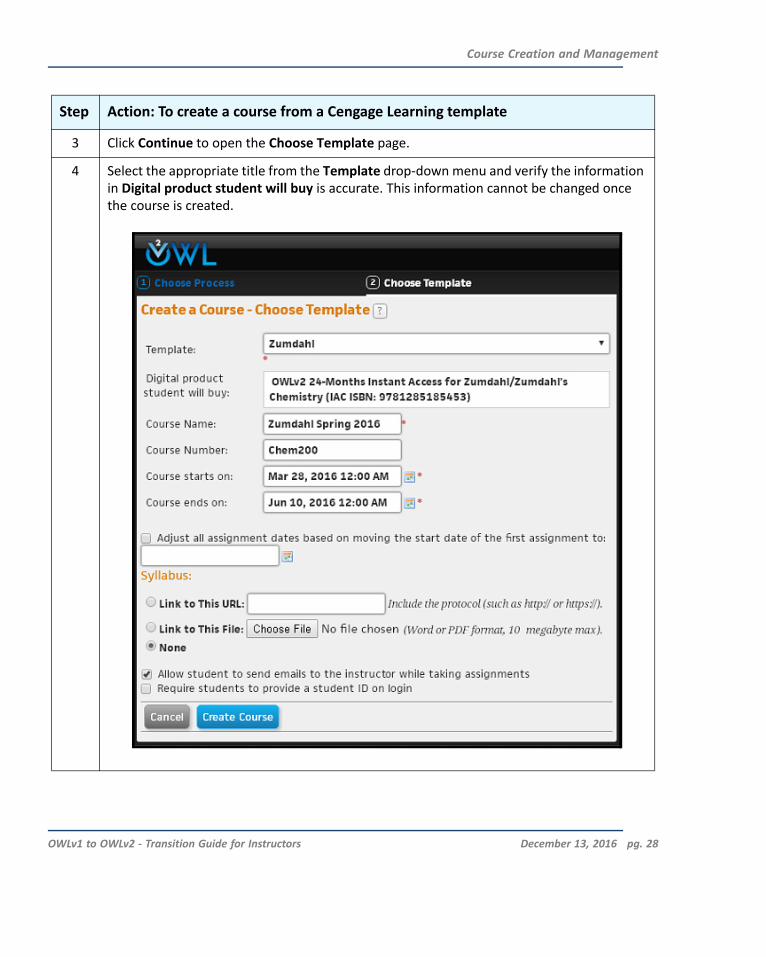
3 Click Continue to open the Choose Template page.
4 Select the appropriate title from the Template drop‐down menu and verify the information in Digital product student will buy is accurate. This information cannot be changed once the course is created.
OWLv1 to OWLv2 ‐ Transition Guide for Instructors December 13, 2016 pg. 28
Course Creation and Management
Step Action: To create a course from a Cengage Learning template
5 Enter the Course Name (required) and Course Number (optional).
Note: Because you’re able to manage all your OWLv2 courses with a single sign on (rather than logging in and out to access different texts), it is important your course naming convention allows you to easily manage the multiple discipline‐specific chemistry courses you teach.
6 Use the calendar widget to set the Course starts on and Course ends on dates (required).
To maximize the trial period duration for students, please make sure your course start date is set for the first actual day of class.
Note: The free‐trial allows up to 1 day of student access to OWLv2 per week of the course, for a maximum of 14 days. The beginning of the trial period is based on the course starting date. Students must register with an Access Code when the trial expires. If students miss the cut‐off date, all their work is saved until they regain access.
7 (Optional) Adjust the dates by selecting the option to Adjust all assignment dates based on moving the start date of the first assignment to:, then use the calendar widget to select a new date and time. Click Done when you are finished and all assignment dates in the course are adjusted relative to the new Start Date.
If you choose not to use this option, all assignments are automatically given the same start and due/unavailable dates as the course start and end date, respectively.
8 (Optional) Add a syllabus by using the Link to This URL option for a syllabus hosted on an external site, or you can just use the Link to This File option to upload your syllabus to OWLv2.
9 (Optional) Select the checkbox next to Require students to provide a student ID on login if you need to set up unique, anonymous student identification for your course.
This feature is useful when generating reports for large classes where students may have similar names.
OWLv1 to OWLv2 ‐ Transition Guide for Instructors December 13, 2016 pg. 29
Course Creation and Management
Step Action: To create a course from a Cengage Learning template
10 (Optional) When available, select the checkbox next to Allow students to send emails to the instructor while taking assignments. Students can then send an email from their assignment take. The email contains their question, information identifying the specific assignment, and a link allowing you to view the content and your student’s response.
Note: You can add up to 10 email addresses for additional recipients. Additional email addresses are added when editing a Course on the Course Information page.
11 Click Create Course when the Course Information is complete. Details for your new course, registration instructions, and options for your next steps are displayed on the Course Created page.
OWLv1 to OWLv2 ‐ Transition Guide for Instructors December 13, 2016 pg. 30
Course Creation and Management
Managing Sections
If you need to set up several classes with similar curricula and schedules, you can create sections with separate Gradebooks, with the content, assignments, options, and due dates inherited from the parent course. To begin creating a section, click the Create Section link in the Actions column on the Courses page.
Section Features
The parent course instructor is enrolled as an instructor in all sections. To delegate section grading and assignment creation to another instructor, you simply enroll that instructor into the section.
To distinguish sections from courses: the parent course has a red dot by its name, while sections do not. Also, the parent course has a Create Section link in the Actions column, while sections do not.
Sections include all assignments from the parent course and any additional assignments created at the section level.
Note: On the Assignments page, an icon in the Status column indicates which assignments are Assigned to Parent Course.
Only the parent course instructor can edit the assignment name, content, late penalty, or practice settings of parent level assignments. The section instructor can view but cannot change parent course content.
Both the parent course instructor and section instructor can review and edit grades for a particular section, or create and edit additional assignments.
Section instructors can edit the dates of parent assignments without affecting assignments in the parent course or other sections.
Editing assignment dates in the parent course will not override edits made at the section level.
During the assignment creation process, you will see that the course/section in which you are creating it appears at the top. Always pay attention to where you are creating an assignment, especially if you are working in a section.
OWLv1 to OWLv2 ‐ Transition Guide for Instructors December 13, 2016 pg. 31
Managing Enrollment
MANAGING ENROLLMENT
Student registration in OWLv2 is very simple compared to OWLv1. In OWLv2, students can log in and purchase an Access Code, register, and access OWLv2 all from the same site. Students can later use the Access Code to gain full registration. You can also manage enrollment on the Users page; there is no need to upload a roster.
Note: Be sure to inform any students who have previously used OWLv1 that this is a new version of the platform with different registration instructions.
Enabling Student Self-Registration
OWLv2 supplies you with a Registration Instructions for Students document that contains a Course Key and the details students need to self‐register in your course for a free trial. Choosing to register with a Course Key gives students up to 1 day of free access to OWLv2 per week of the course based upon the course’s starting date.
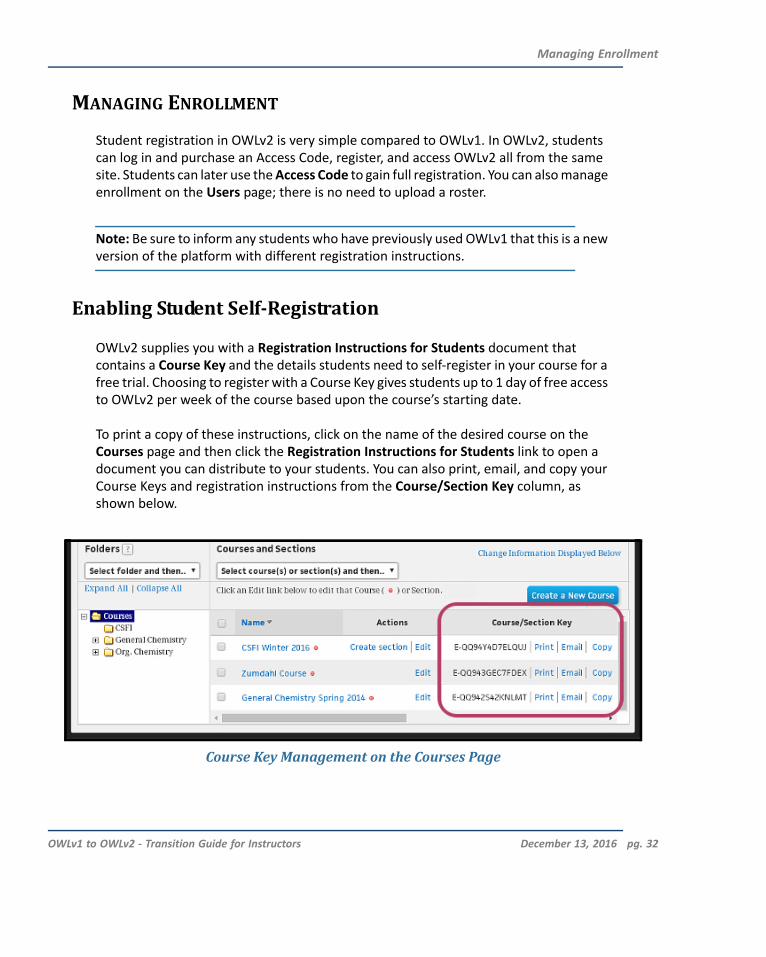
To print a copy of these instructions, click on the name of the desired course on the Courses page and then click the Registration Instructions for Students link to open a document you can distribute to your students. You can also print, email, and copy your Course Keys and registration instructions from the Course/Section Key column, as shown below.
OWLv1 to OWLv2 ‐ Transition Guide for Instructors December 13, 2016 pg. 32
Course Key Management on the Courses Page

Managing Enrollment
Manually Enrolling and Unenrolling Users
Manual enrollment options are all found on the Users page, which functions somewhat differently than other pages within OWLv2. From the Users page you can email users, enroll/unenroll yourself as a student, enroll/unenroll students, and enroll/unenroll instructors in courses or sections. Because accidental changes in student enrollment (such as unintentionally dropping a student from a course) can lead to loss of grade data, it is important to fully understand the enrollment process to avoid unwanted results. Since all types of enrollment follow the same process, the steps below will help you when enrolling any user.
When your OWLv2 course is first created, your Users page will look like the image below. Before getting started, make sure you have the desired course selected in the Course or Section drop‐down menu before you start the enrollment process. You can change which course is selected by choosing a new course from the menu.
OWLv1 to OWLv2 ‐ Transition Guide for Instructors December 13, 2016 pg. 33
OWLv2 Users Page Initial View
Managing Enrollment
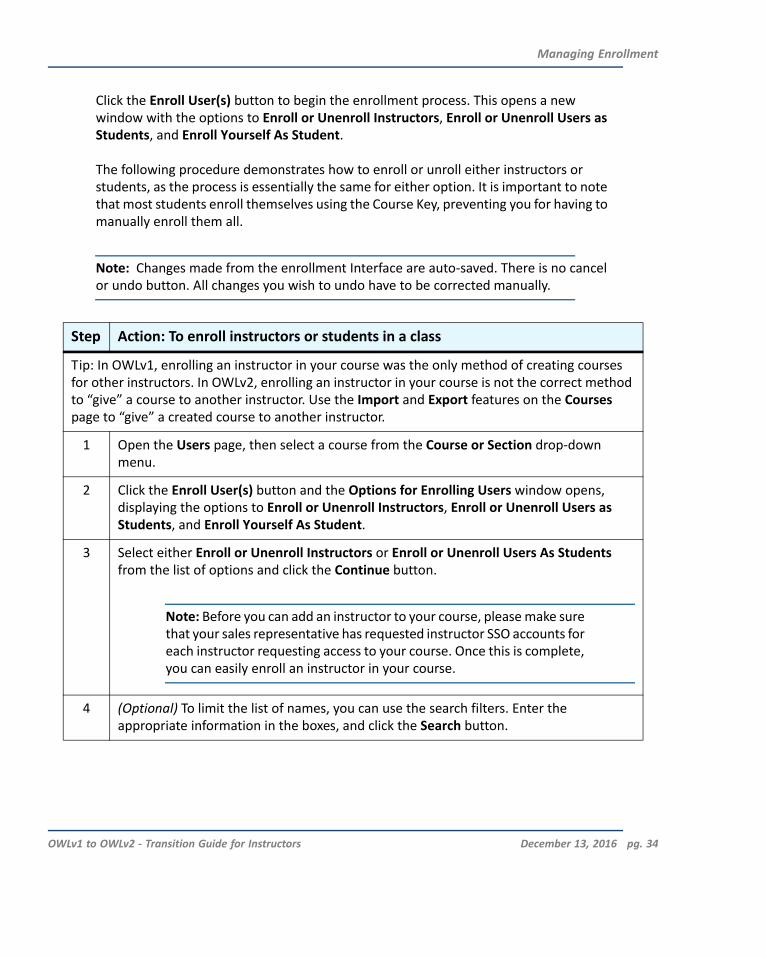
Click the Enroll User(s) button to begin the enrollment process. This opens a new window with the options to Enroll or Unenroll Instructors, Enroll or Unenroll Users as Students, and Enroll Yourself As Student.
The following procedure demonstrates how to enroll or unroll either instructors or students, as the process is essentially the same for either option. It is important to note that most students enroll themselves using the Course Key, preventing you for having to manually enroll them all.
Note: Changes made from the enrollment Interface are auto‐saved. There is no cancel or undo button. All changes you wish to undo have to be corrected manually.
Step Action: To enroll instructors or students in a class
Tip: In OWLv1, enrolling an instructor in your course was the only method of creating courses for other instructors. In OWLv2, enrolling an instructor in your course is not the correct method to “give” a course to another instructor. Use the Import and Export features on the Courses page to “give” a created course to another instructor.
1 Open the Users page, then select a course from the Course or Section drop‐down menu.
2 Click the Enroll User(s) button and the Options for Enrolling Users window opens, displaying the options to Enroll or Unenroll Instructors, Enroll or Unenroll Users as Students, and Enroll Yourself As Student.
3 Select either Enroll or Unenroll Instructors or Enroll or Unenroll Users As Students from the list of options and click the Continue button.
Note: Before you can add an instructor to your course, please make sure that your sales representative has requested instructor SSO accounts for each instructor requesting access to your course. Once this is complete, you can easily enroll an instructor in your course.
4 (Optional) To limit the list of names, you can use the search filters. Enter the appropriate information in the boxes, and click the Search button.
OWLv1 to OWLv2 ‐ Transition Guide for Instructors December 13, 2016 pg. 34

Managing Enrollment
Step Action: To enroll instructors or students in a class
5 Under Available Instructors or Available Users heading, select the check box next to the names of users you wish to include, then click the Enroll button to move them into your roster. The names are listed on the right side under the Enrolled Instructors or Enrolled Students.
Note: The names of users who are eligible for enrollment appear on the left side of the page, those who are already enrolled are listed on the right.
6 Click the Return to the Previous Page link to return to the Users overview page.
OWLv1 to OWLv2 ‐ Transition Guide for Instructors December 13, 2016 pg. 35

Assignment Creation and Management
Unenrolling Users If you want to remove a student or instructor from the roster, simply select the checkbox by the name and click the Unenroll Users button. This action is also performed from the general Users page. Your ability to enroll and unenroll instructors into your course in OWLv2 is dramatically improved compared to OWLv1. By selecting this option, you can easily allow other instructors to co‐instruct your course. Currently in OWLv2, there is no specific TA role as there was in OWLv1, but enrolling as an instructor offers all the features necessary for a TA. OWLv2 is currently in the process of refining the TA role and it is expecting to add it in the near future.
Enrolling Yourself as a Student or Changing to Student View Many instructors like to view assignments and grade results from the student view. The OWLv2 method for doing this is much improved over OWLv1. Instead of just previewing the assignments as an instructor, OWLv2 lets you experience every aspect of the student interface by allowing you to also enroll as a student in your own course.
The Users page supplies the option to enroll yourself as a student, but the easiest way to do this is by clicking the Change to Student View link in the Global Actions Menu. This alternate student view lets you view the course as your students see it, allowing you to take assignments and have your grades appear in the Gradebook just like any normal student. Whenever you wish to exit student mode, you can click Return to Instructor View to enter back into your instructor role.
ASSIGNMENT CREATION AND MANAGEMENT
During standard course creation in OWLv1, your course was automatically loaded with all of your textbook’s available assignments. Some of the best improvements for instructors in OWLv2 are the Assignments page functions. The new interface allows instructors greater control over the number of assignments they make available to students, as well as greater ease of assignment option customization. To get started, let’s take a tour of the OWLv2 Assignments page functions.
OWLv1 to OWLv2 ‐ Transition Guide for Instructors December 13, 2016 pg. 36
Assignment Creation and Management
Assignments Page Interface
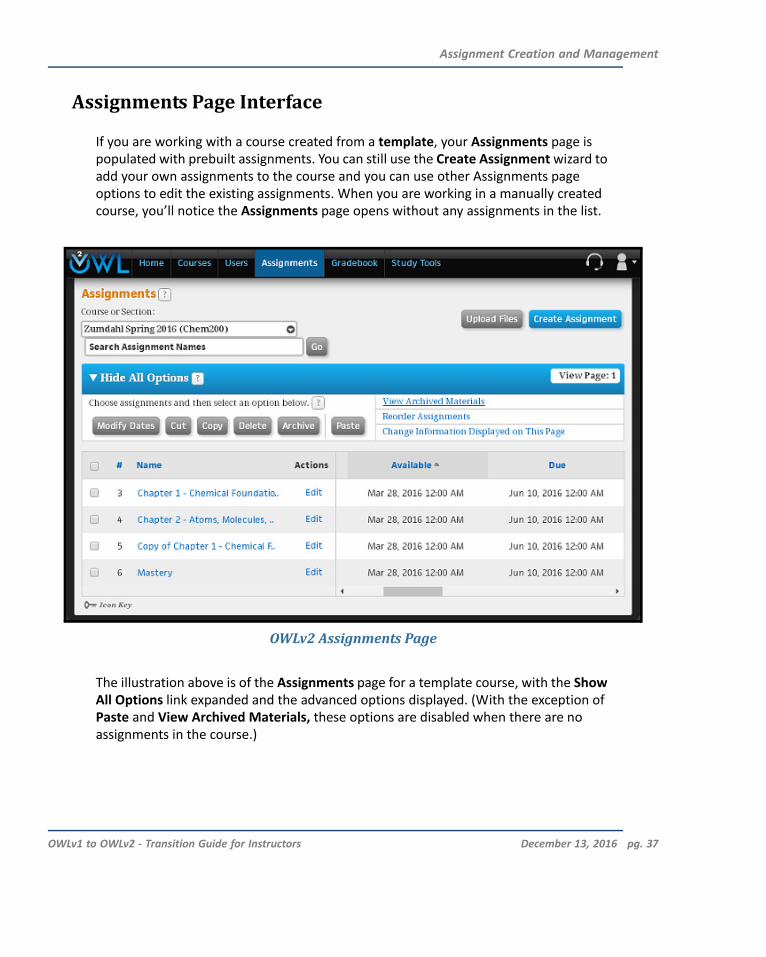
If you are working with a course created from a template, your Assignments page is populated with prebuilt assignments. You can still use the Create Assignment wizard to add your own assignments to the course and you can use other Assignments page options to edit the existing assignments. When you are working in a manually created course, you’ll notice the Assignments page opens without any assignments in the list.
OWLv2 Assignments Page
The illustration above is of the Assignments page for a template course, with the Show All Options link expanded and the advanced options displayed. (With the exception of Paste and View Archived Materials, these options are disabled when there are no assignments in the course.)
OWLv1 to OWLv2 ‐ Transition Guide for Instructors December 13, 2016 pg. 37

Assignment Creation and Management
Basic Assignment Page Options
With the Show All Options link set to hide the advanced options, the following controls are always available by default.
Course or Section
Use this drop‐down menu to select the appropriate course or section.
Search Assignment Names Use the Search Assignment Names field to find specific assignments quickly. Type in part or all of an assignment name, and click Go to display only matching items.
Upload Files Click the Upload Files button open the File Management page where you can upload files into the OWLv2 server for your use and for your students to access.
Create Assignment Clicking this button opens a wizard that helps you build new assignments using items from your OWLv2 content sources.
Assignment Summary Clicking an assignment name opens the Assignment Summary page where you see assignment details and access options for assignment editing and management.
Edit Link Click Edit in the Actions column to modify your assignments. Depending on the assignment type, your editing options may include adding new material, editing the assignment information, or changing the assignment’s options.
Status Icons The Status column displays icons that let you see at a glance the assignment’s grading status, availability, and for sections, whether it is assigned at the parent course level. At the bottom of the page is an expandable Icon Key containing a legend describing the icons that may appear as labels for assignments or students with special conditions.
OWLv1 to OWLv2 ‐ Transition Guide for Instructors December 13, 2016 pg. 38

Assignment Creation and Management
Advanced Assignment Page Options
The advanced options on the Assignments page are hidden or displayed through the use of the Show All Options/Hide All Options toggle. You may need to click the Show All Options link, if the controls for the following tasks are hidden.
Assignments Page Advanced Options
View Archived Materials Click this link to go to the Archived Materials page, where you can see the folders, courses, sections, and assignments that are stored and not currently in use. Archived assignments are removed from the assignments list but remain available for you to view, retrieve, delete, or copy.
Self-Authored Questions When available, you can click the Self‐Authored Questions link to access an area where you can create or modify your own questions using OWLv2’s authoring editors. You can later use your self‐authored questions in addition to selecting from the items provided in your course materials.
Reorder Assignments Reorder Assignments option changes the display of the default assignment order on your Assignments page. Clicking the link opens the reordering interface, where you can drag and drop the assignments into whatever order you wish.
Once you are done moving assignments, click the Save & Return button to save the list and return to the Assignments page. Click Cancel to undo any changes.
OWLv1 to OWLv2 ‐ Transition Guide for Instructors December 13, 2016 pg. 39
Assignment Creation and Management
Note: Tip: Reordering assignments does not change the Assignment page display for your students. Student assignment display is ordered first by start and Due Date, then alphanumeric by name.
Change Information Displayed on This Page
Click this link to open the Assignments Page Display Options page where you can specify which columns of information you wish to see used on the Assignments page.
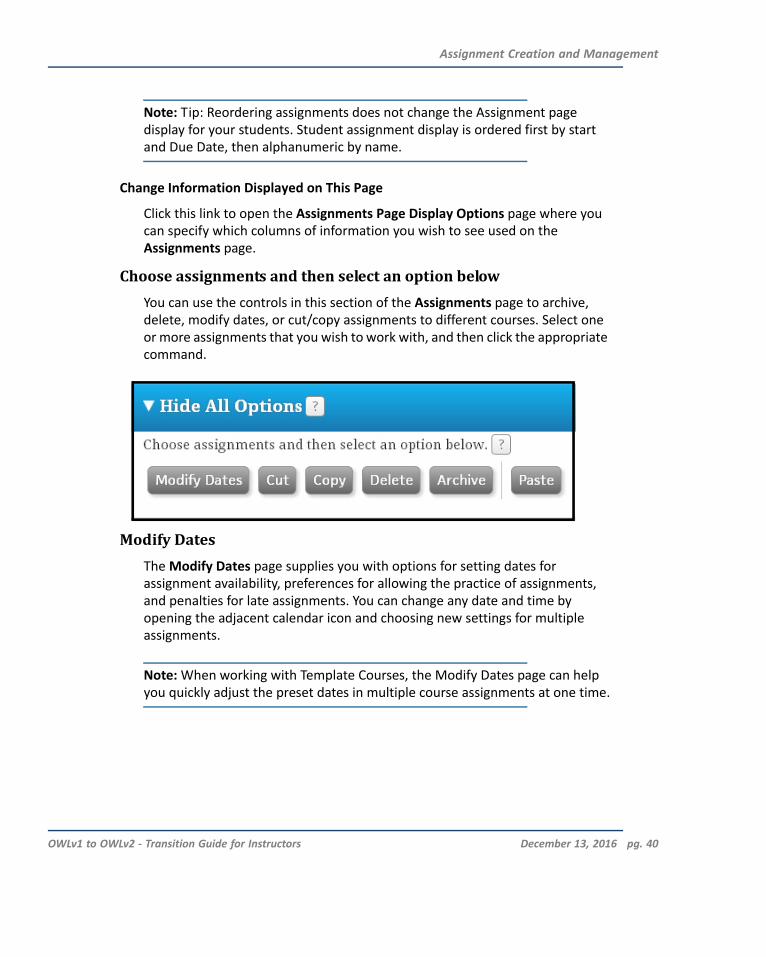
Choose assignments and then select an option below You can use the controls in this section of the Assignments page to archive, delete, modify dates, or cut/copy assignments to different courses. Select one or more assignments that you wish to work with, and then click the appropriate command.
Modify Dates The Modify Dates page supplies you with options for setting dates for assignment availability, preferences for allowing the practice of assignments, and penalties for late assignments. You can change any date and time by opening the adjacent calendar icon and choosing new settings for multiple assignments.
Note: When working with Template Courses, the Modify Dates page can help you quickly adjust the preset dates in multiple course assignments at one time.
OWLv1 to OWLv2 ‐ Transition Guide for Instructors December 13, 2016 pg. 40
Assignment Creation and Management
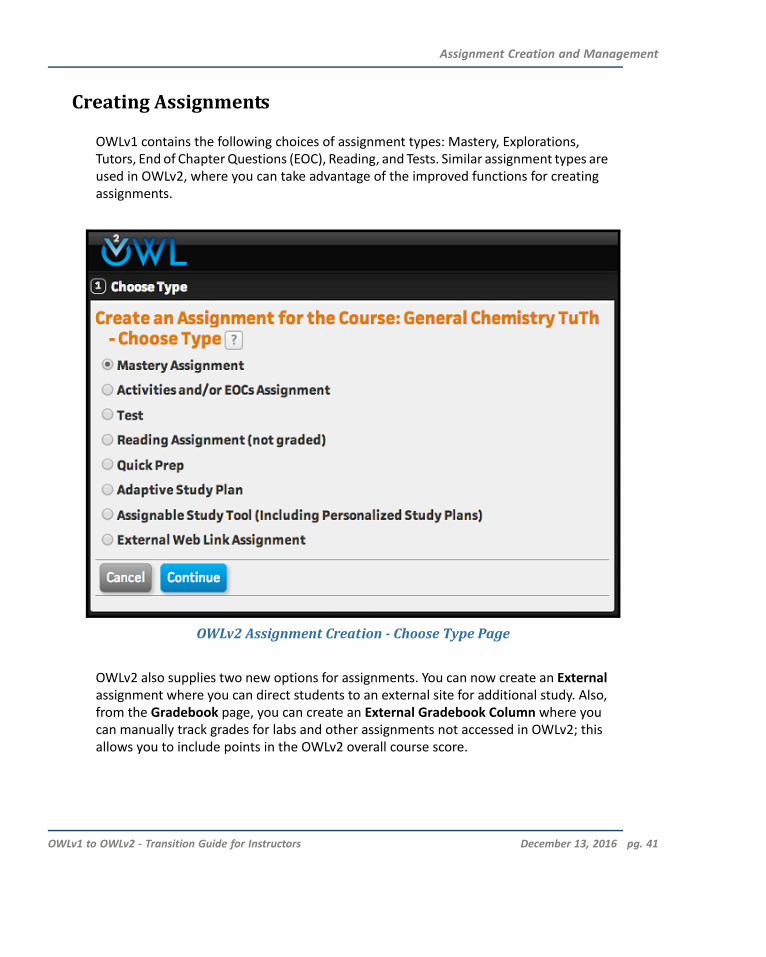
Creating Assignments
OWLv1 contains the following choices of assignment types: Mastery, Explorations, Tutors, End of Chapter Questions (EOC), Reading, and Tests. Similar assignment types are used in OWLv2, where you can take advantage of the improved functions for creating assignments.
OWLv2 Assignment Creation Choose Type Page
OWLv2 also supplies two new options for assignments. You can now create an External assignment where you can direct students to an external site for additional study. Also, from the Gradebook page, you can create an External Gradebook Column where you can manually track grades for labs and other assignments not accessed in OWLv2; this allows you to include points in the OWLv2 overall course score.
OWLv1 to OWLv2 ‐ Transition Guide for Instructors December 13, 2016 pg. 41
Assignment Creation and Management
New assignment creation features in OWLv2
Feedback during Assignment. Supplies students with a way to self‐correct a response before they submit an answer. This circumvents an issue with students becoming frustrated over the requirement to achieve perfection on all portions of multi‐part Mastery question in order to achieve a score. You can establish whether the correct/incorrect indicators for responses always appear or only when there are no attempts remaining.
First question submission error detection. Warns students when their first response contains a formatting error. If an error is detected, the student is alerted and given the chance to make a correction before submitting for a score. Error detection only works on the first answer submitted to prevent students from “mining” for correct answers.
Email Instructor. With the Allow student to send emails to the instructor while taking assignments option enabled, students are able to email their instructor from within an assignment take. If the student needs to reach out for help, the message sent contains which assignment and question the student is on, a screenshot of the specific assignment content, as well as the progress and responses at the time it was sent. Remember that this feature is turned on or off on the Course Information page.
Note: The student’s message is sent to the email address associated with your OWLv2 instructor account.
Editing Item Details. While creating or editing content in Mastery, Non‐Mastery (EOC), or Test assignments, the new Edit Details button allows you to change the possible points for individual items and the mastery requirement for Mastery groups. For Mastery questions, score editing is done at the group level, not at the sub‐item level.
Disabling Objectives. When creating an Adaptive Study Plan assignment, an option is now available allows you to select and deselect which objectives are to appear in your assignment. In this way, you can omit objectives that are not being covered in class.
Limiting Quiz takes. When creating an Adaptive Study Plan assignment, an option is available that allows you to limit how many time your students can take the main Quiz. You can also limit the number of takes for the Pre‐Test and Post‐Test in Quick Prep v1 assignments or the main Quiz in Quick Prep v2 assignments.
OWLv1 to OWLv2 ‐ Transition Guide for Instructors December 13, 2016 pg. 42

Assignment Creation and Management
Guidelines for Creating Assignments
The procedure below supplies you with basic instructions for creating most kinds of assignments using the assignment creation wizard. For additional details on a specific step or assignment type, please refer to the online Textual Help or the OWLv2 User Guide for Instructors.
Step Action: To create an assignment
1 On the Assignments page, select the appropriate course from the Course and Sections drop‐down menu.
2 Click the Create Assignment button and the Choose Type page opens.
3 Select the appropriate assignment type for your new assignment.
Depending on your course materials, you may be able to choose from Mastery, Non‐Mastery (Activities, Problems, and/or EOCs), Test, Reading, External, Quick Prep, or Adaptive Study Plan.
OWLv1 to OWLv2 ‐ Transition Guide for Instructors December 13, 2016 pg. 43

Assignment Creation and Management
Step Action: To create an assignment
4 Click Continue and the Assignment Information page opens.
The Assignment Information page supplies you with options to enter the assignment name, set practice preferences, add an optional penalty, and select dates using the calendar widget.
Note: Depending on the assignment type, some of these options may not be available.
5 Enter the assignment name and choose the appropriate dates (required). Practice and penalty settings are optional, however, if you set an Unavailable Date you should also set a Late Penalty.
6 Click Continue to open the choose content page (the name of this page can vary, depending on the assignment type you’re creating).
7 Use the check boxes or radio buttons that are provided to select your assignment’s content. (The External assignment type allows you to enter a URL from an external web site; there is no need to select content.)
OWLv1 to OWLv2 ‐ Transition Guide for Instructors December 13, 2016 pg. 44
Assignment Creation and Management
Step Action: To create an assignment
8 Select the appropriate content for your assignment, there is no need to exclude chapters or sections as you do in OWLv1 (for assignments that are complete at this stage you click Done to save and exit the wizard.)
Note: Some assignments are complete at this stage, while other assignment types have two additional steps where you can set assignment options and also filter, preview, and select individual items (click Save Changes to save and exit). Please refer to the comprehensive OWLv2 User Guide or the online Help for details.
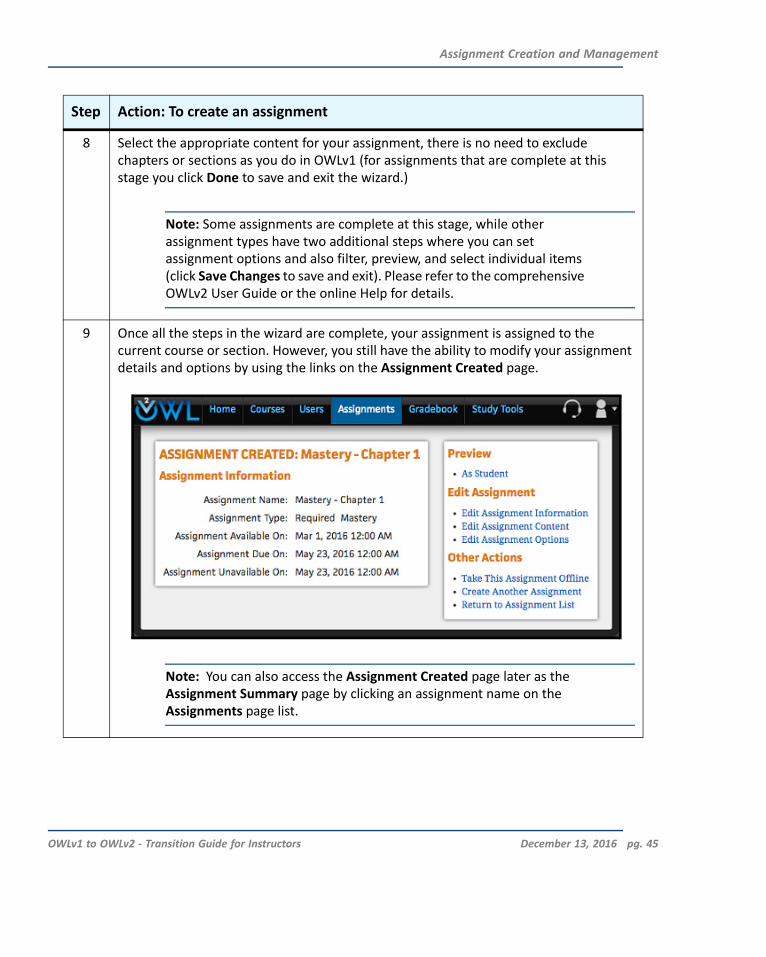
9 Once all the steps in the wizard are complete, your assignment is assigned to the current course or section. However, you still have the ability to modify your assignment details and options by using the links on the Assignment Created page.
Note: You can also access the Assignment Created page later as the Assignment Summary page by clicking an assignment name on the Assignments page list.
OWLv1 to OWLv2 ‐ Transition Guide for Instructors December 13, 2016 pg. 45
Managing Your Gradebook
MANAGING YOUR GRADEBOOK
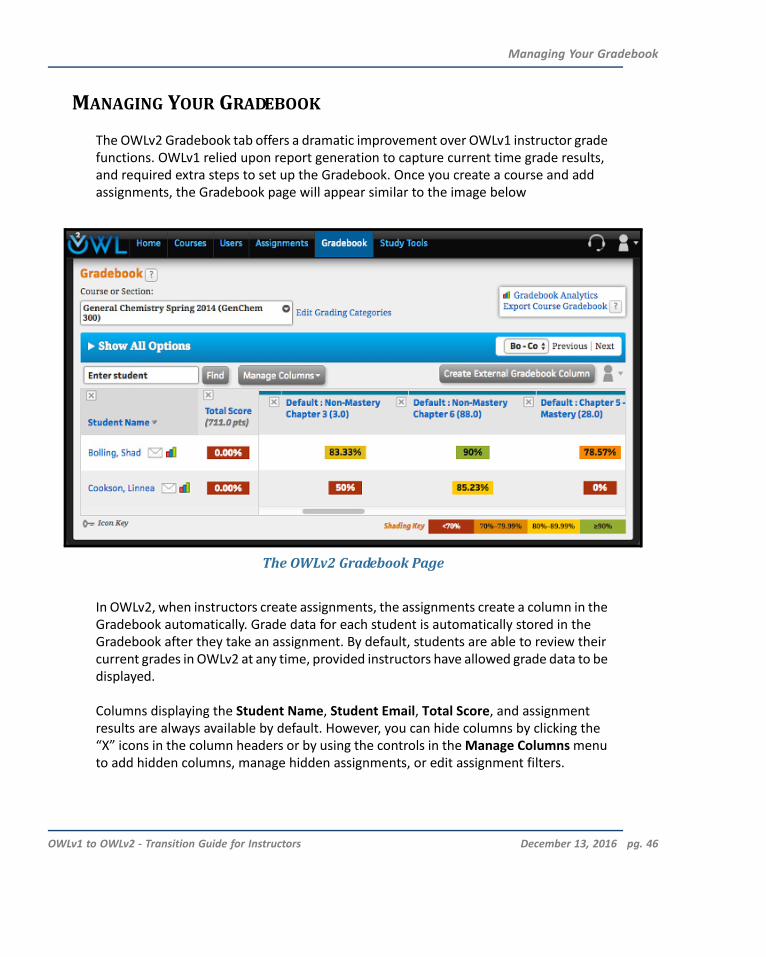
The OWLv2 Gradebook tab offers a dramatic improvement over OWLv1 instructor grade functions. OWLv1 relied upon report generation to capture current time grade results, and required extra steps to set up the Gradebook. Once you create a course and add assignments, the Gradebook page will appear similar to the image below
The OWLv2 Gradebook Page
In OWLv2, when instructors create assignments, the assignments create a column in the Gradebook automatically. Grade data for each student is automatically stored in the Gradebook after they take an assignment. By default, students are able to review their current grades in OWLv2 at any time, provided instructors have allowed grade data to be displayed.
Columns displaying the Student Name, Student Email, Total Score, and assignment results are always available by default. However, you can hide columns by clicking the “X” icons in the column headers or by using the controls in the Manage Columns menu to add hidden columns, manage hidden assignments, or edit assignment filters.
OWLv1 to OWLv2 ‐ Transition Guide for Instructors December 13, 2016 pg. 46

Managing Your Gradebook
Because the OWLv2 Gradebook features are so different from those found in OWLv1, it’s important to note the availability of the following options:
Analytic reports for individual students or your entire course with comparisons to global data. See “Gradebook Analytics” on page 48.
Export grade data in a variety of LMS‐ready formats. See“Export Course Gradebook” on page 48.
Group assignments by type so that they are weighted collectively in final grade calculations. See “Edit Grading Categories” on page 49
Control the display of individual columns and assignments on your Gradebook page. “Manage Columns” on page 49
Include scores for assignments completed outside of OWLv2. See “External Gradebook Column” on page 49.
Extend Due Dates for one or multiple students. See “Perform student and assignment actions” on page 49.
Ability to filter assignments appearing on the Gradebook page by criteria such as date range, assignment type, and grading status. See “Gradebook Preferences” on page 50.
Access an overview of all assignment grade details for an individual student. See “Student Grade Details” on page 50.
Ability to delete assignment attempts. See “Edit Grade Details” on page 51.
Manual override of scores for one or multiple students. See “Edit Assignment Details” on page 52
OWLv1 to OWLv2 ‐ Transition Guide for Instructors December 13, 2016 pg. 47

Managing Your Gradebook
Understanding Your Gradebook’s Features
One of the features you may appreciate the most in OWLv2 is the improved Gradebook. When you click the Gradebook link, you are automatically given a snapshot of current‐time grade data for each of your enrolled students. Unlike the OWLv1 platform, which required significant setup and regular report generation in order to stay up to date on grade data, the OWLv2 Gradebook requires little in the way of setup.
Gradebook Analytics OWLv2 analytic reports supply a quick way to generate and view summaries of score information, response statistics, and performance results. You have the option to create reports that are increasingly granular; you can choose from data for assignments, concepts, and individual items. Click the Gradebook Analytics link at the top of the page to see aggregate results for the course, click the “bar graph” icon next to a student name to see results for a specific student.
Export Course Gradebook Once you have grading information from a few assignments, you may want to save a copy of that data that you can use outside of OWLv2. The Export Course Gradebook function allows you to export Gradebook data in an LMS‐specific format, which you can use to import into a different course. To do this, click link Export Course Gradebook under the Report Creator heading. Then select the Format to Export from the drop‐down and click Export.
Note: A common difficulty can occur when assignment or student data fields in the school LMS have been customized and don’t match the format of the exported spreadsheet. Be sure to adjust for this when you prepare the exported Gradebook spreadsheet for import to your LMS.
OWLv1 to OWLv2 ‐ Transition Guide for Instructors December 13, 2016 pg. 48

Managing Your Gradebook
Edit Grading Categories Once your assignments are created, you may want to create your own custom Grading Categories. This allows you to apply weights to the assignment categories so that student grades are correctly calculated throughout the academic session. Using Grading Categories also color codes the assignments by type in the Gradebook.
Note: Assignments created in the parent course level are inherited in their child sections; Grading Categories are inherited the same way.
Manage Columns You use the Manage Columns drop‐down menu to show or hide gradebook columns, filter which assignments to display, and manage any “hidden” assignments. Deselecting or selecting a check box causes the listed column to be hidden or displayed. You can also quickly hide columns and assignments by clicking the “X” icon in the column header. Click Edit Assignment Filters to control which assignments appear by type and dates.
External Gradebook Column An External Gradebook Column is a “place holder” in your Gradebook you can use to manually record grades for offline paper assignments or labs done outside of OWLv2. As your students complete their assignments, you enter their grades which are then calculated into their course score. This information is also included on your students’ Assignments and Grades pages.
Perform student and assignment actions Use this drop‐down menu to select from actions such as emailing students, adjusting scores for multiple assignments, customizing options for specific students, or querying Gradebook data.
OWLv1 to OWLv2 ‐ Transition Guide for Instructors December 13, 2016 pg. 49
Managing Your Gradebook
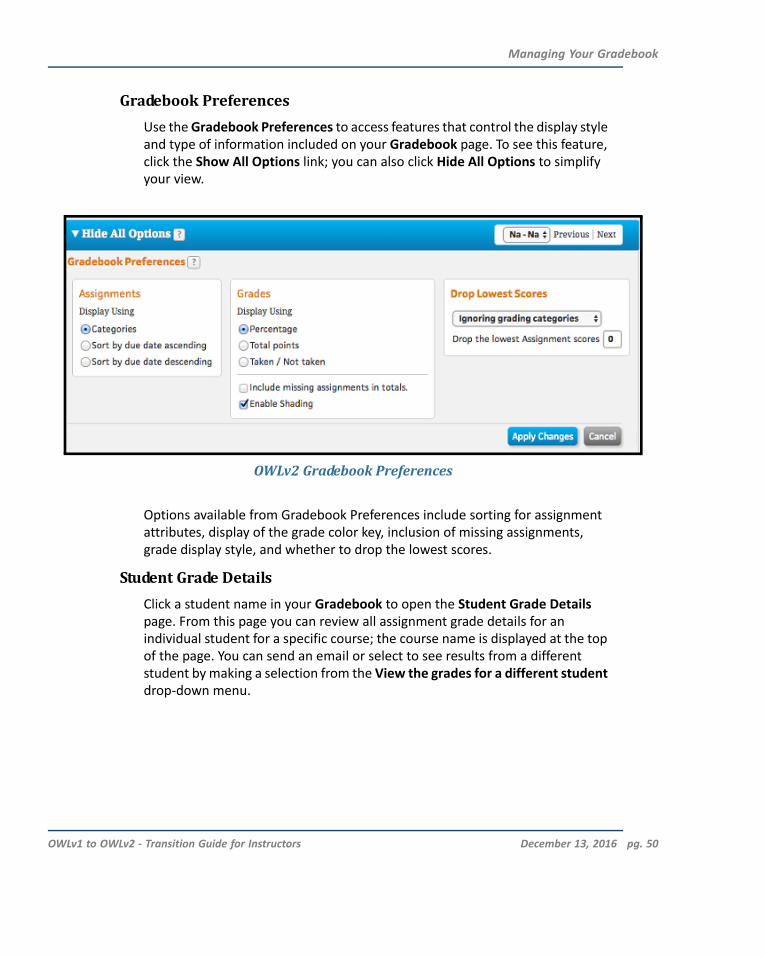
Gradebook Preferences Use the Gradebook Preferences to access features that control the display style and type of information included on your Gradebook page. To see this feature, click the Show All Options link; you can also click Hide All Options to simplify your view.
OWLv2 Gradebook Preferences
Options available from Gradebook Preferences include sorting for assignment attributes, display of the grade color key, inclusion of missing assignments, grade display style, and whether to drop the lowest scores.
Student Grade Details Click a student name in your Gradebook to open the Student Grade Details page. From this page you can review all assignment grade details for an individual student for a specific course; the course name is displayed at the top of the page. You can send an email or select to see results from a different student by making a selection from the View the grades for a different student drop‐down menu.
OWLv1 to OWLv2 ‐ Transition Guide for Instructors December 13, 2016 pg. 50
Managing Your Gradebook
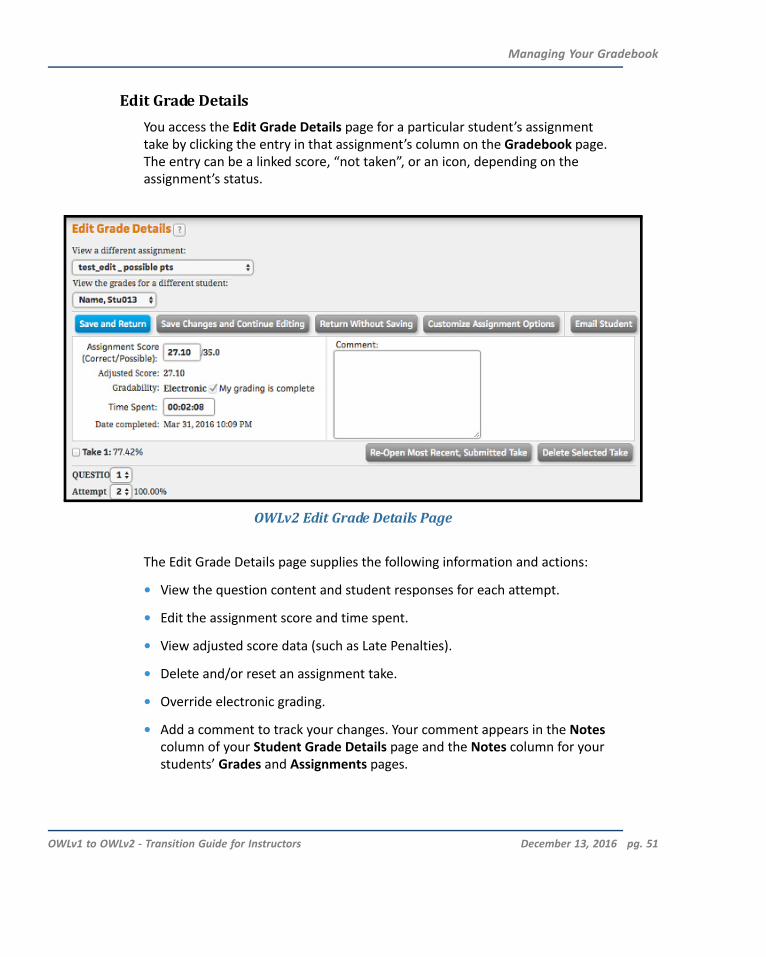
Edit Grade Details You access the Edit Grade Details page for a particular student’s assignment take by clicking the entry in that assignment’s column on the Gradebook page. The entry can be a linked score, “not taken”, or an icon, depending on the assignment’s status.
OWLv2 Edit Grade Details Page
The Edit Grade Details page supplies the following information and actions:
• View the question content and student responses for each attempt.
• Edit the assignment score and time spent.
• View adjusted score data (such as Late Penalties).
• Delete and/or reset an assignment take.
• Override electronic grading.
• Add a comment to track your changes. Your comment appears in the Notes column of your Student Grade Details page and the Notes column for your students’ Grades and Assignments pages.
OWLv1 to OWLv2 ‐ Transition Guide for Instructors December 13, 2016 pg. 51
Managing Your Gradebook
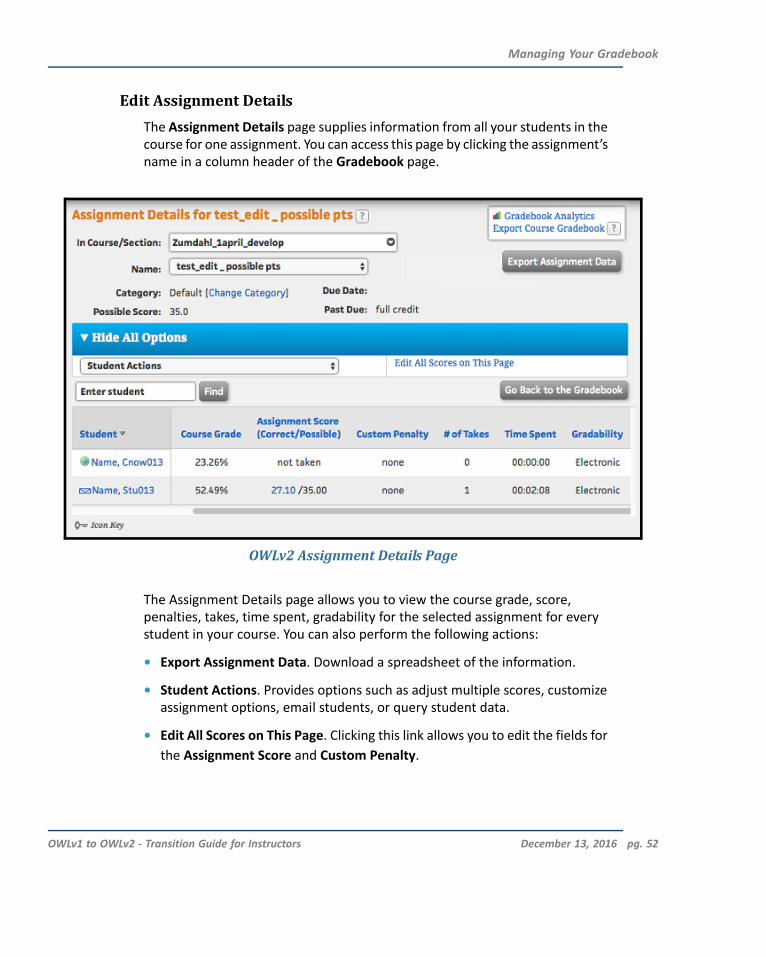
Edit Assignment Details The Assignment Details page supplies information from all your students in the course for one assignment. You can access this page by clicking the assignment’s name in a column header of the Gradebook page.
OWLv2 Assignment Details Page
The Assignment Details page allows you to view the course grade, score, penalties, takes, time spent, gradability for the selected assignment for every student in your course. You can also perform the following actions:
• Export Assignment Data. Download a spreadsheet of the information.
• Student Actions. Provides options such as adjust multiple scores, customize assignment options, email students, or query student data.
• Edit All Scores on This Page. Clicking this link allows you to edit the fields for the Assignment Score and Custom Penalty.
OWLv1 to OWLv2 ‐ Transition Guide for Instructors December 13, 2016 pg. 52

OWLv2 Study Tools Page
Working with Study Tools
WORKING WITH STUDY TOOLS
The Study Tools page displays the Cengage Learning study plans and other online course materials that are accessible through OWLv2. You and your students are able to review these materials at your leisure, however, assigned content is generally disabled on your students’ self‐study view.
Depending on your product, you may see the following types of content:
Quick Prep content consists of a study plan designed to provide your students with a review of key chemistry concepts. Assignment content is placed into a diagnostic setup where your students take an evaluative Pre‐Test or Quiz and review a customized Study Plan. Textbooks that supply Quick Prep v1 content will have students finishing the assignment with a Post‐Test that evaluates their progress, while Quick Prep v2 assignments have a main Quiz only.
OWLv1 to OWLv2 ‐ Transition Guide for Instructors December 13, 2016 pg. 53

Working with Study Tools
Adaptive Study Plans provide students with a customized study plan. The student takes a diagnostic quiz (Pre‐Test) at the beginning of each section and then receives a Study Plan based on the quiz results. Students work through the study materials until mastery is achieved on the required topics.
Assignable Study Tools (Personalized Study Plans) provide students with diagnostic content that supplies a customized list of recommended study material. The student takes a Pre‐Test at the beginning of each section and receives a Personalized Study Plan based on the quiz results. The Post‐Test at the end of each section demonstrates the student's learning.
eBooks are online versions of the course textbook, usually in Flash, FlashPaper, or HTML 5 format.
Exercises and Practice Tests are activities that allow students to take practice coursework topics online. This helps reinforce learning and preparation for class assignments and tests.
Tutorials offer students a wide range of supplemental activities and readings to complement the core text.
Note: When you create assignments from Quick Prep or Adaptive Study Plan content, the graded sections are automatically made inaccessible for self‐study. If desired, you can make assigned content available on the Study Tools page by changing the assignment option.
OWLv1 to OWLv2 ‐ Transition Guide for Instructors December 13, 2016 pg. 54

Frequently Asked Questions
FREQUENTLY ASKED QUESTIONS
OWLv2 content is delivered in a different way than OWLv1. Here are some commonly asked questions about system differences and best practices for managing your course.
Contents Frequently Asked Questions
“How do I manage late work?” on page 55
“Is there a "Ignore Assignment Due Dates" feature in OWLv2?” on page 56
“What if I want to allow students to practice with work submitted after the Due Date?” on page 56
“How can I re‐create my OWLv1 course in OWLv2?” on page 56
“Can I author my own questions or modify existing questions?” on page 57
“How do I increase the number of attempts to unlimited as I can in OWLv1?” on page 57
“How do I change the number of correct responses required for Mastery?” on page 58
“How do I work with sections?” on page 58
“How do I provide access to teaching assistants or adjuncts?” on page 59
How do I manage late work? In OWLv1 there are no penalties for late assignments. Students receive zero credit for any work done after the Due Date. In OWLv2 you have the ability to use an "Unavailable Date,” which is the date when students can no longer work on or access the assignment.
If you set an Unavailable Date, you should apply a late penalty for work submitted after the Due Date, otherwise students earn full credit for all work submitted up until the Unavailable Date.
OWLv1 to OWLv2 ‐ Transition Guide for Instructors December 13, 2016 pg. 55

Frequently Asked Questions
Is there a "Ignore Assignment Due Dates" feature in OWLv2? OWLv1 supplies a feature allowing you to "Ignore Assignment Due Dates.” Using this feature means students can receive full credit on assignments no matter when that credit was earned.
OWLv2 does not have a similar feature, but one way to provide credit for all assignments done before the end of the semester is to change the Due Dates of all assignments to be the last day of classes at the very end of your semester. This gives students full credit on the assignments regardless of when the students completed them, but throughout the semester students can see the Due Dates applied to their work.
What if I want to allow students to practice with work submitted after the Due Date?
In OWLv1 students could access any assignment in their Past Due Assignments page and work beyond the Due Date. Although the work wasn't counted towards credit, this allowed students to re‐work problems to prepare for exams and quizzes.
In OWLv2 you can allow students to continue to access Mastery, Non‐Mastery (EOC), and Test assignments by using the Practice feature. From the Assignments page click Edit next to an assignment's name. Choose Edit Assignment Information. You'll see the option to Allow students to use this assignment for practice?. You can also enable Practice when creating an assignment.
How can I re-create my OWLv1 course in OWLv2? In OWLv2 there is new content and features that make a 1:1 correlation between the assignment sets difficult. However, you can still find all of the Mastery, Non‐Mastery (EOC), and interactive multimedia material you used in OWLv1. It just may be delivered a different way in a different location.
It is recommend all instructors use the template course provided by Cengage learning by choosing the Copy Course and then the Modify template course from Cengage Learning option when you're creating a course for the first time. This template gives you all of the important introductory material for students that is similar to the introductory material in OWLv1.
OWLv1 to OWLv2 ‐ Transition Guide for Instructors December 13, 2016 pg. 56
Frequently Asked Questions
By using the provided template course you'll get a course that is very similar to how the assignments were delivered in OWLv1 with all of the material provided for you in pre‐made assignments. Course set‐up involves excluding the material you don't want and changing due dates and assignment settings.
In OWLv2 you can customize any assignment by adding and removing items, editing the point value for items or groups, editing the mastery requirements for groups, changing the assignment options, and setting the available and due dates. All items within the assignment can be worked independently.
Can I author my own questions or modify existing questions? With the authoring permissions enabled, you can click the Self‐Authored Questions link on the Assignments page to access an area in OWLv2 where you can create or modify your own questions using an authoring editor. You can later use these questions in addition to drawing assignment questions directly from your course materials
How do I increase the number of attempts to unlimited as I can in OWLv1?
In assignments that provide it, the maximum number of attempts per question or Mastery group in OWLv2 is 10. There are a few reasons for this limit. One is that most instructors agree that if a student cannot get a question correct in less than five tries, the student probably needs assistance beyond what any online homework can offer.
Also, remember that all of the Mastery groups and questions can be worked independently within an assignment ‐ students do not have to complete the entire assignment in one sitting. As an extra feature, if a student saves and exits an assignment, s/he can come back later and resume exactly where they left off, with all questions maintaining their same values.
OWLv1 to OWLv2 ‐ Transition Guide for Instructors December 13, 2016 pg. 57
Frequently Asked Questions
How do I change the number of correct responses required for Mastery?
During the assignment creation process you have the option to Edit Details while selecting individual Mastery groups. Edit Details allows you to change the mastery requirements and the point value of individual items within the group. By default, most Mastery groups require 2 out of 3 questions to be answered correctly but this can vary, depending on the Mastery group.
The Group Mastery option only appears when you are creating or editing Mastery assignments. This option allows you to select how many items appear in the group (Min. = 2, Max. = 5) and how many correct responses are required for achieving mastery (Min. = 1, Max. = 5). Your entry for the mastery requirement cannot be greater than the number of items presented in the group. The Score can have a value of 0 through 100 for any assignments providing the option to edit details.
How do I work with sections? In OWLv2 you can make as many sections as you need to for your parent course. Because enrollment is controlled by unique Course Keys, you have control over which course or section students can self‐enroll.
Each section shares the core assignments with the parent course. The content in inherited assignments cannot be altered from the section level, however, the dates can be edited without affecting the dates in the parent course.
Section instructors can create their own additional assignments that are different from those inherited from the parent course. On the Assignments page, an icon in the Status column indicates which assignments are inherited from the parent course.
OWLv1 to OWLv2 ‐ Transition Guide for Instructors December 13, 2016 pg. 58

How do I provide access to teaching assistants or adjuncts? If you have adjuncts who teach their own courses, it is recommended you create a template course for all instructors to use and then copy that course for fellow instructors or adjuncts.
If you have teaching assistants, you can create one parent course and give each TA his or her own section. The TA will have full instructor level access in his or her section, but is unable to make any modification to the parent course. Any changes in the parent course you make are automatically populated to each section.
TAs are also able to add assignments to their sections, but these do not affect the parent course at all. It is recommend, however, that you ask your TAs not to add any assignments so all sections remain the same.
If you need to provide your TAs with access, but don't want to create sections, you can enroll the TAs as an instructor in your course from the Users page and ask your TAs to only use the student views and gradebook views since they have full access to modify all assignments as co‐instructors in your course. The OWLv2 team is exploring options for restrictive levels of access as a future development item.
Copyright Notice
© 2016 Cengage Learning, Inc. All rights reserved. Republication, reproduction or redistribution of Cengage Learning, Inc. ("Cengage Learning") content, including by framing or similar means, is prohibited without the prior written consent of Cengage Learning. To request permission to photocopy, duplicate, republish or otherwise reuse Cengage Learning material, or for efiles for students with disabilities, go to www.cengage.com/permissions.
OWLv1 to OWLv2 ‐ Transition Guide for Instructors December 13, 2016 pg. 59
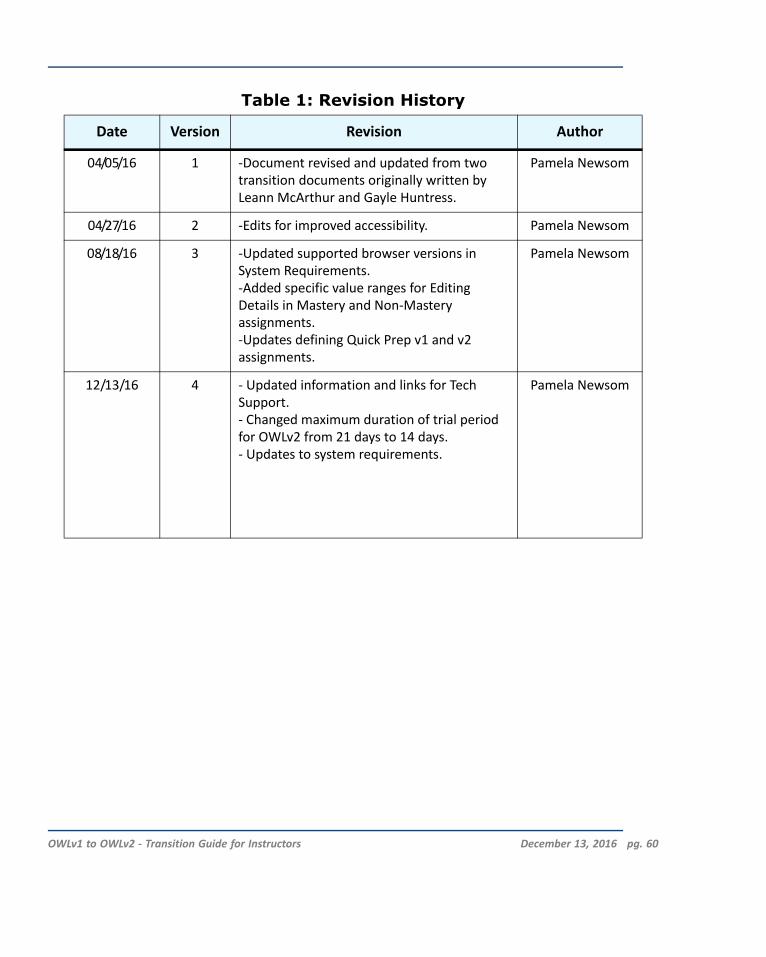
Table 1: Revision History
Date Version Revision Author
04/05/16 1 ‐Document revised and updated from two transition documents originally written by Leann McArthur and Gayle Huntress.
Pamela Newsom
04/27/16 2 ‐Edits for improved accessibility. Pamela Newsom
08/18/16 3 ‐Updated supported browser versions in System Requirements. ‐Added specific value ranges for Editing Details in Mastery and Non‐Mastery assignments. ‐Updates defining Quick Prep v1 and v2 assignments.
Pamela Newsom
12/13/16 4 ‐ Updated information and links for Tech Support. ‐ Changed maximum duration of trial period for OWLv2 from 21 days to 14 days. ‐ Updates to system requirements.
Pamela Newsom
OWLv1 to OWLv2 ‐ Transition Guide for Instructors December 13, 2016 pg. 60