Embed Size (px)
Citation preview
ownCloud Configuration and Usage Guide v.07-‐31-‐2012 – J.Schneider 1
ownCloud Configuration and Usage Guide
This guide will assist you with configuring and using YSUʼs Cloud Data storage solution (ownCloud). The setup instructions will include how to navigate the web interface, how to share a stored document with another user, and how to configure automatic synchronization between your locally saved documents and the cloud storage server. ownCloud Storage information: You will be allocated 10 gigabytes (GB) of cloud storage space with a maximum single file size of 5 GB. YSUʼs ownCloud implementation is to be used soley as a temporary storage service to allow easy file sharing with other members within YSU. Currently, ownCloud will allow you to store files up to a maximum time of 45 days. Please ensure that you keep a local copy of any files stored on ownCloud as they will be removed after the 45 day storage time limit has been reached. Methods of Use: This document covers accessing ownCloud via the web interface as well as using a synchronization client to upload files to the cloud storage server. The web interface allows the user to upload, browse, share, delete, and organize their files in relation to the cloud storage. The synchronization clients are optional, however they allow the user to designate a folder on their local system that will mirror onto the cloud server giving the user a “drag and drop” feel. Table of Contents: Section 1: Windows Sync Client Installation……………………………………………….. Page 02 Section 2: Windows Sync Client Configuration……………………………………………. Page 04 Section 3: Windows Sync Client: Configure
Additional Folders for Synchronization………………………………………... Page 06 Section 4: Mac Sync Client Installation…………………………………………………….... Page 08 Section 5: Mac Sync Client: Configure Additional
Folders for Synchronization…………………………………………………….... Page 11 Section 6: How to access and use the ownCloud web interface………………………... Page 13 Section 7: Manually uploading files to ownCloud………………………………………….. Page 15 Section 8: How to share a file within ownCloud……………………………………………. Page 18

ownCloud Configuration and Usage Guide v.07-‐31-‐2012 – J.Schneider 2
Section 1: Windows Sync Client Installation:
Step 1: Download the ownCloud Windows sync software from:
http://owncloud.org/sync-clients/
Step 2: Launch the setup file and click Next > to continue
Step 3: On the Choose Components window, leave the default options and click Next >

ownCloud Configuration and Usage Guide v.07-‐31-‐2012 – J.Schneider 3
Step 4: On the Choose Install Location window, leave the default Destination Folder and click Install
The Installation process begins. Wait for it to complete and move on to the next step
Step 5: On the Install Completed window, ensure the Run ownClowd Client box has a check mark and click Finish

ownCloud Configuration and Usage Guide v.07-‐31-‐2012 – J.Schneider 4
Section 2: Windows Sync Client Configuration:
Step 1: Locate the ownCloud icon in your system tray, right click and select Configure
ownCloud icon
Please note: You may have to click the “Show hidden icons” arrow if you do not see the icon.
Step 2: Enter the URL for the YSU ownCloud server
URL:
https://files.ysu.edu
Step 3: Enter your YSU Username and Password to verify your identity
ownCloud Configuration and Usage Guide v.07-‐31-‐2012 – J.Schneider 5
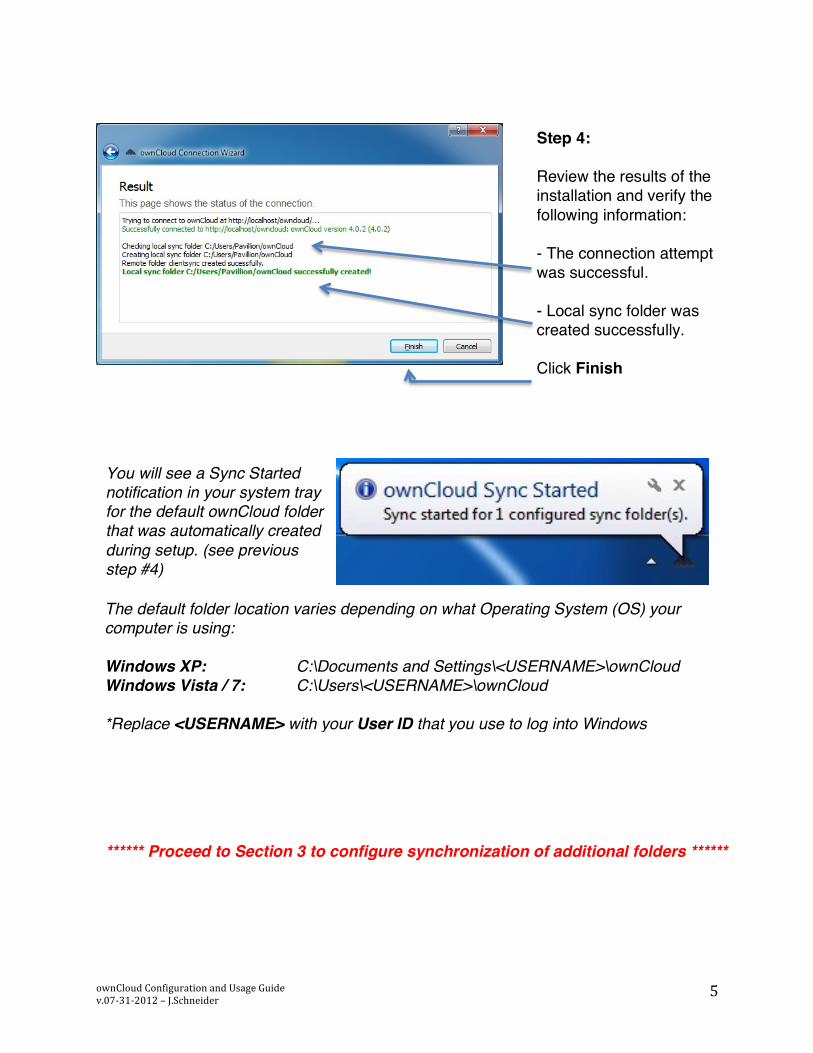
Step 4: Review the results of the installation and verify the following information: - The connection attempt was successful. - Local sync folder was created successfully. Click Finish
You will see a Sync Started notification in your system tray for the default ownCloud folder that was automatically created during setup. (see previous step #4) The default folder location varies depending on what Operating System (OS) your computer is using: Windows XP: C:\Documents and Settings\<USERNAME>\ownCloud Windows Vista / 7: C:\Users\<USERNAME>\ownCloud *Replace <USERNAME> with your User ID that you use to log into Windows
****** Proceed to Section 3 to configure synchronization of additional folders ******

ownCloud Configuration and Usage Guide v.07-‐31-‐2012 – J.Schneider 6
Step 2: Click the Add Sync button
Section 3: Windows Sync Client: Configure Additional Folders for Synchronization:
Step 1: Locate the ownCloud icon in your system tray, right click and select Open status…
ownCloud icon
Please note: You may have to click the “Show hidden icons” arrow if you do not see the icon.
Step 3: - Click the Choose… button and select the folder you wish to synchronize. - Enter the folder alias name. This will be the folder display name within the Sync Client status window Click Next

ownCloud Configuration and Usage Guide v.07-‐31-‐2012 – J.Schneider 7
You can view the folder location of each synchronization job directly below the header. The first line gives you the local path to the folder you are synchronizing The second line (Remote Path) gives you the corresponding folder name where the files will appear within the ownCloud web interface.
Step 5: You should now be back to the Status window. Verify your newly created synchronization job appears in the list. The status of each job can be viewed simply by hovering the mouse over it. The status is also graphically represented within the cloud graphic
Step 4: - Click the to your ownCloud radio button and enter the folder name in the text box to the right. Your files will appear in this folder within the ownCloud web interface If this folder does not already exist in ownCloud, you will be asked to create the folder by clicking the create button before you can complete the setup. - Click Finish

ownCloud Configuration and Usage Guide v.07-‐31-‐2012 – J.Schneider 8
Section 4: Mac Sync Client Installation:
Step 1: Download the ownCloud Mac client sync software from:
http://owncloud.org/sync-clients/
Step 2: Double-click the downloaded DMG (Disk Image) file.
Step 3: Drag the ownCloud icon and drop it on the Applications folder
Step 4: Double Click the Applications icon.

ownCloud Configuration and Usage Guide v.07-‐31-‐2012 – J.Schneider 9
Step 5: Locate the ownCloud icon in the applications list and double-click to open.
Step 6: Click Open if prompted to do so.
Step 7: Click OK on the No server connection has been configured message
Step 8: Click on the ownCloud system tray icon and select Configure

ownCloud Configuration and Usage Guide v.07-‐31-‐2012 – J.Schneider 10
Step 9: Enter the ownCloud server address as follows:
https://files.ysu.edu
Click Next
Step 10: Enter your YSU username and password. Optional: Check the box if you do not want to save your password.
Step 11: Verify the connection attempt was successful (displayed in green text). If you receive an error, please click back and verify the URL and your Username / Password Click Finish

ownCloud Configuration and Usage Guide v.07-‐31-‐2012 – J.Schneider 11
Step 2: Click the Add Sync… button
Section 5: Mac Sync Client: Configure Additional Folders for Synchronization:
Step 1: Click on the ownCloud system tray icon and select Open status…
Step 3: - Click the Choose… button and select the folder you wish to synchronize. - Enter the folder alias name. This will be the folder display name within the Sync Client status window Click Next

ownCloud Configuration and Usage Guide v.07-‐31-‐2012 – J.Schneider 12
Step 4: - Click the to your ownCloud radio button and enter the folder name in the text box to the right. Your files will appear in this folder within the ownCloud web interface If this folder does not already exist in ownCloud, you will be asked to create the folder by clicking the create button before you can complete the setup. - Click Finish
You can view the folder location of each synchronization job directly below the header. The first line gives you the local path to the folder you are synchronizing The second line (Remote Path) gives you the corresponding folder name where the files will appear within the ownCloud web interface.
Step 5: You should now be back to the Status window. Verify your newly created synchronization job appears in the list. The status of each job can be viewed simply by hovering the mouse over it. The status is also graphically represented within the cloud graphic

ownCloud Configuration and Usage Guide v.07-‐31-‐2012 – J.Schneider 13
Step 2: Enter your YSU username and password into the appropriate fields and press enter.
Step 1: Open your web browser and enter the following URL into the address bar: https://files.ysu.edu
Section 6: How to access and use the ownCloud web interface:

ownCloud Configuration and Usage Guide v.07-‐31-‐2012 – J.Schneider 14
Step 3: After successfully logging in, the ownCloud web interface will be displayed. Please consult the figure below for a detailed breakdown of the interface and its functionality
Navigation Pane: Used to access varying categories supported by ownCloud. The Files category is the most commonly used.
New/Upload Button: Used to create new Text Files and Folders. The upwards-pointing arrow on the right is used to upload new files from your local system.
Display Pane: Displays the content of the selected category (ex: uploaded files will be displayed here).
Search: Allows you to search for files / folders stored on the server.
Settings: Access your personal settings.
Log out: Allows the current user to log out

ownCloud Configuration and Usage Guide v.07-‐31-‐2012 – J.Schneider 15
Section 7: Manually uploading files to ownCloud:
****** Refer to Section 6 to login to the ownCloud web interface ******
Step 1: Select Files from the menu on the left.
Step 2: Select a folder (or create a new one) to upload your file into. If you do not choose a folder, the file will be uploaded to the root of the Files list. (to create a new folder, click the “New” button and select “Folder”)
Step 3: Click the upload button to bring up the File selection window
Step 4: Select the file you would like to upload to ownCloud and click open (or double click the file)

ownCloud Configuration and Usage Guide v.07-‐31-‐2012 – J.Schneider 16
Step 5: Once the file finishes uploading, it will be displayed in the list of Files.

ownCloud Configuration and Usage Guide v.07-‐31-‐2012 – J.Schneider 17
Section 8: How to share a file within ownCloud:
Step 1: Cursor over the file you wish to share. You will be presented with additional options for the file. Click the Share icon.
Step 2: Click the downward pointing arrow to the right of User or Group

ownCloud Configuration and Usage Guide v.07-‐31-‐2012 – J.Schneider 18
Step 3: Enter the YSU USERNAME of the person you wish to share the file with. When the correct username is displayed, select it in the list.
Step 4: Check the can edit checkbox next to the username if you wish to allow the user to edit the file.

ownCloud Configuration and Usage Guide v.07-‐31-‐2012 – J.Schneider 19
Congratulations! The file is now shared with the selected user. They will now be able to access this file via the Shared folder under their account.