Embed Size (px)
Citation preview
1 www.e-bikes.se
Owner manual
For E-bike from Sweden
Table of Content
I、Packing list and parts name instruction.
II、General Assembly Instructions
III、Inspect before riding
IV、Charging
V、Maintenance
VI、Simple Troubleshooting
VII、Warrantee
2 www.e-bikes.se
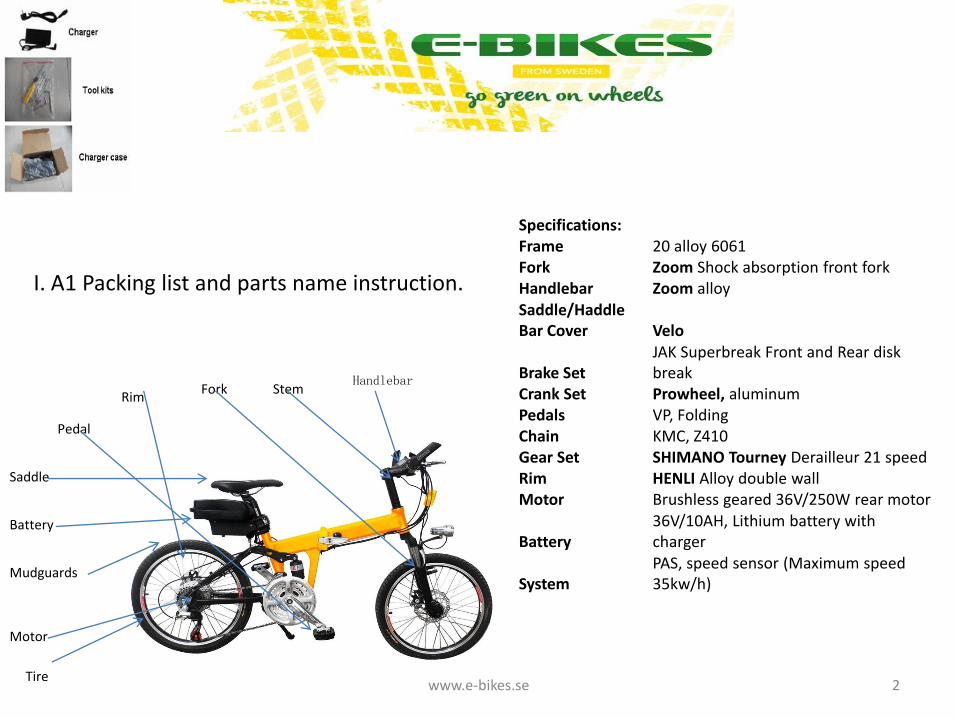
I. A1 Packing list and parts name instruction.
Saddle
Battery
Fork
Pedal
Motor
Mudguards
Stem
Tire
Rim Handlebar
Specifications: Frame 20 alloy 6061 Fork Zoom Shock absorption front fork Handlebar Zoom alloy Saddle/Haddle Bar Cover Velo
Brake Set JAK Superbreak Front and Rear disk break
Crank Set Prowheel, aluminum Pedals VP, Folding Chain KMC, Z410 Gear Set SHIMANO Tourney Derailleur 21 speed Rim HENLI Alloy double wall Motor Brushless geared 36V/250W rear motor
Battery 36V/10AH, Lithium battery with charger
System PAS, speed sensor (Maximum speed 35kw/h)
3 www.e-bikes.se
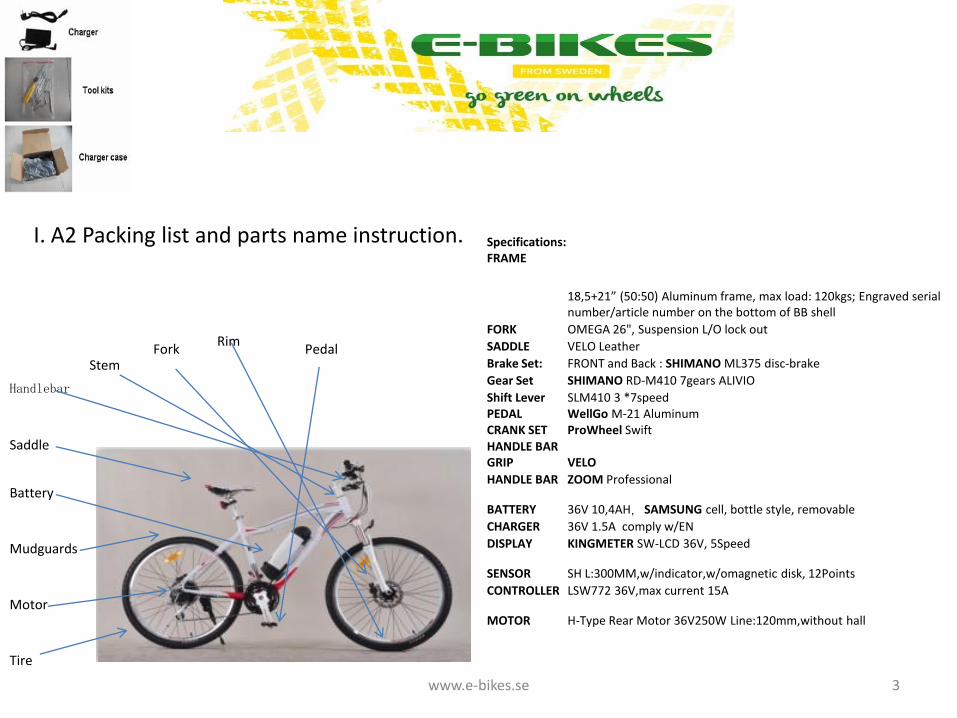
I. A2 Packing list and parts name instruction.
Saddle
Battery
Fork Pedal
Motor
Mudguards
Stem
Tire
Rim
Handlebar
Specifications: FRAME
18,5+21” (50:50) Aluminum frame, max load: 120kgs; Engraved serial number/article number on the bottom of BB shell
FORK OMEGA 26", Suspension L/O lock out
SADDLE VELO Leather
Brake Set: FRONT and Back : SHIMANO ML375 disc-brake
Gear Set SHIMANO RD-M410 7gears ALIVIO
Shift Lever SLM410 3 *7speed PEDAL WellGo M-21 Aluminum CRANK SET ProWheel Swift HANDLE BAR GRIP VELO
HANDLE BAR ZOOM Professional
BATTERY 36V 10,4AH,SAMSUNG cell, bottle style, removable
CHARGER 36V 1.5A comply w/EN
DISPLAY KINGMETER SW-LCD 36V, 5Speed
SENSOR SH L:300MM,w/indicator,w/omagnetic disk, 12Points
CONTROLLER LSW772 36V,max current 15A
MOTOR H-Type Rear Motor 36V250W Line:120mm,without hall
4 www.e-bikes.se
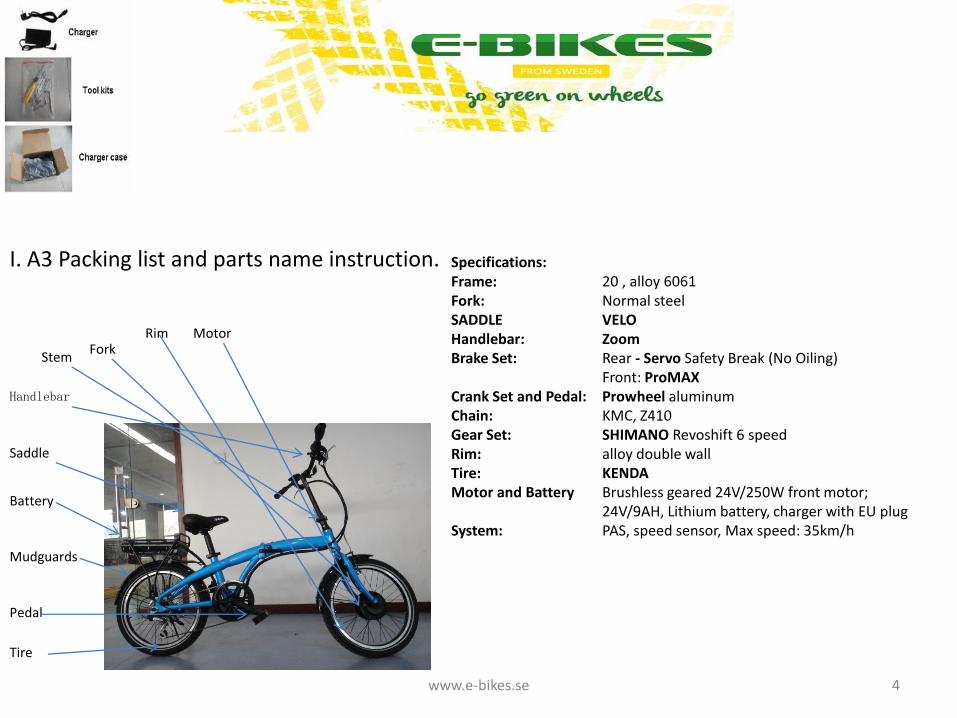
I. A3 Packing list and parts name instruction.
Saddle
Battery
Fork
Pedal
Motor
Mudguards
Stem
Tire
Rim
Handlebar
Specifications: Frame: 20 , alloy 6061 Fork: Normal steel SADDLE VELO Handlebar: Zoom Brake Set: Rear - Servo Safety Break (No Oiling) Front: ProMAX Crank Set and Pedal: Prowheel aluminum Chain: KMC, Z410 Gear Set: SHIMANO Revoshift 6 speed Rim: alloy double wall Tire: KENDA Motor and Battery Brushless geared 24V/250W front motor; 24V/9AH, Lithium battery, charger with EU plug System: PAS, speed sensor, Max speed: 35km/h
5 www.e-bikes.se
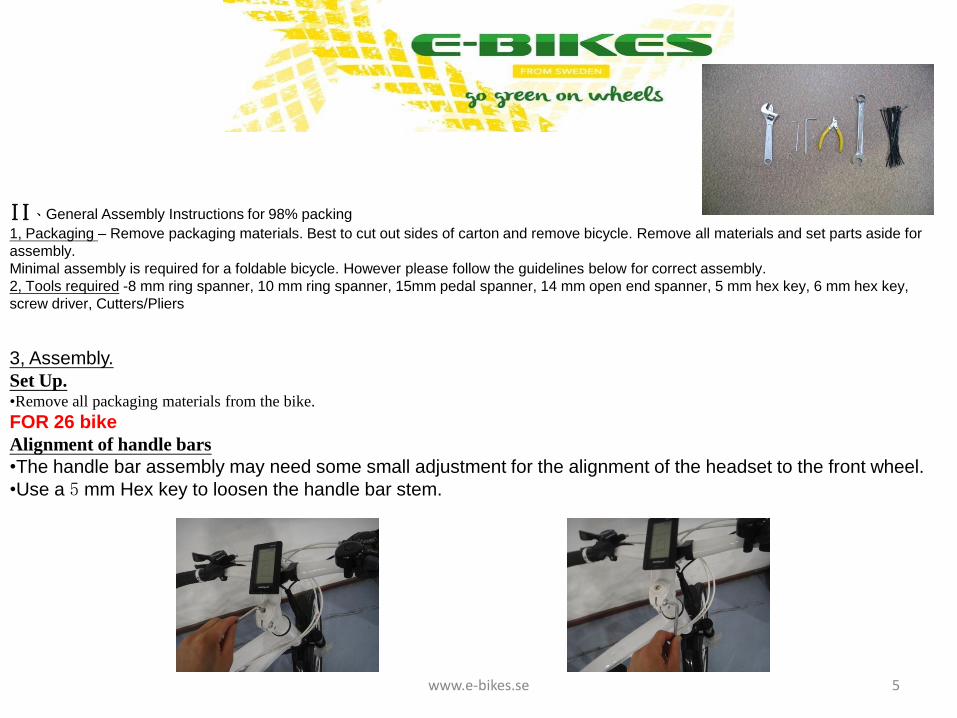
II、General Assembly Instructions for 98% packing
1, Packaging – Remove packaging materials. Best to cut out sides of carton and remove bicycle. Remove all materials and set parts aside for
assembly.
Minimal assembly is required for a foldable bicycle. However please follow the guidelines below for correct assembly.
2, Tools required -8 mm ring spanner, 10 mm ring spanner, 15mm pedal spanner, 14 mm open end spanner, 5 mm hex key, 6 mm hex key,
screw driver, Cutters/Pliers
3, Assembly.
Set Up. •Remove all packaging materials from the bike.
FOR 26 bike
Alignment of handle bars
•The handle bar assembly may need some small adjustment for the alignment of the headset to the front wheel.
•Use a 5 mm Hex key to loosen the handle bar stem.
6 www.e-bikes.se
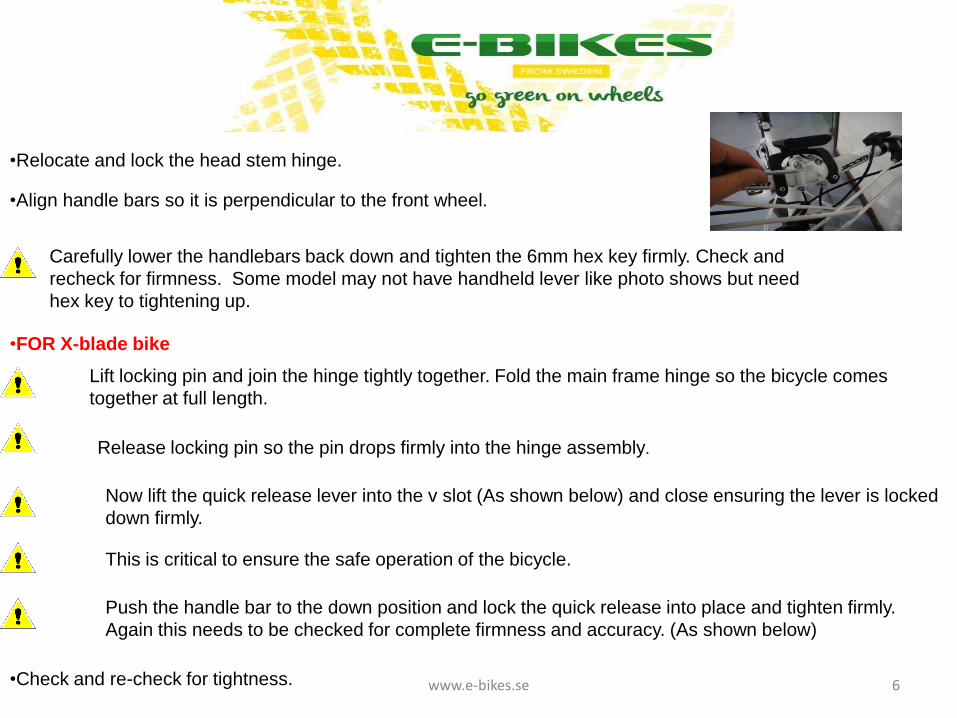
•Relocate and lock the head stem hinge.
•Align handle bars so it is perpendicular to the front wheel.
Carefully lower the handlebars back down and tighten the 6mm hex key firmly. Check and
recheck for firmness. Some model may not have handheld lever like photo shows but need
hex key to tightening up.
•FOR X-blade bike
Lift locking pin and join the hinge tightly together. Fold the main frame hinge so the bicycle comes
together at full length.
Release locking pin so the pin drops firmly into the hinge assembly.
Now lift the quick release lever into the v slot (As shown below) and close ensuring the lever is locked
down firmly.
This is critical to ensure the safe operation of the bicycle.
Push the handle bar to the down position and lock the quick release into place and tighten firmly.
Again this needs to be checked for complete firmness and accuracy. (As shown below)
•Check and re-check for tightness.
7 www.e-bikes.se
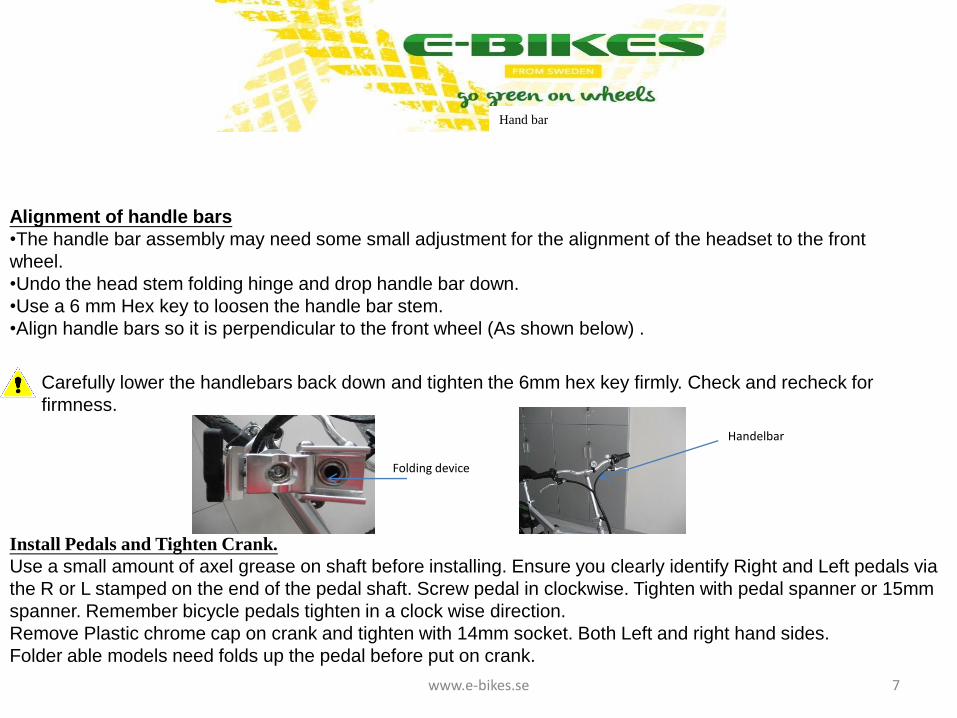
Alignment of handle bars
•The handle bar assembly may need some small adjustment for the alignment of the headset to the front
wheel.
•Undo the head stem folding hinge and drop handle bar down.
•Use a 6 mm Hex key to loosen the handle bar stem.
•Align handle bars so it is perpendicular to the front wheel (As shown below) .
Hand bar
Carefully lower the handlebars back down and tighten the 6mm hex key firmly. Check and recheck for
firmness.
Install Pedals and Tighten Crank.
Use a small amount of axel grease on shaft before installing. Ensure you clearly identify Right and Left pedals via
the R or L stamped on the end of the pedal shaft. Screw pedal in clockwise. Tighten with pedal spanner or 15mm
spanner. Remember bicycle pedals tighten in a clock wise direction.
Remove Plastic chrome cap on crank and tighten with 14mm socket. Both Left and right hand sides.
Folder able models need folds up the pedal before put on crank.
Folding device
Handelbar
8 www.e-bikes.se
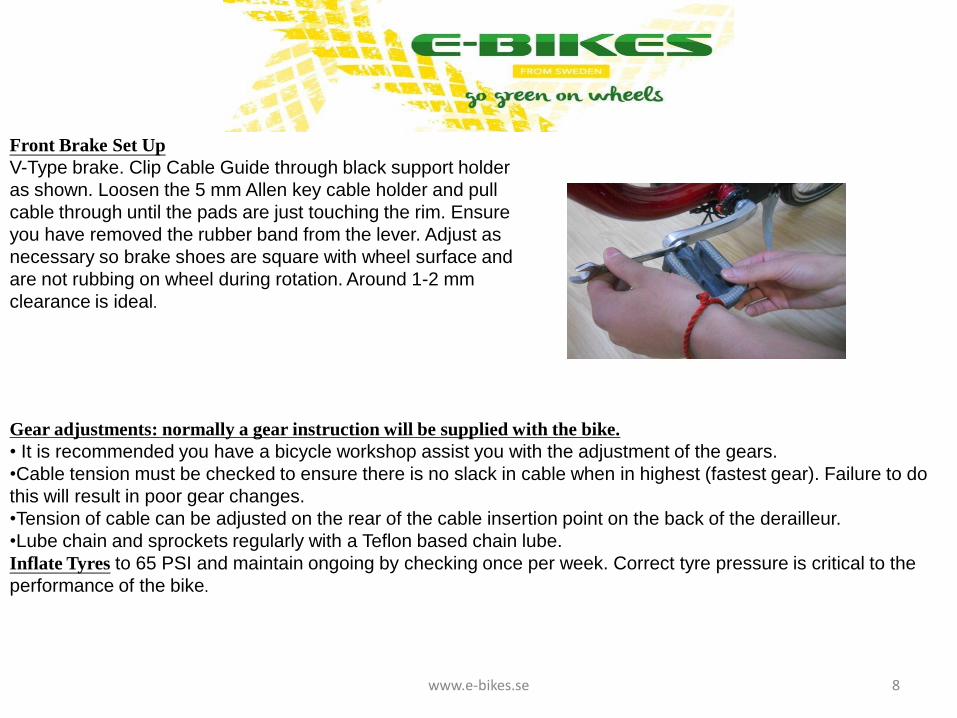
Front Brake Set Up
V-Type brake. Clip Cable Guide through black support holder
as shown. Loosen the 5 mm Allen key cable holder and pull
cable through until the pads are just touching the rim. Ensure
you have removed the rubber band from the lever. Adjust as
necessary so brake shoes are square with wheel surface and
are not rubbing on wheel during rotation. Around 1-2 mm
clearance is ideal.
Gear adjustments: normally a gear instruction will be supplied with the bike.
• It is recommended you have a bicycle workshop assist you with the adjustment of the gears.
•Cable tension must be checked to ensure there is no slack in cable when in highest (fastest gear). Failure to do
this will result in poor gear changes.
•Tension of cable can be adjusted on the rear of the cable insertion point on the back of the derailleur.
•Lube chain and sprockets regularly with a Teflon based chain lube.
Inflate Tyres to 65 PSI and maintain ongoing by checking once per week. Correct tyre pressure is critical to the
performance of the bike.
9 www.e-bikes.se
Fully inflated tyre is necessary for a good riding ranges !!
Connect Battery Plug. Ensure no other plug is ever connected to the main battery slot.
Ensure you are familiar with operation of the bike before riding.
Ensure people/children are clear of moving wheels etc and test throttle.
Safety.
Ride safely and always wear protective gear including knee pads, elbow pads gloves and helmet. Always Use an
approved bicycle helmet. Always obey local road rules and legal guidelines.
III、Inspect before riding Important note: Before riding ensure you are familiar with the operation of the throttle. The throttle turns towards
the rider. This engages the motor.
Please check it before riding as below:
1. Check the grip.
2. Check tire pressure.
3. Check brake pads for wear and replace in necessary.
4. Check Brakes for alignment of front pads and wear.
5. Check the tightness of chain and Q-release
6. Check the gear function.
7. Check pedal tightness on crank.
8. Check the power indication.
9. Check battery status via Charge light on charger and on bike
10. Check the tightness of saddle.
11. Do not only use front V-brake when State of emergency. 20% front 80% rear brake use is recommended.
10 www.e-bikes.se
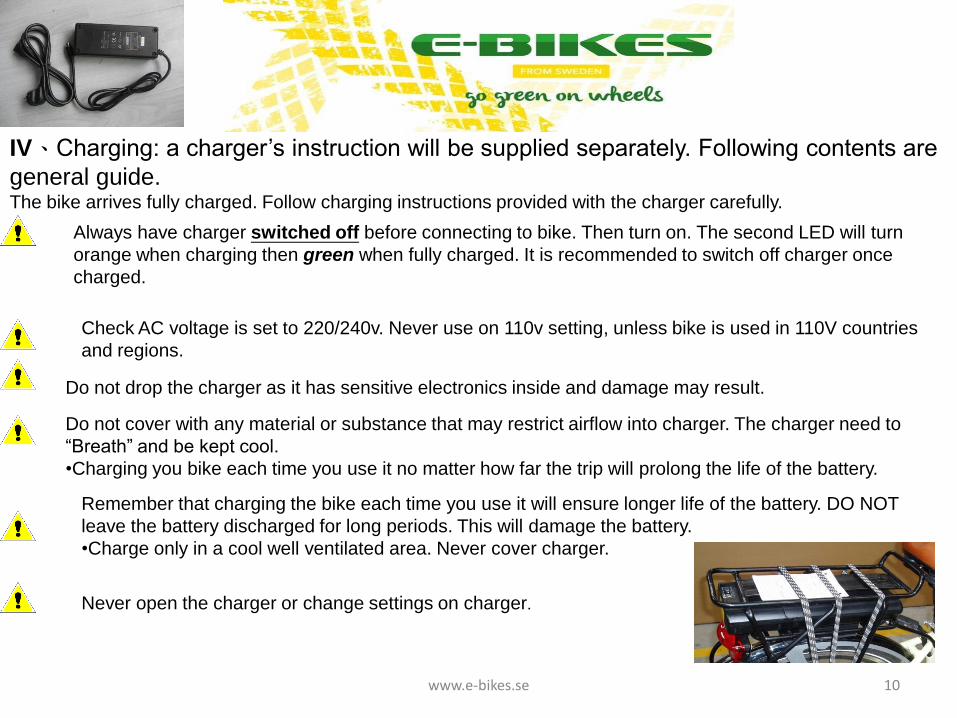
IV、Charging: a charger’s instruction will be supplied separately. Following contents are
general guide. The bike arrives fully charged. Follow charging instructions provided with the charger carefully.
Always have charger switched off before connecting to bike. Then turn on. The second LED will turn
orange when charging then green when fully charged. It is recommended to switch off charger once
charged.
Check AC voltage is set to 220/240v. Never use on 110v setting, unless bike is used in 110V countries
and regions.
Do not drop the charger as it has sensitive electronics inside and damage may result.
Do not cover with any material or substance that may restrict airflow into charger. The charger need to
“Breath” and be kept cool.
•Charging you bike each time you use it no matter how far the trip will prolong the life of the battery.
Remember that charging the bike each time you use it will ensure longer life of the battery. DO NOT
leave the battery discharged for long periods. This will damage the battery.
•Charge only in a cool well ventilated area. Never cover charger.
Never open the charger or change settings on charger.
11 www.e-bikes.se
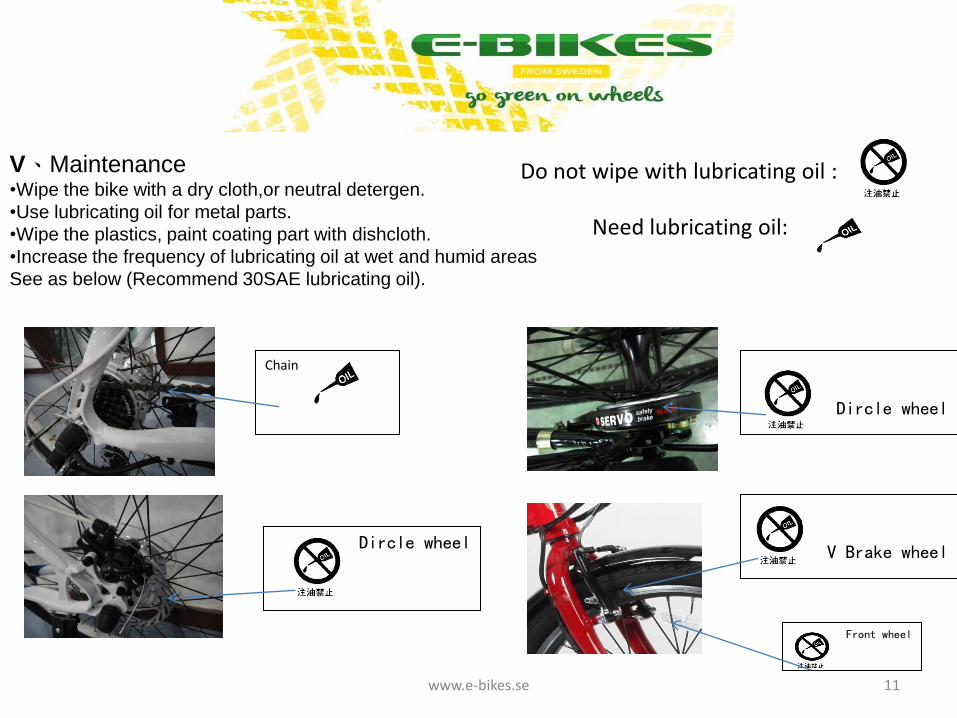
V、Maintenance •Wipe the bike with a dry cloth,or neutral detergen.
•Use lubricating oil for metal parts.
•Wipe the plastics, paint coating part with dishcloth.
•Increase the frequency of lubricating oil at wet and humid areas
See as below (Recommend 30SAE lubricating oil).
Need lubricating oil:
Do not wipe with lubricating oil :
Chain
Dircle wheel
Dircle wheel
V Brake wheel
Front wheel
12 www.e-bikes.se
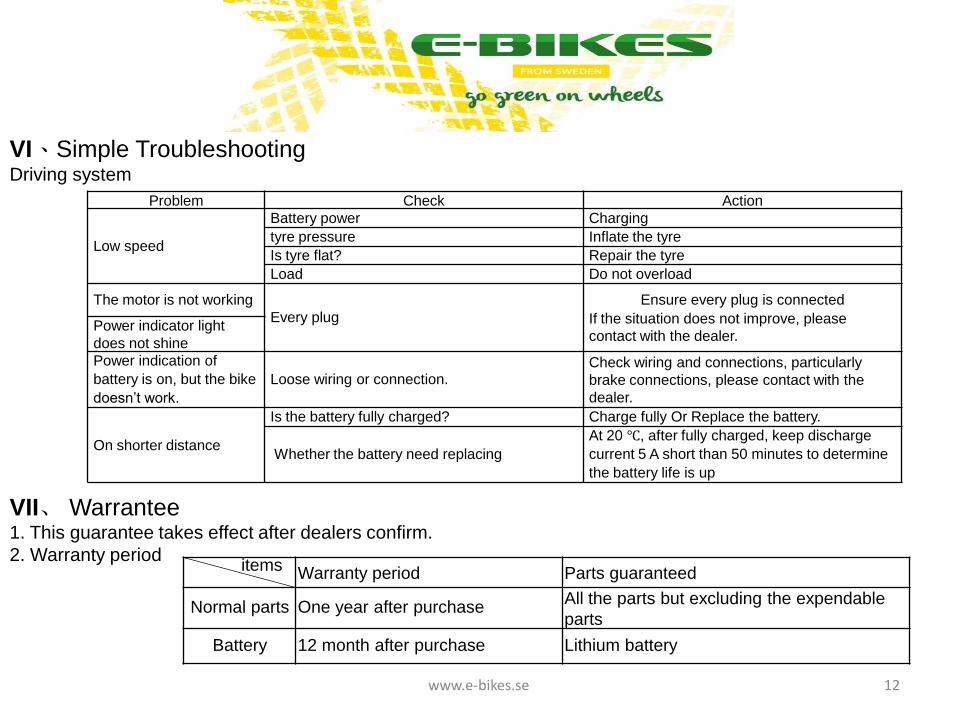
Problem Check Action
Low speed
Battery power Charging
tyre pressure Inflate the tyre
Is tyre flat? Repair the tyre
Load Do not overload
The motor is not working
Every plug
Ensure every plug is connected
If the situation does not improve, please
contact with the dealer. Power indicator light
does not shine
Power indication of
battery is on, but the bike
doesn’t work.
Loose wiring or connection. Check wiring and connections, particularly
brake connections, please contact with the
dealer.
On shorter distance
Is the battery fully charged? Charge fully Or Replace the battery.
Whether the battery need replacing
At 20 ℃, after fully charged, keep discharge
current 5 A short than 50 minutes to determine
the battery life is up
VI、Simple Troubleshooting Driving system
VII、 Warrantee 1. This guarantee takes effect after dealers confirm.
2. Warranty period items Warranty period Parts guaranteed
Normal parts One year after purchase All the parts but excluding the expendable
parts
Battery 12 month after purchase Lithium battery
13 www.e-bikes.se
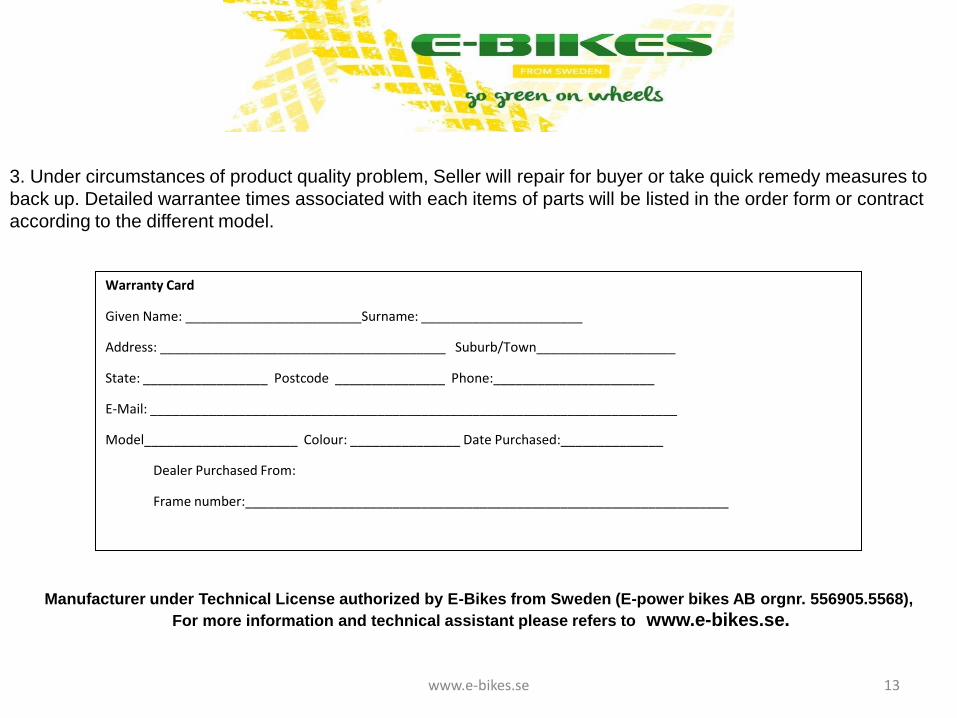
3. Under circumstances of product quality problem, Seller will repair for buyer or take quick remedy measures to
back up. Detailed warrantee times associated with each items of parts will be listed in the order form or contract
according to the different model.
Warranty Card
Given Name: ________________________Surname: ______________________
Address: _______________________________________ Suburb/Town___________________
State: _________________ Postcode _______________ Phone:______________________
E-Mail: ________________________________________________________________________
Model_____________________ Colour: _______________ Date Purchased:______________
Dealer Purchased From:
Frame number:__________________________________________________________________
Manufacturer under Technical License authorized by E-Bikes from Sweden (E-power bikes AB orgnr. 556905.5568),
For more information and technical assistant please refers to www.e-bikes.se.

14 www.e-bikes.se