Embed Size (px)
Citation preview

Owner’s ManualMode d’emploi
SIRIUS BUS INTERFACE
INTERFACE DU BUS SIRIUS
CD-SB10
English
Fran
çais
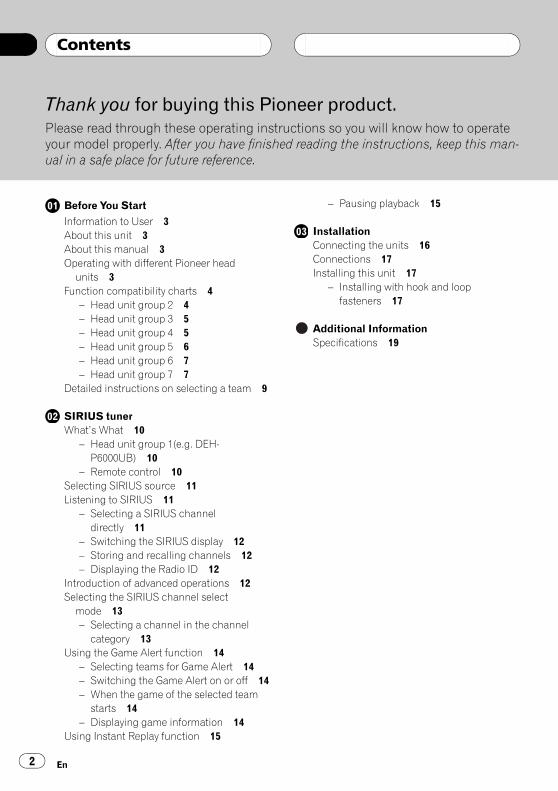
Thank you for buying this Pioneer product.Please read through these operating instructions so you will know how to operateyour model properly. After you have finished reading the instructions, keep this man-ual in a safe place for future reference.
Before You Start
Information to User 3About this unit 3About this manual 3Operating with different Pioneer head
units 3Function compatibility charts 4
– Head unit group 2 4– Head unit group 3 5– Head unit group 4 5– Head unit group 5 6– Head unit group 6 7– Head unit group 7 7
Detailed instructions on selecting a team 9
SIRIUS tunerWhat’s What 10
– Head unit group 1(e.g. DEH-P6000UB) 10
– Remote control 10Selecting SIRIUS source 11Listening to SIRIUS 11
– Selecting a SIRIUS channeldirectly 11
– Switching the SIRIUS display 12– Storing and recalling channels 12– Displaying the Radio ID 12
Introduction of advanced operations 12Selecting the SIRIUS channel select
mode 13– Selecting a channel in the channel
category 13Using the Game Alert function 14
– Selecting teams for Game Alert 14– Switching the Game Alert on or off 14– When the game of the selected team
starts 14– Displaying game information 14
Using Instant Replay function 15
– Pausing playback 15
InstallationConnecting the units 16Connections 17Installing this unit 17
– Installing with hook and loopfasteners 17
Additional InformationSpecifications 19
Contents
En2

Information to User
Alteration or modifications carried out withoutappropriate authorization may invalidate theuser’s right to operate the equipment.
This device complies with part 15 of the FCCRules. Operation is subject to the followingtwo conditions:(1) This device may not cause harmful interfer-ence, and (2) this device must accept any inter-ference received, including interference thatmay cause undesired operation.
About this unit
WARNINGHandling the cord on this product or cords asso-ciated with accessories sold with the productmay expose you to chemicals listed on proposi-tion 65 known to the State of California and othergovernmental entities to cause cancer and birthdefects or other reproductive harm.Wash handsafter handling.
CAUTION! Do not allow this unit to come into contact
with liquids. Electrical shock could result.Also, damage to this unit, smoke, and over-heating could result from contact with liquids.
! Keep this manual handy as a reference for op-erating procedures and precautions.
About this manualInstructions in this manual use DEH-P6000UBas an example head unit. When using other
head units, refer to Operating with differentPioneer head units on this page.
Operating with differentPioneer head unitsHead units are divided into several groups;find which group yours falls into and operate itaccording to the corresponding function com-patibility charts on the following pages.! Select SIRIUS source when using this sys-
tem with head units grouped 1, 2 and 3. Se-lect EXTERNAL source to use with otherhead units. For detailes about EXTERNALsource, refer to the head unit’s manual.
Head unit group 1Operation of the following head units is thesame as the “DEH-P6000UB”. Refer to the in-struction starting on page 10.DEH-P600UB, DEH-P680MP, DEH-P690UB,DEH-P700BT, DEH-P780MP, DEH-P790BT,DEH-P800PRS, DEH-P880PRS, DEH-P980BT,DEH-P6800MP, DEH-P6900UB, DEH-P7000BT,DEH-P7800MP, DEH-P7900BT, DEH-P9800BT,FH-P800BT, FH-P8000BT
Head unit group 2When using this system with these headunits, operate while referring to the head unitgroup 2 function compatibility chart.DEH-P390MP, DEH-P480MP, DEH-P490MP,DEH-P2900MP, DEH-P3800MP, DEH-P3900MP,DEH-P4800MP, DEH-P4900MP
Head unit group 3When using this system with these headunits, operate while referring to the head unitgroup 3 function compatibility chart.DEH-P400UB, DEH-P500UB, DEH-P3000IB,DEH-P4000UB, DEH-P5000UB
Before You Start
En 3
English
Section
01

Head unit group 4When using this system with these headunits, operate while referring to the head unitgroup 4 function compatibility chart.DEH-P580MP, DEH-P960MP, DEH-P5800MP,DEH-P9600MP, DVH-P5000MP, FH-P5000MP
Head unit group 5When using this system with these headunits, operate while referring to the head unitgroup 5 function compatibility chart.DEH-P8MP, DEH-P80MP, DEH-P860MP, DEH-P8600MP
Head unit group 6When using this system with these headunits, operate while referring to the head unitgroup 6 function compatibility chart.AVH-P6600DVD, AVH-P7600DVD, AVX-P8DVD*! * ADD-ON mode (M) only.
Head unit group 7When using this system with these headunits, operate while referring to the head unitgroup 7 function compatibility chart.AVIC-N2
Other head unitsOperation of the following head units is fullyexplained in the head units’ manual. Refer tothe instruction manual that came with yourhead unit.AVH-P4000DVD, AVH-P4900DVD, AVH-P5000DVD, AVH-P5900DVD, AVH-P7800DVD,AVIC-D2, AVIC-D3, AVIC-F700BT, AVIC-F900BT,AVIC-N3, AVIC-Z1, AVIC-Z2! FUNCTION 3 and FUNCTION 4 are not
available with AVIC-D2.
Function compatibility chartsHead unit group 2
Controls
Selecting the source Press SOURCE to selectSIRIUS.
Selecting channel Press c or d.
Changing bands Press BAND.
Storing presets Press and hold 1 to 6.
Recalling presets Press 1 to 6.
Recalling presets se-quentially (in ChannelNumber Select mode)
Press a or b.
Selecting category (inChannel Category Se-lect mode)
Press a or b.
Displaying the functionmenu
Press FUNCTION.
Switching channel in-formation
Press DISPLAY.
Switching the channelselect mode (in thefunction menu)
Select CHNUMBER/CATE-GORY and press c or d.
Turning the game alertfunction on/off (in thefunction menu)
Select TEAMSETTING andpress and hold a or b.
Selecting a league (inthe function menu)
In the league select mode,press a or b.
Switching the displayto the team selectmode (in the functionmenu)
In the league select modeand with a desired leaguedisplayed, press and holda or b.
Selecting a team (inthe function menu)
In the team select mode,press a or b.
Storing the selectedteam in memory (in thefunction menu)
In the team select modeand with a desired teamdisplayed, press and holda or b.
Before You Start
En4
Section
01

Controls
Deleting the team se-lection from memory(in the function menu)
In the team select modeand with the selected teamdisplayed, press and holda or b.
Displaying game infor-mation (in the functionmenu)
Select GAME INFO andpress a or b.
Notes
! With some units, pressing and holdingCLOCK can directly change the channel selectmode.
! For detailed instructions on the Team Settingfunction, refer to Detailed instructions on se-lecting a team on page 9.
Head unit group 3
Controls
Selecting the source Press SRC (SOURCE) to se-lect SIRIUS.
Selecting channel Push MULTI-CONTROL leftor right.
Changing bands Press BAND.
Storing presets Press LIST and then useMULTI-CONTROL.
Recalling presets Press LIST and then useMULTI-CONTROL.
Recalling presets se-quentially (in ChannelNumber Select mode)
Push MULTI-CONTROL upor down.
Selecting category (inChannel Category Se-lect mode)
Push MULTI-CONTROL upor down.
Displaying the functionmenu
Use MULTI-CONTROL.
Switching channel in-formation
Press DISP.
Switching the channelselect mode (in thefunction menu)
Select CH SELECT MODEand press MULTI-CON-TROL.
Controls
Turning the game alertfunction on/off (in thefunction menu)
Select GAME ALERTandpress MULTI-CONTROL.
Selecting a league (inthe function menu)
In the league select mode,turn MULTI-CONTROL.
Switching the displayto the team selectmode (in the functionmenu)
In the league select modeand with a desired leaguedisplayed, press MULTI-CONTROL.
Selecting a team (inthe function menu)
In the team select mode,turn MULTI-CONTROL.
Storing the selectedteam in memory (in thefunction menu)
In the team select modeand with a desired teamdisplayed, press and holdMULTI-CONTROL.
Deleting the team se-lection from memory(in the function menu)
In the team select modeand with the selected teamdisplayed, press and holdMULTI-CONTROL.
Displaying game infor-mation (in the functionmenu)
Select GAME INFO andpress MULTI-CONTROL.
Note
! With some units, pressing and holdingSAT MODE can directly change the channelselect mode.
Head unit group 4
Controls
Selecting the source Press SOURCE to select anexternal source for SIRIUS.
Selecting channel Press c or d.
Changing bands Press BAND.
Storing presets Press and hold 1 to 6.
Recalling presets Press 1 to 6.
Recalling presets se-quentially (in ChannelNumber Select mode)
Press a or b.
Before You Start
En 5
English
Section
01

Controls
Selecting category (inChannel Category Se-lect mode)
Press a or b.
Displaying the functionmenu
Press FUNCTION.
Switching channel in-formation (FUNC1)
Press a or b.
Switching the channelselect mode (FUNC2)
Press a or b.
Turning the game alertfunction on/off(FUNC3)
Press and hold a or b.
Selecting a league(FUNC3)
In the league select mode,press a or b.
Switching the displayto the team selectmode (FUNC3)
In the league select modeand with a desired leaguedisplayed, press and holda or b.
Selecting a team(FUNC3)
In the team select mode,press a or b.
Storing the selectedteam in memory(FUNC3)
In the team select modeand with a desired teamdisplayed, press and holda or b.
Deleting the team se-lection from memory(FUNC3)
In the team select modeand with the selected teamdisplayed, press and holda or b.
Displaying game infor-mation (FUNC4)
Press a or b.
Notes
! For detailed instructions on FUNCTION 3,refer to Detailed instructions on selecting ateam on page 9.
! With some head units,AUTO/MANUAL (A/M)may appear in thefunction menu, but this function is not avail-able with SIRIUS source.
Head unit group 5
Controls
Selecting the source Press SOURCE to select anexternal source for SIRIUS.
Selecting channel Push MULTI-CONTROL leftor right.
Changing bands Press BAND.
Storing presets Press and hold 1 to 6.
Recalling presets Press 1 to 6.
Recalling presets se-quentially (in ChannelNumber Select mode)
Push MULTI-CONTROL upor down.
Selecting category (inChannel Category Se-lect mode)
Push MULTI-CONTROL upor down.
Displaying the functionmenu
Use MULTI-CONTROL.
Switching channel in-formation (FUNC1)
Press MULTI-CONTROL.
Switching the channelselect mode (FUNC2)
Press MULTI-CONTROL.
Turning the game alertfunction on/off(FUNC3)
Press and hold MULTI-CONTROL.
Selecting a league(FUNC3)
In the league select mode,push MULTI-CONTROL upor down.
Switching the displayto the team selectmode (FUNC3)
In the league select modeand with a desired leaguedisplayed, press and holdMULTI-CONTROL.
Selecting a team(FUNC3)
In the team select mode,push MULTI-CONTROL upor down.
Storing the selectedteam in memory(FUNC3)
In the team select modeand with a desired teamdisplayed, press and holdMULTI-CONTROL.
Before You Start
En6
Section
01
Controls
Deleting the team se-lection from memory(FUNC3)
In the team select modeand with the selected teamdisplayed, press and holdMULTI-CONTROL.
Displaying game infor-mation (FUNC4)
Push MULTI-CONTROL upor down.
Notes
! For detailed instructions on FUNCTION 3,refer to Detailed instructions on selecting ateam on page 9.
! With some head units,AUTO/MANUAL (A/M)may appear in thefunction menu, but this function is not avail-able with SIRIUS source.
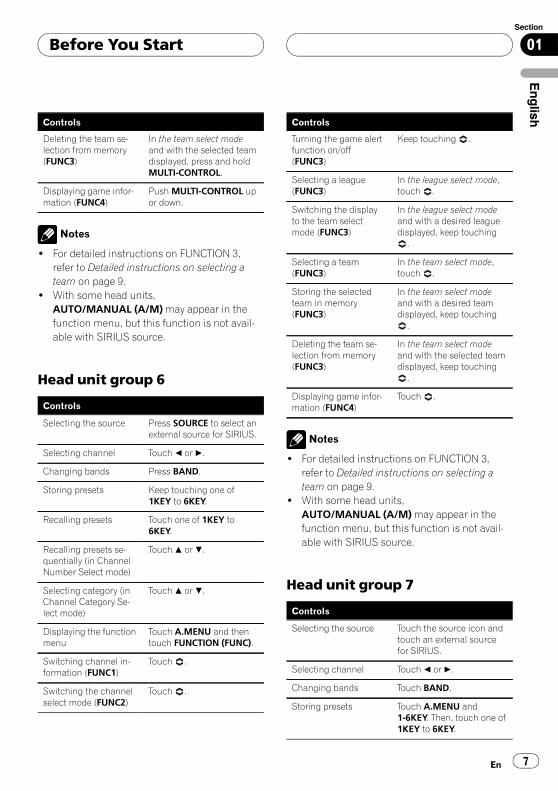
Head unit group 6
Controls
Selecting the source Press SOURCE to select anexternal source for SIRIUS.
Selecting channel Touch c or d.
Changing bands Press BAND.
Storing presets Keep touching one of1KEY to 6KEY.
Recalling presets Touch one of 1KEY to6KEY.
Recalling presets se-quentially (in ChannelNumber Select mode)
Touch a or b.
Selecting category (inChannel Category Se-lect mode)
Touch a or b.
Displaying the functionmenu
Touch A.MENU and thentouch FUNCTION (FUNC).
Switching channel in-formation (FUNC1)
Touch .
Switching the channelselect mode (FUNC2)
Touch .
Controls
Turning the game alertfunction on/off(FUNC3)
Keep touching .
Selecting a league(FUNC3)
In the league select mode,touch .
Switching the displayto the team selectmode (FUNC3)
In the league select modeand with a desired leaguedisplayed, keep touching
.
Selecting a team(FUNC3)
In the team select mode,touch .
Storing the selectedteam in memory(FUNC3)
In the team select modeand with a desired teamdisplayed, keep touching
.
Deleting the team se-lection from memory(FUNC3)
In the team select modeand with the selected teamdisplayed, keep touching
.
Displaying game infor-mation (FUNC4)
Touch .
Notes
! For detailed instructions on FUNCTION 3,refer to Detailed instructions on selecting ateam on page 9.
! With some head units,AUTO/MANUAL (A/M)may appear in thefunction menu, but this function is not avail-able with SIRIUS source.
Head unit group 7
Controls
Selecting the source Touch the source icon andtouch an external sourcefor SIRIUS.
Selecting channel Touch c or d.
Changing bands Touch BAND.
Storing presets Touch A.MENU and1-6KEY. Then, touch one of1KEY to 6KEY.
Before You Start
En 7
English
Section
01
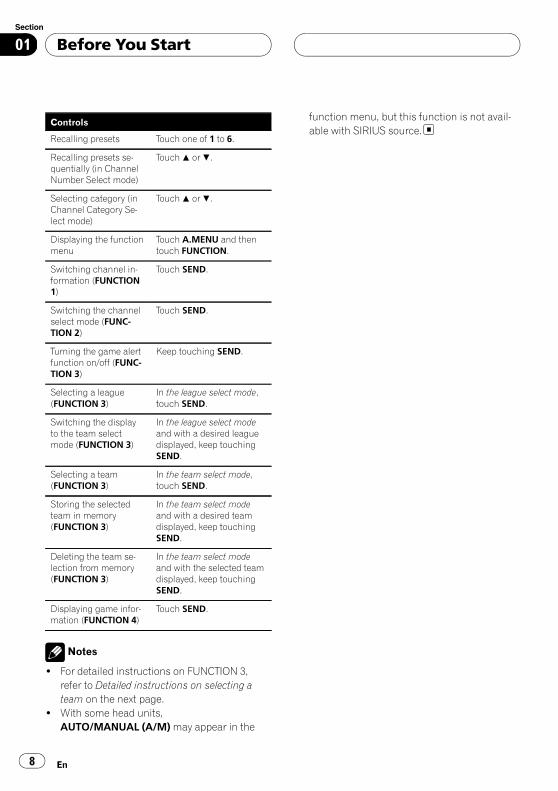
Controls
Recalling presets Touch one of 1 to 6.
Recalling presets se-quentially (in ChannelNumber Select mode)
Touch a or b.
Selecting category (inChannel Category Se-lect mode)
Touch a or b.
Displaying the functionmenu
Touch A.MENU and thentouch FUNCTION.
Switching channel in-formation (FUNCTION1)
Touch SEND.
Switching the channelselect mode (FUNC-TION 2)
Touch SEND.
Turning the game alertfunction on/off (FUNC-TION 3)
Keep touching SEND.
Selecting a league(FUNCTION 3)
In the league select mode,touch SEND.
Switching the displayto the team selectmode (FUNCTION 3)
In the league select modeand with a desired leaguedisplayed, keep touchingSEND.
Selecting a team(FUNCTION 3)
In the team select mode,touch SEND.
Storing the selectedteam in memory(FUNCTION 3)
In the team select modeand with a desired teamdisplayed, keep touchingSEND.
Deleting the team se-lection from memory(FUNCTION 3)
In the team select modeand with the selected teamdisplayed, keep touchingSEND.
Displaying game infor-mation (FUNCTION 4)
Touch SEND.
Notes
! For detailed instructions on FUNCTION 3,refer to Detailed instructions on selecting ateam on the next page.
! With some head units,AUTO/MANUAL (A/M)may appear in the
function menu, but this function is not avail-able with SIRIUS source.
Before You Start
En8
Section
01
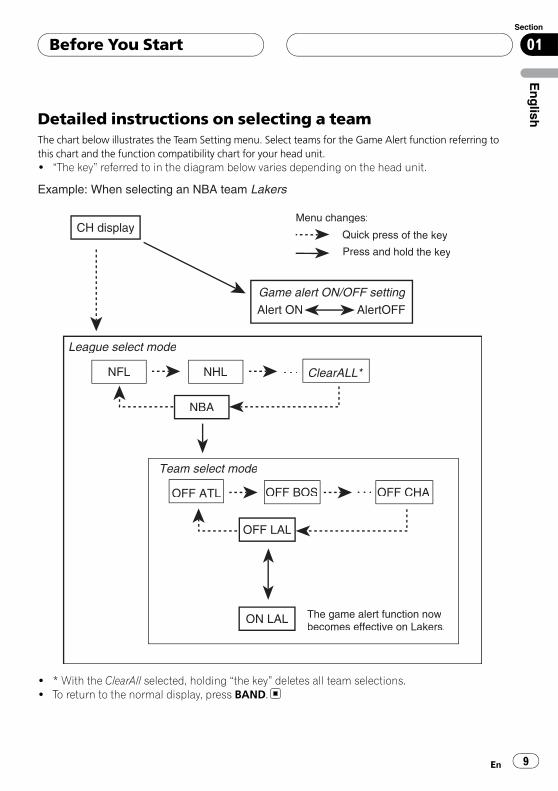
Detailed instructions on selecting a teamThe chart below illustrates the Team Setting menu. Select teams for the Game Alert function referring tothis chart and the function compatibility chart for your head unit.! “The key” referred to in the diagram below varies depending on the head unit.
Game alert ON/OFF setting
Alert ON AlertOFF
League select mode
Team select mode
Quick press of the key
Press and hold the key
OFF ATL OFF CHAOFF BOS
ON LAL
OFF LAL
CH display
Example: When selecting an NBA team Lakers
Menu changes:
ClearALL*NHLNFL
NBA
The game alert function nowbecomes effective on Lakers.
! * With the ClearAll selected, holding “the key” deletes all team selections.! To return to the normal display, press BAND.
Before You Start
En 9
English
Section
01

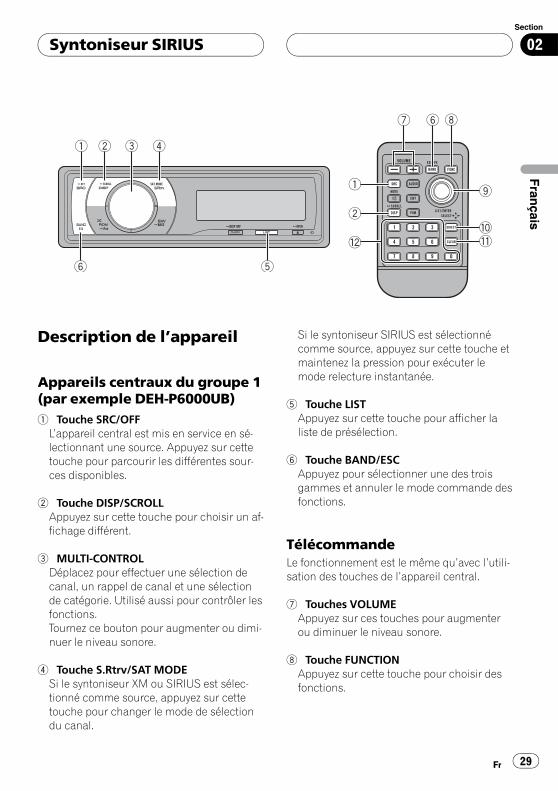
What’s What
Head unit group 1(e.g. DEH-P6000UB)1 SRC/OFF button
The head unit is turned on by selecting asource. Press to cycle through all the avail-able sources.
2 DISP/SCROLL buttonPress to select different displays.
3 MULTI-CONTROLMove to perform channel select, channel re-call and category select. Also used for con-trolling functions.Turn to increase or decrease the volume.
4 S.Rtrv/SAT MODE buttonWhen XM tuner or SIRIUS tuner is selectedas the source, press to change the channelselect mode.When SIRIUS tuner is selected as thesource, press and hold to perform the In-stant Replay mode.
5 LIST buttonPress to display the preset channel list.
6 BAND/ESC buttonPress to select among three bands and can-cel the control mode of functions.
Remote controlOperation is the same as when using the but-tons on the head unit.
7 VOLUME buttonsPress to increase or decrease the volume.
8 FUNCTION buttonPress to select functions.
9 Thumb padMove to perform channel select, channel re-call and category select. Also used for con-trolling functions.Functions are the same asMULTI-CONTROL except for volume con-trol.
a DIRECT buttonPress to directly select the desired channel.
1 32 4
6 5
8
2
c
1
7 6
ba
9
SIRIUS tuner
En10
Section
02

b CLEAR buttonPress to cancel the input number when 0 to9 are used.
c 0 to 9 buttonsPress to directly select the desired channelor preset tuning. Buttons 1 to 6 can operatethe preset tuning.
Selecting SIRIUS source% Press SRC to select SIRIUS.
Listening to SIRIUS
1 2 3
5
4
1 SIRIUS band indicator2 SIRIUS channel number indicator3 SIRIUS preset number indicator4 SIRIUS channel select setting indicator
Shows what channel select setting has beenselected. CH is displayed whenChannel number is selected, and CAT is dis-played when Category is selected.I.R is displayed during the Instant Replaymode.
5 SIRIUS channel nameShows the channel name of broadcastchannel.
% Select a SIRIUS band.Press BAND.
# Band can be selected from SR-1, SR-2 orSR-3.
% Select a channel.PushMULTI-CONTROL left or right.# If you push and holdMULTI-CONTROL left orright, you can increase or decrease channel num-ber continuously.# You can also perform tuning from a desiredchannel category. (Refer to Selecting a channel inthe channel category on page 13.)
Notes
! It may take a few seconds before you can hearanything while this system acquires and pro-cesses the satellite signal.
! When you change the channel, the channelname is displayed, followed by the categoryname.
Selecting a SIRIUS channel directlyWhen using the remote control, you can selectthe SIRIUS channel directly by entering the de-sired channel number.
1 Press DIRECT.Channel number input display appears.
2 Press 0 to 9 to enter the desired channelnumber.# You can cancel the input number by pressingCLEAR.
3 Press DIRECT.The SIRIUS channel of entered number isselected.# After entering the number input mode, if youdo not perform an operation within about eightseconds, the mode is automatically canceled.
SIRIUS tuner
En 11
English
Section
02

Switching the SIRIUS displayVarious information, including channel num-ber, name and category, song/program title,artist/feature and composer, can be displayedfor the selected channel.
% Press DISP to switch the SIRIUS display.Each press of DISP changes the SIRIUS dis-play in the following order:Play time—Channel number—Channel name—Category name—Artist name—Song title/program title—Composer name# When you change the display, text automati-cally scrolls.# Play time is displayed during the Instant Re-play mode. Refer to Using Instant Replay functionon page 15.# Play time display indicates the time invertedfrom the live broadcast. Play time is displayed innegative number.
Storing and recalling channelsYou can easily store up to six broadcast sta-tions for later recall.! Only the remote control can operate this
function.! Six stations for each band can be stored in
memory.! Channels are stored and recalled on a
broadcast station basis. This means that ifthe broadcast station you stored has beenassigned to a different channel by SIRIUS,you can still recall the same broadcast sta-tion (though a different channel numbermay appear in the display).
% When you find a station that you wantto store in memory press one of preset tun-ing buttons 1 to 6 and hold until the SIRIUSpreset number stops flashing.The number you have pressed will flash in theSIRIUS preset number indicator and then re-
main lit. The selected station has been storedin memory.The next time you press the same preset tun-ing button the station is recalled from mem-ory.# You can also recall stations assigned to presettuning numbers by pushingMULTI-CONTROL upor down.
Note
If a channel cannot be recalled from memory, thetuner automatically receives the channel 184.
Displaying the Radio IDIf you select CH 000, the ID code is displayed.
% Push MULTI-CONTROL left or right toselect CH 000.
Note
To select CH 000, set the channel select setting toChannel number. About the channel select set-ting, refer to Selecting the SIRIUS channel selectmode on the next page.
Introduction of advancedoperations1 Press MULTI-CONTROL to display themain menu.
2 Use MULTI-CONTROL to selectFUNCTION.The function selection menu is displayed.Turn to change the menu option. Press toselect.
SIRIUS tuner
En12
Section
02

3 Turn MULTI-CONTROL to select thefunction.Channel mode (channel select mode setting)—Game alert (game alert setting)—Team Setting (team setting)—Game Info(game info)—Pause (pause)
Notes
! You can also select the function by pressingFUNCTION on the remote control.
! To return to the ordinary display, press BAND.! If you do not operate functions within about
30 seconds, the display is automatically re-turned to the ordinary display.
! During the Instant Replay mode, you can se-lect Pause (pause). Refer to Using Instant Re-play function on page 15.
Selecting the SIRIUSchannel select modeYou have two methods for selecting a channel:by number and by category. When selectingby number, channels in any category can beselected. Select by category to narrow yoursearch down to only channels in a particularcategory.
% Press SAT MODE repeatedly to selectthe desired channel select setting.Channel number (channel number select set-ting)—Category (channel category selectsetting)
Note
You can also perform this operation in the menuthat appears by usingMULTI-CONTROL.
Selecting a channel in thechannel categoryChannels are organized into various programcategories, e.g. Rock, Classic, Jazz. You canspecify channels by selecting the desired cate-gory.
1 Select the channel select settings toCategory.Refer to Selecting the SIRIUS channel selectmode on this page.
2 Push MULTI-CONTROL up or down toselect the desired channel category.Once you select a channel category, the tunersearches for channels in that category. Duringsearch, the channel category does not imme-diately change even if you pushMULTI-CONTROL. To successively change thechannel category, continue pushingMULTI-CONTROL.
3 Push MULTI-CONTROL left or right toselect the desired channel in the selectedchannel category.The channel number moves up or down in theselected channel category.Channels that cannot currently be selectedare skipped, and the next channel in thatchannel category is selected.
Note
If you select a channel of another category bychannel recall, etc., during step 2 and 3, the cate-gory selected in step 2 remains in memory. If youpushMULTI-CONTROL left or right, the channelnumber moves up or down in the category se-lected in step 2 regardless of the category of thepreset channel.
SIRIUS tuner
En 13
English
Section
02
Using the Game Alert functionThis system can alert you when games invol-ving your favorite teams are about to start. Touse this function you need in advance to setup a game alert for the teams.
Selecting teams for Game Alert1 Use MULTI-CONTROL to selectTeam Setting in the function menu.Refer to Introduction of advanced operations onpage 12.
2 Push MULTI-CONTROL left or right toselect a desired league.League names are switched in the display.
3 Push MULTI-CONTROL up or down toselect a desired team.Teams in the selected category are switched inthe display.
4 Press MULTI-CONTROL to store the se-lected team in memory.The game alert function will start on thatteam.# To turn the Game Alert off of the selectedteam, pressMULTI-CONTROL again.# When you have already made 12 team selec-tions, FULL is displayed and additional team se-lection is not possible. In this case, first deletethe team selection and then try again.
5 Repeat these steps for selecting otherteams.Up to 12 teams can be selected.
Switching the Game Alert on or offOnce you made team selections, you need toturn the Game Alert function on.! The Game Alert function is on at the default
setting.
1 Use MULTI-CONTROL to selectGame alert in the function menu.Refer to Introduction of advanced operations onpage 12.
2 Press MULTI-CONTROL to turn theGame Alert on.The Game Alert function is now on.# To turn the Game Alert function off, pressMULTI-CONTROL again.
When the game of the selectedteam startsWhen a game of the selected team is about tostart (or is currently playing) on a different sta-tion, Game alert info is displayed. Press andhold MULTI-CONTROL to switch to that sta-tion, and you can listen to that game.! If you do not operate the function within
about 10 seconds, the display is automati-cally returned.
Displaying game informationIf games of your selected teams are currentlyplaying, you can display information of thegames and tune to the broadcast channel.You can display information of the gameswhile enjoying the sound from currently tun-ing station. You can also tune to the broadcastchannel when you wish to.
1 Use MULTI-CONTROL to selectGame Info in the function menu.The game information of your selected team isdisplayed.Refer to Introduction of advanced operations onpage 12.
2 Push MULTI-CONTROL up or down toselect a game.The game is displayed, followed by more de-tailed game information.
SIRIUS tuner
En14
Section
02

! Game score will be updated automatically.
3 Press MULTI-CONTROL to switch to thatstation to listen to the game.
Notes
! If you have not made any team selections,NOT SET is displayed.
! When games involving your favorite teams arenot currently playing, NO GAME is displayed.
Using Instant Replay functionFollowing functions can be operated duringthe Instant Replay mode.! To use this function, Pioneer head unit
which is compatible with Instant ReplayFunction is required.
! To use this function, SIRIUS plug-and-playunit with Instant Replay Function is re-quired.
% Performing the Instant Replay modeWhen SIRIUS tuner is selected as the source,press and hold SAT MODE.# In the following conditions, tuner exits fromthe Instant Replay mode.
— When BAND is pressed— When another source is selected
% Select a trackPushMULTI-CONTROL left or right.
% Fast forward or reversePush and hold MULTI-CONTROL left or right.
Pausing playbackYou can operate this function only during the In-stant Replay mode.
1 Use MULTI-CONTROL to select Pause inthe function menu.Refer to Introduction of advanced operations onpage 12.
2 Press MULTI-CONTROL to turn pauseon.Playback of the current track pauses.# To turn pause off, pressMULTI-CONTROLagain.
SIRIUS tuner
En 15
English
Section
02

Connecting the units
Blue Black
This unit
Head unit(sold separately)
Multi-CD player(sold separately)
To IP-BUS input (blue)
IP-BUS cable
IP-BUS cable(supplied)
1.5 m (4 ft. 11 in.)Fuse (2 A) Yellow
Connect to the constant 12 V supply terminal.
Black (chassis ground)Connect to a clean, paint-free metal location.
“SiriusConnect universal tuner” or “SIRIUS Dock and play radio with SiriusConnect vehicle kit”(sold separately)
SiriusConnect Cable(sold separately)
Installation
En16
Section
03

Connections
Important
! Use of this unit in conditions other than thefollowing could result in fire or malfunction.— Vehicles with a 12-volt battery and negative
grounding.! To prevent a short-circuit, overheating or mal-
function, be sure to follow the directionsbelow.— Disconnect the negative terminal of the
battery before installation.— Secure the wiring with cable clamps or ad-
hesive tape. To protect the wiring, wrap ad-hesive tape around them where they lieagainst metal parts.
— Place all cables away from moving parts,such as gear shift and seat rails.
— Place all cables away from hot places,such as near the heater outlet.
— Do not pass the yellow cable through ahole into the engine compartment to con-nect to a battery.
— Do not shorten any cables.— Never cut the insulation of the power cable
of this unit in order to share the powerwith other devices. Current capacity of thecable is limited.
— Use a fuse of the rating prescribed.! IP-BUS connectors are color-coded. Be sure
to connect connectors of the same color.
Installing this unit
Important
! Check all connections and systems beforefinal installation.
! Do not use unauthorized parts. Use of un-authorized parts may cause malfunctions.
! Consult your dealer if installation requires dril-ling of holes or other modifications to the vehi-cle.
! Do not install this unit where :— it may interfere with operation of the vehi-
cle.— it may cause injury to a passenger as a re-
sult of a sudden stop.! When mounting this unit, make sure none of
the leads are trapped between this unit andthe surrounding metalwork or fittings.
! Do not mount this unit near heater outletswhere it would be affected by heat, or near thedoors where rainwater might splash onto it.
! Before drilling any mounting holes, alwayscheck behind where you want to drill theholes. Do not drill into the gas line, brake line,electrical wiring or other important parts.
! If this unit is installed in the passenger com-partment, anchor it securely so it does notbreak free while the vehicle is moving, caus-ing injury or an accident.
! If this unit is installed under the front seat,make sure it does not obstruct seat move-ment. Route all leads and cords carefullyaround the sliding mechanism so they do arenot caught or pinched in the mechanism andcause a short-circuit.
Installing with hook and loopfastenersThoroughly wipe off the surface before affixingthe hook and loop fasteners.! If the hook fasteners adhere to the car mat
directly, you may install this unit withoutusing the loop fasteners.
Installation
En 17
English
Section
03
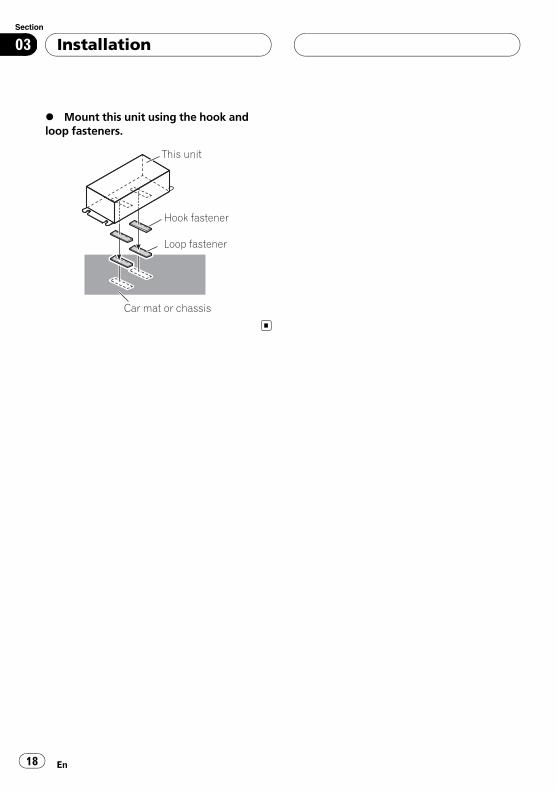
% Mount this unit using the hook andloop fasteners.
This unit
Hook fastener
Loop fastener
Car mat or chassis
Installation
En18
Section
03

SpecificationsGeneralPower source ............................. 14.4 V DC (10.8 V to 15.1 V
allowable)Grounding system ................... Negative typeMax. current consumption
..................................................... 2.0 ADimensions (W × H × D) ... 127 × 35 × 52 mm
(5 × 1-3/8 × 2 in.)Weight .......................................... 185 g (6.53 oz)
Notes
! Specifications and the design are subject tomodifications without notice due to improve-ments.
! “SIRIUS”, “SiriusConnect”and the SIRIUS doglogo and related marks are trademarks of SIR-IUS Satellite Radio Inc. All rights reserved.
Additional Information
En 19
English
Appendix

Nous vous remercions d’avoir acheté cet appareilPioneer.Afin d’utiliser votre appareil correctement, veuillez lire ce mode d’emploi entière-ment. Après avoir lu ce mode d’emploi, conservez-le dans en endroit sûr pour pouvoirvous y référer ultérieurement.
Avant de commencer
Quelques mots sur cet appareil 21Quelques mots sur ce mode d’emploi 21Utilisation avec différents appareils centraux
Pioneer 21Tableaux de compatibilité des fonctions 22
– Appareils centraux du groupe 2 22– Appareils centraux du groupe 3 23– Appareils centraux du groupe 4 24– Appareils centraux du groupe 5 25– Appareils centraux du groupe 6 25– Appareils centraux du groupe 7 26
Instructions détaillées sur la sélection d’uneéquipe 28
Syntoniseur SIRIUSDescription de l’appareil 29
– Appareils centraux du groupe 1(parexemple DEH-P6000UB) 29
– Télécommande 29Sélection de la source SIRIUS 30Ecoute de SIRIUS 30
– Sélection directe d’un canalSIRIUS 30
– Changement de l’affichage SIRIUS 31– Mise en mémoire et rappel des
canaux 31– Affichage de l’ID de la radio 32
Introduction aux opérations avancées 32Choix du mode de sélection du canal
SIRIUS 32– Sélection d’un canal dans la catégorie
de canal 32Utilisation de la fonction Alerte Match 33
– Sélection des équipes pour l’AlerteMatch 33
– Mise en service ou hors service del’Alerte Match 34
– Quand le match de l’équipesélectionnée commence 34
– Affichage des informations sur lesmatchs 34
Utilisation de la fonction Relectureinstantanée 34– Pause de la lecture 35
InstallationConnexion des appareils 36Connexions 37Installation de l’appareil 37
– Installation avec des fixationsVelcro 38
Informations complémentairesCaractéristiques techniques 39
Table des matières
Fr20
Quelques mots sur cet appareil
PRÉCAUTION! Ne laissez pas cet appareil entrer en contact
avec des liquides. Cela pourrait provoquer uneélectrocution. Tout contact avec des liquidespourrait aussi provoquer des dommages, dela fumée et une surchauffe de l’appareil.
! Conservez ce mode d’emploi à portée de mainafin de vous y référer pour les modes d’opéra-tion et les précautions.
Quelques mots sur ce moded’emploiLes instructions de ce mode d’emploi utilisentDEH-P6000UB comme exemple d’appareilcentral. Si vous utilisez un autre appareil cen-tral, reportez-vous à cette page, Utilisationavec différents appareils centraux Pioneer.
Utilisation avec différentsappareils centraux PioneerLes appareils centraux sont divisés en plu-sieurs groupes ; trouvez le groupe auquel ap-partient votre appareil central et utilisez-leselon les tableaux de compatibilité de fonc-tions correspondants figurant sur les pagessuivantes.! Sélectionnez la source SIRIUS si vous utili-
sez ce système avec des appareils centrauxde groupes 1, 2 ou 3. Sélectionnez lasource EXTERNAL pour une utilisationavec d’autres appareils centraux. Pouravoir des détails sur la source EXTÉ-RIEURE, reportez-vous au mode d’emploide l’appareil central.
Appareils centraux du groupe 1Le mode d’utilisation des appareils centrauxsuivant est le même que celui de "DEH-P6000UB". Reportez-vous aux instructionscommençant en page 29.DEH-P600UB, DEH-P680MP, DEH-P690UB,DEH-P700BT, DEH-P780MP, DEH-P790BT,DEH-P800PRS, DEH-P880PRS, DEH-P980BT,DEH-P6800MP, DEH-P6900UB, DEH-P7000BT,DEH-P7800MP, DEH-P7900BT, DEH-P9800BT,FH-P800BT, FH-P8000BT
Appareils centraux du groupe 2Lors de l’utilisation de ce système avec ces ap-pareils centraux, suivez le mode opératoirecorrespondant au tableau de compatibilité desfonctions pour les appareils centraux dugroupe 2.DEH-P390MP, DEH-P480MP, DEH-P490MP,DEH-P2900MP, DEH-P3800MP, DEH-P3900MP,DEH-P4800MP, DEH-P4900MP
Appareils centraux du groupe 3Lors de l’utilisation de ce système avec ces ap-pareils centraux, suivez le mode opératoirecorrespondant au tableau de compatibilité desfonctions pour les appareils centraux dugroupe 3.DEH-P400UB, DEH-P500UB, DEH-P3000IB,DEH-P4000UB, DEH-P5000UB
Appareils centraux du groupe 4Lors de l’utilisation de ce système avec ces ap-pareils centraux, suivez le mode opératoirecorrespondant au tableau de compatibilité desfonctions pour les appareils centraux dugroupe 4.DEH-P580MP, DEH-P960MP, DEH-P5800MP,DEH-P9600MP, DVH-P5000MP, FH-P5000MP
Avant de commencer
Fr 21
SectionFran
çais
01
Appareils centraux du groupe 5Lors de l’utilisation de ce système avec ces ap-pareils centraux, suivez le mode opératoirecorrespondant au tableau de compatibilité desfonctions pour les appareils centraux dugroupe 5.DEH-P8MP, DEH-P80MP, DEH-P860MP, DEH-P8600MP
Appareils centraux du groupe 6Lors de l’utilisation de ce système avec ces ap-pareils centraux, suivez le mode opératoirecorrespondant au tableau de compatibilité desfonctions pour les appareils centraux dugroupe 6.AVH-P6600DVD, AVH-P7600DVD, AVX-P8DVD*! * Mode ADD-ON (M) seulement.
Appareils centraux du groupe 7Lors de l’utilisation de ce système avec ces ap-pareils centraux, suivez le mode opératoirecorrespondant au tableau de compatibilité desfonctions pour les appareils centraux dugroupe 7.AVIC-N2
Autres appareils centrauxL’utilisation des appareils centraux suivantsest décrite complètement dans le mode d’em-ploi des appareils centraux. Reportez-vous aumode d’emploi fourni avec votre appareil cen-tral.AVH-P4000DVD, AVH-P4900DVD, AVH-P5000DVD, AVH-P5900DVD, AVH-P7800DVD,AVIC-D2, AVIC-D3, AVIC-F700BT, AVIC-F900BT,AVIC-N3, AVIC-Z1, AVIC-Z2! FUNCTION 3 et FUNCTION 4 ne sont pas
disponible avec AVIC-D2.
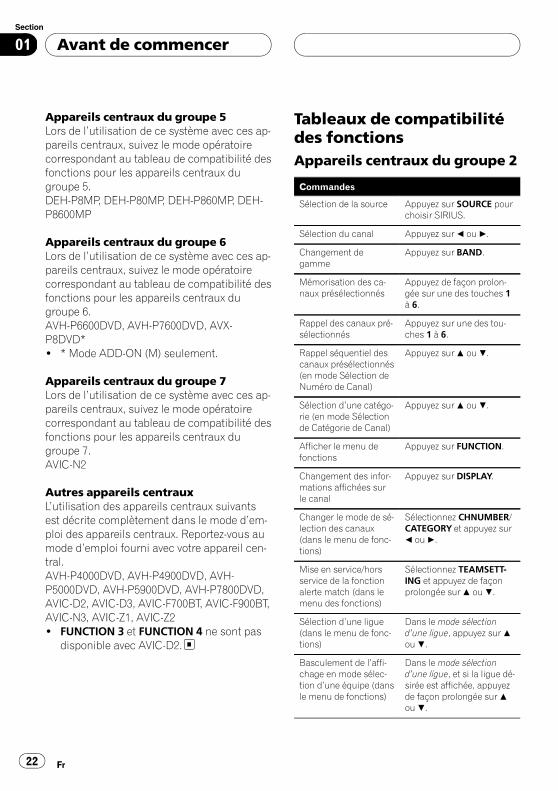
Tableaux de compatibilitédes fonctionsAppareils centraux du groupe 2
Commandes
Sélection de la source Appuyez sur SOURCE pourchoisir SIRIUS.
Sélection du canal Appuyez sur c ou d.
Changement degamme
Appuyez sur BAND.
Mémorisation des ca-naux présélectionnés
Appuyez de façon prolon-gée sur une des touches 1à 6.
Rappel des canaux pré-sélectionnés
Appuyez sur une des tou-ches 1 à 6.
Rappel séquentiel descanaux présélectionnés(en mode Sélection deNuméro de Canal)
Appuyez sur a ou b.
Sélection d’une catégo-rie (en mode Sélectionde Catégorie de Canal)
Appuyez sur a ou b.
Afficher le menu defonctions
Appuyez sur FUNCTION.
Changement des infor-mations affichées surle canal
Appuyez sur DISPLAY.
Changer le mode de sé-lection des canaux(dans le menu de fonc-tions)
Sélectionnez CHNUMBER/CATEGORY et appuyez surc ou d.
Mise en service/horsservice de la fonctionalerte match (dans lemenu des fonctions)
Sélectionnez TEAMSETT-ING et appuyez de façonprolongée sur a ou b.
Sélection d’une ligue(dans le menu de fonc-tions)
Dans lemode sélectiond’une ligue, appuyez sur aou b.
Basculement de l’affi-chage en mode sélec-tion d’une équipe (dansle menu de fonctions)
Dans lemode sélectiond’une ligue, et si la ligue dé-sirée est affichée, appuyezde façon prolongée sur aou b.
Avant de commencer
Fr22
Section
01

Commandes
Sélection d’une équipe(dans le menu de fonc-tions)
Dans lemode sélectiond’une équipe, appuyez sura ou b.
Mise en mémoire del’équipe sélectionnée(dans le menu desfonctions)
Dans lemode sélectiond’une équipe, et si l’équipedésirée est affichée, ap-puyez de façon prolongéesur a ou b.
Suppression en mé-moire de l’équipe sélec-tionnée (dans le menudes fonctions)
Dans lemode sélectiond’une équipe, et si l’équipesélectionnée est affichée,appuyez de façon prolon-gée sur a ou b.
Affichage d’informa-tions sur les matchs(dans le menu de fonc-tions)
Sélectionnez GAME INFOet appuyez sur a ou b.
Remarques
! Avec certains appareils, appuyer de façon pro-longée sur CLOCK peut changer directementle mode de sélection du canal.
! Pour avoir des instructions détaillées sur lafonction Paramétrage de l’Equipe, reportez-vous à la page 28, Instructions détaillées sur lasélection d’une équipe.
Appareils centraux du groupe 3
Commandes
Sélection de la source Appuyez sur SRC(SOURCE) pour choisir SI-RIUS.
Sélection du canal Poussez MULTI-CONTROLvers la gauche ou vers ladroite.
Changement degamme
Appuyez sur BAND.
Mémorisation des ca-naux présélectionnés
Appuyez sur LIST puis utili-sez le bouton MULTI-CONTROL.
Commandes
Rappel des canaux pré-sélectionnés
Appuyez sur LIST puis utili-sez le bouton MULTI-CONTROL.
Rappel séquentiel descanaux présélectionnés(en mode Sélection deNuméro de Canal)
Poussez MULTI-CONTROLvers le haut ou vers le bas.
Sélection d’une catégo-rie (en mode Sélectionde Catégorie de Canal)
Poussez MULTI-CONTROLvers le haut ou vers le bas.
Afficher le menu defonctions
Utilisez MULTI-CONTROL.
Changement des infor-mations affichées surle canal
Appuyez sur DISP.
Changer le mode de sé-lection des canaux(dans le menu de fonc-tions)
Sélectionnez CH SELECTMODE et appuyez surMULTI-CONTROL.
Mise en service/horsservice de la fonctionalerte match (dans lemenu des fonctions)
Sélectionnez GAME ALERTet appuyez sur MULTI-CONTROL.
Sélection d’une ligue(dans le menu de fonc-tions)
Dans lemode sélectiond’une ligue, tournezMULTI-CONTROL.
Basculement de l’affi-chage en mode sélec-tion d’une équipe (dansle menu de fonctions)
Dans lemode sélectiond’une ligue et si la ligue dé-sirée est affichée, appuyezsur MULTI-CONTROL.
Sélection d’une équipe(dans le menu de fonc-tions)
Dans lemode sélectiond’une équipe, tournezMULTI-CONTROL.
Mise en mémoire del’équipe sélectionnée(dans le menu desfonctions)
Dans lemode sélectiond’une équipe, et si l’équipedésirée est affichée, ap-puyez de façon prolongéesur MULTI-CONTROL.
Avant de commencer
Fr 23
SectionFran
çais
01

Commandes
Suppression en mé-moire de l’équipe sélec-tionnée (dans le menudes fonctions)
Dans lemode sélectiond’une équipe, et si l’équipesélectionnée est affichée,appuyez de façon prolon-gée sur MULTI-CONTROL.
Affichage d’informa-tions sur les matchs(dans le menu de fonc-tions)
Sélectionnez GAME INFOet appuyez sur MULTI-CONTROL.
Remarque
! Avec certains appareils, un appui prolongésur SAT MODE peut changer directement lemode de sélection du canal.
Appareils centraux du groupe 4
Commandes
Sélection de la source Appuyez sur SOURCE poursélectionner une source ex-térieure pour SIRIUS.
Sélection du canal Appuyez sur c ou d.
Changement degamme
Appuyez sur BAND.
Mémorisation des ca-naux présélectionnés
Appuyez de façon prolon-gée sur une des touches 1à 6.
Rappel des canaux pré-sélectionnés
Appuyez sur une des tou-ches 1 à 6.
Rappel séquentiel descanaux présélectionnés(en mode Sélection deNuméro de Canal)
Appuyez sur a ou b.
Sélection d’une catégo-rie (en mode Sélectionde Catégorie de Canal)
Appuyez sur a ou b.
Afficher le menu defonctions
Appuyez sur FUNCTION.
Changement des infor-mations affichées surle canal (FUNC1)
Appuyez sur a ou b.
Commandes
Changer le mode de sé-lection du canal(FUNC2)
Appuyez sur a ou b.
Mise en service/horsservice de la fonctionalerte match (FUNC3)
Appuyez de façon continuesur a ou b.
Sélection d’une ligue(FUNC3)
Dans lemode sélectiond’une ligue, appuyez sur aou b.
Basculer sur l’affichagedu mode sélectiond’une équipe (FUNC3)
Dans lemode sélectiond’une ligue, et si la ligue dé-sirée est affichée, appuyezde façon prolongée sur aou b.
Sélection d’une équipe(FUNC3)
Dans lemode sélectiond’une équipe, appuyez sura ou b.
Mise en mémoire del’équipe sélectionnée(FUNC3)
Dans lemode sélectiond’une équipe, et si l’équipedésirée est affichée, ap-puyez de façon prolongéesur a ou b.
Suppression de la mé-moire de la sélectiond’une équipe (FUNC3)
Dans lemode sélectiond’une équipe, et si l’équipesélectionnée est affichée,appuyez de façon prolon-gée sur a ou b.
Affichage des informa-tions sur les matchs(FUNC4)
Appuyez sur a ou b.
Remarques
! Pour avoir des informations détaillées surFUNCTION 3, reportez-vous à la page 28, Ins-tructions détaillées sur la sélection d’uneéquipe.
! Avec certains appareils centraux,AUTO/MANUAL (A/M) peut s’afficher dansle menu des fonctions, mais cette fonctionn’est pas disponible avec la source SIRIUS.
Avant de commencer
Fr24
Section
01

Appareils centraux du groupe 5
Commandes
Sélection de la source Appuyez sur SOURCE poursélectionner une source ex-térieure pour SIRIUS.
Sélection du canal Poussez MULTI-CONTROLvers la gauche ou vers ladroite.
Changement degamme
Appuyez sur BAND.
Mémorisation des ca-naux présélectionnés
Appuyez de façon prolon-gée sur une des touches 1à 6.
Rappel des canaux pré-sélectionnés
Appuyez sur une des tou-ches 1 à 6.
Rappel séquentiel descanaux présélectionnés(en mode Sélection deNuméro de Canal)
Poussez MULTI-CONTROLvers le haut ou vers le bas.
Sélection d’une catégo-rie (en mode Sélectionde Catégorie de Canal)
Poussez MULTI-CONTROLvers le haut ou vers le bas.
Afficher le menu defonctions
Utilisez MULTI-CONTROL.
Changement des infor-mations affichées surle canal (FUNC1)
Appuyez sur MULTI-CONTROL.
Changer le mode de sé-lection du canal(FUNC2)
Appuyez sur MULTI-CONTROL.
Mise en service/horsservice de la fonctionalerte match (FUNC3)
Appuyez sur MULTI-CONTROL de façon prolon-gée.
Sélection d’une ligue(FUNC3)
Dans lemode sélectiond’une ligue, poussezMULTI-CONTROL vers lehaut ou vers le bas.
Basculer sur l’affichagedu mode sélectiond’une équipe (FUNC3)
Dans lemode sélectiond’une ligue, et si la ligue dé-sirée est affichée, appuyezde façon prolongée surMULTI-CONTROL.
Commandes
Sélection d’une équipe(FUNC3)
Dans lemode sélectiond’une équipe, poussezMULTI-CONTROL vers lehaut ou vers le bas.
Mise en mémoire del’équipe sélectionnée(FUNC3)
Dans lemode sélectiond’une équipe, et si l’équipedésirée est affichée, ap-puyez de façon prolongéesur MULTI-CONTROL.
Suppression de la mé-moire de la sélectiond’une équipe (FUNC3)
Dans lemode sélectiond’une équipe, et si l’équipesélectionnée est affichée,appuyez de façon prolon-gée sur MULTI-CONTROL.
Affichage des informa-tions sur les matchs(FUNC4)
Poussez MULTI-CONTROLvers le haut ou vers le bas.
Remarques
! Pour avoir des informations détaillées surFUNCTION 3, reportez-vous à la page 28, Ins-tructions détaillées sur la sélection d’uneéquipe.
! Avec certains appareils centraux,AUTO/MANUAL (A/M) peut s’afficher dansle menu des fonctions, mais cette fonctionn’est pas disponible avec la source SIRIUS.
Appareils centraux du groupe 6
Commandes
Sélection de la source Appuyez sur SOURCE poursélectionner une source ex-térieure pour SIRIUS.
Sélection du canal Touchez c ou d.
Changement degamme
Appuyez sur BAND.
Mémorisation des ca-naux présélectionnés
Touchez de façon prolon-gée une des touches 1KEYà 6KEY.
Rappel des canaux pré-sélectionnés
Touchez une des touches1KEY à 6KEY.
Avant de commencer
Fr 25
SectionFran
çais
01
Commandes
Rappel séquentiel descanaux présélectionnés(en mode Sélection deNuméro de Canal)
Touchez a ou b.
Sélection d’une catégo-rie (en mode Sélectionde Catégorie de Canal)
Touchez a ou b.
Afficher le menu defonctions
Touchez A.MENU puisFUNCTION (FUNC).
Changement des infor-mations affichées surle canal (FUNC1)
Touchez .
Changer le mode de sé-lection du canal(FUNC2)
Touchez .
Mise en service/horsservice de la fonctionalerte match (FUNC3)
Touchez de façon pro-longée.
Sélection d’une ligue(FUNC3)
Dans lemode sélectiond’une ligue, touchez .
Basculer sur l’affichagedu mode sélectiond’une équipe (FUNC3)
Dans lemode sélectiond’une ligue, et si la ligue dé-sirée est affichée, touchez
de façon prolongée.
Sélection d’une équipe(FUNC3)
Dans lemode sélectiond’une équipe, touchez .
Mise en mémoire del’équipe sélectionnée(FUNC3)
Dans lemode sélectiond’une équipe, et si l’équipedésirée est affichée, tou-chez de façon prolon-gée.
Suppression de la mé-moire de la sélectiond’une équipe (FUNC3)
Dans lemode sélectiond’une équipe, et si l’équipesélectionnée est affichée,touchez de façon pro-longée.
Affichage des informa-tions sur les matchs(FUNC4)
Touchez .
Remarques
! Pour avoir des informations détaillées surFUNCTION 3, reportez-vous à la page 28, Ins-
tructions détaillées sur la sélection d’uneéquipe.
! Avec certains appareils centraux,AUTO/MANUAL (A/M) peut s’afficher dansle menu des fonctions, mais cette fonctionn’est pas disponible avec la source SIRIUS.
Appareils centraux du groupe 7
Commandes
Sélection de la source Touchez l’icône de lasource et touchez unesource extérieure pour SI-RIUS.
Sélection du canal Touchez c ou d.
Changement degamme
Touchez BAND.
Mémorisation des ca-naux présélectionnés
Touchez A.MENU et1-6KEY. Puis touchez unedes touches 1KEY à 6KEY.
Rappel des canaux pré-sélectionnés
Touchez une des touches 1à 6.
Rappel séquentiel descanaux présélectionnés(en mode Sélection deNuméro de Canal)
Touchez a ou b.
Sélection d’une catégo-rie (en mode Sélectionde Catégorie de Canal)
Touchez a ou b.
Afficher le menu defonctions
Touchez A.MENU puisFUNCTION.
Changement des infor-mations affichées surle canal (FUNCTION 1)
Touchez SEND.
Changer le mode de sé-lection du canal(FUNCTION 2)
Touchez SEND.
Mise en service/horsservice de la fonctionalerte match (FUNC-TION 3)
Touchez SEND de façonprolongée.
Sélection d’une ligue(FUNCTION 3)
Dans lemode sélectiond’une ligue, touchez SEND.
Avant de commencer
Fr26
Section
01
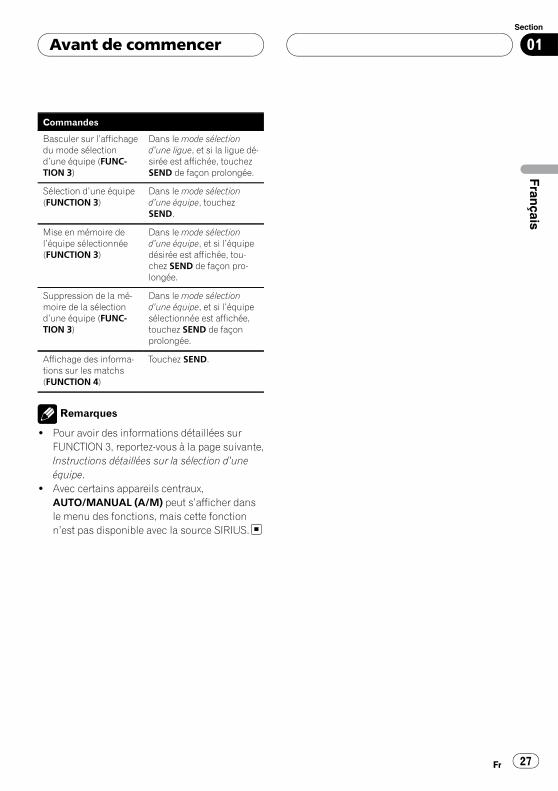
Commandes
Basculer sur l’affichagedu mode sélectiond’une équipe (FUNC-TION 3)
Dans lemode sélectiond’une ligue, et si la ligue dé-sirée est affichée, touchezSEND de façon prolongée.
Sélection d’une équipe(FUNCTION 3)
Dans lemode sélectiond’une équipe, touchezSEND.
Mise en mémoire del’équipe sélectionnée(FUNCTION 3)
Dans lemode sélectiond’une équipe, et si l’équipedésirée est affichée, tou-chez SEND de façon pro-longée.
Suppression de la mé-moire de la sélectiond’une équipe (FUNC-TION 3)
Dans lemode sélectiond’une équipe, et si l’équipesélectionnée est affichée,touchez SEND de façonprolongée.
Affichage des informa-tions sur les matchs(FUNCTION 4)
Touchez SEND.
Remarques
! Pour avoir des informations détaillées surFUNCTION 3, reportez-vous à la page suivante,Instructions détaillées sur la sélection d’uneéquipe.
! Avec certains appareils centraux,AUTO/MANUAL (A/M) peut s’afficher dansle menu des fonctions, mais cette fonctionn’est pas disponible avec la source SIRIUS.
Avant de commencer
Fr 27
SectionFran
çais
01

Instructions détaillées sur la sélection d’une équipeLe tableau ci-dessous montre le menu Paramétrage d’une équipe. Sélectionne les équipes pour la fonctionAlerte Match en se référant à ce tableau et au tableau de compatibilité des fonctions pour votre appareilcentral.! “La touche” à laquelle se réfère le diagramme suivant dépend de l’appareil central.
! * Avec Effacer tout sélectionné, maintenir “la touche” enfoncée supprime toutes les sélectionsd’équipe.
! Appuyez sur BAND pour revenir à l’affichage normal.
Avant de commencer
Fr28
Section
01
Description de l’appareil
Appareils centraux du groupe 1(par exemple DEH-P6000UB)1 Touche SRC/OFF
L’appareil central est mis en service en sé-lectionnant une source. Appuyez sur cettetouche pour parcourir les différentes sour-ces disponibles.
2 Touche DISP/SCROLLAppuyez sur cette touche pour choisir un af-fichage différent.
3 MULTI-CONTROLDéplacez pour effectuer une sélection decanal, un rappel de canal et une sélectionde catégorie. Utilisé aussi pour contrôler lesfonctions.Tournez ce bouton pour augmenter ou dimi-nuer le niveau sonore.
4 Touche S.Rtrv/SAT MODESi le syntoniseur XM ou SIRIUS est sélec-tionné comme source, appuyez sur cettetouche pour changer le mode de sélectiondu canal.
Si le syntoniseur SIRIUS est sélectionnécomme source, appuyez sur cette touche etmaintenez la pression pour exécuter lemode relecture instantanée.
5 Touche LISTAppuyez sur cette touche pour afficher laliste de présélection.
6 Touche BAND/ESCAppuyez pour sélectionner une des troisgammes et annuler le mode commande desfonctions.
TélécommandeLe fonctionnement est le même qu’avec l’utili-sation des touches de l’appareil central.
7 Touches VOLUMEAppuyez sur ces touches pour augmenterou diminuer le niveau sonore.
8 Touche FUNCTIONAppuyez sur cette touche pour choisir desfonctions.
1 32 4
6 5
8
2
c
1
7 6
ba
9
Syntoniseur SIRIUS
Fr 29
SectionFran
çais
02

9 Sélecteur multidirectionnelDéplacez pour effectuer une sélection decanal, un rappel de canal et une sélectionde catégorie. Utilisé aussi pour contrôler lesfonctions.Ses fonctions sont les mêmes que celles deMULTI-CONTROL sauf pour la commandedu volume.
a Touche DIRECTAppuyez sur cette touche pour choisir direc-tement le canal désiré.
b Touche CLEARAppuyez sur cette touche pour annuler leschiffres entrés quand vous utilisez les tou-ches 0 à 9.
c Touches 0 à 9Appuyez sur une de ces touches pour choi-sir le canal ou la présélection que vous dési-rez. Les touches 1 à 6 permettentd’effectuer la présélection.
Sélection de la source SIRIUS% Appuyez sur SRC pour choisir SIRIUS.
Ecoute de SIRIUS
1 2 3
5
4
1 Indicateur de gamme SIRIUS2 Indicateur du numéro de canal SIRIUS
3 Indicateur du numéro SIRIUS présélectionné4 Indicateur de réglage de sélection du canal
SIRIUSIndique quel réglage de sélection des canauxa été sélectionné. CH est affiché quandChannel number est sélectionné, et CAT estaffiché quand Category est sélectionné.I.R s’affiche en mode relecture instantanée.
5 Nom du canal SIRIUSAffiche le nom de canal du canal émis.
% Sélection d’une gamme SIRIUS.Appuyez sur BAND.# La gamme peut être sélectionnée parmi SR-1,SR-2 ou SR-3.
% Sélectionnez un canal.Poussez MULTI-CONTROL vers la gauche ouvers la droite.# Si vous poussez de façon prolongéeMULTI-CONTROL vers la gauche ou vers ladroite, vous pouvez augmenter ou diminuer le nu-méro de canal de façon continue.# Vous pouvez aussi effectuer un accord dansune catégorie de canaux désirée. (Reportez-vousà la page 32, Sélection d’un canal dans la catégoriede canal.)
Remarques
! Un délai de quelques secondes peut s’écouleravant que vous entendiez quelque chose pen-dant que ce système acquiert et traite le si-gnal satellite.
! Quand vous changez de canal, le nom ducanal est affiché, suivi du nom de la catégo-rie.
Sélection directe d’un canal SIRIUSQuand vous utilisez le boîtier de télécom-mande, vous pouvez sélectionner le canal SI-RIUS directement en saisissant le numéro decanal désiré.
Syntoniseur SIRIUS
Fr30
Section
02

1 Appuyez sur DIRECT.L’écran de saisie du numéro de canals’affiche.
2 Appuyez sur les touches 0 à 9 pour sai-sir le numéro de canal désiré.# Vous pouvez annuler le numéro saisi en ap-puyant sur CLEAR.
3 Appuyez sur DIRECT.Le canal SIRIUS ayant le numéro saisi estsélectionné.# Après être passé en mode saisie de numéro,ce mode est automatiquement annulé si vousn’effectuez aucune opération dans les huit secon-des environ.
Changement de l’affichage SIRIUSDiverses informations incluant le numéro ducanal, son nom et sa catégorie, le titre de laplage musicale/du programme, l’interprète/lespectacle et le compositeur, peuvent être affi-chés pour le canal sélectionné.
% Appuyez sur DISP pour changer d’affi-chage SIRIUS.Chaque pression sur DISP modifie l’affichageSIRIUS dans l’ordre suivant :Temps de lecture—Numéro du canal—Nomdu canal—Nom de la catégorie—Nom de l’in-terprète—Titre de la plage musicale/du pro-gramme—Nom du compositeur# Quand vous changez d’affichage, le texte dé-file automatiquement.# Le temps de lecture s’affiche en mode relec-ture instantanée. Reportez-vous à la page 34, Uti-lisation de la fonction Relecture instantanée.# L’affichage du temps de lecture indique letemps de façon décroissante par rapport à l’émis-sion en direct. Le temps de lecture s’affiche enchiffre négatif.
Mise en mémoire et rappel descanauxVous pouvez facilement mettre en mémoirejusqu’à six stations d’émission pour les rappe-ler ultérieurement.! Cette fonction n’est accessible qu’à partir
de la télécommande.! Vous pouvez mettre en mémoire six sta-
tions pour chaque gamme.! Les canaux sont mis en mémoire et rappe-
lés sur la base de la station d’émission.Cela signifie que si la station d’émissionque vous avez mise en mémoire a été affec-tée à un canal différent par SIRIUS, vouspouvez toujours rappeler la même stationd’émission (bien qu’un numéro de canaldifférent puisse apparaître dans l’affi-chage).
% Lorsque se présente une station quevous désirez mettre en mémoire, mainte-nez la pression sur une des touches de pré-sélection 1 à 6 jusqu’à ce que le numéro dela présélection SIRIUS cesse de clignoter.Le nombre sur lequel vous avez appuyé cli-gnote sur l’indicateur de numéro de présélec-tion SIRIUS puis reste allumé. La stationsélectionnée a été mise en mémoire.Lorsque vous appuyez à nouveau sur cettemême touche de présélection, la station enmémoire est rappelée.# Vous pouvez aussi rappeler les stations misesen mémoire dans les numéros de présélection enpoussantMULTI-CONTROL vers le haut ou versle bas.
Remarque
Si un canal ne peut pas être rappelé à partir de lamémoire, le syntoniseur reçoit automatiquementle canal 184.
Syntoniseur SIRIUS
Fr 31
SectionFran
çais
02

Affichage de l’ID de la radioSi vous sélectionnez CH 000, le code ID estaffiché.
% Poussez MULTI-CONTROL vers la gau-che ou vers la droite pour sélectionnerCH 000.
Remarque
Pour sélectionner CH 000, positionnez le réglagede sélection des canaux sur Channel number.Pour des informations sur le réglage de sélectiondes canaux, reportez-vous à cette page, Choix dumode de sélection du canal SIRIUS.
Introduction auxopérations avancées1 Appuyez sur MULTI-CONTROL pour affi-cher le menu principal.
2 Utilisez MULTI-CONTROL pour choisirFUNCTION.Le menu de sélection des fonctions s’affiche.Tournez pour changer l’option de menu. Ap-puyez pour sélectionner.
3 Tourner MULTI-CONTROL pour sélec-tionner la fonction.Channel mode (réglage du mode de sélectiondu canal)—Game alert (paramétrage de l’a-lerte match)—Team Setting (paramétrage del’équipe)—Game Info (informations sur lesmatchs)—Pause (pause)
Remarques
! Vous pouvez aussi effectuer cette opérationen appuyant sur FUNCTION de la télé-commande.
! Appuyez sur BAND pour revenir à l’affichageordinaire.
! Si vous n’utilisez pas les fonctions pendantenviron 30 secondes, l’écran revient automati-quement à l’affichage ordinaire.
! En mode relecture instantanée, vous pouvezsélectionner Pause (pause). Reportez-vous àla page 34, Utilisation de la fonction Relectureinstantanée.
Choix du mode de sélectiondu canal SIRIUSVous disposez de deux méthodes pour sélec-tionner un canal : par numéro et par catégorie.Quand vous sélectionnez par numéro, des ca-naux appartenant à n’importe quelle catégoriepeuvent être sélectionnés. Sélectionnez parcatégorie pour restreindre votre recherche auxseuls canaux d’une catégorie particulière.
% Appuyez de façon répétée surSAT MODE pour choisir le réglage de sélec-tion du canal désiré.Channel number (réglage de sélection parnuméro de canal)—Category (réglage de sé-lection par catégorie de canaux)
Remarque
Vous pouvez aussi effectuer cette opération dansle menu qui s’affiche en utilisantMULTI-CONTROL.
Sélection d’un canal dans lacatégorie de canalLes canaux sont organisés en diverses catégo-ries de programme, par exemple Rock, Clas-sique, Jazz. Vous pouvez spécifier les canauxen sélectionnant la catégorie désirée.
Syntoniseur SIRIUS
Fr32
Section
02

1 Sélectionnez les réglages de sélectiondes canaux pour Category.Reportez-vous à la page précédente, Choix dumode de sélection du canal SIRIUS.
2 Poussez MULTI-CONTROL vers le hautou vers le bas pour sélectionner la catégo-rie de canal désirée.Une fois que vous avez sélectionné une caté-gorie de canaux, le syntoniseur recherche lescanaux appartenant à cette catégorie. Pen-dant la recherche, la catégorie de canaux nechange pas immédiatement même si vouspoussez MULTI-CONTROL. Pour changer suc-cessivement de catégorie de canaux, conti-nuez à pousser MULTI-CONTROL.
3 Poussez MULTI-CONTROL vers la gau-che ou vers la droite pour sélectionner lecanal désiré dans la catégorie de canalsélectionnée.Le numéro de canal augmente ou diminuedans la catégorie de canaux sélectionnée.Les canaux qui ne peuvent pas être sélection-nés actuellement sont sautés, et le canal sui-vant dans cette catégorie de canaux estsélectionné.
Remarque
Si vous sélectionnez un canal d’une autre catégo-rie par un rappel de canal, etc., pendant les éta-pes 2 et 3, la catégorie sélectionnée à l’étape 2reste en mémoire. Si vous poussezMULTI-CONTROL vers la gauche ou vers ladroite, le numéro de canal augmente ou diminuedans la catégorie sélectionnée dans l’étape 2quelle que soit la catégorie du canal pré-sélectionné.
Utilisation de la fonctionAlerte MatchCe système peut vous alerter quand desmatchs auxquels participent vos équipes favo-rites sont sur le point de démarrer. Pour utili-ser cette fonction vous devez définir à l’avanceune alerte match pour les équipes.
Sélection des équipes pourl’Alerte Match1 Utilisez MULTI-CONTROL pour sélec-tionner Team Setting dans le menu desfonctions.Reportez-vous à la page précédente, Introduc-tion aux opérations avancées.
2 Poussez MULTI-CONTROL vers la gau-che ou vers la droite pour sélectionner laligue désirée.Les noms des ligues changent sur l’écran.
3 Poussez MULTI-CONTROL vers le hautou vers le bas pour sélectionner une équipedésirée.Les équipes de la catégorie sélectionnée chan-gent sur l’écran.
4 Utilisez MULTI-CONTROL pour enregis-trer l’équipe sélectionnée en mémoire.La fonction alerte match commencera surcette équipe.# Pour désactiver l’Alerte Match sur l’équipe sé-lectionnée, appuyez à nouveau surMULTI-CONTROL.# Quand vous avez déjà sélectionné 12 équipes,FULL s’affiche et aucune sélection d’équipe addi-tionnelle n’est possible. Dans ce cas, supprimezd’abord la sélection d’équipe et réessayez.
5 Répétez ces étapes pour sélectionnerd’autres équipes.Vous pouvez sélectionner jusqu’à 12 équipes.
Syntoniseur SIRIUS
Fr 33
SectionFran
çais
02
Mise en service ou hors servicede l’Alerte MatchAprès avoir effectué les sélections d’équipes,vous devez mettre en service la fonction AlerteMatch.! En réglage par défaut, la fonction Alerte
Match est en service.
1 Utilisez MULTI-CONTROL pour sélec-tionner Game alert dans le menu desfonctions.Reportez-vous à la page 32, Introduction auxopérations avancées.
2 Appuyez sur MULTI-CONTROL pour ac-tiver l’Alerte Match.La fonction Alerte Match est maintenant enservice.# Appuyez à nouveau sur MULTI-CONTROLpour mettre la fonction Alerte Match hors service.
Quand le match de l’équipesélectionnée commenceQuand un match de l’équipe sélectionnée estsur le point de commencer (ou est en cours)sur une autre station, une alerte de matchGame alert info est affichée. Appuyez surMULTI-CONTROL de façon prolongée pourbasculer sur cette station, et vous pouvezécouter le match.! Si vous n’utilisez pas la fonction dans un
délai d’environ 10 secondes, l’écran revientà l’affichage précédent.
Affichage des informations surles matchsSi des matchs de vos équipes sélectionnéessont en cours, vous pouvez afficher des infor-mations sur ces matchs et vous accorder surle canal qui les diffuse.
Vous pouvez afficher les informations relativesaux matchs tout en profitant du son de la sta-tion sur laquelle vous êtes accordé. Vous pou-vez aussi passer sur le canal qui diffuse lesmatchs quand vous le souhaitez.
1 Utilisez MULTI-CONTROL pour sélec-tionner Game Info dans le menu desfonctions.Les informations sur le match de votre équipesélectionnée sont affichées.Reportez-vous à la page 32, Introduction auxopérations avancées.
2 Poussez MULTI-CONTROL vers le hautou vers le bas pour sélectionner un match.Le match est affiché, suivi d’informations plusdétaillées sur ce match.
! Le score du match sera mis à jour auto-matiquement.
3 Appuyez sur MULTI-CONTROL pour pas-ser sur cette station et écouter le match.
Remarques
! Si vous n’avez effectué aucune sélection d’é-quipes, NOT SET s’affiche.
! Quand aucun match impliquant vos équipesfavorites n’est en cours, NO GAME estaffiché.
Utilisation de la fonctionRelecture instantanéeLes fonctions suivantes peuvent être utiliséesen mode relecture instantanée.! Pour utiliser cette fonction, un appareil
central Pioneer compatible avec la fonctionde relecture instantanée est requis.
! Pour utiliser cette fonction, l’unité plug-and-play SIRIUS intégrant la fonction de re-lecture instantanée est requise.
Syntoniseur SIRIUS
Fr34
Section
02
% Exécution du mode relecture ins-tantanéeLorsque le syntoniseur SIRIUS est choisicomme source, appuyez de façon prolongéesur SAT MODE.# Le syntoniseur quitte le mode relecture instan-tanée dans les conditions suivantes.
— Si vous appuyez sur BAND— Lorsqu’une autre source est sélectionnée
% Sélection d’une plagePoussez MULTI-CONTROL vers la gauche ouvers la droite.
% Avance ou retour rapidePoussez et maintenez MULTI-CONTROL versla gauche ou vers la droite.
Pause de la lectureVous ne pouvez utiliser cette fonction qu’enmode relecture instantanée.
1 Utilisez MULTI-CONTROL pour sélec-tionner Pause dans le menu des fonctions.Reportez-vous à la page 32, Introduction auxopérations avancées.
2 Appuyez sur MULTI-CONTROL pour ac-tiver la pause.La lecture de la plage en cours se met enpause.# Appuyez à nouveau sur MULTI-CONTROLpour mettre la pause hors service.
Syntoniseur SIRIUS
Fr 35
SectionFran
çais
02

Connexion des appareils
Bleu Noir
Cet appareil
Appareil central (vendu séparément)
Lecteur de CD à chargeur (vendu séparément)
Vers l’entrée IP-BUS (bleu)
Câble IP-BUS
Câble IP-BUS (fourni)
1.5 mFusible (2 A) Jaune
Connectez à la borne d’alimentation 12 V permanente.
Noir (masse du châssis)Connectez sur un endroit métallique propre, non recouvert de peinture.
“Syntoniseur universel SiriusConnect” ou “Radio SIRIUS Dock and Play avec un kit pour véhicule SiriusConnect” (vendu séparément)
Câble SiriusConnect (vendu séparément)
Installation
Fr36
Section
03

Connexions
Important
! L’utilisation de cet appareil dans des condi-tions autres que les conditions suivantespourrait provoquer un incendie ou un mauvaisfonctionnement.— Véhicules avec une batterie 12 volts et une
mise à la masse du négatif.! Pour éviter un court-circuit, une surchauffe ou
un dysfonctionnement, assurez-vous de res-pecter les instructions suivantes.— Déconnectez la borne négative de la batte-
rie avant l’installation.— Fixez le câblage avec des serre-fils ou de la
bande adhésive. Pour protéger les câbles,enroulez-les de bande adhésive là où ilssont en contact avec des parties métalli-ques.
— Placez les câbles à l’écart de toutes lesparties mobiles, telles que le levier de vi-tesse et les rails des sièges.
— Placez les câbles à l’écart de tous les en-droits chauds, par exemple les sorties dechauffage.
— Ne faites pas passer le câble jaune à tra-vers un trou dans le compartiment moteurpour le connecter à la batterie.
— Ne raccourcissez pas les câbles.— Ne coupez jamais l’isolation du câble d’ali-
mentation de cet appareil pour partagerl’alimentation avec d’autres appareils. Lacapacité en courant du câble est limitée.
— Utilisez un fusible correspondant aux ca-ractéristiques spécifiées.
! Les connecteurs IP-BUS utilisent un codageen couleurs. Assurez-vous de connecter en-semble des connecteurs de la mêmecouleur.
Installation de l’appareil
Important
! Vérifiez toutes les connexions et tous les systè-mes avant l’installation finale.
! N’utilisez pas de pièces détachées non autori-sées. L’utilisation de pièces non autoriséespeut provoquer des dysfonctionnements.
! Consultez votre revendeur si l’installation né-cessite le perçage de trous ou d’autres modifi-cations du véhicule.
! N’installez pas cet appareil là où :— il peut interférer avec l’utilisation du véhi-
cule.— il peut blesser un passager en cas d’arrêt
soudain du véhicule.! Lors du montage de cet appareil, assurez-vous
qu’aucun fil n’est coincé entre l’appareil et lesparties métalliques ou les équipements envi-ronnants.
! Ne montez pas cet appareil dans un endroitsitué près d’un orifice de chauffage, où il se-rait affecté par la chaleur, ou près des portes,où il pourrait être mouillé par la pluie.
! Avant de percer un trou de montage, vérifieztoujours derrière l’emplacement où vous vou-lez percer le trou. Ne percez pas de trou dansle conduit d’essence, le conduit de frein, uncâble électrique ou d’autres pièces importan-tes.
! Si l’appareil est installé dans le compartimentpassager, fixez-le solidement de façon qu’il nese détache pas quand le véhicule est en mou-vement, ce qui risquerait de provoquer desblessures ou un accident.
! Si l’appareil est installé sous un siège avant,assurez-vous qu’il ne gêne pas le déplace-ment du siège. Faites passer tous les fils et lescordons soigneusement autour du méca-nisme de glissière de façon qu’ils ne soientpas coincés dans le mécanisme ou pincés parcelui-ci, et ne provoquent pas de court-circuit.
Installation
Fr 37
SectionFran
çais
03

Installation avec des fixationsVelcroEssuyez parfaitement la surface avant deposer les fixations Velcro.! Si la partie crochets des fixations Velcro ad-
hère directement au tapis de la voiture,vous pouvez installer cet appareil sans utili-ser la partie boucles des fixations Velcro.
% Montez cet appareil en utilisant les fi-xations Velcro.
Cet appareil
Partie crochets
Partie boucles
Tapis ou châssis de la voiture
Installation
Fr38
Section
03
Caractéristiques techniquesGénéralitésTension d’alimentation ......... 14,4 V CC (10,8 V à 15,1 V
acceptable)Mise à la masse ....................... Pôle négatifConsommation max. en courant
..................................................... 2,0 ADimensions (L x H x P) ......... 127 × 35 × 52 mmPoids .............................................. 185 g
Remarques
! Les caractéristiques et la présentation peu-vent être modifiées sans avis préalable à find’amélioration.
! “SIRIUS”, “SiriusConnect” et le logo SIRIUS re-présentant un chien et les marques associéessont des marques commerciales de SIRIUSSatellite Radio Inc. Tous droits réservés.
Informationscomplémentaires
Fr 39
AnnexeFran
çais

PIONEER CORPORATION4-1, MEGURO 1-CHOME, MEGURO-KUTOKYO 153-8654, JAPAN
PIONEER ELECTRONICS (USA) INC.P.O. Box 1540, Long Beach, California 90801-1540, U.S.A.TEL: (800) 421-1404
PIONEER EUROPE NVHaven 1087, Keetberglaan 1, B-9120 Melsele, BelgiumTEL: (0) 3/570.05.11
PIONEER ELECTRONICS ASIACENTRE PTE. LTD.253 Alexandra Road, #04-01, Singapore 159936TEL: 65-6472-7555
PIONEER ELECTRONICS AUSTRALIA PTY. LTD.178-184 Boundary Road, Braeside, Victoria 3195, AustraliaTEL: (03) 9586-6300
PIONEER ELECTRONICS OF CANADA, INC.300 Allstate Parkway, Markham, Ontario L3R 0P2, CanadaTEL: 1-877-283-5901TEL: 905-479-4411
PIONEER ELECTRONICS DE MEXICO, S.A. de C.V.Blvd.Manuel Avila Camacho 138 10 pisoCol.Lomas de Chapultepec, Mexico, D.F. 11000TEL: 55-9178-4270
先鋒股份有限公司總公司 : 台北市中山北路二段44號13樓電話 : (02) 2521-3588
先鋒電子(香港)有限公司香港九龍尖沙咀海港城世界商業中心9樓901-6室電話 : (0852) 2848-6488
Published by Pioneer Corporation.Copyright© 2007 by Pioneer Corporation.All rights reserved.
Publié par Pioneer Corporation. Copyright© 2007 par Pioneer Corporation. Tousdroits réservés.
Printed in ChinaImprimé en Chine
<49.UTAPN.001> UC<KMMZX> <07K00000>