Embed Size (px)
Citation preview

PRINTED IN U.S.A.
SAVE THIS MANUAL Use plastic bag and tie provided, to hang manuals nearbythe softener for future reference.
Solid State Water Softenerz Warranty
z Start Up / Setting Timer
z How It Works
z Care Of / Troubleshooting
z Specifications
z Repair Parts
Sears, Roebuck and Co., Hoffman Estates, IL 60179 USA
OWNER’SMANUAL
MODEL NO.625.348321
Caution:Read and FollowAll Safety Rules andOperating InstructionsBefore First Use ofThis Product.
If you have questions wheninstalling, operating or main-taining your softener, andwhen setting the timer, callthis toll ---free number...
1---800---426---9345
WARRANTY
2
SEARS RESIDENTIAL WATER SOFTENERFULL ONE YEAR WARRANTY ON WATER SOFTENER
For one year from the date of purchase, when this water softener is installed and maintainedin accordance with our instructions, Sears will repair, free of charge, defects in material orworkmanship in this water softener.
FULL TEN YEAR WARRANTY AGAINST LEAKSFor ten years from the date of purchase, Sears will furnish and install a new current modelwater softener tank or salt storage drum, free of charge, if either the tank or drum developa leak.TO OBTAIN WARRANTY SERVICE, SIMPLY CONTACT THE NEAREST SEARS SERVICECENTER THROUGHOUT THE UNITED STATES. This warranty applies only while this prod-uct is in use in the United States.This warranty gives you specific legal rights, and you may have other rights which vary fromstate to state.
Sears, Roebuck and Co., D/817 WA, Hoffman Estates, IL 60179
If you want your water softener professionally installed, talk to your Sears Salesman. He will arrangefor a prompt, quality installation by Sears Authorized Installers.
SEARS INSTALLATION POLICYAll installation labor arranged by Sears shall beperformed in a neat, workmanlike manner inaccordance with generally accepted trade prac-tices. Further, all installations shall comply withall local laws, codes, regulations, and ordi-nances. Customer shall also be protected, duringinstallation, by insurance relating to PropertyDamage, Workman’s Compensation and PublicLiability.
SEARS INSTALLATION WARRANTYIn addition to any warranty extended to you onthe Sears merchandise involved, which warran-ty becomes effective the date the merchandise isinstalled, should the workmanship of any Searsarranged installation prove faulty within oneyear, Sears will, upon notice from you, causesuch faults to be corrected at no additional cost toyou.
FACTS AND FIGURES TO KEEP
Fill in the blanks below and keep this book in a safeplace so you always have these facts.
Water Softener Model No.†Serial NumberDate InstalledWater Hardness Grains Per GallonIron Content Parts Per Million*pH Taste And/Or OdorWater Pressure Pounds/Square InchWater Flow Rate Gallons Per Minute
†The model number is on the rating decal, locatedon the rim, under the salt hole cover.

TABLE OF CONTENTS
3
PAGENO.
SECTION 1 SOFTENER START UPA. SAFETY GUIDES 4B. CHECK LIST OF STEP-BY-STEP GUIDES TO INSTALL 5C. PROGRAM THE TIMER 6D. SANITIZING THE WATER SOFTENER 7E. FILL THE STORAGE TANK WITH SALT 8
SECTION 2 HOW YOUR WATER SOFTENER WORKSA. FACE PLATE TIMER FEATURES 9-10B. SOFT WATER SERVICE AND REGENERATION 11-13
SECTION 3 CARE OF YOUR SOFTENERA. SALT: REFILLING STORAGE TANK, SALT BRIDGE 14B. KEEPING THE WATER SOFTENER CLEAN 15C. KEEP THE SOFTENER FROM FREEZING 16D. HELPFUL HINTS CHECKLIST 17
SECTION 4 OTHER THINGS TO KNOWA. HOW TO “FINE-TUNE”YOUR WATER SOFTENER 18-20B. DIMENSIONS/SPECIFICATIONS 21
SECTION 5 SERVICE TECH INFORMATIONA. ELECTRICAL CONNECTIONS 22B. REGENERATION CYCLE TIMES 23C. TROUBLESHOOTING 24-26D. ROTARY VALVE SERVICE 27E. WATER FLOW THROUGH THE SOFTENER VALVE 28-30
SECTION 6 REPAIR PARTS 32-35

WATER SOFTENER START-UPSECTION 1
4
1A. SAFETY GUIDES
Y Read all steps, guides and rules carefully be-fore installing and using your new water softener.Follow all steps exactly to correctly install. Failureto follow them could cause personal injury orproperty damage. Reading this book will also helpyou to get all of the benefits from your water soft-ener.Y Your water softener will remove hardness min-erals and “clear water”iron from water, up to thelimits shown on page 21. It will not remove othertypes of iron, acids, tastes and odors, etc. It willnot purify polluted water or make it safe to drink.Y Protect the softener and piping from freezing.Damage from freezing voids the softener warran-ty. See page 16.
CAUTIONSPLEASE READ AND COMPLY WITH THE FOL-LOWING GUIDES TO PREVENT DAMAGE TOTHE SOFTENER OR OTHER PROPERTY,PERSONAL INJURY, OR POSSIBLE FATALSHOCK.Y THIS SOFTENER WORKS ON 24 VOLTSONLY. BE SURE TO USE THE TRANSFORMERINCLUDED, AND PLUG IT INTO A 120V OUT-LET.Y Unplug the transformer right away if thepower cable should become damaged orfrayed. Make repairs before plugging backinto the power outlet.Y Always unplug the softener from electricalpower before removing outer valve covers.

WATER SOFTENER START-UPSECTION 1
5
1B. CHECK LIST OF ALL STEP-BY-STEP GUIDES TO INSTALL
Refer to the Installation Manual, part no.7159931, for step-by-step guides.
To be sure you have done all the steps to installthe softener, read the following list. Page num-bers referred to are in the Installation Manual.
n Is the house water flow going INTO the soft-ener valve INLET? Trace piping to be sure.See pages 10 and 11.
n Is the plumbing bypass valve (or 3 valves) setfor SERVICE? Bypass valve(s) should alwaysremain in soft water service position. Posi-tion in “bypass” only if needed for softenerrepairs. See page 18.
n Is the valve drain hose connected the rightway, and without sharp bends or kinks thatcould stop or reduce water flow? See page 16.
n Is the softener power cable connected to thetransformer, and is the transformer pluggedinto an inside, 120V-60Hz electrical outlet?See page 20.
n Be sure to restart the water heater. See page20.
Note, for installations in the State of Massachusetts:Plumbing codes of Massachusetts shall be adhered to.Consult with your licensed plumber.
brass3--valve
plastic
BypassValves
WaterHeater
WATER SOFTENER START-UPSECTION 1
6
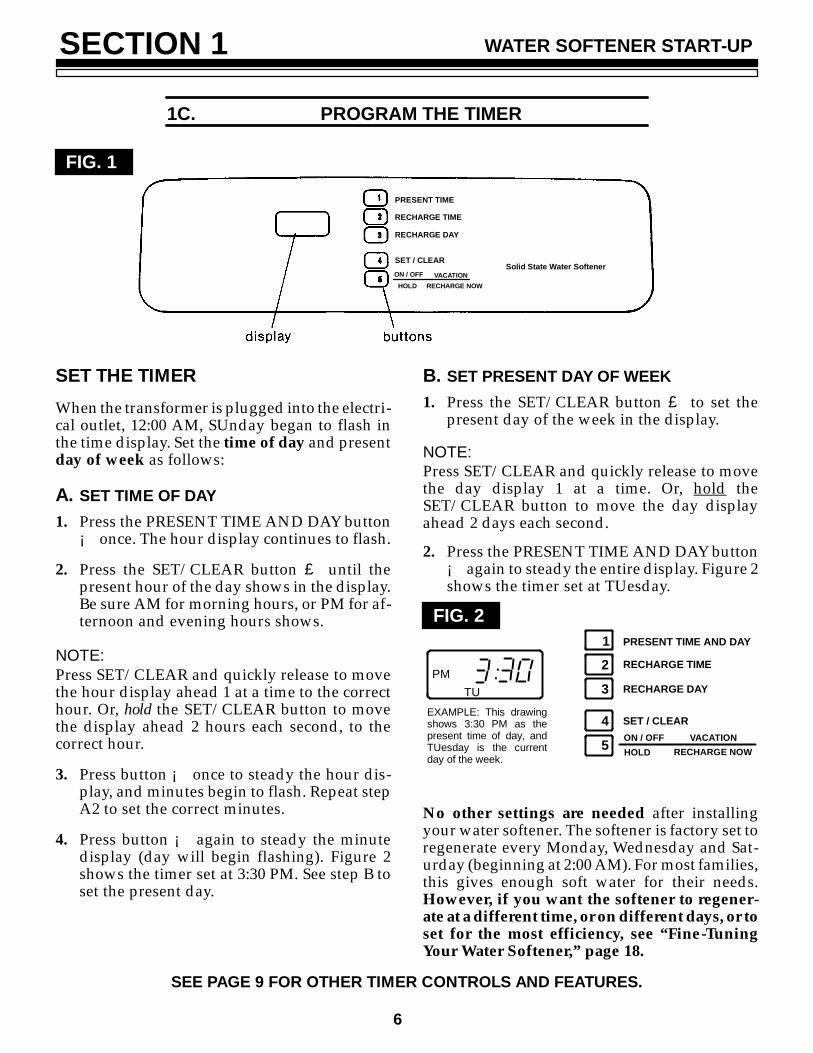
1C. PROGRAM THE TIMER
FIG. 1
PRESENT TIME
RECHARGE TIME
RECHARGE DAY
SET / CLEARON / OFF VACATION
HOLD RECHARGE NOW
Solid State Water Softener
SET THE TIMERWhen the transformer is plugged into the electri-cal outlet, 12:00 AM, SUnday began to flash inthe time display. Set the time of day and presentday of week as follows:
A. SET TIME OF DAY1. Press the PRESENT TIME AND DAY button
¡ once. The hour display continues to flash.
2. Press the SET/CLEAR button £ until thepresent hour of the day shows in the display.Be sure AM for morning hours, or PM for af-ternoon and evening hours shows.
NOTE:Press SET/CLEAR and quickly release to movethe hour display ahead 1 at a time to the correcthour. Or, hold the SET/CLEAR button to movethe display ahead 2 hours each second, to thecorrect hour.
3. Press button ¡ once to steady the hour dis-play, and minutes begin to flash. Repeat stepA2 to set the correct minutes.
4. Press button ¡ again to steady the minutedisplay (day will begin flashing). Figure 2shows the timer set at 3:30 PM. See step B toset the present day.
B. SET PRESENT DAY OF WEEK1. Press the SET/CLEAR button £ to set the
present day of the week in the display.
NOTE:Press SET/CLEAR and quickly release to movethe day display 1 at a time. Or, hold theSET/CLEAR button to move the day displayahead 2 days each second.2. Press the PRESENT TIME AND DAY button
¡ again to steady the entire display. Figure 2shows the timer set at TUesday.
FIG. 2
..TU
PM
EXAMPLE: This drawingshows 3:30 PM as thepresent time of day, andTUesday is the currentday of the week.
ON / OFF VACATIONHOLD RECHARGE NOW
PRESENT TIME AND DAY
RECHARGE TIME
RECHARGE DAY
SET / CLEAR
12
3
4
5
No other settings are needed after installingyour water softener. The softener is factory set toregenerate every Monday, Wednesday and Sat-urday (beginning at 2:00 AM). For most families,this gives enough soft water for their needs.However, if you want the softener to regener-ate at a different time, or on different days, or toset for the most efficiency, see “Fine-TuningYour Water Softener,” page 18.
SEE PAGE 9 FOR OTHER TIMER CONTROLS AND FEATURES.
WATER SOFTENER START-UPSECTION 1
7
1D. SANITIZING THE WATER SOFTENER
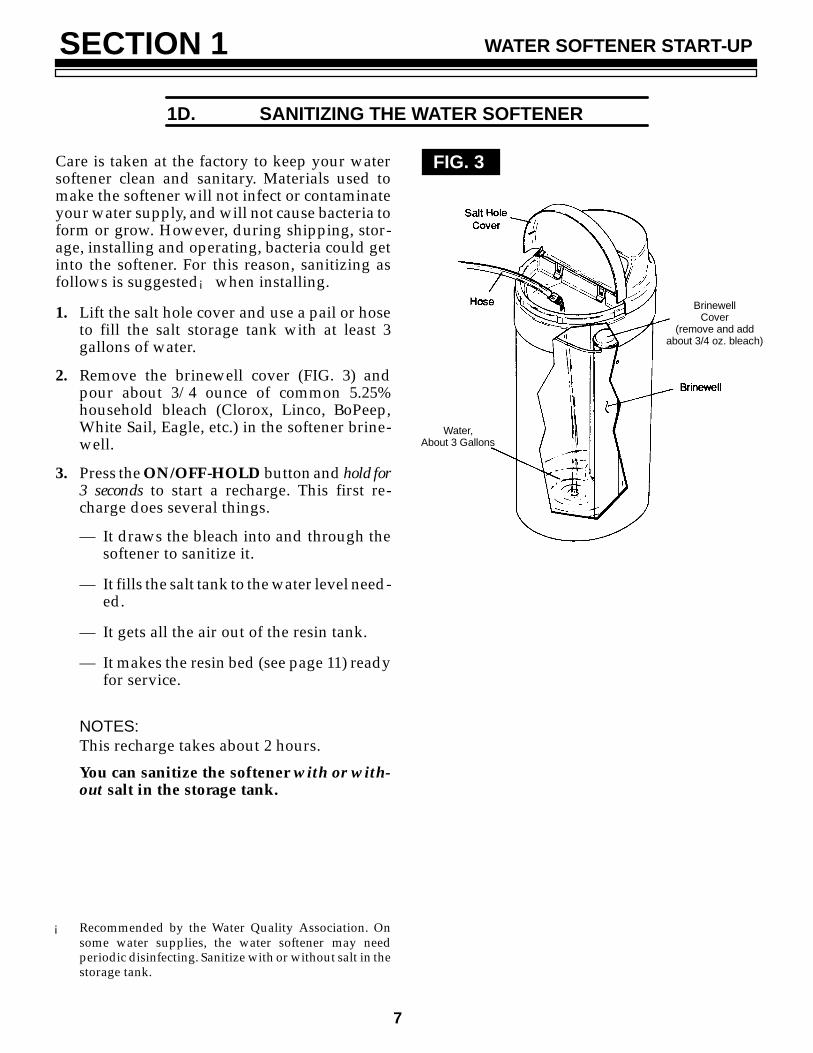
Care is taken at the factory to keep your watersoftener clean and sanitary. Materials used tomake the softener will not infect or contaminateyour water supply, and will not cause bacteria toform or grow. However, during shipping, stor-age, installing and operating, bacteria could getinto the softener. For this reason, sanitizing asfollows is suggested¡ when installing.
1. Lift the salt hole cover and use a pail or hoseto fill the salt storage tank with at least 3gallons of water.
2. Remove the brinewell cover (FIG. 3) andpour about 3/4 ounce of common 5.25%household bleach (Clorox, Linco, BoPeep,White Sail, Eagle, etc.) in the softener brine-well.
3. Press the ON/OFF-HOLD button and hold for3 seconds to start a recharge. This first re-charge does several things.— It draws the bleach into and through the
softener to sanitize it.
— It fills the salt tank to the water level need-ed.
— It gets all the air out of the resin tank.
— It makes the resin bed (see page 11) readyfor service.
NOTES:This recharge takes about 2 hours.You can sanitize the softener with or with-out salt in the storage tank.
¡ Recommended by the Water Quality Association. Onsome water supplies, the water softener may needperiodic disinfecting. Sanitize with or without salt in thestorage tank.
FIG. 3
Water,About 3 Gallons
BrinewellCover
(remove and addabout 3/4 oz. bleach)

WATER SOFTENER START-UPSECTION 1
8
1E. FILL THE STORAGE TANK WITH SALT
Brine (salt dissolved in water) is needed for eachand every regeneration. The water for makingbrine is metered into the salt storage tank by thesoftener. However, you must keep the tank filledwith salt.
Fill the tank with NUGGET or PELLET watersoftener salt. DO NOT use rock salts, as theyhave dirt and sediments that will stop thesoftener from working.
Before filling, be sure the brinewell cover is inplace on the top of the brinewell. Salt storagecapacity is shown on page 21.
NOTES:In humid areas, it is best to fill the storage tankhalf-full, and to refill it more often. Salt bridging(see page 14) occurs more often when conditionsare humid.
WATER SOFTENING SALT WITH IRON RE-MOVING ADDITIVES — Some salts have anadditive to help the softener handle iron in thewater supply. Although this additive may helpto keep the softener resin clean, it may alsorelease corrosive fumes that will weaken andshorten the life of some softener parts.
FIG. 4
SODIUM INFORMATION: Water softeners us-ing sodium chloride for regeneration add so-dium to the water. Persons who are on sodiumrestricted diets should consider the added so-dium as part of their overall sodium intake.
For example, if your water supply is 15 grainshard, you would have to drink 3 quarts ofsoftened water to consume 335 milligrams ofsodium. That is equivalent to eating 2-1/2 slicesof white bread.
Persons who are concerned about their drinkingwater should consider a Sears Drinking WaterSystem that will remove or reduce in excess of90% of the sodium and other drinking watercontaminants.
YOU HAVE NOW FINISHED THE WATER SOFTENER START UP. AFTER THE SANITIZING RE-CHARGE, ON PAGE 7, THE SOFTENER WILL BE GIVING YOU SOFT WATER.

HOW YOUR WATER SOFTENER WORKSSECTION 2
9
2A. FACE PLATE TIMER FEATURES
RECHARGE NOW — If you have guests visit-ing, or other times when you use more waterthan usual, you could begin to run out of softwater. If the softener is not scheduled to regener-ate for another day or 2, you would get hardwater until then. If this happens, or you think itmight happen, press and hold in the HOLD-RE-CHARGE NOW button ¤ for 3 seconds untilRCHG shows. RCHG will flash in the displayduring the regeneration, which lasts under 2hours.
NOTE:Avoid using HOT water while the softenerregenerates, because bypass hard water willrefill the water heater (see “Automatic Bypass,”page 13).
FIG. 5
..PMRCHG
ON / OFF VACATIONHOLD RECHARGE NOW
PRESENT TIME AND DAY
RECHARGE TIME
RECHARGE DAY
SET / CLEAR
12
3
4
5
VACATION — The day you leave on vacation, orother long absence, press (do not hold in) theON/OFF VACATION button ¤ . VAC begins toflash in the display (FIG. 6). The timer will keeptime, but the softener will not regenerate towaste water and salt.
NOTE:Whie in VACATION, the softener will gothrough a regeneration if the RECHARGE NOWfeature is used (see above).
To shut off the water supply to the softener, usethe plumbing bypass valve(s), FIG. 16, page 21.
WHEN YOU RETURN, press the VACATION,button again to return the softener to service, andthe correct time of day in the display. Rememberto do this or the softener will not regenerateand you will soon have hard water.
FIG. 6
ON / OFF VACATIONHOLD RECHARGE NOW
PRESENT TIME AND DAY
RECHARGE TIME
RECHARGE DAY
SET / CLEAR
12
3
4
5
ERROR CODE — An error code could appear inthe face plate display if a problem occurs in thesoftener electronics. If you see an error codeinstead of the present time of day, please call youlocal Sears Service Department for service.
Continued

HOW YOUR WATER SOFTENER WORKSSECTION 2
10
2A. FACE PLATE TIMER FEATURES
TIMER “POWER-OUTAGE MEMORY” — Ifelectrical power to the timer goes off, the“memory” built into timer circuitry keeps allsettings for 6 hours (minimum) or more. Thedisplay is blank and the softener will notregenerate. When electrical power comes on, 1 of2 things will happen.
1. The present time of day will show, meaningthe timer memory has kept all settings.
NOTE:If the softener was in a regeneration when powerwas lost, it will now finish the cycle.
2. The display will show a time, but it will beflashing. The timer memory did not keep thetime settings and they must be reset (page 6).
The flashing display is to remind you to resetthe timer.
NOTE:When power comes on, the flashing displayreturns to a time of 12:00 AM Sunday, thenbegins to keep time again. If you do not reset alltime settings, the softener will regenerate 3 dayseach week. However, regeneration will mostlikely be on the wrong days and at the wrongtime.
If the softener was in a regeneration when powerwent off, the valve will return to service positionwithout finishing the regeneration cycle. If yourwater tastes salty:
- - use RECHARGE NOW (see page 9) to startanother regeneration, or
- - open 1 or more soft water faucets and allow torun until the salt taste is gone.

HOW YOUR WATER SOFTENER WORKSSECTION 2
11
2B. SOFT WATER SERVICE AND REGENERATION
SERVICEWhen the softener is giving you soft water, it iscalled “Service”. During service, hard watercomes from the house main water pipe into thesoftener. Inside the softener resin tank is a bedmade up of thousands of tiny, plastic resin beads(FIG. 7). As hard water passes through the bed,each bead attracts and holds the hardnessminerals. This is called ion-exchanging. It ismuch like a magnet attracting and holdingmetals. Water without the hardness minerals(soft water) flows out of the softener and into thehouse soft water pipes.
After a period of time, the resin beads becomecoated with hardness minerals and they have tobe cleaned. This cleaning is called recharge, orregeneration.
Regeneration is started at about 2:00 a.m. (facto-ry setting) by the timer. It takes place in 5 stagesor cycles. These are:
FILLBRININGBRINE RINSE
BACKWASHFAST RINSE
123
45
FIG. 7 WATER FLOW THROUGH THESOFTENER IN SERVICE
hard waterIN
soft waterOUT
resin tankbrine valve
salt storagetank (salt
not shown)
resin bed
REGENERATION¡ FILL: Salt, dissolved in water, is called brine.Brine is needed to clean the hardness mineralsfrom the resin beads. To make the brine, softwater flows into the salt storage area during thefill cycle as shown in FIG. 8.
The length of the fill cycle is factory set toprovide softening capacity for an average family.You can reset this time when “fine-tuning” thewater softener, pages 18 through 20.
FIG. 8 WATER FLOW THROUGH THESOFTENER IN FILL
hard waterIN
soft waterOUT
brine valve
salt storagetank
fill water

HOW YOUR WATER SOFTENER WORKSSECTION 2
12
2B. SOFT WATER SERVICE AND REGENERATION
© BRINING: During brining, the brine is movedfrom the salt storage area, into the resin tank.Inside the resin tank, brine cleans hardnessminerals from the resin beads and they aredischarged out the drain. How much brine isneeded to clean the resin depends on:
- - the amount of resin in the softener.- - how fast the brine goes through the bed.
The nozzle and venturi (FIG. 9) makes thesuction to take brine from the salt tank and put itinto the resin tank. It keeps the brine flow downto a very slow rate to get the best resin cleaningwith the least salt.
¢ BRINE RINSE: After all of the brine goes intothe resin tank, the brine valve closes. Waterkeeps flowing the same way it did duringbrining, except the brine flow has stopped.Hardness minerals and brine flush from theresin tank to the drain.
FIG. 9 WATER FLOW THROUGH THESOFTENER IN BRINING ANDBRINE RINSE
hard waterIN
hard waterbypass OUT
brine valve
drain
nozzle &venturi
brine
£ BACKWASH: During backwash, water flowsUP through the resin tank (FIG. 10) at a fast rateto flush iron minerals, dirt and sediments fromthe bed and to the drain. The bed lifts andexpands for good cleaning.
FIG. 10 WATER FLOW THROUGH THESOFTENER IN BACKWASH
hard waterIN
hard waterbypass OUT
drain
resin bed liftedand expanded
¤ FAST RINSE: Backwash is followed by a fastflow of water down through the resin tank. Thefast flow packs the resin bed and gets it ready forreturn to service (FIG. 11).After fast rinse, the softener returns to service.Hard water goes into the resin tank where theresin bed again takes out the hardness minerals.Soft water goes to the house soft water pipes.
FIG. 11 WATER FLOW THROUGH THESOFTENER IN FAST RINSE
soft waterOUT
drain
hard waterIN

HOW YOUR WATER SOFTENER WORKSSECTION 2
13
2B. SOFT WATER SERVICE AND REGENERATION
AUTOMATIC BYPASSDuring the brining, brine rinse and backwashcycles of regeneration, HARD water goesthrough the softener valve and to the housepipes. If a faucet is opened, hard water is therefor your needs. However, you should not useHOT water, if possible, because the water heaterwill refill with hard water. The softener regener-ates from 2:00 AM to about 4:00 AM, (you can setanytime), a time when not much water is used.
If you get up early in the morning and you canhear the softener regenerating, change the timesetting. Set the recharge time to 12:00 AM or 1:00AM (page 18). Then regeneration will start andend that much earlier and your water heater willnot refill with hard water if a hot faucet isopened.

CARE OF YOUR SOFTENERSECTION 3
14
3A. SALT¼ REFILLING STORAGE TANK/BREAKING A SALT BRIDGE
WHEN TO REFILL WITH SALT: Check the saltlevel a few weeks after you install the softenerand every week after that. Refill when thestorage tank is about 1/3 full. Never let thesoftener use all the salt before refilling. Withoutsalt, you will soon have hard water.
IMPORTANT:You will have a loss in softening capacity andmay get partly hard water if less than 10 inchesof salt is in the storage tank.
PLEASE SEE PAGE 8 FOR SALT FILLING DIRECTIONS.
SALT BRIDGE
Sometimes, a hard crust or salt bridge forms inthe salt storage tank. It is usually caused by highhumidity or the wrong kind of salt. When the saltbridges, an empty space forms between thewater and salt. Then, salt will not dissolve (melt)in the water to make brine. Without brine, theresin bed does not regenerate and you will havehard water.
If the storage tank is full of salt, it is hard to tell ifyou have a salt bridge. Salt is loose on top, but thebridge is under it. The following is the best wayto check for a salt bridge.
Salt should be loose all the way to the bottom ofthe tank. Hold a broom handle, or like tool, up tothe softener as shown in FIG. 12. Make a pencilmark on the handle, 1, or 2, below the top heightof the rim. Then, carefully push it straight downinto the salt. If a hard object is felt before thepencil mark gets to the top of the tank, it’s mostlikely a salt bridge. Carefully push into thebridge in a few places to break it. Do not try tobreak the salt bridge by pounding on theoutside of the salt tank. You may damage it.
If the wrong kind of salt made the bridge, take itout. Then fill the tank with nugget or pellet saltonly.
FIG. 12 A SALT BRIDGE
Broom Handle
CARE OF YOUR SOFTENERSECTION 3
15
3B. KEEPING THE WATER SOFTENER CLEAN
COVERSTo keep your new Kenmore water softenerlooking nice, apply a coat of paste wax andrepeat once a year. When dusty, wipe it with adamp cloth to keep it sparkling.
NOTE:Never use cleaners having ammonia or abra-sives. They may scratch and dull the surface.
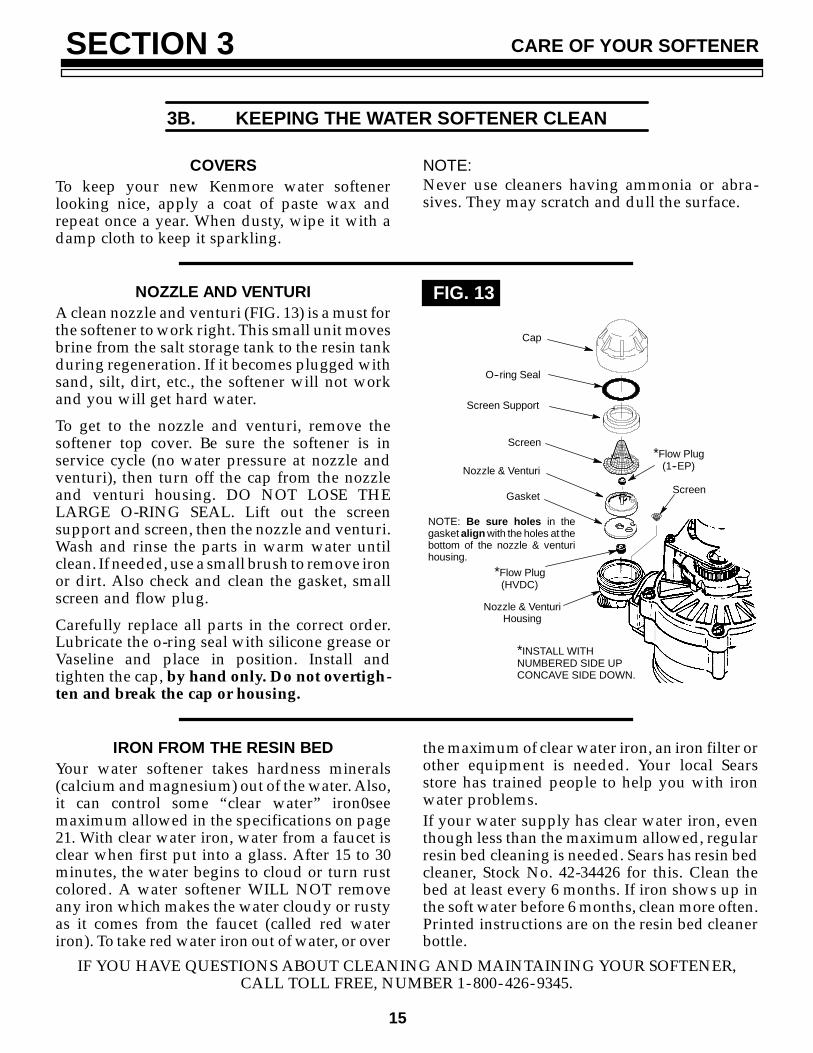
NOZZLE AND VENTURIA clean nozzle and venturi (FIG. 13) is a must forthe softener to work right. This small unit movesbrine from the salt storage tank to the resin tankduring regeneration. If it becomes plugged withsand, silt, dirt, etc., the softener will not workand you will get hard water.To get to the nozzle and venturi, remove thesoftener top cover. Be sure the softener is inservice cycle (no water pressure at nozzle andventuri), then turn off the cap from the nozzleand venturi housing. DO NOT LOSE THELARGE O-RING SEAL. Lift out the screensupport and screen, then the nozzle and venturi.Wash and rinse the parts in warm water untilclean. If needed, use a small brush to remove ironor dirt. Also check and clean the gasket, smallscreen and flow plug.Carefully replace all parts in the correct order.Lubricate the o-ring seal with silicone grease orVaseline and place in position. Install andtighten the cap, by hand only. Do not overtigh-ten and break the cap or housing.
FIG. 13
NOTE: Be sure holes in thegasket align with the holes at thebottom of the nozzle & venturihousing.
*INSTALL WITHNUMBERED SIDE UPCONCAVE SIDE DOWN.
Cap
O--ring Seal
Screen Support
Screen
Nozzle & Venturi
Gasket
*Flow Plug(HVDC)
Nozzle & VenturiHousing
Screen
*Flow Plug(1--EP)
IRON FROM THE RESIN BEDYour water softener takes hardness minerals(calcium and magnesium) out of the water. Also,it can control some “clear water” iron0seemaximum allowed in the specifications on page21. With clear water iron, water from a faucet isclear when first put into a glass. After 15 to 30minutes, the water begins to cloud or turn rustcolored. A water softener WILL NOT removeany iron which makes the water cloudy or rustyas it comes from the faucet (called red wateriron). To take red water iron out of water, or over
the maximum of clear water iron, an iron filter orother equipment is needed. Your local Searsstore has trained people to help you with ironwater problems.If your water supply has clear water iron, eventhough less than the maximum allowed, regularresin bed cleaning is needed. Sears has resin bedcleaner, Stock No. 42-34426 for this. Clean thebed at least every 6 months. If iron shows up inthe soft water before 6 months, clean more often.Printed instructions are on the resin bed cleanerbottle.
IF YOU HAVE QUESTIONS ABOUT CLEANING AND MAINTAINING YOUR SOFTENER,CALL TOLL FREE, NUMBER 1-800-426-9345.

CARE OF YOUR SOFTENERSECTION 3
16
3C. KEEP THE SOFTENER FROM FREEZING
If the softener is installed where it could freeze(summer cabin, lake home, etc.), you must drainall water from it to stop possible freeze damage.To drain the softener —
1. Close the shut-off valve on the house mainwater pipe, near the water meter or pressuretank.
2. Open a faucet in the soft water pipes to ventpressure in the softener.
3. Looking at FIG. 16 on page 21, move the stemin a single bypass valve to bypass. Close theinlet and outlet valve in a 3-valve bypasssystem, and open the bypass valve. If youwant water in the house pipes again, reopenthe shut-off valve on the main water pipe.
4. Unplug the transformer at the wall outlet.Remove the salt hole cover and the maincover. Take off both drain hoses.
5. Carefully remove the large holding clips atthe softener inlet and outlet (see Key No. 61,on page 34). Separate the softener from theadaptors or bypass valve.
6. Remove the brinewell cover and disconnectthe brine valve tubing at the nozzle andventuri assembly (see page 34). Lift the brinevalve out of the brinewell. Tip the brine valveupside down to drain out water.
FIG. 14 DRAIN WATER FROM THESOFTENER
7. Looking at FIG. 14, lay a piece of 2 inch thickboard near the floor drain. Move the softenerclose to the drain. SLOWLY and CAREFUL-LY tip it over until the rim rests on the woodblock with the inlet and outlet over the drain.Do not allow the softener’s weight to rest onthe inlet and outlet fittings or they willbreak.
8. Tip the bottom of the softener up a few inchesand hold until all water has drained. Leavethe softener laying like this until you areready to use it. Plug the inlet and outlet withrags to keep dirt, bugs, etc. out.

CARE OF YOUR SOFTENERSECTION 3
17
3D. HELPFUL HINTS CHECKLIST
... TO HELP YOU SAVE MONEY
NOTE:1. Read “ERROR CODE”, page 9.2. If your water softener fails to work, make the following easy checks. Often, you will find what’swrong yourself and you won’t have to call and wait for service. If, after making the checks, your soften-er still does not work right, call your Sears Service Department, or call toll free, number1-800-426-9345 for telephone assistance.You can find the model number of your water softener on the rating decal, on the brine tank rim. Seepage 32.
PROBLEM CAUSE CORRECTIONNO SOFT WATER No salt in the storage tank Refill with salt (see page 8). Use the RECHARGE
NOW button to start a regeneration (see page 9).Transformer unplugged at the walloutlet, or power cable disconnected
Check for loss of power and correct. Reset thetimes, then use the RECHARGE NOW button tostart a regeneration (see page 9).
Fuse blown, circuit breaker popped, orcircuit switched off— SEE PAGE 10,“TIMER POWER-OUTAGE MEMORY”.
Replace fuse, reset circuit breaker, or switch circuiton. Reset times and use the RECHARGE NOWbutton to start a regeneration.
Timer in the vacation (VAC) position See VACATION feature to return the softener toservice (page 9).
No regenerations set on the timer See pages 18-20 to select and program aschedule. Use the RECHARGE NOW button tostart an immediate regeneration.
Manual bypass valve(s) in bypassposition
See FIG. 16, page 21. Move stem in single bypassvalve to SERVICE.
Salt in storage tank bridged Refer to page 14 to break.Dirty, plugged or damaged nozzle &venturi
Take apart and clean (see page 15) or replacedamaged parts.
Valve drain hose plugged Hose must not have kinks, sharp bends, or anywater flow blockage (see page 16 in yourinstallation manual).
Low or high system water pressure (Lowpressure may disrupt brine draw duringrecharge. High pressures may causeinner valve parts failure.)
If pressure is low, increase well pump output to aminimum of 20 psi. Add a pressure reducing valve,in the supply pipe to the softener, if day timepressure is over 100 psi (see installation manual).
WATER HARDSOMETIMES
Regenerations too few Refer to pages 18-20 to find correct setting.WATER HARDSOMETIMES More water being used See pages 18-20 for correct regeneration setting.
Hot water used when softener isregenerating
Avoid using hot water as the water heater refillswith hard water (see “Automatic Bypass”on page13).
Possible increase in water hardness Ask your Sears retail or catalog store for a newwater analysis.
Leaking faucet or toilet valve A small leak will waste hundreds of gallons of waterin a few days. Fix all plumbing leaks and alwaysfully close faucets.

OTHER THINGS TO KNOWSECTION 4
18
4A. HOW TO “FINE-TUNE” YOUR SOFTENER
It is not hard to fine-tune your softener, but itdoes take a few minutes of your time to do itright. You may save up to 500 pounds or more ofsalt each year with proper tuning. Read thefollowing carefully.To have soft water all the time, the softener mustregenerate, or recharge a certain number of timesin each 7 day period. How many times toregenerate (set the timer) depends on 3 things.
1. The number of people in your home — tellsyou how much water is used.
2. The grains per gallon (GPG) hardness of yourwater supply — listed on your water analysisreport (see page 2 in your Installation Manu-al, or page 2 of this manual).
NOTE:If your water supply contains iron, compensatefor it by adding to the water hardness number.For example, assume your water is 15 gpg hard andcontains 2 ppm iron. Add 5 to the hardness number foreach 1 ppm of iron. In this example, you would use 25for your hardness number.
15 gpg hardness2 ppm iron x 5 = 10 +10
(times) 25 HARDNESS NUMBER
3. How much salt is used each regeneration —determined by the length of the fill cycle (seepages 19 and 20).
REGENERATION TABLE: The table (page 20)makes it easy fo you to pick the best regenerationand fill time setting to use.Step 1 — Go down the side of the table to thenumber of persons in your family, or the numberof people in the house using water.Step 2 — Across the top of the table, find thecolumn listing the grains per gallon hardness ofyour water, or hardness number for iron water.Step 3 — Read across and down the table to findthe point where steps 1 and 2 meet. At thismeeting point, suggested days to regenerate,and fill cycle minutes needed are shown.
TO SET THE TIMER FOR DAYS OF REGEN-ERATION AND FILL MINUTES, DO THE FOL-LOWING.NOTE:Remember, the timer is factory set for Monday,Wednesday and Saturday regenerations startingat 2:00 AM. Fill time is factory set for 8 minutes.1. SET DAYS AND TIME OF REGENERA-
TION, OR RECHARGE
a. Press the RECHARGE TIME button © onceto display the factory set regeneration daysand starting time (flashing). To change the re-generation start time, do step b following.Otherwise go to step c.
FIG. 15
ON / OFF VACATIONHOLD RECHARGE NOW
PRESENT TIME AND DAY
RECHARGE TIME
RECHARGE DAY
SET / CLEAR
12
3
4
5
..AM
MO WE SA
NOTE:Read “Automatic Bypass”page 13, when choos-ing a regeneration starting time other than 2:00AM.
b. Press the SET/CLEAR button£ until the de-sired regeneration starting time shows in thedisplay.
NOTE:Press SET/CLEAR and quickly release to movethe display ahead 1 hour at a time. Or, hold theSET/CLEAR button to move the display ahead 2hours each second.WRITE IN YOUR RESULTS HERE.1. M T W TH F S SU Suggested days to
---circle suggested days--- regenerate2. ______Fill Cycle minutes needed
OTHER THINGS TO KNOWSECTION 4
19
4A. HOW TO “FINE-TUNE” YOUR SOFTENER
c. Press the RECHARGE DAY button ¢ andSUnday begins to flash.
---- If you want regenerations on Sunday (fromregeneration table), press the SET/CLEAR but-ton £ to display ON.
---- If you do not want Sunday regenerations, pressSET/CLEAR button £ to display OFF.
d. Press the RECHARGE DAY button ¢ againto display a flashing MOnday and ON (facto-ry set recharge). As you did in step c, use theSET/CLEAR button£ to change the displayfrom ON to OFF, or from OFF to ON.
e. Press RECHARGE DAY button ¢ to displaya flashing TUesday, WEdnesday, etc., eachtime using the SET/CLEAR button£ to dis-play either ON or OFF as needed.
After recharge is either set or cancelled forSAturday, press the PRESENT TIME ANDDAY button ¡ once again to return the pres-ent time and day display.
2. SET THE FILL CYCLE MINUTES
a. Press and hold the RECHARGE TIME button© until FILL shows in the display, then re-lease button © . After a few seconds, the fillcycle minutes (factory setting¼ 8) will flash.
b. Press the SET/CLEAR button £ to set theminutes of fill cycle needed, as shown in theregeneration table.
NOTE:You may get hard water between regenerationsif you set the timer for fewer fill minutes than theRegeneration Table shows you to set. A highersetting than needed will waste salt.
NOTE:Press SET/CLEAR and quickly release to movethe display ahead 1 minute at a time. Or, hold theSET/CLEAR button to move the display ahead 2minutes each second. THE DISPLAY BEGINSOVER AT 0 AFTER PASSING 59.
c. Press PRESENT TIME AND DAY button ¡to return the present time and day display.
TO SET THE PRESENT TIME OF DAY, ANDDAY OF WEEK, SEE PAGE 6.
IF YOU NEED HELP TO PROGRAM THE TIMER, CALL TOLL FREE,NUMBER 1-800- 426-9345.

OTHER THINGS TO KNOWSECTION 4
20
4A. HOW TO “FINE-TUNE” YOUR SOFTENER
SEE INSTRUCTIONS FOR USING THE TABLE, PAGE 18.
REGENERATION TABLEREGENERATION TABLEWATER HARDNESS -- GRAINS PER GALLON
Up to 5 6 to 1011 to
1516 to
2021 to
2526 to
3031 to
3536 to
4041 to
4546 to
501
PERSONIN THEHOUSEHOLD
M M M M M M M M MTH
MTH
1PERSONIN THEHOUSEHOLDHOUSEHOLD
2 2 2 2 3 3 4 5 2 6HOUSEHOLD
2PERSONSIN THEHOUSEHOLD
M M M M MTH
MTH
M W
S
M W
S
M W
S
M TTH FS
2PERSONSIN THEHOUSEHOLD
IN THEHOUSEHOLD 2 2 3 5 3 3 2 3 3 2
IN THEHOUSEHOLD
3PERSONSIN THEHOUSEHOLD
M M MTH
MTH
M W
S
M W
S
M W
S
M TTHS
M TTH FS SU
M TTH FS
3PERSONSIN THEHOUSEHOLD
IN THEHOUSEHOLD 2 3 2 3 3 3 3 3 2 3
IN THEHOUSEHOLD
4PERSONSIN THEHOUSEHOLD
M M MTH
M W
S
M TTH FS
M TTHS
M TTH FS SU
EVERYDAY
M TTH FS SU
EVERYDAY
4PERSONSIN THEHOUSEHOLD
IN THEHOUSEHOLD 2 5 3 3 2 3 2 2 3 3
IN THEHOUSEHOLD
5PERSONSIN THEHOUSEHOLD
M MTH
M W
S
M TTH FS
M TTH FS SU
M TTH FS
M TTH FS SU
EVERYDAY
EVERYDAY
EVERYDAY
5PERSONSIN THEHOUSEHOLD
IN THEHOUSEHOLD 3 3 3 2 2 3 3 3 4 4
IN THEHOUSEHOLD
6PERSONSIN THEHOUSEHOLD
M MTH
M W
S
M W
S
M TTHS
M TTH FS SU
EVERYDAY
EVERYDAY
EVERYDAY
EVERYDAY
6PERSONSIN THEHOUSEHOLD
IN THEHOUSEHOLD 3 3 3 2 3 3 3 4 5 7
IN THEHOUSEHOLD
7PERSONSIN THEHOUSEHOLD
M M W
S
M W
S
M TTH FS SU
M TTH FS SU
EVERYDAY
EVERYDAY
EVERYDAY
EVERYDAY
7PERSONSIN THEHOUSEHOLD
IN THEHOUSEHOLD 4 2 3 2 3 3 4 5 8
IN THEHOUSEHOLD
8PERSONSIN THEHOUSEHOLD
M M W
S
M TTHS
EVERYDAY
EVERYDAY
EVERYDAY
EVERYDAY
EVERYDAY
8PERSONSIN THEHOUSEHOLD
IN THEHOUSEHOLD 5 3 3 2 3 4 5 8
IN THEHOUSEHOLD
9PERSONSIN THEHOUSEHOLD
MTH
M W
S
M TTH FS SU
M TTH FS SU
EVERYDAY
EVERYDAY
EVERYDAY
9PERSONSIN THEHOUSEHOLD
IN THEHOUSEHOLD 2 3 2 3 4 5 8
IN THEHOUSEHOLD
10PERSONSIN THEHOUSEHOLD
MTH
M TTH FS
M TTH FS
EVERYDAY
EVERYDAY
EVERYDAY
10PERSONSIN THEHOUSEHOLD
IN THEHOUSEHOLD 3 2 3 3 4 7
IN THEHOUSEHOLD
DAYS TO REGENERATE: M = Monday, T = Tuesday, W = WednesdayTH = Thursday, F = Friday, S = Saturday, SU = Sunday(factory set for Monday, Wednesday and Saturday)MINUTE-LENGTH OF FILL CYCLE NEEDED(factory set for 8 minutes)
M T WTH FS SU
4
LEGEND:
MINUTES OF FILL @ 0.3 GPM
POUNDS OF SALT USED EACH REGENERATION
2 3 4 5 5 7 8 9 10 minutesminutes
poundspounds 1.8 2.7 3.6 4.5 5.4 6.3 7.2 8.1 9

OTHER THINGS TO KNOWSECTION 4
21
4B. DIMENSIONS/SPECIFICATIONS
FIG. 16 BYPASS VALVES
Bypass valve(s) should always remain in softwater service position. Position in “bypass”only if needed for softener repairs.
A
B
CD
E
F
INCHES CMA Salt Tank Height 40-1/4 102.2B Resin Tank Diameter(nominal) 8 20.3C Resin Tank Height (nominal) 40 101.6D Inlet-Outlet Height 41-1/2 105.4E Overall height 46 116.8F1 Length 19-1/2 49.5F2 Width 16-1/2 41.9— Distance between inlet-outlet
center lines3-3/8 8.6
MODEL NO. 625.348321NOTE:Please see the rating decal for water softener operating capacity, salt usage and service flow rate/pressure lossperformance specifications. Performance specifications are validated by the Water Quality Association (WQA).The rating decal is located on the rim, under the salt hole cover (see page 32).
WATER SUPPLY TO WATER SOFTENERMINIMUM WATER SYSTEM FLOW (gpm) 3MINIMUM-MAXIMUM WATER PRESSURE (psi) 20-120MAXIMUM WATER TEMPERATURE (5F) 120MAXIMUM WATER HARDNESS (gpg) 50MAXMUM “CLEAR WATER”IRON (ppm) 2
SALT FOR WATER SOFTENERTYPE OF SALT NEEDED Nugget/PelletALTERNATE TYPE OF SALT Pure, evaporated, compacted
water softener saltSTORAGE CAPACITY (pounds) 200
OTHERSTYPE OF ION EXCHANGE MATERIAL (resin) High CapacityAMOUNT OF RESIN (cu.ft.) .52REGENERATION (RECHARGE) CYCLE TIME (min.)
FILL (factory setting-time is adjustable) 8BRINING/BRINE RINSE 80BACKWASH 12FAST RINSE 4TOTAL REGENERATION TIME (factory setting) 118
gpm = gallons per minute psi = pounds per square inchgpg = grains per gallon ppm = parts per million

SERVICE TECH. INFORMATIONSECTION 5
22
5A. ELECTRICAL CONNECTIONS
IMPORTANT:Keep this manual with your water softener. If repairs are needed, the service technician must have theinformation on the following pages. For telephone assistance, call toll free, 1-800-426-9345.
PRESENT TIME
RECHARGE TIME
RECHARGE DAY
SET / CLEARON / OFF VACATION
HOLD RECHARGE NOW
Solid State Water Softener
FACEPLATE TIMER

SERVICE TECH. INFORMATIONSECTION 5
23
5B. REGENERATION CYCLE TIMES
SEE REGENERATION TABLE ON PAGE 20, AND SPECIFICATIONS, PAGE 21.CYCLE FLOW RATES (GALLONS PER MINUTE)
FILL (flow to salt storage tank) 0.3 (1.1 liters)BRINING .16 (.6 liters)BRINE RINSE
(flow to drain).11 (.4 liters)
BACKWASH (flow to drain) 1.8 (6.8 liters)FAST RINSE 1.8 (6.8 liters)
TO SET DOUBLE BACKWASH (Softener has a backwash and fast rinse cycle before brining, andafter brining, which is beneficial on some kinds of iron bearing water):
USE BUTTONS £ (SET/CLEAR), and ¡ (PRESENT TIME AND DAY)1. Press and hold £ entire display comes on.. . . . . . . . . . . . . . .
" Press ¡ to display 3 dashes" Press £ to display dbl" Press ¡ to display 18:88
2. Press £ to return present time.REPEAT ABOVE STEPS TO CANCEL DOUBLE BACKWASH.
CYCLE SEQUENCE WITH DOUBLE BACKWASH: 1. Fill 2. Backwash 3. Fast Rinse 4. Brining/Brine Rinse 5. Back-wash 6. Fast Rinse — Return to Service
OTHER RECHARGE CYCLE TIME ADJUSTMENTSCycle times in specifications are factory settings. Do the following to check for correct cycle times.NOTE: Removing from electrical power (varies from 6 to15 hours) resets timer to factory programming.
DISPLAY MUST SHOW TIME AND DAY
1. Press and hold £ ¼ entire displaycomes on.
2. Press © ¼ 2:08 shows; meaning#2 cycle (brining & br. rinse) and80 minutes (8 x 10).
a. If 2:08 does show, go to step 3.
b. If other than 2:08 (2:00 to 2:15),press £ until 2:08 shows.
3. Press © ¼ 3:12 shows, meaning#3 cycle (backwash) and 12 minutes.
a. If 3:12 does show, go to step 4.
b. If other than 3:12 (3:00 to 3:30),press £ until 3:12 shows.
NOTE: Instead of programming a double backwash, alonger single backwash is beneficial on some types of ironwater.
4. Press © ¼ 4:04 shows; meaning#4 cycle (fast rinse) and 4 minutes.
a. If 4:04 does show, go to step 5.
b. If other than 4:04 (4:00 to 4:30),press £ until 4:04 shows.
5. Press © ¼ 18:88 shows.6. Press £ ¼ to return to present time and day.
TO SET MINUTE — LENGTH OF FILL CYCLE (factory setting, 8 minutes)USE BUTTONS © (RECHARGE TIME), £ (SET/CLEAR), and ¡ (PRESENT TIME AND DAY)
1. Press and hold © until FILL shows, then 16 (factory setting)." Press £ to set the desired fill minutes
(from regeneration table).2. Press ¡ to return present time and day.
PM
MO WE TH FR SARCHG ..AM
TUSU
PM
MO WE TH FR SARCHG ..AM
TUSU
..
..
..PM
MO WE TH FR SARCHG ..AM
TUSU
..
..
..

SERVICE TECH. INFORMATIONSECTION 5
24
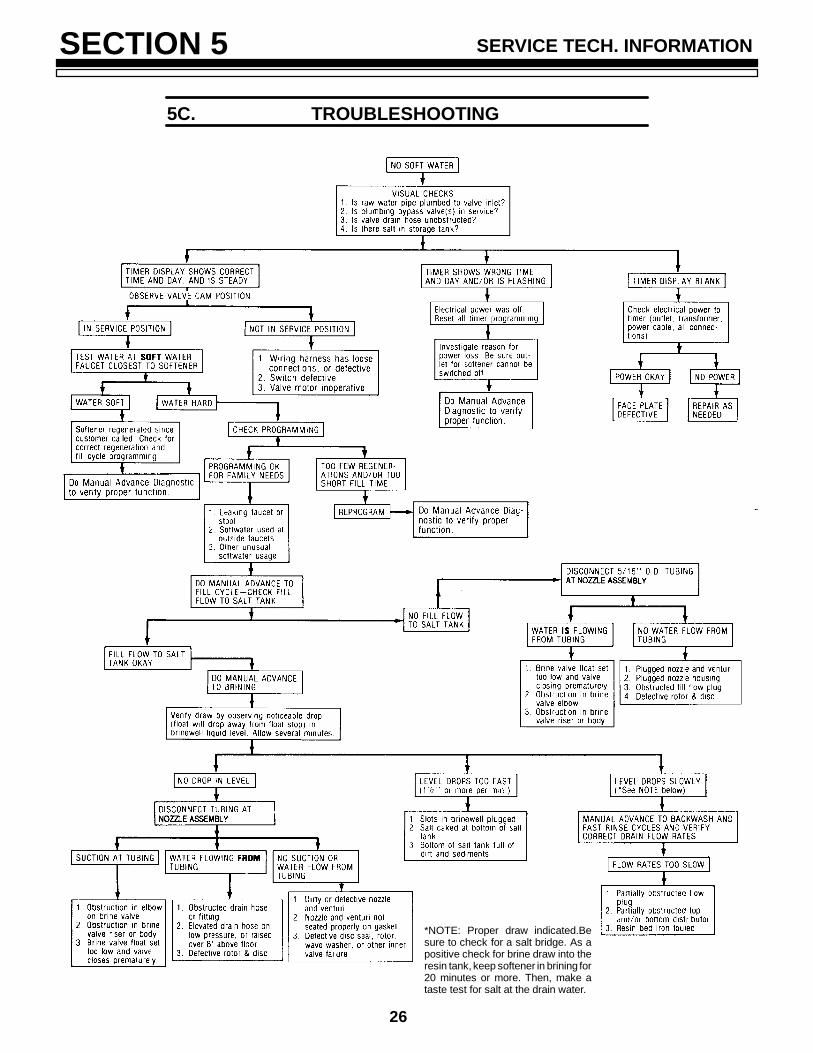
5C. TROUBLESHOOTING
AUTOMATIC ELECTRONIC DIAGNOSTICSThe face plate has a self-diagnostic function for theelectrical system (except input power). The face platemonitors the electronic components and circuits forcorrect operation. If a malfunctionoccurs, an error code appears in theface plate display.
The chart below shows the error codes that couldappear, and the possible defects for each code.
While an error code appears in the display, all faceplate buttons are inoperable except the SET button.The SET button remains operational so the serviceperson can make the MANUAL ADVANCE DIAG-NOSTICS to further isolate the defect.
CODEPOSSIBLE DEFECT
MOST LIKELY LESS LIKELYE— 1, E— 2, wiring harness or connection to switch / position switch / motor inoperative / valve defect causingE— 1, E— 2,E— 3, E— 4
wiring harness or connection to switch / position switch / motor inoperative / valve defect causinghigh torqueE— 3, E— 4 high torque
PROCEDURE FOR REMOVING ERROR CODE FROM FACE PLATE: 1. Unplug transformer 2. Correct de-fect 3. Plug-in transformer 4. Wait for 6 minutes. The error code will return if the defect was not corrected.
FACE PLATE REPLACEMENT: Be sure the valve is in service position (observe valve cycle indicator. . . seebelow) when replacingthe face plate.If, after installing and programming the replacement face place, the valve is not in service position, do the fol-lowing to assure correct cycle orientation, or timing, between the face plate and valve.Use the MANUAL ADVANCE procedures, below. With the RECHARGE NOW button, advance through therecharge cycles until the valve stops in service position, and RECHARGE no longer flashes in the timer.
NOTE: The valve motor may automatically drive through several valve positions while searching for service.
MANUAL ADVANCE DIAGNOSTICUse the following procedures to advance softenervalve through regeneration cycles to check opera-tion.
Remove top cover to observe valve rotation.
DISPLAY MUST SHOW TIME AND DAY
1. Press and hold £ for 3 secondsuntil 18:88 displays.
2. Press ¢ to display position (P) switch open orclosed indicator.
If the valve is in service, fill, brin-ing, backwash or fast rinse (seemarkings on cam under motor), thedisplay will show¼ (- - ), meaningthe position switch is open.
While the valve is ro-tating from 1 cycle toanother, the displaywill show (- P), mean-ing the position switchis closed.3. To advance valve,
press ¤ each timeyou want to moveinto next cycle.(Pressing ¤ whilevalve is rotatinghas no affect.)
— Press and hold¤ for 3 seconds tomove softener into fill cycle. Re-move brinewell cover and, using aflashlight, observe fill water enter-ing tank.
continued
CAM
MOTORpositionmarkers
PM
MO WE TH FR SARCHG ..AM
TUSU

SERVICE TECH. INFORMATIONSECTION 5
25
5C. TROUBLESHOOTING
a. If it does not move into fill, valve motor is inop-erative. Check all wiring and connections.
b. If water does not enter tank, see “Quick-CheckTroubleshooting,” page 26.
— After fill, press ¤ to movesoftener into brining. A slow flowof water to drain begins. Verifybrine draw from brine tank. Seeflow rates on page 23.
NOTE: WHILE IN MANUAL ADVANCE, THETIME DISPLAY WILL AUTOMATICALLY RE-TURN TO THE PRESENT TIME IF A BUTTON ISNOT PRESSED WITHIN 4 MINUTES.
c. If softener does not draw brine¼ see “Quick-Check Troubleshooting”.
NOTE: Be sure a salt bridge is not preventing waterwith salt contact.
— Again press ¤ to move softenerinto backwash. Look for a fast flowof water from drain hose. See flowrates, page 23.
d. An obstructed flow indicates aplugged top distributor, back-wash flow plug, or drain hose.
— Press ¤ to move softener intofast rinse. Again look for fast drainflow. Allow softener to rinse for afew minutes to flush out any brineremaining in resin tank from brin-ing cycle test.
— To return softener to service,press ¤ .
4. Press ¢ to display 18:88.
5. Press £ to return present timeand day.
BRINE VALVE FLOAT SETTING FREEBOARD MEASUREMENT
Freeboard*
PM
MO WE TH FR SARCHG ..AM
TUSU
..MO
PM
SERVICE TECH. INFORMATIONSECTION 5
26
5C. TROUBLESHOOTING
*NOTE: Proper draw indicated.Besure to check for a salt bridge. As apositive check for brine draw into theresin tank, keep softener in brining for20 minutes or more. Then, make ataste test for salt at the drain water.

SERVICE TECH. INFORMATIONSECTION 5
27
5D. ROTARY VALVE SERVICE
Before working on the valve, turn off the watersupply and disconnect from electrical power. TORELIEVE PRESSURE:
- - 3 VALVE BYPASS: Close the inlet valve and open asoft water faucet. Then close the outlet valve andopen the bypass valve.
- - SEARS SPECIAL BYPASS: Slide the bypass valvestem to bypass position. Loosen the 3 hex head screws(see A in drawing) toward the back side of the valveto allow pressure water to bleed out (catch waterwitha rag).
DISASSEMBLYTo remove a part or group of parts, refer to the valvedrawing. A common screwdriver or nut driver,Phillips screwdriver and pliers are the only toolsneeded to completely disassembe.
SERVICING THE VALVEInspect all o-rings, seals and gaskets for wear ordefects.
Inspect the bottom surface of the rotor and disc forscratches, chips or wear.
NOTE: If replacement is needed, be sure to use thecurrent replacement part.
ASSEMBLYBe sure all parts are in place and in the properposition. Lubricate ALL o-rings and seals with FDAapproved silicone grease. To install the rotor seal,first place the seal into the valve groove, roundedside down (see cross-section). Apply a light coatingof silicone grease to the seal’s crossing ribs. Then,carefully center the wear strip on the seal, and push itdownward onto the seal.
Install the nozzle and venturi seal and drain seal.Assemble 2 o-rings and the wave washer onto therotor and disc. Then center the rotor and disc, in thevalve body, on the rotor seal.
Lower the cover onto the valve body and rotor shaft.Then install the cover holding screws. Before tight-ening the screws, install the valve cam and gear.Then, turn the rotor (clockwise only) to serviceposition. Tighten the screws using a criss-crosspattern. If a torque wrench is available, torque to30-40 inch pounds.
screen
Lubricate the gear on the motor, and the valve camgear with Molykote grease, or other high quality gearlubricant.
Be sure to orient switch as shown, with lever towardthe cam.

SERVICE TECH. INFORMATIONSECTION 5
28
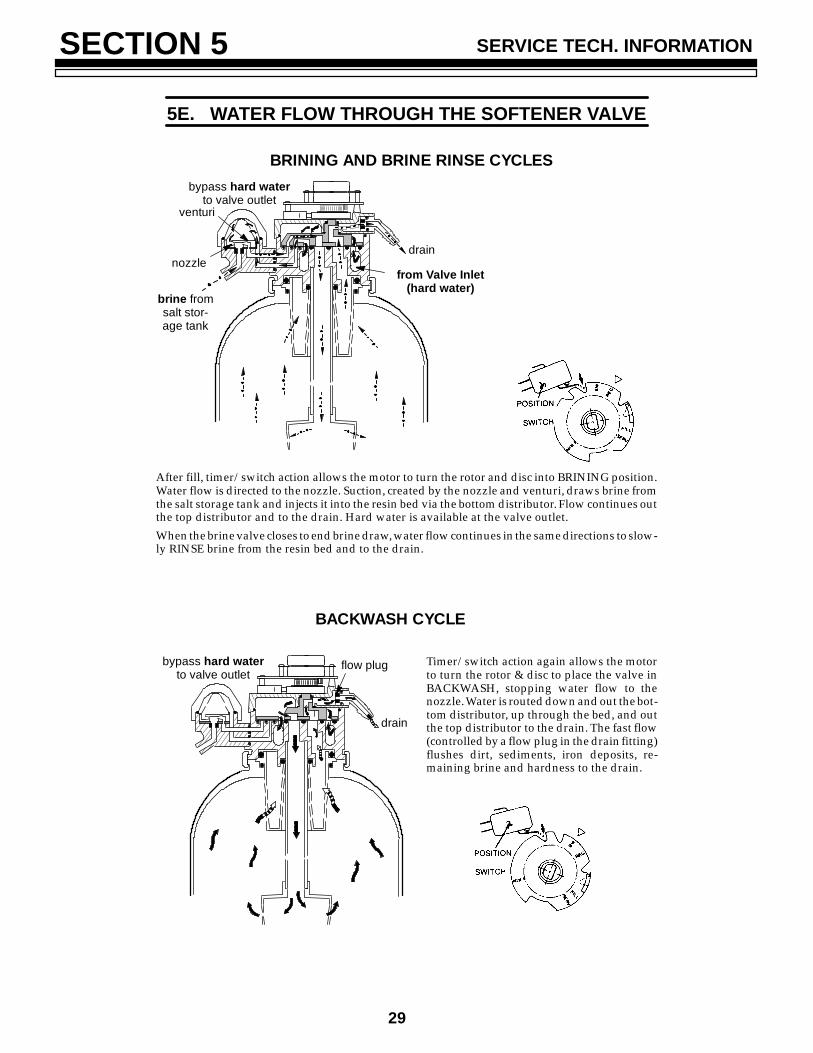
5E. WATER FLOW THROUGH THE SOFTENER VALVE
SERVICE CYCLE
Hard water enters the valve inlet port. Internal valve porting routes the water down andout the top distributor, into the resin tank. Hard water is softened as it passes through theresin bed, then enters the bottom distributor. Soft water flows back into the valve and outthe valve outlet, to the house soft water pipes.
To Valve Outlet(soft water)
resinbed resin
bed
bottom distributor
resin tank
top distributor
from Valve Inlet(hard water)
FILL CYCLE
To begin a regeneration, the solid state timer energizes the circuit to the valve motor. Thevalve motor rotates the rotor and discand the valve cam until the position switch lever dropsto open the motor circuit and position the valve in FILL. As the rotor and disc rotates, theport opens for SOFT water fill through the venturi. Fill flow continues to the brine valve,andinto the salt storage tank. Soft water is still available to the house lines.
To Valve Outlet(soft water)
resinbed resin
bed
bottom distributor
resin tank
top distributor
from Valve Inlet(hard water)
fill water(soft)
fill flowplug
venturiposition switch valve cam
rotor & disc
SERVICE TECH. INFORMATIONSECTION 5
29
5E. WATER FLOW THROUGH THE SOFTENER VALVE
BRINING AND BRINE RINSE CYCLES
After fill, timer/switch action allows the motor to turn the rotor and disc into BRINING position.Water flow is directed to the nozzle. Suction, created by the nozzle and venturi, draws brine fromthe salt storage tank and injects it into the resin bed via the bottom distributor. Flow continues outthe top distributor and to the drain. Hard water is available at the valve outlet.When the brine valve closes to end brine draw,water flow continues in the same directions to slow-ly RINSE brine from the resin bed and to the drain.
drain
brine fromsalt stor-age tank
nozzle
venturi
bypass hard waterto valve outlet
from Valve Inlet(hard water)
BACKWASH CYCLE
Timer/switch action again allows the motorto turn the rotor & disc to place the valve inBACKWASH, stopping water flow to thenozzle.Water is routed down and out the bot-tom distributor, up through the bed, and outthe top distributor to the drain. The fast flow(controlled by a flow plug in the drain fitting)flushes dirt, sediments, iron deposits, re-maining brine and hardness to the drain.
drain
flow plugbypass hard waterto valve outlet

SERVICE TECH. INFORMATIONSECTION 5
30
5E. WATER FLOW THROUGH THE SOFTENER VALVE
FAST RINSE CYCLE
During FAST RINSE, the rotor & disc is positioned so water flow enters the resin tankthrough the top distributor, and exits through the bottom distributor, to the drain.The solid state timer again energizes the motor to return the valve to service, and as thevalve rotates, the position switch lever drops to open the circuit. The valve remains posi-tioned in service until the timer initiates the next regeneration.
soft waterto valve outlet
drain

SERVICE TECH. INFORMATIONSECTION 5
31
NOTES

REPAIR PARTSSECTION 6
32
SEARS WATER SOFTENERMODEL NO. 625.348321
KEYNO.
PARTNUMBER DESCRIPTION
1 7137604 Cover (main)2 7137612 Salt Hole Cover3 7118333 Wire Harness (switch)4 7132840 Power Cord (transformer)5 7144978 Timer Repl. (PWA)6 7137581
7155872Face Plate (order decal below)Face Plate Decal
7 7137599 Rim8 7137727 Brinewell Cover9 7082150 Wing Nut, 1/4²
10 7100819 Brinewell11 7144619 Salt Storage Tank12 7148875 Screw, Plastic, 1/4² x 5/8²13 0900431 Tube Clamp F14 1103200 Tube Adaptor F15 9003500 Grommet F16 7116488 Brine Valve Assy. (also see pg. 33)17 7105047 Replacement Distributor18 0501741 Resin19 7092155 Resin Tank (incl. Key No. 18)20 7170270 O-Ring, 2-3/4² x 3²21 7077870 Top Distributor22 7170254 O-Ring, 13/16² x 1-1/16²23 7170296 O-Ring, 2-7/8² x 3-1/4²24 7141001 Vapor Barrier25 7176292 Clamp Section (2 req.)26 7088033 Clamp Retainer (2 req.)27 7095373 Transformer, 24V-10VA F
z 7159931 Installation Manual
z 7199012 Owners Manualz not illustrated
F Included in parts bag¼ see page 35.
REPAIR PARTSSECTION 6
33
11 12
3031
32
33
34
35
363738
39
4041
42
4344
45
46
47
48
49INLET --- OUTLETGROUNDING CLAMPS
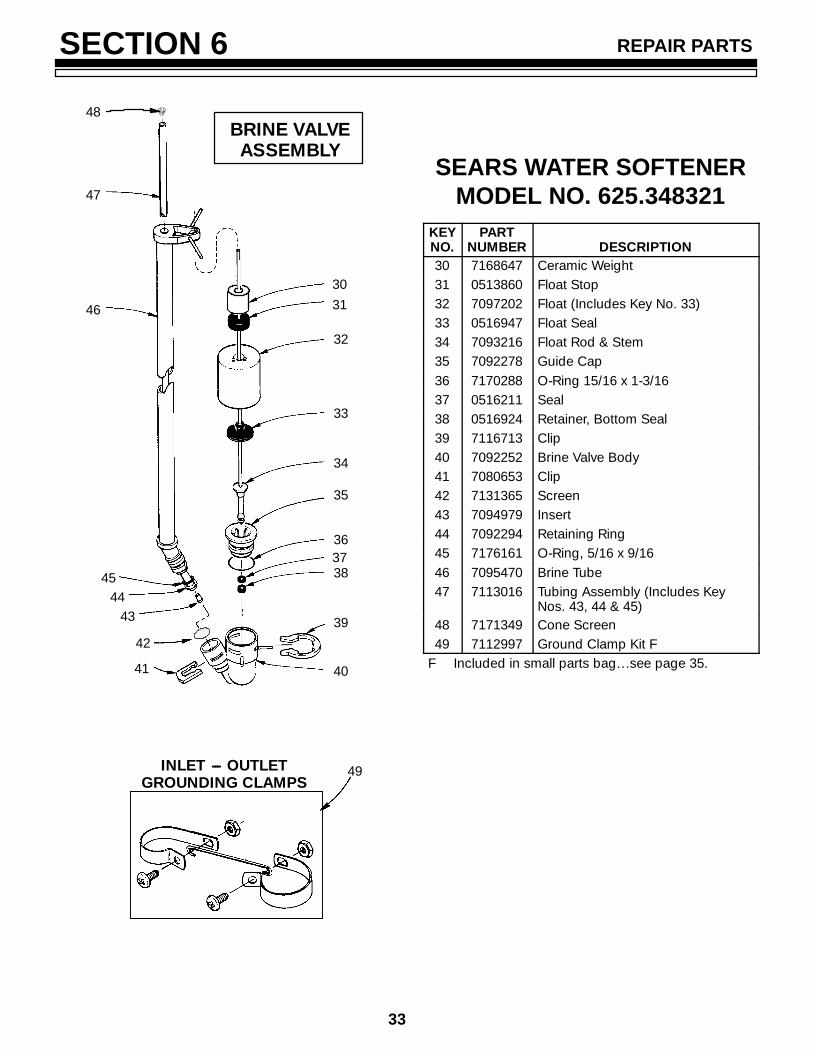
BRINE VALVEASSEMBLY
SEARS WATER SOFTENERMODEL NO. 625.348321
KEYNO.
PARTNUMBER DESCRIPTION
30 7168647 Ceramic Weight31 0513860 Float Stop32 7097202 Float (Includes Key No. 33)33 0516947 Float Seal34 7093216 Float Rod & Stem35 7092278 Guide Cap36 7170288 O-Ring 15/16 x 1-3/1637 0516211 Seal38 0516924 Retainer, Bottom Seal39 7116713 Clip40 7092252 Brine Valve Body41 7080653 Clip42 7131365 Screen43 7094979 Insert44 7092294 Retaining Ring45 7176161 O-Ring, 5/16 x 9/1646 7095470 Brine Tube47 7113016 Tubing Assembly (Includes Key
Nos. 43, 44 & 45)48 7171349 Cone Screen49 7112997 Ground Clamp Kit F
F Included in small parts bag¼ see page 35.

REPAIR PARTSSECTION 6
34
SEARS WATER SOFTENERMODEL NO. 625.348321
13
14
7778
79
8081
82
83
84
VALVE ASSEMBLY

REPAIR PARTSSECTION 6
35
SEARS WATER SOFTENERMODEL NOS. 625.348321
PARTS LISTKEYNO.
PARTNUMBER DESCRIPTION
50 7131755 Screw, #6-20 x 7/8 (2 req.)51 7133008 Motor (incl. 2 ea. of Key No. 50)52 0900857 Screw, #6-20 x 3/8 (2 req.)53 7117808 Motor Plate54 0503288 Bearing55 7113927 Cam and Gear56 7142942 Clip (Drain)57 0501228 Flow Plug58 7170327 O-Ring, 5/8 x 13/1659 7024160 Drain Hose Adaptor60 0900431 Tube Clamp F61 7116713 Clip (2 req.) F62 0507369 Installation Nut (2 req.) ¡63 0507615 Installation Tube (2 req.) ¡64 7170335 Washer (2 req.) ¡z 42-3441 Installation Kit (includes Key Nos.
62, 63 & 64) ¡65 2207800 Installation Adaptor (2 req.) F66 7170288 O-Ring, 15/16 x 1-3/16 (2 req.) F67 7134224 Rotor Seal68 7170204 O-Ring, 3/8 x 9/1669 7092642 Plug (Drain Seal)70 7129889 Spring71 7081764 Seal (Nozzle & Venturi)72 7082053 Valve Body73 7170319 O-Ring, 1/4 x 3/8 (2 req.)74 7081201 Retainer (Nozzle & Venturi)75 7081104 Nozzle & Venturi Housing76 1202600 Nut — Ferrule77 1148800 Flow Plug, .3 gpm
¡ PARTS NOT INCLUDED WITH MODEL NO. 625.348321, avail-able from Sears.
KEYNO.
PARTNUMBER DESCRIPTION
78 7187772 Nozzle and Venturi — Gasket Kit79 7146043 Screen80 7167659 Screen Support81 7170262 O-Ring, 3/8 x 1-3/882 7081188 Cap83 0521829 Flow Plug, .1 gpm84 7095030 Cone Screen85 7170246 O-Ring, 3-3/8 x 3-5/886 7199232 Rotor & Disc87 7082087 Wave Washer88 7170212 O-Ring, 3/4 x 15/1689 7170238 O-Ring, 7/16 x 5/890 7085263 Valve Cover91 7074123 Screw, #10-14 x 2 (5 req.)92 7077472 Expansion Pin93 7030713 Switch94 7117816 Spacer95 7070412 Screw, #4-24 x 1-1/8 (flat head)z 7187065 Nozzle & Venturi Assy. (includes
Key Nos. 75, and 78 through 84)z 7147112 Parts Bag, (includes parts marked
with a F, pages 32, 33 & 35) — or-der manuals separately, if needed.
z 7129716 Seal Kit (includes Key Nos. 67, 68,71, 85, 88 and 89)
z 42-3433 Drain Tube, 3/8² I.D. x 20 ¢¡
z not illustrated
BYPASS INSTALLATION VALVEMODEL NO. 625.34372KEYNO.
PARTNUMBER
DESCRIPTION
100 0502206 Retainer Ring101 7129863 Bypass Body102 7105013 O-Ring, 13/16 x 1 (4 req.)103 7130911 Stem104 7170288 O-Ring, 15/16 x 1-3/16 (2 req.)z 42-3437 Bypass Valve (Complete) ¡

7199012 ( 3/00 )
Sears, Roebuck and Co., Hoffman Estates, IL 60179 U.S.A.
OWNERSMANUAL
MODEL NO.625.348321
SOLID STATEWATER SOFTENER
The model number ofyour water softener isfound on the rating de-cal. This decal is on therim, under the salt cover.
When requesting serviceor ordering parts, alwaysprovide the following in-formation:
z Product Typez Model Numberz Part Numberz Part Description
For the repair or replacement parts you needCall 7 am -- 7 pm, 7 days a week1 -- 800 -- 366 -- PART
(1 -- 800 -- 366 -- 7278)
For in--home major brand repair serviceCall 24 hours a day, 7 days a week1 -- 800 -- 4 -- REPAIR
(1 -- 800 -- 473 -- 7247)
For the location of aSears Repair Service Center in your area
Call 24 hours a day, 7 days a week1 -- 800 -- 488 -- 1222
For information on purchasing a SearsMaintenance Agreement, or to inquire
about an existing AgreementCall 9 am -- 5 pm, Monday -- Saturday
1 -- 800 -- 827 -- 6655
REPAIR SERVICES
REPAIR SERVICES
America’s Repair Specialists