Embed Size (px)
Citation preview

Owner’s booklet.Here’s everything you’ll need to know.
41029400B_OB_OTP_US_EN_MGDL_R3.indd 1 11/7/14 3:07 PM

41029400B_OB_OTP_US_EN_MGDL_R3.indd 2 11/7/14 3:07 PM

Welcome
Congratulations. You have chosen one of the most advanced diabetes management systems available today. Your OneTouch® Ping® Glucose Management System will play an integral part in the blood glucose management and continuous insulin delivery regimen that you have established with your health care professional.
Your OneTouch® Ping® System combines the functionality of a OneTouch® Ping® Insulin Pump and a OneTouch® Ping® Meter Remote through radio frequency (RF) communication. Both devices will work independently of one another, but using them together can provide you with options to help make insulin delivery more discreet and flexible.
Your OneTouch® Ping® Insulin Pump uses advanced technology, providing continuous insulin delivery to help maintain your blood glucose targets as recommended by your health care professional. It delivers insulin in two ways: 1) continuous “basal” insulin delivery and 2) “bolus” insulin delivery to cover foods eaten and/or reduce a high blood glucose level.
Your OneTouch® Ping® Meter Remote combines the accuracy expected from OneTouch® products with features designed to make testing and tracking more convenient. These include a meter remote memory that serves as an electronic logbook for storing all your glucose test results along with other diabetes-related health records. Another new feature is a Food Database which can be easily accessed on your meter remote. The Food Database helps take the guesswork out of carb counting.
41029400B_OB_OTP_US_EN_MGDL_R3.indd 1 11/7/14 3:07 PM

When the devices are used together, your OneTouch® Ping® Meter Remote gives you convenient remote access to insulin delivery functions available with the OneTouch® Ping® Insulin Pump. Your OneTouch® Ping® System also allows your most recent blood glucose results from the OneTouch® Ping® Meter Remote to be automatically entered into bolus insulin calculations to cover carbohydrates in food or to correct for a high blood glucose level.
This Owner’s Booklet is designed to provide the information that you are looking for, when you need it. We hope you keep it handy.
Of course you may still have questions. If you do, our customer service representatives will be happy to answer your call. You can reach them at Customer Service at 1 877 937-7867. You can also obtain information at www.animas.com.
41029400B_OB_OTP_US_EN_MGDL_R3.indd 2 11/7/14 3:07 PM

41029400B_OB_OTP_US_EN_MGDL_R3.indd 3 11/7/14 3:07 PM

TABLE OF CONTENTS
BEFORE YOU BEGIN ............................................................................................................. I
SECTION I ONETOUCH® PING® INSULIN PUMP
CHAPTER 1 - Important information .....................................................................................1
CHAPTER 2 - Explanation of symbols .................................................................................15
CHAPTER 3 - Introduction to your Onetouch® Ping® Insulin Pump .......................................16
CHAPTER 4 - Getting your pump ready ..............................................................................23
CHAPTER 5 - Using the Normal Bolus feature ....................................................................38
CHAPTER 6 - Using Basal Program features .......................................................................40
CHAPTER 7 - Suspend/Resume feature .............................................................................50
CHAPTER 8 - History feature .............................................................................................52
CHAPTER 9 - Status feature ..............................................................................................59
CHAPTER 10 - Advanced features/Setup and activation ......................................................63
CHAPTER 11 - Using Advanced features ............................................................................78
CHAPTER 12 - Care and maintenance ...............................................................................96
CHAPTER 13 - Safety system and alarms ..........................................................................98
CHAPTER 14 - Troubleshooting guidelines .......................................................................119
CHAPTER 15 - Sick day guidelines ..................................................................................128
CHAPTER 16 - Lifestyle issues ........................................................................................130
CHAPTER 17 - My information .........................................................................................133
CHAPTER 18 - Warranty and other technical information ..................................................140
41029400B_OB_OTP_US_EN_MGDL_R3.indd 4 11/7/14 3:07 PM

SECTION II ONETOUCH® PING® METER REMOTE
CHAPTER 1 - Setting up your OneTouch® Ping® Meter Remote.........................................155
CHAPTER 2 - Setting up and using the Food Database .....................................................180
CHAPTER 3 - Estimating bolus insulin amounts with the bolus calculator ...........................183
CHAPTER 4 - Testing your blood glucose .........................................................................184
CHAPTER 5 - Adding comments to glucose test results ....................................................203
CHAPTER 6 - Making logbook entries ..............................................................................208
CHAPTER 7 - FastFacts® / Using your meter remote logbook ............................................215
CHAPTER 8 - Control solution testing ...............................................................................228
CHAPTER 9 - Caring for your meter remote and test strips ...............................................233
CHAPTER 10 - Understanding meter remote error and other messages .............................237
CHAPTER 11 - Detailed information about your meter remote and test strips .....................243
SECTION III ONETOUCH® PING® SYSTEM / USING YOUR ONETOUCH® PING® METER REMOTE AND ONETOUCH® PING® INSULIN PUMP TOGETHER
CHAPTER 1 - Overview of your OneTouch® Ping® System ................................................251
CHAPTER 2 - Establishing communication between your meter remote and your insulin pump ................................................................................252
CHAPTER 3 - Pump Home and Meter Home screens on your meter remote .......................269
CHAPTER 4 - Insulin delivery functions on your meter remote ...........................................271
CHAPTER 5 - Checking the status of your OneTouch® Ping® System ................................289
CHAPTER 6 - Troubleshooting your OneTouch® Ping® System ..........................................292
CHAPTER 7 - OneTouch® Ping® System Communication Technical Specifications ..............309
Appendix A: Glossary ......................................................................................................319
Index ..............................................................................................................................323
41029400B_OB_OTP_US_EN_MGDL_R3.indd 5 11/7/14 3:07 PM

41029400B_OB_OTP_US_EN_MGDL_R3.indd 6 11/7/14 3:07 PM

I BEFORE YOU BEGIN
Do Not attempt to connect to your pump before you have been trained on your pump, or until you have watched the training video. Check with your health care professional regarding your individual training needs.
As part of your training, your health care professional will assist you in making the appropriate selections for your insulin pump and meter remote settings. Your insulin pump must be programmed for your own personal use. Your insulin pump settings impact the calculations for insulin delivery using either your meter remote or insulin pump. Be comfortable with using your insulin pump before you activate the RF feature on your insulin pump and meter remote. See the appropriate chapters in Section I, for the steps on setting up and using your insulin pump.
The following insulins have been tested by the pump manufacturer and found to be safe for use in the insulin cartridge of the pump: Humalog® and Novolog®. Before using a different insulin with this pump, check the insulin drug label to make sure it can be used with the pump.
Many people also find it helpful to practice the blood glucose test process with control solution before testing with blood for the first time. See Chapter 8 in Section II.
For best results the use of your insulin pump, or your meter remote to access pump functions, is recommended for people with diabetes who:
• Test their blood glucose levels four to six times per day or as recommended by their health care team.
• Demonstrate adequate carbohydrate counting skills.
• Maintain good diabetes self-care skills.
• See their health care professional regularly.
• Have adequate vision and hearing to recognize the pump alerts.
41029400B_OB_OTP_US_EN_MGDL_R3.indd 1 11/7/14 3:07 PM

BEFORE YOU BEGINII
You should carefully read this Owner’s Booklet and any inserts that come with your OneTouch® Ping® System. These include inserts for:
• OneTouch® Ultra® Test Strips
• OneTouch® Ultra® Control Solution
While reading this Owner’s Booklet, please note the following:
• Display screens throughout the Owner’s Booklet are examples only. They should not be considered suggestions for individual programming and may not be representative of current health states.
• “Blood Glucose” is often abbreviated as BG in both instructional copy as well as in example display screens.
• Your OneTouch® Ping® Insulin Pump will often be referred to as simply “your pump”. Similarly, your OneTouch® Ping® Meter Remote will often be referred to as “your meter remote”. “The devices” will often be used when referring to both the OneTouch® Ping® Insulin Pump and OneTouch® Ping® Meter Remote.
Take special note of Warnings and Cautions throughout this Owner’s Booklet, which are identified with .
41029400B_OB_OTP_US_EN_MGDL_R3.indd 2 11/7/14 3:07 PM

BEFORE YOU BEGIN III
Intended use
Your OneTouch® Ping® Glucose Management System is indicated for the treatment of insulin-requiring diabetes and for the quantitative measurement of glucose in fresh capillary whole blood.
Your OneTouch® Ping® Insulin Pump is indicated for continuous subcutaneous infusion of insulin for the treatment of insulin-requiring diabetes.
Your OneTouch® Ping® Meter Remote Glucose Monitoring System is intended to be used for the quantitative measurement of glucose in fresh capillary whole blood. When used together with the OneTouch® Ping® Insulin Pump, it also functions as a wireless (RF) remote control to deliver insulin from the pump. Your OneTouch® Ping® Meter Remote Glucose Monitoring System is intended for use for self-testing outside the body (in vitro diagnostic use) by people with diabetes at home and by health care professionals in a clinical setting as an aid to monitor the effectiveness of diabetes control. Your OneTouch® Ping® Meter Remote Glucose Monitoring System is specifically indicated for use on the finger, forearm or palm. It should not be used for the diagnosis of diabetes or testing of newborns.
About radio frequency (RF) communication
Your meter remote and pump have built-in RF capability. RF is a type of wireless communication. Cell phones use RF technology, as do many other devices. RF is how your meter remote and pump communicate and share data.
The RF feature on your meter remote and pump will be deactivated when you first receive them. In order to begin using your meter remote and pump together as a system, RF must be activated on both devices and they must be paired (synchronized). Activating RF opens a line of communication on both devices and pairing ensures communication will take place only between one meter remote and one pump.
RF communication between your meter remote and pump will work up to a distance of about 10 feet (3.0 meters) and will transmit through clothing. Direct line of sight is not required for RF communication. As long as you have a good RF signal and are within range, you can use your meter remote to access pump functions.
41029400B_OB_OTP_US_EN_MGDL_R3.indd 3 11/7/14 3:07 PM
BEFORE YOU BEGINIV
When conditions or distance cause RF communication to be lost or interrupted, you will not be able to use your meter remote to access pump functions. This also means that data transfer between the two devices will stop temporarily. As soon as the problem is resolved, RF communication will resume. Any status records stored in your pump during the RF interruption will then be sent to your meter remote.
Your meter remote and pump are subject to and comply with U.S. Federal regulations, Part 15 of the Federal Communications Commission (FCC) Rules regarding devices with RF capability. From these regulations, the two conditions of operation specific to your device are given in the following FCC required statement:
This device complies with Part 15 of the FCC Rules. Operation is subject to the following two conditions: 1) this device may not cause harmful interference, and 2) this device must accept any interference received, including interference that may cause undesired operation.
Compliance with these guidelines means that under normal day-to-day circumstances your OneTouch® Ping® System should not affect the operation of other devices. Additionally, your OneTouch® Ping® System should operate normally in the presence of other devices in a normal household environment. In the event there is interference from another device, it is recommended that you increase distance between your system and that device, or turn off the interfering device. Alternatively, you may turn off RF communication between the meter remote and pump and perform insulin delivery functions directly from your pump (see Chapter 2 in Section III).
Changes or modifications not expressly approved by the manufacturer (Animas® Corporation) could void the user’s authority to operate the equipment.
There are environments where it is recommended that you not use the RF communication feature linking your meter remote and pump. When you are in radiology and MRI departments and around radiology equipment, it is recommended you first deactivate the RF communication feature on both your meter remote and your pump. Then you must remove both devices and leave them outside the MRI room. Any metal needle infusion sets should also be removed and left outside the MRI room.
41029400B_OB_OTP_US_EN_MGDL_R3.indd 4 11/7/14 3:07 PM

BEFORE YOU BEGIN V
Likewise, during air travel your airline may have specific restrictions about using your System with RF communication activated. It is recommended that you deactivate the RF feature on your pump and meter remote during flights, or check with your airline’s RF restrictions when making your travel plans. To learn more about deactivating the RF feature on your pump and meter remote, see Chapter 2 in Section III.
Your pump has additional environmental restrictions. See Chapter 1 in Section I, for recommendations regarding the use of pumps in the presence of radiology equipment.
Using your meter remote and pump together as a system
Once you have established communication between your meter remote and pump, you can access certain pump functions directly from your meter remote. These include delivering a bolus, monitoring pump status, and confirming many pump alarms and warnings.
Your pump has its own set of display screens and buttons to provide stand-alone insulin delivery without the use of your meter remote. Some of the buttons work the same way as the buttons on your meter remote. One example is the button on your pump. Like the button on your meter remote, the
button on your pump is used to confirm entries. Be sure you know how the buttons work on both your pump and meter remote before you begin using the devices together as a system.
When you use your meter remote to access pump functions, your meter remote display screens will closely resemble your pump display screens.
41029400B_OB_OTP_US_EN_MGDL_R3.indd 5 11/7/14 3:07 PM

BEFORE YOU BEGINVI
a
c
b
a. OneTouch® Ping® Insulin Pump
b. One Energizer® Lithium L91 AA battery (1.5V) for your pump
c. Low Profile Clip
d. Owner’s Booklet*
* Not pictured above
OneTouch® Ping® System Carton Contents
Your OneTouch® Ping® System carton includes your insulin pump, your meter remote, and other accessories you will need to begin using both devices. Your meter remote and BG testing supplies are included within a separate kit within the carton. Check the contents of your carton to make sure all items are included. If any items are missing call Customer Service at 1 877 937-7867.
Your OneTouch® Ping® System carton includes:
• The OneTouch® Ping® Insulin Pump and pump accessories:
41029400B_OB_OTP_US_EN_MGDL_R3.indd 6 11/7/14 3:07 PM

BEFORE YOU BEGIN VII
• The OneTouch® Ping® Meter Remote kit which includes:
a
g
e
h
c
b
f
i
d
a. OneTouch® Ping® Meter Remote
b. OneTouch® Ultra® Control Solution
c. OneTouch® Lancing Device If another type of lancing device is included, see the separate instructions for that lancing device.
d. OneTouch® AST™ Clear Cap
e. OneTouch® UltraSoft® Sterile Lancets
f. Carrying Case
g. Two 1.5V AAA Alkaline Batteries* (batteries included but not installed)
h. OneTouch® Ultra® Test Strips
i. USB Cable
A warranty card for your meter remote is also included.
* See Chapter 9 in Section II, for important information on the correct way to install the batteries in your meter remote.
41029400B_OB_OTP_US_EN_MGDL_R3.indd 7 11/7/14 3:07 PM

BEFORE YOU BEGINVIII
WARNING: Keep the pump, meter remote, and accessories away from young children. Small items such as the battery door, batteries, battery cap, clip, test strips, lancets, protective disks on the lancets, and control solution vial cap are choking hazards.
Supply Reordering
You can place orders for cartridges, infusion sets, skin prep, test strips, batteries and many meter remote and pump accessories by calling our Reorder Department or by visiting our eStore at https://estore.animascorp.com/. In the United States and Puerto Rico, you may also call 1 877 937-7867.
Emergency Kit
Keep an emergency kit with you at all times to make sure you always have necessary supplies. This kit should include but is not limited to:
• Quick-acting glucose tablets or gel
• BG monitoring supplies including meter, test strips, lancing device, lancets, meter remote batteries (2 AAA alkaline)
• Blood or urine ketone testing supplies
• Rapid-acting and other insulin as recommended by your health care team
• Extra infusion sets and Animas® 2.0mL Cartridges (200 unit/2ml)
• Dressing and adhesive, if used
• An extra Energizer® Lithium L91 AA battery for your pump
• An extra pump battery cap
41029400B_OB_OTP_US_EN_MGDL_R3.indd 8 11/7/14 3:07 PM

BEFORE YOU BEGIN IX
• An extra pump cartridge cap (In the U.S. and Puerto Rico, call 1 877 937-7867 to order an extra cartridge cap. All other customers contact your local Animas® distributor.)
• Glucagon Emergency Kit®
• Emergency contact phone numbers
Be sure to inform a family member, co-worker and/or friend where this emergency kit is kept.
41029400B_OB_OTP_US_EN_MGDL_R3.indd 9 11/7/14 3:07 PM

BEFORE YOU BEGINX
41029400B_OB_OTP_US_EN_MGDL_R3.indd 10 11/7/14 3:07 PM

Section I
OneTouch® Ping®
Insulin Pump
41029400B_OB_OTP_US_EN_MGDL_R3.indd 1 11/7/14 3:07 PM

41029400B_OB_OTP_US_EN_MGDL_R3.indd 2 11/7/14 3:07 PM

1 CHAPTER 1 - Important information
Welcome
You have begun a new way of life with your OneTouch® Ping® Insulin Pump.
Your choice of pump therapy is a sign that you are committed to taking excellent care of yourself. Your pump has been specially designed to help you manage your diabetes, using advanced technology and sophisticated safety systems.
Your pump is used for insulin therapy to help maintain your blood glucose (BG) targets as recommended by your health care team. You program it to deliver two ways: a continuous, 24-hour “basal” rate and “bolus” insulin deliveries to accommodate for immediate doses to cover foods eaten and high BG. It is important to remember that successful pump therapy is a partnership of advanced technology and responsible self-care.
Please take a moment to look at the back of your pump and write down the serial number.
My pump serial number is: ________________________________
Serial Number (S/N)
US patent pendingMade in USA
ONETOUCH® PING® INSULIN PUMP
Rx O
NLY
(U.S
.)
IPX8
Label P/N: 400-274-00 Rev.A
West Chester, PA
FCC ID: VWT115MRI
24/7 TECHNICAL SUPPORT
1-877-937-7867
S/N: 79-57351-15
41029400B_OB_OTP_US_EN_MGDL_R3.indd 1 11/7/14 3:07 PM

CHAPTER 1 - Important information2
Technical Assistance
Animas Customer Service is available 24 hours a day. Our representatives are trained on the operation and set up of our products and are able to provide technical assistance or answer your product related questions. In the United States and Puerto Rico, call 1 877 937-7867. When calling, please have your pump and serial number available. The serial number is located on the back of the pump. For non-urgent technical questions, please email [email protected].
Important Note
Do Not Remove the New Factory-Installed Plastic Display Lens Protection Film.
Your pump now comes with a new factory-installed transparent plastic lens protection film covering the display lens. This protective film is highly durable and is designed to protect your pump display lens from incidental damage. Please do not attempt to remove this film. This protective film must remain in place at all times to fully protect your pump display lens from scratches and other cosmetic damage. This film will not protect your pump display lens from extreme abuse.
Should the pre-installed lens protection film become damaged or separate from the display, the film should be replaced. Replacement films are available through the following source:
In the United States and Puerto Rico, call Animas® at 1 877 YES-PUMP (1 877 937-7867) and press 2 for Reorders.
Please note that the OneTouch® Ping® Insulin Pump limited warranty does not cover damage resulting from normal wear and tear, accidents, negligence or misuse, and abuse, including scratched display lenses. We urge you to protect your pump screen from damage and use a lens protection film at all times.
Do Not Adjust the Pump Time and/or Date on February 29, 2016 (Leap Day/Leap Year).
If you make changes to the time and/or date of your OneTouch® Ping® Insulin Pump on February 29, 2016, the changes will not be saved in the pump.
41029400B_OB_OTP_US_EN_MGDL_R3.indd 2 11/7/14 3:07 PM

CHAPTER 1 - Important information 3
You may feel you have to change the time and/or date of your pump on this particular date because:
• You are starting your pump for the first time on that day.
• You are re-starting your pump on that day after the battery power has been depleted for more than 24 hours.
• You are traveling across time zones on that day.
If this is the case, wait until the next day (March 1, 2016) to change the time and/or date so that your changes will be saved in your pump.
If you do not make any changes to the time or date on your pump on February 29, 2016, your pump will recognize that day as a valid date and operate as expected to deliver insulin and record insulin usage.
You will not experience this issue on any other Leap Day/Leap Year.
41029400B_OB_OTP_US_EN_MGDL_R3.indd 3 11/7/14 3:07 PM
CHAPTER 1 - Important information4
WARNING:
• Do Not attempt to connect to your pump before you have been trained on your pump or unless your certified OneTouch® Ping® Insulin Pump trainer is present.
• Incorrect use of your pump, failure to follow the instructions in this Owner’s Booklet or improper/inadequate self-care and troubleshooting techniques can lead to death or serious injury. If you do not understand something or have questions, ask your health care team or call our Customer Service representatives at 1 877 937-7867.
• Your pump is designed to deliver insulin reliably, but because your pump uses only rapid-acting insulin, you will not have long-acting insulin in your body. To avoid the risk of diabetic ketoacidosis (DKA) or very high BG, you must be prepared to give yourself an injection of insulin if delivery is interrupted for any reason.
• Your pump is designed and calibrated to deliver U100 insulin. Use of any insulin with lesser or greater concentration can result in serious injury or death.
WARNING:
• Never start the Prime/Rewind sequence on your pump while the infusion set is connected to your body. The Prime/Rewind sequence includes steps for rewinding the pump motor, loading an insulin cartridge and tightening the cartridge cap, and priming the infusion set tubing. Failure to disconnect your infusion set from your body before performing these steps can result in over delivery of insulin, and possible injury or death. If your pump sustains internal damage, the amount of unintended insulin delivery could be significant. This could result in serious injury or death from hypoglycemia.
• The end of operational life of your pump is December 31, 2022.
This section of the Owner’s Booklet contains information about how to use, program and maintain your new pump. It is important to read it carefully. Even if you are an experienced pumper, keep your Owner’s Booklet handy for reference. Warnings, cautions and safety tips are found throughout this Owner’s Booklet, indicated by a symbol.
41029400B_OB_OTP_US_EN_MGDL_R3.indd 4 11/7/14 3:07 PM

CHAPTER 1 - Important information 5
Procedure Patient is PumperHealth Care Professional/
Technician is Pumper
Pacemaker/Automatic Implantable Cardioverter-Defibrillator (AICD)
• Disconnect pump and leave outside room during insertion of device and reprogramming.
• Infusion set can remain in place.
• Follow normal safety practices and proceed to the designated safe area while each X-ray is taken and during reprogramming.
EKG • No need to disconnect. • No need to disconnect.
Cardiac Catheterization
• Disconnect pump and leave outside room during procedure.
• Follow normal safety practices and proceed to the designated safe area while each X-ray is taken.
Nuclear Stress Test • Disconnect pump and leave outside room during scan.
• Can remain connected during injection of radioisotope.
• Follow normal safety practices and proceed to the designated safe area while each X-ray is taken.
Warnings and Precautions
Radiology Equipment
Your pump has been designed to operate in the presence of common sources of electrostatic and electromagnetic interference, such as store security systems. However, like all portable electronic devices, your pump should not be exposed to very strong electromagnetic fields, such as in MRI’s, RF welders or magnets used to lift automobiles. Very strong magnetic fields, such as in an MRI, can re-magnetize the portion of the motor that regulates insulin delivery. If you plan to undergo an MRI, remove your pump beforehand and keep it outside the room during the procedure.
Medical Procedures and Equipment
For procedures not included above or on the chart on the following pages, call (in advance of your procedure) 1 877 937-7867 in the U.S. and Puerto Rico.
41029400B_OB_OTP_US_EN_MGDL_R3.indd 5 11/7/14 3:07 PM

CHAPTER 1 - Important information6
Procedure Patient is PumperHealth Care Professional/
Technician is Pumper
Colonoscopy • No need to disconnect. • No need to disconnect.
Laser Surgery • Pump and infusion set can be worn; however some lasers can create interference and cause pump to alarm.
• Pump and infusion set can be worn; however some lasers can create interference and cause pump to alarm.
General Anesthesia • Determination based on what medical equipment is being used in the procedure.
• Determination based on what medical equipment is being used in the procedure.
Dental X-Rays • No need to disconnect.
• Pump should remain covered by lead apron placed on the patient by the dentist or technician.
• No need to disconnect.
• Follow normal X-ray safety practices and proceed to the designated safe area when each X-ray is taken.
Ultrasound • No need to disconnect.
• Transducer should not be pointed directly at pump or site. If site is directly in range of transducer, site should be removed.
• No need to disconnect.
• Transducer should not be pointed directly at pump or site.
Medical Procedures and Equipment
41029400B_OB_OTP_US_EN_MGDL_R3.indd 6 11/7/14 3:07 PM

CHAPTER 1 - Important information 7
Procedure Patient is PumperHealth Care Professional/
Technician is Pumper
Mammogram and Bone Density Test
• Do Not expose pump to test.
• Disconnect pump prior to test and leave pump in locked dressing room.
• Infusion set can remain in place during test.
• No need to disconnect.
• Follow normal safety practices and proceed to the designated safe area while each test is being performed.
Body X-Rays, Fluoroscopy (chest, neck, abdomen, torso, etc.)
• Do Not expose pump to X-ray beam.
• Disconnect pump prior to exam and leave pump in locked dressing room.
• Infusion set can remain in place during X-ray.
• No need to disconnect.
• Follow normal X-ray safety practices and proceed to the designated safe area when each X-ray is taken.
Therapeutic Radiation/Oncology (cancer treatment radiation)
• Do Not expose pump to radiation treatment.
• Disconnect pump prior to radiation treatment and leave pump in locked dressing room.
• If the infusion set doesn’t interfere with the area being treated, the set can remain in place during radiation.
• No need to disconnect.
• Follow normal radio-protection practices and proceed to the designated safe area while the patient is undergoing treatment.
Medical Procedures and Equipment
41029400B_OB_OTP_US_EN_MGDL_R3.indd 7 11/7/14 3:07 PM

CHAPTER 1 - Important information8
Medical Procedures and Equipment
Procedure Patient is PumperHealth Care Professional/
Technician is Pumper
CT Scans and MRI’s (Magnetic Resonance imaging)
• Do Not bring pump into the exam room at any time.
• Disconnect pump and metal needle infusion set prior to exam and leave in a locked dressing room.
• Soft cannula infusion sets can remain in place.
• If pump is accidentally allowed in the exam room disconnect pump immediately and contact Customer Service for instructions.
• MRI: Do Not bring pump into the same room as the MRI machine at any time.
• If pump is accidentally allowed in the MRI room disconnect pump immediately and contact Customer Service for instructions.
• CT Scan: No need to disconnect.
• Follow normal CT Scan safety practices and proceed to the designated safe area when each Scan is performed.
Electro-cautery surgery
• Disconnect from pump during surgery.
• Disconnect prior to surgery and leave pump in locked dressing room.
• If the infusion set doesn’t interfere with the area being treated, the set can remain in place during surgery.
• No need to disconnect.
When in doubt, disconnect and leave pump in locked dressing room. Follow usual instructions for bolusing to cover any missed basal insulin when you reconnect.
41029400B_OB_OTP_US_EN_MGDL_R3.indd 8 11/7/14 3:07 PM

CHAPTER 1 - Important information 9
Amusement Parks
Very powerful electromagnets are sometimes used on “free-fall” amusement park rides. Pumps should be removed and not taken on these “free-fall” types of rides.
High gravity forces can be experienced when riding on some roller-coasters. It is recommended that you disconnect (NOT suspend) your pump while on roller-coaster rides.
Aircraft without Cabin Pressurization
If flying in aircraft without cabin pressurization or flying in aircraft used for aerobatics or combat simulation (pressurized or not), it is recommended that you disconnect (NOT suspend) pump.
Precautions
• Your pump is a sealed device that should be opened ONLY by the manufacturer. If your pump seal is broken by anyone other than an authorized Animas® factory technician, the warranty is voided and your pump is no longer waterproof. If the back label on your pump is removed or damaged, the warranty is voided and your pump is no longer waterproof.
• When using your pump, if the pump is placed at a vertically higher position than the infusion site, a very small amount of additional insulin infusion may occur. To minimize this condition and maintain pump delivery accuracy, the vertical distance between your pump and the infusion site should be no more than 12 inches (30 centimeters). If your pump is placed at a vertically lower position than the infusion site, this condition is eliminated.
• Occasionally check the infusion site for proper placement and leaks. Improperly placed infusion sites or leaks around the infusion site can result in under infusion.
• Occasionally check the infusion set tubing for any damage, leaks or kinks while using your pump. Damaged, leaking or kinked tubing may restrict or stop insulin delivery and result in under infusion.
41029400B_OB_OTP_US_EN_MGDL_R3.indd 9 11/7/14 3:07 PM

CHAPTER 1 - Important information10
• Only use Animas® 2.0mL Cartridges (200 unit/2ml) infusion sets with a standard Luer connector. Efficacy of pump cannot be guaranteed if cartridges other than those manufactured by Animas® Corporation are used or if cartridges are used more than once.
• Always dispose of used cartridges and infusion sets following the regulations in your community. Failure to follow these guidelines may pose health hazards.
• Prior to replacing the battery cap, make sure the o-ring fits securely and is not damaged. A damaged o-ring may impact the battery contact and/or the waterproof feature of your pump. See Chapter 4 in Section I.
• Prior to inserting a cartridge into your pump, check the o-rings on the cartridge to be sure they are not damaged. Damaged cartridge o-rings can result in under or over delivery of insulin.
• Occasionally check the vents to be sure they are clear of debris. See Chapter 12 in Section I.
• Occasionally check that your pump personal settings are correct.
• Occasionally check to make sure your pump emits audible tones that are easily detectable and that the vibrate feature is working correctly. For example, audible tones should be heard and the vibration pulse felt every time you replace the battery.
• If using the upload or download feature, keep the communication window free of obstructions and refer to the Instructions for Use included with the wireless download cable. Contact your local Animas® distributor for information on ezManager® Software and wireless download cable.
NOTE: Your pump uses battery power to notify you of alerts, warnings, and alarms. If you do not confirm the notification, your pump will continue to use battery power as the notifications repeat and progress. This will result in reduced battery life and the Replace Battery Alarm screen appearing sooner than expected.
Additionally, certain warnings (e.g., Low Cartridge Warning, Occlusion Alarm) take precedence over less critical ones (e.g., Low Battery Warning). This means if you do not confirm the more critical warning, battery life will be reduced and your pump may skip the Low Battery Warning and go directly to the Replace Battery Alarm, or battery life will end before a Replace Battery Alarm is displayed.
41029400B_OB_OTP_US_EN_MGDL_R3.indd 10 11/7/14 3:07 PM

CHAPTER 1 - Important information 11
Safety Information
• Your pump is designed only for Continuous Subcutaneous Insulin Infusion (CSII). It is not intended for use with any other delivery substance.
• This section of the Owner’s Booklet gives instruction on how to program and operate your pump. Animas® Corporation does not make any recommendations on specific programming related to your diabetes care program. Consult your health care team for instructions specific to your treatment plan.
° Consult your health care team before using your pump to determine which programming features are appropriate for you. Some features require a greater knowledge of insulin pumping and advanced self-care skills. Additionally, some advanced programming features require that testing and fine-tuning of basic settings be completed in order to achieve the best possible results. Your health care team will give you specific training on programming and using your pump.
WARNING: CONFIRM all pump alerts, alarms and warnings as soon as possible. Not confirming alerts, alarms and warnings can affect insulin delivery as follows:
• Pump battery power may be drained much sooner than expected, leaving you without a way to deliver insulin if you do not have a replacement battery.
• The calculation of Insulin on Board (IOB) when using the bolus calculator feature may not be as accurate, resulting in the “suggested” bolus amount being less than what it should be.
• Basal and bolus delivery may be suspended for up to 2 hours once the alert, alarm or warning is confirmed without the pump directly notifying the user.
• Any Combo Bolus or Temp Basal in effect may be canceled without the pump directly notifying the user.
Any of these situations can result in over delivery or under delivery of insulin, resulting in serious injury or death.
41029400B_OB_OTP_US_EN_MGDL_R3.indd 11 11/7/14 3:07 PM

CHAPTER 1 - Important information12
° Use of Extended Bolus, Combo Bolus, ezCarb (carb calculator), Insulin on Board (IOB) and ezBG (BG correction calculator) all require input from your health care team. Do Not attempt to use these features until you have specific information for your treatment plan and have had specific training on each programming feature.
° Only your health care team can determine your Insulin to Carbohydrate (I:C) ratios, Insulin Sensitivity Factors (ISFs), BG Target ranges and duration of Insulin on Board (IOB).
° Basal rates that are too high or too low can adversely affect BG levels. Work with your health care team to fine-tune basal rates.
° The way your body uses insulin can be affected by many things. Contact your health care team about lifestyle changes such as starting/stopping your exercise program or significant weight loss/gain. Your basal rates may need to be modified.
• Do Not stop using your pump if you are ill. Even when you’re sick, your body still needs insulin. See Chapter 15 in Section I.
• When you begin using the Audio Bolus feature, always look at the screen as you program so that you are completely comfortable with the feature before delivering a bolus via audio prompts only.
• Animas® Corporation recommends that you have someone around you (family, friends, etc.) who understands diabetes and pump therapy, so in the event of an emergency, they can help you. Be sure they are familiar with any information given to you by your health care team.
• Before Bedtime
° Try to arrange infusion set changes at meals or one to two hours before bedtime. If a change is needed at bedtime, then check BG in one to two hours. Always check BG one to two hours after infusion set change.
° Always check that your cartridge has enough insulin to last through the night before going to bed. Unless otherwise recommended by your health care team, Do Not use the vibrate feature during sleep. It is recommended that you set the volume to high for all warnings and alarms before going to sleep.
41029400B_OB_OTP_US_EN_MGDL_R3.indd 12 11/7/14 3:07 PM

CHAPTER 1 - Important information 13
• Always remove all air bubbles from cartridge and tubing before beginning insulin delivery. Air bubbles can compromise accuracy of delivery. Refer to the Instructions for Use included with your cartridge packaging.
• Interference with your pump electronics by cell phones can occur if worn in close proximity. It is recommended that you wear your pump and cell phone at least 6 inches (15.2 centimeters) apart. When RF is turned on and you are using your pump and meter remote together as a system, RF interference is possible. See Chapter 7 in Section III.
• If you return your pump for service and a replacement pump is sent, Do Not use the replacement pump until all the settings specific to your treatment plan have been programmed.
• If you drop your pump or it has been hit against something hard, inspect it to be sure it is still working properly. Check that the display screen is working and clear, that the cartridge cap, battery cap and infusion set are properly in place. Check for leaks around the cartridge by wrapping a piece of tissue around the connection area. Cracks, chips or damage to your pump may impact the battery contact and/or the waterproof feature of your pump. Call our Customer Service representatives at 1 877 937-7867 if you identify or suspect your pump has been damaged. They will help determine if your pump should be replaced.
• Your pump is designed to operate in conditions where temperatures are between 40°F (5°C) and 104°F (40°C). If your pump is exposed to temperatures outside these parameters, extra care should be taken to protect it from extreme temperatures.
• Your pump and pump cartridges are latex free.
• To avoid risk of explosion, Do Not use your pump in the presence of explosive gases.
• Your pump is designed to achieve optimum performance and battery life with an Energizer® Lithium L91 AA battery (1.5V). Rechargeable batteries and Carbon-Zinc batteries do not have the necessary characteristics to power your pump and should not be used. Some AA lithium batteries are available with other voltages such as 3.6V or 4.0V. Do Not use these batteries. Use of anything other than a 1.5V battery could permanently damage your pump and voids its warranty.
41029400B_OB_OTP_US_EN_MGDL_R3.indd 13 11/7/14 3:07 PM

CHAPTER 1 - Important information14
• Do Not use household cleaners, chemicals, solvents, bleach, scouring pads or sharp instruments to clean your pump. Never put your pump in the dishwasher or use very hot water to clean it.
• Never use a hair dryer, microwave oven or baking oven to dry your pump. Use a soft towel.
WARNING: Your pump and pump accessories include small component pieces that could pose a choking hazard for small children.
41029400B_OB_OTP_US_EN_MGDL_R3.indd 14 11/7/14 3:07 PM

15 CHAPTER 2 - Explanation of symbols
Shown below are symbols you will find on your OneTouch® Ping® Insulin Pump or its packaging.
On your system packaging:
Do Not Reuse
On the front of your pump:
Up Arrow button
Down Arrow button
OK button
On the top of your pump:
Contrast button
On the back of your pump:
Important Information (See Owner’s Booklet for Instructions for Use)
S/N Serial Number
Date of Manufacture
IPX8 Waterproof Equipment (protected against the effects of submersion; tested to 12 feet (3.6 meters) for 24 hours)
Type BF Medical Equipment (patient isolated, not defibrillator protected)
Rx Only CAUTION: Federal (U.S.) law restricts this device to sale by, or on the order of a physician.
i Consult Owner’s Booklet
MRI Do Not wear or operate around MRI
devices. Remove and leave outside MRI room before entering.
41029400B_OB_OTP_US_EN_MGDL_R3.indd 15 11/7/14 3:07 PM

16 CHAPTER 3 - Introduction to your Onetouch® Ping® Insulin Pump
An insulin pump is a tool to allow you to better manage your diabetes. When connected to a properly inserted infusion set, your pump delivers insulin at a continuous level (basal rate), 24 hours a day. You program delivery of an immediate dose (bolus) of insulin to cover food eaten or to correct high BG.
Your pump is engineered and manufactured to the highest standards of quality.
Get to Know Your OneTouch® Ping® Insulin Pump
Up button
Down button
Display Screen
Audio bolus/ ezBolus™ button
OK button
Contrast button
41029400B_OB_OTP_US_EN_MGDL_R3.indd 16 11/7/14 3:07 PM

17 CHAPTER 3 - Introduction to your Onetouch® Ping® Insulin Pump
Main Programming Buttons
There are 3 buttons for main programming functions. The and buttons allow you to move through screen selections and to scroll up and down to enter values such as a bolus amount. The button allows you to select an item or activate a function.
Programming Basics
• Use the / buttons to scroll to the desired selection and then press the button to select. If the cursor is flashing, it means your pump is in Edit mode and by scrolling with the / buttons, you can edit the flashing field.
• Once you have finished editing, press the button to confirm your entry and to exit the Edit mode.
Display Screen
All programming, operations, warnings and alarms are shown on the display screen.
Contrast Button
Pressing this button adjusts the contrast of your display. There are three contrast levels: Dim, Default and Bright. To preserve battery life, your pump display will Auto-dim when a button is not pressed for half the time your display time-out is set. While in Auto-dim mode, you can restore the default contrast level you have set by pressing the button on top of your pump. Pressing a function button while in Auto-dim mode will restore the default contrast level as well as perform the function of the key. To adjust contrast during a Call Service alarm, you must use the button. See Chapter 10 in Section I.
NOTE: When viewing your pump display in bright sunlight, it is recommended you shade the screen or move to a shady area for best visibility.
41029400B_OB_OTP_US_EN_MGDL_R3.indd 17 11/7/14 3:07 PM

18 CHAPTER 3 - Introduction to your Onetouch® Ping® Insulin Pump
Audio Bolus/ezBolus™
This button allows you to program a bolus without looking at your pump, by using audible tones to confirm programming and delivery. If you choose not to activate the Audio Bolus feature, this button provides a shortcut to the Normal Bolus screen.
NOTE: When you first use the Audio Bolus feature, you should always look at the screen to confirm correct programming until you are comfortable with using audio feedback to program a bolus. See Chapter 10 in Section I.
Battery Cap/Vent
This cap unscrews easily with a coin or the battery cap tool to replace and secure your battery. There is an o-ring around the cap, which prevents water from entering. The battery cap also is equipped with a built-in vent to allow air to enter your pump to maintain pressurization but prevent water from entering. Be careful not to over tighten the battery cap. See Chapter 4 in Section I.
Primary Vent
This vent is part of the redundant vent safety system, which allows air inside your pump to maintain equalized pressure but prevents water from getting inside.
WARNING: Under no circumstances should you introduce any kind of sharp object into the vent openings to clean them. Doing so will compromise your pump’s waterproof capabilities. If at any time you suspect the vent openings are clogged, replace the battery cap or call Animas® Customer Service for questions about the Primary Vent.
Cartridge Cap
Primary Vent
Battery Cap/Vent
41029400B_OB_OTP_US_EN_MGDL_R3.indd 18 11/7/14 3:07 PM
19 CHAPTER 3 - Introduction to your Onetouch® Ping® Insulin Pump
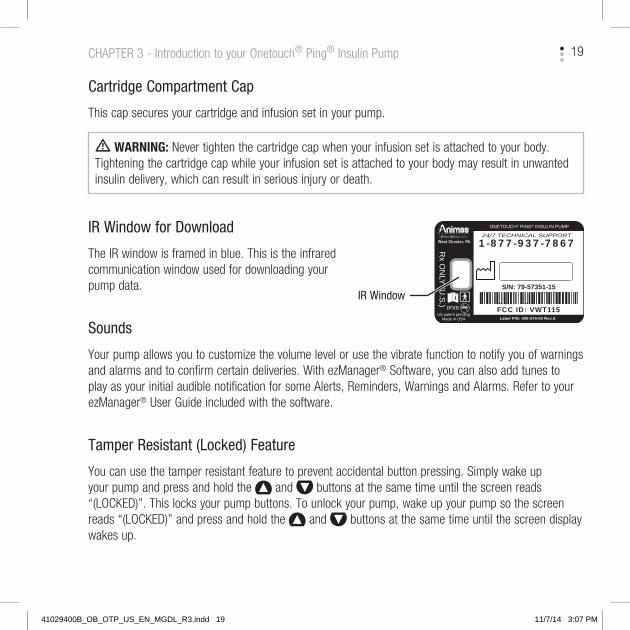
WARNING: Never tighten the cartridge cap when your infusion set is attached to your body. Tightening the cartridge cap while your infusion set is attached to your body may result in unwanted insulin delivery, which can result in serious injury or death.
IR Window for Download
The IR window is framed in blue. This is the infrared communication window used for downloading your pump data.
Sounds
Your pump allows you to customize the volume level or use the vibrate function to notify you of warnings and alarms and to confirm certain deliveries. With ezManager® Software, you can also add tunes to play as your initial audible notification for some Alerts, Reminders, Warnings and Alarms. Refer to your ezManager® User Guide included with the software.
Tamper Resistant (Locked) Feature
You can use the tamper resistant feature to prevent accidental button pressing. Simply wake up your pump and press and hold the and buttons at the same time until the screen reads “(LOCKED)”. This locks your pump buttons. To unlock your pump, wake up your pump so the screen reads “(LOCKED)” and press and hold the and buttons at the same time until the screen display wakes up.
Cartridge Compartment Cap
This cap secures your cartridge and infusion set in your pump.
US patent pendingMade in USA
ONETOUCH® PING® INSULIN PUMP
Rx O
NLY
(U.S
.)
IPX8
Label P/N: 400-274-00 Rev.A
West Chester, PA
FCC ID: VWT115MRI
24/7 TECHNICAL SUPPORT
1-877-937-7867
S/N: 79-57351-15
IR Window
41029400B_OB_OTP_US_EN_MGDL_R3.indd 19 11/7/14 3:07 PM

20 CHAPTER 3 - Introduction to your Onetouch® Ping® Insulin Pump
Basic Display Screens
Verify Screen
When you insert a battery, an all-black screen with an hourglass symbol will appear followed by the VERIFY screen. From here you should verify the settings for time, date, language and battery type. With “Confirm” highlighted, press to confirm the settings and go to the Home screen.
NOTE: If you do not confirm the settings on the VERIFY screen, you will be notified with an alarm beep sequence on your pump. If not confirmed after 1 hour, the sequence will progress to 3 chirps/vib and then 4 long tones/vib within an hour.
Home Screen
Once you have your pump set up, the Home screen is the first screen that is displayed when you “wake up” your pump. Press any button to wake up your pump. The Home screen shows the time of day, a battery life indicator, if you have an extended bolus or temp basal currently active, current basal rate, and how much insulin remains in your cartridge. You access the Main Menu from here or you can take a shortcut to the Status screen. The battery life indicator is shaded to show approximate battery life remaining.
NOTE: When the RF feature is activated on your pump, an RF ( ) symbol will appear on the top left of your pump Home screen.
After a set amount of time with no button presses, your pump display screen will “time out” to conserve battery life. When your pump times out, the screen display is blank.
Status
Basal Rate0.025U/Hr
Insulin: 105UMenu
2 : 27PM
VERIFY
Confirm
ModeMonthDayYear
ENGLISHBattery = Lith
2:27PM12 Hr
2007
Jan7
Status
Basal Rate0.025U/Hr
Insulin: 105UMenu
2 : 27PM
41029400B_OB_OTP_US_EN_MGDL_R3.indd 20 11/7/14 3:07 PM

21 CHAPTER 3 - Introduction to your Onetouch® Ping® Insulin Pump
Main Menu Screen
This screen shows all Main Menu options.
Bolus
This selection takes you to the Normal Bolus screen. If you have activated Advanced Bolus features, the Bolus Menu will be displayed. From the Bolus Menu you can select the bolus type, program and deliver the bolus dose.
Suspend/Resume
The Suspend function stops all insulin deliveries and Resume restarts basal delivery.
History
This option allows you to review history of boluses, total daily dose (TDD), alarms, primes, suspend and basal information.
Basal
The Basal Menu allows you to access and program your basal rate. This continuous rate maintains your blood glucose between meals. This rate will be determined by your health care team. The default Basal Menu will display one basal program and the Temp Basal option. You can activate additional basal program options with the Setup Advanced menu.
MAIN MENU
Home
BolusSuspnd/ResumHistoryBasalSetupPrime/RewindStatus
41029400B_OB_OTP_US_EN_MGDL_R3.indd 21 11/7/14 3:07 PM

22 CHAPTER 3 - Introduction to your Onetouch® Ping® Insulin Pump
Setup
This menu allows you to personalize the settings and features of your pump, as well as add advanced features to the menu. Your health care team will advise you on which features are best suited for your plan of treatment, as well as train you to achieve the best results.
Prime/Rewind
This function enables you to properly align the cartridge and piston rod as well as prime your infusion set tubing and fill your cannula or needle before connecting to your pump.
41029400B_OB_OTP_US_EN_MGDL_R3.indd 22 11/7/14 3:07 PM

23 CHAPTER 4 - Getting your pump ready
Status
This feature allows you to quickly see your current/most recent settings and pump deliveries.
To complete this section, you will need the following items:
• OneTouch® Ping® Insulin Pump
• Energizer® Lithium L91 AA battery (1.5V)
• Battery cap tool or coin
• Infusion set with standard Luer connector
• Animas® 2.0mL Cartridges (200 unit/2ml)
• Alcohol wipe (to clean top of insulin vial)
• Vial of U100 insulin (rapid-acting) at room temperature
• Skin prep such as IV Prep™ (to clean and prepare site for infusion set insertion)
WARNING: Before proceeding with this chapter, you should have completed your pump training and/or watched your training video.
CAUTION: Under no circumstances should you use an alcohol wipe or skin prep to clean your pump. See Chapter 12 in Section I.
41029400B_OB_OTP_US_EN_MGDL_R3.indd 23 11/7/14 3:07 PM

24 CHAPTER 4 - Getting your pump ready
WARNING: • Rechargeable batteries and Carbon-Zinc batteries do not have the necessary characteristics to
power your pump and must not be used. Use of these batteries voids your pump warranty.
• Under no circumstances should you attempt to power your pump with a high-energy 3.6V AA Lithium battery. Use of these batteries could permanently damage your pump and voids its warranty.
CAUTION: It is possible to safely power your pump with a conventional AA Alkaline battery (1.5V), but battery life is significantly reduced. Be sure you select the correct Battery Type on the VERIFY screen when you change the battery to ensure accuracy of battery life indicator.
Battery Type
Your pump is designed to achieve optimum performance and battery longevity with an Energizer® Lithium L91 AA battery (1.5V).
If you must use an AA Alkaline battery, the following is recommended:
• Energizer® E91 (labeled as Energizer® MAX)
NOTE: Your pump uses battery power to notify you of alerts, warnings, and alarms. If you do not confirm the notification, your pump will continue to use battery power as the notifications repeat and progress. This will result in reduced battery life and the Replace Battery Alarm screen appearing sooner than expected.
Additionally, certain warnings (e.g., Low Cartridge Warning, Occlusion Alarm) take precedence over less critical ones (e.g., Low Battery Warning). This means if you do not confirm the more critical warning, battery life will be reduced and your pump may skip the Low Battery Warning and go directly to the Replace Battery Alarm, or battery life will end before a Replace Battery Alarm is displayed.
41029400B_OB_OTP_US_EN_MGDL_R3.indd 24 11/7/14 3:07 PM

25 CHAPTER 4 - Getting your pump ready
Changing the Battery
Each time you change the battery
• A full rewind and prime sequence is required. See Priming your Pump and Infusion Set, in this chapter.
• The Insulin on Board (IOB) calculation starts over at zero.
• The Combo bolus returns to the factory set default duration and split.
• You should review your basal program settings.
• All user-programmable pump settings will be retained in the pump memory.
WARNING: Low Battery Warning means battery life will only last a minimum of 30 minutes.
WARNING: CONFIRM all pump alerts, alarms and warnings as soon as possible. Not confirming alerts, alarms and warnings can affect insulin delivery as follows:
• Pump battery power may be drained much sooner than expected, leaving you without a way to deliver insulin if you do not have a replacement battery.
• The calculation of Insulin on Board (IOB) when using the bolus calculator feature may not be as accurate, resulting in the “suggested” bolus amount being less than what it should be.
• Basal and bolus delivery may be suspended for up to 2 hours once the alert, alarm or warning is confirmed without the pump directly notifying the user.
• Any Combo Bolus or Temp Basal in effect may be canceled without the pump directly notifying the user.
Any of these situations can result in over delivery or under delivery of insulin, resulting in serious injury or death.
41029400B_OB_OTP_US_EN_MGDL_R3.indd 25 11/7/14 3:07 PM

26 CHAPTER 4 - Getting your pump ready
1. Use a coin to unscrew the battery cap with a counter-clockwise motion.
2. Check your battery cap for damage such as cracks or missing threads, and be sure the colored o-ring fits securely and is not torn or damaged.
3. Check the vent hole on the top of the battery cap to be sure it is clear of debris. This vent maintains pressurization while preventing water from entering the compartment.
NOTE: The battery cap should be replaced every 6 months, or if the o-ring or cap is damaged or the vent is clogged. See Chapter 12 in Section I.
4. Insert the Energizer® Lithium L91 AA (1.5V) battery into the battery compartment with the positive (+) end going in first.
5. Replace the cap by turning clockwise until you cannot see the o-ring. Then slowly tighten the cap until flush with pump body.
NOTE: Over tightening the battery cap can cause your pump case to crack. Cracks, chips, or damage to your pump may impact the battery contact and/or the waterproof feature of your pump.
6. Each time you change the battery, your pump will run a series of self-tests which will last a few seconds. An all black screen with an hourglass symbol will appear followed by the VERIFY screen. Your pump will give a beep to alert you to verify (or change) the time/date, language and battery type.
7. Check the displayed time/date, battery type and language. If correct, scroll down to highlight “Confirm” and press the button. The Home screen will be displayed. For more details on changing the time and date, see Setup - Basics, Setting/Changing Time and Date, in this chapter.
NOTE: The time and date must be programmed to confirm the VERIFY screen.
Battery Cap Vent holeO-ring
Energizer® Lithium L91 AA battery
41029400B_OB_OTP_US_EN_MGDL_R3.indd 26 11/7/14 3:07 PM

27 CHAPTER 4 - Getting your pump ready
Setup – Basics
You can use your computer, with ezManager®, to upload Time/Date and Sound settings. For instructions on uploading Time/Date Sound settings, refer to your ezManager® User Guide.
Setting/Changing the Time and Date
When you change your battery, the VERIFY screen allows you to edit the time and date.
You can also access the Time/Date SETUP screen by selecting “Setup” from the MAIN MENU.
1. From the Home screen, press to select “Menu”. Scroll to “Setup” on the MAIN MENU. Press .
2. Scroll to “Time/Date” on the SETUP menu. Press .
MAIN MENU
Home
BolusSuspnd/ResumHistoryBasalSetupPrime/RewindStatus
SETUP
Main Menu
Time/Date
Sound
Advanced
Status
Basal Rate0.025U/Hr
Insulin: 105UMenu
2 : 27PM
8. To change the battery type, highlight the “Battery” field and press to activate Edit mode (indicated by flashing cursor).
9. Use the / buttons to change battery type and press to confirm and exit Edit mode.
NOTE: The correct battery type must be selected in order for your battery life indicator to be accurate. “Lith” = Lithium, “Alkl” = Alkaline.
10. Scroll to “Confirm” and press . The Home screen is displayed.
NOTE: Until you have programmed a basal rate, the Alert screen shown here will appear when your pump is awakened. Simply scroll to “Confirm” and press to move past this Alert screen.
41029400B_OB_OTP_US_EN_MGDL_R3.indd 27 11/7/14 3:07 PM

28 CHAPTER 4 - Getting your pump ready
3. Press the button to activate Edit mode (indicated by flashing cursor).
4. Use the / buttons to change to your desired settings. Press the button to confirm your setting and exit Edit mode.
5. Use the / buttons to select the next field. Repeat the above process. Scroll to highlight “Main Menu” and press button when finished. The MAIN MENU screen will be displayed.
NOTE: • If you select the 12-hour time format, the AM/PM indicators will change as
you scroll to set the time. Be sure the desired AM or PM selection is correctly displayed when setting the time.
• If you select the 24-hour time format, the time will be shown in military time.
• Do Not change the pump time and/or date on February 29, 2016 (Leap Day/Leap Year). If you make changes to the time and/or date of your pump on February 29, 2016, the changes will not be saved in the pump. Wait until the next day (March 1, 2016) to change the time and/or date so that your changes will be saved in your pump. Refer to page 3 for more details.
Daylight Saving Time (certain states and countries only)
“Spring Forward”
If you advance the hour on your pump clock after 11pm but before midnight, you must also manually forward the date by one day. If you change your pump clock after midnight, your pump date will have changed automatically to the appropriate date.
“Fall Back”
It is recommended that you set your clock back before midnight on Saturday or after 1am on Sunday. This keeps your pump set to the correct date. Your pump will register an additional hour in the Daily Totals History because the day has essentially been altered to consist of 25 hours. If you change
SETUPTime/Date
Main Menu
ModeMonthDayYear
2: 27PMHour: Minute
12 HrJan292007
41029400B_OB_OTP_US_EN_MGDL_R3.indd 28 11/7/14 3:07 PM

29 CHAPTER 4 - Getting your pump ready
the clock between midnight and 1am, you must also change the date. This will result in a duplicate date entry in your history. (This duplicate entry will contain up to one hour’s worth of insulin delivered.)
Sounds - Setting/Changing
Note that this menu only adjusts sounds. It does not activate the feature. For example, Audio Bolus Sound is adjusted in this menu, but to turn the Audio Bolus feature on, go to the Setup Advanced menu. See Chapter 10 in Section I.
Your pump comes pre-loaded with a tune for most Alerts, Reminders and Alarms on medium and high volume settings. This tune plays only for the initial audible notification. If you do not confirm the initial notification, the next sound will be the factory default. If not confirmed, Warnings and Alarms will automatically progress to high volume and vibrate within one hour. With ezManager® Software, you can change or add tunes to play as your initial notification for some Alerts, Reminders, Warnings and Alarms. Refer to your ezManager® User Guide included with the software.
The options from the first SETUP SOUND menu are listed below. Normal Bolus Sound and Temp Basal Sound can be set to one of the following: Vibrate (Vib), Low volume (L), Medium volume (M), High volume (H) or can be shut off (OFF) completely. For safety reasons, some sounds cannot be turned off.
Normal Bolus Sound
Audio Bolus Sound (OFF is not an option for this sound setting)
Remote Bolus Sound (Vibrate and OFF are the only options for this sound)
Temp Basal Sound
The Remote Bolus Sound on your pump signals you when you use your meter remote to deliver a bolus from your pump. This setting applies only when you begin using your meter remote and pump together as a system (see Section III). Vibrate (Vib) is the default setting and OFF is the only other option for this sound setting.
41029400B_OB_OTP_US_EN_MGDL_R3.indd 29 11/7/14 3:07 PM

30 CHAPTER 4 - Getting your pump ready
The options from the second Setup Sound menu are listed below. They can be set to one of the following: Vibrate (Vib), Low volume (L), Medium volume (M), High volume (H) or can be shut off (OFF). For safety reasons, some sounds cannot be turned off.
Alert Sound
Reminder Sound (OFF is not an option for this sound setting)
Warning Sound (OFF is not an option for this sound setting)
Alarm Sound (OFF is not an option for this sound setting)
NOTE: If you download tunes from ezManager® Software to play on your initial audible notification, they will not play for any sound set at the Low volume (L) level.
CAUTION: Unless otherwise recommended by your health care professional, vibrate mode should not be used during sleep. It is recommended that you set the volume to high for all warnings before going to sleep.
1. From the MAIN MENU, scroll to “Setup”. Press the button.
2. Scroll to “Sound”. Press the button to go to the SETUP SOUND screen.
3. Use the / buttons to scroll to your selection. Press the button.
4. The cursor will flash to indicate you can edit the selection. Use / buttons to change to desired setting. Press the button to confirm.
SETUP SOUND
Next MenuMain Menu
N-BolusA-BolusR-Bolus
T-Basal
HLVib
OFF
SETUP SOUND
Main Menu
Alert
Reminder
Warning
Alarm
L
Vib
M
H
SETUP
Main Menu
Time/Date
Sound
Advanced
MAIN MENU
Home
BolusSuspnd/ResumHistoryBasalSetupPrime/RewindStatus
41029400B_OB_OTP_US_EN_MGDL_R3.indd 30 11/7/14 3:07 PM

31 CHAPTER 4 - Getting your pump ready
5. Repeat for remaining selections.
6. Scroll to “Next Menu” to access second SETUP SOUND menu or scroll to “Main Menu” when finished to return to the MAIN MENU.
The Cartridge
Filling the Cartridge
Refer to the Instructions for Use included with your cartridges.
Connecting the Tubing to the Cartridge
To complete this section, you will need the following:
• Filled Animas® 2.0mL Cartridge (200 unit/2ml)
• Infusion set compatible with your OneTouch® Ping® Insulin Pump
WARNING: The efficacy of your pump cannot be guaranteed if cartridges other than those manufactured by Animas® Corporation are used.
Only infusion sets marketed for use with insulin infusion pumps using insulin-compatible tubing and with a standard Luer lock can be used with your OneTouch® Ping® Insulin Pump. The efficacy of your pump cannot be guaranteed if infusion sets other than those specified are used.
Do Not connect infusion set to your body until after you have completed the Prime process.
Never start the Prime/Rewind sequence on your pump while the infusion set is connected to your body. Failure to disconnect your infusion set from your body before you start the Prime/Rewind process can result in over delivery of insulin, and possible injury or death. If your pump sustains internal damage, the amount of unintended insulin delivery could be significant. This could result in serious injury or death from hypoglycemia.
41029400B_OB_OTP_US_EN_MGDL_R3.indd 31 11/7/14 3:07 PM

32 CHAPTER 4 - Getting your pump ready
1. Clean the workspace where you will be connecting the infusion set to the cartridge. Wash your hands thoroughly with soap and water.
2. Open sterile infusion set package carefully. If the package is damaged or opened, use another set and contact your supplier.
3. Unscrew the cartridge compartment cap from your pump, using a counter-clockwise motion.
4. Remove infusion set tubing cap from the Luer connector. (Not all infusion sets have these caps.)
5. After removing protective cap, thread the Luer connector of the infusion set through the top (smaller) opening of the cartridge compartment cap, being careful not to touch Luer tip with hands or work surface.
6. Remove cap from the filled cartridge tip. To avoid insulin spillage and introduction of air in the cartridge, it should never be filled beyond the 2.0 mL mark. The plunger is properly positioned for maximum fill when the black o-ring nearest the plunger tip is centered on the 2.0 mL mark. Attach infusion set Luer connector to cartridge tip using clockwise motion until finger tight and then twist another quarter of a turn.
Correctly threaded through cap
Luer connector of infusion set
Top of cartridge compartment cap
Connect infusion set to cartridge here
WARNING: Be sure to twist the Luer connector an extra quarter of a turn to ensure a secure connection. If the connection is not secure, insulin may leak around the cartridge, resulting in under delivery of insulin.
41029400B_OB_OTP_US_EN_MGDL_R3.indd 32 11/7/14 3:07 PM

33 CHAPTER 4 - Getting your pump ready
7. Put cartridge/tubing assembly aside.
NOTE: • Check for leaks, cracks or damage each time you change your cartridge and infusion set. To avoid
leakage, be sure to tighten the Luer connection securely. You can check for moisture periodically by wrapping a tissue around the Luer connection between the cartridge and infusion set.
• When handling the cartridge, take care not to twist or turn the plunger in the cartridge body. Maintaining straight alignment of the plunger keeps the o-rings properly seated, which minimizes the possibility of introducing air into the cartridge and will prevent insulin spillage.
Changing the Cartridge
1. Disconnect infusion set from your body.
2. Unscrew the cartridge cap, leaving tubing connected to the cartridge.
3. With the tubing connected to the cartridge, pull cartridge straight out of your pump.
4. Disconnect tubing from cartridge and discard. Proceed with filling the new cartridge as outlined above.
WARNING: Never prime tubing or tighten the cartridge cap while the infusion set is connected to your body. Failure to disconnect your infusion set from your body before performing this step can result in over delivery of insulin, and possible injury or death. If your pump sustains internal damage, the amount of unintended insulin delivery could be significant. This could result in serious injury or death from hypoglycemia.
Priming your Pump and Infusion Set
NOTE: As each step is completed, the check box on the ezPrime menu will be shaded.
41029400B_OB_OTP_US_EN_MGDL_R3.indd 33 11/7/14 3:07 PM

34 CHAPTER 4 - Getting your pump ready
3. On the ezPrime menu, “Rewind” is highlighted. Press . The REWIND MOTOR screen is displayed.
4. Scroll up to “Go Rewind”. Press . Your pump will rewind the piston rod.
1. Make sure you are disconnected from your pump.
2. From the MAIN MENU, select “Prime/Rewind”.
MAIN MENU
Home
BolusSuspnd/ResumHistoryBasalSetupPrime/RewindStatus
REWIND MOTOR
Cancel
Disconnectinfusion set
from your body!
Go Rewind
ezPrime
Main Menu
RewindLoad CartPrimeFill Cannula
����
REWINDACTIVE
Please wait.
Full rewindrequired.
<<------<<------<<------
REWIND MOTOR
Cancel
Disconnectinfusion set
from your body!
Go Rewind
NOTE: Before starting the rewind, your pump will vibrate as it performs a self test.
5. When the rewind action is complete, the REWIND COMPLETE screen is displayed. Your pump will beep once to let you know the rewind is complete.
NOTE: If using a partially filled cartridge, you can select Stop during the Rewind Active function to stop the rewind at the position desired. After every third rewind, your pump is required to do a Full Rewind and will not offer the option of selecting the “Stop” position. A Full Rewind is always required when a battery is inserted.
6. Insert your filled cartridge.
REWINDACTIVE
Position: 160U
Stop
<<------<<------<<------
41029400B_OB_OTP_US_EN_MGDL_R3.indd 34 11/7/14 3:07 PM

35 CHAPTER 4 - Getting your pump ready
8. On the REWIND COMPLETE screen, “Continue” is highlighted. Press . Your pump will align the piston rod with the cartridge. The LOAD CARTRIDGE ACTIVE screen is displayed, followed by the PRIME screen. Your pump will beep once to let you know the cartridge is aligned with the piston rod.
9. On the PRIME screen, “Continue” is highlighted. Press .
10. The DELIVER PRIME screen is displayed. Be sure the infusion set is not connected to your body until the prime is complete.
7. Secure cartridge compartment cap to pump by turning in a clockwise motion until finger tight but Do Not over tighten.
WARNING: Never tighten the cartridge cap while the infusion set is connected to your body. Failure to disconnect your infusion set from your body before performing this step can result in over delivery of insulin, and possible injury or death. If your pump sustains internal damage, the amount of unintended insulin delivery could be significant. This could result in serious injury or death from hypoglycemia.
PRIME
Cancel
Be sure set isdisconnected
from your body.Then select
Continue.
ContinueInsulin: 200U
REWINDCOMPLETE
Cancel
Load U100cartridge.
Attach cap.Select Continue.
Continue
LOADCARTRIDGE
ACTIVE
>>------>>------>>------
Please wait.
DELIVERPRIME
Cancel
Press AND HOLDOK button
while primingtubing.
Go PrimeInsulin: 200U
NOTE: If screen display has timed out while loading your cartridge, select Prime/Rewind from the MAIN MENU and highlight “Load Cart” from the ezPrime menu. Press to display the REWIND COMPLETE screen. Continue with Step 8.
ezPrime
Main Menu
RewindLoad CartPrimeFill Cannula
����
41029400B_OB_OTP_US_EN_MGDL_R3.indd 35 11/7/14 3:07 PM

36 CHAPTER 4 - Getting your pump ready
11. Make sure “Go Prime” is highlighted. Press and hold the button until you see 5 drops of insulin come out the end of your infusion set. This means your tubing is primed. The PRIMING ACTIVE screen is displayed, followed by the PRIMING DONE screen.
Refer to the Instructions for Use included with your infusion set for proper insertion guidelines. See Selecting the Infusion Site and Inserting the Infusion Set in this chapter.
12. From the ezPrime menu, “Fill Cannula” is highlighted. Press the button. The FILL CANNULA screen is displayed.
NOTE: This step is not necessary for needle sets.
WARNING: Never prime while the infusion set is connected to your body. Failure to disconnect your infusion set from your body before performing this step can result in over delivery of insulin, and possible injury or death. If your pump sustains internal damage, the amount of unintended insulin delivery could be significant. This could result in serious injury or death from hypoglycemia.
PRIMINGACTIVE
Press AND HOLDOK button
while primingtubing.
>>------>>------>>------
Insulin: 177U
PRIMINGDONE
23U
177U
Primed
Remaining
ezPrime
Main Menu
RewindLoad CartPrimeFill Cannula
����
FILL CANNULA
Main Menu
Amount
Go
0.00 U
13. Use the / buttons to enter the amount of insulin needed to fill the cannula. Refer to the Instructions for Use included with your infusion set for details on how much insulin is required to fill the cannula. Press . “Go” is highlighted. Press to fill the cannula.
NOTE: The maximum Fill Cannula amount is 1U at a time.
If your pump is suspended, the screen will alert you with the ezPrime “Pump suspended” screen. You must resume delivery of your pump in order to complete the Priming function.
ezPrime
Home
Pumpsuspended.
Primingis
disabled.
Rewind
41029400B_OB_OTP_US_EN_MGDL_R3.indd 36 11/7/14 3:07 PM

37 CHAPTER 4 - Getting your pump ready
NOTE: The Fill Cannula step is not required for your pump to operate. For example, when you prime your pump after a battery change and you are not inserting a new infusion set, this step is not necessary. Filling the cannula when not necessary can result in unwanted delivery of insulin.
Selecting the Infusion Site and Inserting the Infusion Set
Your health care team will review appropriate site selections and techniques for insertion based on your body type. Refer to the Instructions For Use included with your infusion set for proper insertion guidelines.
Changing the Cartridge and Infusion Set
Cartridges and infusion sets require replacement and are not to be reused. Infusion sets should be replaced approximately every 2–3 days or as directed by your health care team. Refer to the insulin labeling and follow the direction of your health care team for frequency of replacing the cartridge.
WARNING: Do Not attempt to insert the infusion set into your body until you have been trained by your health care team. Improper insertion of your infusion set can lead to death or serious injury.
CAUTION: Occasionally check the infusion set tubing for any damage, air bubbles, leaks or kinking, which may restrict or stop insulin delivery and result in under infusion.
41029400B_OB_OTP_US_EN_MGDL_R3.indd 37 11/7/14 3:07 PM

38 CHAPTER 5 - Using the Normal Bolus feature
This chapter covers the basics of a Normal bolus, which is used to cover food you have eaten and high BG.
Your pump also offers advanced bolus features. See Chapter 10 in Section I.
1. From the MAIN MENU, select “Bolus”.
2. The cursor will flash over the amount field to indicate that it can be edited. Use the / buttons to enter desired bolus amount. Press .
3. “Go” is highlighted. Press to deliver the bolus.
4. The DELIVERING bolus screen is displayed. If you have activated the Normal Bolus sound in the SETUP SOUND menu, your pump will beep to confirm start of delivery, as well as when delivery is complete.
MAIN MENU
Home
BolusSuspnd/ResumHistoryBasalSetupPrime/RewindStatus
NORMAL BOLUS
Main Menu
Amount
Go
2.35 U
NORMAL BOLUS
Main Menu
Amount
Go
0.00 U
NORMAL BOLUS
Main Menu
Amount
Go
2.35 U
DELIVERING
2.00U
Press anyfunction button
to cancel.
41029400B_OB_OTP_US_EN_MGDL_R3.indd 38 11/7/14 3:07 PM

39 CHAPTER 5 - Using the normal bolus feature
NOTE: During a bolus delivery, you can stop delivery at any time by pressing any button on the front panel of your pump. The Warning screen shown here will be displayed. Confirm the Warning by pressing and check your Bolus History for the amount delivered.
NOTE: You can check when you last gave a bolus by looking in History or Status. These features are covered later. See Chapter 8 and Chapter 9 in Section I.
NOTE: If you have Advanced Bolus and Reminders features turned on, the BOLUS MENU at right will be displayed when you select “Bolus” from the MAIN MENU. Select “Normal” and press . Follow steps 2 through 4 in this chapter.
BOLUS MENU
Main Menu
NormalezCarbezBGCombo BolusReminders
Warning
Confirm
Bolusdelivery
canceled byuser button
press.Delivered:
2.00U of 2.35U
41029400B_OB_OTP_US_EN_MGDL_R3.indd 39 11/7/14 3:07 PM

40 CHAPTER 6 - Using Basal Program features
You can program your pump to display either 1 or 4 basal program options. Basal insulin is delivered continuously to help keep your BG in target between meals. Having more than one pre-set basal program makes it easy for you to switch based on your needs including weekends, weekdays, shift work, and menstruation. If you are new to pumping, your health care team may suggest you first become comfortable with one program before using multiple basal programs. The factory default displays one basal program and the temporary basal program. To display multiple basal options, see Chapter 10 in Section I.
You can use your computer and ezManager® Software to upload basal program names as well as basal rates. For instructions on uploading basal program information, refer to the ezManager® User Guide included with the software.
Setting a Basal Program
Each basal program can be set with up to 12 different basal rates (doses) in a 24-hour period. These 12 start times can be set to accommodate your changing basal needs throughout the day. For example, your body may need more insulin in the early morning to compensate for the “dawn phenomenon.” You can program time segments to begin at any hour or half hour.
NOTE: The / buttons will move the cursor through fields when not in Edit mode. When in Edit mode, the / buttons will change the value of the field. If the cursor is flashing, that means you can edit the entry. Use the button to start/stop Edit mode.
Use the My Information chart in Chapter 17 in Section I to record and enter your basal program times and doses as recommended by your health care team.
41029400B_OB_OTP_US_EN_MGDL_R3.indd 40 11/7/14 3:07 PM

41 CHAPTER 6 - Using Basal Program features
1. From the MAIN MENU, select “Basal”. Press .
The BASAL MENU displays the following:
• Total basal insulin programmed for the 24-hour period
• Temp (if you wish to program a Temporary Basal rate)
• The active basal program, designated by number and by name, as well as an “A” to indicate the active program. (If you have activated multiple basal programs in the Setup Advanced menu, all 4 basal program options will be displayed as shown on the far right.)
2. Scroll to select the program “1-WEEKDAY” and press .
NOTE: You do not have to Suspend your pump to edit an active program. When you select “Edit” from the BASAL MENU, your pump automatically suspends delivery. When you exit the Edit mode, the active program delivery automatically resumes.
3. The BASAL OPTIONS screen is displayed. “Edit” is highlighted. Press the button. From the EDIT BASAL screen, you can edit the basal segments of the selected program.
4. Scroll to the desired “U/Hr” field. Press to activate Edit mode (indicated by flashing cursor).
MAIN MENU
Home
BolusSuspnd/ResumHistoryBasalSetupPrime/RewindStatus
BASAL MENU
Main Menu
Total 0.00U
TempA1-WEEKDAY
BASAL MENU
Main Menu
Total 0.00U
TempA1-WEEKDAY 2-other 3-weekend 4-exercise
BASAL MENU
Main Menu
Total 0.00U
TempA1-WEEKDAY
EDIT BASAL
Save/Review
Total 0.00U
12:00A- - : - -
Start U/HrE
0.000- - .- - -
41029400B_OB_OTP_US_EN_MGDL_R3.indd 41 11/7/14 3:08 PM

42 CHAPTER 6 - Using Basal Program features
5. Use / buttons to set desired basal rate. Press to confirm and exit Edit mode for this field.
6. Scroll down to select the next “Start” time field. Press the button to activate Edit mode (indicated by flashing cursor).
NOTE: The next available empty basal segment will appear automatically as you program the previous segment. If the next empty basal segment does not appear, you have programmed all 12 possible segments.
7. Change next “Start” time field as desired, press the button to exit Edit mode. Segments can start on the hour or half hour.
NOTE: The 24-hour Total changes automatically as you change U/Hr settings.
8. Continue until basal segments have been set as recommended by your health care team.
9. When finished, scroll to “Save/Review” and press . If you have edited the active program, it is now resumed automatically. The BASAL OPTIONS screen is displayed.
NOTE: If your screen display has timed out (gone to sleep) before you have selected Save/Review while editing, a Warning screen will remind you the basal edit has not been saved. See Chapter 13 in Section I.
EDIT BASAL
Save/Review
Total 0.60U
12:00A- - : - -
Start U/Hr
0.025- - .- - -
E
EDIT BASAL
Save/Review
Total 0.60U
12:00A 4:00A
Start U/HrE
0.025- - .- - -
EDIT BASAL
Save/Review
Total 13.60U
12:00A 4:00A- - : - -
Start U/Hr
0.025 0.675- - .- - -
E
Warning
Edit Basal
Basal editnot saved.
Basaldelivery
suspended.
41029400B_OB_OTP_US_EN_MGDL_R3.indd 42 11/7/14 3:08 PM

43 CHAPTER 6 - Using Basal Program features
10. “Review” is highlighted. Press to review your entries for accuracy. Your basal segment settings are shown (5 on first screen, 5 on second screen and 2 on last screen). If you have more than 5 segments programmed, scroll to “Next” to see second and third screens as desired.
11. “Options” is highlighted. Press . The BASAL OPTIONS screen is displayed.
a. If you’ve edited and saved/reviewed the active program, it is resumed automatically. You can also select “Go” and the Home screen is displayed, which shows the current rate of delivery for the program that is active.
b. If you’ve edited an inactive program and wish to activate it, select “Go” from the BASAL OPTIONS screen. When you select “Go”, the Home screen is displayed, which shows the current rate of delivery for the program that is active.
Adding/Changing Segments in an Existing Basal Program
1. From the BASAL MENU, select desired program.
2. “Edit” is highlighted. Press .
3. Scroll to highlight the field you wish to change or to next available blank line to add a segment. Press to activate Edit mode. (The cursor will flash to indicate Edit mode.)
4. Use / buttons to set Start times and U/Hr amounts.
5. Check that the AM/PM settings are correct.
NOTE:• If you program a segment to start at the same time as an existing segment, the previously entered
segment is deleted.
BASAL OPTIONS
Main Menu
A1-WEEKDAYTotal 13.60U
ClearEditReviewGo
BASAL OPTIONS
Main Menu
A1-WEEKDAYTotal 13.60U
ClearEditReviewGo
41029400B_OB_OTP_US_EN_MGDL_R3.indd 43 11/7/14 3:08 PM

44 CHAPTER 6 - Using Basal Program features
• If you program a segment to start at a time that precedes an existing segment, the new segment is automatically inserted in the correct place. You must then scroll to the new segment, highlight the corresponding U/Hr field and enter or change amount, if desired.
6. When finished, scroll to “Save/Review” and press . If you have edited the active program, it is now resumed automatically. The BASAL OPTIONS screen is displayed.
a. Select “Review” from the BASAL OPTIONS screen to review your entries for accuracy. Your basal segment settings are shown (5 on first screen, 5 on second screen and 2 on last screen). If you have more than 5 segments programmed, scroll to “Next” to see second and third screens as desired.
b. If you’ve edited an inactive program, select the program from the BASAL MENU. Press . Select “Go” from the BASAL OPTIONS screen to activate the program you’ve selected.
When you select “Go”, the Home screen is displayed, which shows the current rate of delivery for the program that is active. (Or you can simply wait for your pump display to time out. When you press any button, your active basal program rate information is displayed on the Home screen.)
CAUTION: Always review changes to your basal program to be sure they are correct. Incorrect basal rates can result in under or over delivery of insulin. See Reviewing Basal Programs in this chapter.
41029400B_OB_OTP_US_EN_MGDL_R3.indd 44 11/7/14 3:08 PM

45 CHAPTER 6 - Using Basal Program features
Reviewing Basal Programs
1. From the BASAL MENU, scroll to highlight desired program. Press .
2. Scroll to “Review” from the BASAL OPTIONS screen. Press . Your basal segment settings are shown (5 on first screen, 5 on second screen and 2 on last screen). If you have more than 5 segments programmed, scroll to “Next” to see second and third screens as desired.
3. When finished, “Options” is highlighted. Press .
4. Scroll to “Main Menu” and press . The MAIN MENU screen is displayed. The active basal program continues.
5. If reviewing an inactive program and you wish to activate it, select the program you wish to activate from the BASAL MENU screen. Press .
6. Select “Go” from the BASAL OPTIONS screen to activate the program. The Home screen is displayed to show the current rate per hour of the program you have activated.
BASAL OPTIONS
Main Menu
A1-WEEKDAYTotal 13.60U
ClearEditReviewGo
A1-WEEKDAY
Options
Total 13.60U
12:00A 4:00A- - : - -
Start U/Hr
Next
0.025 0.675- - .- - -
41029400B_OB_OTP_US_EN_MGDL_R3.indd 45 11/7/14 3:08 PM
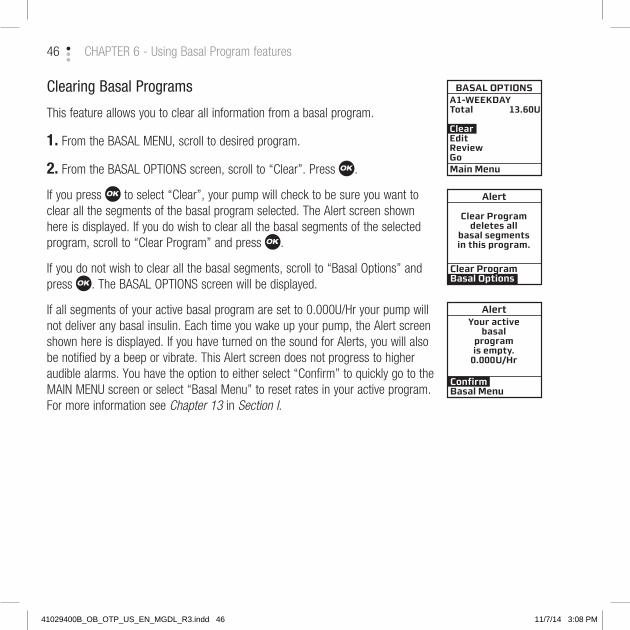
46 CHAPTER 6 - Using Basal Program features
Clearing Basal Programs
This feature allows you to clear all information from a basal program.
1. From the BASAL MENU, scroll to desired program.
2. From the BASAL OPTIONS screen, scroll to “Clear”. Press .
If you press to select “Clear”, your pump will check to be sure you want to clear all the segments of the basal program selected. The Alert screen shown here is displayed. If you do wish to clear all the basal segments of the selected program, scroll to “Clear Program” and press .
If you do not wish to clear all the basal segments, scroll to “Basal Options” and press . The BASAL OPTIONS screen will be displayed.
If all segments of your active basal program are set to 0.000U/Hr your pump will not deliver any basal insulin. Each time you wake up your pump, the Alert screen shown here is displayed. If you have turned on the sound for Alerts, you will also be notified by a beep or vibrate. This Alert screen does not progress to higher audible alarms. You have the option to either select “Confirm” to quickly go to the MAIN MENU screen or select “Basal Menu” to reset rates in your active program. For more information see Chapter 13 in Section I.
BASAL OPTIONS
Main Menu
A1-WEEKDAYTotal 13.60U
ClearEditReviewGo
Alert
Clear ProgramBasal Options
Clear Programdeletes all
basal segmentsin this program.
Alert
ConfirmBasal Menu
Your activebasal
programis empty.
0.000U/Hr
41029400B_OB_OTP_US_EN_MGDL_R3.indd 46 11/7/14 3:08 PM

47 CHAPTER 6 - Using Basal Program features
Temporary Basal Feature
This feature allows you to increase your active basal delivery rate for events such as sick days or decrease for events such as exercise. You can decrease your basal rate by 90% (in 10% decrements) or increase your basal rate by 200% (in 10% increments). You can also set to OFF. You can set the duration up to 24 hours in half-hour increments. (If you have activated multiple basal programs in the Setup Advanced menu, all 4 basal program options will be displayed as shown on screen example below, right.)
CAUTION: The lowest basal delivery amount possible is 0.025U/Hr. The highest basal delivery amount possible is 25U/Hr or the Max Basal amount you set in the Setup Advanced menu in Chapter 11.
1. From the BASAL MENU, scroll to “Temp”. Press .
2. The “Change” % field will flash to indicate Edit mode. Use the / buttons to enter the percentage change desired. Press the button to exit Edit mode.
BASAL MENU
Main Menu
Total 0.00U
TempA1-WEEKDAY
BASAL MENU
Main Menu
Total 0.00U
TempA1-WEEKDAY 2-other 3-weekend 4-exercise
A1-WEEKDAY
Main Menu
TEMP BASAL
Go
0%
4.0 Hr
Change:
Duration:
41029400B_OB_OTP_US_EN_MGDL_R3.indd 47 11/7/14 3:08 PM

48 CHAPTER 6 - Using Basal Program features
3. The “Duration” field is highlighted. Press to activate Edit mode.
4. Use the / buttons to enter the duration desired. Press to exit Edit mode.
5. “Go” is highlighted. Press to activate Temp Basal.
CAUTION: The lowest basal delivery amount possible is 0.025U/Hr. When you set a negative temporary basal rate, your pump will beep and display an Alert screen to remind you of the minimum delivery limit. This screen will display once for 5 seconds and give one audible alert (if you turned on Alert sounds in Setup).
Alert
Temp ActiveMinimum
Basal ratelimited to0.025U/Hr
6. The Home screen is displayed and shows your Temp Basal is active, the percentage change, the duration and how much time is left. When the duration of time is complete, your pump will automatically resume the active basal program.
NOTE: If you turned on the Temp Basal sound in Setup, your pump will beep once every 30 minutes to remind you of Temp Basal status.
A1-WEEKDAY
Main Menu
TEMP BASAL
Go
-40%
2.0 Hr
Change:
Duration:
Status
TEMP BASAL-40%%4.0 Hr
TTime Left 1.2 HrInsulin: 105U
Menu
2 : 27PM
41029400B_OB_OTP_US_EN_MGDL_R3.indd 48 11/7/14 3:08 PM

49 CHAPTER 6 - Using Basal Program features
Canceling a Temporary Basal Program
1. From the BASAL MENU, select “TEMP BASAL”. Press .
2. Details of the current active Temp Basal program will be displayed. Scroll up to “CANCEL” and press .
Your previously active basal program will be activated and the Home screen will be displayed to show the current rate per hour of the active basal program.
NOTE: If you Suspend your pump while a Temp Basal program is active, the Temp Basal program will be canceled and an Alert screen will notify you that the Temp Basal program has been canceled. This Alert is displayed once and gives an audible tone once (if you turned on Alert sounds in Setup). Temp Basal is also canceled when you change the battery and/or prime.
CAUTION: When you switch to another basal program or set a Temp Basal, you will most likely be changing the total insulin units delivered over a period of time. Be sure to review the total insulin units before you switch basal programs or set a Temp Basal. Units that are too high or too low may result in a hypoglycemic or hyperglycemic event.
A1-WEEKDAY
Main Menu
TEMP ACTIVE
CANCEL
0.675 U/Hr-40%
= 0.405 U/HrTime left
1.2 Hr
AlertPump Suspended
If active, Temp Basal &Combo Bolus
have beencanceled.
41029400B_OB_OTP_US_EN_MGDL_R3.indd 49 11/7/14 3:08 PM

50 CHAPTER 7 - Suspend/Resume feature
This feature allows you to stop and restart delivery quickly and easily.
It also cancels delivery of any Temp Basal or Bolus, including Combo Bolus that may be currently active. The Combo Bolus feature is covered in Chapter 10 in Section I.
Suspending Delivery
1. From the MAIN MENU, scroll to “Suspnd/Resum” and press .
2. “Suspend” is highlighted. Press .
The screen will display a message reminding you that this mode not only suspends your active basal delivery but also cancels any Temp Basal or Combo Bolus that may be active.
3. The Home screen is then displayed, showing that pump deliveries are suspended.
MAIN MENU
Home
BolusSuspnd/ResumHistoryBasalSetupPrime/RewindStatus
PumpDelivery
Suspend
Main Menu
AlertPump Suspended
If active, Temp Basal &Combo Bolus
have beencanceled.
Status
SUSPENDEDBasal Rate0.675U/Hr
Insulin: 105UMenu
2 : 27PM
41029400B_OB_OTP_US_EN_MGDL_R3.indd 50 11/7/14 3:08 PM
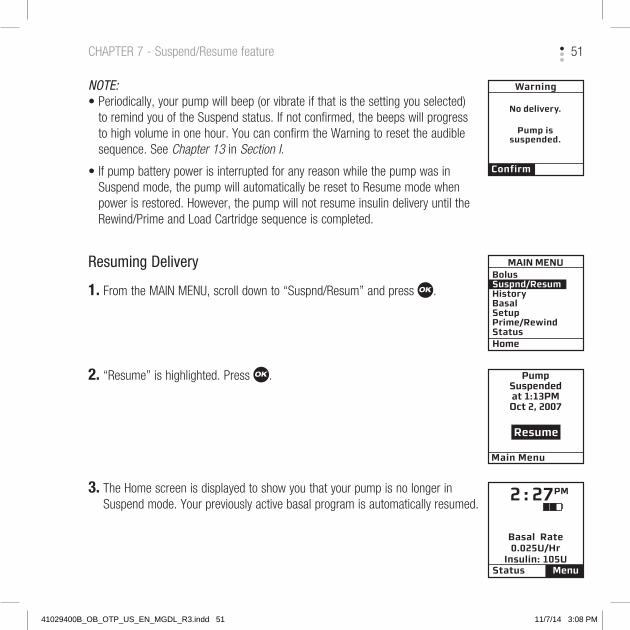
51 CHAPTER 7 - Suspend/Resume feature
NOTE:• Periodically, your pump will beep (or vibrate if that is the setting you selected)
to remind you of the Suspend status. If not confirmed, the beeps will progress to high volume in one hour. You can confirm the Warning to reset the audible sequence. See Chapter 13 in Section I.
• If pump battery power is interrupted for any reason while the pump was in Suspend mode, the pump will automatically be reset to Resume mode when power is restored. However, the pump will not resume insulin delivery until the Rewind/Prime and Load Cartridge sequence is completed.
Resuming Delivery
1. From the MAIN MENU, scroll down to “Suspnd/Resum” and press .
2. “Resume” is highlighted. Press .
3. The Home screen is displayed to show you that your pump is no longer in Suspend mode. Your previously active basal program is automatically resumed.
Warning
Confirm
No delivery.
Pump issuspended.
MAIN MENU
Home
BolusSuspnd/ResumHistoryBasalSetupPrime/RewindStatus
PumpSuspendedat 1:13PM
Oct 2, 2007
Resume
Main Menu
Status
Basal Rate0.025U/Hr
Insulin: 105UMenu
2 : 27PM
41029400B_OB_OTP_US_EN_MGDL_R3.indd 51 11/7/14 3:08 PM

52 CHAPTER 8 - History feature
Your pump stores important records for your review. You can access your pump’s history and view it directly on your pump screen or download it onto your computer using ezManager® Software.
Refer to the User Guide included with the software. Certain information on your pump history screens will include a “(P)” or “(M)”. This indicates if the action was initiated from your pump (P) or your meter remote (M) when you begin using the devices together as a system (see Chapter 1 in Section III ).
Your pump stores basal rates, boluses, alarms and settings. Your pump stores these records indefinitely, even when batteries are removed.
From the MAIN MENU, select “History”. The HISTORY menu is displayed.
Bolus History
Your pump displays the last 500 Bolus records.
NOTE: BG values and carb values are not displayed on your pump. However, when you download your pump history with ezManager® Software, up to 500 bolus records, including any BG and Carb values used in bolus calculations, will be displayed on the ezManager® reports. Additionally, blood glucose values from your meter remote (900 total) will be stored in pump history and displayed on the ezManager® Software reports.
MAIN MENU
Home
BolusSuspnd/ResumHistoryBasalSetupPrime/RewindStatus
41029400B_OB_OTP_US_EN_MGDL_R3.indd 52 11/7/14 3:08 PM

53 CHAPTER 8 - History feature
1. From the HISTORY menu, select “Bolus”. This screen displays the following:
• Bolus Record number
• Date of bolus
• Time of bolus
• Type of bolus delivered and whether it was initiated from your pump (P) or meter remote (M)
˚ Normal
˚ Combo
˚ Audio
• Amount of bolus programmed and delivered
• Status of bolus
˚ ACTIVE
˚ COMPLETED
˚ CANCELED and whether the bolus was canceled from your pump (P) or meter remote (M)
• If ezBG or ezCarb was used
NOTE: If the pump battery power is interrupted for any reason during a Bolus delivery, the Bolus will be canceled and the insulin amount delivered may not be recorded in your pump’s history.
2. Scroll up to highlight the record field. Press to activate Review mode (indicated by flashing cursor).
3. Record 1 indicates the most recent record. Use the / buttons to scroll to other records.
4. When finished reviewing, press to exit Review mode.
5. “History Menu” is highlighted. Press to return to the HISTORY menu.
HISTORY
Main Menu
BolusTotal Daily Dose (TDD)AlarmPrimeSuspendBasal
BOLUS
History Menu
Record 1
NORMAL (P)
ezCarb
Mar 23, 20071:13PM
2.80U of 2.80U
COMPLETED
BOLUS
History Menu
Record 2
NORMAL (P)
ezBG
Mar 23, 200712:13PM
0.80U of 3.80U
CANCELED (M)
41029400B_OB_OTP_US_EN_MGDL_R3.indd 53 11/7/14 3:08 PM

54 CHAPTER 8 - History feature
Total Daily Dose (TDD) History
Your pump displays the last 120 TDD records.
1. From the HISTORY menu, select “Total Daily Dose (TDD)”. This screen displays the following:
• Record number
• Date of record
• If Temp Basal was active on that date
• If Suspend was activated on that date
• Total Bolus for the date
• Total Basal for the date
• Total dose for the date
2. Scroll up to highlight the record field. Press to activate Review mode (indicated by flashing cursor).
3. Record 1 indicates the most recent record. Use the / buttons to scroll to other records.
4. When finished reviewing, press to exit Review mode.
5. “History Menu” is highlighted. Press to return to the HISTORY menu.
NOTE:• Each daily total is the total delivered since midnight.
• Total Daily Dose (TDD) insulin amounts recorded in the pump are not affected by interruptions in pump battery power, as they reflect the total amount of insulin delivered in a 24-hour day that starts and ends at midnight. However, if pump battery power is interrupted for any reason during a Bolus delivery, the Bolus will be canceled and the insulin amount delivered may not be recorded in your pump’s history.
HISTORY
Main Menu
BolusTotal Daily Dose (TDD)AlarmPrimeSuspendBasal
TDD
History Menu
Record 1
TempSuspendBolusBasal
TOTAL =
Mar 23, 2007NoNo
6.200U0.700U
6.900U
41029400B_OB_OTP_US_EN_MGDL_R3.indd 54 11/7/14 3:08 PM

55 CHAPTER 8 - History feature
Alarm History
Your pump displays the last 30 Alarm records.
1. From the HISTORY menu, select “Alarm”. The screen displays the following:
• Record number
• Date of alarm
• Time of alarm
• Alarm Code
• Alarm Type
2. Scroll up to highlight the record field. Press to activate Review mode (indicated by flashing cursor).
3. Record 1 indicates the most recent record. Use the / buttons to scroll to other records.
4. When finished reviewing, press to exit Review mode.
5. “History Menu” is highlighted. Press to return to the HISTORY menu.
HISTORY
Main Menu
BolusTotal Daily Dose (TDD)AlarmPrimeSuspendBasal
ALARM
History Menu
Record 1
Code XXX-XXX
Mar 23, 200701:13PM
EMPTY CARTRIDGE
41029400B_OB_OTP_US_EN_MGDL_R3.indd 55 11/7/14 3:08 PM

56 CHAPTER 8 - History feature
Prime History
Your pump displays the last 60 Prime and Fill Cannula records. Prime and Fill Cannula records are stored as separate records.
1. From the HISTORY menu, select “Prime”. The screen displays the following:
• Record number
• Date of prime
• Time of prime
• Amount of prime
2. Scroll up to highlight the record field. Press to activate Review mode (indicated by flashing cursor).
3. Record 1 indicates the most recent record. Use the / buttons to scroll to other records.
4. When finished reviewing, press to exit Review mode.
5. “History Menu” is highlighted. Press to return to the HISTORY menu.
HISTORY
Main Menu
BolusTotal Daily Dose (TDD)AlarmPrimeSuspendBasal
PRIME
History Menu
Record 1
Fill CannulaTotal 1.0U
Mar 23, 200701:15PM
PRIME
History Menu
Record 2
PrimedTotal 23.7U
Mar 23, 200701:13PM
41029400B_OB_OTP_US_EN_MGDL_R3.indd 56 11/7/14 3:08 PM

57 CHAPTER 8 - History feature
Suspend History
Your pump displays the last 30 Suspend records.
1. From the HISTORY menu, select “Suspend”. The screen displays the following:
• Record number
• Date and time pump delivery was suspended
• Date and time pump delivery was resumed
2. Scroll up to highlight the record field. Press to activate Review mode (indicated by flashing cursor).
3. Record 1 indicates the most recent record. Use the / buttons to scroll to other records.
4. When finished reviewing, press to exit Review mode.
5. “History Menu” is highlighted. Press to return to the HISTORY menu.
HISTORY
Main Menu
BolusTotal Daily Dose (TDD)AlarmPrimeSuspendBasal
SUSPEND
History Menu
Record 1
Resumed
Mar 23, 200701:13PM
Mar 23, 200701:13PM
Suspended
41029400B_OB_OTP_US_EN_MGDL_R3.indd 57 11/7/14 3:08 PM

58 CHAPTER 8 - History feature
Basal History
Your pump displays the last 270 Basal delivery records.
1. From the HISTORY menu, select “Basal”. The screen displays the following:
• Record number
• Date and time basal rate was adjusted
• Basal rate adjustment
2. Scroll up to highlight the record field. Press to activate Review mode (indicated by flashing cursor).
3. Record 1 indicates the most recent record. Use the / buttons to scroll to other records.
4. When finished reviewing, press to exit Review mode.
5. “History Menu” is highlighted. Press to return to the HISTORY menu.
NOTE: The History records each basal rate change. When no basal is being delivered, the Basal History Record will show 0 units delivered. This can happen for the following reasons:
• Cartridge change
• Basal segment set to 0
• Battery change
• Basal edit screen accessed
• Suspend
• Prime menu accessed
• Alarm
• Loss of prime
HISTORY
Main Menu
BolusTotal Daily Dose (TDD)AlarmPrimeSuspendBasal
BASAL
History Menu
Record 1
Rate = 0.670
Mar 23, 200701:13PM
41029400B_OB_OTP_US_EN_MGDL_R3.indd 58 11/7/14 3:08 PM

59 CHAPTER 9 - Status feature
This feature gives you easy access to a summary of information about your pump’s current programming and performance. There are six Status screens.
1. From the MAIN MENU or from the Home screen, scroll to “Status” and press .
Status Screen 1 – Active Basal
The screen displays the following information:
• Which basal program is currently active
• The 24-hour total for the active basal program
• Units per hour currently being delivered
• Insulin currently remaining in cartridge
The cursor is flashing on the STATUS 1 screen. Press the button to move to the STATUS 2 screen or press to highlight “Main Menu” and exit Status screens.
MAIN MENU
Home
BolusSuspnd/ResumHistoryBasalSetupPrime/RewindStatus
Status
Basal Rate0.025U/Hr
Insulin: 105UMenu
2 : 27PM
STATUS 1
Main Menu
ACTIVE BASAL
24-Hr Total 13.60U
0.675U/HrInsulin: 105U
A1-WEEKDAY
41029400B_OB_OTP_US_EN_MGDL_R3.indd 59 11/7/14 3:08 PM

60 CHAPTER 9 - Status feature
Status Screen 2 – IOB, Last Bolus
The screen displays the following information:
• Amount of insulin currently “on board” (IOB). For more information on this feature, see Chapter 10 in Section I.
• Type and amount of last completed bolus
˚ N = Normal
˚ C = Combo (normal portion only)
˚ A = Audio
• Time and date of last bolus
The cursor is flashing on the STATUS 2 screen. Press the button to move to the STATUS 3 screen or press to highlight “Main Menu” and exit Status screens.
Status Screen 3 – Delivery Today
The screen displays the following information since midnight and up to the current time:
• Insulin type
• If Temp Basal has been active
• If Suspend has been active
• Total bolus amount delivered
• Total basal amount delivered
• Total insulin delivered (excluding prime amounts)
The cursor is flashing on the STATUS 3 screen. Press the button to move to the STATUS 4 screen or press to highlight “Main Menu” and exit Status screens.
Main Menu
DELIVERY TODAY
TempSuspendBolusBasal
TOTAL =
NoNo
9.400U0.200U
9.600U
U100
STATUS 3
Main Menu
IOB=1.70U
N 3.30U9:55AMJul 8, 2007
LAST BOLUS
STATUS 2
41029400B_OB_OTP_US_EN_MGDL_R3.indd 60 11/7/14 3:08 PM

61 CHAPTER 9 - Status feature
Status Screen 4 – Combo Bolus
The screen displays the following information:
• Most recent Combo Bolus status
˚ Active or Completed or Canceled
˚ Start date
˚ Start time
˚ End time
˚ Amount delivered (if active, shows amount delivered as of current time)
For more information on Combo Bolus, see Chapter 10 in Section I.
The cursor is flashing on the STATUS 4 screen. Press the button to move to the STATUS 5 screen or press to highlight “Main Menu” and exit Status screens.
Status Screen 5 – Temp Basal
The screen displays the following information:
• Most recent Temp Basal status
˚ Active/Inactive
˚ Start date
˚ Start time
˚ End time
˚ % adjustment
The cursor is flashing on the STATUS 5 screen. Press the button to move to the STATUS 6 screen or press to highlight “Main Menu” and exit Status screens.
Main Menu
COMBO BOLUS
StartEnd
Delivered:3.28/9.00U
CANCELLED
07:23AM07:31AM
Mar 23, 2007
STATUS 4
Main Menu
TEMP BASAL
StartEndChange:
ACTIVE
04:00PM06:00PM-50%
Mar 23, 2007
STATUS 5
41029400B_OB_OTP_US_EN_MGDL_R3.indd 61 11/7/14 3:08 PM

62 CHAPTER 9 - Status feature
Status Screen 6 – Codes
The screen displays the following information:
• Software revision
• Last seven digits of the serial number of your pump
• Codes for manufacturer’s use
The cursor is flashing on the STATUS 6 screen. Press to highlight “Main Menu” and exit Status screens.
Main Menu
CODESREV M=XXX.XX.XXD=XXX P=XXXS/N# 76543-21
STATUS 6
41029400B_OB_OTP_US_EN_MGDL_R3.indd 62 11/7/14 3:08 PM

63 CHAPTER 10 - Advanced features/Setup and activation
Now you’ve made it through the basics! Your pump offers many advanced features that you may find helpful in managing your diabetes. Consult with your health care team to determine which advanced features are appropriate for you.
This chapter tells you how to set up and turn on the advanced features. Chapter 11 in Section I covers how to use each advanced feature.
You can also use your computer and ezManager® Software to upload settings for Advanced Setup. Refer to the ezManager® User Guide included with the software.
From the MAIN MENU screen, select “Setup”. Then select “Advanced” from the SETUP screen and press .
Setup Advanced Screen 1 – Audio Bolus Feature
This screen allows you to:
• Turn Audio Bolus on or off
• Select the Audio Bolus delivery step size
˚ 0.1, 0.5, 1.0, 5.0 Units
1. Use the / buttons to scroll to the desired field.
2. Press to change to flashing cursor for Edit mode.
3. Use the / buttons to change to desired setting.
4. Press when setting is made.
NOTE: If Audio Bolus is activated, you cannot use the side button as a shortcut to Normal Bolus. You can still give a Normal Bolus via the MAIN MENU.
MAIN MENU
Home
BolusSuspnd/ResumHistoryBasalSetupPrime/RewindStatus
SETUP
Main Menu
Time/Date
Sound
Advanced
SETUP ADV 1
Home
AUDIO BOLUS
Enable OFF
Next
Delivery Step 0.1U
41029400B_OB_OTP_US_EN_MGDL_R3.indd 63 11/7/14 3:08 PM

64 CHAPTER 10 - Advanced features/Setup and activation
To move to the next Setup Advanced screen, scroll to the bottom of the screen and highlight “Next”. Press .
To return to the Home screen, scroll to “Home” and press . For more information, see Chapter 11 in Section I.
Setup Advanced Screen 2 – Advanced Bolus Features and Multiple Basal Programs
This screen allows you to:
• Turn Advanced Bolus Features (ezCarb, ezBG, Combo Bolus) on or off
• Turn personal Reminders feature on or off
• Select bolus delivery speed (NRML (normal): 1U every second or SLOW: 1U every 4 seconds)
NOTE: Users may experience a slight stinging sensation with normal bolus delivery. If this occurs changing the bolus delivery speed to “SLOW” may reduce the stinging sensation.
• Select either 1 basal program or 4 basal programs to be displayed in the BASAL MENU
NOTE: If a program other than 1-Weekday is active, you cannot change this setting to display 1 basal program. The Alert screen shown here will be displayed to remind you.
1. Scroll to the desired field.
2. Press to change to flashing cursor for Edit mode.
3. Use the / buttons to change to desired setting.
4. Press when setting is made.
To move to the next Setup Advanced screen, scroll to the bottom of the screen and highlight “Next”. Press .
To return to the Home screen, scroll to “Home” and press .
SETUP ADV 2
Home
BOLUSAdv. BolusRemindersDelivery
NextPrograms 4
OFFOFF
NRML
BASAL
Alert
1-weekdaymust be the
active programto change thebasal display
setting.
Confirm
41029400B_OB_OTP_US_EN_MGDL_R3.indd 64 11/7/14 3:08 PM

65 CHAPTER 10 - Advanced features/Setup and activation
Setup Advanced Screen 3 – Insulin Limits
This screen allows you to:
• Set maximum basal delivery per hour
• Set maximum bolus amount
• Set maximum daily (24-hour) delivery amount. Your pump checks that total insulin delivery each 24-hour period (running from midnight of the previous day to midnight of the current day) does not exceed this limit.
• Set maximum 2-hour delivery amount. Your pump checks that total insulin delivery over each rolling 2-hour period does not exceed this limit.
NOTE: If pump battery power is interrupted for any reason, the pump will record the amount of insulin delivered over the previous 2 hour period as 0 units, rather than the actual amount delivered before power was interrupted.
1. Scroll to the desired field.
2. Press to change to flashing cursor for Edit mode.
3. Use the / buttons to change to desired setting.
4. Press when setting is made. To move to the next Setup Advanced screen, scroll to the bottom of the screen and highlight “Next”. Press .
To return to the Home screen, scroll to “Home” and press .
SETUP ADV 3
Home
Max LIMITSBasal
Bolus
Daily
2Hr
Next
25.00U/Hr
35.00U
600.00U
100.00U
CAUTION: Should you attempt a delivery that exceeds the limits you have set, your pump will alert you and display a text message. See Chapter 13 in Section I for additional information.
41029400B_OB_OTP_US_EN_MGDL_R3.indd 65 11/7/14 3:08 PM

66 CHAPTER 10 - Advanced features/Setup and activation
Setup Advanced Screen 4 – Language Setup, Display Timeout, Contrast and Battery Type
This screen allows you to:
• Select a different language
• Set the length of time your display stays on before timing out to save battery life
˚ 15, 30, 45 or 60 seconds
• Select a contrast setting
• Select Lithium (recommended) or Alkaline battery type. You can also change the battery type on the VERIFY screen when you insert a new battery.
1. Scroll to the desired field.
2. Press to change to flashing cursor for Edit mode.
3. Use the / buttons to change to desired setting.
4. Press when setting is made.
To move to the next Setup Advanced screen, scroll to the bottom of the screen and highlight “Next”. Press .
To return to the Home screen, scroll to “Home” and press .
SETUP ADV 4
Home
Language ENGLISHDisplay Timeout in 60 secsContrast 8Battery Lith
Next
41029400B_OB_OTP_US_EN_MGDL_R3.indd 66 11/7/14 3:08 PM
67 CHAPTER 10 - Advanced features/Setup and activation
Contrast Button
Pressing the button on the top of your pump adjusts the contrast. There are three contrast levels: Dim, Default and Bright. To preserve battery life, your pump display will Auto-dim when a button is not pressed for half the time your display time out is set. While in Auto-dim mode, you can restore the default contrast level you have set by pressing the button on top of your pump. Pressing a function button while in Auto-dim mode will restore the default contrast level as well as perform the function of the key. If in Call Service Alarm mode, you must use the button to restore the default contrast level.
To return contrast setting to original factory default, press the button and button at the same time. When the word “Contrast” is displayed on the screen, press any button to return to the default contrast setting.
NOTE: When viewing your pump display in bright sunlight, it is recommended you shade the screen or move to a shady area for best visibility.
41029400B_OB_OTP_US_EN_MGDL_R3.indd 67 11/7/14 3:08 PM

68 CHAPTER 10 - Advanced features/Setup and activation
Setup Advanced Screen 5 – Auto-OFF Feature
This screen allows you to set your pump to automatically suspend basal delivery and sound an alarm if no buttons are pressed in a user-selected number of hours. This feature can be used as a safeguard in case the user is unconscious.
1. Scroll to the desired field.
2. Press to change to flashing cursor for Edit mode.
3. Use the / buttons to change to desired setting.
4. Press when setting is made.
To move to the next Setup Advanced screen, scroll to the bottom of the screen and highlight Next. Press .
To return to the Home screen, scroll to “Home” and press .
NOTE: If pump battery power is interrupted for any reason, the cumulative time that was recorded with the Auto-Off feature will be reset to 0 hours when power is restored.
SETUP ADV 5
Home
AUTO OFFEnable
Next
OFFWhen enabled,
suspend in 12 Hrif no buttonsare pressed.
41029400B_OB_OTP_US_EN_MGDL_R3.indd 68 11/7/14 3:08 PM

69 CHAPTER 10 - Advanced features/Setup and activation
Setup Advanced Screen 6 – Low Cartridge Warning Setting and Occlusion Sensitivity Setting
This screen allows you to:
• Set your low cartridge warning to alert you at 10, 20, 30, 40 or 50 units remaining
• Set your occlusion detection sensitivity to High (more sensitive) or Low (less sensitive)
1. Use the / buttons to scroll to the desired field.
2. Press to change to flashing cursor for Edit mode.
3. Use the / buttons to change to desired setting.
4. Press when setting is made.
To move to the next Setup Advanced screen, scroll to the bottom of the screen and highlight “Next”. Press .
To return to the Home screen, scroll to “Home” and press .
NOTE:• The Low Cartridge Warning only alerts you one time. For example, if you have
it set to 30U and receive an alert, and then change the setting to 20U, it will not alert at 20U until after the next cartridge has been primed.
• If a bolus is delivered which causes a Low Cartridge Warning, your remaining insulin may be less than the Warning screen displays.
Warning
Confirm
Lowcartridge.
10U orless left.
SETUP ADV 6
Home
Low Cartridge Warning 20U
Next
Occlusion Sensitivity L
41029400B_OB_OTP_US_EN_MGDL_R3.indd 69 11/7/14 3:08 PM

70 CHAPTER 10 - Advanced features/Setup and activation
Setup Advanced Screen 7 – Personal Settings - Insulin to Carb (I:C) Ratios
Your health care team may recommend you use different Insulin to Carb (I:C) ratios for different times of day. When you use the ezCarb feature, your pump will automatically select the I:C ratio for the current time of day.
WARNING: Your health care team will determine your personal settings for the bolus calculator feature. Use of incorrect personal settings can result in over or under delivery of insulin.
This screen allows you to:
• Set different I:C ratios for 12 different time slots
NOTE: If you set only one ratio, it will be used for the entire 24-hour period.
From the SETUP ADV 7 screen, scroll up to “I:C Ratio”. Press .
1. The first segment always starts at midnight. The last time slot available is 11:30pm. Use the / buttons to scroll to the “1U:” (grams) field.
2. Press to change to flashing cursor for Edit mode.
3. Use the / buttons to change to desired setting.
4. Press when setting is made.
5. To move to the next I:C Ratio screen, scroll to “--->>” and press .
SETUP ADV 7
Home
I:C Ratio
ISF
BG Target
Next
I:C Ratio1 of 12
Done
Time:12:00A
1U: 13 g
Home<<---- ---->>
41029400B_OB_OTP_US_EN_MGDL_R3.indd 70 11/7/14 3:08 PM

71 CHAPTER 10 - Advanced features/Setup and activation
6. Scroll up to the “Time” field and press to change to flashing cursor for Edit mode.
7. Use the / buttons to change the segment start time. Press .
8. Scroll to the “1U:” (grams) field and press to change to flashing cursor for Edit mode.
9. Use the / buttons to change the “1U:” (grams) field as desired. Press . Repeat to set remaining segments per your health care team’s recommendations.
To review your settings, highlight “--->>” and press to scroll through each segment. Confirm the times and setting values are correct.
When finished, scroll to “Done” and press to return to the SETUP ADV 7 screen.
To return to the Home screen, scroll to “Home” and press .
Setup Advanced Screen 7 – Personal Settings - Insulin Sensitivity Factor (ISF)
Your health care team may recommend you use different Insulin Sensitivity Factors (ISFs) for different times of day. When you use the ezCarb or ezBG feature, your pump will automatically select the ISF for the current time of day.
This screen allows you to:
• Set different ISFs for 12 different time slots
NOTE: If you set only one ratio, it will be used for the entire 24-hour period.
From the SETUP ADV 7 screen, scroll up to “ISF”. Press .
I:C Ratio2 of 12
Done
Time:6:00A
1U: 15g
Home<<---- ---->>
SETUP ADV 7
Home
I:C Ratio
ISF
BG Target
Next
41029400B_OB_OTP_US_EN_MGDL_R3.indd 71 11/7/14 3:08 PM

72 CHAPTER 10 - Advanced features/Setup and activation
1. The first segment always starts at midnight. The last time slot available is 11:30pm. Use the / buttons to scroll to the “1U:” (mg/dL) field.
2. Press to change to flashing cursor for Edit mode.
3. Use the / buttons to change to desired setting.
4. Press when setting is made.
5. To move to the next ISF screen, scroll to “--->>” and press .
6. Scroll up to the “Time” field and press to change to flashing cursor for Edit mode.
7. Use the / buttons to change the segment start time. Press .
8. Scroll to the “1U:” (mg/dL units) field and press to change to flashing cursor for Edit mode.
9. Use the / buttons to change the “1U:” (mg/dL units) field as desired. Press . Repeat to set remaining segments per your health care team’s recommendations.
To review your settings, highlight “--->>” and press to scroll through each segment. Confirm the times and setting values are correct.
When finished, scroll to “Done” and press to return to the SETUP ADV 7 screen.
To return to the Home screen, scroll to “Home” and press .
ISF1 of 12
Done
Time:12:00A
1U: 40
Home<<---- ---->>
mg/dL
ISF2 of 12
Done
Time:6:00A
1U: 50
Home<<---- ---->>
mg/dL
41029400B_OB_OTP_US_EN_MGDL_R3.indd 72 11/7/14 3:08 PM

73 CHAPTER 10 - Advanced features/Setup and activation
Setup Advanced Screen 7 – Personal Settings - BG Target Ranges
Your health care team may recommend you use different BG Target ranges for different times of day. When you use the ezCarb or ezBG feature, your pump will automatically select the BG Target range for the current time of day.
This screen allows you to:
• Set different BG Targets and ranges for 12 different time slots
NOTE: If you set only one ratio, it will be used for the entire 24-hour period.
From the SETUP ADV 7 screen, scroll up to “BG Target”. Press .
1. The first segment always starts at midnight. The last time slot available is 11:30pm. Use the / buttons to scroll to the BG Target field.
2. Press to change to flashing cursor for Edit mode.
3. Use the / buttons to change to desired setting.
4. Press when setting is made.
5. Scroll to the “+/-”(range) field. Press to change to flashing cursor for Edit mode.
NOTE: By setting a range (+/-) your pump will not calculate a BG correction dose if your actual BG is within that range. If you prefer to correct to one target number rather than a range, simply set your range to +/- 0. This screen allows you to:
6. Use the / buttons to change the range as desired. Press .
SETUP ADV 7
Home
I:C Ratio
ISF
BG Target
Next
BG Target1 of 12
Done
Time:12:00A
120+/- 10
Home<<---- ---->>
mg/dLmg/dL
BG Target1 of 12
Done
Time:12:00A
120+/- 5
Home<<---- ---->>
mg/dLmg/dL
41029400B_OB_OTP_US_EN_MGDL_R3.indd 73 11/7/14 3:08 PM

74 CHAPTER 10 - Advanced features/Setup and activation
7. To move to the next BG Target screen, scroll to “--->>” and press .
8. Scroll up to the “Time” field and press to change to flashing cursor for Edit mode.
9. Use the / buttons to change the segment start time. Press .
10. Scroll to the BG Target field. Press to change to flashing cursor for Edit mode.
11. Use the / buttons to change to desired setting.
12. Press when setting is made.
13. Scroll to the “+/-”(range) field. Press to change to flashing cursor for Edit mode.
14. Use the / buttons to change the range as desired. Press . Repeat to set remaining segments per your health care team’s recommendations.
To review your settings, highlight “--->>” and press to scroll through each segment. Confirm the times and setting values are correct.
When finished, scroll to “Done” and press to return to the SETUP ADV 7 screen.
To return to the Home screen, scroll to “Home” and press .
BG Target2 of 12
Done
Time:6:00A
120+/- 10
Home<<---- ---->>
mg/dLmg/dL
41029400B_OB_OTP_US_EN_MGDL_R3.indd 74 11/7/14 3:08 PM

75 CHAPTER 10 - Advanced features/Setup and activation
Setup Advanced Screen 8 – Insulin on Board (IOB) Setting
This feature allows you to program the rate at which your body uses your bolus. Even with rapid-acting insulin, your body takes some time to use your entire bolus insulin. When this feature is activated and you give a bolus, your pump will tell you how much Insulin on Board (IOB) is currently remaining and will calculate a decreased bolus dose as an option. This helps to prevent “stacking” insulin and can help reduce your risk of hypoglycemia*. The duration of insulin action varies from person to person and can vary based on the infusion site you have selected and your activity level, among other factors. Your health care team will give you a recommended duration to program into your pump.
*Recommended reading for pump users includes:
• Pumping Insulin, by John Walsh, PA, CDE and Ruth Roberts, MA
• Smart Pumping, by Howard Wolpert, MD
WARNING: This feature is intended for use only with U100 rapid-acting insulin analogs such as Novolog® or Humalog®. If you use an insulin other than Novolog® or Humalog®, Do Not use this feature. Use of any insulin with lesser or greater concentration can result in serious injury or death.
This screen allows you to:
• Turn the IOB feature on or off
• Select the duration
1. Use the / buttons to scroll to the desired field.
2. Press to change to flashing cursor for Edit mode.
3. Use the / buttons to change to desired setting.
SETUP ADV 8
Home
Insulin on BoardIOB-2
Next
OFF
Duration4.0 Hr
41029400B_OB_OTP_US_EN_MGDL_R3.indd 75 11/7/14 3:08 PM
76 CHAPTER 10 - Advanced features/Setup and activation
4. Press when setting is made.
To move to the next Setup Advanced screen, scroll to the bottom of the screen and highlight “Next”. Press .
To return to the Home screen, scroll to “Home” and press .
NOTE: Your pump is constantly tracking IOB, so when you turn on the feature, your pump will immediately take into account the current amount remaining from previous bolus doses within the time frame you’ve selected during set up of the feature.
Points to remember about the IOB feature on your pump
• A curvilinear algorithm is used, which more closely mimics the way drugs decay in the body versus a straight line decay.
• With BG below target, IOB amount is displayed and is subtracted from the carb portion of the bolus.
• With BG within target, IOB amount is displayed for reference but not subtracted from bolus total.
41029400B_OB_OTP_US_EN_MGDL_R3.indd 76 11/7/14 3:08 PM

77 CHAPTER 10 - Advanced features/Setup and activation
• With BG above target, IOB amount is displayed and is subtracted from BG bolus.
Setup Advanced Screen 9 – Sick Day Guidelines
During your pump training, your health care team will discuss guidelines to use when you’re sick. This is a convenient way to store your basic sick day guidelines as recommended by your health care team. For more information on sick day guidelines, refer to Chapter 15 in Section I and contact your health care team.
This screen allows you to:
• Set a BG limit as a reminder for testing when sick
• Set the frequency of checking for ketones when sick
• Set the frequency of checking your BG when sick
To move to the next Setup Advanced screen, scroll to the bottom of the screen and highlight “Next”. Press .
To return to the Home screen, scroll to “Home” and press .
NOTE: This screen is intended as a reference only. Alerts are NOT triggered based on values displayed on this screen.
Setup Advanced Screen 10 – Establishing Communication with Your Meter Remote
This screen allows you to activate the RF and pairing features on your pump. When you are ready to begin using your pump and meter remote together as a system, you will need to activate RF communication and pair the devices. See Chapter 2 in Section III.
SETUP ADV 9
Home
Sick daysBG over
Next
240
Check ketones every 4 HrsCheck BG every 2 Hrs
mg/dL
41029400B_OB_OTP_US_EN_MGDL_R3.indd 77 11/7/14 3:08 PM

78 CHAPTER 11 - Using Advanced features
NOTE: Before using these features, you must turn them on in the Setup Advanced menu. See Chapter 10 in Section I.
Audio Bolus and ezBolus™
The Audio Bolus feature of the OneTouch® Ping® Insulin Pump allows you to bolus without looking at the screen display. This is convenient if you wear your pump under your clothing. When first using the audio bolus feature, also check the display screen until you are comfortable with the programming steps. If you do not wish to use the Audio Bolus feature, this button serves as a shortcut to the Normal Bolus screen. See ezBolus™ in this chapter.
CAUTION: When you first use the Audio Bolus feature, you should always look at the screen to confirm correct programming until you are comfortable with the feature.
CAUTION: Using the features in this chapter requires an advanced understanding of insulin pump therapy and should not be used without training and advice from your health care team. In order to achieve optimal results, some of these features should only be used once you have tested and fine-tuned your basal rates and your health care team has determined your individual targets and ratios.
41029400B_OB_OTP_US_EN_MGDL_R3.indd 78 11/7/14 3:08 PM

79 CHAPTER 11 - Using Advanced features
1. Turn on Audio Bolus in the Setup Advanced menu and select your preferred step size. See Chapter 10 in Section I.
2. The Audio Bolus button is the soft rubber button on the end of your pump. Press it once. Your pump will beep (or vibrate) to indicate you’ve accessed Audio Bolus mode as well as indicate the step size you’ve set up.
The number of beeps (or vibrate pulses) reminds you of the step size you’ve set.
• 1 indicates 0.1U step size
• 2 indicates 0.5U step size
• 3 indicates 1.0U step size
• 4 indicates 5.0U step size
3. Press the Audio Bolus button once for each step size you’ve programmed to reach the desired total amount. For example, if you are using 1.0U step size and you wish to bolus 4 units, press the button 4 times. You will hear a beep tone or vibrate for each button press. If you are using 0.5U step size and you wish to bolus 4 units, press the button 8 times.
4. Within 5 seconds, your pump will respond with a number of confirmation beeps equal to the number of times you pressed the Audio Bolus button.
NOTE: Do Not press any of the function buttons at this time unless you wish to cancel delivery.
5. Within 5 seconds, your pump will beep twice to “ask” you to confirm that you wish to activate delivery and “Confirm” is displayed on the Audio Bolus screen.
Audio BolusStep size=1.0U/Press
0.00U
Enterbolus amount
Press any otherkey to CANCEL
Audio Bolus
Confirm
3.00U
Press any otherkey to CANCEL
41029400B_OB_OTP_US_EN_MGDL_R3.indd 79 11/7/14 3:08 PM
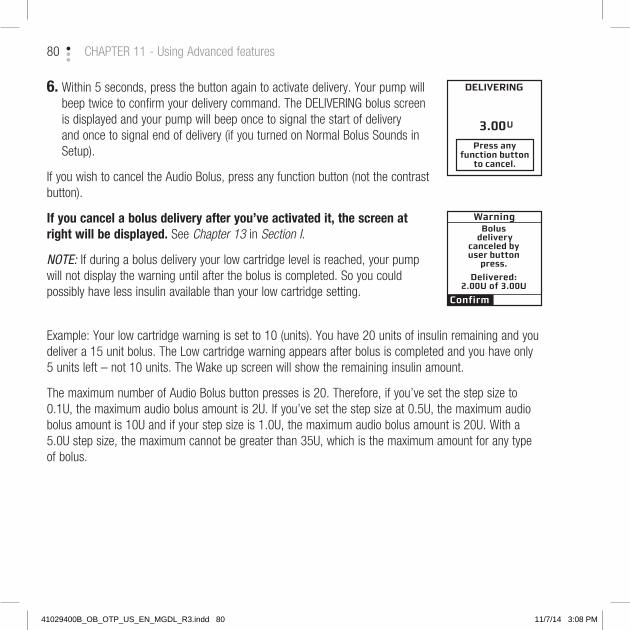
80 CHAPTER 11 - Using Advanced features
6. Within 5 seconds, press the button again to activate delivery. Your pump will beep twice to confirm your delivery command. The DELIVERING bolus screen is displayed and your pump will beep once to signal the start of delivery and once to signal end of delivery (if you turned on Normal Bolus Sounds in Setup).
If you wish to cancel the Audio Bolus, press any function button (not the contrast button).
If you cancel a bolus delivery after you’ve activated it, the screen at right will be displayed. See Chapter 13 in Section I.
NOTE: If during a bolus delivery your low cartridge level is reached, your pump will not display the warning until after the bolus is completed. So you could possibly have less insulin available than your low cartridge setting.
Example: Your low cartridge warning is set to 10 (units). You have 20 units of insulin remaining and you deliver a 15 unit bolus. The Low cartridge warning appears after bolus is completed and you have only 5 units left – not 10 units. The Wake up screen will show the remaining insulin amount.
The maximum number of Audio Bolus button presses is 20. Therefore, if you’ve set the step size to 0.1U, the maximum audio bolus amount is 2U. If you’ve set the step size at 0.5U, the maximum audio bolus amount is 10U and if your step size is 1.0U, the maximum audio bolus amount is 20U. With a 5.0U step size, the maximum cannot be greater than 35U, which is the maximum amount for any type of bolus.
DELIVERING
3.00U
Press anyfunction button
to cancel.
Warning
Confirm
Bolus delivery
canceled byuser button
press.
Delivered:2.00U of 3.00U
41029400B_OB_OTP_US_EN_MGDL_R3.indd 80 11/7/14 3:08 PM

81 CHAPTER 11 - Using Advanced features
ezBolus™
If you do not have your Audio Bolus feature turned on, the button on the end of your pump will function as a shortcut to the Normal Bolus screen.
1. Press the button on the end once. The Normal Bolus screen is displayed. Program a Normal Bolus as usual.
Advanced Bolus Features
• ezCarb
• ezBG
• Combo Bolus
• Reminders
All Advanced Bolus features are activated in the Setup Advanced Menu. See Chapter 10 in Section I. When the Advanced Bolus features and Reminders are activated, the full BOLUS MENU is displayed.
WARNING: Be sure to review all the values used in bolus calculations to make sure they are correct. You may always adjust the insulin units up or down before you decide to administer your bolus. If you dose an insulin amount that is too high or too low, this may result in a hypoglycemic or hyperglycemic event. Please discuss the bolus calculator feature and all relevant personal settings with your health care professional before using the calculator for the first time.
NORMAL BOLUS
Main Menu
Amount
Go
0.00 U
BOLUS MENU
Main Menu
NormalezCarbezBGCombo BolusReminders
41029400B_OB_OTP_US_EN_MGDL_R3.indd 81 11/7/14 3:08 PM

82 CHAPTER 11 - Using Advanced features
ezCarb
This feature allows you to manually enter the number of carbs eaten, and your pump will automatically calculate your bolus dose, based on the I:C ratio, ISF and BG Target range you have entered for the current time of day. Consult your health care team for your personal I:C ratios, ISFs and BG Target ranges. See Chapter 10 in Section I.
If the IOB feature is activated, your pump will calculate a reduced amount for high BG correction boluses and for Carb Boluses if you entered a below-target BG value.
When you use your meter remote to deliver an ezCarb Bolus, you may also select the number of carbs eaten directly from a Food Database stored in your meter remote, see Chapter 4 in Section III. The Food Database is available through an upload to your meter remote from ezManager® Software. For instructions on uploading the Food Database, refer to the ezManager® User Guide included with the software.
41029400B_OB_OTP_US_EN_MGDL_R3.indd 82 11/7/14 3:08 PM

83 CHAPTER 11 - Using Advanced features
Entering Carbs Manually
1. From the BOLUS MENU, scroll to “ezCarb”. Press . The ezCarb Home screen is displayed.
2. The cursor will flash on the “Carbs” field to indicate that you can edit the total number of carbs eaten. Use the / buttons to enter the number of carbs. Press . “Add BG” is highlighted. (See Adding a BG Bolus to ezCarb in this chapter.)
NOTE: The max limit for ezCarb Total is 999g.
3. Check that the grams of carb entered and your I:C ratio at the top of the screen are correct.
a. If the entries are correct, scroll to “Show Result”. Press and go to Step 5.
b. If not correct, scroll up to highlight the field and press to activate Edit mode. Use / buttons to enter your I:C ratio and/or change the carb entry. Press .
4. Scroll down to “Show Result”. Press .
5. The Bolus Total screen is displayed. The bolus amount field is highlighted and flashing to indicate you can enter the total amount as shown or adjust as needed. Enter your bolus amount. Press .
NOTE: Calculated total units will be rounded to the nearest .05 units.
ezCarb Home
Main Menu
Carbs: 34g
I:C 1U: 15g
Add BGShow Result
BOLUS MENU
Main Menu
NormalezCarbezBGCombo BolusReminders
ezCarb Home
Main Menu
Carbs: 34 g
I:C 1U: 15g
Add BGShow Result
Bolus Total
Main Menu
CarbBG +IOBTotal =
2.26U0.00U
- -.- - U2.25U
0.00UGoType Normal
Bolus Total
Main Menu
CarbBG +IOBTotal =
2.26U0.00U
- -.- - U2.25U
2.25UGoType Normal
41029400B_OB_OTP_US_EN_MGDL_R3.indd 83 11/7/14 3:08 PM

84 CHAPTER 11 - Using Advanced features
6. “Go” is highlighted. If you wish to give a Normal Bolus, press to deliver.
7. If you wish to give a Combo Bolus, scroll to the “Type” field and press to edit.
8. Use the / buttons to select bolus type: “Normal” (default) or “Combo”. Press .
9. “Go” is highlighted. Press .
NOTE: If you select the Combo Bolus option, the Combo Bolus screen will be displayed. See Combo Bolus in this chapter for instructions on delivering the Combo Bolus.
Bolus Total
Main Menu
CarbBG +IOBTotal =
2.26U0.00U
- -.- - U2.25U
2.25UGoType Normal
DELIVERING
2.25U
Press anyfunction button
to cancel.
Bolus Total
Main Menu
CarbBG +IOBTotal =
2.26U0.00U
- - .- - U2.25U
2.25UGoType Combo
41029400B_OB_OTP_US_EN_MGDL_R3.indd 84 11/7/14 3:08 PM

85 CHAPTER 11 - Using Advanced features
Entering Carbs Using the Food Database
This feature is only available on your meter remote, and can be accessed when delivering an ezCarb Bolus from your meter remote. See Chapter 4 in Section III.
Adding a BG Bolus to ezCarb
1. On the ezCarb Home screen, enter the number of carbs. Press .
2. “Add BG” is highlighted. Press . The BG CORRECT screen is displayed.
3. The “Actual” field is highlighted and flashing to indicate Edit mode. Use the / buttons to enter your BG value. Press . “Show Result” is highlighted.
4. Check that the BG Target range and ISF are correct.
a. If they are correct, press with “Show Result” highlighted.
b. If they are not correct, scroll up to highlight the fields and press . Use the / buttons to adjust the values. Press to exit Edit mode. Scroll down to “Show Result”. Press .
BG CORRECT
Main Menu
ActualTarget - = +
ISF 37 mg/dLShow Result
mg/dL220120100
BG CORRECT
Main Menu
ActualTarget - = +
ISF 37 mg/dLShow Result
mg/dL220120100
ezCarb Home
Main Menu
Carbs: 34g
I:C 1U: 15g
Add BGShow Result
BG CORRECT
Main Menu
ActualTarget - = +
ISF 37 mg/dLShow Result
mg/dL220120100
BG CORRECT
Main Menu
ActualTarget - = +
ISF 37 mg/dLShow Result
mg/dL220120100
41029400B_OB_OTP_US_EN_MGDL_R3.indd 85 11/7/14 3:08 PM

86 CHAPTER 11 - Using Advanced features
5. The Bolus Total screen is displayed and shows the calculated bolus units from your ezCarb Bolus. The bolus amount field is highlighted and flashing, and displays 0.00 units.
6. Enter the Bolus amount and press . “Go” is highlighted. Press to deliver as a Normal Bolus or scroll to the “Type” field to select Combo Bolus, then select “Go”.
If you selected the Combo Bolus option, you will begin the steps for delivering the ezCarb units as a Combo Bolus (see Combo Bolus in this chapter). The bolus amount you entered on the Bolus Total screen in step 6 will appear in the “Total” field on the first Combo Bolus screen.
ezBG
This feature allows you to enter your BG reading and your pump will automatically calculate a BG correction bolus based on the ISF and BG Target range for the current time of day. If the IOB feature is activated, your pump will calculate a reduced dose for high BG correction boluses.
1. From the BOLUS MENU, select “ezBG”. Press the button.
Bolus Total
Main Menu
CarbBG +IOBTotal =
2.26U2.70U
- -.- - U4.95U
GoType Normal
0.00U
Bolus Total
Main Menu
CarbBG +IOBTotal =
2.26U2.70U
- -.- - U4.95U
4.95UGoType Normal
BOLUS MENU
Main Menu
NormalezCarbezBGCombo BolusReminders
41029400B_OB_OTP_US_EN_MGDL_R3.indd 86 11/7/14 3:08 PM

87 CHAPTER 11 - Using Advanced features
2. The “Actual” field will be highlighted and flashing to indicate Edit mode. Use the / buttons to enter your actual BG reading. Press the button to confirm the entry and exit Edit mode.
3. Check to be sure the BG Target and Insulin Sensitivity Factor (ISF) are correct. Your health care team will give you these values. If you need to edit these fields, scroll up to highlight the field and press to activate Edit mode. Use
/ buttons to change target. Press to confirm and to exit Edit mode.
4. “Show Result” is highlighted. Press .
5. The ezBG Total screen is displayed with a suggested bolus amount. The bolus amount field is highlighted and flashing to indicate you can enter the total amount as shown or adjust as needed. Enter your bolus amount. Press to deliver.
ezBG Total
Main MenuGo
BG +IOB
Total =
2.81U- -.- - U
2.80U0.00U0.00U
ezBG Total
Main MenuGo
BG +IOB
Total =
2.81U- -.- - U
2.80U2.80U
DELIVERING
2.80U
Press anyfunction button
to cancel.
ezBG
Main Menu
ActualTarget - = +ISF 37 mg/dL
mg/dL224120104
Show Result
ezBG
Main Menu
ActualTarget - = +ISF 37 mg/dL
mg/dL224120104
Show Result
ezBG
Main Menu
ActualTarget - = +ISF 37 mg/dL
mg/dL224120104
Show Result
ezBG
Main Menu
ActualTarget - = +ISF 37 mg/dL
mg/dL224120104
Show Result
41029400B_OB_OTP_US_EN_MGDL_R3.indd 87 11/7/14 3:08 PM

88 CHAPTER 11 - Using Advanced features
NOTE: If the IOB feature is activated, your pump will calculate a reduced BG Bolus amount for your review.
NOTE: If you enter a BG amount below 70 mg/dL or above 250 mg/dL, your pump will alert you that you’ve entered an out of range BG. To confirm the Alert, press . Treat the out of range BG as recommended by your health care team.
ezBG Total
Main MenuGo
BG +IOB -
Total =
2.81U1.00U
1.80U1.80U
Alert
LOW BG
Confirm
Treat low BG.No bolus
recommended.Monitor BG.
Alert
HIGH BG
Confirm
Treat high BG.
Check site.Check
ketones.Monitor BG.
41029400B_OB_OTP_US_EN_MGDL_R3.indd 88 11/7/14 3:08 PM

89 CHAPTER 11 - Using Advanced features
Combo Bolus
The Combo Bolus feature is used to give both a Normal and Extended Bolus. This feature is useful for consumption of high fat meals such as pizza, if you will be “grazing” over a few hours or if you have gastroparesis. You can program part of your bolus amount to be delivered immediately and part of it to be delivered slowly over the course of up to 12 hours. Your health care team can help you determine the “split” of Normal to Extended insulin amounts, as well as the duration that is most appropriate for you.
1. From the BOLUS MENU, select “Combo Bolus”. If you used the ezCarb Bolus option to calculate a bolus and chose to deliver it as a Combo Bolus, you will begin at the Combo Bolus screen in step 2.
2. Use the / buttons to enter the Total bolus amount. Press . “Go” is highlighted. The factory default setting for Duration is 30 minutes, and the Ratio is 0% Normal and 100% Extended. If these settings are appropriate, press to deliver.
3. To change either the Duration or Ratio, scroll up to the desired field and press to activate Edit mode.
BOLUS MENU
Main Menu
NormalezCarbezBGCombo BolusReminders
Combo Bolus
Main MenuGo
TotalDuration
8.50U0.5Hr
Extend100%0.00U
Normal:0:
0.00:
Combo Bolus
Main MenuGo
TotalDuration
8.50U4.0Hr
Extend70%5.95U
Normal:30:
2.55:
41029400B_OB_OTP_US_EN_MGDL_R3.indd 89 11/7/14 3:08 PM

90 CHAPTER 11 - Using Advanced features
4. Use the / buttons to change settings. As you change the Ratio by percentage, the amount in units is automatically changed. You cannot change the ratio by units, only by percentage.
5. When settings are correct, press to confirm and exit Edit mode.
NOTE: Your pump is “smart”; it will remember your last duration and the ratio (as percentages) you programmed. So if you use the same duration and ratio for certain types of meals, you need only change the total bolus amount the next time you use this feature. However, the last programmed Combo Bolus settings will be cleared each time you change the battery.
6. Scroll to “Go” and press to activate. The Home screen shows Combo Bolus active.
To cancel an active Combo Bolus from the BOLUS MENU, select “Combo Bolus”. Details of the active Combo Bolus will be displayed.
Scroll to “CANCEL” and press to cancel the Combo Bolus.
NOTE: If you Suspend your pump, any active Combo Bolus will also be canceled and the screen display will alert you. Combo Bolus is also canceled when you change the battery and/or prime your pump.
Combo Bolus
Main MenuGo
TotalDuration
8.50U0.5Hr
Extend70 %5.95U
Normal:30:
2.55:
Combo Bolus
Main MenuGo
TotalDuration
8.50U4.0Hr
Extend70%5.95U
Normal:30:
2.55:
Status
Basal Rate0.675U/Hr
Insulin: 105UMenu
BOLUS ACTIVE
2 : 27PM
Combo Bolus
Main Menu
CANCEL
Duration
Delivered 0.0 : 4.0Hrs
2.55U : 8.50U
ACTIVE
41029400B_OB_OTP_US_EN_MGDL_R3.indd 90 11/7/14 3:08 PM

91 CHAPTER 11 - Using Advanced features
Reminders
This feature allows you to set personal reminders. You can set two bolus reminders for times of day, and one reminder to check BG at a certain time after a bolus. Confirm the Reminder by pressing . Once you’ve confirmed the Reminder, you will not be alerted again.
Bolus Reminders for Time of Day
1. From the BOLUS MENU, select “Reminders”. Press .
2. The “Reminder-1” field will be highlighted with a flashing cursor to indicate Edit mode. Use the / buttons to turn on or off. Press to confirm and exit Edit mode.
3. The “Time” field for this reminder will be highlighted. Press to activate Edit mode. Use the / buttons to enter the time you wish a reminder to sound (or vibrate, if that is the setting you selected in the SETUP SOUND menu). Press to confirm your setting and exit Edit mode. When the feature is turned on, your pump will display the “Reminder” screen on the right at the selected time of day.
4. Repeat for the Reminder 2.
BOLUS MENU
Main Menu
NormalezCarbezBGCombo BolusReminders
REMINDERS
Main Menu
Reminder-1
Time =Reminder-2
Time =
OFF12:00PM
OFF12:00PM
BG Check
After Bolus =
OFF1 Hr
REMINDERS
Main Menu
Reminder-1
Time =Reminder-2
Time =
OFF12:00PM
OFF12:00PM
BG Check
After Bolus =
OFF1 Hr
Confirm
Reminder
12:00PM
41029400B_OB_OTP_US_EN_MGDL_R3.indd 91 11/7/14 3:08 PM

92 CHAPTER 11 - Using Advanced features
BG Check Reminder
1. From the REMINDERS menu, select “BG Check”. Press to activate Edit mode to turn this reminder on or off. Press to confirm and exit Edit mode.
2. Scroll down to highlight the “After Bolus” field. Press to select the field and activate Edit mode. Use the / buttons to enter how long after a Normal Bolus you wish your pump to sound (or vibrate) to remind you to check your BG. You can select a reminder time of 1, 2, 3 or 4 hours.
When this feature is turned on, your pump will display the BG Reminder screen immediately after a bolus. On this screen you can use the / buttons to select a different reminder time (1, 2, 3, or 4 hours), or opt not to be reminded by entering 0. For example, if you have given a bolus in the evening, you may not wish to have the Reminder sound while you are sleeping. If the Reminder is not confirmed, battery life will be reduced and the Replace Battery Alarm will appear sooner than expected.
NOTE:• When you enter a time, your pump will sound a reminder and display this
screen at that time after any Normal Bolus is programmed, including the Normal portion of a Combo Bolus. If you program an Extended Bolus only, the reminder will sound at the default time you have set.
• If pump battery power is interrupted for any reason, any BG Check Reminder scheduled to appear will be canceled when power is restored until the next Bolus is delivered.
3. When finished setting reminders, scroll to “Main Menu” and press to display the MAIN MENU.
REMINDERS
Main Menu
Reminder-1
Time =Reminder-2
Time =
OFF12:00PM
OFF12:00PM
BG Check
After Bolus =
OFF1 Hr
REMINDERS
Main Menu
Reminder-1
Time =Reminder-2
Time =
OFF12:00PM
OFF12:00PM
BG Check
After Bolus =
ON1 Hr
Confirm
BGReminder
Check BGin
1 Hr
Confirm
CheckBG
Last bolus12:15PM
Reminder
41029400B_OB_OTP_US_EN_MGDL_R3.indd 92 11/7/14 3:08 PM

93 CHAPTER 11 - Using Advanced features
Delivery Speed - Bolus
On rare occasions, usually with very large boluses, users may experience a slight stinging sensation with rapid bolus delivery. If this is a concern, you can set the bolus delivery speed to slow to accommodate your needs. If you use the slow setting, your pump will pause approximately 4 seconds in between delivery of each unit of insulin programmed.
Multiple Basal Programs
This feature allows 4 different Basal programs to show on your BASAL MENU screen. Users find this feature beneficial if their activity level is different during the week than on weekends. Switching work shifts at work is another reason to use multiple basal programs. Some use a different basal program during menstruation. An “A” will appear to the left of the basal program that is currently active.
NOTE: If a program other than 1-Weekday is active, you cannot change this setting to display 1 basal program. The Alert screen shown here will pop up to remind you.
BASAL MENU
Main Menu
Total 13.60U
TempA1-WEEKDAY 2-other 3-weekend 4-exercise
Alert
1-weekdaymust be the
active programto change thebasal display
setting.
Confirm
41029400B_OB_OTP_US_EN_MGDL_R3.indd 93 11/7/14 3:08 PM

94 CHAPTER 11 - Using Advanced features
IOB
Even with rapid-acting insulin, your body takes some time to use the entire bolus amount. If you have activated this feature, your pump will track the bolus insulin remaining in your system - IOB - and calculate a suggested lower BG correction bolus dose. The lower dose is only recommended if you use the ezBG feature or if you add a BG bolus to an ezCarb bolus. For this feature to give optimal results, you should always use either ezBG or the Add BG feature during ezCarb programming when entering a BG correction bolus.
CAUTION: Your health care team will give you recommendations specific to your plan of treatment.
In the examples shown here, the IOB amount is subtracted from the BOLUS TOTAL screen and the ezBG Total screen.
NOTE:• When you replace the battery, the IOB amount is cleared.
• Your pump constantly tracks IOB. If you’ve given a bolus before turning on the feature, your pump will show the remaining amount from that bolus as IOB immediately.
Bolus Total
Main Menu
CarbBG +IOB –Total =
2.25U2.70U1.00U3.95U
3.95UGoType Normal
ezBG Total
Main MenuGo
BG +IOB -
Total =
2.81U1.00U
1.80U1.80U
41029400B_OB_OTP_US_EN_MGDL_R3.indd 94 11/7/14 3:08 PM

95 CHAPTER 11 - Using Advanced features
Sick Day Guidelines
To review your basic sick day guidelines, refer to this screen. For more information on sick day guidelines, refer to Chapter 15 in Section I and contact your health care team.
1. From the SETUP menu, select “Advanced”.
2. Scroll to the Setup Advanced Screen 9.
3. Enter or review the guidelines as recommended by your health care team.
Establishing Communication with your Meter Remote
When you are ready to begin using your pump and meter remote together as a system, you will need to activate RF communication and pair the devices. See Chapter 2 in Section III.
SETUP ADV 9
Home
Sick daysBG over
Next
240
Check ketones every 4 HrsCheck BG every 2 Hrs
mg/dL
41029400B_OB_OTP_US_EN_MGDL_R3.indd 95 11/7/14 3:08 PM

96 CHAPTER 12 - Care and maintenance
The Vents
Your pump features a redundant Vent Safety System. Vents serve two purposes. First, they allow air to enter and exit your pump so that pressure is equalized under a variety of environmental circumstances, such as changes in altitude. Second, the vents are backed by a special membrane, which keeps water from entering your pump.
Battery Cap with O-ring and Vent
Your battery cap contains an o-ring and vent. There is a tiny hole backed by a membrane, which allows air to pass through but prevents water from entering. The o-ring helps to keep your pump waterproof. It is recommended that you change the battery cap/vent every 6 months. If you work in a dusty environment such as a construction site, mill, cement factory, etc., or if you are a frequent swimmer, you should change your battery cap every 3 months. You can call Animas® to order an extra battery cap.
WARNING: Under no circumstances should you introduce any kind of sharp object into the vent openings to clean them. Doing so could compromise your pump’s waterproof capabilities. If at any time you suspect the vent opening is clogged, replace the battery cap.
Vent HoleO-ring
41029400B_OB_OTP_US_EN_MGDL_R3.indd 96 11/7/14 3:08 PM

97 CHAPTER 12 - Care and maintenance
CAUTION: Do Not use household or industrial cleaners, chemicals, solvents, bleach, scouring pads or sharp instruments to clean your pump. Never put your pump in the dishwasher or use very hot water to clean it. Use only a very mild detergent (for example a drop of liquid soap in a glass of water) and a lint-free cloth.
Never put your pump in a microwave oven or baking oven to dry it. Use a soft towel.
Never clean the battery or insulin cartridge compartments.
Cleaning
General Wear and Tear
If you drop your pump or it has been hit against something hard, inspect it to be sure it is still working properly. Check that the display screen is working and clear, that the cartridge cap, battery cap and infusion set are properly in place. Check for leaks around the cartridge by wrapping a piece of tissue around the connection area. Cracks, chips or damage to your pump may impact the battery contact and/or the waterproof feature of your pump. Call our Customer Service representatives at 1 877 937-7867 if you identify or suspect your pump is damaged. They will help determine if your pump should be replaced.
Disposal
International and US regulations require controlled disposal of devices such as insulin pumps.
Dispose of batteries according to your local environmental regulations.
41029400B_OB_OTP_US_EN_MGDL_R3.indd 97 11/7/14 3:08 PM

98 CHAPTER 13 - Safety system and alarms
Alerts, Warnings and Alarms
Your pump has a progressive warnings and alarms safety system. This means if you do not confirm the warning or alarm, it will progress to the sweep alarm with vibrate within one hour. At the high volume stage, if you do not confirm the warning or alarm, the sweep alarm will begin and will not stop until appropriate action is taken.
NOTE: Your pump uses battery power to notify you of alerts, warnings, and alarms. If you do not confirm the notification, your pump will continue to use battery power as the notifications repeat and progress. This will result in reduced battery life and the Replace Battery Alarm screen appearing sooner than expected.
Additionally, certain warnings (e.g., Low Cartridge Warning, Occlusion Alarm) take precedence over less critical ones (e.g., Low Battery Warning). This means if you do not confirm the more critical warning, battery life will be reduced and your pump may skip the Low Battery Warning and go directly to the Replace Battery Alarm, or battery life will end before a Replace Battery Alarm is displayed.
Alerts are automatically displayed to remind you of a function that you’ve set or a condition that exists. Warnings are triggered for a variety of reasons. They require you to confirm the warning by pressing and/or taking action to address the warning. Alarms are triggered by several conditions. All require you to address the alarm by taking appropriate action in order to clear the alarm condition.
41029400B_OB_OTP_US_EN_MGDL_R3.indd 98 11/7/14 3:08 PM

99 CHAPTER 13 - Safety system and alarms
WARNING: CONFIRM all pump alerts, alarms and warnings as soon as possible. Not confirming alerts, alarms and warnings can affect insulin delivery as follows:
• Pump battery power may be drained much sooner than expected, leaving you without a way to deliver insulin if you do not have a replacement battery.
• The calculation of Insulin on Board (IOB) when using the bolus calculator feature may not be as accurate, resulting in the “suggested” bolus amount being less than what it should be.
• Basal and bolus delivery may be suspended for up to 2 hours once the alert, alarm or warning is confirmed without the pump directly notifying the user.
• Any Combo Bolus or Temp Basal in effect may be canceled without the pump directly notifying the user.
Any of these situations can result in over delivery or under delivery of insulin, resulting in serious injury or death.
- Indicates that this alert, warning or alarm can play a tune as the initial notification for medium and high volume settings. The pump default for sounds at the low volume setting is a factory-set sound and cannot be modified with ezManager® Software.
IMPORTANT: Many of the following pump alerts, warnings and alarms will also sound and/or display on your meter remote, once you begin using the devices together as a system. See Chapter 6 in Section III for a complete list.
NOTE: Alarms, warnings and alerts will display actual insulin units during pump operation, rather than the “XX” or “XXX” units displayed on some of the screens in this list.
41029400B_OB_OTP_US_EN_MGDL_R3.indd 99 11/7/14 3:08 PM

100 CHAPTER 13 - Safety system and alarms
Alert
ConfirmBasal Menu
Your activebasal
programis empty.
0.000U/Hr
Alert: Active Basal Program Empty
Cause Active basal program is empty.
Effect No basal deliveries.
MessageDisplayed once until confirmed or until pump goes to sleep and each time manually awakened.
Action None required but can confirm or select Basal Menu.
Beeps/VibUser selected, one time and each time manually awakened. No progression.
Alert
Temp ActiveMinimum
Basal ratelimited to0.025U/Hr
Alert: Temp Basal Minimum Rate
Cause Negative Temp Basal activated.
Effect Basal delivery will not go below 0.025U/Hr.
Message Displayed once for 3 seconds.
Action None required.
Beeps/Vib User selected, one time. No progression.
Alerts, Warnings and Alarms
41029400B_OB_OTP_US_EN_MGDL_R3.indd 100 11/7/14 3:08 PM

101 CHAPTER 13 - Safety system and alarms
Alerts, Warnings and Alarms
AlertPump Suspended
If active, Temp Basal &Combo Bolus
have beencanceled.
Alert: Suspend (Temp Basal/Combo Bolus Canceled)
Cause Pump suspended.
Effect Any active Temp Basal/Combo Bolus canceled.
Message Displayed once for 3 seconds.
Action None required.
Beeps/Vib User selected, one time. No progression.
Alert: Low BG
Cause BG entry below 70 mg/dL.
Effect Requires user confirmation to continue.
Message Displayed until confirmed or until pump goes to sleep.
Action Press to confirm.
Beeps/Vib User selected, one time. No progression.
Alert
LOW BG
Confirm
Treat low BG.
No bolus
recommended.
Monitor BG.
41029400B_OB_OTP_US_EN_MGDL_R3.indd 101 11/7/14 3:08 PM

102 CHAPTER 13 - Safety system and alarms
Alert: High BG
Cause BG entry above 250 mg/dL.
Effect Requires user confirmation to continue.
Message Displayed until confirmed or until pump goes to sleep.
Action Press to confirm.
Beeps/Vib User selected, one time. No progression.
Alert
HIGH BG
Confirm
Treat high BG.
Check site.Check
ketones.Monitor BG.
Alert
Clear ProgramBasal Options
Clear Programdeletes all
basal segmentsin this program.
Alert: Clear Program Basal Segments
Cause Clear command selected from BASAL OPTIONS screen.
Effect Requires user confirmation to continue.
MessageDisplayed until one of the two options is selected or until pump goes to sleep.
Action Select “Clear Program” or “Basal Options”.
Beeps/Vib User selected, one time.
Alerts, Warnings and Alarms
41029400B_OB_OTP_US_EN_MGDL_R3.indd 102 11/7/14 3:08 PM

103 CHAPTER 13 - Safety system and alarms
Alerts, Warnings and Alarms
Alert: Basal Program Display Change
CauseChanging display of basals from 4 to 1 but program 1 is not currently active.
Effect Requires user confirmation to continue.
Message Displayed until confirmed or until pump goes to sleep.
Action Press to confirm.
Beeps/Vib User selected, one time.
Alert
1-weekdaymust be the
active programto change thebasal display
setting.
Confirm
Warning: Basal Delivery Suspended
Cause Basal Edit was not saved.
Effect Basal delivery stopped.
Message Displayed when manually awakened until confirmed.
Action Press to select “Edit Basal”. Review basal edits and select “Save/Review”.
Beeps/VibUser selected, every 3 minutes until confirmed. If not confirmed, progresses to sweep/vibe within one hour.
Warning
Edit Basal
Basal editnot saved.
Basaldelivery
suspended.
41029400B_OB_OTP_US_EN_MGDL_R3.indd 103 11/7/14 3:08 PM

104 CHAPTER 13 - Safety system and alarms
Warning: Suspend
Cause Pump suspended manually.
Effect All deliveries stop.
MessageDisplayed each time pump is awakened until confirmed and once every 15 minutes until action is taken.
Action Press to confirm. Resume delivery.
Beeps/VibUser selected, once every 15 min. No progression if confirmed each time displayed. Sweep/vibe within one hour if not confirmed.
Warning
Confirm
No delivery.
Pump issuspended.
Alerts, Warnings and Alarms
41029400B_OB_OTP_US_EN_MGDL_R3.indd 104 11/7/14 3:08 PM

105 CHAPTER 13 - Safety system and alarms
Warning: No Cartridge Detected, Deliveries Disabled
CauseNo cartridge detected after “Load cartridge” step during Rewind/Prime.
Effect No deliveries.
Message Displayed when manually awakened until confirmed.
Action Press to confirm. Be sure Rewind/Prime sequence is completed with cartridge properly in place.
Beeps/VibUser selected, once every 3 min. No progression if confirmed each time displayed. Sweep/vibe within one hour if not confirmed.
Warning
Confirm
No cartridgedetected.
Deliverydisabled.
Alerts, Warnings and Alarms
41029400B_OB_OTP_US_EN_MGDL_R3.indd 105 11/7/14 3:08 PM

106 CHAPTER 13 - Safety system and alarms
Alerts, Warnings and Alarms
Warning: Low Battery
Cause Battery life will only last a minimum of 30 minutes.
Effect Deliveries continue.
MessageDisplays when pump is awake until confirmed. Displays when triggered by event (such as bolus) & when manually awakened.
Action Press to confirm. Insert new battery.
Beeps/VibUser selected, every 3 minutes until confirmed. If not confirmed, progresses to sweep/vibe within one hour.
Warning
Confirm
Lowbattery.
Warning
Confirm
Lowcartridge.
XX U orless left.
Warning: Low Cartridge
Cause Low insulin level reached.
EffectDeliveries may continue until Empty Cartridge alarm is triggered.
Message Displayed when manually awakened until confirmed.
Action Press to confirm. Replace with filled cartridge.
Beeps/VibUser selected, every 3 minutes until confirmed. If not confirmed, progresses to sweep/vibe within one hour.
41029400B_OB_OTP_US_EN_MGDL_R3.indd 106 11/7/14 3:08 PM

107 CHAPTER 13 - Safety system and alarms
Alerts, Warnings and Alarms
Warning
Confirm
Exceedsmax bolusXX.XX U.
No bolusdelivery.
Warning: Exceeds Max Bolus
Cause Audio bolus delivery exceeds user-set maximum.
Effect Bolus delivery stops.
Message Displayed when manually awakened until confirmed.
Action Press to confirm. Reprogram max bolus amount in the Setup Advanced menu.
Beeps/VibUser selected, every 3 minutes until confirmed. If not confirmed, progresses to sweep/vibe within one hour.
41029400B_OB_OTP_US_EN_MGDL_R3.indd 107 11/7/14 3:08 PM

108 CHAPTER 13 - Safety system and alarms
Warning
Confirm
Exceedsmax TDD
XXX U.
No delivery.
Warning: Exceeds Max TDD
Cause Bolus delivery exceeds user-set maximum.
EffectAll deliveries stop until action is taken. Any Combo Bolus or Temp Basal is temporarily suspended.
Message Displayed when manually awakened until confirmed.
Action
Press to confirm. Reprogram max TDD amount in the Setup Advanced menu. If the Warning is not confirmed by the time your pump clock passes midnight, the message will continue to be displayed, but any Combo Bolus or Temp Basal that is currently suspended will resume.
Beeps/VibUser selected, every 3 minutes until confirmed. If not confirmed, progresses to sweep/vibe within one hour.
Alerts, Warnings and Alarms
41029400B_OB_OTP_US_EN_MGDL_R3.indd 108 11/7/14 3:08 PM

109 CHAPTER 13 - Safety system and alarms
Alerts, Warnings and Alarms
Warning: Exceeds Max Basal
CauseBasal delivery rate (or Temp Basal delivery) exceeds user-set maximum.
Effect Basal delivery stops.
MessageDisplayed when awakened (by basal delivery attempt every 3 min. or manually) until confirmed.
Action Press to confirm. Reprogram Max Basal amount in the Setup Advanced menu (or reprogram Temp Basal).
Beeps/VibUser selected, every 3 minutes until confirmed. If not confirmed, progresses to sweep/vibe within one hour.
Warning
Confirm
Exceedsmax basalXXX U/Hr.
No basaldelivery.
41029400B_OB_OTP_US_EN_MGDL_R3.indd 109 11/7/14 3:08 PM

110 CHAPTER 13 - Safety system and alarms
Warning
Confirm
Exceedsmax 2 Hr
XX U.
No delivery.
Warning: Exceeds Max 2-hour Delivery
CauseCombined basal and bolus delivery exceeds user-set 2-hour maximum.
Effect Insulin delivery stops.
Message Displayed when manually awakened until confirmed.
Action Press to confirm. Reprogram Max 2-Hr amount in the Setup Advanced menu.
Beeps/VibUser selected, every 3 minutes until confirmed. If not confirmed, progresses to sweep/vibe within one hour.
Alerts, Warnings and Alarms
41029400B_OB_OTP_US_EN_MGDL_R3.indd 110 11/7/14 3:08 PM

111 CHAPTER 13 - Safety system and alarms
Alerts, Warnings and Alarms
Warning
Confirm
Deliverycanceled
due tolow
cartridge.
Warning: Delivery Canceled due to Low Cartridge
CauseBasal or Bolus delivery exceeds insulin remaining in cartridge.
Effect Basal or Bolus delivery stopped.
MessageOnce per occurrence and each time awakened until confirmed.
Action Press to confirm. Replace with full cartridge.
Beeps/VibUser selected, every 3 minutes until confirmed. If not confirmed, progresses to sweep/vibe within one hour.
41029400B_OB_OTP_US_EN_MGDL_R3.indd 111 11/7/14 3:08 PM

112 CHAPTER 13 - Safety system and alarms
Warning: No Prime, No Delivery
Cause Pump is not primed.
Effect All deliveries stop.
Message Every 3 minutes or when awakened manually.
Action Press to confirm. Disconnect, reprime.
Beeps/VibUser selected, every 3 minutes until confirmed. If not confirmed, progresses to sweep/vibe within one hour.
Warning
Confirm
Pump isnot primed.No delivery.
Alerts, Warnings and Alarms
Warning
Confirm
Bolus delivery
canceled byuser button
press.
Delivered:X.XX U of X.XX U
Warning: Bolus Delivery Canceled
CauseUser pressed function button on pump during bolus delivery.
Effect Bolus delivery stopped.
Message Every 3 minutes or when awakened manually.
Action Press to confirm. If button was pressed accidentally, repeat steps to deliver remaining insulin units.
Beeps/VibUser selected, every 3 minutes until confirmed. If not confirmed, progresses to sweep/vibe within one hour.
41029400B_OB_OTP_US_EN_MGDL_R3.indd 112 11/7/14 3:08 PM

113 CHAPTER 13 - Safety system and alarms
Warning
Confirm
Batterychange
requiresRewind-Prime.
Warning: Battery Change Requires Rewind Prime
Cause Prime attempted without rewind.
Effect All deliveries stopped.
Message Every 3 minutes or when awakened manually.
Action Press to confirm. Rewind and prime.
Beeps/VibUser selected, every 3 minutes until confirmed. If not confirmed, progresses to sweep/vibe within one hour.
Alerts, Warnings and Alarms
41029400B_OB_OTP_US_EN_MGDL_R3.indd 113 11/7/14 3:08 PM

114 CHAPTER 13 - Safety system and alarms
Alarm: Occlusion
Cause Occlusion detected.
Effect All deliveries stop.
Message Continuous until confirmed.
ActionPress to confirm. Disconnect and prime to clear occlusion. Option to select Suspend (see Suspend Warning screen, page 104).
Beeps/Vib
User selected, every 3 minutes until confirmed. If not confirmed, progresses to sweep/vibe within one hour. (Once confirmed, No Prime warning triggered, see No Prime Warning screen, page 112.)
ALARM
Confirm
OCCLUSIONDETECTED
No delivery.
Suspend
Alerts, Warnings and Alarms
41029400B_OB_OTP_US_EN_MGDL_R3.indd 114 11/7/14 3:08 PM

115 CHAPTER 13 - Safety system and alarms
Alarm: Empty Cartridge
Cause Cartridge empty.
Effect All deliveries stop.
Message Continuous until confirmed.
ActionPress to confirm. Replace with full cartridge. Option to select “Suspend” (see Suspend Warning screen, page 104).
Beeps/Vib
User selected, every 3 minutes until confirmed. If not confirmed, progresses to sweep/vibe within one hour. (Once confirmed, No Prime warning triggered, see No Prime Warning screen, page 112.)
ALARM
Confirm
EMPTYCARTRIDGENo delivery.
Replace cartridge.
Suspend
Alerts, Warnings and Alarms
41029400B_OB_OTP_US_EN_MGDL_R3.indd 115 11/7/14 3:08 PM

116 CHAPTER 13 - Safety system and alarms
ALARMREPLACEBATTERY
Remove batteryto silencethe alarm.
No delivery.
Alarm: Replace Battery
CauseBattery either has minimum 3 minutes left or battery is dead.
Effect All deliveries stop.
Message Continuous until battery is removed.
Action Remove battery to silence alarm. Insert new battery.
Beeps/VibMAX volume every 3 minutes until action taken. If not confirmed, will progress to 4 long tones/vib.
Alerts, Warnings and Alarms
41029400B_OB_OTP_US_EN_MGDL_R3.indd 116 11/7/14 3:08 PM

117 CHAPTER 13 - Safety system and alarms
ALARMCALL SERVICE
Remove batteryto silencethe alarm.
No delivery.054-0108
Alarm: Call Service
Cause Hardware or software problem detected.
Effect All deliveries stop.
Message Continuous until battery is removed.
ActionPress to silence alarm for 30 minutes (alarm can only be silenced once). Call Customer Service at 1 877 937-7867.
Beeps/VibUser-selected, every 3 minutes. If not confirmed, progresses to sweep/vibe within one hour.
NOTE: Some Call Service Alarms have a unique sound/vibration sequence and cannot be silenced by pressing .
For these Alarms the usual progression is replaced by 3 chirps/vib repeated every 9 minutes for the first half hour. This is followed by 4 long tones/vib after that.
Alerts, Warnings and Alarms
41029400B_OB_OTP_US_EN_MGDL_R3.indd 117 11/7/14 3:08 PM

118 CHAPTER 13 - Safety system and alarms
ALARM
Confirm
AUTO-OFF
No buttonpresses in last
XX hours.
No delivery.
Alarm: Auto-Off
Cause Suspended due to no key press in user-set time period.
Effect All deliveries stop.
Message Continuous until confirmed.
Action Press to confirm. Adjust time period in the Setup Advanced menu.
Beeps/Vib
MAX volume every 3 minutes. If not confirmed, progresses to sweep/vibe within one hour. (Once confirmed, No Prime warning triggered, see No Prime Warning screen, page 112.)
Alerts, Warnings and Alarms
41029400B_OB_OTP_US_EN_MGDL_R3.indd 118 11/7/14 3:08 PM

119 CHAPTER 14 - Troubleshooting guidelines
It’s a good idea to set up a troubleshooting procedure to use anytime you suspect something might be wrong. Work with your health care team to establish guidelines* in the event of a problem.
Hypoglycemia
WARNING: Low blood glucose is a risk for anyone using insulin therapy. You may experience one or more of the following symptoms:
• Shakiness; rapid heart rate; nervousness; perspiration; cold, clammy skin; weakness; blurred or double vision; sudden hunger; tingling in your hands, lips, or tongue; headache and confusion.
• If you experience symptoms of hypoglycemia, you should immediately eat a quick-acting carbohydrate (glucose tablets, juice, or hard candy).
• If your BG is abnormally low, Do Not attempt to program your pump yourself. Get help.
• Treat hypoglycemia immediately.
* Walsh JA & Roberts R, Pumping Insulin. 2006. San Diego: Torrey Pine Press.
Rule of 15
1. Consume 15 grams of quick-acting carbohydrate
2. Wait 15 minutes
3. Recheck BG
4. If BG is < 70 mg/dL, repeat above
41029400B_OB_OTP_US_EN_MGDL_R3.indd 119 11/7/14 3:08 PM

120 CHAPTER 14 - Troubleshooting guidelines
Troubleshooting hypoglycemia:
INSULIN PUMP
POSSIBLE CAUSE OF LOW BG SUGGESTED SOLUTION
Basal rate programmed incorrectly
Check times and rates, remember to review basal programs when making any changes.
Clock time incorrect Reset clock to current time, being careful to check AM & PM.
Pump exposed to MRI Disconnect from pump. Call Customer Service at 1 877 937-7867.
FOOD INTAKE
POSSIBLE CAUSE OF LOW BG SUGGESTED SOLUTION
Bolus too large Check bolus amounts and times. Bolus only enough to lower your BG to normal level.
Low carbohydrate intake for bolus
Measure carbohydrates accurately. See dietitian for carb counting review. May need recalculation of I:C ratio; consult with health care team.
Improper timing of bolus Match timing of bolus with intake of food. Check BG prior to meal bolus and adjust accordingly.
Alcohol consumption May cause hypoglycemia. Eat food when drinking alcohol. Be cautious with bedtime bolus. Always check BG before going to bed. Check BG at 3 am. Consult health care team.
41029400B_OB_OTP_US_EN_MGDL_R3.indd 120 11/7/14 3:08 PM

121 CHAPTER 14 - Troubleshooting guidelines
Troubleshooting hypoglycemia:
ACTIVITY
POSSIBLE CAUSE OF LOW BG SUGGESTED SOLUTION
Did not Suspend pump or activate Temp Basal
Consult health care team for guidelines for use of Temp Basal rate during exercise.
Low carbohydrate intake prior to exercise
If not decreasing insulin prior to exercise, may need to eat foods containing carbohydrate prior to exercise.
Unplanned activity (shopping)
If BG is <100 mg/dL, eat snack prior to exercise. Frequent BG testing before, during and after any activity.
Long or intensive exercise Effects of exercise can be present for hours after activity has stopped. Consult with health care team for specific guidelines.
Preventing hypoglycemia:
• Check BG a minimum of four times a day, and more frequently with exercise.
• Keep accurate track of carbohydrates in the foods you eat.
• Consult your health care professional if you are experiencing frequent hypoglycemia.
If you experience frequent or severe episodes of hypoglycemia, contact your health care team. It may be necessary to adjust your basal rates, bolus doses, or review your BG Target goals, along with your daily regimen of food and exercise. If you have a low BG level (hypoglycemia), follow the routine established for you by your health care team.
• It is important to monitor your BG frequently, including periodic checks at 3:00 AM.
• Investigate the cause of hypoglycemia.
41029400B_OB_OTP_US_EN_MGDL_R3.indd 121 11/7/14 3:08 PM

122 CHAPTER 14 - Troubleshooting guidelines
Hyperglycemia
Because your pump uses only rapid-acting insulin, you will not have a reserve of long-acting insulin in your body. This means that any interruption in the delivery of insulin by your pump can quickly result in a sharp rise of your BG levels.
Hyperglycemia (high BG) can occur within two to four hours after insulin delivery stops, and DKA (diabetic ketoacidosis) can develop within four to ten hours.
Several things can cause a high BG reading. The most common problems and causes of high BG are listed in the following table, as are some suggested solutions.
Troubleshooting hyperglycemia:INFUSION SET
POSSIBLE CAUSE OF HIGH BG SUGGESTED SOLUTION
Redness, irritation, inflammation, swelling, discharge or discomfort
Change infusion set tubing and site. Contact health care team.
Bump or nodule at infusion site
Change infusion set and rotate sites. Avoid this area for site selection.
Scar tissue Avoid this area for site selection.
Catheter inserted in area of friction
Avoid waistline and friction areas.
Kink in tubing/catheter Change infusion set tubing and site.
Infusion set not primed (air in tubing)
Disconnect tubing from body. Prime tubing completely.
41029400B_OB_OTP_US_EN_MGDL_R3.indd 122 11/7/14 3:08 PM

123 CHAPTER 14 - Troubleshooting guidelines
Troubleshooting hyperglycemia:
FOOD INTAKE
POSSIBLE CAUSE OF HIGH BG SUGGESTED SOLUTION
Bolus insufficient or omitted Review carbohydrate counting and I:C ratio settings.
High protein or fat intake Consult dietitian; may need to count protein and fat.
Long meal (holiday), continuous snacking, slowly absorbed food (high fiber), delayed digestion (gastroparesis)
Consult health care team. May need to use extended bolus or combination bolus option.
Improper bolus timing Consult health care team.
INSULIN
POSSIBLE CAUSE OF HIGH BG SUGGESTED SOLUTION
Cloudy, clumpy, crystallized, or expired insulin, or insulin exposed to extreme temperatures
Remove infusion set and cartridge and discard. Use new insulin vial.
41029400B_OB_OTP_US_EN_MGDL_R3.indd 123 11/7/14 3:08 PM

124 CHAPTER 14 - Troubleshooting guidelines
CAUTION: Infusion set should be changed every 2 to 3 days or as recommended by your health care team.
Always use clean technique!
Notify health care team with signs or symptoms of infection!
ACTIVITY
POSSIBLE CAUSE OF HIGH BG SUGGESTED SOLUTION
Less activity Use Temp Basal increase. Consult health care team.
Overuse of Temp Basal reduction
Record amount of time for changes. Frequent BG testing to document changes.
BG > 250 mg/dL with ketones before exercise
BG will increase with exercise when ketones are present. Do Not exercise when ketones are present. Consult health care team for exercise guidelines.
Troubleshooting hyperglycemia:
41029400B_OB_OTP_US_EN_MGDL_R3.indd 124 11/7/14 3:08 PM

125 CHAPTER 14 - Troubleshooting guidelines
OTHER
POSSIBLE CAUSE OF HIGH BG SUGGESTED SOLUTION
Medications (steroids, terbutaline, other hormone treatments)
Inform health care team of all medication changes or additions.
Infection, illness, virus Refer to Sick Day Management Guidelines.
Pre-menstrual cycle Consult health care team. May need to use Temp Basal or set additional Basal Program.
Pregnancy Insulin requirements may increase in later trimesters. Consult health care team.
Weight changes May need recalculation of basal or bolus doses. Consult health care team.
WARNING: Consult your health care team before making any changes in your basal rates, bolus ratios or correction factor.
When in doubt, change it out! 1. Follow guidelines provided by your health care team. 2. Change infusion set. 3. Check for ketones. 4. Take rapid-acting insulin by injection.
Troubleshooting hyperglycemia:
41029400B_OB_OTP_US_EN_MGDL_R3.indd 125 11/7/14 3:08 PM

126 CHAPTER 14 - Troubleshooting guidelines
Problems with Infusion Sets, Sites and Cartridge
A number of problems can occur with infusion sets and sites, the most common of which are listed in the following table, along with some suggested solutions.
POSSIBLE PROBLEMS SUGGESTED SOLUTION
Air bubbles in tubing Always fill your pump cartridge with room temperature insulin. Check Luer lock connection and tubing; change infusion set if needed. If using a disconnect set, remove the set from your infusion site and prime the bubbles out. Check that cartridge plunger is straight and the cartridge is not filled with more than 2.0 mL of insulin.
Kinked tubing Straighten tubing if needed; replace infusion set if needed.
Dislodged needle or cannula
Change infusion set and site. Consider using different tape, dressing or infusion set. A cannula cannot be pushed back into skin successfully.
Blood in tubing (insulin looks pink or red)
Change infusion set and site. Check needle/cannula angle at new infusion site.
41029400B_OB_OTP_US_EN_MGDL_R3.indd 126 11/7/14 3:08 PM

127 CHAPTER 14 - Troubleshooting guidelines
DKA (Diabetic Ketoacidosis)
Hyperglycemia can lead to DKA. If your BG is above 250 mg/dL, check blood or urine ketones per your health care team. Remember, the first signs of DKA are often nausea and vomiting. Also remember that because you no longer have long-acting insulin in your system, DKA can develop quickly if you ignore and/or fail to troubleshoot potential problems.
POSSIBLE PROBLEMS SUGGESTED SOLUTION
Insulin leak Check Luer lock connection by wrapping a tissue around it to check for moisture; tighten or change cartridge and infusion set if needed. Check that cartridge is not filled with more than 2.0 mL of insulin.
Redness, tenderness, lumps, itching, warmth, discharge
Change infusion set and site; use clean technique. Treat old site for infection if necessary. Consult health care team.
Cartridge Reused Do Not reuse cartridge. Cartridge is for single use only.
41029400B_OB_OTP_US_EN_MGDL_R3.indd 127 11/7/14 3:08 PM

128 CHAPTER 15 - Sick day guidelines
During periods of minor illness*, it may be more difficult to maintain good control of your diabetes. Examples of minor illness are: dental surgery, colds, nausea/vomiting, sore throat, mild infections, diarrhea, fever. However, you should call your health care team if:
• Illness persists without improvement for 24-48 hours.
• Temperature rises above 100° Fahrenheit.
• Vomiting or diarrhea continues longer than 4 hours.
• There are moderate to large amounts of ketones in urine.
• BG levels continue to run less than 60 mg/dL or above 250 mg/dL (above 130 mg/dL during pregnancy) after taking extra bolus doses as prearranged by your health care team.
• You show signs of ketoacidosis, dehydration or other serious problems such as: increased drowsiness, abdominal or chest pain, difficulty breathing, fruity odor to the breath, dry cracked lips, mouth or tongue.
• Any uncertainty as to what to do to take care of yourself.
Never omit your insulin! If you are ill and cannot eat, your need for insulin continues and may also increase.
• Continue your usual basal dose of insulin along with bolus insulin to cover food eaten or to correct high BG as prearranged with your health care team.
• You may need to temporarily increase or decrease your basal rate by using the Temp Basal feature as prearranged with your health care team.
41029400B_OB_OTP_US_EN_MGDL_R3.indd 128 11/7/14 3:08 PM

129 CHAPTER 15 - Sick day guidelines
Medication
Always let your health care team know ALL medications you are taking. Even medications you are taking for other reasons may impact your diabetes management, so it is important that you always let your health care team know all the medications you are taking.
Blood and Urine Testing
• Check your BG before your usual mealtime and every 2-4 hours if indicated.
• Test your blood or urine for ketones at least 4 times a day, or according to instructions from your health care team.
Fluids and Diet
Always follow your health care team’s sick day guidelines. Fluid intake is essential with any illness. Consume 8 ounces of fluid per hour. Every third hour consume 8 ounces of a sodium-rich liquid, such as bouillon. You need to consume 150-200 grams of carbohydrates daily. If ketones are moderate, contact your health care team. Develop a sick plan with your health care team prior to illness.
* Mensing C., The Art and Science of Diabetes Self-Management Education. 2006. Chicago: American Association of Diabetes Educators.
41029400B_OB_OTP_US_EN_MGDL_R3.indd 129 11/7/14 3:08 PM

130 CHAPTER 16 - Lifestyle issues
Exercise and Sports
There are many options for wearing your pump during exercise and sports activities. During “low-contact” sport activities, such as walking, biking or aerobics, your pump can be clipped to the waistband, or for added security, placed in a “sport case.” During “contact” sports such as baseball, basketball or hockey, your pump can be disconnected for up to one hour. Always follow your health care team’s individual guidelines when disconnecting your pump because you may need to compensate for missed basal insulin. Before and after you disconnect for any length of time, remember to check your BG levels.
Swimming
Your pump is tested for immersion in water to a depth of 12 feet (3.6 meters) for 24 hours under normal swimming conditions. You should not wear your pump while scuba diving or when using high diving boards.
Your pump should not be taken into hot tubs, as the extreme temperature can adversely affect insulin quality.
If your pump has been dropped, examine it carefully for cracks or signs of damage. If the back label of your pump is not securely affixed or if you suspect your pump may have been damaged or otherwise had its waterproof integrity compromised, Do Not use in water. Call our Customer Service representatives at 1 877 937-7867.
41029400B_OB_OTP_US_EN_MGDL_R3.indd 130 11/7/14 3:08 PM

131 CHAPTER 16 - Lifestyle issues
Traveling
With a pump, traveling becomes less complicated and more enjoyable. However, traveling still requires preparation. Remember to order your pump supplies in advance and pack the following items:
• A letter from your health care team that explains the necessity of carrying insulin supplies and wearing a pump.
• A prescription for insulin, both rapid-acting for your pump and the type recommended by your health care team in case you need to take insulin by injection (Remember, your pump is designed and calibrated to use U100 concentration insulin only. Use of any insulin with lesser or greater concentration can result in serious injury or death.)
• Emergency supplies listed in Before You Begin.
• Accessible snacks.
• Bottled water to prevent dehydration while flying. (Remember to check your BG frequently to distinguish between high blood glucose dehydration and normal flight dehydration.)
• The name of a referral health care team at your final destination in case of an emergency.
• Pack your insulin carefully so that it is not exposed to extreme temperatures or temperature changes. (Refer to the instructions that came with your insulin for appropriate storage conditions.)
• Pack your pump supplies in carry-on luggage when traveling by air or train. Do Not pack your supplies in checked luggage. Contact the Federal Aviation Administration (or your country equivalent) or your local airport security office before traveling by air to obtain prescription/medical supply carry-on regulations.
• Adjust your pump’s clock when crossing time zones. However, Do Not change the pump time and/or date on February 29, 2016 (Leap Day/Leap Year). If you make changes to the time and/or date of your pump on February 29, 2016, the changes will not be saved in the pump. Wait until the next day (March 1, 2016) to change the time and/or date so that your changes will be saved in your pump. Refer to page 3 for more details.
41029400B_OB_OTP_US_EN_MGDL_R3.indd 131 11/7/14 3:08 PM

132 CHAPTER 16 - Lifestyle issues
• Pumps will rarely set off airport metal detectors, so there is no need to remove your pump when passing through airport security. However, as airport security technology becomes more sophisticated, it is possible that a pump will set off the detector.
NOTE: While going through airport security, please keep these important things in mind. The pump should not go through the X-ray screening that is used for carry-on or checked luggage. The new airport screening, Whole Body Imaging Technology, is also a form of X-ray. If you are chosen to go through this form of screening, you will need to disconnect from the pump at your skin site prior to the scan and request alternate methods of screening the pump other than using X-ray. Your infusion set may remain in place.
For more information on traveling with pumps, visit the American Diabetes Association (ADA) website (www.diabetes.org) or call your local airport for security guidelines that may apply.
Intimacy
Your pump need not interfere with intimacy. You can disconnect most infusion sets. Always follow your health care team’s guidelines when disconnecting from your pump. You may need to compensate for missed basal insulin. Also, before and after you disconnect for any length of time, remember to check your BG levels.
41029400B_OB_OTP_US_EN_MGDL_R3.indd 132 11/7/14 3:08 PM

133 CHAPTER 17 - My information
This chapter provides tables to record information needed for programming your personal settings into your pump. Consult your health care team for correct information for your personal treatment plan.
Insulin to Carb Ratios (I:C)
Daily Time Slot My I:C ratio
12am
Insulin Sensitivity Factor (ISF)
Time of Day My ISF
12am
41029400B_OB_OTP_US_EN_MGDL_R3.indd 133 11/7/14 3:08 PM

134 CHAPTER 17 - My information
Time of Day My BG Target My BG Target range (+/-)
12am
BG Targets
41029400B_OB_OTP_US_EN_MGDL_R3.indd 134 11/7/14 3:08 PM

135 CHAPTER 17 - My information
Activity Type % DecreaseSet Temp in advance of
activity (yes or no)Minutes to set in
advance
Light (gardening, walking, shopping)
Moderate (leisurely biking, golf {no cart})
Strenuous (basketball, jogging, swimming)
Sustained (ice skating, rowing, hiking)
Temp Basal Rate Decrease for Activity
My duration for Insulin on Board (IOB) is: ________________________
41029400B_OB_OTP_US_EN_MGDL_R3.indd 135 11/7/14 3:08 PM

136 CHAPTER 17 - My information
Basal Programming Date ________________________
Segment Start Time
Program 1 Weekday
–––––––––––Units/Hr
Program 2 Other
–––––––––––Units/Hr
Program 3 Weekend
–––––––––––Units/Hr
Program 4 Exercise
–––––––––––Units/Hr
41029400B_OB_OTP_US_EN_MGDL_R3.indd 136 11/7/14 3:08 PM

137 CHAPTER 17 - My information
Basal Programming Date ________________________
Segment Start Time
Program 1 Weekday
–––––––––––Units/Hr
Program 2 Other
–––––––––––Units/Hr
Program 3 Weekend
–––––––––––Units/Hr
Program 4 Exercise
–––––––––––Units/Hr
41029400B_OB_OTP_US_EN_MGDL_R3.indd 137 11/7/14 3:08 PM

138 CHAPTER 17 - My information
Basal Programming Date ________________________
Segment Start Time
Program 1 Weekday
–––––––––––Units/Hr
Program 2 Other
–––––––––––Units/Hr
Program 3 Weekend
–––––––––––Units/Hr
Program 4 Exercise
–––––––––––Units/Hr
41029400B_OB_OTP_US_EN_MGDL_R3.indd 138 11/7/14 3:08 PM

139 CHAPTER 17 - My information
Basal Programming Date ________________________
Segment Start Time
Program 1 Weekday
–––––––––––Units/Hr
Program 2 Other
–––––––––––Units/Hr
Program 3 Weekend
–––––––––––Units/Hr
Program 4 Exercise
–––––––––––Units/Hr
41029400B_OB_OTP_US_EN_MGDL_R3.indd 139 11/7/14 3:08 PM

140 CHAPTER 18 - Warranty and other technical information
OneTouch® Ping® Insulin Pump Warranty
Animas warrants that the OneTouch® Ping® Insulin Pump will be free from defects in material and workmanship for a period of four (4) years from the date of purchase by the original purchaser. This limited warranty extends only to the original retail purchaser.
If, during the warranty period, the pump should fail because of a defect in material or workmanship, it may be returned to Animas and Animas will repair or replace your pump with a new or recertified pump, at Animas’ option, without charge to the purchaser. In certain circumstances and at its sole discretion, Animas may instead elect to refund all or a portion of the purchase price of the pump to the purchaser. Freight and transportation charges, where applicable, incurred in shipping a pump to be repaired or replaced under this limited warranty will be paid by Animas. In the event a pump is replaced or repaired under this warranty, the warranty period shall not be extended. Once you have received your repaired or replaced pump, you must return your original pump to Animas. In the event it is not returned, this warranty shall be void and the user will not be entitled to future pump replacement or repairs.
This limited warranty is valid only if the OneTouch® Ping® Insulin Pump is used under normal use and conditions and in accordance with the manufacturer’s instructions as detailed in the Owner’s Book provided to you at time of purchase. This limited warranty does not extend to any damage resulting from the following:
• changes or modifications to the pump by the user or any other third person after the date of manufacture;
• service or repairs performed by any person or entity other than an Animas-authorized service person;
• a force majeure or other event beyond the control of Animas;
• accidents, negligence, misuse, or abuse of the pump by the user or any other third person, including, but not limited to, improper storage of or physical abuse such as dropping or otherwise damaging the OneTouch® Ping® Insulin Pump; or
• normal “wear and tear,” including but not limited to cosmetic damage such as scratched display lenses and/or scratched paint
41029400B_OB_OTP_US_EN_MGDL_R3.indd 140 11/7/14 3:08 PM

141 CHAPTER 18 - Warranty and other technical information
This limited warranty only covers the pump and does not cover batteries, infusion sets, cartridges, battery caps, or other accessories of the insulin pump.
Except as expressly set forth in this limited warranty, all other warranties are expressly disclaimed and excluded, including, without limitation, any warranties of merchantability or fitness for a particular purpose.
The remedies provided for in this warranty are the exclusive remedies available in the event of any breach hereof. Except for such remedies, Animas, its suppliers, and its distributors shall not be liable for any losses, liabilities, claims, or damages of any kind or nature whatsoever, including, without limitation, any indirect, consequential, incidental, or special damages caused by or arising from a defect of the insulin pump.
41029400B_OB_OTP_US_EN_MGDL_R3.indd 141 11/7/14 3:08 PM

142 CHAPTER 18 - Warranty and other technical information
OneTouch® Ping® Insulin Pump Accessory Warranty
LIMITED PRODUCT WARRANTY FOR INSULIN PUMP ACCESSORIES (Cases, Clips, Skins, etc.)
Your OneTouch® Ping® Insulin Pump accessory is warranted against defects in materials and workmanship for a period of THREE (3) MONTHS from the date of original retail purchase. If a defect exists, Animas Corporation, at its option and to the extent permitted by law will (1) repair the product at no charge using new or refurbished parts, (2) exchange the product with a functionally equivalent product that is new or refurbished, or (3) refund the original purchase price. This warranty is available only to the original retail purchaser and excludes damage resulting from abuse, accident, modifications or other causes that are not defects in materials and workmanship. To the extent permitted by applicable law Animas is not liable for any direct, indirect, incidental or consequential damages arising out of the use or service of the product. The warranty and remedies described above are exclusive and in lieu of all other warranties, remedies, and conditions, whether oral, written, express, statutory or implied. To the extent permitted by applicable law Animas disclaims all implied and statutory warranties, including, warranties of merchantability and fitness for a particular purpose. If implied warranties cannot be disclaimed, then such warranties are limited in duration to the duration of this warranty. Any recovery is limited to the original purchase price. No other person is authorized to modify this limited warranty. Some states do not allow limitations on how long an implied warranty lasts, or exclusions of incidental or consequential damages, so the above limitations may not apply to you. This warranty gives you specific legal rights, and you may have other rights, which vary from state to state.
41029400B_OB_OTP_US_EN_MGDL_R3.indd 142 11/7/14 3:08 PM

143 CHAPTER 18 - Warranty and other technical information
OneTouch® Ping® Insulin Pump Maintenance Parts Warranty
LIMITED PRODUCT WARRANTY FOR INSULIN PUMP MAINTENANCE PARTS (Battery Caps, Cartridge Caps, etc.)
Your OneTouch® Ping® Insulin Pump maintenance part is warranted against defects in materials and workmanship for a period of SIX (6) MONTHS from the date of original retail purchase. If a defect exists, Animas Corporation, at its option and to the extent permitted by law will (1) repair the product at no charge using new or refurbished parts, (2) exchange the product with a functionally equivalent product that is new or refurbished, or (3) refund the original purchase price. This warranty is available only to the original retail purchaser and excludes damage resulting from abuse, accident, modifications or other causes that are not defects in materials and workmanship. To the extent permitted by applicable law Animas is not liable for any direct, indirect, incidental or consequential damages arising out of the use or service of the product. The warranty and remedies described above are exclusive and in lieu of all other warranties, remedies, and conditions, whether oral, written, express, statutory or implied. To the extent permitted by applicable law Animas disclaims all implied and statutory warranties, including, warranties of merchantability and fitness for a particular purpose. If implied warranties cannot be disclaimed, then such warranties are limited in duration to the duration of this warranty. Any recovery is limited to the original purchase price. No other person is authorized to modify this limited warranty. Some states do not allow limitations on how long an implied warranty lasts, or exclusions of incidental or consequential damages, so the above limitations may not apply to you. This warranty gives you specific legal rights, and you may have other rights, which vary from state to state.
41029400B_OB_OTP_US_EN_MGDL_R3.indd 143 11/7/14 3:08 PM

144 CHAPTER 18 - Warranty and other technical information
Number of Basal Segments 12 per Program
Number of Basal Programs 4
Basal Delivery Frequency (Basal rates of 0.2 U/hr or higher)
every 3 minutes
Temp Basal Range -90% to +200%, in 10% increments, OFF
Temp Basal Duration 0.0 hr to 24 hrs in 0.5 hr increments
Extended Bolus Duration 0.1 hr to 12 hrs, with 0.5 hr increments for 0.5 hr to 12 hrs
Battery Type 1.5 Volt Energizer® AA L91 Lithium or 1.5 Volt AA Alkaline
Number of Batteries 1
Battery Life, Typical use approximately 5 to 7 weeks for a lithium battery and approximately 2 to 3 weeks for an alkaline battery
End of Operational Life December 31, 2022
Maximum volume infused under single fault condition
Max 2.0U
Cartridge Capacity up to 2.0 mL or 200 units
Technical Specifications
NOTE: When applicable, testing used 23” Comfort™ infusion set and temperature of 73°F ± 2°F (23°C ± 1°C)
41029400B_OB_OTP_US_EN_MGDL_R3.indd 144 11/7/14 3:08 PM

145 CHAPTER 18 - Warranty and other technical information
Storage Conditions -4°F (-20°C) to +140°F (+60°C) 10% to 100% relative humidity, including condensing
Atmospheric pressure: 500 Hpa to 1060 Hpa
Batteries must be removed during storage periods exceeding 2 weeks.
Operating Conditions +40°F (+5°C) to +104°F (+40°C) Outside these temperatures, the flow accuracy and time to occlusion could be compromised.
20% to 90% relative humidity, including condensing
Atmospheric pressure: 700 Hpa to 1060 Hpa
Pump Disposal Contact Animas® Corporation for pump disposal information
Audio Bolus Range 0.1–2.0U in 0.1U step
0.5–10.0U in 0.5U step
1.0–20.0U in 1.0U step
5.0–35.0U in 5.0U step
Technical Specifications – Animas® Vibe™ Insulin Pump (continued)
41029400B_OB_OTP_US_EN_MGDL_R3.indd 145 11/7/14 3:08 PM

146 CHAPTER 18 - Warranty and other technical information
Delivery Mode Accuracy
Bolus +/- 5%
Basal +/- 5%
Flow Rate Accuracy
Basal/Bolus DeliveryLow Occlusion
Sensitivity SettingMaximum Occlusion Sensitivity Setting
0.025U/Hr basal 120 hours 72 hours
1.0U/Hr basal 3 hours 1.5 hours
3U or more bolus 30 seconds 8 seconds
Maximum Time to Occlusion Alarm*
* Maximum Time to Occlusion will vary based upon user-selected delivery rates. Certain factors, such as the presence of air in the infusion set or the cartridge and/or ambient temperature changes, can delay an occlusion alarm.
41029400B_OB_OTP_US_EN_MGDL_R3.indd 146 11/7/14 3:08 PM

147 CHAPTER 18 - Warranty and other technical information
Continuous Operation, Internally Powered Device
Type BF Medical Equipment (Patient isolated, not defibrillator protected)
Waterproof Equipment, IPX8 (protected against the effects of submersion, tested at 12 feet (3.6 meters) for 24 hours).
Infrared communication port
Occlusion Pressure Threshold 75 kPa typical, 241 kPa max.
Bolus Volume after Occlusion release (1.0U/Hr basal)
• 1.0U max with occlusion sensitivity set to high
• 3.0U max with occlusion sensitivity set to low
Delivery Rates • Bolus, under 1U: 1.1 to 2.2U/sec
• Bolus, 1U or more (normal delivery speed): 0.5 to 0.9U/sec
• Bolus, 1U or more (slow delivery speed): 0.2 to 0.4U/sec
• Prime: 1.7 to 3.3U/sec
Insulin Types Used Rapid-acting U100 insulin
Basal Rate Range 0.025-25U/Hr in 0.025U/Hr steps
Bolus Range 0.05-35U in 0.05U steps
Protection from equipment error More than 1.5 million redundant safety cross-checks per day for both hardware and software functionality
41029400B_OB_OTP_US_EN_MGDL_R3.indd 147 11/7/14 3:08 PM

148 CHAPTER 18 - Warranty and other technical information
Patient’s Bill of Rights and Responsibilities
It is the intent of Animas Corporation to address and respect patients’ rights in providing care and services. It is the policy of Animas Corporation to provide services to all patients without regard to race, color, national origin, religion, sex, age or disability. No person shall be excluded from participation in or be denied the benefits of any service, or be subject to discrimination because of race, color, national origin, religion, sex, age or disability.
It is the responsibility of all Animas® employees involved in interaction with the patient through sales, education programs, customer service or any other means to understand and promote this policy. It is the responsibility of patients of Animas Corporation to actively participate in his or her care.
• The patient is given information to allow decision making regarding care or services. The patient is responsible for providing accurate and complete information about his or her health and medical conditions.
• The patient is involved in conflict resolution. The patient should inform Animas® about his or her expectations and satisfaction with care.
• Patient complaints will be heard, reviewed and resolved to the best of our ability. The patient should ask questions when they do not understand his or her care, treatment, services, or what they are expected to do.
• The patient should follow the treatment plan or contact his or her health care professional if unable to do so. The patient should also express any concerns about his or her ability to follow the instructions and should report changes in his or her condition as appropriate. If they do not follow the instructions, the patient should accept shared responsibility for the outcomes of care, treatment, services, or what they are expected to do.
• The patient is involved in resolving ethical issues.
• The patient has a right to confidentiality and privacy with regards to his or her medical information. The patient should notify Animas® Customer Support with concerns related to product or safety issues.
41029400B_OB_OTP_US_EN_MGDL_R3.indd 148 11/7/14 3:08 PM

149 CHAPTER 18 - Warranty and other technical information
• The patient has a right to have his or her property respected. The patient should be considerate and respectful of Animas® employees.
• The patient should meet any financial obligation agreed to with Animas®. The Animas® Inside Sales Department will discuss billing of co-pays and deductibles, including whether the patient has ongoing ability to pay for supplies. Animas® will also address patients who lose insurance coverage.
• The patient has a right to have his or her communication needs met. Animas® will work with the patient to ensure that any language requirements, including sign language and any additional educational needs, are met.
If the patient believes that they have been denied a benefit of service because of race, color, national origin, religion, sex, age or disability, they may file a Complaint of Discrimination with the Manager of Animas®’ Customer Service Department, either verbally or in writing.
If the complaint is filed in writing, it should include a name, address, phone number and a brief description of what occurred which led to the belief that the individual was discriminated against. In this way the appropriate person may respond to the complaint. The complaint may also be filed with external agencies such as the State Department of Social Services, or the State Department of Health and Human Services.
Please contact Animas Corporation if there are any questions or concerns regarding this information.
41029400B_OB_OTP_US_EN_MGDL_R3.indd 149 11/7/14 3:08 PM

150 CHAPTER 18 - Warranty and other technical information
The Joint Commission
Animas® is committed to the safety and care of its patients. As part of this commitment, Animas® is accredited by The Joint Commission, which sets the standards for quality of care in the health care community. If you would like to contact The Joint Commission regarding an issue, you may do so by fax (630-792-5636) or mail (Office of Quality Monitoring, The Joint Commission, One Renaissance Boulevard, Oakbrook Terrace, IL 60181). You will need to complete a Quality Incidence Report Form, which is available from The Joint Commission.
Medicare DMEPOS Supplier Standards
NOTE: This is an abbreviated version of the supplier standards Medicare DMEPOS suppliers must meet. These standards are listed in their entirety in the Code of Federal Regulations - 42 C.F.R. 424.57(c). The full text of these standards can be obtained at http://ecfr.gpoaccess.gov. Upon request, we will furnish you a written copy of the standards.
1. A supplier must be in compliance with all applicable Federal and State licensure and regulatory requirements and cannot contract with an individual or entity to provide licensed services.
2. A supplier must provide complete and accurate information on the DMEPOS supplier application. Any changes to this information must be reported to the National Supplier Clearinghouse within 30 days.
3. An authorized individual (one whose signature is binding) must sign the application for billing privileges.
4. A supplier must fill orders from its own inventory, or must contract with other companies for the purchase of items necessary to fill the order. A supplier may not contract with any entity that is currently excluded from the Medicare program, any State health care programs, or from any other Federal procurement or nonprocurement programs.
5. A supplier must advise beneficiaries that they may rent or purchase inexpensive or routinely purchased durable medical equipment, and of the purchase option for capped rental equipment.
41029400B_OB_OTP_US_EN_MGDL_R3.indd 150 11/7/14 3:08 PM

151 CHAPTER 18 - Warranty and other technical information
6. A supplier must notify beneficiaries of warranty coverage and honor all warranties under applicable State law, and repair or replace free of charge Medicare-covered items that are under warranty.
7. A supplier must maintain a physical facility on an appropriate site. This standard requires that the location is accessible to the public and staffed during posted hours of business. The location must be at least 200 square feet and contain space for storing records.
8. A supplier must permit CMS or its agents to conduct on-site inspections to ascertain the supplier’s compliance with these standards. The supplier location must be accessible to beneficiaries during reasonable business hours, and must maintain a visible sign and posted hours of operation.
9. A supplier must maintain a primary business telephone listed under the name of the business in a local directory or a toll free number available through directory assistance. The exclusive use of a beeper, answering machine, answering service or cell phone during posted business hours is prohibited.
10. A supplier must have comprehensive liability insurance in the amount of at least $300,000 that covers both the supplier’s place of business and all customers and employees of the supplier. If the supplier manufactures its own items, this insurance must also cover product liability and completed operations.
11. A supplier must agree not to initiate telephone contact with beneficiaries, with a few exceptions allowed. This standard prohibits suppliers from contacting a Medicare beneficiary based on a physician’s oral order unless an exception applies.
12. A supplier is responsible for delivery and must instruct beneficiaries on use of Medicare-covered items, and maintain proof of delivery.
13. A supplier must answer questions and respond to complaints of beneficiaries, and maintain documentation of such contacts.
14. A supplier must maintain and replace at no charge or repair directly, or through a service contract with another company, Medicare-covered items it has rented to beneficiaries.
41029400B_OB_OTP_US_EN_MGDL_R3.indd 151 11/7/14 3:08 PM

152 CHAPTER 18 - Warranty and other technical information
15. A supplier must accept returns of substandard (less than full quality for the particular item) or unsuitable items (inappropriate for the beneficiary at the time it was fitted and rented or sold) from beneficiaries.
16. A supplier must disclose these supplier standards to each beneficiary to whom it supplies a Medicare-covered item.
17. A supplier must disclose to the government any person having ownership, financial, or control interest in the supplier.
18. A supplier must not convey or reassign a supplier number; i.e., the supplier may not sell or allow another entity to use its Medicare billing number.
19. A supplier must have a complaint resolution protocol established to address beneficiary complaints that relate to these standards. A record of these complaints must be maintained at the physical facility.
20. Complaint records must include: the name, address, telephone number and health insurance claim number of the beneficiary, a summary of the complaint, and any actions taken to resolve it.
21. A supplier must agree to furnish CMS any information required by the Medicare statute and implementing regulations.
22. All suppliers must be accredited by a CMS-approved accreditation organization in order to receive and retain a supplier billing number. The accreditation must indicate the specific products and services, for which the supplier is accredited in order for the supplier to receive payment of those specific products and services (except for certain exempt pharmaceuticals). Implementation Date - October 1, 2009
23. All suppliers must notify their accreditation organization when a new DMEPOS location is opened.
24. All supplier locations, whether owned or subcontracted, must meet the DMEPOS quality standards and be separately accredited in order to bill Medicare.
41029400B_OB_OTP_US_EN_MGDL_R3.indd 152 11/7/14 3:08 PM

153 CHAPTER 18 - Warranty and other technical information
25. All suppliers must disclose upon enrollment all products and services, including the addition of new product lines for which they are seeking accreditation.
26. Must meet the surety bond requirements specified in 42 C.F.R. 424.57 (c). Implementation Date - May 4, 2009
27. A supplier must obtain oxygen from a state-licensed oxygen supplier.
28. A supplier must maintain ordering and referring documentation consistent with provisions found in 42 C.F.R. 424.516(f).
29. DMEPOS suppliers are prohibited from sharing a practice location with certain other Medicare providers and suppliers.
30. DMEPOS suppliers must remain open to the public for a minimum of 30 hours per week with certain exceptions.
NOTE: Medicare defines an insulin pump as a capped rental.
• Medicare will pay a monthly rental fee for a period not to exceed 13 months, after which ownership of the equipment is transferred to the Medicare beneficiary.
• After ownership of the equipment is transferred to the Medicare beneficiary, it is the beneficiary’s responsibility to arrange for any required equipment service or repair.
41029400B_OB_OTP_US_EN_MGDL_R3.indd 153 11/7/14 3:08 PM

154 CHAPTER 18 - Warranty and other technical information
41029400B_OB_OTP_US_EN_MGDL_R3.indd 154 11/7/14 3:08 PM

Section II
OneTouch® Ping® Meter Remote
41029400B_OB_OTP_US_EN_MGDL_R3.indd 3 11/7/14 3:08 PM

41029400B_OB_OTP_US_EN_MGDL_R3.indd 4 11/7/14 3:08 PM

155 CHAPTER 1 - Setting up your OneTouch® Ping® Meter Remote
FRONT
Getting to know your OneTouch® Ping® Meter Remote and Test Strips
Test Strip PortInsert test strip here to turn meter remote display on for testing.
LED Indicator LightFlashes green during normal operation and red when there is an alarm or warning. Display with Backlight
BG test results, messages, symbols, and other data appear here.USB Data Port
Used to download logbook memory to a PC.
SmartChip® PortWill be used in the future to install software upgrades. (Feature not yet available for use.)
Up and Down buttonsScroll through/highlight menus, code numbers, and logbook records. Select or change information.
Back Button Turns your meter remote display on/off. Navigates you back to the previous menu item.
OK Button Turns your meter remote display on. Turns the display backlight on/off. Confirms menu selections.
This is the pre-set unit of measure.
41029400B_OB_OTP_US_EN_MGDL_R3.indd 155 11/7/14 3:08 PM
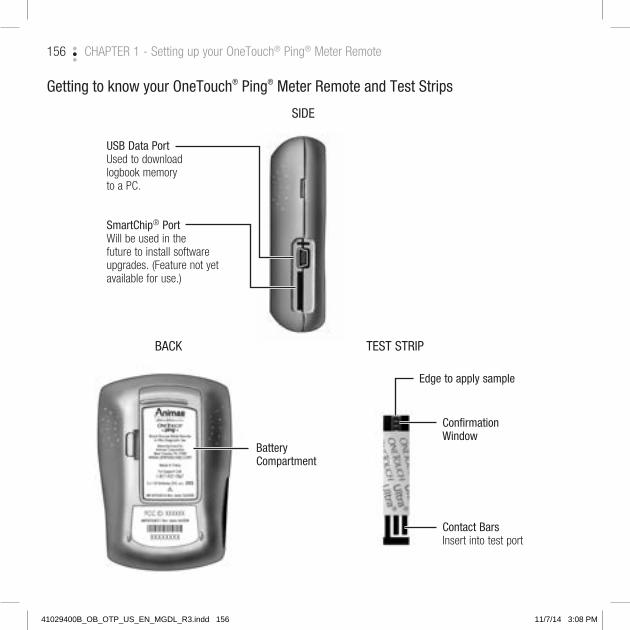
CHAPTER 1 - Setting up your OneTouch® Ping® Meter Remote156
Getting to know your OneTouch® Ping® Meter Remote and Test Strips
TEST STRIP
Edge to apply sample
Contact BarsInsert into test port
Confirmation Window
SIDE
USB Data PortUsed to download logbook memory to a PC.
SmartChip® PortWill be used in the future to install software upgrades. (Feature not yet available for use.)
BACK
Battery Compartment
41029400B_OB_OTP_US_EN_MGDL_R3.indd 156 11/7/14 3:08 PM
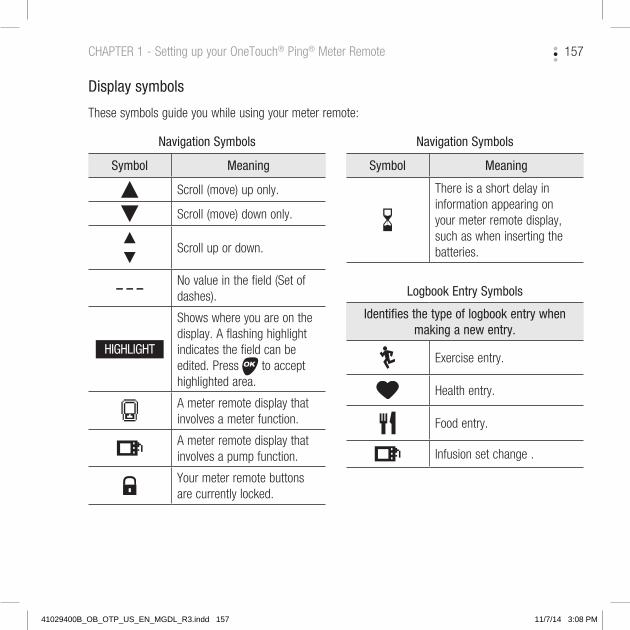
CHAPTER 1 - Setting up your OneTouch® Ping® Meter Remote 157
Display symbols
These symbols guide you while using your meter remote:
Navigation Symbols
Symbol Meaning
Scroll (move) up only.
Scroll (move) down only.
Scroll up or down.
– – –No value in the field (Set of dashes).
HIGHLIGHT
Shows where you are on the display. A flashing highlight indicates the field can be edited. Press to accept highlighted area.
A meter remote display that involves a meter function.
A meter remote display that involves a pump function.
Your meter remote buttons are currently locked.
Navigation Symbols
Symbol Meaning
There is a short delay in information appearing on your meter remote display, such as when inserting the batteries.
Logbook Entry Symbols
Identifies the type of logbook entry when making a new entry.
Exercise entry.
Health entry.
Food entry.
Infusion set change .
41029400B_OB_OTP_US_EN_MGDL_R3.indd 157 11/7/14 3:08 PM

CHAPTER 1 - Setting up your OneTouch® Ping® Meter Remote158
Display symbols
These symbols guide you while using your meter remote:
Battery Power Symbols
Symbol Meaning
Power remaining in your meter remote or pump batteries.
Full power remaining.
About two-thirds power remaining.
About one-third power remaining.
No power remaining. You must replace the batteries.
RF Signal Strength Symbols
Communication signal strength between your meter remote and pump.
Full strength.
Medium strength.
Low strength.
The RF connection is lost or interrupted (no connection).
RF communication has been deactivated by the user.
NOTE: If your meter remote and pump are not paired, no RF signal strength symbol will appear.
41029400B_OB_OTP_US_EN_MGDL_R3.indd 158 11/7/14 3:08 PM

CHAPTER 1 - Setting up your OneTouch® Ping® Meter Remote 159
Turning your meter remote display on
You will first need to install the batteries before your meter remote display will turn on. See Chapter 9 in Section II.
To turn your meter remote display on, press or . An all-black start-up screen will appear followed by the hourglass symbol. The Meter Home screen will then be displayed.
CAUTION: If the graphics appear to be different, call Customer Service at 1 877 937-7867. There may be a problem with your meter remote.
If
your meter remote display does not power on, try changing your meter remote batteries. See Chapter 9 in Section II.
You can also turn your meter remote on by inserting a test strip (see Chapter 4 in Section II ).
From the Meter Home screen you will have access to the Main Menu and all meter remote operations (see next page).
Meter Home
Last BGJun 19-067:40am
10:32 am
10999
Aft BrkftAvg.
14 days
(Example)
41029400B_OB_OTP_US_EN_MGDL_R3.indd 159 11/7/14 3:08 PM

CHAPTER 1 - Setting up your OneTouch® Ping® Meter Remote160
Using your meter remote display backlight
When your meter remote display is already on, press and hold for two seconds to turn the backlight on or off.
NOTE: Turning the backlight on uses more battery power.
Turning your meter remote display off
There are several ways to turn your meter remote display off:
• Before or after completing a test, remove the test strip.
• If there is no test strip in your meter remote, press and hold for two seconds.
• Your meter remote display will turn off by itself if left alone for a short time. However, you can extend battery life by turning it off as soon as you are finished.
Meter Home screen
The Meter Home screen displays the current time of day stored in your meter remote and battery power remaining. Your most recent BG test result appears along with the date and time of the test. Your average BG test results for the current meal period appears next to your most recent BG test result. Averages are based on the number of days you select when you set up your meter remote. See Advanced features in this chapter.
To go to the Main Menu screen, press .
Meter Home
Last BGJun 19-0610:32am
3:18 pm
105109
Aft LunchAvg.
14 days
41029400B_OB_OTP_US_EN_MGDL_R3.indd 160 11/7/14 3:08 PM

CHAPTER 1 - Setting up your OneTouch® Ping® Meter Remote 161
Main Menu screen
The Main Menu screen provides access to all meter remote operations.
Main Menu screen options are as follows:
• Bolus - Once you activate RF communication on your meter remote and pump, and pair the devices, you will be able to use your meter remote to deliver a bolus from your pump. (See Chapter 4 in Section III.)
• FastFacts - View on-screen summaries and graphs of BG test results and other health data stored in your meter remote memory.
• Meter Remote Settings - Customize your meter remote for your personal use.
• Add Logbook Entry - Add important health-related data to your meter remote memory.
• System Status - Review and/or troubleshoot pump, meter remote, and RF operations. You will not be able to review or troubleshoot pump operations from your meter remote until you activate RF communication on your meter remote and pump, and pair the devices. (See Chapter 4 in Section III.)
To select any item on the Main Menu screen, press to scroll to/highlight it on the screen and press .
NOTE: Many of your meter remote screens include an option to return to the Main Menu screen before and after completing a step or procedure. Simply press to highlight “Main Menu” and press .
Main Menu
BolusFastFacts
Meter SettingsAdd Logbook Entry
System Status
41029400B_OB_OTP_US_EN_MGDL_R3.indd 161 11/7/14 3:08 PM

CHAPTER 1 - Setting up your OneTouch® Ping® Meter Remote162
Setting up your meter remote
Your meter remote has settings that let you customize your meter remote for your personal use. Your meter remote comes pre-set at the factory with the display language and other features already selected. Before using your meter remote for the first time you should check and update these settings if necessary.
You can change or customize the other meter remote features as follows:
Basic
• Change the display language, time, or date.
NOTE: Once you activate RF communication on your meter remote and pump, and pair the devices, your meter remote automatically sets its time and date to match the pump time and date.
Customize
• Personalize features such as time and date formats, averages, meal schedule, “Before Meal” and “After Meal” glucose ranges, hypoglycemia level, and bolus calculator.
Lock Buttons
• Disable your meter remote buttons/functions to protect against unintentional use.
RF
• Activate and deactivate the RF feature, change the RF channel, activate pairing, and test RF communication between your meter and pump (once you begin using them together as a system).
41029400B_OB_OTP_US_EN_MGDL_R3.indd 162 11/7/14 3:08 PM

CHAPTER 1 - Setting up your OneTouch® Ping® Meter Remote 163
Alerts
• Set your meter remote to alert you when specific actions have been taken or need to be taken or when there are problems using your meter remote. Alerts may be set using sound and/or LED light.
Your meter remote will provide an additional set of alerts once you activate RF communication on your meter remote and pump, and pair the devices. These include alerts when there are communication problems between the devices, when your intended actions require attention, and when there are problems with pump operation. Many pump alerts, warnings, and alarms will display and/or sound both on your pump and on your meter remote. You can use your meter remote to confirm and clear the alerts, warnings, and alarms from both devices. Pump sounds are set directly on your pump during your pump set-up procedure.
NOTE: You do not need to change any of your meter remote settings in order to begin BG testing. Simply insert a test strip to turn your meter remote display on and proceed with the test. See Chapter 4 in Section II.
Following is a summary of meter remote settings that you can change or personalize for your own use. Factory settings refer to how your meter remote is set up when you receive it from the manufacturer. Custom settings refer to the alternate ways you can change or personalize the factory settings.
41029400B_OB_OTP_US_EN_MGDL_R3.indd 163 11/7/14 3:08 PM

CHAPTER 1 - Setting up your OneTouch® Ping® Meter Remote164
Meter Remote Settings
Option Factory Settings Custom Settings
Basic Set-up:
Language English Spanish
Time 12:00 am Change as necessary
Date Jan 1-07 Change as necessary
Customize Settings:
Time Format am/pm 24-hour
Date Format MM/DD/YY DD/MM/YY
Begin of week Sunday Monday
Contrast 0 -10 to 10
Beeper volume 20 1 to 20
Advanced Features:
Averages 14 Day 7, 30, 60, 90 Day
SchedulePre-set (see Advanced Features in this chapter)
Personal
Glucose Range
Before Meal 90–130 mg/dL Personal
After Meal — Personal
Hypo Level 70 mg/dL Personal
41029400B_OB_OTP_US_EN_MGDL_R3.indd 164 11/7/14 3:08 PM

CHAPTER 1 - Setting up your OneTouch® Ping® Meter Remote 165
Meter Remote Settings
Option Factory Settings Custom Settings
Calculator Set-up:
This menu option is only available if your meter remote is not paired with your pump. When the devices are paired, these values are retrieved directly from your pump.
I:C Ratio 1U:15g Personal
BG Target 120 mg/dL Personal
+/– (range) 10 mg/dL Personal
Insulin Sensitivity (IS) Factor 1U:50 mg/dL Personal
Lock Buttons Unlocked Locked
RF Activation Off On
Pairing Off On
Alerts:
Warning Cue On (Audio Beep) Off
LED Off On
41029400B_OB_OTP_US_EN_MGDL_R3.indd 165 11/7/14 3:08 PM

CHAPTER 1 - Setting up your OneTouch® Ping® Meter Remote166
Basic Set-up
NOTE:• After installing the batteries for the first time, your meter remote will automatically enter Basic Set-up
(at step 3) when you turn your meter remote display on. There will be a short delay of up to 30 seconds as your meter remote performs a power-on self test. An hourglass symbol ( ) will appear on the display during that time.
• See Chapter 9 in Section II for important information on the correct way to install the batteries.
1. Go to Meter Settings mode
On the Main Menu screen press to highlight “Meter Settings”. Press to confirm your selection and go to the Meter Settings screen.
2. Go to Basic Set-up
“Basic” will be highlighted. Press to confirm your selection and go to the Basic Set-up screen.
3. Choose a display language
“Language” will be highlighted. Press to confirm your selection and go to the Language Set-up screen.
4. Set the display language
English is the language that has been pre-set at the factory. Press for English, or highlight “Español” and press for Spanish.
NOTE: Once you begin using your meter remote and pump together as a system, the language on your meter remote must be set to the same language as your pump to use your meter remote to access pump functions.
Main Menu
BolusFastFacts
Meter SettingsAdd Logbook Entry
System Status
Meter Settings
BasicCustomize
Lock ButtonsRF
Alerts
Basic Set-up
LanguageDate/Time
Language Set-up
Set up in?
EnglishEspañol
41029400B_OB_OTP_US_EN_MGDL_R3.indd 166 11/7/14 3:08 PM

CHAPTER 1 - Setting up your OneTouch® Ping® Meter Remote 167
5. Set the time of day
On the Basic Set-up screen, press to highlight “Date/Time”. Press to confirm your selection.
Press to scroll to the correct hour. Press to confirm your selection.
Press to scroll to the correct minutes and press .
“am” or “pm” is now highlighted next to minutes. Press to scroll to the correct am or pm setting. Press to confirm your selection.
The month is now highlighted.
Basic Set-up
LanguageDate/Time
Date/Time Set-up
Time 8:00 am
Date Jan 1-07
Date/Time Set-up
Time 10:00 am
Date Jan 1-07
Time 10:32 am
Date Jan 1-07
Date/Time Set-up
Date/Time Set-up
Time 10:32 am
Date Jan 1-07
41029400B_OB_OTP_US_EN_MGDL_R3.indd 167 11/7/14 3:08 PM

CHAPTER 1 - Setting up your OneTouch® Ping® Meter Remote168
6. Set the date
Press to scroll to the correct month and press . Repeat these steps to select the day and then the year. To confirm each selection, press .
After you confirm the final selection for year, you will return to the Meter Settings screen where you can begin the Customize Set-up.
NOTE:• If more than two minutes elapse during battery replacement, you may have to
re-set the date and time. All other meter remote settings remain saved in the meter remote memory.
• You will need to manually adjust your meter remote clock time to reflect any Daylight Saving Time adjustments in your local area.
• Once you activate RF communication on your meter remote and pump, and pair the devices, your meter remote’s clock time will be set to match the pump’s clock time.
Customize
On the Meter Settings screen, press with “Customize” highlighted.
You will be reminded to have your Owner’s Booklet available as a reference while customizing your meter remote.
When you choose “Customize” on the Meter Settings screen, an additional menu of options appears. You must review all the menu options and make selections for each for your settings to be saved. Press to begin with “Settings”.
The Calculator Set-up option on your meter remote is available only when your meter remote is not paired with your pump.
Date/Time Set-up
Time 10:32 am
Date Jun 1-07
Date/Time Set-up
Time 10:32 am
Date Jun 19-07
Please use your Owner's Booklet to help you set
up your Meter
Meter Settings
BasicCustomize
Lock ButtonsRF
Alerts
Customize
Settings
Advanced Features
Calculator Set-up
41029400B_OB_OTP_US_EN_MGDL_R3.indd 168 11/7/14 3:08 PM

CHAPTER 1 - Setting up your OneTouch® Ping® Meter Remote 169
Settings
“Time Format” is now highlighted.
1. Set the time format
Press to highlight the time format you prefer – am/pm or 24 hour. Press to confirm your selection.
“Date Format” is now highlighted.
2. Set the date format
Press to highlight the date format you want your meter remote to display – month first (MM/DD/YY) or day first (DD/MM/YY). Press to confirm your selection.
“Begin of week” is now highlighted.
3. Set the day your week starts on
For record-keeping purposes you can begin your week on Sunday or Monday. Press to highlight your choice and press to confirm your selection.
“Contrast” is now highlighted.
4. Select the display contrast
You can adjust the contrast level of your meter remote display from -10 (low contrast) to 10 (high contrast) to help with viewing. To change the contrast level, press to select the desired level. As you scroll, the display contrast changes automatically to help you make your choice. Press to confirm your selection.
“Beeper volume” is now highlighted.
Settings
Time Format am/pmDate Format MM/DD/YYBegin of week SundayContrast 8Beeper volume 20
am/pm24 hour
SettingsTime Format am/pmDate Format MM/DD/YYBegin of week SundayContrast 8Beeper volume 20
SettingsTime Format am/pmDate Format MM/DD/YYBegin of week SundayContrast 10Beeper volume 20
SundayMonday
SettingsTime Format am/pmDate Format MM/DD/YYBegin of week SundayContrast 8Beeper volume 20
MM/DD/YYDD/MM/YY
41029400B_OB_OTP_US_EN_MGDL_R3.indd 169 11/7/14 3:08 PM

CHAPTER 1 - Setting up your OneTouch® Ping® Meter Remote170
5. Set the beeper volume
Your meter remote was set at the factory to give audio signals (beeps) at key points in the test procedure. Beeps are also used to sound warnings and alarms that arise from meter remote or pump operation. Beep volume may be set anywhere from 1 (barely audible) to 20 (loudest).
To change the volume, press to select the desired level. Press to confirm your selection.
You will return to the Customize screen.
NOTE:• You cannot turn the beep completely off.
• Your settings are not saved until you have made a selection for each and pressed after the last setting (Beeper volume).
Advanced features
You can choose the number of days to be included in your BG test averages, and set your personal meal schedule, before-meal and after-meal glucose ranges, and target hypoglycemic level.
On the Customize screen, press with “Advanced Features” highlighted.
SettingsTime Format am/pmDate Format MM/DD/YYBegin of week SundayContrast 8Beeper volume 20
Customize
Settings
Advanced Features
Calculator Set-up
41029400B_OB_OTP_US_EN_MGDL_R3.indd 170 11/7/14 3:08 PM

CHAPTER 1 - Setting up your OneTouch® Ping® Meter Remote 171
1. Set the days included for test averages
“Averages” is now highlighted. Your meter remote is pre-set to display a 14-day average of your BG test results on the Meter Home screen, and when you compare your current BG test result to your previous BG test result. You can change the number of days that make up this average to include the last 7, 30, 60, or 90 days. Press to choose the number of days you want to include and press .
“Schedule” is now highlighted.
NOTE: You can still look at averages for all five time periods by reviewing your meter remote logbook.
2. Set your meal schedule
Next, your meter remote will prompt you to select time periods for your usual meal schedule. When you set this feature all of your BG test results will automatically be tagged with the mealtime.
To view the pre-set meal schedule highlight “Pre-set” and press .
The pre-set schedule will appear on the screen. Both “Before Meal” and “After Meal” times are pre-set (“a” refers to am and “p” refers to pm). Whenever you test, these mealtimes will be recorded in your meter remote memory whether or not you have actually eaten according to this schedule. To use the pre-set schedule, press .
To personalize your schedule, press , choose “Personal”, and press .
To change all or some of the personal meal schedule:
• Press to scroll through each mealtime.
• Press to select the correct hours and minutes (in 15-minute steps).
• Press to confirm your selection and move to/highlight the next mealtime.
• If you make a mistake, press to return to any mealtime and make corrections.
Pre-set ScheduleBef BrkftAft BrkftBef LunchAft LunchBef DinnerAft DinnerNight
6:00 a- 9:00 a9:00 a- 11:00 a
11:00 a- 2:00 p2:00 p- 5:00 p5:00 p- 8:00 p8:00 p- 11:00 p
11:00 p- 6:00 a
Advanced FeaturesAverages 14 DayScheduleGlucose Range Before Meal 90-130 After Meal --- - ---Hypo Level 70
Pre-setPersonal
Advanced FeaturesAveragesScheduleGlucose Range Before Meal After MealHypo Level 70
7 Day14306090
Personal ScheduleBef BrkftAft BrkftBef LunchAft LunchBef DinnerAft DinnerNight
6:00 a- 9:00 a9:00 a- 11:00 a
11:00 a- 2:00 p2:00 p- 5:00 p5:00 p- 8:00 p8:00 p- 11:00 p
11:00 p- 6:00 a
41029400B_OB_OTP_US_EN_MGDL_R3.indd 171 11/7/14 3:08 PM

CHAPTER 1 - Setting up your OneTouch® Ping® Meter Remote172
You only need to set the start times for each mealtime. End times will automatically change to match the start time of the next time period. For example, if you set the start time of “Bef Lunch” for 10:00 am, the end time of the previous “Aft Brkft” will automatically change to 10:00 am.
End time of “Aft Brkft” is the same as the start time of “Bef Lunch”.
When you are finished, press to save your personal schedule.
NOTE: You have the option to modify the mealtime for any test if necessary. See Advanced Features, in this chapter.
NOTE: It is important that your meter remote date and time are correct. That way your BG test results and other health information will be stored correctly in your meter remote memory. The lower end of the “Before Meal” Glucose Range is now highlighted.
3. Set your before-meal and after-meal glucose ranges
The “Before Meal” glucose range is pre-set to 90–130 mg/dL. To use this range, press twice. You can change this range to one recommended by your health care professional.
Press to change the lower end of the range in 1 mg/dL steps, and press . Repeat these steps to enter a value for the upper end.
There is no pre-set “After Meal” glucose range. If you have an “After Meal” glucose range recommended by your health care professional, press and then to select to your target numbers.
The factory-set hypoglycemic level (“Hypo Level”) is now highlighted.
Personal ScheduleBef BrkftAft BrkftBef LunchAft LunchBef DinnerAft DinnerNight
7:00 a- 9:00 a9:00 a- 10:00 a
10:00 a- 1:00 p1:00 p- 5:00 p5:00 p- 8:00 p8:00 p- 11:00 p
11:00 p- 7:00 a
Personal ScheduleBef BrkftAft BrkftBef LunchAft LunchBef DinnerAft DinnerNight
7:00 a- 9:00 a9:00 a- 10:00 a
10:00 a- 1:00 p1:00 p- 5:00 p5:00 p- 8:00 p8:00 p- 11:00 p
11:00 p- 7:00 a
Advanced FeaturesAverages 14 DayScheduleGlucose Range Before Meal 90-130 After Meal --- - ---Hypo Level 70
Personal
Advanced FeaturesAverages 14 DayScheduleGlucose Range Before Meal 90-130 After Meal --- - ---Hypo Level 70
Personal
41029400B_OB_OTP_US_EN_MGDL_R3.indd 172 11/7/14 3:08 PM

CHAPTER 1 - Setting up your OneTouch® Ping® Meter Remote 173
4. Set your target hypoglycemic level
The factory-set hypoglycemia level is 70 mg/dL. If your health care professional has advised you to use a different level, press to select the correct number and press .
NOTE: Your Advanced Features settings are not saved until you have made a selection for each and pressed after the last setting (Hypo Level).
Calculator Set-up
The last item on the Customize screen is “Calculator Set-up”. This feature is mainly intended for use once you have completed pump training and fully understand the ezCarb and ezBG functions on your pump. See Chapter 10 in Section I.
NOTE: Please discuss the Calculator Set-up with your health care professional before using this feature.
The ezCarb and BG Bolus screens on your meter remote allow you to automatically calculate a bolus to cover carbs eaten and/or correct a high BG. Before you begin using your meter remote and pump together as a system (see Section III ), the Calculator Set-up on your meter remote lets you enter a series of bolus calculator settings that are used on the ezCarb and ezBG Bolus screens. The Calculator Set-up feature on your meter remote will only be available when the devices are not paired (see Chapter 4 in Section III ).
WARNING: Be sure to enter and store the correct values for each of the items in the Calculator Set-up screen. Incorrect values can lead to calculated insulin units that may be too high or too low for your current profile and situation.
Advanced FeaturesAverages 14 DayScheduleGlucose Range Before Meal 90-130 After Meal --- - ---Hypo Level 70
Personal
Customize
Settings
Advanced Features
Calculator Set-up
41029400B_OB_OTP_US_EN_MGDL_R3.indd 173 11/7/14 3:08 PM

CHAPTER 1 - Setting up your OneTouch® Ping® Meter Remote174
1. Set your I:C Ratio
Your I:C ratio is used to help calculate a bolus to cover the number of carbs in a meal or snack. It is defined as the approximate number of carbs (grams) that you can cover with 1 unit of insulin. You can change your I:C ratio by pressing to select the desired number.
Press to confirm your I:C ratio value.
The “BG Target” field is now highlighted.
NOTE: When using the Calculator Set-up on your meter remote, the I:C ratio you set applies to all times of the day. However, you may make changes to the I:C ratio as needed through the Calculator Set-up or during bolus calculations on the ezCarb and ezBG Bolus screens.
2. Set your default BG Target
Your BG target represents your goal for achieving good glycemic (BG) control. To choose a different target, press to select the desired BG Target and press .
The “+/–” field is now highlighted.
3. Set your default +/– (range) value
By setting a range (+/–), your meter remote will not calculate a BG correction if your actual BG is within that range. If you prefer to correct to a single target rather than a target range, set your range to “+/– 0”. Press to select the desired BG target range and press .
The “IS Factor” field is now highlighted.
Calculator Set-up
I:C Ratio
BG Target
IS Factor
1U:15 g
120 mg/dL
+ / – 10 mg/dL
1U:50 mg/dL
Calculator Set-up
I:C Ratio
BG Target
IS Factor
1U:15 g
120 mg/dL
+ / – 10 mg/dL
1U:50 mg/dL
Calculator Set-up
I:C Ratio
BG Target
IS Factor
1U:15 g
120 mg/dL
+ / – 10 mg/dL
1U:50 mg/dL
41029400B_OB_OTP_US_EN_MGDL_R3.indd 174 11/7/14 3:08 PM

CHAPTER 1 - Setting up your OneTouch® Ping® Meter Remote 175
4. Set your default Insulin Sensitivity (IS) Factor
“IS Factor” is the approximate amount by which you can lower your BG level (in mg/dL) with one unit of insulin. You can change your IS Factor by scrolling to the desired number and pressing .
After setting your IS Factor and pressing , you will return to the Meter Settings screen with “Lock Buttons” highlighted.
WARNING: Bolus units that are computed with the calculator may not take all your other health factors into consideration. These include:• Your stress level.
• Whether you plan to exercise.
• Any IOB from a syringe, pen, or pump bolus.
You may always adjust the insulin units up or down before you decide to administer your bolus. If you dose an insulin amount that is too high or too low, this may result in a hypoglycemic or hyperglycemic event. Please discuss the bolus calculator feature and all relevant personal settings with your health care professional before using the calculator for the first time.
Calculator Set-up
I:C Ratio
BG Target
IS Factor
1U:15 g
120 mg/dL
+ / – 10 mg/dL
1U:50 mg/dL
41029400B_OB_OTP_US_EN_MGDL_R3.indd 175 11/7/14 3:08 PM

CHAPTER 1 - Setting up your OneTouch® Ping® Meter Remote176
Lock Buttons
The Lock Buttons feature lets you protect your meter remote from unintentional use. For example, locking your meter remote buttons can help prevent unintended insulin delivery once you begin using your meter remote and pump together as a system. While buttons are locked, you will have limited ability to navigate through meter remote operations.
1. Go to Lock Buttons
On the Meter Settings screen press with “Lock Buttons” highlighted.
2. Lock your meter remote buttons
“Cancel” will be highlighted. To lock the buttons, highlight “Lock” and press .
You will go to the Meter Home screen.
NOTE:• You can also lock your meter remote buttons simply by pressing and holding and at the same
time for about three seconds after your meter remote display has been turned on.
• Once your meter remote buttons are locked, you will only have access to the Meter Home screen. The lock symbol will appear on top of the screen. Buttons will remain locked even if you turn your meter remote display on or off.
• While the buttons are locked, you will still be able to perform a BG test. Pending alarms and warnings will still be displayed.
• The Lock Buttons feature only affects the buttons on your meter remote. It does not affect the buttons on your pump.
• You may also lock the buttons on your pump using the Tamper Resistant feature on your pump. See Chapter 4 in Section I.
Lock Buttons
Lock Buttons to protectagainst unintentional use.
LockCancel
Meter Settings
BasicCustomize
Lock ButtonsRF
Alerts
41029400B_OB_OTP_US_EN_MGDL_R3.indd 176 11/7/14 3:08 PM

CHAPTER 1 - Setting up your OneTouch® Ping® Meter Remote 177
Unlocking your meter remote buttons
To unlock the meter remote buttons, press and hold and at the same time for about three seconds after your meter remote display has been turned on.
RF and Pairing
The RF and Pairing features on your meter remote and pump are used to establish communication between the two devices. This way you can use your meter remote display for remote access to many pump functions. The RF feature also makes it easy for BG test results from your meter remote to be incorporated into bolus calculations on the ezCarb and ezBG Bolus screens. When you are ready to begin using your meter remote to access pump functions, see Chapter 1 in Section III.
41029400B_OB_OTP_US_EN_MGDL_R3.indd 177 11/7/14 3:08 PM

CHAPTER 1 - Setting up your OneTouch® Ping® Meter Remote178
Alerts
Your OneTouch® Ping® Meter Remote will alert you to specific alarms and warnings that result from meter remote operation. In addition to text messages (Notification screens) that appear on your meter remote display, you can choose how you would like to be alerted with audio beeps or LED signals. See Chapter 10 in Section II for a description of meter remote-specific alerts that will sound and display on your meter remote. That chapter provides tips for taking the appropriate action to clear the problem and continue use.
Your meter remote will provide an additional set of alerts once you have activated RF communication on your meter remote and pump, and pair the devices. These include alerts when there are communication problems between the devices or if your intended actions might require additional attention. Many alerts, warnings, and alarms related to insulin delivery from your pump will also display and/or sound both on your meter remote and your pump. See Chapter 6 in Section III for a description of these types of messages/alerts. That chapter also provides tips for taking the appropriate action to clear the problem and continue use.
Your pump has a progressive warnings and alarms safety system. This means that if you do not confirm the warning or alarm, your pump will begin to beep louder and start to vibrate within one hour. At that time, if you do not confirm the warning or alarm, it will continue until the necessary action is taken. You may confirm the alarm or warning on either your meter remote or your pump. Certain pump conditions, such as the “Replace Battery” warning, require taking action directly on your pump to clear the problem. See Chapter 6 in Section III for information on clearing alerts, warnings, and alarms from your pump and meter remote.
1. Go to Alerts
On the Meter Settings screen press with “Alerts” highlighted.
“Warning Cue” is now highlighted.
Meter Settings
BasicCustomize
Lock ButtonsRF
Alerts
41029400B_OB_OTP_US_EN_MGDL_R3.indd 178 11/7/14 3:08 PM

CHAPTER 1 - Setting up your OneTouch® Ping® Meter Remote 179
2. Set the Warning Cue (Audio beeps) mode
You may choose to be alerted to warnings on your meter remote by audio beeps. When you activate the Warning Cue, this also specifies that warnings on your pump will also sound on your meter remote after you activate RF communication and pair the devices. Once you begin using your meter remote and pump together as a system (see Chapter 1 in Section III), you may wish to review or change this setting.
To activate the Warning Cue, press with “On” highlighted.
3. Set the LED mode
Your meter remote has an LED indicator light located on the top of your meter remote. You may use the LED to visually signal you if there is an alarm, warning, or notification on your meter remote. LED alerts are in addition to text and audio alerts. During normal operation, the LED flashes green. A flashing red LED indicates an alarm, warning, or notification. When you activate the LED mode, this also specifies that alarms, warnings, or alerts on your pump will also flash on your meter remote after you activate RF communication and pair the devices. Once you begin using your meter remote and pump together as a system (see Chapter 1 in Section III), you may wish to review or change this setting.
To activate the LED alerts, press with “On” highlighted.
You will return to the Meter Settings screen.
NOTE:• Whenever your meter remote alerts you to an alarm or warning, you must confirm the message on
either your meter remote or pump. If the alarm or warning requires corrective action before normal operation can continue, you must take the appropriate steps to resolve the problem.
• Setting the LED to “On” will use more battery power.
Alerts
Warning Cue
LED
OnOff
On
Alerts
Warning Cue
LED OnOff
Off
41029400B_OB_OTP_US_EN_MGDL_R3.indd 179 11/7/14 3:08 PM

180 CHAPTER 2 - Setting up and using the Food Database
Food Database
Your meter remote comes from the factory with a basic Food Database pre-loaded.
The Food Database contains pre-calculated carbohydrate, fat, protein, and fiber amounts for 500 food choices. You may use ezManager® Software on your PC to update the Food Database in your meter remote memory choosing from a comprehensive library of over 5,000 food choices.
The Food Database provides you with an easy and accurate way to obtain carb totals when using the bolus calculator in the ezCarb Bolus screen. You can also use the Food Database for making logbook entries. A special “Favorites” selection in the Food Database lets you create a separate library of food items and carb amounts for your most preferred or frequently consumed food items.
NOTE: When selecting and totaling carb amounts from the Food Database for use in the bolus calculator in the ezCarb Bolus screen, a maximum of 999 grams(g) will be used in the calculations – even if you selected a “Total” amount greater than 999g.
Updating the food database from your PC
Follow instructions in the ezManager® User Guide for updating the Food Database on your meter remote.
Making selections from the food database
You can access the Food Database from either the ezCarb Bolus screen (see Chapter 4 in Section III ) or by making a Food Logbook entry (see Chapter 6 in Section II ).
From either starting point, the Food List screen will appear where you can access 16 food categories. The first six food categories appear on the Food List screen. Press to scroll to the other food categories.
Food ListFavorites
BeansBeverages
BreadsCereals
DairyEthnic �
41029400B_OB_OTP_US_EN_MGDL_R3.indd 180 11/7/14 3:08 PM

181 CHAPTER 2 - Setting up and using the Food Database
1. Choose a food category
Press to highlight the desired category and press . A second menu of brand choices for that category appears.
2. Choose a food brand/type
An additional menu of brand choices appears along with the carb totals for a typical serving size. Press to highlight the desired brand/type, and then press
to display nutritional information for that food brand/type.
If you do not see the desired food item in the list, you may add it for future reference by following instructions in the ezManager® User Guide.
3. Adjust your serving size
Nutritional information is displayed for the standard serving size of that food item. The “Serving” field is highlighted. Press to adjust the serving size as needed and press . As you adjust the serving size, the nutritional units will automatically be re-calculated.
4. Add or edit additional food items as needed
“Add More Items” will be highlighted. Up to nine food items may be selected for use with the bolus calculator or when making a logbook entry.
Press to return to the Food List screen, and repeat steps 1–4 to add additional food items and carbs to your total.
When you are finished, press to highlight “Total” and press .
Food ListFavorites
BeansBeverages
BreadsCereals
DairyEthnic
�
Canned
Bushs BakedGarbanzo Beans
▼▲
Carbs(g)2927
Bushs Baked Serving:SvgSize = 1/2 cupCarbsFatProteinFiberAdd More Items
1.0
29.0165
Total
Bushs Baked Serving:SvgSize = 1/2 cupCarbsFatProteinFiberAdd More Items
1.029
29.0165
Total
Bushs BakedServing:SvgSize = 1/2 cupCarbsFatProteinFiberAdd More Items
1.0
29.0165
Total
41029400B_OB_OTP_US_EN_MGDL_R3.indd 181 11/7/14 3:08 PM

182 CHAPTER 2 - Setting up and using the Food Database
The ezCarb Total or Food Entry Total screen will appear and will list all your food items and their specific carb amounts. “Done” will be highlighted. “Max Carbs = 999 g” will appear to let you know that 999 is the maximum carb value used in the bolus calculation, regardless of the “Total” that appears. If you have selected more than three food items, press to display the rest of your entries.
If the food items and carb amounts are correct, press .
If you need to add additional food items, highlight “Add More Items” and press . Then follow the same steps above for adding new items.
If you need to make a change to a particular food item, press to highlight the food item you wish to edit and press . Nutritional information will appear on the display and you may adjust the serving size as needed. To delete a food item, change the serving size to 0. When you are finished, press with “Total” highlighted.
When all entries are completed, highlight “Done” and press .
ezCarb TotalItemBushs Baked BeansChickpeas CannedKidney Beans CanTotal Max Carbs = 999 gAdd More Items Done
Carbs(g)295438
121 g
41029400B_OB_OTP_US_EN_MGDL_R3.indd 182 11/7/14 3:08 PM

183 CHAPTER 3 - Estimating bolus insulin amounts with the bolus calculator
Your meter remote includes an ezCarb and ezBG Bolus calculator feature. This feature lets you calculate a bolus to cover carbs eaten and/or correct a high BG. ezCarb and ezBG Bolus calculations on your meter remote work much like the calculations on your pump with a few differences:
• You will not be able to use your meter remote to deliver the bolus from your pump. But you will be able to use the information to manually enter and deliver a bolus amount directly on your pump, or for a pen/syringe bolus.
• Your meter remote does not allow you to include any IOB in the calculations.
• Your meter remote uses settings from the Calculator Set-up (see Chapter 1 in Section II) as initial inputs for the ezCarb and ezBG Bolus calculator screens.
When you begin using your devices together as a system, the meter remote will replace settings from the Calculator Set-up with settings that are saved in your pump and that apply to the current time of day. Any IOB will also be included in the calculations if the IOB feature is activated on your pump. And you will be able to use your meter remote to deliver the bolus from your pump. See Chapter 4 in Section III for instructions on using the ezCarb and/or ezBG Bolus calculator feature on your meter remote.
To access the ezCarb and ezBG feature on your meter remote, highlight “Bolus” on the Main Menu screen and press . You have the option of selecting an ezCarb or ezBG Bolus calculation.
Main Menu
BolusFastFacts
Meter SettingsAdd Logbook Entry
System Status
Bolus Menu
ezCarbezBG
Main Menu
41029400B_OB_OTP_US_EN_MGDL_R3.indd 183 11/7/14 3:08 PM

184 CHAPTER 4 - Testing your blood glucose
BG test principle
When using your meter remote to test your BG, glucose in the blood sample mixes with special chemicals in the test strip and a small electric current is produced. The strength of this current changes with the amount of glucose in the blood sample. Your meter remote measures the current, calculates your BG level, displays the BG test result, and stores it in its memory.
Starting the test process
Have these things with you when you test your BG level:
• OneTouch® Ping® Meter Remote
• OneTouch® Ultra® Test Strips
• Lancing device
• Sterile lancets with protective disks
• OneTouch® Ultra® Control Solution
CAUTION: If you cannot test due to a problem with your testing supplies, contact your health care professional or Customer Service at 1 877 937-7867. Failure to test could delay treatment decisions and lead to a serious medical condition.
CAUTION: The test strip vial contains drying agents that are harmful if inhaled or swallowed and may cause skin or eye irritation.
41029400B_OB_OTP_US_EN_MGDL_R3.indd 184 11/7/14 3:08 PM

185 CHAPTER 4 - Testing your blood glucose
NOTE: • Use only OneTouch® Ultra® Test Strips with your meter remote.
• Make sure your meter remote and test strips are about the same temperature before you test.
• OneTouch® Ultra® Test Strips are for single use only. Never re-use a test strip that had either blood or control solution applied to it.
• Testing must be done within the operating range (43°–111°F/6°–44°C). For the most accurate BG test results, try to test as close to room temperature (68°–77°F/20°–25°C) as you can.
1. Check the code on the test strip vial before inserting the test strip
Code numbers are used to calibrate your meter remote with the test strips you are using.
2. Insert a test strip
Remove the test strip from its vial and immediately replace the vial cap and close it tightly. With clean, dry hands, you may touch the test strip anywhere on its surface. Do Not bend, cut or modify the test strips in any way. Use each test strip immediately after removing it from the vial.
Insert the test strip into the test port as shown. Make sure the three contact bars are facing you. Push the test strip in as far as it will go. Do Not bend the test strip.
41029400B_OB_OTP_US_EN_MGDL_R3.indd 185 11/7/14 3:08 PM

186 CHAPTER 4 - Testing your blood glucose
An all-black start-up screen will be followed by an hourglass symbol and then the Match Code screen. The Match Code screen will display the pre-set numeric code “25”.
NOTE: If you insert a test strip while your meter remote is in the middle of certain insulin delivery procedures (e.g., delivering a Normal Bolus or the Normal portion of a Combo Bolus), you must either allow that procedure to complete, or cancel the operation so you can continue with the test.
3. Confirm that the code displayed on your meter remote matches the code on the test strip vial
If the code on your meter remote does not match the code number on the test strip vial, press to match the code number on the test strip vial. The new code number will flash on the display for three seconds, after which the display will advance to the Test/Apply Blood screen.
If the codes already match, press to go to the Test/Apply Blood screen. When you do not make a change after three seconds, the display will advance to the Test/Apply Blood screen.
CAUTION: Matching the code on your meter remote and the code on the test strip vial is essential to obtain accurate BG test results. Each time you test, check to make sure the code numbers match.
Your meter remote is now ready to perform a BG test.
TestMatch Code
��
25
TestMatch Code
25��
41029400B_OB_OTP_US_EN_MGDL_R3.indd 186 11/7/14 3:08 PM

187 CHAPTER 4 - Testing your blood glucose
4. Select the test mode
There are two options for testing:
“Test/Apply Blood” for fingertip, forearm, or palm testing. When “Test/Apply Blood” is at the top of the screen you may test using a fingertip, forearm, or palm blood sample.
“Test/Control Solution” for a control solution test. If you are performing a control solution test, press to scroll to the Test/Control Solution screen. See Chapter 8 in Section II.
NOTE:• If the Test/Apply Blood screen appears before you are sure the codes match, press to go back
to the Match Code screen. Or, remove the test strip and re-start from step 1. See Starting the Test Process in this chapter.
• If you change from the Test/Apply Blood screen to the Test/Control Solution screen by mistake, press to change it back to the Test/Apply Blood screen.
TestApply Blood
��
TestControl Solution
��
41029400B_OB_OTP_US_EN_MGDL_R3.indd 187 11/7/14 3:08 PM

188 CHAPTER 4 - Testing your blood glucose
Getting a blood sample
Overview of the OneTouch® Lancing Device
OneTouch® UltraSoft® Sterile Lancet
Blue (or black) cap* (for fingertip sampling)
Depth indicator
Cocking control
Release button
OneTouch® AST™ Clear Cap* (for alternate site sampling)
Lancet point
Protective disk
*The blue (or black) cap and OneTouch® AST™ Clear Cap are also used for depth adjustment.
CAUTION: To reduce the chance of infection:
• Make sure to wash the puncture site with soap and water before sampling.
• Never share a lancet or lancing device with anyone.
• Always use a new, sterile lancet – lancets are for single use only.
• Keep your meter remote and lancing device clean. See Chapter 9 in Section II.
NOTE: If you do not have a OneTouch® Lancing Device, please refer to the instructions that came with your lancing device.
41029400B_OB_OTP_US_EN_MGDL_R3.indd 188 11/7/14 3:08 PM

189 CHAPTER 4 - Testing your blood glucose
Choosing the right sampling site at the right time
Your meter remote allows you to sample blood from your fingertip, forearm, or palm. Forearm and palm testing is also referred to as “alternate site testing” (AST). At times, BG test results obtained at the forearm or palm may be different from a fingertip measurement. Talk to your health care professional before you begin using your forearm or palm for sampling.
If you are testing: Use blood sample from your:
Routinely before meals
Prior to or more than two hours after:• a meal• a rapid-acting insulin injection or pump bolus• exercise
Fingertip, forearm, or palm
When your BG is changing rapidly, such as:• within two hours after a meal• within two hours after a rapid-acting insulin injection or
pump bolus, or• during or within two hours after exercise
When you are concerned about the possibility of hypoglycemia (low blood glucose)
Fingertip
41029400B_OB_OTP_US_EN_MGDL_R3.indd 189 11/7/14 3:08 PM

190 CHAPTER 4 - Testing your blood glucose
CAUTION: Do Not test on your forearm or palm when:
• You think your BG is rapidly falling, such as within two hours of exercise or a rapid-acting insulin injection or pump bolus. Testing with a fingertip sample may identify hypoglycemia or an insulin reaction sooner than testing with a forearm or palm sample.
• It has been less than two hours after a meal, a rapid-acting insulin injection or pump bolus, physical exercise, or you think your BG level is changing rapidly.
• You are concerned about the possibility of hypoglycemia or an insulin reaction, such as when driving a car. This is especially important if you suffer from hypoglycemia unawareness (lack of symptoms to indicate an insulin reaction).
Remember: Consult your health care professional before using your forearm or palm for testing.
Choose a different puncture site each time you test. Repeated punctures in the same spot may cause soreness and calluses.
If bruising occurs at an alternate site or you have difficulty getting a sample, consider sampling from a fingertip instead. You may want to review the choice of sites with your health care professional.
41029400B_OB_OTP_US_EN_MGDL_R3.indd 190 11/7/14 3:08 PM

191 CHAPTER 4 - Testing your blood glucose
Preparing your sample site
Before you test your BG, wash your hands and forearm (if applicable) thoroughly with warm, soapy water. Rinse and dry.
Lancing and sampling from your fingertip
1. Remove the blue (or black) cap by snapping it off
2. Install a sterile lancet into the OneTouch® Lancing Device
Insert the lancet into the holder and push in firmly. Twist the protective disk until it separates from the lancet and save the disk for later use. Do Not twist the lancet.
3. Replace the blue (or black) cap by snapping it back on
4. Adjust the depth setting
The OneTouch® Lancing Device has nine puncture depth settings, numbered 1 through 9. The smaller numbers are for a shallower puncture and the larger numbers are for a deeper puncture. Shallower punctures work for children and most adults. Deeper punctures work well for people with thick or calloused skin. Twist the blue (or black) cap until the correct setting appears.
NOTE: A shallower puncture may be less painful. Try a shallower setting first and increase the depth until you find the one deep enough to get a sufficient drop of blood for testing ( sample size).
41029400B_OB_OTP_US_EN_MGDL_R3.indd 191 11/7/14 3:08 PM

192 CHAPTER 4 - Testing your blood glucose
5. Cock the OneTouch® Lancing Device
Slide the cocking control back until it clicks. If it does not click, it may have been cocked when you inserted the lancet.
6. Puncture your finger
Hold the OneTouch® Lancing Device firmly against the side of your finger. Press the release button. Remove the OneTouch® Lancing Device from your finger.
7. Get a round drop of blood
Gently squeeze and/or massage your fingertip until a round drop of blood sufficient for testing forms ( sample size) on your fingertip.
If the blood smears or runs, Do Not use that sample. Dry the area and gently squeeze another drop of blood or puncture a new site.
41029400B_OB_OTP_US_EN_MGDL_R3.indd 192 11/7/14 3:08 PM

193 CHAPTER 4 - Testing your blood glucose
Lancing and sampling from an alternate site
Sampling from your palm or forearm allows you to use your fingertips less often. You may find that obtaining a blood sample from an alternate site is less painful than using a fingertip. Getting a blood sample from your forearm or palm is different than getting a sample from your fingertips.
Forearm sampling
Choose a fleshy area of the forearm away from bone, visible veins and hair. Sometimes there is less blood flow to the forearm than to the fingertips. To help you get a large enough drop of blood, you may gently massage or apply warmth to the site to increase blood flow.
Palm sampling
Choose a fleshy area on the palm below your thumb or pinky finger. Select a spot with no visible veins and away from deep lines which may cause your blood sample to smear.
Forearm
Palm
The OneTouch® AST™ Clear Cap is used for forearm and palm sampling only. Replace the blue (or black) cap with the OneTouch® AST™ Clear Cap.
Blue (or black) cap for fingertip sampling only
41029400B_OB_OTP_US_EN_MGDL_R3.indd 193 11/7/14 3:08 PM

194 CHAPTER 4 - Testing your blood glucose
1. Remove the blue (or black) cap by snapping it off
2. Insert a sterile lancet into the OneTouch® Lancing Device
Insert the lancet into the holder and push in firmly. Twist the protective disk until it separates from the lancet and save the disk for later use. Do Not twist the lancet.
3. Install the OneTouch® AST™ Clear Cap on the OneTouch® Lancing Device by snapping it on
4. Adjust the depth setting
You may have to adjust the OneTouch® Lancing Device to a deeper setting to get a large enough drop of blood from your forearm or palm. Twist the OneTouch® AST™ Clear Cap toward the larger numbers to increase the depth.
41029400B_OB_OTP_US_EN_MGDL_R3.indd 194 11/7/14 3:08 PM

195 CHAPTER 4 - Testing your blood glucose
5. Cock the OneTouch® Lancing Device
Slide the cocking control back until it clicks. If it does not click, it may have been cocked when you inserted the lancet.
6. Puncture your forearm or palm
Firmly press and hold the lancing device against your forearm or palm for a few seconds. Wait until the skin surface under the OneTouch® AST™ Clear Cap changes color (as blood collects beneath the skin). This tells you there is enough blood flow for a good sample. Then press the release button while continuing to apply pressure. Keep holding the lancing device against your skin until a round drop of blood forms under the cap.
When sampling blood from your forearm or palm, make sure the drop of blood is sufficient for testing ( sample size) before you release pressure and remove the lancing device.
7. Remove the OneTouch® Lancing Device
Carefully lift the lancing device away from your skin. Do Not smear the blood sample.
NOTE:• You may need to wait a little longer to get a large enough drop of blood from the forearm or palm.
Do Not squeeze the site excessively.
• If the sample drop of blood runs or spreads due to contact with hair or with a line in your palm, Do Not use that sample. Try puncturing again in a smoother area.
• Remember: You may have to adjust the lancing device to a deeper setting to get a large enough drop of blood ( sample size).
Forearm
Palm
41029400B_OB_OTP_US_EN_MGDL_R3.indd 195 11/7/14 3:08 PM

196 CHAPTER 4 - Testing your blood glucose
Applying blood and reading BG test results
Once you have a blood sample and your meter remote shows the Test/Apply Blood screen, you are ready to obtain a BG test result. If your meter remote does not show the Test/Apply Blood screen, remove the unused test strip and re-start the test process. See Starting the Test Process in this chapter.
1. Prepare to apply the sample
Keeping your finger extended and steady, move your meter remote and test strip toward the blood drop.
Do Not apply blood on the top of the test strip.
Do Not hold your meter remote and test strip underneath the blood drop. This may cause blood to run into the test port and damage your meter remote.
When applying a drop of blood from your forearm or palm, keep your palm or forearm steady and bring the top edge of the test strip to the drop of blood with your other hand.
Fingertip
Forearm Palm
41029400B_OB_OTP_US_EN_MGDL_R3.indd 196 11/7/14 3:08 PM

197 CHAPTER 4 - Testing your blood glucose
2. Apply the sample
Line up the test strip with the blood drop so that the narrow channel on the edge of the test strip is almost touching the edge of the blood drop.
Gently touch the channel to the edge of the blood drop.
Be careful not to push the test strip against your fingertip or the test strip may not fill completely.
NOTE:• Do Not smear or scrape the drop of blood with the test strip.
• Do Not apply more blood to the test strip after you have moved the drop of blood away.
• Do Not move the test strip in your meter remote during a test.
CAUTION: You may get an ERROR 5 message or an inaccurate BG test result if the blood sample does not fill the confirmation window completely. See Chapter 10 in Section II. Discard the test strip and re-start the test process.
Narrow Channel
41029400B_OB_OTP_US_EN_MGDL_R3.indd 197 11/7/14 3:08 PM

198 CHAPTER 4 - Testing your blood glucose
3. Wait for the confirmation window to fill completely
The blood drop will be drawn into the narrow channel and the confirmation window should fill completely.
When the confirmation window is full, this means you have applied enough blood. Now you can move the test strip away from the blood drop and wait for your meter remote to count down from 5 to 1.
4. Read your BG test result on your meter remote
Your BG level appears on the display, along with the unit of measure, and the date and time of the test. BG test results are automatically stored in your meter remote’s memory.
WARNING: If mg/dL does not appear with the BG test result, call Customer Service at 1 877 937-7867. Use of the wrong unit of measure may cause you to misinterpret your BG level, and may lead to incorrect treatment.
Not FullFullConfirmation Window
(Example)
CAUTION: If you test at the low end of the operating range (43°F/6°C) and your BG is high (over 180 mg/dL), the reading on your meter remote may be lower than your actual BG. In this situation, repeat the test in a warmer environment with a new test strip as soon as possible.
41029400B_OB_OTP_US_EN_MGDL_R3.indd 198 11/7/14 3:08 PM

199 CHAPTER 4 - Testing your blood glucose
Error messages
If you get an ERROR message on your screen rather than a BG test result, see Chapter 10 in Section II.
Unexpected BG test results
Refer to these cautions whenever your BG test results are lower than, higher than, or not what you expect.
CAUTION: Dehydration and low BG test resultsYou may get false low BG test results if you are severely dehydrated. If you think you are severely dehydrated, contact your health care professional immediately.
CAUTION: Low BG test resultsIf your BG test result is lower than 70 mg/dL or is shown as LOW GLUCOSE, it may mean hypoglycemia (low BG). This may require immediate treatment according to your health care professional’s recommendations. Although this BG test result could be due to a test error, it is safer to treat first, then do another test.
CAUTION: High BG test resultsIf your BG test result is higher than 180 mg/dL, it may mean hyperglycemia (high BG). If you are uncertain about this BG test result, consider re-testing. Your health care professional can work with you to determine what actions, if any, you should take if your BG test results are higher than 180 mg/dL.
If your meter remote displays HIGH GLUCOSE, you may have a very high BG level (severe hyperglycemia) exceeding 600 mg/dL. Re-check your BG level. If the BG test result is HIGH GLUCOSE again, this may indicate a severe problem with your BG control and it is important that you obtain and follow instructions from your health care professional without delay.
41029400B_OB_OTP_US_EN_MGDL_R3.indd 199 11/7/14 3:08 PM

200 CHAPTER 4 - Testing your blood glucose
After getting a BG test result
Once you have read your BG test result, you may:
• Go directly to the Bolus Menu screen where you can calculate a bolus
“Bolus” will be highlighted. Press . See Chapter 4 in Section III, for using your meter remote to deliver a bolus.
NOTE:• RF communication must be activated on your meter remote and your pump, and the devices must be
paired, before you will be able to use your meter remote to access pump functions. See Chapter 2 in Section III for completing these procedures.
or
Jun 19-06 10:32 am
105Comment
Bolusmg/dL
��
CAUTION: Repeated unexpected BG test resultsIf you continue to get unexpected BG test results, check your system with control solution. See Chapter 8 in Section II.
If you are experiencing symptoms that are not consistent with your BG test results and you have followed all instructions in this booklet, call your health care professional. Never ignore symptoms or make significant changes to your diabetes control program without speaking to your health care professional.
CAUTION: Unusual red blood cell countA hematocrit (percentage of your blood that is red blood cells) that is either very high (above 55%) or very low (below 30%) can cause false BG test results.
41029400B_OB_OTP_US_EN_MGDL_R3.indd 200 11/7/14 3:08 PM
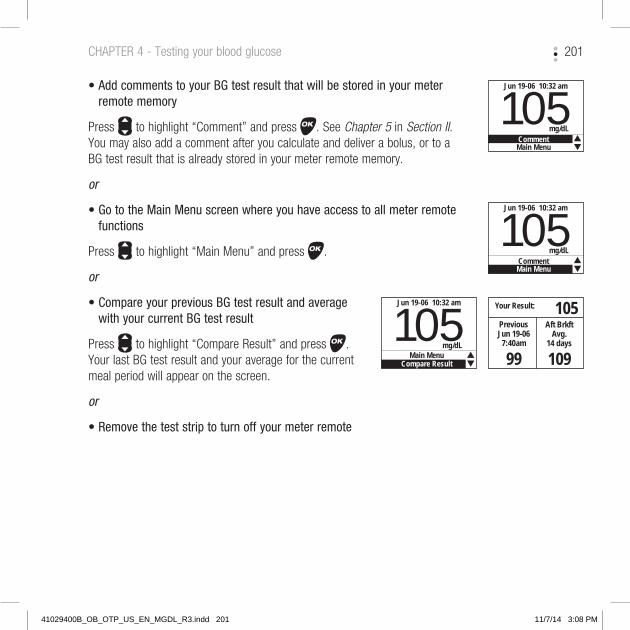
201 CHAPTER 4 - Testing your blood glucose
• Add comments to your BG test result that will be stored in your meter remote memory
Press to highlight “Comment” and press . See Chapter 5 in Section II. You may also add a comment after you calculate and deliver a bolus, or to a BG test result that is already stored in your meter remote memory.
or
• Go to the Main Menu screen where you have access to all meter remote functions
Press to highlight “Main Menu” and press .
or
• Compare your previous BG test result and average with your current BG test result
Press to highlight “Compare Result” and press . Your last BG test result and your average for the current meal period will appear on the screen.
or
• Remove the test strip to turn off your meter remote
Jun 19-06 10:32 am
105Main MenuComment
mg/dL��
Jun 19-06 10:32 am
105Main MenuComment
mg/dL��
Jun 19-06 10:32 am
105Compare Result
Main Menumg/dL
��
Your Result: 105PreviousJun 19-06
7:40am
99
Aft BrkftAvg.
14 days
109
41029400B_OB_OTP_US_EN_MGDL_R3.indd 201 11/7/14 3:08 PM

202 CHAPTER 4 - Testing your blood glucose
Removing the used lancet
Remove the lancing device cap by snapping it off. Cover the exposed lancet tip before removing the lancet. Place the lancet protective disk on a hard surface. Push the lancet tip into the disk. Remove the lancet and place it in a container for sharp objects. Replace the cap.
Disposing of the used lancet and test strip
It is important to discard the used lancet carefully after each use to avoid unintended lancet stick injuries. Used test strips and lancets may be considered biohazardous waste in your area. Be sure to follow your local regulations for proper disposal, or follow your health care professional’s recommendations for proper disposal of biohazardous waste.
41029400B_OB_OTP_US_EN_MGDL_R3.indd 202 11/7/14 3:08 PM
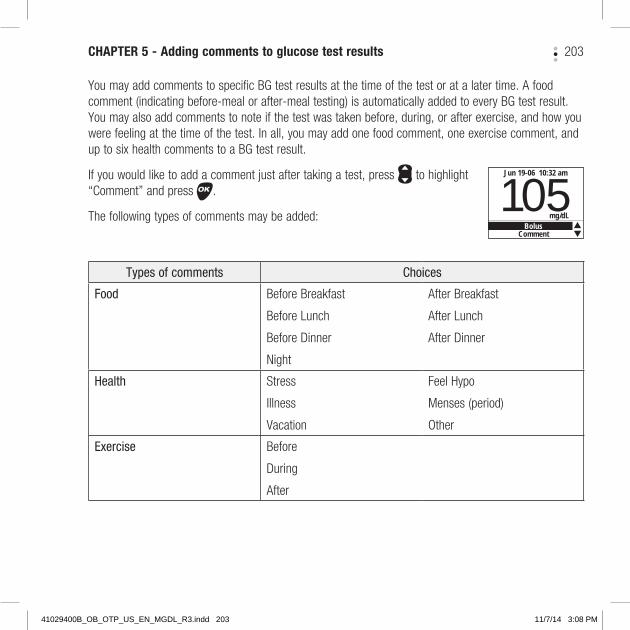
203 CHAPTER 5 - Adding comments to glucose test results
You may add comments to specific BG test results at the time of the test or at a later time. A food comment (indicating before-meal or after-meal testing) is automatically added to every BG test result. You may also add comments to note if the test was taken before, during, or after exercise, and how you were feeling at the time of the test. In all, you may add one food comment, one exercise comment, and up to six health comments to a BG test result.
If you would like to add a comment just after taking a test, press to highlight “Comment” and press .
The following types of comments may be added:
Jun 19-06 10:32 am
105Comment
Bolusmg/dL
��
Types of comments Choices
Food Before Breakfast
Before Lunch
Before Dinner
Night
After Breakfast
After Lunch
After Dinner
Health Stress
Illness
Vacation
Feel Hypo
Menses (period)
Other
Exercise Before
During
After
41029400B_OB_OTP_US_EN_MGDL_R3.indd 203 11/7/14 3:08 PM

204 CHAPTER 5 - Adding comments to glucose test results
Rules for adding comments to BG test results
• If you wish to add a comment to the current BG test result, press to highlight “Comment” while viewing the BG test result and press . If you wish to add a comment to a BG test result at a later date, display the logbook record for that BG test result and press . See Chapter 7 in Section II.
• A food comment is automatically assigned to every BG test result based on the pre-set or your personal meal schedule (see Chapter 1 in Section II). You may edit that food comment as necessary.
• Press to scroll up or down through the various menus and choices.
• Press to make selections.
• You must save your selections by highlighting “Save” and then pressing .
• If you insert a test strip while you are adding comments to a BG test result, your comments (other than the food comment) will not be saved.
• To remove an entry, highlight “---” from the menu.
How to add a comment
Following are the steps you take to add a comment. In this example, we will add a food, exercise, and health comment to a BG test result.
With any BG test result on the display, highlight “Comment” and press .
“Health” is always highlighted first since the food comment is automatically assigned based on the pre-set or your personal meal schedule.
Jun 19-06 10:32 am
105Main MenuComment
mg/dL��
Jun 19-06 10:32 amGluc.105 Comment
Food
Health
Exer
Save
Aft Brkft
---------
---------
41029400B_OB_OTP_US_EN_MGDL_R3.indd 204 11/7/14 3:08 PM

205 CHAPTER 5 - Adding comments to glucose test results
Food comments
If you wish to change the food comment to a different mealtime, press to highlight “Food” and press .
Press to highlight your mealtime and press again.
Your choices are “Bef Brkft”, “Aft Brkft”, “Bef Lunch”, “Aft Lunch”, “Bef Dinner”, “Aft Dinner”, and “Night”.
Once you select your mealtime, “Health” is highlighted again.
If you are finished commenting, press to highlight “Save” and press . If you do not press , your entries will not be saved. If you wish to enter other comments, press to highlight another menu choice and then press .
Jun 19-06 10:32 amGluc.105 Comment
Food
Health
Exer
Save
Aft Brkft
---------
---------
Jun 19-06 10:32 amGluc.105 Comment
Food
Health
Exer
Save
---------Bef BrkftAft BrkftBef LunchAft Lunch �
�
Jun 19-06 10:32 amGluc.105 Comment
Food
Health
Exer
Save
Bef Lunch
---------
---------
Jun 19-06 10:32 amGluc.105 Comment
Food
Health
Exer
Save
Bef Lunch
---------
---------
41029400B_OB_OTP_US_EN_MGDL_R3.indd 205 11/7/14 3:08 PM

206 CHAPTER 5 - Adding comments to glucose test results
Health comments
You can comment on a BG test result with notes about your overall health at the time of the test. Press with “Health” highlighted. You may add up to six descriptors from this menu:
Stress Menses (period)
Feel Hypo Vacation
Illness Other
After adding your first health comment, “Health 2” will automatically appear on the screen.
To add additional health comments, press and select another one from the menu. Note that your previous comment is no longer available.
When you have completed adding comments, press to highlight “Save” and press . If you do not press , your entries will not be saved.
Exercise comments
You can comment on a BG test result as occurring before, during, or after exercise.
After you add the exercise comment, “Save” will automatically be highlighted.
Jun 19-06 10:32 amGluc.105 Comment
Food
Health
Exer
Save
---------StressFeel HypoIllnessMenses �
�
Jun 19-06 10:32 amGluc.105 Comment
FoodHealth 1Health 2ExerSave
---------Feel HypoIllnessMensesVacation ▼
▲
Jun 19-06 10:32 am Gluc.105 Comment
FoodHealth 1Health 2ExerSave
Bef LunchStress------------------
Jun 19-06 10:32 amGluc.105 Comment
Save
FoodHealth 1Health 2Exer
Bef LunchStress- - - - - - - -After
Jun 19-06 10:32 amGluc.105 Comment
Save
Bef Lunch---------BeforeDuringAfter
Food
Health
Exer
41029400B_OB_OTP_US_EN_MGDL_R3.indd 206 11/7/14 3:08 PM

207 CHAPTER 5 - Adding comments to glucose test results
If you press , all of the comments you have entered will appear with the BG test result in the logbook, as in this example.
Editing or deleting comments (example)
To edit or delete a comment from a BG test result, first display that BG test result in your meter remote logbook (see Chapter 7 in Section II ). Be sure the highlight is on the BG test result to which the comment is attached. Press .
To change the mealtime, highlight “Food” and press .
Highlight the desired mealtime and press again. You may edit other comments at this time.
To delete a comment, press to highlight “- - -” and press . When you have completed editing the comments, press to highlight “Save” and press .
Your edited comment will appear this way in your meter remote logbook.
NOTE: You can delete or edit comments, but you cannot delete a BG test result.
LogbookJun 19-06 10:32am Glucose 105 mg/dL Bef Lunch Stress After Exer
▼
LogbookJun 19-06 10:32am Glucose 105 mg/dL Aft Brkft Stress After Exer
▼
LogbookJun 19-06 10:32am Glucose 105 mg/dL Bef Lunch Stress After Exer
▼
Jun 19-06 10:32 amGluc.105 Comment
Save
FoodHealth 1Health 2Exer
Bef LunchStress- - - - - - - -After
Jun 19-06 10:32 amGluc.105 Comment
Save
---------Bef BrkftAft BrkftBef LunchAft Lunch
Food
Health
Exer�
�
41029400B_OB_OTP_US_EN_MGDL_R3.indd 207 11/7/14 3:08 PM

208 CHAPTER 6 - Making logbook entries
Logbook entries let you store separate records concerning exercise, health, and food that are not associated with a BG test result. Logbook entries are different than comments, which are added to a specific BG test result. You do not have to perform a BG test in order to add valuable information to your meter remote logbook.
Entries are saved as stand-alone logbook records with an assigned date and time.
Rules for adding logbook entries
• If you wish to add a new logbook entry, press to highlight “Add Logbook Entry” on the Main Menu screen and press . Press to highlight the entry type on the Add New Entry screen and press . A graphic icon representing the entry type will appear in the upper left-hand corner of the screen.
• Before adding an entry, the date and time must be selected. Press to choose either the current date and time displayed or “Other Time”.
• Press to confirm your choices and the logbook record screen will appear. If no logbook record screen appears, your entries have not been saved.
Main Menu
BolusFastFacts
Meter SettingsAdd Logbook Entry
System Status
Entry Types Choices
ExerciseLevel:
Duration:
Mild
Length of time
Moderate Hard
Health
Health Notes:
Stress
Menses (period)
Feel Hypo
Vacation
Illness
Other
Food Carbs (total carb amounts for a meal or snack)
Pump Date and time of infusion set changes
41029400B_OB_OTP_US_EN_MGDL_R3.indd 208 11/7/14 3:08 PM

209 CHAPTER 6 - Making logbook entries
• If you insert a test strip while you are adding a logbook record, your record will not be saved.
• It is possible to enter the same entry type more than once for a given date and time.
• To remove an entry, press to highlight “---” from the menu.
• Prior to viewing the logbook record screen, you may press and return to the previous screen to review or edit the information you have entered.
• When making logbook entries, the starting values for entering data will be the ones you last saved.
Entering the date and time for an entry
A date and time must be selected after choosing an entry type. In this example, the date and time will be selected for an Exercise entry.
If the entry is for the current date and time, press .
If the entry is for a previous date and time, press to highlight “Other Time” and press .
A calendar will appear on the screen for the current month as it is stored in your meter remote, and the current day will be highlighted. Press to scroll to the desired day for the logbook entry. Each time you scroll backward past the first day of the month, the previous month’s calendar will appear.
Press when you have the correct month and day highlighted.
Press to enter the time in hours and minutes and then press after each selection. If you have selected the am/pm time format, “am” or “pm” will be displayed next to the minutes and will be highlighted. Press to scroll to the correct am or pm setting. Press to confirm your selection.
Then make your logbook entry.
Add New Entry
Exercise
Health
Food
Pump
Exercise Entry
Add New Entry for
Jun 19-06 3:18 pmOther Time
Select Entry DateJun-06
4111825
5121926
6132027
7142128
8152229
162330
1 101724
92 3
Jun 19-06
What time?
8:30 am
41029400B_OB_OTP_US_EN_MGDL_R3.indd 209 11/7/14 3:08 PM

210 CHAPTER 6 - Making logbook entries
Exercise entries
Press to highlight “Exercise” on the Add New Entry screen and press .
If the entry is for the current date and time press . Press to highlight “Other Time” and press if the entry is for a previous date and time.
Press to rate the exercise you performed as Mild, Moderate, or Hard. Press .
Then press to record the duration of the exercise to the nearest five minutes. Press to save the entry.
The exercise entry will be saved this way in your meter remote logbook.
Jun 19-06 3:18 pmExercise Entry
Exercise ----------Duration Mild Moderate Hard
Jun 19-06 3:18 pmExercise Entry
Exercise ModerateDuration 00:45
LogbookJun 19-06 3:18 pm Exercise Moderate 00:45
�
Exercise Entry
Add New Entry for
Jun 19-06 3:18 pmOther Time
Add New Entry
Exercise
Health
Food
Pump
41029400B_OB_OTP_US_EN_MGDL_R3.indd 210 11/7/14 3:08 PM

211 CHAPTER 6 - Making logbook entries
Health entries
Health entries let you enter information about your health status. To add a health entry, press to highlight “Health” on the Add New Entry screen and press . Follow the steps as described in the Entering the date and time for an entry in this chapter to select the correct time and date of the new entry.
Choose from this menu:
Stress Menses (period)
Feel Hypo Vacation
Illness Other
Press to save and view the Health Notes entry.
The health entry with your Health Note will be saved this way in your meter remote logbook.
Jun 19-06 3:18 pmHealth Notes
�
�----------Stress
Feel HypoIllness
MensesVacation
LogbookJun 19-06 3:18 pm Stress
�
Add New Entry
Exercise
Health
Food
Pump
41029400B_OB_OTP_US_EN_MGDL_R3.indd 211 11/7/14 3:08 PM

212 CHAPTER 6 - Making logbook entries
Food entries
Food and BG levels are closely linked. Food entries let you keep track of carb amounts either entered manually, or selected from the Food Database.
Press to highlight “Food” on the Add New Entry screen and press . Follow the same steps to select the correct time and date of the new entry.
Select the desired meal, snack, or alcohol descriptor and press .
On the Food Entry/Edit screen highlight “Carb Entry” if you would like to add a carb amount manually, or “Food List” if you would like to refer to the Food Database. The Food Database includes carb amounts for hundreds of food types.
NOTE: If you select “Alcohol” from the Food Entry screen above, you will not be able to enter a specific carb amount. Instead, a logbook entry will be made indicating “Alcohol” at the time and date for the logbook entry.
Manual carb entry
To add a carb amount manually, highlight “Carb Entry” and press .
Then press to highlight the desired carb amount. Carbs are entered in 1-gram steps in the range of 0 to 999. Press when finished.
The food entry will be saved this way in your meter remote logbook.
NOTE: If you enter “0” carbs, this value will be included in your Food averages when viewing data (see Chapter 7 in Section II). Do Not enter “0” (leave entry as “------”) if you do not want this value included in your averages.
Jun 19-06 3:18 pmFood Entry
----------Breakfast
LunchDinnerSnack
Alcohol
Food EntryEdit
Carb EntryFood List
Add New Entry
Exercise
Health
Food
Pump
LunchInformation
Carb: ------
LogbookJun 19-06 3:18 pm Lunch Carbs: 60
�
41029400B_OB_OTP_US_EN_MGDL_R3.indd 212 11/7/14 3:08 PM

213 CHAPTER 6 - Making logbook entries
Food Database carb entry
To add a carb amount from the Food Database, highlight “Food List” and press . Then follow the instructions in the Food Database chapter (see Chapter 2 in Section II ) for making selections. When you are finished choosing your carb amount from the Food Database, you will go to the Logbook screen for your selected meal where you can modify or delete your entry in your meter remote logbook.
Pump entries
Once you begin using your meter remote and pump together as a system, you may also wish to keep track of your infusion set changes in your meter remote logbook.
Press to highlight “Pump” on the Add New Entry screen and press . Follow the steps for selecting the correct time and date of the new entry. You may track the date and time of every infusion set change.
To record when you changed your infusion set, press to highlight “Infusion Set Change” and press .
Your pump entry will be saved this way in your meter remote logbook.
Add New Entry
Exercise
Health
Food
Pump
Jun 19-06 3:18pmPump Entry
-------------Infusion Set Change
LogbookJun 19-06 3:18 pm Pump Infusion Set Change
�
41029400B_OB_OTP_US_EN_MGDL_R3.indd 213 11/7/14 3:08 PM

214 CHAPTER 6 - Making logbook entries
Editing or deleting logbook entries
To edit or delete a logbook entry, first display that logbook entry in your meter remote logbook (see Chapter 7 in Section II ). Make sure the logbook entry icon, date and time, and description are correct for the logbook entry you wish to edit or delete. Then press .
Select “Edit” to change the logbook entry or “Delete” to remove it completely, and then press .
To edit an entry, highlight the descriptor you would like to change and press . Press to change the entry and press .
For example, the edited entry will appear this way in your logbook if you choose to select “Illness” instead of “Stress”.
LogbookJun 19-06 3:18 pm Stress
�
Jun 19-06 3:18 pmHealth Entry
EditDelete
Add New Entry
LogbookJun 19-06 3:18 pm Illness
�
41029400B_OB_OTP_US_EN_MGDL_R3.indd 214 11/7/14 3:08 PM

215 CHAPTER 7 - FastFacts® / Using your meter remote logbook
The FastFacts screen lets you review and edit data records stored in your meter remote memory. You can also perform on-screen trending of BG, and other health-related data.
To get to the FastFacts screen, press to highlight “FastFacts” on the Main Menu screen and press .
When you choose “FastFacts” on the Main Menu screen, an additional menu of options appears.
FastFacts screen options
Logbook (Meter Remote Memory)
Scroll through BG test results and other health data entries, by date and time.
Glucose by Meals
Display BG test results by date, before and after meals.
Glucose Analysis
Analyze your BG test results in more detail through charts and graphs that organize your data several different ways.
• Graph of All Results - An interactive graph of all BG test results by date.
• Graph by Time of Day - A graph of BG test results by time of day.
• Average of All Results - The average of all BG test results taken for the last 7, 14, 30, 60, and 90 days.
• Average by Time of Day - BG test result averages by time of day for the last 7, 14, 30, 60, and 90 days.
Main Menu
BolusFastFacts
Meter SettingsAdd Logbook Entry
System Status
FastFactsLogbook
Glucose by MealsGlucose Analysis
Hypo InfoFood Averages
41029400B_OB_OTP_US_EN_MGDL_R3.indd 215 11/7/14 3:08 PM

216 CHAPTER 7 - FastFacts® / Using your meter remote logbook
• Average by Exercise - BG test result averages before, during, and after exercise.
• Glucose Range Info - The percent of BG test results within, above, and below your target range, before and after meals, for the last 7, 14, 30, 60, and 90 days.
Hypo Info
Review incidents of hypoglycemic events (BG test results below your pre-set or personal level stored in your meter remote), before and after meals, for the last 7, 14, 30, 60, and 90 days. See Chapter 1 in Section II and consult with your health care professional before setting your hypoglycemic level.
Food Averages
Average your daily intake of carbohydrates, for the last 7, 14, 30, 60, and 90 days.
Logbook
Your meter remote logbook stores at least 20,000 logbook records. Logbook records are created whenever data are saved for a particular time and date. Three types of logbook records are stored in your meter remote:
• BG test results with or without added comments
BG test results from your meter remote are automatically stored as logbook records whenever you take a test. Date and time are tagged to the BG test result. A food comment is always attached to the BG test result based on the pre-set or your personal meal schedule. You may add other comments to the BG test result by accessing the logbook at the time of the test or at a later time. You may also edit or delete comments attached to the BG test result.
BG test results may not be deleted from the logbook.
• Health-related data (logbook entries) not associated with a BG test result
41029400B_OB_OTP_US_EN_MGDL_R3.indd 216 11/7/14 3:08 PM

217 CHAPTER 7 - FastFacts® / Using your meter remote logbook
Health-related data may be added either as stand-alone logbook entries for a specific date and time. As with comments, you may also edit or delete health-related logbook records.
Viewing logbook records
To review your logbook entries, press to highlight “Logbook” on the FastFacts screen and then press .
Your most recent logbook entry will appear on the display.
Press to scroll through previous logbook records.
To edit or delete a data record, press when that data record is on the display. You will then have the option to edit, delete, and/or add a new logbook entry. Your options are defined by the type of data record you were viewing on the display.
NOTE:• You cannot delete or edit a BG test result, but you can edit any comment
associated with those types of records. You can, however, delete any logbook record that is not associated with a BG test result.
• When adding a new logbook entry, you have the option of creating a record for the current time and date or for a previous time and date.
FastFactsLogbook
Glucose by MealsGlucose Analysis
Hypo InfoFood Averages
LogbookJun 19-06 3:18 pm Exercise Moderate 00:45
�
LogbookJun 19-06 3:18 pm Glucose 123 mg/dL Aft Lunch
▼
41029400B_OB_OTP_US_EN_MGDL_R3.indd 217 11/7/14 3:08 PM

218 CHAPTER 7 - FastFacts® / Using your meter remote logbook
Glucose by Meals
To review before-meal and after-meal BG test results, press to highlight “Glucose by Meals” on the FastFacts screen and press .
Highlight the desired mealtime and press .
A summary of all BG test results by date before and after the chosen meal (or at night) will appear. Press to view more entries.
Press to return to the FastFacts screen.
Glucose Analysis
When you select “Glucose Analysis” on the FastFacts screen, an additional menu of choices appears.
Press to highlight the desired choice and then press .
Glucose by Meals
Breakfast
Lunch
Dinner
Night
Glucose by Meals
Jun 19Jun 18Jun 17Jun 16Jun 15Jun 14
80100
70140
7095
Bef Brkft Aft Brkft12011512511095
112 �
�
FastFactsLogbook
Glucose by MealsGlucose Analysis
Hypo InfoFood Averages
FastFactsLogbook
Glucose by MealsGlucose Analysis
Hypo InfoFood Averages
Glucose AnalysisGraph of All Results
Graph by Time of DayAverage of All Results
Average by Time of DayAverage by ExerciseGlucose Range Info
41029400B_OB_OTP_US_EN_MGDL_R3.indd 218 11/7/14 3:08 PM

219 CHAPTER 7 - FastFacts® / Using your meter remote logbook
Graph of All Results
To view an interactive graph of three days (at a time) of BG test results, press to highlight “Graph of All Results” on the Glucose Analysis screen and press .
The first screen provides instructions for moving from one time period to the next, and for examining a particular BG test result more closely. Press to continue.
The most recent three days of BG test results appear on a graph with the currently selected BG test result flashing.
A bold bar above the dates indicates a weekend. The two dotted lines indicate the lowest and highest values of your before-meal and after-meal glucose ranges (see Chapter 1 in Section II ). If you have not selected an after-meal range, only the before-meal range will appear. BG test results above 300 mg/dL or below 50 mg/dL are indicated by an arrow at the top or bottom edge of the graph.
You may scroll backward or forward in time on the graph by pressing to move from one point to another. Individual BG test results will flash as you scroll.
To view the details of a test, press while that BG test result is flashing. Press to return to the graph. You may move back and forth between the graph and the logbook as often as you wish.
Press while any graph is displayed to return to the Glucose Analysis screen.
InteractiveGlucose Graph
Graph shows allresults
Use arrows to scrollOK for details
Glucose AnalysisGraph of All Results
Graph by Time of DayAverage of All Results
Average by Time of DayAverage by ExerciseGlucose Range Info
��
300
250
200
150
100
50Jun 17 Jun 19Jun 18
LogbookJun 17-06 3:18 pm Glucose 105 mg/dL Dinner Carbs: 45
▼
▲
��
300
250
200
150
100
50Jun 16 Jun 18Jun 17
41029400B_OB_OTP_US_EN_MGDL_R3.indd 219 11/7/14 3:08 PM

220 CHAPTER 7 - FastFacts® / Using your meter remote logbook
Graph by Time of Day
You may view BG test results on a graph by time of day when you select “Graph by Time of Day” on the Glucose Analysis screen and press .
Highlight the desired time of day and press . The time of day is based on the pre-set or your personal meal schedule (see Chapter 1 in Section II ).
You will be reminded of the time period you chose for the graph that follows. Press to continue.
The most recent seven days of BG test results appear on a graph.
A bold bar above the dates indicates a weekend. The two dotted lines indicate the lowest and highest values of your before-meal and after-meal glucose ranges (see Chapter 1 in Section II ). If you have not selected an after-meal range, only the before-meal range will appear. BG test results above 300 mg/dL or below 50 mg/dL are indicated by an arrow at the top or bottom edge of the graph.
Press to scroll forward or backward in time. The graph will update (move one day) with each press of .
Press to return to the Glucose Analysis screen.
Graph daily resultby time period
Before BreakfastAfter BreakfastBefore LunchAfter Lunch
Before DinnerAfter Dinner �
�
Glucose AnalysisGraph of All Results
Graph by Time of DayAverage of All Results
Average by Time of DayAverage by ExerciseGlucose Range Info
��
300
250
200
150
100
50Jun 13 Jun 19
Graph daily resultby time period
Before BreakfastGlucose Results
41029400B_OB_OTP_US_EN_MGDL_R3.indd 220 11/7/14 3:08 PM

221 CHAPTER 7 - FastFacts® / Using your meter remote logbook
Average of All Results
To view your BG test result averages over a pre-defined number of days, press to highlight “Average of All Results” on the Glucose Analysis screen and
press .
BG test result averages are displayed for the last 7, 14, 30, 60, and 90 days with the number of tests completed during that time period included in parentheses.
Press to return to the Glucose Analysis screen.
Average by Time of Day
To view your BG test result averages by time of day, press to highlight “Average by Time of Day” on the Glucose Analysis screen and press .
Test averages by time of day are available for the last 7, 14, 30, 60, and 90 days. Highlight the desired time period and press .
BG test result averages are displayed for the period you selected, with the number of tests completed during that time period included in parentheses. The time of day is based on the pre-set or your personal meal schedule (see Chapter 1 in Section II ).
Press to return to the Glucose Analysis screen.
Glucose AnalysisGraph of All Results
Graph by Time of DayAverage of All Results
Average by Time of DayAverage by ExerciseGlucose Range Info
Average of all Results
Number of Days Avg(31)(42)(48)(54)(73)
714306090
115119120118157
Glucose AnalysisGraph of All Results
Graph by Time of DayAverage of All Results
Average by Time of DayAverage by ExerciseGlucose Range Info
Average byTime of Day
714306090
Days
Avg. by Time ofDay - 14 Days
Bef BrkftAft BrkftBef LunchAft LunchBef DinnerAft Dinner
(14)(14)(14)(14)(6)(7)
95135
80128125155
41029400B_OB_OTP_US_EN_MGDL_R3.indd 221 11/7/14 3:08 PM

222 CHAPTER 7 - FastFacts® / Using your meter remote logbook
Average by Exercise
To view your BG test result averages before, during, and after exercise, press to highlight “Average by Exercise” on the Glucose Analysis screen and press .
BG test result averages before, during, and after exercise are available for the last 7, 14, 30, 60, and 90 days. Highlight the desired time period and press .
BG test result averages are displayed before, during, and after exercise for the period you selected, with the number of tests completed during that time period included in parentheses.
Press to return to the Glucose Analysis screen.
Glucose AnalysisGraph of All Results
Graph by Time of DayAverage of All Results
Average by Time of DayAverage by ExerciseGlucose Range Info
Average byExercise
714306090
Days
Avg. by Exercise14 Days
Before Exercise
During Exercise
After Exercise
(14)
(3)
(14)
125
103
110
41029400B_OB_OTP_US_EN_MGDL_R3.indd 222 11/7/14 3:08 PM

223 CHAPTER 7 - FastFacts® / Using your meter remote logbook
Glucose Range Info
To review the percentage of your BG test results that are above, below, and within your target ranges, press to highlight “Glucose Range Info” on the Glucose Analysis screen and press .
Percentages will be calculated for the before- and after-meal ranges you entered in the Set-up mode.
Choose either “Before Meal” or “After Meal” averages and press .
“Before Meal” and “After Meal” BG test results are based on the pre-set or your personal meal schedule (see Chapter 1 in Section II ).
Highlight the desired time of day and press .
Percentages can be viewed for the last 7, 14, 30, 60, or 90 days. Highlight the desired time period and press .
The percentage of your BG test results that are above, below, and within your target range will appear for the time period selected, with the number of tests that make up that percentage included in parentheses.
NOTE: Sometimes percentages may not total 100% exactly due to rounding.
Press to return to the Glucose Analysis screen.
Glucose AnalysisGraph of All Results
Graph by Time of DayAverage of All Results
Average by Time of DayAverage by ExerciseGlucose Range Info
Glucose Range Info
Before MealAfter Meal
Bef Brkft GlucoseRange 90-130
714306090
Days
Bef Brkft GlucoseRange 90-130
Above
In Range
Below
(6)
(5)
(3)
20%
70%
10%
Before Meal GlucoseRange 90-130
BreakfastLunchDinnerNightTotal
41029400B_OB_OTP_US_EN_MGDL_R3.indd 223 11/7/14 3:08 PM

224 CHAPTER 7 - FastFacts® / Using your meter remote logbook
Hypoglycemia Information
If you select “Hypo Info” on the FastFacts screen, your meter remote will display the actual number of hypoglycemic events by time of day, defined by the hypo level set in Advanced Features (see Chapter 1 in Section II ).
Highlight the desired time period for viewing the number of hypoglycemic events and press .
The number of events before and after meals and during the night for the selected time period is displayed.
Before-meal and after-meal events are based on the pre-set or your personal meal schedule (see Chapter 1 in Section II ).
Press to return to the FastFacts screen.
FastFactsLogbook
Glucose by MealsGlucose Analysis
Hypo InfoFood Averages
Hypo Info(70 mg/dL or less)
714306090
Days
Hypo Info(70 mg/dL or less)
1020
Bef BrkftAft BrkftBef LunchAft Lunch
Total - 14 Days: 4
�
41029400B_OB_OTP_US_EN_MGDL_R3.indd 224 11/7/14 3:08 PM

225 CHAPTER 7 - FastFacts® / Using your meter remote logbook
Food Averages
Select “Food Averages” on the FastFacts screen to view average daily intake of carbohydrates over the last 7, 14, 30, 60, and 90 days. Averages may be displayed for the meal periods you selected when making logbook entries, or as a daily average.
Press to select the desired meal period and press .
Then press to select the number of days and press .
Your daily carbohydrate average will appear to the right on the screen. The number of entries used for that average appears in parentheses to the left.
Press to return to the FastFacts screen.
FastFactsLogbook
Glucose by MealsGlucose Analysis
Hypo InfoFood Averages
Food Averages
BreakfastLunchDinnerSnack
Daily Average
Food Averages
714306090
Days
Food AveragesBreakfast
14 Day (Avg.)
(14) Carbs 45
41029400B_OB_OTP_US_EN_MGDL_R3.indd 225 11/7/14 3:08 PM

226 CHAPTER 7 - FastFacts® / Using your meter remote logbook
Downloading meter remote logbook records to a PC
It’s important to save the data in your meter remote memory on a regular basis. Your meter remote memory will store at least 20,000 records but will eventually fill up if you do not transfer the data to a PC and/or other storage device. If your meter remote memory becomes full, the oldest records will be replaced by the newest records as they are created. You can use your meter remote with ezManager® Software (provided with your pump) for storing your records, and to help you spot patterns for planning meals, exercise, and medication. ezManager® Software puts information downloaded from your meter remote into charts and graphs.
Transferring BG test results to your PC for storage or home viewing requires ezManager® Software from Animas® and a USB 2.0 compliant Type ‘A’ to Mini ‘B’ Interface Cable. The USB Interface Cable is included with your OneTouch® Ping® System Kit.
NOTE: To ensure safe operation of your meter remote when connecting it to a PC, the computer must have an appropriate safety approval as indicated by the presence of one or more of the following logos (UL, CSA, or CE) on the PC or monitor. Also check to see if the PC is connected correctly to its power source.
WARNING:• Electrostatic discharge (ESD) can build up when it’s very dry and/or while you are wearing certain
synthetic clothing. To reduce ESD build-up and possible damage to your meter remote, first touch a grounded metal surface (such as a doorknob) before connecting your meter remote to a PC with the USB Cable.
• To avoid a possible shock, Do Not insert a test strip or change the batteries when your meter remote is connected to a PC with the USB Cable.
41029400B_OB_OTP_US_EN_MGDL_R3.indd 226 11/7/14 3:08 PM

227 CHAPTER 7 - FastFacts® / Using your meter remote logbook
1. Install the software on your PC
Follow the installation instructions provided with ezManager® Software.
2. Get ready to transfer readings
Connect the Type ‘A’ end of the USB Cable to a USB port on your PC. With your meter remote turned on, connect the Mini ‘B’ end of the USB Cable to the data port located on the lower left side of your meter remote. Be sure the Mini ‘B’ plug is inserted all the way.
After you plug the USB Cable into the data port, “PC” will appear on your meter display. This indicates that your meter remote is in communication mode. You will not be able to perform a test when your meter remote is in communication mode.
If the data transfer command is not received within one minute, your meter remote will turn itself off. Press the button to turn the meter back on.
3. Transfer data
Follow the instructions provided with ezManager® Software to download the BG test results from your meter remote. Once you begin using your meter remote and pump together as a system, you can use ezManager® Software to download and combine insulin delivery data from your pump with BG management data from your meter remote.
PC
41029400B_OB_OTP_US_EN_MGDL_R3.indd 227 11/7/14 3:08 PM

228 CHAPTER 8 - Control solution testing
Control solution testing
OneTouch® Ultra® Control Solution contains a known amount of glucose and is used to check that your meter remote and the test strips are working properly.
Do a control solution test:
• To practice the test process instead of using blood.
• Once a week.
• Whenever you open a new vial of test strips.
• If you suspect your meter remote or test strips are not working properly.
• If you have had repeated unexpected BG test results (as described in Unexpected BG test results in Chapter 4 in Section II ).
• If you drop or damage your meter remote.
CAUTION:• Do Not swallow control solution; it is not for human consumption.
• Do Not apply control solution to the skin or eyes as it may cause skin or eye irritation.
• The control solution range printed on the test strip vial is for OneTouch® Ultra® Control Solution only. It is not a recommended range for your blood glucose level.
• If you continue to get control solution test results that fall outside the range printed on the test strip vial, Do Not use your meter remote, the test strips, or control solution. Call Customer Service at 1 877 937-7867.
NOTE:• Use OneTouch® Ultra® Control Solution with your meter remote. For information on a second level of
control solution, contact Customer Service.
• Control solution tests must be done at room temperature (68°–77°F/20 °–25°C). Make sure your meter remote, test strips, and control solution are at room temperature before testing.
41029400B_OB_OTP_US_EN_MGDL_R3.indd 228 11/7/14 3:08 PM

229 CHAPTER 8 - Control solution testing
Performing a control solution test
1. Check the code on the test strip vial before inserting the test strip
2. Insert a test strip to turn on your meter remote
Make sure the three contact bars are facing you. Push the test strip in as far as it will go. Do Not bend the test strip.
An all-black start-up screen will be followed by an hourglass symbol and then the Match Code screen.
CAUTION: If the graphics appear to be different, call Customer Service at 1 877 937-7867. There may be a problem with your meter remote.
TestMatch Code
��
25(Example)
41029400B_OB_OTP_US_EN_MGDL_R3.indd 229 11/7/14 3:08 PM

230 CHAPTER 8 - Control solution testing
3. Confirm that the code displayed on your meter remote matches the code on the test strip vial
If the code on your meter remote does not match the code on the test strip vial, press to match the code number on the test strip vial. The new code number will flash on the display for three seconds, after which the display will advance to the Test/Apply Blood screen.
If the codes already match, press to go to the Test/Apply Blood screen. When you do not make a change after three seconds, the display will advance to the Test/Apply Blood screen.
4. Set your meter remote for a control solution test
Press to change “Apply Blood” to “Control Solution”. To mark a test as a control solution test, you must change “Apply Blood” to “Control Solution” before you apply the solution. It cannot be changed later.
WARNING: It is important that your control solution tests are marked correctly, as test results on your meter remote are used in ezCarb and ezBG Bolus calculations. Control solution tests that are not correctly marked can be used in bolus calculations. This may result in suggested bolus amounts that may be too high or too low, which can cause serious injury or death.
Your meter remote is now ready to perform a control solution test.
TestControl Solution
��
TestApply Blood
��
TestMatch Code
��
25
41029400B_OB_OTP_US_EN_MGDL_R3.indd 230 11/7/14 3:09 PM

231 CHAPTER 8 - Control solution testing
5. Prepare and apply the control solution
Shake the control solution vial before each control solution test. Remove the cap and squeeze the vial to discard the first drop. Then wipe the tip with a clean tissue or cloth. Hold the vial upside down and gently squeeze a hanging drop.
Touch and hold the hanging drop of control solution to the narrow channel in the top edge of the test strip. Make sure the confirmation window fills completely. Control Solution should not be applied to the flat face of the test strip.
6. Read your result
When the confirmation window is full, your meter remote will count down from 5 to 1.
Your control solution result will then appear on the screen, along with the date, time, unit of measure, and the words “Control Solution”.
The control solution results can be viewed in the list of past results, but are not counted in your result averages.
Topedge
Narrow channelApply drop here
Confirmation Window
41029400B_OB_OTP_US_EN_MGDL_R3.indd 231 11/7/14 3:09 PM

232 CHAPTER 8 - Control solution testing
7. Check if the result is in range
Compare the result displayed on your meter remote to the control solution range printed on the test strip vial. Each vial of test strips may have a different control solution range. If the results you get are not within this range, your meter remote and test strips may not be working properly. Repeat the control solution test.
Out-of-range results may be due to:
• Not following the instructions detailed in this chapter.
• Expired or contaminated control solution.
• Expired or damaged test strip.
• Use of a test strip or control solution past its discard date.
• A problem with your meter remote.
CAUTION: Do Not use the test strips or control solution after the expiration date printed on the vial or discard date, whichever comes first, or BG test results may be inaccurate.
CAUTION: Do Not use the test strips if your vial is damaged or left open to the air. This could lead to error messages or tests that read higher than the actual value. Call Customer Service at 1 877 937-7867 immediately if the test strip vial is damaged.
100-135 mg/dLExample
41029400B_OB_OTP_US_EN_MGDL_R3.indd 232 11/7/14 3:09 PM

233 CHAPTER 9 - Caring for your meter remote and test strips
Your meter remote does not need any special maintenance.
Storing your system
Store your meter remote, test strips, control solution and other items in your carrying case after each use. Store each item in a cool, dry place below 86°F (30°C), but Do Not refrigerate. Keep all items away from direct sunlight and heat.
Tightly close the cap on the test strip vial and/or control solution vial immediately after use to avoid contamination or damage. Store test strips only in their original vial.
Checking for expiration or damage
Test strips and control solution have expiration dates printed on their vials. When you first open a test strip or control solution vial, you must record the discard date (date opened plus three months) in the space provided on the label.
Cleaning your meter remote
To clean your meter remote, wipe the outside with a soft cloth dampened with water and mild detergent. Do Not use alcohol or another solvent to clean your meter remote.
Do Not get any liquids, dirt, dust, blood, or control solution inside your meter remote through the test port or the data port. Never spray cleaning solution on your meter remote or immerse it in any liquid.
Cleaning your OneTouch® Lancing Device and OneTouch® AST™ Clear Cap
To clean these items, wipe them with a soft cloth dampened with water and mild detergent. Do Not immerse the OneTouch® Lancing Device in any liquid.
To disinfect these items, prepare a solution of one part household bleach to ten parts water. Wipe the OneTouch® Lancing Device with a soft cloth dampened with this solution. Immerse the caps only in this solution for 30 minutes. After disinfecting, rinse briefly with water and allow both to air dry.
41029400B_OB_OTP_US_EN_MGDL_R3.indd 233 11/7/14 3:09 PM

234 CHAPTER 9 - Caring for your meter remote and test strips
Batteries
Your meter remote uses two AAA alkaline batteries. Batteries are provided with your meter remote but must be installed for your meter remote to power on. Replacement batteries can be found in most stores where batteries are sold.
NOTE: Do Not use lithium batteries in your meter remote. The use of lithium batteries will significantly reduce the number of tests you can complete after the Low Meter Batteries warning screen appears.
Low meter remote battery
When this message appears on the screen, the batteries are low and should be replaced as soon as possible. The backlight will no longer turn on.
You can complete about 100 more BG tests from the time this symbol first appears if you are using alkaline batteries.
When this message appears on the screen, you cannot test, enter data in your meter remote logbook, use your meter remote to access pump functions, or use the FastFacts® feature. You must replace the batteries before using your meter remote.
WARNING: Certain batteries may cause leaking, which can damage your meter remote or cause the batteries to lose power sooner than normal. As a result, your meter remote display may not turn on or may show a battery warning sooner than may be expected.
WARNING: To avoid a possible shock, Do Not change the batteries while your meter remote is connected to a PC with the USB Interface Cable.
Low Meter Batteries!WARNING
You should replacethe batteries soon.
+
Confirm
Meter Batteries!ALARM
You MUST replacethe batteries now.
See Owner’s Booklet
+
41029400B_OB_OTP_US_EN_MGDL_R3.indd 234 11/7/14 3:09 PM

235 CHAPTER 9 - Caring for your meter remote and test strips
Installing/Replacing the batteries
1. Remove the old batteries (if replacing the batteries).
Open the battery compartment by pressing the tab to the right and lifting the compartment cover to remove it.
NOTE: Do Not use lithium batteries in your meter remote. The use of lithium batteries will significantly reduce the number of tests you can complete after the Low Meter Batteries warning screen appears.
Lift both batteries out of the compartment by pulling up on the ribbon.
2. Insert the new batteries.
Locate the plus (+) signs inside the battery compartment and on your fresh AAA alkaline batteries. Take the plus (+) end of one battery and insert it underneath the plastic tab that sticks out at the top of the compartment. Then push down on the minus (-) end of the battery until it clicks into place.
41029400B_OB_OTP_US_EN_MGDL_R3.indd 235 11/7/14 3:09 PM

236 CHAPTER 9 - Caring for your meter remote and test strips
3. Replace the cover.
Insert the two compartment cover tabs into the matching holes, and push down until you hear the door click into place.
NOTE: When you install batteries, there will be a short delay of up to 30 seconds, as your meter remote performs a power-on self test. An hourglass symbol ( ) will appear on the screen during that time.
4. Dispose of batteries according to your local environmental regulations.
NOTE:• Your meter remote will automatically enter Basic Set-up mode when you turn your meter remote
display on after installing batteries for the first time.
• Every time you replace your meter remote batteries, you have two minutes to complete the procedure for your date and time settings to remain saved in your meter remote memory. If more than two minutes elapse before the batteries are replaced, you may have to re-set the date and time. All other meter remote settings remain saved in your meter remote memory.
Repeat these steps with the second battery. Both batteries should be fresh.
NOTE: You must insert the plus (+) end of each battery before the minus (-) end for the batteries to be installed correctly.
Plastic Tab
41029400B_OB_OTP_US_EN_MGDL_R3.indd 236 11/7/14 3:09 PM

237 CHAPTER 10 - Understanding meter remote error and other messages
Your meter remote displays messages when there are problems with the test strip, with your meter remote, and when your BG levels are beyond the measurement limits (higher than 600 mg/dL or lower than 20 mg/dL). Display messages are in addition to LED and audio cues that alert you to meter remote problems. Messages do not appear in all cases when a problem has occurred. Improper use may cause an inaccurate BG test result without producing an error message. To clear a notification, warning, or alarm, you may need to remove the test strip and/or follow the prompts on your meter remote screen.
IMPORTANT: There are additional special messages that are displayed on your meter remote when you begin using your meter remote and pump together as a system. These include messages regarding communication problems between the devices or if your intended actions might require additional attention. A third set of special messages covers pump warnings, alarms, and alerts that appear on both your pump and meter remote displays. If a message is displayed on your meter remote and is not included in the list that follows, see Chapter 6 in Section III for a list of additional special messages.
41029400B_OB_OTP_US_EN_MGDL_R3.indd 237 11/7/14 3:09 PM

238 CHAPTER 10 - Understanding meter remote error and other messages
Indicates What to do
Below 20 mg/dL
WARNING
LOW
GLUCOSE
You may have a very low BG level (severe hypoglycemia) lower than 20 mg/dL. Although this message could be due to a test error, it is safer to treat first, and then do another test.
This may require immediate treatment according to your health care professional’s recommendations. Although this message could be due to a test error, it is safer to treat first, and then do another test.
Above 600 mg/dL
WARNING
HIGH
GLUCOSE
You may have a very high BG level (severe hyperglycemia) exceeding 600 mg/dL.
Re-check your BG level. If the BG test result is HIGH GLUCOSE again, obtain and follow instructions from your health care professional without delay.
Below 20 mg/dL
WARNING
LOW
CONTROL
Your control solution test result is very low and below the lower range printed on the test strip vial.
Repeat the test. If you continue to get control solution test results that fall below the range, Do Not use your meter remote. Call Customer Service at 1 877 937-7867.
Above 600 mg/dL
WARNING
HIGH
CONTROL
Your control solution test result is very high and above the upper range printed on the test strip vial.
Repeat the test. If you continue to get control solution test results that fall above the upper range, Do Not use your meter remote. Call Customer Service at 1 877 937-7867.
41029400B_OB_OTP_US_EN_MGDL_R3.indd 238 11/7/14 3:09 PM

239 CHAPTER 10 - Understanding meter remote error and other messages
Indicates What to do
Call CustomerService.
WARNING
Error 1
Meter problem.
SC: XXX
There is a problem with your meter remote.
Do Not use your meter remote. Contact Customer Service at 1 877 937-7867 for a replacement.
Meter or stripproblem.
Retest with a new strip.
WARNING
Error 2
Error message could be caused either by a used test strip or a problem with your meter remote.
Repeat the test with a new test strip; see Chapter 4 in Section II. If this message continues to appear, contact Customer Service at 1 877 937-7867.
Meter was not ready.
WARNING
Error 3
Retest with a new strip.
The sample was applied before your meter remote was ready.
Repeat the test with a new test strip. Apply a blood or control solution sample only after “Test/Apply Blood” or “Test/Control Solution” appears on the screen. If this message continues to appear, call Customer Service at 1 877 937-7867.
41029400B_OB_OTP_US_EN_MGDL_R3.indd 239 11/7/14 3:09 PM

240 CHAPTER 10 - Understanding meter remote error and other messages
Indicates What to do
Strip problem.
See Owner’s Booklet.
WARNING
Error 4
One of the following may apply:
You may have high BG and have tested in an environment near the low end of the system’s operating temperature range (43°–111°F/6.1°–43.9°C).
or,
There may be a problem with the test strip. For example, it may have been damaged or moved during testing.
or,
The sample was improperly applied.
or,
There may be a problem with your meter remote.
If you tested in a cool environment, repeat the test in a warmer environment with a new test strip; see Chapter 4 in Section II.
If you tested in a normal or warm environment, repeat the test with a new test strip; Chapter 4 in Section II.
If you applied the blood incorrectly, review Chapter 4 in Section II and repeat the test with a new test strip.
If the error message appears again, contact Customer Service at 1 877 937-7867.
Strip problem or sample too small.
Retest with a new strip.
WARNING
Error 5
Your meter remote has detected a problem with the test strip. Possible causes are test strip damage or an incompletely filled confirmation window.
Repeat the test with a new test strip. Refer to Chapter 4 in Section II.
41029400B_OB_OTP_US_EN_MGDL_R3.indd 240 11/7/14 3:09 PM

241 CHAPTER 10 - Understanding meter remote error and other messages
Indicates What to do
Error 6
Call Customer Service at 1 877 937-7867.
Call Customer Service at 1 877 937-7867.
Error 7
Call Customer Service at 1 877 937-7867.
Call Customer Service at 1 877 937-7867.
Out of operating range.
WARNING
Temperature Error
See Owner’s Booklet.
Meter remote is too hot (above 111°F/44°C) or too cold (below 43°F/6°C) to work correctly.
Wait a few minutes and insert a new test strip. If you do not get TEMPERATURE ERROR message, your meter remote is now within operating range.
Low Meter Batteries!WARNING
You should replacethe batteries soon.
+
Confirm
Meter remote batteries are low but still have enough power to perform a test.
Press to confirm the Warning. You can complete about 100 more tests from the time this message first appears if you are using alkaline batteries. Test results will still be accurate, but replace the batteries as soon as possible.
41029400B_OB_OTP_US_EN_MGDL_R3.indd 241 11/7/14 3:09 PM

242 CHAPTER 10 - Understanding meter remote error and other messages
Indicates What to do
Meter Batteries!ALARM
You MUST replacethe batteries now.
See Owner’s Booklet
+
Meter remote batteries do not have enough power to perform a test.
Replace your meter remote batteries.
No Data.
Notification
Confirm
You have accessed your meter remote memory (logbook) but there are currently no data available for this particular meter remote procedure.
Press to confirm the Notification. Repeat the procedure after data records have been stored.
Meter Locked.See Owner’s Booklet for
instructions to unlockor call Customer Service.
Notification Your meter remote buttons are currently locked. You will have very limited access to meter remote functions.
To unlock your meter remote buttons, press and hold and at the same time for about three seconds.
Food data not available for this food category.
Notification
Confirm
You selected a food category for which there are no data in the Food Database stored in your meter remote.
Press to confirm the Notification. Data may be available for this food category when you update the Food Database using ezManager® Software.
41029400B_OB_OTP_US_EN_MGDL_R3.indd 242 11/7/14 3:09 PM

243 CHAPTER 11 - Detailed information about your meter remote and test strips
Comparing meter remote and lab results
BG test results with your meter remote are plasma-calibrated. This helps you and your health care professional compare your meter remote results with laboratory tests. If you have been using another type of meter – one that provides whole-blood-calibrated BG test results – you may notice that BG test results with your meter remote are approximately 12% higher.
Your meter remote BG test results and laboratory test results both are expressed in plasma-equivalent units. However, your meter remote BG test result may differ from your laboratory result due to normal variation. Meter remote BG test results can be affected by factors and conditions that do not affect laboratory results in the same way.
Your meter remote BG value is considered accurate when it is within ±20% of the laboratory measurement. There are some specific situations that could cause a difference of more than ±20%:
• You have eaten recently. The BG level from blood obtained from a fingertip can be up to 70 mg/dL higher than blood drawn from a vein (venous sample) used for a lab test.1
• Your hematocrit (percentage of your blood that is red blood cells) is high (above 55%) or low (below 30%).
• You are severely dehydrated.
• You tested at a temperature near the low end of the operating range (43°F/6.1°C) and you get a high BG test result (i.e., greater than 180 mg/dL). In this situation, repeat the test in a warmer environment with a new test strip as soon as possible.
1 Sacks, D.B. “Carbohydrates.” Burtis, C.A., and Ashwood E.R. (ed.), Tietz Textbook of Clinical Chemistry. Philadelphia: W.B. Saunders Company, (1994), 959.
41029400B_OB_OTP_US_EN_MGDL_R3.indd 243 11/7/14 3:09 PM

244 CHAPTER 11 - Detailed information about your meter remote and test strips
For accuracy and precision data and for important information on limitations, see the insert that comes with your test strips.
To maximize your chances of an accurate comparison between meter remote and laboratory results, follow a few basic guidelines:
Before going to the lab
• Perform a control solution test to make sure your meter remote is working properly.
• Do Not eat for at least eight hours before you test your blood.
• Take your meter remote with you to the lab.
While at the lab
• Conduct your meter remote test within 15 minutes of the lab test.
• Use only fresh, capillary blood obtained from the fingertip.
• Follow all instructions in this Owner’s Booklet for performing a BG test with your meter remote.
41029400B_OB_OTP_US_EN_MGDL_R3.indd 244 11/7/14 3:09 PM

245 CHAPTER 11 - Detailed information about your meter remote and test strips
Reported BG Test Result Range 20 to 600 mg/dL
Calibration Plasma-equivalent
Sample Fresh capillary whole blood
Test Time 5 seconds
Assay Method Glucose oxidase biosensor
Power Source Two 1.5V AAA alkaline batteries
Unit of measure mg/dL
Memory At least 20,000 records
Automatic Shutoff Three minutes after inserting a test strip if sample has not been applied or during pairing; one minute after all other user actions
Size: 3.80 x 2.46 x 1.12 inches
Weight Approximately 3.88 ounces (with batteries)
Operating Ranges Temperature: 43°–111°F (6–44°C)
• Relative Humidity: 10–90%, Altitude: up to 10,000 feet (3048 meters)
• Hematocrit: 30–55%
Battery ratings: 2 x 1.50 V d.c.
• (2 x AAA alkaline batteries)
• direct current
Technical Specifications
41029400B_OB_OTP_US_EN_MGDL_R3.indd 245 11/7/14 3:09 PM

246 CHAPTER 11 - Detailed information about your meter remote and test strips
Symbols Please refer to safety-related notes in the owner’s booklet and inserts that come with your OneTouch® Ping® Meter Remote.
Direct current
Do Not Reuse
Electrical Standards: Your meter remote complies with applicable EMC emission requirements. Emissions of the energy used are low and not likely to cause interference in nearby electrical equipment.
Your meter remote complies with US Federal Regulations 47 CFR Part 15. Your meter remote has been tested for immunity to electrostatic discharge (ESD) as specified in ISO 15197 and IEC 61000-4-2.
Your meter remote has been tested for immunity to radio frequency interference at the frequency range and test levels specified in ISO 15197.
Guarantee Animas® guarantees that your OneTouch® Ping® Meter Remote will be free of defects in material and workmanship for four years, valid from the date of purchase. The guarantee extends only to the original purchaser and is not transferable. If your meter remote should fail during the guarantee period because of a defect in material or workmanship, Animas® will replace your meter remote.
Technical Specifications (continued)
41029400B_OB_OTP_US_EN_MGDL_R3.indd 246 11/7/14 3:09 PM

247 CHAPTER 11 - Detailed information about your meter remote and test strips
Analytical Performance Characteristics
System Accuracy
The accuracy of the blood glucose monitoring function of the OneTouch® Ping® Meter Remote was assessed by comparing blood glucose test results on 141 subjects with those obtained using a YSI Model 2300 Glucose Analyzer. Six results were obtained for each subject (each tested in duplicate with three test strip lots). The following results were obtained:
System Accuracy Results for Glucose Concentration <75 mg/dL
Within ±5 mg/dL Within ±10 mg/dL Within ±15 mg/dL*
111/162 (68.5%) 154/162 (95.1%) 162/162 (100%)
System Accuracy Results for Glucose Concentration ≥75 mg/dL
Within ±5% Within ±10% Within ±15% Within ±20%*
282/684 (41.2%) 516/684 (75.4%) 639/684 (93.4%) 680/684 (99.4%)
System Accuracy Results across the entire Glucose Range
Within ±15 mg/dL or ±20% 842/846 (99.5%)
These results indicate that the blood glucose monitoring function of the OneTouch® Ping® Meter Remote meets the ISO 15197 requirements for accuracy.
* ISO 15197 Minimum Acceptable Accuracy Requirements:
41029400B_OB_OTP_US_EN_MGDL_R3.indd 247 11/7/14 3:09 PM

248 CHAPTER 11 - Detailed information about your meter remote and test strips
• 95% of individual glucose results must fall within ±15 mg/dL of the YSI reference at glucose concentrations <75 mg/dL
• 95% of individual glucose results must fall within ±20% of the YSI reference at glucose concentrations ≥75 mg/dL
Regression Statistics
# of Subjects # of Readings Slope (mg/dL) Intercept (mg/dL)
141 846 0.988 -3.68
95% CI Slope 95% CI Intercept Std. Error (Sy.x) R2
(0.98, 1.00) (-5.54, -1.81) 14.3 0.984
These results indicate that the OneTouch® Ping® Meter Remote compares well with a laboratory method.
Abbreviations:
CI Confidence Interval Std. Standard
Sy.x Standard Error R2 Coefficient of Determination
41029400B_OB_OTP_US_EN_MGDL_R3.indd 248 11/7/14 3:09 PM

249 CHAPTER 11 - Detailed information about your meter remote and test strips
Precision
Within Run PrecisionWithin Run Precision (100 venous blood tests)
Target Glucose (mg/dL)
Mean Glucose (mg/dL)
Standard Deviation (mg/dL)
Coefficient of Variation (%)
40 44 1.4 3.2
100 106 2.6 2.5
130 133 2.9 2.1
200 204 3.5 1.7
300 316 6.1 1.9
Total PrecisionTotal Precision (200 control solution tests)
Glucose Level (mg/dL)
Mean Glucose (mg/dL)
Standard Deviation (mg/dL)
Coefficient of Variation (%)
Low 43 1.3 2.9
Normal 122 2.2 1.8
High 350 6.1 1.7
Results show that the greatest variability observed (of two lots tested) is 3.2% or less.
41029400B_OB_OTP_US_EN_MGDL_R3.indd 249 11/7/14 3:09 PM

250 CHAPTER 11 - Detailed information about your meter remote and test strips
41029400B_OB_OTP_US_EN_MGDL_R3.indd 250 11/7/14 3:09 PM

Section III
OneTouch® Ping® System / Using your OneTouch® Ping® Meter Remote and
OneTouch® Ping® Insulin Pump together
41029400B_OB_OTP_US_EN_MGDL_R3.indd 5 11/7/14 3:09 PM

41029400B_OB_OTP_US_EN_MGDL_R3.indd 6 11/7/14 3:09 PM

251 CHAPTER 1 - Overview of your OneTouch® Ping® System
Once you have been trained on your pump and meter remote, you are ready to learn how to use the devices together as a system. Using them together can provide you with options to help make insulin delivery more discreet and flexible.
When the devices are used together as a system, your meter remote will give you convenient remote access to certain pump functions, including calculating and delivering a bolus.
When using the devices together, your most recent BG test results from your meter remote are automatically entered into bolus calculations.
Before you begin using your devices together as a system, you must establish communication between your meter remote and pump. The procedure for establishing communication will be covered in the next chapter in Section III.
NOTE:• You should review your pump and meter remote settings and make any desired changes before using
the devices together as a system.
• When using your devices together as a system, you will sometimes need to access both devices. Examples of this are when you are establishing communication between your meter remote and pump, when RF communication is lost or deactivated, or when you need to resolve certain warnings, alarms or alerts.
• Your OneTouch® Ping® Meter Remote and OneTouch® Ping® Insulin Pump are designed to communicate via RF only with each other. They will not communicate with any other devices.
WARNING: You must complete the Animas® pump training before using your meter remote to access pump functions. During pump training, your health care professional will assist you in making the appropriate selections for your pump settings. Your pump settings directly impact dosing calculations when using your meter remote to deliver insulin from your pump. You are not able to modify pump settings from your meter remote. It is important to have pump settings programmed before using your meter remote to access pump functions.
41029400B_OB_OTP_US_EN_MGDL_R3.indd 251 11/7/14 3:09 PM

252 CHAPTER 2 - Establishing communication between your meter remote and your insulin pump
Establishing communication between your meter remote and pump requires that the RF feature is activated on both devices, and the devices are paired. Activating RF opens a line of communication on both devices, and pairing ensures communication will take place only between one meter remote and one pump. Once RF communication is activated and the devices are paired, communication will take place even when one or both displays have been turned off or have timed out automatically.
If you deactivate the RF feature on one or both devices, or if RF communication is lost, you will not be able to use your meter remote to access pump functions. This also means no data will be exchanged during that time. Once RF communication is re-established, you will be able to resume using your devices together as a system. Any new data generated since the last data transfer will be exchanged on the devices at that time.
NOTE:• The procedure for activating RF and pairing is done separately on each device.
• The RF feature on your meter remote will automatically be activated when you begin the pairing procedure on your meter remote.
Pairing your meter remote and pump
You pair the devices by first activating RF communication and pairing on your pump, and then activating pairing on your meter remote. The RF channel on your pump will be automatically set to match the one on your meter remote.
If you want to separately activate or deactivate the RF feature on either your meter remote or pump, see Reactivating/deactivating the RF feature on your meter remote in this chapter, and Reactivating/deactivating the RF feature on your pump in this chapter.
41029400B_OB_OTP_US_EN_MGDL_R3.indd 252 11/7/14 3:09 PM

253 CHAPTER 2 - Establishing communication between your meter remote and your insulin pump
NOTE: For the pairing to be successful, the pump must be awake (display on) and “searching” at the same time you select “Start Pairing” on your meter remote. If either your pump or meter remote display times out before pairing is completed, you will need to repeat the steps to pair the devices. It is recommended that you keep your pump display on the SETUP ADV 10 screen and actively searching until you have activated pairing on your meter remote. You can keep the pump from timing out by pressing and releasing the contrast button on top of the pump every few seconds while the SETUP ADV 10 screen is displayed.
Activate the RF feature on your pump
1. Select “Setup” from the Main Menu screen on your pump display and press .
2. Select “Advanced” on the SETUP screen on your pump display and press .
3. With “Next” highlighted on your pump display, continue to press to scroll through the SETUP ADV screens until the SETUP ADV 10 screen is displayed.
4. Press on your pump until the “RF” field is highlighted. Press on your pump so that the highlight is flashing.
5. Press or on your pump to change “OFF” to “ON” and then press .
SETUP ADV 10
Home
METERRFSearchChannel
Next
OFF– – – –
Auto
Pump display
SETUP ADV 10
Home
METERRFSearchChannel
Next
ON– – – –
Auto
Pump display
41029400B_OB_OTP_US_EN_MGDL_R3.indd 253 11/7/14 3:09 PM
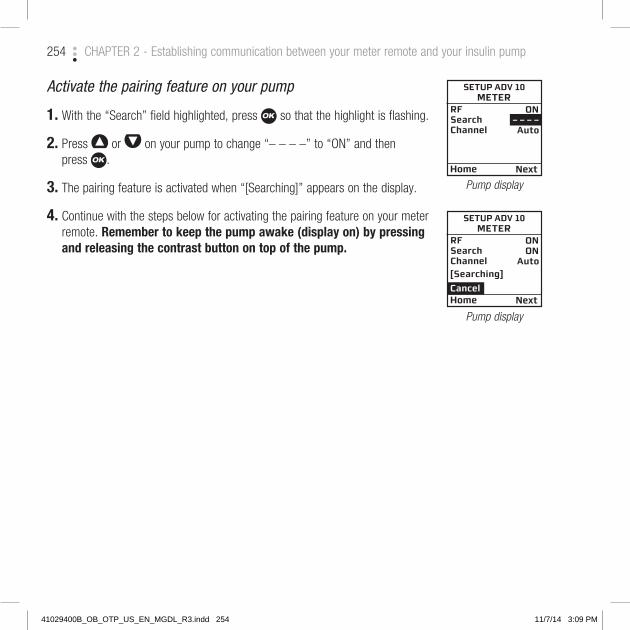
254 CHAPTER 2 - Establishing communication between your meter remote and your insulin pump
Activate the pairing feature on your pump
1. With the “Search” field highlighted, press so that the highlight is flashing.
2. Press or on your pump to change “– – – –” to “ON” and then press .
3. The pairing feature is activated when “[Searching]” appears on the display.
4. Continue with the steps below for activating the pairing feature on your meter remote. Remember to keep the pump awake (display on) by pressing and releasing the contrast button on top of the pump.
SETUP ADV 10
Home
METERRFSearchChannel
Next
ON– – – –
Auto
Pump display
SETUP ADV 10
Home
METERRFSearchChannel
Next
ONON
Auto[Searching]
Cancel
Pump display
41029400B_OB_OTP_US_EN_MGDL_R3.indd 254 11/7/14 3:09 PM

255 CHAPTER 2 - Establishing communication between your meter remote and your insulin pump
Activate the pairing feature on your meter remote
1. Select “Meter Settings” from the Main Menu screen on your meter remote display and press .
2. Highlight “RF” from the Meter Settings screen on your meter remote display and press .
3. Select “Pairing” from the RF Set-up screen on your meter remote display and press .
4. Check that your pump is awake (display on) and the SETUP ADV 10 screen on your pump display has the “RF” and “Search” fields set to “ON”, and “[Searching]” displayed.
5. Highlight “Start Pairing” on the meter remote display and press . The meter remote will automatically search for a pump within RF range.
Confirm pairing on your pump
1. Verify that the meter remote serial number displayed on your pump matches the one on the back of your meter remote. With “Confirm” highlighted and flashing on your pump display, press to confirm the pairing on your pump. “Next” will be highlighted on your pump display.
Pairing
1. Activate Pairing-Mode on pump2. Select <Start Pairing>
Start PairingCancel
Meter remote display
PairingSearching for insulin pump
Meter remote display
SETUP ADV 10
Home
METERRFSearchChannel
Next
ONOFF
7
[ABCD1234]
Confirm
Pump display
Meter Settings
BasicCustomize
Lock ButtonsRF
Alerts
Meter remote display
RF Set-up
RF on/offRF Channel
PairingRF Test
Meter remote display
41029400B_OB_OTP_US_EN_MGDL_R3.indd 255 11/7/14 3:09 PM

256 CHAPTER 2 - Establishing communication between your meter remote and your insulin pump
Accept pairing on your meter remote
1. Verify that the pump serial number displayed on the meter remote matches the serial number on the back of your pump. Highlight “Accept” on your meter remote display and press to confirm the pairing on your meter remote. You will go directly to the Pump Home screen on your meter remote display (see Chapter 3 in Section III ).
Whenever the devices are paired, the Pump Home screen will be the first screen displayed on your meter remote when you turn it on.
NOTE:• You must confirm pairing on your pump first, and then on your meter remote for pairing to be
successful.
• If either your pump or meter remote display times out before the pairing is completed, you will need to repeat the steps to activate and confirm the pairing on both devices. For the pairing to be successful, the pump must be awake (display on) and “Searching” at the same time you select “Start Pairing” on your meter remote.
• To cancel pairing on your pump, press or on your pump while “Confirm” is highlighted and flashing on the SETUP ADV 10 screen on your pump display. “Confirm” will change to “Cancel”. Press
on your pump to cancel the pairing on your pump. To cancel on your meter remote, highlight “Cancel” on the Pairing screen on your meter remote display. Press on your meter remote to cancel pairing on your meter remote.
WARNING: If the pump serial number displayed on your meter remote does not match the serial number on the back of your pump, turn the RF feature off on your meter remote and pump and call Customer Service at 1 877 937-7867 immediately.
PairingSearching for insulin pump
Found Pump: SN: 123456789
AcceptCancel
Meter remote display
41029400B_OB_OTP_US_EN_MGDL_R3.indd 256 11/7/14 3:09 PM

257 CHAPTER 2 - Establishing communication between your meter remote and your insulin pump
After your devices are paired, the ezCarb and ezBG Bolus screens on your meter remote display will retrieve the bolus calculator values (settings) that are set and saved on your pump. You will not have access to the Calculator Set-up option on your meter remote. You will be reminded on your meter remote display that the bolus calculator settings from Calculator Set-up on your meter remote have been replaced.
Press on your meter remote to confirm the Notification. You will go to the Pump Home screen on your meter remote display (see Chapter 3 in Section III ).
NOTE: Your meter remote and pump must use the same unit of measure (mg/dL) for BG measurements or the devices cannot be paired. The BG unit of measure for both devices is set at the factory and cannot be changed.
If the BG unit of measure is not the same on both devices, you will be notified on your meter remote display during the pairing procedure.
Contact Customer Service at 1 877 937-7867 for instructions on replacing your meter remote or pump with one that has the correct glucose unit of measure.
This Notification screen will be followed by a Warning screen on your meter remote display indicating that the pairing procedure has failed. Press on your meter remote to confirm the Warning. You will not be able to use your meter remote to access pump functions unless both devices have the same glucose unit of measure (mg/dL).
Stored meter calculatorsettings will be
overwritten by settings from pump.
Notification
Confirm
Meter remote display
Pump and meter glucoseunits do not match.
Contact customer service.
Notification
Confirm
Meter remote display
Pairing procedure failed!
WARNING
Confirm
Meter remote display
41029400B_OB_OTP_US_EN_MGDL_R3.indd 257 11/7/14 3:09 PM
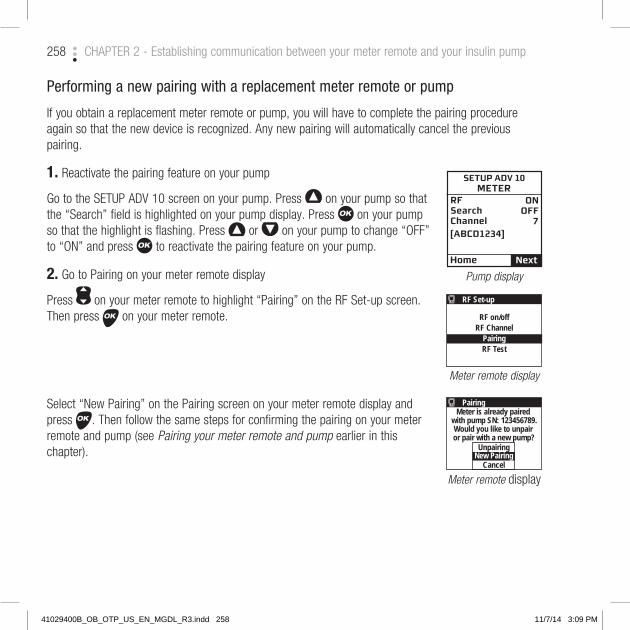
258 CHAPTER 2 - Establishing communication between your meter remote and your insulin pump
Performing a new pairing with a replacement meter remote or pump
If you obtain a replacement meter remote or pump, you will have to complete the pairing procedure again so that the new device is recognized. Any new pairing will automatically cancel the previous pairing.
1. Reactivate the pairing feature on your pump
Go to the SETUP ADV 10 screen on your pump. Press on your pump so that the “Search” field is highlighted on your pump display. Press on your pump so that the highlight is flashing. Press or on your pump to change “OFF” to “ON” and press to reactivate the pairing feature on your pump.
2. Go to Pairing on your meter remote display
Press on your meter remote to highlight “Pairing” on the RF Set-up screen. Then press on your meter remote.
Select “New Pairing” on the Pairing screen on your meter remote display and press . Then follow the same steps for confirming the pairing on your meter remote and pump (see Pairing your meter remote and pump earlier in this chapter).
RF Set-up
RF on/offRF Channel
PairingRF Test
Meter remote display
PairingMeter is already paired
with pump SN: 123456789.Would you like to unpair or pair with a new pump?
UnpairingNew Pairing
Cancel
Meter remote display
SETUP ADV 10
Home
METERRFSearchChannel
Next
ONOFF
7 [ABCD1234]
Pump display
41029400B_OB_OTP_US_EN_MGDL_R3.indd 258 11/7/14 3:09 PM

259 CHAPTER 2 - Establishing communication between your meter remote and your insulin pump
Unpairing your meter remote and pump
1. Go to Pairing on your meter remote display
To unpair the two devices, first press on your meter remote to highlight “Pairing” on the RF Set-up screen on your meter remote. Then press on your meter remote.
2. Select Unpairing on your meter remote display
Select “Unpairing” from the Pairing screen on your meter remote display and press .
NOTE: If you unpair your meter remote and pump, they will not be able to communicate and share data, and you will not be able to use your meter remote to access pump functions.
Because you unpaired the devices a Notification screen will appear on your meter remote display. The Notification screen will remind you that the current calculator settings last saved on your pump may not be appropriate for the current time of day. It is important that you review these settings before using the ezCarb or ezBG feature on your meter remote to see that they still would apply. You may always edit these settings by changing the settings in Calculator Set-up under the Meter Settings screen on your meter remote display, or directly on the ezCarb and ezBG Bolus screens on your meter remote display.
RF Set-up
RF on/offRF Channel
PairingRF Test
Meter remote display
PairingMeter is already paired
with pump SN: 123456789.Would you like to unpair or pair with a new pump?
UnpairingNew Pairing
Cancel
Meter remote display
Current calculator settings may not be
appropriate fortime of day.
Use Calculator Set-up to edit settings.
Notification
Confirm
Meter remote display
41029400B_OB_OTP_US_EN_MGDL_R3.indd 259 11/7/14 3:09 PM

260 CHAPTER 2 - Establishing communication between your meter remote and your insulin pump
3. Confirm the unpairing
Press on your meter remote to confirm the Notification on your meter remote.
A second Notification screen will appear on your meter remote display to let you know that your meter remote and pump are now unpaired. Press on your meter remote display to confirm the Notification. You will go to the Meter Home screen on your meter remote display (see Chapter 3 in Section III ).
NOTE: There is no separate unpairing procedure on your pump. Your pump remains ready to re-establish an RF link with the last paired meter remote, or to pair with a new meter remote.
Pump unpaired.
Notification
Confirm
Meter remote display
41029400B_OB_OTP_US_EN_MGDL_R3.indd 260 11/7/14 3:09 PM

261 CHAPTER 2 - Establishing communication between your meter remote and your insulin pump
Reactivating/deactivating the RF feature on your meter remote
NOTE: The “RF on/off” menu option on the RF set-up screen on your meter remote is only available if your meter remote and pump are paired.
Deactivating RF communication on your meter remote
There are times when you might want or need to deactivate the RF feature on your meter remote. One situation is when you are on an airplane. Follow these instructions for deactivating the RF feature on your meter remote if it is activated.
1. Go to RF on/off on your meter remote display
Highlight “RF on/off” on the RF Set-up screen on your meter remote display and then press .
2. Deactivate the RF feature on your meter remote
You will be reminded on your meter remote display that the RF feature is activated. To deactivate the RF feature, highlight “RF off” on your meter remote display and press . All communication between your meter remote and pump will be stopped.
3. Wait for confirmation that the RF feature on your meter remote is deactivated
A Notification screen will appear on your meter remote display to remind you that the RF feature is deactivated on your meter remote.
Press on your meter remote to confirm the Notification. You will go to the Meter Home screen on your meter remote display (see Chapter 3 in Section III ).
RF Set-up
RF on/offRF Channel
PairingRF Test
Meter remote display
RF on/offThe RF is active. Caution!
RF offCancel
All communication to connected RF devices will
be stopped with RF off!
Meter remote display
RF communicationdeactivated.
Notification
Confirm
Meter remote display
41029400B_OB_OTP_US_EN_MGDL_R3.indd 261 11/7/14 3:09 PM
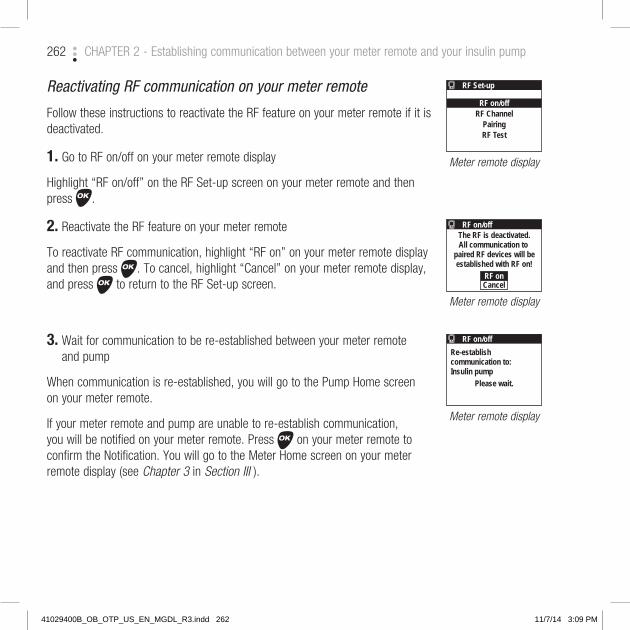
262 CHAPTER 2 - Establishing communication between your meter remote and your insulin pump
Reactivating RF communication on your meter remote
Follow these instructions to reactivate the RF feature on your meter remote if it is deactivated.
1. Go to RF on/off on your meter remote display
Highlight “RF on/off” on the RF Set-up screen on your meter remote and then press .
2. Reactivate the RF feature on your meter remote
To reactivate RF communication, highlight “RF on” on your meter remote display and then press . To cancel, highlight “Cancel” on your meter remote display, and press to return to the RF Set-up screen.
3. Wait for communication to be re-established between your meter remote and pump
When communication is re-established, you will go to the Pump Home screen on your meter remote.
If your meter remote and pump are unable to re-establish communication, you will be notified on your meter remote. Press on your meter remote to confirm the Notification. You will go to the Meter Home screen on your meter remote display (see Chapter 3 in Section III ).
RF on/offThe RF is deactivated.All communication to
paired RF devices will beestablished with RF on!
RF onCancel
Meter remote display
RF Set-up
RF on/offRF Channel
PairingRF Test
Meter remote display
RF on/off
Re-establish communication to:Insulin pump
Please wait.
Meter remote display
41029400B_OB_OTP_US_EN_MGDL_R3.indd 262 11/7/14 3:09 PM

263 CHAPTER 2 - Establishing communication between your meter remote and your insulin pump
Reactivating/deactivating the RF feature on your pump
Deactivating RF communication on your pump
There are times when you might want or need to deactivate the RF feature on your pump. One situation is when you are on an airplane. Follow these instructions to deactivate the RF feature on your pump if it is activated.
1. Go to the SETUP ADV 10 screen on your pump
Select “Setup” from the Main Menu screen on your pump display and press . Then select “Advanced” on the SETUP screen on your pump display and press
. With “Next” highlighted on your pump display, continue to press to scroll through the SETUP ADV screens until the SETUP ADV 10 screen is displayed.
2. Go to RF on your pump display
Press on your pump until the “RF” field is highlighted on your pump display. Then press on your pump so that the highlight is flashing. Press or on your pump to change “ON” to “OFF” and then press to deactivate the RF feature on your pump.
“Next” will be highlighted on your pump display. With “Home” highlighted, press on your pump to return to the Home screen on your pump display.
SETUP ADV 10
Home
METERRFSearchChannel
Next
ONOFF
7 [ABCD1234]
Pump display
SETUP ADV 10
Home
METERRFSearchChannel
Next
OFF– – – –
Auto
Pump display
41029400B_OB_OTP_US_EN_MGDL_R3.indd 263 11/7/14 3:09 PM

264 CHAPTER 2 - Establishing communication between your meter remote and your insulin pump
Reactivating RF communication on your pump
Follow these instructions to activate the RF feature on your pump if it is deactivated.
1. Go to the SETUP ADV 10 screen on your pump display
Select “Setup” from the Main Menu screen on your pump display and press . Then select “Advanced” on the SETUP screen on your pump display and press
. With “Next” highlighted on your pump display, continue to press to scroll through the SETUP ADV screens until the SETUP ADV 10 screen is displayed.
2. Go to RF on your pump display
Press on your pump until the “RF” field is highlighted on your pump display. Then press on your pump so that the highlight is flashing. Press or on your pump to change “OFF” to “ON” and then press to reactivate the RF feature on your pump.
“Next” will be highlighted on your pump display. With “Home” highlighted, press on your pump to return to the Home screen on your pump display.
SETUP ADV 10
Home
METERRFSearchChannel
Next
OFF– – – –
Auto
Pump display
SETUP ADV 10
Home
METERRFSearchChannel
Next
ONOFF
7 [ABCD1234]
Pump display
41029400B_OB_OTP_US_EN_MGDL_R3.indd 264 11/7/14 3:09 PM

265 CHAPTER 2 - Establishing communication between your meter remote and your insulin pump
Troubleshooting RF communication between your meter remote and pump
Certain conditions may cause RF communication between your meter remote and pump to be lost or interrupted. One situation is when your devices are not within RF range of each other (about 10 feet/3.0 meters). Another condition is dampness from wet clothing. If RF communication is lost, make sure your devices are within RF range and you have removed any wet clothing. If RF communication problems continue, you can use the RF test feature on your meter remote to help troubleshoot the problem.
The RF Test feature on your meter remote displays information about the RF connection between your meter remote and pump. In the event your meter remote indicates repeated communication errors, or you are having continuing difficulties in using your meter remote to access pump functions, contact Customer Service at 1 877 937-7867 and be prepared to follow the steps below.
NOTE: The “RF Test” menu option on the RF set-up screen on your meter remote is only available if your meter remote and pump are paired.
41029400B_OB_OTP_US_EN_MGDL_R3.indd 265 11/7/14 3:09 PM

266 CHAPTER 2 - Establishing communication between your meter remote and your insulin pump
RF Test
If your meter remote and pump are paired, you may troubleshoot the RF connection by checking the RF channel, and the RF signal strength and quality.
1. Go to RF Test on your meter remote display
Highlight “RF Test” on the RF Set-up screen on your meter remote display. Then press on your meter remote.
If the devices are not paired, you will be notified on your meter remote display. If your meter remote and pump are paired, you will see the serial number of the paired pump on the RF Test screen on your meter remote display.
2. Start the RF Test from your meter remote
“Start” is highlighted. Press on your meter remote to continue with the RF Test.
3. Contact Customer Service for further instructions
Information about the RF channel, and RF signal strength and quality will appear on the display. Customer Service may use this information to help resolve problems with RF communication, including manually setting the RF channel on your meter remote and pump. Press to return to the Main Menu screen.
RF TestIdentifier:
RF channel: 1
Start
PumpSN: 123456789
Meter remote display
RF TestIdentifier:
RF channel: 1RF signal: 3RF quality: 3 start
PumpSN: 123456789
Meter remote display
RF Set-up
RF on/offRF Channel
PairingRF Test
Meter remote display
41029400B_OB_OTP_US_EN_MGDL_R3.indd 266 11/7/14 3:09 PM

267 CHAPTER 2 - Establishing communication between your meter remote and your insulin pump
Changing the RF channel on your meter and pump
The RF channel on your meter remote must always match the RF channel on your pump. When you pair your meter remote and pump, the RF channel is automatically set to match on both devices. To avoid interference from another device or improve communication between your meter remote and pump, you can also manually change/set the RF channel on your meter remote and pump to match.
NOTE: The “RF Channel” menu option on the RF set-up screen on your meter remote is only available if your meter remote and pump are paired.
Manually set the RF channel on your meter remote
1. Go to RF Channel on your meter remote display
Press on your meter remote to highlight “RF Channel” on the RF Set-up screen. Then press on your meter remote.
A Notification screen will appear on your meter remote display to remind you to set the RF channel on your meter remote to match the one on your pump. Press to confirm the Notification on your meter remote display.
2. Set the RF Channel on your meter remote
Press on your meter remote to manually select the desired channel. Then press on your meter remote.
After making your selection, you will return to the RF Set-up screen on your meter remote display. You will then need to manually set the RF channel on your pump to match the channel you set on your meter remote.
RF Set-up
RF on/offRF Channel
PairingRF Test
Meter remote display
Please use the same RFchannel as the paired
pump!
Notification
Confirm
Meter remote display
RF Channel
Selected RF Channel
��1
Meter remote display
41029400B_OB_OTP_US_EN_MGDL_R3.indd 267 11/7/14 3:09 PM

268 CHAPTER 2 - Establishing communication between your meter remote and your insulin pump
Manually set the RF channel on your pump
1. Go to Channel on your pump display
Go to the SETUP ADV 10 screen on your pump display. Press on your pump until the “Channel” field is highlighted. Then press on your pump so that the highlight is flashing.
2. Set the RF Channel on your pump
Press or on your pump to change the current channel to match the RF channel you selected on your meter remote. Then press on your pump.
“Next” will be highlighted on your pump display. With “Home” highlighted, press on your pump to return to the Home screen on your pump display.
SETUP ADV 10
Home
METERRFSearchChannel
Next
ONOFF
9 [ABCD1234]
Pump display
SETUP ADV 10
Home
METERRFSearchChannel
Next
ONOFF
1 [ABCD1234]
Pump display
41029400B_OB_OTP_US_EN_MGDL_R3.indd 268 11/7/14 3:09 PM

269 CHAPTER 3 - Pump Home and Meter Home screens on your meter remote
NOTE: Unless otherwise specified, all references to screens and buttons apply to your meter remote from this chapter forward.
Once RF communication is activated on your meter remote and pump and the devices are paired, you are ready to begin using the devices together as a system. This means many of the pump functions will now be available on your meter remote. You will still need to access your pump directly for specific set-up and delivery functions, and to resolve certain pump warnings and alarms. In the event RF communication between the devices is lost, you can access all pump functions directly on the pump.
When your devices are paired, your meter remote provides two Home screens: a Pump Home screen and a Meter Home screen. From either of these Home screens, you can go to the Main Menu screen on your meter remote where you have access to all meter remote functions, including certain pump functions. The Main Menu screen on your meter remote display is the same Main Menu screen you had access to before the devices were paired.
NOTE: The Pump Home screen and Main Menu screen on your meter remote display are not the same as the Home screen and Main Menu screen on your pump display. Be sure you understand the differences between these screens before using the devices together as a system.
Using your meter remote once your devices are paired
Turn your meter remote display on by pressing or on your meter remote.
After an all-black start-up screen appears on your meter remote display, an hourglass symbol will appear as your meter remote searches for a paired pump. This will be followed by the Pump Home screen. You can switch between the Pump Home screen and the Meter Home screen by pressing on your meter remote.
NOTE: If your meter remote is not currently paired with your pump, the Meter Home screen will appear instead of the Pump Home screen.
Pump: JLSmith
Basal Rate0.025U/Hr
10:32 am
Insulin: 100U
��
Meter Home
Last BGJun 19-06
7:40am
10:32 am
10999
Aft BrkftAvg.
14 days
��
41029400B_OB_OTP_US_EN_MGDL_R3.indd 269 11/7/14 3:09 PM

270 CHAPTER 3 - Pump Home and Meter Home screens on your meter remote
Pump Home screen on your meter remote display
The Pump Home screen on your meter remote displays the current time of day stored in your pump, RF signal strength, the insulin units and battery power remaining in your pump, and other information about your current basal or bolus insulin delivery. The unique ID name/number of your pump will also appear at the top. To create a unique ID for your pump, refer to your ezManager® Software User Guide. If you do not create a unique ID for your pump, the first 7 digits of the pump serial number will appear at the top.
In this example Pump Home screen, “BOLUS ACTIVE” indicates that your pump is currently delivering an extended bolus dose. “TEMP BASAL” indicates that a temporary basal rate (a decrease of 40% in this example) was set for four hours, with two hours remaining.
From the Pump Home screen you can view the Meter Home screen or go to the Main Menu screen.
To view the Meter Home screen, press . To go to the Main Menu screen, press .
Meter Home screen on your meter remote
The Meter Home screen displays the current time of day stored in your meter remote, RF signal strength, and battery power remaining in your meter remote. Your most recent BG test result appears along with the date and time of the test. Your average BG test results for the current meal period appears next to your most recent BG test result. Averages are based on the number of days you select when you set up your meter remote (see Chapter 1 in Section II ).
To go back to the Pump Home screen, press . To go to the Main Menu screen, press .
NOTE: Once your devices are paired, the clock time on your meter remote will be automatically set to match the clock time on your pump.
Pump: JLSmith
BOLUS ACTIVE
3:18 pm
Insulin: 100U
TEMP BASAL-40% 4.0HrTime left: 2.0Hr
��
(Example)
Meter Home
Last BGJun 19-0610:32am
3:18 pmAft Lunch
Avg.14 days
��
109 105
41029400B_OB_OTP_US_EN_MGDL_R3.indd 270 11/7/14 3:09 PM

271 CHAPTER 4 - Insulin delivery functions on your meter remote
Calculating and delivering a bolus
You can use your meter remote to deliver any bolus type that is available with your pump. The procedures for delivering boluses from your meter remote are very similar to delivering boluses from your pump.
Your bolus options are:
• Normal
• ezCarb
• ezBG
• Combo Bolus
WARNING: Be sure to review all the values used in bolus calculations to make sure they are correct. You may always adjust the insulin units up or down before you decide to administer your bolus. If you dose an insulin amount that is too high or too low, this may result in a hypoglycemic or hyperglycemic event. Please discuss the bolus calculator feature and all relevant personal settings with your health care professional before using the calculator for the first time.
As long as RF communication is activated on your meter remote and pump, and the devices are paired, you may deliver a Normal Bolus using your meter remote. The other bolus types are available only if you enabled the Advanced Bolus features on your pump. If insulin delivery is suspended on your pump, or if RF communication is lost or deactivated, you will not be able to use your meter remote as a remote control to deliver any type of bolus.
NOTE: You can administer insulin directly from your pump under any situation where you are unable to do so using your meter remote (e.g., RF communication is lost or deactivated, or your meter remote and pump are out of RF range).
41029400B_OB_OTP_US_EN_MGDL_R3.indd 271 11/7/14 3:09 PM

272 CHAPTER 4 - Insulin delivery functions on your meter remote
There are two ways to get to the Bolus Menu screen on your meter remote.
The first way is right after you take a BG test. When your result appears on the screen, “Bolus” will be highlighted. Press if you would like to go directly to the Bolus Menu screen. You may still add a comment to the test result after you deliver the bolus.
The second way is to press to highlight “Bolus” on the Main Menu screen and press .
In this example, all bolus options are available on the screen.
NOTE: If Advanced features are not enabled on your pump, selecting “Bolus” from the Main Menu screen takes you directly to the Normal Bolus screen.
Jun 19-06 10:32 am
CommentBolus
mg/dL105
��
Main Menu
BolusFastFacts
Meter SettingsAdd Logbook Entry
System Status
Normal Bolus
Amount U
GoMain Menu
0.00
Bolus Menu
NormalezCarbezBG
Combo BolusMain Menu
JLSmith
41029400B_OB_OTP_US_EN_MGDL_R3.indd 272 11/7/14 3:09 PM

273 CHAPTER 4 - Insulin delivery functions on your meter remote
Normal Bolus
NOTE: Bolus delivery speed can be adjusted in the Setup Advanced menu on your pump.
1. Select a Normal Bolus
To deliver a Normal Bolus, press to highlight “Normal” on the Bolus Menu screen and press .
2. Choose the bolus amount
The “Amount” field is highlighted and flashing. Press to enter the bolus units and press .
3. Confirm you want to deliver the bolus
“Go” is now highlighted. Press to deliver the bolus or to return to the Bolus Menu screen.
When you press , “DELIVERING” will appear at the top of the screen and the units will count down to 0. After the bolus is delivered, you will return to the Pump Home screen, or to your BG test result if you began the bolus procedure from that screen.
Bolus Menu
NormalezCarbezBG
Combo BolusMain Menu
JLSmith
Normal Bolus
Amount U
GoMain Menu
2.35
Normal Bolus
Amount U
GoMain Menu
0.00
Normal Bolus
Amount U
GoMain Menu
2.35
Bolus
Press anyfunction button
to cancel
1.35DELIVERING
U
41029400B_OB_OTP_US_EN_MGDL_R3.indd 273 11/7/14 3:09 PM

274 CHAPTER 4 - Insulin delivery functions on your meter remote
Canceling a Normal Bolus
You may stop the undelivered bolus amount by pressing any button on the meter remote (or pump) while “DELIVERING” still appears at the top of the screen. After pressing any button, a Warning screen will appear that prompts you to confirm that you canceled bolus delivery. Insulin units that were delivered before the bolus was canceled appear at the bottom of the screen.
Press to confirm the Warning. You will return to the Pump Home screen, or to your BG test result if you began the bolus procedure from that screen. You may also press on your pump to confirm the Warning.
Special messages during Normal Bolus Delivery
Certain messages may appear at the top of the Normal Bolus screen (or as separate screens) after you press to confirm the desired bolus units.
“COMBO ACTIVE” will appear if a Combo Bolus (see Combo Bolus in this chapter) is already in progress. This lets you know that you will be adding a Normal Bolus on top of an extended bolus.
“SUSPENDED” will appear if you try to set and deliver a Normal Bolus while insulin delivery is suspended (see Chapter 7 in Section I ). You cannot deliver a Normal Bolus until you resume insulin delivery from your pump.
PUMP WARNING
Bolus delivery canceled
by user button press.Delivered:
1.35 U of 2.35 U
Confirm
Normal Bolus
Amount U
GoMain Menu
2.35
COMBO ACTIVE
Normal Bolus
Amount U
GoMain Menu
SUSPENDED
2.35
41029400B_OB_OTP_US_EN_MGDL_R3.indd 274 11/7/14 3:09 PM

275 CHAPTER 4 - Insulin delivery functions on your meter remote
If you set up your pump to remind you to test your BG, (see Chapter 10 and Chapter 11 in Section I ) you will be prompted to confirm the reminder on the display after the bolus is delivered. This screen also lets you change when you will be reminded to check your BG. In this example, you will be reminded to check your BG two hours after you deliver the bolus. To confirm the reminder time on the screen, press .
To select a different reminder time, first press so that the “Hr” field is highlighted. Then press so the highlight is flashing.
Press to select a reminder time of one to four hours, or “0” to turn the reminder feature off for this particular bolus. Press after you make your selection.
Press again to confirm the Check BG reminder time. You will return to the Pump Home screen, or to your BG test result if you began the bolus procedure from that screen.
NOTE: A Warning screen will appear if a bolus exceeds the limits that you set and saved on your pump. Press to confirm the Warning and follow the appropriate steps for adjusting the limits that are stored in your pump. You may also press on your pump to confirm the Warning.
BG Reminder
Check BGin
1 Hr
Confirm
BG Reminder
Check BGin
2 Hr
Confirm
BG Reminder
Check BGin
2 Hr
Confirm
41029400B_OB_OTP_US_EN_MGDL_R3.indd 275 11/7/14 3:09 PM

276 CHAPTER 4 - Insulin delivery functions on your meter remote
ezCarb Bolus
The ezCarb feature allows you to enter the number of carbs eaten, and then have your meter remote automatically calculate and deliver a bolus from your pump. The calculator is based on the I:C ratios that you have set and stored in your pump, and the number of carbs you plan to consume. Carb totals may be entered manually for the calculator, or may be selected from the Food Database stored in the meter remote.
You may also include a BG correction in your ezCarb bolus calculation. The BG correction is based on the ISF and BG Target you have set and stored in your pump, and your current BG test result.
If the IOB feature is enabled on your pump, your meter remote will calculate a reduced bolus amount if there is any IOB left from a previous bolus.
Be sure to discuss your personal I:C ratios, ISFs, BG Targets and IOB with your health care professional before you use the ezCarb feature.
1. Select an ezCarb Bolus
1a. To use the ezCarb feature, press to highlight “ezCarb” on the Bolus Menu screen. Then press .
1b. In anticipating that you might want to add a BG correction to your ezCarb Bolus, your meter remote will first check if the most recent BG test on your meter remote was taken within the last 15 minutes. If it was, you will go directly to the ezCarb Home screen below. Your most recent BG test result will appear in the “Actual” field on the BG Correct screen that is displayed if you decide to add a BG correction to your ezCarb Bolus (see step 4, Add a BG correction ).
If your most recent glucose test was taken more than 15 minutes ago, you will be notified on the display. You will be prompted to re-test or manually enter a new BG value if you are planning to add a BG correction to your ezCarb Bolus (see step 4, Add a BG correction ). Press to confirm the Notification and go to the ezCarb Home screen below.
Bolus Menu
NormalezCarbezBG
Combo BolusMain Menu
JLSmith
Last BG more than 15minutes old.
Notification
Retest or enternew BG.
Confirm
41029400B_OB_OTP_US_EN_MGDL_R3.indd 276 11/7/14 3:09 PM

277 CHAPTER 4 - Insulin delivery functions on your meter remote
1c. The ezCarb Home screen will appear. On the ezCarb Home screen, you can either manually enter carbs or automatically enter carbs from the Food Database. Carb entries made with the ezCarb feature on your meter remote are saved in your meter remote memory (see Chapter 7 in Section II ), and in your pump (see Chapter 8 in Section I ). The maximum carbs that can be entered in the ezCarb Bolus calculations is 999 grams(g) – even if the selected and totaled amount from the Food Database is greater than that amount.
2. Enter a carb amount
To enter carbs manually, press to enter the number of carbs you have eaten and press . You will go to step 3 and “Add BG” will be highlighted.
To enter carbs from the Food Database, press while the “Carbs:” field has a value of 0 and is highlighted and flashing.
“Food List” will be highlighted. Press to go to the Food Database where you can make your food selections with their corresponding carb amounts. Please see Chapter 2 in Section II for more information on the Food Database. When you are finished making food selections your total carbs will appear in the “Carbs:” field.
3. Review/change your carbs and/or I:C ratio
“Add BG” will be highlighted.
Now you have the option to make changes to your carbs and/or I:C ratio, add a BG correction, or simply show the calculated carb bolus amount.
3a. To change your carbs manually, press to highlight the “Carbs:” field and press . With the highlight flashing, press to change the amount and press when finished. “Add BG” will be highlighted again.
ezCarb Home
Main Menu
Carbs:I:C=Food ListReview TotalAdd BGShow Result
0g1U:15g
ezCarb Home
Main Menu
Carbs:I:C=Food ListReview TotalAdd BGShow Result
34g1U:15g
ezCarb Home
Main Menu
Carbs:I:C=Food ListReview TotalAdd BGShow Result
0g1U:15g
ezCarb Home
Main Menu
Carbs:I:C=Food ListReview TotalAdd BGShow Result
34g1U:15g
ezCarb Home
Main Menu
Carbs:I:C=Food ListReview TotalAdd BGShow Result
34g1U:15g
41029400B_OB_OTP_US_EN_MGDL_R3.indd 277 11/7/14 3:09 PM

278 CHAPTER 4 - Insulin delivery functions on your meter remote
3b. To review the carbs that you selected from the Food Database, press to highlight “Review Total” and press . You will go to the ezCarb Total screen on your meter remote display. When you are done changing, deleting or adding food items you will return to the ezCarb Home screen.
3c. To go directly to the Food Database where you can also change, delete, or add food items to the ezCarb Total List, press to highlight “Food List” and press . You will return to the ezCarb Home screen when you are finished selecting foods.
3d. The I:C ratio that appears on the screen is the one that you stored in your pump for this time of the day. To change your I:C ratio, press to highlight the “I:C=” field and press . With the highlight flashing, press
to change the I:C ratio and press when finished. “Add BG” will be highlighted again.
3e. To add a BG correction, continue with step 4.
NOTE: Changes made to your I:C ratio during ezCarb calculation apply to this bolus only and will not affect the I:C ratios you have stored in your pump.
ezCarb Home
Main Menu
Carbs:I:C=Food ListReview TotalAdd BGShow Result
34g1U:15g
ezCarb Home
Main Menu
Carbs:I:C=Food ListReview TotalAdd BGShow Result
34g1U:15g
ezCarb Home
Main Menu
Carbs:I:C=Food ListReview TotalAdd BGShow Result
34g1U:15g
ezCarb Home
Main Menu
Carbs:I:C=Food ListReview TotalAdd BGShow Result
34g1U:15g
41029400B_OB_OTP_US_EN_MGDL_R3.indd 278 11/7/14 3:09 PM

279 CHAPTER 4 - Insulin delivery functions on your meter remote
4. Add a BG correction
You have the option to add a BG correction to your ezCarb Bolus. Press with “Add BG” highlighted to do so. If you do not want to add a BG correction, press to highlight “Show Result” and press . This will bypass the BG correction step and take you to the Bolus Total screen in step 5.
4a. In this example, the most recent BG test result on your meter remote (220 mg/dL) was taken within the last 15 minutes and that value appears in the “Actual” field. You may adjust the BG level up or down using . Press when finished.
NOTE: If the most recent BG test result on your meter remote was taken more than 15 minutes ago, three dashes (“– – –”) will appear in the “Actual” field on the BG Correct screen. You have the option to manually enter a more recent BG test result or to re-test. Press to manually enter a new BG value, or insert a new test strip to re-test. If you decide to re-test, you will have to repeat the steps for starting an ezCarb Bolus when your BG test result appears on the display. When you return to the BG Correct screen and you have the desired BG value in the “Actual” field, press .
4b. “Show Result” is highlighted. Values appear on the screen for your “Target” and your “IS Factor”. Target refers to the BG Target level that you stored in your pump. IS Factor is the ISF that you stored in your pump.
BG Correct
Main Menu
ActualTarget=IS FactorShow Result
220 mg/dL-120mg/dL+100mg/dL
37mg/dL
BG Correct
Main Menu
ActualTarget=IS FactorShow Result
220mg/dL-120mg/dL+100mg/dL
37mg/dL
BG Correct
Main Menu
ActualTarget=IS FactorShow Result
– – – mg/dL-120mg/dL
– – – mg/dL37mg/dL
41029400B_OB_OTP_US_EN_MGDL_R3.indd 279 11/7/14 3:09 PM

280 CHAPTER 4 - Insulin delivery functions on your meter remote
4c. If all your entries are correct, press with “Show Result” highlighted on the BG Correct screen. If you need to adjust any entry, press to first highlight it, and then press . Use to make the change and then press again.
NOTE: Changes made to your IS Factor or BG Target during ezCarb calculations apply to this bolus only and will not affect the IS Factor or BG Target you have stored in your pump.
Before calculating an estimated BG correction, your meter remote will first check to see if your Actual BG is within the range 70–250 mg/dL. If your Actual BG falls below 70 mg/dL or above 250 mg/dL, you will be prompted with either a LOW BG or HIGH BG Pump Alert screen.
Press on your meter remote or on your pump to confirm the Alert. Treat a LOW BG or HIGH BG immediately according to your health care professional’s recommendation.
5. Review and deliver your ezCarb Bolus
The Bolus Total screen shows the Carb and BG correction amounts calculated from your previous entries. If the IOB feature is enabled on your pump, the suggested total bolus amount will be adjusted accordingly. “Total” units are rounded to the nearest .05 units. The amount field will be highlighted and flashing, and will display 0.00 units.
NOTE: If you have not enabled the IOB feature on your pump, a set of dashes (“– –.– –”) will appear as the IOB amount.
Pump Alert
LOW BGTreat low BG.
No bolus recommended.Monitor BG.
Confirm
Pump Alert
HIGH BGTreat high BG.
Check site.Check ketones.
Monitor BG.
Confirm
Bolus Total
Main Menu
CarbBGIOBTotal
2.25U + 2.70U
––.––U= 4.95U
GoType Normal
4.95 U
Bolus Total
Main Menu
CarbBGIOBTotal
2.25U + 2.70U
–– .––U= 4.95U
GoType Normal
0.00 U
41029400B_OB_OTP_US_EN_MGDL_R3.indd 280 11/7/14 3:09 PM

281 CHAPTER 4 - Insulin delivery functions on your meter remote
5a. Press to enter either the suggested “Total” units or a different bolus amount. Press once you have selected the desired bolus amount.
5b. “Go” is highlighted. You can deliver the ezCarb Bolus either as a Normal Bolus or as a Combo Bolus by making your selection in the “Type” field. The pre-set delivery type for an ezCarb Bolus is Normal.
5c. To deliver your ezCarb Bolus as a Normal Bolus, make sure “Normal” appears in the “Type” field. With “Go” highlighted, press . This will begin delivery of the units as a Normal Bolus.
5d. To deliver an ezCarb Bolus as a Combo Bolus, first press to highlight the “Type” field. Then press so that the highlight over “Normal” is flashing. Press so that “Combo” appears on the screen and is highlighted. Press
to continue.
“Go” is highlighted again. Press to begin the steps for delivering the ezCarb units as a Combo Bolus (see Combo Bolus in this chapter). The bolus amount you entered in the Bolus Total screen in step 5 will appear in the “Total” field on the first Combo Bolus screen.
Bolus Total
Main Menu
CarbBGIOBTotal
2.25U + 2.70U
–– .––U= 4.95U
GoType Normal
4.95 U
Bolus Total
Main Menu
CarbBGIOBTotal
2.25U + 2.70U
––.––U= 4.95U
GoType Normal
4.95 U
Bolus Total
Main Menu
CarbBGIOBTotal
2.25U + 2.70U
––.––U= 4.95U
GoType Combo
4.95 U
Bolus Total
Main Menu
CarbBGIOBTotal
2.25U + 2.70U
––.––U= 4.95U
GoType Combo
4.95 U
41029400B_OB_OTP_US_EN_MGDL_R3.indd 281 11/7/14 3:09 PM

282 CHAPTER 4 - Insulin delivery functions on your meter remote
Combo Bolus
A Combo Bolus is used to deliver both a Normal and an Extended Bolus. See Chapter 11 in Section I for information on Combo Boluses.
1. Select a Combo Bolus
On the Bolus Menu screen, press to highlight “Combo Bolus” and press .
If you used the ezCarb Bolus option to calculate a bolus and chose to deliver it as a Combo Bolus, you will begin at the Combo Bolus screen in step 2.
2. Review/change your bolus amount, duration, and/or split percentages
Total Combo Bolus units will be highlighted in the “Total” field. Your starting point will be “0.00” units if you are initiating the Combo Bolus from the Bolus Menu screen.
2a. Press to adjust the amount and press when finished.
NOTE: You may not start a new Combo Bolus if another one is active. If a Combo Bolus is active, “ACTIVE” will appear on the top of the screen and the duration and units delivered so far will appear below. To cancel the current active Combo Bolus, press to highlight “CANCEL” and press . Any remaining insulin from the current active Combo Bolus will be canceled. You will return to the Pump Home screen.
Bolus Menu
NormalezCarbezBG
Combo BolusMain Menu
JLSmith
Combo BolusTotalDurationNorm:Ext
GoMain Menu
8.50U0.5Hr
0 : 100%0.00 : 8.50U
Combo BolusTotalDurationNorm:Ext
GoMain Menu
0.00U0.5Hr
0 : 100%0.00 : 0.00U
41029400B_OB_OTP_US_EN_MGDL_R3.indd 282 11/7/14 3:09 PM

283 CHAPTER 4 - Insulin delivery functions on your meter remote
2b. “Go” is highlighted. Values appear on the screen for “Duration” and “Norm:Ext”. “Duration” is the amount of time you would like to extend the bolus. “Norm:Ext” refers to how you want to split your total bolus into normal (Norm) and extended (Ext) units. Splits are represented as percentages that total 100%.
The duration time displayed is the duration time of your last Combo Bolus. Likewise, the splits displayed are the splits of your last Combo Bolus. If you are using the Combo Bolus feature for the first time, the displayed values will be the pre-set values stored in your pump (30 minutes duration, 0% and 100% for normal and extended units).
2c. If all your entries are correct, press with “Go” highlighted. If you need to adjust any entry, press to highlight it, and then press . Use to make the change and press again. “Go” will be highlighted after each change is made.
For example, to change your split, highlight the “Norm:Ext” field and press . Press to enter the desired split percentages. As you scroll, normal (Norm) and extended (Ext) units appear on the screen below the percentages (%s). When you are finished, press again.
You can use the same steps to go back and change the duration time. Press when finished.
3. Start delivery of the Combo Bolus
With “Go” highlighted, press to begin delivering the bolus.
Combo BolusTotalDurationNorm:Ext
GoMain Menu
8.50U0.5 Hr
30 : 70% 2.55 : 5.95U
Combo Bolus
Duration
Delivered
CANCELMain Menu
0.0 : 4.0 Hrs
ACTIVE
0.60 U : 2.00 U
Combo BolusTotalDurationNorm:Ext
GoMain Menu
8.50U0.5 Hr
30 : 70% 2.55 : 5.95U
Combo BolusTotalDurationNorm:Ext
GoMain Menu
8.50U0.5Hr
2.55 : 5.95U30 : 70%
41029400B_OB_OTP_US_EN_MGDL_R3.indd 283 11/7/14 3:09 PM

284 CHAPTER 4 - Insulin delivery functions on your meter remote
ezBG Bolus
ezBG Bolus lets you calculate and deliver a BG correction bolus. The steps for ezBG Boluses are the same as for adding a BG correction bolus under the ezCarb feature. All ezBG Boluses are delivered as Normal boluses.
1. Select an ezBG Bolus
1a. Press to highlight “ezBG” on the Bolus Menu screen and press .
1b. Your meter remote will first check if the most recent BG test on your meter remote was taken within the last 15 minutes. If it was, you will go to the ezBG screen in step 2. Your most recent BG test result will appear in the “Actual” field on the ezBG screen.
If your last BG test was taken more than 15 minutes ago, you will be notified on the display. You will be prompted to re-test or manually enter a new BG value. Press to confirm the Notification and go to the ezBG screen in step 2.
2. Review/change your BG value
In this example, the most recent BG test result on your meter remote (224mg/dL) was taken within the last 15 minutes. You may adjust the level up or down using
. Press when finished so that “Show Result” is highlighted.
ezBGActualTarget=IS Factor
Show ResultMain Menu
224mg/dL-120mg/dL
+104mg/dL37mg/dL
Bolus Menu
NormalezCarbezBG
Combo BolusMain Menu
JLSmith
Last BG more than 15minutes old.
Notification
Retest or enternew BG.
Confirm
41029400B_OB_OTP_US_EN_MGDL_R3.indd 284 11/7/14 3:09 PM

285 CHAPTER 4 - Insulin delivery functions on your meter remote
NOTE: If the most recent BG test result on your meter remote was taken more than 15 minutes ago, three dashes (“– – –”) will appear in the “Actual” field on the ezBG screen. You have the option to manually enter a new BG value or to re-test. Press to manually enter a more recent BG test result, or insert a new test strip to re-test. If you decide to re-test, you will have to repeat the steps for starting a new BG Bolus when your BG test result appears on the display. When you return to the ezBG screen and you have the desired BG value in the “Actual” field, press .
3. Review/change your BG Target and/or IS Factor as needed
Values appear on the screen for your “Target” and your “IS Factor”. Target refers to the BG target that you stored in your pump. Your IS Factor is the ISF that you stored in your pump.
If all your entries are correct, press with “Show Result” highlighted.If you need to adjust any entry, press to highlight it, and then press . Use to make the change and press again.
Use the same steps to go back and change your glucose target or your Actual BG. When all changes have been made and “Show Result” is highlighted, press
to go to the ezBG Total screen in step 4.
NOTE: Changes made to your IS Factor or BG Target during ezBG calculations apply to this bolus only and will not affect the IS Factor or BG Target you have stored in your pump.
4. Review and deliver your ezBG bolus
The ezBG Total screen shows the calculated BG correction amount from your ezBG screen entries. If the IOB feature is enabled on your pump, the suggested total bolus amount will be adjusted accordingly. “Total” units are rounded to the nearest .05 units. The amount field will be highlighted and flashing, and will display 0.00 units.
NOTE: If you have not enabled the IOB feature on your pump, “– –.– –” is shown as the IOB amount.
ezBGActualTarget=IS Factor
Show ResultMain Menu
– – – mg/dL-120mg/dL
– – – mg/dL37mg/dL
ezBGActualTarget=IS Factor
Show ResultMain Menu
224mg/dL-120mg/dL
+104mg/dL37mg/dL
0.00U
ezBG TotalBGIOB
Total
GoMain Menu
2.80U––.––U
2.80U=
+
41029400B_OB_OTP_US_EN_MGDL_R3.indd 285 11/7/14 3:09 PM

286 CHAPTER 4 - Insulin delivery functions on your meter remote
Press to enter the calculated “Total” units from above or a different bolus amount. Press once you have entered the desired bolus amount.
“Go” is highlighted. Press to deliver the bolus.
WARNING: If RF communication is lost during the delivery of a Normal Bolus or the normal portion of a Combo Bolus, the bolus will be discontinued. Any remaining normal bolus units will not be delivered. Delivery of the extended portion of a Combo Bolus continues even if RF communication is lost or interrupted.
• A Warning screen will appear on your meter remote display to remind you that the bolus was discontinued. A similar Warning screen will appear on your pump display, and will indicate the number of insulin units delivered before the bolus was discontinued.
• You must confirm the Warning on either your meter remote or pump to continue.
WARNING
Bolus canceled.Move devices
closer, orchange channel.
Delivered: see pump
Confirm
ezBG TotalBGIOB
Total
GoMain Menu
2.80U –– .––U
2.80U
2.80U
=
+
ezBG TotalBGIOB
Total
GoMain Menu
2.80U –– .––U
2.80U
2.80U
=
+
41029400B_OB_OTP_US_EN_MGDL_R3.indd 286 11/7/14 3:09 PM

287 CHAPTER 4 - Insulin delivery functions on your meter remote
Using the ezCarb and ezBG calculator feature when your devices are not paired
When you use the bolus calculator feature, your meter remote gets important information from your pump. If your meter remote is not currently paired with your pump, the meter remote cannot get that data.
There may be times when the two devices are not paired but you would still like to use the calculator feature on your meter remote. An example might be when you want to give yourself a bolus from a pen or syringe. You will still be able to use the ezCarb or ezBG calculator feature on the ezCarb and ezBG Bolus screens.
In cases where your devices are not paired and you access the Bolus Menu on your meter remote, a Notification screen will appear on your meter remote display. It will remind you that the bolus calculator values last set and saved on your pump may not be appropriate for the current time of day.
If the devices are not paired, the Bolus Menu screen will only include the ezCarb and ezBG options. The steps for calculating a bolus will be the same as when the devices are paired. The ezCarb and ezBG Bolus screens will use the bolus calculator settings last set and saved on your pump prior to the unpairing. You may edit the bolus calculator settings using the Calculator Set-up feature on your meter remote or directly on the ezCarb or ezBG screens.
Bolus Menu
ezCarbezBG
Main Menu
Current calculator settings may not be
appropriate fortime of day.
Use Calculator Set-up to edit settings.
Notification
Confirm
41029400B_OB_OTP_US_EN_MGDL_R3.indd 287 11/7/14 3:09 PM

288 CHAPTER 4 - Insulin delivery functions on your meter remote
Note that the ezCarb and ezBG Bolus screens will be similar to the display screens when your meter remote and pump are paired, with a few exceptions:
1. The IOB amount will appear as “– –.– –” to indicate that the IOB stored in your pump is not available for use in the calculation.
2. “Go” is replaced by “Done” to indicate that you are calculating a bolus but will not be using your meter remote to deliver it from your pump.
See Chapter 1 in Section II, for a complete explanation of settings from Calculator Set-up and how they are used on the ezCarb and ezBG Bolus screens.
Unless you re-set/save the calculator settings on your meter remote using the Calculator Set-up screen, a Notification screen will appear every time you use the ezCarb or ezBG calculator feature while the devices are unpaired. This is to remind you that the current bolus calculator settings last set and saved on your pump may not be appropriate for the current time of day.
It is important that you review these settings before using the ezCarb or ezBG feature on your meter remote to see that they still would apply. You may always edit these settings by changing the settings in Calculator Set-up under the Meter Settings screen on your meter remote display, or directly on the ezCarb and ezBG Bolus screens on your meter remote display.
Press to confirm the Notification.
Bolus TotalBGIOB
Total
DoneMain Menu
0.25U –– .––U
1.45U
1.45U
=
+
(Example ezBG screen when your meter
remote and pump are not paired.)
Current calculator settings may not be
appropriate fortime of day.
Use Calculator Set-up to edit settings.
Notification
Confirm
41029400B_OB_OTP_US_EN_MGDL_R3.indd 288 11/7/14 3:09 PM

289 CHAPTER 5 - Checking the status of your OneTouch® Ping® System
You may review the status of various pump functions and features directly on your meter remote display. You may also verify your meter remote serial number and software version number. Your meter remote and pump must be paired, and RF activated, in order to access pump status screens on your meter remote display.
Press to highlight “System Status” on the Main Menu screen and press .
Checking Pump Status
With “Pump Status” highlighted, press to access a series of screens with information about your insulin delivery.
Six status screens are available. They are labeled 1 through 6 on the top right of the screen. Basal and bolus data appear in the first five screens. Your pump serial number and pump software version number appear on the final screen. Press to scroll from one status screen to the next, and press twice to highlight and then return to the Main Menu screen.
System Status
Pump Status
Meter Status
Main Menu
BolusFastFacts
Meter SettingsAdd Logbook Entry
System Status
41029400B_OB_OTP_US_EN_MGDL_R3.indd 289 11/7/14 3:09 PM

290 CHAPTER 5 - Checking the status of your OneTouch® Ping® System
Status Screen 1- Active Basal
The first status screen shows which basal program is currently active, the 24-hour total for the active basal program, units per hour for the current time segment, and insulin remaining in your pump. The (status screen) number “1” will be flashing on the top right of the screen. This indicates that you are in Review mode and can scroll up or down to view other status screens.
To continue scrolling through the status screens, press while the number “1” is highlighted and flashing. This will take you to the next status screen.
To return to the Main Menu screen, press so that “Main Menu” is highlighted. Press again to return to the Main Menu screen.
Status Screen 2 - IOB, Last Bolus
The second status screen displays the current IOB amount, even if the IOB feature on your pump is disabled. This screen also shows the type (“N” = Normal, “C” = Combo [normal portion only], “A” = Audio), amount, time and date of your last completed bolus. See Chapter 5 and Chapter 11 in Section I for an explanation of bolus types.
Status Screen 3 - Delivery Today
Total bolus and basal amounts delivered for the current day (from midnight to the current time) appear on the third status screen. Any Temp Basal amounts are included in the total. The screen will indicate if a Temp Basal had been set (“Yes” or “No”) or if insulin delivery had been suspended (“Yes” or “No”).
StatusIOB = 0.0ULast Bolus
Main Menu
N 3.30U 8:35 am
2
Jun 19-06
StatusDelivery Today U100
Main Menu
TempSuspendBolusBasalTotal
NoNo
9.400U0.200U9.600U
3
StatusActive Basal
A1-WEEKDAY24-Hr Total 13.60U
0.675 U/HrInsulin 100U
Main Menu
1
Flashing Number
StatusActive Basal
Main Menu
A1-WEEKDAY24-Hr Total 13.60U
0.675 U/HrInsulin 100U
1
Flashing Number
41029400B_OB_OTP_US_EN_MGDL_R3.indd 290 11/7/14 3:09 PM

291 CHAPTER 5 - Checking the status of your OneTouch® Ping® System
Status Screen 4 - Combo Bolus
The date, time period (start and end time), and total units of your last Combo Bolus will appear on the next screen. “COMPLETED” will appear to indicate the entire bolus was delivered. “ACTIVE” will appear if bolus delivery is still in progress. “CANCELED” will appear if you used your meter remote or pump to cancel the bolus.
Status Screen 5 - Temp Basal
The fifth status screen indicates the date, time period (start and end time) of your last Temp Basal, and the percentage increase or decrease in units from the basal program that was in effect at the time.
Status Screen 6 - Codes
The pump software version number and the last seven digits of your pump serial number appear on the sixth (last) status screen.
Checking Meter Remote Status
To check your meter remote serial number and the current version of the software loaded inside your meter remote, press to highlight “Meter Status” and then press .
Your meter remote serial number and current meter remote software version number will appear on the screen.
StatusCodes
Main Menu
REV XXX.XX.XXS/N# 76543-21
6
StatusTemp Basal
Main Menu
StartEndChange
4:00pm6:00pm
-50%
5
Jun 19-06ACTIVE
StatusCombo Bolus
Main Menu
Start timeEnd timeDelivered
12:00pm2:00pm
8.50 / 8.50U
4
COMPLETEDJun 19-06
System Status
Pump Status
Meter Status
Meter Status
S/N: 87654321
SW Version: V01.00
41029400B_OB_OTP_US_EN_MGDL_R3.indd 291 11/7/14 3:09 PM

292 CHAPTER 6 - Troubleshooting your OneTouch® Ping® System
Once you activate RF communication and pair the devices, your meter remote will display additional special messages. These include messages regarding communication problems between the devices or if your intended actions might require additional attention.
IMPORTANT: If a message is displayed on your meter remote and is not included in the list that follows, it may be due to an error specific to your meter remote (see Chapter 10 in Section II ) or a pump related message that appears on both your pump and meter remote displays (see the list of pump related messages that follows in this chapter).
System error messages on your meter remote
Indicates What to do
System error.Call Customer
Service.
WARNING
Error 8
There are RF communication problems between your meter remote and pump.
Call Customer Service at 1 877 937-7867 for more information.
Pairing procedure canceled!
WARNING
Confirm
Your meter remote was able to locate an insulin pump but the pairing procedure was canceled before it was completed.
Press to confirm the Warning. If you would like to pair your meter remote with the same pump or another pump, repeat the pairing procedure.
41029400B_OB_OTP_US_EN_MGDL_R3.indd 292 11/7/14 3:09 PM

293 CHAPTER 6 - Troubleshooting your OneTouch® Ping® System
Indicates What to do
Pairing procedure failed!
WARNING
Confirm
Your meter remote was unable to locate a pump during the pairing procedure. Your pump may not be within RF range (approximately 10 feet/3.0 meters), or you may not have activated the Pairing mode on your pump.
Press to confirm the Warning. Activate the Pairing mode on your pump (see pages 252-257) and make sure it is within RF range (approximately 10 feet/3.0 meters) of your meter remote. Repeat the steps for pairing your meter remote with your pump.
WARNING
Bolus canceled.Move devices
closer, orchange channel.
Delivered: see pump
Confirm
Bolus was canceled because RF communication was lost during bolus delivery, and has not been re-established.
Press to confirm the Warning. Make sure your meter remote and pump are within RF range, and/or try troubleshooting the RF connection with Customer Service at 1 877 937-7867 using the RF Test feature on your meter remote. Please refer to your pump to see how many insulin units were delivered before the bolus was canceled. You will still be able to deliver insulin directly from your pump or as an insulin injection.
System error messages on your meter remote (continued)
41029400B_OB_OTP_US_EN_MGDL_R3.indd 293 11/7/14 3:09 PM

294 CHAPTER 6 - Troubleshooting your OneTouch® Ping® System
Indicates What to do
Last BG more than 15minutes old.
Notification
Retest or enternew BG.
Confirm
The last BG test taken on your meter remote was more than 15 minutes ago, and may not be current enough for calculating a BG correction.
Press to confirm the Notification. You will be prompted to re-test or manually enter a more recent BG test result.
No communication.Pump is busy.
Notification
Confirm
There is no communication between your meter remote and pump because your pump is in the middle of a procedure.
Your pump must complete the procedure before it can respond to your meter remote command. Press to confirm the Notification. Wait a few seconds for your pump to complete the procedure. If the message appears again, check the RF status.
Pump unpaired.
Notification
Confirm
Your meter remote and pump are no longer paired, and will not be able to communicate or share data. You will not be able to use your meter remote to deliver insulin from your pump while the devices are unpaired.
Press to confirm the Notification. To re-pair your meter remote with your pump, or to pair your meter remote with a new pump, complete the pairing procedure (see page 258). In cases where you are not able to use your meter remote to access pump functions, you will still be able to deliver insulin directly from your pump or as an insulin injection.
System error messages on your meter remote (continued)
41029400B_OB_OTP_US_EN_MGDL_R3.indd 294 11/7/14 3:09 PM

295 CHAPTER 6 - Troubleshooting your OneTouch® Ping® System
Indicates What to do
Unable to communicatewith pump!
Notification
Confirm
Your meter remote and pump are unable to communicate. Possible causes are that the devices are not within RF range or there is RF interference. You will not be able to use your meter remote to deliver insulin from your pump when the devices are unable to communicate.
Press to confirm the Notification. See if your meter remote and pump are within RF range (about 10 feet/ 3.0 meters of one another), and use the RF Test feature on your meter remote to check the strength and quality of the RF signal (see page 265-266). In cases where you are not able to use your meter remote to access pump functions, you will still be able to deliver insulin directly from your pump or as an insulin injection.
Function not available. Allcommunication to
connected RF devices isstopped!
Notification
Confirm
Your meter remote and pump are unable to communicate. A possible cause is that RF communication has been deactivated.
Press to confirm the Notification. Check to see if you have deactivated RF communication on either your meter remote or pump (see pages 261-263). In cases where you are not able to use your meter remote to access pump functions, you will still be able to deliver insulin directly from your pump or as an insulin injection.
System error messages on your meter remote (continued)
41029400B_OB_OTP_US_EN_MGDL_R3.indd 295 11/7/14 3:09 PM

296 CHAPTER 6 - Troubleshooting your OneTouch® Ping® System
Indicates What to do
Unable to communicatewith pump!
Bolus settings maynot be current.
Verify & edit bolussettings as needed.
Notification
Confirm
You have accessed the bolus calculator on either the ezCarb or ezBG Bolus screens, but your meter remote and pump are unable to communicate. The ezCarb and ezBG Bolus screens will use the bolus calculator values last set and saved on your pump.
The values last set and saved on your pump may not be appropriate for the current time of day. Press to confirm the Notification. You may edit the values as necessary in Calculator Set-up under the Meter Settings screen if your meter remote and pump are unpaired. You may also edit the values directly on the ezCarb and ezBG Bolus screens.
Stored meter calculatorsettings will be
overwritten by settings from pump.
Notification
Confirm
Your meter remote and pump are now paired, and the bolus calculator settings from Calculator Set-up will be replaced by those last set and saved on your pump.
Press to confirm the Notification. You may edit the settings on the ezCarb and ezBG Bolus screens.
Current calculator settings may not be
appropriate fortime of day.
Use Calculator Set-up to edit settings.
Notification
Confirm
You have chosen to unpair your meter remote and pump. The current calculator settings last saved may not be appropriate for the current time of day.
Press to confirm the Notification. It is important that you review these settings before using the ezCarb or ezBG feature on your meter remote to see that they still would apply. You may edit the settings in Calculator Set-up under the Meter Settings screen if your meter remote and pump are unpaired. You may also edit the settings directly on the ezCarb and ezBG Bolus screens.
System error messages on your meter remote (continued)
41029400B_OB_OTP_US_EN_MGDL_R3.indd 296 11/7/14 3:09 PM

297 CHAPTER 6 - Troubleshooting your OneTouch® Ping® System
Indicates What to do
Function not available.Device must be paired.
Notification
Confirm
You have tried to initiate a pump function, but your meter remote and pump are not currently paired.
Press to confirm the Notification. Complete the pairing procedure on your meter remote and pump.
Pump and meter glucoseunits do not match.
Notification
Contact Customer Service.
Confirm
The glucose unit of measure on your meter remote does not match the glucose unit of measure on your pump. They must match for the pairing procedure to be successful.
Press to confirm the Notification.
Call Customer Service immediately at 1 877 937-7867.
RF communicationdeactivated.
Notification
Confirm
You have deactivated RF communication between your meter remote and pump.
Press to confirm the Notification.
Please use the same RFchannel as the paired
pump!
Notification
Confirm
The RF channel on your meter remote and pump must be set to match for the devices to communicate.
Press to confirm the Notification. If you are manually setting the RF Channel on your meter remote, make sure it matches the RF channel on your pump (see pages 252-253).
System error messages on your meter remote (continued)
41029400B_OB_OTP_US_EN_MGDL_R3.indd 297 11/7/14 3:09 PM

298 CHAPTER 6 - Troubleshooting your OneTouch® Ping® System
There are a series of pump alarms, warnings, and alerts that display and/or sound both on your meter remote and pump. It is possible that pump warnings, alarms, or alerts may sound and display first on your pump before doing so on your meter remote. Pump alarms, warnings, and alerts require you to confirm the message on either your meter remote or pump, and then take appropriate action on your pump to address the problem. Some pump alarms also provide an option to suspend insulin delivery.
Your pump has a progressive warnings and alarms safety system. This means that if you do not confirm the warning or alarm, your pump will begin to beep louder and start to vibrate within one hour. At that time, if you do not confirm the warning or alarm, it will continue until the necessary action is taken.
NOTE: Your pump uses battery power to notify you of alerts, warnings, and alarms. If you do not confirm the notification, your pump will continue to use battery power as the notifications repeat and progress. This will result in reduced battery life and the Replace Battery Alarm screen appearing sooner than expected.
Additionally, certain warnings (e.g., Low Cartridge Warning, Occlusion Alarm) take precedence over less critical ones (e.g., Low Battery Warning). This means if you do not confirm the more critical warning, battery life will be reduced and your pump may skip the Low Battery Warning and go directly to the Replace Battery Alarm, or battery life will end before a Replace Battery Alarm is displayed.
41029400B_OB_OTP_US_EN_MGDL_R3.indd 298 11/7/14 3:09 PM

299 CHAPTER 6 - Troubleshooting your OneTouch® Ping® System
WARNING: CONFIRM all pump alerts, alarms and warnings as soon as possible. Not confirming alerts, alarms and warnings can affect insulin delivery as follows:
• Pump battery power may be drained much sooner than expected, leaving you without a way to deliver insulin if you do not have a replacement battery.
• The calculation of Insulin on Board (IOB) when using the bolus calculator feature may not be as accurate, resulting in the “suggested” bolus amount being less than what it should be.
• Basal and bolus delivery may be suspended for up to 2 hours once the alert, alarm or warning is confirmed without the pump directly notifying the user.
• Any Combo Bolus or Temp Basal in effect may be canceled without the pump directly notifying the user.
Any of these situations can result in over delivery or under delivery of insulin, resulting in serious injury or death.
IMPORTANT: If a message is displayed on your meter remote and is not included in the list that follows, it may be due to an error specific to your meter remote (see Chapter 10 in Section II ), or a communication error between the devices (see the list of communication-related messages in this chapter).
41029400B_OB_OTP_US_EN_MGDL_R3.indd 299 11/7/14 3:09 PM

300 CHAPTER 6 - Troubleshooting your OneTouch® Ping® System
Pump Display Meter Remote Display Indicates What to do
Warning
Edit Basal
Basal editnot saved.
Basaldelivery
suspended.
PUMP WARNING
Basal edit not saved.Basal delivery
suspended.
See pump.
Confirm
The basal program edit was not saved on your pump. Basal delivery is currently stopped.
Press on your meter remote or on your pump to confirm the Warning. If you press
on your pump, you will go to the Edit Basal screen where you can review and save your basal program edits.
Warning
Confirm
No delivery.
Pump issuspended.
No delivery.
PUMP WARNING
Pump is suspended.
Confirm
You manually suspended insulin delivery on your pump. All insulin delivery is stopped.
Press on your meter remote or on your pump to confirm the Warning. Follow steps for resuming insulin delivery using your pump.
Pump alarms, warnings, and alerts that display on both devices
NOTE: When pump alarms, warnings, and alerts display on both devices, there are slight differences in how the messages appear on your meter remote and pump displays. Where applicable, alarms, warnings, and alerts will display actual insulin units during pump operation, rather than the “XX” or “XXX” units displayed on some of the screens in this list.
41029400B_OB_OTP_US_EN_MGDL_R3.indd 300 11/7/14 3:09 PM

301 CHAPTER 6 - Troubleshooting your OneTouch® Ping® System
Pump Display Meter Remote Display Indicates What to do
Warning
Confirm
Lowbattery.
PUMP WARNING
Low pump battery.
Confirm
Your pump battery is very low and will only last a minimum of thirty minutes.
Press on your meter remote or on your pump to confirm the Warning. Replace your pump battery as soon as possible.
Warning
Confirm
Exceedsmax bolusXX.XX U.
No bolusdelivery.
PUMP WARNING
Exceeds max bolusXX.XX U.
No bolus delivery.
Confirm
The audio bolus exceeds the bolus limit (xx.xx units in this example) you set and saved in your pump. Audio bolus delivery is currently stopped.
Press on your meter remote or on your pump to confirm the Warning. You may need to adjust the limit that is stored in your pump.
Warning
Confirm
Exceedsmax 2Hr
XX U.
No delivery.
Exceeds max 2HrXX U.
PUMP WARNING
No delivery.
Confirm
Combined basal and bolus delivery exceeds the 2-hour delivery limit (xx units in this example) you set and saved in your pump. Insulin delivery is currently stopped.
Press on your meter remote or on your pump to confirm the Warning. You may need to adjust the limit that is stored in your pump.
Pump alarms, warnings, and alerts that display on both devices (continued)
41029400B_OB_OTP_US_EN_MGDL_R3.indd 301 11/7/14 3:09 PM

302 CHAPTER 6 - Troubleshooting your OneTouch® Ping® System
Pump Display Meter Remote Display Indicates What to do
Warning
Confirm
Exceedsmax TDD
XXX U.
No delivery.
Exceeds max TDDXXX U.
No delivery.
PUMP WARNING
Confirm
The bolus exceeds the Total Daily Dose (TDD) limit (xxx units in this example) you set and saved in your pump. All insulin delivery is currently stopped. Any Combo bolus or Temp Basal is temporarily suspended.
Press on your meter remote or on your pump to confirm the Warning. You may need to adjust the limit that is stored in your pump. If the Warning is not confirmed by the time your pump clock passes midnight, the message will continue to be displayed, but any Combo Bolus or Temp Basal that is currently suspended will resume.
Warning
Confirm
Lowcartridge.
XX U orless left.
Low cartridge.
PUMP WARNING
XX Uor less left.
Confirm
The insulin units remaining in your pump cartridge are less than the warning level (xx units in this example) you set and saved in your pump. Insulin deliveries will continue until the Empty Cartridge alarm goes off.
Press on your meter remote or on your pump to confirm the Warning. Replace the insulin cartridge in your pump.
Pump alarms, warnings, and alerts that display on both devices (continued)
41029400B_OB_OTP_US_EN_MGDL_R3.indd 302 11/7/14 3:09 PM

303 CHAPTER 6 - Troubleshooting your OneTouch® Ping® System
Pump Display Meter Remote Display Indicates What to do
Warning
Confirm
Exceedsmax basal
XX.XX U/Hr.
No basaldelivery.
PUMP WARNING
Exceeds max basalXX.XX U/Hr
No basal delivery.
Confirm
Basal delivery (or a Temp Basal) exceeds the basal limit (xx.xx units in this example) you set and saved in your pump. Basal delivery is currently stopped.
Press on your meter remote or on your pump to confirm the Warning. You may need to adjust the limit that is stored in your pump or adjust the Temp Basal.
Warning
Confirm
Deliverycanceled
due tolow
cartridge.
PUMP WARNING
Delivery canceled
due tolow cartridge.
Confirm
Bolus delivery will exceed the insulin units remaining in your pump cartridge. Bolus delivery has been canceled.
Press on your meter remote or on your pump to confirm the Warning. Replace the insulin cartridge on your pump.
Warning
Confirm
No cartridgedetected.
Deliverydisabled.
No cartridgedetected.
PUMP WARNING
Delivery disabled.
Confirm
There is no insulin cartridge in your pump. All insulin delivery is currently stopped.
Press on your meter remote or on your pump to confirm the Warning. Install a new insulin cartridge and prime it.
Pump alarms, warnings, and alerts that display on both devices (continued)
41029400B_OB_OTP_US_EN_MGDL_R3.indd 303 11/7/14 3:09 PM

304 CHAPTER 6 - Troubleshooting your OneTouch® Ping® System
Pump Display Meter Remote Display Indicates What to do
Warning
Confirm
Pump isnot primed.No delivery.
Pump is not primed.
PUMP WARNING
No delivery.
Confirm
Your pump is not primed. All insulin delivery is currently stopped.
Press on your meter remote or on your pump to confirm the Warning. Disconnect and then re-prime your pump.
Warning
Confirm
Bolus delivery
canceled byuser button
press.
Delivered:X.XX U of X.XX U
PUMP WARNING
Bolus delivery canceled
by user button press.Delivered:
X.XX U of X.XX U
Confirm
The bolus was canceled because you pressed a button on your meter remote or pump while the bolus was being delivered. The number of insulin units delivered (x.xx of x.xx units in this example) before the bolus was canceled appears at the bottom of the screen.
Press on your meter remote or on your pump to confirm the Warning.
Pump alarms, warnings, and alerts that display on both devices (continued)
41029400B_OB_OTP_US_EN_MGDL_R3.indd 304 11/7/14 3:09 PM

305 CHAPTER 6 - Troubleshooting your OneTouch® Ping® System
Pump Display Meter Remote Display Indicates What to do
Warning
Confirm
Bolus canceled.
Delivered:
Move devicescloser, orchange channel.
X.XX U of XX.XX U
PUMP WARNINGBolus canceled.Move devices
closer, orchange channel.
Delivered:XX.XX U of XX.XX U
Confirm
The bolus was canceled because RF communication was lost during bolus delivery, and then re-established.
Press on your meter remote or on your pump to confirm the Warning. Make sure your meter remote and pump are within RF range, and/or try troubleshooting the RF connection with Customer Service at 1 877 937-7867 using the RF Test feature on your meter remote. Please refer to your pump display to see how many insulin units were delivered (xx.xx of xx.xx units in this example) before the bolus was canceled. You will still be able to deliver insulin directly from your pump or as an insulin injection.
Pump alarms, warnings, and alerts that display on both devices (continued)
41029400B_OB_OTP_US_EN_MGDL_R3.indd 305 11/7/14 3:09 PM

306 CHAPTER 6 - Troubleshooting your OneTouch® Ping® System
Pump Display Meter Remote Display Indicates What to do
ALARMCALL SERVICE
Remove batteryto silencethe alarm.
No delivery.XXX-XXXX
PUMP ALARMCALL
CUSTOMER SERVICENo delivery.
XX-XXXXRemove pump battery
to silencethe alarm.
There is a problem with your pump hardware or software. All insulin delivery is currently stopped.
Press on your pump to confirm the Alarm and silence it for the next 30 minutes. Remove your pump battery to completely silence the alarm. Call Customer Service at 1 877 937-7867 immediately. To clear the alarm from your meter remote, you must turn the meter remote off and then back on.
ALARM
Confirm
AUTO-OFF
No buttonpresses in last
XX hours.
No delivery.
PUMP ALARMAUTO-OFFNo delivery.No button
presses in lastXX hours.
Confirm
There were no button presses on your pump or meter remote within the allowable Auto-off time limit (xx hours in this example) you set and saved in your pump. All insulin delivery is currently suspended.
Press on your meter remote or on your pump to confirm the Alarm. Once confirmed, the No Prime Warning is triggered.
Pump alarms, warnings, and alerts that display on both devices (continued)
41029400B_OB_OTP_US_EN_MGDL_R3.indd 306 11/7/14 3:09 PM

307 CHAPTER 6 - Troubleshooting your OneTouch® Ping® System
Pump Display Meter Remote Display Indicates What to do
ALARM
Confirm
EMPTYCARTRIDGENo delivery.
Replace cartridge.
Suspend
PUMP ALARM
EMPTYCARTRIDGENo delivery.
Replace cartridge.
Confirm
The insulin cartridge in your pump is empty. All insulin delivery is currently stopped.
Press on your meter remote or on your pump to confirm the Alarm. Replace the insulin cartridge in your pump. You also have the option to suspend insulin delivery from your pump.
ALARM
Confirm
OCCLUSIONDETECTED
No delivery.
Suspend
PUMP ALARM
OCCLUSIONDETECTEDNo delivery.
Confirm
An occlusion was detected. All insulin delivery is currently stopped.
Press on your meter remote or on your pump to confirm the Alarm. You also have the option to suspend insulin delivery from your pump. Disconnect and re-prime to clear the occlusion.
ALARMREPLACEBATTERY
Remove batteryto silencethe alarm.
No delivery.
PUMP ALARMREPLACE
PUMP BATTERYNo delivery.
Remove pump batteryto silencethe alarm.
Your pump battery has only enough power for about another three minutes of use. All insulin delivery is currently stopped.
Replace your pump battery immediately.
Pump alarms, warnings, and alerts that display on both devices (continued)
41029400B_OB_OTP_US_EN_MGDL_R3.indd 307 11/7/14 3:09 PM

308 CHAPTER 6 - Troubleshooting your OneTouch® Ping® System
Pump Display Meter Remote Display Indicates What to do
Alert
ConfirmBasal Menu
Your activebasal
programis empty.
0.000U/Hr
Pump Alert
Your active basalprogram is empty.
0.000 U/Hr
Confirm
The active basal program is empty.
Press on your meter remote or on your pump to confirm the Alert. Or, highlight “Basal Menu” on your pump to go to the Basal Menu screen where you can make adjustments to your active basal program.
Alert
LOW BG
Confirm
Treat low BG.
No bolus
recommended.
Monitor BG.
Pump Alert
LOW BGTreat low BG.
No bolus recommended.Monitor BG.
Confirm
The Actual BG value you entered on the ezCarb or ezBG Bolus screen is below 70 mg/dL. A bolus is not recommended.
Press on your meter remote or on your pump to confirm the Alert. Treat a LOW BG immediately according to your health care professional’s recommendations.
Alert
HIGH BG
Confirm
Treat high BG.
Check site.Check
ketones.Monitor BG.
Pump Alert
HIGH BGTreat high BG.
Check site.Check ketones.
Monitor BG.
Confirm
The Actual BG value you entered on the ezCarb or ezBG Bolus screen is above 250 mg/dL.
Press on your meter remote or on your pump to confirm the Alert. Treat a HIGH BG immediately according to your health care professional’s recommendations.
Pump alarms, warnings, and alerts that display on both devices (continued)
41029400B_OB_OTP_US_EN_MGDL_R3.indd 308 11/7/14 3:09 PM

309 CHAPTER 7 - OneTouch® Ping® System Communication Technical Specifications
Electromagnetic Emissions:
The information contained in this section is intended to provide guidance on the proper operation of the OneTouch® Ping® System with respect to electromagnetic compatibility (EMC). Following this guidance will not guarantee faultless operation but should provide reasonable assurance of such. The tables in this section are required by the EMC standard, IEC 60601-1-2.
Medical electrical systems need special precautions regarding electromagnetic compatibility (EMC) and need to be installed and put into service according to the EMC information provided in this Owner’s Booklet.
Portable and mobile RF equipment can effect medical electrical systems.
Cables and accessories not specified for use with the OneTouch® Ping® System by Animas® are not authorized. Use of such unauthorized cables or accessories may adversely impact safety, performance and EMC (increased emissions or decreased immunity).
Care should be taken if the OneTouch® Ping® System is adjacent to or stacked upon other electrical equipment. If such use is unavoidable, it should be verified through observation that neither product is affected by the proximate use.
41029400B_OB_OTP_US_EN_MGDL_R3.indd 309 11/7/14 3:09 PM

310 CHAPTER 7 - OneTouch® Ping® System Communication Technical Specifications
Guidance and Manufacturer’s Declaration on Electromagnetic Emissions
The OneTouch® Ping® System is intended for use in the electromagnetic environment specified below. The customer or the user of the OneTouch® Ping® System should assure that it is used in such an environment.
Emissions Test Compliance Electromagnetic Environment – Guidance
RF emissions
CISPR 11
Group 1 The OneTouch® Ping® System uses RF energy only for its internal function. Therefore, its RF emissions are very low and are not likely to cause any interference in nearby electronic equipment.
RF emissions
CISPR 11
Class B
Harmonic emissions
IEC 61000-3-2
Not applicable
Voltage fluctuations/ flicker emissions
IEC 61000-3-3
Not applicable
41029400B_OB_OTP_US_EN_MGDL_R3.indd 310 11/7/14 3:09 PM

311 CHAPTER 7 - OneTouch® Ping® System Communication Technical Specifications
Guidance and Manufacturer’s Declaration – Electromagnetic Immunity
The OneTouch® Ping® System is intended for use in the electromagnetic environment specified below. The customer or the user of the OneTouch® Ping® System should assure that it is used in such an environment.
Immunity Test IEC 60601 Test Level Compliance LevelElectromagnetic
Environment – Guidance
Electrostatic-discharge (ESD)
IEC 61000-4-2
± 6 kV contact
± 8 kV air
± 8 kV contact
± 15 kV air
(pump,IEC 60601-2-24)
± 6 kV contact
± 8 kV air
(CGM Transmitter)
Floors should be wood, concrete or ceramic tile. If floors are covered with synthetic material, the relative humidity should be at least 30%.
Electrical fast transient/burst
IEC 61000-4-4
± 2 kV for power supply lines
± 1 kV for input/output lines
Not applicable Not applicable
Surge
IEC 61000-4-5
± 1 kV line(s) to line(s)
± 2 kV line(s) to earth
Not applicable Not applicable
41029400B_OB_OTP_US_EN_MGDL_R3.indd 311 11/7/14 3:09 PM
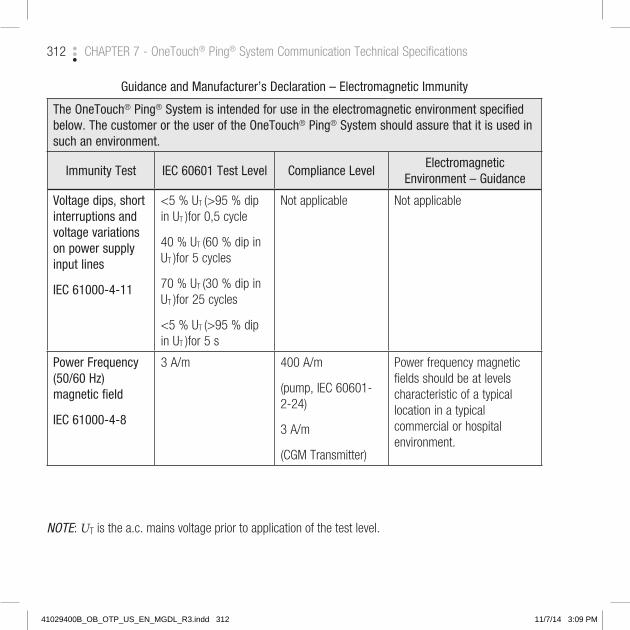
312 CHAPTER 7 - OneTouch® Ping® System Communication Technical Specifications
Guidance and Manufacturer’s Declaration – Electromagnetic Immunity
The OneTouch® Ping® System is intended for use in the electromagnetic environment specified below. The customer or the user of the OneTouch® Ping® System should assure that it is used in such an environment.
Immunity Test IEC 60601 Test Level Compliance LevelElectromagnetic
Environment – Guidance
Voltage dips, short interruptions and voltage variations on power supply input lines
IEC 61000-4-11
<5 % UT (>95 % dip in UT )for 0,5 cycle
40 % UT (60 % dip in UT )for 5 cycles
70 % UT (30 % dip in UT )for 25 cycles
<5 % UT (>95 % dip in UT )for 5 s
Not applicable Not applicable
Power Frequency (50/60 Hz)magnetic field
IEC 61000-4-8
3 A/m 400 A/m
(pump, IEC 60601-2-24)
3 A/m
(CGM Transmitter)
Power frequency magnetic fields should be at levels characteristic of a typical location in a typical commercial or hospital environment.
NOTE: UT is the a.c. mains voltage prior to application of the test level.
41029400B_OB_OTP_US_EN_MGDL_R3.indd 312 11/7/14 3:09 PM

313 CHAPTER 7 - OneTouch® Ping® System Communication Technical Specifications
Guidance and Manufacturer’s Declaration – Electromagnetic Immunity
The OneTouch® Ping® System is intended for use in the electromagnetic environment specified below. The customer or the user of the OneTouch® Ping® System should assure that it is used in such an environment.
Immunity TestIEC 60601 Test Level
Compliance Level
Electromagnetic Environment – Guidance
Conducted RF
IEC 61000-4-6
3 Vrms
150 kHz to 80 MHz
Not applicable
Radiated RF
IEC 61000-4-3
3 V/m
80 MHz to 2,5 GHz
10 V/m Portable and mobile RF communications equipment should be used no closer to any part of the OneTouch® Ping® Insulin Pump, including cables, than the recommended separation distance calculated from the equation applicable to the frequency of the transmitter.
Recommended separation distance:d = 0.35 √P 80 MHz to 800 MHzd = 0.7 √P 800 MHz to 2,5 GHz
where P is the maximum output power rating of the transmitter in watts (W) according to the transmitter manufacturer and d is the recommended separation distance in meters (m).
Field strengths from fixed RF transmitters, as determined by an electromagnetic site surveya, should be less than the compliance level in each frequency rangeb.
Interference may occur in the vicinity of equipment marked with the following symbol:
41029400B_OB_OTP_US_EN_MGDL_R3.indd 313 11/7/14 3:09 PM

314 CHAPTER 7 - OneTouch® Ping® System Communication Technical Specifications
NOTE 1: At 80 MHz and 800 MHz, the higher frequency range applies.
NOTE 2: These guidelines may not apply in all situations. Electromagnetic propagation is affected by absorption and reflection from structures, objects and people.
a Field strengths from fixed transmitters, such as base stations for radio (cellular/cordless) telephones and land mobile radios, amateur radio, AM and FM radio broadcast and TV broadcast cannot be predicted theoretically with accuracy. To assess the electromagnetic environment due to fixed RF transmitters, an electromagnetic site survey should be considered. If the measured field strength in the location in which the OneTouch® Ping® System is used exceeds the applicable RF compliance level above, the OneTouch® Ping® System should be observed to verify normal operation. If abnormal performance is observed, additional measures may be necessary, such as re-orienting or relocating the OneTouch® Ping® System.
b Over the frequency range 150 kHz to 80MHz, field strengths should be less than 3 V/m.
Separation Distance
Because there are many devices that use RF technology, it is possible to experience communication interference between your pump and meter remote from other RF devices. Examples of devices that use RF technology and may cause communication interference with your OneTouch® Ping® System include cell phones, baby monitors, cordless phones and wireless Local Area Network (LAN) routers.
The OneTouch® Ping® System is intended for use in an electromagnetic environment in which radiated RF disturbances are controlled. The user of the OneTouch® Ping® System can help prevent electromagnetic interference by maintaining a minimum distance between portable and mobile RF communications equipment (transmitters) and the OneTouch® Ping® System as recommended in the table below. For devices with output power greater than what is listed below, please contact Customer Service.
41029400B_OB_OTP_US_EN_MGDL_R3.indd 314 11/7/14 3:09 PM

315 CHAPTER 7 - OneTouch® Ping® System Communication Technical Specifications
Operating Range Minimum 3.3 feet (1 meter) obstructed Minimum 9.8 feet (3 meters) unobstructed
Communication Time Minimum 0.5 seconds (approximately) Maximum 10.5 seconds (approximately)
Frequency Range 902–928 MHz
Operating Channels 16
Device Output Power/Frequency
Recommended Separation Distance From Other RF devices
150 kHz to 80 MHz 80 MHz to 800 MHz 800 MHz to 2.5 GHz
0.01W 0.4 feet (0.12 meters) 0.4 feet (0.12 meters) 0.8 feet (0.23 meters)
0.1W 1.2 feet (0.37 meters) 1.2 feet (0.37 meters) 2.4 feet (0.74 meters)
1W 3.8 feet (1.17 meters) 3.8 feet (1.17 meters) 7.6 feet (2.33 meters)
10W 12.1 feet (3.69 meters) 12.1 feet (3.69 meters) 24.2 feet (7.38 meters)
100W 38.3 feet (11.67 meters) 38.3 feet (11.67 meters) 76.5 feet (23.33 meters)
41029400B_OB_OTP_US_EN_MGDL_R3.indd 315 11/7/14 3:09 PM

316 CHAPTER 7 - OneTouch® Ping® System Communication Technical Specifications
Pump flow accuracy upon initial start up (per IEC 60601-2-24)
Average flow rate during a 30 minute period. The measurements were taken at an intermediate basal rate of 2.0 U/hr in accordance with 60601-2-24:1998 at room temperature.
Flow
rate
(U/h
r)
Time (hr)
4.0
3.5
3.0
2.5
2.0
1.5
1.0
0.5
0.00.0 5.0 10.0 15.0 20.0
Avg. flow rate (30min)Set rate
41029400B_OB_OTP_US_EN_MGDL_R3.indd 316 11/7/14 3:09 PM

317 CHAPTER 7 - OneTouch® Ping® System Communication Technical Specifications
Pump flow accuracy after initial stabilization period (per IEC 60601-2-24)
The Trumpet curve shows the accuracy of the flow rate during a 5 hour period (300 deliveries) as a function of an averaging window. The reported percent error deviation is calculated from the overall weight increase over the full T2 time period.
(The above pump flow test indicates that the insulin pump delivered with an accuracy of 0.38%).
Erro
r in
mea
sure
d flo
w ra
te (%
)
Observation interval (min)
30.00
20.00
10.00
-10.00
-20.00
-30.00
-40.00
0.00
10 30 50 70 90
% error: 0.38%
Ep(max)Ep(min)% Error
41029400B_OB_OTP_US_EN_MGDL_R3.indd 317 11/7/14 3:09 PM

318 CHAPTER 7 - OneTouch® Ping® System Communication Technical Specifications
41029400B_OB_OTP_US_EN_MGDL_R3.indd 318 11/7/14 3:09 PM

Appendix A: Glossary
41029400B_OB_OTP_US_EN_MGDL_R3.indd 7 11/7/14 3:09 PM

41029400B_OB_OTP_US_EN_MGDL_R3.indd 8 11/7/14 3:09 PM

319 Appendix A: Glossary
Glossary
alpha cells - Alpha cells are found in the pancreas. They produce a hormone called glucagon, which raises BG levels.
basal rate - The basal rate is the amount of insulin that is continuously delivered by an insulin pump. It is measured in units per hour (U/Hr). The basal rate usually provides about 40% to 60% of the daily total delivery of insulin.
beta cells - Beta cells are found in the pancreas. They produce insulin, which lowers BG levels. In type 1 diabetes mellitus, the beta cells are destroyed, so the body can no longer produce insulin.
blood glucose (BG) levels - BG levels are the measure of how much glucose (sugar) is in the blood. The normal level is about 70–110 mg/dL.
bolus - A bolus is the amount of insulin delivered at one time, usually before a meal or when BG is high.
cannula - A cannula is a small tube that is inserted into the body. Some infusion sets are designed so that only the cannula remains in the body and the needle used for insertion is removed.
dawn phenomenon - More insulin may be required in the early morning hours of normal sleep to counteract the release of several hormones that act to increase BG levels. This increased need for insulin is known as dawn phenomenon and may cause a person with diabetes to have a high BG level in the morning upon waking. Basal rate delivery by the OneTouch® Ping® Insulin Pump can be programmed to compensate for dawn phenomenon.
diabetes - Diabetes is a complex disease in which the body cannot maintain healthy BG levels because either enough insulin cannot be produced or the body cannot appropriately use insulin. In type 1 diabetes, the body no longer produces insulin and in type 2 diabetes, the body cannot use insulin properly.
diabetic ketoacidosis (DKA) - DKA results when there is not enough insulin available to help glucose enter the cells where it is used for energy. The body, in turn, burns muscle and fat for energy. A waste product of fat burning is ketones. Ketones accumulate in the blood and then pass through the urine and lungs. This condition can be identified by urine and/or blood tests. DKA usually requires hospitalization and can be fatal if not promptly treated.
41029400B_OB_OTP_US_EN_MGDL_R3.indd 319 11/7/14 3:09 PM
320 Appendix A: Glossary
gastroparesis - Gastroparesis is a complication of diabetes that causes delayed emptying of the stomach, resulting in unpredictable swings in BG levels.
gestational diabetes - Gestational diabetes is a form of diabetes that may develop during pregnancy. In some women, certain hormones normally produced by the body during pregnancy can result in unusually high BG levels. If the body cannot produce enough insulin, this can lead to hyperglycemia and may require treatment with insulin. Gestational diabetes usually ends when the baby is born, but many mothers who experience gestational diabetes may later develop Type 2 diabetes.
glucagon - Glucagon is a hormone produced by the alpha cells in the pancreas. It causes BG levels to rise.
glucose - Glucose is a carbohydrate and the body’s most important source of energy. It is produced from digested food, by the normal action of the liver, and is carried by the blood throughout the body.
hyperglycemia - Hyperglycemia is also known as high blood glucose. It occurs when BG levels rise above 180 mg/dL, and the body does not have enough or cannot use insulin to process food. Symptoms of hyperglycemia include nausea, vomiting, muscle and joint aches, blurred vision,
excessive thirst, and frequent urination. Over time, weight loss can result. Hyperglycemia can occur even while using an insulin pump and can lead to diabetic ketoacidosis (DKA) if untreated.
hypoglycemia - Hypoglycemia is also known as low blood glucose. It occurs when BG levels drop to below 70 mg/dL. This can happen if a person with diabetes has taken too much insulin or has exercised more than usual. Symptoms of hypoglycemia include dizziness, shakiness, rapid heartbeat, sudden hunger, cold or clammy skin, fuzzy vision, confusion, mood changes, and tingling or numbness in the hands, arms, tongue, or lips. Hypoglycemia can occur even while using an insulin pump, and if left untreated, can lead to unconsciousness and diabetic coma.
infrared - Infrared is a wireless means by which the OneTouch® Ping® Insulin Pump communicates with external devices using an optical signal which is invisible to the human eye.
infusion set - An infusion set consists of a length of thin plastic tubing (available in various lengths) with a Luer-lock connector at one end, and at the other end, a very small cannula that is placed under the skin. It is connected to the insulin pump and used to deliver insulin to the body.
infusion site - The infusion site is the place on the body where the infusion set needle is inserted under the skin.
41029400B_OB_OTP_US_EN_MGDL_R3.indd 320 11/7/14 3:09 PM

321 Appendix A: Glossary
insulin - Insulin is a hormone produced by the beta cells in the pancreas. Insulin is needed by the body to regulate the production and use of glucose.
insulin limits - Insulin limits are a programmable feature of the OneTouch® Ping® Insulin Pump. After consulting with your health care team, you can use the Advanced Setup menu to program maximum limits for basal rate delivery, bolus delivery, and total daily delivery.
insulin pump - An insulin pump is a small, battery-powered device that mechanically pumps measured amounts of insulin through an infusion set into the body. THE PUMP IS NOT AUTOMATIC. You program and control it, and you must perform four to six BG tests daily to ensure delivery of appropriate amounts of insulin by the pump.
ketones - Ketones, or ketone bodies, are substances produced by normal liver activity, and used by muscle tissue. In uncontrolled diabetes, the process becomes unbalanced and ketones can accumulate in the blood, pass through the urine and ultimately result in diabetic ketoacidosis (DKA).
Luer-lock - A Luer-lock, or Luer connection, is a standardized, specially threaded fitting used to connect the infusion set to the pump’s insulin cartridge.
mg/dL - mg/dL is the unit used to measure BG levels. It is the abbreviation for milligrams of glucose per deciliter of blood. To convert mg/dL to mmol/L, divide by 18 or multiply by 0.055.
mmol/L - mmol/L is an alternative unit used to measure BG levels. It is the abbreviation for millimoles/liter. To convert mmol/L to mg/dL, multiply by 18 or divide by 0.055.
occlusion - Occlusion means “blockage.” The OneTouch® Ping® Insulin Pump is designed to be able to sense when delivery of the insulin is being blocked for some reason. The pump will automatically stop delivering insulin and give an alarm to alert you to clear the occlusion and re-start the pump.
o-ring - Both the cartridge and the battery cap contain an “o” shaped ring made of a soft material that functions as a seal when compressed. O-rings operate properly only if the surface is free of defects (cuts, scratches, abrasion).
pancreas - The pancreas is a glandular organ just behind the stomach, next to the liver. It produces digestive enzymes used to break down proteins in food. It contains alpha cells, which produce glucagon, and beta cells, which produce insulin.
41029400B_OB_OTP_US_EN_MGDL_R3.indd 321 11/7/14 3:09 PM

322 Appendix A: Glossary
stress hormones - Stress hormones (or “counter-regulatory” hormones) are released by the body in times of intense physical or emotional stress. These hormones cause the body to release glucose. If the glucose is not used as energy, hyperglycemia and ketoacidosis can result.
subcutaneous - Subcutaneous means beneath the skin. The infusion set needle is placed subcutaneously.
type 1 diabetes - Type 1 diabetes results from destruction of the beta cells in the pancreas. People with type 1 diabetes mellitus must use insulin to regulate their BG levels.
type 2 diabetes - Type 2 diabetes usually occurs in people 40 years or older. People with type 2 diabetes have a progressive loss of beta cells over time. They can sometimes regulate their BG levels by following an individual meal plan, exercising and taking antidiabetic pills. They frequently require insulin for optimal BG control.
41029400B_OB_OTP_US_EN_MGDL_R3.indd 322 11/7/14 3:09 PM

Index
41029400B_OB_OTP_US_EN_MGDL_R3.indd 9 11/7/14 3:09 PM

41029400B_OB_OTP_US_EN_MGDL_R3.indd 10 11/7/14 3:09 PM

323 Index
AAccuracy, meter remote ...............................247Active basal program empty alert ..................100Adding logbook entries .................................208Advanced bolus .................................39, 64, 81Advanced features, insulin pump ....................63Advanced features, meter remote .........164, 170AICD ...............................................................5Air bubbles ....................................................13Aircraft ............................................................9Alarm history .................................................55Alarms, insulin pump .....................................98Alarms, meter remote ..................163, 178, 237Alarms, meter remote and
insulin pump ............................163, 178, 300Alerts, insulin pump .................................30, 98Alerts, meter remote ............................163, 178Alerts, meter remote and
insulin pump ............................163, 178, 300Alternate site testing procedure ............189, 193Amusement parks ............................................9Audio bolus .................................12, 29, 63, 78Audio bolus delivery step size .........................63Auto-dim .......................................................17Auto-off alarm .....................................118, 306Auto-off feature .............................................68Average, by exercise ....................................222Average, by time of day ................................221Average, of all results ...................................221
BBacklight/button, meter remote .............155, 160Basal delivery suspended warning .........103, 300Basal history ..................................................58Basal program, features .................................40Basal program, reviewing ...............................45Basal program, temp basal .............................47Basic set-up, insulin pump .............................27Basic set-up, meter remote ..................164, 166Batteries, insulin pump .............................13, 25Batteries, meter remote ................................234Battery cap, insulin pump .........................26, 96Battery cap/vent, insulin pump ........................26Battery insertion, insulin pump ........................26Battery insertion, meter remote .....................235Beep, insulin pump ..................................19, 51Beep, meter remote .............................169, 178BG/check reminder, insulin pump ...................92BG/check reminder, meter remote ................275BG correction calculator .................................86BG targets/ranges, insulin pump .....................73BG targets/ranges, meter remote ..................174BG test result screen, meter remote ......198, 200Bolus, combo, insulin pump ............................89Bolus, combo, meter remote .........................282Bolus delivery speed ................................64, 93Bolus, ezBG, insulin pump ..............................86Bolus, ezBG, meter remote ...........................284Bolus, ezCarb, insulin pump ...........................82Bolus, ezCarb, meter remote ........................276Bolus, history .................................................52
41029400B_OB_OTP_US_EN_MGDL_R3.indd 323 11/7/14 3:09 PM

324 Index
Bolus, normal, insulin pump ...........................38Bolus, normal, meter remote ........................273Buttons, insulin pump ....................................16Buttons, meter remote .................................155
CCable, USB for meter remote ........................226Calculator feature, insulin pump ......................86Calculator feature, meter remote ...........173, 183Calculator set-up,
meter remote ...................173, 183, 257, 287Call service alarm ................................117, 306Cancel a bolus, insulin pump ..........................39Cancel a bolus, meter remote .......................274Carb calculator ..............................................82Carbon-zinc batteries ...............................13, 24Cardiac catheter ..............................................5Carton contents .........................................VI, VIICartridge ...........................................10, 12, 31Cell phones ...................................................13Changing the batteries, meter remote ...........235Changing the battery, insulin pump .................25Changing the cartridge ...................................33Cleaning your insulin pump.......................14, 97Cleaning your meter remote and
lancing device ..........................................233Clear program basal segments alert ..............102Coding the meter remote ......................185, 229Colonoscopy ....................................................6Combo bolus, insulin pump ......................61, 89Combo bolus, meter remote .........................282Comment, adding to BG test result ................203
Comment, editing or deleting ........................207Comments, exercise.....................................206Comments, food ..........................................205Comments, health ........................................206Confirmation window ....................156, 198, 231Connecting to a PC, meter remote ................226Contrast/button, insulin pump .............16, 17, 67Contrast, meter remote ........................164, 169Control solution ............................................228Control solution, result range ........................232Control solution, storing ................................233Control solution, testing ................................228Correction bolus .............................................86Customize set-up, meter remote ...........162, 168
DDamage, insulin pump ...................................13Data port .....................................155, 156, 227Date format, meter remote ...................164, 169Date setting, insulin pump ..............................27Date setting, meter remote ...........................168Daylight saving time, insulin pump ..................28Daylight saving time, meter remote ...............168Dehydration .................................128, 131, 199Discard date, control solution ........................233Discard date, test strips ................................233Display check, meter remote ........................186Display contrast, insulin pump ............16, 17, 67Display contrast, meter remote .............164, 169Display language, insulin pump .................20, 66Display language, meter remote ............164, 166Display timeout setting, insulin pump ..............66
41029400B_OB_OTP_US_EN_MGDL_R3.indd 324 11/7/14 3:09 PM

325 Index
Disposal, insulin pump ...................................97Disposal, lancet and test strips .....................202DKA ................................................4, 127, 128Download, insulin pump ...........................19, 52Download, meter remote ..............................226Drop of blood .......................................192, 195
EEditing comments ........................................207Editing logbook entries .................................214Edit mode ......................................................17EKG ................................................................5Electromagnetic fields ......................................5Electromagnets ................................................9Empty cartridge alarm ..........................115, 307Error messages, meter remote ......................292Exceeds insulin remaining ............................111Exceeds max basal warning ..................109, 303Exceeds max bolus warning ..................107, 301Exceeds max TDD warning ...................108, 302Exercise and sports ......................................130Exercise comments ......................................206Exercise logbook entries ...............................210Expiration date, control solution ....................233Expiration date, test strips ............................233Extended bolus ................................61, 89, 282ezBG bolus, insulin pump ...............................86ezBG bolus, meter remote ............................284ezCarb bolus, insulin pump .............................82ezCarb bolus, meter remote ..........................276ezManager® software program ....19, 27, 29, 40,
52, 63, 82, 181
FFastFacts® Menu .........................................215Fingertip testing procedure ...........................191Food averages .....................................216, 225Food comments ...........................................205Food database .............................................180Food list ..............................................180, 212Food logbook entries ....................................212Forearm ......................................189, 193, 195Forearm or palm sampling,
important information ........................189, 195
GGeneral anesthesia ..........................................6Glucose analysis ..........................................218Glucose analysis, average by exercise ...........222Glucose analysis, average by time of day .......221Glucose analysis, average of all results ..........221Glucose analysis, by time of day ...................220Glucose analysis, glucose range info .............223Glucose analysis, graph of all results .............219Glucose, by meals ........................................218Glucose range, after-meal ............................223Glucose range, before-meal..........................223Graph, all results ..........................................219Graph, by time of day ...................................220Guarantee, meter remote .............................246
41029400B_OB_OTP_US_EN_MGDL_R3.indd 325 11/7/14 3:09 PM

326 Index
HHealth comments .........................................206Health logbook entries ..................................211Help, insulin pump ...........................................2High BG alert, insulin pump ..................102, 308High blood glucose .......................................128HIGH CONTROL warning ...............................238HIGH GLUCOSE warning,
meter remote ...................................199, 238History feature ...............................................52Home screen, insulin pump ............................20Home screens, meter remote ................160, 270Hyperglycemia .............................122, 127, 199Hypoglycemia ........................75, 119, 189, 199Hypo level, meter remote ..............172, 216, 224
IInfection, reduce the chance .........................188Infusion set ......................................33, 37, 122Insulin limits ..................................................65Insulin on board (IOB), insulin pump ..........75, 94Insulin on Board (IOB), meter remote .....285, 288Insulin on Board (IOB), setting .........................75Insulin sensitivity factor (ISF), insulin pump ......71Insulin sensitivity (IS) factor, meter remote .....175Insulin to carb (I:C) ratio, insulin pump .............70Insulin to carb (I:C) ratio, meter remote ..........174Intended use ................................................... IIIIntimacy ......................................................132IR (infra-red) ..................................................19
LLab results, comparing with
meter remote results ................................243Lancet, disposal ...........................................202Lancet, inserting in lancing device ........191, 194Lancet, protective disk .........188, 191, 194, 202Lancing ...............................................191, 193Lancing device and cap ................188, 191, 193Lancing device, depth setting .......188, 191, 194Lancing device,
OneTouch® AST™ Clear Cap .....188, 193, 194Language setup, insulin pump ..................20, 66Language setup, meter remote .............164, 166Laser surgery on the eye ..................................6LED .....................................................165, 179LED mode ...................................................179Locked buttons, insulin pump .........................19Locked buttons, meter remote ......162, 165, 176Locked feature, insulin pump ..........................19Locked feature, meter remote ...............165, 176Logbook entries ...........................................208Logbook entries, editing or deleting ...............214Logbook entries, exercise .............................210Logbook entries, food ...................................212Logbook entries, health ................................211Logbook entries, pump .................................213Logbook feature, meter remote .....................216LOW BATTERY alarm, meter remote......234, 241Low battery warning, insulin pump ..........25, 106LOW BATTERY warning,
meter remote ...................................234, 241
41029400B_OB_OTP_US_EN_MGDL_R3.indd 326 11/7/14 3:09 PM

327 Index
Low BG alert, insulin pump ...................101, 308Low cartridge ................................................80Low cartridge warning ..........................106, 302Low cartridge warning setting .........................69LOW CONTROL warning ...............................238LOW GLUCOSE warning,
meter remote ...................................199, 238
MMagnets ..........................................................5Main menu screen, insulin pump ....................21Main Menu Screen, meter remote .................161Maintenance, insulin pump .............................96Meal schedule .....................................164, 171Meter remote alerts......................163, 178, 300Meter remote Home screens .................160, 270Meter remote notification messages ..............292Meter remote status, meter remote ...............291Meter remote
warning messages ....................237, 292, 300mg/dL .........................................155, 198, 257MRI .................................................................5Multiple basal programs .....................40, 45, 93
NNo cartridge detected,
deliveries disabled warning ...............105, 303No prime, no delivery warning ...............112, 304Normal bolus, insulin pump ............................38
Normal bolus, meter remote .........................273Notification messages, meter remote ............292Nuclear stress test ...........................................5
OOcclusion alarm ...................................114, 307Occlusion sensitivity setting ............................69OneTouch® AST™ Clear Cap .......................188O-ring .....................................................26, 32
PPacemaker ......................................................5Pairing ....................................... III, 77, 95, 252Pairing procedure ........................................252Palm ...........................................189, 193, 195Patient’s bill of rights ....................................148PC communication mode, meter remote ........226Precautions, insulin pump ................................9Precision, meter remote ...............................249Primary vent ..................................................18Prime history .................................................56Prime/rewind .................................................22Priming the pump ..........................................33Programming buttons, insulin pump ..........16, 17Pump alarms .........................................98, 300Pump alerts ...................................98, 237, 300Pump history .................................................52Pump history, alarms .....................................54Pump history, basal .......................................58Pump history, bolus .......................................52Pump history, prime .......................................56Pump history, suspend ...................................57
41029400B_OB_OTP_US_EN_MGDL_R3.indd 327 11/7/14 3:09 PM

328 Index
Pump history, total daily dose (TDD) ................54Pump Home screen, insulin pump ...................20Pump Home screen, meter remote ................270Pump ID on your meter remote display ..........270Pump logbook entries ...................................213Pump status, insulin pump .............................59Pump status, meter remote ..........................289Pump warnings ......................................98, 300
RRadio Frequency (RF) ..................................III, IVRadiology equipment ........................................5Rechargeable batteries, insulin pump ........13, 24Reminders ...............................................81, 91Repeated unexpected BG test results ............199Replace battery alarm, insulin pump .....116, 301Replacement pump ........................................13Resume insulin delivery ..................................51RF activation ................. I, 77, 95, 252, 261, 263RF channel ..........................................252, 267RF communication .......... III, 158, 251, 252, 265RF interference ................................... IV, V, 265RF on/off, insulin pump ........................252, 263RF on/off, meter remote ...............................261RF test ........................................................266RF welders ......................................................5Roller-coasters ................................................9
SSafety information, insulin pump .....................11Schedule, meal ....................................164, 171Serial number, insulin pump .....15, 62, 256, 291Serial number, meter remote ................256, 291Setting the time and date, insulin pump ..........27Setting the time and date, meter remote .......167Set-up, advanced features, insulin pump .........63Set-up, advanced features, meter remote ......170Set-up, basic, insulin pump ............................27Set-up, basic, meter remote .................164, 166Setup – Basics ..............................................27Set-up, customize, meter remote ..........162, 168SmartChip port ....................................155, 156Sounds setting/changing, insulin pump ...........29Start-up screens, meter remote ....159, 186, 229Status feature, insulin pump ...........................59Status feature, meter remote ........................289Storing your control solution .........................233Storing your meter remote ............................233Storing your test strips .................................233Supplier standards .......................................150Supply reordering .......................................... VIIISuspend history .............................................57Suspend insulin delivery .................................50Suspend (temp basal/combo bolus canceled)
alert .........................................................101Suspend warning .................................103, 300Swimming ...................................................130Symbols, insulin pump ...................................15Symbols, meter remote ........................157, 246
41029400B_OB_OTP_US_EN_MGDL_R3.indd 328 11/7/14 3:09 PM

329 Index
System communication technical specifications .............................309
System status feature, meter remote .............289
TTamper resistant (Locked) feature,
insulin pump ..............................................19Technical and clinical help ................................2Technical specifications, insulin pump ...........144Technical specifications, meter remote ..........245Temp basal ...........................47, 49, 50, 54, 61Temp basal minimum rate alert ....................100Temperature ..........................13, 198, 228, 245Testing procedure ........................................184Test strip, applying drop of blood ..................196Test strip, care of .........................................233Test strip, confirmation window ....156, 198, 231Test strip, contact bars .................156, 185, 229Test strip, disposal .......................................202Test strip port ..............................155, 185, 229Time format, insulin pump ..............................27Time format, meter remote ...................164, 169Time out, insulin pump .............................20, 66Time setting, insulin pump........................20, 27Time setting, meter remote...................164, 167Total daily dose (TDD) history ..........................54Traveling .....................................................131Troubleshooting, insulin pump ................98, 119Troubleshooting, meter remote .....................237Troubleshooting, system .......................292, 300Turning meter remote display off ..................160Turning meter remote display on ...................159
UUnexpected BG test results ...........................199Unit of measure ...................155, 198, 231, 257Unpairing .....................................................259Unpairing procedure .....................................259Upload, insulin pump ......................................10USB cable for meter remote ..........................226USB data port ..............................155, 156, 227
WWake up screen, insulin pump ........................20Warning cue, meter remote ..................165, 179Warning messages, insulin pump....................98Warning messages, meter remote ........237, 292Warning messages, meter remote and
insulin pump ............................................300Warranty, insulin pump ................................140Waterproof ..........................................9, 13, 96
XX-rays .........................................................6, 7
41029400B_OB_OTP_US_EN_MGDL_R3.indd 329 11/7/14 3:09 PM

330 Index
Patent information
This blood glucose monitoring system described herein is covered by one or more of the following U.S. patents: 5,708,247; 5,951,836; 6,241,862; 6,284,125 and 7,112,265. Use of the monitoring device described herein is protected under one or more of the following U.S. patents: 6,413,410; 6,733,655; 7,250,105. Purchase of the monitoring device described herein does not act to grant a use license under these patents. Such a license is granted only when the device is used with OneTouch® Ultra® Test Strips. No test strip supplier other than LifeScan, Inc. is authorized to grant such a license. The accuracy of results generated with LifeScan meters using test strips manufactured by anyone other than LifeScan has not been evaluated by LifeScan.
41029400B_OB_OTP_US_EN_MGDL_R3.indd 330 11/7/14 3:09 PM

41029400B_OB_OTP_US_EN_MGDL_R3.indd 3 11/7/14 3:09 PM

© 2014 Animas® Corporation. All rights reserved.
This product is covered by one, or more, U.S. patents including 6,656,148. Other patents pending. Glucagon Emergency Kit® is a trademark of Eli Lilly and Company. Energizer® is a trademark of the Eveready Company. OneTouch® Ultra® and OneTouch® UltraSmart® are trademarks of Johnson & Johnson. Novolog® is a trademark of Novo Nordisk A/S. Humalog® is a trademark of Eli Lilly and Company.
P/N: 41029400 Rev. B Rev. Date: 2014/10
200 Lawrence Drive West Chester, PA 19380, USA
Animas® has received both ISO 13485:2003 (International Organization for Standardization) certification and The Joint Commission accreditation. By meeting these most rigorous standards, Animas® is committed to superior quality and safety for its customers.
Customer Service is available 24 hours a day, 7 days a week.
U.S. & Puerto Rico: 1 877 YES-PUMP (937-7867)
Visit us at www.animas.com.
CAUTION: Federal (U.S.) law restricts this device to sale by, or on the order of a physician.
41029400
41029400B_OB_OTP_US_EN_MGDL_R3.indd 4 11/7/14 3:09 PM