Embed Size (px)
Citation preview

OWNER'S MANUAL
AUTOMATIC ELECTRIC WASHING MACHINE
Before beginning installation, read these instructions carefully. This will simplify installation and ensure that the product is installed correctly and safely. Leave these instructions near the product after installation for future reference.
MFL69482507 Rev.02_081216
Made in KoreaYear of manufacturer : 2016
www.lg.com
WTT03TLXM
EN English AR العربية

TABLE OF CONTENTS This manual may contain images or content different from the model you purchased.This manual is subject to revision by the manufacturer.
SAFETY INSTRUCTIONS ......................................................3IMPORTANT SAFETY INSTRUCTIONS ................................................... 3
INSTALLATION .......................................................................9Parts .......................................................................................................... 9Accessories ............................................................................................... 9Specifications .......................................................................................... 10Installation Place Requirements .............................................................. 11Unpacking and Removing Packing Materials .......................................... 12Stacking the Pedestal Washing Machine ................................................ 12Connecting the Supply Hose ................................................................... 13Installing the Drain Hose ......................................................................... 16Leveling the Appliance ............................................................................. 17
OPERATION ..........................................................................18Using the Appliance ................................................................................. 18Sorting Laundry ....................................................................................... 19Closing the Door and Drawer .................................................................. 20Adding Cleaning Products ....................................................................... 21Control Panel ........................................................................................... 23Programme Table .................................................................................... 24Option Programme .................................................................................. 26
SMART FUNCTIONS ............................................................27Using the Smart Diagnosis™ Function .................................................... 27
MAINTENANCE .....................................................................28Cleaning Your Washing Machine ............................................................. 28Tub Clean ................................................................................................ 29Cleaning the Water Inlet Filter ................................................................. 29Cleaning the Lint Filter ............................................................................. 30Caution on Freezing During Winter ......................................................... 30
TROUBLESHOOTING ..........................................................32Diagnosing Problems .............................................................................. 32Error Messages ....................................................................................... 37

3
SAFETY INSTRUCTIONSThe following safety guidelines are intended to prevent unforeseen risks or damage from unsafe or incorrect operation of the appliance.The guidelines are separated into ‘WARNING’ and ‘CAUTION’ as described below.
This symbol is displayed to indicate matters and operations that can cause risk. Read the part with this symbol carefully and follow the instructions in order to avoid risk.
WARNINGThis indicates that the failure to follow the instructions can cause serious injury or death.
CAUTIONThis indicates that the failure to follow the instructions can cause the minor injury or damage to the product.
IMPORTANT SAFETY INSTRUCTIONS
WARNINGTo reduce the risk of explosion, fire, death, electric shock, injury or scalding to persons when using this product, follow basic precautions, including the following:
Children in the HouseholdThis appliance is not intended for use by persons (including children) with reduced physical, sensory or mental capabilities, or lack of experience and knowledge, unless they have been given supervision or instruction concerning use of the appliance by a person responsible for their safety. Children should be supervised to ensure that they do not play with the appliance.

4
EN
For Use in Saudi Arabia: •The hands shall not be inserted into running water-extracting drum. •The washing machine shall not be installed at a humid place. •The washing machine whose door can be opened during water extraction, that if it takes 15 seconds or more for complete stop of water-extraction chamber drum such a case should be understood as a trouble.
Installation •Never attempt to operate the appliance if it is damaged, malfunctioning, partially disassembled, or has missing or broken parts, including a damaged cord or plug. •This appliance should only be transported by two or more people holding the appliance securely. •Do not install the appliance in a damp and dusty place. Do not install or store the appliance in any outdoor area, or any area that is subject to weathering conditions such as direct sunlight, wind, or rain or temperatures below freezing. •Tighten the drain hose to avoid separation.

5
EN
•If the power cord is damaged or the hole of the socket outlet is loose, do not use the power cord and contact an authorized service centre. •This appliance must not be installed behind a lockable door, a sliding door or a door with a hinge on the opposite side to that of the appliance, in such a way that a full opening of the appliance door is restricted. •This pedestal washing machine must be installed underneath a matching LG front-loading washing machine manufactured after 2009. •This appliance must be grounded. In the event of malfunction or breakdown, grounding will reduce the risk of electric shock by providing a path of least resistance for electric current. •This appliance is equipped with a power cord having an equipment-grounding conductor and a grounding power plug. The power plug must be plugged into an appropriate socket outlet that is installed and grounded in accordance with all local codes and ordinances. •Improper connection of the equipment-grounding conductor can result in risk of electric shock. Check with a qualified electrician or service personnel if you are in doubt as to whether the appliance is properly grounded. •Do not modify the power plug provided with the appliance. If it does not fit the outlet, have a proper outlet installed by a qualified electrician.
6
EN
Operation •Do not use a sharp object like drill or pin to press or separate an operation unit. •Do not repair or replace any part of the appliance. All repairs and servicing must be performed by qualified service personnel unless specifically recommended in this Owner’s Manual. Use only authorized factory parts. •Use new hose or hose-set supplied with the appliance. Reusing old hoses can cause a water leak and subsequent property damage. •Do not reach into the appliance if the tub or agitator is moving. •Keep the area underneath and around the appliance free of combustible materials such as lint, paper, rags, chemicals, etc. •Do not put animals, such as pets into the appliance. •Do not leave the appliance door open. Children may hang on the door or crawl inside the appliance, causing damage or injury. •Never reach into the appliance while it is operating. Wait until the drum has completely stopped. •Do not put in, wash or dry articles that have been cleaned in, washed in, soaked in, or spotted with combustible or explosive substances (such as wax, oil, paint, gasoline, degreasers, drycleaning solvents, kerosene, vegetable oil, cooking oil, etc.). Improper use can cause fire or explosion. •In case of flood, disconnect the power plug and contact the LG Electronics customer information centre. •Do not push down the door excessively, when the appliance door is open.

7
EN
•Do not touch the door during a high temperature programme. •Do not use flammable gas and combustible substances (benzene, gasoline, thinner, petroleum, alcohol, etc.) near the appliance. •If the drain hose or inlet hose is frozen during winter, use it only after thawing. •Keep all washing detergents, softener and bleach away from children. •Do not touch the power plug or the appliance controls with wet hands. •When pulling out the power plug from an outlet, hold the power plug, not the cable. •Do not bend the power cable excessively or place a heavy object on it. •If there is a gas leakage (isobutane, propane, natural gas, etc.), do not touch the appliance or power plug and ventilate the area immediately. •Do not operate the pedestal washing machine with two or more pedestal washing machines stacked. •To avoid breaking the door glass, do not push too hard on the door when closing. •Do not step on the pedestal washing machine. •Do not wash rugs, mats, shoes or pet blankets, or any other items other than clothes or sheets, in this machine. •This appliance must only be used for domestic household purposes and should not be used in mobile applications. •Do not open or close the door by foot.

8
EN
Maintenance •Securely plug the power plug in the socket outlet after completely removing any moisture and dust. •Disconnect the power cord before cleaning the appliance. •Never unplug the appliance by pulling on the power cable. Always grip the power plug firmly and pull straight out from the socket outlet. •Do not spray water inside or outside the appliance to clean it.
Disposal •Before discarding an old appliance, unplug it. Cut off the cable directly behind the appliance to prevent misuse. •Dispose of all packaging materials (such as plastic bags and styrofoam) away from children. The packaging materials can cause suffocation. •Remove the door before disposing of or discarding this appliance to avoid the danger of children or small animals getting trapped inside.

9
INSTALLATIONParts
8
9
7
6
5
4
2
1
3
1 Door
2 Drum
3 Lint Filter
4 Control Panel
5 Drawer
6 Water Supply Hose
7 Power Plug
8 Water Drain Hose
9 Leveling Feet
Accessories
Water supply hose (for cold water)
Connecting supply hose
Water drain hose Water supply hose connector
General-type connector / Screw-
type connector
Cable tie Water drain hose connector
Anti-slip sheets Spanner Detergent measuring
cup
(18EA)(5EA)
Screws Hose clips
• Different accessories may apply to each model.

10
EN
SpecificationsModel WTT03TLXMName Automatic electric washing machine
Wash Capacity 3.5 kgPower Supply 220 V~, 50/60 Hz
Max. Watt 1500 WSpin Speed Rinse Hold/No Spin/700
Standard Water Consumption 44 litreDrum Volume 27 litre
Size 700 mm (W) x 770 mm (D) x 360 mm (H)Product Weight 48.7 kg
Permissible Water Pressure 0.1 - 0.8 MPa (1.0 - 8.0 kgf / cm²)IP No.(Degree of protection) IPX4
• Appearance and specifications may change without notice to improve the quality of the product. • The external hot water supply MUST NOT exceed 65°C. • No further backflow protection required for connection to the water supply. • Country of origin : Made in Korea

11
EN
Installation Place RequirementsLocation
133 cm
2.5 cm2.5 cm 70 cm
* 179 cm
* 179 cm : additionally needed for service.
Level floor : Allowable slope under the entire appliance is 1°.Power outlet : Must be within 1.5 meters of either side of the location of the appliance. • Do not overload the outlet with more than one appliance.
Additional Clearance : 2.5 cm at the sides and 10 cm behind the unit. • Do not place or store laundry products on top of the appliance at any time. • These products may damage the finish or controls.
WARNING • The plug must be plugged into an appropriate outlet that is properly installed and grounded in accordance with all local codes and ordinances.
Positioning • Install the appliance on a flat hard floor. • Make sure that air circulation around the appliance is not impeded by carpets, rugs, etc. • Never try to correct any unevenness in the floor with pieces of wood, cardboard or similar materials under the appliance. • If it is impossible to avoid positioning the appliance next to a gas cooker or coal burning stove, an insulation (85x60 cm) covered with aluminum foil on the side facing the cooker or stove must be inserted between the two appliances.
• Do not install the appliance in rooms where freezing temperatures may occur. Frozen hoses may burst under pressure. The reliability of the electronic control unit may be impaired at temperatures below freezing point. • Ensure that when the appliance is installed, it is easily accessible for an engineer in the event of a breakdown. • With the appliance installed, adjust all four feet using a transit bolt spanner to ensure the appliance is stable, and a clearance of approximately 20 mm is left between the top of the appliance and the underside of any work-top. • If the appliance is delivered in winter and temperatures are below freezing, place the appliance at room temperature for a few hours before putting it into operation. • Do not use a drip pan as it can block the drawer. Using the drip pan may result in increased vibration and noise during operation.
WARNING • This equipment is not designed for maritime use or for use in mobile installations such as caravans, aircraft etc.
Electrical Connection • Do not use an extension cord or double adapter. • Always unplug the appliance and turn off the water supply after use. • Connect the appliance to an earthed socket in accordance with current wiring regulations. • The appliance must be positioned so that the plug is easily accessible. • Repairs to the appliance must only be carried out by qualified personnel. Repairs carried out by inexperienced persons may cause injury or serious malfunctioning. Contact your local service centre.

12
EN
Unpacking and Removing Packing Materials1 Lift the appliance off the foam base.
• If you must lay the appliance down to remove the carton base, always protect the side of the appliance and lay it carefully on its side. Do not lay the appliance on its front or back.
2 Pull and save the foam block for future use. • If the washing machine must be moved in the future, the foam block will help prevent damage to the washing machine during transportation.
NOTE • To prevent damage, do not remove the foam block until the washing machine is at the final location.
3 Turn the top cover about 180 degrees. • Cover the upper hole with the top cover and install 4 short screws (included in packing box) to fix it in place.
Short screws
Top cover
WARNING • The top cover must be installed to avoid the risk of electric shock or short circuit from water drops. Failure to do so can cause serious injury, fire, electric shock or death.
Stacking the Pedestal Washing Machine
1 Make sure the leveling feet on the front-loading washing machine are fully retracted before stacking. Place the front-loading washing machine on top of the pedestal washing machine. Make sure the holes on the pedestal washing machine align with the holes in the front-loading washing machine.
Stacking holes
Stacking holes
2 Install 4 long screws (included in box) at each corner to securely attach the front-loading washing machine to the pedestal washing machine.
Long screws
3 Turn the feet of the front-loading washing machine slightly until it is snugged up against the pedestal washing machine.
EN
WARNING • This pedestal washing machine must be installed underneath a matching LG front-loading washing machine manufactured after 2009. (16-21 kg washing machine only) • The pedestal washing machine will not work as a standalone unit. • The pedestal washing machine must be stacked under an LG front-loading washing machine in order to operate properly.
Connecting the Supply Hose • Water supply pressure must be between 0.1 MPa and 0.8 MPa (1.0‒8.0 kgf/cm2). • Do not strip or crossthread when connecting supply hose to the valve. • If the water supply pressure is more than 0.8 MPa, a decompression device should be installed. • Periodically check the condition of the hose and replace the hose if necessary.
Hose connector
Rubber seal
Hose connectorRubber seal
Checking the Rubber Seal on the Supply HoseTwo rubber seals are supplied with the water supply hoses. They are used for preventing water leaks. Make sure the connection to taps is sufficiently tight.
Hose connectorRubber seal
Hose connectorRubber seal

13
EN
WARNING • This pedestal washing machine must be installed underneath a matching LG front-loading washing machine manufactured after 2009. (16-21 kg washing machine only) • The pedestal washing machine will not work as a standalone unit. • The pedestal washing machine must be stacked under an LG front-loading washing machine in order to operate properly.
Connecting the Supply Hose • Water supply pressure must be between 0.1 MPa and 0.8 MPa (1.0‒8.0 kgf/cm2). • Do not strip or crossthread when connecting supply hose to the valve. • If the water supply pressure is more than 0.8 MPa, a decompression device should be installed. • Periodically check the condition of the hose and replace the hose if necessary.
Hose connector
Rubber seal
Hose connectorRubber seal
Checking the Rubber Seal on the Supply HoseTwo rubber seals are supplied with the water supply hoses. They are used for preventing water leaks. Make sure the connection to taps is sufficiently tight.
Hose connectorRubber seal
Hose connectorRubber seal

14
EN
Connecting Hose to Water Tap
Connecting Screw-Type Hose to Tap with ThreadScrew the hose connector onto the water supply tap.
1 Loose the four fixing screws.
Upper connector
Rubber seal
Fixing screw
2 Remove the guide plate if the tap is too large to fit the adapter.
Guide plate
3 Push the adapter onto the end of the tap so that the rubber seal forms a watertight connection. Tighten the four fixing screws.
4 Push the supply hose vertically upwards so that the rubber seal within the hose can adhere completely to the tap and then tighten it by screwing it to the right.
Plate
Supply hose
Connecting One Touch Type Hose to Tap Without Thread
1 Unscrew the adapter ring plate and loose the four fixing screws.
Ring plate

15
EN
2 Remove the guide plate if the tap is too large to fit the adapter.
Guide plate
3 Push the adapter onto the end of the tap so that the rubber seal forms a watertight connection. Tighten the four fixing screws and the adapter ring plate.
4 Pull the connector latch plate down, push the supply hose onto the adapter, and release the connector latch plate. Make sure the adapter locks into place.
Latch plate
NOTE • After connecting the supply hose to the water tap, turn on the water tap to flush out foreign substances (dirt, sand, sawdust, and etc.) in the water lines. Let the water drain into a bucket, and check the water temperature.
Connecting Hose to Two Washing Machines
1 Connect the water supply hose connector to the water supply hose of the front-loading washing machine. Open the accessory package for pedestal washing machine installation.
Water supply hose connector
Press board
2 Connect the water supply hose of pedestal washing machine to the water supply hose connector, pedestal washing machine to be installed.
Rubber packing
Rubber packing
3 Connect the additionally provided water supply hose of the front-loading washing machine to the water supply hose connector and water faucet.
Water supply hose connector

16
EN
Installing the Drain Hose • The drain hose should not be placed higher than 100 cm above the floor. Water in the appliance may not drain or may drain slowly.
1 Insert the hose clip onto the drain hose elbow.
Hose clip
Drain hose elbow
2 With the hose leading up from the elbow, insert the elbow onto the drain outlet on the back of the pedestal washing machine.
3 Adjust the hose clip in place to prevent leaking.
Hose clip
Using the Drain Hose ConnectorConnect the drain hose of the front-lading washing machine and the pedestal washing machine to the drain connector. Insert the included wire hose clamps on to the ends of the two drain hoses. Push the drain hoses firmly onto the drain connector. Adjust the wire hose clamps to prevent the hoses from coming loose or leaking. Failure to do so could result in flooding. Use of the drain connector helps avoid siphoning, odors, or improper draining.
Drain hose connector

17
EN
Leveling the ApplianceIf the floor is uneven, turn the adjustable feet as required (Do not insert pieces of wood etc. under the feet). Make sure that all four feet are stable and resting on the floor and then check that the appliance is perfectly level (Use a spirit level). • Once the appliance is level, tighten the lock nuts up towards the base of the appliance. All lock nuts must be tightened.
Raise Lower
Lock nut
Tighten all 4 lock nuts securely
Diagonal Check • When pushing down the edges of the top plate diagonally, the appliance should not move up and down at all (check both directions). If the appliance rocks when pushing the machine top plate diagonally, adjust the feet again.
WARNING • When stacking the front-loading washing machine on the pedestal washing machine, use the leveling feet on the pedestal washing machine to level both. The front-loading washing machine´s leveling feet should be minimized and the locknuts turned counterclockwise to secure them.
NOTE • Timber or suspended type flooring may contribute to excessive vibration and unbalance. • If the washing machine is installed on a raised platform, it must be securely fastened in order to eliminate the risk of falling off.
Using Anti-Slip Sheets (Optional)If you install the appliance on a slippery surface, it may move because of excessive vibration. Incorrect leveling may cause malfunction through noise and vibration. If this occurs, install the anti-slip sheets under the leveling feet and adjust the level.
1 Clean the floor to attach the anti-slip sheets. • Use a dry rag to remove and clean foreign objects and moisture. If moisture remains, the anti-slip sheets may slip.
2 Adjust the level after placing the appliance in the installation area.
3 Place the adhesive side of the anti-slip sheets on the floor. • It is most effective to install the anti-slip sheets under the front feet. If it is difficult to place the pads under the front feet, place them under the back feet.
This side up
Adhesive side
4 Ensure the appliance is level. • Push or rock the top edges of the appliance gently to make sure that the appliance does not rock. If the appliance rocks, level the appliance again.
NOTE • You can obtain anti-slip sheets from the LG Service Centre.
EN
Installing the Drain Hose • The drain hose should not be placed higher than 100 cm above the floor. Water in the appliance may not drain or may drain slowly.
1 Insert the hose clip onto the drain hose elbow.
Hose clip
Drain hose elbow
2 With the hose leading up from the elbow, insert the elbow onto the drain outlet on the back of the pedestal washing machine.
3 Adjust the hose clip in place to prevent leaking.
Hose clip
Using the Drain Hose ConnectorConnect the drain hose of the front-lading washing machine and the pedestal washing machine to the drain connector. Insert the included wire hose clamps on to the ends of the two drain hoses. Push the drain hoses firmly onto the drain connector. Adjust the wire hose clamps to prevent the hoses from coming loose or leaking. Failure to do so could result in flooding. Use of the drain connector helps avoid siphoning, odors, or improper draining.
Drain hose connector

18
OPERATION EN
Using the Appliance
1 Sort laundry and load items. • Sort laundry by fabric type, soil level, colour and load size as needed. Open the door and load items into the washing machine.
2 Add cleaning products. • Add the proper amount of detergent with the detergent measuring cup to the washing drum evenly.
3 Closing the door and drawer.
4 Turn on the washing machine. • Press the Power button to turn on the washing machine.
5 Choose the desired washing cycle. • Press the cycle button repeatedly until the desired cycle is selected.
6 Begin cycle. • Press the Start/Pause button to begin the cycle. The washing machine will agitate briefly without water to measure the weight of the load. If the Start/Pause button is not pressed within 5 minutes, the washing machine will shut off and all settings will be lost.
7 Add softener. • When the machine chimes for about 20 seconds, add the softener and press Start/Pause to restart the cycle.
8 End of cycle. • When the cycle is finished, a melody will sound. Immediately remove your clothing from the washing machine to remove wrinkling and odors. • After washing is complete, wipe off the washing machine door, gasket and inside the washing drum with a dry towel for clean washing.

19
EN
Sorting Laundry
1 Look for a care label on your clothes. • This will tell you about the fabric content of your garment and how it should be washed. • Symbols on the care labels.
Wash temperature
Normal machine wash
Permanent press
Delicate
Hand wash
Do not wash
2 Sorting laundry. • To get the best results, sort clothes into loads that can be washed with the same wash cycle. • Different fabrics need to be washed at varying temperatures and spin speeds. • Wash two or more towels or knits together. If washed separately, laundry which absorbs a lot of water may not be washed well or abnormal spin-drying may occur due to leaning. • Always sort dark colours from pale colours and whites. Wash separately as dye and lint transfer can occur causing discolouration of white and pale garments. If possible, do not wash heavily soiled items with lightly soiled ones. −Soil (Heavy, Normal, Light) : Separate clothes according to amount of soil. −Colour (White, Lights, Darks): Separate white fabrics from coloured fabrics. −Lint (Lint producers, Collectors): Wash lint producers and lint collectors separately.
3 Caring before loading. • Do not wash 'memory wire' on female inner wear (such as a brassiere) as it may damage other clothes or the washing machine and create noise. • Check all pockets to make sure that they are empty. Items such as nails, hair clips, matches, pens, coins and keys can damage both your washing machine and your clothes.
• Close zippers, hooks and strings to make sure that these items don’t snag on other clothes. • Pre-treat dirt and stains by brushing a small amount of detergent dissolved water onto stains to help lift dirt. • If an item of clothing has a long lace attached to it, arrange the lace so it cannot be tangled or put it into a washing net. • Remove the insides of cushions, pillows, or sitting mats and only wash the cover. The insides may protrude, damaging other laundry. Plastic parts may generate abnormal vibrations.
CAUTION • Divide laundry in large volume for washing so that the laundry can be submerged under water completely. If laundry expands during washing, it may cause damage to the laundry and parts during washing or spin.

20
EN
Closing the Door and Drawer
1 Push the washing machine door until it clicks.
2 Push the drawer completely closed.
CAUTION • Do not let your hands get stuck between the door and the washing machine, as this can cause injury. • Forcing the drawer or the door to open can cause part damages and safety problems. • Closing the drawer before having closed the door completely may scratch the door glass. • Ensure the drawer is pulled out completely to prevent the door from contacting the front load washing machine.
NOTE • Door lock may fail if there is too much laundry in the machine or if the door is not completely closed. • If the product is operating or the Drawer Lock ( ), indicator is displayed, the door cannot open. To open the door, press the Start/Pause button to stop the product, and when Drawer Lock ( ), indicator disappears, open the door. Do not force the drawer and door open. • If ( , , ) or a warning sign appears on the display, close the drawer and the door completely. After doing so, press the Start/Pause button.
• If the drawer cannot be opened completely, pull the drawer forward with a little force using both hands. • If power failure occurs during product operation, the door cannot be opened. Provide the power again or contact the LG service centre. (in case of boil wash, the door may not open after the power is supplied again due to high temperature inside the washing machine). • If the door cannot open due to high temperature, carry out rinsing with cold water using the Rinse+Spin programme or wait a while before opening the door.

21
EN
Adding Cleaning ProductsDetergent Dosage • Detergent should be used according to the instruction of the detergent manufacturer and selected according to type, colour, soiling of the fabric and washing temperature. • If too much detergent is used, too many suds can occur and this will result in poor washing results or cause heavy load to the motor. • If you wish to use liquid detergent follow the guidelines provided by the detergent manufacturer. • If too many suds occur, reduce the detergent amount. • Detergent usage may need to be adjusted for water temperature, water hardness, size and soil level of the load. For best results, avoid oversudsing. • Refer to the label of the clothes, before choosing the detergent and water temperature. • When using the washing machine, use designated detergent for each type of clothing only: −General powdered detergents for all types of fabric −Powdered detergents for delicate fabric −Liquid detergents for all types of fabric or designated detergents only for wool
• For better washing performance and whitening, use detergent with the general powdered bleach.
Adding DetergentMeasure the detergent with the detergent dispenser and pour it into the tub.
• Use the provided detergent measuring cup to add only one cup of detergent. • Reduce the amount of detergent for lightly soiled laundry. If you use too much detergent, excessive bubbles will remain after rinsing.

22
EN
Adding Softeners
Adding Fabric SoftenerCASE 1. When the machine chimes:
1 Press Start/Pause to pause the cycle.
2 Add the liquid fabric softener.
3 Close the door, slide the drawer closed, and press Start/Pause to restart the cycle.
NOTE • To disable or enable the fabric softener alert, press and hold the Extra Rinse button for three seconds.
CASE 2. If you miss the softener add point:
1 Press the Power button to interrupt the cycle.
2 Select the Rinse+Spin programme and press the Start button to start the cycle. Add the fabric softener at the chimes.
3 Close the door, slide the drawer closed, and press Start/Pause to restart the cycle.
NOTE • Do not pour fabric softener directly on the clothes. • The softener can also be diluted with water and added directly into the drum. Do not pour undiluted softener directly onto clothing because it may stain fabrics.
Adding Water Softener • A water softener, such as anti-limescale (e.g. Calgon) can be used to cut down on the use of detergent in extremely hard water areas. Dispense according to the amount specified on the packaging. First add detergent and then the water softener. • Use the quantity of detergent required for soft water.
CAUTION • Do not directly put bleach to the laundry. This may cause partial discoloration and severe damage to the laundry. • Do not use chlorine bleach or acidic cleaner when washing the laundry, as it can cause damage to clothes such as discoloration and decoloration of laundry.

23
EN
Control Panel
1 2
3
5
NormalSpeed WashLingerie/Wool
Boil WashBaby WearRinse+Spin
1 Power Button • Press the Power button to turn the washing machine on.
NOTE • If there is any water remaining in the drum after the washing machine shuts off, it will drain following 4 minutes delay. The washing machine can be restarted any time before the drain begins. However, once the water begins to drain, all functions will be suspended until the water has been completely drained and the washing machine shuts off.
2 Start/Pause Button • This Start/Pause button is used to start the wash cycle or pause the wash cycle. • If a temporary stop of the wash cycle is needed, press the Start/Pause button.
NOTE • If you do not press the Start/Pause button within 4 minutes of selecting a programme, the washing machine automatically turns off and all cycle settings are lost. Any water remaining in the tub will be drained.
3 Display • The display shows the cycle status and estimated time remaining. • : Drawer lock indicator • : Door lock indicator • : Child lock indicator
4 Programme Button • Programmes are available according to laundry type.
5 Options • Use these buttons to select the desired options for the selected programme. • The setting lights above the buttons illuminate to show the current selection.

24
EN
Programme TableWashing Programme
Programme Description NoteMaximum
Load
Normal
Use this programme to wash lightly soiled normal items, except delicate fabrics such as wool or silk.
• Pressing the Start/Pause button without selecting a programme will cause the Normal programme to begin immediately using the default settings.
3.5 kg
Speed WashUse this programme to speed up the washing time for small loads and lightly soiled clothes.
• Use very little detergent in this programme. 1 kg
Lingerie/Wool
Use this programme to wash textiles, lingerie, or fine clothes likely to shrink or deform.
• To reduce damage to textiles and improve washing performance, use special neutral detergent for wool.
• To prevent damage to clothes, the drum spins gently to the left and right for washing.
1.5 kg

25
EN
Programme Description NoteMaximum
Load
Boil WashUse this programme to wash under wears or baby wear to be sterilized and whitened.
• In this programme, laundry is washed thoroughly due to high temperature. Use 1/2 the amount of detergent recommended by the manufacturer for a normal load.
• Do not wash white or brightly colored laundry with darkly colored laundry that can discharge colors.
• It is more effective to pre-wash laundry which is stained with blood or milk briefly with cold water before carrying out main washing can remove stains more effectively.
• In this programme, water is heated using the heating system of the washing machine.
• Bubble Removing Function: If an excessive amount of detergent is used, the bubble removing function may operate.
• Lowering Drain Temperature Function: For the safety, cold water is briefly supplied before draining to lower the water temperature.
1.5 kg
Baby WearUse this programme to wash baby wear hygienically.
• Select a proper type of neutral detergent. • Clothes are washed at high temperature
to sterilize and remove mites. • It is more effective to pre-wash laundry
stained with food, sweat, urine and feces briefly before washing.
• Due to high temperature, this programme is not recommended for wool, silk or any other delicates.
1.5 kg
Rinse+SpinSelect this programme to rinse and spin a load separately from a regular cycle.
• Add fabric softener only. 1.5 kg

26
EN
Option ProgrammeTub CleanUse this option to keep the drum clean by sterilizing germs within the drum. For information on using Tub Clean, see the Cleaning Your Washing Machine section.
Extra RinseUse this option to increase the number of rinsing programmes.
1 Press the Power button.
2 Select a washing programme.
3 Press the Extra Rinse button to set time required. • When you press the Extra Rinse button, the number of rinsing cycles (1 - 5) to be added will be displayed.
4 Press the Start/Pause button.
Child LockUse this option to disable the controls. This feature can prevent children from changing cycles or operating the appliance.
Locking the Control Panel
1 Press and hold the Tub Clean and Extra Rinse button at the same time for three seconds.
2 will appear on the display. When the Child Lock is set, all buttons are locked except the Power button.
NOTE • Turning off the power or completing all cycles will not reset the child lock function. You must deactivate child lock before you can access any other functions.
Unlocking the Control PanelPress and hold the Tub Clean and Extra Rinse button at the same time for three seconds. • To change the cycle or option, press the Start/Pause button to stop operation, and then choose the cycle or option which you wish to change.

27
SMART FUNCTIONS EN
Using the Smart Diagnosis™ FunctionUse this function if you need an accurate diagnosis by an LG Electronics service centre when the product malfunctions or fails. Use this function only to contact the service representative, not during normal operation.
1 Press the Power button to turn on the washing machine. Do not press any other buttons or turn the cycle selector knob.
2 When instructed to do so by the call centre, place the mouthpiece of your phone close to the Power button.
Max.
10 mm
3 Press and hold the Tub Clean button for three seconds, while holding the phone mouthpiece to the icon or Power button.
4 Keep the phone in place until the tone transmission has finished. Time remaining for data transfer is displayed. • For best results, do not move the phone while the tones are being transmitted. • If the call centre agent is not able to get an accurate recording of the data, you may be asked to try again.
LG Electronics service centre
5 Once the countdown is over and the tones have stopped, resume your conversation with the call centre agent, who will then be able to assist you using the information transmitted for analysis.
NOTE • The Smart Diagnosis™ function depends on the local call quality. • The communication performance will improve and you can receive better service if you use the home phone. • If the Smart Diagnosis™ data transfer is poor due to poor call quality, you may not receive the best Smart Diagnosis™ service.

28
MAINTENANCE EN
WARNING • Unplug the washing machine before cleaning to avoid the risk of electric shock. Failure to follow this warning may result in serious injury, fire, electric shock, or death. • Never use harsh chemicals, abrasive cleaners, or solvents to clean the washing machine. They may damage the finish.
Cleaning Your Washing MachineCare After Wash • After the cycle is finished, wipe the door and the inside of the door seal to remove any moisture. • Leave the door open to dry the drum interior. • Wipe the body of the washing machine with a dry cloth to remove any moisture.
Cleaning the ExteriorProper care of your washing machine can extend its life.
Door: • Wash with a damp cloth on the outside and inside and then dry with a soft cloth.
Exterior: • Immediately wipe off any spills. • Wipe with a damp cloth. • Do not press the surface or the display with sharp objects.
Cleaning the Interior • Use a towel or soft cloth to wipe around the washing machine door opening and door glass. • Always remove items from the washing machine as soon as the cycle is complete. Leaving damp items in the washing machine can cause wrinkling, colour transfer, and odour. • Run the Tub Clean programme once a month (or more often if needed) to remove detergent buildup and other residue

29
EN
Tub CleanUse this option to keep the drum clean by sterilizing germs within the drum.
1 Press the Power button.
2 Dilute 200 ml liquid chlorine bleach in 1 ℓ of water and pour the mixture in the drum.
3 Press the Tub Clean button to set time required.
4 Press the Start/Pause button.
CAUTION • If there is a child, be careful not to leave the door open for too long.
Cleaning the Water Inlet Filter • Turn off the stopclock if the washing machine is to be left for any length of time (e.g. holiday), especially if there is no floor drain (gully) in the immediate vicinity. • icon may blink on the display when the water pressure is weak or an inlet filter is clogged with dirt. Clean the inlet filter. • The inlet filter screens could be plugged by hard water scale, sediment in the water supply, or other debris.
1 Turn off the water tap and unscrew the water inlet hose.
2 Clean the filter using a hard bristle brush.

30
EN
Cleaning the Lint FilterThe filter is an important part for efficient washing performance result, so it needs special care from you. It is recommended that the filter be cleaned regularly.
1 Pull the cap of the lint filter.
2 Open the cap and remove lint and then wash out.
3 Insert the lower part of the filter into the drum and close the cap until you hear a click sound.
NOTE • When the lint filter is damaged, contact LG service centre. • Do not operate the washing machine without the lint filter. • Do not place the lint filter loosely. Doing so may damage the fabrics or the washing machine.
Caution on Freezing During Winter • When frozen, the product does not operate normally. Make sure to install the product where it will not freeze during winter. • In case the product must be installed outside on a porch or in other outdoor conditions, make sure to check the following.
How to Keep the Product from Freezing • After closing the tap, disconnect the cold supply hose from the tap, and remove water while keeping the hose facing downwards.
Supply hose

31
EN
How to Handle Freezing
Step 1. When the Door is Frozen • Thaw out the door using a hot water cloth.
Step 2. When the Water Supply Hose is Frozen • icon may blink on the display when water supply problems occur, take the following measures. −Take out water supply hose and connect to the tap and check that water comes from the tap and supply hose. −Turn off the tap, and thaw out the tap and both connection areas of supply hose of the product using a hot water cloth. −Take out supply hose and immerse in warm water below 50–60 °C.
Supply hose 50‒60 °C
Step 3. When the Drain Pump is Frozen • , icon may blink on the display when drain pump problems occur, take the following measures.
1 Pour 15 ℓ warm water below 50–60 °C in the drum until washing machine wing nuts are immersed and wait for an hour.
2 Press the Power button and then run the Boil Wash programme for an hour. • When icon appears on the display, repeat steps 1 to 2.
3 Turn off the power when the Boil Wash programme is finished. If the drawer is open, select the Rinse+Spin and then press the Extra Rinse to the number of 9 and press the Start/Pause button to run the Spin.
4 Select the Rinse+Spin programme and press the Start/Pause button to check that the washing machine works.
5 When icon appears on the display, thaw out the drain hose inner part with the hot water.
32
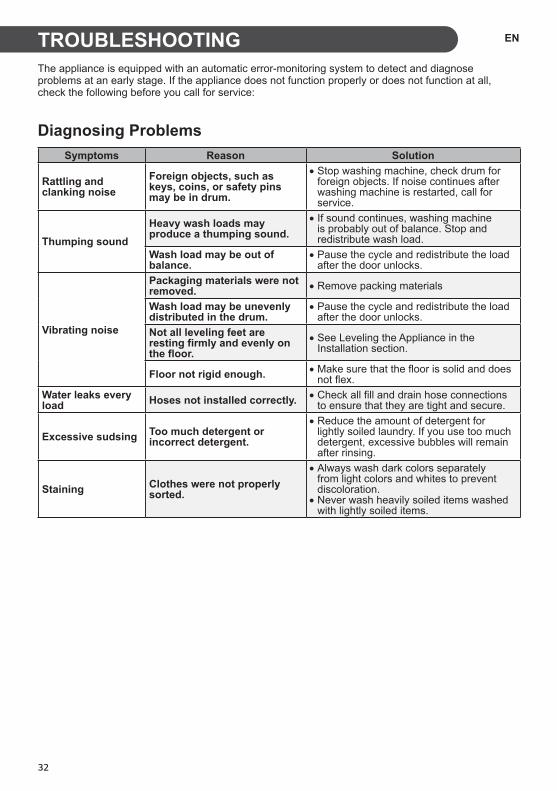
TROUBLESHOOTING EN
The appliance is equipped with an automatic error-monitoring system to detect and diagnose problems at an early stage. If the appliance does not function properly or does not function at all, check the following before you call for service:
Diagnosing ProblemsSymptoms Reason Solution
Rattling and clanking noise
Foreign objects, such as keys, coins, or safety pins may be in drum.
• Stop washing machine, check drum for foreign objects. If noise continues after washing machine is restarted, call for service.
Thumping soundHeavy wash loads may produce a thumping sound.
• If sound continues, washing machine is probably out of balance. Stop and redistribute wash load.
Wash load may be out of balance.
• Pause the cycle and redistribute the load after the door unlocks.
Vibrating noise
Packaging materials were not removed. • Remove packing materials
Wash load may be unevenly distributed in the drum.
• Pause the cycle and redistribute the load after the door unlocks.
Not all leveling feet are resting firmly and evenly on the floor.
• See Leveling the Appliance in the Installation section.
Floor not rigid enough. • Make sure that the floor is solid and does not flex.
Water leaks every load Hoses not installed correctly. • Check all fill and drain hose connections
to ensure that they are tight and secure.
Excessive sudsing Too much detergent or incorrect detergent.
• Reduce the amount of detergent for lightly soiled laundry. If you use too much detergent, excessive bubbles will remain after rinsing.
Staining Clothes were not properly sorted.
• Always wash dark colors separately from light colors and whites to prevent discoloration. • Never wash heavily soiled items washed with lightly soiled items.

33
EN
Symptoms Reason Solution
Water leaking
Supply hose connection is loose at the tap, washing machine, or drain hose connector.
• Check hoses and drain hose connectors for leaks, cracks and splits. • Tighten hose connections.
House drain pipes are clogged.
• The washing machine pumps out water very rapidly. Check for water backing up out of the drain pipe during drain. If water is seen coming out of the drain, check for proper drain hose installation and check for restrictions in the drain. Contact a plumber to repair drain pipe.
Drain hose has come out of drain connector or is not inserted far enough.
• Tie drain hose to supply hose or standpipe to prevent it from coming out during drain. For smaller drain pipes, insert the drain hose into the pipe as far as the drain hose flange. For larger drain pipes, insert the drain hose into the pipe 2-5 cm past the flange.
Load is too large for the drum.
• Reduce the load or use the front-loading washing machine. • Stop the washing machine and check the load. Make sure the load fits loosely in the drum and the door closes easily.
Wrinkling
Washing machine not unloaded promptly.
• Always remove items from the washing machine as soon as the cycle is complete.
Washing machine overloaded. • The washing machine can be fully loaded, but the drum should not be tightly packed with items. The door of the washing machine should close easily.
Hot and cold water supply hoses are reversed.
• Hot water rinse can set wrinkles in garments. Check the supply hose connections.
Water leaks Oversudsing of detergent.
• Oversudsing may create leaks, and may be caused by the type and amount of detergent used. Always reduce the amount of detergent if the load is small or lightly soiled, or if your water is very soft. Never use more than the maximum amount shown in the dispenser provided.
34
EN
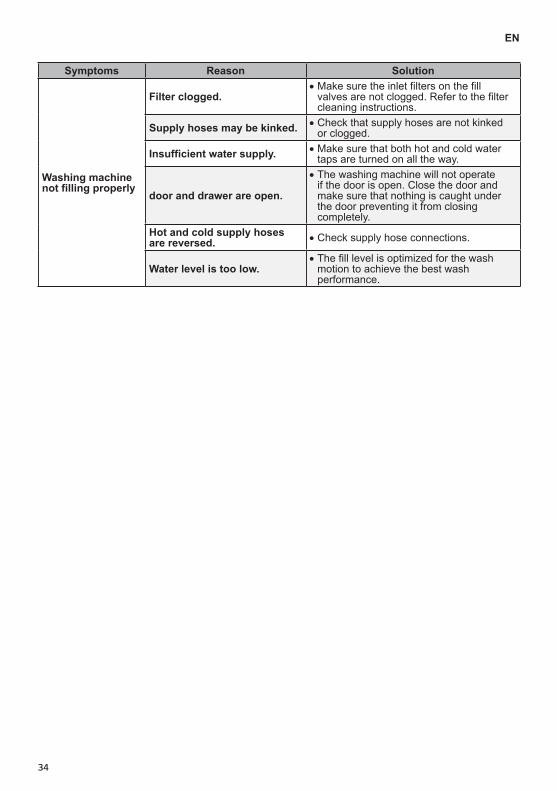
Symptoms Reason Solution
Washing machine not filling properly
Filter clogged. • Make sure the inlet filters on the fill valves are not clogged. Refer to the filter cleaning instructions.
Supply hoses may be kinked. • Check that supply hoses are not kinked or clogged.
Insufficient water supply. • Make sure that both hot and cold water taps are turned on all the way.
door and drawer are open.
• The washing machine will not operate if the door is open. Close the door and make sure that nothing is caught under the door preventing it from closing completely.
Hot and cold supply hoses are reversed. • Check supply hose connections.
Water level is too low. • The fill level is optimized for the wash motion to achieve the best wash performance.

35
EN
Symptoms Reason Solution
Washing machine will not operate
Control panel has powered off due to inactivity.
• This is normal. Press the Power button to turn the washing machine on.
Washing machine is unplugged.
• Make sure cord is plugged securely into a working outlet.
Water supply is turned off. • Turn both hot and cold taps fully on.
Controls are not set properly. • Make sure the cycle was set correctly, close the door and press the Start/Pause button.
Door or drawer is open. • Close the door and drawer make sure that nothing is caught under the door preventing it from closing completely.
Circuit breaker/fuse is tripped/blown.
• Check house circuit breakers/fuses. Replace fuses or reset breaker. The washing machine should be on a dedicated branch circuit. The washing machine will resume the cycle where it stopped once power is restored.
Control needs to be reset. • Press the Power button, then re-select the desired programme and press the Start/Pause button.
Start/Pause was not pressed after a cycle was set.
• Press the Power button then re-select the desired programme and press the Start/ Pause button. The washing machine will shut off if the Start/Pause button is not pressed within 4 minutes.
Extremely low water pressure. • Check another tap in the house to make sure that household water pressure is adequate.
Washing machine is too cold. • If the washing machine has been exposed to temperatures below freezing for an extended period of time, allow it to warm up before pressing the Power button.

36
EN
Symptoms Reason Solution
Washing machine will not drain water
Kinked drain hose. • Ensure that the drain hose is not kinked.
Drain located higher than 2.4 m above the floor.
• Make sure that the drain hose is no higher than 2.4 m above the bottom of the washing machine and is no more than 1.5 m away from the washing machine.
Poor stain removal
Heavily soiled load. • Use the front-loading washing machine.
Previously set stains.
• Articles that have previously been washed may have stains that have been set. These stains may be difficult to remove and may require hand washing or pre-treating to aid in stain removal.
Wash cycle time is longer than usual
The washing machine automatically adjusts the wash time for the amount of laundry, water pressure and other operating conditions.
• This is normal. The washing machine adjusts cycle time automatically to provide optimal results for the selected programme. The time remaining shown in the display is only an estimate. Actual time may vary.
Musty or mildewy odor in washing machine
Incorrect or too much detergent has been used.
• This machine requires very little detergent. Use the provided detergent measuring cup.
Inside of drum was not cleaned properly. • Run the Tub clean programme regularly.
Washing machine chimes repeatedly before final rinse
This is not an error. • This is an alert to allow the addition of liquid fabric softener before the final rinse.

37
EN
Error MessagesSymptoms Reason Solution
Drawer is not closed properly
• Close the drawer and press Start/Pause button to start the cycle. • If the drawer is closed and the drawer lock error message is displayed, call for service.
Door is not closed properly
• Open the drawer and make sure the latch area is free of clothing or other obstructions. • Close the door, shut the drawer, and press Start/Pause to start the cycle. • If the door is closed and the door error message is displayed, call for service.
Water supply taps are not fully open.
• Make sure that the water taps are fully open.
Water line hoses are kinked, pinched, or crushed.
• Make sure that the hoses are not kinked or pinched. Be careful when moving the washing machine during cleaning and maintenance.
Water inlet filters are clogged. • Clean the inlet filters.
Water supply pressure to tap or house is too low.
• Check another tap in the house to make sure that household water pressure is adequate and flow is not restricted. Disconnect the supply hose from the washing machine and run a few liters of water through the hose to flush the water supply lines. If flow is too low, contact a plumber to have the water lines repaired.
Water supply connected with leak-limiting hoses.
• Hoses designed to limit leaks can trip falsely and prevent the washing machine from filling. The use of leak limiting hoses is not recommended.
Drain hose is kinked, pinched, or clogged
• Make sure the drain hose is free of clogs, kinks, etc., and is not pinched behind or under the washing machine.
Drain discharge is more than 1.2 m above bottom of washing machine.
• Adjust or repair drain. Maximum drain height is 1.2 m.

38
EN
Symptoms Reason Solution
UE rebalancing operation is not successful.
• The automatic attempt to rebalance the load was not successful. The cycle has been paused to allow the load to be manually adjusted.
The load is too small. • Add more items to allow the washing machine to balance the loads.
Heavy articles are mixed with lighter items. • Wash articles of somewhat similar weight.
The load is out of balance. • Manually redistribute the load if articles have become tangled.
Control error. • Unplug the power plug and call for service.
Water level is too high due to a faulty water valve.
• Close the water taps, unplug the washing machine, and call for service.
The water level sensor is not working correctly.
• Close the water taps, unplug the washing machine, and call for service.
A motor error has occurred. • Allow the washing machine to stand for 30 minutes and then restart the cycle. If the LE error code persists, call for service.
It is time to run the Tub Clean programme. • Run the Tub Clean programme.
Pedestal washing machine is being operated without a full-size washing machine.
• The pedestal washing machine will not operate as a standalone unit. It must be stacked under an LG front-loading washing machine.
Stacking switch is not working properly.
• The stacking switch will not operate properly if the unit is stacked under a non-LG appliance, or an LG appliance manufactured before 2009.
Drain hose, supply hose or drain pump is frozen
• Thaw out the supply hose using a hot water cloth. • Pour warm water in the drum.
CL is not an error. This prevents children from changing cycles or operating the appliance.
• To deactivate, press the Tub Clean and Extra Rinse button for three seconds.

Memo


مذكرة

مذكرة

٣٨
AR
الحلالسببالأعراض
إن العملية التلقائية لإعادة توازن الحمولة غير ناجحة. تم •عملية إعادة توازن UE غير ناجحة.إيقاف الدورة مؤقتا للسماح بضبط الحمولة يدويا.
أضف مزيدا من الأغراض لتتمكن الغسالة من موازنة •الحمولة صغيرة للغاية.الأحمال.
تم خلط الأغراض الثقيلة مع الملابس ذات قم بغسل الأغراض ذات الأوزان المتشابهة. •الأوزان الأقل.
قم بإعادة توزيع الحمولة إذا كانت الأغراض متشابكة. •الحمولة ليست متوازنة.
افصل قابس الطاقة واتصل بمركز الخدمة للحصول على •عطل في وحدة التحكم.المساعدة.
مستوى الماء مرتفع للغاية بسبب صمام أغلق صنابير الماء، وافصل الغسالة، ثم اتصل بالخدمة. •ماء معيب.
أغلق صنابير الماء، وافصل الغسالة، ثم اتصل بالخدمة. •لا يعمل مستشعر مستوى الماء بشكل صحيح.
حدث خطأ في المحرك.قم بإيقاف تشغيل الغسالة لمدة ٣0 دقيقة ثم أعد تشغيل •
الدورة. في حالة استمرار ظهور الخطأ LE، اتصل بالخدمة.
قم بتشغيل البرنامج "تنظيف الحوض". •حان وقت تشغيل برنامج "تنظيف الحوض".
تعمل غسالة القاعدة دون وجود غسالة من غسالات الحجم العادي.
لا تعمل غسالة القاعدة كوحدة منفصلة. يجب وضعها تحت •.LG غسالة تحميل أمامي من
لا يعمل مفتاح الوحدة بشكل سليم.لن يعمل مفتاح الوحدة بشكل سليم في حالة وضع الوحدة •
تحت جهاز ليس من أجهزة LG، أو جهاز LG تم تصنيعه قبل عام 200٩.
خرطوم التصريف، أو خرطوم الإمداد، أو مضخة التصريف مجمدة
قم بإذابة الثلج من خرطوم الإمداد باستخدام قطعة قماش •مبللة بالماء الساخن.
اسكب ماء دافئا في الحلة. •
لا يعتبر CL خطأ. تمنع هذه الخاصية الأطفال من تغيير الدورات أو تشغيل الجهاز
لإلغاء التنشيط، اضغط على الزر تنظيف الحوض وشطف •إضافي لمدة ثلاث ثوان.

٣٧
AR
رسائل الخطأالحلالسببالأعراض
لم يتم إغلاق الدرج بشكل صحيح
أغلق الدرج واضغط على الزر "بدء/إيقاف مؤقت" لتشغيل •الدورة.
في حالة إغلاق الدرج وعرض رسالة الخطأ الخاصة بقفل •الدرج، يرجى الاتصال بالخدمة.
لم يتم إغلاق الباب بشكل سليم
افتح الدرج وتأكد من عدم وجود ملابس أو عوائق أخرى •عند مكان المزلاج.
أغلق الباب والدرج، ثم اضغط على "بدء/إيقاف مؤقت" •لتشغيل الدورة.
في حالة إغلاق الباب وعرض رسالة الخطأ الخاصة •بالباب، يرجى الاتصال بالخدمة.
صنابير إمداد الماء ليست مفتوحة بشكل تأكد من أن صنابير المياه مفتوحة بشكل كامل. •كامل.
خراطيم خطوط الماء ملتوية، أو مضغوطة، أو محشورة.
تأكد من عدم التواء الخراطيم أو ضغطها. كن حريصا عند •تحريك الغسالة أثناء عملية التنظيف والصيانة.
نظف فلاتر الإدخال. •فلاتر إدخال الماء مسدودة.
ضغط إمداد الماء إلى الصنبور أو المنزل ضعيف جدا.
افحص صنبورا آخر موجود بالمنزل للتأكد من أن ضغط •الماء بالمنزل مناسب ومن عدم احتجاز التدفق. افصل
خرطوم الإمداد عن الغسالة واسكب بعض لترات الماء داخل الخرطوم لتنظيف خطوط إمداد الماء. إذا كان التدفق
ضعيفا جدا، فاتصل بسباك لإصلاح خطوط الماء.
تم توصيل خط إمداد الماء بخراطيم تحد من التسريب.
يمكن أن يتم فصل الخراطيم التي تم تصميمها لتحد من •عمليات التسريب بشكل خاطئ وتمنع ملء الغسالة. لا
يوصى باستخدام خراطيم الحد من التسريب.
خرطوم التصريف ملتو أو مضغوط أو مسدود.
تأكد من عدم انسداد خرطوم التصريف، ومن عدم التوائه، •الخ، ومن عدم الضغط عليه خلف الغسالة أو تحتها.
يتم تفريغ الصرف على ارتفاع أكبر من ١.٢ م من قاعدة الغسالة.
اضبط التصريف أو قم بإصلاحه. الحد الأقصى لارتفاع •التصريف يبلغ 1.2 م.

٣6
AR
الحلالسببالأعراض
لن تقوم الغسالة بتصريف الماء
تأكد من أن خرطوم التصريف غير ملتو. •خرطوم التصريف ملتو.
يوجد مكان التصريف على ارتفاع أعلى من ٢.4 م فوق الأرض.
تأكد من أن ارتفاع خرطوم التصريف لا يزيد عن 2.٤م •من قاعدة الغسالة وأن طوله لا يزيد عن 1.5 م من موضع
الغسالة.
إزالة ضعيفة للبقع
استخدم غسالة التحميل الأمامي. •الحمولة شديدة الاتساخ.
البقع قاسية وقديمة.ربما تكون الأغراض التي تم غسلها سابقا ملوثة ببقع •
قاسية. ربما يصعب إزالة هذه البقع وقد يتطلب الأمر غسلها يدويا أو معالجتها مسبقا للمساعدة في إزالة البقع.
وقت دورة الغسيل أطول من المعتاد
تقوم الغسالة بضبط وقت الغسل تلقائيا حسب كمية الغسيل، وضغط الماء، وشروط التشغيل
الأخرى.
هذا طبيعي. تقوم الغسالة بضبط وقت دورة الغسيل تلقائيا •لتقديم نتائج مثالية للبرنامج المختار. الوقت المتبقي المبين
على شاشة العرض ليس سوى قيمة تقديرية. قد يختلف الوقت الفعلي.
تنبعث رائحة عفونة أو قذارة من الغسالة
تم استخدام المنظف غير المناسب أو كمية كبيرة جدا من المنظف.
لا تحتاج هذه الغسالة إلا لمقدار قليل من المنظف. استخدم •كوب عيار المنظف الذي تم تزويده.
قم بتشغيل برنامج تنظيف الحوض بانتظام. •لم يتم تنظيف الحلة من الداخل جيدا.
تصدر الغسالة صوت جرس بشكل متكرر قبل عملية
الشطف الأخيرة.هذا تحذير للسماح بإضافة منعم الأقمشة السائل قبل عملية •ليس هذا بخطأ.
الشطف الأخيرة.

٣5
AR
الحلالسببالأعراض
الغسالة لا تعمل
تم إيقاف تشغيل لوحة التحكم بسبب التوقف هذا طبيعي. اضغط على زر "الطاقة" لتشغيل الغسالة. •عن التشغيل.
تأكد من توصيل السلك بأمان في مقبس يعمل. •تم فصل الطاقة عن الغسالة.
قم بفتح صنبوري الماء الساخن والبارد بشكل كامل. •تم إيقاف إمداد الماء.
تأكد من ضبط الدورة بشكل صحيح، ثم أغلق الباب •لم يتم ضبط عناصر التحكم بشكل صحيح.واضغط على الزر "بدء/إيقاف مؤقت".
أغلق الباب والدرج وتأكد من عدم انحشار أي من •الباب أو الدرج مفتوح.الأغراض تحت الباب مما يمنعه من الإغلاق بشكل كامل.
قاطع التيار/مصهر مفصول/منصهر.
افحص قواطع التيار/المصهرات. استبدل المصهرات أو •أعد ضبط القاطع. ينبغي تخصيص دائرة كهربائية فرعية خاصة بالغسالة. ستستأنف الغسالة الدورة من حيث توقفت
بمجرد استعادة الطاقة.
اضغط على الزر "طاقة"، ثم أعد اختيار البرنامج المطلوب •ينبغي إعادة ضبط عنصر التحكم.واضغط على الزر "بدء/إيقاف مؤقت".
لم يتم الضغط على "بدء/إيقاف مؤقت" بعد ضبط الدورة.
اضغط على زر الطاقة ثم أعد اختيار البرنامج المطلوب •واضغط على الزر "بدء/إيقاف مؤقت". سيتم إيقاف تشغيل
الغسالة إذا لم يتم الضغط على الزر "بدء/إيقاف مؤقت" خلال ٤ دقائق.
افحص صنبور آخر بالمنزل للتأكد من أن ضغط الماء •ضغط الماء منخفض للغاية.بالمنزل مناسب.
الغسالة باردة للغاية.إذا تعرضت الغسالة إلى درجات حرارة أقل من درجات •
حرارة التجمد لفترة طويلة، فدعها حتى يتم تهيئتها قبل الضغط على الزر "طاقة".

٣٤
AR
الحلالسببالأعراض
لا يتم ملء الغسالة بشكل صحيح.
تأكد من أن فلاتر الإدخال الموجودة عند صمامات الملء •الفلتر مسدود.غير مسدودة. راجع إرشادات تنظيف الفلتر.
تأكد من عدم التواء أو انسداد خراطيم الإمداد. •ربما تكون خراطيم الإمداد ملتوية.
تأكد من فتح صنبوري الماء الساخن والبارد بشكل كامل. •إمداد الماء غير كاف.
الباب والدرج مفتوحان.لن تعمل الغسالة إذا كان الباب مفتوحا. أغلق الباب وتأكد •
من عدم انحشار أي شيء أسفل الباب يمنعه من الإغلاق بشكل كامل.
تم عكس خرطومي إمداد الماء الساخن افحص توصيلات خراطيم الإمداد. •والبارد.
يتم تحديد أفضل مستوى ملء مناسب لحركة الغسيل لتحقيق •مستوى الماء منخفض للغاية.أفضل أداء للغسالة.

٣٣
AR
الحلالسببالأعراض
تسرب الماء
إن توصيل خرطوم الإمداد بالصنبور، أو الغسالة، أو موصل خرطوم التصريف غير
محكم.
افحص الخراطيم وموصلات خرطوم التصريف للتأكد من •عدم وجود تسريب، أو انفصام، أو تشققات.
اربط الخرطوم بإحكام. •
انسداد أنابيب خرطوم التصريف.
تقوم الغسالة بضخ الماء بسرعة كبيرة. افحص الماء الذي •يتم إخراجه من أنبوب التصريف أثناء عملية التصريف.
في حالة مشاهدة الماء يخرج من مخرج التصريف، تحقق من تثبيت خرطوم التصريف بشكل سليم وتحقق من أسباب
انحباس ماء التصريف. اتصل بسباك لإصلاح أنبوب التصريف.
انفصال خرطوم التصريف عن موصل التصريف أو لم يتم إدخاله بالمقدار الكافي.
قم بتثبيت خرطوم التصريف في الأنبوب الرأسي لمنعه •من الانفصال أثناء عملية التصريف. وبالنسبة لأنابيب
التصريف الأصغر حجما، قم بتركيب خرطوم التصريف في الأنبوب إلى أقصى حد في الحافة الدائرية. أما بالنسبة
لأنابيب التصريف الأكبر حجما، قم بتركيب خرطوم التصريف في الأنبوب بمقدار من 2 إلى 5 سم من الحافة
الدائرية.
الحمولة كبيرة جدا على الحلة.قم بتقليل الحمولة أو استخدم غسالة التحميل الأمامي. •قم بإيقاف الغسالة وتحقق من الحمولة. تأكد من عدم تكديس •
الحمولة داخل الحلة ومن سهولة إغلاق الباب.
الكرمشة
أزل دائما الأغراض من الغسالة بمجرد اكتمال الدورة. •عدم إفراغ حمولة الغسالة بشكل سريع.
وضع حمولة زائدة داخل الغسالة.يمكن وضع الحمولة كاملة في الغسالة، ولكن دون تكديس •
كمية كبيرة من الأغراض داخل الحلة. ينبغي أن يتم إغلاق باب الغسالة بسهولة.
تم عكس خرطومي إمداد الماء الساخن والماء البارد.
يمكن أن يؤدي الشطف بالماء الساخن إلى إحداث كرمشة •بالملابس. افحص توصيلات خرطوم الإمداد.
رغوة كثيفة من المنظف.تسريبات الماء
قد ينتج عن الرغوة الكثيفة تسريبات، وربما تحدث بسبب •نوع وكمية المنظف المستخدم. قم دوما بتقليل كمية المنظف
إذا كانت الحمولة صغيرة أو متسخة بشكل خفيف، أو إذا كان الماء يسر للغاية. لا تستخدم أبدا أكثر من الكمية
القصوى الموضحة في الموزع المتوفر.

٣2
AR استكشاف الأعطال وإصلاحهاتم تزويد الجهاز بنظام رصد الخطأ آليا لكشف المشكلات وتشخيصها في مرحلة مبكرة. وإذا لم يعمل الجهاز بشكل صحيح أو لم يعمل على الإطلاق،
فتحقق من التالي قبل الاتصال بالخدمة:
تشخيص المشكلاتالحلالسببالأعراض
قد توجد أجسام غريبة مثل المفاتيح أو القطع صوت الارتجاج والقعقعةالمعدنية أو دبابيس السلامة في حلة الغسل.
قم بإيقاف تشغيل الغسالة، وافحص حلة الغسل بحثا عن •أجسام غريبة. إذا استمر صدور صوت الضجيج بعد إعادة
تشغيل الغسالة، فاتصل لطلب الخدمة.
الغسالة تصدر صوتا غير اعتيادي
قد ينتج عن حمولات الغسيل الثقيلة إصدار صوت غير اعتيادي.
في حالة استمرار الغسالة في إصدار الصوت، فمن •المحتمل أن تكون الغسالة مثبتة بشكل غير متوازن. قم
بإيقاف التشغيل وأعد توزيع حمولة الغسيل.
قم بإيقاف تشغيل الدورة مؤقتا وأعد توزيع الحمولة بعد فك •قد تكون حمولة الغسيل غير متوازنة.قفل الباب.
ضوضاء الاهتزاز
أزل مواد التغليف •لم تتم إزالة مواد التغليف.
قد تكون حمولة الغسيل موزعة بشكل غير متساو في حلة الغسل.
قم بإيقاف تشغيل الدورة مؤقتا وأعد توزيع الحمولة بعد فك •قفل الباب.
عدم استواء جميع أقدام الاستواء على راجع "ضبط مستوى الجهاز" في قسم التركيب. •الأرض وثباتها.
تأكد من أن الأرض صلبة وليست لينة. •الأرض ليست صلبة بما يكفي.
افحص جميع توصيلات الملء والتصريف للتأكد من إحكام •لم يتم تركيب الخراطيم بشكل صحيح.تسرب الماء مع كل حمولةالربط والتوصيل.
مقدار كبير من المنظف أو نوعية منظف غير رغوة كثيفةصحيحة.
قلل كمية المنظف للغسيل المتسخ بشكل عادي. في حالة •استخدام كمية كبيرة من المنظف، سيظل هناك كمية كبيرة
من الفقاقيع بعد عملية الشطف.
لم يتم فرز الملابس بطريقة صحيحة.البقع
اغسل دوما الملابس ذات الألوان الغامقة بشكل منفصل عن •الملابس ذات الألوان الفاتحة والبيضاء لتجنب تغير اللون.
لا تقم أبدا بغسل الأغراض شديدة الاتساخ مع الأغراض •قليلة الاتساخ.

٣1
AR
الخطوة ٣. عند تجمد مضخة التصريفقد يومض رمز , على الشاشة عند حدوث مشاكل •
في مضخة التصريف، لذا يرجى اتخاذ الإجراءات التالية.
اسكب 15 لترا من الماء الدافئ الذي تبلغ درجة حرارته من 50 إلى 60 درجة مئوية داخل الحلة حتى يتم إغراق الصامولة
المجنحة وانتظر لمدة ساعة.
١
اضغط على الزر الطاقة ثم قم بتشغيل برنامج "غسيل للتعقيم" لمدة ساعة.
عند ظهور الرمز على الشاشة، كرر الخطوتين 1 •و2.
٢
أوقف التشغيل عند انتهاء برنامج »غسيل للتعقيم«. إذا كان الدرج مفتوحا، إضغط على خيار شطف + دوران ثم اضغط
على شطف إضافي لزر رقم )٩( واضغط على زر التشغيل / إيقاف مؤقت لتشغيل خيار الدوران«.
٣
اختر برنامج شطف + دوران واضغط على الزر بدء/إيقاف مؤقت للتأكد من عمل الغسالة. 4
عند ظهور الرمز على الشاشة، قم بإذابة الثلج من على الجزء الداخلي من خرطوم التصريف بالماء الساخن.
5
كيفية التعامل مع التجمد
الخطوة ١. عند تجمد البابقم بإذابة الثلج من على الباب باستخدام قطعة قماش مبللة بالماء •
الساخن.
الخطوة ٢. عند تجمد خرطوم إمداد الماءقد يومض رمز على الشاشة عند حدوث مشكلة في إمداد •
الماء، لذا يرجى اتخاذ الإجراءات التالية.أزل خرطوم إمداد الماء ووصله بالصنبور ثم تحقق من −
سريان الماء في الصنبور وخرطوم الإمداد.أغلق الصنبور، وقم بإذابة الثلج من الصنبور وكل من −
منطقتي توصيل خرطوم الإمداد للمنتج باستخدام قطعة قماش مبللة بالماء الساخن.
انزع خرطوم الإمداد واغمره في ماء دافئ تبلغ درجة −حرارته أقل من 50-60 درجة مئوية.
خرطومإمداد 50-60 درجة مئوية

٣0
AR
ملاحظة• .LG عند حدوث تلف بفلتر الوبر، اتصل بمركز خدمةلا تقم بتشغيل الغسالة بدون فلتر الوبر. •لا تقم بتركيب فلتر الوبر دون إحكام إغلاقه. قد يؤدي ذلك إلى •
إتلاف الأقمشة أو الغسالة.
توخ الحذر من التجمد في أثناء الشتاءفي حالة التجمد، لا يعمل المنتج بشكل طبيعي. وتأكد من تثبيت •
المنتج في مكان لن يتجمد فيه في أثناء الشتاء.إذا كان يجب تثبيت المنتج في الخارج في الشرفة أو في ظروف •
خارجية أخرى، فاحرص على التحقق من التالي.
كيفية حماية المنتج من التجمدبعد غلق الصنبور، افصل خرطوم الإمداد البارد من الصنبور، •
وأزل الماء مع الحفاظ على توجيه الخرطوم لأسفل.
خرطوم الإمداد
تنظيف فلتر الوبريعد الفلتر جزءا مهما جدا حيث أنه يؤثر على كفاءة عملية الغسيل، ولذلك
يحتاج إلى عناية خاصة منك. ويوصى بتنظيف الفلتر بانتظام.
اسحب غطاء فلتر الوبر. ١
افتح الغطاء وأزل الوبر ثم قم بغسله. ٢
قم بتركيب الجزء السفلي من الفلتر في الحلة وأغلق الغطاء حتى تسمع صوت طقطقة.
٣

2٩
AR
تنظيف فلتر إدخال الماءأغلق المحبس إذا كان سيتم ترك الغسالة لأي فترة من الوقت •
)على سبيل المثال عطلة(، وخصوصا عند عدم وجود صرف في الأرضية )أخدود( في المنطقة المجاورة مباشرة.
قد يومض الرمز على الشاشة عند ضعف ضغط الماء أو •انسداد فلتر الإدخال بالأوساخ. قم بتنظيف فلتر الإدخال.
قد يتم سد مرشحات فلتر الإدخال برواسب من الماء العسر، أو •برواسب إمداد الماء، أو بمخلفات أخرى.
أغلق صنبور الماء وفك خرطوم إدخال الماء. ١
نظف الفلتر باستخدام فرشاة خشنة وصلبة. ٢
تنظيف الحوضاستخدم هذا الخيار للاحتفاظ بحلة الغسيل نظيفة عن طريق تعقيمها من
الجراثيم الموجودة داخل الحلة.
اضغط على الزر الطاقة. ١
قم بتخفيف 200 ميللي من مبيض الكلور السائل في لتر من الماء وقم بسكب المزيج داخل الحلة.
٢
اضغط على زر تنظيف الحوض لضبط الوقت المطلوب. ٣
اضغط على الزر بدء/إيقاف مؤقت. 4
تنبيهفي حالة وجود طفل، توخ الحذر من إبقاء الباب مفتوحا لفترة •
طويلة جدا.

2٨
AR الصيانةتنظيف داخلي
استخدم فوطة أو قطعة قماش ناعمة لمسح المنطقة المحيطة بفتحة •باب الغسالة وزجاج الباب.
أزل دائما الأغراض من الغسالة بمجرد اكتمال الدورة. قد يتسبب •ترك الملابس مبللة داخل الغسالة في كرمشتها، وفقدان لونها،
وتغير رائحتها.شغل برنامج "تنظيف الحوض" مرة واحدة في الشهر )أو أكثر من •
مرة حسب الحاجة( لإزالة تراكمات المنظف والبقايا الأخرى.
تحذيرافصل الغسالة قبل التنظيف لتجنب خطر التعرض لصدمة •
كهربائية. قد يؤدي عدم اتباع هذا التحذير إلى التعرض إلى إصابة خطيرة، أو نشوب حريق، أو التعرض لصدمة كهربائية، أو
حدوث وفاة.لا تستخدم أبدا موادا كيميائية مركزة، أو منظفات كاشطة، أو •
مذيبات لتنظيف الغسالة. قد يتسبب ذلك في تلف تشطيب الغسالة.
تنظيف الغسالةالعناية بعد الغسيل
بعد انتهاء الدورة، امسح الباب وداخل مانعة تسريب الباب لإزالة •أي رطوبة.
اترك الباب مفتوحا لتجفيف حلة الغسل من الداخل. •امسح هيكل الغسالة بقطعة قماش جافة لإزالة أي رطوبة. •
تنظيف الهيكل الخارجييمكن أن تزيد العناية المناسبة لغسالتك من عمرها الافتراضي.
الباب:امسح الجزء الداخلي والخارجي باستخدام قطعة قماش مبللة ثم •
جفف باستخدام قطعة قماش ناعمة.
الهيكل الخارجي:امسح أي تسريبات على الفور. •امسح باستخدام قطعة قماش مبللة. •لا تضغط على السطح أو على شاشة العرض باستخدام أدوات •
حادة.

2٧
AR الوظائف الذكيةبمجرد انتهاء العد التنازلي وتوقف النغمات، تابع محادثتك مع
وكيل مركز الاتصال الذي سيتمكن من مساعدتك باستخدام المعلومات المرسلة للتحليل.
5
ملاحظةتعتمد وظيفة ™Smart Diagnosis على جودة المكالمة •
المحلية.سوف يتحسن أداء الاتصال ويمكنك تلقي خدمة أفضل في حالة •
استخدام هاتف المنزل.إذا كان نقل بيانات ™Smart Diagnosis رديئا بسبب تدني •
جودة المكالمة، فقد لا تتلقى أفضل خدمة .Smart Diagnosis™
Smart Diagnosis™ استخدام وظيفةاستخدم هذه الوظيفة إذا كنت بحاجة إلى تشخيص دقيق من مركز خدمة LG Electronics عند تعطل المنتج أو توقفه عن العمل. لا تستخدم
هذه الوظيفة إلا للاتصال بممثل الخدمة، وليس أثناء عمليات التشغيل العادية.
اضغط فوق زر الطاقة لتشغيل الغسالة. لا تضغط على أي أزرار أخرى ولا تقم بتدوير مقبض تحديد الدورة.
١
إذا تم توجيهك إلى القيام بذلك من خلال مركز الاتصال، فضع صوان التكلم في هاتفك بالقرب من زر الطاقة.
Max.
10 mm
٢
اضغط مع الاستمرار على زر تنظيف الحوض لمدة ٣ ثوان، مع الاستمرار في الإمساك بصوان التكلم في الهاتف فوق
الأيقونة أو زر الطاقة.
٣
أبق الهاتف في مكانه حتى تنتهي نغمة النقل. ويتم عرض الوقت المتبقي لنقل البيانات.
للحصول على أفضل النتائج، لا تحرك الهاتف في أثناء نقل •النغمات.
إذا لم يتمكن موظف مركز الاتصال من الحصول على •تسجيل دقيق للبيانات، فقد يطلب منك إعادة المحاولة.
مركز خدمةLG Electronics
4

26
AR
القفل ضد عبث الأطفالاستخدم هذا الخيار لتعطيل أدوات التحكم. يمكن أن يمنع هذا الخيار
الأطفال من تغيير الدورات أو تشغيل الجهاز.
قفل لوحة التحكماضغط باستمرار على زر تنظيف الحوض وشطف إضافي في
نفس الوقت لمدة ثلاث ثوان.١
سيظهر على الشاشة. عند ضبط قفل الأطفال، يتم قفل جميع الأزرار باستثناء زر
الطاقة.
٢
ملاحظةلن يؤدي إيقاف تشغيل الطاقة أو إكمال جميع الدورات إلى إعادة •
ضبط وظيفة قفل الأطفال. يجب إلغاء تفعيل القفل للأطفال لتتمكن من الوصول إلى أي وظائف أخرى.
إلغاء قفل لوحة التحكماضغط باستمرار على زر تنظيف الحوض وشطف إضافي في نفس
الوقت لمدة ثلاث ثوان.لتغيير الدورة أو الخيار، اضغط على الزر بدء/إيقاف مؤقت •
لإيقاف العملية، ثم اختر الدورة أو الخيار الذي ترغب في تغييره.
خيارات البرامجتنظيف الحوض
استخدم هذا الخيار للاحتفاظ بحلة الغسيل نظيفة عن طريق تعقيمها من الجراثيم الموجودة داخل الحلة. للحصول على معلومات حول استخدام
"تنظيف الحوض"، راجع قسم "تنظيف الغسالة".
شطف إضافياستخدم هذا الخيار لزيادة عدد برامج الشطف.
اضغط على الزر الطاقة. ١
حدد برنامج الغسيل. ٢
اضغط على زر شطف إضافي لضبط الوقت المطلوب.عند الضغط على زر شطف إضافي، سيتم عرض عدد •
دورات الشطف المراد إضافتها )1 - 5(.
٣
اضغط على الزر بدء/إيقاف مؤقت. 4

25
AR
ملاحظةالوصفالبرنامجالحد الأقصى
للحمولة
غسيل للتعقيماستخدم هذا البرنامج لغسل الملابس الداخلية أو ملابس الأطفال لتعقيمها
وتبيضها.
يتم غسل الملابس جيدا في هذا البرنامج نظرا لغسلها عند •درجة حرارة مرتفعة. استخدم نصف مقدار المنظف الموصى
به من قبل الشركة المصنعة للحمولة العادية.لا تغسل الملابس البيضاء أو ذات الألوان الفاتحة مع الملابس •
ذات الألوان الداكنة التي ربما تبهت ألوانها.إن غسل الملابس الملوثة ببقع دماء أو لبن قبل عملية الغسل •
الأساسية لمدة قصيرة بالماء البارد قد يكون أكثر فاعلية في إزالة البقع.
يتم تسخين الماء باستخدام نظام التدفئة الخاص بالغسالة في •هذا البرنامج.
وظيفة التخلص من الفقاقيع: في حالة استخدام كمية كبيرة من •المنظف، ربما يتم تشغيل وظيفة التخلص من الفقاقيع.
وظيفة خفض درجة حرارة ماء التصريف: لأسباب تتعلق •بالأمان، يتم تزويد ماء بارد قبل تصريف الماء لخفض درجة
حرارة الماء.
1.5 كجم
استخدم هذا البرنامج لغسل ملابس ملابس الأطفالالأطفال بطريقة صحية.
اختر نوعا مناسبا من المنظفات المحايدة. •يتم غسل الملابس عند درجة حرارة مرتفعة لتعقيمها والتخلص •
من العث.إن غسل الملابس الملوثة ببقع الطعام، والعرق، والبول، •
والبراز قبل عملية الغسيل الأساسية لمدة قصيرة يكون أكثر فاعلية.
لا يوصى باستخدام هذا البرنامج مع الملابس المصنوعة من •الصوف، أو الحرير، أو الأغراض الأخرى الرقيقة، نظرا
لدرجة الحرارة المرتفعة.
1.5 كجم
اختر هذا البرنامج لشطف وتنشيف شطف + دوران1.5 كجملا تقم إلا بإضافة منعم الأقمشة فقط. •حمولة بشكل منفصل عن الدورة العادية.

2٤
AR
جدول البرامجبرنامج الغسيل
ملاحظةالوصفالبرنامجالحد الأقصى
للحمولة
غسيل عادياستخدم هذا البرنامج لغسل الملابس قليلة
الاتساخ، ما عدا الأقمشة الناعمة مثل الصوف والحرير.
يؤدي الضغط على الزر بدء/إيقاف مؤقت دون تحديد أحد •البرامج إلى بدء البرنامج "العادي" فورا باستخدام الإعدادات
الافتراضية.٣.5 كجم
غسيل سريعاستخدم هذا البرنامج لتسريع الوقت
المستغرق لغسيل كميات صغيرة والبقع البسيطة.
1 كجماستخدم كمية صغيرة جدا من المسحوق. •
الملابس الداخلية / الصوف
استخدم هذا البرنامج لغسل الملابس، أو الملابس الداخلية للسيدات، أو
الملابس الرقيقة التي ربما تكون عرضه للانكماش أو التلف.
لتقليل التلف الذي تتعرض له الملابس وتحسين فاعلية الغسيل، •استخدم منظف محايد خاص بالمنسوجات الصوفية.
لتجتب تلف الملابس، تدور الحلة بلطف ناحية اليسار واليمين •أثناء عملية الغسيل.
1.5 كجم

2٣
AR
لوحة التحكم
1 2
3
5
NormalSpeed WashLingerie/Wool
Boil WashBaby WearRinse+Spin
شاشة العرض
توضح الشاشة حالة الدورة والوقت المقدر الباقي. •: مؤشر قفل الدرج •: مؤشر قفل الباب •: مؤشر قفل الأطفال •
3
زر البرامج
تتوفر البرامج وفقا لنوع الغسيل. •4
الخيارات
استخدم هذه الأزرار في تحديد خيارات الدورة المطلوبة •للبرنامج المحدد.
تضئ مصابيح الإعدادات الموجودة فوق الأزرار لإظهار •التحديد الحالي.
5
زر الطاقة
اضغط فوق زر الطاقة لتشغيل الغسالة. •ملاحظة
في حالة وجود ماء داخل حلة الغسيل بعد توقف الغسالة عن •العمل، سيتم تصريف الماء في غضون الأربع دقائق التالية. ويمكن إعادة تشغيل الغسالة في أي وقت قبل أن تبدأ عملية تصريف الماء. ولكن، بمجرد أن يبدأ تصريف الماء، سيتم تعليق جميع الوظائف حتى يتم تصريف الماء بشكل كامل
وإيقاف تشغيل الغسالة.
1
زر بدء/إيقاف مؤقت
يستخدم هذا الزر بدء/إيقاف مؤقت لبدء دورة الغسيل أو •إيقافها مؤقتا.
في حالة الحاجة إلى إيقاف دورة الغسيل مؤقتا، اضغط على •الزر بدء/إيقاف مؤقت.
ملاحظةإذا لم تقم بالضغط على الزر بدء/إيقاف مؤقت خلال أربع •
دقائق من تحديد البرنامج، يتم إيقاف تشغيل الغسالة تلقائيا وفقدان جميع إعدادات الدورة. وسيتم تصريف أي مياه
موجودة داخل الحوض.
2

22
AR
إضافة منقي الماء•يمكن استخدام منقي الماء، مثل مقاوم الرواسب الكلسية )مثل •
كالجون(، للتقليل من استخدام المنظفات في المناطق ذات الماء العسر. ويتم التوزيع وفقا للكمية المحددة على العبوة. يتعين عليك
أولا إضافة المنظف ثم منقي الماء.استخدم كمية المنظف المطلوبة للماء المنقى. •
تنبيهلا تضع المبيض على الغسيل بشكل مباشر. قد يؤدي ذلك إلى •
تغيير اللون بشكل جزئي وإلحاق ضرر شديد بالغسيل.لا تستخدم مبيض الكلور أو المنظف الحمضي عند الغسل، فقد •
يؤدي إلى إتلاف الملابس كأن يتغير لون الغسيل ويفقد لونه.
إضافة المواد المنعمة
إضافة منعم القماشالحالة ١. عند إصدار الغسالة لصوت جرس:
اضغط على بدء/إيقاف مؤقت لإيقاف الدورة مؤقتا. ١
أضف منعم القماش السائل. ٢
قم بإغلاق الباب، وإزلاق الدرج لإغلاقه، ثم اضغط على بدء/إيقاف مؤقت لإعادة تشغيل الدورة. ٣
ملاحظةلتمكين تحذير منعم الأقمشة أو تعطيله، اضغط على الزر شطف •
إضافي باستمرار لمدة ثلاث ثواني.
الحالة ٢. إذا أغفلت مرحلة إضافة المنعم:اضغط على زر الطاقة لإيقاف الدورة. ١
حدد البرنامج شطف + دوران واضغط على الزر بدء لتشغيل الدورة. أضف منعم الأقمشة عند إصدار صوت الجرس.
٢
قم بإغلاق الباب، وإزلاق الدرج لإغلاقه، ثم اضغط على بدء/إيقاف مؤقت لإعادة تشغيل الدورة. ٣
ملاحظةلا تسكب منعم القماش على الملابس مباشرة. •يمكن أيضا تخفيف المنعم بالماء وإضافته مباشرة إلى حلة الغسيل. •
لا تسكب المنعم غير المخفف بشكل مباشر على الملابس حيث قد يتسبب ذلك في إحداث بقع على الملابس.

21
AR
إضافة المنظفقم بمعايرة المنظف باستخدام درج توزيع المنظف واسكبه في
الحوض.
استخدم كوب عيار المنظف المزود لإضافة كوب واحد فقط من •المنظف.
قلل كمية المنظف للغسيل المتسخ بشكل عادي. في حالة استخدام •كمية كبيرة من المنظف، سيظل هناك كمية كبيرة من الفقاقيع بعد
عملية الشطف.
إضافة منتجات التنظيفمقدار المنظف
يجب استخدام المنظف وفقا لتعليمات الشركة المصنعة للمنظف، •واختيارها وفقا لنوع الأقمشة، ولونها، ومدى اتساخها، ودرجة
حرارة الغسيل.عند استخدام مقدار كبير من المنظف، فقد تحدث رغوة كثيرة •
جدا وهذا يقلل من كفاءة الغسيل أو يؤدي إلى ثقل الحمولة على المحرك.
إذا كنت ترغب في استخدام منظف سائل، فاتبع الإرشادات التي •توفرها الشركة المصنعة للمنظف.
في حالة حدوث الكثير من الرغاوي، يتعين عليك تقليل كمية •المنظف.
قد تحتاج إلى تعديل مقدار استخدام المنظف حسب درجة حرارة •الماء، وعسر الماء، وحجم الحمولة، ومستوى الأوساخ. للحصول
على أفضل النتائج، تجنب حدوث رغاو زائدة عن الحد.راجع ملصق الملابس، قبل اختيار المنظف ودرجة حرارة الماء. •عند استخدام الغسالة، لا تستخدم إلا المنظفات المخصصة لكل نوع •
من أنواع الملابس:منظفات المساحيق العامة لجميع أنواع الأقمشة −منظفات مساحيق للأقمشة الحساسة −المنظفات السائلة لجميع أنواع الأقمشة أو المنظفات −
المخصصة للصوف فقطللحصول على غسيل وتبيض أفضل، استخدم المنظف الذي يحتوي •
على مبيض المسحوق العام.

20
AR
في حالة تعذر فتح الدرج بشكل كامل، اسحب الدرج إلى الأمام •ببعض القوة مستخدما كلتا يديك.
في حالة انقطاع التيار الكهربائي أثناء تشغيل المنتج، سيتعذر فتح •الباب. قم بإمداد المنتج بالتيار الكهربائي مرة أخرى أو اتصل
بمركز خدمة LG. )في حالة الغسيل بالماء الساخن، قد لا يتم فتح الباب بعد إمداد المنتج بالطاقة مرة أخرى بسبب درجة الحرارة
المرتفعة الموجودة داخل الغسالة(.في حالة تعذر فتح الباب بسبب الحرارة العالية، قم بعملية الشطف •
بالماء البارد باستخدام البرنامج الشطف +العصر أو انتظر لفترة قبل فتح الباب.
إغلاف الباب والدرجاضغط على باب الغسالة حتى يصدر صوتا. ١
اضغط عل الدرج حتى يتم إغلاقه بشكل كامل. ٢تنبيه
احرص على تجنب انحشار يدك بين الباب والغسالة، حيث يمكن •أن يعرضك ذلك للإصابة.
قد يؤدي فتح الدرج أو الباب عنوة إلى حدوث تلف بأجزاء الغسالة •ويعرض سلامتك للخطر.
قد يؤدي إغلاق الدرج قبل إغلاق الباب بشكل كامل إلى إحداث •خدوش بالباب الزجاجي.
تأكد من سحب الدرج بشكل كامل لتجنب ملامسة الباب لغسالة •التحميل الأمامي.
ملاحظةقد يتعذر تأمين قفل الباب إذا كان هناك كمية كبيرة من الغسيل في •
الغسالة أو إذا لم يتم إغلاق الباب بإحكام.( ظاهرا • إذا كان المنتج قيد التشغيل أو كان مؤشر قفل الدرج )
بشاشة العرض، فسيتعذر فتح الباب. لفتح الباب، اضغط على الزر بدء/إيقاف مؤقت لإيقاف لتشغيل المنتج، وعند اختفاء مؤشر قفل
(، افتح الباب. لا تحاول فتح الدرج والباب عنوة. الدرج )( أو علامة تحذير على • , , في حالة ظهور )
الشاشة، أغلق الدرج والباب تماما. وبعد ذلك اضغط على الزر بدء/إيقاف مؤقت.

1٩
AR
العناية قبل وضع الحمولة.لا تقم بغسل الملابس النسائية الداخلية التي تحتوي على •
"سلك معدني" )مثل حمالة الصدر( حيث قد تؤدي إلى إتلاف الملابس الأخرى أو الغسالة وقد يحدث صوتا.
افحص جميع الجيوب للتأكد من أنها فارغة. فقد تؤدي أشياء •مثل المسامير، ومشابك الشعر، والثقاب، والأقلام، والقطع المعدنية، والمفاتيح الى إحداث ضرر في كل من الغسالة
وملابسك.
أغلق السحابات، والخطافات، والسلاسل للتأكد من أن هذه •الأغراض لن تعلق بالملابس الأخرى.
امسح الأوساخ والبقع من خلال وضع مقدار صغير من •المنظف المذاب في الماء على البقع وغسلها للمساعدة في
إزالة الأوساخ.في حالة وجود حزام طويل بإحدى قطع الملابس، قم بتسويته •
بحيث لا يتشابك أو ضعه في الشبكة الخاصة بالغسيل.أزل الحشوات الداخلية للمساند، أو الوسائد، أو أبسطة •
الجلوس، واغسل فقط الأغطية. فقد تخرج الأجزاء الداخلية منها، وتتلف الغسيل. ربما تؤدي القطع المصنوعة من
البلاستيك إلى إحداث اهتزازات غير عادية.
٣
تنبيهقسم الملابس في أقسام من أجل الغسيل بحيث يمكن غمر الملابس •
تحت الماء بشكل كامل. علما بأنه إذا تمددت الملابس أثناء الغسيل ، قد يؤدي ذلك إلى تلف الملابس والأجزاء خلال الغسيل أو
التنشيف.
فرز الغسيلابحث عن ملصق العناية الموجود على ملابسك.
سيوضح لك هذا الملصق محتويات أقمشة ملابسك وطريقة •غسلها.
الرموز الموجودة على ملصق العناية. •
درجة حرارة الغسيل
الغسيل في غسالة عادية
طبعة دائمة
غسيل ناعم
غسيل يدوي
ممنوع الغسل
١
فرز الغسيل.للحصول على أفضل النتائج، افرز الملابس إلى أنواع يمكن •
غسلها في دورة الغسيل نفسها.تحتاج الأقمشة المختلفة إلى درجات حرارة وسرعات دوران •
مختلفة عند غسلها.اغسل منشفتين أو قطعتين من القماش معا. عند الغسيل بشكل •
منفصل، فإن الملابس التي تمتص الكثير من الماء قد لا تكون مغسولة بشكل جيد أو قد يحدث تجفيف بشكل غريب
بسب الميل.افرز دائما الملابس ذات الألوان الغامقة عن الملابس ذات •
الألوان الباهتة والملابس البيضاء. واغسلها بشكل منفصل حيث إن الصبغة والوبر قد تنتقل بين الملابس، مما قد يؤدي
إلى تغيير لون الملابس البيضاء والفاتحة. ولا تغسل الملابس شديدة الاتساخ مع الملابس قليلة الاتساخ إذا كان ذلك ممكنا.
اتساخ )شديد، عادي ، خفيف( : −افرز الملابس وفقا لدرجة اتساخها.
اللون )أبيض، فاتح، غامق( : −افصل المنسوجات البيضاء عن المنسوجات الملونة.
الوبر )منتجات وبرية، منتجات تجذب الوبر( : −اغسل المنتجات المنتجة للوبر والمنتجات المجمعة للوبر
بشكل منفصل عن بعضها البعض.
٢

1٨
AR التشغيلاختيار دورة الغسيل المطلوبة.
اضغط زر اختيار الدورات بشكل متكرر حتى يتم تحديد •الدورة المطلوبة.
5
بدء الدورة.اضغط على الزر بدء/إيقاف مؤقت لبدء الدورة. وستهتز •
الغسالة لفترة قليلة بدون وجود ماء لتقيس وزن الحمولة. وإذا لم يتم الضغط على الزر بدء/إيقاف مؤقت خلال 5 دقائق، فستتوقف الغسالة عن العمل وسيتم فقدان جميع الإعدادات.
6
أضف المنعم.بعد أن تقوم الغسالة بإصدار صوت جرس يستمر لمدة 20 •
ثانية تقريبا، أضف المنعم واضغط على بدء/إيقاف مؤقت لإعادة تشغيل الدورة.
٧
إنهاء الدورة.سيصدر صوت نغمة عند إنهاء الدورة. وعلى الفور أخرج •
ملابسك من الغسالة للتخلص من الكرمشة والروائح.وبعد اكتمال عملية الغسيل، قم بمسح باب الغسالة، والحشية، •
وحلة الغسيل بمنشفة جافة لتنظيفها.
٨
استخدام الجهازافرز الغسيل وضع الملابس.
افرز الغسيل حسب نوع النسيج، ومستوى الأوساخ، واللون، •وحجم الحمولة حسب الحاجة. ثم افتح الباب وضع الملابس
داخل الغسالة.
١
أضف منتجات التنظيف.أضف الكمية المناسبة من المنظف باستخدام كوب عيار •
المنظف إلى حلة الغسيل بهدوء.
٢
أغلق الباب والدرج. ٣تشغيل الغسالة.
اضغط على زر الطاقة لتشغيل الغسالة. •4

1٧
AR
استخدام شرائح مانعة للانزلاق )عنصر اختياري(عند تركيب الجهاز على سطح زلق، قد تتحرك الغسالة نتيجة للاهتزاز الشديد. ويمكن أن تؤدي التسوية غير الصحيحة إلى حدوث عطل من
خلال الضوضاء والاهتزاز. في حالة حدوث ذلك، يتعين عليك تركيب شرائح مانعة للانزلاق أسفل أرجل الاستواء وضبط المستوى.
نظف الأرضية لوضع الشرائح المانعة للانزلاق.استخدم قطعة قماش جافة لإزالة الأجسام الغريبة والرطوبة •
وتنظيفها. وإذا ظل بالمكان بعض الرطوبة، فقد تنزلق الشرائح المانعة للانزلاق.
١
اضبط المستوى بعد وضع الجهاز في منطقة التركيب. ٢
ضع الجانب اللاصق للشرائح المانعة للانزلاق على الأرض.يعد تثبيت الحشيات المضادة للانزلاق تحت الأرجل الأمامية •
ذا تأثير أكثر فاعلية. إذا كان من الصعب وضع الحشيات المانعة للانزلاق تحت الأقدام الأمامية، فضعها تحت الأقدام
الخلفية.هذا الجانب العلوي
الجانب اللاصق
٣
تأكد من استواء الجهاز.ادفع الحواف العلوية للغسالة أو قم بهزها بلطف للتأكد من •
عدم اهتزازها. وفي حالة اهتزاز الجهاز، قم بتسويته مرة أخرى.
4
ملاحظةيمكنك الحصول على شرائح مانعة للانزلاق من مركز خدمة •
.LG
ضبط مستوى الجهازإذا كانت الأرضية غير مستوية، فأدر الأقدام القابلة للضبط حسب الحاجة
)لا تضع قطع الخشب وما إلى ذلك تحت الأقدام(. تأكد من أن جميع الأقدام الأربعة مستقرة وثابتة على الأرض ثم تأكد من أن الجهاز مستو
تماما على الأرض )استخدم ميزان الماء(.بمجرد أن يصبح الجهاز مستويا، أحكم ربط صواميل القفل باتجاه •
قاعدة الجهاز. ويجب إحكام ربط كل صواميل القفل.
رفع خفض
صامولة القفل
أحكم ربط جميع صواميل القفل الأربعة
الفحص القطريعند الضغط على حواف اللوحة العلوية للجهاز بشكل قطري •
لأسفل، يجب ألا يتحرك الجهاز لأعلى ولأسفل على الإطلاق )افحص كلا الاتجاهين(. وفي حالة اهتزاز الجهاز عند دفع اللوحة
العلوية للجهاز بشكل قطري، قم بضبط الأقدام مرة أخرى.
تحذيرعند وضع غسالة التحميل الأمامي فوق غسالة القاعدة، استخدم •
أقدام الاستواء الموجودة في غسالة القاعدة لضبط الاستواء للغسالتين. ينبغي تصغير أقدام الاستواء لغسالة التحميل الأمامي
وربط الصواميل الخاصة بها عكس اتجاه عقارب الساعة لتأمينها.
ملاحظةيمكن أن تحدث الأرضيات الخشبية أو المعلقة اهتزازا عنيفا وعدم •
اتزان.عند تركيب الغسالة على قاعدة مرتفعة، يجب تثبيتها بإحكام للحد •
من خطر سقوطها.

16
AR
استخدام موصل خرطوم التصريفقم بتوصيل خرطوم التصريف الخاص بغسالة التحميل الأمامي وخرطوم
التصريف في غسالة القاعدة بموصل التصريف. قم بتركيب مشابك الخراطيم المصنوعة من السلك عند طرفي كل من خرطومي التصريف.
ادفع خرطومي التصريف بقوة في موصل التصريف. ثبت مشابك الخراطيم المصنوعة من السلك بإحكام لمنع الانفصال أو التسريب. يمكن
أن يؤدي عدم القيام بذلك إلى غمر الأرضية بالماء. يساعد استخدام موصل التصريف في تجنب الطرد، أو الروائح، أو التصريف غير
المناسب.
موصلخرطوم التصريف
تركيب خرطوم التصريفلا يجب وضع خرطوم التصريف على ارتفاع أعلى من 100 سم •
عن الأرض. قد يتعذر تصريف الماء الموجود في الجهاز أو يتم تصريفه ببطء.
قم بتركيب مشبك الخرطوم في كوع خرطوم التصريف.
مشبك الخرطوم
كوع خرطوم التصريف
١
مع توجيه الخرطوم نحو الأعلى من ناحية الكوع، أدخل الكوع في مخرج الصرف الموجود بالجزء الخلفي من غسالة القاعدة.
٢
ثبت مشبك الخرطوم بإحكام في موضعه لمنع حدوث أي تسريب.
مشبك الخرطوم
٣

15
AR
توصيل الخرطوم بالغسالتينقم بتوصيل موصل خرطوم إمداد الماء بخرطوم إمداد الماء
الخاص بغسالة التحميل الأمامي. افتح عبوة الملحقات الخاصة بتركيب غسالة القاعدة.
موصل خرطومإمداد الماء
لوحالكبس
١
ركب خرطوم إمداد الماء الخاص بغسالة القاعدة في موصل خرطوم إمداد الماء الخاص بغسالة القاعدة المراد تركيبها.
الحشيةالمطاطية
الحشيةالمطاطية
٢
قم بتوصيل خرطوم إمداد الماء الذي يتم تزويده مع غسالة التحميل الأمامي بموصل خرطوم إمداد الماء وصنبور الماء.
موصل خرطوم إمداد الماء
٣
أزل لوحة التوجيه إذا كان الصنبور كبيرا جدا حتى يلائم المحول.
لوحة التوجيه
٢
ادفع المحول إلى طرف الصنبور بحيث تشكل الحشية المطاطية وصلة منيعة للماء. أحكم ربط مسامير التثبيت الأربعة واللوحة
الحلقية للمحول.
٣
اسحب لوحة مزلاج الموصل إلى أسفل، وادفع خرطوم الإمداد إلى المحول، وحرر لوحة مزلاج الموصل. وتأكد أن أقفال
المحول في مكانها.
لوحة المزلاج
4
ملاحظةبعد توصيل خرطوم الإمداد بصنبور الماء، قم بتشغيل صنبور •
الماء لطرد المواد الغريبة )الغبار، والرمل، ونشارة الخشب، وما إلى ذلك( الموجودة في خطوط الماء. واترك ماء الصرف في دلو،
وتحقق من درجة حرارة الماء.

1٤
AR
ادفع المحول إلى طرف الصنبور بحيث تشكل الحشية المطاطية وصلة منيعة للماء. وأحكم ربط مسامير التثبيت الأربعة.
٣
ادفع خرطوم الإمداد بشكل عمودي لأعلى بحيث يمكن للسدادة المطاطية الموجودة داخل الخرطوم أن تلتصق بالصنبور تماما ثم
أحكم ربطه عن طريق إدارته إلى اليمين.
لوحة
خرطومإمداد
4
توصيل خرطوم من نوع اللمسة الواحدة بالصنبور غير المزود بأسنان
فك اللوحة الحلقية للمحول وحرر مسامير التثبيت الأربعة.
لوحة حلقية
١
توصيل الخرطوم بصنبور الماء
توصيل الخرطوم اللولبي بالصنبور المزود بأسنانثبت موصل الخرطوم بصنبور إمداد الماء.
فك مسامير التثبيت الأربعة.
موصلعلوي
سدادةمطاطية
مسمار التثبيت
١
أزل لوحة التوجيه إذا كان الصنبور كبيرا جدا حتى يلائم المحول.
لوحة التوجيه
٢

1٣
AR
التحقق من السدادة المطاطية بخرطوم الإمدادتتوفر سدادتان مطاطيتان مع خرطومي إمداد الماء، حيث يتم استخدامهما
لمنع تسرب الماء. تأكد من إحكام التوصيل بالصنابير للغاية.
موصل الخرطوممانعة تسريب مطاطية
موصل الخرطوممانعة تسريب مطاطية
تحذيرهذه الغسالة من طراز غسالات القاعدة يجب تركيبها تحت غسالة •
LG متوافقة من طرازات التحميل الأمامي المصنوعة بعد عام 200٩. )الغسالات سعة من 16 إلى 21 كجم فقط(
لا تعمل غسالة القاعدة كوحدة منفصلة. •• LG ينبغي وضع غسالة القاعدة أسفل غسالة التحميل الأمامي من
لتعمل بشكل جيد.
توصيل خرطوم الإمداديجب أن يكون ضغط إمداد الماء ما بين 0.1 ميجا باسكال و0.٨ •
ميجا باسكال )1.0‒٨.0 كجم ثقلي/سم2(.لا تقم بإزالة الخيط أو تنزعه عند توصيل خرطوم الإمداد •
بالصمام.إذا كان ضغط إمداد الماء أعلى من ٨.0 ميجا باسكال، فيجب •
تركيب جهاز تخفيف الضغط.تحقق من حالة الخرطوم بصورة دورية واستبدله إذا لزم الأمر. •
موصل الخرطوم
مانعة تسريب مطاطية
موصل الخرطوممانعة تسريب مطاطية

12
AR
وضع غسالة القاعدةتأكد من أن أقدام الاستواء الموجودة في غسالة التحميل الأمامي
قد تم طيها تماما قبل التثبيت. ضع غسالة التحميل الأمامي فوق غسالة القاعدة. وتأكد من أن الفتحات الموجودة في غسالة القاعدة محاذية للفتحات الموجودة في غسالة التحميل الأمامي.
فتحات التثبيت
فتحات التثبيت
١
قم بتركيب الأربعة براغي الطويلة )الموجودة داخل الصندوق( عند كل ركن لتثبيت غسالة التحميل الأمامي بغسالة القاعدة
بأمان.
براغي طويلة
٢
أدر أقدام غسالة التحميل الأمامي قليلا حتى تلتصق بغسالة القاعدة.
٣
تفريغ محتويات الصندوق وإزالة مواد التغليفارفع الجهاز عن القاعدة المصنعة من الفوم.
إذا لزم قلب الغسالة لأسفل لإزالة القاعدة الكرتونية، فيجب •عليك دائما حماية جانب الغسالة وقلبها بحذر على جانبها. لا
تقلب الجهاز على الجانب الأمامي أو الخلفي.
١
انزع مواد التغليف واحتفظ بها للاستفادة منها في المستقبل.إذا اقتضى الأمر نقل الغسالة في المستقبل، فستساعدك مواد •
التغليف على منع إلحاق الضرر بالغسالة أثناء عملية النقل.
٢
ملاحظةلمنع إلحاق الضرر بغسالة الملابس، لا تقم بإزالة مواد التغليف •
عنها حتى يتم وضعها في المكان المخصص لها.
أدر الغطاء العلوي بمقدار 1٨0 درجة تقريبا.قم بتغطية الفتحة العلوية بالغطاء العلوي وضع به المسامير •
الأربعة القصيرة )الموجودة بصندوق التغليف( لتثبيته في مكانه.
البراغي القصيرة
الغطاء العلوي
٣
تحذيريجب تثبيت الغطاء العلوي لتجنب التعرض إلى صدمة كهربائية أو •
حدوث قصور بالدائرة الكهربية بسبب قطرات الماء. قد يؤدي عدم الالتزام بهذه الإرشادات إلى التعرض لإصابة خطيرة أو نشوب
حريق أو صدمة كهربائية أو الوفاة.

11
AR
لا تركب الجهاز في غرف يمكن أن تصل درجة حرارتها إلى •التجمد، حيث يمكن أن تنفجر الخراطيم المتجمدة تحت الضغط.
يمكن أن تقل كفاءة وحدة التحكم الإلكترونية في ظل درجات الحرارة الأقل من درجة التجمد.
تأكد عند تركيب الجهاز من سهولة وصول المهندس إليه في حالة •تعطله.
عند تركيب الجهاز، يتعين عليك تعديل الأقدام الأربعة مستخدما •مفتاح ربط لمسامير النقل للتأكد من استقرار الجهاز، ووجود
مسافة بمقدار 20 مم بين قمة الجهاز والجزء السفلي لأي سطح عمل أعلاها.
في حالة الحصول على الجهاز في الشتاء وكانت درجات الحرارة •أقل من درجة التجمد، فضع الجهاز في درجة حرارة الغرفة لبضع
ساعات قبل تشغيله.لا تستخدم وعاء للتصريف، لأنه قد يعيق الدرج. كما قد يؤدي •
استخدام وعاء تصريف إلى زيادة الاهتزاز والضوضاء أثناء التشغيل.
تحذيرلم يتم تصميم هذا الجهاز للاستخدام البحري أو للاستخدام في •
المنشآت المتنقلة مثل القوافل والطائرات وما إلى ذلك.
التوصيلات الكهربائيةلا تستخدم سلك إطالة ولا محولا مزدوجا. •احرص دائما على فصل الجهاز وإيقاف إمداد الماء بعد الاستخدام. •يتعين توصيل الجهاز بمقبس مؤرض وفقا للوائح توصيل الأسلاك •
الكهربائية.يجب وضع الجهاز بحيث يمكن الوصول إلى القابس بسهولة. •يجب عدم إصلاح الجهاز إلا بواسطة شخص مؤهل، حيث يمكن •
أن تؤدي الإصلاحات التي تتم من قبل أشخاص ليس لديهم خبرة إلى التعرض إلى إصابة أو عطل خطير. اتصل بمركز الخدمة
المحلي.
متطلبات مكان التركيبالموقع
133 cm
2.5 cm2.5 cm 70 cm
* 179 cm
* 1٧٩ سم : مساحة زائدة مطلوبة للخدمة.
أرض مستوية : المنحدر المسموح به تحت الجهاز بأكمله يكون بزاوية .°1
مأخذ الطاقة : يجب أن يكون بطول 1.5 متر من كلا جانبي الجهاز.لا تزد الحمل على مأخذ الطاقة باستخدام أكثر من جهاز. •
مساحة إضافية: 2.5 سم عند الجوانب و10 سم خلف الوحدة.لا تضع منتجات الغسيل ولا تخزنها فوق الجهاز في أي وقت. •قد تتلف هذه المنتجات تشطيب الغسالة أو عناصر التحكم. •
تحذيريجب توصيل القابس بمأخذ تيار مناسب مثبت بشكل صحيح •
ومؤرض وفقا لجميع القوانين واللوائح المحلية.
تحديد المكانقم بتركيب الجهاز على أرضية صلبة ومسطحة. •تأكد من عدم إعاقة السجاد أو البسط أو ما إلى ذلك لدوران الهواء •
حول الجهاز.لا تحاول أبدا تصحيح أي عدم استواء في الأرضية باستخدام قطع •
من الخشب أو الورق المقوى أو مواد مشابهة تحت الجهاز.إذا كان من المستحيل تجنب وضع الجهاز بجانب موقد غاز أو •
موقد يعمل بالفحم، فيجب وضع عازل )٨5x60 سم( مغطى برقائق الألومنيوم على الجانب المواجه للفرن أو الموقد بين
الجهازين.

10
AR
المواصفاتWTT03TLXMالطراز
غسالة كهربائية أوتوماتيكيةالإسم
٣.5 كجمسعة الغسالة220 فولت تقريبا، 60/50 هرتزمصدر الطاقة
1٨00 واتالحد الأقصى واط
توقف الشطف/بدون تنشيف/٧00سرعة التنشيف
٤٤ لترمعيار استهلاك الماء
2٧ لترحجم الحوض
٧00 مم )العرض( × ٧٧0 مم )العمق( × ٣60 مم )الارتفاع(الحجم
٤٨.٧ كجموزن المنتج
0.1‒0.٨ ميجا باسكال )1.0‒٨.0 كجم ثقلي / سم2(ضغط الماء المسموح به
IPX4رقم IP )درجة الحماية(
يمكن تغيير الشكل والمواصفات دون إخطار بذلك من أجل تحسين جودة المنتج. •إمداد الماء الساخن الخارجي يجب ألا تتجاوز درجة حرارته 65 درجة مئوية. •لا يطلب مزيد من الحماية من التدفق الراجع من أجل الوصلة بمصدر الإمداد بالماء. •بلد المنشأ: صنع في كوريا •

٩
AR التركيب
الأجزاء
باب 1
حلة الغسل 2
فلتر الوبر 3
لوحة التحكم 4
درج 5
خرطوم إمداد الماء 6
قابس الطاقة 7
خرطوم تصريف الماء 8
أقدام التسوية 9
8
9
7
6
5
4
2
1
3
الملحقات
الموصل العام/الموصل اللولبي
موصل خرطومإمداد الماء
خرطوم تصريف الماء توصيلخرطوم الإمداد
خرطوم إمداد الماء)خاص بالماء البارد(
كوب عيارالمنظف
مفتاح ربط أوراق مانعة للانزلاق موصل خرطومتصريف الماء
رباط الكابل
(18EA)(5EA)
مشابك الخرطوم البراغي
قد يتم إرفاق ملحقات مختلفة لكل طراز. •

٨
AR
الصيانةأدخل قابس الطاقة بإحكام في مقبس الخرج بعد إزالة أي رطوبة أو غبار بشكل كامل. •افصل سلك الطاقة قبل تنظيف الجهاز. •احرص دائما على عدم فصل الطاقة عن الجهاز من خلال شد كابل الطاقة. ولإخراج قابس •
الطاقة من مقبس الخرج احرص دائما على الإمساك به بإحكام قبل أن تقوم بجذبه في وضعية مستقيمة.
لا تقم برش الماء داخل الجهاز أو خارجه لتنظيفه. •
التخلصقبل التخلص من جهاز قديم، قم بفصله. اقطع الكابل الموجود خلف الجهاز مباشرة لمنع سوء •
استخدامه.تخلص من جميع مواد التعبئة )مثل أكياس البلاستيك ومادة الستايروفوم( بعيدا عن متناول •
الأطفال، إذ يمكن لمواد التغليف أن تسبب الاختناق.قم بإزالة الباب قبل التخلص من هذا الجهاز تفاديا لخطر احتباس الأطفال أو الحيوانات •
الصغيرة بداخله.

٧
AR
• LG Electronics في حال تدفق الماء خارج الجهاز، افصل مقبس الطاقة واتصل بمركزلمعلومات المستهلك.
لا تضغط على الباب للأسفل بشدة عندما يكون باب الجهاز مفتوحا. •يجب عدم لمس الباب أثناء البرامج ذات درجة الحرارة المرتفعة. •لا تستخدم غازا قابلا للاشتعال أو مواد قابلة للاحتراق )البنزين، والجازولين، وسائل تخفيف •
الدهان "التنر"، والمواد البترولية، والكحول، وما إلى ذلك( بالقرب من الجهاز.لا يمكنك استخدام خرطوم التصريف أو خرطوم الإدخال في حالة تجمدهما خلال فصل الشتاء •
إلا بعد الذوبان.احفظ جميع منظفات الغسيل، والمواد المنعمة، والمبيضات بعيدا عن متناول الأطفال. •تجنب لمس قابس الطاقة أو عناصر التحكم في الجهاز بيدين مبتلتين. •عند سحب قابس الطاقة من مأخذ التيار الكهربي، أمسك بقابس الطاقة وليس الكابل. حيث يمكن •
أن يتسبب تلف الكابل في التعرض لصدمة كهربية أو الإصابة.احرص على عدم ثني كابل الطاقة بشكل مفرط أو وضع شيء ثقيل عليه. •في حالة وجود تسرب غاز )أيسوبيوتين، أو البروبان، أو الغاز الطبيعي، أو ما إلى ذلك(، لا •
تلمس الجهاز أو قابس الطاقة وقم بتهوية المنطقة على الفور.لا تقم بتشغيل الغسالة من طراز غسالات القاعدة مع وضع غسالتين أو أكثر من غسالات •
القاعدة فوقها.لتجنب كسر الباب الزجاجي، لا تضغط بقوة على الباب عند إغلاقه. •لا تقف على غسالة من طراز غسالات القاعدة. •لا تقم بغسل السجاد، أو الأبسطة، أو الأحذية، أو الأغطية الخاصة بالحيوانات الأليفة، أو أي •
أغراض أخرى خلاف الملابس والملاءات، في هذه الغسالة.لا يستخدم هذا الجهاز إلا للأغراض المنزلية فقط ولا ينبغي استخدامه في الاستخدامات •
المتنقلة.لا تستخدم القدم في فتح باب المنتج أو إغلاقه. •

6
AR
التشغيللا تستخدم أداة حادة مثل مثقاب أو دبوس للضغط على وحدة التشغيل أو فصلها. •تجنب إصلاح أو استبدال أي جزء من الجهاز. يجب إجراء جميع التصليحات والخدمة من •
خلال موظف خدمة مؤهل إلا إذا أوصى دليل المالك الحالي بغير ذلك بشكل محدد. استخدم فقط أجزاء المصنع المعتمدة.
استخدم الخرطوم الجديد أو مجموعة الخراطيم الجديدة المرفقة مع الجهاز. علما بأن إعادة •استخدام الخراطيم القديمة قد يؤدي إلى تسرب المياه وبالتالي تلف الممتلكات.
تجنب محاولة الوصول إلى داخل الجهاز إذا كان الحوض أو القلاب في حالة حركة. •حافظ على المنطقة الموجودة أسفل الجهاز وحوله خالية من المواد القابلة للاحتراق مثل الوبر، •
والورق، وقطع القماش، والمواد الكيميائية، وما إلى ذلك.لا تضع الحيوانات الحية مثل الحيوانات الأليفة داخل المنتج. •لا تترك باب الجهاز مفتوحا. حيث يمكن أن يتعلق الأطفال بالباب أو يزحفوا إلى داخل الجهاز، •
مما قد يسبب التلف أو التعرض للإصابة.لا تقترب أبدا من الجهاز في أثناء تشغيله. انتظر حتى تتوقف حلة الغسل تماما. •لا تضع أو تغسل أو تجفف الأغراض النظيفة، أو المغسولة، أو المنقوعة، أو الملطخة بالمواد •
المتفجرة أو القابلة للاحتراق )مثل الشمع، والبنزين، والطلاء، والجازولين، ومزيل الشحوم، ومذيبات التنظيف الجاف، والكيروسين، والزيوت النباتية، وزيوت الطهي، وما إلى ذلك.(.
حيث يمكن أن يتسبب الاستخدام غير السليم في نشوب حريق أو وقوع انفجار.

5
AR
هذه الغسالة من طراز غسالات القاعدة يجب تركيبها تحت غسالة LG متوافقة من طرازات •التحميل الأمامي المصنوعة بعد عام 200٩.
يجب تأريض هذا الجهاز. في حالة حدوث أي خلل أو عطل، سيحد التأريض من خطر •التعرض لصدمة كهربائية من خلال توفير مسار أقل مقاومة للتيار الكهربائي.
يأتي هذا الجهاز مزودا بسلك طاقة يحتوي على موصل تأريض للجهاز وقابس طاقة بوصلة •تأريض. يجب توصيل قابس الطاقة بمقبس تيار مناسب مثبت ومؤرض وفقا لجميع القوانين
واللوائح المحلية.يمكن أن يؤدي توصيل موصل حماية غير مناسب إلى خطر التعرض لصدمة كهربائية. •
استشر كهربائيا أو موظف خدمة مؤهلا إذا كان لديك أي شك حول ما إذا كان الجهاز مؤرضا بشكل صحيح أم لا.
لا تقم بتعديل قابس الطاقة المتوفر مع الجهاز. إذا لم يكن القابس مناسبا لمأخذ التيار، فيمكنك •تثبيت مأخذ تيار مناسب من خلال كهربائي مؤهل.

٤
AR
لاستخدامها في المملكة العربية السعودية:لا يجوز إدخال اليدين عند تشغيل حوض تصريف المياه. •لا يجوز تثبيت الغسالة في مكان رطب. •يعتبر وجود خلل أو مشكلة في الغسالة إذا إستغرق 15 ثانية أو أكثر لوقف تصريف •
المياه بالكامل من الحوض للغسالات التي يمكن فتح بابها أثناء تصريف المياه.
التركيبلا تحاول أبدا تشغيل هذا الجهاز إذا كان تالفا، أو به عطل، أو مفككا بشكل جزئي، أو به أجزاء •
مفقودة أو محطمة، بما في ذلك سلك أو قابس تالف.عند نقل هذا الجهاز ، ينبغي توفر شخصين أو أكثر للإمساك به بإحكام. •تجنب تركيب الجهاز في أماكن الرطوبة والغبار. تجنب تركيب أو تخزين الجهاز في الهواء •
الطلق أو في مساحة معرضة للتأثيرات الجوية كضوء الشمس المباشر أو الرياح أو المطر أو درجات الحرارة دون درجة التجمد.
أحكم ربط خرطوم التصريف لتجنب فصله. •في حالة تلف سلك الطاقة أو ارتخاء فتحة المقبس، لا تستخدم سلك الطاقة واتصل بمركز خدمة •
معتمد.يجب عدم تركيب هذا الجهاز خلف باب قابل للقفل، أو باب منزلق، أو باب مزود بمفصلة على •
الجانب المقابل للجهاز، حيث يؤدي هذا إلى إعاقة فتح باب الجهاز بالكامل.

٣
AR إرشادات السلامة
يتمثل الغرض من إرشادات السلامة التالية في الحيلولة دون وقوع المخاطر غير المتوقعة أو الأضرار الناجمة عن التشغيل غير الآمن أو غير الصحيح للمنتج.
يتم تقسيم الإرشادات إلى "تحذير" و"تنبيه" على النحو الموضح أدناه.
يتم عرض هذا الرمز للإشارة إلى الأمور وعمليات التشغيل التي يمكن أن تسبب مخاطر، فاحرص على قراءة الجزء الذي يحمل هذا الرمز بعناية واتبع الإرشادات
لتجنب المخاطر.
تحذيريشير هذا إلى أن عدم اتباع الإرشادات قد يسبب وقوع إصابة خطيرة أو الوفاة.
تنبيهيشير هذا إلى أن عدم اتباع الإرشادات قد يتسبب في وقوع إصابة طفيفة أو تلف المنتج.
إرشادات السلامة الهامة
تحذيرلتقليل مخاطر وقوع انفجار، أو نشوب حريق، أو حدوث وفاة، أو التعرض لصدمة كهربية، أو إصابة الأشخاص عند استخدام المنتج، يجب اتباع احتياطات السلامة الأساسية، بما فيها
ما يلي:
الأطفال بالمنزلهذا الجهاز غير مخصص لاستخدام الأفراد )بما في ذلك الأطفال( الذين يعانون من نقص في قدراتهم البدنية أو الحسية أو العقلية، أو ليس لديهم خبرة ومعرفة، ما لم يتم الإشراف عليهم أو
تقدم لهم الإرشادات المتعلقة باستخدام الجهاز من قبل شخص مسؤول عن سلامتهم، كذلك يجب الإشراف على الأطفال للتأكد من عدم عبثهم بالجهاز.

قد يحتوي هذا الدليل على صور أو محتوى يختلف عن
الطراز الذي قمت بشرائه.
يخضع هذا الدليل للمراجعة من الشركة المصنعة.
جدول المحتويات
إرشادات السلامة................................................................................ ٣٣ ......................................................................................... إرشادات السلامة الهامة
٩ .......................................................................................... التركيب٩ ........................................................................................................... الأجزاءالملحقات.......................................................................................................... ٩١٠ ..................................................................................................... المواصفاتمتطلبات مكان التركيب........................................................................................ ١١١٢ .............................................................. تفريغ محتويات الصندوق وإزالة مواد التغليف١٢ ........................................................................................... وضع غسالة القاعدةتوصيل خرطوم الإمداد........................................................................................ ١٣تركيب خرطوم التصريف..................................................................................... ١٦١٧ .......................................................................................... ضبط مستوى الجهاز
١٨ ........................................................................................ التشغيلاستخدام الجهاز................................................................................................. ١٨فرز الغسيل..................................................................................................... ١٩٢٠ .......................................................................................... إغلاف الباب والدرج٢١ ....................................................................................... إضافة منتجات التنظيف٢٣ .................................................................................................... لوحة التحكم٢٤ .................................................................................................. جدول البرامجخيارات البرامج................................................................................................ ٢٦
الوظائف الذكية................................................................................ ٢٧٢٧ .................................................................. Smart Diagnosis™ استخدام وظيفة
٢٨ ........................................................................................ الصيانة٢٨ ................................................................................................. تنظيف الغسالة٢٩ ................................................................................................ تنظيف الحوض٢٩ ....................................................................................... تنظيف فلتر إدخال الماء٣٠ .............................................................................................. تنظيف فلتر الوبر٣٠ ........................................................................ توخ الحذر من التجمد في أثناء الشتاء
استكشاف الأعطال وإصلاحها................................................................ ٣٢٣٢ ............................................................................................ تشخيص المشكلات٣٧ ................................................................................................... رسائل الخطأ

دليل المالك
غسالة كهربائية أوتوماتيكية
قبل البدء في تركيب الجهاز، اقرأ هذه التعليمات بعناية. حيث سيبسط ذلك عملية التركيب ويضمن تركيب الجهاز بشكل صحيح وآمن. واحتفظ بهذه التعليمات بالقرب من المنتج بعد التركيب للرجوع إليها في
المستقبل.
صنع في كورياسنة الصنع: 2016
www.lg.com


![An Implementation of Automatic Washing Machine Control ...REFERENCES [1] Chen Xizhen, Chen Guangjian, Jia Jinling, Yu han, Zhou Tianpeng,”Design of Automatic Washing Machine Based](https://img.pdfslide.net/doc/110x75/60d9fc64289ea04fd84f868e/an-implementation-of-automatic-washing-machine-control-references-1-chen-xizhen.jpg)


![DjVu Document - LG USA · LG Fully Automatic Washing machine. Please read your owner's manual carefully, it provides ... [WD-8074FHB] Name Power supply Size Front loading washing](https://img.pdfslide.net/doc/110x75/5ea5fbd7ecb05577c87b0248/djvu-document-lg-usa-lg-fully-automatic-washing-machine-please-read-your-owners.jpg)