Embed Size (px)
Citation preview
Owner'sManual
Side-by-Side36",a21'a8"Built-ln Refrigerators
49-60559-2_ 1224D1893PO05]08-08 JR
monogram.com
Consumer Information
Built-In Refrigerators
Contents Consumer Services
Important Phone Numbers .................. 29Model and Serial Numbers ................... 3Problem Solver ......................... 24-26
Product Registration ......................... 3Safety Instructions ........................ 4-7Smartwater Filter PerformanceData Sheet ................................. 27State of CaliforniaWater Treatment Device Certificate ......... 28
Warranty ......................... Back Cover
Care and Cleaning
Cleaning-Outside and Inside ............... 19Light Bulb Replacement ................ 20-21Moving and Vacation ....................... 22Master Light Switch ........................ 21
Operating InstructionsAutomatic Icemaker ........................ 12Climate Control Drawer ................. 13-16Control Lock ................................ 14
Drop-Down Shelf andLighted Drawer Shelf ....................... 16Ice and Water Dispenser ................ 10, 11Shelves and Bins ........................ 17, 18Storage Pans ............................... 15Temperature Controls ........................ 8Water Filter Cartridge ........................ 9Sabbath Mode Product Kit, ZSAB1 ........... 18
Consumer Information
Built-In Refrigerators
Before
using yourrefrigerator
Read this manual carefully. It is intendedto help you operate and maintain your newrefrigerator properly.
Keep it handy for answers to your questions.
If you don't understand something or need morehelp, there is a list of toll-free consumer servicenumbers included in the back section of thismanual.
OR
Visit our website at: monogram.cam
Writedown themodel &serialnumbers
You'll see them on a label in the lower right handside of the fresh food compartment beneaththe climate control drawer.
These numbers are also on the ConsumerProduct Ownership Registration Cardincluded with this manual.
Before sending in this card, please write thesenumbers here:
Model Number
Serial Number
Usethese numbers in any correspondence orservice calls concerning your refrigerator.
If Soureceived adamagedrefrigerator
Immediately contact the dealer (or builder) thatsold you the refrigerator.
Save time& money
Before SOU request service, check theProblem Solver in the back of this manual.
It lists causes of minor operating problems thatyou can correct yourself.
If Souneedservice
To obtain service, see the Consumer Servicespage in the back of this manual.
We're proud of our service and want you to bepleased. If for some reason you are not happywith the service you receive, here are steps tofollow for further help.
For customers in the USA:
FIRST,contact the people who serviced yourappliance. Explain why you are not pleased.In most cases, this will solve the problem.
NEXT,if you are still not pleased, write all thedetails-including your phone number-to:
Manager, Customer RelationsGEAppliancesAppliance ParkLouisville, KY/40225
For customers in Canada:
FIRST,contact the people who serviced yourappliance. Explain why you are not pleased.In most cases, this will solve the problem.
NEXT,if you are still not pleased, write allthe details-including your phone number to:
Manager, Consumer RelationsMabe Canada Inc.
1 Factory Lane, Suite 310Moncton, N.B. EIC 9M3
IMPORTANT SAFETY INSTRUCTIONS
READ AND SAVE THESE INSTRUCTIONS
WARNING - Whenusing
this appliance, always exercise basic safetyprecautions, including the following:
• Use this appliance onlg for its intendedpurpose as described in this Owner's Hanual.
This refrigerator must be properly installedin accordance with the InstallationInstructions before it is used.
Do not allow children to climb, stand orhang on the shelves in the refrigerator.They could damage the refrigerator andseriously injure themselves.
After gour refrigerator is in operation,do not touch the cold surfaces in thefreezer compartment, particularlg whenhands are damp or wet. Skin may adhereto these extremely cold surfaces.
Do not store or use gasoline or otherflammable vapors and liquids in thevicinitg of this or ang other appliance.
In refrigerators with an automatic icemaker,avoid contact with the moving parts of theejector mechanism, or with the heatingelement located on the bottom of the
icemaker. Do not place fingers or handson the automatic icemaking mechanismwhile the refrigerator is plugged in.
Keep fingers out of the "pinch point" areas:clearances between the doors and between
the doors and cabinet are necessarily small.Be careful closing doors when children arein the area.
Unplug gour refrigerator before cleaningand making repairs. NOTE:We stronglyrecommend that any servicing be performedby a qualified individual.
Before replacing a burned-out light bulb,set the Haster Light switch in the OFFpositionto turn off the lights in order to avoid contactwith a live wire filament. (Aburned-out lightbulb may break when being replaced.)NOTE: Setting the refrigerator temperaturecontrols to OFF does not remove powerto the light circuit.
Do not refreeze frozen foods which have
thawed completelg.
DANGER: RISK OF CHILD ENTRAPMENT
Child entrapment and suffocation are notproblems of the past. Junked or abandonedrefrigeration products are still dangerous.., evenif they will sit for "just a few days." If you aregetting rid of your old appliance, please followthese instructions to help prevent accidents.
Before You Throw Away Your Old RefrigerationProduct:
• Take off the doors.
• Leave the shelves in place so that childrenmay not easily climb inside.
REFRIGERANTSAll refrigeration products contain refrigerants,which under federal law must be removed priorto product disposal. If you are getting rid ofan old refrigeration product, check with thecompany handling the disposal about whatto do.
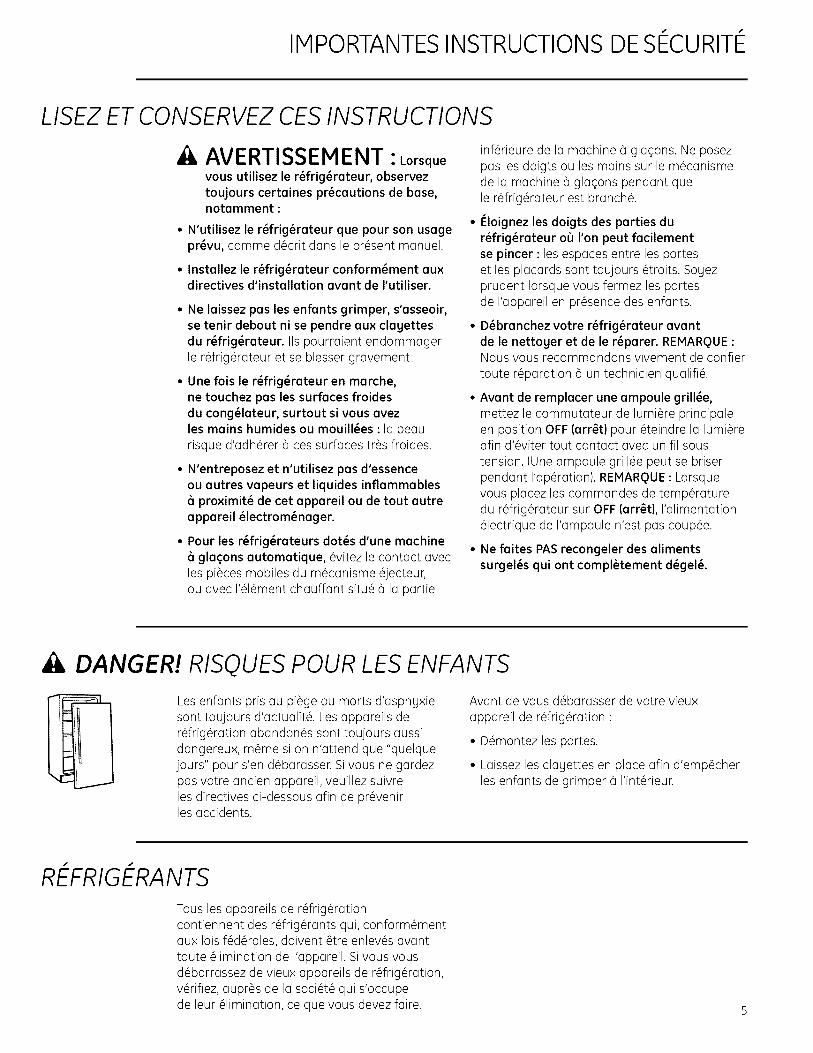
IMPORTANTES INSTRUCTIONSDE SI:CURITI
LISEZET CONSERVEZCESINSTRUCTIONS
AVERTISSEM ENT : Lorsquevous utilisez le r_frig@rateur, observez
toujours certaines precautions de base,notamment :
N'utilisez le r@frig_rateur que pour son usage
pr@vu, comme d_crit dans le present manuel.
Installez le r@frig@rateur conform@ment auxdirectives d'installation avant de I'utiliser.
Ne laissez pas les enfants grimper, s'asseoir,se tenir debout ni se pendre aux clagettesdu r_frig_rateur. IIs pourraient endommagerle r@frig@rateuret se blesser gravement.
Une lois le r@frig@rateur en marche,
ne touchez pus les surfaces froides
du cong_lateur, surtout si vous avez
les mains humides ou mouill_es :la peau
risque d'adh_rer 6 ces surfaces tr_s froides.
N'entreposez et n'utilisez pas d'essenceou autres vapeurs et liquides inflammables
proximit@ de cet appareil ou de tout autreappareil @lectrom@nager.
Pour les r_frig_rateurs dot_s d'une machinegla(_ons automatique, _vitez le contact avec
les pi_ces mobiles du m_canisme _jecteur,ou avec I'_l_ment chauffant situ_ 6 la partie
inf_rieure de la machine 6 glagons. Ne posezpas les doigts ou les mains sur le m_canismede la machine 6 glaqons pendant quele r_frig_rateur est branch,.
I_loignez les doigts des parties dur@frig_rateur o5 I'on peut facilementse pincer :les espaces entre les porteset les placards sont toujours 6troits. Sogezprudent Iorsque vous fermez les portesde I'appareil en presence des enfants.
D@branchezvotre r_frig@rateur avantde le nettoger et de le r_parer. REMARQUE:Nous vous recommandons vivement de confier
toute r_paration 6 un technicien qualifi_.
Avant de remplacer une ampoule grill_e,mettez le commutateur de lumi_re principaleen position OFF (arr_t) pour _teindre la lumi_reafin d'_viter tout contact avec un fil sous
tension. (Une ampoule grill_e peut se briserpendant I'op_ration). REMARQUE: Lorsquevous placez les commandes de temperaturedu r_frig_rateur sur OFF (arr_t}, I'alimentation_lectrique de I'ampoule n'est pas couple.
Ne faites PASrecongeler des alimentssurgel@squi ont compl_tement d@gel@.
DANGER! RISQUES POUR LES ENFANTS
Les enfants pris au pi_ge ou morts d'asphgxiesont toujours d'actualit& Les appareils der_frig_ration abandon_s sont toujours aussidangereux, m_me si on n'attend que "quelquejours" pour s'en d_barasser. Si vous ne gardezpas votre ancien appareil, veuillez suivreles directives ci-dessous afin de pr_venirles accidents.
Avant de vous d_barasser de votre vieux
appareil de r_frig_ration :
• D_montez les portes.
• Laissez les clagettes en place afin d'emp_cherles enfants de grimper 6 I'int_rieur.
R L-FRIG L-RANTSTousles appareils de r@frig@rationcontiennent des r@frig@rantsqui, conform@mentaux lois f@d@rales,doivent @treenlev@savanttoute @limination de I'appareil. Sivous vousd@barrassezde vieux appareils de r@frig@ration,v@rifiez,aupr_s de la soci@t@qui s'occupede leur @limination, ce que vous devez faire.
IMPORTANT SAFETY INSTRUCTIONS
HOW TO CONNECT ELECTRICITY
Do not, under ang circumstances, cut orremove the third (ground) prong from thepower cord. For personal safetg, this appliancemust be properlg grounded.
The power cord of this appliance is equippedwith a 3-prong (grounding) plug which mateswith a standard 3-prong (grounding) wall outletto minimize the possibility of electric shockhazard from this appliance.
Have the wall outlet and circuit checked
by a qualified electrician to make sure the outletis properly grounded.
Where a standard 2-prong wall outlet isencountered, it is your personal responsibilityand obligation to have it replaced witha properly grounded 3-prong wall outlet.
Use ofa GFI (Ground Fault Interruptor} is not
recommended for the refrigerator outlet.
The appliance should always be plugged intoits own individual electrical outlet which has
a voltage rating that matches the rating plate.This provides the best performance and alsoprevents overloading house wiring circuitswhich could cause a fire hazard fromoverheated wires.
DO NOT USE AN ADAPTER PLUG TO CONNECT
THE REFRIGERATOR TO A 2-PRONG OUTLET.
DO NOT USE AN EXTENSION CORD WITH
THIS APPLIANCE.
Never unplug an appliance by pulling onthe power cord. Always grip the plug firmlyand pull straight out from the outlet.
Repair or replace immediately all power cordsthat have become frayed or otherwise damaged.Do not use a cord that shows cracks or abrasion
damage along its length or at either end.
When moving the appliance, be careful not toroll over or damage the power cord.
SAVE THESE INSTRUCTIONS
IMPORTANTES INSTRUCTIONSDE SI:CURITI
RACCORDEMENT ELECTRIQUE
Ne coupez ni retirez en aucun casla troisi_me broche (mise 6 la terre) de la fichedu cordon d'alimentation. Pour votre s_curit@,cet appareil doit @tre correctement mis6 la terre.
Le cordon d'olimentotion de cet opporeil estmuni d'une fiche _ 3 broches (mise _ Io terre)qui se bronche dons une prise murol ordinoire
5 olv@oles(mise _ Io terre) pour r@duireou minimum les risques du chocs @lectriques.
Foites exominer Io prise de couront et le circuitpor un @lectricien quolifi@pour vous ossurerque Io prise est correctement mise 5 Io terre.
Si Io prise murole est du type stondord2 olv@oles,il vous incombe de Io foire
remplocer por une prise _ 3 olv@olescorrectement mise 5 Io terre.
L'utilisation d'un interrupteur de d@faut6 la terre (GFI-Ground Fault Interruptor)n@stpas recommand@ pour la prisede courant du r_frig_rateur.
Lo mochine 5 glogons doit toujours @trebronch@dons so propre prise de couront, dont Io tensionnominole est identique 5 celle indiqu@esurIo ploque [email protected] pr@coutionestrecommond@e pour gorontir un rendementoptimum et @viterune surchorge des circuits@lectriques de Io r@sidence,ce qui pourroit cr@erun risque d'incendie por surschouffe des ills.
N'UTILISEZ PAS UNE FICHE D'ADAPTATION POUR
RACCORBER LE RI_FRIGI_RATEURBANS UNE PRISE
MURALE A 2 ALVI_OLES.
N'UTILISEZ PAS DE CORDONS PROLONGATEURS
AVEC CET APPAREIL.
Ne d@bronchezjomois I'opporeil en tirontle cordon d'olimentotion. Soisissezfermement
Io fiche du cordon et tirez droit pour Io retirerde Io prise.
R@porezou remplocez imm@diotement toutcordon effiloch@ ou endommog& N'utilisezpos un cordon fendill@ou pr@sentont dessignes d'usure.
Lorsque vous d@plocezI'opporeil du mur,foites ottention de ne pos Io foire roulersur le cordon d'olimentotion ofin de ne posI'endommoger.
CONSERVEZ CES DIRECTIVES
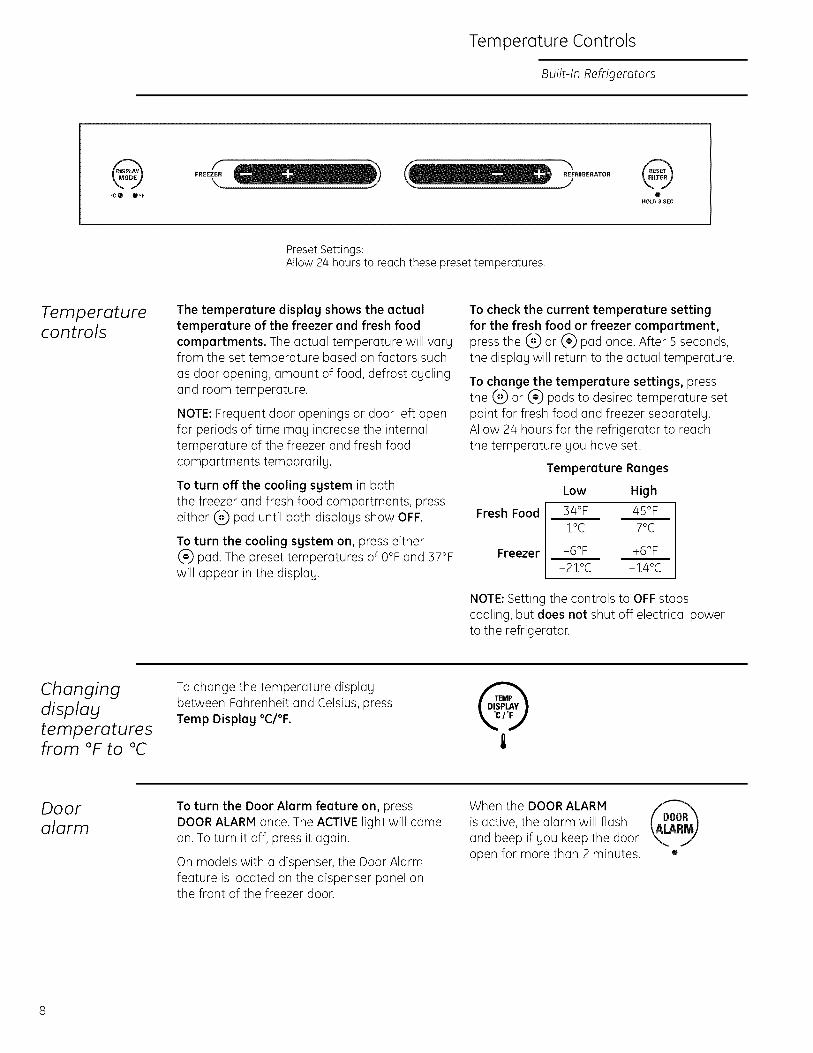
Temperature Controls
Built-In Refrigerators
FFREEZER
FRIGERATOR @®
HOLD 3 SEC
Preset Settings:Allow 24 hours to reach these preset temperatures.
Temperaturecontrols
The temperature displag shows the actualtemperature of the freezer and fresh foodcompartments. The actual temperature will vargfrom the set temperature based on factors suchas door opening, amount of food, defrost cgclingand room temperature.
NOTE: Frequent door openings or door left openfor periods of time mag increase the internaltemperature of the freezer and fresh foodcompartments temporarilg.
To turn off the cooling sgstem in boththe freezer and fresh food compartments, presseither (,_ pad until both displags show OFF.
To turn the cooling sgstem on, press eitherpad. The preset temperatures of 0°F and 37°F
will appear in the display.
To check the current temperature settingfor the fresh food or freezer compartment,press the (,2) or _ pad once. After 5 seconds,the displag will return to the actual temperature.
To change the temperature settings, pressthe _ or _'_ pads to desired temperature setpoint for fresh food and freezer separatelu.Allow 24 hours for the refrigerator to reachthe temperature gou have set.
Fresh Food
Freezer
Temperature Ranges
Low H ig h
34°F 45°F
1oc 7oc
-6°F +6°F
-21°C -14°C
NOTE:Setting the controls to OFFstopscooling, but does not shut off electrical powerto the refrigerator.
Changingdisplagtemperaturesfrom °F to °C
To change the temperature displaybetween Fahrenheit and Celsius, pressTemp Displag °C/°F.
O00r
alarmTo turn the Door Alarm feature on, press
DOOR ALARM once. The ACTIVE light will come
on. To turn it off, press it again.
On models with a dispenser, the Door Alarmfeature is located on the dispenser panel onthe front of the freezer door.
When the DOORALARMis active, the alarm will flashand beep if you keep the dooropen for more than 2 minutes. •
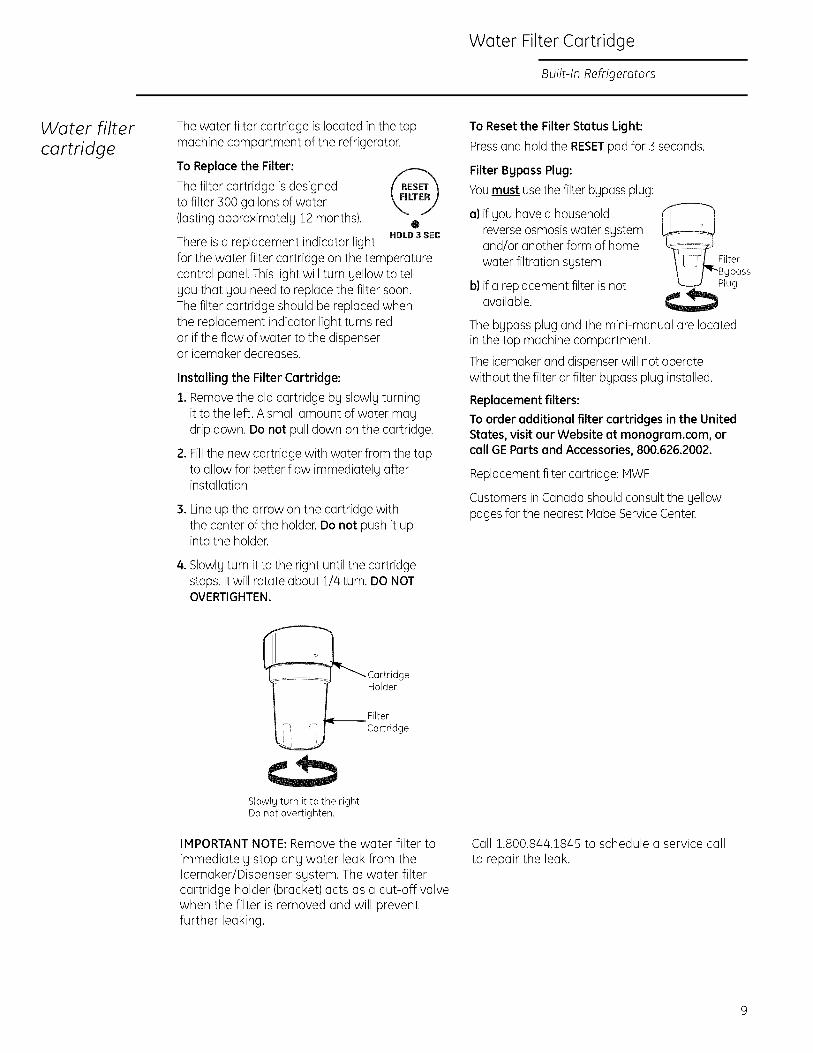
Water Filter Cartridge
Built-In Refrigerators
Water filter
cartridge
The water filter cartridge is located in the topmachine compartment of the refrigerator.
To Replacethe Filter:
The filter cartridge is designed If_ESET'_to filter 300 gallons of water ut?(lasting approximately 12 months), ®
HOLD 3 SECThere isa replacement indicator lightfor the water filter cartridge on the temperaturecontrol panel. This light will turn yellow to tellyou that you need to replace the filter soon.The filter cartridge should be replaced whenthe replacement indicator light turns redor if the flow of water to the dispenseror icemaker decreases.
Installing the Filter Cartridge:
1. Removethe old cartridge by slowly turningit to the left. A small amount of water maydrip down. Do not pull down on the cartridge.
2. Fillthe new cartridge with water from the tapto allow for better flow immediately afterinstallation.
3. Line up the arrow on the cartridge withthe center of the holder. Do not push it upinto the holder.
4. Slowly turn it to the right until the cartridgestops, It will rotate about 1/4 turn. DO NOTOVERTIGHTEN.
To Reset the Filter Status Light:
Pressand hold the RESETpad for 3 seconds.
Filter Bgpass Plug:
Youmust usethe filter bypass plug:
a) if you have a householdreverseosmosis water systemand/or another form of home
water filtration system
b) if a replacement filter is notavailable,
Filter
BypassPlug
Thebypassplugand themini-manualarelocatedinthetopmachinecompartment,
Theicemakerand dispenserwillnotoperate
withoutthefilterorfilterbypasspluginstalled.
Replacement filters:
Toorder additional filter cartridges in the UnitedStates,visitour Website at monogram.corn,orcall GEParts and Accessories, 800.626.2002.
Replacement filter cartridge: MWF
Customers in Canada should consult the yellowpages for the nearest Mabe ServiceCenter.
Slowly turn it to the right.Do not overtighten.
IMPORTANTNOTE: Remove the water filter toimmediately stop any water leak from theIcemaker/Dispenser system. The water filtercartridge holder (bracket) acts as a cut-off valvewhen the filter is removed and will preventfurther leaking.
Call 1.800,844,1845 to schedule a service callto repair the leak.
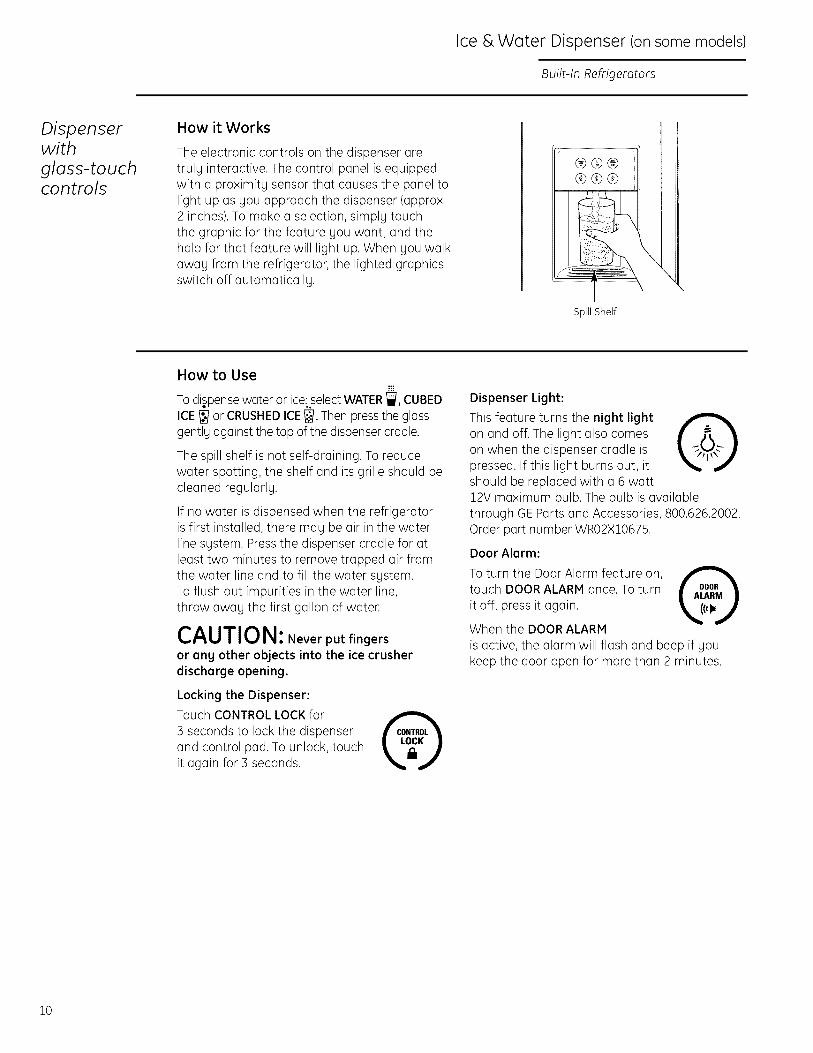
Ice & Water Dispenser (on some models)
Built-In Refrigerotors
Dispenserwith
glass-touchcontrols
How it Works
The electronic controls on the dispenser aretrulg interactive. The control panel is equippedwith a proximity sensor that causes the panel tolight up as gou approach the dispenser (approx.2 inches). To make a selection, simply touchthe graphic for the feature you want, and thehalo for that feature will light up. When gou walkaway from the refrigerator, the lighted graphicsswitch off automatically.
Spill Shelf
How to Use.........
To dispensewater or ice:select WATER_, CUBEDICE_/or CRUSHEDICE9. Then pressthe glassgentlg against the top of the dispenser cradle.
The spill shelf is not self-draining. To reducewater spotting, the shelf and its grille should becleaned regularlg.
If no water is dispensed when the refrigeratoris first installed, there mag be air in the waterline sgstem. Pressthe dispenser cradle for atleast two minutes to remove trapped air fromthe water line and to fill the water sgstem.To flush out impurities in the water line,throw awag the first gallon of water.
CAUTIO N: Never put fingersor eng other objects into the ice crusherdischerge opening.
Locking the Dispenser:
Touch CONTROLLOCK for3 seconds to lock the dispenserand control pad. To unlock, touchit again for 3 seconds.
Dispenser Light:
This feature turns the night lighton and off. The light also comes t, 9on when the dispenser cradle ispressed. If this light burns out, itshould be replaced with a 6 watt12V maximum bulb. The bulb is available
through GEParts and Accessories, 800.626.2002.Order part number WR02X10675.
Door Alarm:
To turn the Door Alarm feature on,touch DOOR ALARM once. To turn
it off, press it again.
When the DOOR ALARM
is active, the alarm will flash and beep if goukeep the door open for more than 2 minutes.
10
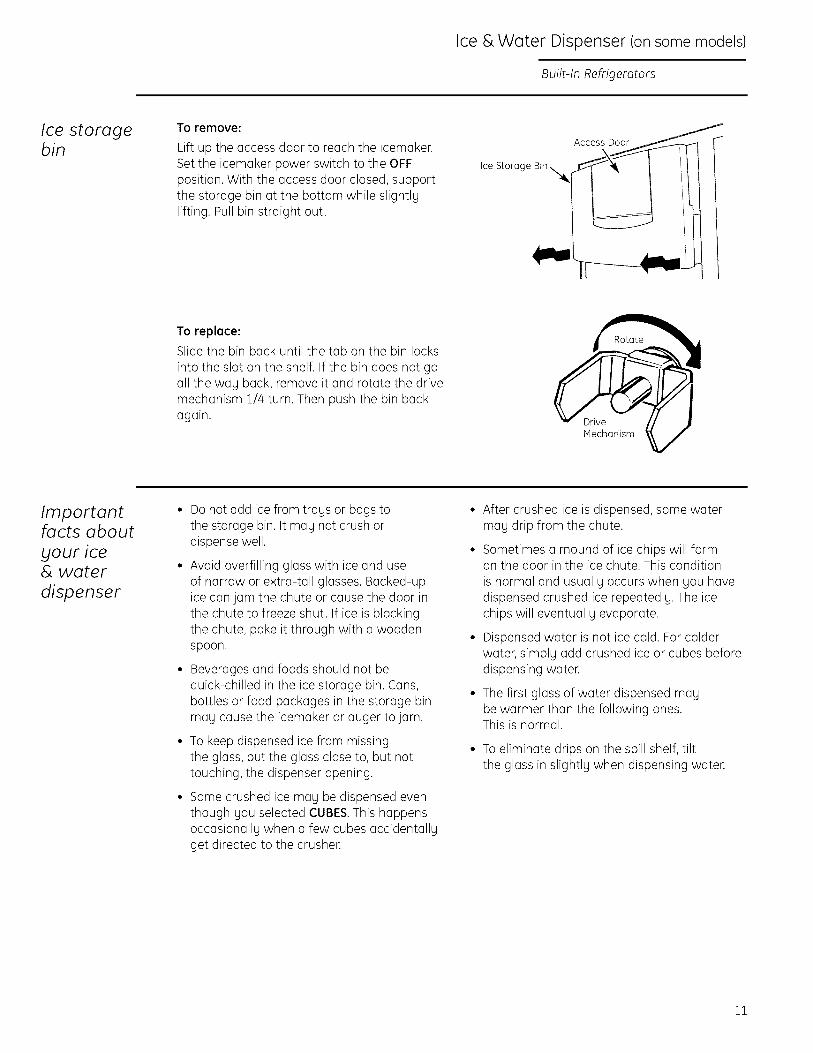
Ice & Water Dispenser (on some models)
Built-In Refrigerators
Ice storagebin
To remove:
Lift up the access door to reach the icemaker.Set the icemaker power switch to the OFFposition. With the access door closed, supportthe storage bin at the bottom while slightlylifting. Pull bin straight out.
Access Door /
Ice Storage "_
To replace:Slide the bin back until the tab on the bin locks
into the slot on the shelf. If the bin does not goall the way back, remove it and rotate the drivemechanism 1//4turn. Then push the bin backagain.
Rotate
Drive
Hechanism
Importantfacts about
gout ice& water
dispenser
Do not add ice from trays or bags tothe storage bin. It may not crush ordispense well.
Avoid overfilling glass with ice and useof narrow or extra-tall glasses. Backed-upice can jam the chute or cause the door inthe chute to freeze shut. If ice is blockingthe chute, poke it through with a woodenspoon.
Beverages and foods should not bequick-chilled in the ice storage bin. Cans,bottles or food packages in the storage binmay cause the icemaker or auger to jam.
To keep dispensed ice from missingthe glass, put the glass close to, but nottouching, the dispenser opening.
Some crushed ice may be dispensed eventhough you selected CUBES.This happensoccasionally when a few cubes accidentallyget directed to the crusher.
After crushed ice is dispensed, some watermay drip from the chute.
Sometimes a mound of ice chips will formon the door in the ice chute. This condition
is normal and usually occurs when you havedispensed crushed ice repeatedly. The icechips will eventually evaporate.
Dispensed water is not ice cold. For colderwater, simply add crushed ice or cubes beforedispensing water.
The first glass of water dispensed maybe warmer than the following ones.This is normal.
To eliminate drips on the spill shelf, tiltthe glass in slightly when dispensing water.
11
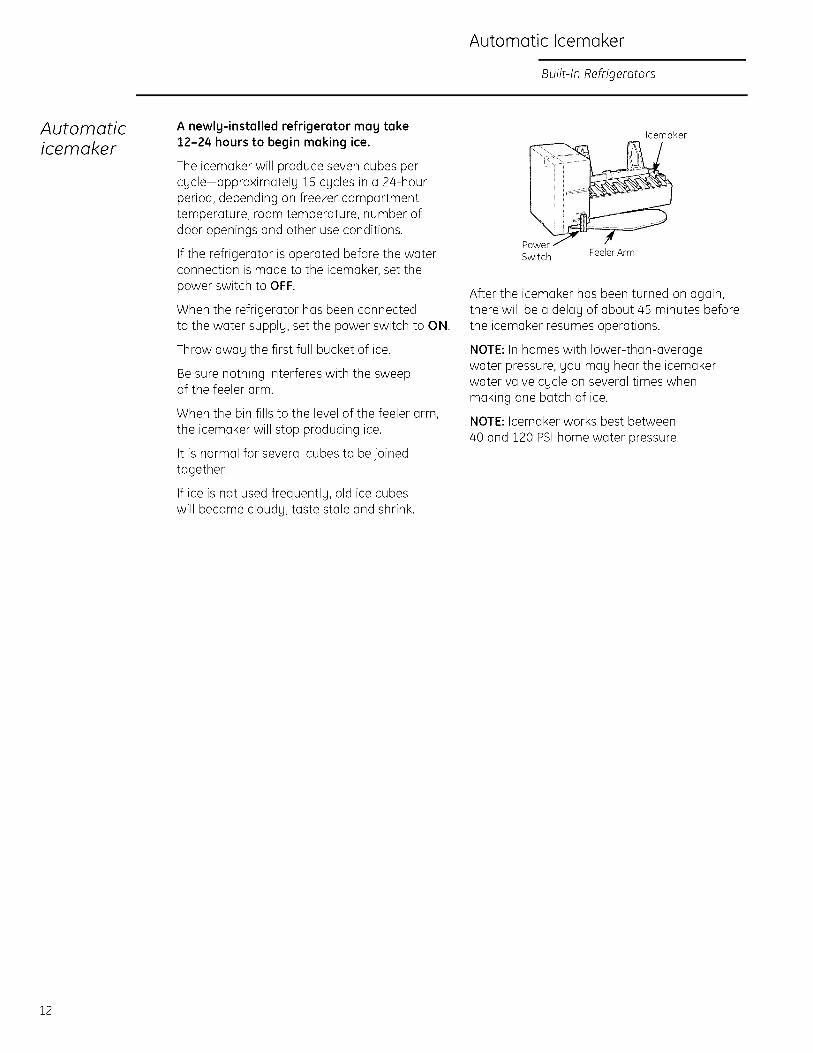
Automatic Icemaker
Built-In Refrigerators
Automaticicemaker
A newlg-installed refrigerator mag take12-24 hours to begin making ice.
The icemaker will produce seven cubes percycle-approximately 15 cycles in a 24-hourperiod, depending on freezer compartmenttemperature, room temperature, number ofdoor openings and other use conditions.
If the refrigerator is operated before the waterconnection is made to the icemaker, set thepower switch to OFF.
When the refrigerator has been connectedto the water supply, set the power switch to ON.
Throw away the first full bucket of ice.
Be sure nothing interferes with the sweepof the feeler arm.
When the bin fills to the level of the feeler arm,the icemaker will stop producing ice.
It is normal for several cubes to be joinedtogether.
If ice is not used frequently, old ice cubeswill become cloudy, taste stale and shrink.
Icemaker
Switch Feeler Arm
After the icemaker has been turned on again,there will be a delay of about/45 minutes beforethe icemaker resumes operations.
NOTE:In homes with lower-than-averagewater pressure, you may hear the icemakerwater valve cycle on several times whenmaking one batch of ice.
NOTE:Icemaker works best between
/40and 120 PSIhome water pressure.
12
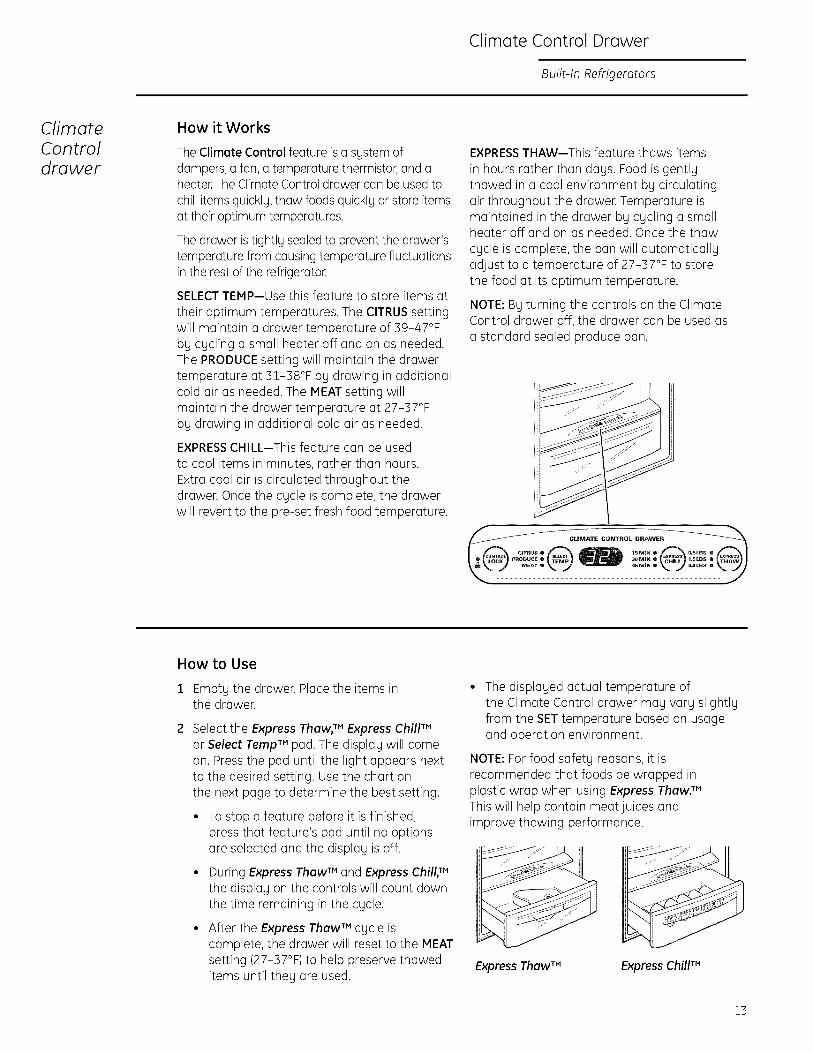
Climate Control Drawer
Built-In Refrigerators
ClimateControldrawer
How it Works
The Climate Control feature is a system ofdampers, a fan, a temperature thermistor, and aheater.The Climate Control drawer can be used tochill items quickly, thaw foods quickly or store itemsat their optimum temperatures.
The drawer is tightly sealed to prevent the drawer'stemperature from causing temperature fluctuationsin the rest of the refrigerator.
SELECTTEMP--Use this feature to store items attheir optimum temperatures. The CITRUSsettingwill maintain a drawer temperature of 39-47°Fby cycling a small heater off and on as needed.The PRODUCEsetting will maintain the drawertemperature at 31-38% by drawing in additionalcold air as needed. The MEATsetting willmaintain the drawer temperature at 27-37°Fby drawing in additional cold air as needed.
EXPRESSCHILL--This feature can be usedto cool items in minutes, rather than hours.Extra cool air is circulated throughout thedrawer. Once the cycle is complete, the drawerwill revert to the pre-set fresh food temperature.
EXPRESSTHAW--This feature thaws items
in hours rather than dogs. Food is gentlythawed in a cool environment by circulatingair throughout the drawer. Temperature ismaintained in the drawer by cycling a smallheater off and on as needed. Once the thaw
cycle is complete, the pan will automaticallyadjust to a temperature of 27-37°F to storethe food at its optimum temperature.
NOTE:By turning the controls on the ClimateControl drawer off, the drawer can be used asa standard sealed produce pan.
CWMATE CONTROL DRAWE_
• PRODUCE • 30MIN • I_5LBS •
How to Use
1 Empty the drawer. Place the items inthe drawer.
Select the Express Thaw,TM Express Chill TM
or Select Temp TM pad, The display will comeon. Pressthe pad until the light appears nextto the desired setting. Usethe chart onthe next page to determine the best setting.
• To stop a feature before it is finished,press that feature's pad until no optionsare selected and the display is off.
• During Express Thaw TM and Express ChilUMthe display on the controls will count downthe time remaining in the cycle.
After the Express Thaw TM cycle iscomplete, the drawer will reset to the MEATsetting (27-37°F) to help preserve thaweditems until they are used.
The displayed actual temperature ofthe Climate Control drawer may vary slightlyfrom the SETtemperature based on usageand operation environment.
NOTE:For food safety reasons, it isrecommended that foods be wrapped inplastic wrap when using Express Thaw.TM
This will help contain meat juices andimprove thawing performance.
Express Thaw TM Express ChilF"
13
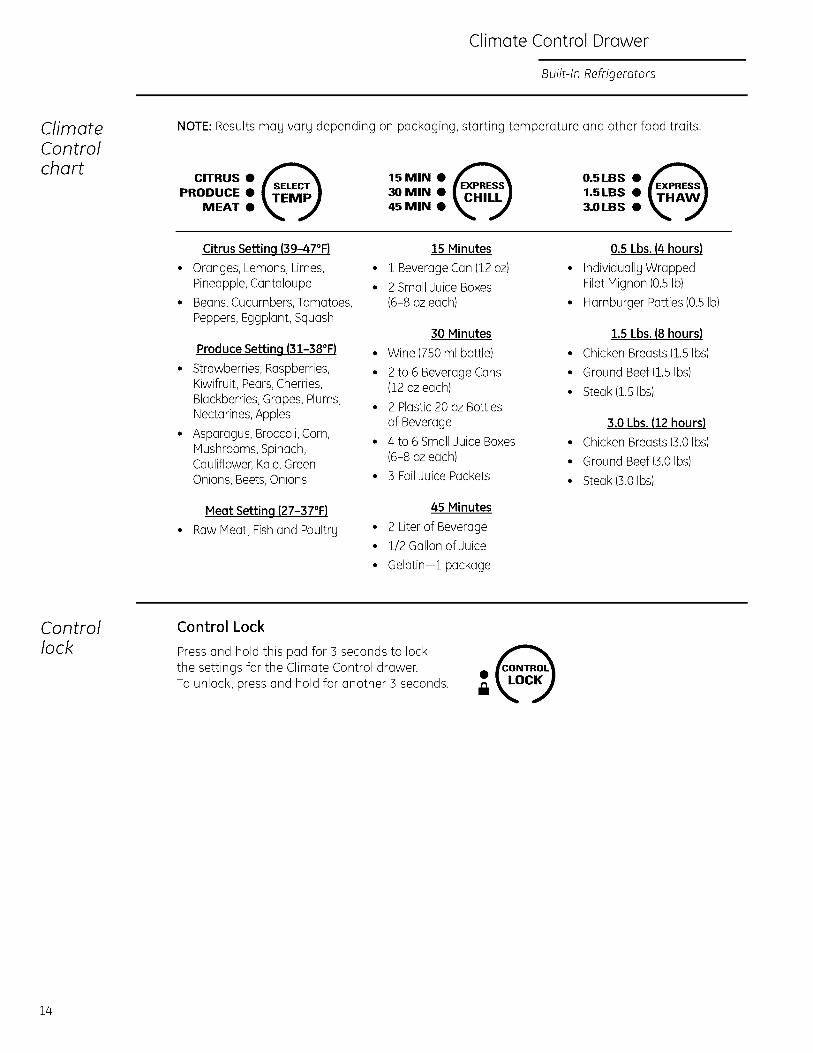
Climate Control Drawer
Built-In Refrigerators
ClimoteControlchort
NOTE: Results mag varg depending on packaging, starting temperature and other food traits.
PRODUCE • 30 M]N • 1.5LBS •
MEAT • 45 MIN • 3.0LBS •
Citrus Setting (39-47°F)
Oranges,Lemons, Limes,Pineapple,CantaloupeBeans,Cucumbers,Tomatoes,Peppers,Eggplant, Squash
ProduceSetting(31-38°F)
Strawberries, Raspberries,Kiwifruit, Pears,Cherries,Blackberries,Grapes,Plums,Nectarines, Apples
Asparagus, Broccoli,Corn,Mushrooms, Spinach,Cauliflower,Kale,GreenOnions,Beets,Onions
°
°
15 Minutes
1 BeverageCan (12 oz)2 Small Juice Boxes(6-8 oz each)
30 Minutes
• Wine (750 ml bottle)
° 2 to 6 Beverage Cans(12oz each)
° 2 Plastic20 oz Bottlesof Beverage
° /4to 6 SmallJuice Boxes(6-8 oz each)
° 3 FoilJuice Packets
0.5 Lbs. (4 hours)
• IndividuallgWrappedFiletMignon (0.5Ib)
• Hamburger Patties(0.5 Ib)
Meat Setting (27-37°F) 45 Minutes
• Raw Meat, Fishand Poultrg ° 2 Literof Beverage• 1/2 GallonofJuice
• Gelatin--1 package
1.5Lbs.(8hours)
• Chicken Breasts(i,5Ibs)
• Ground Beef(l.5 Ibs)
• Steak(1.5 Ibs)
:3.0Lbs. (12hours)
• Chicken Breasts(3.0Ibs)
• Ground Beef(3.0 Ibs)
• Steak (3.01bs)
Controllock
Control Lock
Press and hold this pad for 3 seconds to lockthe settings for the Climate Control drawer.To unlock, press and hold for another 3 seconds. ,@
14
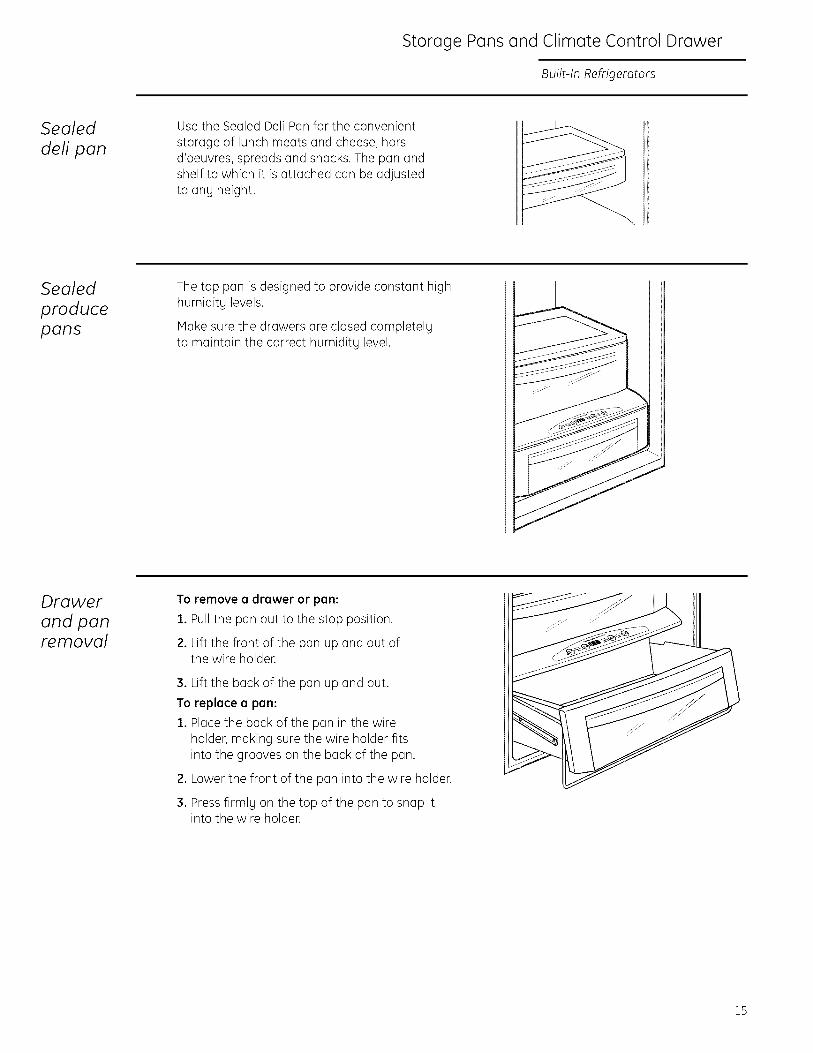
Storage Puns and Climate Control Drawer
Built-In Refrigerators
Sealeddeli pan
Use the Sealed Deli Pan for the convenient
storage of lunch meats and cheese, horsd'oeuvres, spreads and snacks. The pan andshelf to which it is attached can be adjustedto ang height.
Sealedproducepans
The top pan is designed to provide constant highhumiditg levels.
Hake sure the drawers are closed completelgto maintain the correct humiditg level.
Drawer
and panremoval
To remove a drawer or pan:
1. Pull the pan out to the stop position.
2. Lift the front of the pan up and out ofthe wire holder.
3. Lift the back of the pan up and out.
To replace a pan:
1. Place the back of the pan in the wireholder, making sure the wire holder fitsinto the grooves on the back of the pan.
o
3.
Lower the front of the pan into the wire holder.
Pressfirmlg on the top of the pan to snap itinto the wire holder.
15
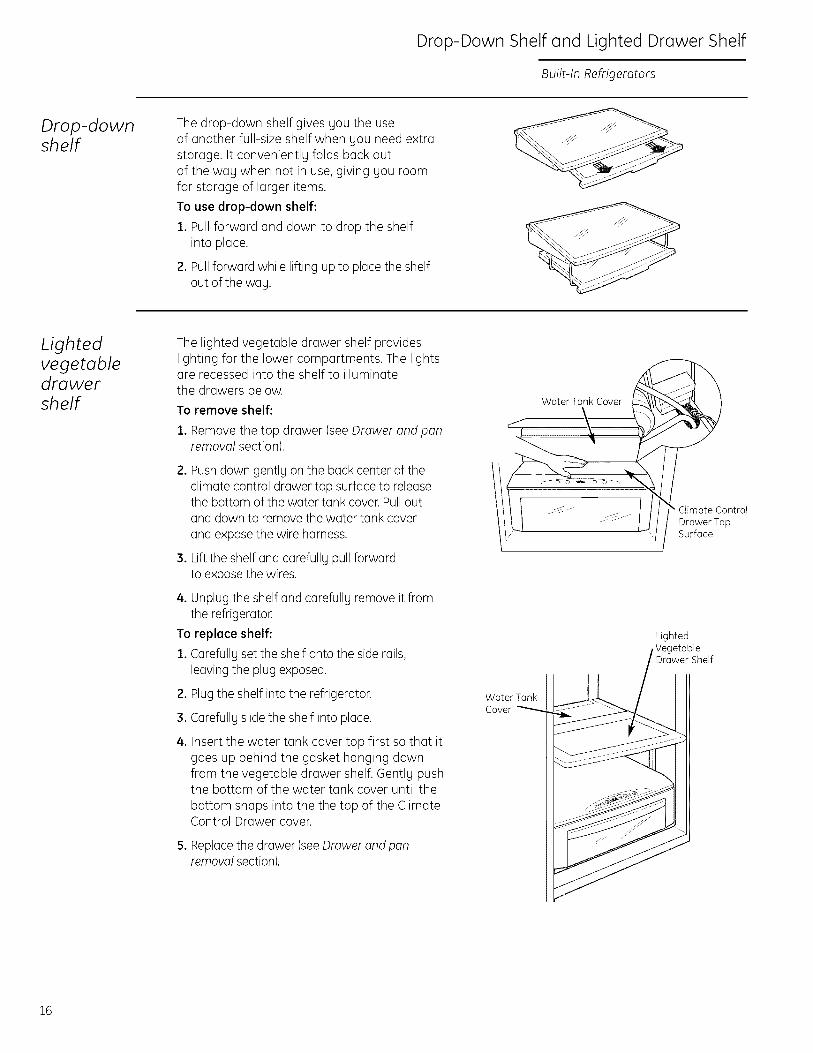
Drop-Down Shelf and Lighted Drawer Shelf
Built-In Refrigerotors
Drop-downshelf
The drop-down shelf gives you the useof another full-size shelf when you need extrastorage. It conveniently folds back outof the way when not in use, giving you roomfor storage of larger items.
To use drop-down shelf:
1. Pull forward and down to drop the shelfinto place.
2. Pullforward while lifting up to place the shelfout of the way.
Lightedvegetabledrowershelf
The lighted vegetable drawer shelf provideslighting for the lower compartments. The lightsare recessed into the shelf to illuminatethe drawers below.
To remove shelf:
1. Remove the top drawer (see Drower ond ponremovol section).
.
3.
Pushdown gently on the back center of theclimate control drawer top surface to releasethe bottom of the water tank cover. Pulloutand down to remove the water tank coverand expose the wire harness.
Lift the shelf and carefully pull forwardto expose the wires.
4. Unplug the shelf and carefully remove it fromthe refrigerator.
To replace shelf:
1.Carefully set the shelf onto the side rails,leaving the plug exposed.
2. Plugthe shelf into the refrigerator.
3.Carefully slide the shelf into place.
o Insert the water tank cover top first so that itgoes up behind the gasket hanging downfrom the vegetable drawer shelf. Gently pushthe bottom of the water tank cover until thebottom snaps into the the top of the ClimateControl Drawer cover.
5. Replacethe drawer (seeOrower ond ponremovol section).
Water Tank Cover
Woter Tonk
Cover
Climote Control
Drower TopSurfoce
LightedVegetableDrower Shelf
16
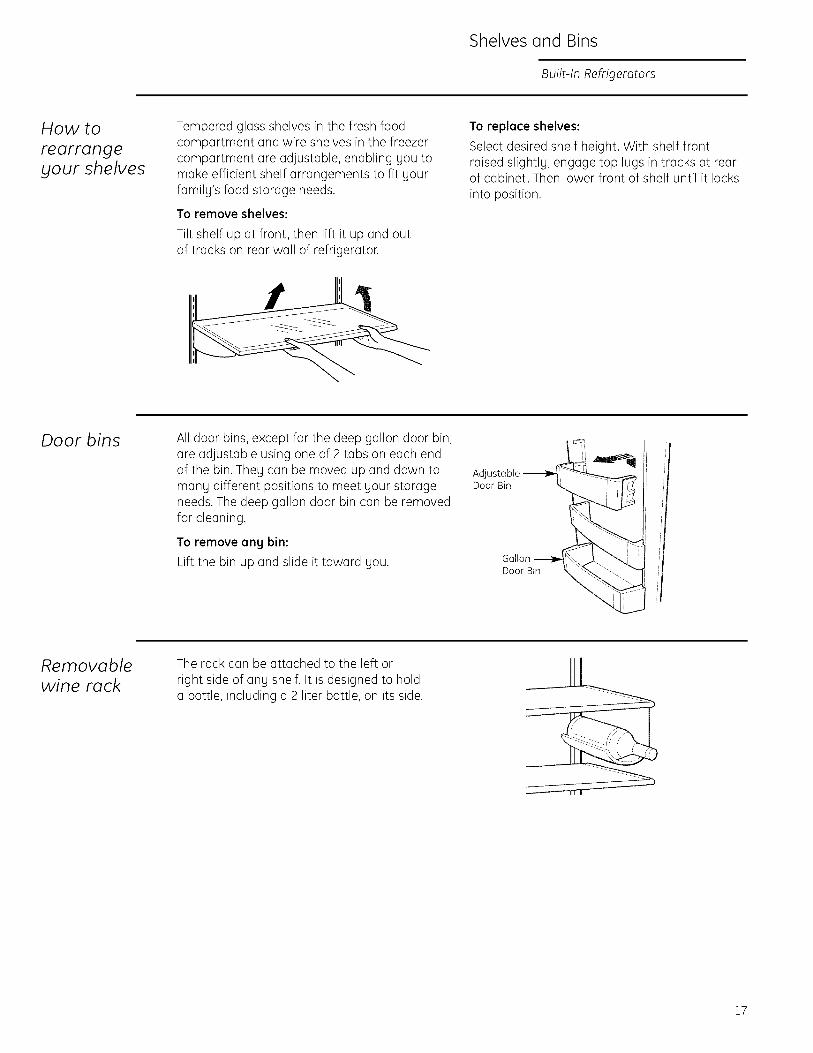
Shelves and Bins
Built-In Refrigerators
How to
rearrangeyour shelves
Tempered glass shelves in the fresh foodcompartment and wire shelves in the freezercompartment are adjustable, enabling you tomake efficient shelf arrangements to fit yourfamily's food storage needs.
To remove shelves:
Tilt shelf up at front, then lift it up and outof tracks on rear wall of refrigerator.
I I
To replace shelves:
Select desired shelf height. With shelf frontraised slightly, engage top lugs in tracks at rearof cabinet. Then lower front of shelf until it locks
into position.
Door bins All door bins, except for the deep gallon door bin,are adjustable using one of 2 tabs on each endof the bin. They can be moved up and down tomany different positions to meet your storageneeds. The deep gallon door bin can be removedfor cleaning.
To remove any bin:
Lift the bin up and slide it toward you.
Adj,Door Bin
GallonDoor Bin
\
Removablewine rack
The rack can be attached to the left or
right side of any shelf. It is designed to holda bottle, including a 2 liter bottle, on its side.
17
Shelves and Bins
Built-In Refrigerators
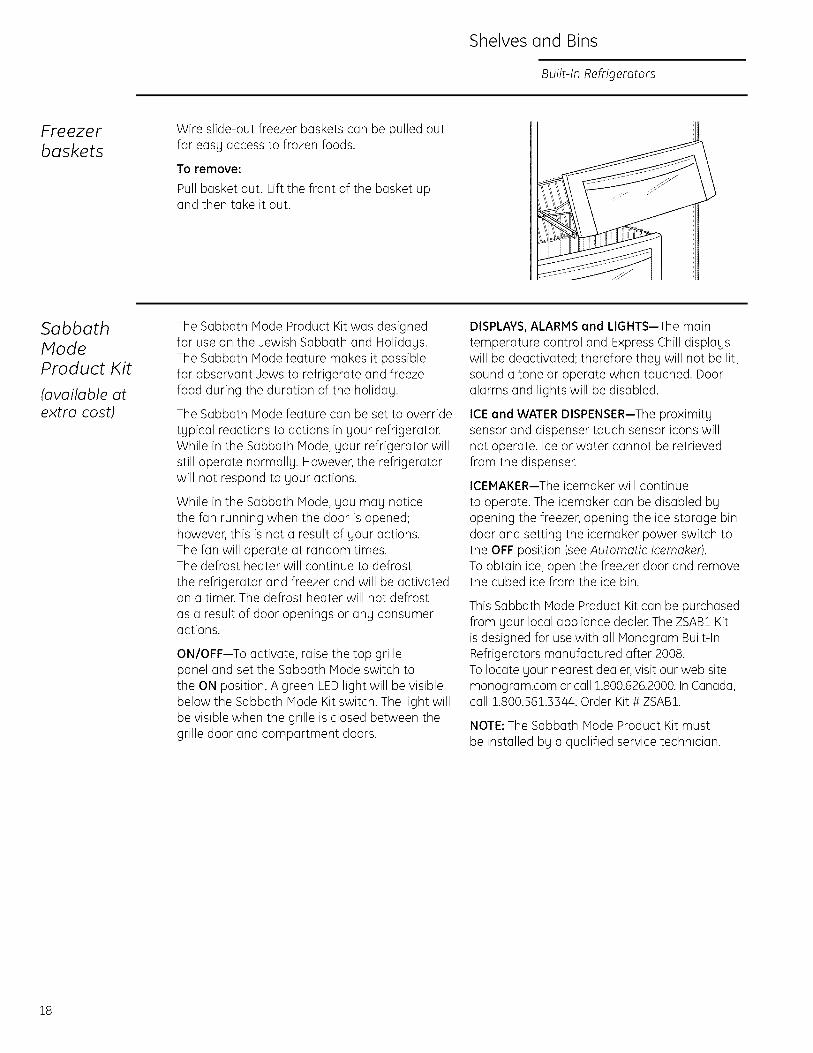
Freezer
basketsWire slide-out freezer baskets can be pulled outfor easy access to frozen foods.
To remove:
Pull basket out. Lift the front of the basket upand then take it out.
SabbathModeProduct Kit
(available atextra cost)
The Sabbath Mode Product Kit was designedfor use on the Jewish Sabbath and Holidays.The Sabbath Mode feature makes it possiblefor observant Jews to refrigerate and freezefood during the duration of the holiday.
The Sabbath Mode feature can be set to overridetypical reactions to actions in your refrigerator.While in the Sabbath Mode, your refrigerator willstill operate normally. However, the refrigeratorwill not respond to your actions.
While in the Sabbath Mode, you may noticethe fan running when the door is opened;however, this is not a result of your actions.The fan will operate at random times.The defrost heater will continue to defrostthe refrigerator and freezer and will be activatedon a timer. The defrost heater will not defrostas a result of door openings or any consumeractions.
ON/OFF--To activate, raise the top grillepanel and set the Sabbath Mode switch tothe ON position. A green LED light will be visiblebelow the Sabbath Mode Kit switch. The light willbe visible when the grille is closed between thegrille door and compartment doors.
DISPLAYS,ALARMSand LIGHTS--The maintemperature control and Express Chill displayswill be deactivated; therefore they will not be lit,sound a tone or operate when touched. Dooralarms and lights will be disabled.
ICEand WATERDISPENSER--Theproximitysensor and dispenser touch sensor icons willnot operate. Ice or water cannot be retrievedfrom the dispenser.
ICEMAKER--The icemaker will continueto operate. The icemaker can be disabled byopening the freezer, opening the ice storage bindoor and setting the icemaker power switch tothe OFF position (seeAutomatic Icemaker).To obtain ice, open the freezer door and removethe cubed ice from the ice bin.
This Sabbath Mode Product Kit can be purchasedfrom your local appliance dealer. The ZSAB1Kitis designed for use with all Monogram Built-InRefrigerators manufactured after 2008.To locate your nearest dealer, visit our web sitemonogram.cam or call 1.800.626.2000.In Canada,call 1.800.561.3344. Order Kit # ZSAB1.
NOTE:The Sabbath Mode Product Kit mustbe installed by a qualified service technician.
18
Care and Cleaning
Built-In Refrigerators
Cleaningoutside
The dispenser spill shelfand the area beneath itshould be cleaned
periodically with a mild liquid dish detergent.
Dispenser cradle--Before cleaning, lockthe dispenser by touching CONTROLLOCK for3 seconds to prevent activating the dispenser.Clean with warm water and a mild liquid dishdetergent. Rinsethoroughly and wipe dry.Unlock the dispenser by touching CONTROLLOCK for 3 seconds.
Do not use chemical cleaners to clean
the dispenser or any part of the dispenser.
Door handles and trim-Clean with a cloth
dampened with soapy water. Dry with a softcloth.
Keep the outside clean. Wipe with a cleancloth lightly dampened with mild liquid dishdetergent. Dry with a clean, soft cloth.
Do not wipe the refrigerator with a soileddish cloth or wet towel. These may leavea residue that can damage the finish. Do notuse scouring pads, powdered cleaners, bleachor cleaners containing bleach because theseproducts can scratch and damage the finish.
Stainless steel--Regularly clean and polishthe stainless steel door panels and handles(on some models)with a commercially availablestainless steel cleaner such as Stainless Steel
Magic TM to preserve and protect the fine finish.Stainless Steel Magic and the Monogrampolishing cloth are available through GEPartsand Accessories,800.626.2002,or monogram.com.For Stainless Steel Magic, order part numberWX10XI5. For Monogram polishing cloth,order part number WX72X10001.
Do not use appliance wax or polish onthe stainless steel.
Cleaninginside
Turn off power at the circuit breaker or fusebox before cleaning. If this is not practical, wringexcess moisture out of sponge or cloth whencleaning around switches, lights or controls.
Use warm water and baking soda solution-about a tablespoon (15 ml) of baking sodato a quart (1 liter) of water. This both cleansand neutralizes odors. Thoroughly rinseand wipe dry.
Other parts of the refrigerator-includingdoor gaskets, meat and vegetable drawers,ice storage bin and all plastic parts-can becleaned the same way.
Do not wash any plastic refrigerator partsin the dishwasher.
Avoid cleaning cold glass shelves with hotwater because the extreme temperaturedifference may cause them to break. Handleglass shelves carefully. Rough handling oftempered glass can cause it to shatter.
NOTE:Interior lights may get too hot and turnoff automatically if the refrigerator door is leftopen too long. This is normal and they will turnback on when they cool down.
19
Care and Cleaning
Built-In Refrigerators
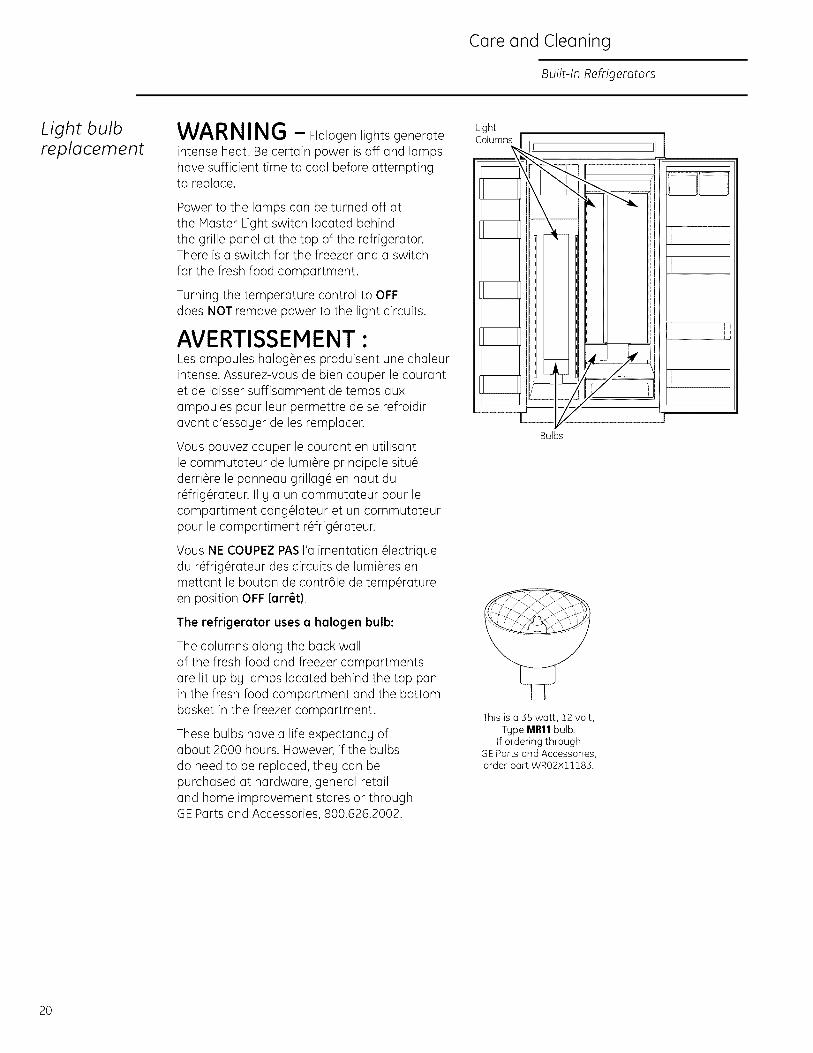
Light bulbreplacement
WARNING - Halogenlightsgenerate
intenseheat.Be certainpower isoffand lamps
havesufficienttimetocoolbeforeattempting
to replace,
Power to the lamps can be turned off atthe Master Light switch located behindthe grille panel at the top of the refrigerator.There is a switch for the freezer and a switch
for the fresh food compartment.
Turning the temperature control to OFFdoes NOT remove power to the light circuits.
AVERTISSEMENT :Lesampouleshalog@nesproduisentune chaleur
intense.Assurez-vousde biencouperlecourant
etde laissersuffisammentde temps aux
ampoulespourleurpermettrede serefroidir
avantd'essager de les remplacer.
Vous pouvez couper le courant en utilisantle commutateur de lumi@reprincipale situ@derri@rele panneau grillag@en haut dur@[email protected] a un commutateur pour lecompartiment cong@lateur et un commutateurpour le compartiment r@frig@rateur.
Vous NE COUPEZPASI'alimentation @lectriquedu r@frig@ateurdes circuits de lumi@resenmettant le bouton de contr61e de temp@ratureen position OFF (arr@t).
The refrigeretor uses e helogen bulb:
The columns along the back wallof the fresh food and freezer compartmentsare lit up bg lamps located behind the top panin the fresh food compartment and the bottombasket in the freezer compartment.
These bulbs have a life expectancy ofabout 2000 hours. However, if the bulbsdo need to be replaced, they can bepurchasedathardware,generalretail
and home improvementstoresorthroughGE Portsand Accessories,800.626.2002.
LightColumns
Bulbs
This is a 35 watt, 12 volt,Type MR11 bulb.
If ordering throughGEParts and Accessories,order part WR02X11183.
20
Care and Cleaning
Built-In Refrigerators
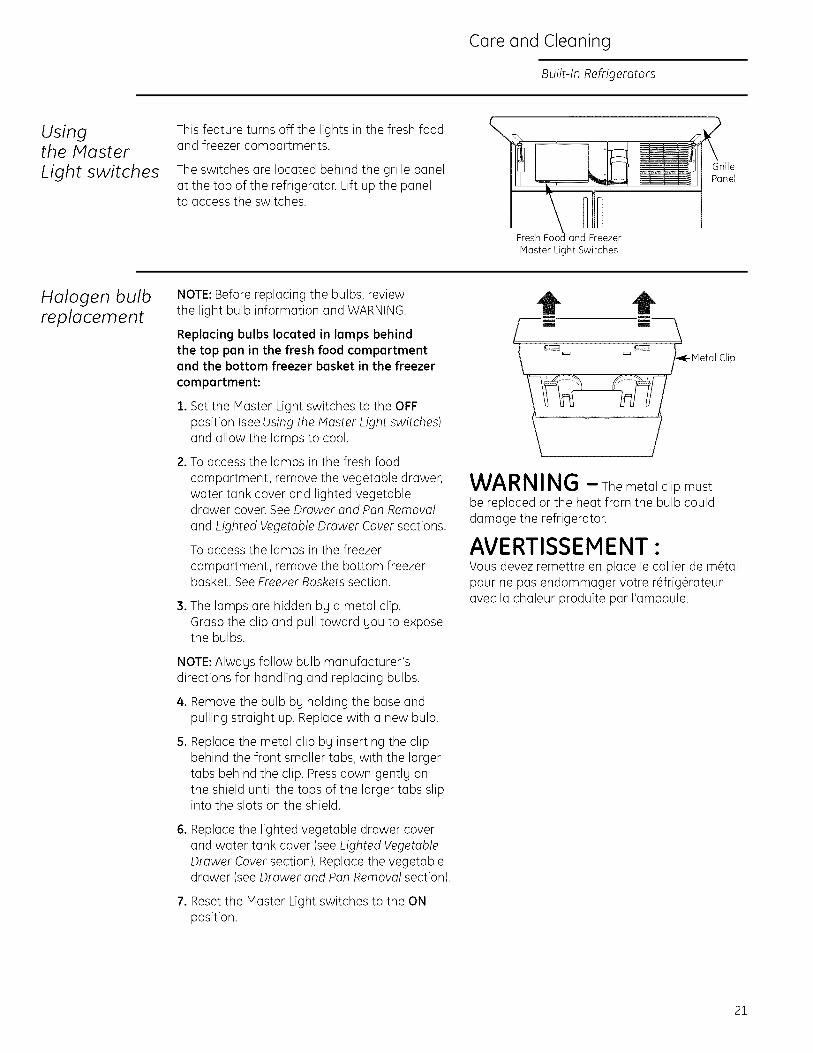
Usingthe MasterLight switches
This feature turns off the lights in the fresh foodand freezer compartments.
The switches are located behind the grille panelat the top of the refrigerator. Lift up the panelto access the switches.
Fresh Food and FreezerMaster Light Switches
Halogen bulbreplacement
NOTE: Before replacing the bulbs, reviewthe light bulb information and WARNING.
Replacing bulbs located in lamps behindthe top pan in the fresh food compartmentend the bottom freezer basket in the freezercompartment:
,
,
Set the Master Light switches to the OFFposition (see Using the Master Light switches)and allow the lamps to cool.
To access the lamps in the fresh foodcompartment, remove the vegetable drawer,water tank cover and lighted vegetabledrawer cover. See Drawer and Pan Removaland Lighted Vegetable Orawer Cover sections.
To access the lamps in the freezercompartment, remove the bottom freezerbasket. SeeFreezer Baskets section.
3. The lamps are hidden by a metal clip.Grasp the clip and pull toward you to exposethe bulbs.
NOTE: Always follow bulb manufacturer'sdirections for handling and replacing bulbs.
°
S°
Remove the bulb by holding the base andpulling straight up. Replace with a new bulb.
Replace the metal clip by inserting the clipbehind the front smaller tabs, with the largertabs behind the clip. Press down gently onthe shield until the tops of the larger tabs slipinto the slots on the shield.
° Replace the lighted vegetable drawer coverand water tank cover (see Lighted VegetableDrawer Cover section). Replace the vegetabledrawer (see Orawer and Pan Removal section).
7. Reset the Master Light switches to the ONposition.
t t
_Metal Clip
WARNING - Themetalclip mustbe replaced or the heat from the bulb coulddamage the refrigerator.
AVERTISSEMENT :Vous devez remettre en place le collier de m@talpour ne pas endommager votre r@frig@rateuravec la chaleur produite par I'ampoule.
21
Care and Cleaning
Built-In Refrigerators
Preparingfor vacation
For long vacations or absences, remove foodand shut off power to the refrigerator at the fusebox or circuit breaker. Clean the interior (seeCleaning Inside). Leave doors open.
For shorter vacations, remove perishable foodsand leave controls at regular settings. However, ifthe room temperature is expected to drop below60°F (16°C),follow the same instructions as forlong vacations.
Set the icemaker power switch to the OFFposition and be sure to shut off the water supplyto the refrigerator.
22
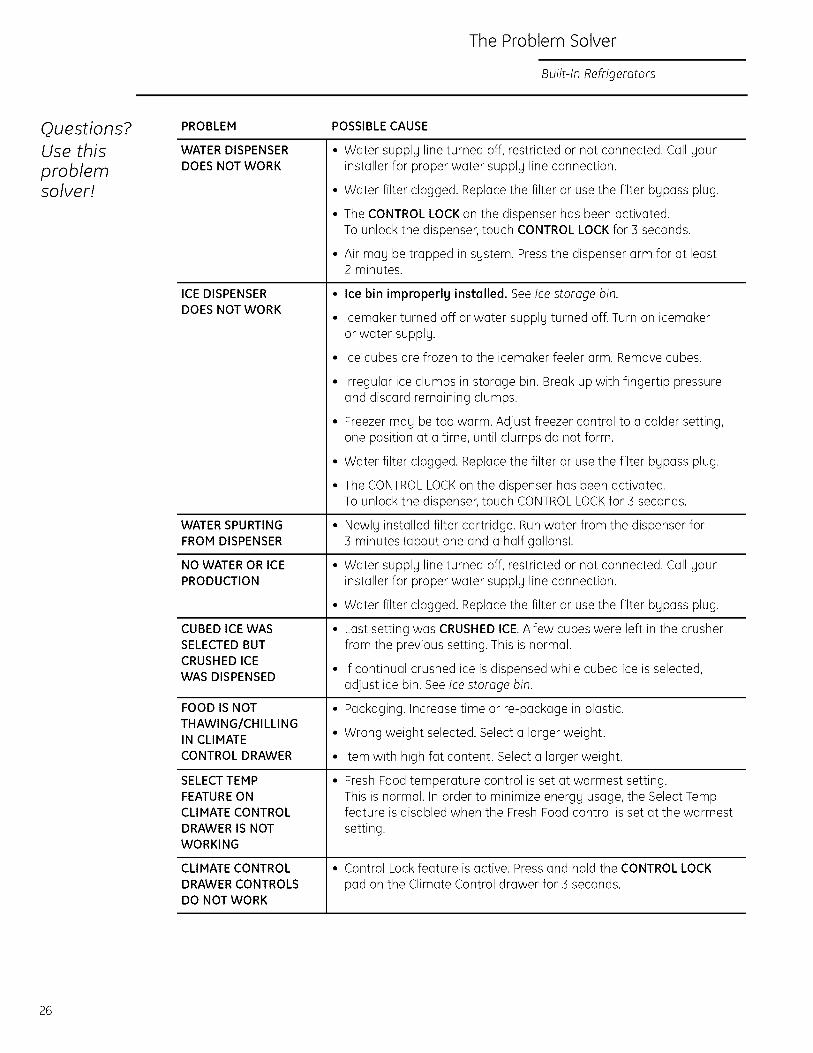
The Problem Solver
Built-In Refrigerators
Questions?Use this
problemsolver!
PROBLEM POSSIBLECAUSE
REFRIGERATORDOES NOT OPERATE
MOTOR OPERATESFOR LONG PERIODSOR CYCLES ON AND
OFF FREQUENTLY
(Modern refrigerators
with more storage
space and a larger
freezer require
more operating time.Theg start and stopoften to maintain
even temperatures.)
OPERATINGSOUNDS
Hag be in defrost cgcle when compressor does not operate for about30 minutes.
• Temperature control set at OFF.• If interior light is not on, refrigerator mag not be plugged in at
wall outlet.
• The fuse is blown/circuit breaker is tripped. Replace fuse or resetthe breaker.
• Normal when refrigerator is first plugged in. Wait 2/4 hours forthe refrigerator to completelg cool down.
• The new variable speed compressor is designed to run for longerperiods of time to optimize efficiencg and noise. You mag noticethe compressor and/or fan speeds accelerate based upon dooropenings and/or increased food loads.
• You mag hear the fans spinning at high speeds. This happens whenthe refrigerator is first plugged in, when the doors are openedfrequentlg or when a large amount of food is added to therefrigerator or freezer compartments. The fans are helping tomaintain the correct temperatures.
• Door left open or package holding door open.• If either door is open for over 3 minutes, gou mag hear the fans
come on in order to cool the light.• Hot weather or frequent door openings. This is normal.• Temperature controls set at the coldest setting. See Temperature
Controls.
• Refrigerator is so quiet, that most of the time gou will hear low or nooperating noise.
• Normal fan air flow--one fan blows cold air through thefresh food and freezer compartments-another fan coolsthe compressor motor.
• The fans change speeds in order to provide optimal cooling andenergg savings.
• These NORHAL sounds will also be heard from time to time:
- You may hear a whooshing or gurgling sound when the doors close.This is due to pressure equalizing within the refrigerator.
- A water dripping noise mag occur during the defrost cgcle as icemelts from the evaporator and flows into the drain pan.
- The flow of refrigerant through the freezer cooling coils mag makea gurgling noise like boiling water.
- Water dropping on the defrost heater can cause a sizzling, poppingor buzzing sound during the defrost cgcle.
- You mag hear cracking or popping sounds when the refrigeratoris first plugged in or during/after the defrost cgcle. This happens asthe refrigerator cools to the correct temperature.
- Electronic dampers click open and closed to provide optimal coolingand energg savings,
- The compressor mag cause a clicking or chirping sound whenattempting to restart (this could take up to 5 minutes).
- The electronic control board mag cause a clicking sound whenrelags activate to control refrigerator components.
- Ice cubes dropping into the bin and water running in pipesas icemaker refills.
- The icemaker water valve will buzz when the icemaker fillswith water.
23
The Problem Solver
Built-In Refrigerators
Questions?Use this
problemsolver!
PROBLEM POSSIBLE CAUSE
DOOR NOT CLOSING
PROPERLY
ACTUAL
TEMPERATURE
NOT EQUAL TO SETTEMPERATURE
VIBRATION ORRATTLING
(Slight vibrationis normal.)
FRESH FOOD
OR FREEZER
COMPARTMENT
TOO WARM
FROST OR ICE
CRYSTALS ON
FROZEN FOOD
IFrost within packageis normal.}
SLOW ICE CUBE
FREEZING
ICE HASODOR/TASTE
AUTOMATIC
ICEMAKER
DOES NOT WORK
MOISTURE FORMS
ON CABINET
SURFACE BETWEEN
THE DOORS
• Package may be holding door open,
• Check the door gasket; it may be out of position,
• Refrigerator is not level. See Installation Instructions.
• Refrigerator just plugged in, Allow 24 hours for sgstem to stabilize.
• Door open for too long. Allow 24 hours for sgstem to stabilize.
• Warm food added to refrigerator. Allow 24 hours for sgstemto stabilize.
• Defrost cgcle is in process. Allow 24 hours for sgstem to stabilize.
• Refrigerator mag not be properlg installed.
• Temperature controls not set cold enough, See Temperature Controls.
• Warm weather or frequent door openings.
• Door left open for long time.
• Package mag be holding door open.
• Door left open or package holding door open.
• Too frequent or too long door openings.
• Doormay havebeen leftopen,
• Freezer compartment is too warm. Set the freezer to a coldertemperature.
• Old cubes need to be discarded.
• Ice storage bin needs to be emptied and washed.
• Unsealed packages in freezer compartment mag be transmittingodor/taste to ice.
• Keep open box of baking soda in refrigerator; replace everg 3 months.
• Poor-tasting incoming water. Replace water filter.
• Icemaker power switch is in the OFF position.
• Water supplg turned off or not connected.
• Freezer compartment too warm.
• Piled up cubes in storage bin mag cause icemaker to shut offtoo soon. Level cubes in bin.
• Not unusual during periods of high humiditg. Wipe surface drg.
• Controlling humiditg and temperature in the kitchen with airconditioning will eliminate this condition.
24

The Problem Solver
Built-In Refrigerators
PROBLEM POSSIBLE CAUSE
MOISTURE
COLLECTS INSIDE
REFRIGERATOR
HAS ODOR
INTERIOR LIGHT
DOES NOT WORK
SMALL OR
HOLLOW CUBES
WATER ON
THE FLOOR
UNEVEN SPACING
OR GAPS BETWEEN
DOORS AND
KITCHEN CABINET
POOR DOOR
ALIGNMENT OR
ONE DOOR HIGHER
THAN THE OTHER
Too frequent or long door openings.
In humid weather, air carries moisture into refrigerator when doorsare opened.
Controlling humidity and temperature in the kitchen with airconditioning will eliminate this condition.
Foods with strong odors should be tightly covered.
Check for spoiled food.
Interior needs cleaning. See Care and Cleaning.
Keep open box of baking soda in refrigerator; replace every] months.
No power at outlet.
Light bulb needs replacing. See Care and Cleaning.
Master Light switch is in the OFFposition.
The refrigerator is equipped with a safety feature that turns offthe refrigerator lights when the doors have been opened for anextended period. Once the refrigerator doors are closed and the lightshove had time to cool, they will again come on automatically whenthe doors are opened.
Water filter clogged. Replace the filter or use the filter bypass plug.
Check for a connection to a Reverse Osmosis water system.If an ROis connected, remove the water filter and install theoriginal bypass plug that come with the unit.
If you use an extra toll gloss or pitcher, or overfill a gloss or pitcher,you may be jamming the cubes in the funnel chute. They can fuseinside the chute and drop out later, leaving water or ice on the floor.
Kitchen cabinets are not level or square. Call the installer orcabinetmaker.
• Fresh food door needs adjusting. See Installation Instructions.
• Refrigerator is not level. SeeAttention Installer Instructions.
WATERHAS POOR • Water dispenser has not been used for a long time. Dispense waterTASTEOR ODOR until all water in system is replenished.
WATERIN FIRSTGLASSISWARM
• Normal when refrigerator is first installed. Wait 24 hours for therefrigerator to completely cool down.
• Water dispenser has not been used for a long time. Dispense wateruntil all water in system is replenished.
• Water system has been drained. Allow several hours for replenishedsupply to chill.
25
The Problem Solver
Built-In Refrigerators
Questions?Use this
problemsolver!
PROBLEM POSSIBLECAUSE
WATER DISPENSER
DOES NOT WORK
ICE DISPENSER
DOES NOT WORK
WATER SPURTING
FROM DISPENSER
NO WATER OR ICE
PRODUCTION
CUBED ICE WAS
SELECTED BUT
CRUSHED ICE
WAS DISPENSED
FOOD IS NOT
THAWING/CHILLINGIN CLIMATE
CONTROL DRAWER
SELECT TEMP
FEATURE ON
CLIMATE CONTROL
DRAWER IS NOT
WORKING
CLIMATE CONTROL
DRAWER CONTROLS
DO NOT WORK
Water supplg line turned off, restricted or not connected. Call gourinstaller for proper water supplg line connection.
• Water filter clogged. Replace the filter or use the filter bgpass plug.
• The CONTROLLOCK on the dispenser has been activated.To unlock the dispenser, touch CONTROL LOCKfor ] seconds.
• Air mag be trapped in sgstem. Pressthe dispenser arm for at least2 minutes.
• Ice bin improperly installed. See Ice storage bin.
• Icemaker turned off or water supply turned off. Turn on icemakeror water supplg.
• Ice cubes are frozen to the icemaker feeler arm. Remove cubes.
• Irregular ice clumps in storage bin. Break up with fingertip pressureand discard remaining clumps.
• Freezer mag be too warm. Adjust freezer control to a colder setting,one position at a time, until clumps do not form.
• Water filter clogged. Replace the filter or use the filter bypass plug.
• The CONTROLLOCKon the dispenser has been activated.To unlock the dispenser, touch CONTROLLOCKfor ] seconds.
• Newly installed filter cartridge. Run water from the dispenser for] minutes (about one and a half gallons).
• Water supply line turned off, restricted or not connected. Call gourinstaller for proper water supplg line connection.
• Water filter clogged. Replace the filter or use the filter bgpass plug.
• Last setting was CRUSHEDICE.Afew cubes were left in the crusherfrom the previous setting. This is normal.
• If continual crushed ice is dispensed while cubed ice is selected,adjust ice bin. See Ice storage bin.
• Packaging. Increase time or re-package in plastic.
• Wrong weight selected. Select a larger weight.
• Item with high fat content. Select a larger weight.
• Fresh Food temperature control is set at warmest setting.This is normal. In order to minimize energg usage, the Select Tempfeature is disabled when the Fresh Food control is set at the warmest
setting.
Control Lock feature is active. Press and hold the CONTROLLOCK
pad on the Climote Control drower for ] seconds.
26
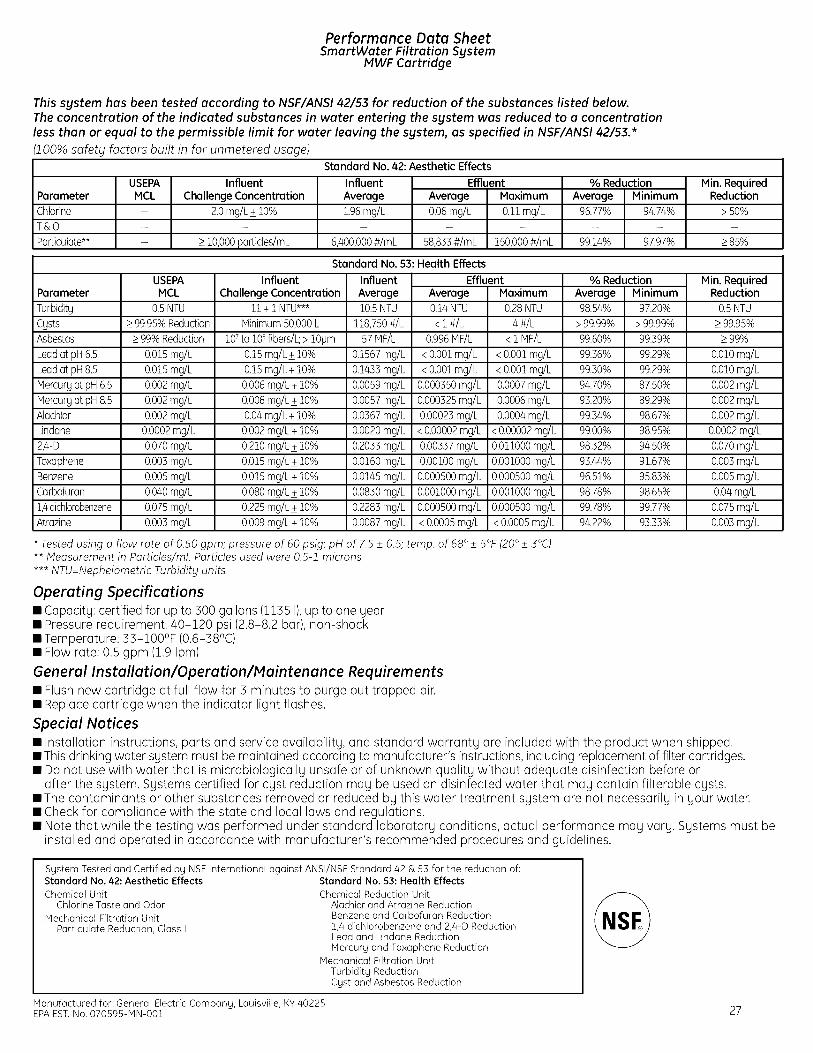
Performance Data SheetSmartWater Filtration System
MWF Cartridge
This sgstem has been tested according to NSF/ANSI 42/53 for reduction of the substances listed below.The concentration of the indicated substances in water entering the system was reduced to a concentrationless than or equal to the permissible limit for water leaving the system, as specified in NSF/ANSI 42/53.*(100% safety factors built in for unmetered usage)
USEPA InfluentParameter MCL Challenge ConcentrationChlorine - 2.0mg/L± 10%T&O - -
Particulate** - _>10,000particles/mL
Standard No. 42: Aesthetic Effects
Influent EffluentAverage Average Maximum1.96mg/L 0.06mg/L 0.11mg/L
6,400,000#/mL 58,833#/mL 150,000#/mL
% ReductionAverage Minimum
96,77% 94,74%
99.14% 97,97%
Min. RequiredReduction
> 50%
_>85%
Parameter
Turbiditg
CgstsAsbestos
Leadat pH6.5Leadat pH8.5
Mercurgat pH6.5
Mercurgat pH8.5A1Gchlor
LindGne
2,4-D
ToxopheneBenzene
Corbofuron
1,4dichlorobenzeneAtrozine
USEPAMCL
0.5NTU_>99.95%Reduction
_>99%Reduction
0.015mg/L0.015mg/L
0.002mg/L0.002mg/L
0.002mg/L0.0002mg/L
0.070mg/L0.003mg/L
0.005mg/L0.040mg/L
0.075mg/L0.003mg/L
Standard No. 53: Health Effects
InfluentChallenge Concentration
11+ 1 NTU***
Minimum50,000L
107to 108fibers/L;> 101Jm
0.15mg/L+ 10%0.15mg/L+ 10%
0.006mg/L+ 10%0.006mg/L+ 10%
0.04mg/L+ 10%0.002mg/L+ 10%
0.210mg/L+ 10%0.015mg/L+ 10%
0.015mg/L+ 10%0.080mg/L+ 10%
0.225mg/L+ 10%0.009mg/L+ 10%
InfluentAverage10.5NTU
118,750#/L57MF/L
0.1567mg/L0.1433mg/L
0.0059mg/L0.0057mg/L
0.0367mg/L0.0020mg/L
0.2033mg/L0.0160mg/L
0.0145mg/L0.0830mg/L
0.2283mg/L0.0087mg/L
EffluentAverage0,14NTU
< i #/L0,996MF/L
< 0,001mg/L< 0,001mg/L
0.000350mg/L0.000325mg/L
0.00023mg/L< 0.00002mg/L
0.00337mg/L0.00100mg/L
0.000500mg/L0.001000mg/L
0.000500mg/L< 0.0005mg/L
Maximum
0.28NTU
4#/L< 1 MF/L
<0,001mg/L<0.001mg/L
0.0007mg/L0.0006mg/L
0.0004mg/L< 0.00002mg/L
0.011000mg/L0.001000mg/L
0.000500mg/L0.001000mg/L
0.000500mg/L< 0.0005mg/L
% Reduction
Average Minimum98,54% 9720%
>99,99% >99,99%
%60% 99.39%
99.36% 99.29%
99.30% 99.29%
94.70% 87.50%
93.20% 89.29%
99.34% 98.67%
99.00% 98.95%
98.32% 94.50%
93.44% 91.67%
96.51% 95.83%
98.78% 98.65%
99.78% 99.77%
94.22% 93,33%
Min. RequiredReduction
0.5NTU
2 99.95%_>99%
0.010mg/L0,010mg/L
0.002mg/L0.002mg/L
0.002mg/L0.0002mg/L
0.070mg/L0.003mg/L
0.005mg/L0,04mg/L
0.075mg/L0.003mg/L
Tested using a flow rate of 0.50 gpm; pressure of 60 psig; pH of 7.5 +_0.5; temp. of 68 ° +_5°F (20 ° +_3°C1** Measurement in Partictes/mt. Particles used were 0.5-1 microns
*** NTU=Nephetometric Turbiditg units
Operating Specifications• Capacity: certified for up to 300 gallons (1135 I);up to one year• Pressure requirement: 40-120 psi (2.8-8.2 bar), non-shock• Temperature: 33-100°F (0.6-38°C)• Flow rate: 0.5 gpm (1.9 Ipm)
General Installation/Operation/Maintenance Requirements• Flush new cartridge at full flow for 5 minutes to purge out trapped air.• Replace cartridge when the indicator light flashes.
Special Notices• Installation instructions, parts and service availabilitg, and standard warrantg are included with the product when shipped.• This drinking water sgstem must be maintained according to manufacturer's instructions, including replacement of filter cartridges.• Do not use with water that is microbiologicallg unsafe or of unknown qualitg without adequate disinfection before or
after the sgstem. Sgstems certified for cgst reduction mag be used on disinfected water that mag contain filterable cgsts.IThe contaminants or other substances removed or reduced bg this water treatment sgstem are not necessarilg in gour water.• Check for compliance with the state and local laws and regulations.• Note that while the testing was performed under standard laboratorg conditions, actual performance mag varg. Sgstems must be
installed and operated in accordance with manufacturer's recommended procedures and guidelines.
Standard No. 42: Aesthetic Effects
Chemical UnitChlorine Taste and Odor
Mechanical Filtration Unit
Particulate Reduction, Class I
Sgstem Tested and Certified bg NSF International against ANSI/NSF Standard 42 & 53 for the reduction of:Standard No. 53: Health EffectsChemical Reduction Unit
Alachlor and Atrazine ReductionBenzene and Carbofuran Reduction1,4 dichlorobenzene and 2,4-D ReductionLead and Lindane ReductionMercurg and Toxaphene Reduction
Mechanical Filtration UnitTurbiditg ReductionCast and Asbestos Reduction
Manufactured for: General Electric Compang, Louisville, KY 40225EPA EST. No. 070595-MN-001 27

State of CaliforniaDepartment of Health Services
Water Treatment DeviceCertificate Number
05-1698
Date issued: February 2, 2005
Cysts
Turbidity
Organic Contaminants
AlachlorAtrazine
BenzeneCarbofura_
Lindane
Mercury
2,4-D
Rated Service Capacity: 300 ga! Rated SerVice Flow: 0.5 gpm
Conditions of Certification:Do not use where water is microbiologically unsafe or with water Of unknown quality, except that systems certified forcyst reduction may be used on disinfected waters that may contain filterable cysts.
28
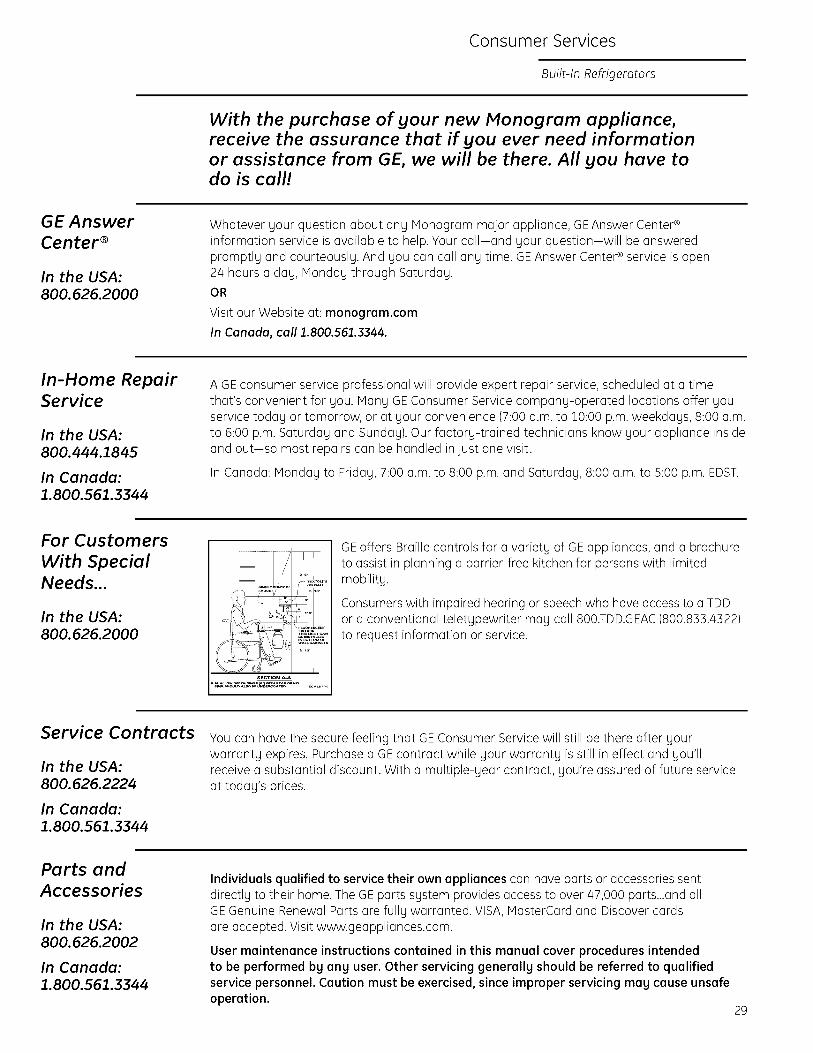
Consumer Services
Built-In Refrigerators
With the purchase of gour new Monogram appliance,receive the assurance that if gou ever need informationor assistance from GE, we will be there. All gou have todo is call!
GE Answer
Center ®
In the USA:800.626.2000
Whatever your question about any Monogram major appliance, GEAnswer Center®information service is available to help. Your coil-and your question-will be answeredpromptly and courteously. And you con coil any time. GEAnswer Center®service is open24 hours o day, Monday through Saturday.OR
Visit our Website at: monogram.com
In Canada, call 1.800.561.3344.
In-Home RepairService
In the USA:800.444.1845
In Canada:1.800.561.3344
A GEconsumer service professional will provide expert repair service, scheduled at o timethat's convenient for you. Many GEConsumer Service company-operated locations offer youservice today or tomorrow, or at your convenience (7:00 o.m. to 10:00 p.m. weekdays, 8:00 o.m.to 6:00 p.m. Saturday and Sundog). Our factory-trained technicians know your appliance insideand out-so most repairs con be handled in just one visit.
In Canada: Monday to Friday, 7:00 a.m. to 8:00 p.m. and Saturday, 8:00 a.m. to S:00 p.m. EDST.
For Customers
With SpecialNeeds...
In the USA:800.626.2000
71 .................I _
Se_lON
GEoffers Braille controls for o variety of GEappliances, and o brochureto assist in planning o barrier-free kitchen for persons with limitedmobility.
Consumers with impaired hearing or speech who have access to a TDDor o conventional teletypewriter may call 800.TDD.GEAC(800.833.4322)to request information or service.
Service Contracts
In the USA:800.626.2224
In Canada:1.800.561.3344
You con have the secure feeling that GEConsumer Service will still be there after yourwarranty expires. Purchase o GEcontract while your warranty is still in effect and you'llreceive o substantial discount. With o multiple-gear contract, you're assured of future serviceat today's prices.
Parts andAccessories
In the USA:800.626.2002
In Canada:1.800.561.3344
Individuals qualified to service their own appliances can have parts or accessories sentdirectly to their home. The GEparts system provides access to over 47,000 parts...and allGEGenuine Renewal Parts are fully warranted. VISA, HasterCard and Discover cardsare accepted. Visit www.geappliances.com.
User maintenance instructions contained in this manual cover procedures intendedto be performed by any user. Other servicing generally should be referred to qualifiedservice personnel. Caution must be exercised, since improper servicing may cause unsafeoperation.
29
Notes
Built-In Refrigerotors
30
Notes
Built-In Refrigerotors
Warranty
Built-In Refrigerators
WHAT ISCOVERED
From the Date
of the OriginalPurchase
WHAT IS NOT
COVERED
YOUR MONOGRAM REFRIGERATOR WARRANTY
Staple sales slip or cancelled check here. Proof of originalpurchase date is needed to obtain service under warrantg.
LIMITED TWO-YEAR WARRANTYFor two years from date of original purchase, we will provide, free of charge, parts and service labor inyour home to repair or replace any part of the refrigerator that fails because of a manufacturing defect.
LIMITED FIVE-YEAR WARRANTYFor five years from date of original purchase, we will provide, free of charge, parts and service laborin your home to repair or replace any part of the sealed refrigerating system (the compressor, condenser,evaporator and oil connecting tubing) that fails because of o manufacturing defect.
LIMITED ADDITIONAL SIXTH- THROUGH TWELFTH-YEAR WARRANTY ON THE SEALED SYSTEMFor the sixth through twelfth year from the date of the original purchase, we will provide, free of charge,replacement parts for any part of the sealed refrigerating system (the compressor, condenser, evaporator andall connecting tubing) that fails because of a manufacturing defect. You pay for the service trip to your homeand for service labor charges.
LIMITED THIRTY-DAY WARRANTY ON WATER FILTER CARTRIDGE (Water filter, if included)From the date of the original purchase we will provide, free of charge, replacement parts for any part ofthe water filter cartridge that fails because of a manufacturing defect. During this limited thirty-day warranty,we will also provide, free of charge, a replacement water filter cartridge.II o II II II II II ID IDO OII II II II ID IDO OII Q O O O O O O Q Q O O O O O O Q I I O O O O O Q I I O O O O O Q I I O O O O O Q I I O O O O O Q O I e
This warranty is extended to the original purchaser and any succeeding owner for products purchased forordinary home use in the/48 mainland states, Hawaii, Washington, D.C.or Canada. If the product is locatedin an area where service by a GE Authorized Servicer is not available, you may be responsible for a tripcharge or you may be required to bring the product to an Authorized GE Service location for service.In Alaska the warranty is the same except that it is LIMITEDbecause you must pay to ship the productto the service shop or for the service technician's travel costs to your home.
All warranty service will be provided by our Factory Service Centers or by our authorized Customer Care®servicers during normal working hours.
Should your appliance need service, during warranty period or beyond, in the USAcall 800./444.1845.In Canada: 800.561.3344. Pleasehave your serial number and model number available when calling for service.
• Service trips to gour home to teach gou howto use the product.
° Replacement of house fuses or resetting of circuitbreakers.
° Damage to the product caused bg accident, fire,floods or acts of God.
° Failure of the product if it is used for other thanits intended purpose or used commerciallg.
° Damage caused after deliverg.
° Improper installation, deliverg or maintenance.If gou have an installation problem, contactgour dealer or installer. You are responsiblefor providing adequate electrical, plumbingand other connecting facilities.
° Replacement of the light bulbs, if included,or water filter cartridge, if included, otherthan as noted above.
° Replacement of the water filter cartridge,if included, due to water pressure that is outsidethe specified operating range or due to excessivesediment in the water supplg.
° Loss of food due to spoilage (in the USAonlg).° Incidental or consequential damage caused
bg possible defects with this appliance.° Product not accessible to provide required
service.
IEXCLUSIONOF IMPLIED WARRANTIES--Your sole and exclusive remedy is product repair as provided in Ithis Limited Warranty. Any implied warranties, including the implied warranties of merchantabilitg or Ifitness for a particular purpose, are limited to one year or the shortest period allowed by law.
OO508-08 JR
Printedin the UnitedStates
Some states/provinces do not allow the exclusion or limitation of incidental or consequential damages,so the above limitation or exclusion may not apply to you. This warranty gives you specific legal rights, and youmay also have other rights which vary from state to state/province to province. To know what your legal rightsare in your state/province, consult your local or state/provincial consumer affairs office or your state's AttorneyGeneral.
Warrantor in USA: General Electric Compang,Louisville, KY 40225
Warrantor in Canada: Mabe Canada Inc.
GE Consumer & IndustrialAppliancesGeneral Electric CompanyLouisville, KY/40225ge.com

![Manual - Sears Parts Direct · Mabe Canada Inc.! Factorg Lane,Suite 510 moncton, N.B.E1C9M] IMPORTANT SAFETY INSTRUCTIONS READ ALL INSTRUCTIONS BEFORE USE SAVE THESE INSTRUCTIONS](https://img.pdfslide.net/doc/110x75/5eab1ff55003f37c8a319247/manual-sears-parts-direct-mabe-canada-inc-factorg-lanesuite-510-moncton-nbe1c9m.jpg)