Embed Size (px)
Citation preview
SIMPLY CLEVER
OWNER'S MANUALOWNER'S MANUAL
Amundsen and Bolero infotainment systems

3V0012720ED
Preface
This Owner's Manual is intended for the Amundsen and Bolero infotainmentsystems.
Please read these Owner's Manual carefully, because the operation in ac-cordance with these instructions is a prerequisite for proper use of the unit.
3V
00
1272
0E
D
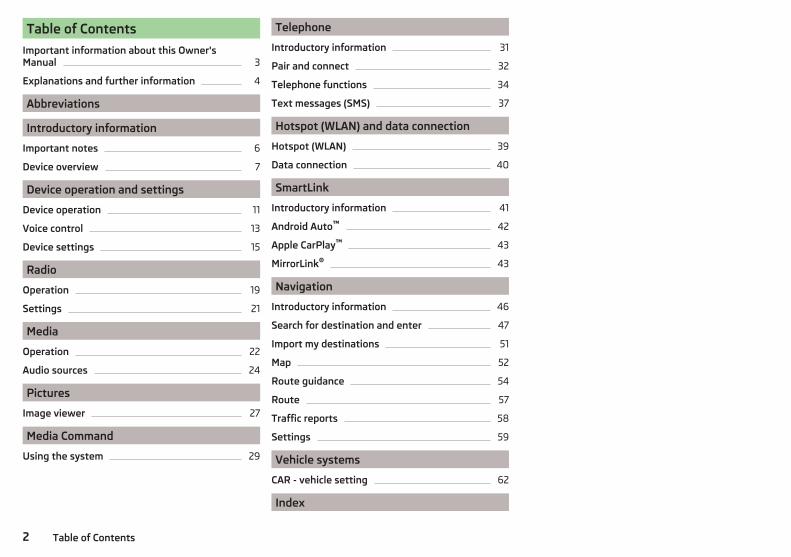
Table of Contents
Important information about this Owner'sManual 3
Explanations and further information 4
Abbreviations
Introductory information
Important notes 6
Device overview 7
Device operation and settings
Device operation 11
Voice control 13
Device settings 15
Radio
Operation 19
Settings 21
Media
Operation 22
Audio sources 24
Pictures
Image viewer 27
Media Command
Using the system 29
Telephone
Introductory information 31
Pair and connect 32
Telephone functions 34
Text messages (SMS) 37
Hotspot (WLAN) and data connection
Hotspot (WLAN) 39
Data connection 40
SmartLink
Introductory information 41
Android Auto™ 42
Apple CarPlay™ 43
MirrorLink® 43
Navigation
Introductory information 46
Search for destination and enter 47
Import my destinations 51
Map 52
Route guidance 54
Route 57
Traffic reports 58
Settings 59
Vehicle systems
CAR - vehicle setting 62
Index
2 Table of Contents
Important information about this Owner's Manual
This Owner's Manual is valid for all types of Amundsen and Bolero infotain-ment systems (hereafter only devices). The device may differ depending on thevehicle model, in which it is installed in both its appearance and in the arrange-ment of the controls.
This Owner's Manual describes all possible device functions without identify-ing them as special equipment, model variants or market-dependent equip-ment. Consequently, the device in your vehicle does not need to contain all ofthe functions described in this Owner's Manual.
For example, if the vehicle is not factory equipped with the sound system, themenu points ŠKODA Surround and Virtual Subwoofer are not displayed in the soundsettings menu.
The availability of some features described in this Owner's Manual dependson the type of external devices (for example, telephone, music player, etc.).
The illustrations in this Owner's Manual are for illustrative purposes only. Theillustrations can differ in minor details from your vehicle; they are only inten-ded to provide general information.
ŠKODA AUTO pursues a policy of ongoing product and model developmentwith all vehicles. Therefore, changes to the scope of delivery with regard todesign, equipment and technology are possible at any time. The informationprovided in this Owner's Manual corresponds to the information available atthe time of publishing.
Therefore, legal claims cannot be made based on the technical data, illustra-tions and information contained in this Owner's Manual.
We recommend that the web pages that are referred to in this Owner's Man-ual are displayed using the classic view. Not all necessary information may bedisplayed correctly if the mobile view is chosen.
Screen texts that appear in this Owner's Manual may differ slightly dependingon the texts show on the device screen.
Information and System SupportInformation e.g. related to updating the device software, compatible externaldevices etc., Please refer to the following websites.
http://go.skoda.eu/infotainment
Declaration of conformityŠKODA AUTO hereby declares that the ŠKODA Infotainment systems meet thebasic requirements and additional provisions of the 1999/5/EC Directive withreference to radio equipment and telecommunications devices.
3Important information about this Owner's Manual
Explanations and further information
Structure of these Owner's ManualThe Owner's Manual are hierarchically divided into the following areas.
■ Main chapters (e.g. Introductory information) - the title of the main chapter isalways shown on the lower right side of the page■ Chapter (e.g. Equipment overview)
■ Module (for example, Switching the unit on/off)
Information searchWhen searching for information in the Owner's Manual, we recommend usingthe Index at the end of the manual.
Text notes- Short press (e.g. a button) within 1 s
- Long press (e.g. a button) for more than 1 s
Text Symbols® Trademark
™ Trademark
→ Marker to the next operation step.
The text symbol used for the right control dial
WARNINGTexts with this symbol draw attention to threats of a serious accident, in-jury or loss of life.
CAUTIONTexts with this symbol draw attention to the risk of vehicle damage or possibleinoperability of some systems.
NoteTexts with this symbol contain additional information.
“Press”“Hold”
4 Explanations and further information
Abbreviations
Abbreviation Definition
2D planar map display
3D spatial map display
A2DPa Bluetooth® profile for the one-sided audio data transmis-sion
ACC Adaptive cruise control
AF Alternative frequencies for the current radio station
AM Identification of the radio-frequency range
TCS Traction Control of the drive wheels
AVRCPa Bluetooth® profile for the operation associated with thetransmission of audio data multimedia functions
DAB Digital radio reception
DRMa system for monitoring or restricting the use of digital me-dia content
ESC Electronic Stability Control
FM Identification of the radio-frequency range
HFPa Bluetooth® profile for communication between a mobiletelephone and the Infotainment
GPS Satellite system for determining the position
GPTmethod for the division of the areas in the data devices (tobe used for mass storage resources)
ID3 tagan additional feature of a music file, which allows for the dis-play of artist, title, album name, etc.
mp3 compressed audio format
mp4 Compressed video format
MSC a communication protocol for a USB device
MTP a communication protocol for a data device
PIN personal identification number
RDSa system for the transmission of additional information forFM radio reception
Messages a service for short text messages
TMC Traffic reports, which may affect the navigation
Abbreviation Definition
TP Identification of a traffic information station
UPnPNetwork protocol for establishing a wireless connection ofan external device with the device
VIN Vehicle identification number
wav Audio format
WLAN Wireless Local Area Network
WPSEstablishing a secure connection of the device to an availa-ble hotspot (WLAN)
wma compressed audio format
5Abbreviations
Introductory information
Important notes
Introduction to the subject
WARNING■ Concentrate fully at all times on your driving! As the driver you are fullyresponsible for the operation of your vehicle.■ Only use the device in such a way that you have control of the vehicle inevery traffic situation (e.g. Do not write text messages while driving, do notcouple or connect the telephone, do not work with the contact list, do notenter any destinations, do not connect WLAN or SmartLink etc.)- Otherwisethere is a risk of an accident!
WARNING■ Adjust the volume to ensure that acoustic signals from outside the vehi-cle, e.g. sirens from emerging vehicles instructing you to give way to, suchas the police, ambulance and fire brigade, can be heard at all times.■ High volumes can cause hearing damage.
WARNING■ Never leave a communication device, e.g. mobile phone, audio sources, inthe deployment area of an airbag, on a seat, on the dashboard or any an-other area, from which it can be thrown during a sudden braking manoeu-vre, an accident or a collision - There is a risk of injury!■ Never connect or disconnect an external device while driving - There is arisk of accident!■ Always route the connection cable of the external device such that isdoes not restrict you when driving.
CAUTIONIn some countries, some unit features can no longer be selected when the ve-hicle is running faster than a certain speed. This is not a malfunction, but com-plies with the national legal regulations.
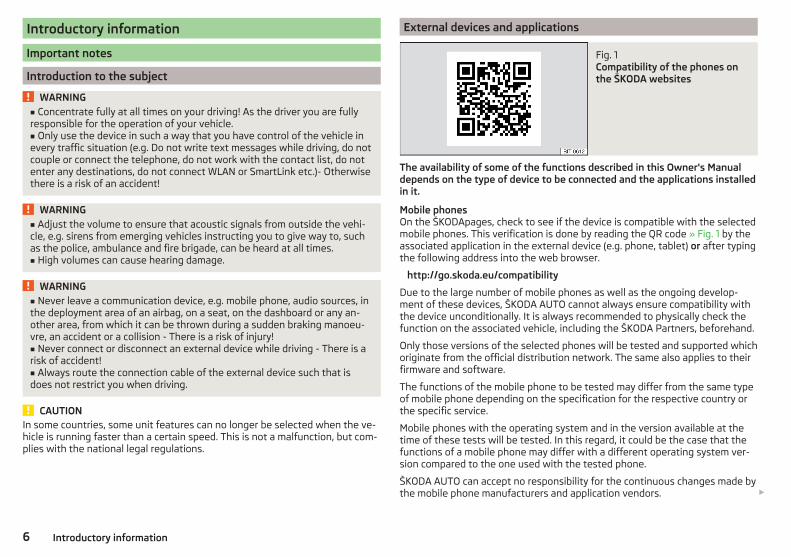
External devices and applications
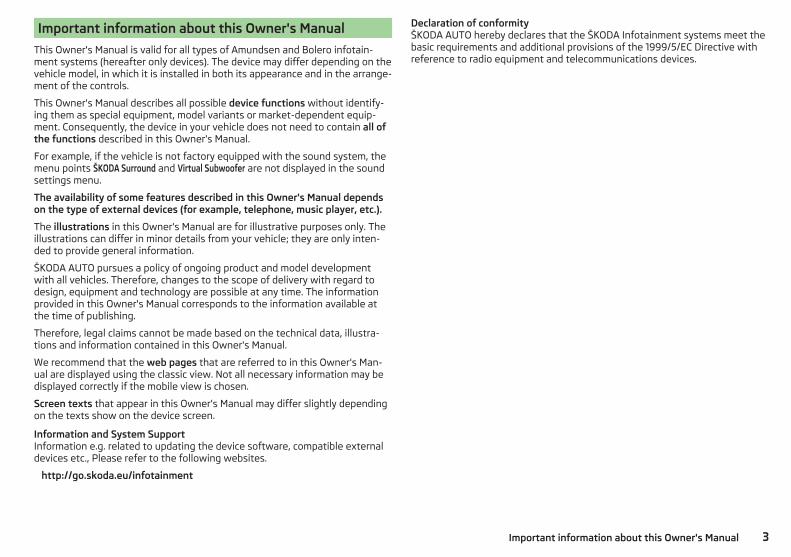
Fig. 1 Compatibility of the phones onthe ŠKODA websites
The availability of some of the functions described in this Owner's Manualdepends on the type of device to be connected and the applications installedin it.
Mobile phonesOn the ŠKODApages, check to see if the device is compatible with the selectedmobile phones. This verification is done by reading the QR code » Fig. 1 by theassociated application in the external device (e.g. phone, tablet) or after typingthe following address into the web browser.
http://go.skoda.eu/compatibility
Due to the large number of mobile phones as well as the ongoing develop-ment of these devices, ŠKODA AUTO cannot always ensure compatibility withthe device unconditionally. It is always recommended to physically check thefunction on the associated vehicle, including the ŠKODA Partners, beforehand.
Only those versions of the selected phones will be tested and supported whichoriginate from the official distribution network. The same also applies to theirfirmware and software.
The functions of the mobile phone to be tested may differ from the same typeof mobile phone depending on the specification for the respective country orthe specific service.
Mobile phones with the operating system and in the version available at thetime of these tests will be tested. In this regard, it could be the case that thefunctions of a mobile phone may differ with a different operating system ver-sion compared to the one used with the tested phone.
ŠKODA AUTO can accept no responsibility for the continuous changes made bythe mobile phone manufacturers and application vendors.
6 Introductory information
ŠKODA AUTO does not accept any liability for any damage to the device or ve-hicle due to the use of incorrect or illegal applications or the improper or unau-thorized use of mobile phones.
ApplicationsApplications can be installed in external devices (e.g. Mobile, tablet) making itpossible to display additional information in the device screen or to operatethe device.
Due to the large number of applications and communication systems (e.g..SmartLink » page 41) As well as the ongoing development of these devices,the applications may not be functional in all external devices. ŠKODA AUTO canaccept no liability for their proper function.
Applications, their use and the required data connection may be chargeable.
The range of available applications and their functionality is dependent on thedevice, vehicle and region.
The function of mobile applications can be influenced by the quality of the In-ternet connection.
Some applications are dependent on the availability of services that are provi-ded by third parties.
Device overview
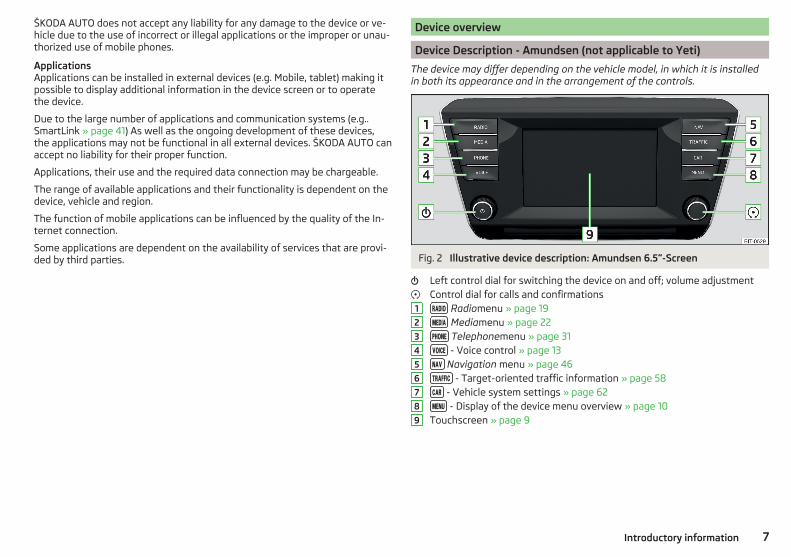
Device Description - Amundsen (not applicable to Yeti)
The device may differ depending on the vehicle model, in which it is installedin both its appearance and in the arrangement of the controls.
Fig. 2 Illustrative device description: Amundsen 6.5-Screen
Left control dial for switching the device on and off; volume adjustmentControl dial for calls and confirmations Radiomenu » page 19 Mediamenu » page 22 Telephonemenu » page 31 - Voice control » page 13 Navigation menu » page 46 - Target-oriented traffic information » page 58 - Vehicle system settings » page 62 - Display of the device menu overview » page 10Touchscreen » page 9
1
2
3
4
5
6
7
8
9
7Introductory information

Device Description - Amundsen (applies to Yeti)
Fig. 3 Equipment overview
Left control dial for switching the device on and off; volume adjustmentControl dial for calls and confirmations Radiomenu » page 19 Mediamenu » page 22 Telephonemenu » page 31 - Voice control » page 13 - Switches traffic programme on/off » page 21 Navigation menu » page 46 - Target-oriented traffic information » page 58 - Display of the device menu overview » page 10Touchscreen » page 9SD memory card slot “SD1”SD memory card slot “SD2”
1
2
3
4
5
6
7
8
9
10
11
Device Description - Bolero (not applicable to Yeti)
The device may differ depending on the vehicle model, in which it is installedin both its appearance and in the arrangement of the controls.
Fig. 4 Illustrative device description: Bolero 6.5-Screen
Left control dial for switching the device on and off; volume adjustmentControl dial for calls and confirmations Radiomenu » page 19 Mediamenu » page 22 Telephonemenu » page 31Depending on equipment fitted:▶ - Voice control » page 13▶ - Switches traffic programme on/off » page 21 - Device Settings » page 15 -Sound settings - Vehicle systems settings » page 62 - Display of the device menu overview » page 10Touchscreen » page 9
1
2
3
4
5
6
7
8
9
8 Introductory information
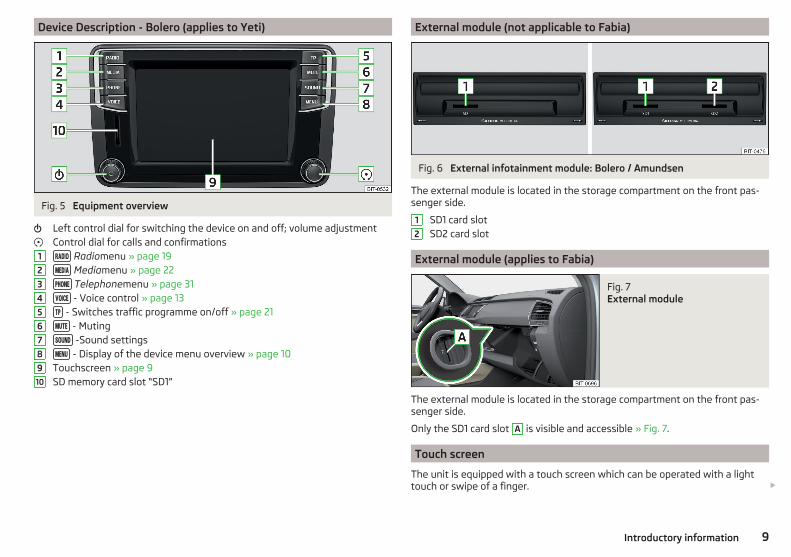
Device Description - Bolero (applies to Yeti)
Fig. 5 Equipment overview
Left control dial for switching the device on and off; volume adjustmentControl dial for calls and confirmations Radiomenu » page 19 Mediamenu » page 22 Telephonemenu » page 31 - Voice control » page 13 - Switches traffic programme on/off » page 21 - Muting -Sound settings - Display of the device menu overview » page 10Touchscreen » page 9SD memory card slot “SD1”
1
2
3
4
5
6
7
8
9
10
External module (not applicable to Fabia)
Fig. 6 External infotainment module: Bolero / Amundsen
The external module is located in the storage compartment on the front pas-senger side.
SD1 card slotSD2 card slot
External module (applies to Fabia)
Fig. 7 External module
The external module is located in the storage compartment on the front pas-senger side.
Only the SD1 card slot A is visible and accessible » Fig. 7.
Touch screen
The unit is equipped with a touch screen which can be operated with a lighttouch or swipe of a finger.
1
2
9Introductory information
The brightness level of the screen can be set in the menu → → screen →Brightness level: .
CAUTION■ It is not possible to operate the screen with your fingernails or while wearinggloves.■ To protect the screen, you can use a suitable screen protector for touchpadsthat does not affect its functionality.■ Dirt can be removed from the screen by using a soft cloth and, if necessary,methylated spirits.
Software update
Fig. 8 Available software updates onthe ŠKODA websites
Part of the device is the installed software.
The software update ensures optimum operation of the device (e.g.. Compati-bility with new phones, updating the radio station logo).
Current information on the compatibility of external devices can be found onthe following ŠKODAInternet pages. This is done by reading the QR code» Fig. 8 by the associated application in the external device (e.g. phone, tablet)or after typing the following address into the web browser.
http://go.skoda.eu/updateportal
▶To display the software information, press the button, then tap on theSystem information function surface Tap→ System information.
▶To start the software update, tap on the Update software function surface inthe displayed menu.
Device on / off
› To power on/off the device, press .
Automatic Power On of the deviceIf the device was not turned off with the control switch before the ignitionwas turned off, it will automatically switch on after the ignition is switched on.
Automatic Power Off of the deviceIf the vehicle key is pulled out of the ignition lock while the unit is switched on,the device will switch off automatically.
If the vehicle is fitted with the starter button, the device will switch off auto-matically after the engine is switched off and the door is opened.
With the ignition off, the device will automatically turn off after about 30 mi-nutes.
The device turns off automatically under certain circumstances. The device in-forms of this via a text message on the device display.
Restart the deviceIf the device does not respond (if it “freezes”) This can be restarted by holing for longer than 10 s.
Unit menus
Fig. 9 Overview of the device menu
› To display the device menu overview, press the button.
Overview of the device menu » Fig. 9Menu Radio » page 19Menu Media » page 22Menu Images » page 27sound settingsUnit set-up » page 15- Setting the vehicle systems (dos not apply to Yeti) » page 62Navigation » page 46menu (Applies to Amundsen)
10 Introductory information
Menu Telephone » page 31Target-oriented traffic information (TMC) (applies to Amundsen)» page 58Media Command menu » page 29Menu SmartLink » page 41When connecting a supported external device instead of the symbol the actual connection is shown instead of a symbol▶ -Android Auto » page 42▶ - Apple CarPlay » page 43▶ - MirrorLink® » page 43
Adjusting the volume
Every change in volume is displayed on the screen.
› To increase the volume, turn the controller clockwise.› To reduce volume, turn the controller anticlockwise.› To mute, turn the controller to the left to 0.› or: Press the key (applies to Bolero in the Yeti model ).
The following symbol appears in the display when the sound is muted: .
If, at the time of muting, sound is played from the source in the media menu,then the playback is interrupted (pause)1).
CAUTION■ High volumes can cause sound resonance in the vehicle.■ When changing or connecting an audio source, this may cause suddenchanges in volume. Reduce the volume before changing or connecting an au-dio source.
Device operation and settings
Device operation
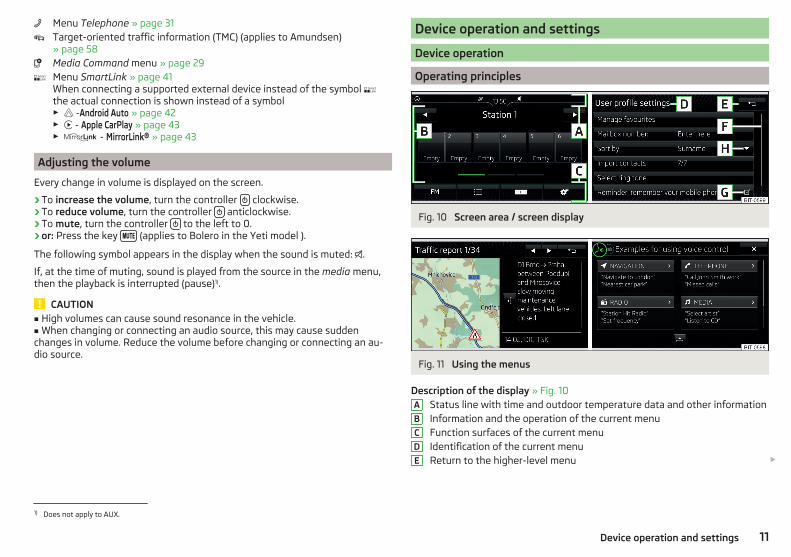
Operating principles
Fig. 10 Screen area / screen display
Fig. 11 Using the menus
Description of the display » Fig. 10Status line with time and outdoor temperature data and other informationInformation and the operation of the current menuFunction surfaces of the current menuIdentification of the current menuReturn to the higher-level menu
A
B
C
D
E
1) Does not apply to AUX.
11Device operation and settings

Scroll symbol - positioning and moving in the menu is possible by movingfingers on the scroll symbol up or downMenu item with “Checkbox”▶ - Function is switched on▶ - Function is switched off Open a sub menu of the menu item with the “pop-up window”
Operating the menus » Fig. 11Reduction / enlargement of the menu windowBrowse the menu- List entriesOpen / close the menu window
Close the menu window
Function interfacesThe screen areas which confirm a function or a menu are called “function in-terfaces”.▶White background - The button is active and thus selectable▶Grey background - The button is inactive and thus not selectable▶Green frame - Currently selected key
Selecting menu/menu item/function▶Drag your finger over the screen in the required direction.▶Turning the knob .
Confirming menu/menu item/function▶By tapping on the function interface.▶Press the wheel .
Returning to higher-level menu▶By tapping on the function interface .▶By tapping on the screen outside of the “pop-up window”.▶By pressing the corresponding button next to the screen (e.g. in the menu
Media, by pressing the button).
Select the menu item / function value▶ - Selected menu item / function value▶ - Deselected menu item / function value
Set value▶By pressing the function surface with one of the following symbols .
▶Touching or moving your finger over the scale.▶Turning the knob .
F
G
H
NoteDepending on the equipment fitted, the device can be operated using the but-tons on the multifunction steering wheel. Additional information » Owner'sManual.
Alphanumeric with keyboard
Fig. 12 Example of the keyboard display
The alphanumeric keypad is used to enter for letters, numbers and characters.
Description of the alphanumeric keyboard » Fig. 12Input lineContext-dependent:▶ - Switch to capital letters▶ - Switch to special characters▶ - Switch to numbersContext-dependent:▶ - Switch to numbers▶ - Switch to Latin letters▶ - Switch to Cyrillic letters- Display of searched entries (the number of searched entries is displayedin the function surface)Erase the entered charactersBy holding the variants of each type are displayed.Switching between keyboards with specific characters of the selected lan-guages » page 17Enters a blankMove the cursor within the input line to the leftMove the cursor within the input line to the rightConfirmation of the entered number
A
B
C
12 Device operation and settings
SearchWhile entering characters, a search is made for corresponding entries.
The entry such as a telephone contact to be searched for must be enteredalong with the special characters (diacritics).
By tapping on the function surface a list of matching entries opens. If lessthan 5 entries were found, a list of the found entries opens automatically.
Operating using an application in the external device
Applies to Amundsen (not applicable to Yeti).
Several device functions can be operated using an application in the supportedexternal device.
› Enable the data transfer in the device. To do this, press and then tap on Tap→ Mobile device data transfer → Enable data transmission for ŠKODA Apps.
› Release the device operation using the application. To do this, press andthen tap on Tap→ Mobile device data transfer → Use apps to operate: → Con-firm/Allow .
› Connect the equipment to an external device via WLAN» page 39.› In the external device, install an application for the device operation (e.g.
Start ŠKODA Media Command).
NoteThe description of the device operation ŠKODA Media Command is part of theapplication.
Voice control
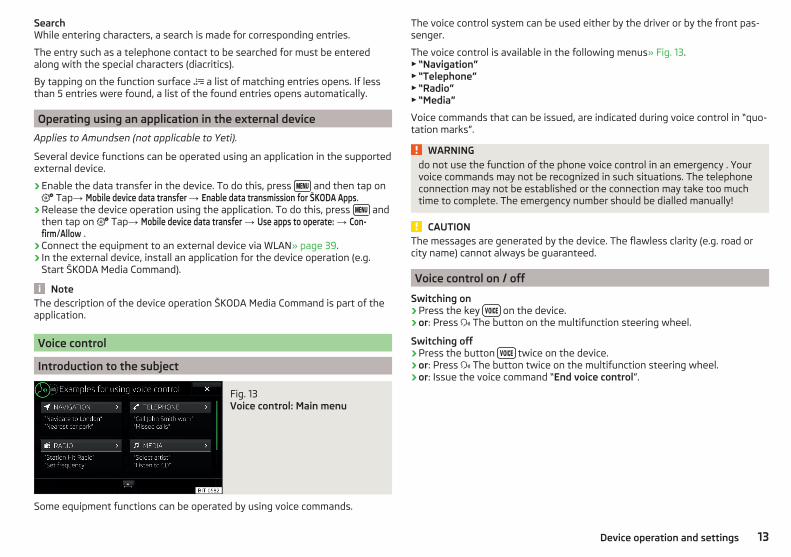
Introduction to the subject
Fig. 13 Voice control: Main menu
Some equipment functions can be operated by using voice commands.
The voice control system can be used either by the driver or by the front pas-senger.
The voice control is available in the following menus» Fig. 13.▶“Navigation”▶“Telephone”▶“Radio”▶“Media”
Voice commands that can be issued, are indicated during voice control in “quo-tation marks”.
WARNINGdo not use the function of the phone voice control in an emergency . Yourvoice commands may not be recognized in such situations. The telephoneconnection may not be established or the connection may take too muchtime to complete. The emergency number should be dialled manually!
CAUTIONThe messages are generated by the device. The flawless clarity (e.g. road orcity name) cannot always be guaranteed.
Voice control on / off
Switching on› Press the key on the device.› or: Press The button on the multifunction steering wheel.
Switching off› Press the button twice on the device.› or: Press The button twice on the multifunction steering wheel.› or: Issue the voice command “End voice control”.
13Device operation and settings
Operation principle
Fig. 14 Screen areas and screen display
› The voice command must only be issued when the symbol is displayedand the input tone has completely faded. The input tone can be switchedon / off. To do this, press and then Tap→ Voice control.
› In the voice control main menu, choose one of the menus (z. B. Navigation)the following screen is displayed » Fig. 14.
On the screen, examples of available menu items are display in area Band examples of each possible command are displayed in area C .
By tapping on the function interface a detailed help menu is displayed.
During voice control operation, the following symbols appear in the devicescreen.
symbols A
» Fig. 14Meaning
Waiting for your voice command
A voice command is recognized
A message will be played
Voice control is stopped
It is not necessary to wait for the end of message playback when the device isplaying a message. The device message can be ended by pressing the button or by pressing the symbol key Ended on the multifunction steeringwheel. Then a voice command can be issued. The voice control is hereby muchfaster.
not recognizing a voice commandIf a voice command is not detected three times in succession from the device,then the voice control is stopped.
NoteThe display of the Voice mode symbols are dependent of the equipment fittedalso on the display of the instrument cluster.
Function requirements
Function requirements for voice control.The unit is switched on.There will be no telephone call using a phone connected to the device.The parking aid is not active.
Notes on voice control for navigationTo the destination, you are first required to issue the command“enter ad-dress” and then follow the device instructions.
You can say the house number and a further additional address in the form ofa number where necessary. The device then offers the number combination ithas found if the house number and the additional address, exists in the streetentered where appropriate.
It is not necessary to spell city and street names if the entered destination islocated in a country that has no voice control available for the language.
Notes on voice control of the radioIn order for a radio station can be selected by means of voice command, thestation must be stored in the list of available stations » page 20.
CAUTIONFor some languages, there is no voice control available. This device indicatesthis fact through a text message that is displayed after setting the device lan-guage screen .
NoteDuring voice control, no navigation announcements and traffic announce-ments are played.
14 Device operation and settings
voice commands
Requirements for optimum voice command recognition▶Speak with a normal tone of voice without intonation and excessive pauses.▶Avoid bad pronunciation.▶Close the doors, windows and sliding roof, in order to avoid disturbing envi-
ronmental influences on the function of the voice commands.▶You are recommended to speak louder at higher speeds, so that the sound of
your voice is not drowned out by the increased ambient noise.▶During voice control, limit additional noise in the vehicle, e.g. passengers
talking at the same time.
Voice commands can be used anytime during voice control.
Voice command Function
“Back” Return to the previous menu
“Help”reproducing and displaying possible voice com-mands
Voice commands that can be used while browsing the list entries.
Voice command Function
“Next page”
Browse menu / list / directory“Previous page”
“First page”
“Last page”
Correction of a voice command inputA voice command can be corrected, modified or re-entered by pressing thebutton or the icon key Actuated on the multifunction steering wheel.However, this is only possible as long as the symbol appears on the screen.
You do not have to wait until the voice command is recognized by the device.
Stop/restore voice command input
StopThis allows you more time for the voice command input.
The process for voice command input can by turning the dial stopped.
When stopping, the symbol changes from .
RestoreThe procedure for voice command input can be restarted in one of the follow-ing ways.▶By tapping on the function interface .▶By pressing the button on the device.▶By pressing the icon key on the multifunction steering wheel.
Device settings
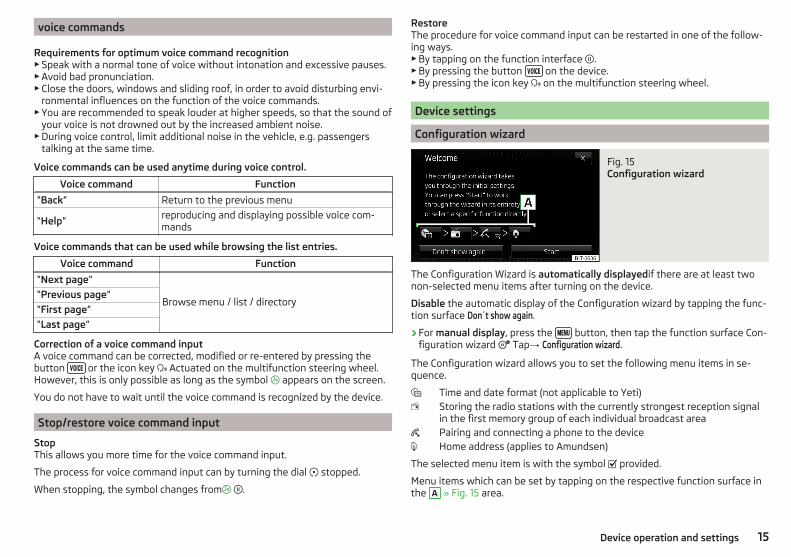
Configuration wizard
Fig. 15 Configuration wizard
The Configuration Wizard is automatically displayedif there are at least twonon-selected menu items after turning on the device.
Disable the automatic display of the Configuration wizard by tapping the func-tion surface Don´t show again.
› For manual display, press the button, then tap the function surface Con-figuration wizard Tap→ Configuration wizard.
The Configuration wizard allows you to set the following menu items in se-quence.
Time and date format (not applicable to Yeti)Storing the radio stations with the currently strongest reception signalin the first memory group of each individual broadcast areaPairing and connecting a phone to the deviceHome address (applies to Amundsen)
The selected menu item is with the symbol provided.
Menu items which can be set by tapping on the respective function surface inthe A » Fig. 15 area.
15Device operation and settings
Sound settings
The scope of the following menu is dependent on the vehicle equipment withthe sound system.
› Press the button, then tap on the function surface surface.
■ Volume - Volume settings■ Announcements - Adjustment of traffic announcements volume (TP)■ Navigation announcements - sets the volume for the navigation announce-
ments■ Voice control - volume setting for voice output■ Maximum switch-on volume - Sets the maximum volume after switching on the
device■ Speed-dependent vol. adjustment - increases the volume as speed increases■ AUX volume: - Sets the volume for the device connected via AUX
■ Quiet - low volume■ Medium - Medium volume■ Loud - High volume
■ Bluetooth audio: - Volume setting of the device connected via Bluetooth ® au-dio profile of the connected external device
■ Entertainment fading while parking - Lowers the audio volume (e.g. radio volume)with activated parking aid
■ Entertainment fading (nav. announcements) - Lowers the audio volume (e.g. radiovolume) in the event of a nav. announcements
■ Bass - Mid - Treble - setting the equalizer■ Balance - Fader - Sets the balance between left and right, front and rear■ Subwoofer - Subwoofer volume settings■ ŠKODA Surround - Turn surround sound on/off (Cannot be used in Radio mode)■ Virtual Subwoofer -Turn virtual subwoofer on/off (Cannot be used in Radio
mode)■ Sound Character - Select the sound character (applies to Yeti)■ Surround - Optimising the sound for the room (applies to Yeti)■ Sound focus -Setting the optimum room sound perception
■ All - Optimising the sound for the entire vehicle interior■ Driver - Optimising the sound for the driver
■ Touchscreen tone - Switch on/off audible tone when touching the screen■ No navigation announcements during call - Switches on or off the navigation
prompts during a telephone conversation
Screen settings
› Press the button, then tap on the function surface Tap→ screen.
■ Switch off screen (in 10 seconds) - Enable / disable the automatic power off func-tion
■ Brightness: - Adjusts the brightness of the screen■ Touchscreen tone - Switch on/off audible tone when touching the screen■ Proximity sensor - Turn the proximity sensors on/off (When the function is on,
e.g.Navigation will be shown in the main menu when moving a finger to-wards the bottom bar with the functional surfaces on the screen)
■ Show clock in standby mode - Time and date displayed on the screen when theignition is switched on and the unit is switched off
Time and date settings
› Press the button, then tap on the function surface Tap on → Time anddate.
■ Clock time source: - Setting the time source: manual / GPS (applies to Amund-sen)
■ Time: - Time settings■ Summer (DST) - Switches the summer time setting on/off (applies to Amund-
sen)■ automatically adjust DST - Turn on / off the automatic switch to daylight saving
time■ Time zone: - Select the time zone■ Time format: - Set the time format■ Date: - Date settings■ Date format: - Set the date format
NoteWith the Yeti model, the time and date settings are set via the MAXI DOT dis-play» Owner's Manual.
Setting the device language
› Press the button, then tap on the function surface Tap on → Language.› Select the device language or tap the function surface Automatic to set the
MAXI DOT display matching language (applies to the Yeti).
In some languages, after selecting the function surfaceFemale and Male are dis-played for the choice of voice prompts for the device.
16 Device operation and settings
Note■ When a language is selected which does not support voice control, the de-vice will indicate with a message on the screen .■ The messages are generated by the device. The flawless clarity (e.g. road orcity name) cannot always be guaranteed.
Additional keypad language settings
› Press the button, then tap on the function surface Tap on→ Additionalkeypad languages.
In this menu, a keyboard language set can be added to allow the entering ofcharacters other than those in the currently selected language (function sur-face ).
Unit settings
› Press the button, then tap on the function surface Tap on→ units .
■ Distance: - Distance units■ Speed: - Speed units■ Temperature: - Temperature units■ Volume: - Volume units■ Consumption: - Consumption units■ Pressure: - Pressure units for tyre pressure
NoteWith the Yetimodel setting the device units is carried out via the MAXI DOTdisplay.» Owner's Manual.
Setting data transfer
An active data transfer allows data transfer between the device and the exter-nal device (e.g. MirrorLink® application) or the operation of some device func-tions using the application of the external device (e.g. ŠKODA MediaCommand).
› Press the button, then tap on the function surface Tap on→ Mobile de-vice data transfer.
■ Enable data transfer for ŠKODA apps- Turning data transfer on and off■ Use apps to operate: - Setting device operation using the applications of the ex-
ternal device (applies to Amundsen)■ Deactivate - Prohibition of device operation through an external device■ Confirm - Device operation with required confirmation■ Allow - Device operation without any restriction
Voice control settings
› Press the button, then tap on the function surface Tap→ voice Actions .
■ Example commands (infotainment syst.) - Switch on/off the menus containing basicvoice commands when voice control is activated
■ Voice control session start tone - Switch on/off the audible signal when turning onthe voice control
■ Voice control session end tone - Switch on/off the audible signal when voice con-trol ends
■ Input tone in voice dialogue - Switch on/off the audible signal for the voice input■ End tone in voice dialog - Turn on / off the acoustic signal after the end of a voice
command
Safe removal of the external device
› Press the button, then tap on the function surface Tap onRemove safe-ly: and select the external device to be removed.
Reset to factory settings
› Press the button, then tap on the function surfaces → Factory settings.
In this menu, all or only chosen settings can be restored.
Bluetooth®Settings
› Press the button, then tap on the function surface Tap on→ Blue-tooth .
■ Bluetooth - Switch on/off Bluetooth® function■ Visibility: - switch on/off the visibility of the Bluetooth® device for other devi-
ces■ Name: - Changing the name of the Bluetooth®unit■ Paired devices - display the list of paired Bluetooth ® devices
17Device operation and settings

■ Find devices - searches for available devices■ Bluetooth audio (A2DP/AVRCP) - Turn on/off the ability to connect an audio device
(e.g. MP3 player, tablet etc.)
Wireless settings
Applies to Amundsen (does not apply to Yeti).
› Press the button, then tap on the function surface Tap on→ WLAN.
■ WLAN - List of available hotspots of external devices■ WLAN - Turn on / off the device wireless■ WPS Quick Connect (WPS button) - Establishing a secure connection to the hot-
spot of the external device using WPS■ Manual settings - Setting the parameters for search and connection to the
hotspot of the external device■ Network name - Enter the Hotspot name■ Network key - Setting the access password■ Security level: - Adjusting the security
■ WPA2 - WPA2 security■ WPA - WPA security■ No security level - No coverage (without required entry of the access pass-
word)■ Connect - Connection establishment
■ Search - Search / Restore the list of available hotspots■ Mobile hotspot - Setting device hotspots (in the functional surface the symbol displayed with the number of connected external devices)■ Mobile hotspot - Turn on / off device hotspots■ WPS Quick Connect (WPS button) - Establishing a secure connection to the de-
vice via hotspot WPS■ Hotspot settings - Setting the parameters for the connection to the device
hotspot■ Security level: - Setting the connection security
■ WPA2 - WPA2 security■ WPA - WPA security■ No security level - No coverage (without required entry of the access pass-
word)■ Network key - Entering the access password■ SSID: ... - Name of the device hotspot■ Do not send network name (SSID) -Switch WLAN hotspot security on/off■ Storage - Storage of the device hotspot parameters
System information
› Press the button, then tap on the function surface Tap on→ systeminformation .
› To perform a Software Update (Z. B. Bluetooth® or radio station logo) Tapthe functional surface Update software.
Displaying system information.▶Device part number: ... - Part number of the device▶Hardware: ... - Version of the hardware used▶Software: ... - Version of the software used▶Navigation database: ... - Version of the navigation data▶Media Codec: ... - Media codec version▶Bluetooth version: ... - Version of the Bluetooth® software used
The information on available software updates is to be obtained from a ŠKODApartner or on the following ŠKODA Internet pages.
http://go.skoda.eu/infotainment
18 Device operation and settings
Radio
Operation
Introduction to the subject
The device allows analogue radio reception of FM and AM frequency ranges aswell as DAB digital radio reception.
CAUTION■ For vehicles with window antennas do not stick foil or metal coated stickersto the window - Radio signal reception could be affected.■ Car parks, tunnels, tall buildings or mountains can interfere with the radiosignal even causing it to fail completely.
Main menu
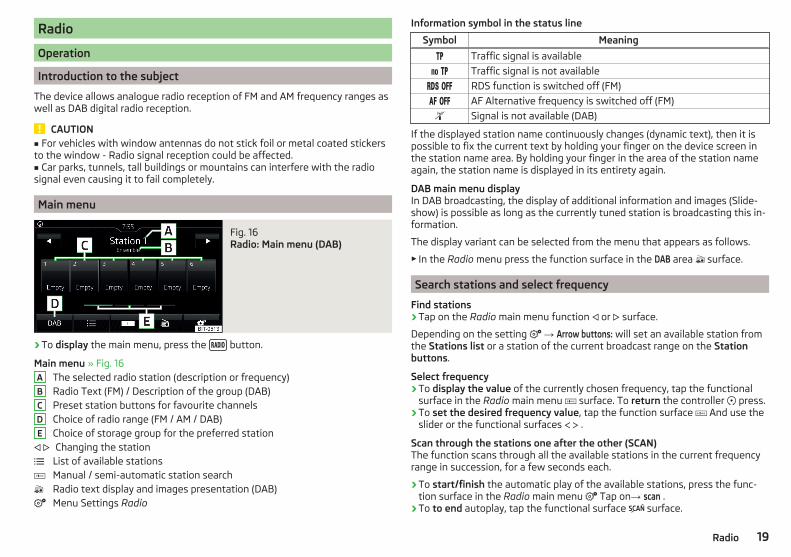
Fig. 16 Radio: Main menu (DAB)
› To display the main menu, press the button.
Main menu » Fig. 16The selected radio station (description or frequency)Radio Text (FM) / Description of the group (DAB)Preset station buttons for favourite channelsChoice of radio range (FM / AM / DAB)Choice of storage group for the preferred stationChanging the station
List of available stationsManual / semi-automatic station searchRadio text display and images presentation (DAB)Menu Settings Radio
A
B
C
D
E
Information symbol in the status line
Symbol Meaning
Traffic signal is available
Traffic signal is not available
RDS function is switched off (FM)
AF Alternative frequency is switched off (FM)
Signal is not available (DAB)
If the displayed station name continuously changes (dynamic text), then it ispossible to fix the current text by holding your finger on the device screen inthe station name area. By holding your finger in the area of the station nameagain, the station name is displayed in its entirety again.
DAB main menu displayIn DAB broadcasting, the display of additional information and images (Slide-show) is possible as long as the currently tuned station is broadcasting this in-formation.
The display variant can be selected from the menu that appears as follows.
▶ In the Radio menu press the function surface in the DAB area surface.
Search stations and select frequency
Find stations› Tap on the Radio main menu function or surface.
Depending on the setting → Arrow buttons: will set an available station fromthe Stations list or a station of the current broadcast range on the Stationbuttons.
Select frequency› To display the value of the currently chosen frequency, tap the functional
surface in the Radio main menu surface. To return the controller press.› To set the desired frequency value, tap the function surface And use the
slider or the functional surfaces .
Scan through the stations one after the other (SCAN)The function scans through all the available stations in the current frequencyrange in succession, for a few seconds each.
› To start/finish the automatic play of the available stations, press the func-tion surface in the Radio main menu Tap on→ scan .
› To to end autoplay, tap the functional surface surface.
19Radio

List of available stations
Fig. 17 Example, the list of available stations: FM / DAB
› To display the list of available stations of the currently selected broadcastingarea, rotate the controller in the Radio functional surface surface.
› To play, tap on the function surface of the desired station.› To Sort (FM) the stations by name, group or genre, tap on the functional sur-
face A » Fig. 17 » .
Information symbolsSymbol Meaning
Radio station, which is stored under a preset button
Currently played stations
Traffic information station
(e.g.) Type of program being broadcast (FM)
(e.g.) Type the regional broadcast (FM)
Signal reception is not available (DAB)
Signal reception is not safe (DAB)
Transmitter with image broadcasting (DAB)
Update listIn the FM radio area, the station list is updated automatically.
In the AM and DABradio area, the update takes place manually by tapping thefunction surface » Fig. 17.
CAUTIONTo sort the stations according to genre, the RDS and AF functions must beswitched on. These functions can be set in theradio main menu in the FM bandby pressing the functional surface → Advanced settings switched on / off.
Station buttons for your favourite stations
Fig. 18 Station buttons
For each field of broadcasting, there are station buttons available to storeeach station A That are split into groups of three B » Fig. 18.
› To save a station on the main menu Radio, hold down the desired functionsurface A until an acoustic signal sounds.
› To save a station in the station list, keep the function surface of the desiredstation held down, and then tap the desired station button.
If a station is saved on an already assigned station button, this station buttonwill be overwritten.
Station logos
Channel logos are stored in the device memory which are assigned automati-cally by the device when storing the stations under preset buttons.
assign station logo automatically› to Disable / Enable in the radio main menu, tap on the functional surface
Tap on→ Advanced settings → Automatic storage station logos .
Assign station logo manually› Tap on the Radio main menu function → Station logos.› Tap on an occupied station button and select the data carrier (SD card, USB).› Search for and select the desired station logo on the respective data carrier.
Remove channel logo manually› Tap on the Radio main menu function → Station logos.› Tap on the station button from which you want to remove a logo.
Update station logosCurrent information on the on available software, the components of whichare also station logos, can be found on the following ŠKODAwebsite.
20 Radio

http://go.skoda.eu/infotainment
Note■ The following image formats are supported: jpg, gif, png, bmp.■ We recommend a resolution of up to 500 x 500 pixels.
TP Traffic programme
› To switch on/off the traffic monitoring in the main menu Radio, tap on thefunction surface → Traffic program (TP).
During a traffic announcement, it is possible to cancel the current announce-ment if necessary by deactivating the traffic monitoring.
Note■ Should this station not transmit traffic reports or the signal is not available,then the device automatically searches in the background for another TP sta-tion.■ During playback in menu Media or a station in the AM radio range, trafficnews is received from the previously selected FM radio range.
Settings
Settings for all broadcasting areas
› Tap on the Radio main menu function surface.
■ Sound - sound settings■ Scan -Start auto-playing all available stations in the current frequency band,
each station for around 5 seconds■ Arrow buttons: Arrow buttons: - setting the station change function (function
surfaces )■ Preset list - Change between stations stored under the preset buttons■ Station list - Change between all available stations of the selected broad-
casting range■ Traffic programme (TP) - Switches TP traffic programme on/off■ Delete presets - Deletes the preset buttons■ Station logos - manual assignment /removal of station logos■ Radio text - Switching the text display radio (valid only for FM and DAB) on and
off■ Advanced settings - further settings that are different depending on the selec-
ted broadcasting range(valid only for FM and DAB)
Advanced Settings (FM)
› Select the FM band in the Radio main menu and tap on the function surface Tap on→ Advanced settings.
■ Auto-save station logos- Automatic storage of the station logos■ Region for station logo - Clarification of the station logo region■ Automatic frequency control (AF) - Search for alternative frequencies of the station
currently being played to on/off■ Radio Data System (RDS) - enable/disable RDS function (receiving additional in-
formation from the station)■ RDS Regional: - Setting the automatic change to a regional stations with a
stronger reception signal■ Fix - Turn off the automatic change■ Automatic - Switching on the automatic change
Advanced settings (DAB)
› In the Radio main menu, select the DAB range and tap on the function sur-face Tap on → Advanced settings.
■ Auto-save station logos- Automatic storage of the station logos■ DAB traffic announcements - Switch on/off DAB traffic announcements■ Other DAB announcements - Switch on/off other announcements (e.g., warnings,
regional weather, sports reports, financial news)■ DAB - DAB station tracking - Switch on/off automatic DAB station tracking on an-
other frequency or in other station groups■ Automatic DAB - FM switching - Switch on/off auto-switching from DAB to the FM
broadcasting range if the DAB signal is lost■ L-band - Enable / disable the availability of L-band
DAB station trackingWhen a DAB transmitter is a part of several broadcast stations and if the cur-rent station group is not available on any other frequency, then when the sig-nal is poor, the same station will be searched in another channel group.
Automatic change from DAB to FMWith bad DAB reception the device tries to find an FM transmitter.
The station name is followed by () while the station is being received on theFM band. The () marker disappears when the relevant DAB station can be re-ceived again.
21Radio
If a DAB station is also not available in the FM band due to poor reception, thedevice will be switched to mute.
L-bandFor the DAB radio reception in different countries, different broadcasting rang-es are used. In some countries the DAB radio reception is only possible in theso called L-band.
If no L-band DAB radio reception is possible in the country then we recom-mend turning off the L-band. The channel scan is therefore faster.
Media
Operation
Main menu
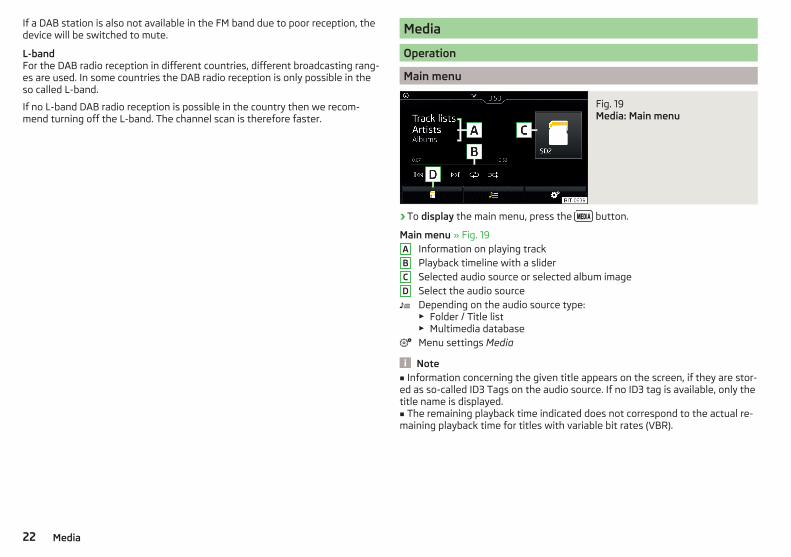
Fig. 19 Media: Main menu
› To display the main menu, press the button.
Main menu » Fig. 19Information on playing trackPlayback timeline with a sliderSelected audio source or selected album imageSelect the audio sourceDepending on the audio source type:▶ Folder / Title list▶ Multimedia databaseMenu settings Media
Note■ Information concerning the given title appears on the screen, if they are stor-ed as so-called ID3 Tags on the audio source. If no ID3 tag is available, only thetitle name is displayed.■ The remaining playback time indicated does not correspond to the actual re-maining playback time for titles with variable bit rates (VBR).
A
B
C
D
22 Media
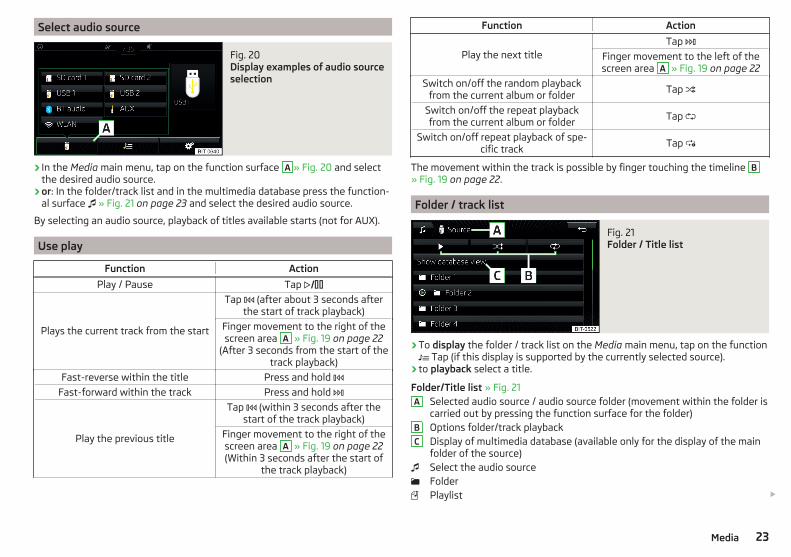
Select audio source
Fig. 20 Display examples of audio sourceselection
› In the Media main menu, tap on the function surface A » Fig. 20 and selectthe desired audio source.
› or: In the folder/track list and in the multimedia database press the function-al surface » Fig. 21 on page 23 and select the desired audio source.
By selecting an audio source, playback of titles available starts (not for AUX).
Use play
Function Action
Play / Pause Tap
Plays the current track from the start
Tap (after about 3 seconds afterthe start of track playback)
Finger movement to the right of thescreen area A » Fig. 19 on page 22
(After 3 seconds from the start of thetrack playback)
Fast-reverse within the title Press and hold
Fast-forward within the track Press and hold
Play the previous title
Tap (within 3 seconds after thestart of the track playback)
Finger movement to the right of thescreen area A » Fig. 19 on page 22(Within 3 seconds after the start of
the track playback)
Function Action
Play the next titleTap
Finger movement to the left of thescreen area A » Fig. 19 on page 22
Switch on/off the random playbackfrom the current album or folder
Tap
Switch on/off the repeat playbackfrom the current album or folder
Tap
Switch on/off repeat playback of spe-cific track
Tap
The movement within the track is possible by finger touching the timeline B» Fig. 19 on page 22.
Folder / track list
Fig. 21 Folder / Title list
› To display the folder / track list on the Media main menu, tap on the function Tap (if this display is supported by the currently selected source).
› to playback select a title.
Folder/Title list » Fig. 21Selected audio source / audio source folder (movement within the folder iscarried out by pressing the function surface for the folder)Options folder/track playbackDisplay of multimedia database (available only for the display of the mainfolder of the source)Select the audio sourceFolderPlaylist
A
B
C
23Media
Currently playing title / track playback stoppedThe title cannot be played (tapping on the function surface shows thecause).
Note■ In the list, the first 1000 entries (titles, directories etc.) are displayed with theoldest creation date.■ The scanning speed of the folder / track list depends on the connectionspeed and volume of data.
Multimedia database
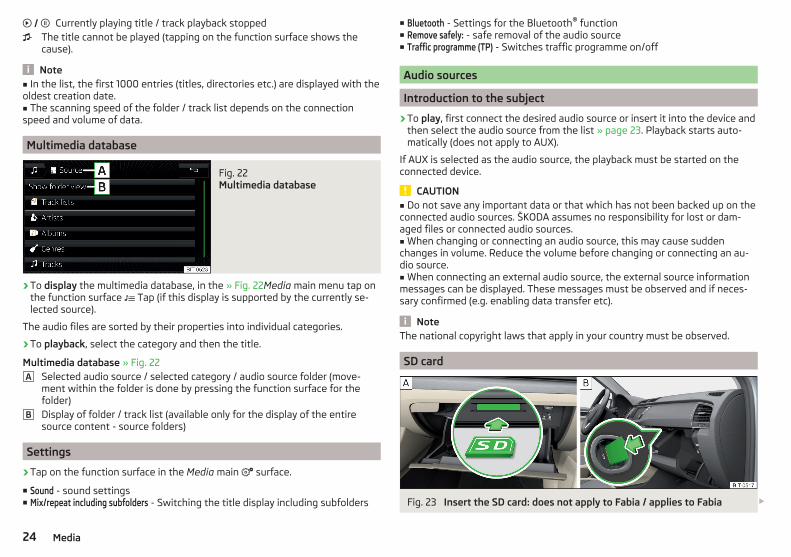
Fig. 22 Multimedia database
› To display the multimedia database, in the » Fig. 22Media main menu tap onthe function surface Tap (if this display is supported by the currently se-lected source).
The audio files are sorted by their properties into individual categories.
› To playback, select the category and then the title.
Multimedia database » Fig. 22Selected audio source / selected category / audio source folder (move-ment within the folder is done by pressing the function surface for thefolder)Display of folder / track list (available only for the display of the entiresource content - source folders)
Settings
› Tap on the function surface in the Media main surface.
■ Sound - sound settings■ Mix/repeat including subfolders - Switching the title display including subfolders
A
B
■ Bluetooth - Settings for the Bluetooth® function■ Remove safely: - safe removal of the audio source■ Traffic programme (TP) - Switches traffic programme on/off
Audio sources
Introduction to the subject
› To play, first connect the desired audio source or insert it into the device andthen select the audio source from the list » page 23. Playback starts auto-matically (does not apply to AUX).
If AUX is selected as the audio source, the playback must be started on theconnected device.
CAUTION■ Do not save any important data or that which has not been backed up on theconnected audio sources. ŠKODA assumes no responsibility for lost or dam-aged files or connected audio sources.■ When changing or connecting an audio source, this may cause suddenchanges in volume. Reduce the volume before changing or connecting an au-dio source.■ When connecting an external audio source, the external source informationmessages can be displayed. These messages must be observed and if neces-sary confirmed (e.g. enabling data transfer etc).
NoteThe national copyright laws that apply in your country must be observed.
SD card
Fig. 23 Insert the SD card: does not apply to Fabia / applies to Fabia
24 Media
The SD card slot/s is/are located in an external module in the glove compart-ment on the passenger side.
Insert SD card (Does not apply to Fabia)› “Insert” the SD card in the slot in the direction of arrow (with the cut end fac-
ing right), until this locks » Fig. 23-.
Insert SD card (Does not apply to Fabia)› Insert The SD card in the direction of the arrow, with the trimmed edge
downwards (LHD) or upwards (RHD), into the bay until it “locks” » Fig. 23 - .
Remove the SD card› Tap on the function surface in the Media main Tap onRemove safely: and se-
lect the SD card.› Press on the inserted SD memory card. The SD card “jumps” into the eject
position.
CAUTION■ Do not use an SD card with a broken write protection slide - there is a risk ofdamage to the SD card reader!■ When using an SD card with an adapter, vehicle vibrations might cause thecard to fall out of the adapter.
USB input
The USB input (shown with the symbol ) is located in the front centre con-sole. The exact installation location of the input » Owner's Manual.
The USB input audio source can be connected directly or via a connecting ca-ble.
› To connect, insert the USB audio source into the appropriate input.› To disconnect the USB audio source, tap on the Media main menu function
surface Tap onRemove safely: and select the USB source.› Disconnect the audio source from the corresponding USB input.
Charge USB audio sourceWith the device on after connecting the USB audio source, the charging proc-ess is automatically started (applies for audio sources where charging via theUSB connector is possible).
The charging efficiency can differ compared to the charging from the usualmains power supply.
Some connected audio sources may not be recognised and cannot be charged.
CAUTIONUSB extension cords, or reducers may impair the function of the connected au-dio source.
NoteWe recommend that you use extension cords from ŠKODA Original Accesso-ries.
AUX - input
The AUX input (marked with the lettering) is located in the front centreconsole. The exact installation location of the input » Owner's Manual.
› To connect, insert the plug of the AUX audio source into the appropriate con-nector.
› To disconnect, pull the plug out of the AUX audio source.
CAUTION■ The AUX input must only be used for audio devices!■ If an external audio source is connected to the AUX input, which is equippedwith an adapter for external power supply, the sound may be impaired.
Note■ The 3.5 mm stereo jack plug is used for the AUX input.■ We recommend that you use extension cords from ŠKODA Original Accesso-ries.
Bluetooth®player
The unit allows audio files of a connected Bluetooth® player to play using theA2DP and AVRCP audio profile.
With the device, multiple devices can be paired using Bluetooth® , but only oneof them can be used as a Bluetooth®player.
Connect the Bluetooth® player› Connect the player to the device - follow the same instructions as for pairing
the device with a telephone » page 33.
Separate the Bluetooth® player› Terminate the connection in the list of paired devices » page 33.
25Media
Automatic playback stop and disconnectionIf an Apple device is connected as a Bluetooth® player, and this is connected tothe USB input, then the Bluetooth ® connection is not dropped. If playback iscancelled, playback must be started again. Only if USB is selected as the audiosource will the Apple device disconnect as a Bluetooth® player. In this regard,an appropriate warning message appears on the device screen.
If the USB audio source is an Apple device, this unit cannot be connected as aBluetooth®player. In this regard, an appropriate warning message appears onthe device screen.
If the Bluetooth® player audio source is connected to the AUX input, then theaudio output is switched from the AUX input of the external connected device.For further playback the audio source is to be switched to AUX.
Replace the Bluetooth® playerIf you would like to replace a Bluetooth®Player which is connected to the ma-chine as a phone at the same time, , then a relevant information message ap-pears in the device screen.
› End the connection to the currently connected Bluetooth®player and repeatthe pairing procedure » page 33, Managing paired external devices.
CAUTIONIf an external device is connected to the device using Apple CarPlay™
orAndroid Auto™ , then it cannot be connected using Bluetooth®.
WLAN
Applies to Amundsen (Does not apply to Yeti).
The device allows you to play audio files from one of the external devices con-nected to the device WLAN.
› connect an external device that supports the DLNA (Digital Living NetworkAlliance), with the device WLAN» page 39.
› If necessary use the UPnP application (Universal Plug and Play) in the con-nected device, which allows playback to start.
› Select the audio source Select WLAN.
Supported audio sources and file formats
Supported audio sources
Source Interface Type SpecificationFile sys-
tem
SD card SD reader Standard size SD, SDHC, SDXC
FAT16FAT32exFATNTFS
USB-devices
USB 1.x; 2.xand 3.x or
higher withsupport of
USB 2.x
MSC
USB stick;HDD (without anyspecial software);
The MSC modesupports USB de-
vices
MTP
Devices with theAndroid operat-
ing system orWindows mobile(mobile phone,
tablet)
Apple
Devices with theiOS operating
system (iPhone,iPod, iPad)
26 Media
Supported audio file formats
Codec type(File formats)
File suffix Max. bit rateMaximumsampling
ratePlaylists
Windows MediaAudio
9 and 10wma 384 kbit / s
96 kHz
m3uplswpl
m3u8asx
WAV wav
Defined bythe format(approx. 1.5
Mbit/s)
MPEG-1; 2 and 2.5Layer 3
mp3320 kbit / s
48 kHzMPEG-2 and 4
aac; mp4;m4a
FLAC;OGG Vorbis
flac; ogg
Defined bythe format(approx. 5.5
Mbit/s)
The GPT standards (GUID partition table) method structured audio sources arenot supported by the device.
Files that are protected by Digital Rights Management (DRM) technology can-not be played back by the device.
Pictures
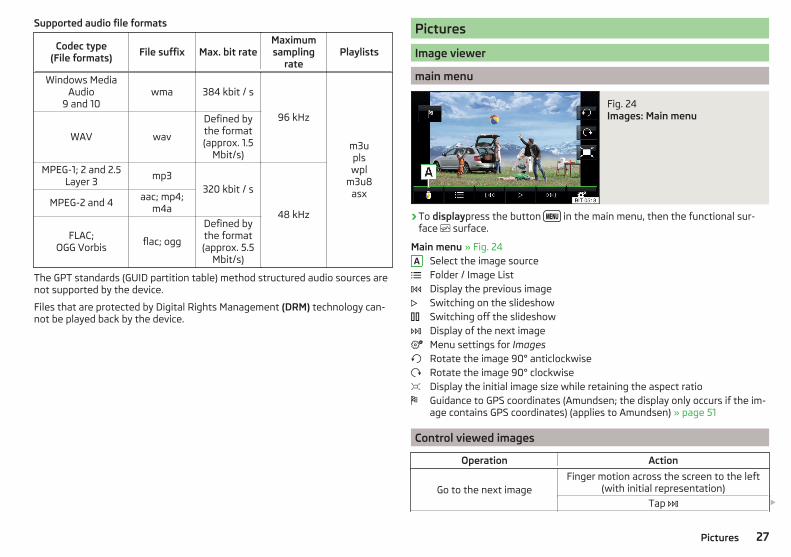
Image viewer
main menu
Fig. 24 Images: Main menu
› To displaypress the button in the main menu, then the functional sur-face surface.
Main menu » Fig. 24Select the image sourceFolder / Image ListDisplay the previous imageSwitching on the slideshowSwitching off the slideshowDisplay of the next imageMenu settings for ImagesRotate the image 90° anticlockwiseRotate the image 90° clockwiseDisplay the initial image size while retaining the aspect ratioGuidance to GPS coordinates (Amundsen; the display only occurs if the im-age contains GPS coordinates) (applies to Amundsen) » page 51
Control viewed images
Operation Action
Go to the next imageFinger motion across the screen to the left
(with initial representation)
Tap
A
27Pictures
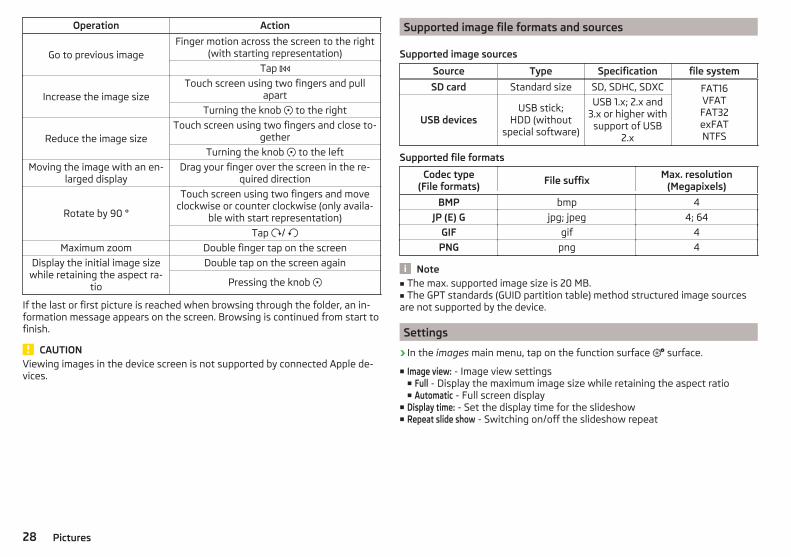
Operation Action
Go to previous imageFinger motion across the screen to the right
(with starting representation)
Tap
Increase the image sizeTouch screen using two fingers and pull
apart
Turning the knob to the right
Reduce the image sizeTouch screen using two fingers and close to-
gether
Turning the knob to the left
Moving the image with an en-larged display
Drag your finger over the screen in the re-quired direction
Rotate by 90 °
Touch screen using two fingers and moveclockwise or counter clockwise (only availa-
ble with start representation)
Tap /
Maximum zoom Double finger tap on the screen
Display the initial image sizewhile retaining the aspect ra-
tio
Double tap on the screen again
Pressing the knob
If the last or first picture is reached when browsing through the folder, an in-formation message appears on the screen. Browsing is continued from start tofinish.
CAUTIONViewing images in the device screen is not supported by connected Apple de-vices.
Supported image file formats and sources
Supported image sources
Source Type Specification file system
SD card Standard size SD, SDHC, SDXC FAT16VFATFAT32exFATNTFS
USB devicesUSB stick;
HDD (withoutspecial software)
USB 1.x; 2.x and3.x or higher with
support of USB2.x
Supported file formats
Codec type(File formats)
File suffixMax. resolution
(Megapixels)
BMP bmp 4
JP (E) G jpg; jpeg 4; 64
GIF gif 4
PNG png 4
Note■ The max. supported image size is 20 MB.■ The GPT standards (GUID partition table) method structured image sourcesare not supported by the device.
Settings
› In the images main menu, tap on the function surface surface.
■ Image view: - Image view settings■ Full - Display the maximum image size while retaining the aspect ratio■ Automatic - Full screen display
■ Display time: - Set the display time for the slideshow■ Repeat slide show - Switching on/off the slideshow repeat
28 Pictures
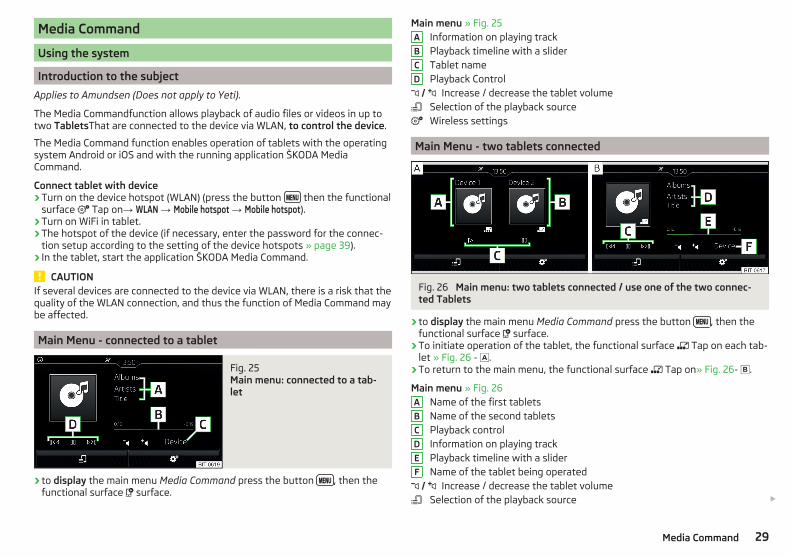
Media Command
Using the system
Introduction to the subject
Applies to Amundsen (Does not apply to Yeti).
The Media Commandfunction allows playback of audio files or videos in up totwo TabletsThat are connected to the device via WLAN, to control the device.
The Media Command function enables operation of tablets with the operatingsystem Android or iOS and with the running application ŠKODA MediaCommand.
Connect tablet with device› Turn on the device hotspot (WLAN) (press the button then the functional
surface Tap on→ WLAN → Mobile hotspot → Mobile hotspot).› Turn on WiFi in tablet.› The hotspot of the device (if necessary, enter the password for the connec-
tion setup according to the setting of the device hotspots » page 39).› In the tablet, start the application ŠKODA Media Command.
CAUTIONIf several devices are connected to the device via WLAN, there is a risk that thequality of the WLAN connection, and thus the function of Media Command maybe affected.
Main Menu - connected to a tablet
Fig. 25 Main menu: connected to a tab-let
› to display the main menu Media Command press the button , then thefunctional surface surface.
Main menu » Fig. 25Information on playing trackPlayback timeline with a sliderTablet namePlayback Control
Increase / decrease the tablet volumeSelection of the playback sourceWireless settings
Main Menu - two tablets connected
Fig. 26 Main menu: two tablets connected / use one of the two connec-ted Tablets
› to display the main menu Media Command press the button , then thefunctional surface surface.
› To initiate operation of the tablet, the functional surface Tap on each tab-let » Fig. 26 - .
› To return to the main menu, the functional surface Tap on» Fig. 26- .
Main menu » Fig. 26Name of the first tabletsName of the second tabletsPlayback controlInformation on playing trackPlayback timeline with a sliderName of the tablet being operated
Increase / decrease the tablet volumeSelection of the playback source
A
B
C
D
A
B
C
D
E
F
29Media Command
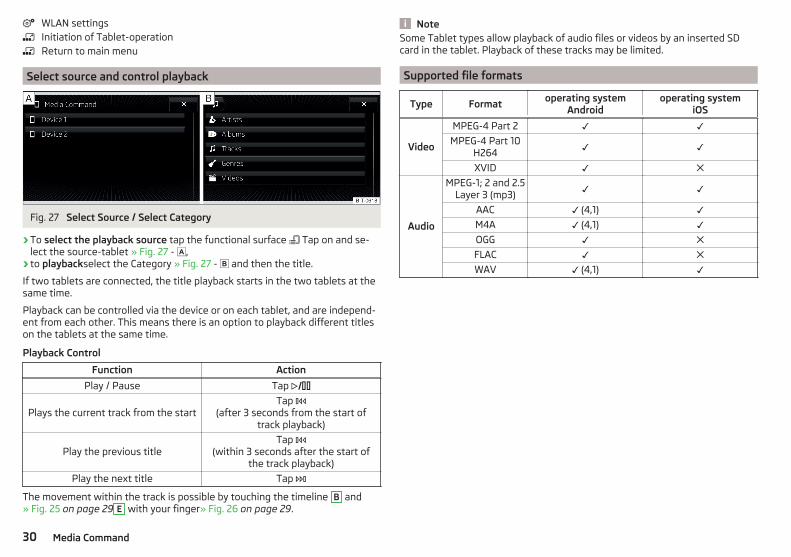
WLAN settingsInitiation of Tablet-operationReturn to main menu
Select source and control playback
Fig. 27 Select Source / Select Category
› To select the playback source tap the functional surface Tap on and se-lect the source-tablet » Fig. 27 - ,
› to playbackselect the Category » Fig. 27 - and then the title.
If two tablets are connected, the title playback starts in the two tablets at thesame time.
Playback can be controlled via the device or on each tablet, and are independ-ent from each other. This means there is an option to playback different titleson the tablets at the same time.
Playback Control
Function Action
Play / Pause Tap
Plays the current track from the startTap
(after 3 seconds from the start oftrack playback)
Play the previous titleTap
(within 3 seconds after the start ofthe track playback)
Play the next title Tap
The movement within the track is possible by touching the timeline B and» Fig. 25 on page 29 E with your finger» Fig. 26 on page 29.
NoteSome Tablet types allow playback of audio files or videos by an inserted SDcard in the tablet. Playback of these tracks may be limited.
Supported file formats
Type Formatoperating system
Androidoperating system
iOS
Video
MPEG-4 Part 2
MPEG-4 Part 10H264
XVID
Audio
MPEG-1; 2 and 2.5Layer 3 (mp3)
AAC (4,1)
M4A (4,1)
OGG
FLAC
WAV (4,1)
30 Media Command
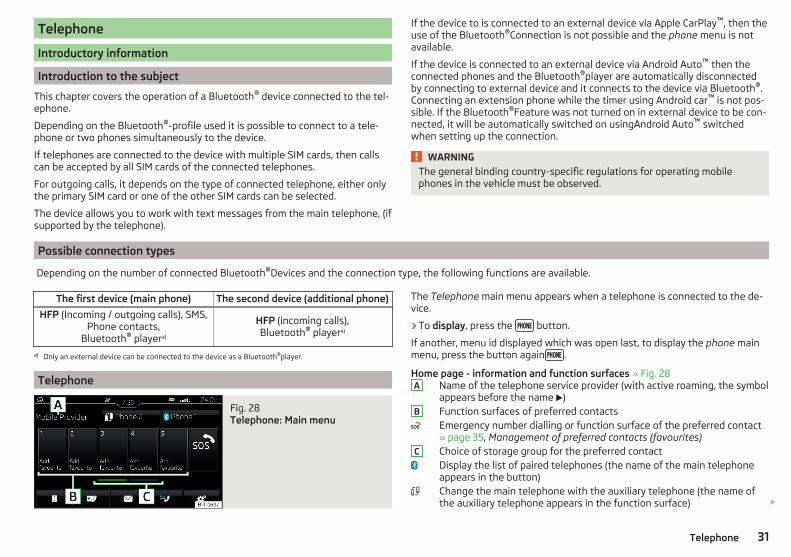
Telephone
Introductory information
Introduction to the subject
This chapter covers the operation of a Bluetooth® device connected to the tel-ephone.
Depending on the Bluetooth®-profile used it is possible to connect to a tele-phone or two phones simultaneously to the device.
If telephones are connected to the device with multiple SIM cards, then callscan be accepted by all SIM cards of the connected telephones.
For outgoing calls, it depends on the type of connected telephone, either onlythe primary SIM card or one of the other SIM cards can be selected.
The device allows you to work with text messages from the main telephone, (ifsupported by the telephone).
If the device to is connected to an external device via Apple CarPlay™, then theuse of the Bluetooth®Connection is not possible and the phone menu is notavailable.
If the device is connected to an external device via Android Auto™ then theconnected phones and the Bluetooth®player are automatically disconnectedby connecting to external device and it connects to the device via Bluetooth®.Connecting an extension phone while the timer using Android car™ is not pos-sible. If the Bluetooth®Feature was not turned on in external device to be con-nected, it will be automatically switched on usingAndroid Auto™ switchedwhen setting up the connection.
WARNINGThe general binding country-specific regulations for operating mobilephones in the vehicle must be observed.
Possible connection types
Depending on the number of connected Bluetooth®Devices and the connection type, the following functions are available.
The first device (main phone) The second device (additional phone)
HFP (Incoming / outgoing calls), SMS,Phone contacts,
Bluetooth® playera)
HFP (incoming calls),Bluetooth® playera)
a) Only an external device can be connected to the device as a Bluetooth®player.
Telephone
Fig. 28 Telephone: Main menu
The Telephone main menu appears when a telephone is connected to the de-vice.
› To display, press the button.
If another, menu id displayed which was open last, to display the phone mainmenu, press the button again .
Home page - information and function surfaces » Fig. 28Name of the telephone service provider (with active roaming, the symbolappears before the name )Function surfaces of preferred contactsEmergency number dialling or function surface of the preferred contact» page 35, Management of preferred contacts (favourites)Choice of storage group for the preferred contactDisplay the list of paired telephones (the name of the main telephoneappears in the button)Change the main telephone with the auxiliary telephone (the name ofthe auxiliary telephone appears in the function surface)
A
B
C
31Telephone
Enter the telephone numberDisplay the phone contact list, depending on the connection type» page 31, Possible connection typesDisplay a collection of text messages (SMS) (with new messages thenumber of messages appears next to the functional surface)Display the call list (missed calls, in addition to the function surface, thenumber of calls when absent is displayed)Menu settings for Telephone
Symbols in the status barSignal strength of the telephone service networkCharge status of the telephone batteryMissed callCurrent callIncoming SMSOngoing data transfer
Settings
› In the Telephone main menu, tap on the function surface, surface.
■ Hands-free - Switching a call to the telephone / back to the device (the menuitem is displayed during a call)
■ Select telephone - Search for available telephones/list of paired telephones/se-lect telephone
■ Bluetooth - Bluetooth® settings » page 17■ User profile - user profile settings
■ Manage favourites - set the function surfaces for your favourite contacts■ Mailbox number: - Enter the voice mail phone number■ Sort by: - Arrangement of telephone contact list
■ Surname - Sort by contact name■ Forename - Sort by contact's first name
■ Import contacts: - Import telephone contacts■ Select ring tone - Selecting the ring tone■ Reminder: Remember your mobile - Turn on/off the warning mode before forget-
ting the phone in the vehicle (if the phone was connected to the device)■ Show pictures for contacts - Switch on/off the display of the image assigned to
the contact■ Conference - Activates/deactivates conference calls
Pair and connect
Introduction to the subject
The range of the connection to the hands-free system is limited to the passen-ger compartment.
To connect a telephone with the device, the two devices must be paired viaBluetooth®.
The coupling procedure depends on the number of telephones that are alreadyconnected» page 31, Possible connection types.
Up to 20 external devices can be paired with the device. After reaching themaximum number, the pairing of the next external device will replace that ofthe device that has not been used for the longest period of time.
A connection with a telephone that is already paired does not require coupling.It is enough to find the telephone that has been coupled in the list of coupledphones and make the connection.
WARNINGPair and connect a telephone to the device only when the vehicle is at astandstill - there is risk of accident!
conditions for coupling
Fig. 29 Compatibility of the phones onthe ŠKODA websites
The telephone can be coupled with the device under the following conditions.
The ignition is switched on.The Bluetooth® function of the device and the telephone is switched on.The visibility of the device and the telephone is switched on.The telephone is within range of the Bluetooth® signal of the device.
32 Telephone
The telephone is compatible with the device.There is no external device connected to the device using Apple CarPlay™.
The pairing can be initiated from the device or from the telephone.
During the pairing and connection process, information messages are dis-played in the device screen and the telephone screen. These messages mustbe observed and if necessary confirmed (e.g. enabling the contact import orconnecting the Bluetooth® player etc).
By reading the QR code » Fig. 29 using the associated application in the exter-nal device (e.g. phone, tablet) or after typing the following address into theweb browser, information about the compatibility of phones and updates areavailable for Bluetooth®device can be displayed.
http://go.skoda.eu/compatibility
Pairing and connection process
Pair the telephone with the device› Search available Bluetooth® devices in your telephone.› Select the device (name of the device → Bluetooth → Name:).› Confirm or enter the PIN code to confirm the pairing.
The phone is connected to the device or just paired, depending on the numberof external devices that are already connected.
Pair the device with the telephone› If there is no telephone connected to the device, then press the button
then tap the function surface Find telephone.› or: If the device is connected to a phone, then in the main menu phone tap
on the functional surface → Search phone.› Select the desired telephone from the list of selected external Bluetooth®
devices.› Confirm the PIN code (enter and confirm if necessary to confirm the pairing.
If external Bluetooth® devices are already connected to the device, then dur-ing the pairing and connection process messages and options for the possibleconnection type (e.g. replacement of the connected external Bluetooth® de-vice) are displayed.
Possible connection types for phones » page 31.
Managing paired external devices
Fig. 30 List of paired external devices / Bluetooth ® profiles
› In the Telephone main menu, tap on the function surface, Tap on → Blue-tooth → Paired devices.
In the list of paired external devices, the following symbols of the Bluetooth ®
profile may appear for the individual external devices» Fig. 30 .
SymbolIcon col-
ourOperation
grey External device can be connected as telephone
green External device is connected as telephone
grey
External device can be connected as Bluetooth® play-er
white External device is connected as Bluetooth® player
Connection set-up▶Select the desired external device from the list of paired external devices.▶Select the desired profile from the list of available Bluetooth® profiles
» Fig. 30 - .
If external Bluetooth® devices are already connected to the device, then dur-ing the connection process messages and options for the possible connectiontype (e.g. replacement of the connected external Bluetooth® device) are dis-played.
Disconnection▶Select the desired external device from the list of paired external devices.▶Select the desired profile from the list of available Bluetooth® profiles
» Fig. 30 - .
33Telephone

Delete the paired external device▶To delete, tap on one of the following function surfaces.
- Delete all external devices- Delete the desired external device
▶Confirm the deletion by tapping on the function surface Delete.
NoteTo the turn on / off the connectivity of Bluetooth®Player press the button , then the functional surface Tap→ Bluetooth → Bluetooth audio (A2DP /
AVRCP).
Telephone functions
Enter telephone number and select
Fig. 31 Numeric keypad / editing the telephone number
Enter a telephone number and dial› In the Telephone main menu, tap on the function surface, surface.› Enter the telephone number using the numeric keypad » Fig. 31 - .› Select the number entered by tapping on the function surface .
Function surfaces of the numerical keyboardEnter the last dialled number / dial the telephone number enteredDialling the emergency number (valid only in certain countries)Dial the breakdown number in case of breakdownDial the info number (for information regarding the products and serv-ices of the brand ŠKODA )Dial the mailbox number
Delete all
Delete the last number enteredDisplay of function surfaces / for the movement of the cursor in theinput line » Fig. 31 -
Breakdown and info numbersThe breakdown and info numbers are free of charge. Charges are only madefor a telephone call in accordance with the fare conditions of your telephoneservice provider.
The phone numbers are already set at the factory. If you want to change thenumbers, then consult a ŠKODA service partner.
If no breakdown or Info calls can be made then a ŠKODA service partner shouldbe consulted.
Search for a contact using the numeric keypadThe numeric keypad can also be used for a contact search.
For example, if you enter 32, the unit will display contacts with the letter se-quence DA, FA, EB, etc. next to the numerical keypad in areas 1 » Fig. 31.
Voice mailboxIf not import the voicemail number or was not imported or entered, then thiscan be entered or changed as follows.
▶ In the Telephone main menu, tap on the function surface, → user profile →mailbox number: surface.
▶To select the voice mailbox number, tap the functional surface surface.
List of telephone contacts
Fig. 32 List of telephone contacts / contact details
› In the Telephone main menu, tap on the function surface, a list of tele-phone contacts is displayed » Fig. 32- .
34 Telephone
The main telephone is connected to the device, the telephone contacts fromthe telephone are used.
Function interfacesContact searchSelect a number in the telephone contact list - if a telephone contact con-tains several telephone numbers, the system displays a menu containingthe telephone numbers for this contact after selecting the contact)Display the contact details » Fig. 32 - The contact name can be read out by the device's generated voiceSelect the number in the contact detailsOpens the menu for sending a text message (SMS)Processing the telephone number of the contact before diallingStart route guidance to the contact address (applies to Amundsen)
Import listAfter the first connection of your main telephone with the device the importthe telephone contacts to the device memory starts. The import can take sev-eral minutes.
The device telephone book contains 2000 free memory locations for importedtelephone contacts. Each contact can contain up to 5 telephone numbers.
For the last 4 connected telephones an import follows with a maximum of1000 contact assigned images to the device memory.
The number of imported contacts can be viewed in the menu item → Userprofile → Import contacts. be determined.
If an error occurs during the import, an appropriate message appears on thescreen.
Refresh listWhen the telephone reconnects with the device the list is automatically upda-ted.
The update can be performed manually as follows.
▶ In the Telephone main menu, tap on the function surface, → User profile →Import contacts. surface.
During updating, the number of imported contacts to the device memory/thenumber of contacts in the telephone is displayed.
A
B
C
Management of preferred contacts (favourites)
Fig. 33 Favourite contacts
Connecting to a favouriteThe functional surfaces of preferred contacts allow for an immediate dial ofthe contact telephone number.
The favourites are available in two storage groups.
› To the change Storage Group tap on the functional surface B » Fig. 33.› To choose tap on the assigned function area A » Fig. 33.
Assigning preferred favourite› In the main menu Telephone, tap on the desired function surface A » Fig. 33.› Select the desired contact (if necessary one of the contact numbers).
Change allocated preferred favourites› In the Telephone main menu, hold the desired function surface A » Fig. 33.› Select the desired contact (if necessary one of the contact numbers).
Clear preferred favourite› Press the button, then tap on the function surface Tap on → User pro-
file → Manage favourites.› Press the desired function surface of the preferred contact and confirm the
deletion.
You can delete all contacts by tapping on the function surface Delete all andconfirm the deletion process.
35Telephone
Call list
Fig. 34 Call history / Contact details
› In the Telephone main menu, tap on the function surface, a call list is dis-played » Fig. 34 - .
The call list can also be displayed during a telephone call.
Function surfaces and symbolsSetting the display depending on the type of call▶ All - List of all calls▶ Missed calls - list of missed calls▶ Dialled numbers - list of dialled numbers▶ Received calls - list of received callsDial a number from the call listDisplay the contact details » Fig. 34 - Select the number in the contact detailsEdit the phone number before dialling (the number is not assigned to anytelephone contact)Answered callOutgoing callMissed call
A
B
C
Telephone call
Fig. 35 Incoming call / Current conversation
Fig. 36 Next incoming call / Next call taken
Depending on the conversation context, the following functions can be execu-ted.
End dialling / reject incoming call / end callAccept incoming call / return to held callSwitch on/off ringerHold a callSwitch off/on microphoneConnect conference callShow caller details (if the contact is stored in the list)
36 Telephone
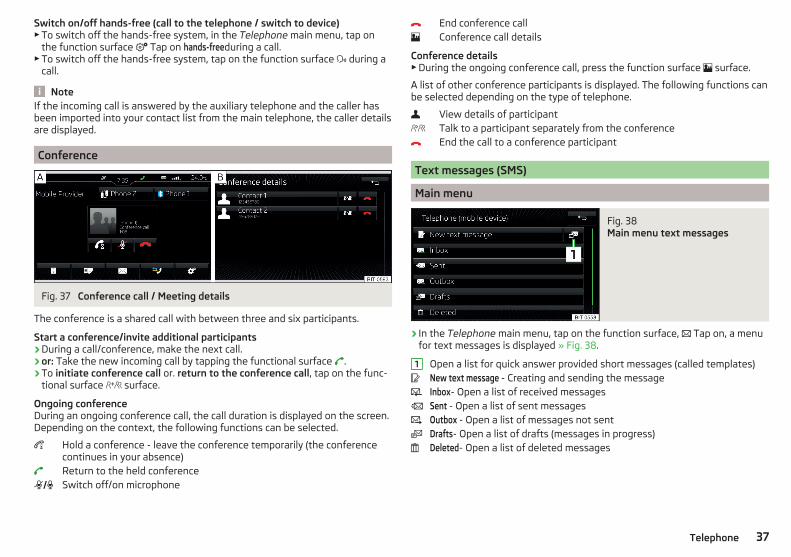
Switch on/off hands-free (call to the telephone / switch to device)▶To switch off the hands-free system, in the Telephone main menu, tap on
the function surface Tap on hands-freeduring a call.▶To switch off the hands-free system, tap on the function surface during a
call.
NoteIf the incoming call is answered by the auxiliary telephone and the caller hasbeen imported into your contact list from the main telephone, the caller detailsare displayed.
Conference
Fig. 37 Conference call / Meeting details
The conference is a shared call with between three and six participants.
Start a conference/invite additional participants› During a call/conference, make the next call.› or: Take the new incoming call by tapping the functional surface .› To initiate conference call or. return to the conference call, tap on the func-
tional surface surface.
Ongoing conferenceDuring an ongoing conference call, the call duration is displayed on the screen.Depending on the context, the following functions can be selected.
Hold a conference - leave the conference temporarily (the conferencecontinues in your absence)Return to the held conferenceSwitch off/on microphone
End conference callConference call details
Conference details▶During the ongoing conference call, press the function surface surface.
A list of other conference participants is displayed. The following functions canbe selected depending on the type of telephone.
View details of participantTalk to a participant separately from the conferenceEnd the call to a conference participant
Text messages (SMS)
Main menu
Fig. 38 Main menu text messages
› In the Telephone main menu, tap on the function surface, Tap on, a menufor text messages is displayed » Fig. 38.
Open a list for quick answer provided short messages (called templates)New text message - Creating and sending the messageInbox- Open a list of received messagesSent - Open a list of sent messagesOutbox - Open a list of messages not sentDrafts- Open a list of drafts (messages in progress)Deleted- Open a list of deleted messages
1
37Telephone
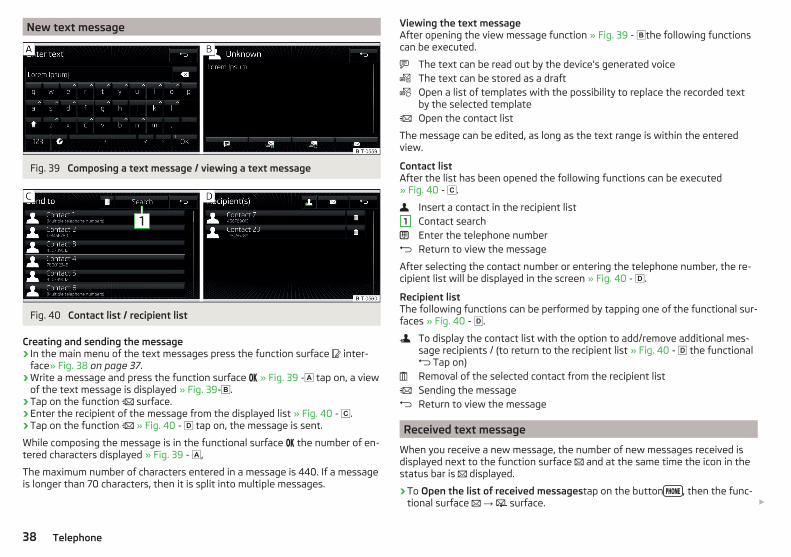
New text message
Fig. 39 Composing a text message / viewing a text message
Fig. 40 Contact list / recipient list
Creating and sending the message› In the main menu of the text messages press the function surface inter-
face» Fig. 38 on page 37.› Write a message and press the function surface » Fig. 39 - tap on, a view
of the text message is displayed » Fig. 39-.› Tap on the function surface.› Enter the recipient of the message from the displayed list » Fig. 40 - .› Tap on the function » Fig. 40 - tap on, the message is sent.
While composing the message is in the functional surface the number of en-tered characters displayed » Fig. 39 - ,
The maximum number of characters entered in a message is 440. If a messageis longer than 70 characters, then it is split into multiple messages.
Viewing the text messageAfter opening the view message function » Fig. 39 - the following functionscan be executed.
The text can be read out by the device's generated voiceThe text can be stored as a draftOpen a list of templates with the possibility to replace the recorded textby the selected templateOpen the contact list
The message can be edited, as long as the text range is within the enteredview.
Contact listAfter the list has been opened the following functions can be executed» Fig. 40 - .
Insert a contact in the recipient listContact searchEnter the telephone numberReturn to view the message
After selecting the contact number or entering the telephone number, the re-cipient list will be displayed in the screen » Fig. 40 - .
Recipient listThe following functions can be performed by tapping one of the functional sur-faces » Fig. 40 - .
To display the contact list with the option to add/remove additional mes-sage recipients / (to return to the recipient list » Fig. 40 - the functional Tap on)Removal of the selected contact from the recipient listSending the messageReturn to view the message
Received text message
When you receive a new message, the number of new messages received isdisplayed next to the function surface and at the same time the icon in thestatus bar is displayed.
› To Open the list of received messagestap on the button , then the func-tional surface → surface.
1
38 Telephone
› Select a message.
The message content and the following menu is displayed.
The text can be read out by the device's generated voiceDisplay a menu with additional options▶ Reply with template - Reply using a template▶ Display numbers - Recognition of telephone numbers in the message in-
cluding the contact number (recognized numbers can be dialled directlyor edited before dialling, or may be sent to this message)
Forwarding a message with the option to edit the message before sendingReply to the sender via a message
Hotspot (WLAN) and data connection
Hotspot (WLAN)
Introduction to the subject
Applies to Amundsen (does not apply to Yeti).
WLAN can be used to connect to the Internet, to playback audio files in themenu media or for operating the device using an application in the externaldevice (e.g. ŠKODA Media Command).
The requirement for the WLAN function is the ignition is switched on. Afterswitching on the ignition, the last-used WLAN connection appears.
It is possible to connect up to 8 external devices on the device hotspot and atthe same time to connect the device to the Hotspot of other external devices.
connect an external device to the hotspot (WLAN) of the device
Device hotspot on / off› Press the button, then tap on the function surface Tap on→ WLAN →
Mobile hotspot → Mobile hotspot.
Set device hotspot▶Press the button, then tap on the function surface Tap on→ WLAN →
Mobile hotspot → Hotspot (WLAN) settings.▶Setting required menu items the following menu.
■ Security level: - Setting the connection security■ Network key - Entering the access password■ SSID: ... - Name of the device hotspots■ Do not send network name (SSID) -Turn WLAN hotspot visibility on/off
▶Tap the functional surface Save to save the parameters of the devices hot-spot.
Connect▶Enable the Wi-Fi in the external device and search for any available hotspots▶Select the device hotspot (if necessary enter the required password).▶Confirm the connection establishment.
39Hotspot (WLAN) and data connection

establish secure connection using WPS▶WLAN in device on.▶Press the button, then tap on the function Tap on→ WLAN → WLAN →
WPS Quick Connect (WPS button).▶Turn on the option to connect to the device hotspot using WPS.
Connect device to the hotspot (WLAN) of the external device
Fig. 41 List of available WLAN networks
› To Turn on / off the device WLAN press the button , then the functionalsurface → Tap on→ WLAN → WLAN → WLAN.
Show Available Hotspots▶Press the button, then tap on the function surface Tap on→ WLAN →
WLAN1).
With WLAN activated, a list of available hotspots with the following informa-tion and functional areas is displayed » Fig. 41.
Searching for available hotspotsTurn the device WLAN on/offAutomatically establish secure connection to the hotspot via WPSManual hotspot search and connectFunctional surfaces of the available hotspotsDisconnection from the currently connected hotpot by deleting the de-vice memory access password (The functional surface will only be shownwhen connected)Current connectionWi-Fi strength of the external device
A
B
C
D
E
F
Connect▶WLAN in device on.▶Show the list of available hotspots, if necessary, update the list by tapping
the functional surfaceSearch.▶Select the desired hotspot▶ If the access to the hotspot is password protected, then enter the required
password.
Search for connection manually and connect▶Turn on WLAN in the device.▶Display list of available hotspots.▶Tap on the functional surface Manual settings and set the required hotspot pa-
rameters.▶Tap the function surface Connect.▶ If the parameters for the search are set correctly and the hotspot is available,
then the connection will take place.
Establish secure connection using WPS▶Turn on WLAN in the device.▶ In the external device, turn on the option to connect to the external device
via WPS.▶Press the button, then tap on the function surface Tap on→ WLAN →
Portable hotspot → WPS Quick Connect (WPS button).
End connection to the hotspot▶Press button when the desired Hotspot (WLAN) is found ,then the func-
tional surface → Tap→ WLAN → WLAN → Delete.
Data connection
Using the data connection, the device can be connected to the Internet.
› Connect the equipment to the hotspot of an external device with activateddata services » page 40, Connect device to the hotspot (WLAN) of the exter-nal device.
1) As long as the device is connected to the hot spot of the external device, its name is displayed in thisfunctional surface.
40 Hotspot (WLAN) and data connection
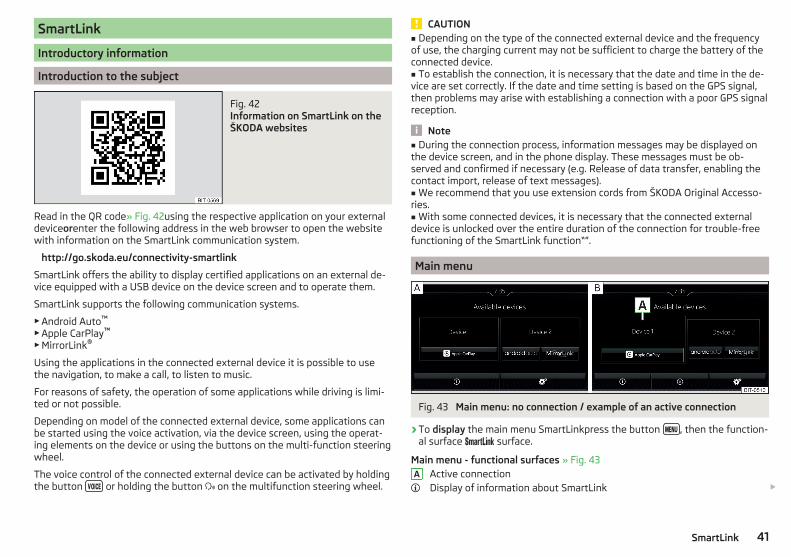
SmartLink
Introductory information
Introduction to the subject
Fig. 42 Information on SmartLink on theŠKODA websites
Read in the QR code» Fig. 42using the respective application on your externaldeviceorenter the following address in the web browser to open the websitewith information on the SmartLink communication system.
http://go.skoda.eu/connectivity-smartlink
SmartLink offers the ability to display certified applications on an external de-vice equipped with a USB device on the device screen and to operate them.
SmartLink supports the following communication systems.
▶Android Auto™
▶Apple CarPlay™
▶MirrorLink®
Using the applications in the connected external device it is possible to usethe navigation, to make a call, to listen to music.
For reasons of safety, the operation of some applications while driving is limi-ted or not possible.
Depending on model of the connected external device, some applications canbe started using the voice activation, via the device screen, using the operat-ing elements on the device or using the buttons on the multi-function steeringwheel.
The voice control of the connected external device can be activated by holdingthe button or holding the button on the multifunction steering wheel.
CAUTION■ Depending on the type of the connected external device and the frequencyof use, the charging current may not be sufficient to charge the battery of theconnected device.■ To establish the connection, it is necessary that the date and time in the de-vice are set correctly. If the date and time setting is based on the GPS signal,then problems may arise with establishing a connection with a poor GPS signalreception.
Note■ During the connection process, information messages may be displayed onthe device screen, and in the phone display. These messages must be ob-served and confirmed if necessary (e.g. Release of data transfer, enabling thecontact import, release of text messages).■ We recommend that you use extension cords from ŠKODA Original Accesso-ries.■ With some connected devices, it is necessary that the connected externaldevice is unlocked over the entire duration of the connection for trouble-freefunctioning of the SmartLink function“”.
Main menu
Fig. 43 Main menu: no connection / example of an active connection
› To display the main menu SmartLinkpress the button , then the function-al surface surface.
Main menu - functional surfaces » Fig. 43Active connectionDisplay of information about SmartLink
A
41SmartLink
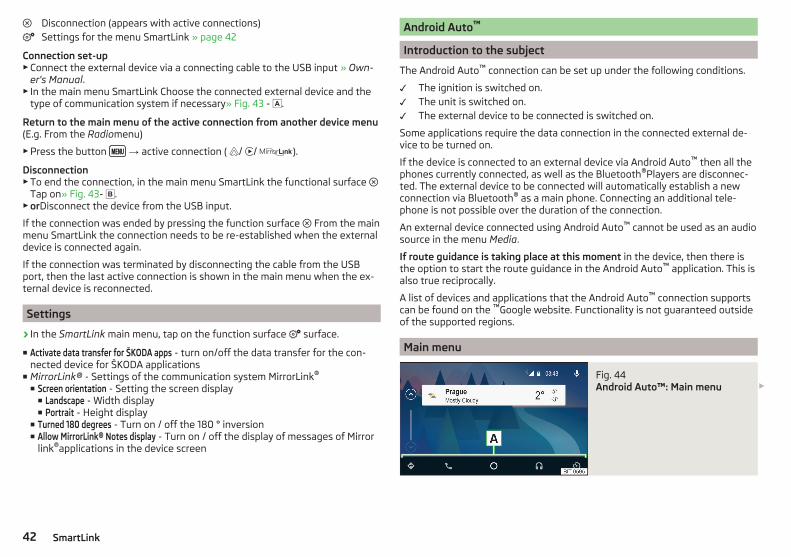
Disconnection (appears with active connections)Settings for the menu SmartLink » page 42
Connection set-up▶Connect the external device via a connecting cable to the USB input » Own-
er's Manual.▶ In the main menu SmartLink Choose the connected external device and the
type of communication system if necessary» Fig. 43 - .
Return to the main menu of the active connection from another device menu(E.g. From the Radiomenu)
▶Press the button → active connection ( / / ).
Disconnection▶To end the connection, in the main menu SmartLink the functional surface
Tap on» Fig. 43- .▶orDisconnect the device from the USB input.
If the connection was ended by pressing the function surface From the mainmenu SmartLink the connection needs to be re-established when the externaldevice is connected again.
If the connection was terminated by disconnecting the cable from the USBport, then the last active connection is shown in the main menu when the ex-ternal device is reconnected.
Settings
› In the SmartLink main menu, tap on the function surface surface.
■ Activate data transfer for ŠKODA apps - turn on/off the data transfer for the con-nected device for ŠKODA applications
■ MirrorLink® - Settings of the communication system MirrorLink®
■ Screen orientation - Setting the screen display■ Landscape - Width display■ Portrait - Height display
■ Turned 180 degrees - Turn on / off the 180 ° inversion■ Allow MirrorLink® Notes display - Turn on / off the display of messages of Mirror
link®applications in the device screen
Android Auto™
Introduction to the subject
The Android Auto™ connection can be set up under the following conditions.
The ignition is switched on.The unit is switched on.The external device to be connected is switched on.
Some applications require the data connection in the connected external de-vice to be turned on.
If the device is connected to an external device via Android Auto™ then all thephones currently connected, as well as the Bluetooth®Players are disconnec-ted. The external device to be connected will automatically establish a newconnection via Bluetooth® as a main phone. Connecting an additional tele-phone is not possible over the duration of the connection.
An external device connected using Android Auto™ cannot be used as an audiosource in the menu Media.
If route guidance is taking place at this moment in the device, then there isthe option to start the route guidance in the Android Auto™ application. This isalso true reciprocally.
A list of devices and applications that the Android Auto™ connection supportscan be found on the ™Google website. Functionality is not guaranteed outsideof the supported regions.
Main menu
Fig. 44 Android Auto™: Main menu
42 SmartLink
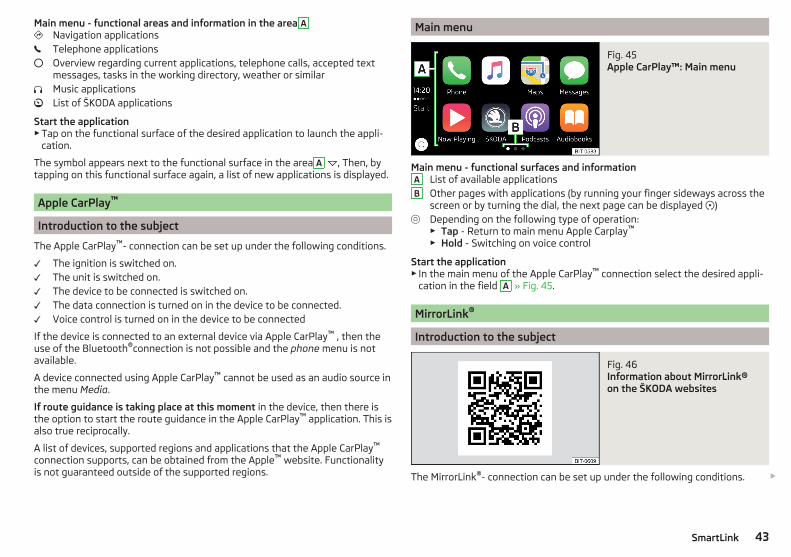
Main menu - functional areas and information in the area ANavigation applicationsTelephone applicationsOverview regarding current applications, telephone calls, accepted textmessages, tasks in the working directory, weather or similarMusic applicationsList of ŠKODA applications
Start the application▶Tap on the functional surface of the desired application to launch the appli-
cation.
The symbol appears next to the functional surface in the area A , Then, bytapping on this functional surface again, a list of new applications is displayed.
Apple CarPlay™
Introduction to the subject
The Apple CarPlay™- connection can be set up under the following conditions.
The ignition is switched on.The unit is switched on.The device to be connected is switched on.The data connection is turned on in the device to be connected.Voice control is turned on in the device to be connected
If the device is connected to an external device via Apple CarPlay™ , then theuse of the Bluetooth®connection is not possible and the phone menu is notavailable.
A device connected using Apple CarPlay™ cannot be used as an audio source inthe menu Media.
If route guidance is taking place at this moment in the device, then there isthe option to start the route guidance in the Apple CarPlay™ application. This isalso true reciprocally.
A list of devices, supported regions and applications that the Apple CarPlay™
connection supports, can be obtained from the Apple™ website. Functionalityis not guaranteed outside of the supported regions.
Main menu
Fig. 45 Apple CarPlay™: Main menu
Main menu - functional surfaces and informationList of available applicationsOther pages with applications (by running your finger sideways across thescreen or by turning the dial, the next page can be displayed )Depending on the following type of operation:▶ Tap - Return to main menu Apple Carplay™
▶ Hold - Switching on voice control
Start the application▶ In the main menu of the Apple CarPlay™ connection select the desired appli-
cation in the field A » Fig. 45.
MirrorLink®
Introduction to the subject
Fig. 46 Information about MirrorLink®on the ŠKODA websites
The MirrorLink®- connection can be set up under the following conditions.
A
B
43SmartLink
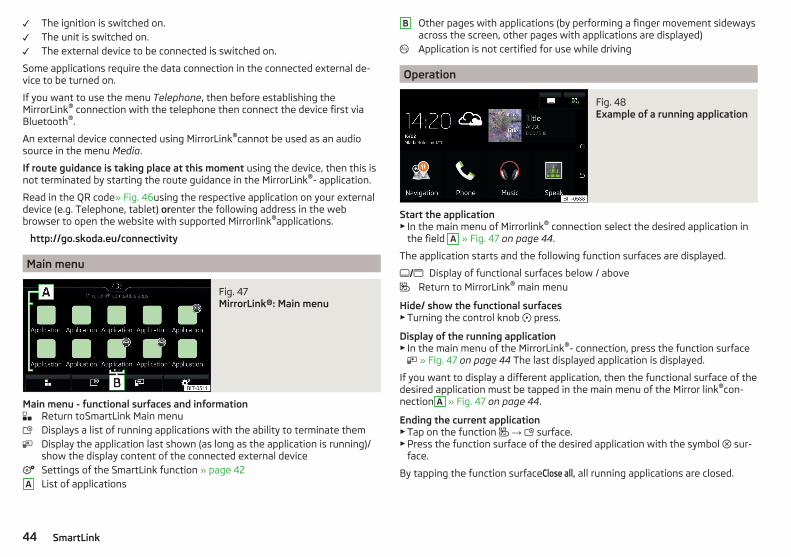
The ignition is switched on.The unit is switched on.The external device to be connected is switched on.
Some applications require the data connection in the connected external de-vice to be turned on.
If you want to use the menu Telephone, then before establishing theMirrorLink® connection with the telephone then connect the device first viaBluetooth®.
An external device connected using MirrorLink®cannot be used as an audiosource in the menu Media.
If route guidance is taking place at this moment using the device, then this isnot terminated by starting the route guidance in the MirrorLink®- application.
Read in the QR code» Fig. 46using the respective application on your externaldevice (e.g. Telephone, tablet) orenter the following address in the webbrowser to open the website with supported Mirrorlink®applications.
http://go.skoda.eu/connectivity
Main menu
Fig. 47 MirrorLink®: Main menu
Main menu - functional surfaces and informationReturn toSmartLink Main menuDisplays a list of running applications with the ability to terminate themDisplay the application last shown (as long as the application is running)/show the display content of the connected external deviceSettings of the SmartLink function » page 42List of applications
A
Other pages with applications (by performing a finger movement sidewaysacross the screen, other pages with applications are displayed)Application is not certified for use while driving
Operation
Fig. 48 Example of a running application
Start the application▶ In the main menu of Mirrorlink® connection select the desired application in
the field A » Fig. 47 on page 44.
The application starts and the following function surfaces are displayed.
Display of functional surfaces below / aboveReturn to MirrorLink® main menu
Hide/ show the functional surfaces▶Turning the control knob press.
Display of the running application▶ In the main menu of the MirrorLink®- connection, press the function surface » Fig. 47 on page 44 The last displayed application is displayed.
If you want to display a different application, then the functional surface of thedesired application must be tapped in the main menu of the Mirror link®con-nection A » Fig. 47 on page 44.
Ending the current application▶Tap on the function → surface.▶Press the function surface of the desired application with the symbol sur-
face.
By tapping the function surfaceClose all, all running applications are closed.
B
44 SmartLink
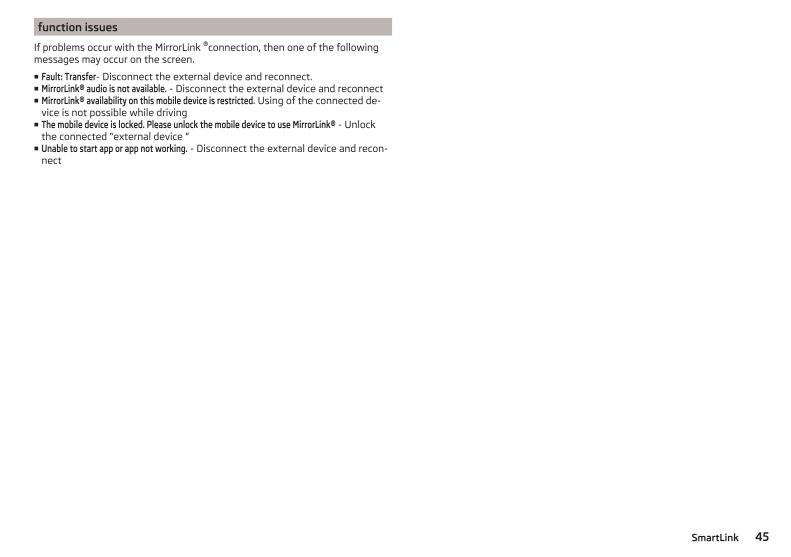
function issues
If problems occur with the MirrorLink ®connection, then one of the followingmessages may occur on the screen.
■ Fault: Transfer- Disconnect the external device and reconnect.■ MirrorLink® audio is not available. - Disconnect the external device and reconnect■ MirrorLink® availability on this mobile device is restricted. Using of the connected de-
vice is not possible while driving■ The mobile device is locked. Please unlock the mobile device to use MirrorLink® - Unlock
the connected “external device ”■ Unable to start app or app not working. - Disconnect the external device and recon-
nect
45SmartLink
Navigation
Introductory information
Navigation - function sequence
Applies to Amundsen.
Route guidance is started as follows.
› Search for/ enter a new destination or Select one of the stored destinations.› Confirm the route calculation in the destination details or if necessary, adjust
the route options.› Select the preferred route type, if this is requested by the device.
A route calculation occurs and route guidance starts.
The route guidance is provided by graphical driving recommendations and nav-igation announcements.
The is an option to add additional destinations during route guidance, or toadapt the route.
If a traffic radio station is available, information concerning traffic delays isevaluated by the device and, if necessary, an alternative route is offered.
If you deviate from the route, then a new route calculation is carried out.
GPS satellite signal
The unit uses the GPS (Global Positioning System) satellite signal for routeguidance.
Outside the range of the GPS satellite signal (e.g. in dense vegetation, in tun-nels, parking garages, etc.), the unit navigates only with restrictions using ve-hicle sensors.
The unit offers the possibility to show in the split screen display the followingPosition » Fig. 50 on page 47 information about the current geographical posi-tion of the vehicle and the satellite signal.
Geographical longitudeGeographical latitudeElevationNumber of received/available satellites
If no GPS satellite signal is available, no values are displayed.
Navigation data
Navigation data sourceThe navigation data is stored on an Original SD Card .
In order to ensure the function of the navigation, the Original SD card, with thenavigation data, must be inserted in the respective slot » page 24, SD card.
If the original SD card should be damaged or lost, a new original SD card can bepurchased from the ŠKODA Original Accessories.
With a Non-original SD Card, the navigation does not work.
Finding out the version of the navigation data› In the Navigation main menu, tap on the function surface, Tap→ version
information .
Update navigation dataWe recommend that you update the navigation data on a regular basis (e.g.Due to newly developed roads and changed traffic signs).
The information on updating the navigation data is to be obtained from aŠKODA partner or on the following ŠKODA Internet pages.
http://go.skoda.eu/infotainment
Main menu
Fig. 49 Navigation: Main menu
› To display, press the button.› If the main menu navigation is not shown, then press the button again .
Description of the function surfaces A » Fig. 49Context-dependent:Route guidance is disabled - Search / enter a new destinationRoute guidance is enabled - The following menu is displayed
46 Navigation
▶ Route details - Displays the route details » page 57▶ Congestion ahead - Manual adjusts traffic conditions » page 59▶ Call destination - Search / enter a new destination / stopover » page 47▶ Stop route guidance - Stops route guidanceThe following menu is displayed▶ Store position - Store the current vehicle position as a flagged destination
» page 50▶ Routes - Display the list of saved routes » page 58▶ Destinations - Display the list of stored destinations » page 50▶ Last destinations - Display the list of recent destinations to which route
guidance was carried out » page 49▶ Home address - Route guidance to your home address » page 50Search for POIs in the categories , and Map presentation options » page 53
Operation of media/radio-playbackNavigation settings
Additional windows
Fig. 50 Extra window
› To switch on/off the traffic monitoring in the main menu Navigation, tap onthe functional surface Tap→ Split screen. .
› To select content of the additional window A » Fig. 50 tap the functionalsurface Tap and select one of the following menus, depending on the con-text.
■ Audio - Operation of radio/mediaplayback■ Compass - Displays the current vehicle location in relation to the compass di-
rections■ Freq. Routes - Display the three most frequently traveled routes (if route guid-
ance is disabled) » page 56
■ Manoeuvre - Display graphical driving recommendations (if route guidance isenabled)
■ Position - Displays the geographical coordinates of the current vehicle location
Search for destination and enter
Search for POI/
Fig. 51 Destination search: Main menu / list of destinations found
The feature allows a full text search of locations or points of interest (POI) byentering keywords.
Display main menu› Route guidance is disabled - From the main menu navigation the functional
surface surface.› Route guidance is enabled - From the main menu navigation, tap on the
functional surface → call destination.› If the menu is » Fig. 51 - not shown to search for a destination, then the
functional surface → Search.
Find destinationIt is possible to enter the POI name or the POI category (POI) or the place andstreet name or house number / postal code directly into the input line.
During input, destinations are shown in area D » Fig. 51 - that best corre-spond to the instructions.
If route guidance e.g. Is required in a car park or restaurant which is close tothe chosen destination, then the Nearby function surface must be tapped in thedestination details of the chosen destination. Then search for and select thedesired destination.
47Navigation
Description of the function surfaces A » Fig. 51Choice of search - Searching for a destination or POI (point of interest) by name - Search for a point along the route (only works with active route guid-ance) - Searching for a destination near the entered destination (after selec-tion in destination details » page 54)Input lineDepending on whether a mark is in the entry line, the following menu isdisplayed - Map display with selected locations corresponding to the enteredcharacters » Fig. 51 - - Choose the type of destination search / destination entry (no charac-ter is entered)▶ Search - Destination / POI search▶ Address - Enter destination via the new address. » page 48, Enter desti-
nation using the address▶ In map- Enter destination via the map point / using the GPS coordinates
» page 49, Enter destination on the map and using GPS coordinatesList of last destinations (no character is entered) » page 49 / List of se-lected destinationsAlphanumeric keypad
List of destinations found▶To Display the list » Fig. 51 - the functional surface surface.
There is a maximum of 6 destinations shown in this list, each is identified witha letter. Then these destinations are shown in the map with the icon and aletter, which coincides with the letter in the list of destinations found.
If several destinations were found, then the list can be scrolled through byturning the controller or sliding the slider.
A
B
C
D
E
Enter destination using the address
Fig. 52 Enter destination using the address: Main menu / list of placesfound
Display main menu› Route guidance is disabled - From the main menu navigation the function
surface surface.› Route guidance is enabled - From the main menu navigation, tap on the
functional surface → call destination.› If the destination entry menu » Fig. 52 - is not shown using the address,
then tap on the function surface → address.
Enter destination› Enter the destination address and then confirm.
Relevant names (e.g. Place/street names) are offered in the entry line duringentry, depending on the context. Previously entered names are offered on apreferential basis.
The location of the destination offered, which is specified in the entry line inparentheses, can be displayed in the map by tapping the functional surfaceMap.
List of places foundThere is a possibility that a map with a list of places of the same name will bedisplayed during entry» Fig. 52 - .
The list of places found can also be called up during address entry by pressingthe function area .
In the list of towns that are found a maximum of 6 towns appear marked witha letter. These towns are then marked in the map with the symbol and a let-ter, which coincides with the letter in the list of places found.
48 Navigation
If several places were found, then the list can be scrolled through by turningthe controller or sliding the slider.
Note■ While entering a street name there is an option to enter the centre of a givenplace as a destination instead of a street name by tapping the function surfaceCentre.■ After entering the street name, the house number or intersection can be en-tered using the name / number of the intersecting road.
Enter destination on the map and using GPS coordinates
Fig. 53 Enter destination using the point: in the map / using GPS coordi-nates
Show map› Route guidance is disabled - From the navigationmain menu, the functional
surface surface.› Route guidance is enabled - From the main menu navigation, tap on the
functional surface → call destination.› Then tap the functional surface and choose the menu item In map.
Enter destination beyond the point› While entering a destination into the map, the map scale displayed can be
changed manually » page 53, Manual change of scale.› By sliding the screen move the desired destination into the cross-hair
» Fig. 53 - .› The destination entry by tapping the function surface confirm.
Enter destination through GPS coordinates› The functional surface with the desired GPS value coordinates for latitude
and longitude Tap on» Fig. 53-.
› Set the desired value and the destination input by pressing the function sur-face confirm.
If information is available about the point entered in the navigation data, thenthese will be displayed instead of the GPS coordinates (e.g. address A» Fig. 53).
Search for petrol station, restaurant or car park
The device enables the quick search of petrol station, restaurant or car parkPOI Categories.
› In the Navigation main menu, tap on the function surface, surface.› The functional surface of the desired category button.
A list of up to 200 of the nearest POIs in the chosen category is displayed in aradius of up to 200 km from the current vehicle position.
› Select the desired POI.
Are certain petrol stations in the menu item → Tank options → Select Preferredpetrol station , then the preferred service stations are displayed in the first threepositions during the petrol station search.
Last destinations (automatically saved destinations)
List of last destinations› In the Navigation main menu, tap on the function surface, → Last destina-
tions.
Details of the final destination› In the main menu navigationtap the functional surface .
If route guide is disabled, then the details of the last destination are displayedto where the route guidance was carried out. If route guidance is enabled,Then the details of the final destinations are displayed.
Last destinations menu for destination / POI searchIn the destination search menu, a short list of last destinations is show in thearea D » Fig. 51 on page 47.
Functional surfaces in the list of last destinations- Destination search by name (the functional surface is displayed with
more than 5 entries available)- Display the destination details » page 54
Search
49Navigation
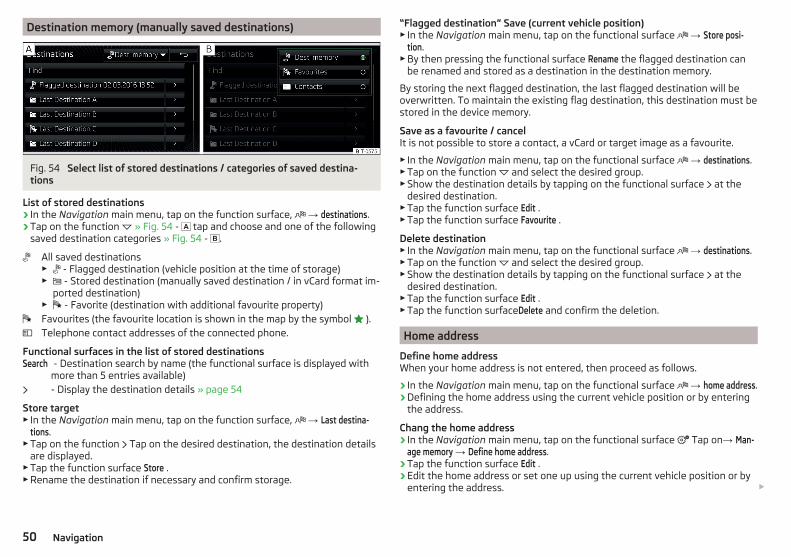
Destination memory (manually saved destinations)
Fig. 54 Select list of stored destinations / categories of saved destina-tions
List of stored destinations› In the Navigation main menu, tap on the function surface, → destinations.› Tap on the function » Fig. 54 - tap and choose and one of the following
saved destination categories » Fig. 54 - .
All saved destinations▶ - Flagged destination (vehicle position at the time of storage)▶ - Stored destination (manually saved destination / in vCard format im-
ported destination)▶ - Favorite (destination with additional favourite property)Favourites (the favourite location is shown in the map by the symbol ).Telephone contact addresses of the connected phone.
Functional surfaces in the list of stored destinations- Destination search by name (the functional surface is displayed with
more than 5 entries available)- Display the destination details » page 54
Store target▶ In the Navigation main menu, tap on the function surface, → Last destina-
tions.▶Tap on the function Tap on the desired destination, the destination details
are displayed.▶Tap the function surface Store .▶Rename the destination if necessary and confirm storage.
Search
“Flagged destination” Save (current vehicle position)▶ In the Navigation main menu, tap on the functional surface → Store posi-
tion.▶By then pressing the functional surface Rename the flagged destination can
be renamed and stored as a destination in the destination memory.
By storing the next flagged destination, the last flagged destination will beoverwritten. To maintain the existing flag destination, this destination must bestored in the device memory.
Save as a favourite / cancelIt is not possible to store a contact, a vCard or target image as a favourite.
▶ In the Navigation main menu, tap on the functional surface → destinations.▶Tap on the function and select the desired group.▶Show the destination details by tapping on the functional surface at the
desired destination.▶Tap the function surface Edit .▶Tap the function surface Favourite .
Delete destination▶ In the Navigation main menu, tap on the functional surface → destinations.▶Tap on the function and select the desired group.▶Show the destination details by tapping on the functional surface at the
desired destination.▶Tap the function surface Edit .▶Tap the function surfaceDelete and confirm the deletion.
Home address
Define home addressWhen your home address is not entered, then proceed as follows.
› In the Navigation main menu, tap on the functional surface → home address.› Defining the home address using the current vehicle position or by entering
the address.
Chang the home address› In the Navigation main menu, tap on the functional surface Tap on→ Man-
age memory → Define home address.› Tap the function surface Edit .› Edit the home address or set one up using the current vehicle position or by
entering the address.
50 Navigation
Delete home address› In the Navigation main menu, tap on the functional surface Tap on→ Man-
age memory → Delete user data → Home address.› Tap the function surfaceDelete and confirm the deletion.
Import my destinations
Introduction to the subject
Fig. 55 MyDestination application on theŠKODA websites
In this chapter, destinations are described which can be imported into the de-vice memory.
Custom destinations can be created by means of the ŠKODA application“MyDestination”.
Read in the QR code» Fig. 55using the respective application on your externaldevice (e.g. Telephone, tablet) orAfter entering the following address in theweb browser more information on the “MyDestination” application will be dis-played.
http://go.skoda.eu/my-destination
Custom destination in vCard-format
In the device memory, a custom destination can be imported in the vCard for-mat (*.vcf) from an SD card or a USB source.
Import› Insert an SD card into the external module or in the device (applies to Yeti) or
connect a USB source to your own destination file.› In the Navigation main menu, tap on the functional surface → Manage mem-
ory → Import objectives (SD / USB).› Select the source and confirm the import.
Route guidance› In the Navigation main menu, tap on the functional surface → Destinations
→ → surface.› Search for and select the desired imported destination.
Delete own destination› In the Navigation main menu, tap on the functional surface → Destinations
→ → surface.› Tap on the function Tap on the desired own destination.› In the destination details, tap the functional surface Edit → Delete and confirm
the deletion.
Own POI categories (My POIs)
Import / update› Insert an SD card with POI categories into the external module or into the
device (applies to Yeti).› In the Navigation main menu, tap on the functional surface → Update My
POIs (SD / USB) → Update.› Select the source and confirm the import.
If there is already the same POI category name in the device, then it will beoverwritten during import.
Show own category destinations in the map› In the Navigation main menu, tap on the functional surface → Map → Se-
lect categories for POIs → My points of interest (Personal POI).
Clear all own POI categories› In the Navigation main menu, tap on the functional surface Tap on→ Man-
age memory → Delete my POIs → Delete.› Tap the function surfaceDelete and confirm the deletion.
Image with GPS coordinates
The device enables the guidance to the GPScoordinate data stored in the im-age.
The image can be obtained from an external device in which GPS coordinatesare stored during image creation. If necessary, this can be created and impor-ted in the application “MyDestination”.
› Press the button, then tap on the function surface Images.› Select the connected source and open the image with GPS coordinates.
51Navigation
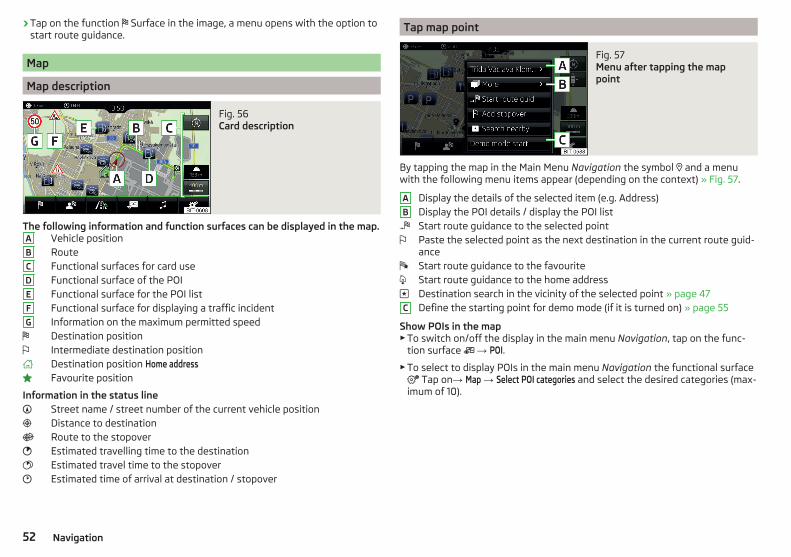
› Tap on the function Surface in the image, a menu opens with the option tostart route guidance.
Map
Map description
Fig. 56 Card description
The following information and function surfaces can be displayed in the map.Vehicle positionRouteFunctional surfaces for card useFunctional surface of the POIFunctional surface for the POI listFunctional surface for displaying a traffic incidentInformation on the maximum permitted speedDestination positionIntermediate destination positionDestination position Home addressFavourite position
Information in the status lineStreet name / street number of the current vehicle positionDistance to destinationRoute to the stopoverEstimated travelling time to the destinationEstimated travel time to the stopoverEstimated time of arrival at destination / stopover
A
B
C
D
E
F
G
Tap map point
Fig. 57 Menu after tapping the mappoint
By tapping the map in the Main Menu Navigation the symbol and a menuwith the following menu items appear (depending on the context) » Fig. 57.
Display the details of the selected item (e.g. Address)Display the POI details / display the POI listStart route guidance to the selected pointPaste the selected point as the next destination in the current route guid-anceStart route guidance to the favouriteStart route guidance to the home addressDestination search in the vicinity of the selected point » page 47Define the starting point for demo mode (if it is turned on) » page 55
Show POIs in the map▶To switch on/off the display in the main menu Navigation, tap on the func-
tion surface → POI.
▶To select to display POIs in the main menu Navigation the functional surface Tap on→ Map → Select POI categories and select the desired categories (max-imum of 10).
A
B
C
52 Navigation

Options for map display
Fig. 58 Map options
› In the Navigation main menu, tap on the functional surface surface.
The following function surfaces are displayed » Fig. 58.2D - Two-dimensional map display3D - Three-dimensional map displayDisplay of the route from the current vehicle location to the destinationPresentation of the destination or the next interim destination in the map(depending on the menu item setting ) → Advanced settings → Status line:)Automatic map display in day or night mode (depending on the currentlyactive vehicle lighting)Daytime map displayNight-time map displayOn / off of the split screen display » page 47On / off of the selected POI categories display » page 52, Tap map point
If the map scale of the 2D Map or 3D Map is greater than 10 km (5 miles), thenthe map is automatically displayed as 2D and aligned in the direction of north.If the scale is increased beyond this value, then the map is switched back tothe original representation.
Map scale
It is possible to change the map scale manually or to turn on the automaticchange of scale.
Symbols of the scale function surfacesIn the map area D » Fig. 56 on page 52 the following context-dependentfunction surfaces and information is displayed.
A
B
C
D
E
Size of the manually set map scale
Size of the automatically set map scale
Turn on / off the automatic change of scale
Map view in reduced scale
Current elevation
Manual change of scaleMap scale can be change in the following ways.
▶Turning the control knob .▶Touching the screen with two fingers and pulling them apart or closing them
together.
Enabling automatic scaling▶ In the Navigation main menu, tap on the functional surface → sur-
face.
Tap on the function is highlighted in green.
The automatic scale is only active as long as the map is centred on the vehicleposition (the function surface or. is hidden).
If the automatic scale is active, the map scale will change automatically de-pending on the type of roads travelled (motorway - smaller map scale / townlarger map scale) and from the manoeuvre to be carried out.
Turn off the automatic change of scale▶ In the Navigation main menu, tap on the functional surface → sur-
face.
Tap on the function is highlighted in white.
The turning off occurs likewise when the map is moved or the map scale ischanged manually.
Map view in reduced scale▶ In the Navigation main menu, tap on the functional surface → or.
→ surface.
The map scale is reduced for a few seconds and then restored.
Change map orientation
Changing map orientation is possible under the following conditions.
53Navigation
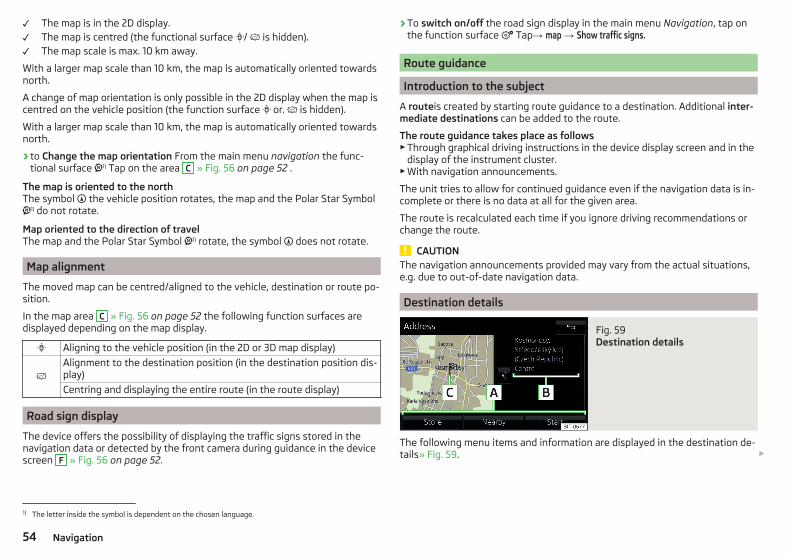
The map is in the 2D display.The map is centred (the functional surface / is hidden).The map scale is max. 10 km away.
With a larger map scale than 10 km, the map is automatically oriented towardsnorth.
A change of map orientation is only possible in the 2D display when the map iscentred on the vehicle position (the function surface or. is hidden).
With a larger map scale than 10 km, the map is automatically oriented towardsnorth.
› to Change the map orientation From the main menu navigation the func-tional surface 1) Tap on the area C » Fig. 56 on page 52 .
The map is oriented to the northThe symbol the vehicle position rotates, the map and the Polar Star Symbol1) do not rotate.
Map oriented to the direction of travelThe map and the Polar Star Symbol 1) rotate, the symbol does not rotate.
Map alignment
The moved map can be centred/aligned to the vehicle, destination or route po-sition.
In the map area C » Fig. 56 on page 52 the following function surfaces aredisplayed depending on the map display.
Aligning to the vehicle position (in the 2D or 3D map display)
Alignment to the destination position (in the destination position dis-play)
Centring and displaying the entire route (in the route display)
Road sign display
The device offers the possibility of displaying the traffic signs stored in thenavigation data or detected by the front camera during guidance in the devicescreen F » Fig. 56 on page 52.
› To switch on/off the road sign display in the main menu Navigation, tap onthe function surface Tap→ map → Show traffic signs.
Route guidance
Introduction to the subject
A routeis created by starting route guidance to a destination. Additional inter-mediate destinations can be added to the route.
The route guidance takes place as follows▶Through graphical driving instructions in the device display screen and in the
display of the instrument cluster.▶With navigation announcements.
The unit tries to allow for continued guidance even if the navigation data is in-complete or there is no data at all for the given area.
The route is recalculated each time if you ignore driving recommendations orchange the route.
CAUTIONThe navigation announcements provided may vary from the actual situations,e.g. due to out-of-date navigation data.
Destination details
Fig. 59 Destination details
The following menu items and information are displayed in the destination de-tails» Fig. 59.
1) The letter inside the symbol is dependent on the chosen language.
54 Navigation
Area with functional surfacesDetailed destination informationDestination position in the map
Display the destination detailsThe destination details can be displayed in one of the following ways.
▶While entering a destination▶By tapping on the function surface in the destination list▶By tapping From the main menu navigation (The details of the last target
indicated is shown, to where route guidance is carried out or was carried out)
Function interfacesUsing functional surfaces in the field A the following functions can be per-formed, depending on the context.
▶Start / Stop route guidance▶Searching for a nearby destination » page 47▶Setting route options▶Store destination▶Edit destination (the object can be deleted, renamed or saved)▶Dial the POI phone number (if the device is connected to a phone» page 32,
Pair and connect)
Route calculation
Fig. 60 Alternative routes
Route calculation is done on the basis of the set route options. The route op-tions can be set: → route options.
Alternative routesWith selection of alternative routes turned on, the following menu is displayedafter the calculation of a new route » Fig. 60.
A
B
C
Calculate the most economical route with shortest travelling time anddistance travelled – the route is highlighted green Calculate the fastest route to the destination, even if a detour is nec-essary - the route is highlighted in red Calculate the shortest route to the destination, even if a longer travel-ling time is required - the route is highlighted in orange
It is possible to select an already calculated alternative route before the calcu-lation of the remaining routes is completed.
Selecting the type of route will start the route guidance.
If no route selection is made within 30 s after the calculation of all routes, theroute guidance is automatically started according to the preferred route type.
Route calculation for the trailer
When driving with a trailer or any other accessory connected to the trailersocket, we recommend that you switch on the trailer recognition, if necessaryto set the maximum speed for towing a trailer.
› For calculating the route for towing a trailer, tap the functional surface in themainnavigation menu → Route options → surface.
Demo mode
The Demo mode provides a travel simulation to the entered destination. Thefunction offers the chance to travel through the calculated route “virtually”.
When the Demo mode is turned on, a menu for route guidance in the Demomode or in normal operation is displayed before the start of route guidance.
› To switch on/offin the main menu Navigation, tap on the functional surface Tap→ Advanced settings → Demo mode.
When the demoMode is switched on, the route starting point can be defined.
› In the Navigation main menu, tap on the functional surface Tap→ Advancedsettings → Define define demo mode starting point.
› Define the starting point by entering the address or the current vehicle posi-tion.
› The demo mode starting pointcan also be set as long as the demo mode isturned on by tap the desired map location and the menu item Start Demo Mod.isselected» page 52, Tap map point.
A
B
C
55Navigation
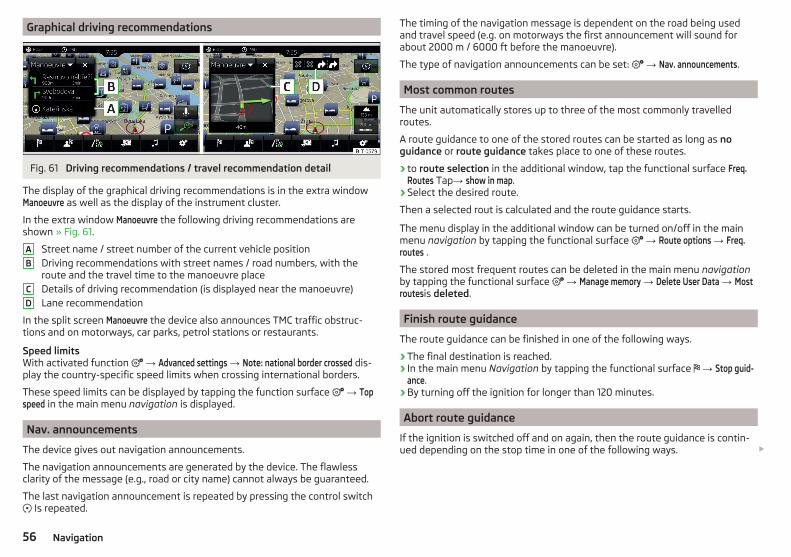
Graphical driving recommendations
Fig. 61 Driving recommendations / travel recommendation detail
The display of the graphical driving recommendations is in the extra windowManoeuvre as well as the display of the instrument cluster.
In the extra window Manoeuvre the following driving recommendations areshown » Fig. 61.
Street name / street number of the current vehicle positionDriving recommendations with street names / road numbers, with theroute and the travel time to the manoeuvre placeDetails of driving recommendation (is displayed near the manoeuvre)Lane recommendation
In the split screen Manoeuvre the device also announces TMC traffic obstruc-tions and on motorways, car parks, petrol stations or restaurants.
Speed limitsWith activated function → Advanced settings → Note: national border crossed dis-play the country-specific speed limits when crossing international borders.
These speed limits can be displayed by tapping the function surface → Topspeed in the main menu navigation is displayed.
Nav. announcements
The device gives out navigation announcements.
The navigation announcements are generated by the device. The flawlessclarity of the message (e.g., road or city name) cannot always be guaranteed.
The last navigation announcement is repeated by pressing the control switch Is repeated.
A
B
C
D
The timing of the navigation message is dependent on the road being usedand travel speed (e.g. on motorways the first announcement will sound forabout 2000 m / 6000 ft before the manoeuvre).
The type of navigation announcements can be set: → Nav. announcements.
Most common routes
The unit automatically stores up to three of the most commonly travelledroutes.
A route guidance to one of the stored routes can be started as long as noguidance or route guidance takes place to one of these routes.
› to route selection in the additional window, tap the functional surface Freq.Routes Tap→ show in map.
› Select the desired route.
Then a selected rout is calculated and the route guidance starts.
The menu display in the additional window can be turned on/off in the mainmenu navigation by tapping the functional surface → Route options → Freq.routes .
The stored most frequent routes can be deleted in the main menu navigationby tapping the functional surface → Manage memory → Delete User Data → Mostroutesis deleted.
Finish route guidance
The route guidance can be finished in one of the following ways.
› The final destination is reached.› In the main menu Navigation by tapping the functional surface → Stop guid-
ance.› By turning off the ignition for longer than 120 minutes.
Abort route guidance
If the ignition is switched off and on again, then the route guidance is contin-ued depending on the stop time in one of the following ways.
56 Navigation
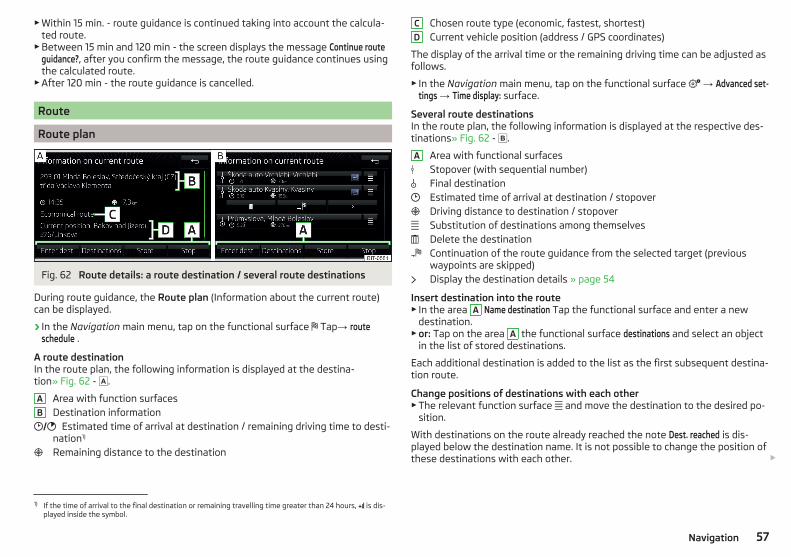
▶Within 15 min. - route guidance is continued taking into account the calcula-ted route.
▶Between 15 min and 120 min - the screen displays the message Continue routeguidance?, after you confirm the message, the route guidance continues usingthe calculated route.
▶After 120 min - the route guidance is cancelled.
Route
Route plan
Fig. 62 Route details: a route destination / several route destinations
During route guidance, the Route plan (Information about the current route)can be displayed.
› In the Navigation main menu, tap on the functional surface Tap→ routeschedule .
A route destinationIn the route plan, the following information is displayed at the destina-tion» Fig. 62 - .
Area with function surfacesDestination information
Estimated time of arrival at destination / remaining driving time to desti-nation1)
Remaining distance to the destination
A
B
Chosen route type (economic, fastest, shortest)Current vehicle position (address / GPS coordinates)
The display of the arrival time or the remaining driving time can be adjusted asfollows.
▶ In the Navigation main menu, tap on the functional surface → Advanced set-tings → Time display: surface.
Several route destinationsIn the route plan, the following information is displayed at the respective des-tinations» Fig. 62 - .
Area with functional surfacesStopover (with sequential number)Final destinationEstimated time of arrival at destination / stopoverDriving distance to destination / stopoverSubstitution of destinations among themselvesDelete the destinationContinuation of the route guidance from the selected target (previouswaypoints are skipped)Display the destination details » page 54
Insert destination into the route▶ In the area A Name destination Tap the functional surface and enter a new
destination.▶or: Tap on the area A the functional surface destinations and select an object
in the list of stored destinations.
Each additional destination is added to the list as the first subsequent destina-tion route.
Change positions of destinations with each other▶The relevant function surface and move the destination to the desired po-
sition.
With destinations on the route already reached the note Dest. reached is dis-played below the destination name. It is not possible to change the position ofthese destinations with each other.
C
D
A
1) If the time of arrival to the final destination or remaining travelling time greater than 24 hours, is dis-played inside the symbol.
57Navigation
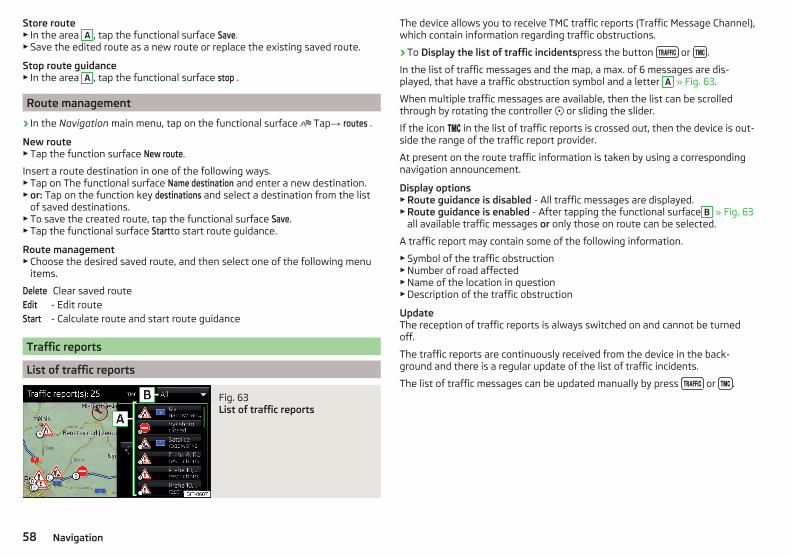
Store route▶ In the area A , tap the functional surface Save.▶Save the edited route as a new route or replace the existing saved route.
Stop route guidance▶ In the area A , tap the functional surface stop .
Route management
› In the Navigation main menu, tap on the functional surface Tap→ routes .
New route▶Tap the function surface New route.
Insert a route destination in one of the following ways.▶Tap on The functional surface Name destination and enter a new destination.▶or: Tap on the function key destinations and select a destination from the list
of saved destinations.▶To save the created route, tap the functional surface Save.▶Tap the functional surface Startto start route guidance.
Route management▶Choose the desired saved route, and then select one of the following menu
items.
Clear saved route- Edit route- Calculate route and start route guidance
Traffic reports
List of traffic reports
Fig. 63 List of traffic reports
DeleteEditStart
The device allows you to receive TMC traffic reports (Traffic Message Channel),which contain information regarding traffic obstructions.
› To Display the list of traffic incidentspress the button or .
In the list of traffic messages and the map, a max. of 6 messages are dis-played, that have a traffic obstruction symbol and a letter A » Fig. 63.
When multiple traffic messages are available, then the list can be scrolledthrough by rotating the controller or sliding the slider.
If the icon in the list of traffic reports is crossed out, then the device is out-side the range of the traffic report provider.
At present on the route traffic information is taken by using a correspondingnavigation announcement.
Display options▶Route guidance is disabled - All traffic messages are displayed.▶Route guidance is enabled - After tapping the functional surface B » Fig. 63
all available traffic messages or only those on route can be selected.
A traffic report may contain some of the following information.
▶Symbol of the traffic obstruction▶Number of road affected▶Name of the location in question▶Description of the traffic obstruction
UpdateThe reception of traffic reports is always switched on and cannot be turnedoff.
The traffic reports are continuously received from the device in the back-ground and there is a regular update of the list of traffic incidents.
The list of traffic messages can be updated manually by press or .
58 Navigation
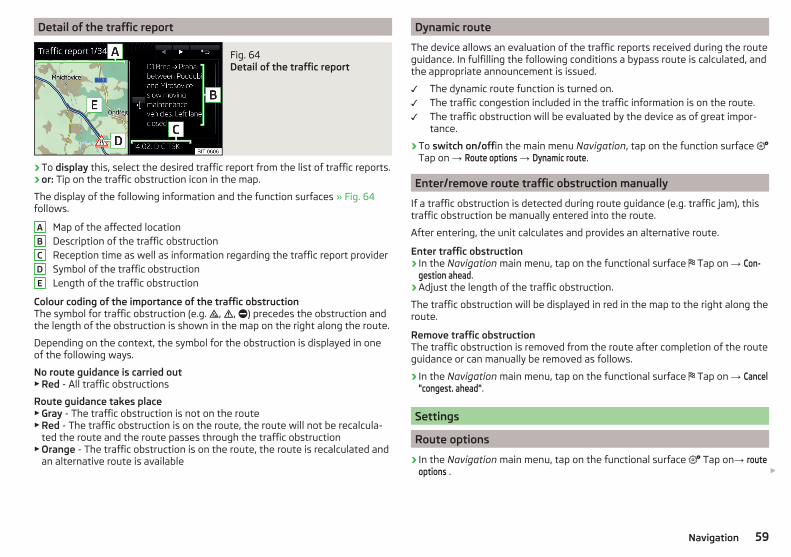
Detail of the traffic report
Fig. 64 Detail of the traffic report
› To display this, select the desired traffic report from the list of traffic reports.› or: Tip on the traffic obstruction icon in the map.
The display of the following information and the function surfaces » Fig. 64follows.
Map of the affected locationDescription of the traffic obstructionReception time as well as information regarding the traffic report providerSymbol of the traffic obstructionLength of the traffic obstruction
Colour coding of the importance of the traffic obstructionThe symbol for traffic obstruction (e.g. , , ) precedes the obstruction andthe length of the obstruction is shown in the map on the right along the route.
Depending on the context, the symbol for the obstruction is displayed in oneof the following ways.
No route guidance is carried out▶Red - All traffic obstructions
Route guidance takes place▶Gray - The traffic obstruction is not on the route▶Red - The traffic obstruction is on the route, the route will not be recalcula-
ted the route and the route passes through the traffic obstruction▶Orange - The traffic obstruction is on the route, the route is recalculated and
an alternative route is available
A
B
C
D
E
Dynamic route
The device allows an evaluation of the traffic reports received during the routeguidance. In fulfilling the following conditions a bypass route is calculated, andthe appropriate announcement is issued.
The dynamic route function is turned on.The traffic congestion included in the traffic information is on the route.The traffic obstruction will be evaluated by the device as of great impor-tance.
› To switch on/offin the main menu Navigation, tap on the function surface Tap on → Route options → Dynamic route.
Enter/remove route traffic obstruction manually
If a traffic obstruction is detected during route guidance (e.g. traffic jam), thistraffic obstruction be manually entered into the route.
After entering, the unit calculates and provides an alternative route.
Enter traffic obstruction› In the Navigation main menu, tap on the functional surface Tap on → Con-
gestion ahead.› Adjust the length of the traffic obstruction.
The traffic obstruction will be displayed in red in the map to the right along theroute.
Remove traffic obstructionThe traffic obstruction is removed from the route after completion of the routeguidance or can manually be removed as follows.
› In the Navigation main menu, tap on the functional surface Tap on → Cancel"congest. ahead".
Settings
Route options
› In the Navigation main menu, tap on the functional surface Tap on→ routeoptions .
59Navigation
■ Suggest 3 alternative routes - Switch on/off the menu for alternative routes (eco-nomical, fast, short)
■ Route: - Setting the preferred route■ Most frequent routes - Show/hide the menu of the most frequent routes in the
split screen■ Dynamic route - Switch on/off dynamic route recalculation due to TMC traffic
reports■ Avoid motorway Switch on/off the non-use of motorways in the route calcu-
lation■ Avoid ferries and motorail trains - Switch on/off the non-use of ferries and mo-
torail trains in the route calculation■ Avoid toll roads - Switch on/off use of toll roads for the route calculation■ Avoid tunnels - Switch on/off use of tunnels for the route calculation■ Avoid routes requiring toll stickers - Switch use of routes requiring toll stickers
on/off for route calculation■ Available toll stickers - Selection of countries for which a valid toll sticker is re-
quired (routes requiring toll stickers are used for route calculation)■ Consider trailer - Turn on / off the setting to take a trailer into account for
route calculation » page 55
Map
› In the Navigation main menu, tap on the functional surface Tap on→ map .
■ Show road signs - Switch on/off the display of traffic signs■ Lane guidance - Display of lane guidance on/off■ Show favourites - Switch on/off the display of favourites■ Show POIs - Switch on/off the display of POIs
■ Select Interest categories - Selection of the displayed category POIs■ Show brands for POIs - Switch on/off the company logos available for the POIs
shown
Manage memory
› In the Navigation main menu, tap on the functional surface Tap on → Man-age memory.
■ Sort Contacts: - Setting the configuration of the phone book■ Surname - Sorting by the contact surname■ By first name - Sorting by the contact first name
■ Define home address - Enter the home address■ Delete My POIs - Deleting own POI categories (Personal POI)
■ Update My POIs (SD / USB) - Import / update your own POI categories (PersonalPOI)
■ Import objectives (SD / USB) - Import destinations in vCard format■ Delete User Data - Delete user data (by pressing the function surfaceDelete and
confirm the deletion)■ Last destinations - Delete the last destinations■ Dest. memory - Delete the stored destinations■ Routes - Delete saved routes■ My points of interest (Personal POI) - Delete the custom POIs■ Entered cities - Delete the history of places already entered via the address■ Home address - Delete the stored home address■ Flagged destination - Delete the flagged destination■ Most frequent routes - Deletion of the most travelled routes
Navigation announcements
› In the Navigation main menu, tap on the functional surface Tap→ naviga-tion announcements .
■ Volume - Volume control of the navigation announcements■ Entertainment fading (nav. announce.) - Setting the fading of the audio volume (e.g.
radio volume.) with navigation announcements■ Nav. announcements: Nav. announcements: - Sets the type of navigation an-
nouncements■ Comprehensive - All navigation announcements■ Brief - Short navigation announcements■ Only in the event of issues - Only navigation announcements when a route is
changed■ No navigation sound during call - Enable / disable the playback of navigation
prompts during a telephone conversation
Fuel options
› In the Navigation main menu, tap on the functional surface Tap→ tank op-tions .
■ Select preferred fuel station - Select your preferred fuel station brand (the selec-ted station brand will be displayed in the first three positions of the list)
■ Tank warning -Turn on- / Off the display of a warning message with the optionto visit the nearest petrol station when the fuel level reaches the reservearea
60 Navigation
Advanced settings
› In the Navigation main menu, tap on the functional surface → Advanced set-tings.
■ Time display: - Select the time display in the status line■ - Estimated arrival time at destination■ - Travelling time - Estimated travelling time to the destination
■ Status line: - Selection of the target type, for which the status line, the routeand travel time are displayed (Here it is also determined which destinationtype after selecting → is displayed in the map)■ - Route destination■ - Next waypoint
■ Note: national border crossed - Switching on/off the display for information on na-tional speed limits when crossing the national border
■ Demo mode - Switch on/off guidance in demo mode■ Define the starting point demo mode - Specifying the start point of the route guid-
ance in the demo mode by entering the address or the current vehicle posi-tion
61Navigation
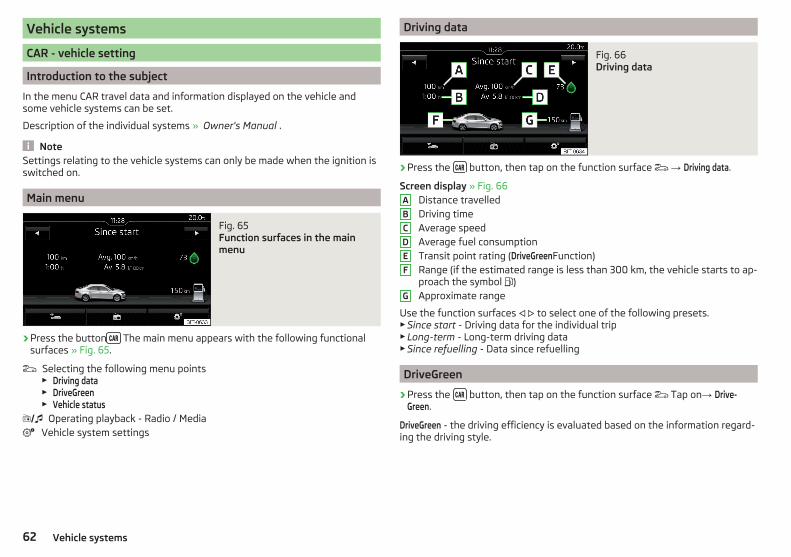
Vehicle systems
CAR - vehicle setting
Introduction to the subject
In the menu CAR travel data and information displayed on the vehicle andsome vehicle systems can be set.
Description of the individual systems » Owner's Manual .
NoteSettings relating to the vehicle systems can only be made when the ignition isswitched on.
Main menu
Fig. 65 Function surfaces in the mainmenu
› Press the button The main menu appears with the following functionalsurfaces » Fig. 65.
Selecting the following menu points▶ Driving data▶ DriveGreen▶ Vehicle status
Operating playback - Radio / MediaVehicle system settings
Driving data
Fig. 66 Driving data
› Press the button, then tap on the function surface → Driving data.
Screen display » Fig. 66Distance travelledDriving timeAverage speedAverage fuel consumptionTransit point rating (DriveGreenFunction)Range (if the estimated range is less than 300 km, the vehicle starts to ap-proach the symbol )Approximate range
Use the function surfaces to select one of the following presets.▶Since start - Driving data for the individual trip▶Long-term - Long-term driving data▶Since refuelling - Data since refuelling
DriveGreen
› Press the button, then tap on the function surface Tap on→ Drive-Green.
DriveGreen - the driving efficiency is evaluated based on the information regard-ing the driving style.
A
B
C
D
E
F
G
62 Vehicle systems
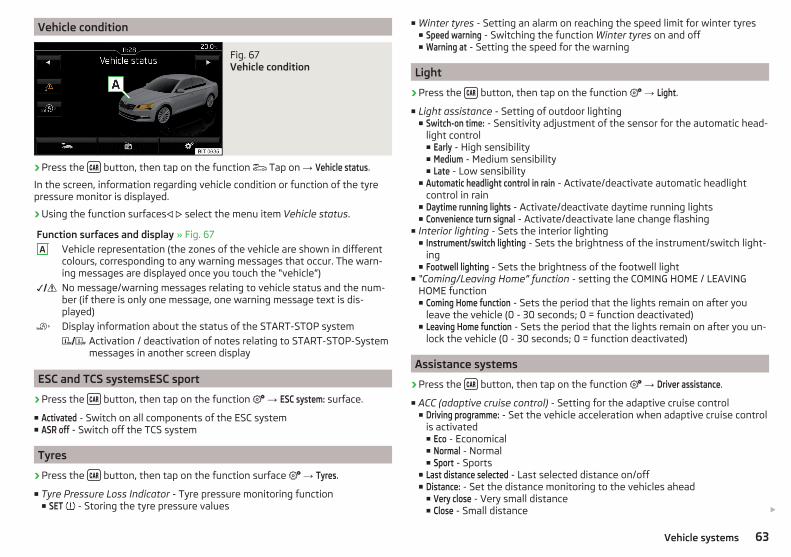
Vehicle condition
Fig. 67 Vehicle condition
› Press the button, then tap on the function Tap on → Vehicle status.
In the screen, information regarding vehicle condition or function of the tyrepressure monitor is displayed.
› Using the function surfaces select the menu item Vehicle status.
Function surfaces and display » Fig. 67
A Vehicle representation (the zones of the vehicle are shown in differentcolours, corresponding to any warning messages that occur. The warn-ing messages are displayed once you touch the “vehicle”)
No message/warning messages relating to vehicle status and the num-ber (if there is only one message, one warning message text is dis-played)
Display information about the status of the START-STOP system
Activation / deactivation of notes relating to START-STOP-Systemmessages in another screen display
ESC and TCS systemsESC sport
› Press the button, then tap on the function → ESC system: surface.
■ Activated - Switch on all components of the ESC system■ ASR off - Switch off the TCS system
Tyres
› Press the button, then tap on the function surface → Tyres.
■ Tyre Pressure Loss Indicator - Tyre pressure monitoring function■ SET - Storing the tyre pressure values
■ Winter tyres - Setting an alarm on reaching the speed limit for winter tyres■ Speed warning - Switching the function Winter tyres on and off■ Warning at - Setting the speed for the warning
Light
› Press the button, then tap on the function → Light.
■ Light assistance - Setting of outdoor lighting■ Switch-on time: - Sensitivity adjustment of the sensor for the automatic head-
light control■ Early - High sensibility■ Medium - Medium sensibility■ Late - Low sensibility
■ Automatic headlight control in rain - Activate/deactivate automatic headlightcontrol in rain
■ Daytime running lights - Activate/deactivate daytime running lights■ Convenience turn signal - Activate/deactivate lane change flashing
■ Interior lighting - Sets the interior lighting■ Instrument/switch lighting - Sets the brightness of the instrument/switch light-
ing■ Footwell lighting - Sets the brightness of the footwell light
■ “Coming/Leaving Home” function - setting the COMING HOME / LEAVINGHOME function■ Coming Home function - Sets the period that the lights remain on after you
leave the vehicle (0 - 30 seconds; 0 = function deactivated)■ Leaving Home function - Sets the period that the lights remain on after you un-
lock the vehicle (0 - 30 seconds; 0 = function deactivated)
Assistance systems
› Press the button, then tap on the function → Driver assistance.
■ ACC (adaptive cruise control) - Setting for the adaptive cruise control■ Driving programme: - Set the vehicle acceleration when adaptive cruise control
is activated■ Eco - Economical■ Normal - Normal■ Sport - Sports
■ Last distance selected - Last selected distance on/off■ Distance: - Set the distance monitoring to the vehicles ahead
■ Very close - Very small distance■ Close - Small distance
63Vehicle systems
■ Medium - Medium distance■ Far - Large distance■ Very far - Very large distance
■ Front Assist (ambient traffic monitor. sys.) - Set the assistant for distancemonitoring to the vehicles ahead■ Active - Activate/deactivate the assistant■ Advance warning - Activates/deactivates advance warning function■ Display distance warning - Activate/deactivate distance warnings
■ Driver Alert System - Activate/deactivate the driver alert system
Parking and manoeuvring
› Press the button, then tap on the function → Parking and manoeuvring.
■ ParkPilot - Settings for the parking aid■ Activate automatically - Activate/deactivate the compact parking aid display
(when driving forward)■ Front volume - Adjust the volume of the beeps for obstacle detection in front■ Front tone setting - Setting the pitch of the beeps for obstacle detection in
front■ Rear volume - Set the volume level of the beeps for the rear obstacle detec-
tion■ Rear tone setting - Setting the pitch of the beeps for the rear obstacle detec-
tion■ Entertainment fading (parking) - Lowers the audio volume (e.g. radio volume)
with activated parking aid
Windshield wipers
› Press the button, then tap on the function Tap→ Windscreen wipers .
■ Wipers - Adjusts the windscreen wipers■ Automatic wiping in rain - Activate/deactivate automatic windscreen wiping in
rain■ Automatic rear wiper - Activate/deactivate automatic rear window wiping
Open and close
› Press the button, then tap on the function → Opening and closing.
■ Central locking - Settings for opening and closing of doors■ Door unlocking: - Set the door unlocking feature
■ All doors - All doors■ Single door - Driver's or passenger's door (when unlocking via the sensor in
the passenger door handle)■ Vehicle side - Doors on the driver or passenger side (when unlocking via the
sensor in the passenger door handle)■ Automatic locking - Activate/deactivate automatic locking when starting off
Instrument cluster (multifunction display)
› Press the button, then tap on the functional surface → Instrument cluster.
In this menu it is possible to hide/show the appearance of the menu items inthe instrument cluster multifunction display and reset the trip data.
■ Current consumption - Display of current fuel consumption on/off■ Average consumption - Display of average fuel consumption on/off■ Travelling time - Display of travelling time on/off■ Distance travelled - Display of distance travelled on/off■ Average speed - Display of average speed on/off■ Digital speed display - Display of current speed on/off■ Speed warning - Winter tyres warning on/off■ Oil temperature - Oil temperature on/off■ Reset "Since start" driving data - Reset the single-trip memory in the device
screen and in the display of the instrument cluster■ Reset "Long-term" driving data - Reset the long-term memory in the device screen
and in the display of the instrument cluster
Time, date and unit setting
› Press the button, then tap the function surface Time and date.› Press the button, then tap the function surface Units.
Service
› Press the button, then tap on the function → Service.
■ Vehicle identification number: - Display of the vehicle identification number(VIN)
■ Inspection in … or … days - number of km/days until the next inspection■ Oil change service in ... or ... days - number of km/days until the next oil
change
64 Vehicle systems
Reset to factory settings
› Press the button, then tap on the function surface → Factory settings.
In this menu you have the possibility to reset the menu items in the settings ofthe vehicle systems to factory settings.
■ Reset all settings and data■ All settings - Restoration of the settings all menu items
■ Reset individual settings/data■ Light - Restoration of the Light menus■ Driver assistance - Restoration of the Driver assistance menus■ Parking and manoeuvring - Restoration of the Parking and manoeuvring menu items■ Interior lighting - Restoration of the Interior lighting menu■ Mirrors and wipers - Restoration of the Mirrors and wipers menu■ Opening and closing - Restoration of the Opening and closing menu■ Instrument cluster - Restoration of the Instrument cluster menu
If one of the above menu items is selected, the system will ask you whetheryou really want to restore the settings.
■ Cancel - Return to higher-level menu■ Reset - Restore the settings
65Vehicle systems
Index
A
A2DP/AVRCP 33Abort route guidance 56Adaptive Cruise Control 63Additional keyboard languages 17Additional windows
Audio 47Compass 47Manoeuvre 47, 56Map 47Menus 47Most frequent routes 47Satellite data 47Turn on/off 47Waypoint tour 47
AimEnter destination using the address 48entered in map 49Search 47
Alphanumeric with keyboard 12Alternative routes 59Android Auto™ 42
Connection establishment 42Disconnection 42Home Page 42
Apple CarPlay™ 43Connection establishment 43disconnection 43Main menu 43
Assistance systems 63AT THE 19Audio
Media 22Radio 19
Audio source 24Automatic driving lights when raining 63Automatic locking 64
Automatic rear window wipe 64Automatic windscreen wiping with rain 64AUX 25
Settings 24
B
BluetoothA2DP / AVRCP 17Name 17on / off 17Paired external devices 17set to 17, 32Set to 17Update 10, 18Visibility 17
Bluetooth Player 25Bluetooth profile 33Breakdown service 34Broadcasting 19
See main menu 19Button CAR 62
C
Call listCall list 36
CAR 62Central locking 64Clear calls 32Close 64Comfort flashing 63COMING HOME 63Compatible sources
Pictures 28Conditions for coupling 32Conference call 37Configuration wizard 15Custom destination 51
D
DAB 19Additional information 19Radio Text and image presentation 19Settings 21
DAB slideshow 19Data connection 40Data transfer of external devices 13Date 16Daytime running lights 63Default settings 17Delete destination 54Demo mode 55, 61Destination
Custom destination 51Favourite 50, 54final destinations 49Flagged destination 50Home address 50Image with GPS 51Memory 54Saved destination 50Telephone contact 50vCard 50
Destination details 54Destination management
Destination details 54Favourite 54Storage 54
Destination memory 50Detail of the traffic report 59device
Restart 10Device
connect to the telephone 32Software update 10
Device Description - Amundsen 7, 8Device Hotspot 39Device language 16
66 Index
Device menuCAR 62Media Command 29Media (Audio) 22Navigation 46Radio 19Sound 16
Device MenuPictures 27SmartLink 41Telephone 31
Device operation 11Device screen 11
Device operation using an application in the ex-ternal device 13
device screenkeyboard 12
Device screen 16Areas 11Important information 9Maintenance 9Operation 11
Disclaimer 6Diverting calls 32Door locking 64Doors - Operation 64Door unlocking 64DriveGreen 62Driver assistance 63Driving data
Display 62Power on/off 64
Driving lights when raining 63Dynamic route
switch on / off 59
E
Edit route 57Elevation 46
Emergency call 34Enter destination
address 48Destination on the map 49
Equalizer 16ESC system 63external device data transfer 17External devices 6External module
SD card 24
F
Factory settings 65Favourite 50, 54file formats
media 26Requirements and Restrictions 26
File formatsPictures 28
Finish route guidance 56Flagged destination 50FM 19
Settings 21Front Assist 63Fuel options 60Function surfaces 11
G
Gas station 49GPS 46Graphical driving recommendations 56
H
Home address 50, 60Home menu
MirrorLink® 44Home Page
Android Auto™ 42
I
ImagesDisplay 28Main menu 27safe removal of the data source 17Select Image Source 27service 27Settings 28
Image viewer 27Important notes 6Import contacts 32Import destinations 51Import my destinations 51Information service 34Input screen with keyboard 12Inspection 64Instrument cluster 64Instrument lighting 63Intermediate target 54Introductory information 6
K
keyboard 12
L
L-band 22Lane recommendation 56Language characters 17Last destinations 49Latitude 46LEAVING HOME 63Light 63Light assistance 63Light sensor - Switching on the light 63List
of available stations 20of telephone contacts 34With folder / track list 23
67Index
List of paired external devices 33List of traffic reports 58Longitude 46
M
main menuApple CarPlay™ 43
Main menuCAR 62Images 27Media 22Media Command 29Navigation 46Radio 19SmartLink 41SMS 37
Manage Favourites 32Manage memory 60Managing paired devices 33Manoeuvre
Graphical driving recommendations 56Nav. announcements 56
Manoeuvring 64Map
automatic scale 53Display 52Display of traffic signs 60Display options 53Fast Map 53Lane recommendation 60Main menu 52Manual scale 53Map alignment 54Operation 52POI display 60Road sign 54Show POI 52|Alignment 53
mediaCompatible sources 26file formats 26Requirements and Restrictions 26
Media 22Audio source 24AUX 25Bluetooth Audio 25Browser 23Foreword 22List 23Main menu 22Multimedia database 24Operation 22safe removal of the data source 17SD card 24Select audio source 23Settings 24USB 25Use play 23Voice control 13WLAN 26
Media Command 29Control 30Main menu 29supported formats 30
MenuSet up 15
Menu CAR 62MirrorLink® 43
Connection establishment 44Disconnection 44function issues 45Main menu 44Operation 44
Mobile phone 6Most common routes 56Multi-function display 64Multi-media
AUX 25
MultimediaUSB 25
Multimedia database 24Mute 11My destinations 51My POIs 51
N
navigationDestination on the map 49Map orientation 53Route calculation 55
Navigation 46Abort route guidance 56Additional windows 47Advanced settings 61Alternative routes 59Contacts 50Demo mode 55, 61Destination address 48Destination details 54destination memory 50Destination representation 53Destination Search 47Dynamic route 59Edit route 57Favourites 50Final destinations 49Finish route guidance 56Foreword 46Fuel options 60GPS 46Graphical driving recommendations 56Home address 50Image with GPS 51Import destination 51Imported destinations 60Intermediate target 54Main menu 46Manage memory 60
68 Index
Map 60Map alignment 54Map scale 53Most common routes 56My destinations 51Navigation announcements 60Navigation data 46Nav. announcements 56Options for map display 53Preferred type of route 59Route 54Route display 53Route guidance 54Route information 57Route memory 58Route options 59Route plan 57Settings 59Status line 61Traffic jam ahead 59Traffic reports (TMC) 58Trailer towing 55Voice control 13
Navigation announcements 60Navigation data 46Nav. announcements 56Network
set to 32New route 58
O
Oil change 64Open 64Operation
Media 22MirrorLink® 44Radio 19Telephone 31
Own POI categories 51
P
Pairing process 33Park Assist 64Parking 64Parking spot 49ParkPilot 64Personal POIs 51Petrol station logo 60Phone
Additional phone 31Adjust text messages 32Clear calls 32Connection types 31Diverting calls 32Import contacts 32Main phone 31Manage Favourites 32Premium 32Settings call 32set to 32User profile 32Voice control 13
Phone connection types 31Pictures 27
Compatible sources 28File formats 28Requirements and restrictions 28Supported file formats 28
Pin codeset to 32
PlayMedia 23
POI 51Choose in the map 52Import 51My POIs 51Speed dial 49Tap in the map 52
Preferred contacts 35
Principles of device operation 11
R
radioSelect station 19
Radio 19Broadcasting 19DAB settings 21FM - settings 21L-band 22List of available stations 20Main menu 19Operation 19Preface 19Radio station Logo 20Save station 20Scan 19Search stations 19set to 21Station buttons 20Traffic programme (TP) 21Voice control 13
Radio stationLogo 20
Radio station logos 20Update 18
Radio stationsChoose 19Save station 20Search stations 19Select station 19Station buttons 20
Rear window - automatic wiping 64Reset - vehicle settings 65Restart the device 10restaurant 49Road sign 54
69Index
Route 54New route 58Route import 58Route memory 58
Route calculation 55Trailer towing 55
Route import 58Route information 57Route memory 58Route options 59Route plan 57Route schedule 57
S
Safe removal of the data source 17Save station 20Screen
See device screen 9Screen display 11SD card 24Search for car park 49Search for petrol station 49Search for restaurant 49Select broadcasting
See main menu 19Select Image Source
Images 27Select source
Media 23Select station
See main menu 19service
Images 27Service 64Settings
Additional keyboard languages 17AUX 24Bluetooth 17, 32Codecs 24
Configuration Wizard 15DAB 21Device 15Device language 16Device screen 16Equalizer 16external device data transfer 17FM 21Images 28Manage favourites 35Media 24Navigation 59Phone 32Pin code 32Radio 21Reset to factory settings 17SmartLink 42Software update 10Sound 16Sound system 16Subwoofer 16Surround 16System information 10, 18Text messages 32Time and date 16Units 17Update software 18User profile 35Vehicle 62Voice control 17Volume 11WLAN 18
Settings Call 32Set up 15Show POIs on the map 52SmartLink 41
Android Auto™ 42Apple CarPlay™ 43Main menu 41MirrorLink® 43set 42
SMS 37new 38Operation 37received 38
Software update 10Software Update 18Sound 16Sound system 16Speed limitations 56Speedlimit for winter tyres 63SSID 18START-STOP 63Station
See main menu 19Station logos
Update 10Status line 11, 52
Navigation 61Telephone 31
Stored destinationsDestination memory 50Final destinations 49
Store destination 54Subwoofer 16Supported sources
media 26Surround 16System information 10, 18
T
TCS 63telephone
conditions for coupling 32Telephone 31
Bluetooth profile 33Breakdown service 34Call list 36Conference call 37connect to the device 32
70 Index
Dialling the telephone number 34Emergency call 34Enter telephone number 34Functions 34Information service 34Main menu 31Operation 31pair 32Pairing process 33Preferred contacts 35Telephone 31Telephone book 34Telephone call 36Text messages (SMS) 37Voicemail 34
Telephone book 34Telephone call 36Telephone functions 34Telephone number 34Text messages 37
new 38received 38
Time 16Tiredness detection 63TMC
Detail of the traffic report 59dynamic route 59List of traffic reports 58Requirements 58
TMC (Traffic reports) 58Tone dialling 36Touch screen 9Traffic
Detail of the traffic report 59dynamic route 59List of traffic reports 58Requirements 58
Traffic jam ahead 59Traffic obstruction 59Traffic programme (TP) 21
Traffic reports (TMC)Detail of the traffic report 59List of traffic reports 58Requirements 58
Trailer towingnavigation 55
Turning off the device 10Turning off the power 10Turning on the power 10Tyre pressure values 63Tyres 63
U
Unit menus 10Unit overview 7Units 17USB 25User profile 32
V
vCard 50, 51Vehicle - settings 62Vehicle condition 63Vehicle identification number 64Vehicle systems 62VIN number 64Voice control 13
Commands 15Function requirements 14Help 15not recognizing a voice command 14on / off 13Operation principle 14Settings 17Stop/restore input/ 15Voice command input correction 15
Voicemail 34Volume 11Volume setting 11
W
WaiterVoice control 14
Warning messages 63Windscreen
Automatic wiping with rain 64Windshield wipers 64Wireless Internet Hotspot
set to 18WLAN 26, 39
Client 40Connect 40Device Hotspot 39Search 40WLAN on / off 40WPS 18
WLAN clientset to 18
WLAN hotspot 39WPS 18
71Index

Reprinting, duplicating, translating and any other use, either in whole or inpart, is not permitted without the written consent of ŠKODA AUTO a.s.
ŠKODA AUTO a.s. expressly reserves all rights relating to copyright laws.
Subject to change.
Issued by: ŠKODA AUTO a.s.
© ŠKODA AUTO a.s. 2016


www.skoda-auto.com
Amundsen and Bolero: Fabia, Rapid, Rapid Spaceback, Yetianglicky 11.2016S00.5614.41.203V0012720ED
3V0012720ED