Embed Size (px)
Citation preview

Owner’s ManualAutoView™ Motorized Shades

Please be sure to read and remove the securing tape and label before operating your motorized shade.
About Your Motorized ShadeMotorized shades offer a convenient solution to everyday challenges. They provide instant privacy, glare reduction, and eliminate the need to manually adjust shades. Motorized shades also eliminate dangerous cords and create a comfortable and energy efficient environment. Your shades feature Z-Wave Radio technology, Z-Wave is an advanced radio platform which operates up to 65 ft and eliminates the need to aim the remote at the shade.
About your Motorized Shade .............................................................................................................................................. 2Basic Shade Control ............................................................................................................................................................ 3Control Features .................................................................................................................................................................. 3Home Button - Single-Channel Remote .............................................................................................................................. 3LED (Light) Locations and Battery Status ........................................................................................................................... 4Program Buttons ................................................................................................................................................................. 5Adusting your Shade’s Default Lower Limit (optional) ........................................................................................................ 6Adjusting your Shade’s Default Upper Limit (optional) ........................................................................................................ 6Adjusting your Shade’s Home Position (optional) ............................................................................................................... 7Adjusting the Home Position on a Group of Shades (optional) ............................................................................................ 8Reversing Motor Direction .................................................................................................................................................... 9Adding Remotes and Creating Groups .............................................................................................................................. 10Adding a New Remote When the Only Remote Controlling the Shade is Lost .................................................................. 10Adding a New Remote as a Group Control ........................................................................................................................ 11Adding Secondary Remotes to a Group of Shades for Individual Control Using a Single-Channel Remote as Primary ... 12Reasigning a Two-Button Remote as a Group Control ...................................................................................................... 13Adding Secondary Remotes to a Group of Shades for Individual control Using a Two-Button Remote as Primary ......... 14Network Reset .................................................................................................................................................................... 15Factory Limits Reset ........................................................................................................................................................... 15Local Reset ......................................................................................................................................................................... 15Z-Wave Information ............................................................................................................................................................ 16FCC Class B Notice ........................................................................................................................................................... 16
Table of Contents
Remove securing tape and position motor RF antenna wire and power cable away from roller tube (see A) or outside of headrail (see B) depending upon product type.
Avoid crimping or damaging the antenna and power lead during installation process.
NOTE: RF antenna should be visible (exposed outside headrail) for greatest RF range. In some cases, RF antenna wire may need to be repositioned for optimal performance.
A. Solar, Roller, Artisian Fabric, Woven Wood
RF Antenna wire
Power cable/
B. Cellular, Pleated, Classic Roman
Power cable
RF Antenna wire
ATTENTION! IMPORTANT INSTALLATION INFORMATION¡ATENCIÓN! INFORMACIÓN IMPORTANTE SOBRE LA INSTALACIÓN
2
Basic Shade Control
Control Features
Home Button − Single-Channel Remote
Upon first power up, you will see a green light illuminate on the headrail or motor end of the shade. This will happen whenever power is first applied or restored after an outage. Press the UP or DOWN button to operate the shade.Note: you can press and release the opposite directional button to stop the shade while it is in motion.
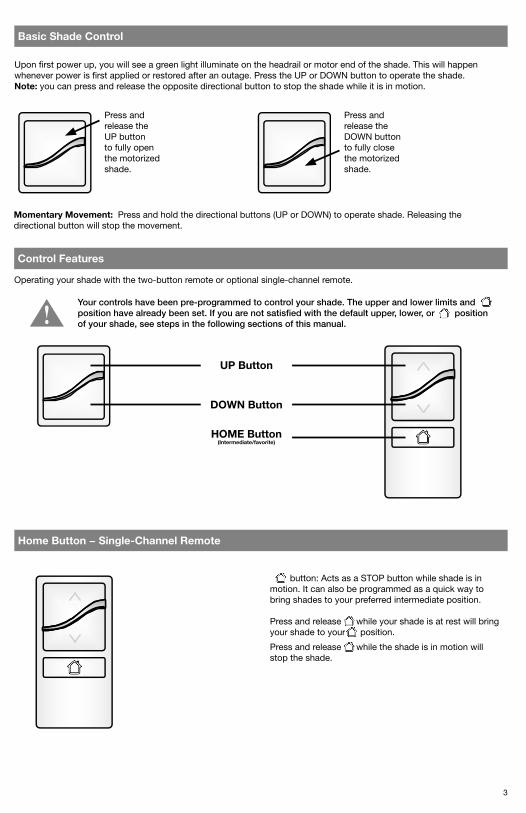
Operating your shade with the two-button remote or optional single-channel remote.
button: Acts as a STOP button while shade is in motion. It can also be programmed as a quick way to bring shades to your preferred intermediate position.
Press and release while your shade is at rest will bring your shade to your position.
Press and release while the shade is in motion will stop the shade.
Press and release the UP button to fully open the motorized shade.
Press and release the DOWN button to fully close the motorized shade.
Your controls have been pre-programmed to control your shade. The upper and lower limits and position have already been set. If you are not satisfied with the default upper, lower, or position of your shade, see steps in the following sections of this manual.
UP Button
DOWN Button
HOME Button(Intermediate/favorite)
3
Momentary Movement: Press and hold the directional buttons (UP or DOWN) to operate shade. Releasing the directional button will stop the movement.
LED (Light) Locations and Battery Status
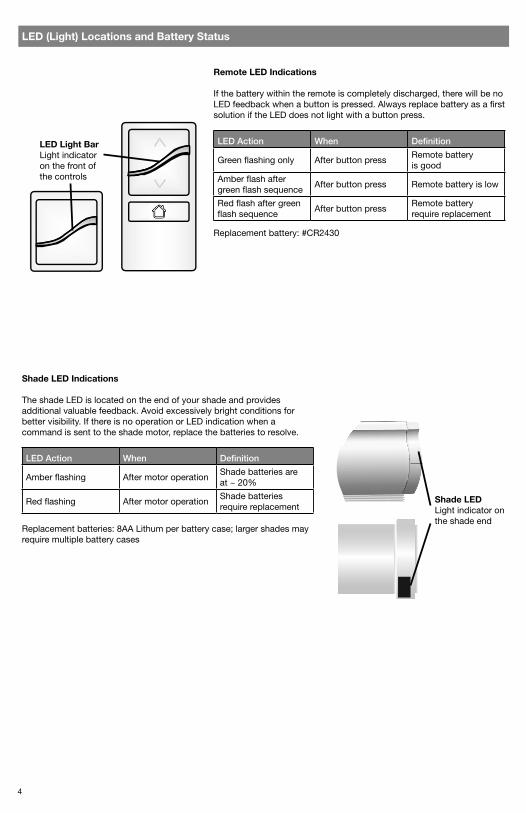
LED Light BarLight indicator on the front of the controls
Shade LEDLight indicator on the shade end
Remote LED Indications
If the battery within the remote is completely discharged, there will be no LED feedback when a button is pressed. Always replace battery as a first solution if the LED does not light with a button press.
Replacement battery: #CR2430
Shade LED Indications
The shade LED is located on the end of your shade and provides additional valuable feedback. Avoid excessively bright conditions for better visibility. If there is no operation or LED indication when a command is sent to the shade motor, replace the batteries to resolve.
Replacement batteries: 8AA Lithum per battery case; larger shades may require multiple battery cases
LED Action When Definition
Green flashing only After button pressRemote battery is good
Amber flash after green flash sequence
After button press Remote battery is low
Red flash after green flash sequence
After button pressRemote battery require replacement
LED Action When Definition
Amber flashing After motor operationShade batteries are at ~ 20%
Red flashing After motor operationShade batteries require replacement
4
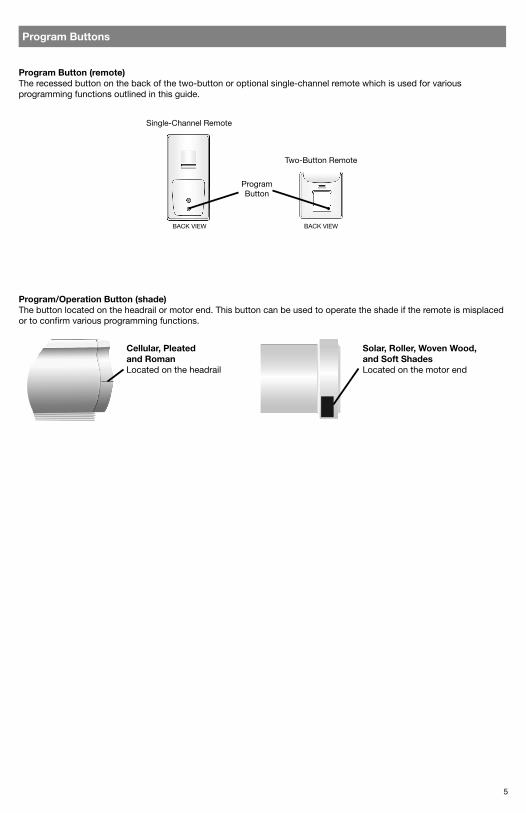
Program Buttons
Cellular, Pleated and RomanLocated on the headrail
Single-Channel Remote
BACK VIEW BACK VIEW
Two-Button Remote
Program Button
Solar, Roller, Woven Wood, and Soft ShadesLocated on the motor end
Program Button (remote)The recessed button on the back of the two-button or optional single-channel remote which is used for various programming functions outlined in this guide.
Program/Operation Button (shade)The button located on the headrail or motor end. This button can be used to operate the shade if the remote is misplaced or to confirm various programming functions.
5
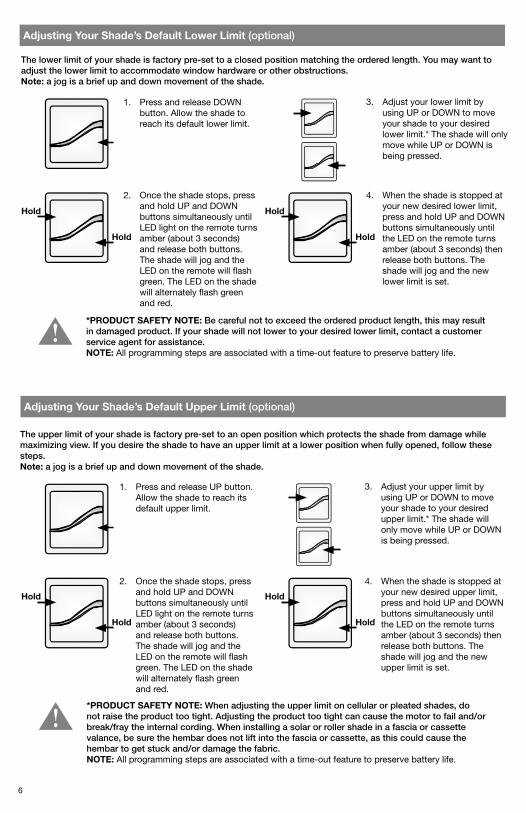
Adjusting Your Shade’s Default Upper Limit (optional)
Adjusting Your Shade’s Default Lower Limit (optional)
1. Press and release DOWN button. Allow the shade to reach its default lower limit.
1. Press and release UP button. Allow the shade to reach its default upper limit.
The lower limit of your shade is factory pre-set to a closed position matching the ordered length. You may want to adjust the lower limit to accommodate window hardware or other obstructions. Note: a jog is a brief up and down movement of the shade.
The upper limit of your shade is factory pre-set to an open position which protects the shade from damage while maximizing view. If you desire the shade to have an upper limit at a lower position when fully opened, follow these steps. Note: a jog is a brief up and down movement of the shade.
*PRODUCT SAFETY NOTE: When adjusting the upper limit on cellular or pleated shades, do not raise the product too tight. Adjusting the product too tight can cause the motor to fail and/or break/fray the internal cording. When installing a solar or roller shade in a fascia or cassette valance, be sure the hembar does not lift into the fascia or cassette, as this could cause the hembar to get stuck and/or damage the fabric.NOTE: All programming steps are associated with a time-out feature to preserve battery life.
*PRODUCT SAFETY NOTE: Be careful not to exceed the ordered product length, this may result in damaged product. If your shade will not lower to your desired lower limit, contact a customer service agent for assistance. NOTE: All programming steps are associated with a time-out feature to preserve battery life.
2. Once the shade stops, press and hold UP and DOWN buttons simultaneously until LED light on the remote turns amber (about 3 seconds) and release both buttons. The shade will jog and the LED on the remote will flash green. The LED on the shade will alternately flash green and red.
2. Once the shade stops, press and hold UP and DOWN buttons simultaneously until LED light on the remote turns amber (about 3 seconds) and release both buttons. The shade will jog and the LED on the remote will flash green. The LED on the shade will alternately flash green and red.
3. Adjust your lower limit by using UP or DOWN to move your shade to your desired lower limit.* The shade will only move while UP or DOWN is being pressed.
3. Adjust your upper limit by using UP or DOWN to move your shade to your desired upper limit.* The shade will only move while UP or DOWN is being pressed.
4. When the shade is stopped at your new desired lower limit, press and hold UP and DOWN buttons simultaneously until the LED on the remote turns amber (about 3 seconds) then release both buttons. The shade will jog and the new lower limit is set.
4. When the shade is stopped at your new desired upper limit, press and hold UP and DOWN buttons simultaneously until the LED on the remote turns amber (about 3 seconds) then release both buttons. The shade will jog and the new upper limit is set.
6
Hold
Hold
Hold
Hold
Hold
Hold
Hold
Hold
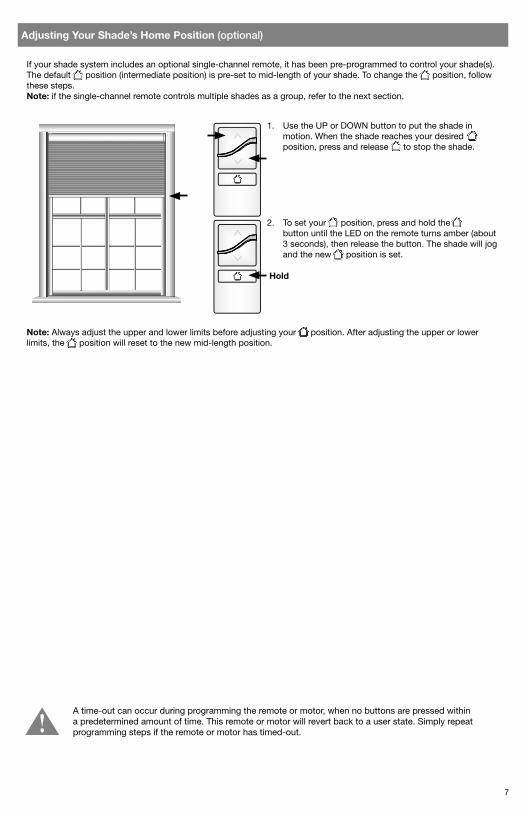
Adjusting Your Shade’s Home Position (optional)
If your shade system includes an optional single-channel remote, it has been pre-programmed to control your shade(s). The default position (intermediate position) is pre-set to mid-length of your shade. To change the position, follow these steps. Note: if the single-channel remote controls multiple shades as a group, refer to the next section.
Note: Always adjust the upper and lower limits before adjusting your position. After adjusting the upper or lower limits, the position will reset to the new mid-length position.
1. Use the UP or DOWN button to put the shade in motion. When the shade reaches your desired position, press and release to stop the shade.
2. To set your position, press and hold the button until the LED on the remote turns amber (about 3 seconds), then release the button. The shade will jog and the new position is set.
A time-out can occur during programming the remote or motor, when no buttons are pressed within a predetermined amount of time. This remote or motor will revert back to a user state. Simply repeat programming steps if the remote or motor has timed-out.
7
Hold
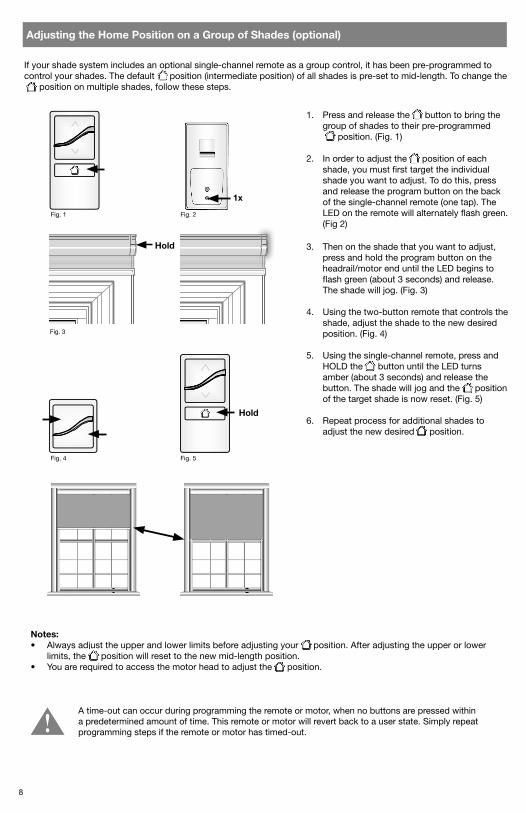
Adjusting the Home Position on a Group of Shades (optional)
If your shade system includes an optional single-channel remote as a group control, it has been pre-programmed to control your shades. The default position (intermediate position) of all shades is pre-set to mid-length. To change the position on multiple shades, follow these steps.
Notes: • Always adjust the upper and lower limits before adjusting your position. After adjusting the upper or lower
limits, the position will reset to the new mid-length position.• You are required to access the motor head to adjust the position.
1. Press and release the button to bring the group of shades to their pre-programmed position. (Fig. 1)
2. In order to adjust the position of each shade, you must first target the individual shade you want to adjust. To do this, press and release the program button on the back of the single-channel remote (one tap). The LED on the remote will alternately flash green. (Fig 2)
3. Then on the shade that you want to adjust, press and hold the program button on the headrail/motor end until the LED begins to flash green (about 3 seconds) and release. The shade will jog. (Fig. 3)
4. Using the two-button remote that controls the shade, adjust the shade to the new desired position. (Fig. 4)
5. Using the single-channel remote, press and HOLD the button until the LED turns amber (about 3 seconds) and release the button. The shade will jog and the position of the target shade is now reset. (Fig. 5)
6. Repeat process for additional shades to adjust the new desired position.
Fig. 1
Fig. 4
Fig. 2
Fig. 5
8
1x
Fig. 3
Hold
Hold
A time-out can occur during programming the remote or motor, when no buttons are pressed within a predetermined amount of time. This remote or motor will revert back to a user state. Simply repeat programming steps if the remote or motor has timed-out.
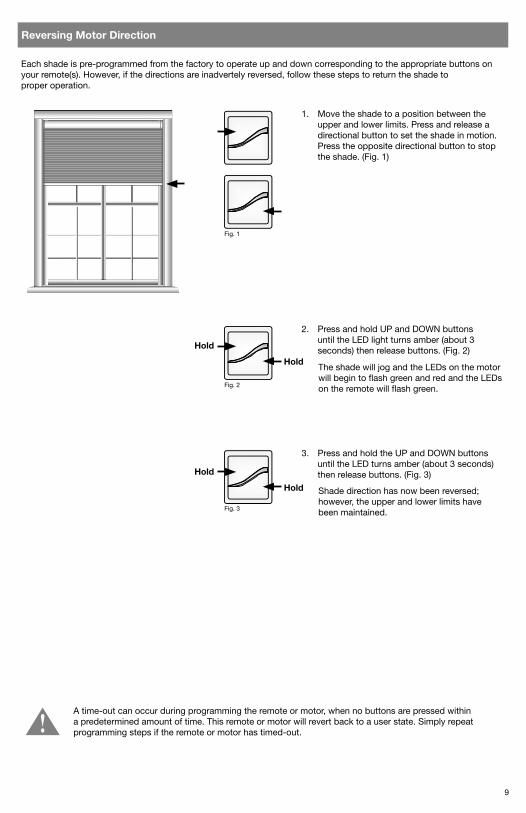
Each shade is pre-programmed from the factory to operate up and down corresponding to the appropriate buttons on your remote(s). However, if the directions are inadvertely reversed, follow these steps to return the shade to proper operation.
Reversing Motor Direction
1. Move the shade to a position between the upper and lower limits. Press and release a directional button to set the shade in motion. Press the opposite directional button to stop the shade. (Fig. 1)
The shade will jog and the LEDs on the motor will begin to flash green and red and the LEDs on the remote will flash green.
Shade direction has now been reversed; however, the upper and lower limits have been maintained.
2. Press and hold UP and DOWN buttons until the LED light turns amber (about 3 seconds) then release buttons. (Fig. 2)
3. Press and hold the UP and DOWN buttons until the LED turns amber (about 3 seconds) then release buttons. (Fig. 3)
Fig. 1
Fig. 3
Fig. 2
9
Hold
Hold
Hold
Hold
A time-out can occur during programming the remote or motor, when no buttons are pressed within a predetermined amount of time. This remote or motor will revert back to a user state. Simply repeat programming steps if the remote or motor has timed-out.
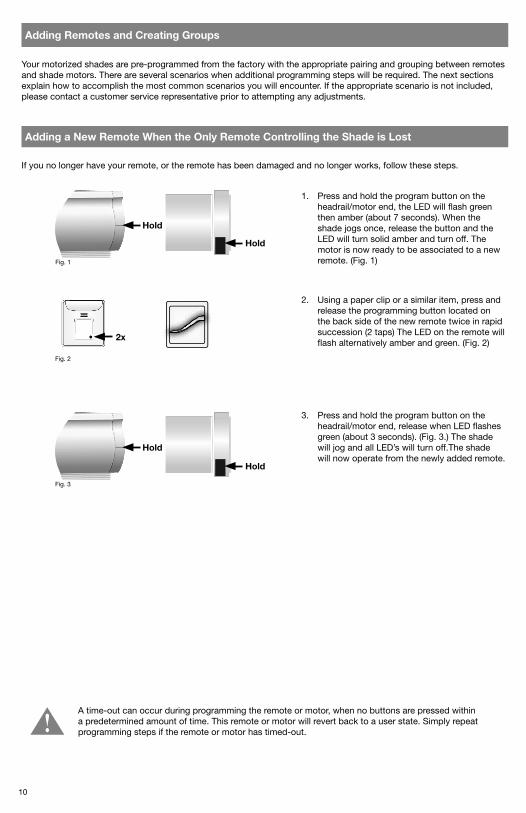
Adding Remotes and Creating Groups
Adding a New Remote When the Only Remote Controlling the Shade is Lost
1. Press and hold the program button on the headrail/motor end, the LED will flash green then amber (about 7 seconds). When the shade jogs once, release the button and the LED will turn solid amber and turn off. The motor is now ready to be associated to a new remote. (Fig. 1)
2x
Your motorized shades are pre-programmed from the factory with the appropriate pairing and grouping between remotes and shade motors. There are several scenarios when additional programming steps will be required. The next sections explain how to accomplish the most common scenarios you will encounter. If the appropriate scenario is not included, please contact a customer service representative prior to attempting any adjustments.
If you no longer have your remote, or the remote has been damaged and no longer works, follow these steps.
2. Using a paper clip or a similar item, press and release the programming button located on the back side of the new remote twice in rapid succession (2 taps) The LED on the remote will flash alternatively amber and green. (Fig. 2)
3. Press and hold the program button on the headrail/motor end, release when LED flashes green (about 3 seconds). (Fig. 3.) The shade will jog and all LED’s will turn off.The shade will now operate from the newly added remote.
A time-out can occur during programming the remote or motor, when no buttons are pressed within a predetermined amount of time. This remote or motor will revert back to a user state. Simply repeat programming steps if the remote or motor has timed-out.
Fig. 1
Fig. 3
Fig. 2
Hold
Hold
Hold
Hold
10

Adding a New Single-Channel Remote as a Group Control
1. Exclude the two-button remote as the primary control
A. Press and release the program button on the back of the remote three times in rapid succession (3 taps). The LED will flash, alternating amber to identify exclusion mode. (Fig. 1)
B. Press and hold the button on the headrail/motor end until the LED begins to flash green (about three seconds), and release. The LED on the motor will turn solid green, then turn off and the shade will jog, confirming exclusion. (Fig. 2)
2. Include the new group remote as the primary control.
A. Press and release the program button on the back of the remote twice in rapid succession (2 taps). (Fig. 3.) The LED on the new group remote will flash alternating amber and green to identify inclusion mode.
B. Press and hold the program button on the headrail/motor end until the LED flashes green (about 3 seconds), and release. (Fig. 4.) The shade will jog and all LED’s will turn off.The shade will now operate from the newly added remote.
Repeat this process for each motor to be added to this group.
Go to page 12 to add secondary remotes to shades in the group for individual control.
If a group control was not selected at the time of purchase and is being added to an existing motorized shade, follow the steps below. Note: Individual shade control will be restored with the original two-button remote only after it has been reassociated with the shade as a secondary remote. (see next page).
Fig. 1
Fig. 3
Fig. 2
Fig. 4
3x
Hold
Hold
2x
11
A time-out can occur during programming the remote or motor, when no buttons are pressed within a predetermined amount of time. This remote or motor will revert back to a user state. Simply repeat programming steps if the remote or motor has timed-out.

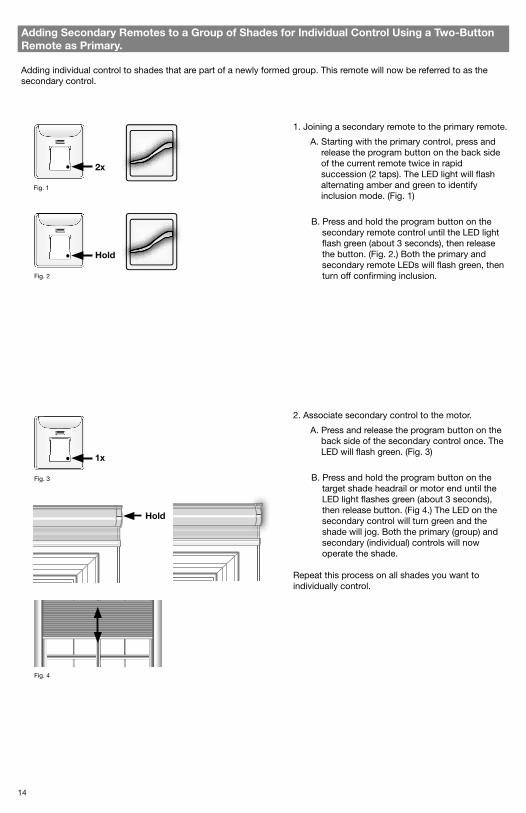
Adding Secondary Remotes to a Group of Shades for Individual Control Using a Single-Channel Remote as Primary
Adding individual control to shades that are part of a newly formed group. This remote will now be referred to as the secondary control.
2x
1. Joining a secondary remote to the primary remote.
A. Starting with the primary control, press and release the program button on the back side of the current remote twice in rapid succession (2 taps). The LED light will flash alternating amber and green to identify inclusion mode. (Fig. 1)
B. Press and hold the program button on the secondary remote control until the LED light flashes green (about 3 seconds), then release the button. (Fig. 2.) Both the primary and secondary remote LEDs will flash green, then turn off confirming inclusion.
2. Associate secondary control to the motor.
A. Press and release the program button on the back side of the secondary control once (1 tap). The LED will flash green. (Fig. 3)
B. Press and hold the program button on the target shade headrail or motor end until the LED light flashes green (about 3 seconds), then release button. (Fig 4.) The LED on the secondary control will turn green and the shade will jog. Both the primary (group) and secondary (individual) controls will now oper-ate the shade.
Repeat this process on all shades you want to individually control.
Fig. 1
Fig. 2
Fig. 3
Fig. 4
1x
Hold
Hold
12

Reassigning a Two-Button Remote as a Group Control
This process is followed when the end user desires to reassign a two-button remote to control a group of shades. You must first exclude all individual two-button remotes and include the two-button remote you desire as the primary controller. NOTE: This two-button remote will no longer perform as a individual motor controller.
2. Include two-button remote as the primary controller of a group of shades.
A. Press and release the program button on the back of the remote twice in rapid succession (2 taps). (Fig. 3.) The LED on the new group remote will flash alternately amber and green to identify inclusion mode.
B. Press and hold the program button on the headrail/motor end until the LED flashes green (about 3 seconds), and release. (Fig. 4.) The shade will jog and all LED’s will turn off.The shade will now operate from the newly added remote.
Repeat this process for each motor to be added to this group.
Go to page 14 to add secondary remotes to shades in the group for individual control.
3x
2x
1. Exclude the two-button remote as the primary control.
A. Press and release the program button on the back of the remote three times in rapid succession (3 taps). The LED will flash, alternating amber to identify exclusion mode. (Fig. 1)
B. Press and hold the button on the headrail/motor end until the LED begins to flash green (about three seconds), and release. The LED on the motor will turn solid green, then turn off and the shade will jog, confirming exclusion. (Fig. 2)
Repeat this process for each motor to be added to this group.
Go to page 14 to add secondary remotes to shades in the group for individual control.
Fig. 3
Fig. 2
Fig. 4
Fig. 1
Hold
Hold
13
Adding Secondary Remotes to a Group of Shades for Individual Control Using a Two-Button Remote as Primary.
Adding individual control to shades that are part of a newly formed group. This remote will now be referred to as the secondary control.
Hold
1. Joining a secondary remote to the primary remote.
A. Starting with the primary control, press and release the program button on the back side of the current remote twice in rapid succession (2 taps). The LED light will flash alternating amber and green to identify inclusion mode. (Fig. 1)
B. Press and hold the program button on the secondary remote control until the LED light flash green (about 3 seconds), then release the button. (Fig. 2.) Both the primary and secondary remote LEDs will flash green, then turn off confirming inclusion.
2. Associate secondary control to the motor.
A. Press and release the program button on the back side of the secondary control once. The LED will flash green. (Fig. 3)
B. Press and hold the program button on the target shade headrail or motor end until the LED light flashes green (about 3 seconds), then release button. (Fig 4.) The LED on the secondary control will turn green and the shade will jog. Both the primary (group) and secondary (individual) controls will now operate the shade.
Repeat this process on all shades you want to individually control.
Fig. 1
Fig. 2
Fig. 3
Fig. 4
2x
Hold
1x
14

Network Reset
Local Reset - Motor
Local Reset - Remotes
1. Press and hold the button on the headrail endcap until the shade jogs once (about 7 seconds), then release the button. The LED will go from solid green, flashing green, and go to flashing amber.
NOTE: Shade limits are not lost. All controllers will be removed from the motor’s memory.
1. Press and hold the button on the headrail endcap until the shade jogs twice (about 15 seconds), then release the button. The LED will go from solid green, flashing green, to flashing amber then go to rapid flashing red.
NOTE: Factory limits are set in the motor at about 2" to 4" apart. All controllers will be removed from the motor’s memory.
1. Press and hold the programming button until the LEDs stop flashing. LEDs will flash green, amber, red, and then finally turn off (about 15 seconds).
NOTE: Local reset must be performed on both the controllers and motors. All motors will be removed from the remotes memory
Use these procedures only if a complete network reset is required.Contact Customer Service to understand if you need to perform these steps.
Hold
Hold
Hold
Hold
15
Z-Wave is a wireless mesh-networking protocol for reliable, intelligent home control of all Z-Wave compatible devices. Z-Wave devices can act as repeaters to create a mesh-network to ensure reliable communication regardless of the manufacturer or type of device. This product can be included and operated in any Z-Wave network with other Z-Wave certified devices from any other manufacturer. Z-Wave devices such as lamp modules, fan controllers, thermostats, dimmer switches and many other types of home control devices are available from a wide range of manufacturers The Z-Wave Alliance (www.z-wavealliance.com) provides a list of manufacturers of Z-Wave compliant devices. Z-Wave was created by Sigma Designs and more details on the technology can be found at www.z-wave.com. This product can be included and operated in any Z-Wave network with other Z-Wave certified devices from other manufacturers and/or other applications. All non-battery operated nodes within the network will act as repeaters regardless of vendor to increase reliability of the network. The current product controls may establish 2 Association Groups. Association Group #1 is dedicated Lifeline for secondary controls, primarily used for battery status reports, central scene cc, local reset cc. Association Group #2 is dedicated to slave shades nodes, with a maximum of 12 slave nodes. Normal shade control command will use association group #2.
FCC Class B NoticeThis device complies with Part 15 of the FCC Rules. Operation is subject to the following two conditions:
1. This device may not cause harmful interference. 2. This device must accept any interference received, including interference that may cause undesired operation.
Note: This equipment has been tested and found to comply with the limits for a Class B digital device, pursuant to Part 15 of the FCC Rules. These limits are designed to provide reasonable protection against harmful interference in a residential installation. This equipment generates, uses and can radiate radio frequency energy and, if not installed and used in accordance with the instructions, may cause harmful interference to radio communications. However, there is no guarantee that interference will not occur in a particular installation. If this equipment does cause harmful interference to radio or television reception, which can be determined by turning the equipment off and on, the user is encouraged to try to correct the interference by one or more of the following measures:
• Reorient or relocate the receiving antenna. • Increase the separation between the equipment and receiver. • Connect the equipment into an outlet on a circuit different from that to which the receiver is connected. • Consult the dealer or an experienced radio/television technician for help.
Modifications: Any modifications made to this device that are not approved by Oracle may void the authority granted to the user by the FCC to operate this equipment.
Advance technical information can be found at the website mentioned below, or contacting customer service.
Bali is a brand of Springs Window Fashions, the Best Experience Company Visit us at: Baliblinds.comor contact motorization technical support at [email protected]
79084-00 (05/16) IMR 16-2679springswindowfashions.com • Middleton, WI 53562