Embed Size (px)
Citation preview

www.tinlizzie18.com 888-QUILT-18(888-784-5818)
Assem
bLed
In T
he
U.s.A. • AssembLed In
The U.s.A. •
OwnersManual
25July2011
TinLizzie18DLS

©2011PrintedintheUnitedStatesFirstPrint27April2011
SecondPrint25July2011

Page 3
Table of Contents
Welcome................................................................................................................ 5
Warranty................................................................................................................. 6
Attachingyoursquaretubing.................................................................................. 7
YourLightFixture.................................................................................................... 8
YourThreadStand.................................................................................................. 9
AttachingBeltGuard.............................................................................................11
ReplacingFuse......................................................................................................11
ConnectingyourTinLizzie18DLStoyourcarriageassembly(deck)...................... 12
AttachingyourHandleBars.................................................................................... 13
GeneralOperationoftheLCDKeyPad.................................................................14
AttachingyourLaserLight..................................................................................... 17
WhatistheTensionReleaseLever?........................................................................ 17
HowDoIAdjusttheHeightoftheHoppingFoot?.................................................. 18
AdjustingtheStrokeofthehoppingfoot................................................................ 18

Page 4
RoutineCleaningandOiling.................................................................................... 19
BobbinWinderandBobbins................................................................................... 20
ThreadingOverview............................................................................................... 22
ThreadingyourTinLizzie18DLS............................................................................... 22
HowDoIChangetheNeedle?............................................................................... 24
HowDoIMakeAdjustmentstoMakethePerfectStitch?....................................... 25
Tension,Tension,Tension....................................................................................... 26TroubleShootingChecklist
Checkspringreplacement/TensionKnob.............................................................. 28
Machinewillnotsew,Icannotturnthehandwheel(Jammed)............................... 30
TimingyourMachine................................................................................................31
Adjustingthebobbinwinder................................................................................... 33
Adjustingthetensionassemblethreadguidesforproperfill......................................33
Adjustingbobbinwinderforcontractwiththeuppershaft........................................34
SettingupoptionalRearHandlesusingtheDLS......................................................35

Page 5
dear TinLizzie18 dLs Owner,
WelcometotheTinLizzie18Family.Since1948,BillFloydhasbeendesigningandimprovingindustrialsewingmachines.TheTinLizzie18DLSisoneofmanyspecialtysewingmachinesthathehasbeeninstrumentalindesigningandmanufacturing.Now,heispassingdowntheknowledge,passionandtraditiontohissonErnie.Togethertheyareco-ownersoftheTinLizzie18L.L.C.Erniehasbeeninthesewingindustrysince1972.In2005theirsharedvisionofanaffordablelongarmquiltingmachineforthehomequilterbecamereality.TodaytheTinLizzie18isinhomesallovertheworld.
TheTinLizzie18DLScomeswithaoneyearcompletewarranty.Wewillalwaysstandbehindourproductandanywarrantyissueswillbefixedatnocharge.Ourwarrantyonpartsisfiveyearsandcoversthesewingmachinehead,motor,electronicsandframe.
Customersatisfactionisournumberonegoal.Ifyouarenothappythenwearenothappy.Ourdealersareselectivelychosen,usingourcriteriaofcustomerserviceandprofessionalintegrity.Sincerely,
WilliamFloyd ErnieFloyd JoshuaFloydTinLizzie18LLC
InthephotoaboveBill,Shirley,Ernie,andJosh
Page 6
WarrantyWebelievethatwehavedesignedandaremanufacturingthebestlongarmquiltingmachineavailable.Asyouunpackyourmachinebesuretokeeptheboxandpackingmaterialsdesignedtoprotectthemachineduringshipping.Shoulditbecomenecessaryforyoutoreturnthemachineforwarrantyworkpleasecallusforspecificinstructionsforpackingandshippingyourmachine.
•YourTinLizzie18DLShasafulllaborwarrantyforoneyearfromthedayyoureceiveyourmachine.Weguaranteethemachinepartsforfiveyears. •Themachinemustbecleanedandoiledregularlyaccordingtotheinstructionsinthismanual.Failuretoproperlymaintainthemachinewillvoidthiswarranty. •YourTinLizzie18DLSmustbepluggedintoasurgeprotectedelectricaloutlet.WehighlyrecommendusinganUn-interruptedPowerSupply(UPS)alsoknownasaBatteryBackup.Thishelpstoensurethatyouaregettingaregulated110voltsintoyourmachine.SeephotobelowofUPSBatteryBackup. •Shouldwemutuallydecidethatyourmachinecannotberepairedusingnormalcommunicationswewillarrangeformachinetobereturnedtothefactory.
should you have a problem
Pleasecontactyoursellingdealershiptheyareyourservicingdealership.BesuretoregisteryourwarrantyontheTinLizzie18website.Ifyourdealershipisunabletofulfillyourneedspleasevisitwww.Tinlizzie18.comUndertheTinLizzieSupport.

Page 7
Attaching the square tubing to the top of your TinLizzie18dLs
ThefollowingwillhelpyougetthesquaretubinginstalledontoyourTin-Lizzie18DLS.Thesquaretubingholdsthethreadstand,flexiblelamp,andhandlesinplacewhileyouareoperatingthemachine.Thehandlescanbeplacedintherearhandlessothatyoucanoperatethemachinefromthefront(freemotion)orfromtheback(workingwithpantographs)byusingtheblackknobstosecurethehandlestothesquaretubing.
Step1.Locatethesquaretubingalongwithtwophillipsheadscrewsandwasherwhichcanbefoundinthebagofaccessories.Seefigure1
Step2.Thesquaretubingwillbeplacedontopofthetworisersyouseeonthetopofthemachine.seefigure2
Step3.Usingthetwoscrewsinthesmallestholesontopofthesquaretubingorientatethesquaretubingsothattheblackknobsareonthesamesideasthemainpowerboxonthemachine.Seefigure3
Step4.Tightenthetwoscrews
Step5.Ifyourblackknobsarenotinplaceattachthemnow.
Figure4showsthemachinecompletelyassembled
Blackknobs
Mainpowerbox
Thesquaretubinghasthefollowingholes
Lookingatthetopofthetube
AThesetwoholesareforthescrewsthatholdthetubetothemachineBThisholeisfortheflexiblelampCThisholeisforthethreadstand
Lookingattheside
DTheseholesarefortheblackknobswhichholdthehandlebarsinplaceEThisholeisamountholeforthelaserlight
Onbothendsisanopeningforthegooseneckbarofthehandlebarstoslideintothesquaretubing.
EHoleforLaser
DHolesforblack
knobs
AHolesforscrews
BHoleforLamp
CHoleforThread
Figure1
Figure2
Figure3
Figure4
Page 8
Your flexible lamp fixture
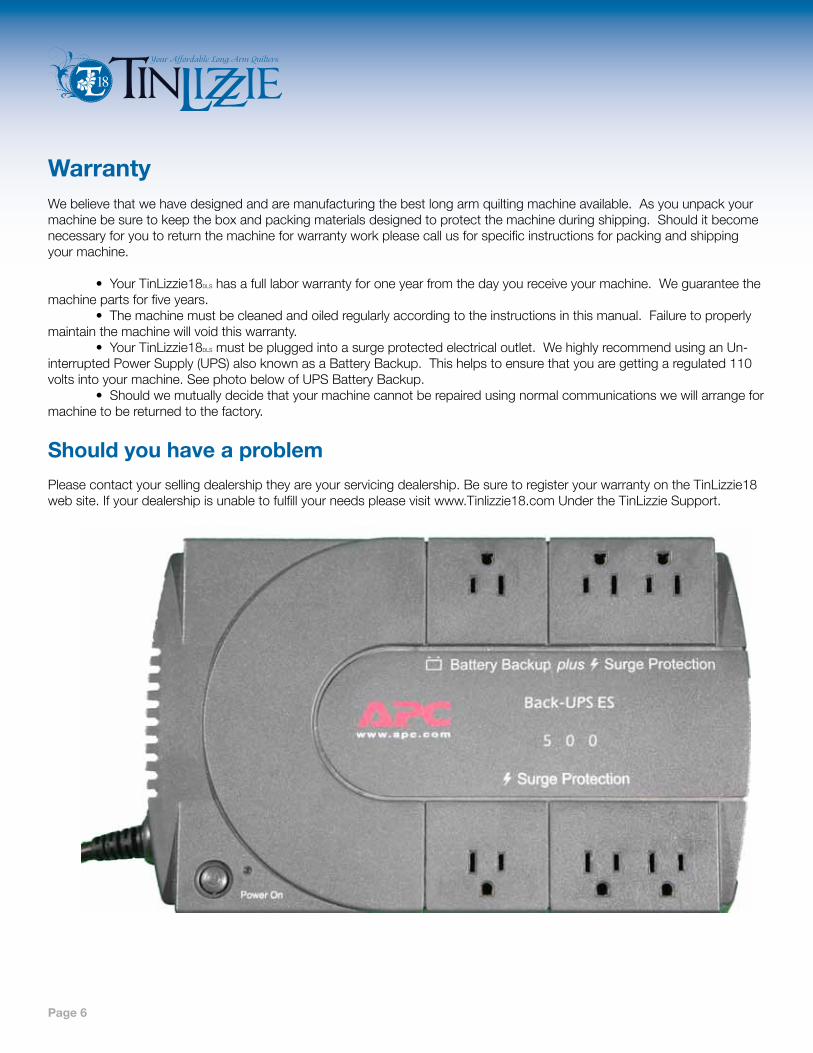
YourTinLizzie18DLScomeswithaflexiblelampwhichputslightontheareayouareworkingtohelpyouseeyourworkasyougo.Whenyouarelookingatthislampyouwillseethatthecordisverylongwewilltrimthiscordsothatyoudon’thaveextracordhangingoffyourmachine.Yourlampcomeswithalightbulbfromthefactory.Thelightbulbisalowwattbrightlight,werecommendthislightasastandardhomelightbulbcancausethelightfixturetogetveryhotandcanburnyouifyoutouchit.
step 1.Removetheprotectivesleevesfromyourlightfixture
step 2. Removenutandwasherfromthebaseofthelamp.(somelampsarepackedwithtwonutsandwashersifthisisthecaseyoucanuseononthetopandoneonthebottom.Ifyouhaveonlyoneitwillstillworkyouwilljustusetheoneonthebottom.)
step 3.Feedthecordandthebaseofthelampintotheholeprovidedonthetopofthesquaretube.(thiswillbethesmallerofthetwoholesontopafteryouhaveputthescrewsintothesmallestholeattachingthesquaretubingtothemachine.)seefigure6
step 4. Placethewasherandthenutbackontothebaseofthelamptosecureittothesquaretubing.
step 5. Tightenthenutagainstthesquaretubingtoholdthelightfix-tureinplace.Seefigure7
step 6. Laythecordofthelightfixtureacrossthetopofthemachinetothemainpowersupplywheretheoutletislocated.
step 7. Trimthecordsothatyouhaveatleast171/2inchesofcordminimum
step 8. Usingtheplugfoundinyouraccessoriesattachthistotheendofthecord.
step 9. Toattachtheplugtotheendofthecordusethesmallscrewdriverthatcamewithyourmachinetoreleasethesilverclipholdingtheplugclosed.
step 10.Withtheplugopenedfeedthecordintothesilverclipandlayinthepathprovide.(checkthatthecordislayingflatinthespaceprovidedtopreventashortintheplug.)Seefigure8
step 11.Closetheplugandcheckthattheclipissecure.
step 12.Plugintotheoutletprovidedonthemainpowerbox.Seefigure9
silverclip
Cordpathwithcordlayingflat
Theseprongspuncherthecordcoverfortheconnection
Figure5
Figure6
Figure7
Figure8
Figure9
Page 9
Your Thread stand
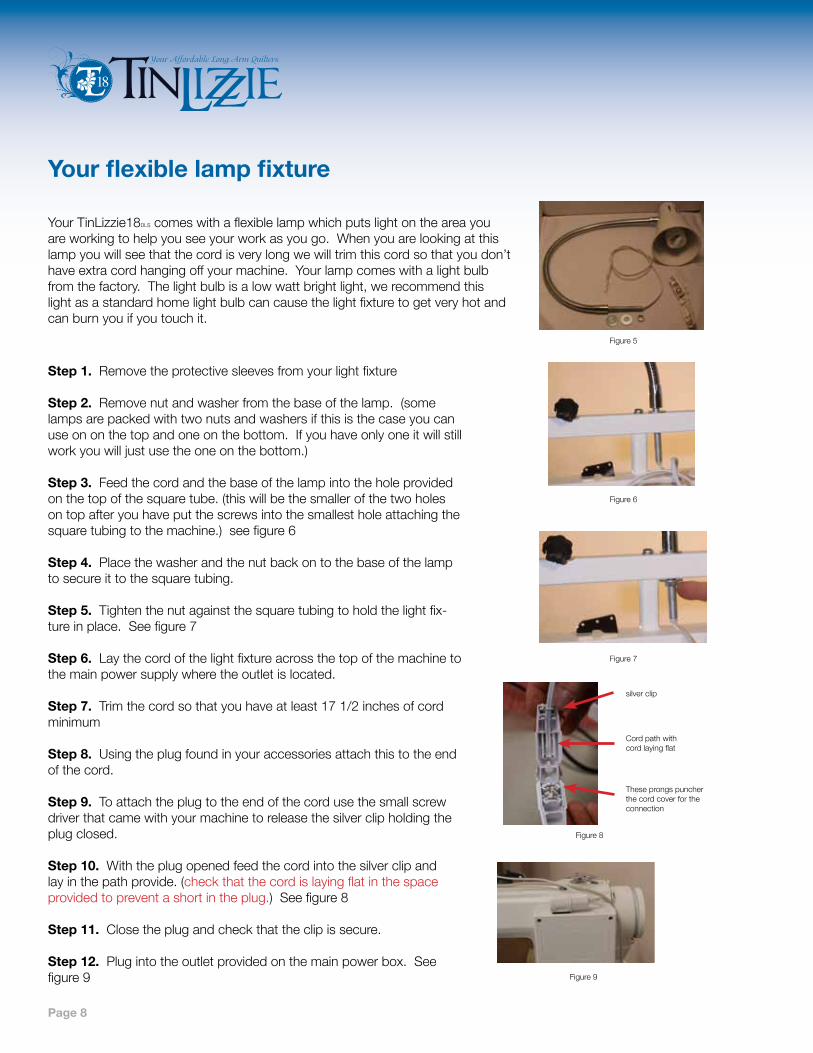
YourTinLizzie18DLScomeswithatwospoolthreadstand.Someassemblyrequired.
Toassembleyourthreadstandandattachtoyourmachinefollowthesesteps.
step1.RemovethenutfromthebottomofonepartC
step 2.PlacepartCintooneofpartBwiththethreadedendtowardsthebottomofpartB.Seefigure11WewillusetheoutsidetwoholesinpartA
step 3. PlacepartCwithpartBattachedintooneofthetwooutsideholesonpartASeefigure12
step 4.ReplacethewasherandthenutontopartCandtighten
Repeatsteps1-4fortheotherCandBpartssothatyouhavethetwospoolholdersattachedtopartASeefigure13
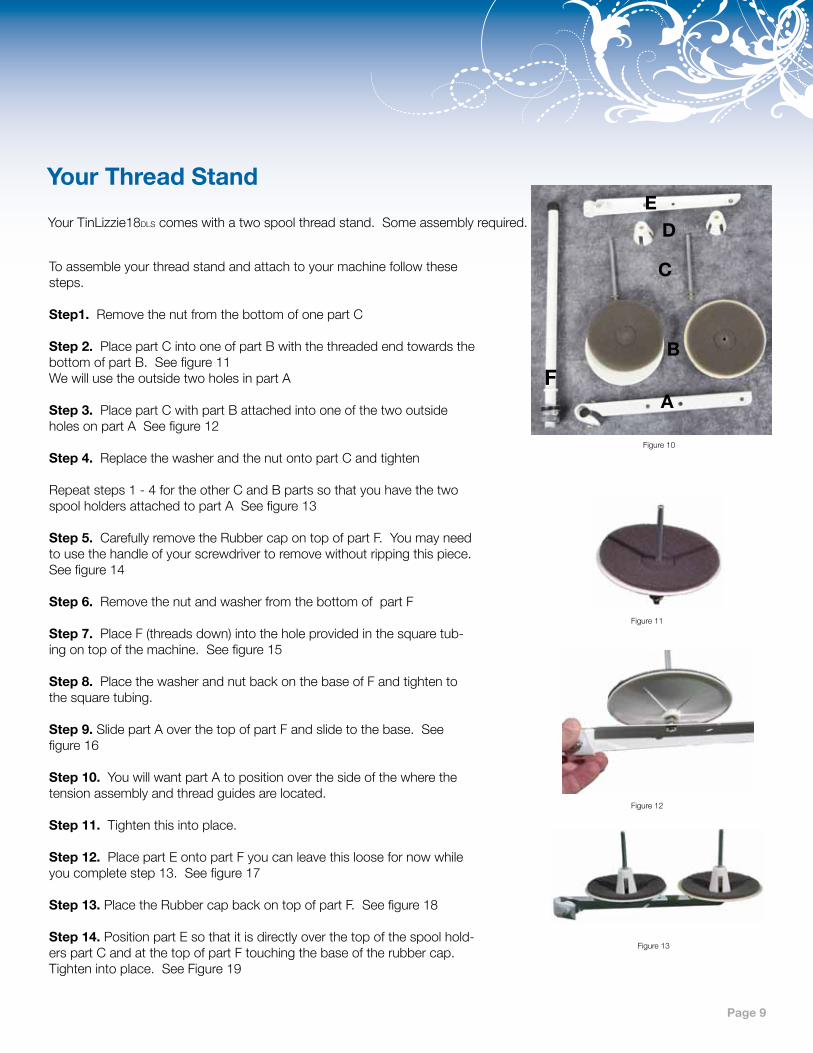
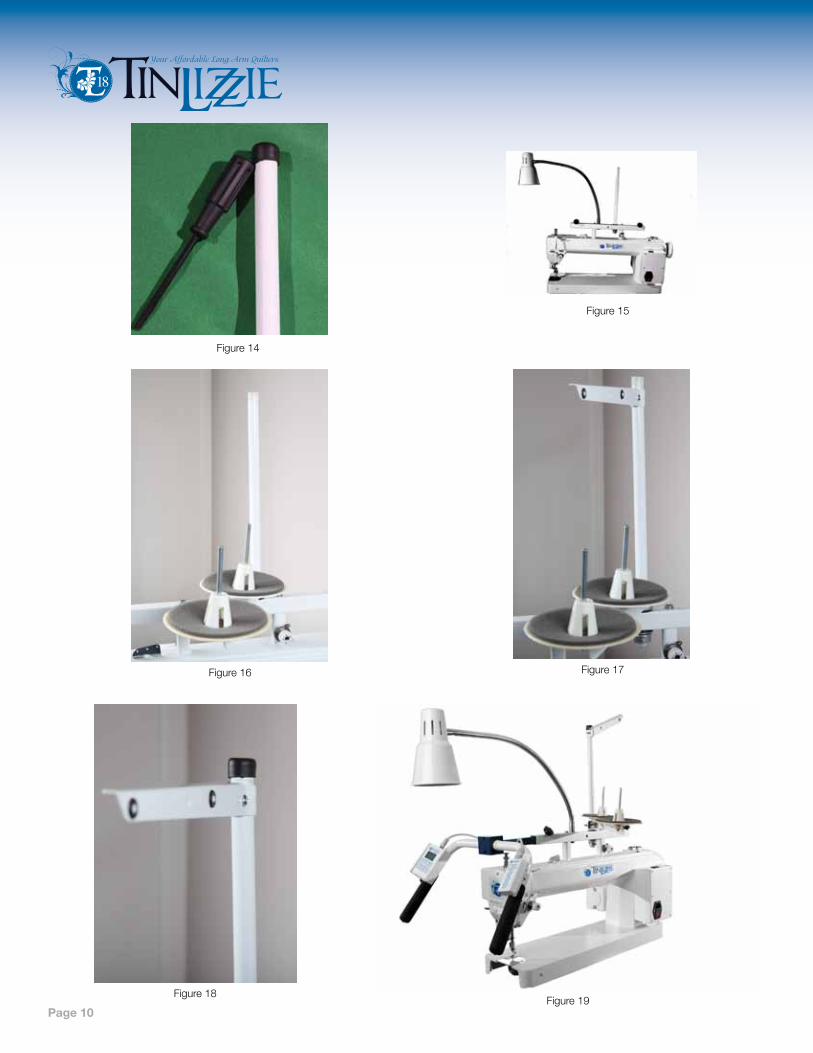
step 5. CarefullyremovetheRubbercapontopofpartF.Youmayneedtousethehandleofyourscrewdrivertoremovewithoutrippingthispiece.Seefigure14
step 6.RemovethenutandwasherfromthebottomofpartF
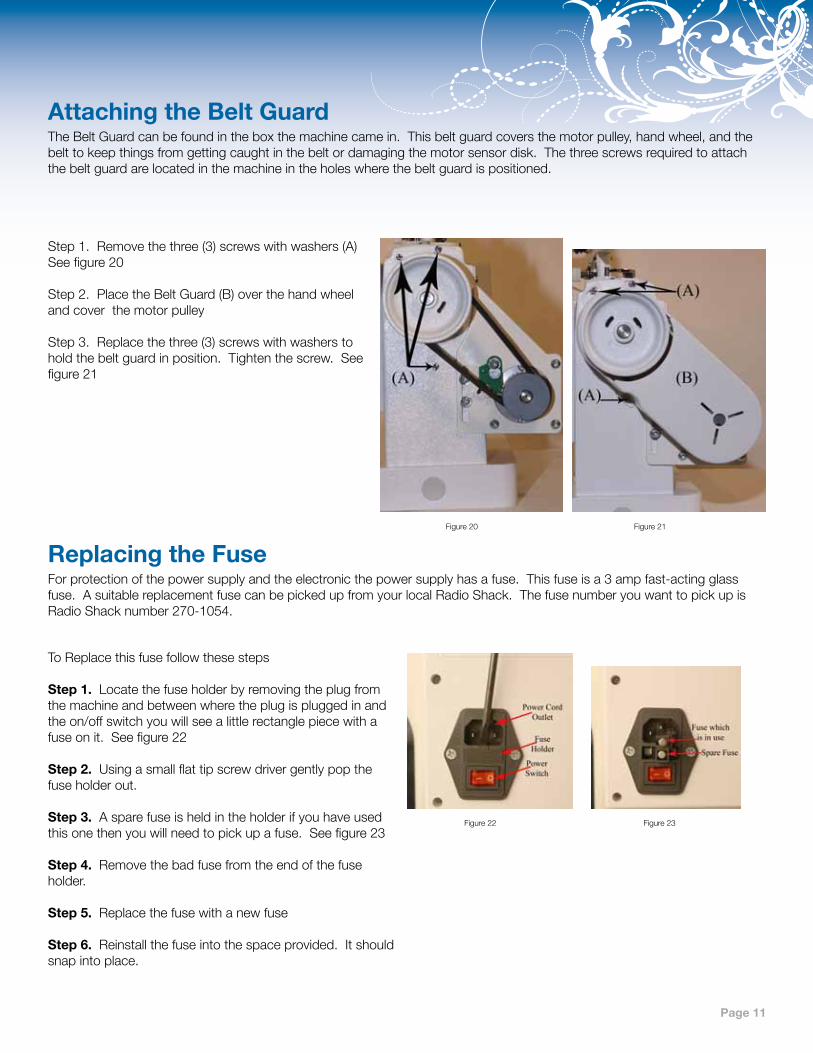
step 7.PlaceF(threadsdown)intotheholeprovidedinthesquaretub-ingontopofthemachine.Seefigure15
step 8.PlacethewasherandnutbackonthebaseofFandtightentothesquaretubing.
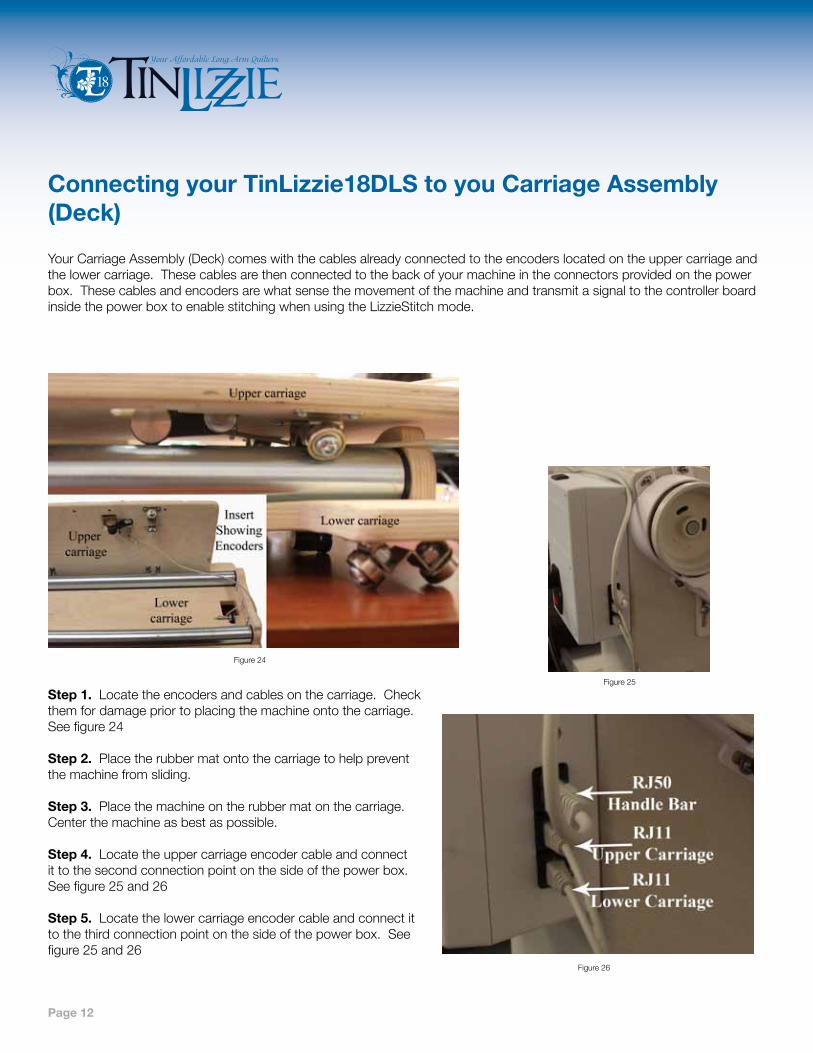
step 9.SlidepartAoverthetopofpartFandslidetothebase.Seefigure16
step 10. YouwillwantpartAtopositionoverthesideofthewherethetensionassemblyandthreadguidesarelocated.
step 11.Tightenthisintoplace.
step 12.PlacepartEontopartFyoucanleavethisloosefornowwhileyoucompletestep13.Seefigure17
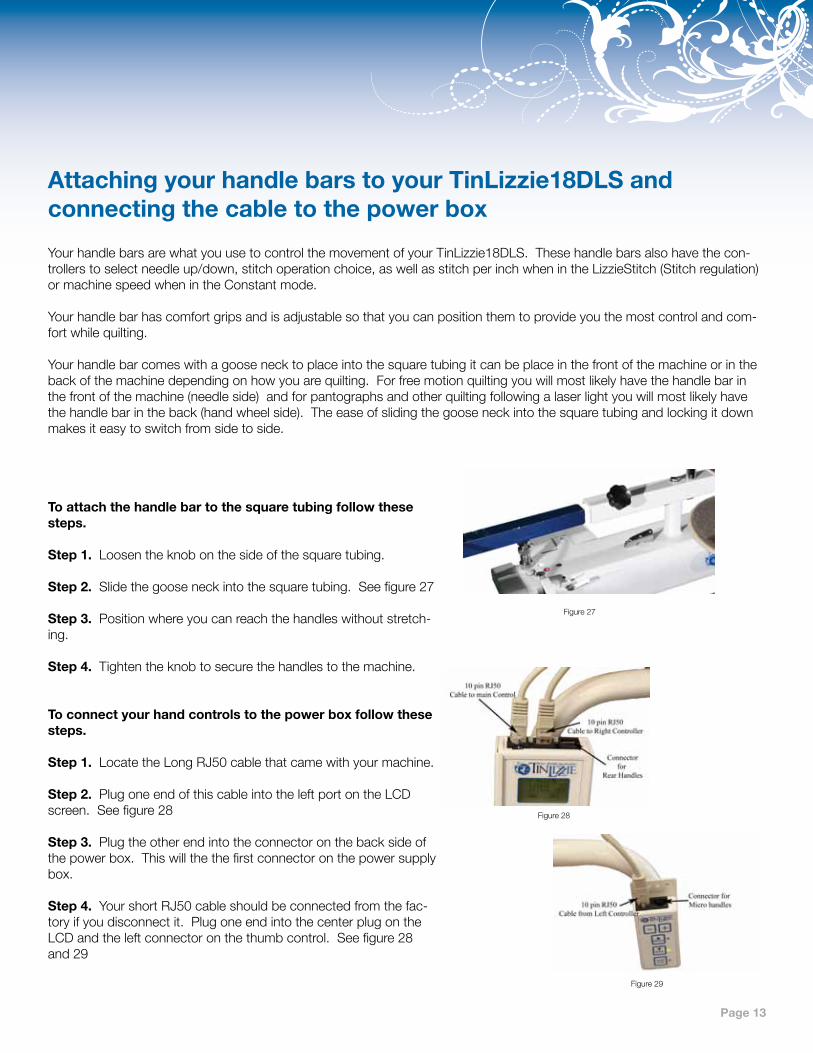
step 13. PlacetheRubbercapbackontopofpartF.Seefigure18
step 14. PositionpartEsothatitisdirectlyoverthetopofthespoolhold-erspartCandatthetopofpartFtouchingthebaseoftherubbercap.Tightenintoplace.SeeFigure19
Figure11
Figure12
Figure13
Figure10
A
b
C
de
F
Page 10
Figure14
Figure15
Figure16 Figure17
Figure18Figure19
Page 11
Attaching the belt GuardTheBeltGuardcanbefoundintheboxthemachinecamein.Thisbeltguardcoversthemotorpulley,handwheel,andthebelttokeepthingsfromgettingcaughtinthebeltordamagingthemotorsensordisk.Thethreescrewsrequiredtoattachthebeltguardarelocatedinthemachineintheholeswherethebeltguardispositioned.
Step1.Removethethree(3)screwswithwashers(A)Seefigure20
Step2.PlacetheBeltGuard(B)overthehandwheelandcoverthemotorpulley
Step3.Replacethethree(3)screwswithwasherstoholdthebeltguardinposition.Tightenthescrew.Seefigure21
Replacing the FuseForprotectionofthepowersupplyandtheelectronicthepowersupplyhasafuse.Thisfuseisa3ampfast-actingglassfuse.AsuitablereplacementfusecanbepickedupfromyourlocalRadioShack.ThefusenumberyouwanttopickupisRadioShacknumber270-1054.
ToReplacethisfusefollowthesesteps
step 1. Locatethefuseholderbyremovingtheplugfromthemachineandbetweenwheretheplugispluggedinandtheon/offswitchyouwillseealittlerectanglepiecewithafuseonit.Seefigure22
step 2.Usingasmallflattipscrewdrivergentlypopthefuseholderout.
step 3.Asparefuseisheldintheholderifyouhaveusedthisonethenyouwillneedtopickupafuse.Seefigure23
step 4. Removethebadfusefromtheendofthefuseholder.
step 5. Replacethefusewithanewfuse
step 6. Reinstallthefuseintothespaceprovided.Itshouldsnapintoplace.
Figure20 Figure21
Figure22 Figure23
Page 12
Connecting your TinLizzie18dLs to you Carriage Assembly (deck)
YourCarriageAssembly(Deck)comeswiththecablesalreadyconnectedtotheencoderslocatedontheuppercarriageandthelowercarriage.Thesecablesarethenconnectedtothebackofyourmachineintheconnectorsprovidedonthepowerbox.ThesecablesandencodersarewhatsensethemovementofthemachineandtransmitasignaltothecontrollerboardinsidethepowerboxtoenablestitchingwhenusingtheLizzieStitchmode.
step 1.Locatetheencodersandcablesonthecarriage.Checkthemfordamagepriortoplacingthemachineontothecarriage.Seefigure24
step 2.Placetherubbermatontothecarriagetohelppreventthemachinefromsliding.
step 3.Placethemachineontherubbermatonthecarriage.Centerthemachineasbestaspossible.
step 4.Locatetheuppercarriageencodercableandconnectittothesecondconnectionpointonthesideofthepowerbox.Seefigure25and26
step 5.Locatethelowercarriageencodercableandconnectittothethirdconnectionpointonthesideofthepowerbox.Seefigure25and26
Figure24
Figure25
Figure26
Page 13
Attaching your handle bars to your TinLizzie18dLs and connecting the cable to the power box
YourhandlebarsarewhatyouusetocontrolthemovementofyourTinLizzie18DLS.Thesehandlebarsalsohavethecon-trollerstoselectneedleup/down,stitchoperationchoice,aswellasstitchperinchwhenintheLizzieStitch(Stitchregulation)ormachinespeedwhenintheConstantmode.
Yourhandlebarhascomfortgripsandisadjustablesothatyoucanpositionthemtoprovideyouthemostcontrolandcom-fortwhilequilting.
Yourhandlebarcomeswithagoosenecktoplaceintothesquaretubingitcanbeplaceinthefrontofthemachineorinthebackofthemachinedependingonhowyouarequilting.Forfreemotionquiltingyouwillmostlikelyhavethehandlebarinthefrontofthemachine(needleside)andforpantographsandotherquiltingfollowingalaserlightyouwillmostlikelyhavethehandlebarintheback(handwheelside).Theeaseofslidingthegooseneckintothesquaretubingandlockingitdownmakesiteasytoswitchfromsidetoside.
To attach the handle bar to the square tubing follow these steps.
step 1. Loosentheknobonthesideofthesquaretubing.
step 2.Slidethegooseneckintothesquaretubing.Seefigure27
step 3. Positionwhereyoucanreachthehandleswithoutstretch-ing.
step 4. Tightentheknobtosecurethehandlestothemachine.
To connect your hand controls to the power box follow these steps.
step 1.LocatetheLongRJ50cablethatcamewithyourmachine.
step 2. PlugoneendofthiscableintotheleftportontheLCDscreen.Seefigure28
step 3.Plugtheotherendintotheconnectoronthebacksideofthepowerbox.Thiswillthethefirstconnectoronthepowersupplybox.
step 4.YourshortRJ50cableshouldbeconnectedfromthefac-toryifyoudisconnectit.PlugoneendintothecenterplugontheLCDandtheleftconnectoronthethumbcontrol.Seefigure28and29
Figure27
Figure28
Figure29

Page 14
General Operation of the LCd key pad
WhenyouturnonyourTinLizzie18DLSyouwillhearone(1)beepandafterthree(3)secondsyouwillhearanotherbeep.Thisletsyouknowthatyourma-chineisready.Thefirstscreenyouseewillbefig30.(Openingscreenwillhaveversionnumberdisplayed.Thisiswheretheversionisdisplayedforyourmachine)
Thecontrolskeysareasfollows:
Thiskeyisfordecreasingmotorspeed,stitchlength,andselectingmodesinmenu.
Thisisthekeyforgoingtothemenu.
Thisisthekeyusedtoselectmenuitems.
Thiskeyisforincreasingmotorspeed,stitchperinch,andselectingmodesinmenu
Thiskeyisforputtingtheneedleinthedownposition.
Thiskeyisforstartingthemachineandstoppingthemachine.Infig31youcanseewhereitshowsStitchOFF.ThisbuttonwillchangeittoStitchON(Note:QuiltingMachinewillnotstitchifyouseethewordoffnexttothestitch.)Machinewillturnoffifnomovementisdetectedafter12seconds
Thiskeyisforputtingtheneedleintheupposition.
Lizzie stitch (stitch Regulation)
Soyouarereadytostartquilting.You’veturnedonyourmachineandwaitedforthebeepsandyouseethescreenseeFig31.AtthispointifyouwanttochangetheStitchesPerInch(SPI)thenyoucanpressandreleasethe(-)keytodecreasethenumberofstitchesoryoucanpressandreleasethe(+)keytoincreasethenumberofstitches.(Note:Ifyoupressandholdthe(-)or(+)keysthenyouwillseethebargraphdecreaseorincreasequickerthanifyoujustpressandreleasethe(-)or(+)keys)OnceyouarehappywiththeStitchesPerInch(SPI)thenyoucanpressandreleasetheStart/StopkeyandtheLCDwillchangetofig32.YoucanseeontheLCDthatnexttotheStitchyouseethewordON.Thismeansthequilterisreadytoquiltandasyoumovethequilteritwillstitch.YoucannotchangethestitchesperinchiftheLCDscreenshowsON.
Figure30
Figure31
Figure32

Page 15
Changing FunctionsWhenyouarereadytoswitchstitchingmodesyouwillpressthe(Menu)key.Thiswillbringupthemenutoselectfrom.AsyoucanseeinFig33Therearethreeoptionsinthemenu.stitch: willletyouchosebetweenLizzie(stitchregulation),constant(manualstitch),Robot,Idle(stitchregulation),Edge(stitchregulation),tieoffup,ortieoffdown.
deactivate: isusedtoswitchbetweenthefronthandlebarsandthebackhan-dlebars.(Note:Bothhandlebarsneedtobeconnectedwhenyouturnonyourmachineforthistowork.Youshouldneverdisconnectorreconnectanycableswhilethepowerison.)(Note:rearhandlebarswithelectronicsareoptional.)
diagnostics: isonlyusedwhendirectedbyyourtechnician.Toexitdiagnosticscyclepower
Selectindicatordash.Tomovetheselectindicatordashontheleftsideofthescreenusethe(-)keytogodownthelistandthe(+)keytogoupthelist.ToSelectthefunctionpressthe(enter)key.
stitch modeOnceyouhavepressedthe(enter)keyyouwillbeabletochoosebetweentheLizzie(stitchregulation),Constant(manualstitch),Robot(usewithrobot)(seeFig34),Idle(stitchregulationnostop),Edge(forusewithrulerswillstopforalongerperiodoftime.),Tieoffup,orTieoffdown.(seeFig34a)
Pressthe(Enter)keyonceyouhavethestitchyouwouldliketouse.
IfyouchooseLizziestitchyouwillbeinthestitchregulationmodeofthema-chinereferbacktofig31foralookattheLCDwhenLizzieisselectedandafterthestitchisoffinthisstateyoucanmovethemachineanditwillnotstitch.Onceyoupressthe(start/stop)keythenthemachinebecomesactiverefertofig32andyoucanbeginstitchingwhenyoumovethemachine.RememberifthemachineshowsONandyoudonotmovethemachinefor12secondsitwillchangetoOFFandyouwillneedtopressthe(start/stop)keyagain. YouwillalsoseeabargraphatthebottomoftheLCDwithSPIontherightseefig31.Thisisyourstitchperinchindicator.Youwillusethe(-)keytodecreasethenumberofStitchesperInchandusethe(+)keytoincreasethenumberofstitchesperinch.(note:Pressingandholdingthe(-)or(+)keythisbargraphwillmovemorerapidlyacrossthescreen.)
Figure33
Figure34
Figure34a

Page 16
Constant stitch (manual stitch)
IfyouchooseConstantyouwillbeinthemanualstitchmodeofthemachine.Fig35showstheLCDscreenfortheConstant.YouwillnoticeyouhavetheOFFjustlikeintheLizziebutyouhavenumberswithpercentageatthebottomratherthanabargraph.SameaswiththeLizziethe(start/stop)keywillturnthemachineonandyouwillbereadytostitchunliketheLizzieonceyouhitthe(start/stop)keythemachinewillbesewing.Fig36showswiththeStitchON
LiketheLizzieyoucanusethe(-)or(+)keystodecreaseorincreasethespeedofthemachine.Constantdoesnothaveadefaulttoturnoffonceithasbeenturnedon.Ifyoustopmovingthreadwillbuildupuntilitrunsoutofthreadoryourthreadbreaks.Itwillstillkeeprunninguntilyoupressthe(start/stop)key.YoucanadjustthemotorspeedwhiletheLCDscreenshowsON
Fig37showstherightcontrollerasyoucanseethekeysaresimilartothekeysontheleftcontroller.Youcandecreaseorincreaseusingthe(-)or(+)keys.YouhaveNeedleupandNeedledown.Youalsohavea(start/stop)key
Figure35
Figure36
Figure37
Robot
Robotgivesstitchcontroltotherobot.ThiswillletyoucontrolthestitchingwiththeRemotecontrolfortheRobot.
Idle (stitch regulation without stop)
IdlestitchgivesyouthestitchregulationasLizzieonceyoupressandreleasethestart/stopbuttonthemachinestartsstitchingwhenyoucometoastoptheneedlecontinuestostitchataslowspeed,Thismodeallowsforeaseinandoutofcorners.Pressandreleasestart/stopbuttonandmachinewillstop.
edge
Usethisstitchmodewhenworkingwithrulers.SeeLizzieStitchforopera-tionofthisstitch.TheonlydifferencebetweentheEdgeandLizzieiswithLizzieStitchwhenyoustopmovingfor12secondsthemachinewillgoofflikepressingthestart/stopbutton.EdgeStitchwillnotstopgivingyoutimetorepositionyourrulerortemplate.
Tie off up or Tie off down
TheseareusedinconjunctionwiththeLizzieStitch.WithTieoffselectedyouwillbeabletostartorfinishyourstitching,Withthemachinenotrunningpresstheenterkeyanditwilldo3stitchestotieoffyourthread.UpwillpositiontheneedleintheuppositionwhileDownwillpositiontheneedleinthedownposition.
Page 17
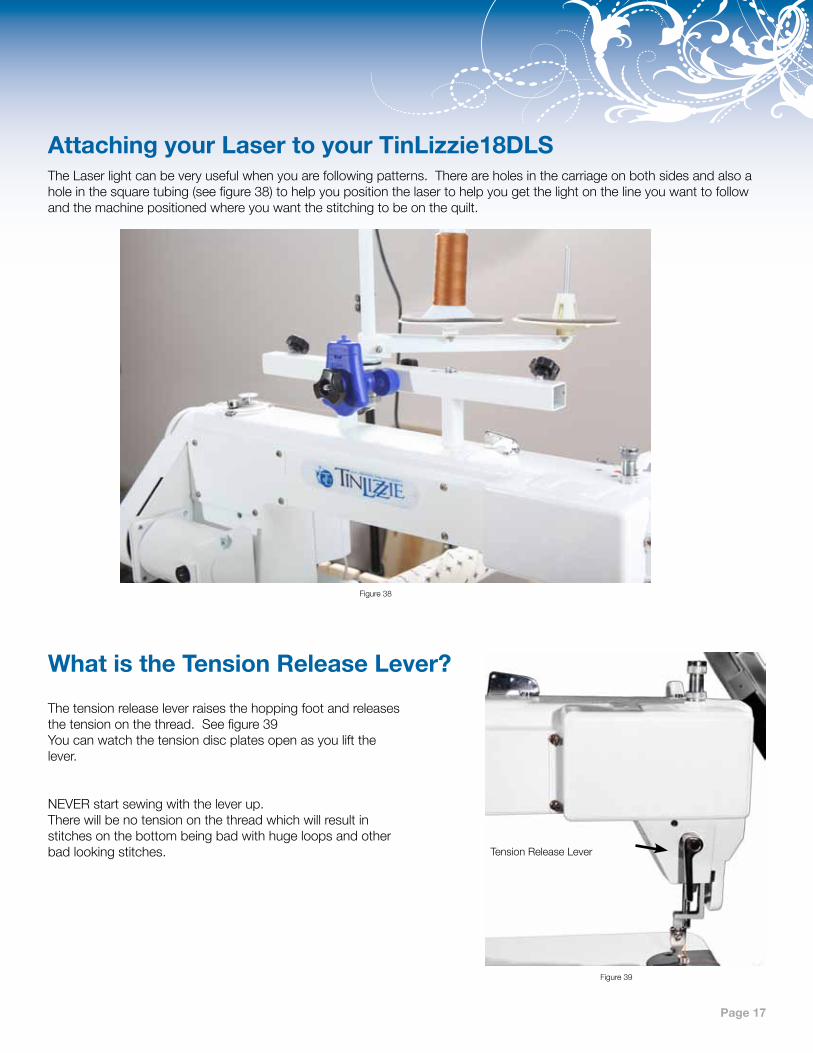
Attaching your Laser to your TinLizzie18dLsTheLaserlightcanbeveryusefulwhenyouarefollowingpatterns.Thereareholesinthecarriageonbothsidesandalsoaholeinthesquaretubing(seefigure38)tohelpyoupositionthelasertohelpyougetthelightonthelineyouwanttofollowandthemachinepositionedwhereyouwantthestitchingtobeonthequilt.
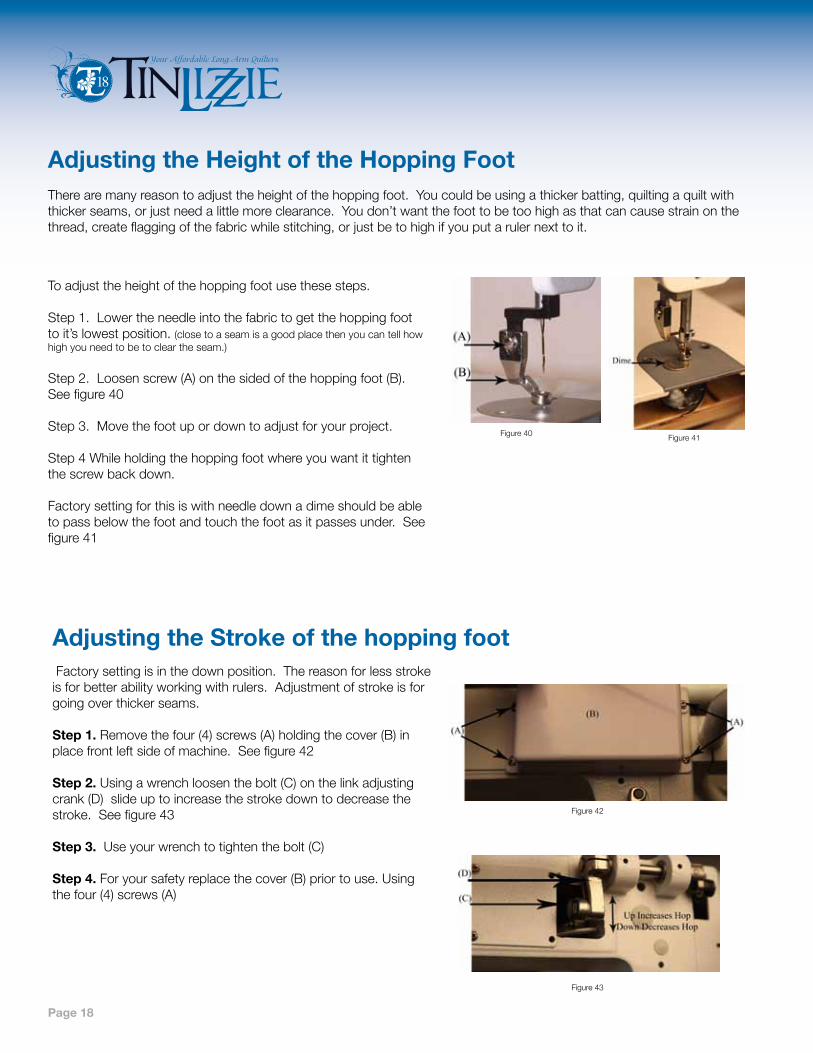
What is the Tension Release Lever?
Thetensionreleaseleverraisesthehoppingfootandreleasesthetensiononthethread.Seefigure39Youcanwatchthetensiondiscplatesopenasyouliftthelever.
NEVERstartsewingwiththeleverup.Therewillbenotensiononthethreadwhichwillresultinstitchesonthebottombeingbadwithhugeloopsandotherbadlookingstitches. TensionReleaseLever
Figure38
Figure39
Page 18
Adjusting the height of the hopping FootTherearemanyreasontoadjusttheheightofthehoppingfoot.Youcouldbeusingathickerbatting,quiltingaquiltwiththickerseams,orjustneedalittlemoreclearance.Youdon’twantthefoottobetoohighasthatcancausestrainonthethread,createflaggingofthefabricwhilestitching,orjustbetohighifyouputarulernexttoit.
Toadjusttheheightofthehoppingfootusethesesteps.
Step1.Lowertheneedleintothefabrictogetthehoppingfoottoit’slowestposition.(closetoaseamisagoodplacethenyoucantellhowhighyouneedtobetocleartheseam.)
Step2.Loosenscrew(A)onthesidedofthehoppingfoot(B).Seefigure40
Step3.Movethefootupordowntoadjustforyourproject.
Step4Whileholdingthehoppingfootwhereyouwantittightenthescrewbackdown.
Factorysettingforthisiswithneedledownadimeshouldbeabletopassbelowthefootandtouchthefootasitpassesunder.Seefigure41
Adjusting the stroke of the hopping footFactorysettingisinthedownposition.Thereasonforlessstrokeisforbetterabilityworkingwithrulers.Adjustmentofstrokeisforgoingoverthickerseams.
step 1.Removethefour(4)screws(A)holdingthecover(B)inplacefrontleftsideofmachine.Seefigure42
step 2.Usingawrenchloosenthebolt(C)onthelinkadjustingcrank(D)slideuptoincreasethestrokedowntodecreasethestroke.Seefigure43
step 3.Useyourwrenchtotightenthebolt(C)
step 4.Foryoursafetyreplacethecover(B)priortouse.Usingthefour(4)screws(A)
Figure40 Figure41
Figure42
Figure43
Page 19
Routine Cleaning and OilingRoutinecleaningandoilingisveryimportanttothelongevityofyourquiltingmachine.Brushoutthefuzzfromaroundthehookandfoot.Changeyourneedleregularlytoavoidthreadbreakage,tensionproblemsandneedlebreakage.Awornneedlecanmeanskippedstitches,shreddedthreadandaweakeningoftheneedleitself.Thesethingscanleadtostitchqualityissues.
Linthasatendencytobuildupinthebobbincase.Atinyamountoflintcancausepoorstitches.Checkthebobbincaseeachtimeyouchangethebobbintokeepitclean.Wesuggestusingasoftbristlebrushtowipeoutthebobbincaseandthebobbinarea.Cannedaironlyblowsthelintaround.Byusingasoftbristlebrushyoucollectthedustonthebrush.Occa-sionally,placeadropofmachineoilonacottonswabtowipeoutthebobbincase.
Keepyourtablecleanofdustandoil.Cleanthebarsandcarriagedeckregularlyforsmoothmovement.
Oilingisextremelyimportanttothelongevityofyourquiltingmachine.Failuretooilyourmachineregularlycanvoidyourwar-ranty.
Theoneoilingspotmarkedwithredarrowismarkedwithredpaintonyourmachine.Anoilbottleisincludedwithyourma-chine.Theoneoilingspotmarkedwithabluearrowcontainsadipstick.Removethedipstickbyliftingitupwithafingernailorscrewdriver.Placedropsofoilinthissameholeifyoufindnooilonthedipstick.
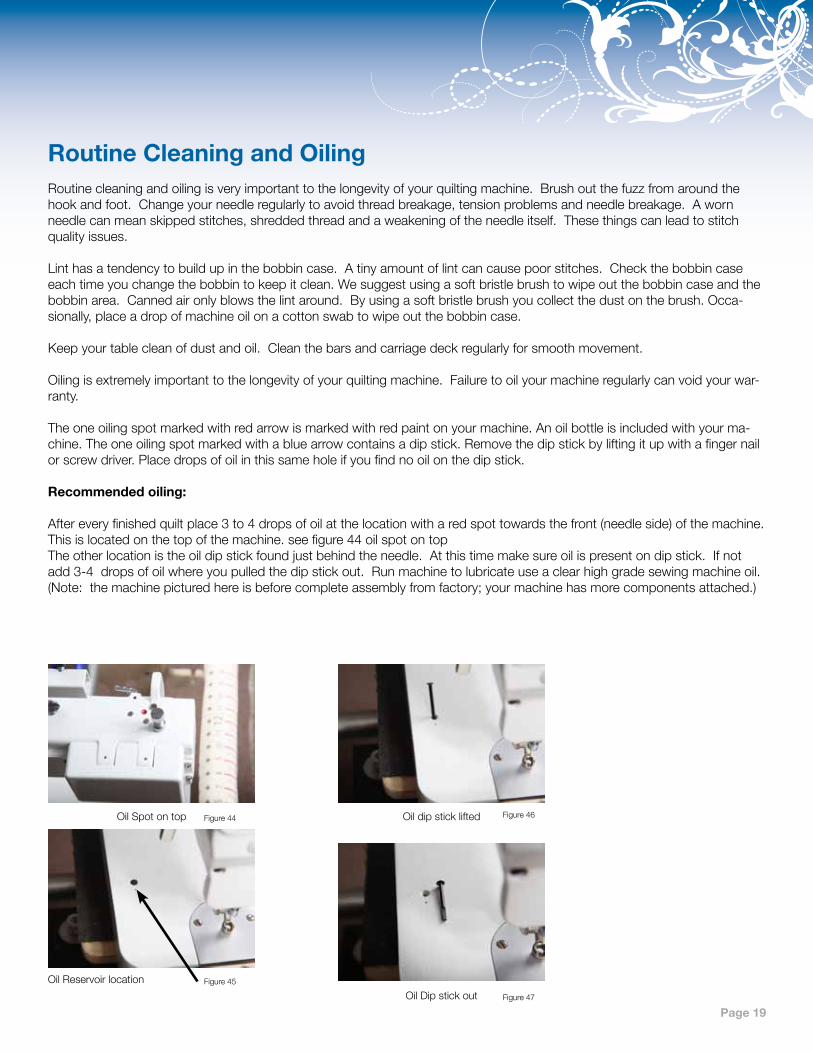
Recommended oiling:
Aftereveryfinishedquiltplace3to4dropsofoilatthelocationwitharedspottowardsthefront(needleside)ofthemachine.Thisislocatedonthetopofthemachine.seefigure44oilspotontopTheotherlocationistheoildipstickfoundjustbehindtheneedle.Atthistimemakesureoilispresentondipstick.Ifnotadd3-4dropsofoilwhereyoupulledthedipstickout.Runmachinetolubricateuseaclearhighgradesewingmachineoil.(Note:themachinepicturedhereisbeforecompleteassemblyfromfactory;yourmachinehasmorecomponentsattached.)
OilSpotontop
OilReservoirlocation
Oildipsticklifted
OilDipstickout
Figure44
Figure45
Figure46
Figure47
Page 20
bobbin Winder and bobbinsAbobbinwinderisincludedwithyourmachine.Thethreadonaproperlywoundbobbinshouldbesnugandhaveevenlay-ersofthread.Asloppyormushywoundbobbinwillresultinpoorstitchquality.
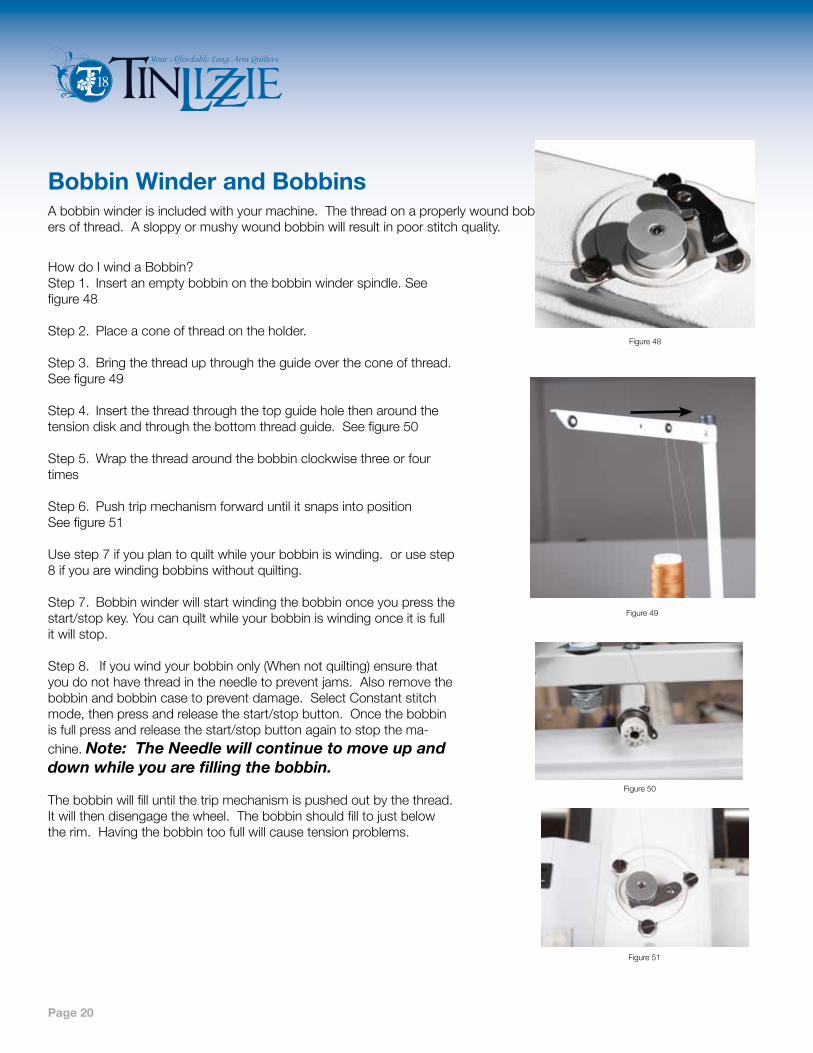
HowdoIwindaBobbin?Step1. Insertanemptybobbinonthebobbinwinderspindle.Seefigure48
Step2. Placeaconeofthreadontheholder.
Step3. Bringthethreadupthroughtheguideovertheconeofthread.Seefigure49
Step4. Insertthethreadthroughthetopguideholethenaroundthetensiondiskandthroughthebottomthreadguide.Seefigure50
Step5. Wrapthethreadaroundthebobbinclockwisethreeorfourtimes
Step6. PushtripmechanismforwarduntilitsnapsintopositionSeefigure51
Usestep7ifyouplantoquiltwhileyourbobbiniswinding.orusestep8ifyouarewindingbobbinswithoutquilting.
Step7. Bobbinwinderwillstartwindingthebobbinonceyoupressthestart/stopkey.Youcanquiltwhileyourbobbiniswindingonceitisfullitwillstop.
Step8. Ifyouwindyourbobbinonly(Whennotquilting)ensurethatyoudonothavethreadintheneedletopreventjams.Alsoremovethebobbinandbobbincasetopreventdamage.SelectConstantstitchmode,thenpressandreleasethestart/stopbutton.Oncethebobbinisfullpressandreleasethestart/stopbuttonagaintostopthema-chine.Note: The Needle will continue to move up and down while you are filling the bobbin.
Thebobbinwillfilluntilthetripmechanismispushedoutbythethread.Itwillthendisengagethewheel.Thebobbinshouldfilltojustbelowtherim.Havingthebobbintoofullwillcausetensionproblems.
Figure48
Figure49
Figure50
Figure51
Page 21
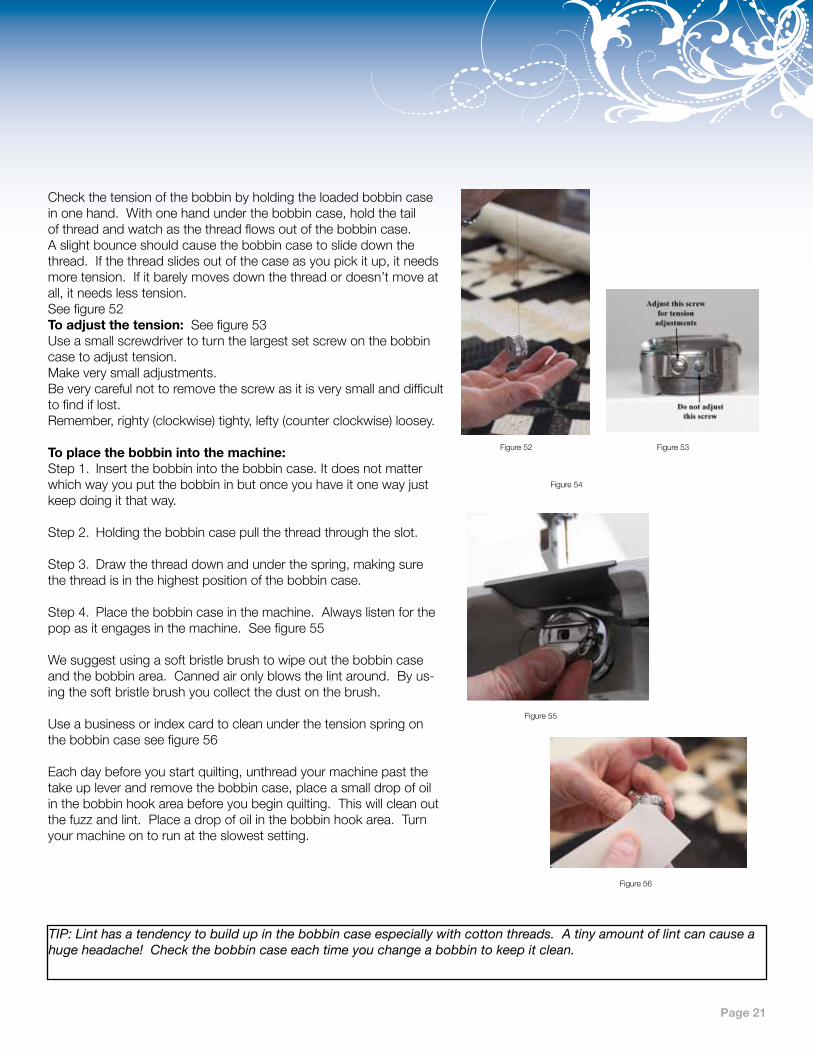
Checkthetensionofthebobbinbyholdingtheloadedbobbincaseinonehand.Withonehandunderthebobbincase,holdthetailofthreadandwatchasthethreadflowsoutofthebobbincase.Aslightbounceshouldcausethebobbincasetoslidedownthethread.Ifthethreadslidesoutofthecaseasyoupickitup,itneedsmoretension.Ifitbarelymovesdownthethreadordoesn’tmoveatall,itneedslesstension.Seefigure52To adjust the tension: Seefigure53Useasmallscrewdrivertoturnthelargestsetscrewonthebobbincasetoadjusttension.Makeverysmalladjustments.Beverycarefulnottoremovethescrewasitisverysmallanddifficulttofindiflost.Remember,righty(clockwise)tighty,lefty(counterclockwise)loosey.
To place the bobbin into the machine:Step1. Insertthebobbinintothebobbincase.Itdoesnotmatterwhichwayyouputthebobbininbutonceyouhaveitonewayjustkeepdoingitthatway.
Step2. Holdingthebobbincasepullthethreadthroughtheslot.
Step3. Drawthethreaddownandunderthespring,makingsurethethreadisinthehighestpositionofthebobbincase.
Step4. Placethebobbincaseinthemachine.Alwayslistenforthepopasitengagesinthemachine.Seefigure55
Wesuggestusingasoftbristlebrushtowipeoutthebobbincaseandthebobbinarea.Cannedaironlyblowsthelintaround.Byus-ingthesoftbristlebrushyoucollectthedustonthebrush.
Useabusinessorindexcardtocleanunderthetensionspringonthebobbincaseseefigure56
Eachdaybeforeyoustartquilting,unthreadyourmachinepastthetakeupleverandremovethebobbincase,placeasmalldropofoilinthebobbinhookareabeforeyoubeginquilting.Thiswillcleanoutthefuzzandlint.Placeadropofoilinthebobbinhookarea.Turnyourmachineontorunattheslowestsetting.
TIP: Lint has a tendency to build up in the bobbin case especially with cotton threads. A tiny amount of lint can cause a huge headache! Check the bobbin case each time you change a bobbin to keep it clean.
Figure52 Figure53
Figure54
Figure55
Figure56
Page 22
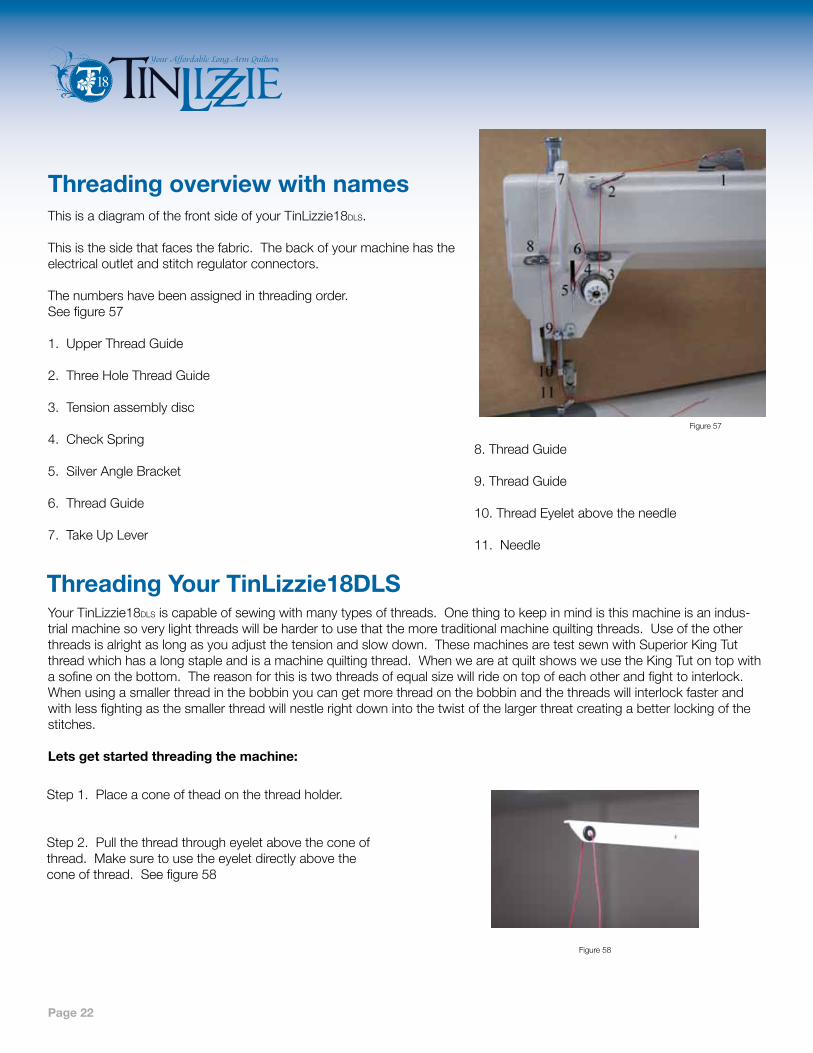
Threading overview with namesThisisadiagramofthefrontsideofyourTinLizzie18DLS.
Thisisthesidethatfacesthefabric.Thebackofyourmachinehastheelectricaloutletandstitchregulatorconnectors.
Thenumbershavebeenassignedinthreadingorder.Seefigure57
1.UpperThreadGuide
2.ThreeHoleThreadGuide
3.Tensionassemblydisc
4.CheckSpring
5.SilverAngleBracket
6.ThreadGuide
7.TakeUpLever
Threading Your TinLizzie18dLsYourTinLizzie18DLSiscapableofsewingwithmanytypesofthreads.Onethingtokeepinmindisthismachineisanindus-trialmachinesoverylightthreadswillbehardertousethatthemoretraditionalmachinequiltingthreads.Useoftheotherthreadsisalrightaslongasyouadjustthetensionandslowdown.ThesemachinesaretestsewnwithSuperiorKingTutthreadwhichhasalongstapleandisamachinequiltingthread.WhenweareatquiltshowsweusetheKingTutontopwithasofineonthebottom.Thereasonforthisistwothreadsofequalsizewillrideontopofeachotherandfighttointerlock.Whenusingasmallerthreadinthebobbinyoucangetmorethreadonthebobbinandthethreadswillinterlockfasterandwithlessfightingasthesmallerthreadwillnestlerightdownintothetwistofthelargerthreatcreatingabetterlockingofthestitches.
Lets get started threading the machine:
Step1.Placeaconeoftheadonthethreadholder.
Step2.Pullthethreadthrougheyeletabovetheconeofthread.Makesuretousetheeyeletdirectlyabovetheconeofthread.Seefigure58
8.ThreadGuide
9.ThreadGuide
10.ThreadEyeletabovetheneedle
11.Needle
Figure58
Figure57
Page 23
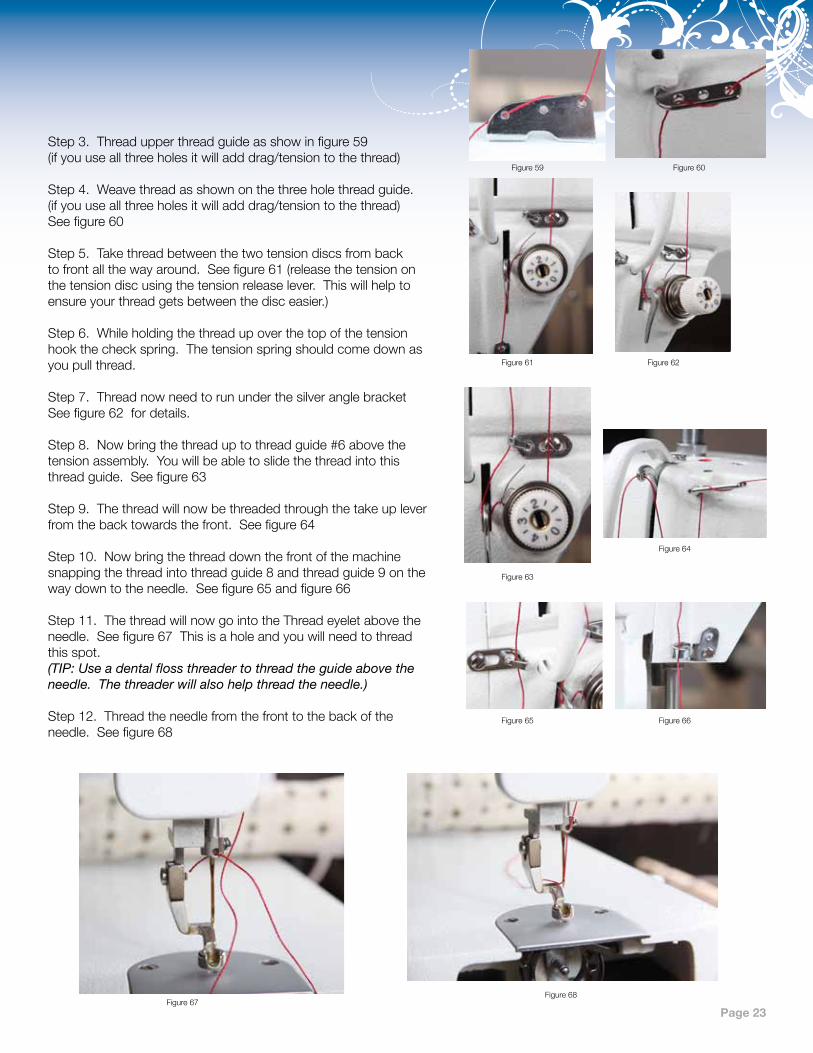
Step3.Threadupperthreadguideasshowinfigure59(ifyouuseallthreeholesitwilladddrag/tensiontothethread)
Step4.Weavethreadasshownonthethreeholethreadguide.(ifyouuseallthreeholesitwilladddrag/tensiontothethread)Seefigure60
Step5.Takethreadbetweenthetwotensiondiscsfrombacktofrontallthewayaround.Seefigure61(releasethetensiononthetensiondiscusingthetensionreleaselever.Thiswillhelptoensureyourthreadgetsbetweenthedisceasier.)
Step6.Whileholdingthethreadupoverthetopofthetensionhookthecheckspring.Thetensionspringshouldcomedownasyoupullthread.
Step7.ThreadnowneedtorununderthesilveranglebracketSeefigure62fordetails.
Step8.Nowbringthethreaduptothreadguide#6abovethetensionassembly.Youwillbeabletoslidethethreadintothisthreadguide.Seefigure63
Step9.Thethreadwillnowbethreadedthroughthetakeupleverfromthebacktowardsthefront.Seefigure64
Step10.Nowbringthethreaddownthefrontofthemachinesnappingthethreadintothreadguide8andthreadguide9onthewaydowntotheneedle.Seefigure65andfigure66
Step11.ThethreadwillnowgointotheThreadeyeletabovetheneedle.Seefigure67Thisisaholeandyouwillneedtothreadthisspot.(TIP: Use a dental floss threader to thread the guide above the needle. The threader will also help thread the needle.)
Step12.Threadtheneedlefromthefronttothebackoftheneedle.Seefigure68
Figure59 Figure60
Figure61 Figure62
Figure63
Figure64
Figure65 Figure66
Figure67Figure68
Page 24
how do I change the needle?A134RSANneedle(size18)willbeinstalledonyourTinLizzie18DLSfromthefactory.Whenitistimetoreplacetheneedleyoucaneasilyinstallone.Besurethepowerswitchisoffonthemachine.Removethebobbincase.
Toremovetheneedleusethesmallerscrewdriverincludedwithyourmachine.
step 1.Loosenthescrewjustabovethethreadguideontheneedlebar;theneedleshouldfalloutasyouloosenthescrew.
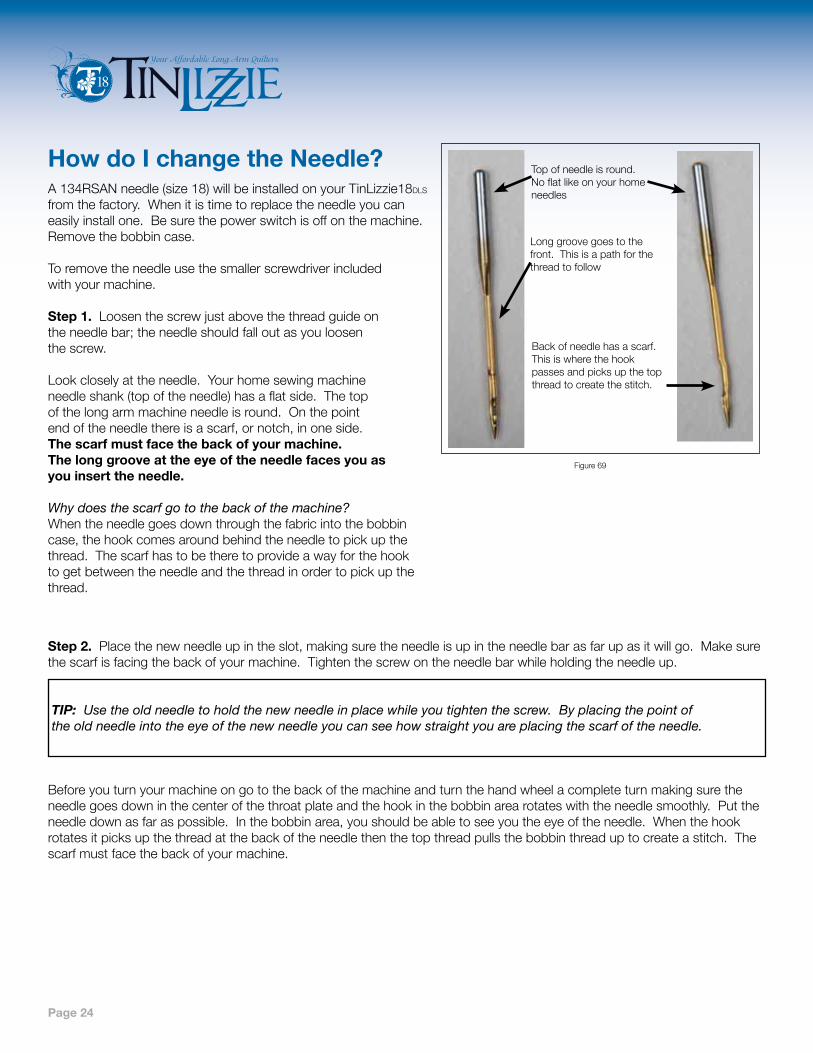
Lookcloselyattheneedle.Yourhomesewingmachineneedleshank(topoftheneedle)hasaflatside.Thetopofthelongarmmachineneedleisround.Onthepointendoftheneedlethereisascarf,ornotch,inoneside.The scarf must face the back of your machine. The long groove at the eye of the needle faces you as you insert the needle.
Why does the scarf go to the back of the machine?Whentheneedlegoesdownthroughthefabricintothebobbincase,thehookcomesaroundbehindtheneedletopickupthethread.Thescarfhastobetheretoprovideawayforthehooktogetbetweentheneedleandthethreadinordertopickupthethread.
Topofneedleisround.Noflatlikeonyourhomeneedles
Longgroovegoestothefront.Thisisapathforthethreadtofollow
Backofneedlehasascarf.Thisiswherethehookpassesandpicksupthetopthreadtocreatethestitch.
Figure69
step 2. Placethenewneedleupintheslot,makingsuretheneedleisupintheneedlebarasfarupasitwillgo.Makesurethescarfisfacingthebackofyourmachine.Tightenthescrewontheneedlebarwhileholdingtheneedleup.
TIP: Use the old needle to hold the new needle in place while you tighten the screw. By placing the point of the old needle into the eye of the new needle you can see how straight you are placing the scarf of the needle.
Beforeyouturnyourmachineongotothebackofthemachineandturnthehandwheelacompleteturnmakingsuretheneedlegoesdowninthecenterofthethroatplateandthehookinthebobbinarearotateswiththeneedlesmoothly.Puttheneedledownasfaraspossible.Inthebobbinarea,youshouldbeabletoseeyoutheeyeoftheneedle.Whenthehookrotatesitpicksupthethreadatthebackoftheneedlethenthetopthreadpullsthebobbinthreaduptocreateastitch.Thescarfmustfacethebackofyourmachine.
Page 25
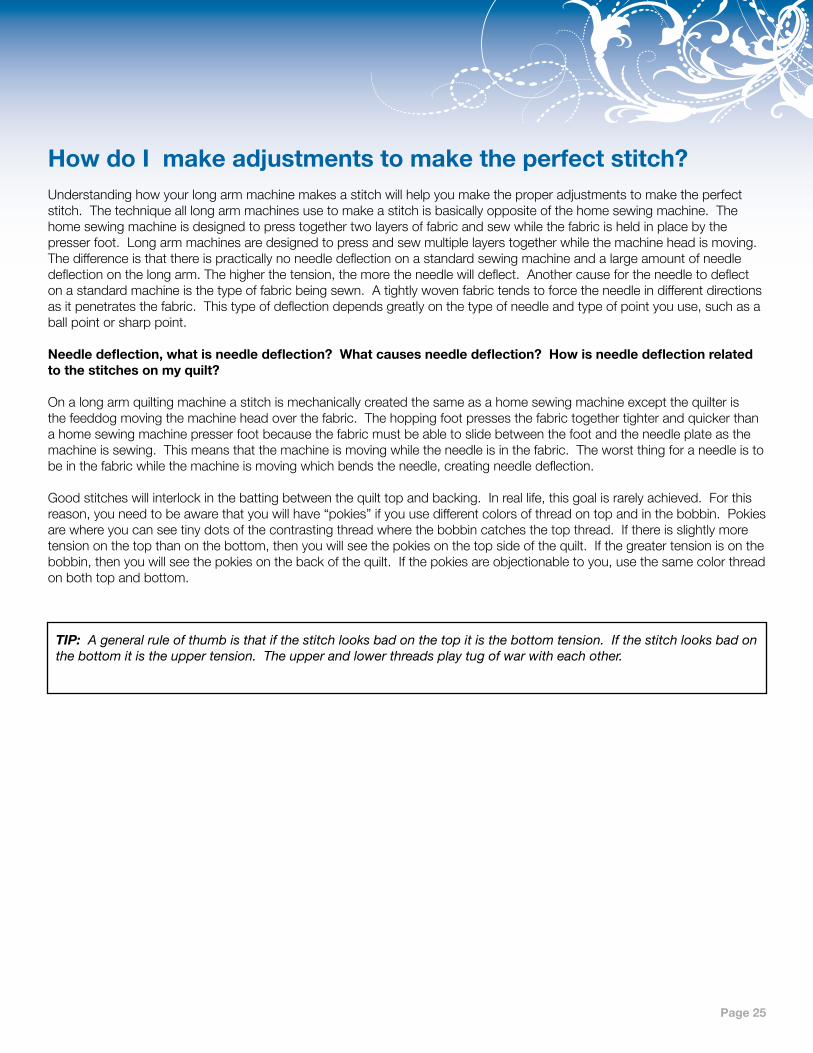
how do I make adjustments to make the perfect stitch?Understandinghowyourlongarmmachinemakesastitchwillhelpyoumaketheproperadjustmentstomaketheperfectstitch.Thetechniquealllongarmmachinesusetomakeastitchisbasicallyoppositeofthehomesewingmachine.Thehomesewingmachineisdesignedtopresstogethertwolayersoffabricandsewwhilethefabricisheldinplacebythepresserfoot.Longarmmachinesaredesignedtopressandsewmultiplelayerstogetherwhilethemachineheadismoving.Thedifferenceisthatthereispracticallynoneedledeflectiononastandardsewingmachineandalargeamountofneedledeflectiononthelongarm.Thehigherthetension,themoretheneedlewilldeflect.Anothercausefortheneedletodeflectonastandardmachineisthetypeoffabricbeingsewn.Atightlywovenfabrictendstoforcetheneedleindifferentdirectionsasitpenetratesthefabric.Thistypeofdeflectiondependsgreatlyonthetypeofneedleandtypeofpointyouuse,suchasaballpointorsharppoint.
needle deflection, what is needle deflection? What causes needle deflection? how is needle deflection related to the stitches on my quilt?
Onalongarmquiltingmachineastitchismechanicallycreatedthesameasahomesewingmachineexceptthequilteristhefeeddogmovingthemachineheadoverthefabric.Thehoppingfootpressesthefabrictogethertighterandquickerthanahomesewingmachinepresserfootbecausethefabricmustbeabletoslidebetweenthefootandtheneedleplateasthemachineissewing.Thismeansthatthemachineismovingwhiletheneedleisinthefabric.Theworstthingforaneedleistobeinthefabricwhilethemachineismovingwhichbendstheneedle,creatingneedledeflection.
Goodstitcheswillinterlockinthebattingbetweenthequilttopandbacking.Inreallife,thisgoalisrarelyachieved.Forthisreason,youneedtobeawarethatyouwillhave“pokies”ifyouusedifferentcolorsofthreadontopandinthebobbin.Pokiesarewhereyoucanseetinydotsofthecontrastingthreadwherethebobbincatchesthetopthread.Ifthereisslightlymoretensiononthetopthanonthebottom,thenyouwillseethepokiesonthetopsideofthequilt.Ifthegreatertensionisonthebobbin,thenyouwillseethepokiesonthebackofthequilt.Ifthepokiesareobjectionabletoyou,usethesamecolorthreadonbothtopandbottom.
TIP: A general rule of thumb is that if the stitch looks bad on the top it is the bottom tension. If the stitch looks bad on the bottom it is the upper tension. The upper and lower threads play tug of war with each other.
Page 26
Tension, Tension, Tension ....Thisprobablycausesmoreproblemsthananythingelse.Youneedcorrecttensiononthetopandbottomthreadsbutyoualsomusthavecorrecttensiononthequiltheldbetweenthebars.Youshouldbeabletogentlyrockthebellybarwherethebackingfabricisattached.Thisallowsenoughmovementofyourquiltlayersfortheneedletopenetrateandmakegoodstitches.
Beforeyoustartmakingadjustmentstoyourmachineaskyourself,“Whatchanged?”Ifyourmachinewasstitchinggreatandallofasuddenithasloopiesonthebackorpuckers,“Whatchanged?”Didyoujustchangethebobbin?Didyoujustliftthetakeupbar?Didyoulowerthetakeupbarafterfinishingyourlastquilt?Didyourecentlychangetheneedle?Didyoujustrollthequilt?
Ifthetakeupbarwiththequiltedportionofyourquiltistoohigh,itwillresultinpoorstitchquality.Youneedafingertipspacebetweenthequiltandthemachinebed.Higherwillresultinpoorstitchquality.Lowerandthequiltwillcreateadragonyourmachine’smovement.
Lookatyourbobbin,asloppywoundbobbinwillnotcreateagoodstitch.Makesurethatthethreadsonthebobbinaresnugandevenlywound.Checktoseeifthereisapieceoflintinthebobbincase.
Tension Trouble shooting checklist• Isthesidetensionleverdown?• HaveIoiledmymachineregularly?• Isthequilttootightontheframe?• Isthethreadcomingofftheconefreely?• Hasyourthreadjumpedoutofthetensiondiscs?• Checkyourthreading.Hasanythingbeenmissedorhasthethreadflippeditselfaroundsomething, increasingyourtension?• Isthehoppingfoottoohighortoolow?• Isyourtakeupbartoohigh?Didyoulowerthetakeupbarafteryourlastquilt?• Doyouneedtochangeyourneedle?• Isyourneedleinproperly?
Top Thread breaking• Checktoseethatyourthreadiscomingoffthespoolfreely.Thethreadguideiscenteredoverthespool andhasnotdevelopedanyburrsorcatches.• Checktoseeifthethreadhasloopeditselfaroundthespoolpin.• Checktoseeiftheneedleisincorrectly,withthescarffacingthebackofthemachine.• Haveyourecentlychangedtheneedle?Isitashighasitwillgointheneedlebar?
The stitch Regulator does not keep up with me?Justlikedrivingyourcaryouneedtomakecontrolledstartsandstops,practicebeingconsistentinyourmovements.
eyelashesEyelashesonthebackofthequiltcanbecausedbytoolittletoptension.Turnthethreadtensiondiskclockwise¼turn.Makesmalladjustments.Repeatuntilstitchqualityisgood.Remembertheupperandlowerthreadplaytugofwarwitheachother.
Loose Top stitchIsthetensionleverhandledown?Itlowersthehoppingfootandappliesthetensiondisk.Isthebobbinthreadinsertedintheslotofthebobbincase?Adjustthetensiondisksmallturnsclockwise.Repeatuntilstitchqualityifgood.

Page 27
Quilt Top PuckersIsyourbackingfabricstretchedtootight?Whilethebackingfabricneedstolieflatandwithoutwrinkles,stretchingittootightcanmakethequilttoppucker.Afterstitchingandreleasingthebackingfabricthetopwillpucker.
Thetoptensionistootight.Adjustthetensiondiscsmallturnscounterclockwise.Repeatuntilstitchqualityisgood.
stitches are skippedSkippedstitchesleaveneedleholeswithoutthreadwhilelargeandsmallstitchesinregulatedmodemeanstheencodersarenotpicking-upthesignalofyourmovementsbecauseoflintorthreadstoppingorslowingthereading.
First,checktoseethatyourmachineisthreadedcorrectly.Lookatthecheckspring,doesthethreadlayinthecheckspring?Whenproperlythreadedthecheckspringwillmoveupanddownasthemachineisstitchingandthethreadisflow-ingfreely.
Checktheneedle.Besureitisallthewayupintotheshaftandthescarfistowardtheback.Ifithasbeenusedforsometime,replacetheneedle.Abluntneedlewillmakeapoppingsoundasitpenetratesthequiltsandwich.
machine drags making it difficult to moveChecktomakesurethequiltonthetakeupbarisnotdraggingonthebedofthemachine.Afingertipdistancebetweenthetakeupbarandthebedofthemachineisallthatisnecessary.Elevatingthetakeupbartoohighcancauseloopiesontheback.Lookforlintorthreadthatmightbesnaggingasyoumovethemachine.
difficult to Control the movement of the machineCheckforlintorotherdebrisonthetrackandbars.Sometimesthesmallestpiecesofthreadcreatethebiggestheadaches.
Page 28
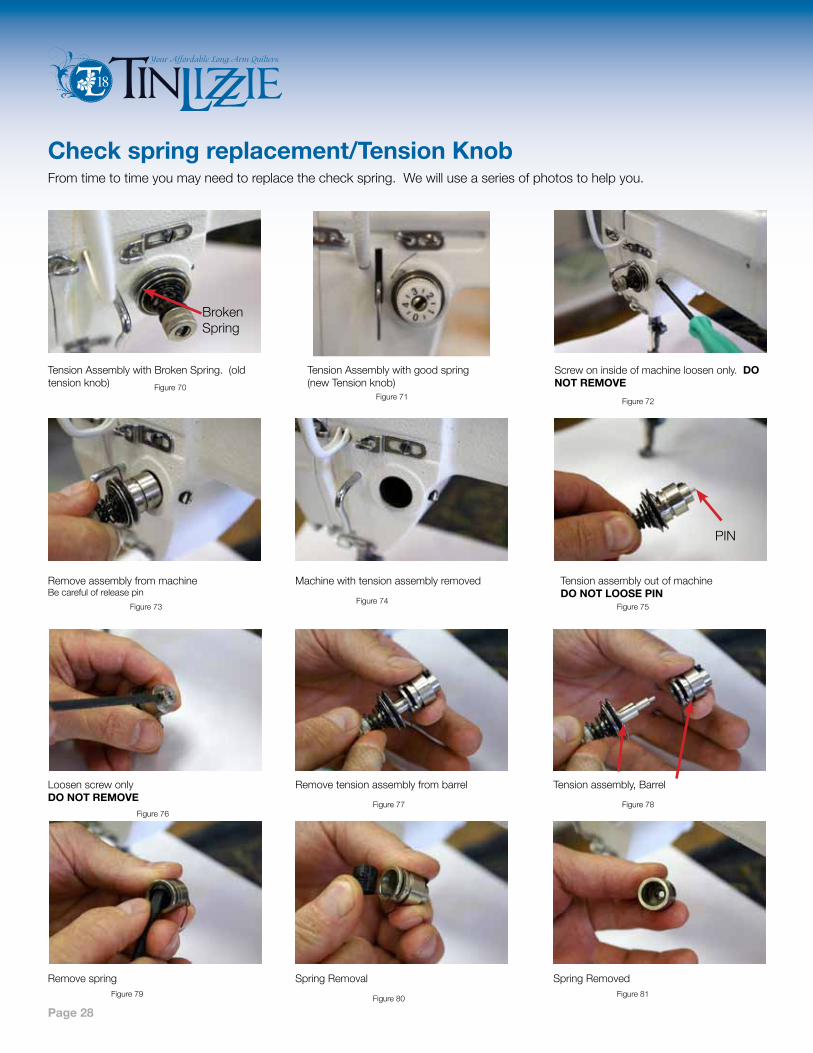
Check spring replacement/Tension KnobFromtimetotimeyoumayneedtoreplacethecheckspring.Wewilluseaseriesofphotostohelpyou.
TensionAssemblywithBrokenSpring.(oldtensionknob)
Screwoninsideofmachineloosenonly.dO nOT RemOVe
RemoveassemblyfrommachineBecarefulofreleasepin
Machinewithtensionassemblyremoved TensionassemblyoutofmachinedO nOT LOOse PIn
PIN
BrokenSpring
LoosenscrewonlydO nOT RemOVe
Removetensionassemblyfrombarrel Tensionassembly,Barrel
Removespring SpringRemoval SpringRemoved
TensionAssemblywithgoodspring(newTensionknob)Figure70
Figure71 Figure72
Figure73Figure74
Figure75
Figure76Figure77 Figure78
Figure79 Figure80 Figure81
Page 29
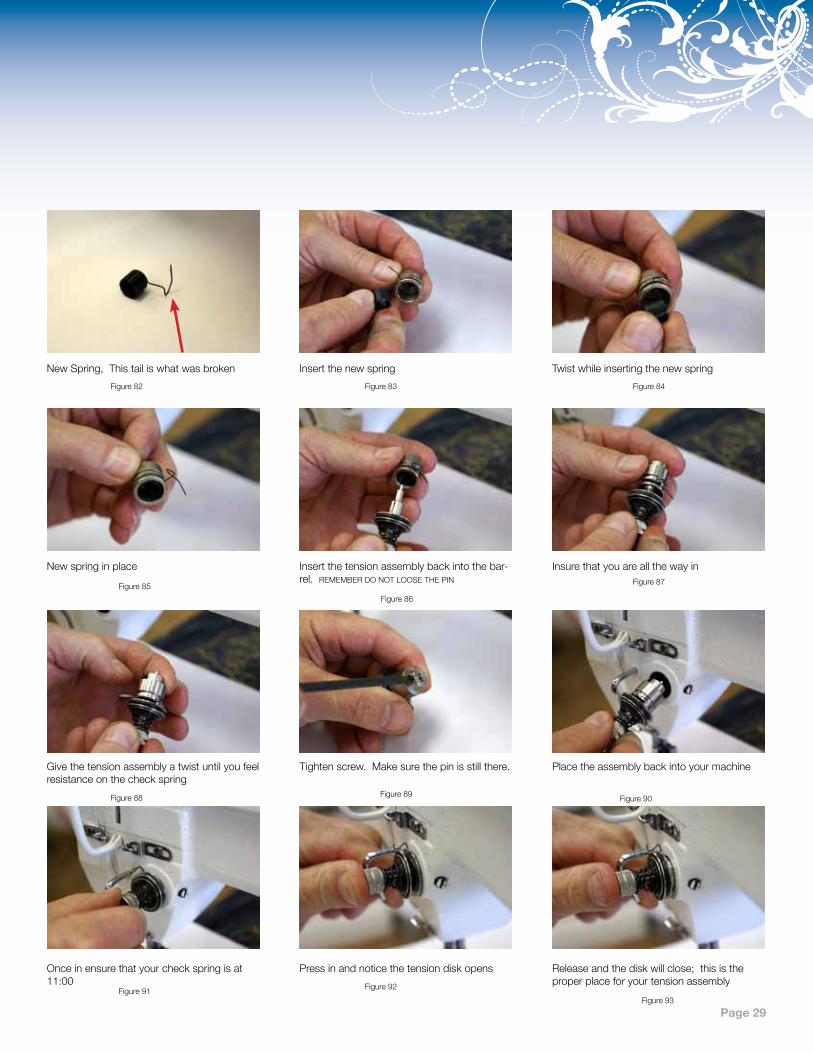
NewSpring,Thistailiswhatwasbroken Insertthenewspring Twistwhileinsertingthenewspring
Newspringinplace Insertthetensionassemblybackintothebar-rel.REMEMBERDONOTLOOSETHEPIN
Insurethatyouareallthewayin
Givethetensionassemblyatwistuntilyoufeelresistanceonthecheckspring
Tightenscrew.Makesurethepinisstillthere. Placetheassemblybackintoyourmachine
Onceinensurethatyourcheckspringisat11:00
Pressinandnoticethetensiondiskopens Releaseandthediskwillclose;thisistheproperplaceforyourtensionassembly
Figure82 Figure83 Figure84
Figure85
Figure86
Figure87
Figure88 Figure89 Figure90
Figure91 Figure92
Figure93
Page 30
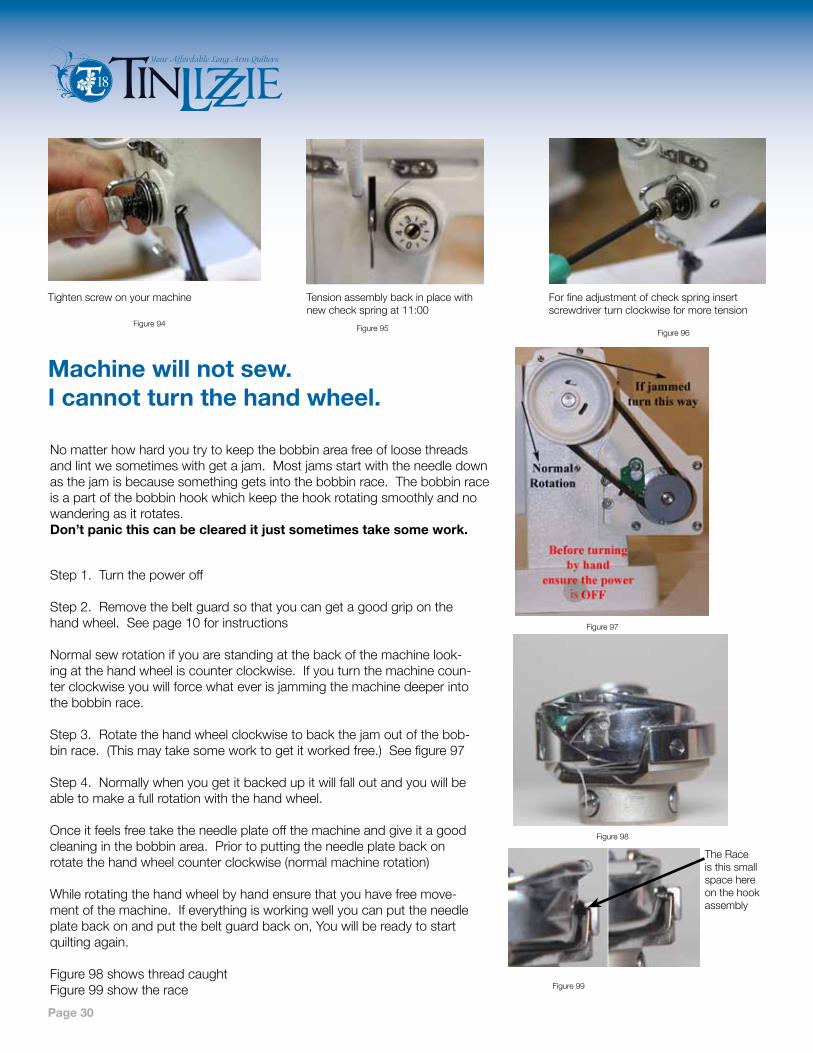
Tightenscrewonyourmachine Tensionassemblybackinplacewithnewcheckspringat11:00
Forfineadjustmentofcheckspringinsertscrewdriverturnclockwiseformoretension
machine will not sew. I cannot turn the hand wheel.
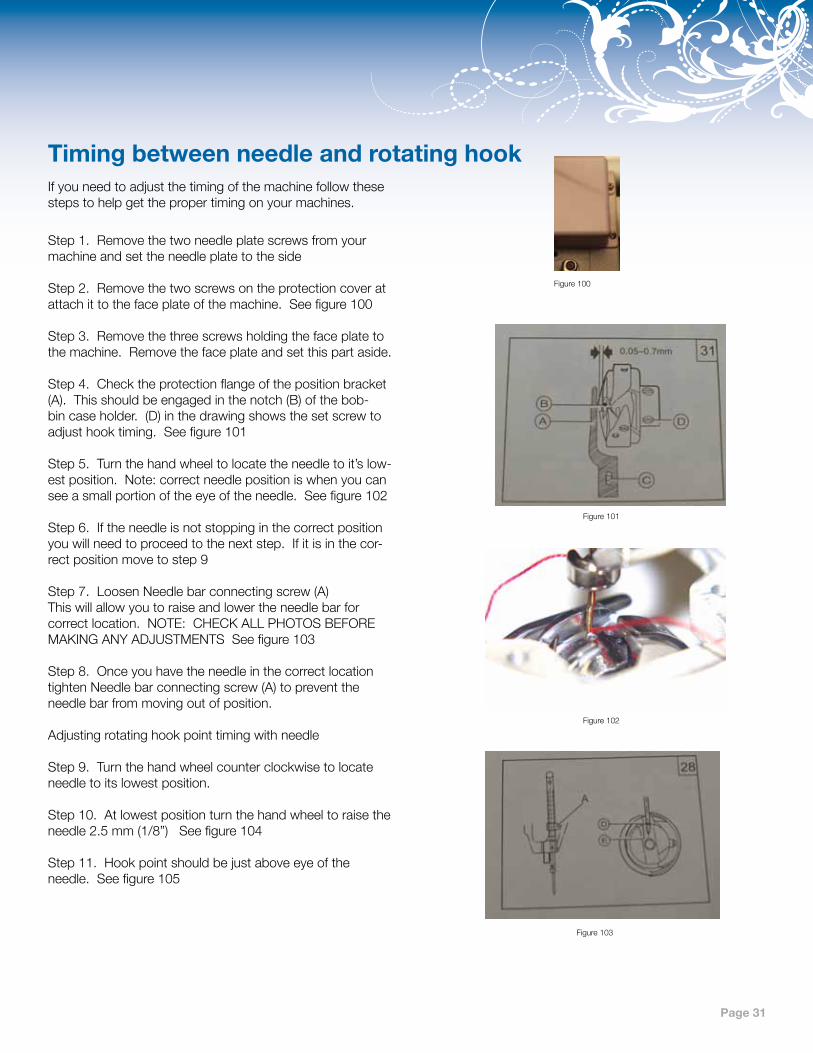
Nomatterhowhardyoutrytokeepthebobbinareafreeofloosethreadsandlintwesometimeswithgetajam.Mostjamsstartwiththeneedledownasthejamisbecausesomethinggetsintothebobbinrace.Thebobbinraceisapartofthebobbinhookwhichkeepthehookrotatingsmoothlyandnowanderingasitrotates.don’t panic this can be cleared it just sometimes take some work.
Step1.Turnthepoweroff
Step2.Removethebeltguardsothatyoucangetagoodgriponthehandwheel.Seepage10forinstructions
Normalsewrotationifyouarestandingatthebackofthemachinelook-ingatthehandwheeliscounterclockwise.Ifyouturnthemachinecoun-terclockwiseyouwillforcewhateverisjammingthemachinedeeperintothebobbinrace.
Step3.Rotatethehandwheelclockwisetobackthejamoutofthebob-binrace.(Thismaytakesomeworktogetitworkedfree.)Seefigure97
Step4.Normallywhenyougetitbackedupitwillfalloutandyouwillbeabletomakeafullrotationwiththehandwheel.
Onceitfeelsfreetaketheneedleplateoffthemachineandgiveitagoodcleaninginthebobbinarea.Priortoputtingtheneedleplatebackonrotatethehandwheelcounterclockwise(normalmachinerotation)
Whilerotatingthehandwheelbyhandensurethatyouhavefreemove-mentofthemachine.Ifeverythingisworkingwellyoucanputtheneedleplatebackonandputthebeltguardbackon,Youwillbereadytostartquiltingagain.
Figure98showsthreadcaughtFigure99showtherace
Figure94 Figure95 Figure96
Figure97
Figure98
Figure99
TheRaceisthissmallspacehereonthehookassembly
Page 31
Timing between needle and rotating hookIfyouneedtoadjustthetimingofthemachinefollowthesestepstohelpgetthepropertimingonyourmachines.
Step1.Removethetwoneedleplatescrewsfromyourmachineandsettheneedleplatetotheside
Step2.Removethetwoscrewsontheprotectioncoveratattachittothefaceplateofthemachine.Seefigure100
Step3.Removethethreescrewsholdingthefaceplatetothemachine.Removethefaceplateandsetthispartaside.
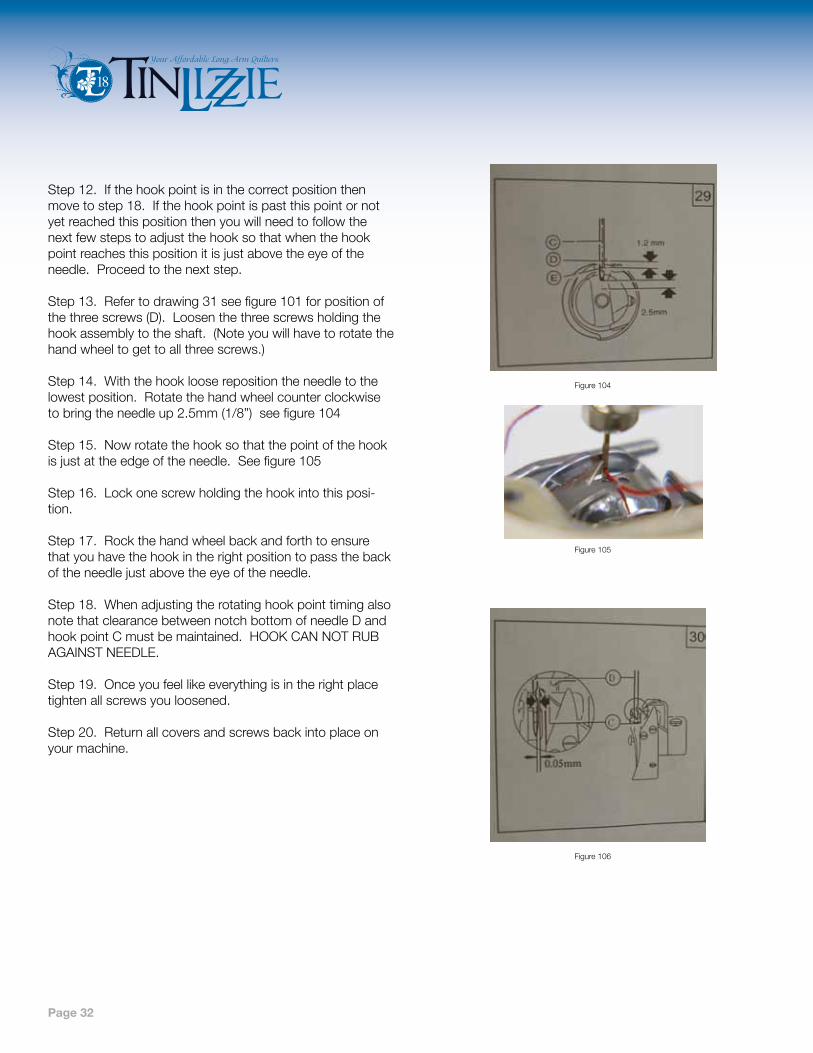
Step4.Checktheprotectionflangeofthepositionbracket(A).Thisshouldbeengagedinthenotch(B)ofthebob-bincaseholder.(D)inthedrawingshowsthesetscrewtoadjusthooktiming.Seefigure101
Step5.Turnthehandwheeltolocatetheneedletoit’slow-estposition.Note:correctneedlepositioniswhenyoucanseeasmallportionoftheeyeoftheneedle.Seefigure102
Step6.Iftheneedleisnotstoppinginthecorrectpositionyouwillneedtoproceedtothenextstep.Ifitisinthecor-rectpositionmovetostep9
Step7.LoosenNeedlebarconnectingscrew(A)Thiswillallowyoutoraiseandlowertheneedlebarforcorrectlocation.NOTE:CHECKALLPHOTOSBEFOREMAKINGANYADJUSTMENTSSeefigure103
Step8.OnceyouhavetheneedleinthecorrectlocationtightenNeedlebarconnectingscrew(A)topreventtheneedlebarfrommovingoutofposition.
Adjustingrotatinghookpointtimingwithneedle
Step9.Turnthehandwheelcounterclockwisetolocateneedletoitslowestposition.
Step10.Atlowestpositionturnthehandwheeltoraisetheneedle2.5mm(1/8”)Seefigure104
Step11.Hookpointshouldbejustaboveeyeoftheneedle.Seefigure105
Figure100
Figure101
Figure102
Figure103
Page 32
Step12.Ifthehookpointisinthecorrectpositionthenmovetostep18.Ifthehookpointispastthispointornotyetreachedthispositionthenyouwillneedtofollowthenextfewstepstoadjustthehooksothatwhenthehookpointreachesthispositionitisjustabovetheeyeoftheneedle.Proceedtothenextstep.
Step13.Refertodrawing31seefigure101forpositionofthethreescrews(D).Loosenthethreescrewsholdingthehookassemblytotheshaft.(Noteyouwillhavetorotatethehandwheeltogettoallthreescrews.)
Step14.Withthehooklooserepositiontheneedletothelowestposition.Rotatethehandwheelcounterclockwisetobringtheneedleup2.5mm(1/8”)seefigure104
Step15.Nowrotatethehooksothatthepointofthehookisjustattheedgeoftheneedle.Seefigure105
Step16.Lockonescrewholdingthehookintothisposi-tion.
Step17.Rockthehandwheelbackandforthtoensurethatyouhavethehookintherightpositiontopassthebackoftheneedlejustabovetheeyeoftheneedle.
Step18.WhenadjustingtherotatinghookpointtimingalsonotethatclearancebetweennotchbottomofneedleDandhookpointCmustbemaintained.HOOKCANNOTRUBAGAINSTNEEDLE.
Step19.Onceyoufeellikeeverythingisintherightplacetightenallscrewsyouloosened.
Step20.Returnallcoversandscrewsbackintoplaceonyourmachine.
Figure104
Figure105
Figure106
Page 33
Adjusting the bobbin winder lever (amount of fill on the bobbin)Step1.Usingyourallenwrenchloosenthesetscrew(A)holdingtheBobbinwinderLever(B)inplace.Seefigure107and108Noteyoudonotneedtopullthebobbinwinderouttoadjustthissetting.
Step2.MovetheBobbinwinderleverinforlessfillandoutformorefill
Step3.Tightensetscrew(A)topreventBobbinwinderlever(B)frommoving
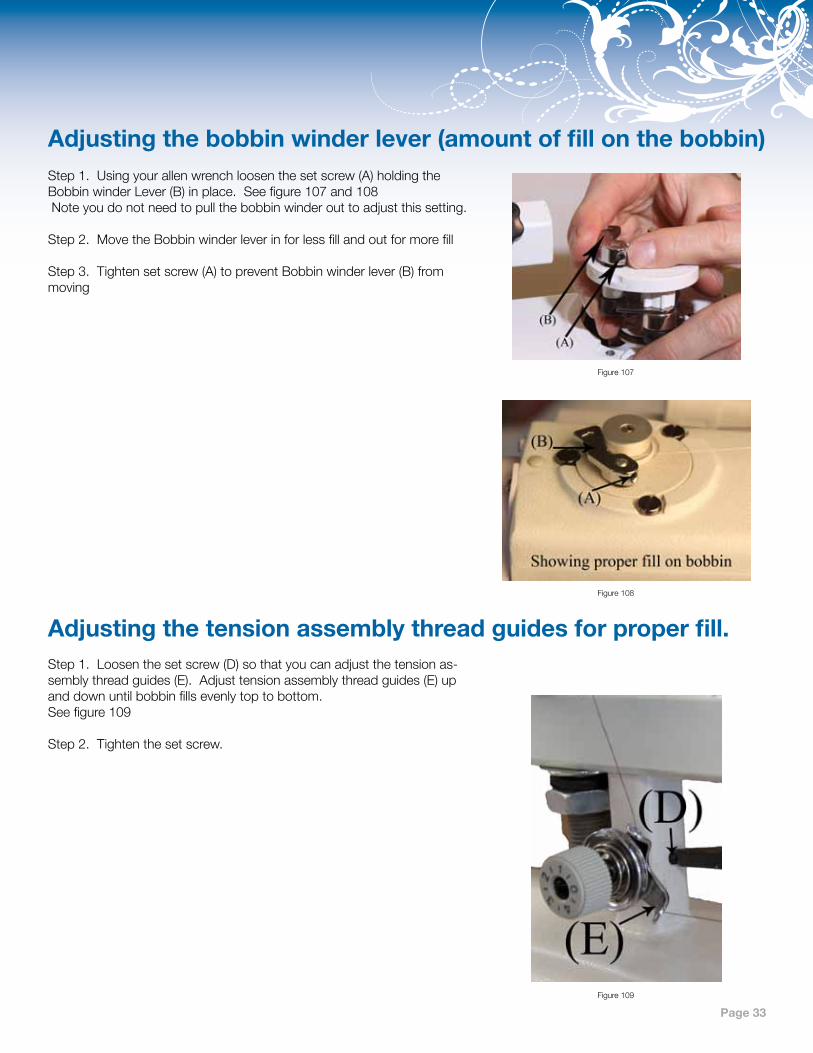
Adjusting the tension assembly thread guides for proper fill.Step1.Loosenthesetscrew(D)sothatyoucanadjustthetensionas-semblythreadguides(E).Adjusttensionassemblythreadguides(E)upanddownuntilbobbinfillsevenlytoptobottom.Seefigure109
Step2.Tightenthesetscrew.
Figure107
Figure108
Figure109

Page 34
Adjusting bobbin winder and contact with the shaft
Step1.Loosenthethree(3)screws(A)holdingthebobbinwinderinplacebutdonotremovethem.Seefigure110
Step2.Twistthebobbinwinder(B)totherightformorecontactwiththeinnershaftormoverleftforlesscontact.
Note:Whentwistingthebobbinwinder(B)youneedtostandonthesideofthemachinewiththeaccesspanel
Step3.Thebobbinwinderdiskwiththefrictionringneedstocontactthediskontheuppershaftwhenengaged.Seefigure111
Step4.Oncedonemovingthebobbinwinderretightenthescrewstoholdthebobbinwinderinplace.
Turningthebobbinwindertotherightwillmovethefrictionwheelcloser
Turningthebobbinwindertotheleftwillmovethefrictionwheelaway
FrictionRingFigure110
Figure111

Page 35
setting up Optional Rear handles using the dLs
TheDigitalLSElectronicsconsistofamainDLScontroller(Shippedonthelefthandle)andaThumbcontroller(shippedontherighthandle).TheyareconnectedtoeachotherusingaRJ50cablewhichisashortcable.TheyareconnectedtothemaincontrollerwithalongRJ50cable.Bothcablesareincludedwiththeset.
(Note:frontandrearDLScontrollersmusthavethesmallswitchlocatedinfig3movedtotheoffposition.)
Figure112Figure113
Figure114
Figure115
Infigure112themainDLScontrollertherearethree(3)connectionspointswhichtwo(2)oftheseareusedwhenyouonlyhavetheonehandleconnected.InFigure113thethumbcontrollerhastwo(2)connectionpoints.wewillbeusingtheletconnectiononly.Figure114and115areforreferenceonly.
Connecting the rear handle bar electronics
TheRearcontrollerwillusethethree(3)connections.Theleftconnection(whenlookingattheLCDscreen)willhaveashortRJ50cableconnectedtoitandthenconnectedtothemachineThemiddleconnectorwillalsohaveashortRJ50cableconnectedtoitandthenconnectedtotheLeftconnectoronthethumbcontrol.TheRightconnectorontheLCDwillhavealongRJ50cableconnectedtoitandthenconnectedtotheleftconnectoronthefronthandlebars.

Page 36
Using a controller
Ifbothcontrollersshowinactivesimplytouchoneofthebuttonsonthecontrolleryouwanttouse.
Thiswillactivatethecontrollersothatyoucanuseit.Ifyouaredoneoryoucannotgetcontrolofthemachinefromthecon-trolleryouwanttousethenyouwillneedtochecktoseeiftheothercontrollerisintheinactivestate.
To deactivate the dLs controller follow these steps.
Step1.PressandreleasethemenubuttonStep2.Usethe“-”buttontomovethecursordowntodeactivateStep3.Pressandreleaseenter.TheDLScontrollerisnowinactive.Seefigure116
Figure116

Page 37
EnjoyyourTinLizzie18 dLs
asyoufinishyourquiltsyourway