Embed Size (px)
Citation preview
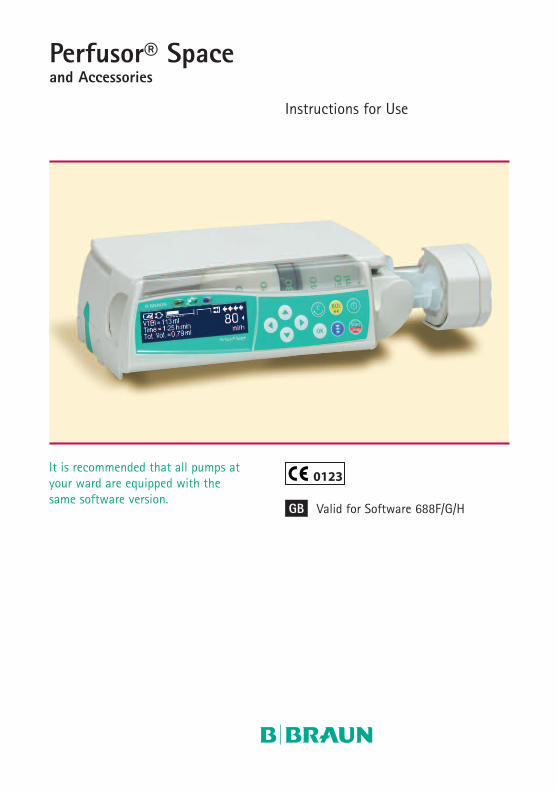
Perfusor® Spaceand Accessories
Instructions for Use
Valid for Software 688F/G/H
It is recommended that all pumps atyour ward are equipped with thesame software version.
GB
CONTENTS
CONTENTS
Perfusor® Space Overview.......................................................................................................3
Patient Safety ........................................................................................................................5
Menu Structure / Navigation.................................................................................................9
Chapter 1 Operation ..........................................................................................................111.1 Start of Infusion .........................................................................................................................111.2 Entry With Different Combinations of Rate, VTBI (= Volume To Be Infused)
and Time .......................................................................................................................................121.3 Bolus Application.......................................................................................................................131.4 Syringe Change and New Therapy Start .............................................................................141.5 End of Infusion ...........................................................................................................................151.6 Standby Mode.............................................................................................................................15
Chapter 2 Advanced Operations....................................................................................162.1 Status Request of Pump when Infusion is Running........................................................162.2 Rate, VTBI and Time Change Without Infusion Interruption and Reset
of Status Menu Data ................................................................................................................16
Chapter 3 Special Functions* .........................................................................................173.1 Dose Rate Calculation (Overview) ........................................................................................173.2 Dose Rate Calculation (Operation) .......................................................................................173.3 Drug Library .................................................................................................................................183.4 Patient Controlled Analgesia (PCA) ......................................................................................193.5 Target Controlled Infusion (TCI).............................................................................................213.6 Barcoding .....................................................................................................................................27
Chapter 4 Options..............................................................................................................284.1 Occlusion Pressure.....................................................................................................................284.2 Data Lock......................................................................................................................................284.3 Bolus Rate ....................................................................................................................................294.4 KVO-Mode....................................................................................................................................294.5 Contrast / Display Light / Keypad Light ..............................................................................304.6 Alarm Volume..............................................................................................................................304.7 Date / Time ..................................................................................................................................304.8 Macro Mode ................................................................................................................................304.9 Language ......................................................................................................................................31
Chapter 5 Alarms ...............................................................................................................325.1 Device Alarm ...............................................................................................................................325.2 Pre-Alarms and Operating Alarms........................................................................................325.3 Reminder Alarms........................................................................................................................355.4 Alarm Hints..................................................................................................................................35
Chapter 6 Battery Operation and Maintenance .......................................................36
Chapter 7 Compatible Syringes .....................................................................................38
Chapter 8 Start Up Graphs and Trumpet Curves ......................................................41
Chapter 9 Technical Data ................................................................................................42
Chapter 10 Warranty / TSC** / Service / Training / Cleaning / Disposal..............44
Chapter 11 Instructions for Use Accessory ..................................................................46
Ordering .....................................................................................................................50
*The availability ofthe listed featuresis depending onthe configurationof the pump.**Technical SafetyCheck.
2
PERFUSOR SPACE® OVERVIEW
PERFUSOR® SPACE OVERVIEW
3
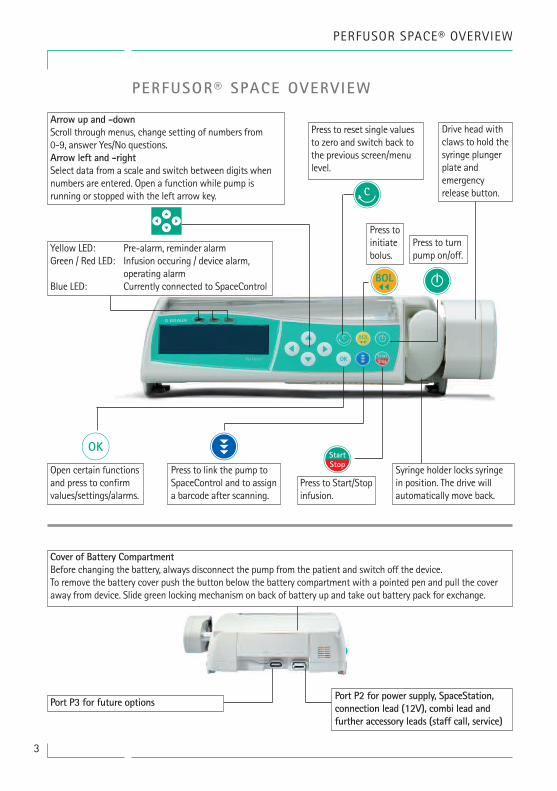
Arrow up and -downScroll through menus, change setting of numbers from0-9, answer Yes/No questions.Arrow left and -rightSelect data from a scale and switch between digits whennumbers are entered. Open a function while pump isrunning or stopped with the left arrow key.
Press to reset single valuesto zero and switch back tothe previous screen/menulevel.
Press to Start/Stopinfusion.
Press to link the pump toSpaceControl and to assigna barcode after scanning.
Open certain functionsand press to confirmvalues/settings/alarms.
Syringe holder locks syringein position. The drive willautomatically move back.
Yellow LED: Pre-alarm, reminder alarmGreen / Red LED: Infusion occuring / device alarm,
operating alarmBlue LED: Currently connected to SpaceControl
qc
k m Sf
Port P2 for power supply, SpaceStation,connection lead (12V), combi lead andfurther accessory leads (staff call, service)
Port P3 for future options
Cover of Battery CompartmentBefore changing the battery, always disconnect the pump from the patient and switch off the device.To remove the battery cover push the button below the battery compartment with a pointed pen and pull the coveraway from device. Slide green locking mechanism on back of battery up and take out battery pack for exchange.
Press toinitiatebolus.
Press to turnpump on/off.
onB
Drive head withclaws to hold thesyringe plungerplate andemergencyrelease button.
PERFUSOR® SPACE OVERVIEW
4
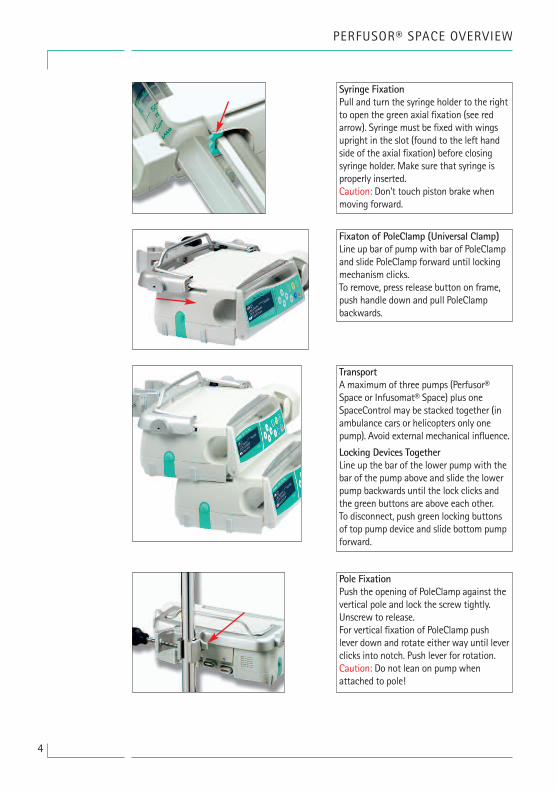
Syringe FixationPull and turn the syringe holder to the rightto open the green axial fixation (see redarrow). Syringe must be fixed with wingsupright in the slot (found to the left handside of the axial fixation) before closingsyringe holder. Make sure that syringe isproperly inserted.Caution: Don't touch piston brake whenmoving forward.
TransportA maximum of three pumps (Perfusor®Space or Infusomat® Space) plus oneSpaceControl may be stacked together (inambulance cars or helicopters only onepump). Avoid external mechanical influence.
Locking Devices TogetherLine up the bar of the lower pump with thebar of the pump above and slide the lowerpump backwards until the lock clicks andthe green buttons are above each other.To disconnect, push green locking buttonsof top pump device and slide bottom pumpforward.
Fixaton of PoleClamp (Universal Clamp)Line up bar of pump with bar of PoleClampand slide PoleClamp forward until lockingmechanism clicks.To remove, press release button on frame,push handle down and pull PoleClampbackwards.
Pole FixationPush the opening of PoleClamp against thevertical pole and lock the screw tightly.Unscrew to release.For vertical fixation of PoleClamp pushlever down and rotate either way until leverclicks into notch. Push lever for rotation.Caution: Do not lean on pump whenattached to pole!
PATIENT SAFETY
PATIENT SAFETY
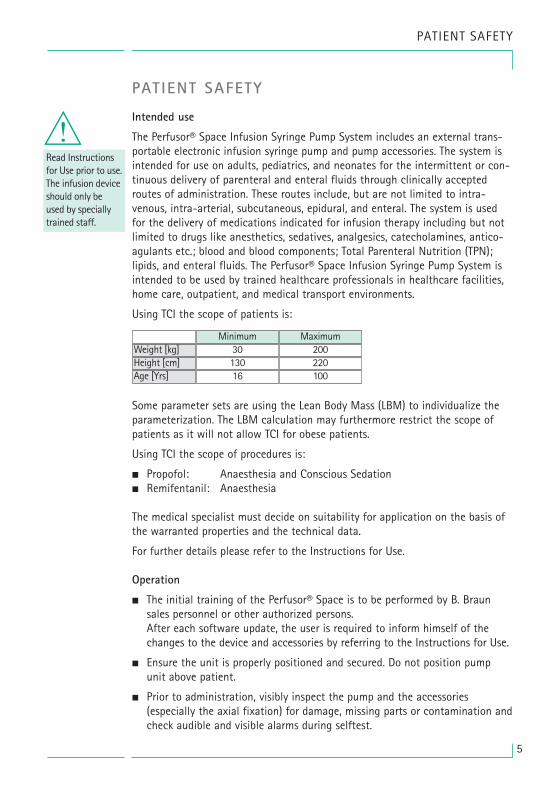
Read Instructionsfor Use prior to use.The infusion deviceshould only beused by speciallytrained staff.
5
Intended use
The Perfusor® Space Infusion Syringe Pump System includes an external trans-portable electronic infusion syringe pump and pump accessories. The system isintended for use on adults, pediatrics, and neonates for the intermittent or con-tinuous delivery of parenteral and enteral fluids through clinically acceptedroutes of administration. These routes include, but are not limited to intra-venous, intra-arterial, subcutaneous, epidural, and enteral. The system is usedfor the delivery of medications indicated for infusion therapy including but notlimited to drugs like anesthetics, sedatives, analgesics, catecholamines, antico-agulants etc.; blood and blood components; Total Parenteral Nutrition (TPN);lipids, and enteral fluids. The Perfusor® Space Infusion Syringe Pump System isintended to be used by trained healthcare professionals in healthcare facilities,home care, outpatient, and medical transport environments.
Using TCI the scope of patients is:
Some parameter sets are using the Lean Body Mass (LBM) to individualize theparameterization. The LBM calculation may furthermore restrict the scope ofpatients as it will not allow TCI for obese patients.
Using TCI the scope of procedures is:
• Propofol: Anaesthesia and Conscious Sedation• Remifentanil: Anaesthesia
The medical specialist must decide on suitability for application on the basis ofthe warranted properties and the technical data.
For further details please refer to the Instructions for Use.
Operation
• The initial training of the Perfusor® Space is to be performed by B. Braunsales personnel or other authorized persons.After each software update, the user is required to inform himself of thechanges to the device and accessories by referring to the Instructions for Use.
• Ensure the unit is properly positioned and secured. Do not position pumpunit above patient.
• Prior to administration, visibly inspect the pump and the accessories(especially the axial fixation) for damage, missing parts or contamination andcheck audible and visible alarms during selftest.
w
Height [cm]Weight [kg]
Age [Yrs]
30Minimum Maximum
200130 22016 100
PATIENT SAFETY
6
• Only connect to patient once the syringe has been inserted correctly andthere is proper fixation of the syringe pressure plate by the claws of the drivehead. Interrupt connection during syringe change to prevent incorrect dosedelivery.
• Select syringe/catheter suitable for use with the intended medical application.
• Position the infusion line free of kinks.
• Recommended change of disposable each 24 h (or as per national hygieneregulations).
• Installation in medically used rooms must comply with the appropriateregulations (e.g. VDE 0100, VDE 0107 or IEC-publications). Observe nationalspecifications and deviations.
• Do not operate the pump in the presence of flammable anaesthetics toprevent explosion.
• Compare the displayed value with the entered value. Start infusion only ifthe values are corresponding.
• If staff call is used we recommend checking the equipment once afterconnecting the pump.
• Protect the device and the power supply against moisture.
• Do not carry the pump device by it's drive mechanism during transportation.
• If the pump device falls or is exposed to force it needs to be examined by theservice department.
• The displayed data must always be checked by the user prior to makingfurther medical decisions.
• During mobile use (homecare, patient transport inside and outside thehospital): Make sure the device is securely fixed and positioned. Positioningchanges and severe shock can lead to minor changes in the deliveryaccuracy.
• A supplemental patient monitoring must be carried out if life-savingmedication is performed.
• Avoid applying external force on the drive mechanism during administration.
• In case high potent drugs are given be sure to have a second infusion pumpfor that drug at hand.
• Independant of the soft limits the selected values have to be the medicallycorrect ones for the given patient.
• In case values relevant for the dose rate calculation (e.g. body weight) arechanging always the flow rate will be updated and the dose rate will be fix.
Other components
• Only use pressure resistant tubes (min. 2 bar/1500 mmHg).
7
PATIENT SAFETY
• Where several infusion lines are connected on one single vascular access, thepossibility of the lines exerting a mutual influence over each other cannot beexcluded.
• Refer to the according manufacturer’s information for possibleincompatibilities of equipment with respect to drugs.
• Use only compatible combinations of equipment, accessories, working partsand disposables with luer lock connectors.
• The use of incompatible disposables may influence the technicalspecifications of the device.
• Connected electrical equipment must comply with the relevant IEC/EN-specifications (e.g. IEC/EN 60950 for data-processing equipment).The user/operator is responsible for the system configuration if additionalequipment is connected. The international standard IEC/EN 60601-1-1 has tobe taken into account.
Safety StandardsPerfusor® Space satisfies all safety standards for medical electrical devices incompliance with IEC/EN 60601-1 and IEC/EN 60601-2-24.
• The EMC-limits (electro-magnetic compatibility) according toIEC/EN 60601-1-2 and IEC/EN 60601-2-24 are maintained. If the equipmentis operated in the vicinity of other equipment which may cause high levels ofinterference (e.g. HF surgical equipment, nuclear spin tomography units,mobile telephones etc.) maintain the recommended protective distances fromthese devices.
• The Perfusor® Space fulfils the applicable requirements of EN 13718 to beused in the air, on the water and in difficult terrain. During transport thePerfusor® Space needs to be fixed on a suitable restraint system by means ofSpaceStation or Pole Clamp SP. When stored under temperature conditionsbeyond the defined operating conditions the Perfusor® Space needs toremain under room temperature at least one hour before usage.
Safety Instructions for using PCA
• In case the demand button is used with SpaceStation the PCA pump has tobe placed in the lowest slot of the lowest SpaceStation.
• Access to the pump settings can be prohibited by DataLock 3. The code forDataLock level 3 should differ from the one for levels 1 and 2 in case thepump is only allowed to be used by pain management professionals.
• For additional safety the removal of the syringe can be prevented by the useof the Syringe Anti Removal Cap (see accessories) and the locking of thesyringe holder. The Syringe Anti Removal Cap is usable for the followingsyringes: B. Braun Original Perfusor Syringe 50 ml, B. Braun Omnifix 50 ml,BD Plastipak 50/60 ml and Tyco Monoject 50 ml. The locking of the syringe
PATIENT SAFETY
8
holder is under the pump and is locked by a clockwise turn of 90°. Make surethe syringe holder is safely locked. Opening of the syringe holder may not bepossible after locking.
• In case opioids are administered and the Syringe Anti Removal Cap is not inuse and the syringe holder is not locked the therapy only should beperformed under surveillance of medical staff. This especially is necessary incase non-authorised access to the drug can be anticipated.
• When ending PCA and starting it again the therapy data are set to defaultvalues.
• Using the demand button also the patient is a permitted user. With thedemand button only a PCA-bolus can be requested. This is limited to pre-defined doses by drug list and pump settings.
Safety instructions for using TCI
• TCI should only be performed by experienced anaesthetists being familiarwith the principles of TCI and properly trained in using the present device.
• The use of TCI with B. Braun Space does not limit the responsibility of theanaesthetist for administration of drugs. They need to be fully aware of theavailable literature for any parameter set used in association with a drug andneed to refer to the prescribed information for rate and dosing limits.
• Pharmacokinetic and pharmacodynamic interactions among anaestheticdrugs are known, but are not taken into account into the calculation of theplasma and effect site concentrations. They have to be taken into account bythe user.
• In particular, the user must be aware that starting the TCI will result in theautomatic infusion of a pre-calculated bolus dose followed by an infusion toachieve the selected target concentration.
• It is essential that the user verifies that the patient characteristics and theselected target concentration as well as the resulting dosages conform to theprescribing information of the relevant country.
• B. Braun has verified the accuracy of the mathematical modelimplementation, the usability as well as pump delivery accuracy.
• While using TCI an appropriate patient monitoring is mandatory.
• Take care of using the right dilution/concentration of the drug and make surethe right dilution is selected at the pump.
• Never administer Propofol or Remifentanil by a second infusion as long asyou use TCI.
• It is possible to completely switch off the TCI mode to avoid the use of TCIaccidentally.
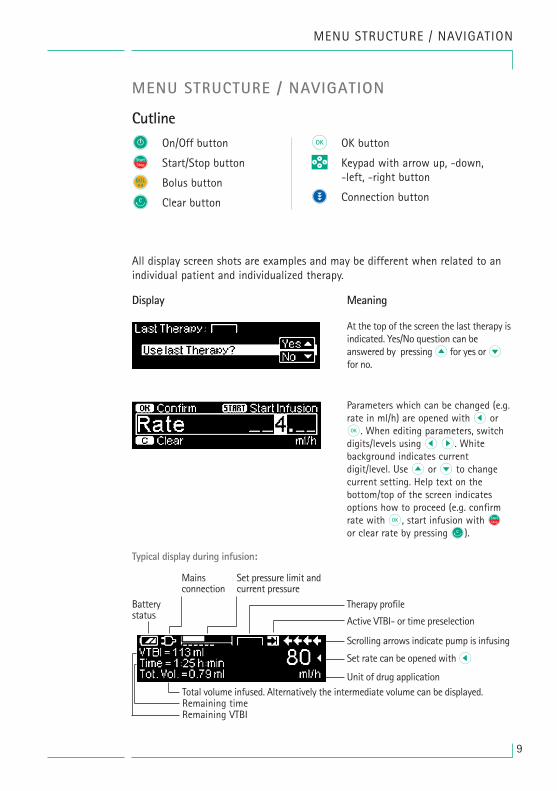
MENU STRUCTURE / NAVIGATION
MENU STRUCTURE / NAVIGATION
At the top of the screen the last therapy isindicated. Yes/No question can beanswered by pressingu for yes ordfor no.
Parameters which can be changed (e.g.rate in ml/h) are opened with l ork. When editing parameters, switchdigits/levels using l r. Whitebackground indicates currentdigit/level. Use u or d to changecurrent setting. Help text on thebottom/top of the screen indicatesoptions how to proceed (e.g. confirmrate with k, start infusion withsfor clear rate by pressing c).
Display Meaning
Mainsconnection
Batterystatus
Unit of drug application
Active VTBI- or time preselection
Scrolling arrows indicate pump is infusing
Set rate can be opened withl
Set pressure limit andcurrent pressure
Therapy profile
Typical display during infusion:
Total volume infused. Alternatively the intermediate volume can be displayed.Remaining timeRemaining VTBI
Cutlineo On/Off button
sf Start/Stop button
nb Bolus button
C Clear button
K OK button
Q Keypad with arrow up, -down,-left, -right button
m Connection button
9
All display screen shots are examples and may be different when related to anindividual patient and individualized therapy.
MENU STRUCTURE / NAVIGATION
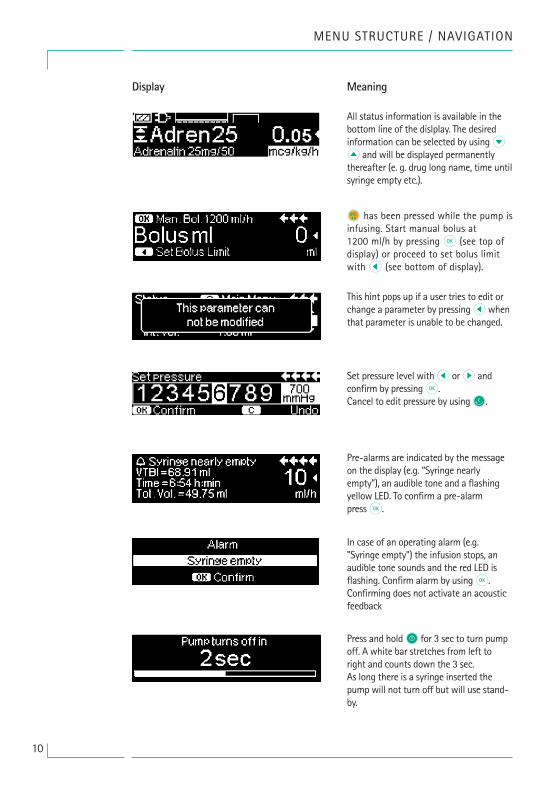
Set pressure level withl orr andconfirm by pressingk.Cancel to edit pressure by usingc.
Pre-alarms are indicated by the messageon the display (e.g. “Syringe nearlyempty”), an audible tone and a flashingyellow LED. To confirm a pre-alarmpressk.
In case of an operating alarm (e.g."Syringe empty") the infusion stops, anaudible tone sounds and the red LED isflashing. Confirm alarm by usingk.Confirming does not activate an acousticfeedback
Press and holdo for 3 sec to turn pumpoff. A white bar stretches from left toright and counts down the 3 sec.As long there is a syringe inserted thepump will not turn off but will use stand-by.
Display Meaning
This hint pops up if a user tries to edit orchange a parameter by pressinglwhenthat parameter is unable to be changed.
10
nb has been pressed while the pump isinfusing. Start manual bolus at1200 ml/h by pressing k (see top ofdisplay) or proceed to set bolus limitwith l (see bottom of display).
All status information is available in thebottom line of the dislplay. The desiredinformation can be selected by usingdu and will be displayed permanentlythereafter (e. g. drug long name, time untilsyringe empty etc.).
Chapter 1
OPERATION
OPERATION
1.1 Start of Infusion
• Ensure correct installation of the pump device. If the pump is connected to mains,the display states information such as the battery status, the mains connectionsymbol and the last therapy.
• Presso to switch on unit. Note the automatic selfcheck: “Selftest active” and thesoftware version are displayed, two audible tones sound and all three LEDs (yellow,green/red and blue) flash once. Information on power supply (battery or mainsconnection), the set pressure level and the syringe (if syringe already inserted) aredisplayed. Hence the drive moves backwards.
• Pressc to start with direct entry of therapy parameters or open pump cover andsyringe holder to start with syringe insertion.
• Insert syringe with wings of the syringe upright in the slot to the right of thehousing. Close syringe holder and pump door. Piston brake moves forward.
Caution: Never leave the pump unattended during syringe loading.
• Confirm syringe type withk. Type of syringe indicated must coincide with syringeinserted.
• Drive will advance and grip pressure plate of syringe.
Caution: Keep hands away from advancing drive.
Note: Make sure that the piston brake moves back into the syringe holder.
• If the prime function is activated, pressU to prime infusion set at 1200 ml/h(pressing key once = 1 ml). Interrupt prime function withk. Repeat procedureuntil infusion line is fully primed. Then pressd to proceed.
• Connect with patient.
• Respectively answer questions in Start Up Menu withu andd, until the rate isdisplayed in the Main Menu.
Enter infusion rate:
• Pressland set rate usingq.
The pump offers the possibility to load up to four languages into the pump(depending on the number of the language specific characters), among which theuser can choose during the operation of the pump. During the first ever start-up ofthe device, the user is requested to select the languages and to mark them withl.After that, the selection has to be confirmed by choosing the last menu item at thebottom of the list and pressingk. Then the desired language must be selected witht and confirmed withk. Answer the following question withd in order toactivate the selected language.
11
OPERATION
Chapter 1
• Presssf to commence infusion. Running arrows on display and green LEDabove display indicate pump is infusing.
Note: Stop the infusion at any time by pressingsf. The pump can be turned offat any time by pressing o for 3 sec (Exception: Data lock level 2) and as long adisposable is inserted.
1.2 Entry With Different Combinations of Rate, VTBI(= Volume To Be Infused) and Time
The Perfusor® Space offers the possibility to enter a volume- and time limit in additionto an infusion rate. When two of these parameters are entered, the third is calculatedby the pump. If a volume and/or time is preselected, an arrow symbol is placed in frontof one of these parameters in the Main Menu. It is called the “target”. During theinfusion of the pump, this target symbol is displayed next to the moving arrows in therun display (this symbol is not visible in case TCI is used). This indicates that the pumphas been programmed, either with a volume- or time limit. The assignment of the tar-get symbol, apparent in the Main Menu, shows the established parameter for the ap-plication (VTBI or time). When the rate is changed, the so-called target parameter isprincipally not adjusted to the new rate but to the parameter which does not have thetarget symbol in front. After theinfusion has started, the remaining VTBI and time are displayed in the Main Menu andthe run display (values are counting down).
1.) Enter VTBI and time: The infusion rate will be calculated and displayed on thebottom of the display.Target: Volume
• Select VTBI with t and open withl.
• Enter VTBI withqand confirm withk.
• Select time with t and open withl.
• Enter time withq and confirm withk.
Check calculated rate on plausibility.
Proceed in the same way to calculate 2.) and 3.).
2.) Infusion with volume limitEnter rate and VTBI: The infusion time will be calculated and displayed at thebottom of the display.Target: VTBI
3.) Infusion with time limitEnter rate and time: The infusion volume will be calculated and displayed at thebottom of the display.Target: Time
Changing already entered values of VTBI and time (rate, VTBI and time already existat the point of change):
12
a) Target symbol is placed in front of VTBI:• Change of VTBI => Adjustment of time. Old and new target: VTBI• Change of time => Adjustment of rate. Old and new target: VTBI
b) Target symbol is placed in front of time:• Change of time => Adjustment of VTBI. Old and new target: Time• Change of VTBI => Adjustment of time. New target: VTBI
Note: Changing VTBI/time is only possible while the pump has been stopped.
1.3 Bolus Application
There are three ways to administer a bolus:
1.)Manual Bolus: Pressnb. Then press k and hold button. Fluid isadministered as long as button is held down. The infused bolus volume isdisplayed.The max. bolus volume is limited to 10 % of the syringe size or 10 sec.Reaching this limit is indicated by an acoustic signal.
2.)Bolus with volume preselection: Pressnb. Then press l and set bolus doselimit by using q. Pressnb to confirm and start bolus. Depending on theservice tool settings an acoustic signal will sound after finishing the bolusvolume.
3.)Bolus with rate calculation: Pressnb. Then press l and set bolus doseby using q. Press k to confirm bolus dose. Set time with q in which abolus is to be delivered. Calculated bolus rate is shown on top of the display.Pressnb to confirm and start bolus.
After pressing the buttonnb the bolus unit can be selected by using d. Theselected unit will be stored and offered as default later on. By this also in dosemode it is possible to administer a bolus in ml.
You can use the service program to enter a default and a maximum bolus rate.Once a new therapy is started the device always returns to the default rate- even if the bolus rate was manually changed beforehand.
Note: If the bolus limit is not entered after pressingnb, the pump switchesback into the run display automatically.
Note: The infused volume during bolus with volume preselection counts up.
In order to purge the line at any time while the pump is stopped pressnb.Answer the following question by pressingu in order to start the purgeprocess. Cancel by pressingu or any other key.
Caution: Take care not to overdose! Given a bolus rate of 1200 ml/h, 1 ml willbe administered in just 3 sec. To cancel bolus infusion at any time press k.At low bolus volumes, under dosages due to the start up characteristic of thepump and the tolerances in the infusion system cannot be excluded. Disconnectpatient while purging.
Chapter 1
OPERATION
13
OPERATION
1.4 Syringe Change and New Therapy Start
Note: To avoid incorrect dosing, always disconnect the pump from the patient whenchanging the syringe. Never leave the pump device unattended during syringe change.Before inserting a new syringe check if the axial fixation is properly working.
• Presssf to stop the infusion. The green LED will disappear.Disconnect the pump from the patient.
• Open syringe holder. Drive mechanism moves backwards into starting position. Ifthe syringe holder is being opened more than 30 sec after the pump was stoppedthe question if a syringe change should be performed must first be answered withu before the drive moves backwards (regardless of the time this always applies incase of a syringe holder alarm). If a syringe holder is pulled just shortly (less thanone second) the displayed question must first be answered by pressingu toinitiate the release of the syringe plunger.
• Open pump door, remove syringe and insert new syringe.
Note: In case the plunger head of the syringe is not released anymore by the clawswhen performing a syringe change, the emergency release button needs to be pressedto release the claws of the drive head. The emergency release button is placed on theoutside of the drive head. It can be released with a pointed pen. Then manually openthe claws and take out the syringe.
• Close the syringe holder (Note: Piston brake must move forward!) and the pumpdoor and confirm the inserted syringe type withk. Drive advances and gripspressure plate of syringe.
Note: Do not block advancing drive unit with any objects. Piston brake must movebackwards into the syringe holder.
• Prime pump if necessary withu then pressd to continue.
• Connect the patient to the pump and check set parameters using t.
• Presssf to start infusion.
To start a new therapy after a syringe change:
• Press c when pump is in the Main Menu.
• Press d and continue to set new therapy parameters with q.
• Presssf to start infusion.
Note: A new therapy can be started at any time during a stopped infusion. Pressc (repeatedly) when the pump is in the Main-, Status- or Options Menu andproceed to follow instructions as described.
Chapter 1
14
Chapter 1
OPERATION
1.5 End of Infusion
• Presssf to stop the infusion. The green LED disappears. Disconnect thepump from the patient.
• Open the syringe holder. Answer the question whether a syringe change should beperformed withu. The drive moves backwards into the starting position.
• Open pump cover. Remove the syringe, move the syringe holder into an uprightposition and close the front door.
• Press o for 3 sec. to switch the pump off. The drive moves into parkingposition.
Note: The settings will be permanently saved by the switched off device.As long as a disposable is inserted the pump will use standby.
1.6 Standby Mode
In the case of extended interruption, the user has the option to maintain the set values.
• Presssf to stop the infusion. Then press o for less than 3 sec.
• Confirm that the pump is supposed to switch into standby by pressing u.
• The pump is now in Standby.
=> While the pump is in the standby mode, it’s display shows the drug and theremaining time for this mode. Change of remaining time by pressingl.Exit standby by pressingc .
As long as a disposable is inserted in the pump will use standby also in case o ispressed for at least or more than 3 sec.
15
Chapter 2
ADVANCED OPERATIONS
ADVANCED OPERATIONS
2.1 Status Request of Pump when Infusion is Running
Pressc to switch between run display and Main Menu while the device is infusing.Navigate through the menu using t to check parameters. In order to check the menuparameters in the Status-/Options Menu, select "Status" respectively "Options" in theMain Menu, open menu withl and scroll through menu with t.
2.2 Rate, VTBI and Time Change Without InfusionInterruption and Reset of Status Menu Data
• Presscwhen the pump is in the run display in order to switch to the Main Menu.Select rate/VTBI/time with t and pressl in order to open the parameter.
• Enter new value withq and confirm withk.
Reset Status Menu Data:
The parameters intermediate volume and -time can be reset when the pump isinfusing or when the pump is stopped.
• Select “Status” in Main Menu with t and pressl.
• Highlight intermediate volume (in ml) or intermediate time (in h:min) with t andopen parameter withl.
• Reset values by pressingu.
Both parameter total volume and -time, are displayed in the pump as "Total" with theaccording unit and can be reset by starting a new therapy. A second way to reset theparameters when the pump is in the Main Menu: Pressc, answer question if the lasttherapy is to be used withu and reset the values withu.
The type of the inserted syringe is displayed in menu item „Syringe“ and cannot bechanged once it has been confirmed at the beginning of the infusion. The drug infostates the drug name, the name of the drug list and its date of origin. The currentbattery capacity in hours and minutes is displayed in the menu item “Battery Cap.” andthe current software version in menu item "Version".
16
SPECIAL FUNCTIONS
SPECIAL FUNCTIONS
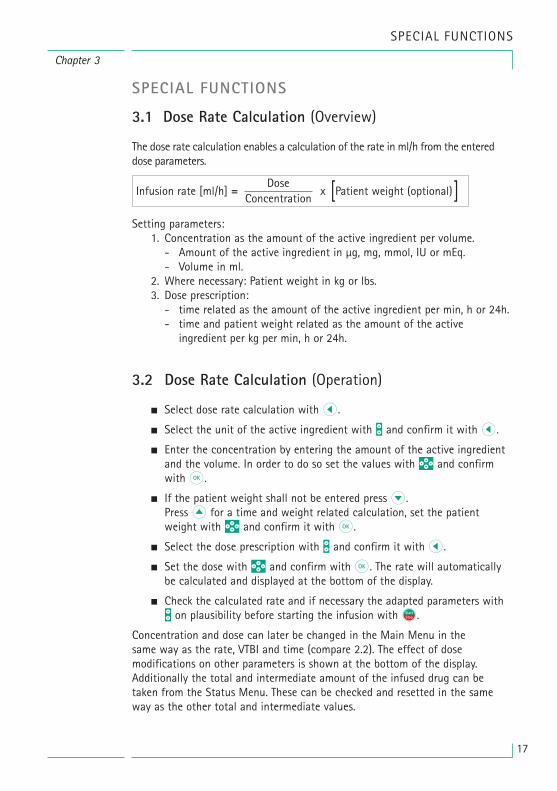
3.1 Dose Rate Calculation (Overview)
The dose rate calculation enables a calculation of the rate in ml/h from the entereddose parameters.
Setting parameters:1. Concentration as the amount of the active ingredient per volume.- Amount of the active ingredient in µg, mg, mmol, IU or mEq.- Volume in ml.
2. Where necessary: Patient weight in kg or lbs.3. Dose prescription:- time related as the amount of the active ingredient per min, h or 24h.- time and patient weight related as the amount of the active
ingredient per kg per min, h or 24h.
3.2 Dose Rate Calculation (Operation)
a Select dose rate calculation with l.
a Select the unit of the active ingredient with T and confirm it with l.
a Enter the concentration by entering the amount of the active ingredientand the volume. In order to do so set the values with q and confirmwith k.
a If the patient weight shall not be entered press d.Press u for a time and weight related calculation, set the patientweight with q and confirm it with k.
a Select the dose prescription with t and confirm it with l.
a Set the dose with q and confirm with k. The rate will automaticallybe calculated and displayed at the bottom of the display.
a Check the calculated rate and if necessary the adapted parameters witht on plausibility before starting the infusion withsf.
Concentration and dose can later be changed in the Main Menu in thesame way as the rate, VTBI and time (compare 2.2). The effect of dosemodifications on other parameters is shown at the bottom of the display.Additionally the total and intermediate amount of the infused drug can betaken from the Status Menu. These can be checked and resetted in the sameway as the other total and intermediate values.
Chapter 3
Infusion rate [ml/h] = x Patient weight (optional)Dose
Concentration [ ]
17
Chapter 3
SPECIAL FUNCTIONS
A deactivation of the dose rate calculation is only possible when the pump isstopped. Press c from Main Menu and then press d.Caution: A change of the patient weight will alter the flow rate.
Following user requests, the parameter sequence in the main menu waschanged in software version G differing from version F. In dose mode, the doserate is displayed before the delivery rate. The cursor is placed on the dose rate.This must be pointed out during first start-up and/or instruction of new users.
3.3 Drug Library
Up to 1500 drug names including therapy data and information can be stored in15 categories. The loading process into the pump can be performed via aseparate PC program („Drug List Editor Space“).
Note: The drug library can be started over the Start Up and Special FunctionsMenu. The user has to make sure prior to the therapy start that the drug libraryin the pump complies with the patient target group. The name of the druglibrary (see headline) will be displayed on the pump.
There are different ways of embedding the drug library into the therapy. Thiscan be done while the infusion is running or when the pump is stopped.
On the one hand, a drug name including the according therapy data can betaken from the drug library. On the other hand, if a rate, VTBI and/or time werealready defined in the Main Menu, the drug name and the adjusted values ofthe data set will be loaded. If a dose rate calculation has already been started abelated assignment of the drug name nevertheless is possible.
In the following the loading of a drug including the according parameters willbe described:
• Open the drug library by pressing l.
• Navigate through list with t and select the drug from category inalphabetical order (all drugs) or within a category with l.
• Respectively confirm the displayed drug information with l.
• Check if the drug short name in the Main Menu is the same as the selecteddrug. Check the parameter in the Main Menu with t and start infusionwithsf.
Hard Limits:
If the set rate/dose/bolus volume and bolus rate exceed the values stored in thedrug library (hard limits), the drug will be rejected, a hint will be displayed andthe pump will fall back into the drug selection. If this occurs while the pump isinfusing the pump will continue to administrate.
18
Chapter 3
SPECIAL FUNCTIONS
Soft Limits:
For the same parameters so called soft limits can be preset via the Drug ListEditor. These can be exceeded without any constraint. The following symbolsthat describe the status with regard to the soft limits are being displayed:
The infusion is within the range of the minimum and maximumsoft limits =
The infusion is within the range of the maximum soft limit =
The infusion is within the range of the minimum soft limit =
Violation of the upper soft limit =
Violation of the lower soft limit =
No soft limit is defined =
Only a drug name is available =(It is possible to select a drug name only from the drug library)
The limits of the drug library have to comply with the limits of the pump andthe disposable.
Note: An adequate monitoring when infusing highly potent drugs isrecommended.
Note: In case a drug from the drug library is selected and the pump is runningunder dose rate calculation the initial values will be overwritten by the druglibrary values if selected.
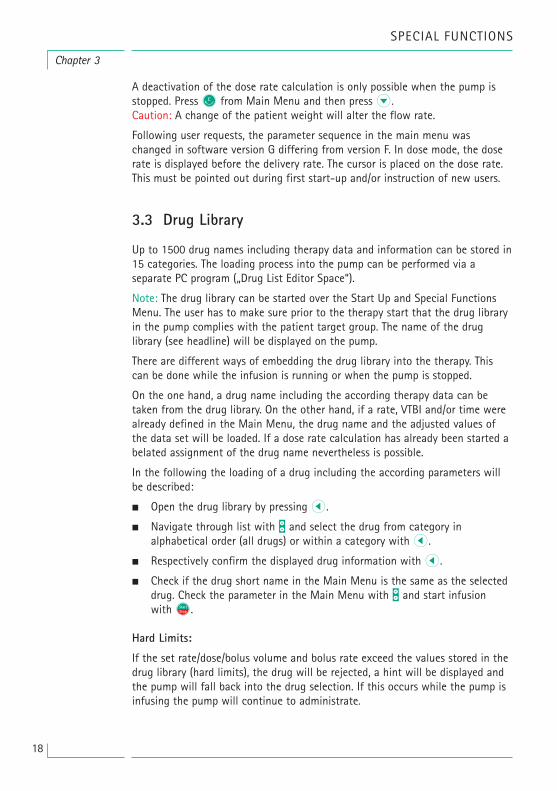
3.4 Patient Controlled Analgesia (PCA)
For PCA a drug list with at least one drug activating the profile PCA is neces-sary. By this the conditions for an effective and safe therapy are defined.
Switch on pump with o and wait until self-check is finished. Depending onthe settings the choice of a drug is offered direcly or the pump is in “MainMenu”.
Select “Special Functions” with t from “Main Menu” and confirm with l.
Select drug list, category and desired drug by using q.
After the selection the pumpoffers additional drug relatedInformation which are confirmedby l.
19
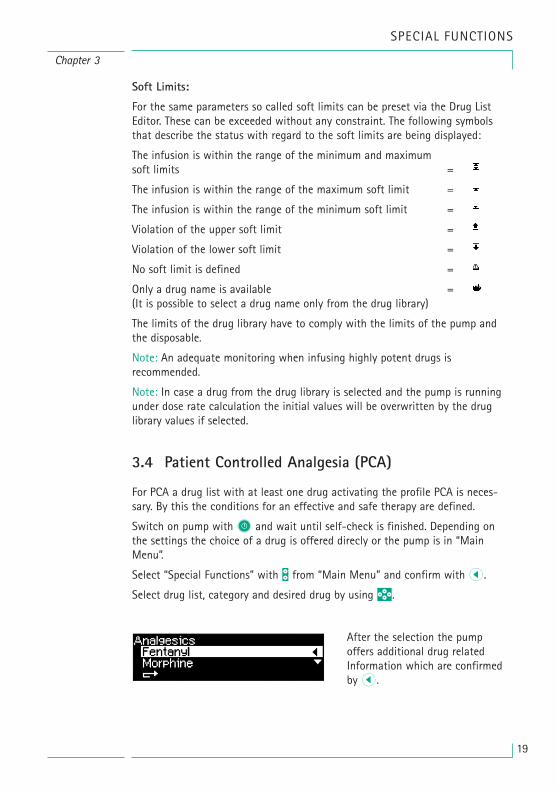
The therapy can be started now withsf in case all values are defined.
Depending on the pre-defined settings the therapy is started with an initialbolus and a basal rate or not.
Before leaving the patient the pump should be put into DataLock level 3 withq in Menu “Options”. This is necessary especially in case non-authorised accessto the settings can be anticipated.
The code is entered with q and confirmed with k.
In this state the patient is allowed to demand boli. Depending on the status ofthe therapy these are either administered or denied. Changing the syringe is alsopossible by using the code for level 1 or level 2. Altering the settings for PCA orother therapies however is only possible with the code for level 3.
The status of the therapy can be checked in the menu „Status“ .
Enter the „Main Menu“ with c and select the “Status“ with q.
An acoustic confirmation of demanded boli can be activated and modulated byt in Data Lock 3.
Is a demand button connected, the therapy symbol looks like this:
In case there is no demand button connected the therapy symbol looks likethis: .
The demand button is connected to the interface P2 at the rear side of thepump.
Chapter 3
SPECIAL FUNCTIONS
20
The pump display now may looklike this.
The A/D-ratio indicates thepercentage of administered anddemanded boli thus giving an ideaabout the effectivity of thetherapy.
*Bolus volume is the volume of a single bolus the patient may demand. Max. Limit is the amount ofdrug or volume a patient may demand within a certain time in total. Lockout is the time in betweentwo boli.
Select profile PCA by using andconfirm with t .The therapy set-tings stored in the drug list aredisplayed *.
21
Hint: It is possible to start a therapy in continuous mode and switch over toPCA later on (in case the drug is dedicated for use with continuous and PCAapplication).
3.5 Target Controlled Infusion (TCI)
Introduction
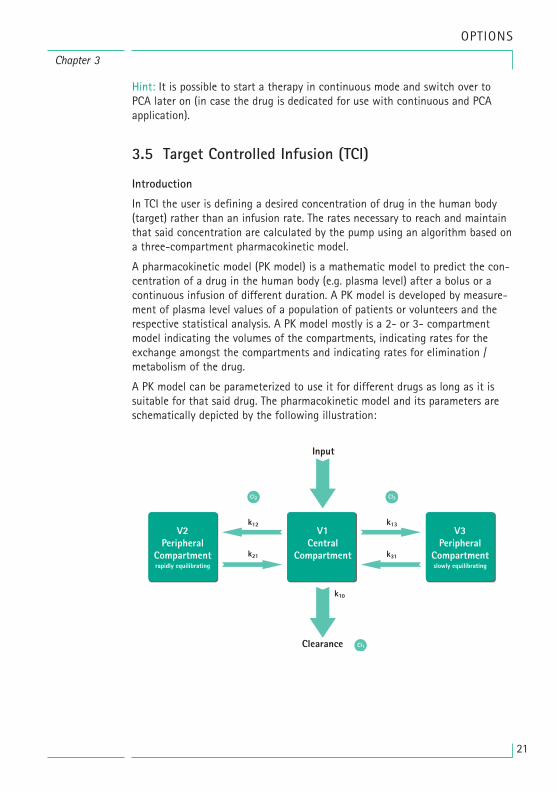
In TCI the user is defining a desired concentration of drug in the human body(target) rather than an infusion rate. The rates necessary to reach and maintainthat said concentration are calculated by the pump using an algorithm based ona three-compartment pharmacokinetic model.
A pharmacokinetic model (PK model) is a mathematic model to predict the con-centration of a drug in the human body (e.g. plasma level) after a bolus or acontinuous infusion of different duration. A PK model is developed by measure-ment of plasma level values of a population of patients or volunteers and therespective statistical analysis. A PK model mostly is a 2- or 3- compartmentmodel indicating the volumes of the compartments, indicating rates for theexchange amongst the compartments and indicating rates for elimination /metabolism of the drug.
A PK model can be parameterized to use it for different drugs as long as it issuitable for that said drug. The pharmacokinetic model and its parameters areschematically depicted by the following illustration:
Chapter 3
OPTIONS
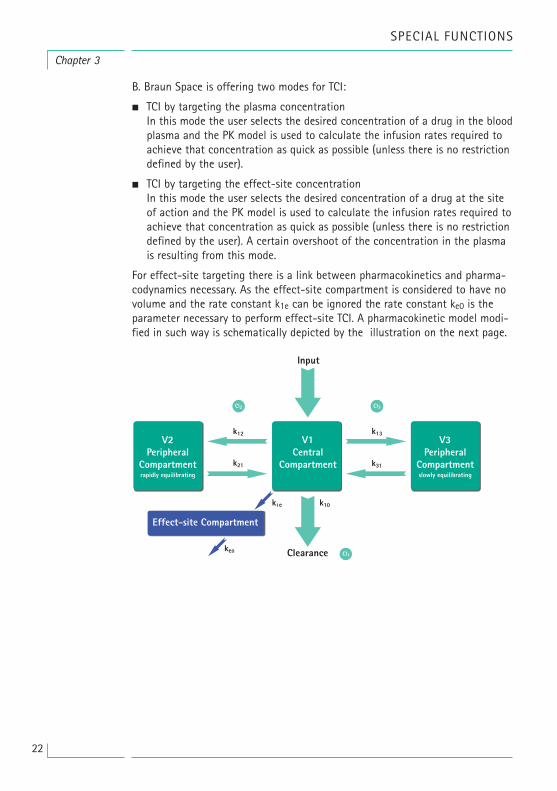
B. Braun Space is offering two modes for TCI:
• TCI by targeting the plasma concentrationIn this mode the user selects the desired concentration of a drug in the bloodplasma and the PK model is used to calculate the infusion rates required toachieve that concentration as quick as possible (unless there is no restrictiondefined by the user).
• TCI by targeting the effect-site concentrationIn this mode the user selects the desired concentration of a drug at the siteof action and the PK model is used to calculate the infusion rates required toachieve that concentration as quick as possible (unless there is no restrictiondefined by the user). A certain overshoot of the concentration in the plasmais resulting from this mode.
For effect-site targeting there is a link between pharmacokinetics and pharma-codynamics necessary. As the effect-site compartment is considered to have novolume and the rate constant k1e can be ignored the rate constant ke0 is theparameter necessary to perform effect-site TCI. A pharmacokinetic model modi-fied in such way is schematically depicted by the illustration on the next page.
Chapter 3
SPECIAL FUNCTIONS
22
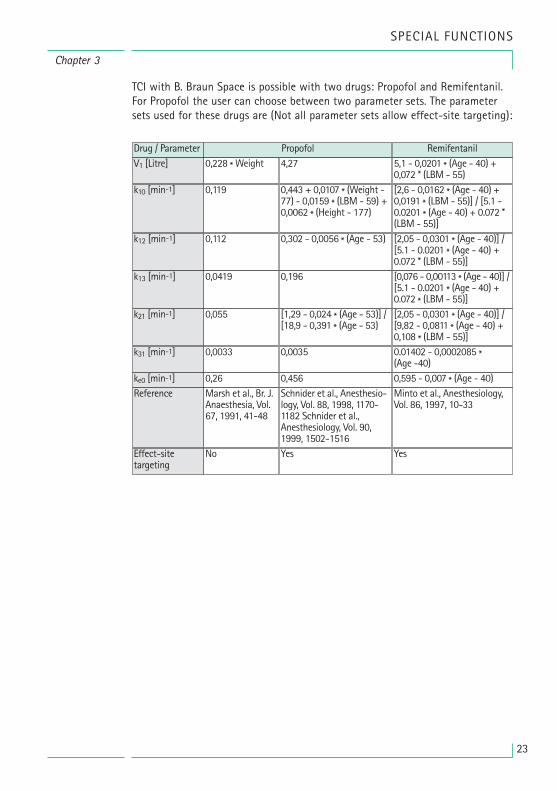
TCI with B. Braun Space is possible with two drugs: Propofol and Remifentanil.For Propofol the user can choose between two parameter sets. The parametersets used for these drugs are (Not all parameter sets allow effect-site targeting):
23
Chapter 3
SPECIAL FUNCTIONS
Drug / ParameterV1 [Litre]
Propofol Remifentanil
k12 [min-1] 0,112
0,119
k13 [min-1] 0,0419
k21 [min-1] 0,055
k31 [min-1] 0,0033
ke0 [min-1] 0,26Reference Marsh et al., Br. J.
Anaesthesia, Vol.67, 1991, 41-48
Effect-sitetargeting
No
k10 [min-1]
0,228 * Weight
0,302 - 0,0056 * (Age - 53)
0,443 + 0,0107 * (Weight -77) - 0,0159 * (LBM - 59) +0,0062 * (Height - 177)
0,196
[1,29 - 0,024 * (Age - 53)] /[18,9 - 0,391 * (Age - 53)
0,0035
0,456Schnider et al., Anesthesio-logy, Vol. 88, 1998, 1170-1182 Schnider et al.,Anesthesiology, Vol. 90,1999, 1502-1516Yes
4,27
[2,05 - 0,0301 * (Age - 40)] /[5.1 - 0.0201 * (Age - 40) +0.072 * (LBM - 55)]
[2,6 - 0,0162 * (Age - 40) +0,0191 * (LBM - 55)] / [5.1 -0.0201 * (Age - 40) + 0.072 *(LBM - 55)]
[0,076 - 0,00113 * (Age - 40)] /[5.1 - 0.0201 * (Age - 40) +0.072 * (LBM - 55)][2,05 - 0,0301 * (Age - 40)] /[9,82 - 0,0811 * (Age - 40) +0,108 * (LBM - 55)]0.01402 - 0,0002085 *(Age -40)0,595 - 0,007 * (Age - 40)Minto et al., Anesthesiology,Vol. 86, 1997, 10-33
Yes
5,1 - 0,0201 * (Age - 40) +0,072 * (LBM - 55)

Drug List
The pre-installed drug list offers the following values:
Important note: Before installing an additional drug list please contact your localB. Braun representative!
Setting up the pump
For TCI a drug list with at least one drug activating the profile TCI is necessary. Thedrug list in this version is pre-defined. By this the conditions for an effective and safetherapy are defined.
Switch on pump witho and wait until self-check is finished. Insert disposable anduse the drug lib according to Instructions for Use.
Selecting a drug
Select drug list, category (the TCI drugs need to be selected from the category “TCI”)and desired drug by usingq .
Chapter 3
SPECIAL FUNCTIONS
24
In this example: Propofol.
Available ConcentrationsPropofol Remifentanil
Default Max. Rate 1.200 ml/hTCIProp
Hard Limit Rate Max of pumpPlasma Limit Default 400 %Plasma Limit Hard Low 100%Plasma Limit Soft Max 450%Default Target 0.0 µg/mlTarget Soft Max 8.0 µg/ml
Short name
5 mg/ml10 mg/ml20 mg/ml
1.200 ml/hTCIRemi
Max of pump400%100%450%0.0 ng/ml8.0 ng/ml
Target Hard Max 15.0 µg/ml 20.0 ng/mlDecrement ConcentrationDefault
1.0 µg/ml 1.0 ng/ml
Default Parameter Set Marsh Minto
20 µg/ml50 µg/ml
25
Chapter 4
OPTIONS
These steps are only necessary in case there are different options for that drug.
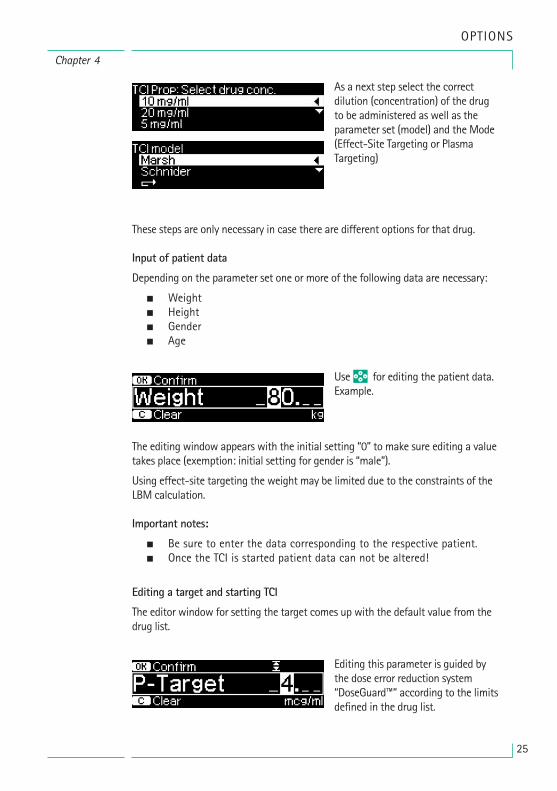
Input of patient data
Depending on the parameter set one or more of the following data are necessary:
• Weight• Height• Gender• Age
The editing window appears with the initial setting “0” to make sure editing a valuetakes place (exemption: initial setting for gender is “male”).
Using effect-site targeting the weight may be limited due to the constraints of theLBM calculation.
Important notes:
• Be sure to enter the data corresponding to the respective patient.• Once the TCI is started patient data can not be altered!
Editing a target and starting TCI
The editor window for setting the target comes up with the default value from thedrug list.
As a next step select the correctdilution (concentration) of the drugto be administered as well as theparameter set (model) and the Mode(Effect-Site Targeting or PlasmaTargeting)
Useq for editing the patient data.Example.
Editing this parameter is guided bythe dose error reduction system“DoseGuard™” according to the limitsdefined in the drug list.
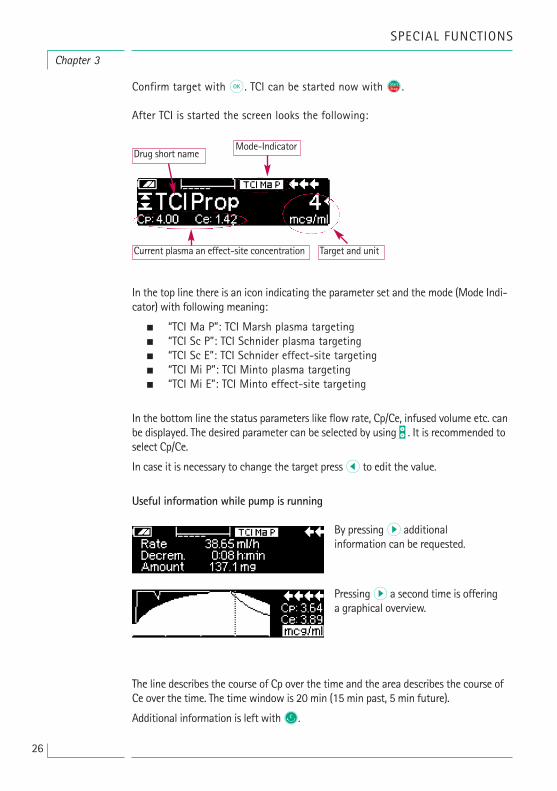
Confirm target with k. TCI can be started now withsf.
After TCI is started the screen looks the following:
In the top line there is an icon indicating the parameter set and the mode (Mode Indi-cator) with following meaning:
• “TCI Ma P”: TCI Marsh plasma targeting• “TCI Sc P”: TCI Schnider plasma targeting• “TCI Sc E”: TCI Schnider effect-site targeting• “TCI Mi P”: TCI Minto plasma targeting• “TCI Mi E”: TCI Minto effect-site targeting
In the bottom line the status parameters like flow rate, Cp/Ce, infused volume etc. canbe displayed. The desired parameter can be selected by using t . It is recommended toselect Cp/Ce.
In case it is necessary to change the target pressl to edit the value.
Useful information while pump is running
The line describes the course of Cp over the time and the area describes the course ofCe over the time. The time window is 20 min (15 min past, 5 min future).
Additional information is left withC.
Chapter 3
SPECIAL FUNCTIONS
26
Drug short name
Target and unit
By pressingr additionalinformation can be requested.
Pressingr a second time is offeringa graphical overview.
Current plasma an effect-site concentration
Mode-Indicator
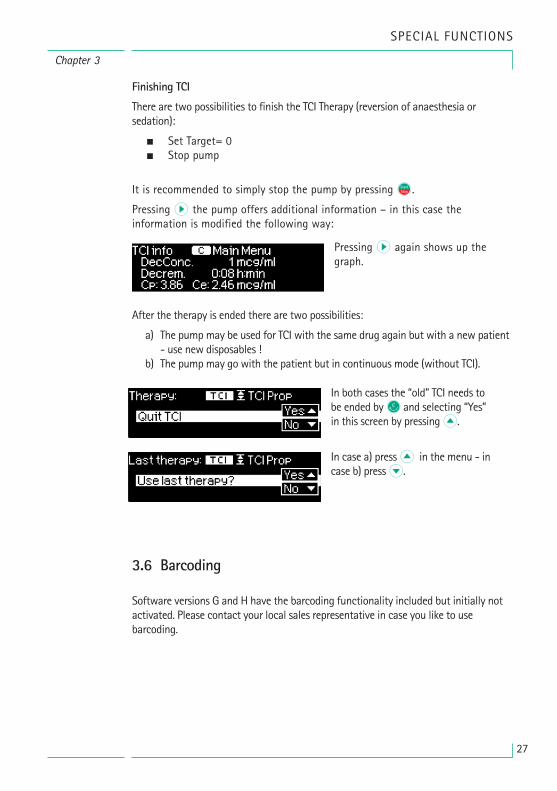
Finishing TCI
There are two possibilities to finish the TCI Therapy (reversion of anaesthesia orsedation):
• Set Target= 0• Stop pump
It is recommended to simply stop the pump by pressingsf.
Pressing R the pump offers additional information – in this case theinformation is modified the following way:
After the therapy is ended there are two possibilities:
a) The pump may be used for TCI with the same drug again but with a new patient- use new disposables !
b) The pump may go with the patient but in continuous mode (without TCI).
3.6 Barcoding
Software versions G and H have the barcoding functionality included but initially notactivated. Please contact your local sales representative in case you like to usebarcoding.
27
Chapter 3
SPECIAL FUNCTIONS
Pressing r again shows up thegraph.
In both cases the “old” TCI needs tobe ended byc and selecting “Yes”in this screen by pressingu.
In case a) pressu in the menu - incase b) pressd.
28
OPTIONS
The options functions may be selected and changed while the pump is infusing orstopped. To edit a menu item, select “Options” in the Main Menu and pressl.Then select desired function with t and follow the Instructions for Use as described.
4.1 Occlusion Pressure
The higher the pressure level is set at, the higher the pressure level must rise beforetriggering an occlusion pressure alarm.
• Enter pressure in Options Menu by pressingl.
• Choose between nine pressure levels (1=lowest level; 9=highest level) bypressing l or r and confirm entry with k.
4.2 Data Lock
The data lock function protects the device against unauthorized access. A fourdigit code (default setting “9119”), which can be changed via the serviceprogram activates this function in level 1 or level 2. There are three securitylevels.
Level 1:A modification of values as well as a bolus application are not possible but achange of the disposable can be conducted. It is possible to navigate through allmenus and status data can be checked. Starting, interrupting and switching thepump off is possible.
Level 2:This level has the same performance characteristic as described under level 1and additional will not allow the change of disposable. In order to prevent adata lock alarm the correct code must be entered within 20 sec after the pumpwas stopped. Changing the disposable and switching the pump off is onlypossible after the code was entered.
Level 3:This level will allow starting and stopping the pump as well as switching off.The code for this level may be different for each drug and is defined in the druglist. A change of the syringe, however, is possible by using the code defined forthe other levels. An overview about the differences between the levels 1, 2 and3 is given by the following table.
Chapter 4
OPTIONS
29
Chapter 4
OPTIONS
Activation of the function:
• Open data lock in Options Menu with l.
• Select between level 1, 2 or 3 (if activated) with l and r and confirmwith k.
• Enter code with q and press k in order to activate data lock.
Changes to the protected values and the bolus function which are markedwithy are only possible after entering the code. After 20 sec in the MainMenu, Status Menu, Special Functions Menu and Options Menu the lock will beactivated again. If the wrong code is entered twice the pump will switch intothe last menu. If the wrong code is entered twice again the pump will go intoan audible alarm, a nurse call will go off and the yellow LED blinks. If a targetvalue was reached while data lock is active a new start of the pump is onlypossible after entering the code.
In order to deactivate the function, select “Off” in the data lock, press k, enterthe code and press k again.
4.3 Bolus Rate
• Open bolus rate in Options Menu withl.
• Change bolus rate withq and confirm setting withk.
Note: Set bolus rate according to therapy requirements. Take care not to overdose!Given a bolus rate of 1800 ml/h, e.g. 0,5 ml are reached within just one second.
4.4 KVO-Mode
After reaching a preselected VTBI/time, the pump can continue the infusion with apredefined KVO-rate (see "Technical Data"). The duration of the KVO-infusion is set viathe service program.
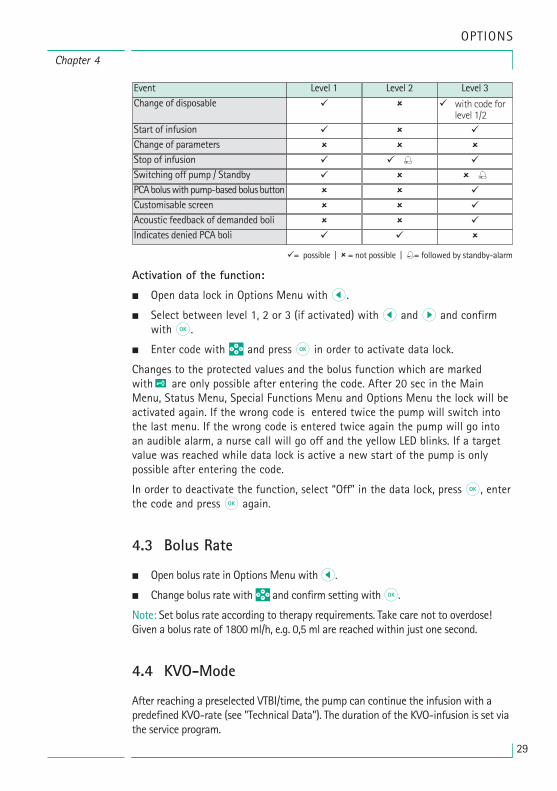
EventChange of disposable
Level 1 Level 2 Level 3
Change of parameters � ��
� ��
Stop of infusion � � ��Switching off pump / Standby � � ��PCAboluswithpump-basedbolusbutton � ��Customisable screen � ��Acoustic feedback of demanded boli � ��Indicates denied PCA boli � ��
Start of infusion
�� � with code forlevel 1/2
�= possible | �= not possible | �= followed by standby-alarm
30
• Open KVO-Mode in Options Menu withl.
• Answer Yes/No question with u, to activate KVO.
4.5 Contrast / Display Light / Keypad Light
Contrast as well as display- and keypad light can be adjusted individually according tothe lighting conditions.
• Open contrast/display light/keypad light in Options Menu by pressingl.
• Choose between 9 contrast- and display light levels withl orr and confirmwithk. For use with light sensitive drugs the keypad- respectively syringe lightcan be completely turned off.
4.6 Alarm Volume
Chose between 9 different alarm volume levels.
• Open alarm volume in Options Menu withl.
• Set volume with l or r and confirm entry with k.
4.7 Date / Time
• Open date/time in Options Menu withl.
• Change date/time withq and confirm withk.
4.8 Macro Mode
The infusion rate appears larger on the display when the macro mode isactivated and the pump is infusing.
• Open macro mode in Options Menu withl.
• Answer Yes/No question by pressingu to activate the macro mode.
For quick activation of macro mode: Press and holdrwhile the pump is infusinguntil the font size changes.
Chapter 4
OPTIONS
31
4.9 Language
This function enables a change of the pump language.
• Open language in the Options Menu with l.
• Select language with t, then press l.
• Confirm Yes/No question with u.
Chapter 4
OPTIONS
32
Chapter 5
ALARMS
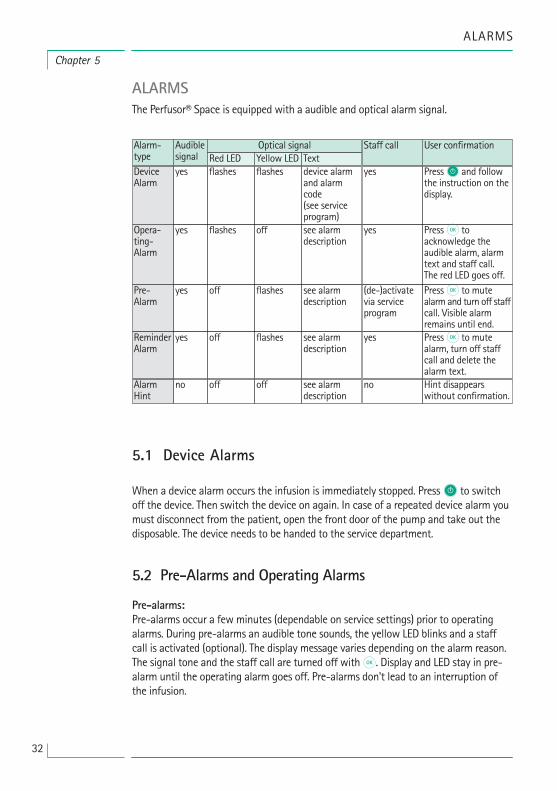
5.1 Device Alarms
When a device alarm occurs the infusion is immediately stopped. PressO to switchoff the device. Then switch the device on again. In case of a repeated device alarm youmust disconnect from the patient, open the front door of the pump and take out thedisposable. The device needs to be handed to the service department.
5.2 Pre-Alarms and Operating Alarms
Pre-alarms:Pre-alarms occur a few minutes (dependable on service settings) prior to operatingalarms. During pre-alarms an audible tone sounds, the yellow LED blinks and a staffcall is activated (optional). The display message varies depending on the alarm reason.The signal tone and the staff call are turned off withk. Display and LED stay in pre-alarm until the operating alarm goes off. Pre-alarms don't lead to an interruption ofthe infusion.
Alarm-typeDeviceAlarm
yes flashes flashes device alarmand alarmcode(see serviceprogram)
yes PressO and followthe instruction on thedisplay.
Opera-ting-Alarm
yes flashes off see alarmdescription
yes
Pre-Alarm
yes off flashes see alarmdescription
(de-)activatevia serviceprogram
Pressk to mutealarm and turn off staffcall. Visible alarmremains until end.
ReminderAlarm
yes off flashes see alarmdescription
yes Pressk to mutealarm, turn off staffcall and delete thealarm text.
AlarmHint
no off off see alarmdescription
no Hint disappearswithout confirmation.
Audiblesignal Red LED
Optical signalYellow LED Text
Staff call User confirmation
Pressk toacknowledge theaudible alarm, alarmtext and staff call.The red LED goes off.
ALARMSThe Perfusor® Space is equipped with a audible and optical alarm signal.
33
Display message Pre-alarm reason
“Syringe nearly empty“ Very little fluid is left in syringe.
“VTBI near end“ The preselected volume is nearly infused.
“Time near end“ The preselected time is almost over.
“Battery nearly empty“ The battery is almost discharged.
“KVO active“ Volume/time are reached and the pump continuesthe infusion at the KVO-rate.
“Communication error" The pump is located in a system in which at leastone device is incompatible or defective. The useof this device in a system is not permitted. Thesystem is to be checked by a service technician.
A stopwatch on the display counts down the remaining time (depending on theservice program, between 3-30 min). After that, the pump changes to theoperating alarm.
The pre-alarms “VTBI near end“ (volume preselection) and “Time near end“ (timepreselection) can be deactivated via the service program.
Operating alarms:Operating alarms lead to an interruption of the infusion. An audible tonesounds, the red LED flashes and a staff call is activated. The display states“Alarm“ and the reason for the operating alarm. The signal tone and the staffcall are turned off with K. Corrections should be made in accordance with thealarm reason.
Display message Alarm reason
“Syringe empty“ There is no fluid left in the syringe.Due to varying syringe tolerances of syringesfrom other manufacturers, some fluid may beleft inside the syringe.Restarting the infusion leads to a complete depletionof the syringe and shut-off via the pressure sensor.Perform syringe change as described in 1.4.
“VTBI infused “ The preselected volume was infused.Continue therapy or select new therapy.
“Time expired“ The preselected time has ended.Continue therapy or select new therapy.
“Battery empty“ The battery pack is discharged.Connect device with mains and/or exchangebattery pack. The battery alarm will be on for 3 min.Then the pump will automatically turn off.
“KVO finished” KVO is reached. Continue with old or set new therapy.
Chapter 5
ALARMS
34
ALARMS
“Pressure high“ An occlusion occured in the system. The setpressure level was exceeded. A bolus reduction isautomatically initiated by the pump.Check if syringe is empty, kinks are in tubing andtubing isn't damaged, IV patency and filter patency.Increase occlusion pressure if necessary.Due to varying syringe tolerances of syringes fromother manufacturers, a pressure alarm may occurbecause of high syringe friction forces.
“Syringe not correctly inserted” The wings of the syringe are not properly inserted.Insert syringe according to describtion in “OverviewPerfusor® Space“ as well as 1.1.
“Syringe holder“ The syringe holder was opened during a runninginfusion. Close syringe holder.
“Battery cover removed“ The battery cover is not properly engaged on thebattery compartment.When pushing on the battery cover listen for “click”.
“Drive blocked“ An external interference kept the drive unit fromadvancing.Basically prevent all external interferences.Consider “Patient Safety“.
“Calibrate device“ Pump calibration data have changed (e.g. after anupdate).Recalibrate device via the service program.
“Claw malfunction“ The emergency release button was pressed and theclaws manually opened.Takeout syringeandcontact technical service department.
“Plunger plate not prop. fixed“ The syringe plunger plate does not attach to theplunger plate sensor on the pump.Check system for negative pressure and eliminatecause. Consider “Patient Safety“.
“Standby Time expired“ The set standby time has ended.Set new time or continue with previously set therapy.
“No battery inserted“ It is not possible to use the pump without abattery pack.Turn off pump and insert battery pack accordingto describtion “Overview Perfusor® Space“.
“Data were reset” Therapy and pump settings could not be restored.Enter therapy and pump settings anew.
"Therapy data were reset" Therapy data could not be restored.Enter therapy anew.
Chapter 5
35
Chapter 5
ALARMS
“Data Lock" An attempt was made to stop or switch the pump offwithout entering the code.Enter the correct code in order to continue thetherapy or in order to turn the pump off.
The red LED doesn’t extinguish until the administration is started again respectively thepump is turned off.
Caution: If a wrench is displayed and/or a yellow, red and blue LED blink then thepump is in the service mode and is not permitted to be used on a patient. The pump isthen to be checked by a service technician.
5.3 Reminder Alarms
Reminder alarms only occur in two cases:
1. A syringe is inserted, the pump doesn’t administrate, no value is being edited andthe device is not operated for two minutes.An acoustic tone sounds, the yellow LED blinks and a staff call is activated.
a) The display states “Reminder alarm!”
b) The display states “Config. not finished!”
Confirm alarm withK and continue to set therapy/Start Up configuration.
2. A value edition was started but not finished and confirmed. This is also possiblewith a missing disposable.An acoustic tone sounds, the display states “Value not accepted“, the yellow LEDblinks and a staff call is activated.Confirm alarm withK and continue to set therapy.
5.4 Alarm Hints
If inproper entries are made the display states corresponding hints (e.g. “Attention!Rate is out of range”; “The parameter can not be modified”) and an audible tonesounds. These hints disappear after a few seconds and don't need to be confirmed.
36
BATTERY OPERATION AND MAINTENANCE
The Perfusor® Space is equipped with the latest NiMH-battery. It has an operatinglifetime of 8 hours at 25 ml/h when new. For optimal treatment of the battery, thedevice is equipped with protection against overcharge and deep depletion. The batterypack is charged by the pump during connection to mains. When disconnected frommains or in case of power failure, the pump automatically switches to battery power.
Note: Prior to a longer storage of the pump (> 0,5 months) the battery pack must becompletely charged and then removed from the pump. Before changing the battery,always disconnect the pump from the patient and switch off the device.
The battery status indicator is a trend display (low, medium, high). For more detailedinformation on the current battery capacity (operating time in hours and minutes)please refer to menu item “Batt. Cap.” in the Status Menu of the Perfusor® Space.
Important information for battery self-check:
If the battery symbol is blinking during mains operation, the battery is eitherdischarged or has a reduced capacity. In this case, the pump should not bedisconnected frommains. If it is necessary to disconnect the pump frommains powerfor urgent reasons, the user should check to ensure if the battery capacity is sufficientfor the proposed use. When the battery symbol blinks permanently (>1h), the batterymust be checked by a technician and replaced if necessary.
Directions for optimal battery use:
The actual battery life may vary due to• ambient temperature• varying load (e.g. frequent boluses).
The optimal life time of a battery pack will only be reached if it's completely dischar-ged from time to time. A maintenance mode which conducts this battery maintenanceis built in. This function should be activated once a month. Furthermore:
• If possible, only charge the battery if it has been completely discharged.• If a battery, which is not completely discharged, is charged several times, its
capacity can be reduced. Its original capacity can be reached again if the batteryis completely discharged and then recharged.
• Under normal temperature conditions a battery can be charged and dischargedapprox. 500 times before its lifetime decreases.
• When the pump is not connected to mains power the battery discharges itselfslowly. This can occur even when the pump is not operating. The originalcapacity will only be reached after several cycles of charging and discharging.
• The battery operating time can only be realized if the pump operatescontinuously with a fully charged battery at room temperature. The display ofthe battery operating time on the pump is an approximate value based on thecurrent delivery rate. If the battery is aged it may differ from the actualachievable operating time.
BATTERY OPERATION AND MAINTENANCE
Chapter 6
37
Caution: Batteries may explode or leak if they are opened or incinerated. Considerdisposal directions!
Battery maintenance:
To accurately balance the battery capacity a cyclical battery maintenance is necessary.The pump asks the user to perform a battery maintenance every 30 days. The batterymaintenance mode detects a possible capacity loss (e.g. through ageing of the batterypack) and then the capacity/running time will be calculated anew. After a longer stora-ge time or a longer operation without battery maintenance it can happen that thebattery pre-alarm time can no longer be maintained. In this case it is necessary to per-form a battery maintenance.To initiate the discharge process the message „Battery maintenance“ and thek-keywill be displayed after switching the pump off. By pressingk andu the dischargeprocess will start. The process is interrupted by switching the pump on again. If thebattery maintenance is to be continued a new activation is necessary. After completelydischarging the battery it will be completely charged again. The total duration of thebattery maintenance process takes approx. twelve hours.
Caution: Please take into account that, if the battery maintenance has not beencompleted there is a possibility of a reduced battery operating time.
BATTERY OPERATION AND MAINTENANCE
Chapter 6
38
COMPATIBLE SYRINGES
Manufacturer:B. Braun
Manufacturer:B. Braun
Syringe TypeB. BraunMat. No.1)
Time to Occl.2)
P 1 [mm:ss]P 9 [mm:ss]
Syringe TypeB. BraunMat. No.1)
Time to Occl.2)
P 1 [mm:ss]P 9 [mm:ss]
Manufacturer:B. Braun
Syringe TypeB. BraunMat. No.1)
Time to Occl.2)
P 1 [mm:ss]P 9 [mm:ss]
Chapter 7
Omnifix5 ml
461 7053Vtyp.0:581:32
Omnifix20 ml
461 7207Vtyp.1:043:26
Omnifix30 ml
461 7304Ftyp.1:136:07
Omnifix50 ml
461 7509Ftyp.1:1613:46
OPS20 ml
872 8615typ.1:084:35
OPS50 ml
872 8810Ftyp.1:3415:27
Omnifix3ml3)
4617022VA/P 4617022V-03US 4610303V-02
typ.0:251:43
Omnifix10ml LL3)
4617100VA/P 4617100V-03US 4617100V-02
typ.0:533:50
Manufacturer:TYCO EU
Syringe TypeTYCO EUMat. No.1)
Time to Occl.2)
P 1 [mm:ss]P 9 [mm:ss]
Monoject3 ml
1100-603495typ.0:511:16
Monoject6 ml
1100-606159typ.0:561:41
Monoject12 ml
1100-612173typ.1:043:27
Monoject20 ml
1100-620036typ.1:195:27
Monoject35 ml
1100-635430typ.1:3212:05
Monoject50/60 ml1100-650090
typ.2:2315:58
COMPATIBLE SYRINGES
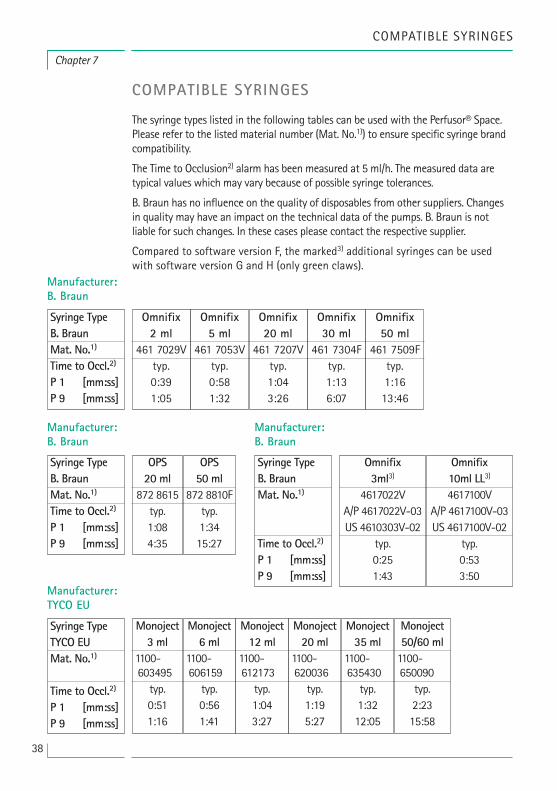
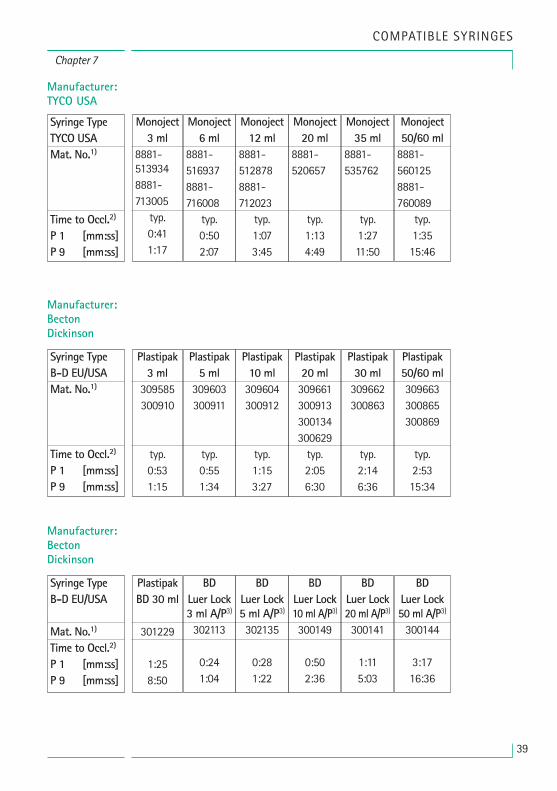
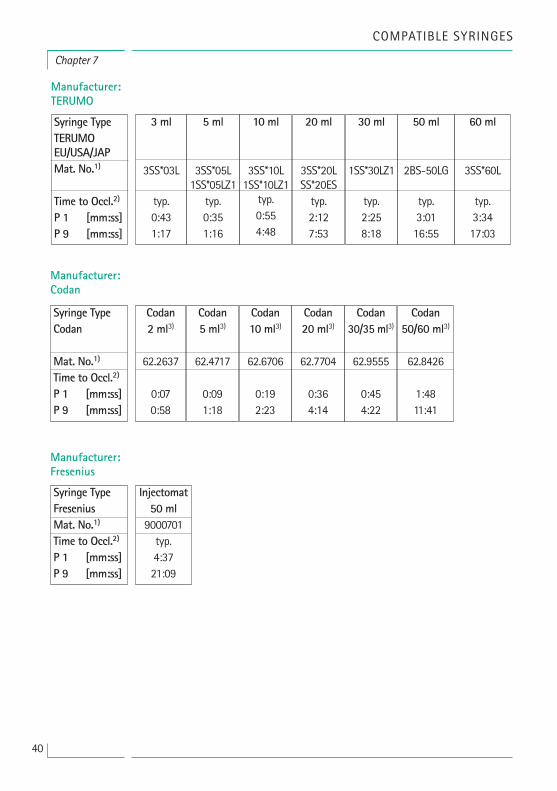
The syringe types listed in the following tables can be used with the Perfusor® Space.Please refer to the listed material number (Mat. No.1)) to ensure specific syringe brandcompatibility.
The Time to Occlusion2) alarm has been measured at 5 ml/h. The measured data aretypical values which may vary because of possible syringe tolerances.
B. Braun has no influence on the quality of disposables from other suppliers. Changesin quality may have an impact on the technical data of the pumps. B. Braun is notliable for such changes. In these cases please contact the respective supplier.
Compared to software version F, the marked3) additional syringes can be usedwith software version G and H (only green claws).
Omnifix2 ml
461 7029Vtyp.0:391:05
39
Chapter 7
COMPATIBLE SYRINGES
Manufacturer:TYCO USA
Syringe TypeTYCO USAMat. No.1)
Time to Occl.2)
P 1 [mm:ss]P 9 [mm:ss]
Monoject3 ml
8881-5139348881-713005
typ.0:411:17
Monoject6 ml
8881-5169378881-716008
typ.0:502:07
Monoject12 ml
8881-5128788881-712023
typ.1:073:45
Monoject20 ml
8881-520657
typ.1:134:49
Monoject35 ml
8881-535762
typ.1:2711:50
Monoject50/60 ml8881-5601258881-760089
typ.1:3515:46
Manufacturer:BectonDickinson
Syringe TypeB-D EU/USAMat. No.1)
Time to Occl.2)
P 1 [mm:ss]P 9 [mm:ss]
Plastipak3 ml309585300910
typ.0:531:15
Plastipak5 ml309603300911
typ.0:551:34
Plastipak10 ml309604300912
typ.1:153:27
Plastipak20 ml309661300913300134300629typ.2:056:30
Plastipak30 ml309662300863
typ.2:146:36
Plastipak50/60 ml309663300865300869
typ.2:5315:34
Manufacturer:BectonDickinson
Syringe TypeB-D EU/USA
Mat. No.1)
Time to Occl.2)
P 1 [mm:ss]P 9 [mm:ss]
PlastipakBD 30 ml
301229
1:258:50
BDLuer Lock3 ml A/P3)
302113
0:241:04
BDLuer Lock5 ml A/P3)
302135
0:281:22
BDLuer Lock10 ml A/P3)
300149
0:502:36
BDLuer Lock20 ml A/P3)
300141
1:115:03
BDLuer Lock50 ml A/P3)
300144
3:1716:36
40
Chapter 7
COMPATIBLE SYRINGES
Manufacturer:TERUMO
Syringe TypeTERUMOEU/USA/JAPMat. No.1)
Time to Occl.2)
P 1 [mm:ss]P 9 [mm:ss]
3 ml
3SS*03L
typ.0:431:17
5 ml
3SS*05L1SS*05LZ1
typ.0:351:16
10 ml
3SS*10L1SS*10LZ1
typ.0:554:48
20 ml
3SS*20LSS*20EStyp.2:127:53
30 ml
1SS*30LZ1
typ.2:258:18
50 ml
2BS-50LG
typ.3:0116:55
60 ml
3SS*60L
typ.3:3417:03
Manufacturer:Codan
Syringe TypeCodan
Mat. No.1)
Time to Occl.2)
P 1 [mm:ss]P 9 [mm:ss]
Codan2 ml3)
62.2637
0:070:58
Codan5 ml3)
62.4717
0:091:18
Codan10 ml3)
62.6706
0:192:23
Codan20 ml3)
62.7704
0:364:14
Codan30/35 ml3)
62.9555
0:454:22
Codan50/60 ml3)
62.8426
1:4811:41
Manufacturer:Fresenius
Syringe TypeFreseniusMat. No.1)
Time to Occl.2)
P 1 [mm:ss]P 9 [mm:ss]
Injectomat50 ml9000701typ.4:3721:09

41
START UP GRAPHS AND TRUMPET CURVES
Chapter 8
The graphs show the accuracy/uniformity of flow in relation to time. They allowfor the following:The delivery behaviour or delivery precision is essentially influenced by the typeof (disposable syringe) used. Deviations from the technical data of the pumpcannot be excluded if syringes (disposables) other than those stated in the orderdata are used.
START UP GRAPHS AND TRUMPET CURVES
Trumpet CurvesMeasured values for second hour in each case.Measurement interval ∆t = 0.5 minObservation interval p x ∆t [min]
Start-up CurvesMeasurement interval ∆t = 0.5 minMeasurement duration T = 120 minFlow Qi (ml/h)
Start Up Curves Trumpet Curves
42
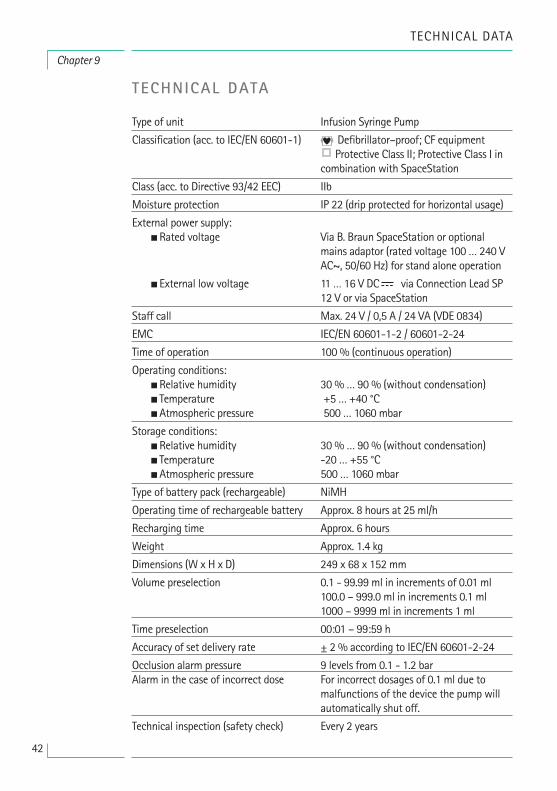
TECHNICAL DATA
Type of unit Infusion Syringe Pump
Classification (acc. to IEC/EN 60601-1) Defibrillator–proof; CF equipmentProtective Class II; Protective Class I in
combination with SpaceStation
Class (acc. to Directive 93/42 EEC) IIb
Moisture protection IP 22 (drip protected for horizontal usage)
External power supply:•Rated voltage Via B. Braun SpaceStation or optional
mains adaptor (rated voltage 100 … 240 VAC~, 50/60 Hz) for stand alone operation
• External low voltage 11 … 16 V DC via Connection Lead SP12 V or via SpaceStation
Staff call Max. 24 V / 0,5 A / 24 VA (VDE 0834)
EMC IEC/EN 60601-1-2 / 60601-2-24
Time of operation 100% (continuous operation)
Operating conditions:•Relative humidity 30 %… 90% (without condensation)• Temperature +5 … +40 °C•Atmospheric pressure 500 … 1060 mbar
Storage conditions:•Relative humidity 30 %… 90% (without condensation)• Temperature -20 … +55 °C•Atmospheric pressure 500 … 1060 mbar
Type of battery pack (rechargeable) NiMH
Operating time of rechargeable battery Approx. 8 hours at 25 ml/h
Recharging time Approx. 6 hours
Weight Approx. 1.4 kg
Dimensions (W x H x D) 249 x 68 x 152 mm
Volume preselection 0.1 - 99.99 ml in increments of 0.01 ml100.0 – 999.0 ml in increments 0.1 ml1000 – 9999 ml in increments 1 ml
Time preselection 00:01 – 99:59 h
Accuracy of set delivery rate ± 2% according to IEC/EN 60601-2-24
Occlusion alarm pressure 9 levels from 0.1 - 1.2 barAlarm in the case of incorrect dose For incorrect dosages of 0.1 ml due to
malfunctions of the device the pump willautomatically shut off.
Technical inspection (safety check) Every 2 years
TECHNICAL DATA
Chapter 9
43
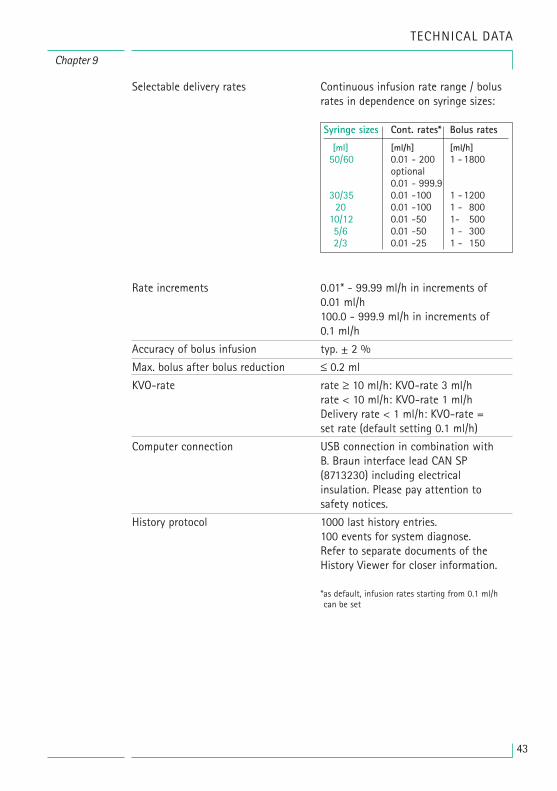
Selectable delivery rates Continuous infusion rate range / bolusrates in dependence on syringe sizes:
Rate increments 0.01* - 99.99 ml/h in increments of0.01 ml/h100.0 - 999.9 ml/h in increments of0.1 ml/h
Accuracy of bolus infusion typ. ± 2 %
Max. bolus after bolus reduction ≤ 0.2 ml
KVO-rate rate ≥ 10 ml/h: KVO-rate 3 ml/hrate < 10 ml/h: KVO-rate 1 ml/hDelivery rate < 1 ml/h: KVO-rate =set rate (default setting 0.1 ml/h)
Computer connection USB connection in combination withB. Braun interface lead CAN SP(8713230) including electricalinsulation. Please pay attention tosafety notices.
History protocol 1000 last history entries.100 events for system diagnose.Refer to separate documents of theHistory Viewer for closer information.
*as default, infusion rates starting from 0.1 ml/hcan be set
Chapter 9
TECHNICAL DATA
Syringe sizes Cont. rates* Bolus rates
[ml] [ml/h] [ml/h]50/60 0.01 - 200 1 -1800
optional0.01 - 999.9
30/35 0.01 -100 1 -120020 0.01 -100 1 - 80010/12 0.01 -50 1- 5005/6 0.01 -50 1 - 3002/3 0.01 -25 1 - 150
44
WARRANTY / TSC* / SERVICE / TRAINING /CLEANING / DISPOSAL
Responsibility of the Manufacturer
The manufacturer, assembler, installer or importer is responsible for the effectson safety, reliability and performance of the equipment only if:
• assembly operations, extensions, re-adjustments, modifications or repairsare carried out by authorized personnel,
• the electrical installation of the relevant room complies with theappropriate requirements (e.g. VDE 0100, 0107 and/or the IEC-publicationsresp. national requirements),
• the equipment is used in accordance with the Instructions for Use and• the Technical Safety Checks are carried out regularly.
Warranty
B. Braun provides 24 months warranty, as from the date of delivery, for everyPerfusor® Space (12 months for every Battery-Pack SP). This covers repair orreplacement of parts damaged as a result of design/manufacturing errors ormaterial defects. Modifications or repairs to the unit undertaken by theuser/operator or by third parties invalidate the warranty.
The warranty does not cover the following:Elimination of faults attributable to incorrect/unauthorized handling, or tonormal wear and tear.Defective rechargeable battery packs can be returned to B. Braun for furtherdisposal.
Separate collection for electrical and electronic equipment(currently applicable to EU community only).
Training
B. Braun offers a training for version F. Please ask your local representative forfurther details.
Technical Safety Check* / Service
The Technical Safety Check is recommended to be carried out every 2 years andshould be documented. Servicing work must be carried out exclusively byB. Braun trained personnel.
Chapter 10
WARRANTY / TSC* / SERVICE / TRAINING / CLEANING / DISPOSAL
The CE markconfirms that thismedical productcomplies with the"Council Directiveon MedicalDevices93/42/EEC” dated14th June 1993.
B. BraunMelsungen AG
45
Check regularly
Check for cleanliness, completeness and damage. Use only according toInstructions for Use. During an exchange interval of the disposable the pumphas to perform a self-test. Check the following items each time the pump isswitched on: self-check, audible alarm, process- and alarm control indication.
Cleaning
Clean external surface of pump using mild soap suds. Do not use spraydisinfectants at the mains power connection. Recommended: disinfectant forwiping available from B. Braun: Meliseptol® Foam pure. After cleaning, allowthe device to vent for at least 1 min prior to use. Do not spray into openings inthe device. Be sure to observe the instructions provided concerning wastedisposal and hygiene for batteries and disposables. Wipe magnifying- anddisplayglas on front of pump door only with a soft cloth. Do not use Hexaquart®or other alkylamine containing disinfectants.
Disposal
The pumps as well as battery packs can be returned to B. Braun for furtherdisposal. When taking care of disposing of disposables as well as infusionsolutions, please consider the applicable hygiene and disposal regulations.
Inspection on Delivery
Despite careful packaging, the risk of damage during transport cannot beentirely prevented. Upon delivery, please check that all items are present. Do notuse a damaged device. Contact the service department.Testing the proper funciton of the device should be performed before initial use.This is even ruled by law in several countries. A respective form can be obtainedfrom B. Braun.
Included in Delivery
Perfusor® Space, Battery-Pack SP, Instructions for Use-Set.
WARRANTY / TSC* / SERVICE / TRAINING / CLEANING / DISPOSAL
Chapter 10
46
Chapter 11
INSTRUCTIONS FOR USE ACCESSORY
INSTRUCTIONS FOR USE ACCESSORY
SpaceStation (8713140)
Station for up to four pumps. For further information see Instructions for Use ofSpaceStation.
SpaceCover Standard (8713147)SpaceCover Comfort (8713145)
Cover to be placed on upper SpaceStation incl. built-in handle. The SpaceCoverComfort additionaly includes a central alarm management and alarm LEDs.
PoleClamp SP (8713130)
A maximum of three B. Braun Space pumps and one SpaceControl can bestacked together when used with the PoleClamp SP. For detailed instructions onsecure fixation of the PoleClamp SP please refer to "Overview Perfusor® Space"and "Patient Safety".
Power Supply SP (8713110A - 8713114A)
The Power Supply SP is adequate to supply power for a single pump and oneSpaceControl.
1.) Connect plug of Power Supply SP with socket P2 on back of pump(ensure that plug “clicks”).
2.) Push power plug into wall outlet.
Note: For disconnection from pump, press lever on plug down.A maximum of three plugs can be stacked upon each other in socket P2.
Technical Data: 100 – 240V AC~, 50/60 Hz
Combi Lead SP 12 V (8713133)
The Combi Lead SP can connect up to three pumps. All pumps can then beoperated via the Connection Lead SP (12 V).
1.) Connect plug of the Combi Lead SP 12 V with the socket P2 on theback of the pump.
47
2.) Connect plug of Connection Lead SP with Combi Lead SP.
3.) Push plug of Connection Lead SP into 12 V connector.
Note: A maximum of three plugs can be stacked upon each other in socket P2.
Battery-Pack SP (8713180)
For further information on the Battery-Pack SP (NiMH) see “Battery Operation”.
Interface Lead CAN SP (8713230)
Interface Lead CAN SP is needed in order to set up a connection between theSpaceStation/pump and the computer outlet (for service requirements).
1.) Push plug into socket F3 on the SpaceStation or P2 on the pump andconnect with the CAN/USB converter.
2.) Connect CAN/USB converter to computer outlet as described in theInstructions for Use manual.
Caution: The Interface Lead CAN SP is only to be used by the servicedepartment; never use while patient is connected.
Note: A maximum of three plugs can be stacked upon each other in socket P2.
Connection Lead SP (12 V) (8713231)
Install the Connection Lead SP (12 V) in the following way:
1.) Connect plug to socket P2 on back of pump or F3 on SpaceStationrespectively.
2.) Put the connection lead into the car socket.
3.) If necessary, remove red adaptor of motor vehicle connector by slightlyturning and simultanously pulling.
The green LED of the electronic box shows the operating voltage. The mainsconnector can easily be replaced by another plug if required.
Caution: Do not connect the pump to a patient during external car batterycharging!
Note: A maximum of three plugs can be stacked upon each other in socket P2.
Chapter 11
INSTRUCTIONS FOR USE ACCESSORY
48
Connection Lead for Staff Call SP (8713232)
To connect the Perfusor® Space to staff call, use the Connection Lead for StaffCall SP. The staff call needs to comply with the requirements of VDE 0834(consider country specific regulations).
Note: Test staff call signalling before every use.
The Perfusor® Space offers three different staff call operating modes. They aredisplayed in the signalling scheme. Consider the staff call of the hospital whenchoosing an operating mode. Choose the operating mode via the serviceprogram.
Caution: The user should always closely observe the local pump alarms as well.
Note: A maximum of three plugs can be stacked upon each other in socket P2.
Technical Data
Polarity of connexion is arbitrary:max. 24 V / 0.5 A / 12 VA
Chapter 11
INSTRUCTIONS FOR USE ACCESSORY
AlarmOperation
white and greenConnecting Wire
white and browndisconnected connectedconnected disconnected
turned off
Alarm
Operation
Alarm
Operation
Alarm
Operation
turned on
1 sec
1 sec 1 sec
turned off
staticwithoutOff-Alarm*)
dynamicwithoutOff–Alarm
dynamicwithOff-Alarm
Operating Alarm
*) in the mode static without Off-Alarm, the staff call can be surpressed withk
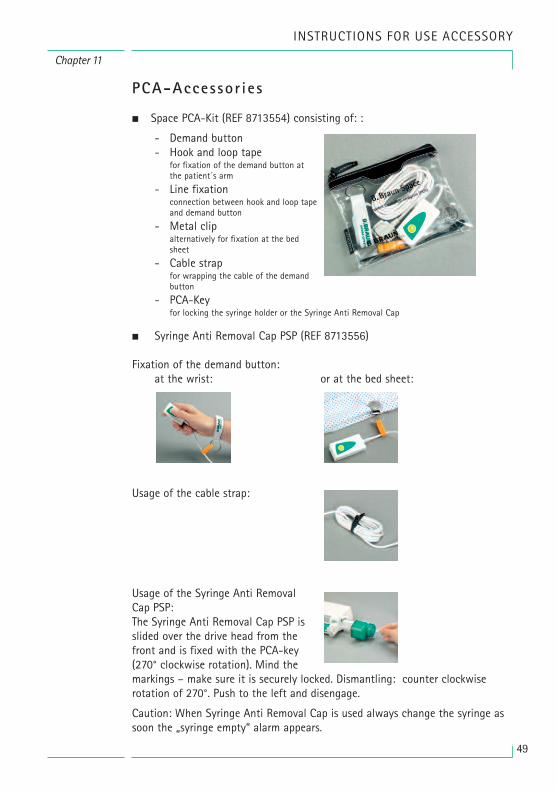
49
Chapter 11
INSTRUCTIONS FOR USE ACCESSORY
PCA-Accessor ies
• Space PCA-Kit (REF 8713554) consisting of: :
- Demand button- Hook and loop tape
for fixation of the demand button atthe patient´s arm
- Line fixationconnection between hook and loop tapeand demand button
- Metal clipalternatively for fixation at the bedsheet
- Cable strapfor wrapping the cable of the demandbutton
- PCA-Keyfor locking the syringe holder or the Syringe Anti Removal Cap
• Syringe Anti Removal Cap PSP (REF 8713556)
Fixation of the demand button:at the wrist: or at the bed sheet:
Usage of the cable strap:
Usage of the Syringe Anti RemovalCap PSP:The Syringe Anti Removal Cap PSP isslided over the drive head from thefront and is fixed with the PCA-key(270° clockwise rotation). Mind themarkings – make sure it is securely locked. Dismantling: counter clockwiserotation of 270°. Push to the left and disengage.
Caution: When Syringe Anti Removal Cap is used always change the syringe assoon the „syringe empty“ alarm appears.
50
ORDERING
Art. No.B. Braun Perfusor® Space (100 – 240 V) ...................................................871 3030
Recommended accessories for the B. Braun Perfusor® Space:SpaceStation ..........................................................................................................871 3140SpaceCover Standard ..........................................................................................871 3147SpaceCover Comfort ............................................................................................871 3145PoleClamp SP ..........................................................................................................871 3130Power Supply SP (Euro Plug) ..............................................................................871 3110APower Supply SP (UK Plug) .................................................................................871 3111APower Supply SP (US Plug) .................................................................................871 3112APower Supply SP (Australian Plug) ...................................................................871 3113APower Supply SP (RSA Plug)...............................................................................871 3115ACombi Lead SP 12 V..............................................................................................871 3133Battery-Pack SP (NiMH).......................................................................................871 3180Interface Lead CAN SP .........................................................................................871 3230Connection Lead SP (12 V) .................................................................................871 3231Connection Lead for Staff Call SP ....................................................................871 3232Space PCA Kit .........................................................................................................871 2554Syringe Anti Removal Cap PSP..........................................................................871 3556
Original Perfusor® Syringes:Original Perfusor® Syringe 50 ml without needle .......................................872 8844FOriginal Perfusor® Syringe 50 ml with aspiration needle .........................872 8810FOriginal Perfusor® Syringe 50 ml with aspiration needleand particle filter .................................................................................................872 8852FOriginal Perfusor® Syringe 50 ml black with aspiration needleand particle filter...................................................................................................872 8828FOriginal Perfusor® Syringe 20 ml without needle .......................................872 8615Original Perfusor® Syringe 20 ml with aspiration needle .........................872 8623Omnifix® 50/60 ml Luer Lock ...........................................................................461 7509FOmnifix® 30 ml Luer Lock...................................................................................461 7304FOmnifix® 20 ml Luer Lock...................................................................................461 7207VOmnifix® 10 ml Luer Lock ...................................................................................461 7100VOmnifix® 5 ml Luer Lock .....................................................................................461 7053VOmnifix® 3 ml Luer Lock .....................................................................................461 7100VOmnifix® 2 ml Luer Lock .....................................................................................461 7029V
51
ORDERING
Original Perfusor® Lines:Original Perfusor® Line, made of PVC; 50 cm...............................................825 5172Original Perfusor® Line, made of PVC; 150 cm ............................................872 2960Original Perfusor® Line, made of PVC; 200 cm ............................................872 2862Original Perfusor® Line, made of PVC; 250 cm ............................................825 5490Original Perfusor® Line, made of PVC; 300 cm ............................................825 5253Original Perfusor® Line, made of PE; 50 cm..................................................825 5059Original Perfusor® Line, made of PE; 100 cm ...............................................825 5067Original Perfusor® Line, made of PE; 150 cm ...............................................872 2935Original Perfusor® Line, made of PE; 200 cm ...............................................872 3060Original Perfusor® Line, made of PE; 250 cm ...............................................827 2565Original Perfusor® Line, type Safesite, made of PVC,with Safesite safety connector; 150 cm.........................................................872 2820Original Perfusor® Line, type Filter, made of PVC,with injection filter 0.22 µm; 200 cm.............................................................872 3001Original Perfusor® Line, type PCA, made of PVCwith back check valve; 168 cm.........................................................................872 6019Original Perfusor® Line, type MR, made of PVC,with swivel nut; 75 cm........................................................................................872 2870Original Perfusor® Line, type MR, made of PVC,with swivel nut; 150 cm .....................................................................................825 5504Original Perfusor® Line, made of PE, black; 150 cm...................................872 3010


38916517 • Drawing No. M688 70 02 01 F04Printed on pulp bleached 100 % chlorine-free0709 • Date of last revision: July 2009
B. Braun Melsungen AGSparte Hospital Care34209 MelsungenGermany
Tel.: +49 (0) 56 61 71-0Fax: +49 (0) 56 61 71-20 44
www.bbraun.com
Manufactured byB. Braun Melsungen AG34209 MelsungenGermanyTel +49 (0) 56 61 71-0