Embed Size (px)
Citation preview

18.04 Client Certification Tests
Page 1 of 32
Name Certification status Description
Audio tests
after-suspend-manual-audio/1_playback_displayport_PRODUCT blocker
after-suspend-manual-audio/1_playback_hdmi_PRODUCT blocker
after-suspend-manual-audio/1_playback_thunderbolt3_PRODUCT non-blocker
after-suspend-manual-audio/1_playback_thunderbolt_PRODUCT blocker
after-suspend-manual-audio/1_playback_type-c_displayport_PRODUCT blocker
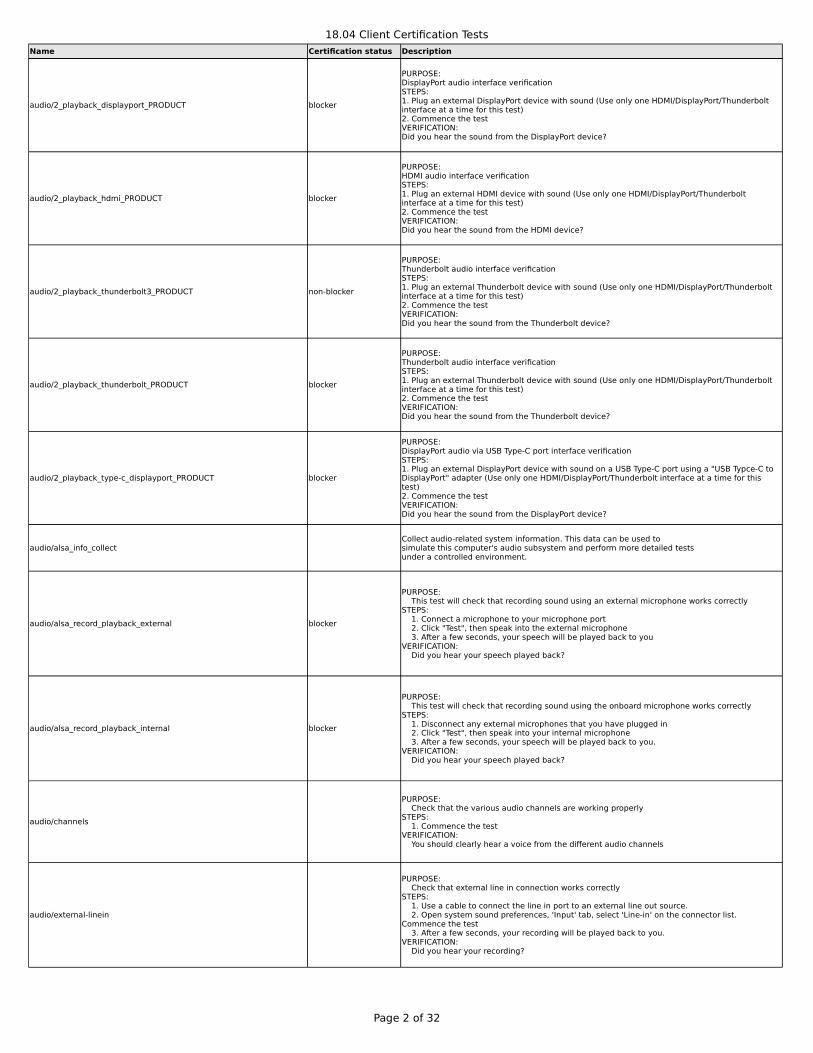
audio/1_playback_displayport_PRODUCT blocker
audio/1_playback_hdmi_PRODUCT blocker
audio/1_playback_thunderbolt3_PRODUCT non-blocker
audio/1_playback_thunderbolt_PRODUCT blocker
audio/1_playback_type-c_displayport_PRODUCT blocker
PURPOSE:DisplayPort audio interface verificationSTEPS:1. Plug an external DisplayPort device with sound (Use only one HDMI/DisplayPort/Thunderbolt interface at a time for this test)2. Commence the testVERIFICATION:Did you hear the sound from the DisplayPort device?
PURPOSE:HDMI audio interface verificationSTEPS:1. Plug an external HDMI device with sound (Use only one HDMI/DisplayPort/Thunderbolt interface at a time for this test)2. Commence the testVERIFICATION:Did you hear the sound from the HDMI device?
PURPOSE:Thunderbolt audio interface verificationSTEPS:1. Plug an external Thunderbolt device with sound (Use only one HDMI/DisplayPort/Thunderbolt interface at a time for this test)2. Commence the testVERIFICATION:Did you hear the sound from the Thunderbolt device?
PURPOSE:Thunderbolt audio interface verificationSTEPS:1. Plug an external Thunderbolt device with sound (Use only one HDMI/DisplayPort/Thunderbolt interface at a time for this test)2. Commence the testVERIFICATION:Did you hear the sound from the Thunderbolt device?
PURPOSE:DisplayPort audio via USB Type-C port interface verificationSTEPS:1. Plug an external DisplayPort device with sound on a USB Type-C port using a "USB Typce-C to DisplayPort" adapter (Use only one HDMI/DisplayPort/Thunderbolt interface at a time for this test)2. Commence the testVERIFICATION:Did you hear the sound from the DisplayPort device?
18.04 Client Certification Tests
Page 2 of 32
Name Certification status Description
audio/2_playback_displayport_PRODUCT blocker
audio/2_playback_hdmi_PRODUCT blocker
audio/2_playback_thunderbolt3_PRODUCT non-blocker
audio/2_playback_thunderbolt_PRODUCT blocker
audio/2_playback_type-c_displayport_PRODUCT blocker
audio/alsa_info_collect
audio/alsa_record_playback_external blocker
audio/alsa_record_playback_internal blocker
audio/channels
audio/external-linein
PURPOSE:DisplayPort audio interface verificationSTEPS:1. Plug an external DisplayPort device with sound (Use only one HDMI/DisplayPort/Thunderbolt interface at a time for this test)2. Commence the testVERIFICATION:Did you hear the sound from the DisplayPort device?
PURPOSE:HDMI audio interface verificationSTEPS:1. Plug an external HDMI device with sound (Use only one HDMI/DisplayPort/Thunderbolt interface at a time for this test)2. Commence the testVERIFICATION:Did you hear the sound from the HDMI device?
PURPOSE:Thunderbolt audio interface verificationSTEPS:1. Plug an external Thunderbolt device with sound (Use only one HDMI/DisplayPort/Thunderbolt interface at a time for this test)2. Commence the testVERIFICATION:Did you hear the sound from the Thunderbolt device?
PURPOSE:Thunderbolt audio interface verificationSTEPS:1. Plug an external Thunderbolt device with sound (Use only one HDMI/DisplayPort/Thunderbolt interface at a time for this test)2. Commence the testVERIFICATION:Did you hear the sound from the Thunderbolt device?
PURPOSE:DisplayPort audio via USB Type-C port interface verificationSTEPS:1. Plug an external DisplayPort device with sound on a USB Type-C port using a "USB Typce-C to DisplayPort" adapter (Use only one HDMI/DisplayPort/Thunderbolt interface at a time for this test)2. Commence the testVERIFICATION:Did you hear the sound from the DisplayPort device?
Collect audio-related system information. This data can be used tosimulate this computer's audio subsystem and perform more detailed testsunder a controlled environment.
PURPOSE: This test will check that recording sound using an external microphone works correctlySTEPS: 1. Connect a microphone to your microphone port 2. Click "Test", then speak into the external microphone 3. After a few seconds, your speech will be played back to youVERIFICATION: Did you hear your speech played back?
PURPOSE: This test will check that recording sound using the onboard microphone works correctlySTEPS: 1. Disconnect any external microphones that you have plugged in 2. Click "Test", then speak into your internal microphone 3. After a few seconds, your speech will be played back to you.VERIFICATION: Did you hear your speech played back?
PURPOSE: Check that the various audio channels are working properlySTEPS: 1. Commence the testVERIFICATION: You should clearly hear a voice from the different audio channels
PURPOSE: Check that external line in connection works correctlySTEPS: 1. Use a cable to connect the line in port to an external line out source. 2. Open system sound preferences, 'Input' tab, select 'Line-in' on the connector list. Commence the test 3. After a few seconds, your recording will be played back to you.VERIFICATION: Did you hear your recording?
18.04 Client Certification Tests
Page 3 of 32
Name Certification status Description
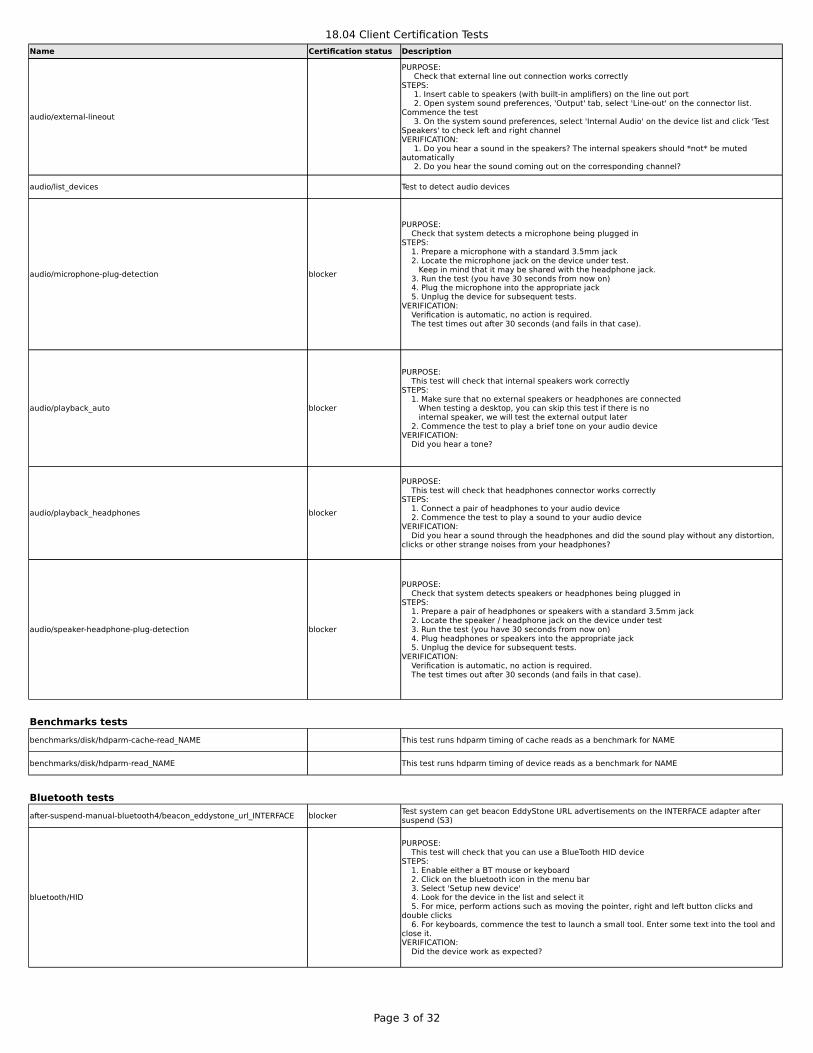
audio/external-lineout
audio/list_devices Test to detect audio devices
audio/microphone-plug-detection blocker
audio/playback_auto blocker
audio/playback_headphones blocker
audio/speaker-headphone-plug-detection blocker
Benchmarks tests
benchmarks/disk/hdparm-cache-read_NAME This test runs hdparm timing of cache reads as a benchmark for NAME
benchmarks/disk/hdparm-read_NAME This test runs hdparm timing of device reads as a benchmark for NAME
Bluetooth tests
after-suspend-manual-bluetooth4/beacon_eddystone_url_INTERFACE blocker
bluetooth/HID
PURPOSE: Check that external line out connection works correctlySTEPS: 1. Insert cable to speakers (with built-in amplifiers) on the line out port 2. Open system sound preferences, 'Output' tab, select 'Line-out' on the connector list. Commence the test 3. On the system sound preferences, select 'Internal Audio' on the device list and click 'Test Speakers' to check left and right channelVERIFICATION: 1. Do you hear a sound in the speakers? The internal speakers should *not* be muted automatically 2. Do you hear the sound coming out on the corresponding channel?
PURPOSE: Check that system detects a microphone being plugged inSTEPS: 1. Prepare a microphone with a standard 3.5mm jack 2. Locate the microphone jack on the device under test. Keep in mind that it may be shared with the headphone jack. 3. Run the test (you have 30 seconds from now on) 4. Plug the microphone into the appropriate jack 5. Unplug the device for subsequent tests.VERIFICATION: Verification is automatic, no action is required. The test times out after 30 seconds (and fails in that case).
PURPOSE: This test will check that internal speakers work correctlySTEPS: 1. Make sure that no external speakers or headphones are connected When testing a desktop, you can skip this test if there is no internal speaker, we will test the external output later 2. Commence the test to play a brief tone on your audio deviceVERIFICATION: Did you hear a tone?
PURPOSE: This test will check that headphones connector works correctlySTEPS: 1. Connect a pair of headphones to your audio device 2. Commence the test to play a sound to your audio deviceVERIFICATION: Did you hear a sound through the headphones and did the sound play without any distortion, clicks or other strange noises from your headphones?
PURPOSE: Check that system detects speakers or headphones being plugged inSTEPS: 1. Prepare a pair of headphones or speakers with a standard 3.5mm jack 2. Locate the speaker / headphone jack on the device under test 3. Run the test (you have 30 seconds from now on) 4. Plug headphones or speakers into the appropriate jack 5. Unplug the device for subsequent tests.VERIFICATION: Verification is automatic, no action is required. The test times out after 30 seconds (and fails in that case).
Test system can get beacon EddyStone URL advertisements on the INTERFACE adapter after suspend (S3)
PURPOSE: This test will check that you can use a BlueTooth HID deviceSTEPS: 1. Enable either a BT mouse or keyboard 2. Click on the bluetooth icon in the menu bar 3. Select 'Setup new device' 4. Look for the device in the list and select it 5. For mice, perform actions such as moving the pointer, right and left button clicks and double clicks 6. For keyboards, commence the test to launch a small tool. Enter some text into the tool and close it.VERIFICATION: Did the device work as expected?
18.04 Client Certification Tests
Page 4 of 32
Name Certification status Description
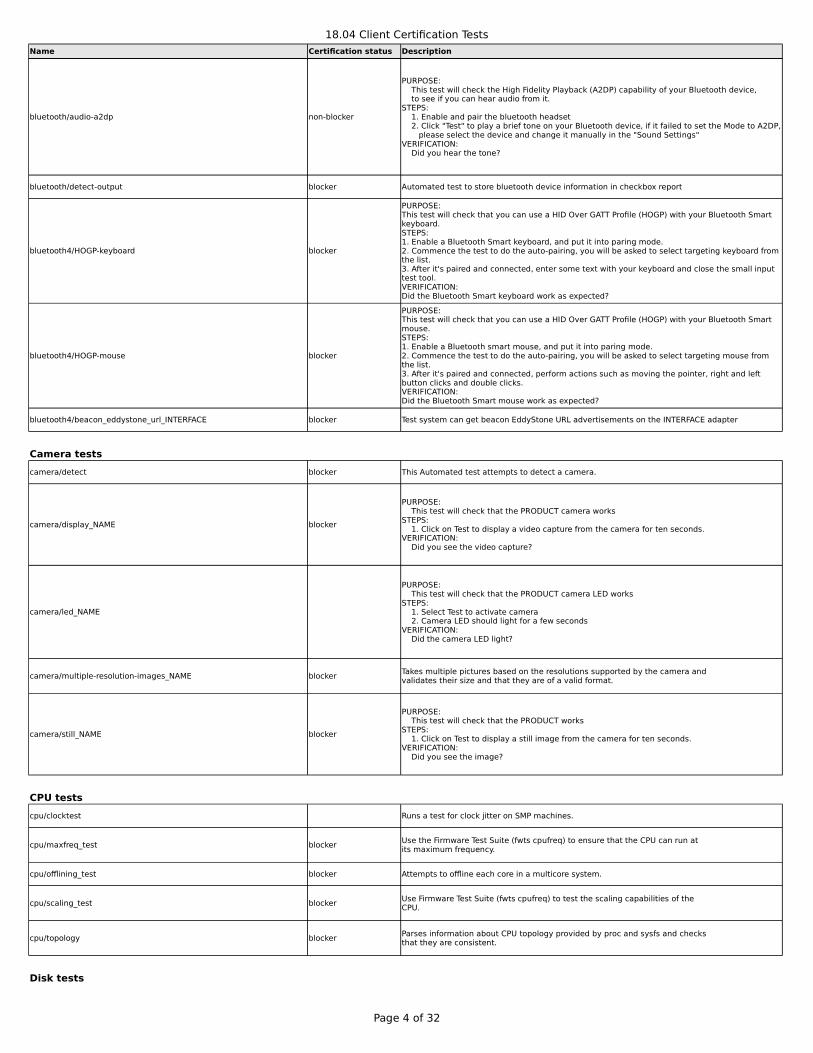
bluetooth/audio-a2dp non-blocker
bluetooth/detect-output blocker Automated test to store bluetooth device information in checkbox report
bluetooth4/HOGP-keyboard blocker
bluetooth4/HOGP-mouse blocker
bluetooth4/beacon_eddystone_url_INTERFACE blocker Test system can get beacon EddyStone URL advertisements on the INTERFACE adapter
Camera tests
camera/detect blocker This Automated test attempts to detect a camera.
camera/display_NAME blocker
camera/led_NAME
camera/multiple-resolution-images_NAME blocker
camera/still_NAME blocker
CPU tests
cpu/clocktest Runs a test for clock jitter on SMP machines.
cpu/maxfreq_test blocker
cpu/offlining_test blocker Attempts to offline each core in a multicore system.
cpu/scaling_test blocker
cpu/topology blocker
Disk tests
PURPOSE: This test will check the High Fidelity Playback (A2DP) capability of your Bluetooth device, to see if you can hear audio from it.STEPS: 1. Enable and pair the bluetooth headset 2. Click "Test" to play a brief tone on your Bluetooth device, if it failed to set the Mode to A2DP, please select the device and change it manually in the "Sound Settings"VERIFICATION: Did you hear the tone?
PURPOSE:This test will check that you can use a HID Over GATT Profile (HOGP) with your Bluetooth Smart keyboard.STEPS:1. Enable a Bluetooth Smart keyboard, and put it into paring mode.2. Commence the test to do the auto-pairing, you will be asked to select targeting keyboard from the list.3. After it's paired and connected, enter some text with your keyboard and close the small input test tool.VERIFICATION:Did the Bluetooth Smart keyboard work as expected?
PURPOSE:This test will check that you can use a HID Over GATT Profile (HOGP) with your Bluetooth Smart mouse.STEPS:1. Enable a Bluetooth smart mouse, and put it into paring mode.2. Commence the test to do the auto-pairing, you will be asked to select targeting mouse from the list.3. After it's paired and connected, perform actions such as moving the pointer, right and left button clicks and double clicks.VERIFICATION:Did the Bluetooth Smart mouse work as expected?
PURPOSE: This test will check that the PRODUCT camera worksSTEPS: 1. Click on Test to display a video capture from the camera for ten seconds.VERIFICATION: Did you see the video capture?
PURPOSE: This test will check that the PRODUCT camera LED worksSTEPS: 1. Select Test to activate camera 2. Camera LED should light for a few secondsVERIFICATION: Did the camera LED light?
Takes multiple pictures based on the resolutions supported by the camera andvalidates their size and that they are of a valid format.
PURPOSE: This test will check that the PRODUCT worksSTEPS: 1. Click on Test to display a still image from the camera for ten seconds.VERIFICATION: Did you see the image?
Use the Firmware Test Suite (fwts cpufreq) to ensure that the CPU can run atits maximum frequency.
Use Firmware Test Suite (fwts cpufreq) to test the scaling capabilities of theCPU.
Parses information about CPU topology provided by proc and sysfs and checksthat they are consistent.
18.04 Client Certification Tests
Page 5 of 32
Name Certification status Description
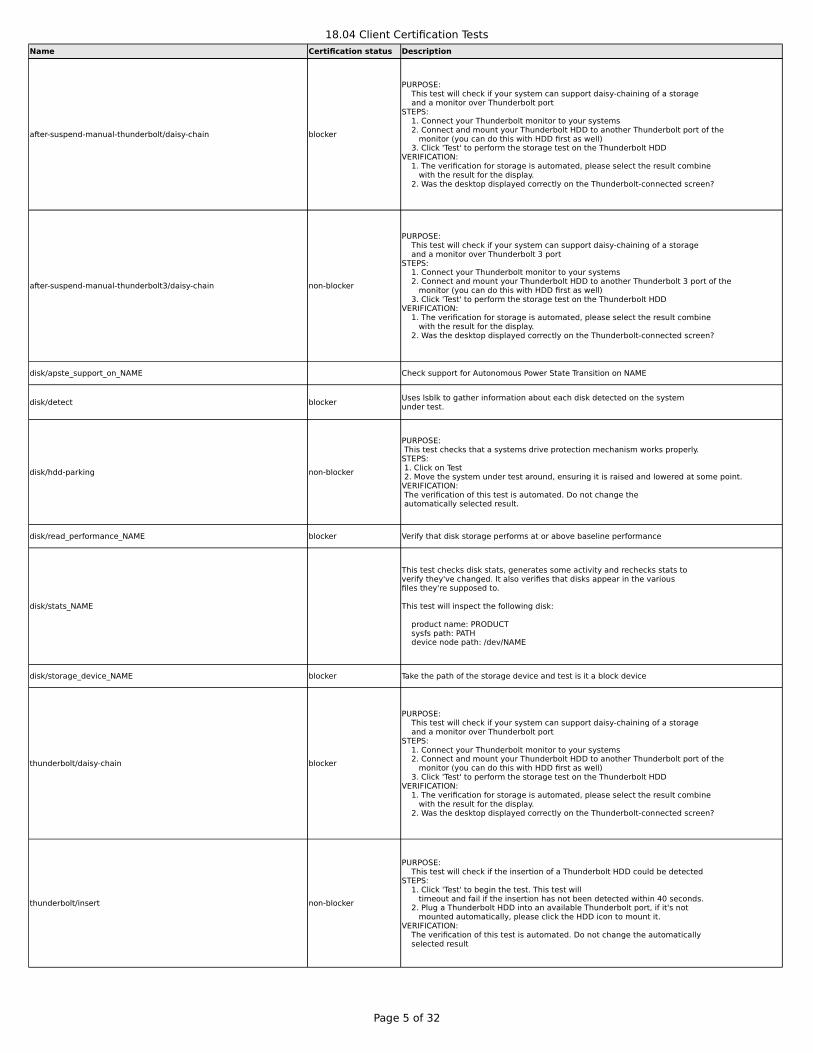
after-suspend-manual-thunderbolt/daisy-chain blocker
after-suspend-manual-thunderbolt3/daisy-chain non-blocker
disk/apste_support_on_NAME Check support for Autonomous Power State Transition on NAME
disk/detect blocker
disk/hdd-parking non-blocker
disk/read_performance_NAME blocker Verify that disk storage performs at or above baseline performance
disk/stats_NAME
disk/storage_device_NAME blocker Take the path of the storage device and test is it a block device
thunderbolt/daisy-chain blocker
thunderbolt/insert non-blocker
PURPOSE: This test will check if your system can support daisy-chaining of a storage and a monitor over Thunderbolt portSTEPS: 1. Connect your Thunderbolt monitor to your systems 2. Connect and mount your Thunderbolt HDD to another Thunderbolt port of the monitor (you can do this with HDD first as well) 3. Click 'Test' to perform the storage test on the Thunderbolt HDDVERIFICATION: 1. The verification for storage is automated, please select the result combine with the result for the display. 2. Was the desktop displayed correctly on the Thunderbolt-connected screen?
PURPOSE: This test will check if your system can support daisy-chaining of a storage and a monitor over Thunderbolt 3 portSTEPS: 1. Connect your Thunderbolt monitor to your systems 2. Connect and mount your Thunderbolt HDD to another Thunderbolt 3 port of the monitor (you can do this with HDD first as well) 3. Click 'Test' to perform the storage test on the Thunderbolt HDDVERIFICATION: 1. The verification for storage is automated, please select the result combine with the result for the display. 2. Was the desktop displayed correctly on the Thunderbolt-connected screen?
Uses lsblk to gather information about each disk detected on the systemunder test.
PURPOSE: This test checks that a systems drive protection mechanism works properly.STEPS: 1. Click on Test 2. Move the system under test around, ensuring it is raised and lowered at some point.VERIFICATION: The verification of this test is automated. Do not change the automatically selected result.
This test checks disk stats, generates some activity and rechecks stats toverify they've changed. It also verifies that disks appear in the variousfiles they're supposed to.
This test will inspect the following disk:
product name: PRODUCT sysfs path: PATH device node path: /dev/NAME
PURPOSE: This test will check if your system can support daisy-chaining of a storage and a monitor over Thunderbolt portSTEPS: 1. Connect your Thunderbolt monitor to your systems 2. Connect and mount your Thunderbolt HDD to another Thunderbolt port of the monitor (you can do this with HDD first as well) 3. Click 'Test' to perform the storage test on the Thunderbolt HDDVERIFICATION: 1. The verification for storage is automated, please select the result combine with the result for the display. 2. Was the desktop displayed correctly on the Thunderbolt-connected screen?
PURPOSE: This test will check if the insertion of a Thunderbolt HDD could be detectedSTEPS: 1. Click 'Test' to begin the test. This test will timeout and fail if the insertion has not been detected within 40 seconds. 2. Plug a Thunderbolt HDD into an available Thunderbolt port, if it's not mounted automatically, please click the HDD icon to mount it.VERIFICATION: The verification of this test is automated. Do not change the automatically selected result
18.04 Client Certification Tests
Page 6 of 32
Name Certification status Description
thunderbolt/remove non-blocker
thunderbolt/storage-test non-blocker
thunderbolt3/daisy-chain non-blocker
thunderbolt3/insert blocker
thunderbolt3/remove blocker
thunderbolt3/storage-test blocker
eSATA disk tests
esata/insert blocker
esata/remove blocker
esata/storage-test blocker
Ethernet Device tests
ethernet/detect blocker
PURPOSE: This test will check the system can detect the removal of a Thunderbolt HDDSTEPS: 1. Click 'Test' to begin the test. This test will timeout and fail if the removal has not been detected within 20 seconds. 2. Remove the previously attached Thunderbolt HDD from the Thunderbolt port.VERIFICATION: The verification of this test is automated. Do not change the automatically selected result
This is an automated test which performs read/write operations on an attachedThunderbolt HDD
PURPOSE: This test will check if your system can support daisy-chaining of a storage and a monitor over Thunderbolt 3 portSTEPS: 1. Connect your Thunderbolt monitor to your systems 2. Connect and mount your Thunderbolt HDD to another Thunderbolt 3 port of the monitor (you can do this with HDD first as well) 3. Click 'Test' to perform the storage test on the Thunderbolt HDDVERIFICATION: 1. The verification for storage is automated, please select the result combine with the result for the display. 2. Was the desktop displayed correctly on the Thunderbolt-connected screen?
PURPOSE: This test will check if the insertion of a Thunderbolt HDD could be detectedSTEPS: 1. Click 'Test' to begin the test. This test will timeout and fail if the insertion has not been detected within 40 seconds. 2. Plug a Thunderbolt HDD into an available Thunderbolt 3 port, if it's not mounted automatically, please click the HDD icon to mount it.VERIFICATION: The verification of this test is automated. Do not change the automatically selected result
PURPOSE: This test will check the system can detect the removal of a Thunderbolt HDDSTEPS: 1. Click 'Test' to begin the test. This test will timeout and fail if the removal has not been detected within 20 seconds. 2. Remove the previously attached Thunderbolt HDD from the Thunderbolt port.VERIFICATION: The verification of this test is automated. Do not change the automatically selected result
This is an automated test which performs read/write operations on an attachedThunderbolt HDD
PURPOSE: This test will check the system can detect the insertion of an eSATA HDDSTEPS: 1. Click 'Test' to begin the test. This test will timeout and fail if the insertion has not been detected within 20 seconds. 2. Plug an eSATA HDD into an available eSATA port.VERIFICATION: The verification of this test is automated. Do not change the automatically selected result
PURPOSE: This test will check the system can detect the removal of an eSATA HDDSTEPS: 1. Click 'Test' to begin the test. This test will timeout and fail if the removal has not been detected within 20 seconds. 2. Remove the previously attached eSATA HDD from the eSATA port.VERIFICATION: The verification of this test is automated. Do not change the automatically selected result
This is an automated test which performs read/write operations on an attachedeSATA HDD
Test to detect and return information about available network controllers onthe system under test.

18.04 Client Certification Tests
Page 7 of 32
Name Certification status Description
ethernet/hotplug-1-end-cycle blocker ethernet/hotplug-1-end-cycle
ethernet/hotplug-INTERFACE-check-disconnected blocker
ethernet/hotplug-INTERFACE-connect blocker
ethernet/hotplug-INTERFACE-disconnect blocker
Firewire disk tests
firewire/insert blocker
firewire/remove blocker
firewire/storage-test blocker
Firmware tests
firmware/fwts_desktop_diagnosis Run Firmware Test Suite (fwts) QA-concerned desktop-specific diagnosis tests.
firmware/no_ACPI_REV_interface blocker This Automated test checks misuse of the _REV interface in ACPI DSDT and SSDT tables
Graphics tests
graphics/1_compiz_check_PRODUCT blocker Check that VENDOR PRODUCT hardware is able to run compiz
graphics/1_cycle_resolution_PRODUCT non-blocker
graphics/1_driver_version_PRODUCT blocker
PURPOSE:Check that ethernet port INTERFACE is detected as being in the correct stateto begin a hotplug connection test.STEPS:1. Ensure there is no ethernet cable attached to port INTERFACE.2. Begin test.
PURPOSE:Check ethernet port INTERFACE connects when cable inserted. Assumes an IPaddress will be assigned by DHCP. Connection asserted by pinging the networkdefined gateway.STEPS:1. Begin the test.2. Insert the ethernet cable in to ethernet port INTERFACE.3. This test will timeout and fail if the insertion and connection establishment has not been detected (10 second timeout for each check).
PURPOSE:Check that when cable removed from ethernet port INTERFACE the systemdetects this correctly.STEPS:1. Depends on previous hotplug connection test passing. We will now test cable disconnection.2. Begin the test.3. Remove the ethernet cable from ethernet port INTERFACE.4. This test will timeout and fail if the removal has not been detected and interface marked as down (10 second timeout for each check).
PURPOSE: This test will check the system can detect the insertion of a FireWire HDDSTEPS: 1. Click 'Test' to begin the test. This test will timeout and fail if the insertion has not been detected within 20 seconds. 2. Plug a FireWire HDD into an available FireWire port.VERIFICATION: The verification of this test is automated. Do not change the automatically selected result
PURPOSE: This test will check the system can detect the removal of a FireWire HDDSTEPS: 1. Click 'Test' to begin the test. This test will timeout and fail if the removal has not been detected within 20 seconds. 2. Remove the previously attached FireWire HDD from the FireWire port.VERIFICATION: The verification of this test is automated. Do not change the automatically selected result
This is an automated test which performs read/write operations on an attachedFireWire HDD
PURPOSE: This test cycles through the detected video modes for the VENDOR PRODUCT graphics cardSTEPS: 1. Click "Test" to start cycling through the video modesVERIFICATION: Did the screen appear to be working for each mode?
Parses Xorg.0.log and discovers the running X driver and version for the VENDOR PRODUCT graphics card
18.04 Client Certification Tests
Page 8 of 32
Name Certification status Description
graphics/1_glxgears_PRODUCT blocker
graphics/1_glxgears_fullscreen_PRODUCT blocker
graphics/1_maximum_resolution_PRODUCT blocker
graphics/1_minimum_resolution_PRODUCT
graphics/1_rotation_PRODUCT blocker
graphics/1_switch_card_PRODUCT_xenial blocker Test GPU switching for VENDOR PRODUCT
graphics/1_video_PRODUCT blocker
graphics/2_compiz_check_PRODUCT blocker Check that VENDOR PRODUCT hardware is able to run compiz
graphics/2_cycle_resolution_PRODUCT non-blocker
graphics/2_driver_version_PRODUCT blocker
graphics/2_glxgears_PRODUCT blocker
graphics/2_glxgears_fullscreen_PRODUCT blocker
PURPOSE: This test tests the basic 3D capabilities of your VENDOR PRODUCT video cardSTEPS: 1. Click "Test" to execute an OpenGL demo. Press ESC at any time to close. 2. Verify that the animation is not jerky or slow.VERIFICATION: 1. Did the 3d animation appear? 2. Was the animation free from slowness/jerkiness?
PURPOSE: This test tests the basic fullscreen 3D capabilities of your VENDOR PRODUCT video cardSTEPS: 1. Click "Test" to execute an OpenGL demo. Press ESC at any time to close. 2. Verify that the animation is not jerky or slow.VERIFICATION: 1. Did the 3d animation appear? 2. Was the animation free from slowness/jerkiness?
PURPOSE: This test will verify the maximum supported resolution on the VENDOR PRODUCT graphics card.STEPS: 1. Select the VENDOR PRODUCT graphics card (a reboot may be necessary) 2. Consult the system's specifications and locate the screen's maximum supported resolution. 3. Click on Test to display the maximum resolution that can be used by Ubuntu on the current display.VERIFICATION: Is this the maximum resolution for the display connected to the VENDOR PRODUCT graphics card?
Ensure the current resolution meets or exceeds the recommended minimumresolution (800x600) on the VENDOR PRODUCT graphics card. See here for details:https://help.ubuntu.com/community/Installation/SystemRequirements
PURPOSE: This test will test display rotation on the VENDOR PRODUCT graphics cardSTEPS: 1. Click "Test" to test display rotation. The display will be rotated every 4 seconds. 2. Check if all rotations (normal right inverted left) took place without permanent screen corruptionVERIFICATION: Did the display rotation take place without permanent screen corruption?
PURPOSE: This test will test the default display with a sample videoSTEPS: 1. Click "Test" to display a video test.VERIFICATION: Do you see color bars and static?
PURPOSE: This test cycles through the detected video modes for the VENDOR PRODUCT graphics cardSTEPS: 1. Click "Test" to start cycling through the video modesVERIFICATION: Did the screen appear to be working for each mode?
Parses Xorg.0.log and discovers the running X driver and version for the VENDOR PRODUCT graphics card
PURPOSE: This test tests the basic 3D capabilities of your VENDOR PRODUCT video cardSTEPS: 1. Click "Test" to execute an OpenGL demo. Press ESC at any time to close. 2. Verify that the animation is not jerky or slow.VERIFICATION: 1. Did the 3d animation appear? 2. Was the animation free from slowness/jerkiness?
PURPOSE: This test tests the basic fullscreen 3D capabilities of your VENDOR PRODUCT video cardSTEPS: 1. Click "Test" to execute an OpenGL demo. Press ESC at any time to close. 2. Verify that the animation is not jerky or slow.VERIFICATION: 1. Did the 3d animation appear? 2. Was the animation free from slowness/jerkiness?
18.04 Client Certification Tests
Page 9 of 32
Name Certification status Description
graphics/2_maximum_resolution_PRODUCT blocker
graphics/2_minimum_resolution_PRODUCT
graphics/2_rotation_PRODUCT blocker
graphics/2_switch_card_PRODUCT_xenial blocker Test GPU switching for VENDOR PRODUCT
graphics/2_valid_opengl_renderer_PRODUCT blocker Check the OpenGL renderer (AMD GPU and DRI_PRIME=1)
graphics/2_video_PRODUCT blocker
graphics/VESA_drivers_not_in_use blocker Check that VESA drivers are not in use
graphics/xorg-failsafe blocker Test that the X is not running in failsafe mode.
graphics/xorg-process blocker Test that the X process is running.
graphics/xorg-version blocker Test to output the Xorg version
Hibernation tests
power-management/1_hibernate_advanced_VENDOR_PRODUCT non-blocker
power-management/2_hibernate_advanced_VENDOR_PRODUCT non-blocker
power-management/hibernate_advanced
Hotkey tests
PURPOSE: This test will verify the maximum supported resolution on the VENDOR PRODUCT graphics card.STEPS: 1. Select the VENDOR PRODUCT graphics card (a reboot may be necessary) 2. Consult the system's specifications and locate the screen's maximum supported resolution. 3. Click on Test to display the maximum resolution that can be used by Ubuntu on the current display.VERIFICATION: Is this the maximum resolution for the display connected to the VENDOR PRODUCT graphics card?
Ensure the current resolution meets or exceeds the recommended minimumresolution (800x600) on the VENDOR PRODUCT graphics card. See here for details:https://help.ubuntu.com/community/Installation/SystemRequirements
PURPOSE: This test will test display rotation on the VENDOR PRODUCT graphics cardSTEPS: 1. Click "Test" to test display rotation. The display will be rotated every 4 seconds. 2. Check if all rotations (normal right inverted left) took place without permanent screen corruptionVERIFICATION: Did the display rotation take place without permanent screen corruption?
PURPOSE: This test will test the default display with a sample videoSTEPS: 1. Click "Test" to display a video test.VERIFICATION: Do you see color bars and static?
PURPOSE:This test will check to make sure your system can successfully hibernate (if supported)STEPS:1. Click on Test2. The system will hibernate and should wake itself within 5 minutes3. If your system does not wake itself after 5 minutes, please press the power button to wake the system manually4. If the system fails to resume from hibernate, please restart System Testing and mark this test as FailedVERIFICATION:Did the system successfully hibernate and did it work properly after waking up?
PURPOSE:This test will check to make sure your system can successfully hibernate (if supported)STEPS:1. Click on Test2. The system will hibernate and should wake itself within 5 minutes3. If your system does not wake itself after 5 minutes, please press the power button to wake the system manually4. If the system fails to resume from hibernate, please restart System Testing and mark this test as FailedVERIFICATION:Did the system successfully hibernate and did it work properly after waking up?
PURPOSE: This test will check to make sure your system can successfully hibernate (if supported)STEPS: 1. Click on Test 2. The system will hibernate and should wake itself within 5 minutes 3. If your system does not wake itself after 5 minutes, please press the power button to wake the system manually 4. If the system fails to resume from hibernate, please restart System Testing and mark this test as FailedVERIFICATION: Did the system successfully hibernate and did it work properly after waking up?
18.04 Client Certification Tests
Page 10 of 32
Name Certification status Description
after-suspend-manual-keys/battery-info blocker
after-suspend-manual-keys/brightness blocker
after-suspend-manual-keys/keyboard-backlight blocker
after-suspend-manual-keys/lock-screen blocker
after-suspend-manual-keys/media-control blocker
after-suspend-manual-keys/microphone-mute blocker
after-suspend-manual-keys/mute blocker
after-suspend-manual-keys/super blocker
after-suspend-manual-keys/video-out blocker
PURPOSE: This test will test the battery information keySTEPS: Skip this test if you do not have a Battery Button. 1. Click Test to begin 2. Press the Battery Info button (or combo like Fn+F3) 3: Close the Power Statistics tool if it opensVERIFICATION: Did the Battery Info key work as expected?
PURPOSE: This test will test the brightness keySTEPS: 1. Press the brightness buttons on the keyboardVERIFICATION: Did the brightness change following to your key presses?
PURPOSE: Verify that the keyboard backlight toggle key works properlySTEPS: 1. Tap the keyboard backlight key 2. Confirm that the keyboard backlight was toggled to the opposite state 3. Tap the keyboard backlight key again 4. Confirm that the keyboard backlight was toggled to the opposite stateVERIFICATION: Did the keyboard backlight state change on each press?
PURPOSE: This test will test the screen lock keySTEPS: 1. Commence the test. If there is no such key, please skip this test. 2. Press the lock screen button on the keyboard in 30 seconds. 3. If the screen is locked, move the mouse or press any key to activate the prompt. 4. Input the password to unlock the screen.VERIFICATION: The verification of this test is automated. Do not change the automatically selected result.
PURPOSE: This test will test the media keys of your keyboardSTEPS: Skip this test if your computer has no media keys. 1. Click test to open a window on which to test the media keys. 2. If all the keys work, the test will be marked as passed.VERIFICATION: Do the keys work as expected?
PURPOSE: This test will test the mute key for your microphoneSTEPS: 1. Click "Test" then speak: "Imagination is more important than knowledge" (or anything else) into your microphone. 2. While you are speaking, please press the mute key for the microphone to mute it and press it again to unmute. 3. After a few seconds, your speech will be played back to you. If the key works, your speech should be interrupted for a few seconds.VERIFICATION: Does the microphone mute key work as expected?
PURPOSE: This test will test the mute key of your keyboardSTEPS: 1. Click test to open a window on which to test the mute key. 2. If the key works, the test will pass and the window will close.VERIFICATION: Does the mute key work as expected?
PURPOSE: This test will test the super key of your keyboardSTEPS: 1. Click test to open a window on which to test the super key. 2. If the key works, the test will pass and the window will close.VERIFICATION: Does the super key work as expected?
PURPOSE: Validate that the External Video hot key is working as expectedSTEPS: 1. Plug in an external monitor 2. Press the display hot key to change the monitors configurationVERIFICATION: Check that the video signal can be mirrored, extended, displayed on external or onboard only.

18.04 Client Certification Tests
Page 11 of 32
Name Certification status Description
after-suspend-manual-keys/volume blocker
after-suspend-manual-keys/wireless blocker
keys/battery-info blocker
keys/brightness blocker
keys/hibernate non-blocker
keys/keyboard-backlight blocker
keys/lock-screen blocker
keys/media-control blocker
PURPOSE: This test will test the volume keys of your keyboardSTEPS: Skip this test if your computer has no volume keys. 1. Click test to open a window on which to test the volume keys. 2. If all the keys work, the test will be marked as passed.VERIFICATION: Do the keys work as expected?
PURPOSE: This test will test the wireless keySTEPS: 1. Press the wireless key on the keyboard 2. Check that the wifi LED turns off or changes color 3. Check that wireless is disabled 4. Press the same key again 5. Check that the wifi LED turns on or changes color 6. Check that wireless is enabledVERIFICATION: Did the wireless turn off on the first press and on again on the second? (NOTE: the LED functionality will be reviewed in a following test. Please only consider the functionality of the wifi itself here.)
PURPOSE: This test will test the battery information keySTEPS: Skip this test if you do not have a Battery Button. 1. Click Test to begin 2. Press the Battery Info button (or combo like Fn+F3) 3: Close the Power Statistics tool if it opensVERIFICATION: Did the Battery Info key work as expected?
PURPOSE: This test will test the brightness keySTEPS: 1. Press the brightness buttons on the keyboardVERIFICATION: Did the brightness change following to your key presses?
PURPOSE: This test will test the hibernate keySTEPS: 1. Press the hibernate key on the keyboard 2. Check that the system hibernated correctly 3. Wake your system after hibernating by pressing the power buttonVERIFICATION: Did the system go to hibernate after pressing the hibernate key?
PURPOSE: Verify that the keyboard backlight toggle key works properlySTEPS: 1. Tap the keyboard backlight key 2. Confirm that the keyboard backlight was toggled to the opposite state 3. Tap the keyboard backlight key again 4. Confirm that the keyboard backlight was toggled to the opposite stateVERIFICATION: Did the keyboard backlight state change on each press?
PURPOSE: This test will test the screen lock keySTEPS: 1. Commence the test. If there is no such key, please skip this test. 2. Press the lock screen button on the keyboard in 30 seconds. 3. If the screen is locked, move the mouse or press any key to activate the prompt. 4. Input the password to unlock the screen.VERIFICATION: The verification of this test is automated. Do not change the automatically selected result.
PURPOSE: This test will test the media keys of your keyboardSTEPS: Skip this test if your computer has no media keys. 1. Click test to open a window on which to test the media keys. 2. If all the keys work, the test will be marked as passed.VERIFICATION: Do the keys work as expected?
18.04 Client Certification Tests
Page 12 of 32
Name Certification status Description
keys/microphone-mute blocker
keys/mute blocker
keys/sleep blocker
keys/super blocker
keys/video-out blocker
keys/volume blocker
keys/wireless blocker
Input Devices tests
input/accelerometer non-blocker
PURPOSE: This test will test the mute key for your microphoneSTEPS: 1. Click "Test" then speak: "Imagination is more important than knowledge" (or anything else) into your microphone. 2. While you are speaking, please press the mute key for the microphone to mute it and press it again to unmute. 3. After a few seconds, your speech will be played back to you. If the key works, your speech should be interrupted for a few seconds.VERIFICATION: Does the microphone mute key work as expected?
PURPOSE: This test will test the mute key of your keyboardSTEPS: 1. Click test to open a window on which to test the mute key. 2. If the key works, the test will pass and the window will close.VERIFICATION: Does the mute key work as expected?
PURPOSE: This test will test the sleep keySTEPS: 1. Press the sleep key on the keyboard 2. Wake your system up by pressing the power buttonVERIFICATION: Did the system go to sleep after pressing the sleep key?
PURPOSE: This test will test the super key of your keyboardSTEPS: 1. Click test to open a window on which to test the super key. 2. If the key works, the test will pass and the window will close.VERIFICATION: Does the super key work as expected?
PURPOSE: Validate that the External Video hot key is working as expectedSTEPS: 1. Plug in an external monitor 2. Press the display hot key to change the monitors configurationVERIFICATION: Check that the video signal can be mirrored, extended, displayed on external or onboard only.
PURPOSE: This test will test the volume keys of your keyboardSTEPS: Skip this test if your computer has no volume keys. 1. Click test to open a window on which to test the volume keys. 2. If all the keys work, the test will be marked as passed.VERIFICATION: Do the keys work as expected?
PURPOSE: This test will test the wireless keySTEPS: 1. Press the wireless key on the keyboard 2. Check that the wifi LED turns off or changes color 3. Check that wireless is disabled 4. Press the same key again 5. Check that the wifi LED turns on or changes color 6. Check that wireless is enabledVERIFICATION: Did the wireless turn off on the first press and on again on the second? (NOTE: the LED functionality will be reviewed in a following test. Please only consider the functionality of the wifi itself here.)
PURPOSE: This test will test your accelerometer to see if it is detected and operational as a joystick device.STEPS: 1. Click on Test 2. Tilt your hardware in the directions onscreen until the axis threshold is met.VERIFICATION: Is your accelerometer properly detected? Can you use the device?
18.04 Client Certification Tests
Page 13 of 32
Name Certification status Description
input/keyboard blocker
LED tests
led/battery-charged
led/battery-charging
led/battery-low
led/caps-lock
led/power
led/power-blink-suspend
led/suspend
led/touchpad
Media Card tests
PURPOSE: This test will test your keyboardSTEPS: 1. Click on Test 2. On the open text area, use your keyboard to type somethingVERIFICATION: Is your keyboard working properly?
PURPOSE: Validate that the battery LED properly displays charged statusSTEPS: 1. Let system run on battery for a short time 2. Plug in AC 3. Let system run on ACVERIFICATION: Does the orange battery LED shut off when system is fully charged?
PURPOSE: Validate that the battery light shows charging statusSTEPS: 1. Let system run on battery for a while 2. Plug in AC plugVERIFICATION: Did the battery indicator LED turn orange?
PURPOSE: Validate that the battery LED indicated low powerSTEPS: 1. Let system run on battery for several hours 2. Monitor battery LED carefullyVERIFICATION: Does the LED light orange when battery is low?
PURPOSE: Block cap keys LED verificationSTEPS: 1. Press "Block Cap Keys" to activate/deactivate cap keys blocking 2. Cap Keys LED should be switched on/off every time the key is pressedVERIFICATION: Did the Cap Keys LED light as expected?
PURPOSE:Check power led is on when system is powered onSTEPS:1. Check power led when system is powered onVERIFICATION:Power led is on when system is powered on
PURPOSE:Check power led is blinking when system is in suspendSTEPS:1. Suspend the system2. Check power led when system is in suspendVERIFICATION:Power led is blinking when system is in suspend
PURPOSE: Suspend LED verification.STEPS: Skip this test if your system does not have a dedicated Suspend LED. 1. The Suspend LED should blink or change color while the system is suspendedVERIFICATION Did the Suspend LED blink or change color while the system was suspended?
PURPOSE: Touchpad LED verificationSTEPS: 1. Click on the touchpad button or press key combination to enable/disable touchpad button 2. Slide your finger on the touchpadVERIFICATION: 1. Touchpad LED status should toggle everytime the button is clicked or the key combination is pressed 2. When the LED is on, the mouse pointer should move on touchpad usage 3. When the LED is off, the mouse pointer should not move on touchpad usage
18.04 Client Certification Tests
Page 14 of 32
Name Certification status Description
mediacard/sd-insert blocker
mediacard/sd-remove blocker
mediacard/sd-storage blocker
mediacard/sdhc-insert blocker
mediacard/sdhc-remove blocker
mediacard/sdhc-storage blocker
Miscellaneous tests
miscellanea/chvt
miscellanea/device_check
miscellanea/dmitest_client Sanity check of DMI system identification data (for desktops & laptops)
miscellanea/oops blocker Run Firmware Test Suite (fwts) oops tests.
miscellanea/submission-resources
Mobile broadband tests
mobilebroadband/cdma_connection non-blocker
mobilebroadband/gsm_connection non-blocker
PURPOSE: This test will check that the systems media card reader can detect the insertion of an UNLOCKED Secure Digital (SD) media cardSTEPS: 1. Commence the test and then insert an UNLOCKED SD card into the reader. (Note: this test will time-out after 20 seconds.) 2. Do not remove the device after this test.VERIFICATION: The verification of this test is automated. Do not change the automatically selected result.
PURPOSE: This test will check that the system correctly detects the removal of an SD card from the systems card reader.STEPS: 1. Commence the test and then remove the SD card from the reader. (Note: this test will time-out after 20 seconds.)VERIFICATION: The verification of this test is automated. Do not change the automatically selected result.
This test is automated and executes after the mediacard/sd-inserttest is run. It tests reading and writing to the SD card.
PURPOSE: This test will check that the systems media card reader can detect the insertion of a UNLOCKED Secure Digital High-Capacity (SDHC) media cardSTEPS: 1. Commence the test and then insert an UNLOCKED SDHC card into the reader. (Note: this test will time-out after 20 seconds.) 2. Do not remove the device after this test.VERIFICATION: The verification of this test is automated. Do not change the automatically selected result.
PURPOSE: This test will check that the system correctly detects the removal of an SDHC card from the systems card reader.STEPS: 1. Commence the test and then remove the SDHC card from the reader. (Note: this test will time-out after 20 seconds.)VERIFICATION: The verification of this test is automated. Do not change the automatically selected result.
This test is automated and executes after the mediacard/sdhc-inserttest is run. It tests reading and writing to the SDHC card.
PURPOSE: This test will check that the system can switch to a virtual terminal and back to XSTEPS: 1. Click "Test" to switch to another virtual terminal and then back to XVERIFICATION: Did your screen change temporarily to a text console and then switch back to your current session?
PURPOSE:Device checkSTEPS:1. Commence the test2. Compare items on System Manifest to the devices known to udevVERIFICATION:Do the devices reported by udev match the devices on the Manifest?
A meta-job that verifies the data necessary for a complete resultsubmission are present. Failure indicates that the results are incompleteand may be rejected.
Creates a mobile broadband connection for a CDMA based modem and checks the connection to ensure it's working.
Creates a mobile broadband connection for a GSM based modem and checks the connection to ensure it's working.
18.04 Client Certification Tests
Page 15 of 32
Name Certification status Description
Monitor tests
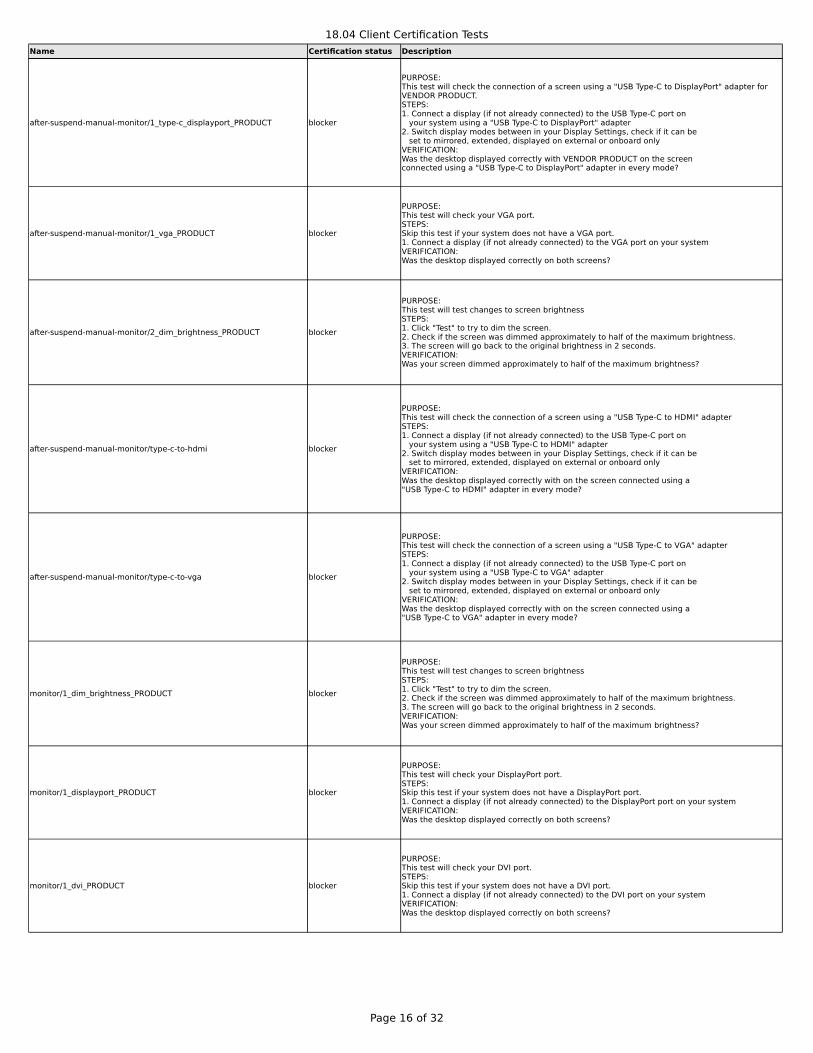
after-suspend-manual-monitor/1_dim_brightness_PRODUCT blocker
after-suspend-manual-monitor/1_displayport_PRODUCT blocker
after-suspend-manual-monitor/1_dvi_PRODUCT blocker
after-suspend-manual-monitor/1_hdmi_PRODUCT blocker
after-suspend-manual-monitor/1_multi-head_PRODUCT blocker
after-suspend-manual-monitor/1_powersaving_PRODUCT blocker
after-suspend-manual-monitor/1_thunderbolt3_PRODUCT non-blocker
after-suspend-manual-monitor/1_thunderbolt_PRODUCT blocker
PURPOSE:This test will test changes to screen brightnessSTEPS:1. Click "Test" to try to dim the screen.2. Check if the screen was dimmed approximately to half of the maximum brightness.3. The screen will go back to the original brightness in 2 seconds.VERIFICATION:Was your screen dimmed approximately to half of the maximum brightness?
PURPOSE:This test will check your DisplayPort port.STEPS:Skip this test if your system does not have a DisplayPort port.1. Connect a display (if not already connected) to the DisplayPort port on your systemVERIFICATION:Was the desktop displayed correctly on both screens?
PURPOSE:This test will check your DVI port.STEPS:Skip this test if your system does not have a DVI port.1. Connect a display (if not already connected) to the DVI port on your systemVERIFICATION:Was the desktop displayed correctly on both screens?
PURPOSE:This test will check your HDMI port.STEPS:Skip this test if your system does not have a HDMI port.1. Connect a display (if not already connected) to the HDMI port on your systemVERIFICATION:Was the desktop displayed correctly on both screens?
PURPOSE:This test verifies that multi-monitor output works on your desktop system. This is NOT the same test as the external monitor tests you would run on your laptop. You will need two monitors to perform this test.STEPS:Skip this test if your video card does not support multiple monitors.1. If your second monitor is not already connected, connect it now2. Open the "Displays" tool (open the dash and search for "Displays")3. Configure your output to provide one desktop across both monitors4. Open any application and drag it from one monitor to the next.VERIFICATION:Was the stretched desktop displayed correctly across both screens?
PURPOSE:This test will check your monitor power saving capabilitiesSTEPS:1. Click "Test" to try the power saving capabilities of your monitor2. Press any key or move the mouse to recoverVERIFICATION:Did the monitor go blank and turn on again?
PURPOSE:This test will check your Thunderbolt 3 port as a monitor interconnect for VENDOR PRODUCT.STEPS:1. Connect a display (if not already connected) to the Thunderbolt 3 port on your system2. Switch display modes between in your Display Settings, check if it can be set to mirrored, extended, displayed on external or onboard onlyVERIFICATION:Was the desktop displayed correctly with VENDOR PRODUCT on the Thunderbolt-connected screen in every mode?
PURPOSE:This test will check your Thunderbolt port as a monitor interconnect for VENDOR PRODUCT.STEPS:1. Connect a display (if not already connected) to the Thunderbolt port on your system2. Switch display modes between in your Display Settings, check if it can be set to mirrored, extended, displayed on external or onboard onlyVERIFICATION:Was the desktop displayed correctly with VENDOR PRODUCT on the Thunderbolt-connected screen in every mode?
18.04 Client Certification Tests
Page 16 of 32
Name Certification status Description
after-suspend-manual-monitor/1_type-c_displayport_PRODUCT blocker
after-suspend-manual-monitor/1_vga_PRODUCT blocker
after-suspend-manual-monitor/2_dim_brightness_PRODUCT blocker
after-suspend-manual-monitor/type-c-to-hdmi blocker
after-suspend-manual-monitor/type-c-to-vga blocker
monitor/1_dim_brightness_PRODUCT blocker
monitor/1_displayport_PRODUCT blocker
monitor/1_dvi_PRODUCT blocker
PURPOSE:This test will check the connection of a screen using a "USB Type-C to DisplayPort" adapter for VENDOR PRODUCT.STEPS:1. Connect a display (if not already connected) to the USB Type-C port on your system using a "USB Type-C to DisplayPort" adapter2. Switch display modes between in your Display Settings, check if it can be set to mirrored, extended, displayed on external or onboard onlyVERIFICATION:Was the desktop displayed correctly with VENDOR PRODUCT on the screenconnected using a "USB Type-C to DisplayPort" adapter in every mode?
PURPOSE:This test will check your VGA port.STEPS:Skip this test if your system does not have a VGA port.1. Connect a display (if not already connected) to the VGA port on your systemVERIFICATION:Was the desktop displayed correctly on both screens?
PURPOSE:This test will test changes to screen brightnessSTEPS:1. Click "Test" to try to dim the screen.2. Check if the screen was dimmed approximately to half of the maximum brightness.3. The screen will go back to the original brightness in 2 seconds.VERIFICATION:Was your screen dimmed approximately to half of the maximum brightness?
PURPOSE:This test will check the connection of a screen using a "USB Type-C to HDMI" adapterSTEPS:1. Connect a display (if not already connected) to the USB Type-C port on your system using a "USB Type-C to HDMI" adapter2. Switch display modes between in your Display Settings, check if it can be set to mirrored, extended, displayed on external or onboard onlyVERIFICATION:Was the desktop displayed correctly with on the screen connected using a"USB Type-C to HDMI" adapter in every mode?
PURPOSE:This test will check the connection of a screen using a "USB Type-C to VGA" adapterSTEPS:1. Connect a display (if not already connected) to the USB Type-C port on your system using a "USB Type-C to VGA" adapter2. Switch display modes between in your Display Settings, check if it can be set to mirrored, extended, displayed on external or onboard onlyVERIFICATION:Was the desktop displayed correctly with on the screen connected using a"USB Type-C to VGA" adapter in every mode?
PURPOSE:This test will test changes to screen brightnessSTEPS:1. Click "Test" to try to dim the screen.2. Check if the screen was dimmed approximately to half of the maximum brightness.3. The screen will go back to the original brightness in 2 seconds.VERIFICATION:Was your screen dimmed approximately to half of the maximum brightness?
PURPOSE:This test will check your DisplayPort port.STEPS:Skip this test if your system does not have a DisplayPort port.1. Connect a display (if not already connected) to the DisplayPort port on your systemVERIFICATION:Was the desktop displayed correctly on both screens?
PURPOSE:This test will check your DVI port.STEPS:Skip this test if your system does not have a DVI port.1. Connect a display (if not already connected) to the DVI port on your systemVERIFICATION:Was the desktop displayed correctly on both screens?
18.04 Client Certification Tests
Page 17 of 32
Name Certification status Description
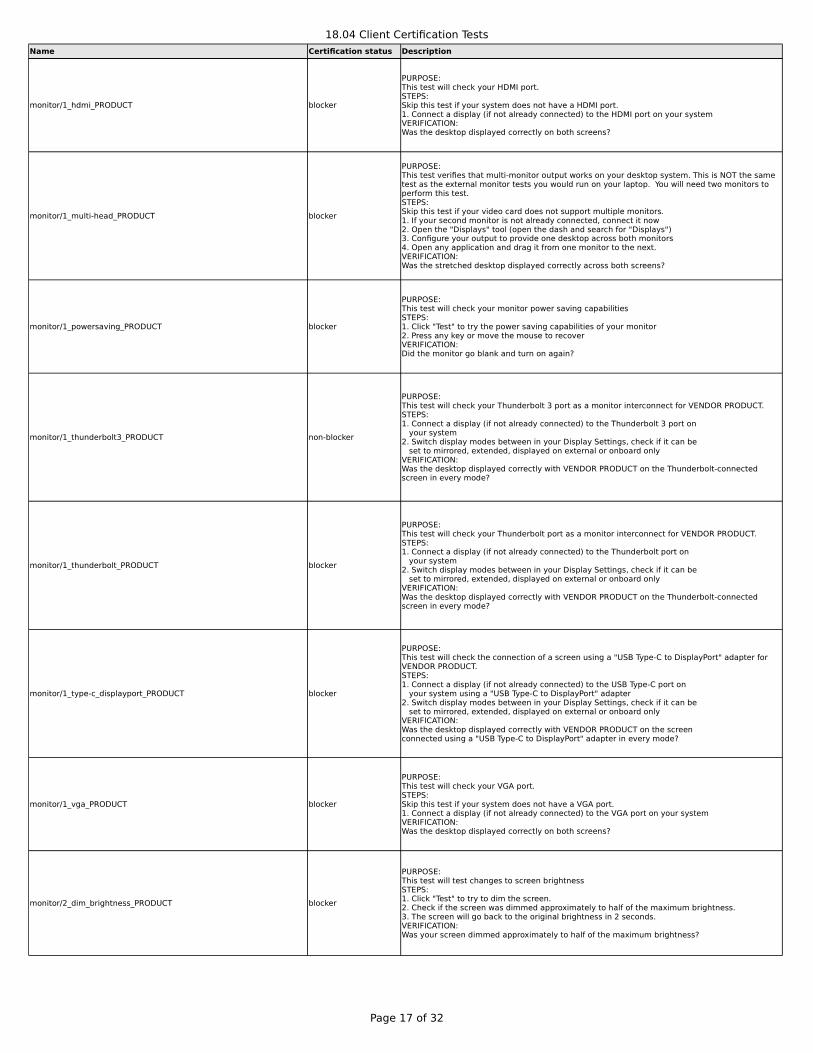
monitor/1_hdmi_PRODUCT blocker
monitor/1_multi-head_PRODUCT blocker
monitor/1_powersaving_PRODUCT blocker
monitor/1_thunderbolt3_PRODUCT non-blocker
monitor/1_thunderbolt_PRODUCT blocker
monitor/1_type-c_displayport_PRODUCT blocker
monitor/1_vga_PRODUCT blocker
monitor/2_dim_brightness_PRODUCT blocker
PURPOSE:This test will check your HDMI port.STEPS:Skip this test if your system does not have a HDMI port.1. Connect a display (if not already connected) to the HDMI port on your systemVERIFICATION:Was the desktop displayed correctly on both screens?
PURPOSE:This test verifies that multi-monitor output works on your desktop system. This is NOT the same test as the external monitor tests you would run on your laptop. You will need two monitors to perform this test.STEPS:Skip this test if your video card does not support multiple monitors.1. If your second monitor is not already connected, connect it now2. Open the "Displays" tool (open the dash and search for "Displays")3. Configure your output to provide one desktop across both monitors4. Open any application and drag it from one monitor to the next.VERIFICATION:Was the stretched desktop displayed correctly across both screens?
PURPOSE:This test will check your monitor power saving capabilitiesSTEPS:1. Click "Test" to try the power saving capabilities of your monitor2. Press any key or move the mouse to recoverVERIFICATION:Did the monitor go blank and turn on again?
PURPOSE:This test will check your Thunderbolt 3 port as a monitor interconnect for VENDOR PRODUCT.STEPS:1. Connect a display (if not already connected) to the Thunderbolt 3 port on your system2. Switch display modes between in your Display Settings, check if it can be set to mirrored, extended, displayed on external or onboard onlyVERIFICATION:Was the desktop displayed correctly with VENDOR PRODUCT on the Thunderbolt-connected screen in every mode?
PURPOSE:This test will check your Thunderbolt port as a monitor interconnect for VENDOR PRODUCT.STEPS:1. Connect a display (if not already connected) to the Thunderbolt port on your system2. Switch display modes between in your Display Settings, check if it can be set to mirrored, extended, displayed on external or onboard onlyVERIFICATION:Was the desktop displayed correctly with VENDOR PRODUCT on the Thunderbolt-connected screen in every mode?
PURPOSE:This test will check the connection of a screen using a "USB Type-C to DisplayPort" adapter for VENDOR PRODUCT.STEPS:1. Connect a display (if not already connected) to the USB Type-C port on your system using a "USB Type-C to DisplayPort" adapter2. Switch display modes between in your Display Settings, check if it can be set to mirrored, extended, displayed on external or onboard onlyVERIFICATION:Was the desktop displayed correctly with VENDOR PRODUCT on the screenconnected using a "USB Type-C to DisplayPort" adapter in every mode?
PURPOSE:This test will check your VGA port.STEPS:Skip this test if your system does not have a VGA port.1. Connect a display (if not already connected) to the VGA port on your systemVERIFICATION:Was the desktop displayed correctly on both screens?
PURPOSE:This test will test changes to screen brightnessSTEPS:1. Click "Test" to try to dim the screen.2. Check if the screen was dimmed approximately to half of the maximum brightness.3. The screen will go back to the original brightness in 2 seconds.VERIFICATION:Was your screen dimmed approximately to half of the maximum brightness?

18.04 Client Certification Tests
Page 18 of 32
Name Certification status Description
monitor/2_displayport_PRODUCT blocker
monitor/2_dvi_PRODUCT blocker
monitor/2_hdmi_PRODUCT blocker
monitor/2_multi-head_PRODUCT blocker
monitor/2_powersaving_PRODUCT blocker
monitor/2_thunderbolt3_PRODUCT non-blocker
monitor/2_thunderbolt_PRODUCT blocker
monitor/2_type-c_displayport_PRODUCT blocker
PURPOSE:This test will check your DisplayPort port.STEPS:Skip this test if your system does not have a DisplayPort port.1. Connect a display (if not already connected) to the DisplayPort port on your systemVERIFICATION:Was the desktop displayed correctly on both screens?
PURPOSE:This test will check your DVI port.STEPS:Skip this test if your system does not have a DVI port.1. Connect a display (if not already connected) to the DVI port on your systemVERIFICATION:Was the desktop displayed correctly on both screens?
PURPOSE:This test will check your HDMI port.STEPS:Skip this test if your system does not have a HDMI port.1. Connect a display (if not already connected) to the HDMI port on your systemVERIFICATION:Was the desktop displayed correctly on both screens?
PURPOSE:This test verifies that multi-monitor output works on your desktop system. This is NOT the same test as the external monitor tests you would run on your laptop. You will need two monitors to perform this test.STEPS:Skip this test if your video card does not support multiple monitors.1. If your second monitor is not already connected, connect it now2. Open the "Displays" tool (open the dash and search for "Displays")3. Configure your output to provide one desktop across both monitors4. Open any application and drag it from one monitor to the next.VERIFICATION:Was the stretched desktop displayed correctly across both screens?
PURPOSE:This test will check your monitor power saving capabilitiesSTEPS:1. Click "Test" to try the power saving capabilities of your monitor2. Press any key or move the mouse to recoverVERIFICATION:Did the monitor go blank and turn on again?
PURPOSE:This test will check your Thunderbolt 3 port as a monitor interconnect for VENDOR PRODUCT.STEPS:1. Connect a display (if not already connected) to the Thunderbolt 3 port on your system2. Switch display modes between in your Display Settings, check if it can be set to mirrored, extended, displayed on external or onboard onlyVERIFICATION:Was the desktop displayed correctly with VENDOR PRODUCT on the Thunderbolt-connected screen in every mode?
PURPOSE:This test will check your Thunderbolt port as a monitor interconnect for VENDOR PRODUCT.STEPS:1. Connect a display (if not already connected) to the Thunderbolt port on your system2. Switch display modes between in your Display Settings, check if it can be set to mirrored, extended, displayed on external or onboard onlyVERIFICATION:Was the desktop displayed correctly with VENDOR PRODUCT on the Thunderbolt-connected screen in every mode?
PURPOSE:This test will check the connection of a screen using a "USB Type-C to DisplayPort" adapter for VENDOR PRODUCT.STEPS:1. Connect a display (if not already connected) to the USB Type-C port on your system using a "USB Type-C to DisplayPort" adapter2. Switch display modes between in your Display Settings, check if it can be set to mirrored, extended, displayed on external or onboard onlyVERIFICATION:Was the desktop displayed correctly with VENDOR PRODUCT on the screenconnected using a "USB Type-C to DisplayPort" adapter in every mode?
18.04 Client Certification Tests
Page 19 of 32
Name Certification status Description
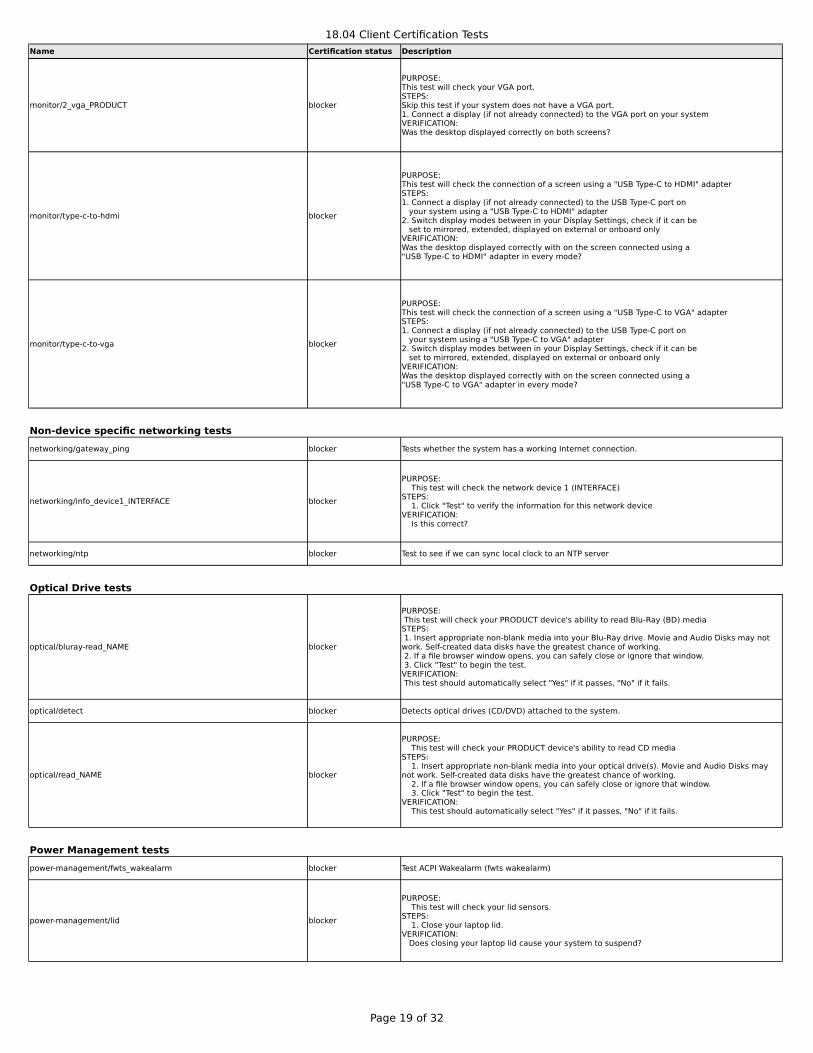
monitor/2_vga_PRODUCT blocker
monitor/type-c-to-hdmi blocker
monitor/type-c-to-vga blocker
Non-device specific networking tests
networking/gateway_ping blocker Tests whether the system has a working Internet connection.
networking/info_device1_INTERFACE blocker
networking/ntp blocker Test to see if we can sync local clock to an NTP server
Optical Drive tests
optical/bluray-read_NAME blocker
optical/detect blocker Detects optical drives (CD/DVD) attached to the system.
optical/read_NAME blocker
Power Management tests
power-management/fwts_wakealarm blocker Test ACPI Wakealarm (fwts wakealarm)
power-management/lid blocker
PURPOSE:This test will check your VGA port.STEPS:Skip this test if your system does not have a VGA port.1. Connect a display (if not already connected) to the VGA port on your systemVERIFICATION:Was the desktop displayed correctly on both screens?
PURPOSE:This test will check the connection of a screen using a "USB Type-C to HDMI" adapterSTEPS:1. Connect a display (if not already connected) to the USB Type-C port on your system using a "USB Type-C to HDMI" adapter2. Switch display modes between in your Display Settings, check if it can be set to mirrored, extended, displayed on external or onboard onlyVERIFICATION:Was the desktop displayed correctly with on the screen connected using a"USB Type-C to HDMI" adapter in every mode?
PURPOSE:This test will check the connection of a screen using a "USB Type-C to VGA" adapterSTEPS:1. Connect a display (if not already connected) to the USB Type-C port on your system using a "USB Type-C to VGA" adapter2. Switch display modes between in your Display Settings, check if it can be set to mirrored, extended, displayed on external or onboard onlyVERIFICATION:Was the desktop displayed correctly with on the screen connected using a"USB Type-C to VGA" adapter in every mode?
PURPOSE: This test will check the network device 1 (INTERFACE)STEPS: 1. Click "Test" to verify the information for this network deviceVERIFICATION: Is this correct?
PURPOSE: This test will check your PRODUCT device's ability to read Blu-Ray (BD) mediaSTEPS: 1. Insert appropriate non-blank media into your Blu-Ray drive. Movie and Audio Disks may not work. Self-created data disks have the greatest chance of working. 2. If a file browser window opens, you can safely close or ignore that window. 3. Click "Test" to begin the test.VERIFICATION: This test should automatically select "Yes" if it passes, "No" if it fails.
PURPOSE: This test will check your PRODUCT device's ability to read CD mediaSTEPS: 1. Insert appropriate non-blank media into your optical drive(s). Movie and Audio Disks may not work. Self-created data disks have the greatest chance of working. 2. If a file browser window opens, you can safely close or ignore that window. 3. Click "Test" to begin the test.VERIFICATION: This test should automatically select "Yes" if it passes, "No" if it fails.
PURPOSE: This test will check your lid sensors.STEPS: 1. Close your laptop lid.VERIFICATION: Does closing your laptop lid cause your system to suspend?
18.04 Client Certification Tests
Page 20 of 32
Name Certification status Description
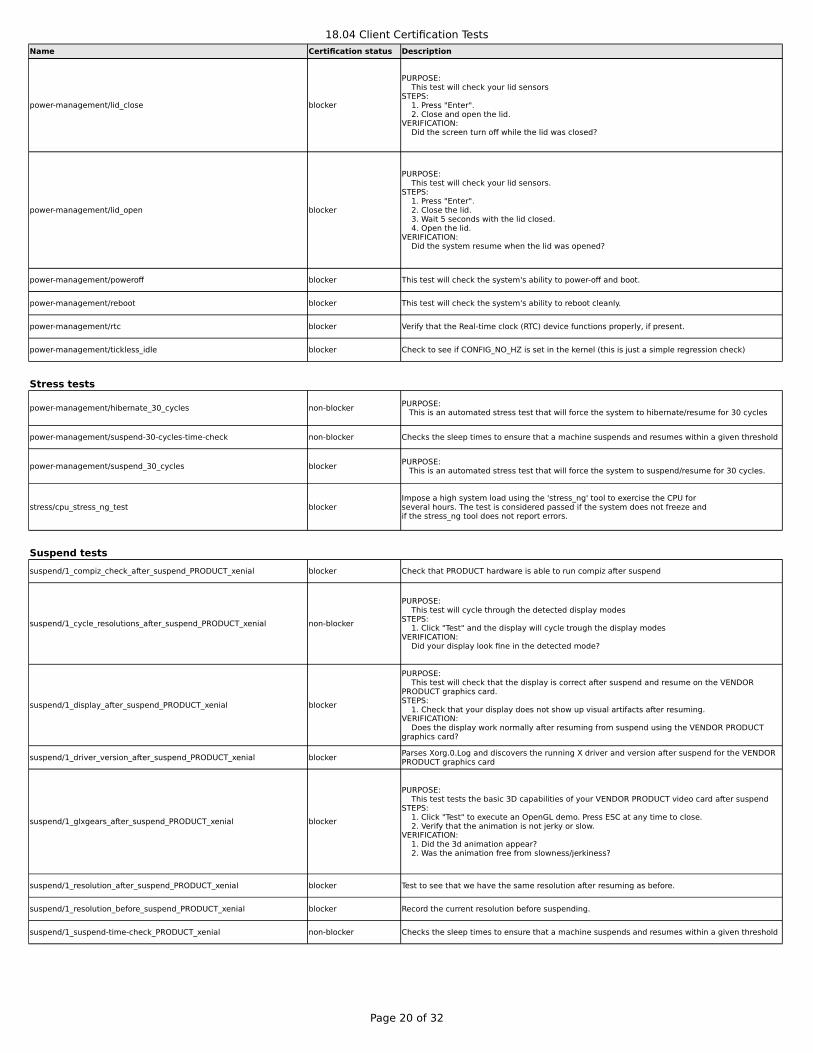
power-management/lid_close blocker
power-management/lid_open blocker
power-management/poweroff blocker This test will check the system's ability to power-off and boot.
power-management/reboot blocker This test will check the system's ability to reboot cleanly.
power-management/rtc blocker Verify that the Real-time clock (RTC) device functions properly, if present.
power-management/tickless_idle blocker Check to see if CONFIG_NO_HZ is set in the kernel (this is just a simple regression check)
Stress tests
power-management/hibernate_30_cycles non-blocker
power-management/suspend-30-cycles-time-check non-blocker Checks the sleep times to ensure that a machine suspends and resumes within a given threshold
power-management/suspend_30_cycles blocker
stress/cpu_stress_ng_test blocker
Suspend tests
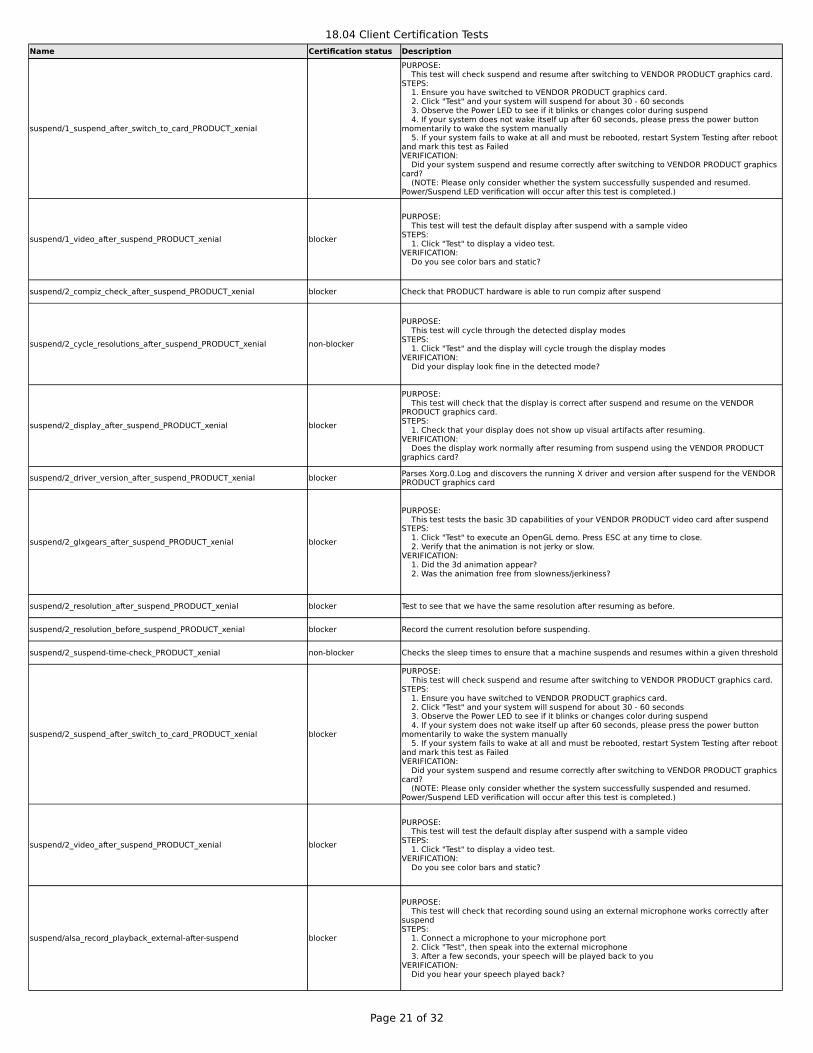
suspend/1_compiz_check_after_suspend_PRODUCT_xenial blocker Check that PRODUCT hardware is able to run compiz after suspend
suspend/1_cycle_resolutions_after_suspend_PRODUCT_xenial non-blocker
suspend/1_display_after_suspend_PRODUCT_xenial blocker
suspend/1_driver_version_after_suspend_PRODUCT_xenial blocker
suspend/1_glxgears_after_suspend_PRODUCT_xenial blocker
suspend/1_resolution_after_suspend_PRODUCT_xenial blocker Test to see that we have the same resolution after resuming as before.
suspend/1_resolution_before_suspend_PRODUCT_xenial blocker Record the current resolution before suspending.
suspend/1_suspend-time-check_PRODUCT_xenial non-blocker Checks the sleep times to ensure that a machine suspends and resumes within a given threshold
PURPOSE: This test will check your lid sensorsSTEPS: 1. Press "Enter". 2. Close and open the lid.VERIFICATION: Did the screen turn off while the lid was closed?
PURPOSE: This test will check your lid sensors.STEPS: 1. Press "Enter". 2. Close the lid. 3. Wait 5 seconds with the lid closed. 4. Open the lid.VERIFICATION: Did the system resume when the lid was opened?
PURPOSE: This is an automated stress test that will force the system to hibernate/resume for 30 cycles
PURPOSE: This is an automated stress test that will force the system to suspend/resume for 30 cycles.
Impose a high system load using the 'stress_ng' tool to exercise the CPU forseveral hours. The test is considered passed if the system does not freeze andif the stress_ng tool does not report errors.
PURPOSE: This test will cycle through the detected display modesSTEPS: 1. Click "Test" and the display will cycle trough the display modesVERIFICATION: Did your display look fine in the detected mode?
PURPOSE: This test will check that the display is correct after suspend and resume on the VENDOR PRODUCT graphics card.STEPS: 1. Check that your display does not show up visual artifacts after resuming.VERIFICATION: Does the display work normally after resuming from suspend using the VENDOR PRODUCT graphics card?
Parses Xorg.0.Log and discovers the running X driver and version after suspend for the VENDOR PRODUCT graphics card
PURPOSE: This test tests the basic 3D capabilities of your VENDOR PRODUCT video card after suspendSTEPS: 1. Click "Test" to execute an OpenGL demo. Press ESC at any time to close. 2. Verify that the animation is not jerky or slow.VERIFICATION: 1. Did the 3d animation appear? 2. Was the animation free from slowness/jerkiness?
18.04 Client Certification Tests
Page 21 of 32
Name Certification status Description
suspend/1_suspend_after_switch_to_card_PRODUCT_xenial
suspend/1_video_after_suspend_PRODUCT_xenial blocker
suspend/2_compiz_check_after_suspend_PRODUCT_xenial blocker Check that PRODUCT hardware is able to run compiz after suspend
suspend/2_cycle_resolutions_after_suspend_PRODUCT_xenial non-blocker
suspend/2_display_after_suspend_PRODUCT_xenial blocker
suspend/2_driver_version_after_suspend_PRODUCT_xenial blocker
suspend/2_glxgears_after_suspend_PRODUCT_xenial blocker
suspend/2_resolution_after_suspend_PRODUCT_xenial blocker Test to see that we have the same resolution after resuming as before.
suspend/2_resolution_before_suspend_PRODUCT_xenial blocker Record the current resolution before suspending.
suspend/2_suspend-time-check_PRODUCT_xenial non-blocker Checks the sleep times to ensure that a machine suspends and resumes within a given threshold
suspend/2_suspend_after_switch_to_card_PRODUCT_xenial blocker
suspend/2_video_after_suspend_PRODUCT_xenial blocker
suspend/alsa_record_playback_external-after-suspend blocker
PURPOSE: This test will check suspend and resume after switching to VENDOR PRODUCT graphics card.STEPS: 1. Ensure you have switched to VENDOR PRODUCT graphics card. 2. Click "Test" and your system will suspend for about 30 - 60 seconds 3. Observe the Power LED to see if it blinks or changes color during suspend 4. If your system does not wake itself up after 60 seconds, please press the power button momentarily to wake the system manually 5. If your system fails to wake at all and must be rebooted, restart System Testing after reboot and mark this test as FailedVERIFICATION: Did your system suspend and resume correctly after switching to VENDOR PRODUCT graphics card? (NOTE: Please only consider whether the system successfully suspended and resumed. Power/Suspend LED verification will occur after this test is completed.)
PURPOSE: This test will test the default display after suspend with a sample videoSTEPS: 1. Click "Test" to display a video test.VERIFICATION: Do you see color bars and static?
PURPOSE: This test will cycle through the detected display modesSTEPS: 1. Click "Test" and the display will cycle trough the display modesVERIFICATION: Did your display look fine in the detected mode?
PURPOSE: This test will check that the display is correct after suspend and resume on the VENDOR PRODUCT graphics card.STEPS: 1. Check that your display does not show up visual artifacts after resuming.VERIFICATION: Does the display work normally after resuming from suspend using the VENDOR PRODUCT graphics card?
Parses Xorg.0.Log and discovers the running X driver and version after suspend for the VENDOR PRODUCT graphics card
PURPOSE: This test tests the basic 3D capabilities of your VENDOR PRODUCT video card after suspendSTEPS: 1. Click "Test" to execute an OpenGL demo. Press ESC at any time to close. 2. Verify that the animation is not jerky or slow.VERIFICATION: 1. Did the 3d animation appear? 2. Was the animation free from slowness/jerkiness?
PURPOSE: This test will check suspend and resume after switching to VENDOR PRODUCT graphics card.STEPS: 1. Ensure you have switched to VENDOR PRODUCT graphics card. 2. Click "Test" and your system will suspend for about 30 - 60 seconds 3. Observe the Power LED to see if it blinks or changes color during suspend 4. If your system does not wake itself up after 60 seconds, please press the power button momentarily to wake the system manually 5. If your system fails to wake at all and must be rebooted, restart System Testing after reboot and mark this test as FailedVERIFICATION: Did your system suspend and resume correctly after switching to VENDOR PRODUCT graphics card? (NOTE: Please only consider whether the system successfully suspended and resumed. Power/Suspend LED verification will occur after this test is completed.)
PURPOSE: This test will test the default display after suspend with a sample videoSTEPS: 1. Click "Test" to display a video test.VERIFICATION: Do you see color bars and static?
PURPOSE: This test will check that recording sound using an external microphone works correctly after suspendSTEPS: 1. Connect a microphone to your microphone port 2. Click "Test", then speak into the external microphone 3. After a few seconds, your speech will be played back to youVERIFICATION: Did you hear your speech played back?
18.04 Client Certification Tests
Page 22 of 32
Name Certification status Description
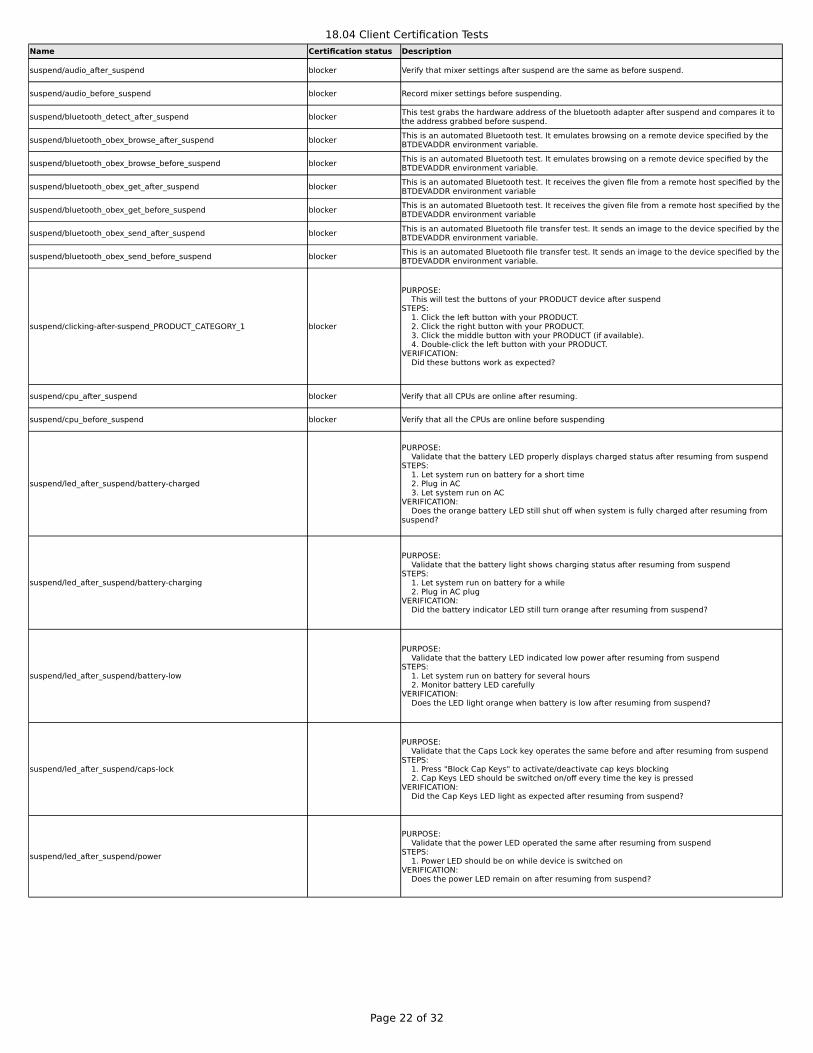
suspend/audio_after_suspend blocker Verify that mixer settings after suspend are the same as before suspend.
suspend/audio_before_suspend blocker Record mixer settings before suspending.
suspend/bluetooth_detect_after_suspend blocker
suspend/bluetooth_obex_browse_after_suspend blocker
suspend/bluetooth_obex_browse_before_suspend blocker
suspend/bluetooth_obex_get_after_suspend blocker
suspend/bluetooth_obex_get_before_suspend blocker
suspend/bluetooth_obex_send_after_suspend blocker
suspend/bluetooth_obex_send_before_suspend blocker
suspend/clicking-after-suspend_PRODUCT_CATEGORY_1 blocker
suspend/cpu_after_suspend blocker Verify that all CPUs are online after resuming.
suspend/cpu_before_suspend blocker Verify that all the CPUs are online before suspending
suspend/led_after_suspend/battery-charged
suspend/led_after_suspend/battery-charging
suspend/led_after_suspend/battery-low
suspend/led_after_suspend/caps-lock
suspend/led_after_suspend/power
This test grabs the hardware address of the bluetooth adapter after suspend and compares it to the address grabbed before suspend.
This is an automated Bluetooth test. It emulates browsing on a remote device specified by the BTDEVADDR environment variable.
This is an automated Bluetooth test. It emulates browsing on a remote device specified by the BTDEVADDR environment variable.
This is an automated Bluetooth test. It receives the given file from a remote host specified by the BTDEVADDR environment variable
This is an automated Bluetooth test. It receives the given file from a remote host specified by the BTDEVADDR environment variable
This is an automated Bluetooth file transfer test. It sends an image to the device specified by the BTDEVADDR environment variable.
This is an automated Bluetooth file transfer test. It sends an image to the device specified by the BTDEVADDR environment variable.
PURPOSE: This will test the buttons of your PRODUCT device after suspendSTEPS: 1. Click the left button with your PRODUCT. 2. Click the right button with your PRODUCT. 3. Click the middle button with your PRODUCT (if available). 4. Double-click the left button with your PRODUCT.VERIFICATION: Did these buttons work as expected?
PURPOSE: Validate that the battery LED properly displays charged status after resuming from suspendSTEPS: 1. Let system run on battery for a short time 2. Plug in AC 3. Let system run on ACVERIFICATION: Does the orange battery LED still shut off when system is fully charged after resuming from suspend?
PURPOSE: Validate that the battery light shows charging status after resuming from suspendSTEPS: 1. Let system run on battery for a while 2. Plug in AC plugVERIFICATION: Did the battery indicator LED still turn orange after resuming from suspend?
PURPOSE: Validate that the battery LED indicated low power after resuming from suspendSTEPS: 1. Let system run on battery for several hours 2. Monitor battery LED carefullyVERIFICATION: Does the LED light orange when battery is low after resuming from suspend?
PURPOSE: Validate that the Caps Lock key operates the same before and after resuming from suspendSTEPS: 1. Press "Block Cap Keys" to activate/deactivate cap keys blocking 2. Cap Keys LED should be switched on/off every time the key is pressedVERIFICATION: Did the Cap Keys LED light as expected after resuming from suspend?
PURPOSE: Validate that the power LED operated the same after resuming from suspendSTEPS: 1. Power LED should be on while device is switched onVERIFICATION: Does the power LED remain on after resuming from suspend?
18.04 Client Certification Tests
Page 23 of 32
Name Certification status Description
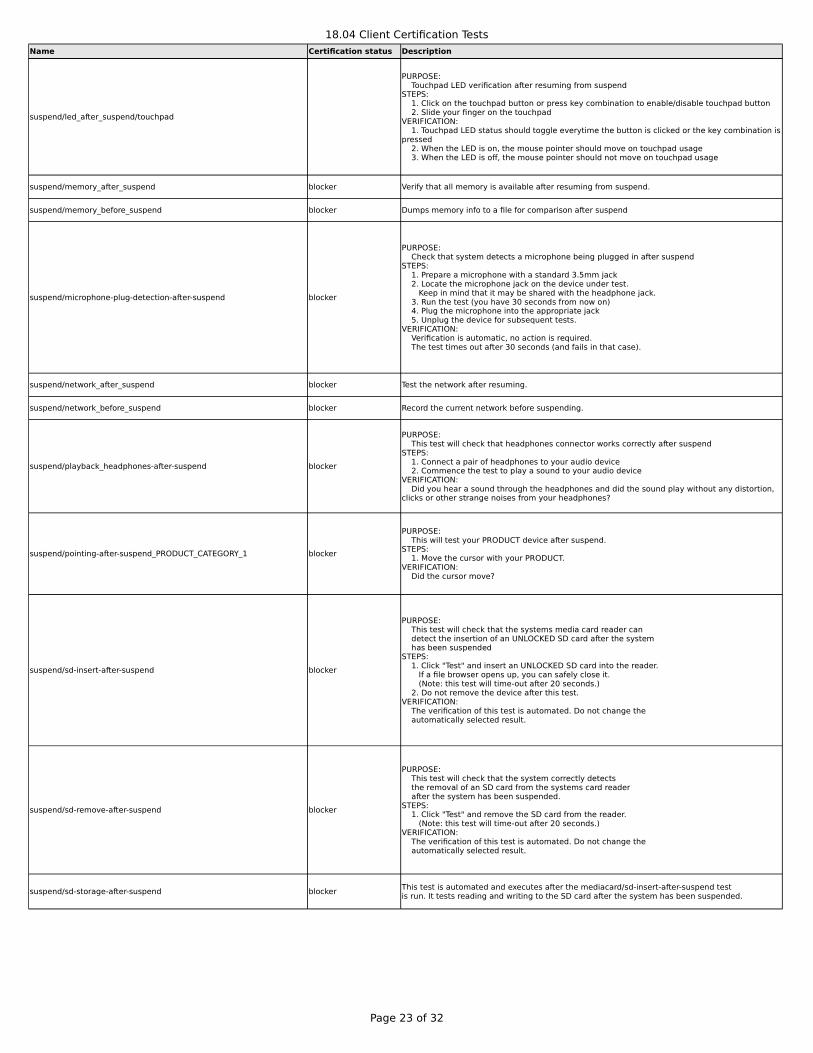
suspend/led_after_suspend/touchpad
suspend/memory_after_suspend blocker Verify that all memory is available after resuming from suspend.
suspend/memory_before_suspend blocker Dumps memory info to a file for comparison after suspend
suspend/microphone-plug-detection-after-suspend blocker
suspend/network_after_suspend blocker Test the network after resuming.
suspend/network_before_suspend blocker Record the current network before suspending.
suspend/playback_headphones-after-suspend blocker
suspend/pointing-after-suspend_PRODUCT_CATEGORY_1 blocker
suspend/sd-insert-after-suspend blocker
suspend/sd-remove-after-suspend blocker
suspend/sd-storage-after-suspend blocker
PURPOSE: Touchpad LED verification after resuming from suspendSTEPS: 1. Click on the touchpad button or press key combination to enable/disable touchpad button 2. Slide your finger on the touchpadVERIFICATION: 1. Touchpad LED status should toggle everytime the button is clicked or the key combination is pressed 2. When the LED is on, the mouse pointer should move on touchpad usage 3. When the LED is off, the mouse pointer should not move on touchpad usage
PURPOSE: Check that system detects a microphone being plugged in after suspendSTEPS: 1. Prepare a microphone with a standard 3.5mm jack 2. Locate the microphone jack on the device under test. Keep in mind that it may be shared with the headphone jack. 3. Run the test (you have 30 seconds from now on) 4. Plug the microphone into the appropriate jack 5. Unplug the device for subsequent tests.VERIFICATION: Verification is automatic, no action is required. The test times out after 30 seconds (and fails in that case).
PURPOSE: This test will check that headphones connector works correctly after suspendSTEPS: 1. Connect a pair of headphones to your audio device 2. Commence the test to play a sound to your audio deviceVERIFICATION: Did you hear a sound through the headphones and did the sound play without any distortion, clicks or other strange noises from your headphones?
PURPOSE: This will test your PRODUCT device after suspend.STEPS: 1. Move the cursor with your PRODUCT.VERIFICATION: Did the cursor move?
PURPOSE: This test will check that the systems media card reader can detect the insertion of an UNLOCKED SD card after the system has been suspendedSTEPS: 1. Click "Test" and insert an UNLOCKED SD card into the reader. If a file browser opens up, you can safely close it. (Note: this test will time-out after 20 seconds.) 2. Do not remove the device after this test.VERIFICATION: The verification of this test is automated. Do not change the automatically selected result.
PURPOSE: This test will check that the system correctly detects the removal of an SD card from the systems card reader after the system has been suspended.STEPS: 1. Click "Test" and remove the SD card from the reader. (Note: this test will time-out after 20 seconds.)VERIFICATION: The verification of this test is automated. Do not change the automatically selected result.
This test is automated and executes after the mediacard/sd-insert-after-suspend testis run. It tests reading and writing to the SD card after the system has been suspended.
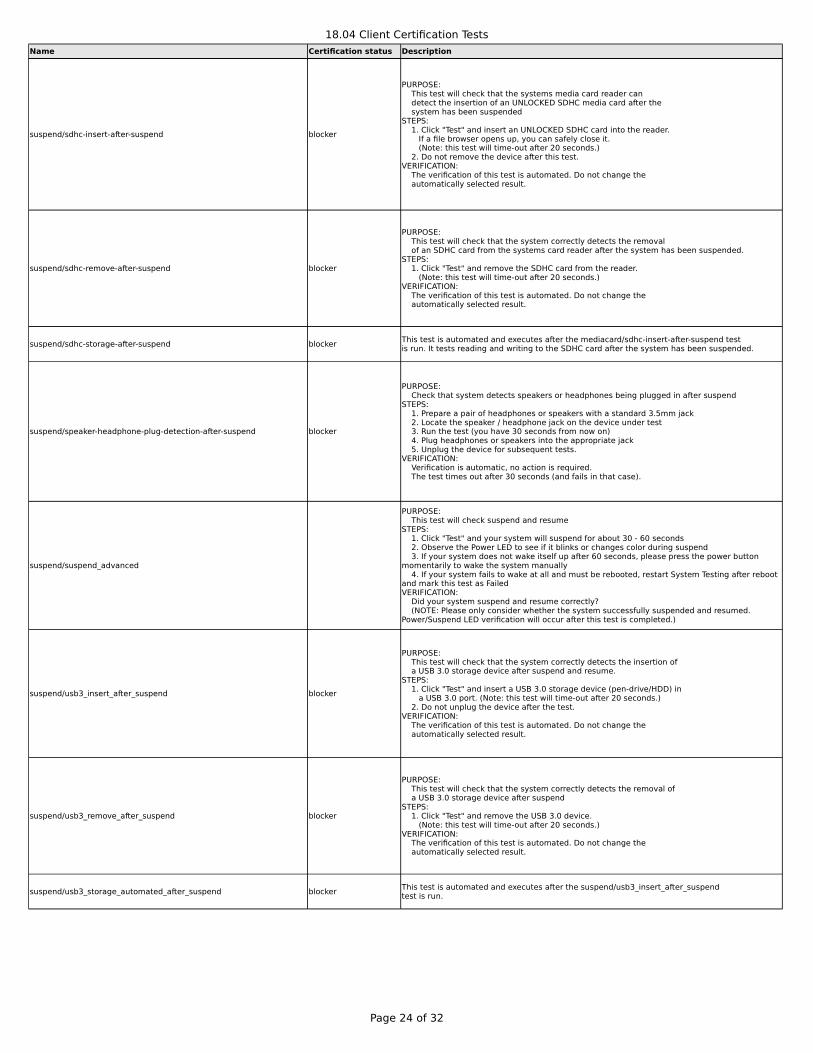
18.04 Client Certification Tests
Page 24 of 32
Name Certification status Description
suspend/sdhc-insert-after-suspend blocker
suspend/sdhc-remove-after-suspend blocker
suspend/sdhc-storage-after-suspend blocker
suspend/speaker-headphone-plug-detection-after-suspend blocker
suspend/suspend_advanced
suspend/usb3_insert_after_suspend blocker
suspend/usb3_remove_after_suspend blocker
suspend/usb3_storage_automated_after_suspend blocker
PURPOSE: This test will check that the systems media card reader can detect the insertion of an UNLOCKED SDHC media card after the system has been suspendedSTEPS: 1. Click "Test" and insert an UNLOCKED SDHC card into the reader. If a file browser opens up, you can safely close it. (Note: this test will time-out after 20 seconds.) 2. Do not remove the device after this test.VERIFICATION: The verification of this test is automated. Do not change the automatically selected result.
PURPOSE: This test will check that the system correctly detects the removal of an SDHC card from the systems card reader after the system has been suspended.STEPS: 1. Click "Test" and remove the SDHC card from the reader. (Note: this test will time-out after 20 seconds.)VERIFICATION: The verification of this test is automated. Do not change the automatically selected result.
This test is automated and executes after the mediacard/sdhc-insert-after-suspend testis run. It tests reading and writing to the SDHC card after the system has been suspended.
PURPOSE: Check that system detects speakers or headphones being plugged in after suspendSTEPS: 1. Prepare a pair of headphones or speakers with a standard 3.5mm jack 2. Locate the speaker / headphone jack on the device under test 3. Run the test (you have 30 seconds from now on) 4. Plug headphones or speakers into the appropriate jack 5. Unplug the device for subsequent tests.VERIFICATION: Verification is automatic, no action is required. The test times out after 30 seconds (and fails in that case).
PURPOSE: This test will check suspend and resumeSTEPS: 1. Click "Test" and your system will suspend for about 30 - 60 seconds 2. Observe the Power LED to see if it blinks or changes color during suspend 3. If your system does not wake itself up after 60 seconds, please press the power button momentarily to wake the system manually 4. If your system fails to wake at all and must be rebooted, restart System Testing after reboot and mark this test as FailedVERIFICATION: Did your system suspend and resume correctly? (NOTE: Please only consider whether the system successfully suspended and resumed. Power/Suspend LED verification will occur after this test is completed.)
PURPOSE: This test will check that the system correctly detects the insertion of a USB 3.0 storage device after suspend and resume.STEPS: 1. Click "Test" and insert a USB 3.0 storage device (pen-drive/HDD) in a USB 3.0 port. (Note: this test will time-out after 20 seconds.) 2. Do not unplug the device after the test.VERIFICATION: The verification of this test is automated. Do not change the automatically selected result.
PURPOSE: This test will check that the system correctly detects the removal of a USB 3.0 storage device after suspendSTEPS: 1. Click "Test" and remove the USB 3.0 device. (Note: this test will time-out after 20 seconds.)VERIFICATION: The verification of this test is automated. Do not change the automatically selected result.
This test is automated and executes after the suspend/usb3_insert_after_suspendtest is run.

18.04 Client Certification Tests
Page 25 of 32
Name Certification status Description
suspend/usb_insert_after_suspend blocker
suspend/usb_remove_after_suspend blocker
suspend/usb_storage_automated_after_suspend blocker
Touchpad tests
touchpad/basic blocker
touchpad/basic-after-suspend blocker
touchpad/continuous-move blocker
touchpad/continuous-move-after-suspend blocker
touchpad/detected-as-mouse blocker
touchpad/detected-as-mouse-after-suspend blocker
touchpad/drag-and-drop blocker
PURPOSE: This test will check that the system correctly detects the insertion of a USB storage device after suspend and resume.STEPS: 1. Click "Test" and insert a USB storage device (pen-drive/HDD). (Note: this test will time-out after 20 seconds.) 2. Do not unplug the device after the test.VERIFICATION: The verification of this test is automated. Do not change the automatically selected result.
PURPOSE: This test will check that the system correctly detects the removal of a USB storage device after suspend.STEPS: 1. Click "Test" and remove the USB device. (Note: this test will time-out after 20 seconds.)VERIFICATION: The verification of this test is automated. Do not change the automatically selected result.
This test is automated and executes after the suspend/usb_insert_after_suspendtest is run.
PURPOSE:Touchpad manual verificationSTEPS:1. Make sure that touchpad is enabled.2. Move cursor using the touchpad.VERIFICATION:Did the cursor move?
PURPOSE:Touchpad manual verificationSTEPS:1. Make sure that touchpad is enabled.2. Move cursor using the touchpad.VERIFICATION:Did the cursor move?
PURPOSE:Touchpad continuous move verificationSTEPS:1. Select "Test" when ready and continuously move your cursor within the borders of the displayed test window.You'll need to keep moving your finger on the touchpad for 10 seconds.VERIFICATION:Did the mouse cursor move without interruption?
PURPOSE:Touchpad continuous move verificationSTEPS:1. Select "Test" when ready and continuously move your cursor within the borders of the displayed test window.You'll need to keep moving your finger on the touchpad for 10 seconds.VERIFICATION:Did the mouse cursor move without interruption?
PURPOSE:This test will check if your touchpad was detected as a mouse.
PURPOSE:This test will check if your touchpad was detected as a mouse.
PURPOSE:Determine that the drag and drop function is working as expected.STEPS:1. Browse to the examples folder in the current user's home directory2. Double tap and hold to select the "Ubuntu_Free_Culture_Showcase" folder3. Drag the selected folder to the desktop and remove finger from touchpad.VERIFICATION:Did a selected folder move to the desktop?
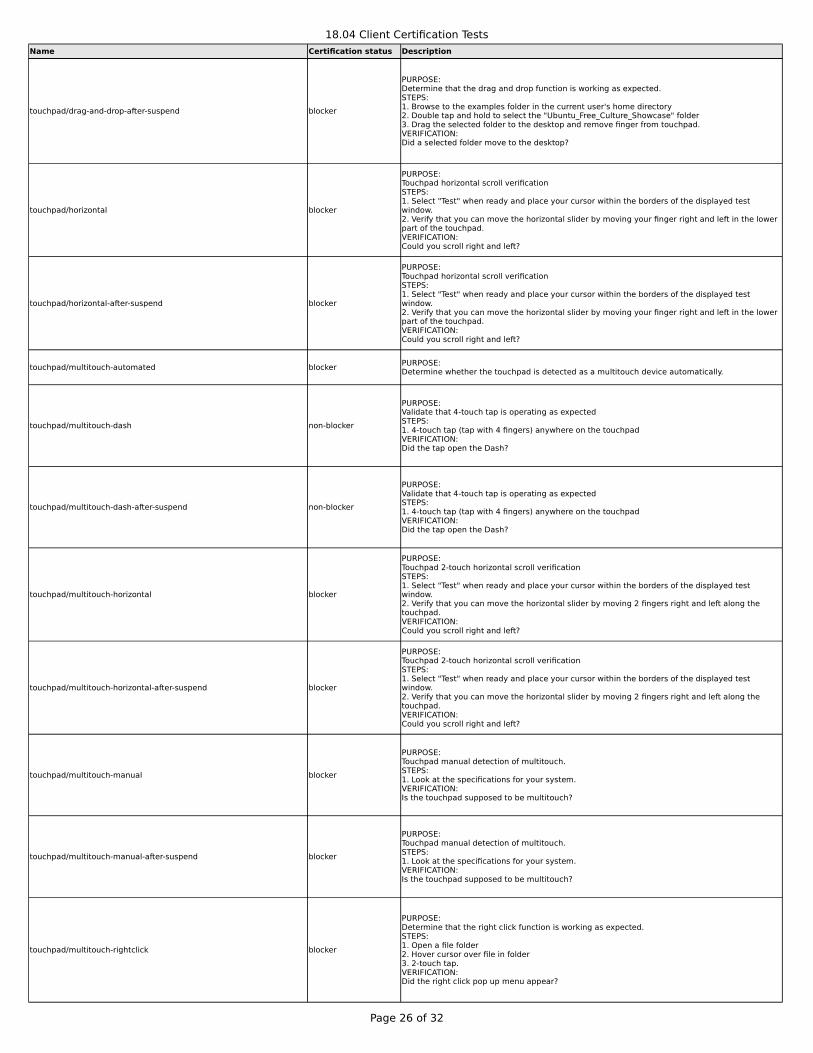
18.04 Client Certification Tests
Page 26 of 32
Name Certification status Description
touchpad/drag-and-drop-after-suspend blocker
touchpad/horizontal blocker
touchpad/horizontal-after-suspend blocker
touchpad/multitouch-automated blocker
touchpad/multitouch-dash non-blocker
touchpad/multitouch-dash-after-suspend non-blocker
touchpad/multitouch-horizontal blocker
touchpad/multitouch-horizontal-after-suspend blocker
touchpad/multitouch-manual blocker
touchpad/multitouch-manual-after-suspend blocker
touchpad/multitouch-rightclick blocker
PURPOSE:Determine that the drag and drop function is working as expected.STEPS:1. Browse to the examples folder in the current user's home directory2. Double tap and hold to select the "Ubuntu_Free_Culture_Showcase" folder3. Drag the selected folder to the desktop and remove finger from touchpad.VERIFICATION:Did a selected folder move to the desktop?
PURPOSE:Touchpad horizontal scroll verificationSTEPS:1. Select "Test" when ready and place your cursor within the borders of the displayed test window.2. Verify that you can move the horizontal slider by moving your finger right and left in the lower part of the touchpad.VERIFICATION:Could you scroll right and left?
PURPOSE:Touchpad horizontal scroll verificationSTEPS:1. Select "Test" when ready and place your cursor within the borders of the displayed test window.2. Verify that you can move the horizontal slider by moving your finger right and left in the lower part of the touchpad.VERIFICATION:Could you scroll right and left?
PURPOSE:Determine whether the touchpad is detected as a multitouch device automatically.
PURPOSE:Validate that 4-touch tap is operating as expectedSTEPS:1. 4-touch tap (tap with 4 fingers) anywhere on the touchpadVERIFICATION:Did the tap open the Dash?
PURPOSE:Validate that 4-touch tap is operating as expectedSTEPS:1. 4-touch tap (tap with 4 fingers) anywhere on the touchpadVERIFICATION:Did the tap open the Dash?
PURPOSE:Touchpad 2-touch horizontal scroll verificationSTEPS:1. Select "Test" when ready and place your cursor within the borders of the displayed test window.2. Verify that you can move the horizontal slider by moving 2 fingers right and left along the touchpad.VERIFICATION:Could you scroll right and left?
PURPOSE:Touchpad 2-touch horizontal scroll verificationSTEPS:1. Select "Test" when ready and place your cursor within the borders of the displayed test window.2. Verify that you can move the horizontal slider by moving 2 fingers right and left along the touchpad.VERIFICATION:Could you scroll right and left?
PURPOSE:Touchpad manual detection of multitouch.STEPS:1. Look at the specifications for your system.VERIFICATION:Is the touchpad supposed to be multitouch?
PURPOSE:Touchpad manual detection of multitouch.STEPS:1. Look at the specifications for your system.VERIFICATION:Is the touchpad supposed to be multitouch?
PURPOSE:Determine that the right click function is working as expected.STEPS:1. Open a file folder2. Hover cursor over file in folder3. 2-touch tap.VERIFICATION:Did the right click pop up menu appear?
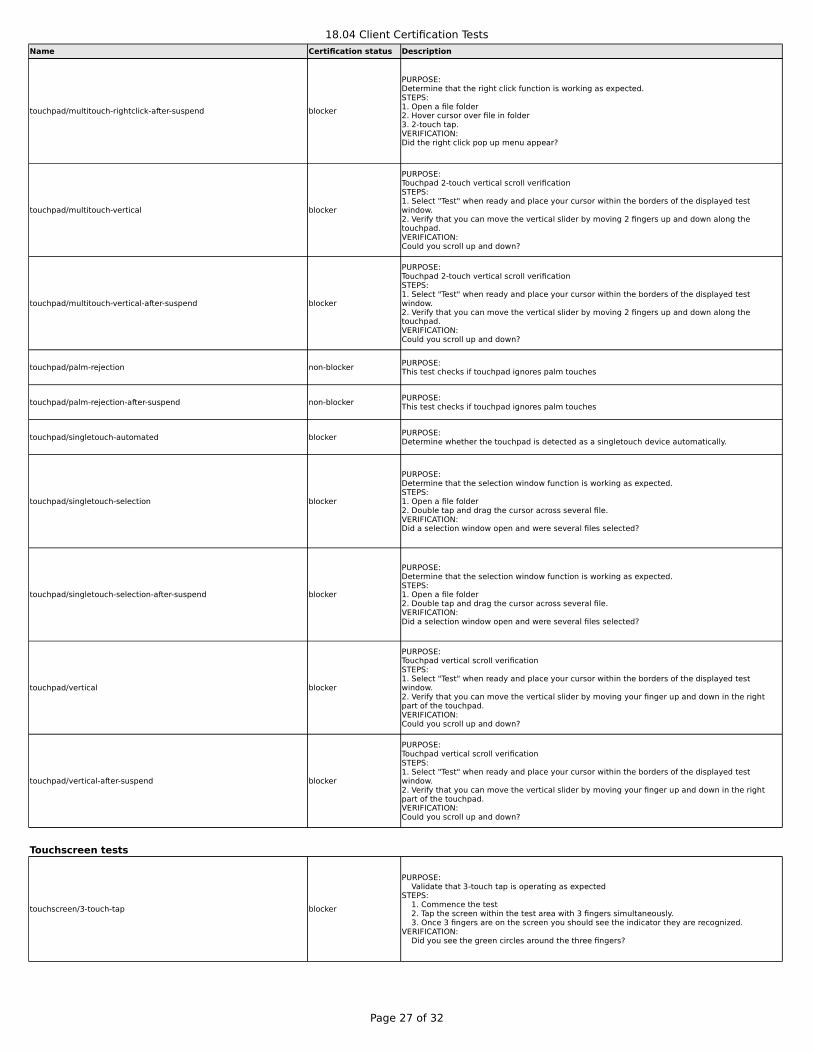
18.04 Client Certification Tests
Page 27 of 32
Name Certification status Description
touchpad/multitouch-rightclick-after-suspend blocker
touchpad/multitouch-vertical blocker
touchpad/multitouch-vertical-after-suspend blocker
touchpad/palm-rejection non-blocker
touchpad/palm-rejection-after-suspend non-blocker
touchpad/singletouch-automated blocker
touchpad/singletouch-selection blocker
touchpad/singletouch-selection-after-suspend blocker
touchpad/vertical blocker
touchpad/vertical-after-suspend blocker
Touchscreen tests
touchscreen/3-touch-tap blocker
PURPOSE:Determine that the right click function is working as expected.STEPS:1. Open a file folder2. Hover cursor over file in folder3. 2-touch tap.VERIFICATION:Did the right click pop up menu appear?
PURPOSE:Touchpad 2-touch vertical scroll verificationSTEPS:1. Select "Test" when ready and place your cursor within the borders of the displayed test window.2. Verify that you can move the vertical slider by moving 2 fingers up and down along the touchpad.VERIFICATION:Could you scroll up and down?
PURPOSE:Touchpad 2-touch vertical scroll verificationSTEPS:1. Select "Test" when ready and place your cursor within the borders of the displayed test window.2. Verify that you can move the vertical slider by moving 2 fingers up and down along the touchpad.VERIFICATION:Could you scroll up and down?
PURPOSE:This test checks if touchpad ignores palm touches
PURPOSE:This test checks if touchpad ignores palm touches
PURPOSE:Determine whether the touchpad is detected as a singletouch device automatically.
PURPOSE:Determine that the selection window function is working as expected.STEPS:1. Open a file folder2. Double tap and drag the cursor across several file.VERIFICATION:Did a selection window open and were several files selected?
PURPOSE:Determine that the selection window function is working as expected.STEPS:1. Open a file folder2. Double tap and drag the cursor across several file.VERIFICATION:Did a selection window open and were several files selected?
PURPOSE:Touchpad vertical scroll verificationSTEPS:1. Select "Test" when ready and place your cursor within the borders of the displayed test window.2. Verify that you can move the vertical slider by moving your finger up and down in the right part of the touchpad.VERIFICATION:Could you scroll up and down?
PURPOSE:Touchpad vertical scroll verificationSTEPS:1. Select "Test" when ready and place your cursor within the borders of the displayed test window.2. Verify that you can move the vertical slider by moving your finger up and down in the right part of the touchpad.VERIFICATION:Could you scroll up and down?
PURPOSE: Validate that 3-touch tap is operating as expectedSTEPS: 1. Commence the test 2. Tap the screen within the test area with 3 fingers simultaneously. 3. Once 3 fingers are on the screen you should see the indicator they are recognized.VERIFICATION: Did you see the green circles around the three fingers?
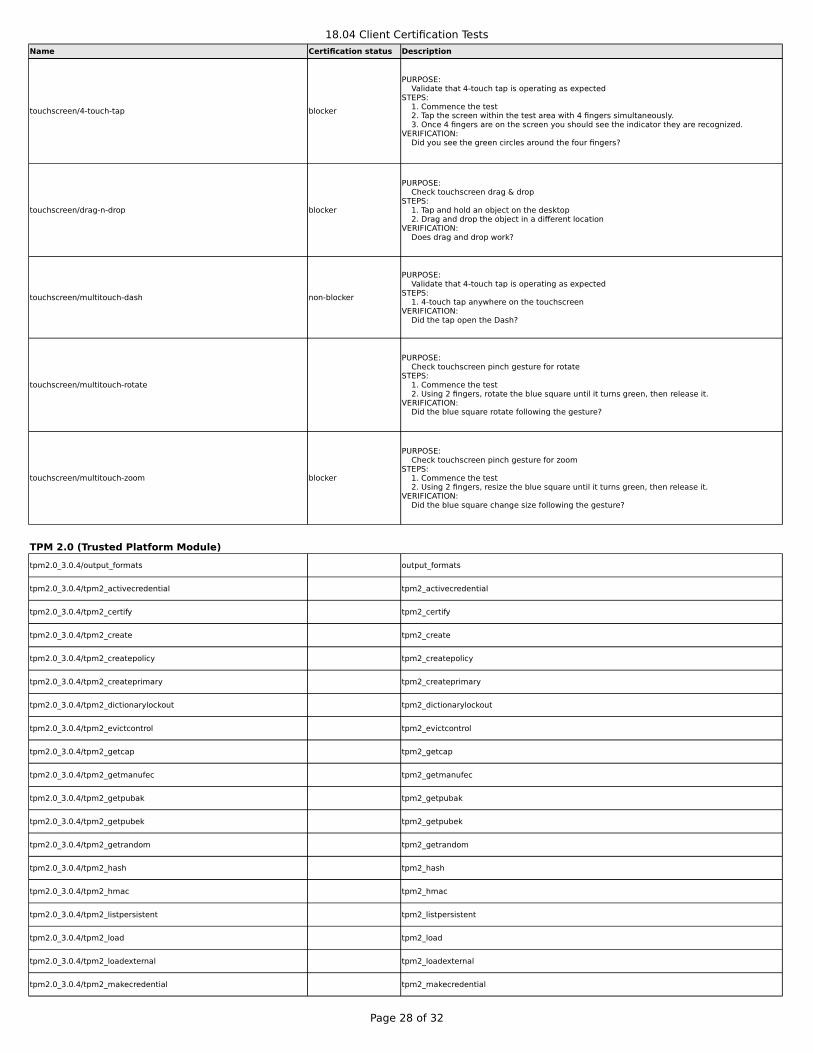
18.04 Client Certification Tests
Page 28 of 32
Name Certification status Description
touchscreen/4-touch-tap blocker
touchscreen/drag-n-drop blocker
touchscreen/multitouch-dash non-blocker
touchscreen/multitouch-rotate
touchscreen/multitouch-zoom blocker
TPM 2.0 (Trusted Platform Module)
tpm2.0_3.0.4/output_formats output_formats
tpm2.0_3.0.4/tpm2_activecredential tpm2_activecredential
tpm2.0_3.0.4/tpm2_certify tpm2_certify
tpm2.0_3.0.4/tpm2_create tpm2_create
tpm2.0_3.0.4/tpm2_createpolicy tpm2_createpolicy
tpm2.0_3.0.4/tpm2_createprimary tpm2_createprimary
tpm2.0_3.0.4/tpm2_dictionarylockout tpm2_dictionarylockout
tpm2.0_3.0.4/tpm2_evictcontrol tpm2_evictcontrol
tpm2.0_3.0.4/tpm2_getcap tpm2_getcap
tpm2.0_3.0.4/tpm2_getmanufec tpm2_getmanufec
tpm2.0_3.0.4/tpm2_getpubak tpm2_getpubak
tpm2.0_3.0.4/tpm2_getpubek tpm2_getpubek
tpm2.0_3.0.4/tpm2_getrandom tpm2_getrandom
tpm2.0_3.0.4/tpm2_hash tpm2_hash
tpm2.0_3.0.4/tpm2_hmac tpm2_hmac
tpm2.0_3.0.4/tpm2_listpersistent tpm2_listpersistent
tpm2.0_3.0.4/tpm2_load tpm2_load
tpm2.0_3.0.4/tpm2_loadexternal tpm2_loadexternal
tpm2.0_3.0.4/tpm2_makecredential tpm2_makecredential
PURPOSE: Validate that 4-touch tap is operating as expectedSTEPS: 1. Commence the test 2. Tap the screen within the test area with 4 fingers simultaneously. 3. Once 4 fingers are on the screen you should see the indicator they are recognized.VERIFICATION: Did you see the green circles around the four fingers?
PURPOSE: Check touchscreen drag & dropSTEPS: 1. Tap and hold an object on the desktop 2. Drag and drop the object in a different locationVERIFICATION: Does drag and drop work?
PURPOSE: Validate that 4-touch tap is operating as expectedSTEPS: 1. 4-touch tap anywhere on the touchscreenVERIFICATION: Did the tap open the Dash?
PURPOSE: Check touchscreen pinch gesture for rotateSTEPS: 1. Commence the test 2. Using 2 fingers, rotate the blue square until it turns green, then release it.VERIFICATION: Did the blue square rotate following the gesture?
PURPOSE: Check touchscreen pinch gesture for zoomSTEPS: 1. Commence the test 2. Using 2 fingers, resize the blue square until it turns green, then release it.VERIFICATION: Did the blue square change size following the gesture?
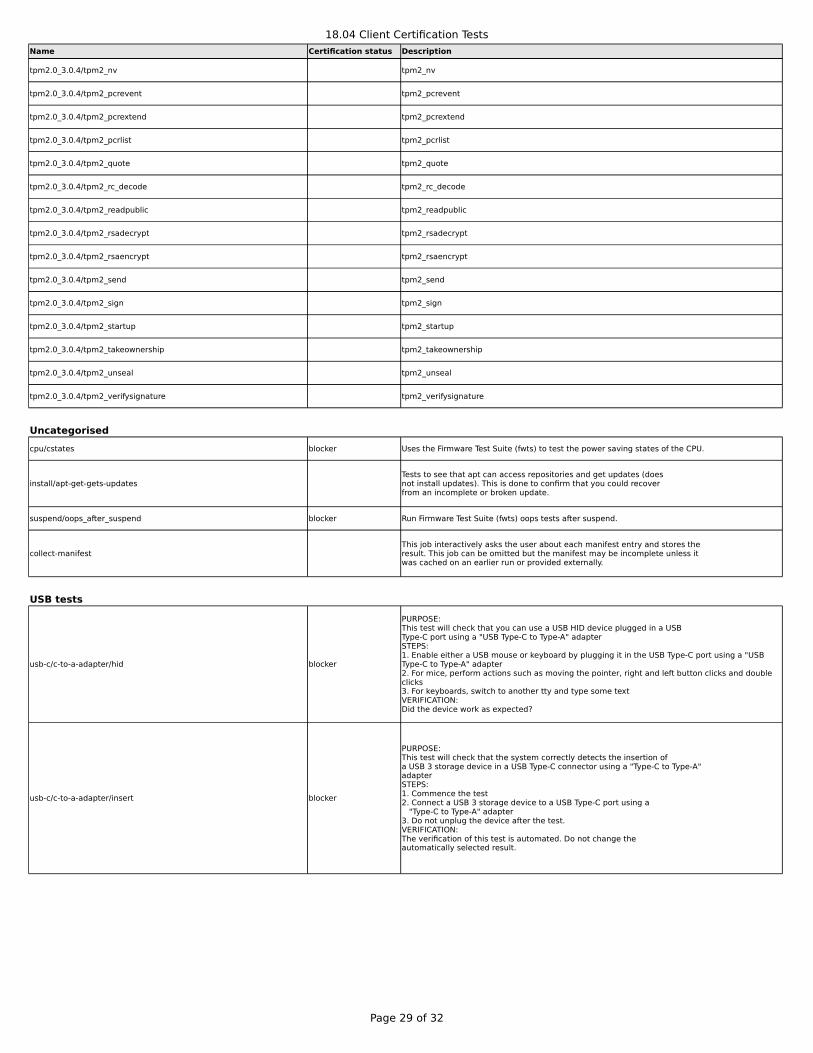
18.04 Client Certification Tests
Page 29 of 32
Name Certification status Description
tpm2.0_3.0.4/tpm2_nv tpm2_nv
tpm2.0_3.0.4/tpm2_pcrevent tpm2_pcrevent
tpm2.0_3.0.4/tpm2_pcrextend tpm2_pcrextend
tpm2.0_3.0.4/tpm2_pcrlist tpm2_pcrlist
tpm2.0_3.0.4/tpm2_quote tpm2_quote
tpm2.0_3.0.4/tpm2_rc_decode tpm2_rc_decode
tpm2.0_3.0.4/tpm2_readpublic tpm2_readpublic
tpm2.0_3.0.4/tpm2_rsadecrypt tpm2_rsadecrypt
tpm2.0_3.0.4/tpm2_rsaencrypt tpm2_rsaencrypt
tpm2.0_3.0.4/tpm2_send tpm2_send
tpm2.0_3.0.4/tpm2_sign tpm2_sign
tpm2.0_3.0.4/tpm2_startup tpm2_startup
tpm2.0_3.0.4/tpm2_takeownership tpm2_takeownership
tpm2.0_3.0.4/tpm2_unseal tpm2_unseal
tpm2.0_3.0.4/tpm2_verifysignature tpm2_verifysignature
Uncategorised
cpu/cstates blocker Uses the Firmware Test Suite (fwts) to test the power saving states of the CPU.
install/apt-get-gets-updates
suspend/oops_after_suspend blocker Run Firmware Test Suite (fwts) oops tests after suspend.
collect-manifest
USB tests
usb-c/c-to-a-adapter/hid blocker
usb-c/c-to-a-adapter/insert blocker
Tests to see that apt can access repositories and get updates (doesnot install updates). This is done to confirm that you could recoverfrom an incomplete or broken update.
This job interactively asks the user about each manifest entry and stores theresult. This job can be omitted but the manifest may be incomplete unless itwas cached on an earlier run or provided externally.
PURPOSE:This test will check that you can use a USB HID device plugged in a USBType-C port using a "USB Type-C to Type-A" adapterSTEPS:1. Enable either a USB mouse or keyboard by plugging it in the USB Type-C port using a "USB Type-C to Type-A" adapter2. For mice, perform actions such as moving the pointer, right and left button clicks and double clicks3. For keyboards, switch to another tty and type some textVERIFICATION:Did the device work as expected?
PURPOSE:This test will check that the system correctly detects the insertion ofa USB 3 storage device in a USB Type-C connector using a "Type-C to Type-A"adapterSTEPS:1. Commence the test2. Connect a USB 3 storage device to a USB Type-C port using a "Type-C to Type-A" adapter3. Do not unplug the device after the test.VERIFICATION:The verification of this test is automated. Do not change theautomatically selected result.
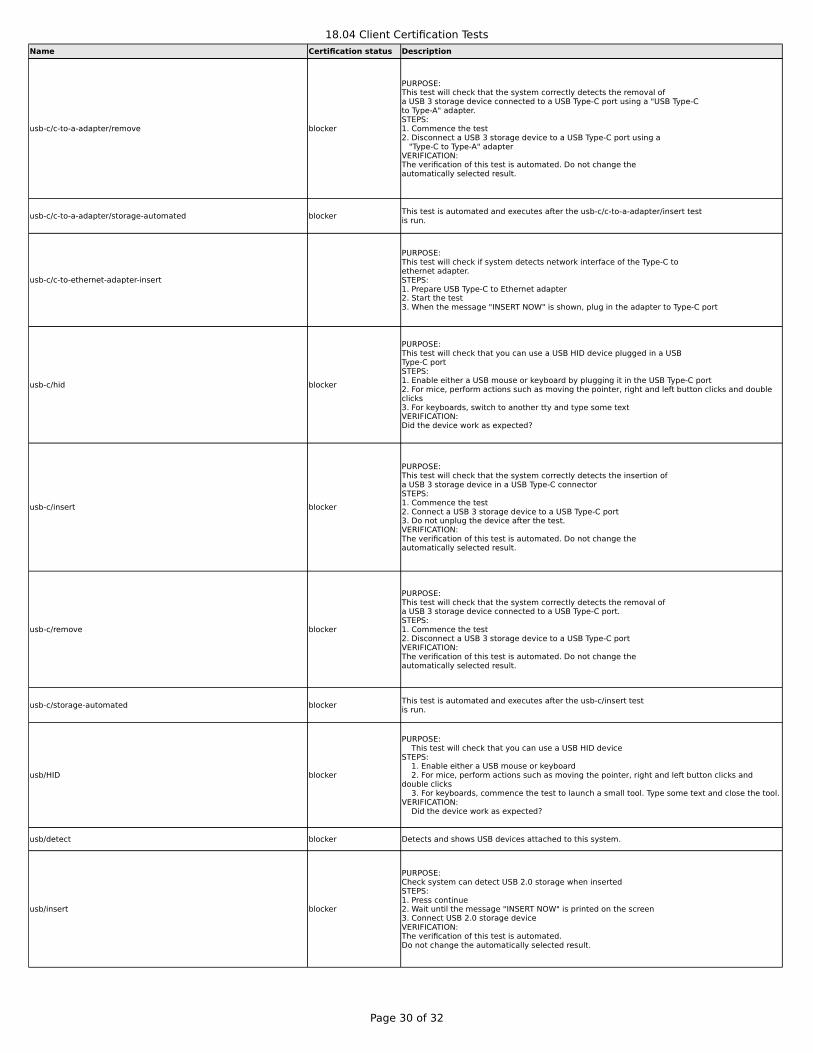
18.04 Client Certification Tests
Page 30 of 32
Name Certification status Description
usb-c/c-to-a-adapter/remove blocker
usb-c/c-to-a-adapter/storage-automated blocker
usb-c/c-to-ethernet-adapter-insert
usb-c/hid blocker
usb-c/insert blocker
usb-c/remove blocker
usb-c/storage-automated blocker
usb/HID blocker
usb/detect blocker Detects and shows USB devices attached to this system.
usb/insert blocker
PURPOSE:This test will check that the system correctly detects the removal ofa USB 3 storage device connected to a USB Type-C port using a "USB Type-Cto Type-A" adapter.STEPS:1. Commence the test2. Disconnect a USB 3 storage device to a USB Type-C port using a "Type-C to Type-A" adapterVERIFICATION:The verification of this test is automated. Do not change theautomatically selected result.
This test is automated and executes after the usb-c/c-to-a-adapter/insert testis run.
PURPOSE:This test will check if system detects network interface of the Type-C toethernet adapter.STEPS:1. Prepare USB Type-C to Ethernet adapter2. Start the test3. When the message "INSERT NOW" is shown, plug in the adapter to Type-C port
PURPOSE:This test will check that you can use a USB HID device plugged in a USBType-C portSTEPS:1. Enable either a USB mouse or keyboard by plugging it in the USB Type-C port2. For mice, perform actions such as moving the pointer, right and left button clicks and double clicks3. For keyboards, switch to another tty and type some textVERIFICATION:Did the device work as expected?
PURPOSE:This test will check that the system correctly detects the insertion ofa USB 3 storage device in a USB Type-C connectorSTEPS:1. Commence the test2. Connect a USB 3 storage device to a USB Type-C port3. Do not unplug the device after the test.VERIFICATION:The verification of this test is automated. Do not change theautomatically selected result.
PURPOSE:This test will check that the system correctly detects the removal ofa USB 3 storage device connected to a USB Type-C port.STEPS:1. Commence the test2. Disconnect a USB 3 storage device to a USB Type-C portVERIFICATION:The verification of this test is automated. Do not change theautomatically selected result.
This test is automated and executes after the usb-c/insert testis run.
PURPOSE: This test will check that you can use a USB HID deviceSTEPS: 1. Enable either a USB mouse or keyboard 2. For mice, perform actions such as moving the pointer, right and left button clicks and double clicks 3. For keyboards, commence the test to launch a small tool. Type some text and close the tool.VERIFICATION: Did the device work as expected?
PURPOSE:Check system can detect USB 2.0 storage when insertedSTEPS:1. Press continue2. Wait until the message "INSERT NOW" is printed on the screen3. Connect USB 2.0 storage deviceVERIFICATION:The verification of this test is automated.Do not change the automatically selected result.
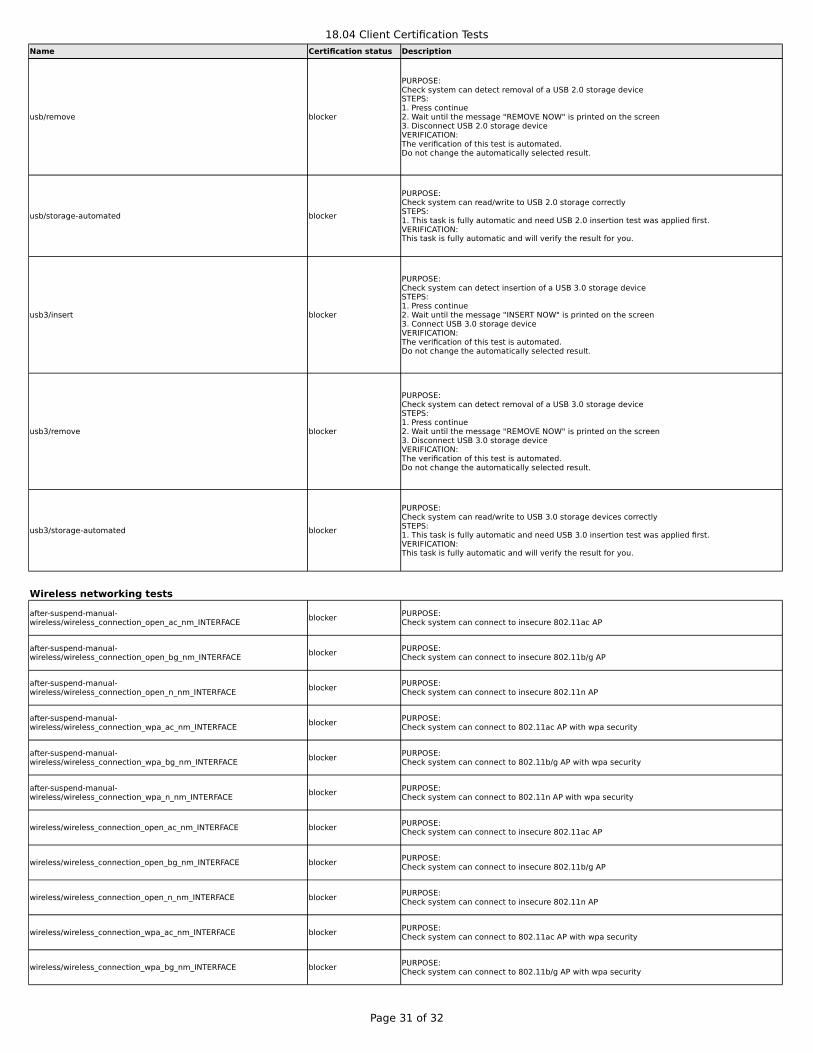
18.04 Client Certification Tests
Page 31 of 32
Name Certification status Description
usb/remove blocker
usb/storage-automated blocker
usb3/insert blocker
usb3/remove blocker
usb3/storage-automated blocker
Wireless networking tests
blocker
blocker
blocker
blocker
blocker
blocker
wireless/wireless_connection_open_ac_nm_INTERFACE blocker
wireless/wireless_connection_open_bg_nm_INTERFACE blocker
wireless/wireless_connection_open_n_nm_INTERFACE blocker
wireless/wireless_connection_wpa_ac_nm_INTERFACE blocker
wireless/wireless_connection_wpa_bg_nm_INTERFACE blocker
PURPOSE:Check system can detect removal of a USB 2.0 storage deviceSTEPS:1. Press continue2. Wait until the message "REMOVE NOW" is printed on the screen3. Disconnect USB 2.0 storage deviceVERIFICATION:The verification of this test is automated.Do not change the automatically selected result.
PURPOSE:Check system can read/write to USB 2.0 storage correctlySTEPS:1. This task is fully automatic and need USB 2.0 insertion test was applied first.VERIFICATION:This task is fully automatic and will verify the result for you.
PURPOSE:Check system can detect insertion of a USB 3.0 storage deviceSTEPS:1. Press continue2. Wait until the message "INSERT NOW" is printed on the screen3. Connect USB 3.0 storage deviceVERIFICATION:The verification of this test is automated.Do not change the automatically selected result.
PURPOSE:Check system can detect removal of a USB 3.0 storage deviceSTEPS:1. Press continue2. Wait until the message "REMOVE NOW" is printed on the screen3. Disconnect USB 3.0 storage deviceVERIFICATION:The verification of this test is automated.Do not change the automatically selected result.
PURPOSE:Check system can read/write to USB 3.0 storage devices correctlySTEPS:1. This task is fully automatic and need USB 3.0 insertion test was applied first.VERIFICATION:This task is fully automatic and will verify the result for you.
after-suspend-manual-wireless/wireless_connection_open_ac_nm_INTERFACE
PURPOSE:Check system can connect to insecure 802.11ac AP
after-suspend-manual-wireless/wireless_connection_open_bg_nm_INTERFACE
PURPOSE:Check system can connect to insecure 802.11b/g AP
after-suspend-manual-wireless/wireless_connection_open_n_nm_INTERFACE
PURPOSE:Check system can connect to insecure 802.11n AP
after-suspend-manual-wireless/wireless_connection_wpa_ac_nm_INTERFACE
PURPOSE:Check system can connect to 802.11ac AP with wpa security
after-suspend-manual-wireless/wireless_connection_wpa_bg_nm_INTERFACE
PURPOSE:Check system can connect to 802.11b/g AP with wpa security
after-suspend-manual-wireless/wireless_connection_wpa_n_nm_INTERFACE
PURPOSE:Check system can connect to 802.11n AP with wpa security
PURPOSE:Check system can connect to insecure 802.11ac AP
PURPOSE:Check system can connect to insecure 802.11b/g AP
PURPOSE:Check system can connect to insecure 802.11n AP
PURPOSE:Check system can connect to 802.11ac AP with wpa security
PURPOSE:Check system can connect to 802.11b/g AP with wpa security

18.04 Client Certification Tests
Page 32 of 32
Name Certification status Description
wireless/wireless_connection_wpa_n_nm_INTERFACE blocker
wireless/wireless_scanning_INTERFACE blocker Check system can find a wireless network AP nearby
PURPOSE:Check system can connect to 802.11n AP with wpa security