Embed Size (px)
Citation preview
Palla
dium
An IntroductionEdition ll
t: (212) 245 6790 i: www.jmny.com Palladium An Introduction 2
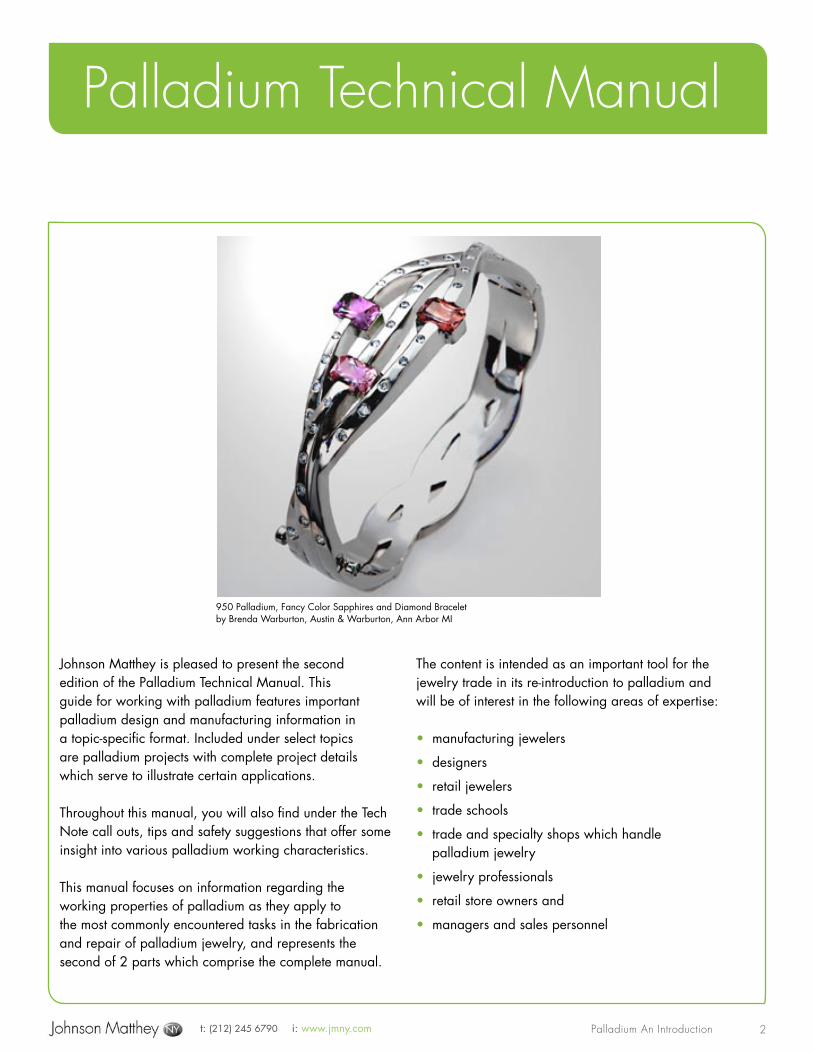
Johnson Matthey is pleased to present the second edition of the Palladium Technical Manual. This guide for working with palladium features important palladium design and manufacturing information in a topic-specific format. Included under select topics are palladium projects with complete project details which serve to illustrate certain applications.
Throughout this manual, you will also find under the Tech Note call outs, tips and safety suggestions that offer some insight into various palladium working characteristics.
This manual focuses on information regarding the working properties of palladium as they apply to the most commonly encountered tasks in the fabrication and repair of palladium jewelry, and represents the second of 2 parts which comprise the complete manual.
The content is intended as an important tool for the jewelry trade in its re-introduction to palladium and will be of interest in the following areas of expertise:
• manufacturing jewelers
• designers
• retail jewelers
• trade schools
• trade and specialty shops which handle palladium jewelry
• jewelry professionals
• retail store owners and
• managers and sales personnel
Palladium Technical Manual
950 Palladium, Fancy Color Sapphires and Diamond Bracelet by Brenda Warburton, Austin & Warburton, Ann Arbor MI
t: (212) 245 6790 i: www.jmny.com Palladium An Introduction 3
Index
Introduction
- Why Palladium?
- Purity
- Wearability
- Workability
- Permanent Whiteness
- Features and Benefits
- Detection of Palladium
- World Palladium Usage
- History of Palladium
- Characteristics
- A Designers Medium
- Alloys
- Hardness
- Palladium alloys - Applications
Palladium DesignConsiderations
Alloys
- Design and Model Guide
- Gates and the Investment Procedures
- Casting
- Casting Parameters for Johnson Matthey’s 950 Palladium
- Torch Casting Palladium
Casting and Melting
t: (212) 245 6790 i: www.jmny.com Palladium An Introduction 4
- Annealing
- Contamination
- Forging, Shaping and Forming
PROJECT: Hand Fabricated Palladium Earrings
- Cutting and Filing
- Hand Engraving
- Cold Working
- Cold Working Precautions
Handworking
- Eye Protection
- Joining Overview
- Torch Soldering
Solders
PROJECT: Assembly of Palladium Stock Findings
PROJECT: Preventing Oxidation
PROJECT: Soldering 18 Karat Yellow Gold and Palladium Bands Together
- Ring Sizing Overview
- Soldering Karat-Gold to Palladium
- Torch Welding
- Palladium Laser Welding
- Filling Voids
- Minor Assembly
- Ring Sizing
- Tack-Welding
- Fusion-Welding
Soldering and Welding
5
- Pre-finishing Techniques
PROJECT: Pre-finishing a Patterned Wedding Band
PROJECT: Pre-finishing Necklace Parts
PROJECT: Pre-finishing 2 Rings
PROJECT: Pre-finishing a Gents Ring
PROJECT: Pre-finishing Inside Rings
PROJECT: Pre-finishing a Wide Flat Tapered Ring
PROJECT: Burnishing Small Pits
- Magnetic Finishing
- Buffing and Polishing
- Polishing Techniques
PROJECT: Polishing a Gold and Palladium Pendant
- Texturing
- Surface Finishes
Finishing
- General Overview
PROJECT: Setting Round Brilliant Cut Gemstones in Prongs and Partial Bezels
PROJECT: Setting Cabochons in Bezels
PROJECT: Setting a 5-Stone Palladium Ring
PROJECT: Setting Small Diamonds in Beads
PROJECT: Channel Setting Diamonds
- Unusual Setting Styles
Setting
Machining
Refining
Die Striking
Glossary
Weights and Measures
Credits
t: (212) 245 6790 i: www.jmny.com Palladium An Introduction
Index
6
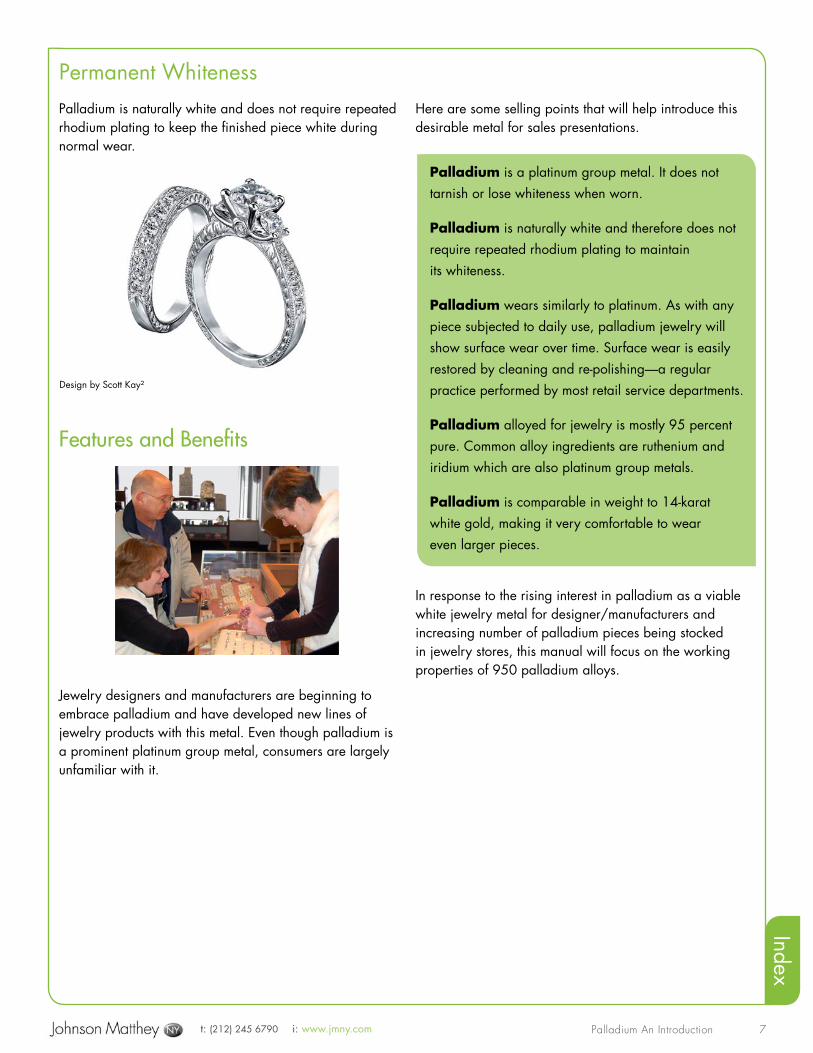
Palladium (atomic symbol Pd) is a platinum group metal (PGM). It is the lightest (least dense) and has the lowest melting point of the group. Palladium is naturally white, not requiring rhodium plating for use with jewelry. It is malleable and ductile in its pure form, but too soft for jewelry unless alloyed. As an alloy containing 950 parts of palladium for jewelry purposes, it is more “pure” than white gold alloys, but the additional elements make it harder and more durable in the as cast condition. Its hardness significantly increases as it is cold worked making it ideal for jewelry and palladium wears similarly to platinum. Palladium resists oxidation at ordinary temperatures but will discolor at soldering temperatures, become brittle with careless, excessive and repeated heating and cooling cycles, and react with strong acids. One of its characteristics that cause it to be sensitive to certain jewelry manufacturing procedures is its ability to absorb considerable amounts of hydrogen and other gases especially when molten.
Palladium alloys for jewelry manufacturing have a high purity level. They are primarily alloyed with other platinum group metals (PGM) and other metals for a wide variety of manufacturing methods.
Wearability
950 palladium has a specific gravity of 11.8., similar to white gold (most 14-karat white gold alloys are around 12.7) and almost half that of platinum making it very comfortable to wear larger pieces.
WorkabilityPalladium is malleable making it easy to bend, form and manipulate and has little or no memory, a characteristic conducive to the setting process of gemstones, machine forming hand fabrication.
Introduction
Design by Lainie Mann¹
PurityWhy Palladium ?
Design by Scott Kay²
Design by Scott Kay²
Design by Tom McLaughlin³
Design by Lainie Mann¹
t: (212) 245 6790 i: www.jmny.com Palladium An Introduction
Index
7
Palladium is naturally white and does not require repeated rhodium plating to keep the finished piece white during normal wear.
Features and Benefits
Jewelry designers and manufacturers are beginning to embrace palladium and have developed new lines of jewelry products with this metal. Even though palladium is a prominent platinum group metal, consumers are largely unfamiliar with it.
Here are some selling points that will help introduce this desirable metal for sales presentations.
In response to the rising interest in palladium as a viable white jewelry metal for designer/manufacturers and increasing number of palladium pieces being stocked in jewelry stores, this manual will focus on the working properties of 950 palladium alloys.
Permanent Whiteness
Design by Scott Kay²
Palladium is a platinum group metal. It does not tarnish or lose whiteness when worn.
Palladium is naturally white and therefore does not require repeated rhodium plating to maintain its whiteness. Palladium wears similarly to platinum. As with any piece subjected to daily use, palladium jewelry will show surface wear over time. Surface wear is easily restored by cleaning and re-polishing—a regular practice performed by most retail service departments.
Palladium alloyed for jewelry is mostly 95 percent pure. Common alloy ingredients are ruthenium and iridium which are also platinum group metals.
Palladium is comparable in weight to 14-karat white gold, making it very comfortable to wear even larger pieces.
t: (212) 245 6790 i: www.jmny.com Palladium An Introduction
Index
8
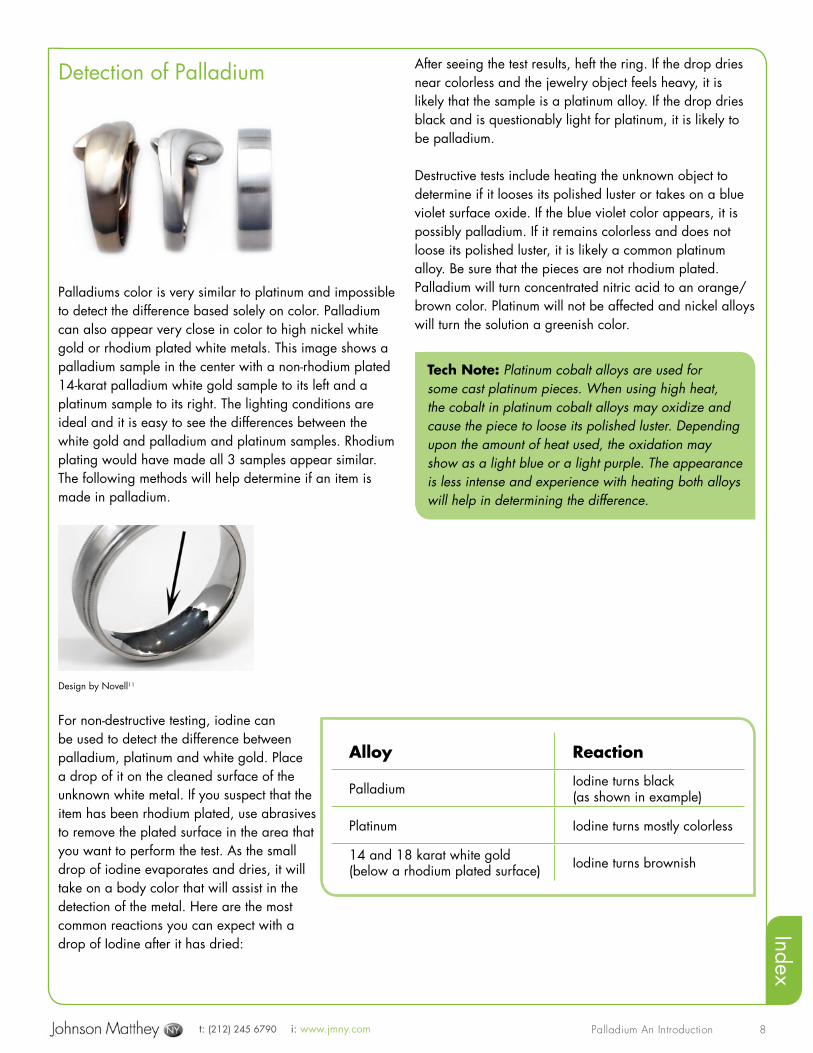
Palladiums color is very similar to platinum and impossible to detect the difference based solely on color. Palladium can also appear very close in color to high nickel white gold or rhodium plated white metals. This image shows a palladium sample in the center with a non-rhodium plated 14-karat palladium white gold sample to its left and a platinum sample to its right. The lighting conditions are ideal and it is easy to see the differences between the white gold and palladium and platinum samples. Rhodium plating would have made all 3 samples appear similar. The following methods will help determine if an item is made in palladium.
For non-destructive testing, iodine can be used to detect the difference between palladium, platinum and white gold. Place a drop of it on the cleaned surface of the unknown white metal. If you suspect that the item has been rhodium plated, use abrasives to remove the plated surface in the area that you want to perform the test. As the small drop of iodine evaporates and dries, it will take on a body color that will assist in the detection of the metal. Here are the most common reactions you can expect with a drop of Iodine after it has dried:
After seeing the test results, heft the ring. If the drop dries near colorless and the jewelry object feels heavy, it is likely that the sample is a platinum alloy. If the drop dries black and is questionably light for platinum, it is likely to be palladium.
Destructive tests include heating the unknown object to determine if it looses its polished luster or takes on a blue violet surface oxide. If the blue violet color appears, it is possibly palladium. If it remains colorless and does not loose its polished luster, it is likely a common platinum alloy. Be sure that the pieces are not rhodium plated. Palladium will turn concentrated nitric acid to an orange/brown color. Platinum will not be affected and nickel alloys will turn the solution a greenish color.
Design by Novell11
Detection of Palladium
Alloy Reaction
Palladium Iodine turns black (as shown in example)
Platinum Iodine turns mostly colorless
14 and 18 karat white gold (below a rhodium plated surface) Iodine turns brownish
Tech Note: Platinum cobalt alloys are used for some cast platinum pieces. When using high heat, the cobalt in platinum cobalt alloys may oxidize and cause the piece to loose its polished luster. Depending upon the amount of heat used, the oxidation may show as a light blue or a light purple. The appearance is less intense and experience with heating both alloys will help in determining the difference.

t: (212) 245 6790 i: www.jmny.com Palladium An Introduction
Index
9
World Palladium UsagePlease visit the website link below to view the latest PGM review:http://www.platinum.matthey.com/publications/pgmreview.html
History of PalladiumThe history of palladium begins with the discovery of its sister metal platinum. The noble metals, which are commonly found together, have a shared beginning that is highlighted by challenges to their widespread use. That is, until modern science and metallurgy unlocked some of the valuable characteristics each offers and has proven platinum and palladium as essential to 21st century commerce.
Platinum was not identified until the 1560’s when Spanish explorers in the Americas encountered a white metal that limited their efficiency in extracting gold from alluvial deposits. Termed Platina, platinum was largely overlooked for two hundred years until 1753 when the Spanish government called for a scientific investigation into possible uses for the metal. As the hired scientist discovered the ease with which platinum mixed with gold (a most valuable commodity at the time), stores of platinum were dumped to prevent forgers from misrepresenting platinum as gold.
Still, samples of platinum managed to make way to European laboratories and in 1803 William Hyde Wollaston isolated palladium from platinum and identified it as a separate elemental metal. Named after the Greek Goddess Athena’s play thing, Pallas, palladium faced issues of marketability due to few known uses for the metal. In 1817, Percival Norton Johnson formed a gold refining company and, in partnership with George Matthey (the origins of Johnson Matthey) some years later, was able to make use of palladium in chemical balances, for rust free surgical instruments and as a substitute for steel.
Throughout the remainder of the 19th century, further research and the discovery of additional platinum group resources in Russia led to the greater intrigue and ubiquity of these metals. But it wasn’t until yet more resources and producers of palladium entered the market in the early 1900’s that the metal saw widespread use - by the 1930s palladium alloys were being used in dentistry. The biggest breakthrough for the increased use of palladium occurred in 1970 when, in the face of growing environmental concern, it was discovered that catalytic converters consisting of palladium, platinum and rhodium could eliminate a high percentage of all the harmful gases from automobile exhausts.
t: (212) 245 6790 i: www.jmny.com Palladium An Introduction
Index
10
Palladium alloys for jewelry manufacturing usually contain 95% palladium and 5% other metals. Specific jewelry manufacturing methods like casting, machining, chain making, hand fabricating or other processes sometimes call for differing alloy ingredients. Of the popular alloys currently being used in the U.S. for palladium jewelry the common balance consists of 95% palladium, nearly 5% ruthenium and trace elements of other metals. The inclusion of specific trace elements offer various benefits to the design and manufacturing process (e.g. hardness, better fluidity for casting, ease in machining) or lend to better wear of the finished jewelry. Alloys containing 95% palladium share inherent characteristics of the pure metal, such as:
Whether palladium plays a supporting role to diamonds or fancy gemstones, or takes the spotlight in visual form or tactile comfort palladium jewelry should be designed to the strengths of this unique metal - the aesthetics of its light, bright, favorable white color and density as well as palladium’s metallurgical assets in setting, fabricating, casting and machining. Following are a few examples:
Characteristics
Palladium Design Considerations
Malleability: palladium is readily capable of being shaped or formed by hammering or pressure.
Ductility: pure or alloyed, these metals are highly capable of being drawn or bent without breaking.
Hardness: palladium alloys considered to be fit for purpose have an as cast hardness measured using the Vickers Hardness scale between 110 and 135 depending upon the alloy. These hardness measurements relate to tests on the core of the casting, where surface processing has not affected the natural hardness. With this hardness range, palladium is relatively
resistant to denting, scratching or bending and wears similarly to platinum. Softer palladium alloys may still be fit for purpose if cold worked into jewelry – e.g. wedding rings made from tube or sheet – as long as they are not annealed after processing.
Strength: with adequate tolerances, palladium has good strength and will hold shape and form through strain or stress when properly designed. Because of palladium’s malleability, slightly heavier cross sections should be used compared to when using for example nickel white golds.
t: (212) 245 6790 i: www.jmny.com Palladium An Introduction
Index
11
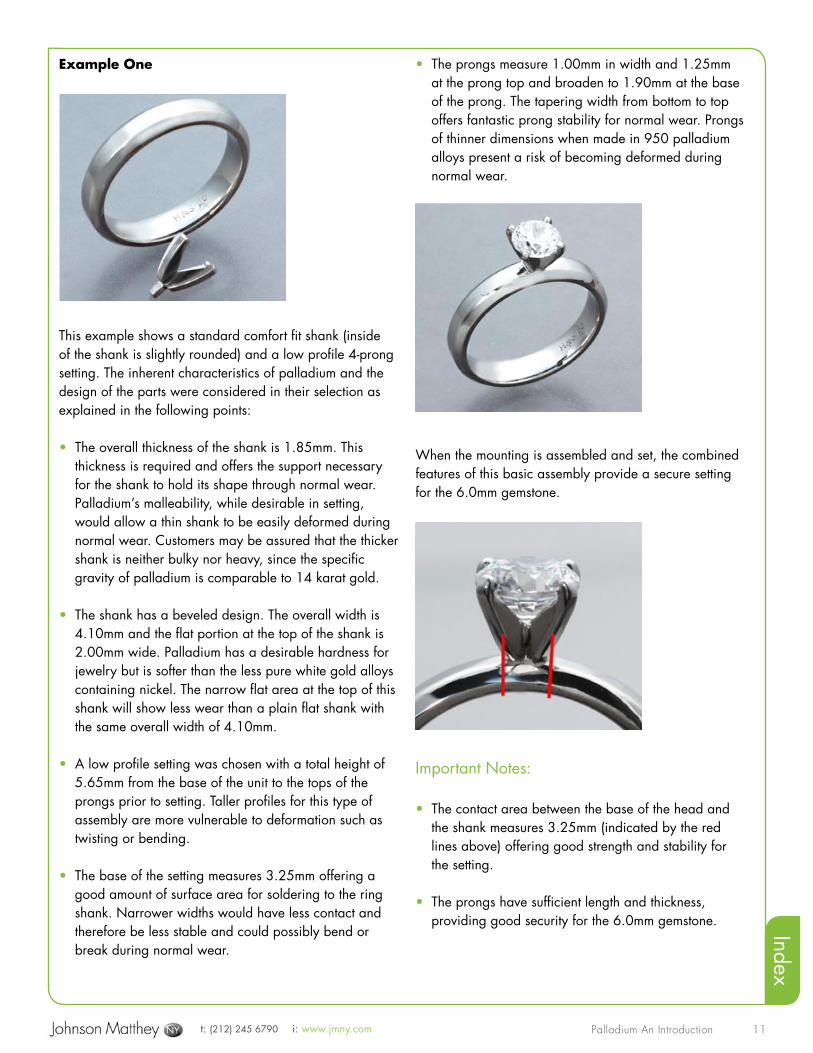
Example One
This example shows a standard comfort fit shank (inside of the shank is slightly rounded) and a low profile 4-prong setting. The inherent characteristics of palladium and the design of the parts were considered in their selection as explained in the following points:
• The overall thickness of the shank is 1.85mm. This thickness is required and offers the support necessary for the shank to hold its shape through normal wear. Palladium’s malleability, while desirable in setting, would allow a thin shank to be easily deformed during normal wear. Customers may be assured that the thicker shank is neither bulky nor heavy, since the specific gravity of palladium is comparable to 14 karat gold.
• The shank has a beveled design. The overall width is 4.10mm and the flat portion at the top of the shank is 2.00mm wide. Palladium has a desirable hardness for jewelry but is softer than the less pure white gold alloys containing nickel. The narrow flat area at the top of this shank will show less wear than a plain flat shank with the same overall width of 4.10mm.
• A low profile setting was chosen with a total height of 5.65mm from the base of the unit to the tops of the prongs prior to setting. Taller profiles for this type of assembly are more vulnerable to deformation such as twisting or bending.
• The base of the setting measures 3.25mm offering a good amount of surface area for soldering to the ring shank. Narrower widths would have less contact and therefore be less stable and could possibly bend or break during normal wear.
• The prongs measure 1.00mm in width and 1.25mm at the prong top and broaden to 1.90mm at the base of the prong. The tapering width from bottom to top offers fantastic prong stability for normal wear. Prongs of thinner dimensions when made in 950 palladium alloys present a risk of becoming deformed during normal wear.
When the mounting is assembled and set, the combined features of this basic assembly provide a secure setting for the 6.0mm gemstone.
Important Notes:
• The contact area between the base of the head and the shank measures 3.25mm (indicated by the red lines above) offering good strength and stability for the setting.
• The prongs have sufficient length and thickness, providing good security for the 6.0mm gemstone.
t: (212) 245 6790 i: www.jmny.com Palladium An Introduction
Index
12
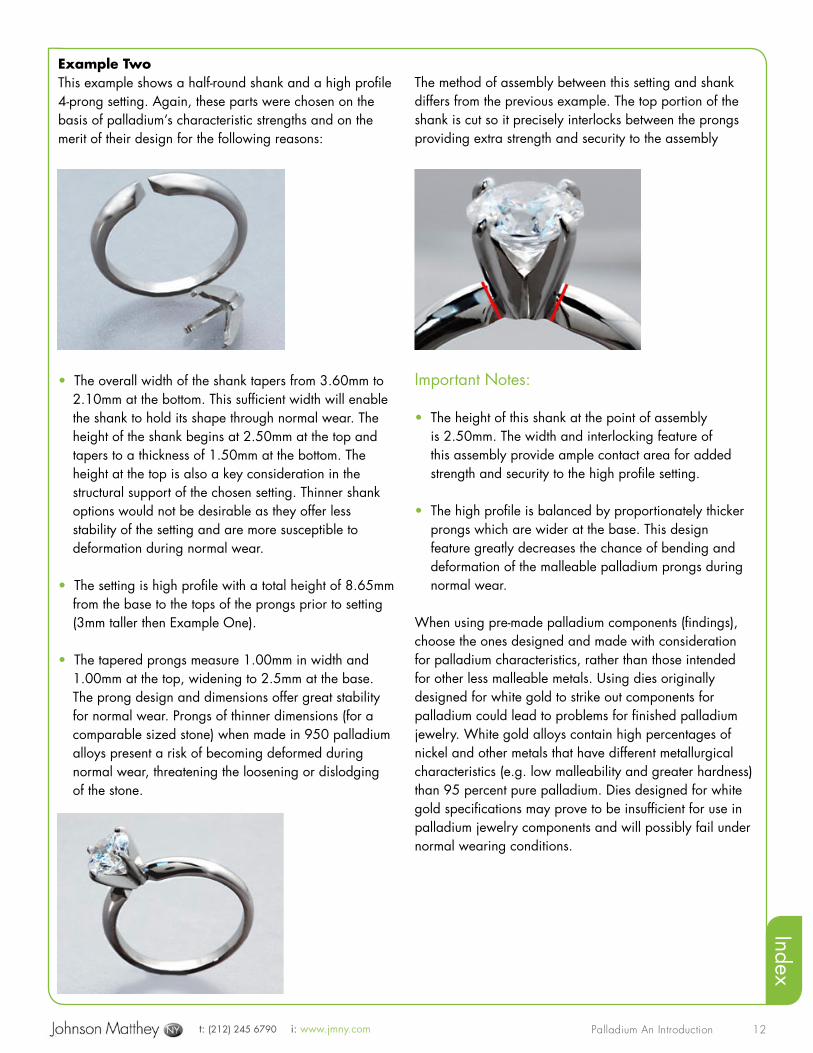
Example TwoThis example shows a half-round shank and a high profile 4-prong setting. Again, these parts were chosen on the basis of palladium’s characteristic strengths and on the merit of their design for the following reasons:
• The overall width of the shank tapers from 3.60mm to 2.10mm at the bottom. This sufficient width will enable the shank to hold its shape through normal wear. The height of the shank begins at 2.50mm at the top and tapers to a thickness of 1.50mm at the bottom. The height at the top is also a key consideration in the structural support of the chosen setting. Thinner shank options would not be desirable as they offer less stability of the setting and are more susceptible to deformation during normal wear.
• The setting is high profile with a total height of 8.65mm from the base to the tops of the prongs prior to setting (3mm taller then Example One).
• The tapered prongs measure 1.00mm in width and 1.00mm at the top, widening to 2.5mm at the base. The prong design and dimensions offer great stability for normal wear. Prongs of thinner dimensions (for a comparable sized stone) when made in 950 palladium alloys present a risk of becoming deformed during normal wear, threatening the loosening or dislodging of the stone.
The method of assembly between this setting and shank differs from the previous example. The top portion of the shank is cut so it precisely interlocks between the prongs providing extra strength and security to the assembly
Important Notes:
• The height of this shank at the point of assembly is 2.50mm. The width and interlocking feature of this assembly provide ample contact area for added strength and security to the high profile setting.
• The high profile is balanced by proportionately thicker prongs which are wider at the base. This design feature greatly decreases the chance of bending and deformation of the malleable palladium prongs during normal wear.
When using pre-made palladium components (findings), choose the ones designed and made with consideration for palladium characteristics, rather than those intended for other less malleable metals. Using dies originally designed for white gold to strike out components for palladium could lead to problems for finished palladium jewelry. White gold alloys contain high percentages of nickel and other metals that have different metallurgical characteristics (e.g. low malleability and greater hardness) than 95 percent pure palladium. Dies designed for white gold specifications may prove to be insufficient for use in palladium jewelry components and will possibly fail under normal wearing conditions.
t: (212) 245 6790 i: www.jmny.com Palladium An Introduction
Index
13
A Designers MediumSuccessful palladium jewelry designers understand the inherent characteristics and numerous positive features of this noble metal. The combination of its, density, malleability, ductility and hardness at high levels of purity offer designers a multitude of distinctive design opportunities.
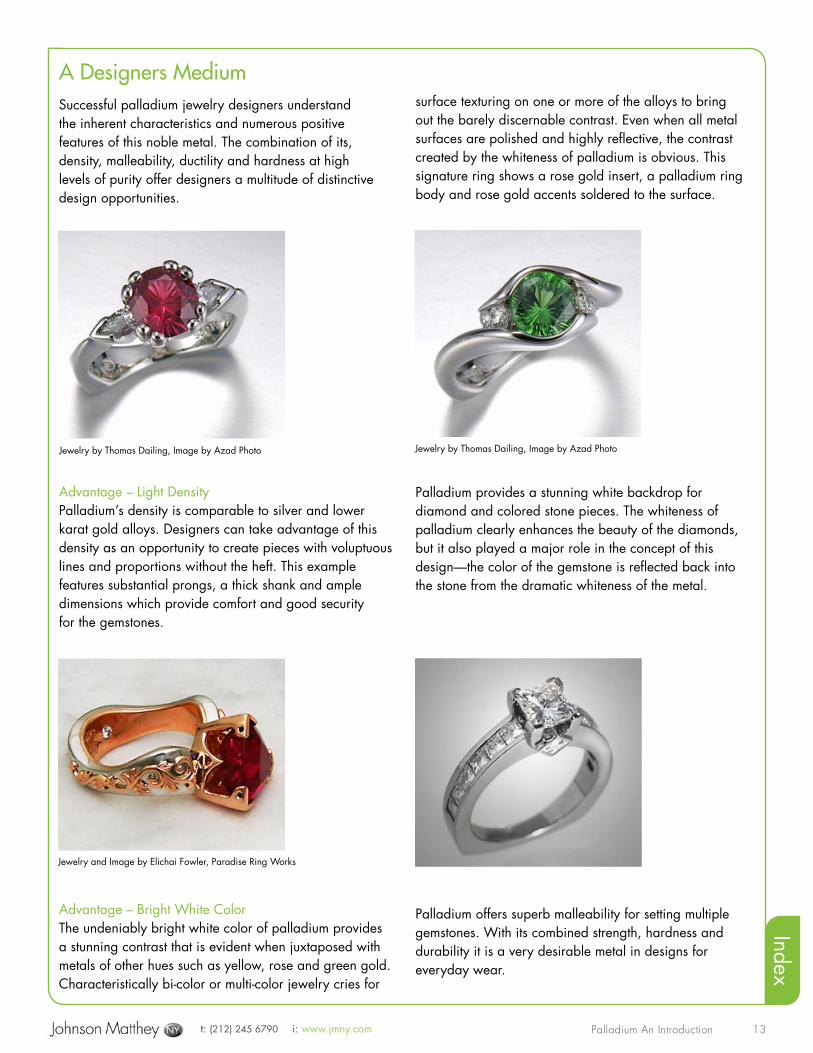
Advantage – Light DensityPalladium’s density is comparable to silver and lower karat gold alloys. Designers can take advantage of this density as an opportunity to create pieces with voluptuous lines and proportions without the heft. This example features substantial prongs, a thick shank and ample dimensions which provide comfort and good security for the gemstones.
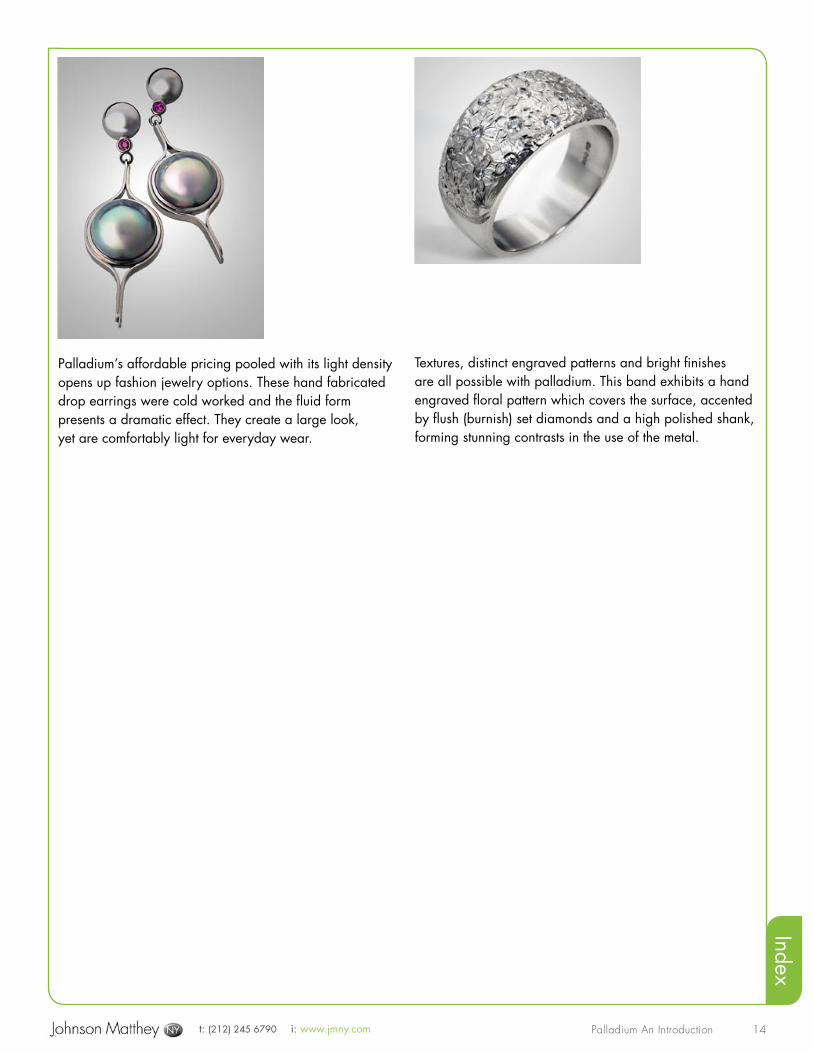
Advantage – Bright White ColorThe undeniably bright white color of palladium provides a stunning contrast that is evident when juxtaposed with metals of other hues such as yellow, rose and green gold. Characteristically bi-color or multi-color jewelry cries for
surface texturing on one or more of the alloys to bring out the barely discernable contrast. Even when all metal surfaces are polished and highly reflective, the contrast created by the whiteness of palladium is obvious. This signature ring shows a rose gold insert, a palladium ring body and rose gold accents soldered to the surface.
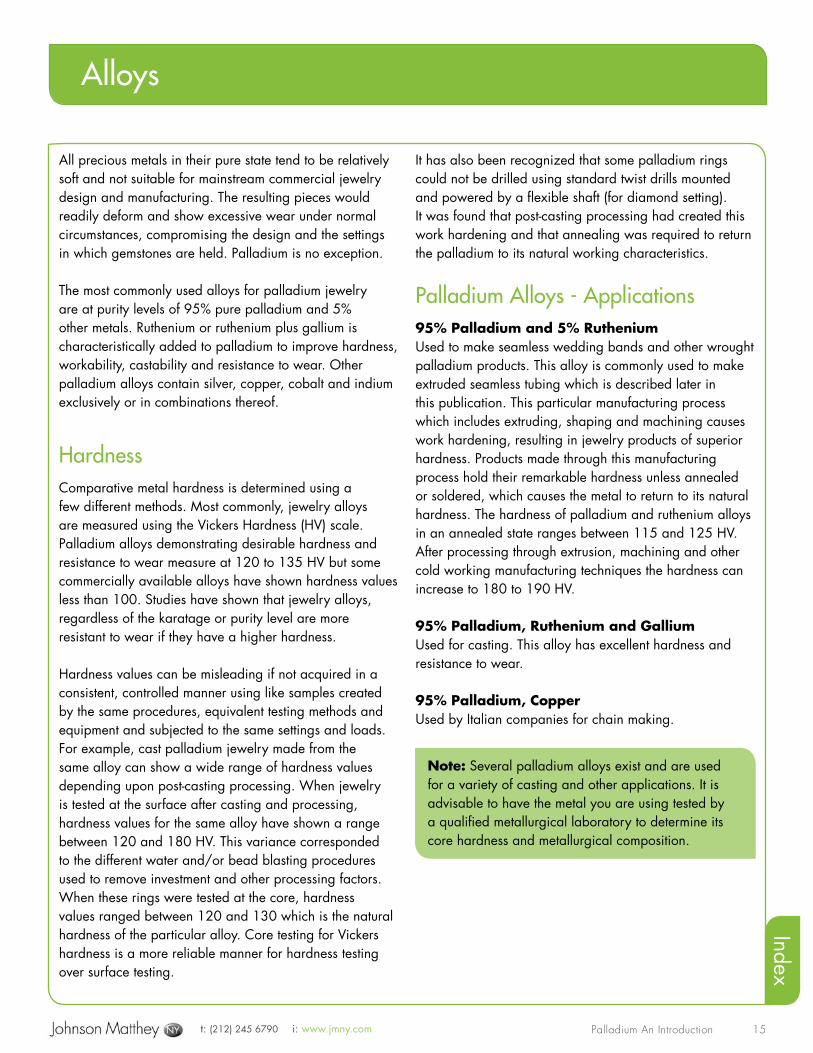
Palladium provides a stunning white backdrop for diamond and colored stone pieces. The whiteness of palladium clearly enhances the beauty of the diamonds, but it also played a major role in the concept of this design—the color of the gemstone is reflected back into the stone from the dramatic whiteness of the metal.
Palladium offers superb malleability for setting multiple gemstones. With its combined strength, hardness and durability it is a very desirable metal in designs for everyday wear.
Jewelry by Thomas Dailing, Image by Azad Photo
Jewelry and Image by Elichai Fowler, Paradise Ring Works
Jewelry by Thomas Dailing, Image by Azad Photo
t: (212) 245 6790 i: www.jmny.com Palladium An Introduction
Index
14
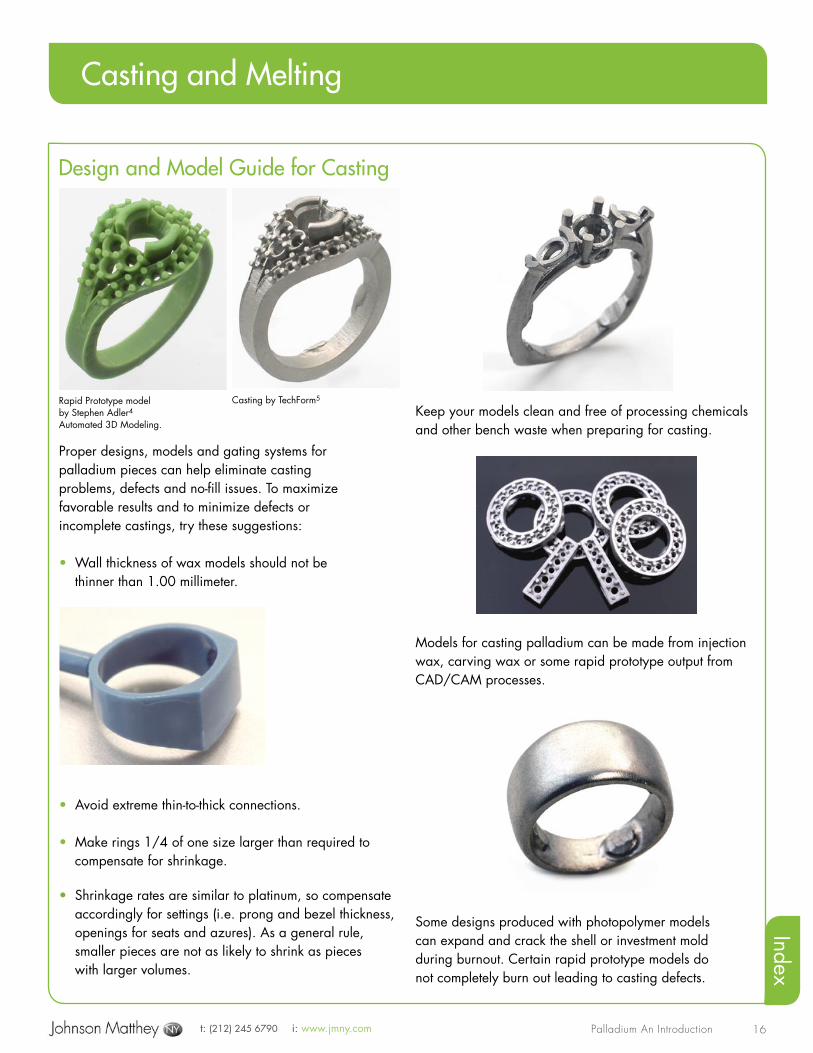
Palladium’s affordable pricing pooled with its light density opens up fashion jewelry options. These hand fabricated drop earrings were cold worked and the fluid form presents a dramatic effect. They create a large look, yet are comfortably light for everyday wear.
Textures, distinct engraved patterns and bright finishes are all possible with palladium. This band exhibits a hand engraved floral pattern which covers the surface, accented by flush (burnish) set diamonds and a high polished shank, forming stunning contrasts in the use of the metal.
t: (212) 245 6790 i: www.jmny.com Palladium An Introduction
Index
15
All precious metals in their pure state tend to be relatively soft and not suitable for mainstream commercial jewelry design and manufacturing. The resulting pieces would readily deform and show excessive wear under normal circumstances, compromising the design and the settings in which gemstones are held. Palladium is no exception.
The most commonly used alloys for palladium jewelry are at purity levels of 95% pure palladium and 5% other metals. Ruthenium or ruthenium plus gallium is characteristically added to palladium to improve hardness, workability, castability and resistance to wear. Other palladium alloys contain silver, copper, cobalt and indium exclusively or in combinations thereof.
HardnessComparative metal hardness is determined using a few different methods. Most commonly, jewelry alloys are measured using the Vickers Hardness (HV) scale. Palladium alloys demonstrating desirable hardness and resistance to wear measure at 120 to 135 HV but some commercially available alloys have shown hardness values less than 100. Studies have shown that jewelry alloys, regardless of the karatage or purity level are more resistant to wear if they have a higher hardness.
Hardness values can be misleading if not acquired in a consistent, controlled manner using like samples created by the same procedures, equivalent testing methods and equipment and subjected to the same settings and loads. For example, cast palladium jewelry made from the same alloy can show a wide range of hardness values depending upon post-casting processing. When jewelry is tested at the surface after casting and processing, hardness values for the same alloy have shown a range between 120 and 180 HV. This variance corresponded to the different water and/or bead blasting procedures used to remove investment and other processing factors. When these rings were tested at the core, hardness values ranged between 120 and 130 which is the natural hardness of the particular alloy. Core testing for Vickers hardness is a more reliable manner for hardness testing over surface testing.
It has also been recognized that some palladium rings could not be drilled using standard twist drills mounted and powered by a flexible shaft (for diamond setting). It was found that post-casting processing had created this work hardening and that annealing was required to return the palladium to its natural working characteristics.
Palladium Alloys - Applications95% Palladium and 5% Ruthenium Used to make seamless wedding bands and other wrought palladium products. This alloy is commonly used to make extruded seamless tubing which is described later in this publication. This particular manufacturing process which includes extruding, shaping and machining causes work hardening, resulting in jewelry products of superior hardness. Products made through this manufacturing process hold their remarkable hardness unless annealed or soldered, which causes the metal to return to its natural hardness. The hardness of palladium and ruthenium alloys in an annealed state ranges between 115 and 125 HV. After processing through extrusion, machining and other cold working manufacturing techniques the hardness can increase to 180 to 190 HV.
95% Palladium, Ruthenium and Gallium Used for casting. This alloy has excellent hardness and resistance to wear.
95% Palladium, Copper Used by Italian companies for chain making.
Alloys
Note: Several palladium alloys exist and are used for a variety of casting and other applications. It is advisable to have the metal you are using tested by a qualified metallurgical laboratory to determine its core hardness and metallurgical composition.
t: (212) 245 6790 i: www.jmny.com Palladium An Introduction
Index
16
Casting and Melting
Design and Model Guide for Casting
Proper designs, models and gating systems for palladium pieces can help eliminate casting problems, defects and no-fill issues. To maximize favorable results and to minimize defects or incomplete castings, try these suggestions:
• Wall thickness of wax models should not be thinner than 1.00 millimeter.
• Avoid extreme thin-to-thick connections.
• Make rings 1/4 of one size larger than required to compensate for shrinkage.
• Shrinkage rates are similar to platinum, so compensate accordingly for settings (i.e. prong and bezel thickness, openings for seats and azures). As a general rule, smaller pieces are not as likely to shrink as pieces with larger volumes.
Keep your models clean and free of processing chemicals and other bench waste when preparing for casting.
Models for casting palladium can be made from injection wax, carving wax or some rapid prototype output from CAD/CAM processes.
Some designs produced with photopolymer models can expand and crack the shell or investment mold during burnout. Certain rapid prototype models do not completely burn out leading to casting defects.
Rapid Prototype model by Stephen Adler4Automated 3D Modeling.
Casting by TechForm5
t: (212) 245 6790 i: www.jmny.com Palladium An Introduction
Index
17
Palladium CastingGeneral Casting Parameters for 950 Palladium AlloysThe parameters listed for casting palladium are applicable to jewelry articles of average weight, with uniform wall thickness, sprued on small trees (100 to 200 grams) and employing specialized induction equipment. Specific adjustments must be made in consideration to conditions, materials used, volume of metal, design characteristics, size and quantity of pieces and other factors when casting outside this control range.
950 Palladium Density or Specific Gravity: 11.8.
Melting Range: 2,460° to 2,915° F (1350 to 1600° C) - Note: Temperatures differ according to the specific alloys processing conditions and equipment.)
Melting Method: Induction.
Melt Time: About 40 seconds.
Hold Time after Complete Melting: 7 to 9 seconds.
Flask temperature range: 1,200° to 1,750° F (650° to 950° C) - Note: Temperatures will differ according to tree design, individual pattern weight and equipment used.
Investment type: Phosphate bonded.
Crucible type: Carbon-free. Continued reliable results have been acquired when crucibles are preheated to 750° to 1125° F (400 to 650° C).
Atmosphere and cover gas: Partial removal of atmosphere with vacuum pressure in a sealed casting chamber and backfilling with an inert gas such as Argon.
Gating and Spruing: Shorter, heavier sprues attached at the heaviest cross section of the pattern or multiple sprues for patterns with thin-to-thick variations in wall thickness.
Metal Preparation: Small, uniformly cut palladium alloy pieces.
Recycled Material: Maximum of 50% which has been thoroughly cleaned and cut to uniform size.
De-investing: High pressure water.
General Notes:
When molten, palladium absorbs excessive amounts of oxygen and hydrogen and has a tendency to decompose refractory materials such as crucibles and less stable investment. Palladium attempts to give off absorbed oxygen and hydrogen when solidifying so careful attention to gating, spruing and other casting conditions is required.
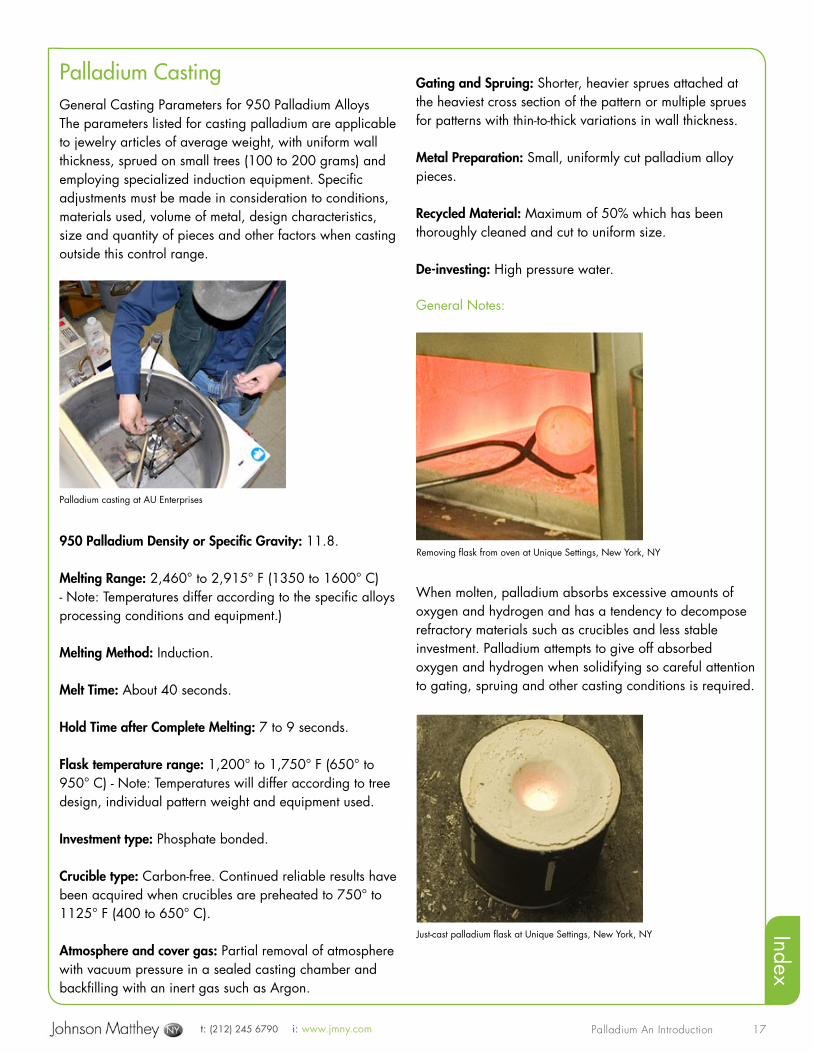
Palladium casting at AU Enterprises
Removing flask from oven at Unique Settings, New York, NY
Just-cast palladium flask at Unique Settings, New York, NY
t: (212) 245 6790 i: www.jmny.com Palladium An Introduction
Index
18
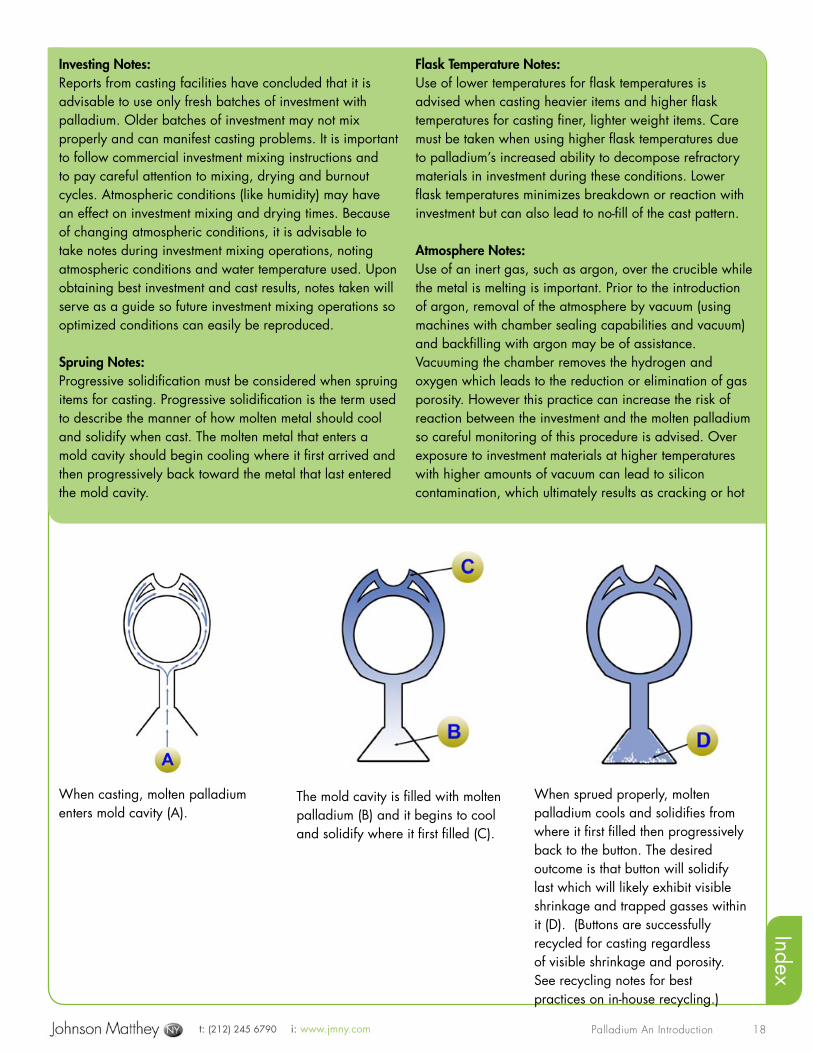
When casting, molten palladium enters mold cavity (A).
The mold cavity is filled with molten palladium (B) and it begins to cool and solidify where it first filled (C).
When sprued properly, molten palladium cools and solidifies from where it first filled then progressively back to the button. The desired outcome is that button will solidify last which will likely exhibit visible shrinkage and trapped gasses within it (D). (Buttons are successfully recycled for casting regardless of visible shrinkage and porosity. See recycling notes for best practices on in-house recycling.)
Investing Notes:Reports from casting facilities have concluded that it is advisable to use only fresh batches of investment with palladium. Older batches of investment may not mix properly and can manifest casting problems. It is important to follow commercial investment mixing instructions and to pay careful attention to mixing, drying and burnout cycles. Atmospheric conditions (like humidity) may have an effect on investment mixing and drying times. Because of changing atmospheric conditions, it is advisable to take notes during investment mixing operations, noting atmospheric conditions and water temperature used. Upon obtaining best investment and cast results, notes taken will serve as a guide so future investment mixing operations so optimized conditions can easily be reproduced.
Spruing Notes:Progressive solidification must be considered when spruing items for casting. Progressive solidification is the term used to describe the manner of how molten metal should cool and solidify when cast. The molten metal that enters a mold cavity should begin cooling where it first arrived and then progressively back toward the metal that last entered the mold cavity.
Flask Temperature Notes:Use of lower temperatures for flask temperatures is advised when casting heavier items and higher flask temperatures for casting finer, lighter weight items. Care must be taken when using higher flask temperatures due to palladium’s increased ability to decompose refractory materials in investment during these conditions. Lower flask temperatures minimizes breakdown or reaction with investment but can also lead to no-fill of the cast pattern.
Atmosphere Notes:Use of an inert gas, such as argon, over the crucible while the metal is melting is important. Prior to the introduction of argon, removal of the atmosphere by vacuum (using machines with chamber sealing capabilities and vacuum) and backfilling with argon may be of assistance. Vacuuming the chamber removes the hydrogen and oxygen which leads to the reduction or elimination of gas porosity. However this practice can increase the risk of reaction between the investment and the molten palladium so careful monitoring of this procedure is advised. Over exposure to investment materials at higher temperatures with higher amounts of vacuum can lead to silicon contamination, which ultimately results as cracking or hot
t: (212) 245 6790 i: www.jmny.com Palladium An Introduction
Index
19
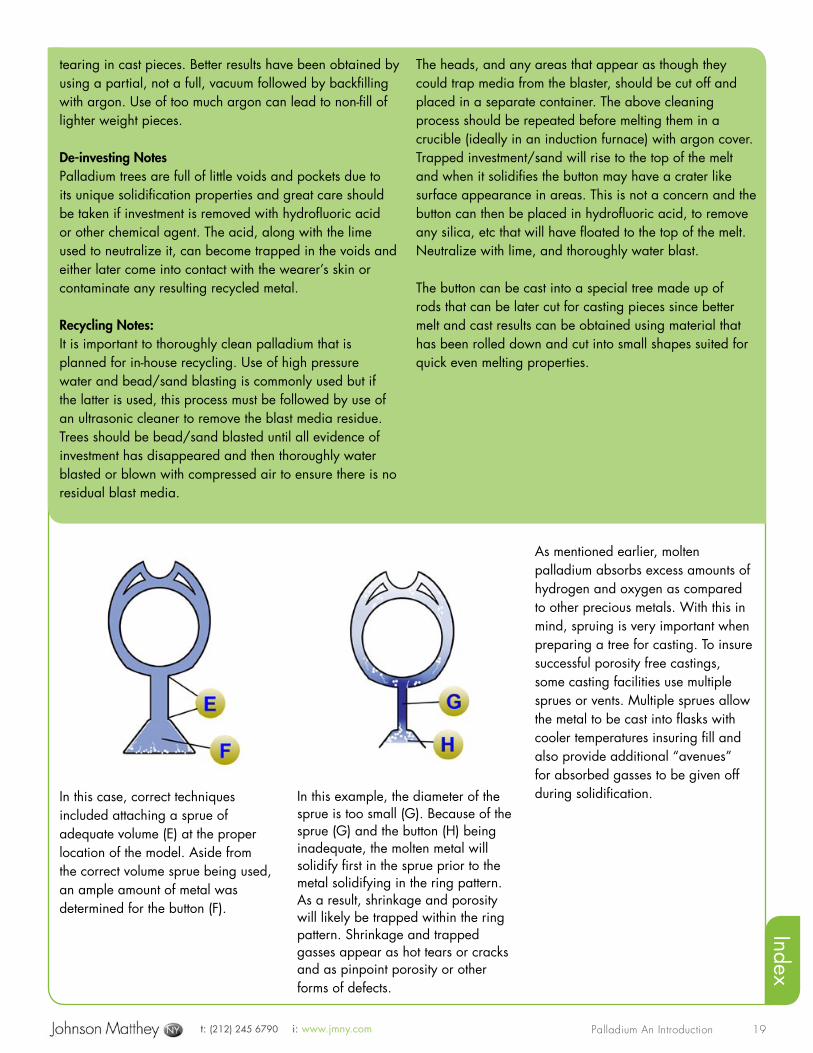
In this case, correct techniques included attaching a sprue of adequate volume (E) at the proper location of the model. Aside from the correct volume sprue being used, an ample amount of metal was determined for the button (F).
In this example, the diameter of the sprue is too small (G). Because of the sprue (G) and the button (H) being inadequate, the molten metal will solidify first in the sprue prior to the metal solidifying in the ring pattern. As a result, shrinkage and porosity will likely be trapped within the ring pattern. Shrinkage and trapped gasses appear as hot tears or cracks and as pinpoint porosity or other forms of defects.
As mentioned earlier, molten palladium absorbs excess amounts of hydrogen and oxygen as compared to other precious metals. With this in mind, spruing is very important when preparing a tree for casting. To insure successful porosity free castings, some casting facilities use multiple sprues or vents. Multiple sprues allow the metal to be cast into flasks with cooler temperatures insuring fill and also provide additional “avenues” for absorbed gasses to be given off during solidification.
tearing in cast pieces. Better results have been obtained by using a partial, not a full, vacuum followed by backfilling with argon. Use of too much argon can lead to non-fill of lighter weight pieces.
De-investing NotesPalladium trees are full of little voids and pockets due to its unique solidification properties and great care should be taken if investment is removed with hydrofluoric acid or other chemical agent. The acid, along with the lime used to neutralize it, can become trapped in the voids and either later come into contact with the wearer’s skin or contaminate any resulting recycled metal.
Recycling Notes:It is important to thoroughly clean palladium that is planned for in-house recycling. Use of high pressure water and bead/sand blasting is commonly used but if the latter is used, this process must be followed by use of an ultrasonic cleaner to remove the blast media residue. Trees should be bead/sand blasted until all evidence of investment has disappeared and then thoroughly water blasted or blown with compressed air to ensure there is no residual blast media.
The heads, and any areas that appear as though they could trap media from the blaster, should be cut off and placed in a separate container. The above cleaning process should be repeated before melting them in a crucible (ideally in an induction furnace) with argon cover. Trapped investment/sand will rise to the top of the melt and when it solidifies the button may have a crater like surface appearance in areas. This is not a concern and the button can then be placed in hydrofluoric acid, to remove any silica, etc that will have floated to the top of the melt. Neutralize with lime, and thoroughly water blast.
The button can be cast into a special tree made up of rods that can be later cut for casting pieces since better melt and cast results can be obtained using material that has been rolled down and cut into small shapes suited for quick even melting properties.
t: (212) 245 6790 i: www.jmny.com Palladium An Introduction
Index
20
Gates and the Investment ProceduresShell casting palladium has been used with considerable success5. After the models are assembled on the tree, the tree is coated with a ceramic shell. When it is dry, investment is poured around the coated tree.
A technician is preparing injection wax models for casting in palladium by building up the gates. Ideally, the diameter of the gate should be slightly larger than the cross section of the largest portion of the item being cast to aid in eliminating shrinkage porosity. Placement of the gate should be directly on the heaviest section. For optimal results, each gating system should be engineered by the piece. Some palladium pieces have been cast more successfully using a multiple gating system.
The next step in the process is to build a tree (if casting multiple pieces). One at a time, pieces are strategically attached to the tree system. Because palladium is lighter by volume as compared to platinum, more pieces can be attached without causing damage to the investment mold during the casting process. (The lower density reduces the force with which the metal enters the mold.)
With the tree built, the next step in shell casting is to apply a ceramic shell coating. This image shows the
ceramic shell over a wax model that’s attached to a tree for casting. Several layers of the shell material are built up through a dipping process prior to investing.
A phosphate-based investment is used for palladium and platinum casting, different from the gypsum-based investment used when casting karat gold and sterling. Investing is completed in a room with a highly controlled environment. The humidity is kept at an even level and the temperature of the deionized water used to mix the investment is monitored. After mixing, the investment is poured over the top of the shell-coated tree and into the flask. Invested flasks stand for 3 hours prior to being placed in the oven for the burnout process.
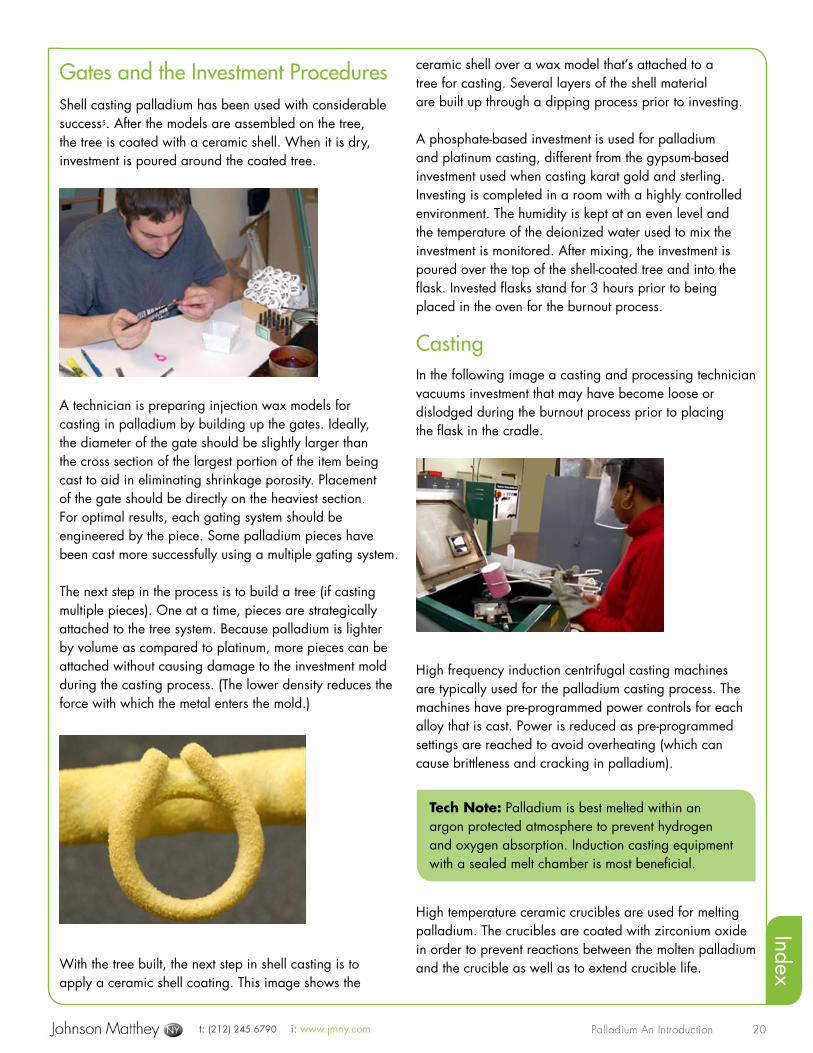
CastingIn the following image a casting and processing technician vacuums investment that may have become loose or dislodged during the burnout process prior to placing the flask in the cradle.
High frequency induction centrifugal casting machines are typically used for the palladium casting process. The machines have pre-programmed power controls for each alloy that is cast. Power is reduced as pre-programmed settings are reached to avoid overheating (which can cause brittleness and cracking in palladium).
High temperature ceramic crucibles are used for melting palladium. The crucibles are coated with zirconium oxide in order to prevent reactions between the molten palladium and the crucible as well as to extend crucible life.
Tech Note: Palladium is best melted within an argon protected atmosphere to prevent hydrogen and oxygen absorption. Induction casting equipment with a sealed melt chamber is most beneficial.
t: (212) 245 6790 i: www.jmny.com Palladium An Introduction
Index
21
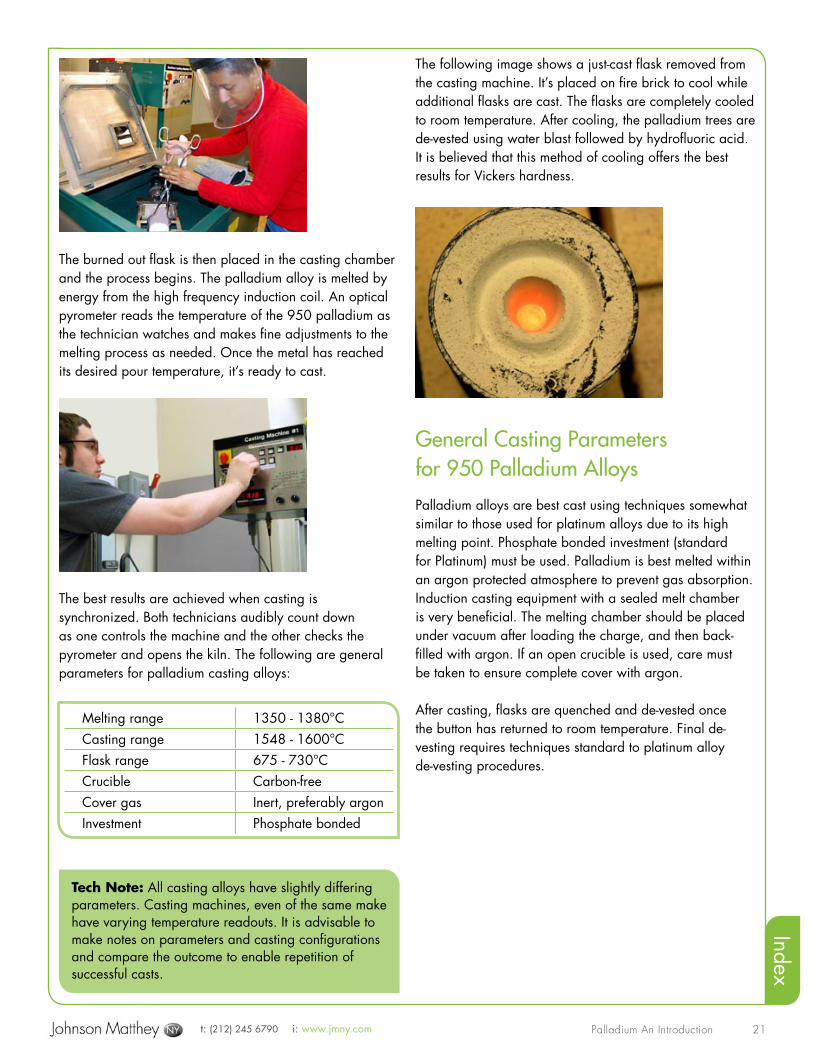
The burned out flask is then placed in the casting chamber and the process begins. The palladium alloy is melted by energy from the high frequency induction coil. An optical pyrometer reads the temperature of the 950 palladium as the technician watches and makes fine adjustments to the melting process as needed. Once the metal has reached its desired pour temperature, it’s ready to cast.
The best results are achieved when casting is synchronized. Both technicians audibly count down as one controls the machine and the other checks the pyrometer and opens the kiln. The following are general parameters for palladium casting alloys:
The following image shows a just-cast flask removed from the casting machine. It’s placed on fire brick to cool while additional flasks are cast. The flasks are completely cooled to room temperature. After cooling, the palladium trees are de-vested using water blast followed by hydrofluoric acid. It is believed that this method of cooling offers the best results for Vickers hardness.
General Casting Parameters for 950 Palladium AlloysPalladium alloys are best cast using techniques somewhat similar to those used for platinum alloys due to its high melting point. Phosphate bonded investment (standard for Platinum) must be used. Palladium is best melted within an argon protected atmosphere to prevent gas absorption. Induction casting equipment with a sealed melt chamber is very beneficial. The melting chamber should be placed under vacuum after loading the charge, and then back-filled with argon. If an open crucible is used, care must be taken to ensure complete cover with argon.
After casting, flasks are quenched and de-vested once the button has returned to room temperature. Final de-vesting requires techniques standard to platinum alloy de-vesting procedures.
Melting range 1350 - 1380°CCasting range 1548 - 1600°CFlask range 675 - 730°CCrucible Carbon-freeCover gas Inert, preferably argonInvestment Phosphate bonded
Tech Note: All casting alloys have slightly differing parameters. Casting machines, even of the same make have varying temperature readouts. It is advisable to make notes on parameters and casting configurations and compare the outcome to enable repetition of successful casts.
t: (212) 245 6790 i: www.jmny.com Palladium An Introduction
Index
22
Torch Casting of Palladium
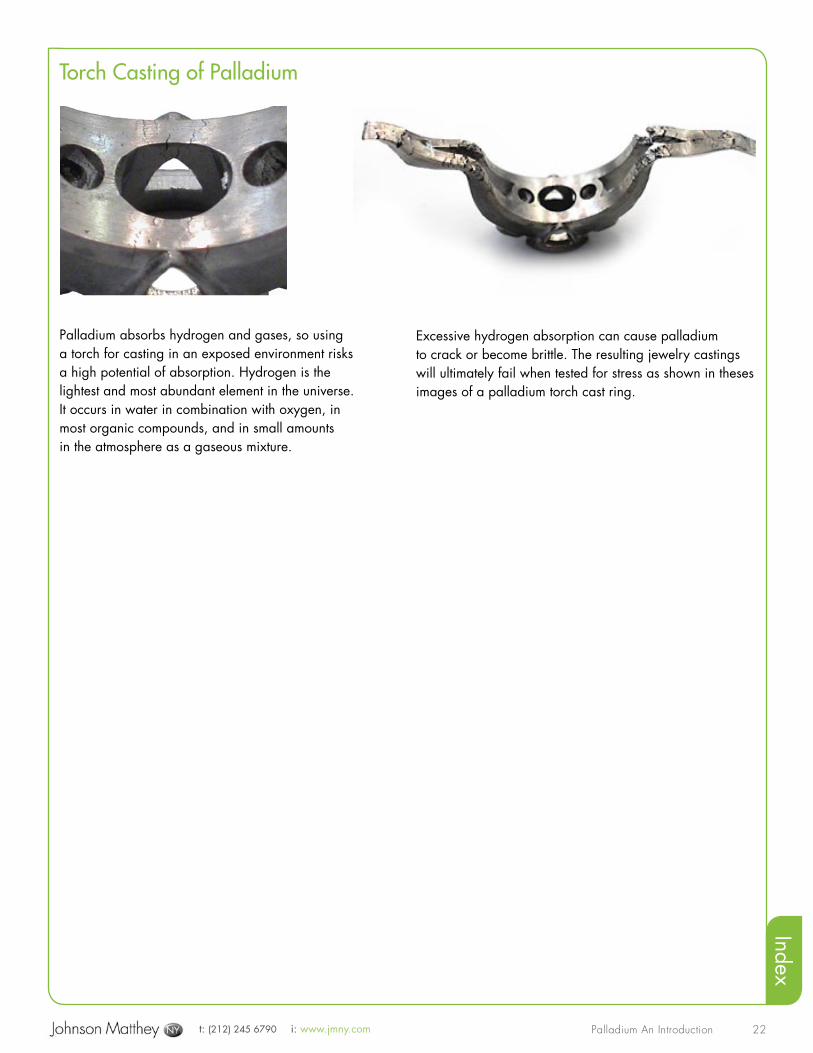
Palladium absorbs hydrogen and gases, so using a torch for casting in an exposed environment risks a high potential of absorption. Hydrogen is the lightest and most abundant element in the universe. It occurs in water in combination with oxygen, in most organic compounds, and in small amounts in the atmosphere as a gaseous mixture.
Excessive hydrogen absorption can cause palladium to crack or become brittle. The resulting jewelry castings will ultimately fail when tested for stress as shown in theses images of a palladium torch cast ring.
t: (212) 245 6790 i: www.jmny.com Palladium An Introduction
Index
23
Handworking
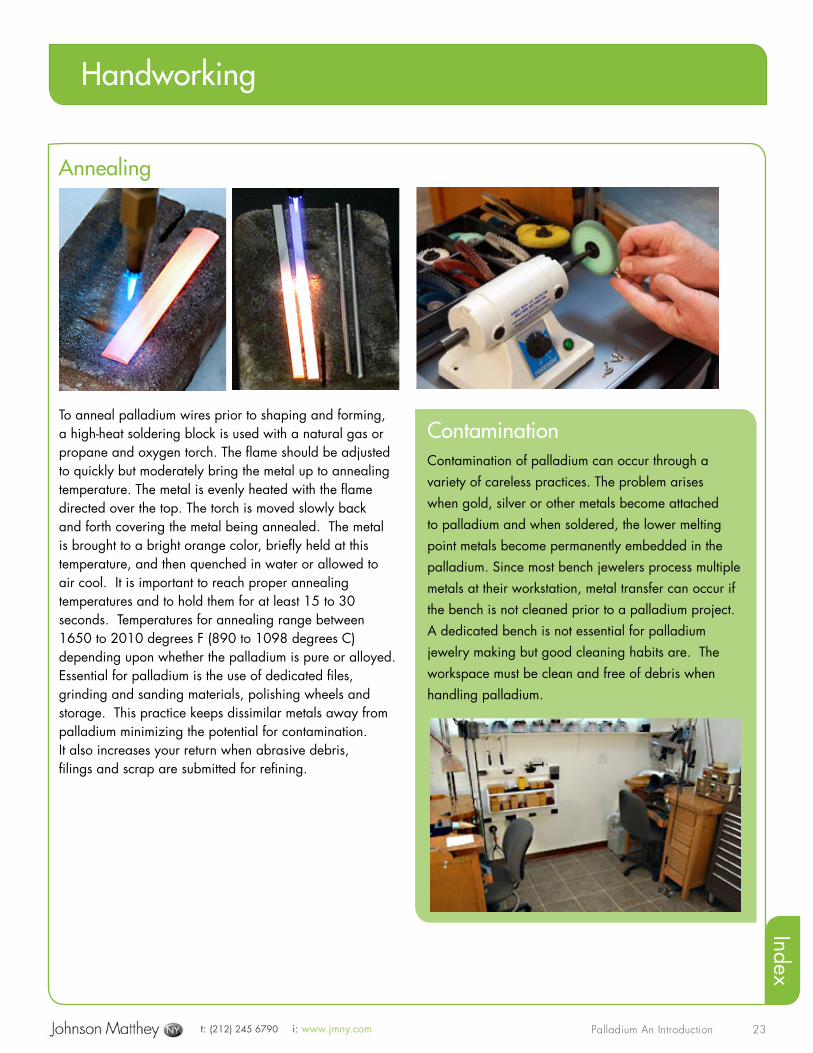
To anneal palladium wires prior to shaping and forming, a high-heat soldering block is used with a natural gas or propane and oxygen torch. The flame should be adjusted to quickly but moderately bring the metal up to annealing temperature. The metal is evenly heated with the flame directed over the top. The torch is moved slowly back and forth covering the metal being annealed. The metal is brought to a bright orange color, briefly held at this temperature, and then quenched in water or allowed to air cool. It is important to reach proper annealing temperatures and to hold them for at least 15 to 30 seconds. Temperatures for annealing range between 1650 to 2010 degrees F (890 to 1098 degrees C) depending upon whether the palladium is pure or alloyed.Essential for palladium is the use of dedicated files, grinding and sanding materials, polishing wheels and storage. This practice keeps dissimilar metals away from palladium minimizing the potential for contamination. It also increases your return when abrasive debris, filings and scrap are submitted for refining.
ContaminationContamination of palladium can occur through a variety of careless practices. The problem arises when gold, silver or other metals become attached to palladium and when soldered, the lower melting point metals become permanently embedded in the palladium. Since most bench jewelers process multiple metals at their workstation, metal transfer can occur if the bench is not cleaned prior to a palladium project. A dedicated bench is not essential for palladium jewelry making but good cleaning habits are. The workspace must be clean and free of debris when handling palladium.
Annealing
t: (212) 245 6790 i: www.jmny.com Palladium An Introduction
Index
24
Forging, Shaping and FormingThe hand fabrication project that follows serves to illustrate the desirable forging, shaping and forming capabilities of palladium.
This project provides an example for procedures used to hand fabricate palladium earrings. Palladium wire materials used in this project include:
• 3x1 rectangular wire• 14 gauge round wire• 18 gauge round wire• 24 gauge sheet• Easy, medium and hard palladium solder
These custom designed earrings feature cultured Mabé pearls and pink sapphires set into hand formed and fabricated palladium.
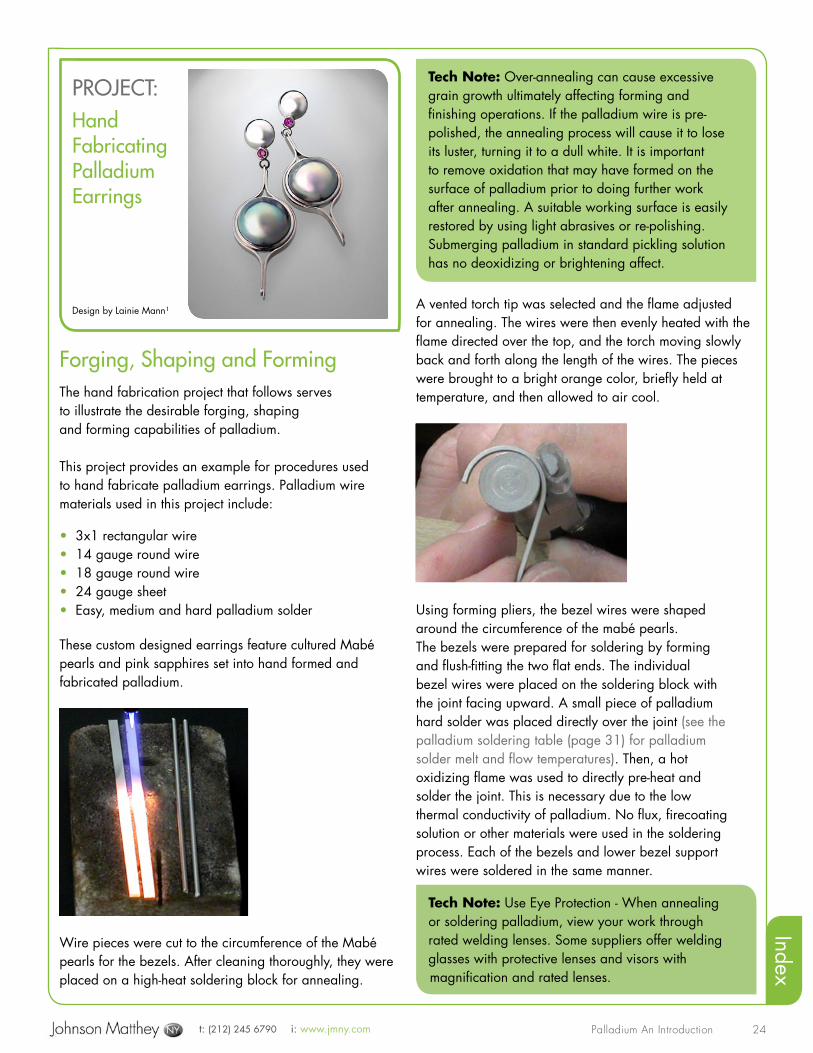
Wire pieces were cut to the circumference of the Mabé pearls for the bezels. After cleaning thoroughly, they were placed on a high-heat soldering block for annealing.
A vented torch tip was selected and the flame adjusted for annealing. The wires were then evenly heated with the flame directed over the top, and the torch moving slowly back and forth along the length of the wires. The pieces were brought to a bright orange color, briefly held at temperature, and then allowed to air cool.
Using forming pliers, the bezel wires were shaped around the circumference of the mabé pearls. The bezels were prepared for soldering by forming and flush-fitting the two flat ends. The individual bezel wires were placed on the soldering block with the joint facing upward. A small piece of palladium hard solder was placed directly over the joint (see the palladium soldering table (page 31) for palladium solder melt and flow temperatures). Then, a hot oxidizing flame was used to directly pre-heat and solder the joint. This is necessary due to the low thermal conductivity of palladium. No flux, firecoating solution or other materials were used in the soldering process. Each of the bezels and lower bezel support wires were soldered in the same manner.
Tech Note: Over-annealing can cause excessive grain growth ultimately affecting forming and finishing operations. If the palladium wire is pre-polished, the annealing process will cause it to lose its luster, turning it to a dull white. It is important to remove oxidation that may have formed on the surface of palladium prior to doing further work after annealing. A suitable working surface is easily restored by using light abrasives or re-polishing. Submerging palladium in standard pickling solution has no deoxidizing or brightening affect.
Tech Note: Use Eye Protection - When annealing or soldering palladium, view your work through rated welding lenses. Some suppliers offer welding glasses with protective lenses and visors with magnification and rated lenses.
PROJECT: Hand Fabricating Palladium Earrings
Design by Lainie Mann¹
t: (212) 245 6790 i: www.jmny.com Palladium An Introduction
Index
25
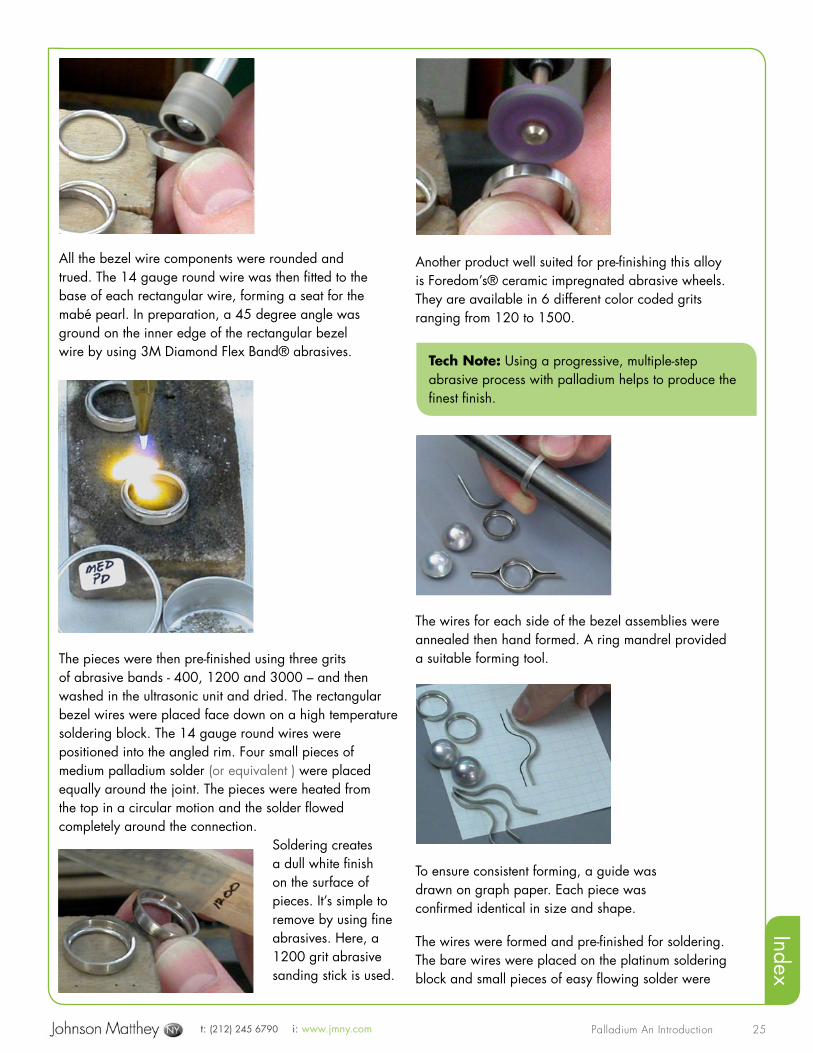
All the bezel wire components were rounded and trued. The 14 gauge round wire was then fitted to the base of each rectangular wire, forming a seat for the mabé pearl. In preparation, a 45 degree angle was ground on the inner edge of the rectangular bezel wire by using 3M Diamond Flex Band® abrasives.
The pieces were then pre-finished using three grits of abrasive bands - 400, 1200 and 3000 – and then washed in the ultrasonic unit and dried. The rectangular bezel wires were placed face down on a high temperature soldering block. The 14 gauge round wires were positioned into the angled rim. Four small pieces of medium palladium solder (or equivalent ) were placed equally around the joint. The pieces were heated from the top in a circular motion and the solder flowed completely around the connection.
Soldering creates a dull white finish on the surface of pieces. It’s simple to remove by using fine abrasives. Here, a 1200 grit abrasive sanding stick is used.
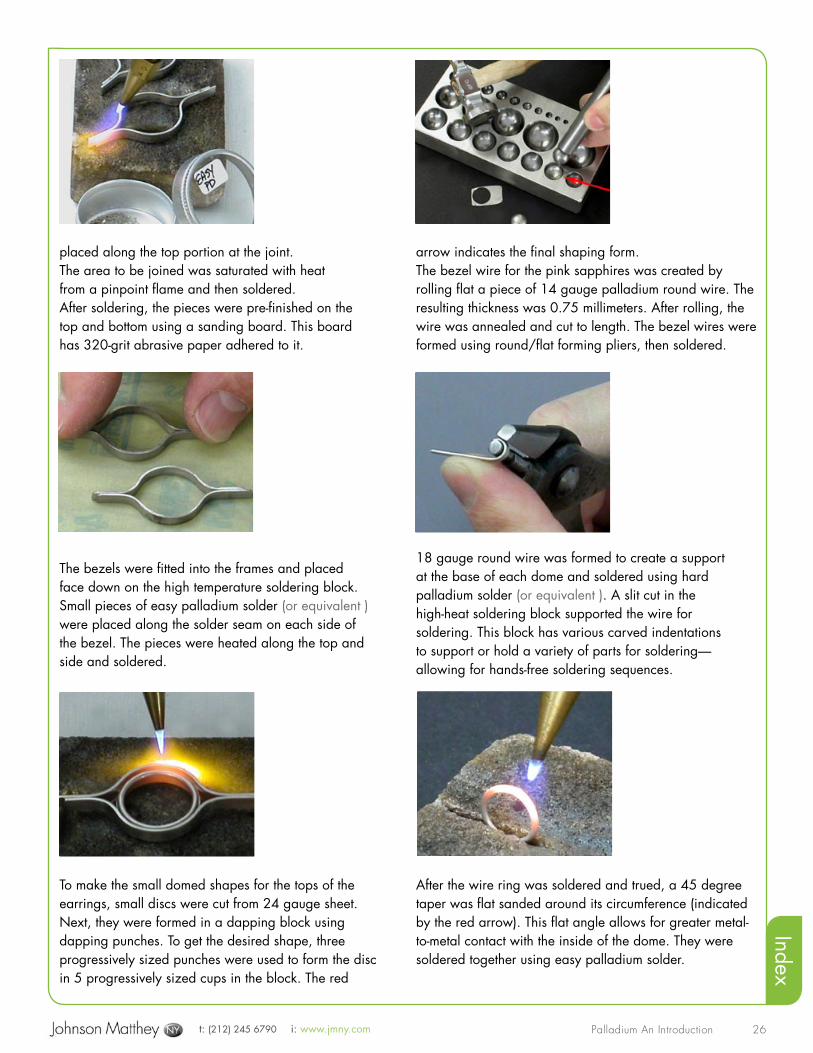
Another product well suited for pre-finishing this alloy is Foredom’s® ceramic impregnated abrasive wheels. They are available in 6 different color coded grits ranging from 120 to 1500.
The wires for each side of the bezel assemblies were annealed then hand formed. A ring mandrel provided a suitable forming tool.
To ensure consistent forming, a guide was drawn on graph paper. Each piece was confirmed identical in size and shape.
The wires were formed and pre-finished for soldering. The bare wires were placed on the platinum soldering block and small pieces of easy flowing solder were
Tech Note: Using a progressive, multiple-step abrasive process with palladium helps to produce the finest finish.
t: (212) 245 6790 i: www.jmny.com Palladium An Introduction
Index
26
placed along the top portion at the joint.The area to be joined was saturated with heat from a pinpoint flame and then soldered. After soldering, the pieces were pre-finished on the top and bottom using a sanding board. This board has 320-grit abrasive paper adhered to it.
The bezels were fitted into the frames and placed face down on the high temperature soldering block. Small pieces of easy palladium solder (or equivalent ) were placed along the solder seam on each side of the bezel. The pieces were heated along the top and side and soldered.
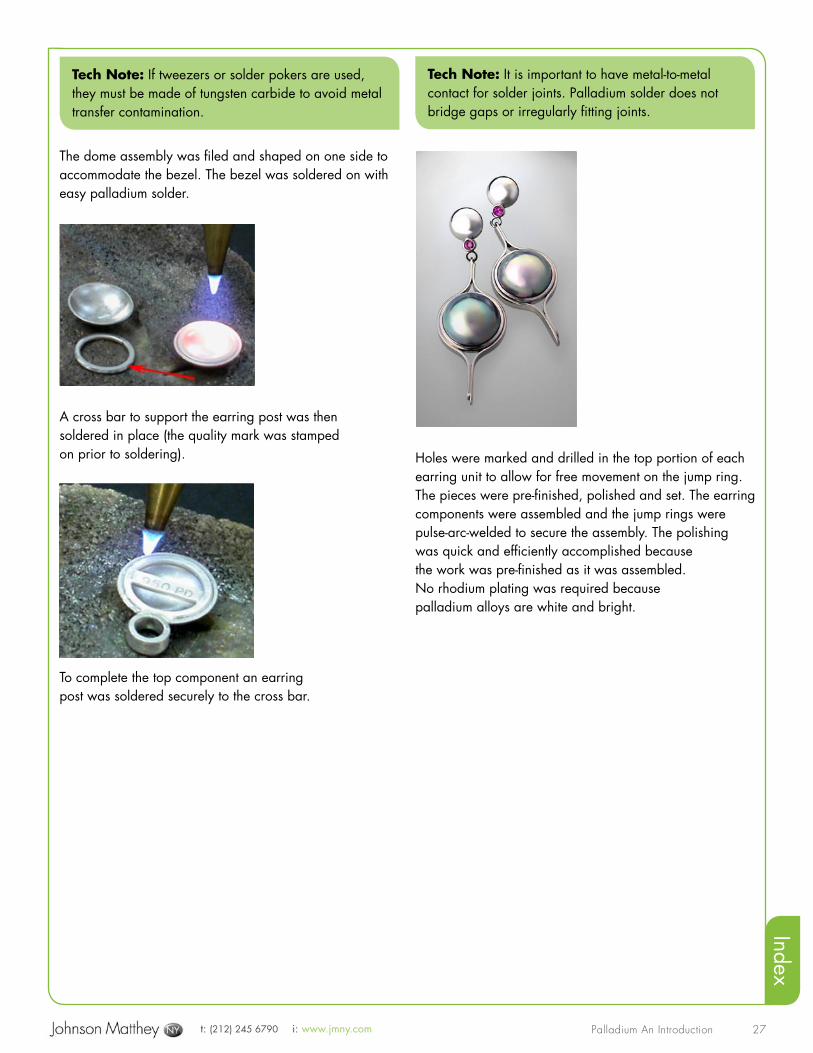
To make the small domed shapes for the tops of the earrings, small discs were cut from 24 gauge sheet. Next, they were formed in a dapping block using dapping punches. To get the desired shape, three progressively sized punches were used to form the disc in 5 progressively sized cups in the block. The red
arrow indicates the final shaping form.The bezel wire for the pink sapphires was created by rolling flat a piece of 14 gauge palladium round wire. The resulting thickness was 0.75 millimeters. After rolling, the wire was annealed and cut to length. The bezel wires were formed using round/flat forming pliers, then soldered.
18 gauge round wire was formed to create a support at the base of each dome and soldered using hard palladium solder (or equivalent ). A slit cut in the high-heat soldering block supported the wire for soldering. This block has various carved indentations to support or hold a variety of parts for soldering—allowing for hands-free soldering sequences.
After the wire ring was soldered and trued, a 45 degree taper was flat sanded around its circumference (indicated by the red arrow). This flat angle allows for greater metal-to-metal contact with the inside of the dome. They were soldered together using easy palladium solder.
t: (212) 245 6790 i: www.jmny.com Palladium An Introduction
Index
27
The dome assembly was filed and shaped on one side to accommodate the bezel. The bezel was soldered on with easy palladium solder.
A cross bar to support the earring post was then soldered in place (the quality mark was stamped on prior to soldering).
To complete the top component an earring post was soldered securely to the cross bar.
Holes were marked and drilled in the top portion of each earring unit to allow for free movement on the jump ring. The pieces were pre-finished, polished and set. The earring components were assembled and the jump rings were pulse-arc-welded to secure the assembly. The polishing was quick and efficiently accomplished because the work was pre-finished as it was assembled. No rhodium plating was required because palladium alloys are white and bright.
Tech Note: If tweezers or solder pokers are used, they must be made of tungsten carbide to avoid metal transfer contamination.
Tech Note: It is important to have metal-to-metal contact for solder joints. Palladium solder does not bridge gaps or irregularly fitting joints.

t: (212) 245 6790 i: www.jmny.com Palladium An Introduction
Index
28
Cutting and Filing
This file has a build-up of palladium particles and needs cleaning. If not cleaned, the larger particles could create divots or trails in the surface of the piece being filed. Use a standard file cleaner to remove built up debris. To minimize build-up and to increase the life of the file, apply a thin coating of oil of wintergreen on the file surface and use less force when filing.
A jeweler’s saw with standard blades (2/0, 4/0 and 8/0) is used for hand-sawing palladium. Beeswax is used to lubricate the saw blades.
Hand Engraving
While hand engraving is an art unto itself, graver work in some form is used at every level in jewelry making, including:
• Preparation, bead raising, cleaning and bright cutting of pave, threadwork and bead setting.
• Prong setting (leveling seats, adjusting prongs for uneven pavilions, shaping prongs, cleaning).
• Flush, channel and bezel setting.
• Removing metal flashing after burring.
• Adding definition or cleaning after repair work.
• Cleaning castings.
The natural beauty of this palladium ring is enhanced with hand engraving of initials done in relief.
This palladium ring was cast5 with a heavy gate at the base of the ring shank. The finished rough casting after the gate was removed weighed 13.64 grams. The outside surfaces of the signet ring after finishing are dead flat and have high polish with crisp edges. To prepare the ring for engraving the ring was polished using a flat lap and platinum Tripoli. Then it was cleaned and another flat lap with white Bendick® rouge was used. For the final color and luster and the last step in the polishing process, a stitched muslin buff was used with 8000 grit Platinum white polishing compound – a process which also softened the edges.
Design by Novell11
t: (212) 245 6790 i: www.jmny.com Palladium An Introduction
Index
29
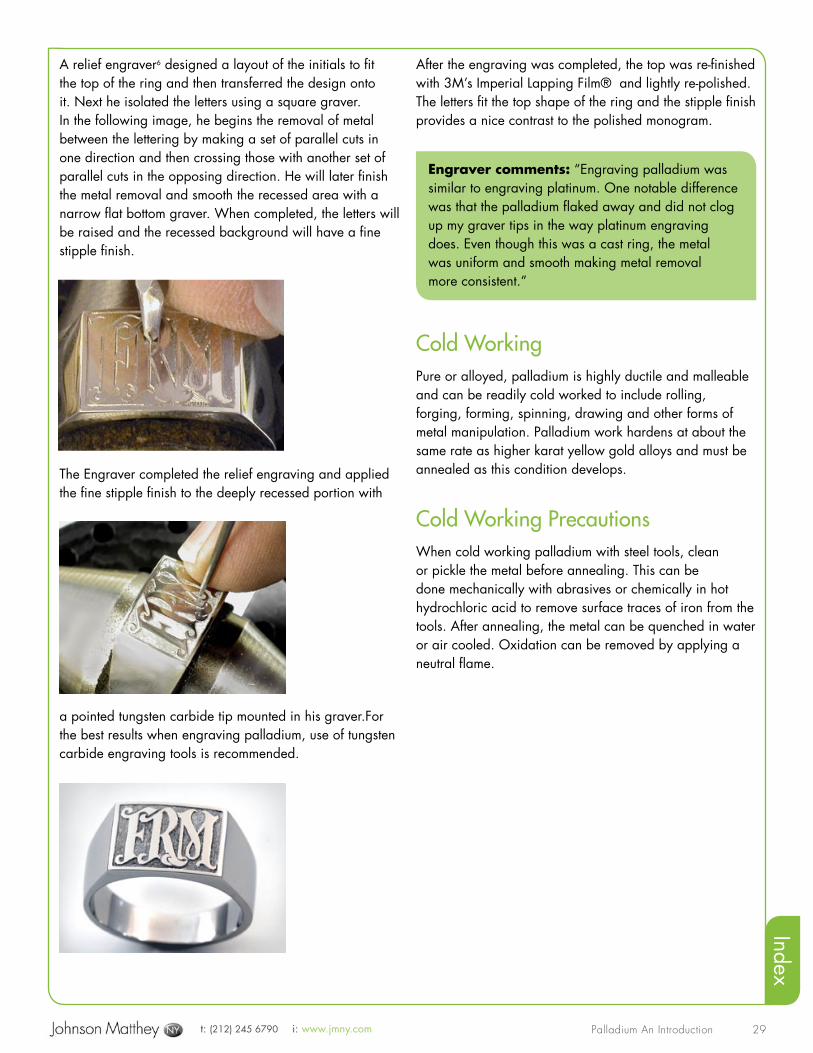
A relief engraver6 designed a layout of the initials to fit the top of the ring and then transferred the design onto it. Next he isolated the letters using a square graver. In the following image, he begins the removal of metal between the lettering by making a set of parallel cuts in one direction and then crossing those with another set of parallel cuts in the opposing direction. He will later finish the metal removal and smooth the recessed area with a narrow flat bottom graver. When completed, the letters will be raised and the recessed background will have a fine stipple finish.
The Engraver completed the relief engraving and applied the fine stipple finish to the deeply recessed portion with
a pointed tungsten carbide tip mounted in his graver.For the best results when engraving palladium, use of tungsten carbide engraving tools is recommended.
After the engraving was completed, the top was re-finished with 3M’s Imperial Lapping Film® and lightly re-polished. The letters fit the top shape of the ring and the stipple finish provides a nice contrast to the polished monogram.
Cold WorkingPure or alloyed, palladium is highly ductile and malleable and can be readily cold worked to include rolling, forging, forming, spinning, drawing and other forms of metal manipulation. Palladium work hardens at about the same rate as higher karat yellow gold alloys and must be annealed as this condition develops.
Cold Working PrecautionsWhen cold working palladium with steel tools, clean or pickle the metal before annealing. This can be done mechanically with abrasives or chemically in hot hydrochloric acid to remove surface traces of iron from the tools. After annealing, the metal can be quenched in water or air cooled. Oxidation can be removed by applying a neutral flame.
Engraver comments: “Engraving palladium was similar to engraving platinum. One notable difference was that the palladium flaked away and did not clog up my graver tips in the way platinum engraving does. Even though this was a cast ring, the metal was uniform and smooth making metal removal more consistent.”
t: (212) 245 6790 i: www.jmny.com Palladium An Introduction
Index
30
Soldering and Welding
Eye ProtectionThe temperatures required to melt and flow some palladium solders exceed 1250° C and melting temperatures of palladium alloys currently range between 1350 and 1380° C. The emanating white light at these temperatures is intense and hazardous to the unprotected eye. Even short exposures are certain to leave an after-image on the retina that will persist for several minutes and distort both positioning and color judgement. Longer exposures can cause permanent damage to the retina.
Eye protection is mandatory for soldering, welding and casting and requires a filter. Filters are known as welding lenses and they shield out the harmful white light. These lenses are rated and available in a variety of ratings. The lowest rating recommended for soldering is a No. 5 welding lens. A No. 5 lens will allow the operator to visualize more of the work and placement of parts during soldering operations. A No. 7 lens is better for prolonged periods of soldering and minimal casting. And, a No. 10 lens is recommended for casting or other intense palladium melting and handling situations. The No. 5, 7 and 10 rated lenses are available as lens plates, goggles and flip-up type head mounted eyewear. The No. 5 rated lens is also available in safety glasses. Individual lenses in all ratings are available and jewelers may find these most beneficial because they can be clamped to magnifiers or other optic enhancers worn for close up viewing of the work being accomplished.
Joining OverviewJoining palladium requires mechanical rivets, soldering or a form of welding. When soldering palladium using palladium or platinum solder, prolonged exposure to intense soldering heat can lead to brittleness of the alloy. Here are a few examples for palladium soldering and welding.
Torch Soldering and Service Work
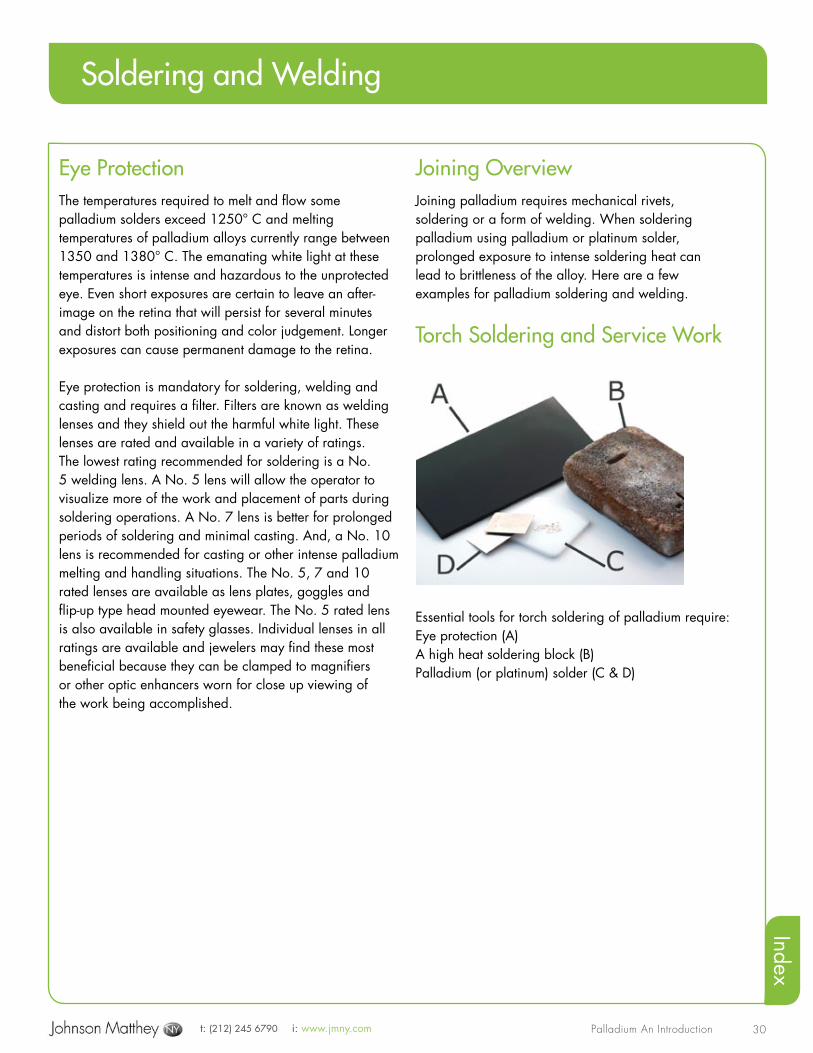
Essential tools for torch soldering of palladium require:Eye protection (A)A high heat soldering block (B)Palladium (or platinum) solder (C & D)
t: (212) 245 6790 i: www.jmny.com Palladium An Introduction
Index
31
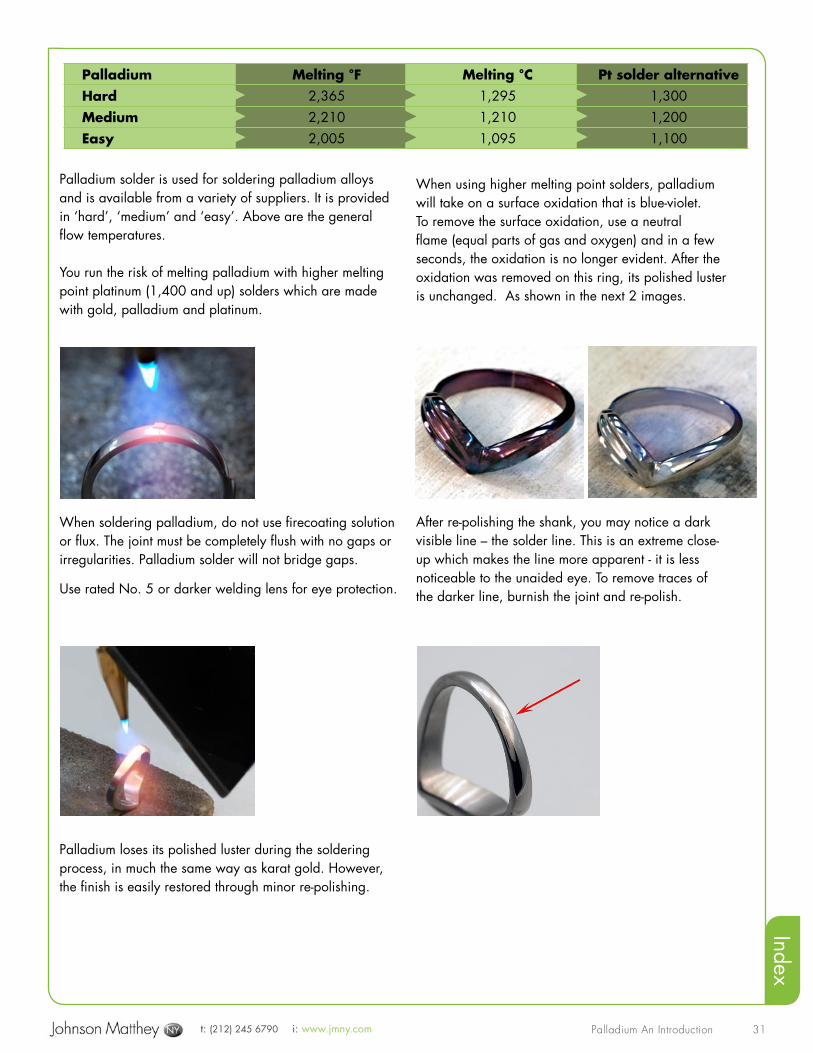
Palladium solder is used for soldering palladium alloys and is available from a variety of suppliers. It is provided in ‘hard’, ‘medium’ and ‘easy’. Above are the general flow temperatures.
You run the risk of melting palladium with higher melting point platinum (1,400 and up) solders which are made with gold, palladium and platinum.
When soldering palladium, do not use firecoating solution or flux. The joint must be completely flush with no gaps or irregularities. Palladium solder will not bridge gaps.
Use rated No. 5 or darker welding lens for eye protection.
Palladium loses its polished luster during the soldering process, in much the same way as karat gold. However, the finish is easily restored through minor re-polishing.
When using higher melting point solders, palladium will take on a surface oxidation that is blue-violet.To remove the surface oxidation, use a neutral flame (equal parts of gas and oxygen) and in a few seconds, the oxidation is no longer evident. After the oxidation was removed on this ring, its polished luster is unchanged. As shown in the next 2 images.
After re-polishing the shank, you may notice a dark visible line – the solder line. This is an extreme close-up which makes the line more apparent - it is less noticeable to the unaided eye. To remove traces of the darker line, burnish the joint and re-polish.
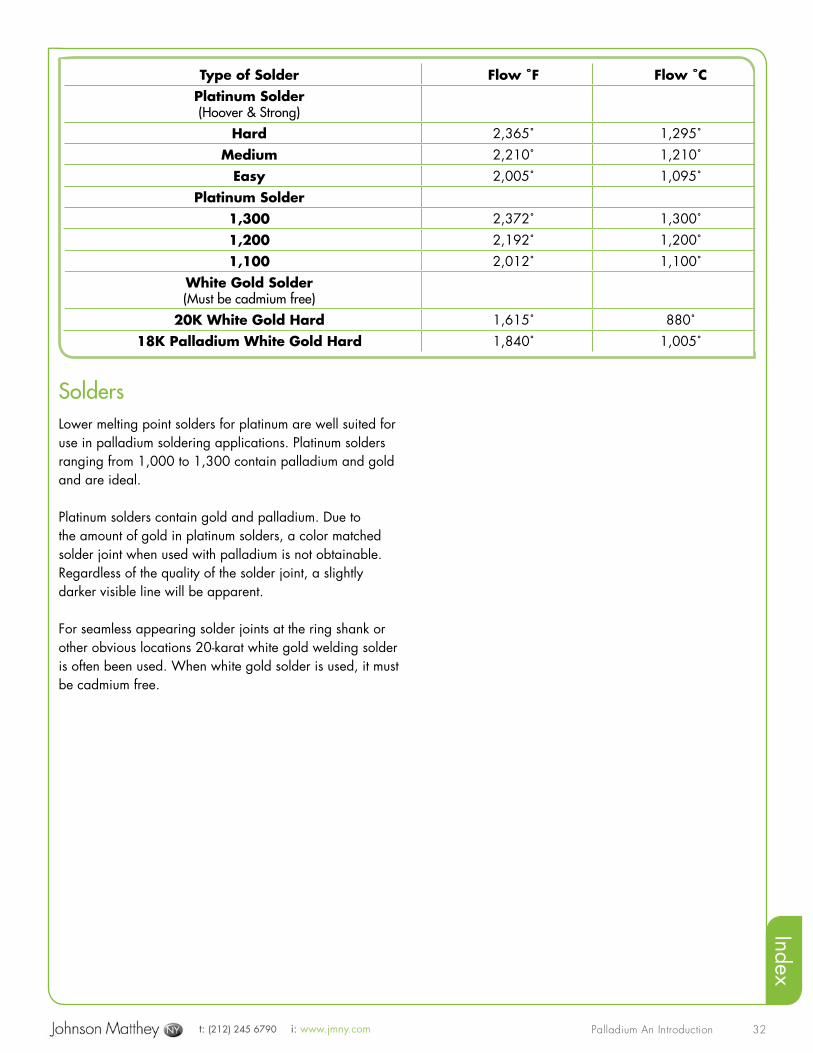
Palladium Melting °F Melting °C Pt solder alternativeHard 2,365 1,295 1,300Medium 2,210 1,210 1,200Easy 2,005 1,095 1,100
t: (212) 245 6790 i: www.jmny.com Palladium An Introduction
Index
32
SoldersLower melting point solders for platinum are well suited for use in palladium soldering applications. Platinum solders ranging from 1,000 to 1,300 contain palladium and gold and are ideal.
Platinum solders contain gold and palladium. Due to the amount of gold in platinum solders, a color matched solder joint when used with palladium is not obtainable. Regardless of the quality of the solder joint, a slightly darker visible line will be apparent.
For seamless appearing solder joints at the ring shank or other obvious locations 20-karat white gold welding solder is often been used. When white gold solder is used, it must be cadmium free.
Type of Solder Flow ˚F Flow ˚CPlatinum Solder (Hoover & Strong)
Hard 2,365˚ 1,295˚Medium 2,210˚ 1,210˚
Easy 2,005˚ 1,095˚Platinum Solder
1,300 2,372˚ 1,300˚1,200 2,192˚ 1,200˚1,100 2,012˚ 1,100˚
White Gold Solder (Must be cadmium free)
20K White Gold Hard 1,615˚ 880˚18K Palladium White Gold Hard 1,840˚ 1,005˚

t: (212) 245 6790 i: www.jmny.com Palladium An Introduction
Index
33
The parts above are palladium die-struck shanks and settings for 1.00 carat size gemstones. The shanks are size 7. This sequence will highlight the fitting, assembly and soldering of these solitaire rings. The parts precisely fit as supplied and little or no alteration is required.
Easy solder will be used to complete this assembly. The tension of the shank is all that’s holding the assembly together. The ring has been placed with the prongs facing down on the high-heat soldering block in preparation for soldering. No flux or fire coat solution is used for palladium soldering.
This image shows the soldering process being conducted through a No. 5 welding lens. A torch tip with no vents and an opening of about 1.2 millimeters is used to heat the joint. The torch is positioned so the hottest part of the oxidizing flame (the area about a 1/4 inch beyond the blue cone) directly heats the joints. The torch is moved slowly from side to side. Because of the low thermo conductivity of palladium, the heat is concentrated in this specific area. The ring is heated and the solder flows down each side. The torch is pulled away as soon as the solder has flown to avoid overheating, pitting or melting. The white arrows indicate the small amount of excess solder on each side of the junction of the setting and shank.
The ring was inspected after soldering. Notice that the palladium has lost its polished luster in the area where it was heated. There is no surface discoloration around this joint because lower temperature easy-flowing solder was used.
Tech Note: Inspect solder joints after the piece has cooled. Be sure that solder has filled the area from the base of the setting (at the finger hole) to the top on both sides, as indicated by the white arrow in the above image.
Tech Note: The prongs are placed downward to help protect them during the soldering process from becoming overheated. (Heat rises and the soldering block serves as a heat sink.)
PROJECT: Assembly of Palladium Stock Findings
t: (212) 245 6790 i: www.jmny.com Palladium An Introduction
Index
34
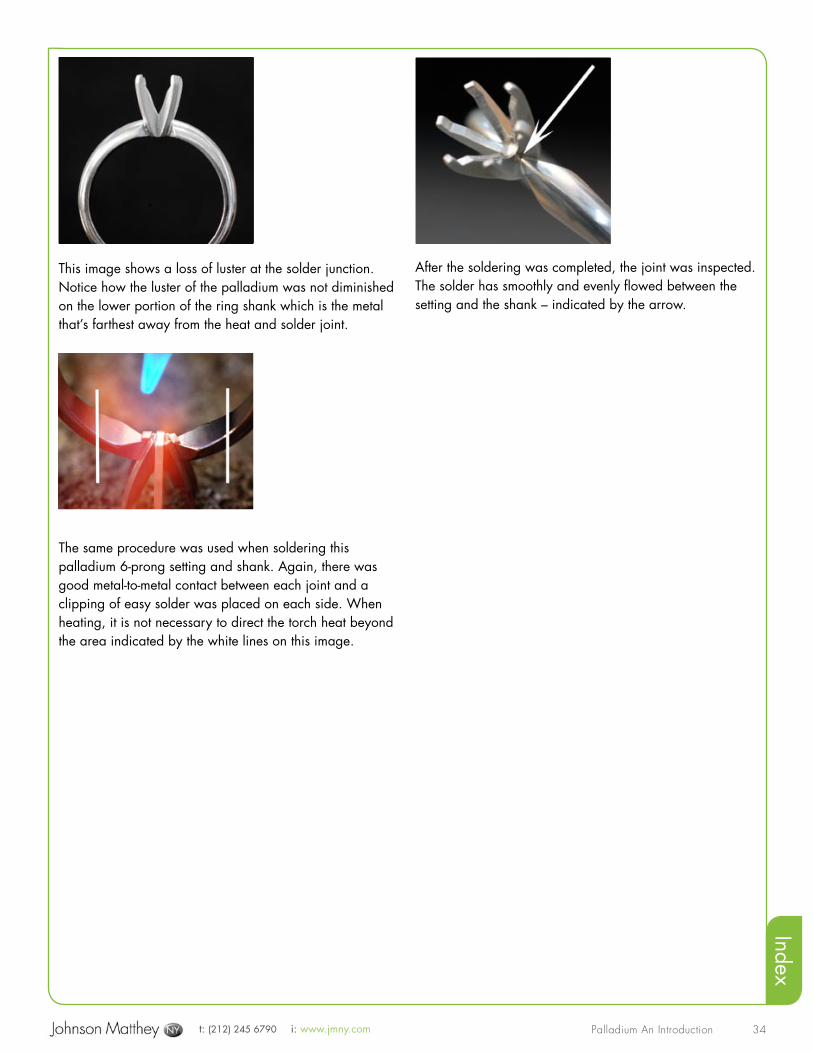
This image shows a loss of luster at the solder junction. Notice how the luster of the palladium was not diminished on the lower portion of the ring shank which is the metal that’s farthest away from the heat and solder joint.
The same procedure was used when soldering this palladium 6-prong setting and shank. Again, there was good metal-to-metal contact between each joint and a clipping of easy solder was placed on each side. When heating, it is not necessary to direct the torch heat beyond the area indicated by the white lines on this image.
After the soldering was completed, the joint was inspected. The solder has smoothly and evenly flowed between the setting and the shank – indicated by the arrow.
t: (212) 245 6790 i: www.jmny.com Palladium An Introduction
Index
35
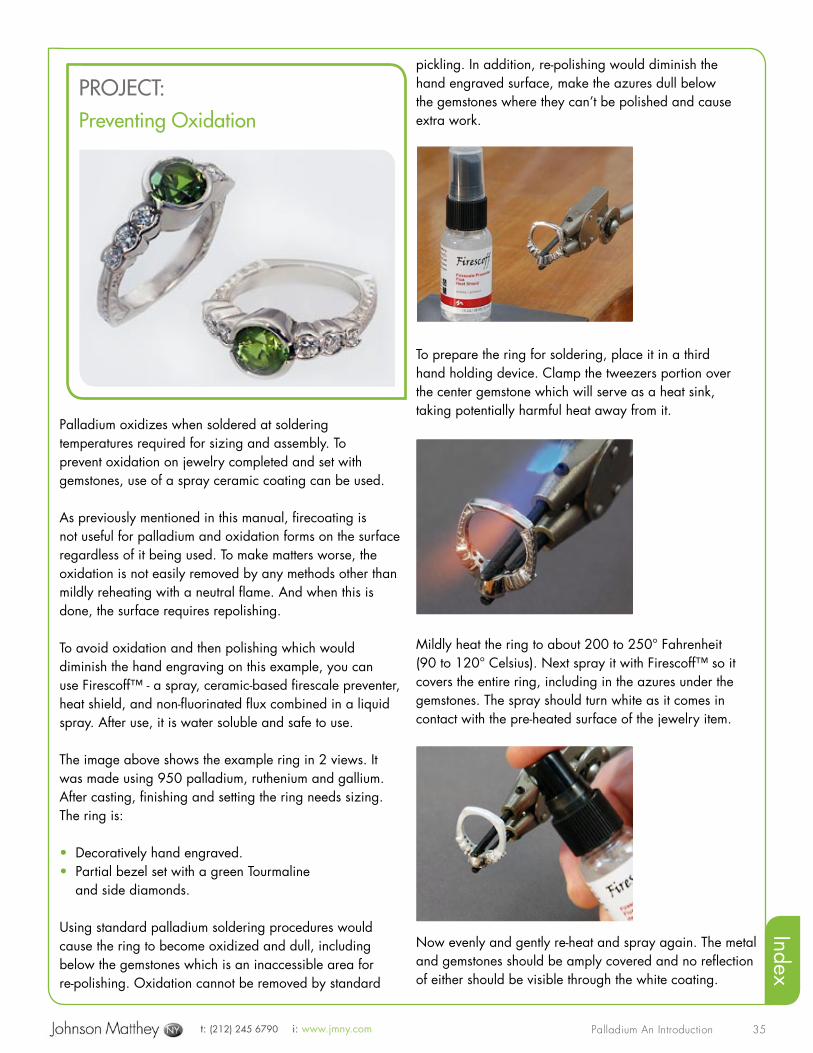
Palladium oxidizes when soldered at soldering temperatures required for sizing and assembly. To prevent oxidation on jewelry completed and set with gemstones, use of a spray ceramic coating can be used.
As previously mentioned in this manual, firecoating is not useful for palladium and oxidation forms on the surface regardless of it being used. To make matters worse, the oxidation is not easily removed by any methods other than mildly reheating with a neutral flame. And when this is done, the surface requires repolishing.
To avoid oxidation and then polishing which would diminish the hand engraving on this example, you can use Firescoff™ - a spray, ceramic-based firescale preventer, heat shield, and non-fluorinated flux combined in a liquid spray. After use, it is water soluble and safe to use.
The image above shows the example ring in 2 views. It was made using 950 palladium, ruthenium and gallium. After casting, finishing and setting the ring needs sizing. The ring is:
• Decoratively hand engraved.• Partial bezel set with a green Tourmaline and side diamonds.
Using standard palladium soldering procedures would cause the ring to become oxidized and dull, including below the gemstones which is an inaccessible area for re-polishing. Oxidation cannot be removed by standard
pickling. In addition, re-polishing would diminish the hand engraved surface, make the azures dull below the gemstones where they can’t be polished and cause extra work.
To prepare the ring for soldering, place it in a third hand holding device. Clamp the tweezers portion over the center gemstone which will serve as a heat sink, taking potentially harmful heat away from it.
Mildly heat the ring to about 200 to 250° Fahrenheit (90 to 120° Celsius). Next spray it with Firescoff™ so it covers the entire ring, including in the azures under the gemstones. The spray should turn white as it comes in contact with the pre-heated surface of the jewelry item.
Now evenly and gently re-heat and spray again. The metal and gemstones should be amply covered and no reflection of either should be visible through the white coating.
PROJECT: Preventing Oxidation
t: (212) 245 6790 i: www.jmny.com Palladium An Introduction
Index
36
Firescoff™ is also a flux so no other flux is required for the soldering procedure.
After soldering, allow the piece to return to room temperature. To remove the coating, use warm water and a soft brush and lightly scrub it or submerge into an ultrasonic. No pickling solution is used. After removal, the ring is in its original brightly polished and finished condition requiring only mild polishing with extra fine rouge for final brightening.
For more information - www.firescoff.com.
t: (212) 245 6790 i: www.jmny.com Palladium An Introduction
Index
37
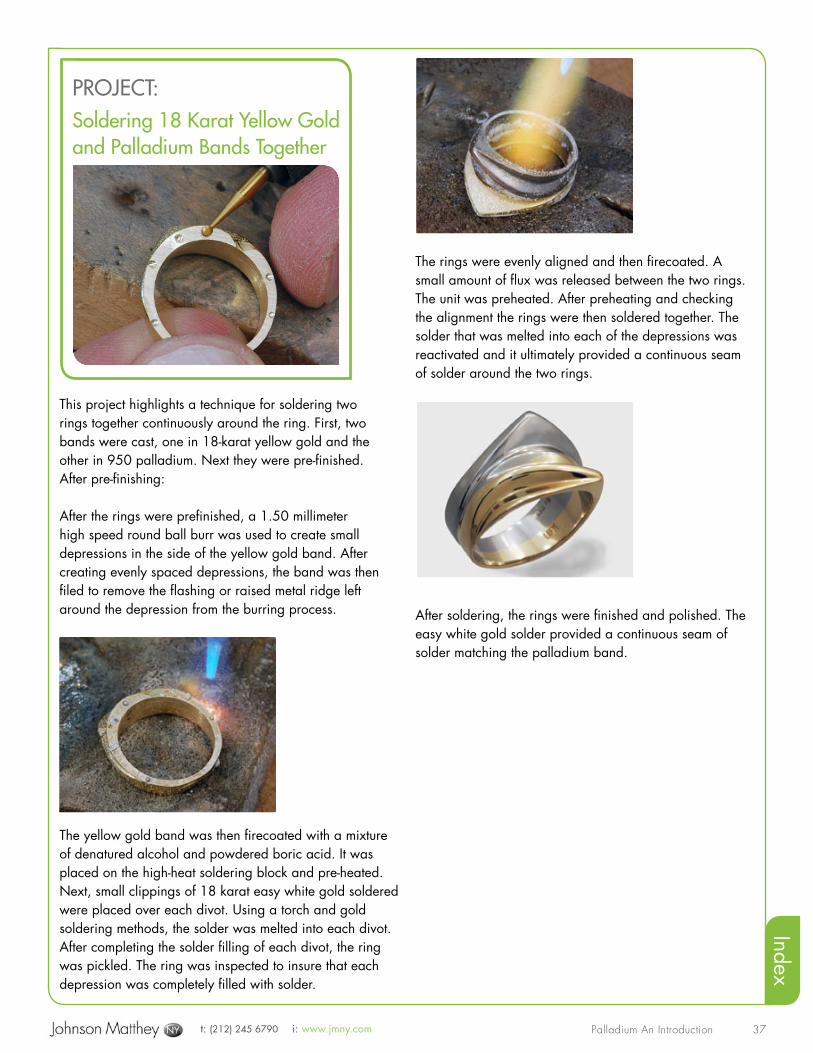
This project highlights a technique for soldering two rings together continuously around the ring. First, two bands were cast, one in 18-karat yellow gold and the other in 950 palladium. Next they were pre-finished. After pre-finishing:
After the rings were prefinished, a 1.50 millimeter high speed round ball burr was used to create small depressions in the side of the yellow gold band. After creating evenly spaced depressions, the band was then filed to remove the flashing or raised metal ridge left around the depression from the burring process.
The yellow gold band was then firecoated with a mixture of denatured alcohol and powdered boric acid. It was placed on the high-heat soldering block and pre-heated. Next, small clippings of 18 karat easy white gold soldered were placed over each divot. Using a torch and gold soldering methods, the solder was melted into each divot. After completing the solder filling of each divot, the ring was pickled. The ring was inspected to insure that each depression was completely filled with solder.
The rings were evenly aligned and then firecoated. A small amount of flux was released between the two rings. The unit was preheated. After preheating and checking the alignment the rings were then soldered together. The solder that was melted into each of the depressions was reactivated and it ultimately provided a continuous seam of solder around the two rings.
After soldering, the rings were finished and polished. The easy white gold solder provided a continuous seam of solder matching the palladium band.
PROJECT: Soldering 18 Karat Yellow Gold and Palladium Bands Together
t: (212) 245 6790 i: www.jmny.com Palladium An Introduction
Index
38
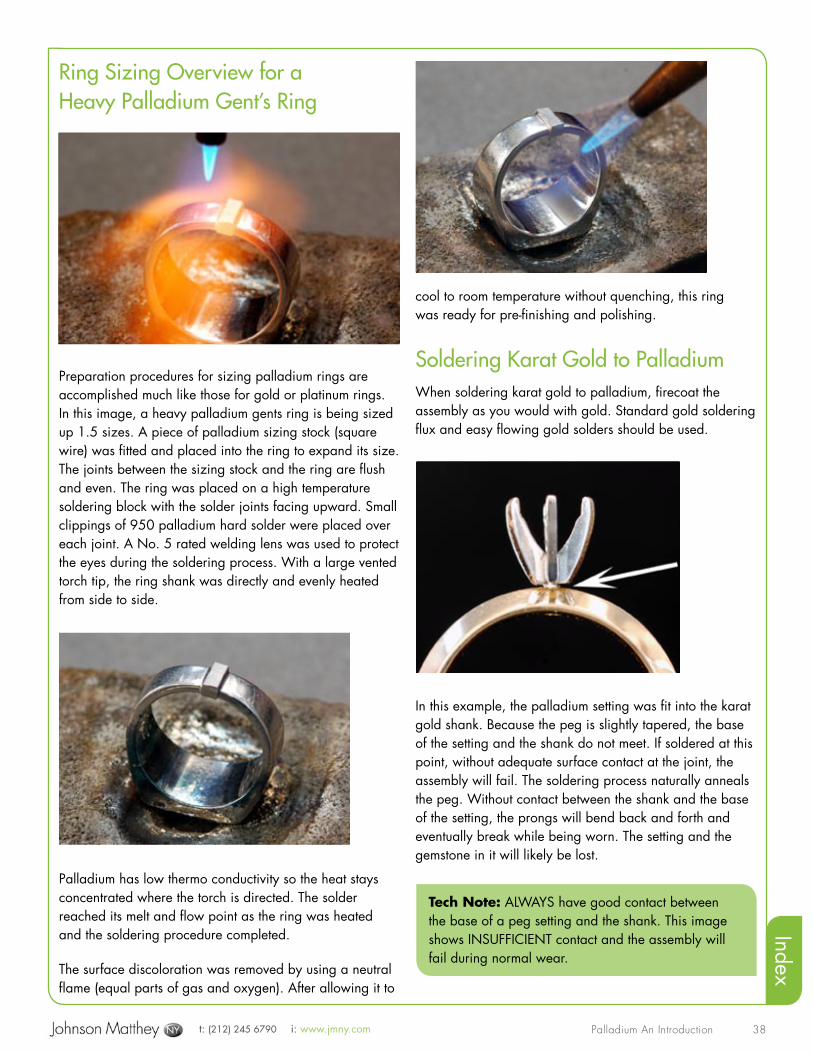
Ring Sizing Overview for a Heavy Palladium Gent’s Ring
Preparation procedures for sizing palladium rings are accomplished much like those for gold or platinum rings. In this image, a heavy palladium gents ring is being sized up 1.5 sizes. A piece of palladium sizing stock (square wire) was fitted and placed into the ring to expand its size. The joints between the sizing stock and the ring are flush and even. The ring was placed on a high temperature soldering block with the solder joints facing upward. Small clippings of 950 palladium hard solder were placed over each joint. A No. 5 rated welding lens was used to protect the eyes during the soldering process. With a large vented torch tip, the ring shank was directly and evenly heated from side to side.
Palladium has low thermo conductivity so the heat stays concentrated where the torch is directed. The solder reached its melt and flow point as the ring was heated and the soldering procedure completed.
The surface discoloration was removed by using a neutral flame (equal parts of gas and oxygen). After allowing it to
cool to room temperature without quenching, this ring was ready for pre-finishing and polishing.
Soldering Karat Gold to PalladiumWhen soldering karat gold to palladium, firecoat the assembly as you would with gold. Standard gold soldering flux and easy flowing gold solders should be used.
In this example, the palladium setting was fit into the karat gold shank. Because the peg is slightly tapered, the base of the setting and the shank do not meet. If soldered at this point, without adequate surface contact at the joint, the assembly will fail. The soldering process naturally anneals the peg. Without contact between the shank and the base of the setting, the prongs will bend back and forth and eventually break while being worn. The setting and the gemstone in it will likely be lost.
Tech Note: ALWAYS have good contact between the base of a peg setting and the shank. This image shows INSUFFICIENT contact and the assembly will fail during normal wear.
t: (212) 245 6790 i: www.jmny.com Palladium An Introduction
Index
39
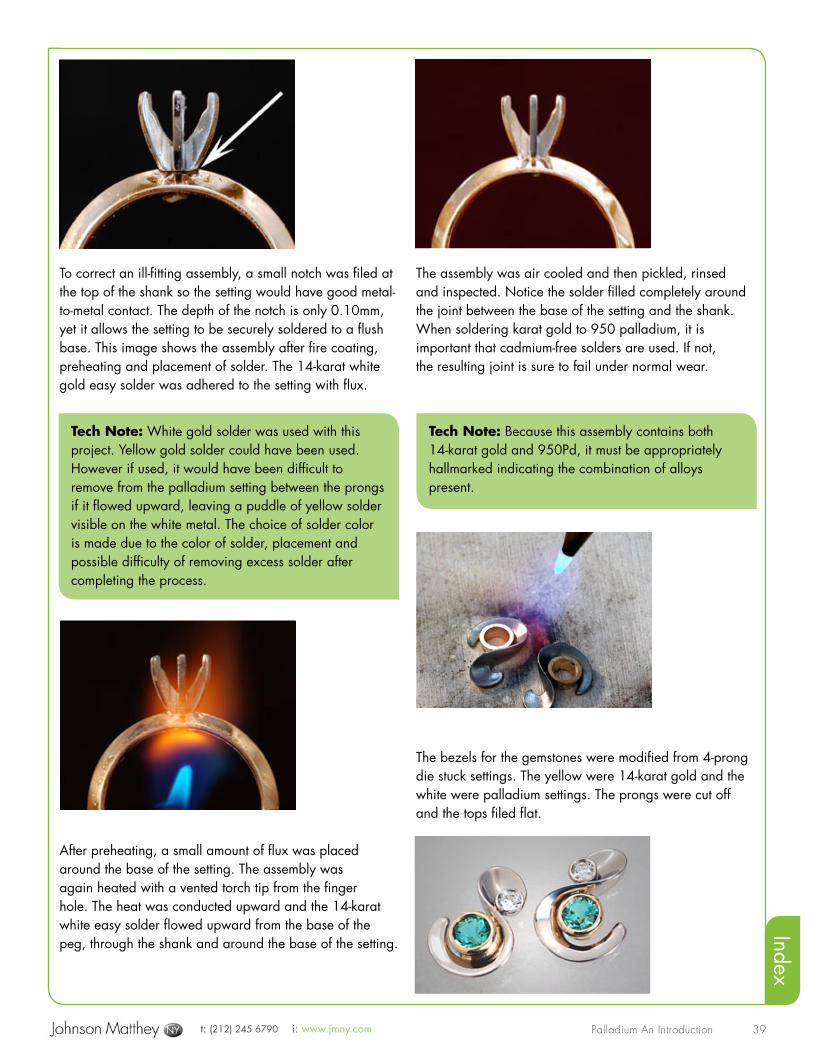
To correct an ill-fitting assembly, a small notch was filed at the top of the shank so the setting would have good metal-to-metal contact. The depth of the notch is only 0.10mm, yet it allows the setting to be securely soldered to a flush base. This image shows the assembly after fire coating, preheating and placement of solder. The 14-karat white gold easy solder was adhered to the setting with flux.
After preheating, a small amount of flux was placed around the base of the setting. The assembly was again heated with a vented torch tip from the finger hole. The heat was conducted upward and the 14-karat white easy solder flowed upward from the base of the peg, through the shank and around the base of the setting.
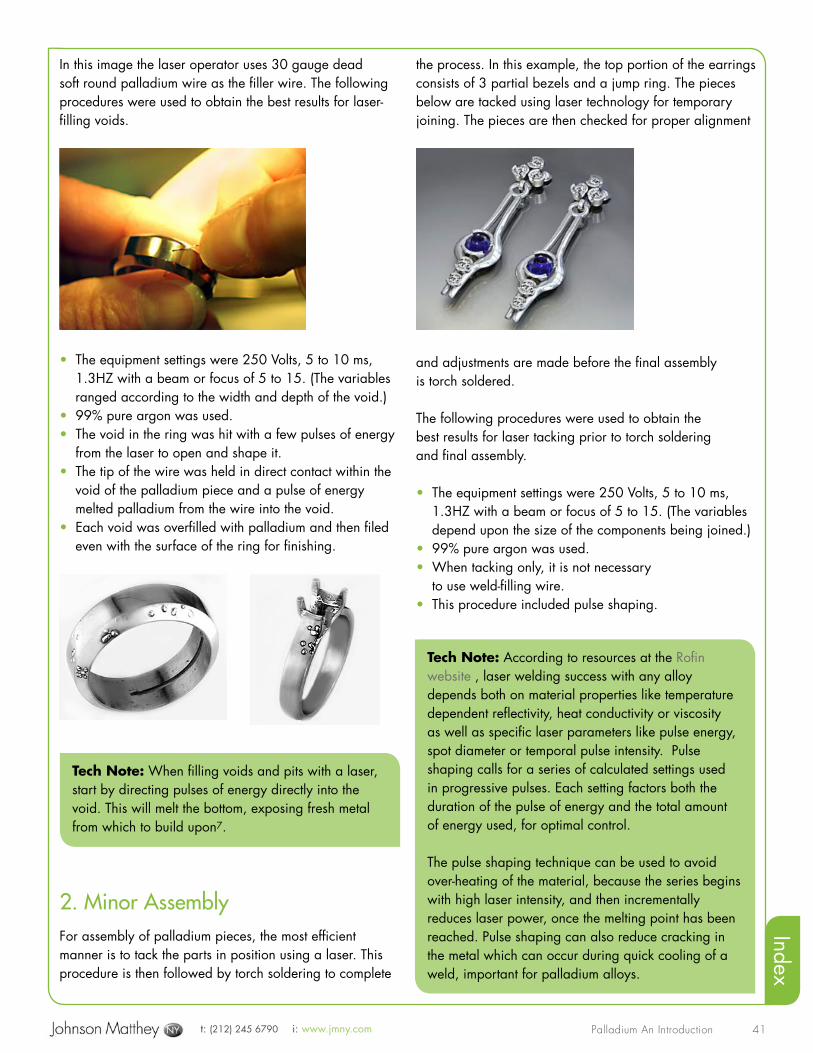
The assembly was air cooled and then pickled, rinsed and inspected. Notice the solder filled completely around the joint between the base of the setting and the shank. When soldering karat gold to 950 palladium, it is important that cadmium-free solders are used. If not, the resulting joint is sure to fail under normal wear.
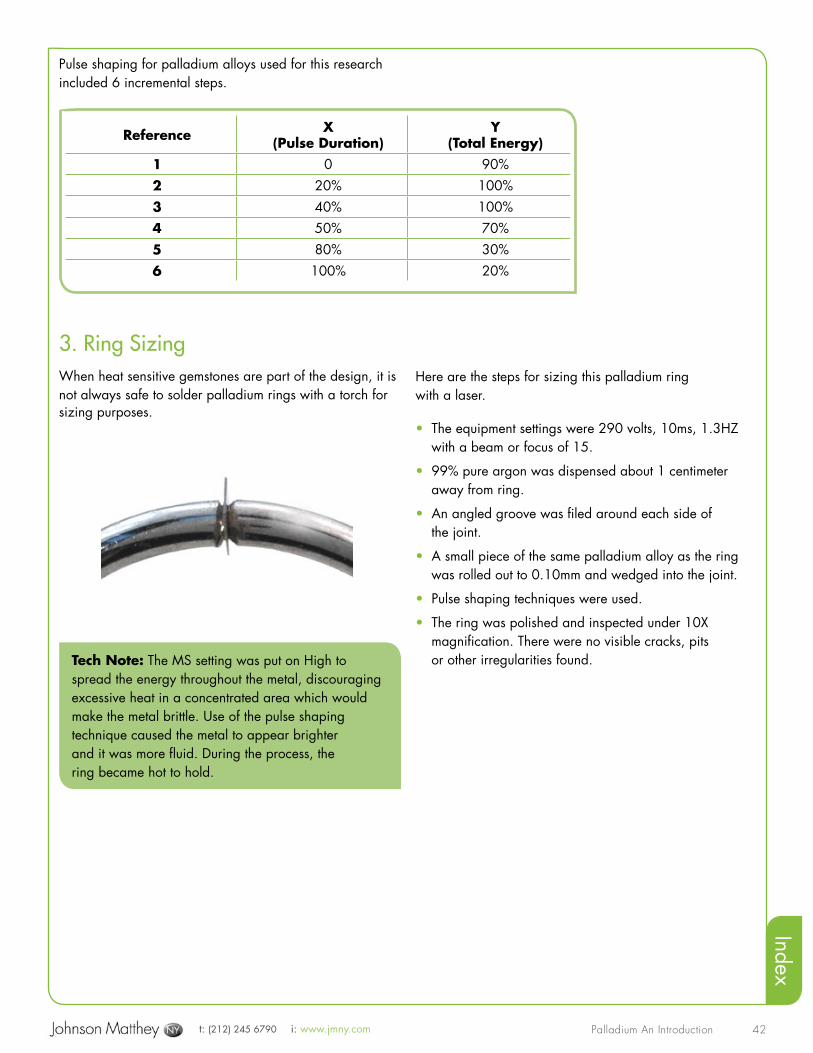
The bezels for the gemstones were modified from 4-prong die stuck settings. The yellow were 14-karat gold and the white were palladium settings. The prongs were cut off and the tops filed flat.
Tech Note: White gold solder was used with this project. Yellow gold solder could have been used. However if used, it would have been difficult to remove from the palladium setting between the prongs if it flowed upward, leaving a puddle of yellow solder visible on the white metal. The choice of solder color is made due to the color of solder, placement and possible difficulty of removing excess solder after completing the process.
Tech Note: Because this assembly contains both 14-karat gold and 950Pd, it must be appropriately hallmarked indicating the combination of alloys present.

t: (212) 245 6790 i: www.jmny.com Palladium An Introduction
Index
40
Torch Welding
Welding palladium with a torch is risky as this practice exposes molten metal to hydrogen absorption. This absorption may result in micro-pitting upon solidification. When molten, palladium dissolves or absorbs large amounts of hydrogen and oxygen and becomes a “homogenous liquid” in the sense that the elemental oxygen is mixed with the liquid palladium on an atomic level. When the metal solidifies, the oxygen wants to change and phase back into a gas, which will release from the metal. But the metal usually solidifies before all the gas escapes and the trapped oxygen is revealed in pitting throughout the joint.
For the best results when sizing a ring, use a standard butt joint and hard palladium solder. If hard palladium solder is not available, 1300 platinum solder will provide good results. Be sure to use the soldering techniques detailed in the soldering section – page 31.
Palladium Laser WeldingEquipment settings and technical procedures for laser welding 950 palladium products differ from those specified for products made from other precious metals. Laser welding any precious metal causes the alloy to be molten, even if for just a millisecond. In this state, palladium most readily absorbs hydrogen and oxygen and if careful procedures are not followed, the gases
will be retained upon solidification, causing the joint to be brittle. Techniques used for laser welding of 950 palladium products require fine tuning on the part of
the operator due to the variable factors in equipment, equipment settings and other laser welding parameters.
The 3 major applications for laser welding palladium are:
1 Filling voids or other casting defects2 Minor assembly3 Ring sizing
The laser welding machine used in this example is a Rofin StarWeld Laser® machine with pulse forming capabilities. It is important to remember that laser welding equipment varies by manufacturer, so the settings listed in this reference are specific to the equipment being used. Overall maintenance of equipment can also have an affect on the settings and final outcome.
1. Filling Voids and PitsVoids and pits can appear with all jewelry alloys, including palladium whether cast, milled, machined or die struck stock products. To repair these irregularities with a laser, you may consider the suggestions that follow.
Tech Note: Manufacturers are continuing to expand their lines of palladium findings as well as sheet and wire for fabrication. Explore the possibilities of modification or an innovative combination of palladium raw materials if the products you need now are unavailable.
t: (212) 245 6790 i: www.jmny.com Palladium An Introduction
Index
41
In this image the laser operator uses 30 gauge dead soft round palladium wire as the filler wire. The following procedures were used to obtain the best results for laser-filling voids.
• The equipment settings were 250 Volts, 5 to 10 ms, 1.3HZ with a beam or focus of 5 to 15. (The variables ranged according to the width and depth of the void.)• 99% pure argon was used.• The void in the ring was hit with a few pulses of energy from the laser to open and shape it.• The tip of the wire was held in direct contact within the void of the palladium piece and a pulse of energy melted palladium from the wire into the void.• Each void was overfilled with palladium and then filed even with the surface of the ring for finishing.
2. Minor AssemblyFor assembly of palladium pieces, the most efficient manner is to tack the parts in position using a laser. This procedure is then followed by torch soldering to complete
the process. In this example, the top portion of the earrings consists of 3 partial bezels and a jump ring. The pieces below are tacked using laser technology for temporary joining. The pieces are then checked for proper alignment
and adjustments are made before the final assembly is torch soldered.
The following procedures were used to obtain the best results for laser tacking prior to torch soldering and final assembly.
• The equipment settings were 250 Volts, 5 to 10 ms, 1.3HZ with a beam or focus of 5 to 15. (The variables depend upon the size of the components being joined.)• 99% pure argon was used.• When tacking only, it is not necessary to use weld-filling wire.• This procedure included pulse shaping.
Tech Note: When filling voids and pits with a laser, start by directing pulses of energy directly into the void. This will melt the bottom, exposing fresh metal from which to build upon7.
Tech Note: According to resources at the Rofin website , laser welding success with any alloy depends both on material properties like temperature dependent reflectivity, heat conductivity or viscosity as well as specific laser parameters like pulse energy, spot diameter or temporal pulse intensity. Pulse shaping calls for a series of calculated settings used in progressive pulses. Each setting factors both the duration of the pulse of energy and the total amount of energy used, for optimal control.
The pulse shaping technique can be used to avoid over-heating of the material, because the series begins with high laser intensity, and then incrementally reduces laser power, once the melting point has been reached. Pulse shaping can also reduce cracking in the metal which can occur during quick cooling of a weld, important for palladium alloys.
t: (212) 245 6790 i: www.jmny.com Palladium An Introduction
Index
42
Pulse shaping for palladium alloys used for this research included 6 incremental steps.
3. Ring SizingWhen heat sensitive gemstones are part of the design, it is not always safe to solder palladium rings with a torch forsizing purposes.
Here are the steps for sizing this palladium ring with a laser.
• The equipment settings were 290 volts, 10ms, 1.3HZ with a beam or focus of 15.
• 99% pure argon was dispensed about 1 centimeter away from ring.
• An angled groove was filed around each side of the joint.
• A small piece of the same palladium alloy as the ring was rolled out to 0.10mm and wedged into the joint.
• Pulse shaping techniques were used.
• The ring was polished and inspected under 10X magnification. There were no visible cracks, pits or other irregularities found.
Reference X(Pulse Duration)
Y (Total Energy)
1 0 90%2 20% 100%3 40% 100%4 50% 70%5 80% 30%6 100% 20%
Tech Note: The MS setting was put on High to spread the energy throughout the metal, discouraging excessive heat in a concentrated area which would make the metal brittle. Use of the pulse shaping technique caused the metal to appear brighter and it was more fluid. During the process, the ring became hot to hold.

t: (212) 245 6790 i: www.jmny.com Palladium An Introduction
Index
43
Tack WeldingTack-welding provides a useful way to position palladium parts prior to soldering. Tack-welding is a temporary joint. Shown in this image is an ABI Tack II unit for tack- and fusion-welding. It is stacked above the ABI Pulse-arc-Welding unit.
Tack-welding will be used to pre-position parts for a multiple prong double gallery wire setting in palladium. The gallery wires were formed with the lower gallery wire slightly smaller in size (to achieve a tapered setting). The lower gallery wire is notched where the prongs will be tacked in place.
The prong wires were tacked--only lightly held in place. A ‘pliers’ lead was used to hold one part of the assembly and another ‘pliers’ lead is used to hold the other part.
The machine settings were adjusted and with one pulse of energy, individual prongs were tacked in place. Tacking allows for prongs to be eas-ily removed if misaligned, and then re-tacked.
Once all of the prongs are properly positioned, the unit is ready for soldering. Solder is placed at each of the joints (no flux or firecoating) and then soldered using easy palladium solder.
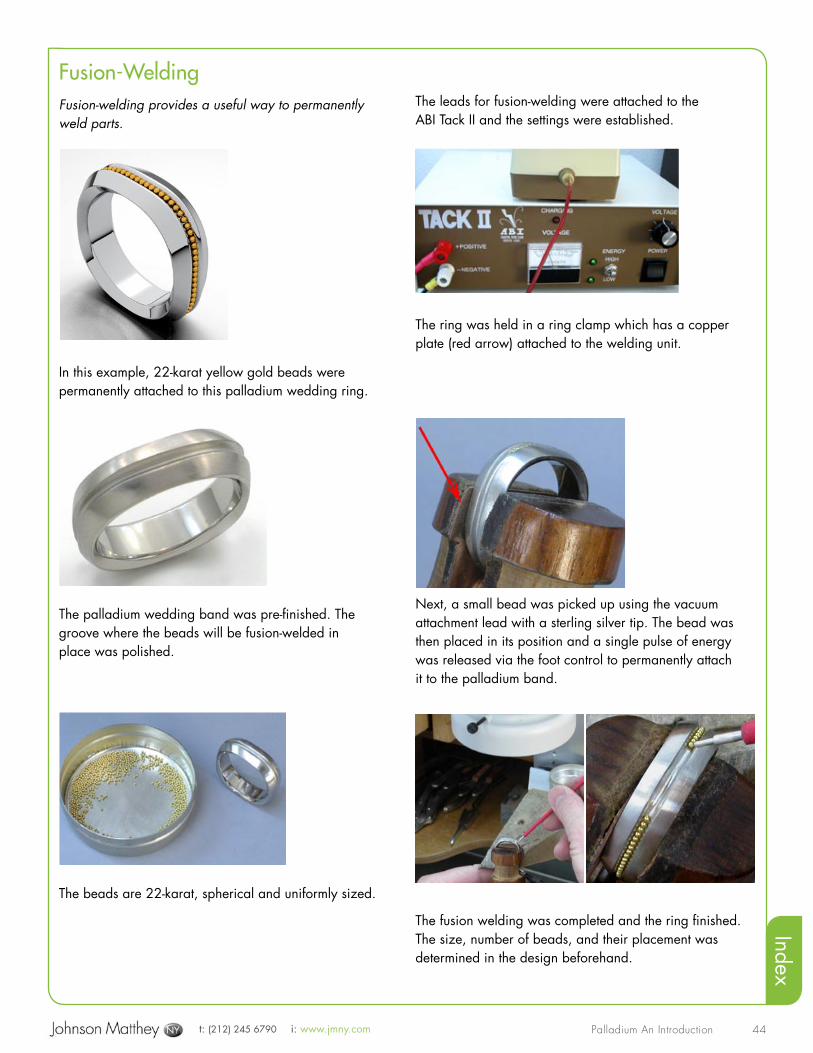
t: (212) 245 6790 i: www.jmny.com Palladium An Introduction
Index
44
Fusion-WeldingFusion-welding provides a useful way to permanently weld parts.
In this example, 22-karat yellow gold beads were permanently attached to this palladium wedding ring.
The palladium wedding band was pre-finished. The groove where the beads will be fusion-welded in place was polished.
The beads are 22-karat, spherical and uniformly sized.
The leads for fusion-welding were attached to the ABI Tack II and the settings were established.
The ring was held in a ring clamp which has a copper plate (red arrow) attached to the welding unit.
Next, a small bead was picked up using the vacuum attachment lead with a sterling silver tip. The bead was then placed in its position and a single pulse of energy was released via the foot control to permanently attach it to the palladium band.
The fusion welding was completed and the ring finished. The size, number of beads, and their placement was determined in the design beforehand.
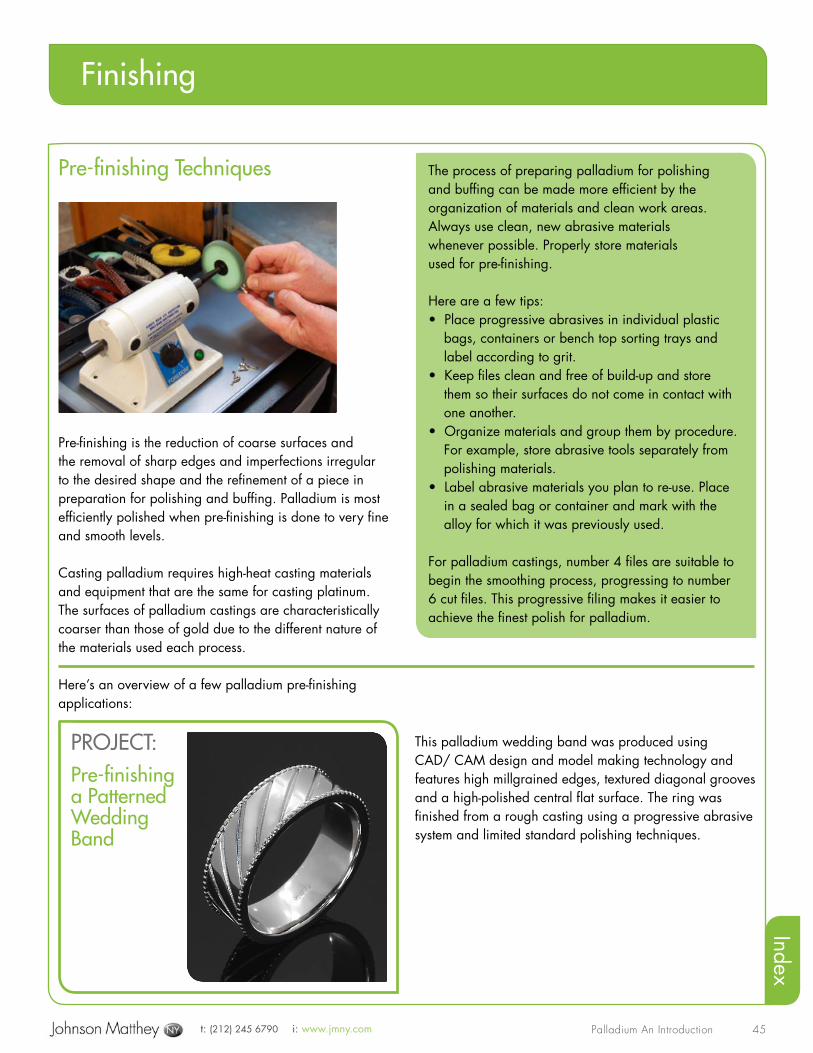
t: (212) 245 6790 i: www.jmny.com Palladium An Introduction
Index
45
Pre-finishing Techniques
Pre-finishing is the reduction of coarse surfaces and the removal of sharp edges and imperfections irregular to the desired shape and the refinement of a piece in preparation for polishing and buffing. Palladium is most efficiently polished when pre-finishing is done to very fine and smooth levels.
Casting palladium requires high-heat casting materials and equipment that are the same for casting platinum. The surfaces of palladium castings are characteristically coarser than those of gold due to the different nature of the materials used each process. Here’s an overview of a few palladium pre-finishing applications:
This palladium wedding band was produced using CAD/ CAM design and model making technology and features high millgrained edges, textured diagonal grooves and a high-polished central flat surface. The ring was finished from a rough casting using a progressive abrasive system and limited standard polishing techniques.
The process of preparing palladium for polishing and buffing can be made more efficient by the organization of materials and clean work areas. Always use clean, new abrasive materials whenever possible. Properly store materials used for pre-finishing.
Here are a few tips:• Place progressive abrasives in individual plastic bags, containers or bench top sorting trays and label according to grit.• Keep files clean and free of build-up and store them so their surfaces do not come in contact with one another.• Organize materials and group them by procedure. For example, store abrasive tools separately from polishing materials.• Label abrasive materials you plan to re-use. Place in a sealed bag or container and mark with the alloy for which it was previously used.
For palladium castings, number 4 files are suitable to begin the smoothing process, progressing to number 6 cut files. This progressive filing makes it easier to achieve the finest polish for palladium.
PROJECT: Pre-finishing a Patterned Wedding Band
Finishing
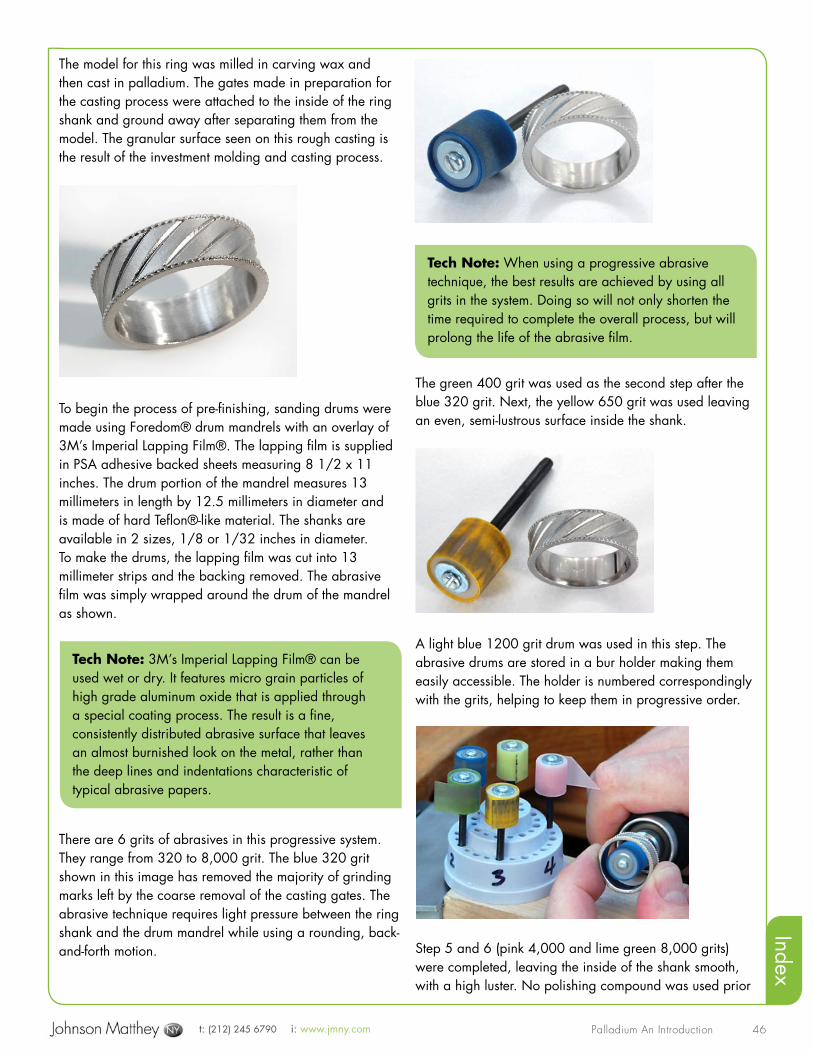
t: (212) 245 6790 i: www.jmny.com Palladium An Introduction
Index
46
The model for this ring was milled in carving wax and then cast in palladium. The gates made in preparation for the casting process were attached to the inside of the ring shank and ground away after separating them from the model. The granular surface seen on this rough casting is the result of the investment molding and casting process.
To begin the process of pre-finishing, sanding drums were made using Foredom® drum mandrels with an overlay of 3M’s Imperial Lapping Film®. The lapping film is supplied in PSA adhesive backed sheets measuring 8 1/2 x 11 inches. The drum portion of the mandrel measures 13 millimeters in length by 12.5 millimeters in diameter and is made of hard Teflon®-like material. The shanks are available in 2 sizes, 1/8 or 1/32 inches in diameter. To make the drums, the lapping film was cut into 13 millimeter strips and the backing removed. The abrasive film was simply wrapped around the drum of the mandrel as shown.
There are 6 grits of abrasives in this progressive system. They range from 320 to 8,000 grit. The blue 320 grit shown in this image has removed the majority of grinding marks left by the coarse removal of the casting gates. The abrasive technique requires light pressure between the ring shank and the drum mandrel while using a rounding, back-and-forth motion.
The green 400 grit was used as the second step after the blue 320 grit. Next, the yellow 650 grit was used leaving an even, semi-lustrous surface inside the shank.
A light blue 1200 grit drum was used in this step. The abrasive drums are stored in a bur holder making them easily accessible. The holder is numbered correspondingly with the grits, helping to keep them in progressive order.
Step 5 and 6 (pink 4,000 and lime green 8,000 grits) were completed, leaving the inside of the shank smooth,with a high luster. No polishing compound was used prior
Tech Note: 3M’s Imperial Lapping Film® can be used wet or dry. It features micro grain particles of high grade aluminum oxide that is applied through a special coating process. The result is a fine, consistently distributed abrasive surface that leaves an almost burnished look on the metal, rather than the deep lines and indentations characteristic of typical abrasive papers.
Tech Note: When using a progressive abrasive technique, the best results are achieved by using all grits in the system. Doing so will not only shorten the time required to complete the overall process, but will prolong the life of the abrasive film.
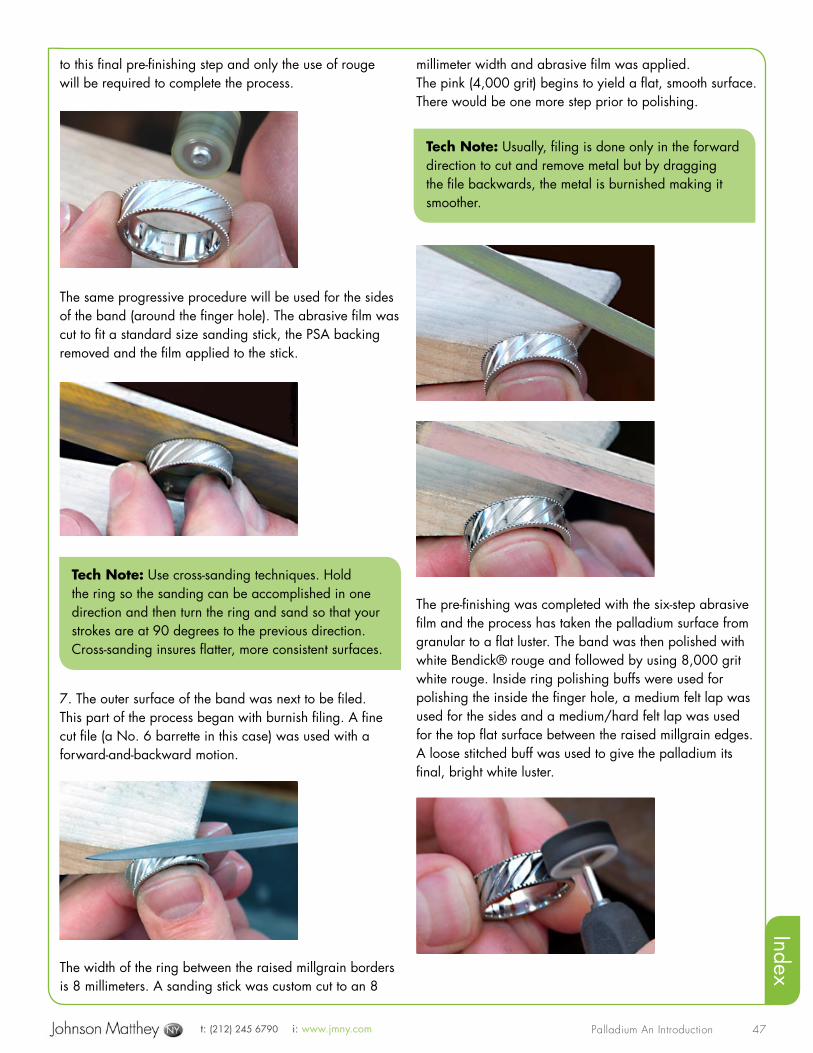
t: (212) 245 6790 i: www.jmny.com Palladium An Introduction
Index
47
to this final pre-finishing step and only the use of rouge will be required to complete the process.
The same progressive procedure will be used for the sides of the band (around the finger hole). The abrasive film was cut to fit a standard size sanding stick, the PSA backing removed and the film applied to the stick.
7. The outer surface of the band was next to be filed. This part of the process began with burnish filing. A fine cut file (a No. 6 barrette in this case) was used with a forward-and-backward motion.
The width of the ring between the raised millgrain borders is 8 millimeters. A sanding stick was custom cut to an 8
millimeter width and abrasive film was applied. The pink (4,000 grit) begins to yield a flat, smooth surface.There would be one more step prior to polishing.
The pre-finishing was completed with the six-step abrasive film and the process has taken the palladium surface from granular to a flat luster. The band was then polished with white Bendick® rouge and followed by using 8,000 grit white rouge. Inside ring polishing buffs were used for polishing the inside the finger hole, a medium felt lap was used for the sides and a medium/hard felt lap was used for the top flat surface between the raised millgrain edges. A loose stitched buff was used to give the palladium its final, bright white luster.
Tech Note: Use cross-sanding techniques. Hold the ring so the sanding can be accomplished in one direction and then turn the ring and sand so that your strokes are at 90 degrees to the previous direction. Cross-sanding insures flatter, more consistent surfaces.
Tech Note: Usually, filing is done only in the forward direction to cut and remove metal but by dragging the file backwards, the metal is burnished making it smoother.
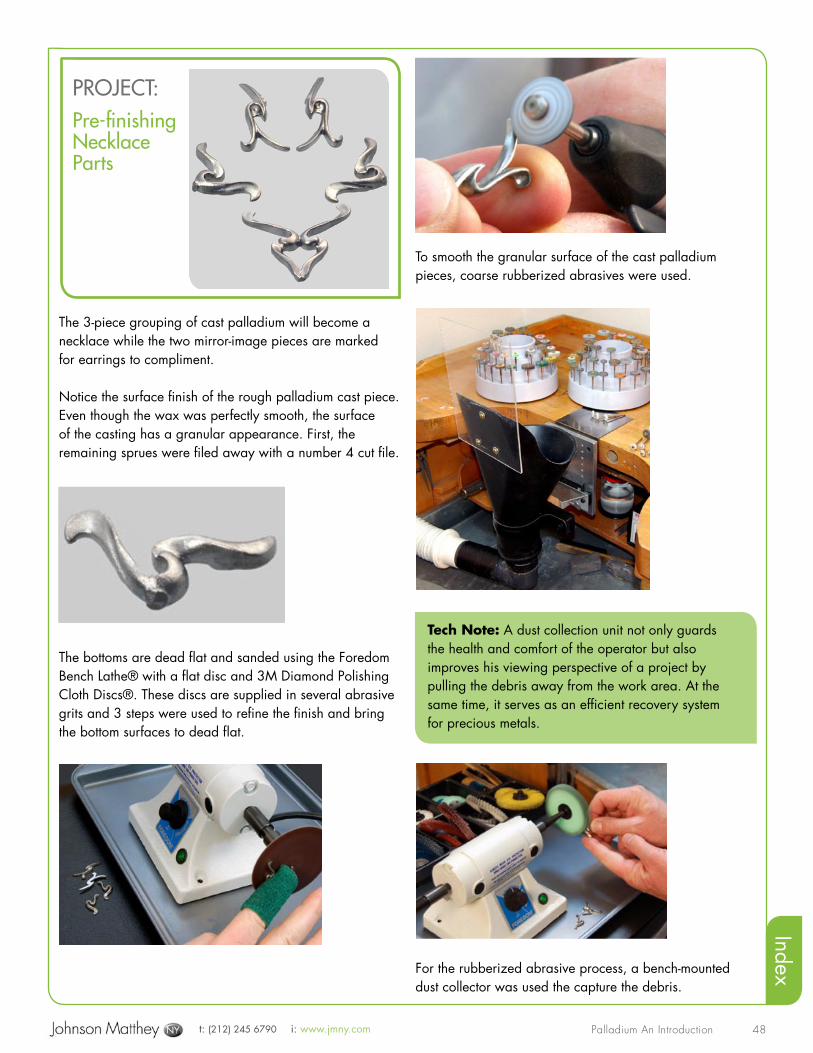
t: (212) 245 6790 i: www.jmny.com Palladium An Introduction
Index
48
The 3-piece grouping of cast palladium will become a necklace while the two mirror-image pieces are marked for earrings to compliment.
Notice the surface finish of the rough palladium cast piece. Even though the wax was perfectly smooth, the surface of the casting has a granular appearance. First, the remaining sprues were filed away with a number 4 cut file.
The bottoms are dead flat and sanded using the Foredom Bench Lathe® with a flat disc and 3M Diamond Polishing Cloth Discs®. These discs are supplied in several abrasive grits and 3 steps were used to refine the finish and bring the bottom surfaces to dead flat.
To smooth the granular surface of the cast palladium pieces, coarse rubberized abrasives were used.
For the rubberized abrasive process, a bench-mounted dust collector was used the capture the debris.
PROJECT: Pre-finishing Necklace Parts
Tech Note: A dust collection unit not only guards the health and comfort of the operator but also improves his viewing perspective of a project by pulling the debris away from the work area. At the same time, it serves as an efficient recovery system for precious metals.
t: (212) 245 6790 i: www.jmny.com Palladium An Introduction
Index
49
To further refine the curved surfaces of the individual pieces, 3M’s Radial Bristle Discs® mounted on the Foredom Bench Lathe® were used. The individual pieces are now ready for polishing.
Tech Note: Radial bristle disc components are used in groups--threaded onto a hub by the user—to achieve various widths of polishing surface. For most projects, threading 6 individual disc components on one hub is sufficient. Fewer may be used for smaller objects. It is important to note that the burnishing of the metal is accomplished with only the very ends of the bristles. For best results and long life for the bristle discs, do not push or otherwise force parts deeper into the wheels for pre-finishing.
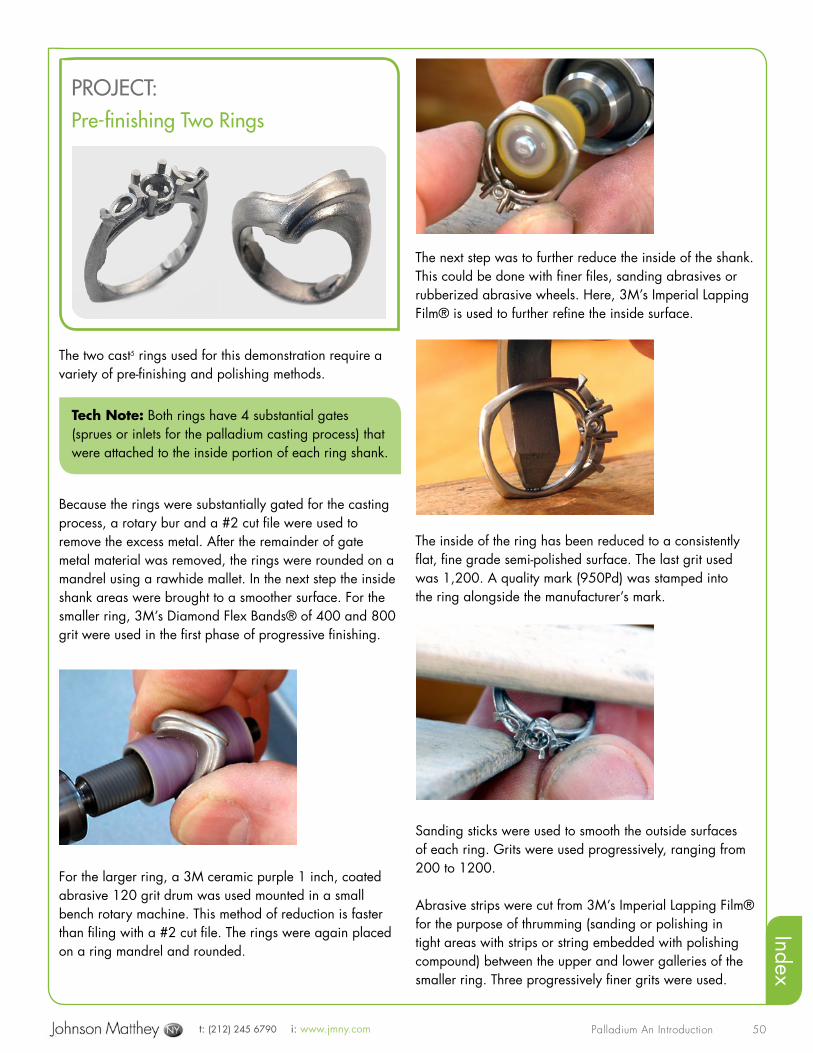
t: (212) 245 6790 i: www.jmny.com Palladium An Introduction
Index
50
The two cast5 rings used for this demonstration require a variety of pre-finishing and polishing methods.
Because the rings were substantially gated for the casting process, a rotary bur and a #2 cut file were used to remove the excess metal. After the remainder of gate metal material was removed, the rings were rounded on a mandrel using a rawhide mallet. In the next step the inside shank areas were brought to a smoother surface. For the smaller ring, 3M’s Diamond Flex Bands® of 400 and 800 grit were used in the first phase of progressive finishing.
For the larger ring, a 3M ceramic purple 1 inch, coated abrasive 120 grit drum was used mounted in a small bench rotary machine. This method of reduction is faster than filing with a #2 cut file. The rings were again placed on a ring mandrel and rounded.
The next step was to further reduce the inside of the shank. This could be done with finer files, sanding abrasives or rubberized abrasive wheels. Here, 3M’s Imperial Lapping Film® is used to further refine the inside surface.
The inside of the ring has been reduced to a consistently flat, fine grade semi-polished surface. The last grit used was 1,200. A quality mark (950Pd) was stamped into the ring alongside the manufacturer’s mark.
Sanding sticks were used to smooth the outside surfaces of each ring. Grits were used progressively, ranging from 200 to 1200.
Abrasive strips were cut from 3M’s Imperial Lapping Film® for the purpose of thrumming (sanding or polishing in tight areas with strips or string embedded with polishing compound) between the upper and lower galleries of the smaller ring. Three progressively finer grits were used.
PROJECT: Pre-finishing Two Rings
Tech Note: Both rings have 4 substantial gates (sprues or inlets for the palladium casting process) that were attached to the inside portion of each ring shank.
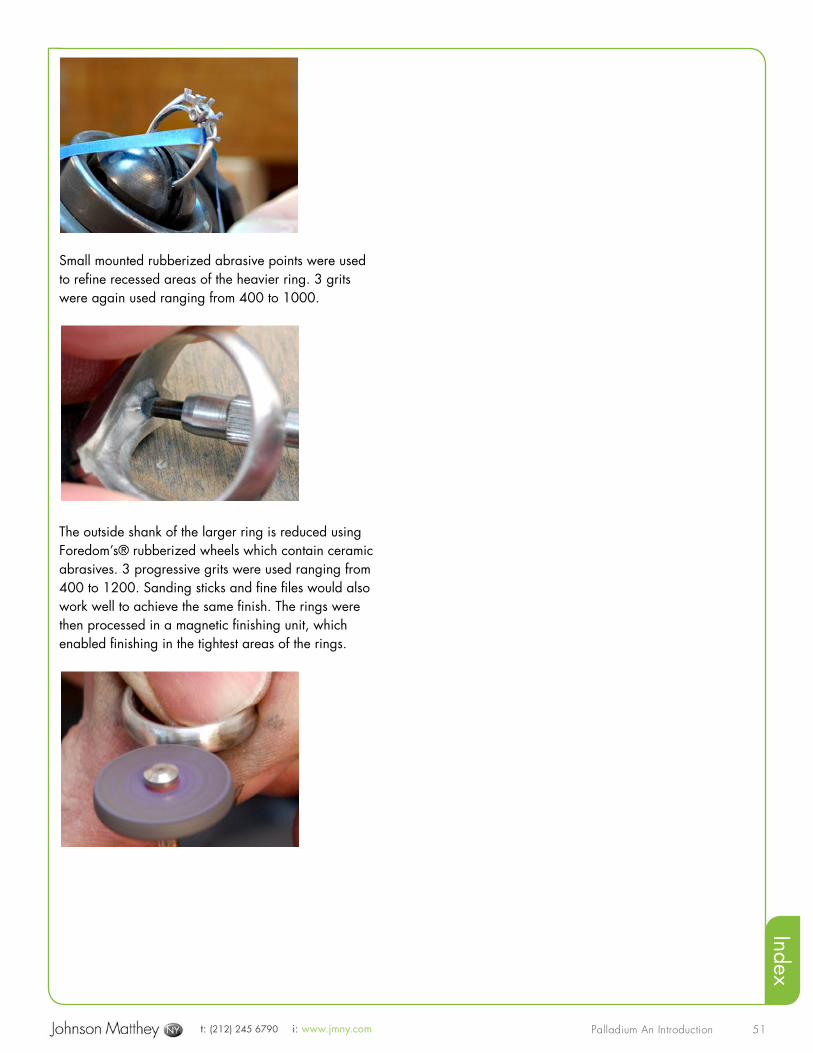
t: (212) 245 6790 i: www.jmny.com Palladium An Introduction
Index
51
Small mounted rubberized abrasive points were used to refine recessed areas of the heavier ring. 3 grits were again used ranging from 400 to 1000.
The outside shank of the larger ring is reduced using Foredom’s® rubberized wheels which contain ceramic abrasives. 3 progressive grits were used ranging from 400 to 1200. Sanding sticks and fine files would also work well to achieve the same finish. The rings were then processed in a magnetic finishing unit, which enabled finishing in the tightest areas of the rings.
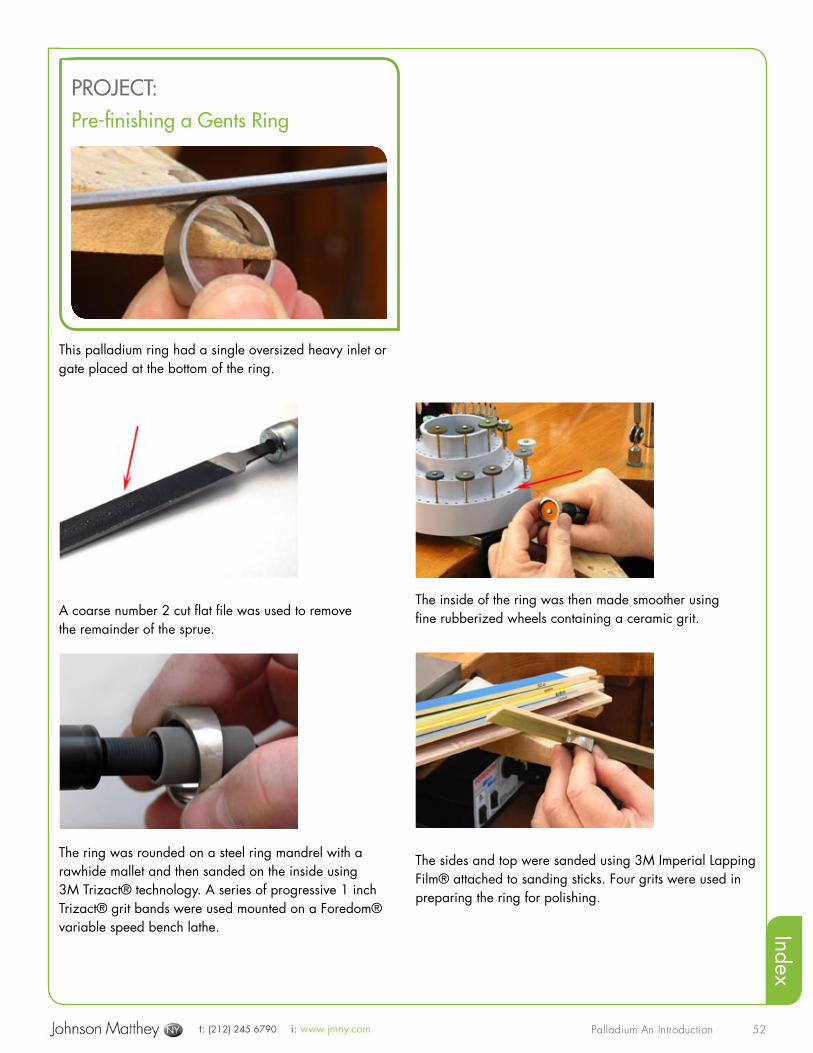
t: (212) 245 6790 i: www.jmny.com Palladium An Introduction
Index
52
This palladium ring had a single oversized heavy inlet or gate placed at the bottom of the ring.
A coarse number 2 cut flat file was used to remove the remainder of the sprue.
The ring was rounded on a steel ring mandrel with a rawhide mallet and then sanded on the inside using 3M Trizact® technology. A series of progressive 1 inch Trizact® grit bands were used mounted on a Foredom® variable speed bench lathe.
The inside of the ring was then made smoother using fine rubberized wheels containing a ceramic grit.
The sides and top were sanded using 3M Imperial Lapping Film® attached to sanding sticks. Four grits were used in preparing the ring for polishing.
PROJECT: Pre-finishing a Gents Ring
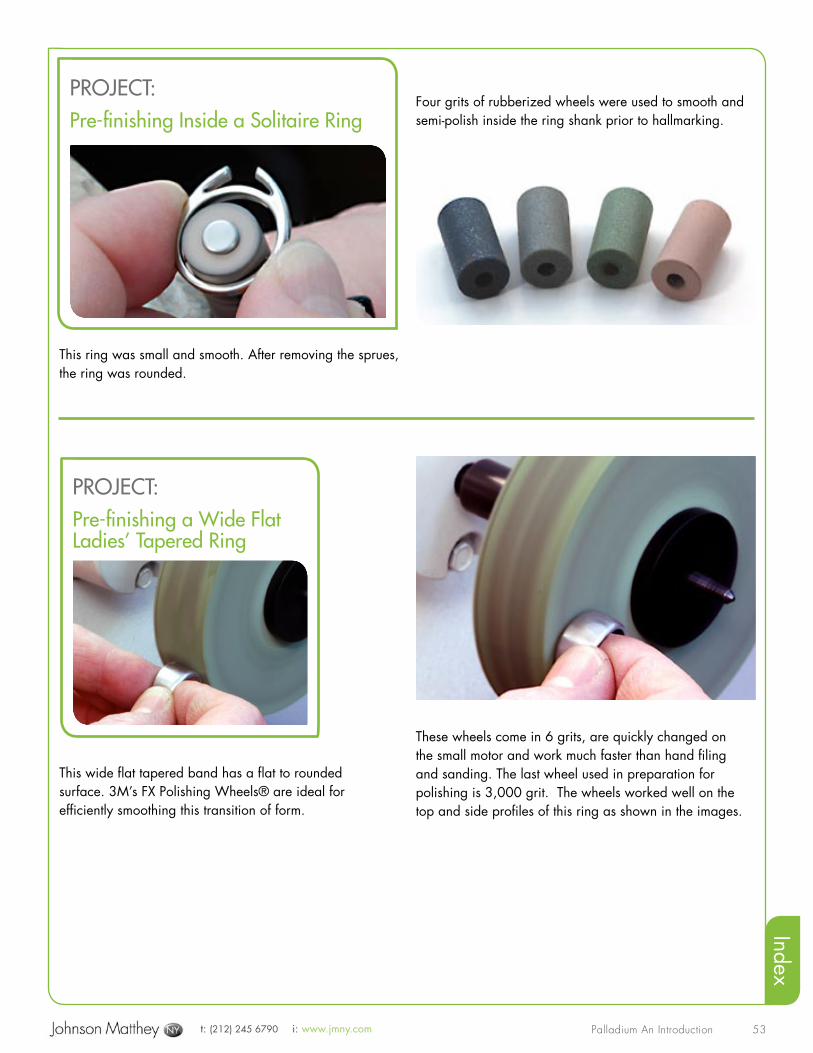
t: (212) 245 6790 i: www.jmny.com Palladium An Introduction
Index
53
This wide flat tapered band has a flat to rounded surface. 3M’s FX Polishing Wheels® are ideal for efficiently smoothing this transition of form.
These wheels come in 6 grits, are quickly changed on the small motor and work much faster than hand filing and sanding. The last wheel used in preparation for polishing is 3,000 grit. The wheels worked well on the top and side profiles of this ring as shown in the images.
This ring was small and smooth. After removing the sprues, the ring was rounded.
Four grits of rubberized wheels were used to smooth and semi-polish inside the ring shank prior to hallmarking.
PROJECT: Pre-finishing Inside a Solitaire Ring
PROJECT: Pre-finishing a Wide Flat Ladies’ Tapered Ring
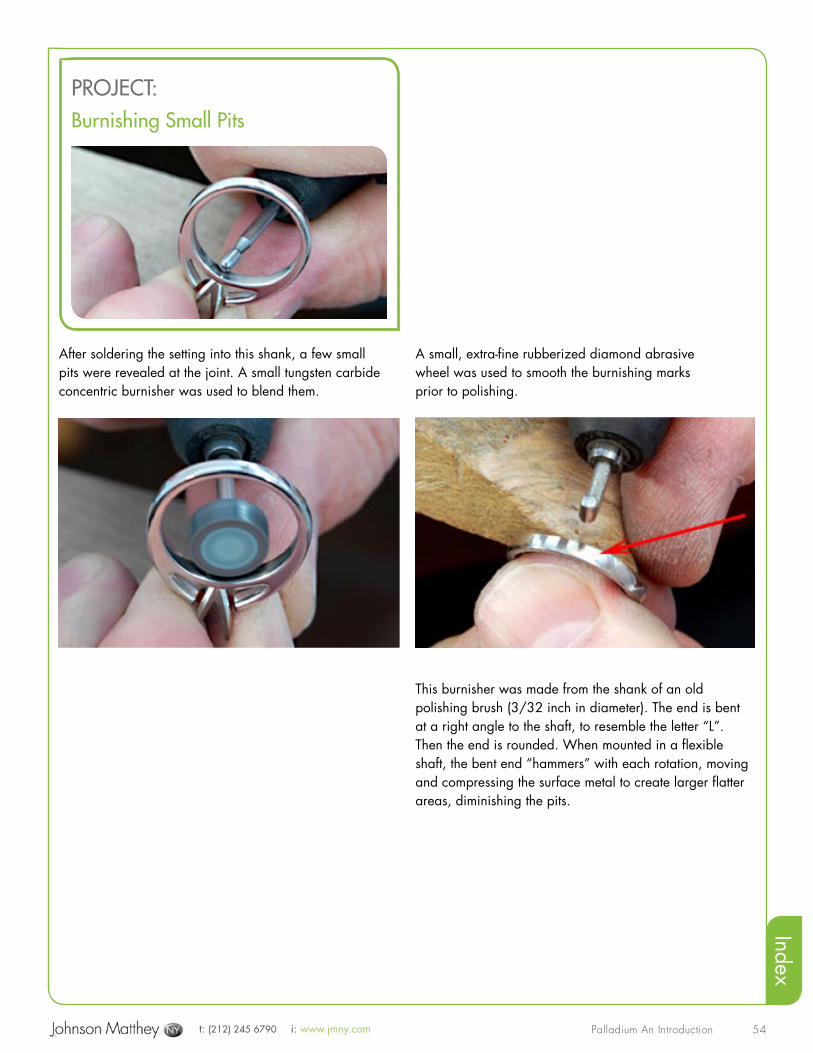
t: (212) 245 6790 i: www.jmny.com Palladium An Introduction
Index
54
After soldering the setting into this shank, a few small pits were revealed at the joint. A small tungsten carbide concentric burnisher was used to blend them.
A small, extra-fine rubberized diamond abrasive wheel was used to smooth the burnishing marks prior to polishing.
This burnisher was made from the shank of an old polishing brush (3/32 inch in diameter). The end is bent at a right angle to the shaft, to resemble the letter “L”. Then the end is rounded. When mounted in a flexible shaft, the bent end “hammers” with each rotation, moving and compressing the surface metal to create larger flatter areas, diminishing the pits.
PROJECT: Burnishing Small Pits

t: (212) 245 6790 i: www.jmny.com Palladium An Introduction
Index
55
Magnetic FinishingCentrifugal magnetic finishing (tumbling) is an automated process which aids in the clean-up, burnishing and polishing of intricate and detailed parts. With media as small as 0.52 mm diameter x 5.80 mm length, these stainless steel pins are able to work in areas such as undercuts, recesses, slots and tight areas.
With palladium, the finishing cycle can be as low as 20 minutes. This alone assures fast turnaround time on parts when compared to other methods. It should be noted that on large, smooth or flat surfaces the finish will appear frosted and a slight buffing is recommended. Depending upon the alloy and the structure of the design, there may be slight percussion marks evident which are easily removed through rouge polishing. This image shows the process in action on the left and the burnishing compound on the right.
These pendant pieces are dropped in the tumbler after filing and pre-finishing. Water was added to the designated level and about 12 drops of burnishing compound were added to the receptacle prior to starting the cycle. The burnishing compound is Stuller’s MF-610®.
Magnetic finishing has brightened this assembly leaving only minute percussion marks on the metal. They are easily removed in the polishing process. This image shows the results immediately after the magnetic finishing process and prior to polishing. The gemstones were placed in their bezels after tumbling.
Here is an image of another ring after magnetic finishing. The pins easily accessed the narrow space between the inner and outer shank surfaces. Notice the very faint percussion marks on the surface of the palladium. They were easily polished away using Bendick’s® white rouge.

t: (212) 245 6790 i: www.jmny.com Palladium An Introduction
Index
56
Buffing and PolishingPolishing is the use of polishing wheels and abrasive compounds to improve the general surface finish. Buffing produces the final bright, high luster finish. For palladium, both procedures require a total of 2 steps to accomplish a commercially satisfactory luster assuming the pre-finishing is done to a fine, smooth level. A third step (second in the buffing stage) will produce a white, bright high luster. Here is a review of how to achieve highly polished palladium that will not require rhodium plating.
Polishing TechniquesFor palladium items that are roughly pre-finished, (grits used for pre-finishing did not go above 600) and still retain tool marks, a 2-step polishing process is used. For the first step, a stitched yellow buff is used with platinum Tripoli®. The best polishing compound for the second step with palladium is Bendick® white rouge and a stitched yellow buff. For items that are finely pre-finished, a one-step polishing process using Bendick® rouge is all that’s required.
Polishing brushes charged with platinum Tripoli®, and then with Bendick® white rouge work well in detailed and intricate areas. For polishing larger flat and or rounded surfaces, a standard yellow stitched buff is used with Tripoli followed by Bendick® white rouge. It is mandatory to clean the piece between each pre-finishing and polishing step. For the best results, use palladium dedicated and grit specific pre-finishing materials and polishing wheels.
Lapping wheels charged with either platinum Tripoli® or Bendick® white rouge work well with palladium—depending upon the quality of the pre-finishing. Here a small hard felt wheel is used to polish a dead flat surface between raised millgrain edges.
With a finely pre-finished palladium ring, the next step is to use white Bendick® rouge on a polishing stick. This step will brighten the color and remove all undesirable abrasive marks.
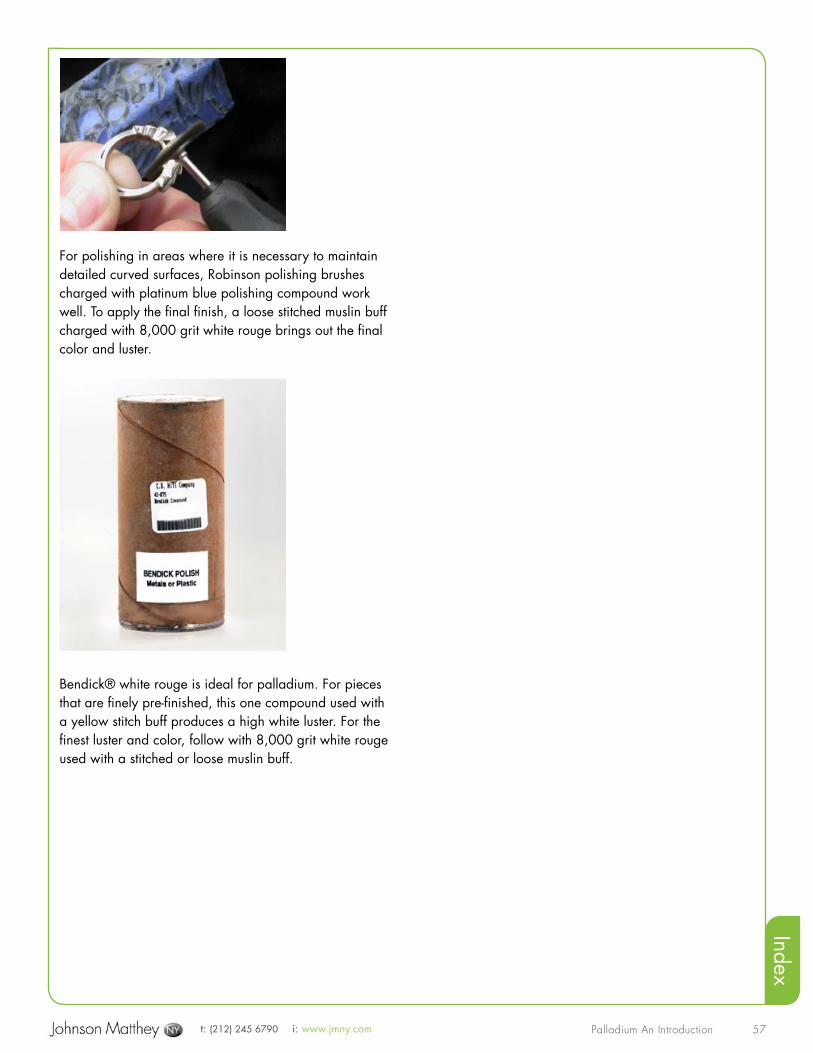
t: (212) 245 6790 i: www.jmny.com Palladium An Introduction
Index
57
For polishing in areas where it is necessary to maintain detailed curved surfaces, Robinson polishing brushes charged with platinum blue polishing compound work well. To apply the final finish, a loose stitched muslin buff charged with 8,000 grit white rouge brings out the final color and luster.
Bendick® white rouge is ideal for palladium. For pieces that are finely pre-finished, this one compound used with a yellow stitch buff produces a high white luster. For the finest luster and color, follow with 8,000 grit white rouge used with a stitched or loose muslin buff.
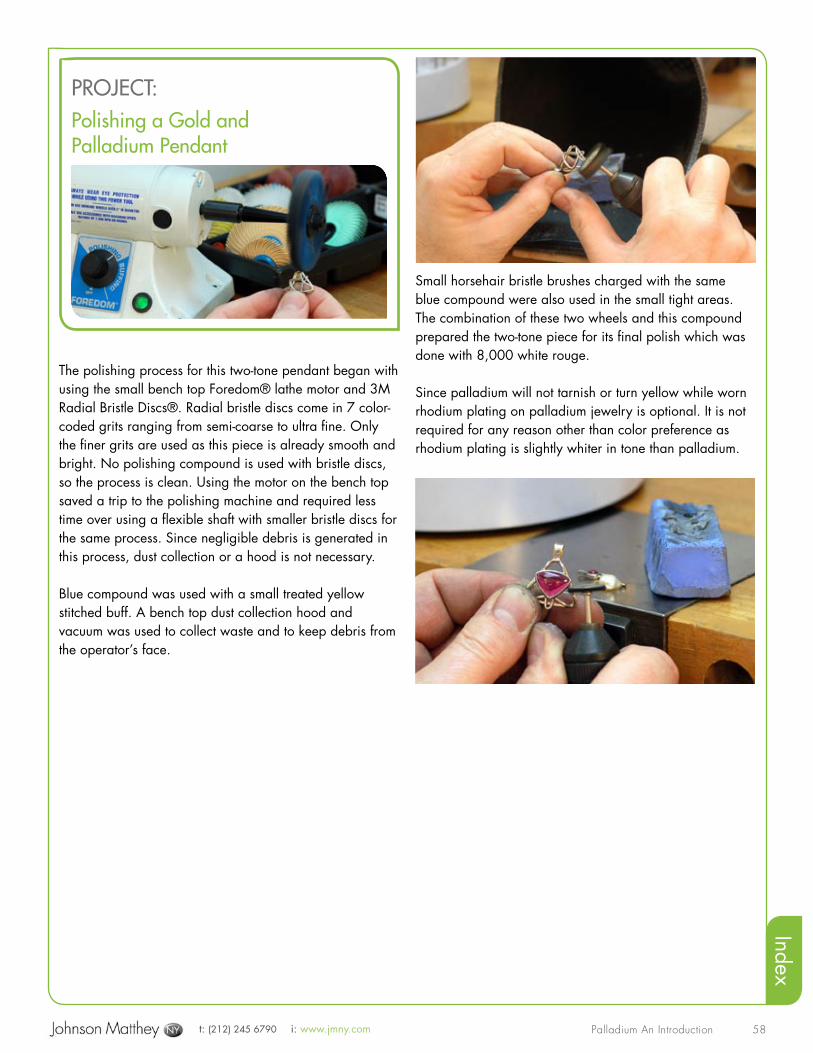
t: (212) 245 6790 i: www.jmny.com Palladium An Introduction
Index
58
The polishing process for this two-tone pendant began with using the small bench top Foredom® lathe motor and 3M Radial Bristle Discs®. Radial bristle discs come in 7 color-coded grits ranging from semi-coarse to ultra fine. Only the finer grits are used as this piece is already smooth and bright. No polishing compound is used with bristle discs, so the process is clean. Using the motor on the bench top saved a trip to the polishing machine and required less time over using a flexible shaft with smaller bristle discs for the same process. Since negligible debris is generated in this process, dust collection or a hood is not necessary.
Blue compound was used with a small treated yellow stitched buff. A bench top dust collection hood and vacuum was used to collect waste and to keep debris from the operator’s face.
Small horsehair bristle brushes charged with the same blue compound were also used in the small tight areas. The combination of these two wheels and this compound prepared the two-tone piece for its final polish which was done with 8,000 white rouge.
Since palladium will not tarnish or turn yellow while worn rhodium plating on palladium jewelry is optional. It is not required for any reason other than color preference as rhodium plating is slightly whiter in tone than palladium.
PROJECT: Polishing a Gold and Palladium Pendant
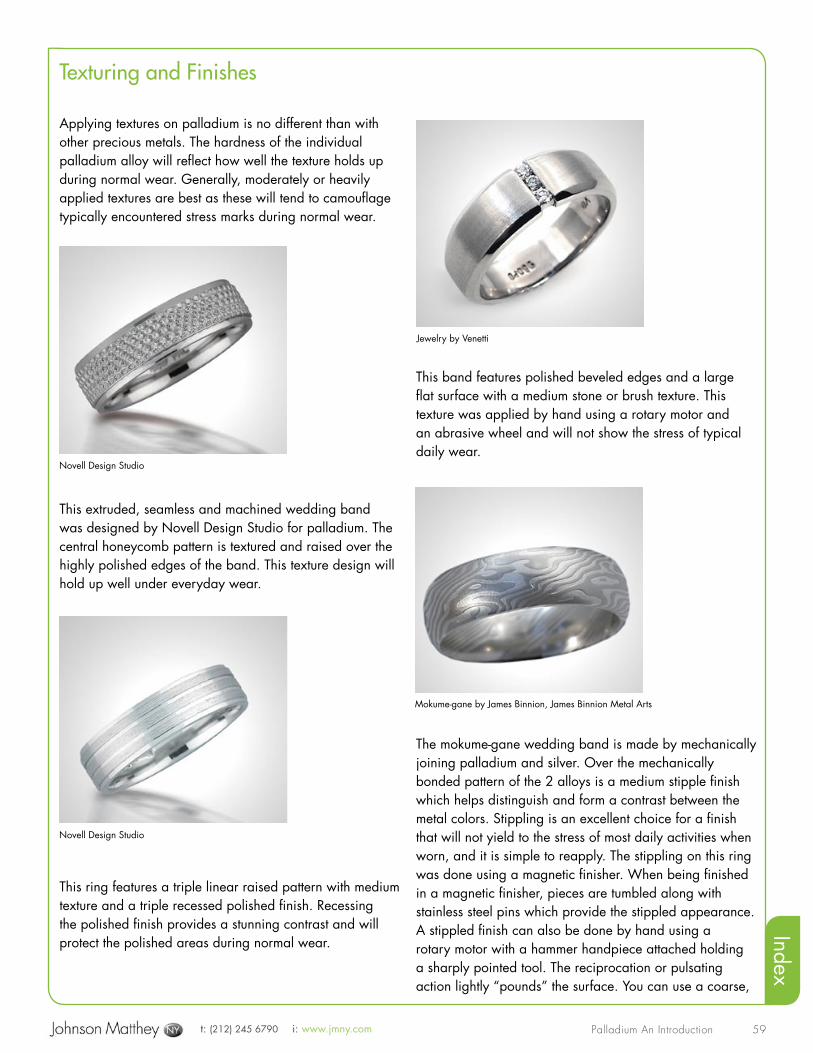
t: (212) 245 6790 i: www.jmny.com Palladium An Introduction
Index
59
Texturing and Finishes
Applying textures on palladium is no different than with other precious metals. The hardness of the individual palladium alloy will reflect how well the texture holds up during normal wear. Generally, moderately or heavily applied textures are best as these will tend to camouflage typically encountered stress marks during normal wear.
This extruded, seamless and machined wedding band was designed by Novell Design Studio for palladium. The central honeycomb pattern is textured and raised over the highly polished edges of the band. This texture design will hold up well under everyday wear.
This ring features a triple linear raised pattern with medium texture and a triple recessed polished finish. Recessing the polished finish provides a stunning contrast and will protect the polished areas during normal wear.
This band features polished beveled edges and a large flat surface with a medium stone or brush texture. This texture was applied by hand using a rotary motor and an abrasive wheel and will not show the stress of typical daily wear.
The mokume-gane wedding band is made by mechanically joining palladium and silver. Over the mechanically bonded pattern of the 2 alloys is a medium stipple finish which helps distinguish and form a contrast between the metal colors. Stippling is an excellent choice for a finish that will not yield to the stress of most daily activities when worn, and it is simple to reapply. The stippling on this ring was done using a magnetic finisher. When being finished in a magnetic finisher, pieces are tumbled along with stainless steel pins which provide the stippled appearance. A stippled finish can also be done by hand using a rotary motor with a hammer handpiece attached holding a sharply pointed tool. The reciprocation or pulsating action lightly “pounds” the surface. You can use a coarse,
Novell Design Studio
Novell Design Studio
Jewelry by Venetti
Mokume-gane by James Binnion, James Binnion Metal Arts
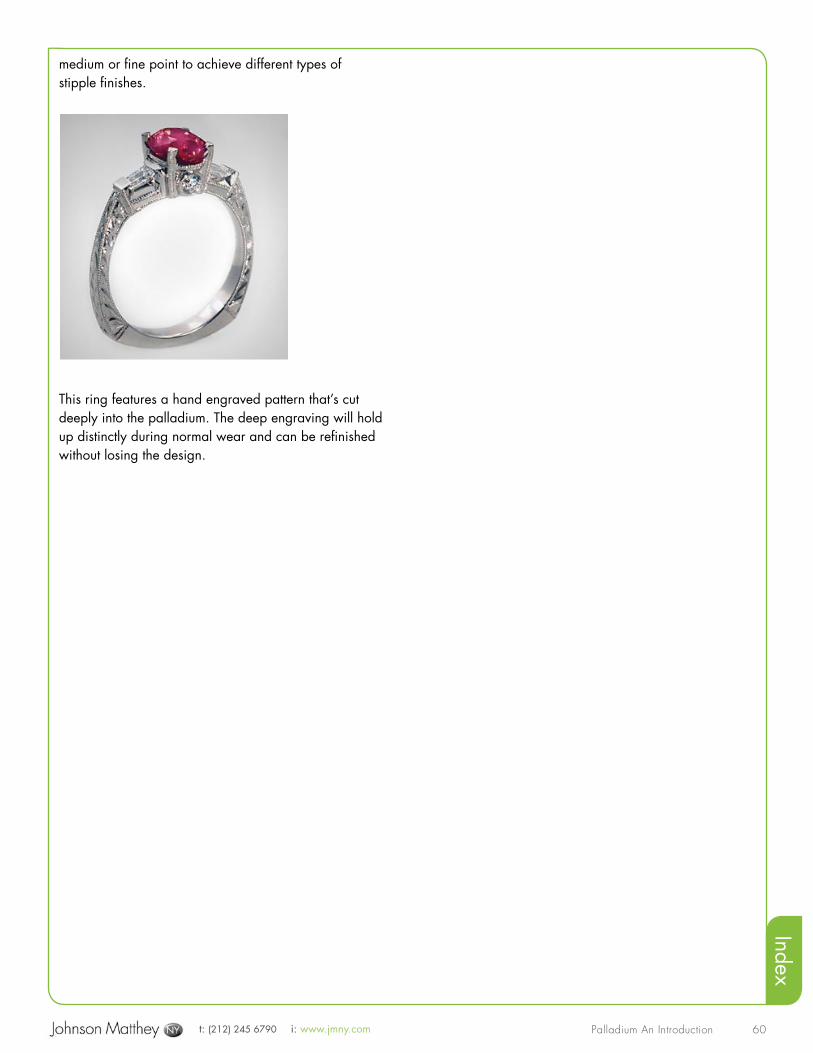
t: (212) 245 6790 i: www.jmny.com Palladium An Introduction
Index
60
medium or fine point to achieve different types of stipple finishes.
This ring features a hand engraved pattern that’s cut deeply into the palladium. The deep engraving will hold up distinctly during normal wear and can be refinished without losing the design.

t: (212) 245 6790 i: www.jmny.com Palladium An Introduction
Index
61
With the proper design, palladium’s favorable metallurgical properties are similar to platinum and ideal
for gemstone setting. Both platinum and palladium have little or no memory as opposed to gold alloys which often causes prongs and channel walls to spring back after forming. Because of palladium’s malleability and other favorable bending and forming characteristics, designs incorporating shorter and heavier prongs will hold up better during normal wear as opposed to thin prongs with tall profiles and no gallery wire supports.
Tooling required for setting palladium is similar to burrs and tools used for gold and platinum. When creating bearings for palladium, about 35 to 45% of the prong or wall thickness is typically removed. In gold, about 45 to 55% of the wall or prong thickness is removed. The thicker wall dimension used for palladium is helpful in holding its shape during normal wear. Because of palladium’s malleability, the heaver beads, prongs and wall thickness are easily shaped and formed over gemstones.
General Overview
This ring was designed using CAD jewelry design software. The customer wanted the stones set closely
together with visible metal kept to a minimum. The 6.00 mm center gemstone is surrounded by round brilliant diamonds ranging from 1.75mm to 2.7mm. This ring design provides an excellent example for gemstone setting and working characteristics of palladium. Alloy characteristics such as malleability and overall strength provide for secure setting.
In preparation for gemstone setting, this rough casting was pre-finished then polished with gray platinum Tripoli® and then Bendick® rouge. The first gemstones to be set were
PROJECT: Setting Round Brilliant Cut Gemstones in Prongs and Partial Bezel
Setting

t: (212) 245 6790 i: www.jmny.com Palladium An Introduction
Index
62
the rows of diamonds on each side of the center grouping. The small prongs were shortened slightly by filing, then rounding using a cup bur of slightly larger diameter (arrow).
A setting burr was selected to create the bearings for the diamonds in the shared prongs (arrow). There are 6 diamonds on each side measuring exactly 1.90mm. The tungsten vanadium setting bur measured 1.80 mm. While burring the depth of the bearing, pressure was applied from side to side to slightly enlarge the bearing to accommodate the 1.90 mm diamonds.
A brass pusher was used to pick up and place the diamonds in their bearings. The brass pusher is made from 3.1mm brass brazing rod and a wooden handle. The end of the brass rod is tapered. The end should be slightly smaller than the outside diameter of the diamond being set. A thin smear of beeswax is used to make the end of the brass rod tacky enough to pick up a diamond from the pre-assigned layout and position it in its bearing.
After placing the diamonds in their bearings and making sure their face up orientation was consistent with the curve of the setting, a beading tool was used to seat and secure the diamonds in their bearings. Select a beading tool with a cup size slightly larger than the prong diameter to shape and form the prongs. The same procedure is used to set the 1.75mm diamonds—four on each side—using a 1.65mm setting burr and smaller beading tool.
Tech Note: Prior to polishing, the pre-finishing process included tumbling the ring for 30 minutes in a magnetic finisher with stainless steel micro pins. This process provided a semi-polish to the 950 palladium ring giving a suitable luster to the hard-to-reach areas of the mounting.
Tech Note: When creating the bearings or seats in palladium jewelry items use lubrication such as oil of wintergreen, standard machine oil or burr lubricants with the setting burr. This helps to maintain the sharpness of the burr as well as easing the cutting of a precise bearing. The lubricant also reduces the friction that causes overheating.
Tech Note: These diamonds matched in diameter and proportions. If the diamonds are not matched, care must be taken when creating the bearings so the tables of the stones will be level and aligned when setting is complete.
Tech Note: Lightly secure the diamonds in place, pushing the prongs only part way, and working opposing points of contact. This will allow you to make final alignment adjustments as the diamonds are secured in their settings.
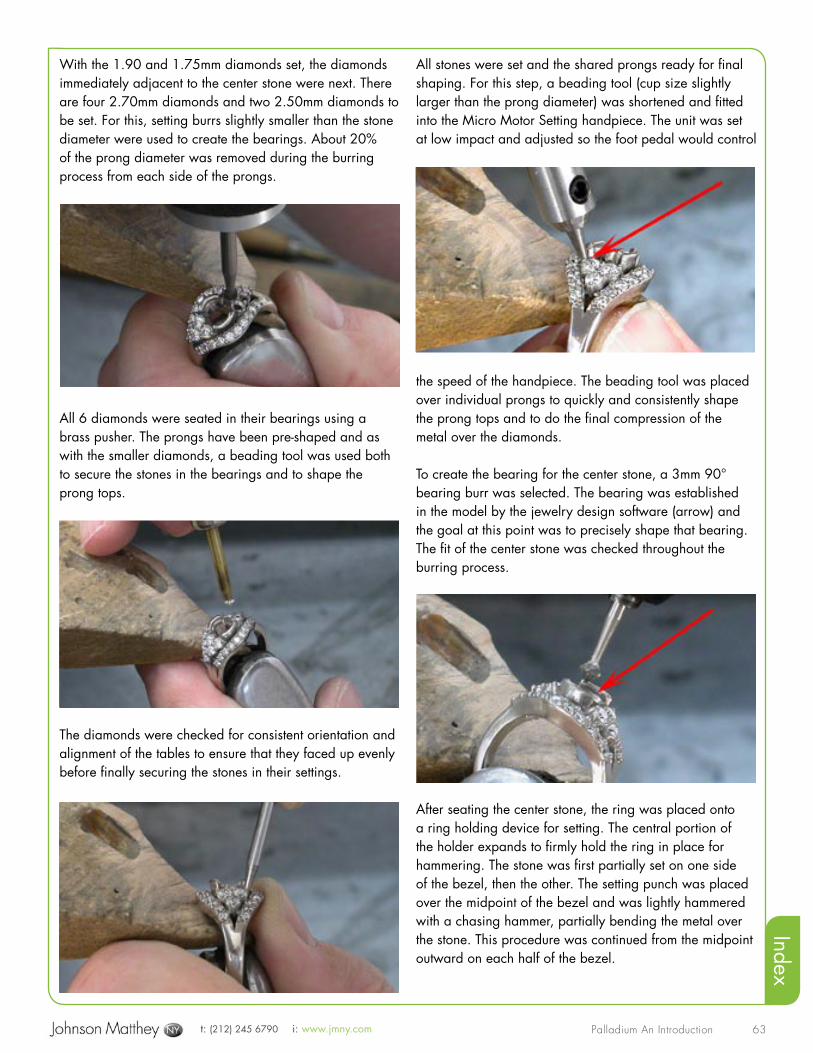
t: (212) 245 6790 i: www.jmny.com Palladium An Introduction
Index
63
With the 1.90 and 1.75mm diamonds set, the diamonds immediately adjacent to the center stone were next. There are four 2.70mm diamonds and two 2.50mm diamonds to be set. For this, setting burrs slightly smaller than the stone diameter were used to create the bearings. About 20% of the prong diameter was removed during the burring process from each side of the prongs.
All 6 diamonds were seated in their bearings using a brass pusher. The prongs have been pre-shaped and as with the smaller diamonds, a beading tool was used both to secure the stones in the bearings and to shape the prong tops.
The diamonds were checked for consistent orientation and alignment of the tables to ensure that they faced up evenly before finally securing the stones in their settings.
All stones were set and the shared prongs ready for final shaping. For this step, a beading tool (cup size slightly larger than the prong diameter) was shortened and fitted into the Micro Motor Setting handpiece. The unit was set at low impact and adjusted so the foot pedal would control
the speed of the handpiece. The beading tool was placed over individual prongs to quickly and consistently shape the prong tops and to do the final compression of the metal over the diamonds.
To create the bearing for the center stone, a 3mm 90° bearing burr was selected. The bearing was established in the model by the jewelry design software (arrow) and the goal at this point was to precisely shape that bearing. The fit of the center stone was checked throughout the burring process.
After seating the center stone, the ring was placed onto a ring holding device for setting. The central portion of the holder expands to firmly hold the ring in place for hammering. The stone was first partially set on one side of the bezel, then the other. The setting punch was placed over the midpoint of the bezel and was lightly hammered with a chasing hammer, partially bending the metal over the stone. This procedure was continued from the midpoint outward on each half of the bezel.
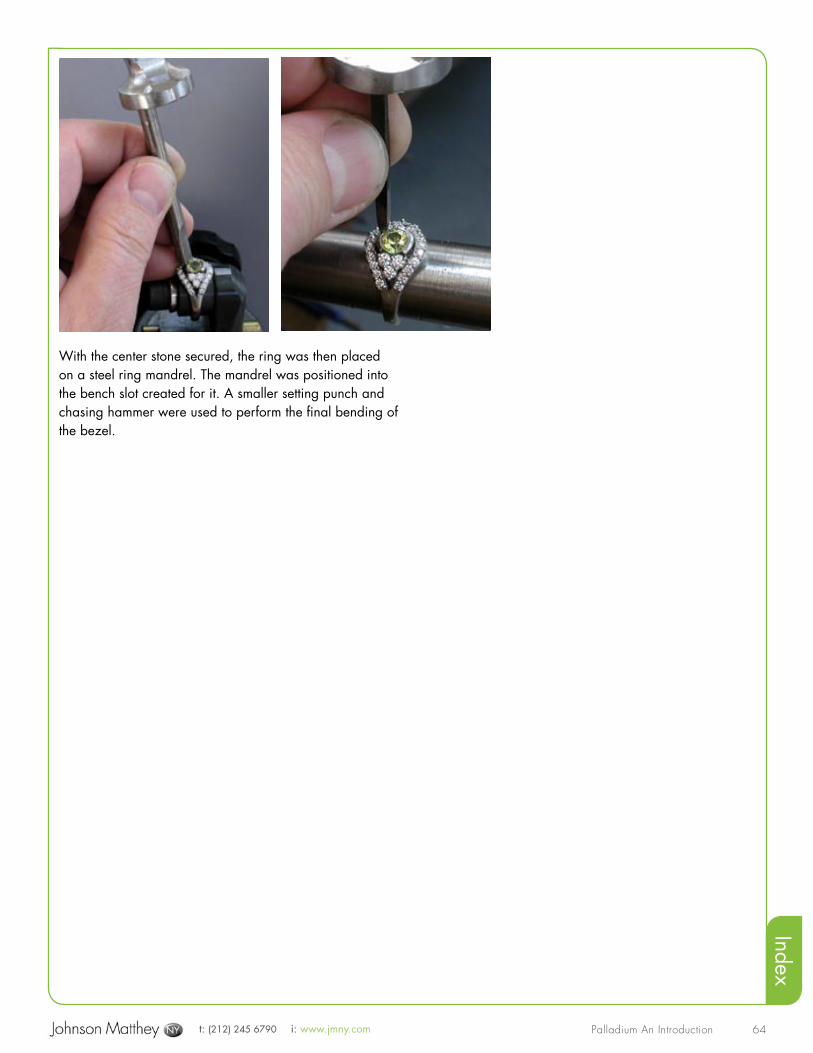
t: (212) 245 6790 i: www.jmny.com Palladium An Introduction
Index
64
With the center stone secured, the ring was then placed on a steel ring mandrel. The mandrel was positioned into the bench slot created for it. A smaller setting punch and chasing hammer were used to perform the final bending of the bezel.
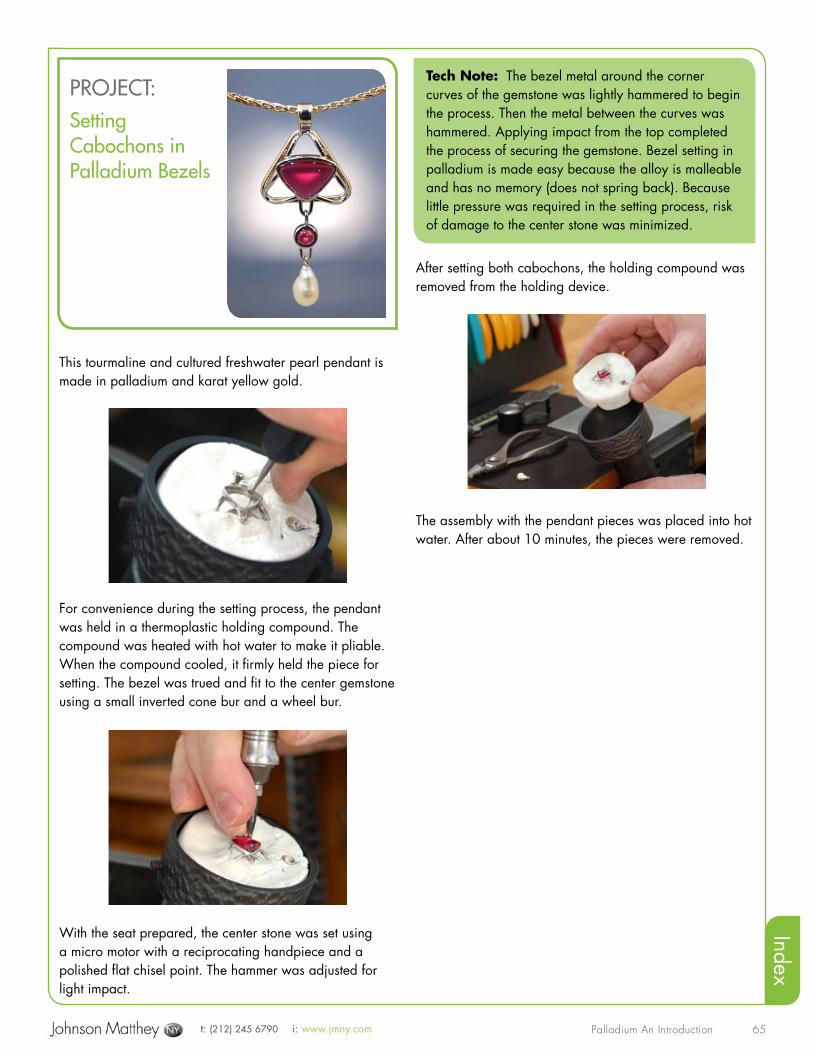
t: (212) 245 6790 i: www.jmny.com Palladium An Introduction
Index
65
This tourmaline and cultured freshwater pearl pendant is made in palladium and karat yellow gold.
For convenience during the setting process, the pendant was held in a thermoplastic holding compound. The compound was heated with hot water to make it pliable. When the compound cooled, it firmly held the piece for setting. The bezel was trued and fit to the center gemstone using a small inverted cone bur and a wheel bur.
With the seat prepared, the center stone was set using a micro motor with a reciprocating handpiece and a polished flat chisel point. The hammer was adjusted for light impact.
After setting both cabochons, the holding compound was removed from the holding device.
The assembly with the pendant pieces was placed into hot water. After about 10 minutes, the pieces were removed.
Tech Note: The bezel metal around the corner curves of the gemstone was lightly hammered to begin the process. Then the metal between the curves was hammered. Applying impact from the top completed the process of securing the gemstone. Bezel setting in palladium is made easy because the alloy is malleable and has no memory (does not spring back). Because little pressure was required in the setting process, risk of damage to the center stone was minimized.
PROJECT: Setting Cabochons in Palladium Bezels
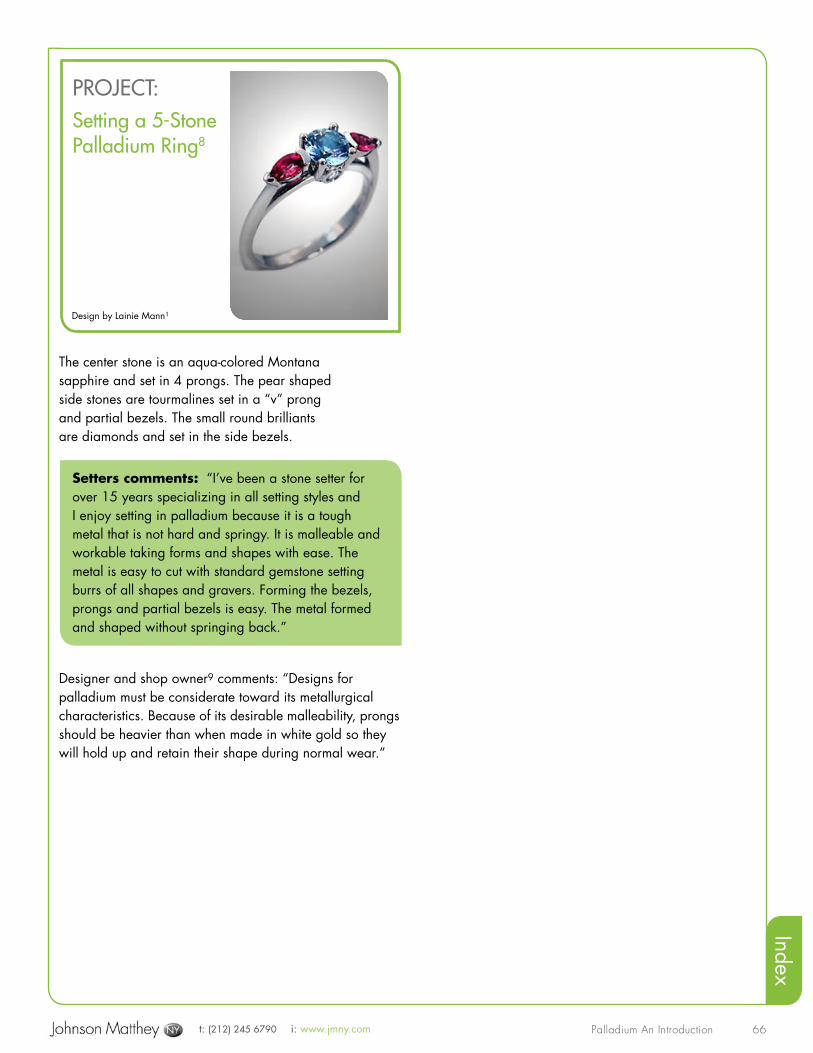
t: (212) 245 6790 i: www.jmny.com Palladium An Introduction
Index
66
The center stone is an aqua-colored Montana sapphire and set in 4 prongs. The pear shaped side stones are tourmalines set in a “v” prong and partial bezels. The small round brilliants are diamonds and set in the side bezels.
Designer and shop owner9 comments: “Designs for palladium must be considerate toward its metallurgical characteristics. Because of its desirable malleability, prongs should be heavier than when made in white gold so they will hold up and retain their shape during normal wear.”
Setters comments: “I’ve been a stone setter for over 15 years specializing in all setting styles and I enjoy setting in palladium because it is a tough metal that is not hard and springy. It is malleable and workable taking forms and shapes with ease. The metal is easy to cut with standard gemstone setting burrs of all shapes and gravers. Forming the bezels, prongs and partial bezels is easy. The metal formed and shaped without springing back.”
PROJECT: Setting a 5-Stone Palladium Ring8
Design by Lainie Mann¹
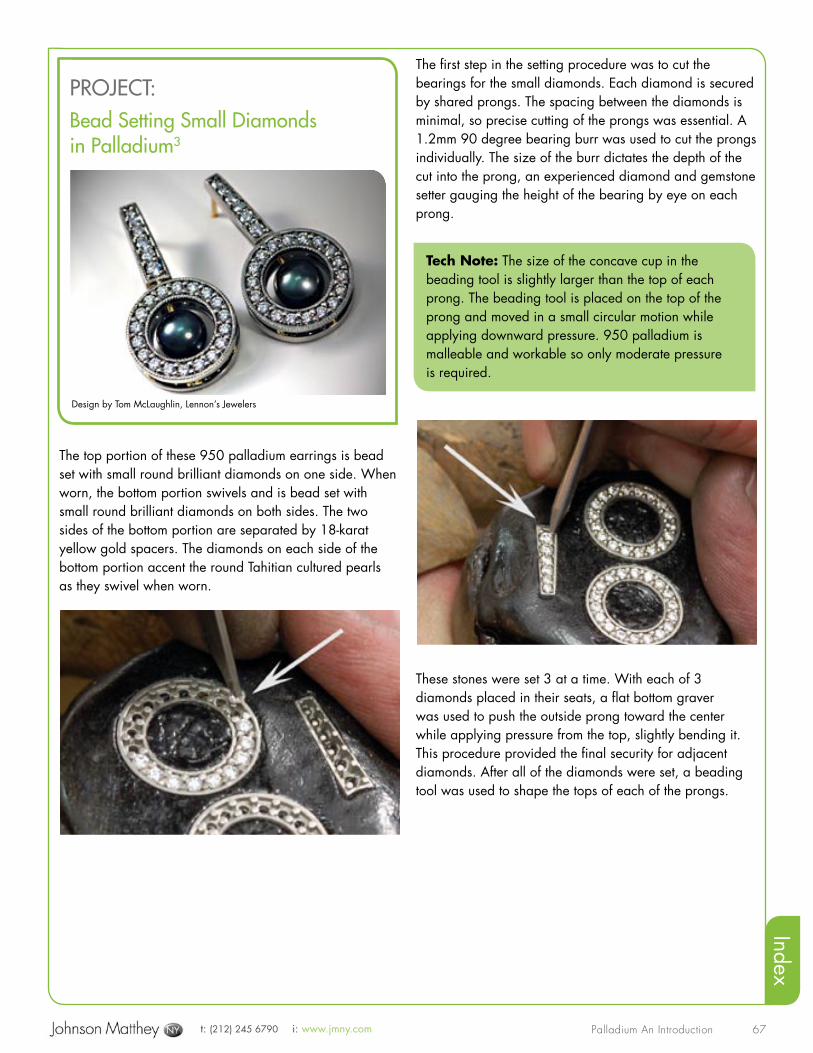
t: (212) 245 6790 i: www.jmny.com Palladium An Introduction
Index
67
The top portion of these 950 palladium earrings is bead set with small round brilliant diamonds on one side. When worn, the bottom portion swivels and is bead set with small round brilliant diamonds on both sides. The two sides of the bottom portion are separated by 18-karat yellow gold spacers. The diamonds on each side of the bottom portion accent the round Tahitian cultured pearls as they swivel when worn.
The first step in the setting procedure was to cut the bearings for the small diamonds. Each diamond is secured by shared prongs. The spacing between the diamonds is minimal, so precise cutting of the prongs was essential. A 1.2mm 90 degree bearing burr was used to cut the prongs individually. The size of the burr dictates the depth of the cut into the prong, an experienced diamond and gemstone setter gauging the height of the bearing by eye on each prong.
These stones were set 3 at a time. With each of 3 diamonds placed in their seats, a flat bottom graver was used to push the outside prong toward the center while applying pressure from the top, slightly bending it. This procedure provided the final security for adjacent diamonds. After all of the diamonds were set, a beading tool was used to shape the tops of each of the prongs.
Tech Note: The size of the concave cup in the beading tool is slightly larger than the top of each prong. The beading tool is placed on the top of the prong and moved in a small circular motion while applying downward pressure. 950 palladium is malleable and workable so only moderate pressure is required.
PROJECT: Bead Setting Small Diamonds in Palladium3
Design by Tom McLaughlin, Lennon’s Jewelers
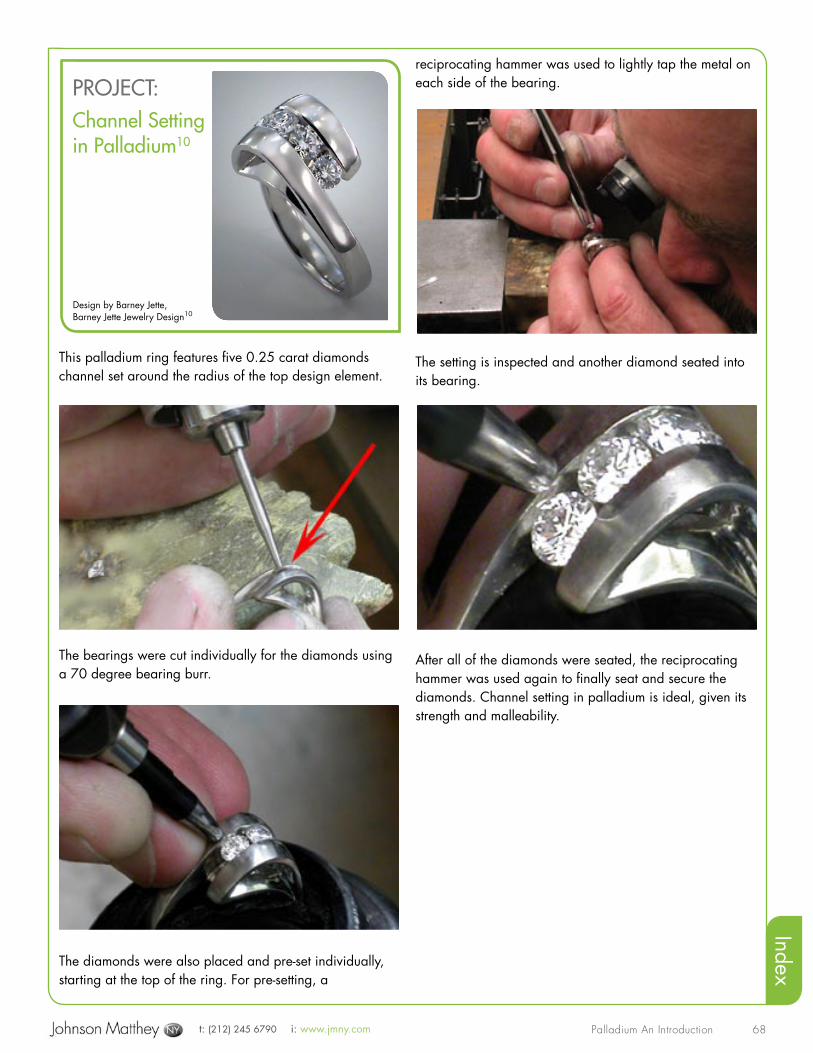
t: (212) 245 6790 i: www.jmny.com Palladium An Introduction
Index
68
This palladium ring features five 0.25 carat diamonds channel set around the radius of the top design element.
The bearings were cut individually for the diamonds using a 70 degree bearing burr.
The diamonds were also placed and pre-set individually, starting at the top of the ring. For pre-setting, a
reciprocating hammer was used to lightly tap the metal on each side of the bearing.
The setting is inspected and another diamond seated into its bearing.
After all of the diamonds were seated, the reciprocating hammer was used again to finally seat and secure the diamonds. Channel setting in palladium is ideal, given its strength and malleability.
PROJECT: Channel Setting in Palladium10
Design by Barney Jette,Barney Jette Jewelry Design10
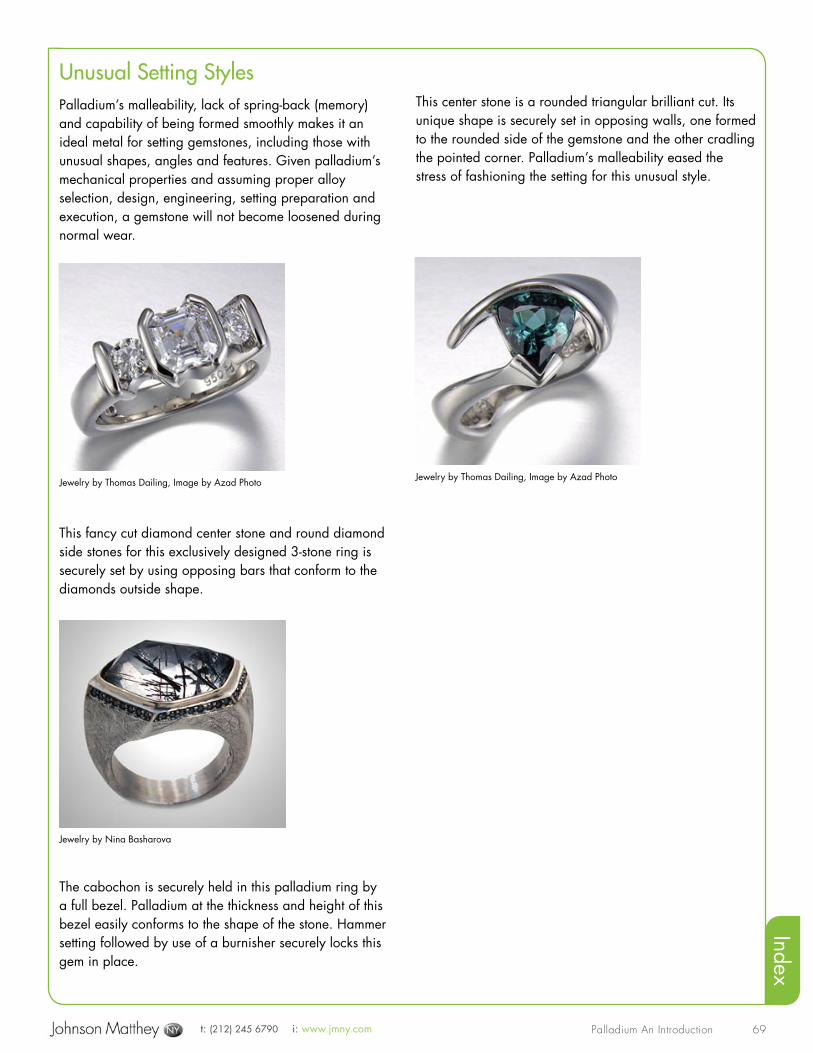
t: (212) 245 6790 i: www.jmny.com Palladium An Introduction
Index
69
Unusual Setting StylesPalladium’s malleability, lack of spring-back (memory) and capability of being formed smoothly makes it an ideal metal for setting gemstones, including those with unusual shapes, angles and features. Given palladium’s mechanical properties and assuming proper alloy selection, design, engineering, setting preparation and execution, a gemstone will not become loosened during normal wear.
This fancy cut diamond center stone and round diamond side stones for this exclusively designed 3-stone ring is securely set by using opposing bars that conform to the diamonds outside shape.
The cabochon is securely held in this palladium ring by a full bezel. Palladium at the thickness and height of this bezel easily conforms to the shape of the stone. Hammer setting followed by use of a burnisher securely locks this gem in place.
This center stone is a rounded triangular brilliant cut. Its unique shape is securely set in opposing walls, one formed to the rounded side of the gemstone and the other cradling the pointed corner. Palladium’s malleability eased the stress of fashioning the setting for this unusual style.
Jewelry by Thomas Dailing, Image by Azad Photo
Jewelry by Nina Basharova
Jewelry by Thomas Dailing, Image by Azad Photo
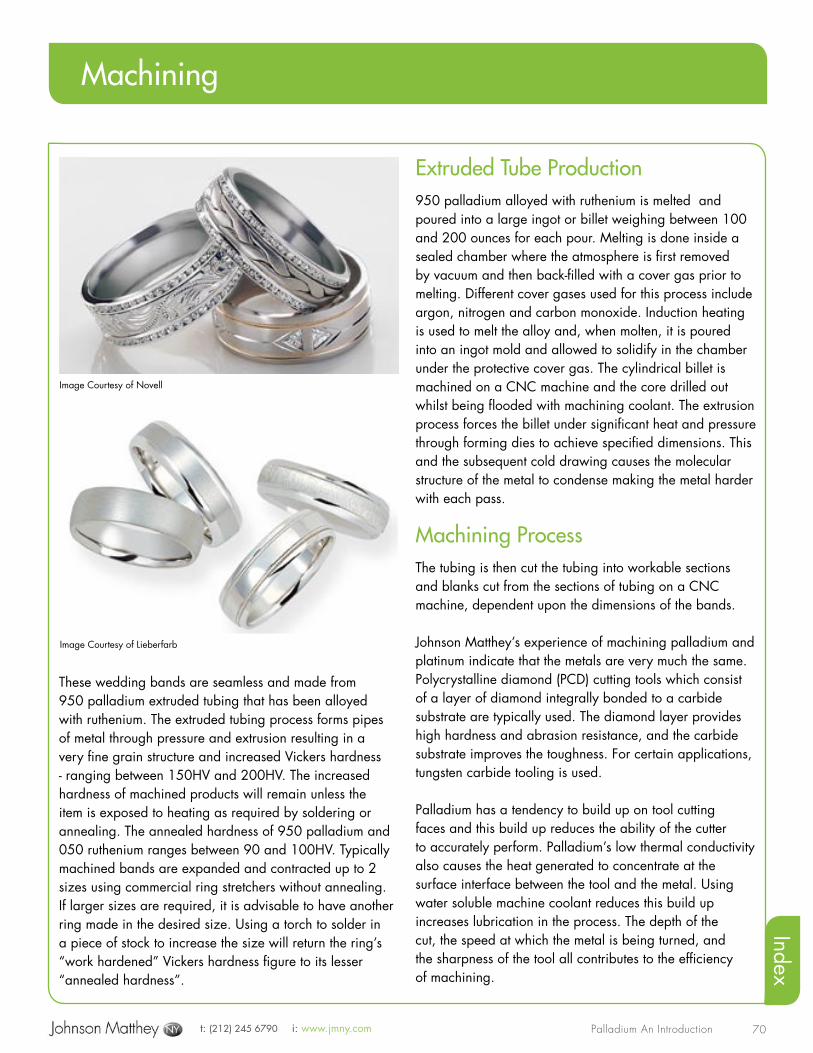
t: (212) 245 6790 i: www.jmny.com Palladium An Introduction
Index
70
These wedding bands are seamless and made from 950 palladium extruded tubing that has been alloyed with ruthenium. The extruded tubing process forms pipes of metal through pressure and extrusion resulting in a very fine grain structure and increased Vickers hardness - ranging between 150HV and 200HV. The increased hardness of machined products will remain unless the item is exposed to heating as required by soldering or annealing. The annealed hardness of 950 palladium and 050 ruthenium ranges between 90 and 100HV. Typically machined bands are expanded and contracted up to 2 sizes using commercial ring stretchers without annealing. If larger sizes are required, it is advisable to have another ring made in the desired size. Using a torch to solder in a piece of stock to increase the size will return the ring’s “work hardened” Vickers hardness figure to its lesser “annealed hardness”.
Extruded Tube Production950 palladium alloyed with ruthenium is melted and poured into a large ingot or billet weighing between 100 and 200 ounces for each pour. Melting is done inside a sealed chamber where the atmosphere is first removed by vacuum and then back-filled with a cover gas prior to melting. Different cover gases used for this process include argon, nitrogen and carbon monoxide. Induction heating is used to melt the alloy and, when molten, it is poured into an ingot mold and allowed to solidify in the chamber under the protective cover gas. The cylindrical billet is machined on a CNC machine and the core drilled out whilst being flooded with machining coolant. The extrusion process forces the billet under significant heat and pressure through forming dies to achieve specified dimensions. This and the subsequent cold drawing causes the molecular structure of the metal to condense making the metal harder with each pass.
Machining ProcessThe tubing is then cut the tubing into workable sections and blanks cut from the sections of tubing on a CNC machine, dependent upon the dimensions of the bands.
Johnson Matthey’s experience of machining palladium and platinum indicate that the metals are very much the same. Polycrystalline diamond (PCD) cutting tools which consist of a layer of diamond integrally bonded to a carbide substrate are typically used. The diamond layer provides high hardness and abrasion resistance, and the carbide substrate improves the toughness. For certain applications, tungsten carbide tooling is used.
Palladium has a tendency to build up on tool cutting faces and this build up reduces the ability of the cutter to accurately perform. Palladium’s low thermal conductivity also causes the heat generated to concentrate at the surface interface between the tool and the metal. Using water soluble machine coolant reduces this build up increases lubrication in the process. The depth of the cut, the speed at which the metal is being turned, and the sharpness of the tool all contributes to the efficiency of machining.
Machining
Image Courtesy of Novell
Image Courtesy of Lieberfarb
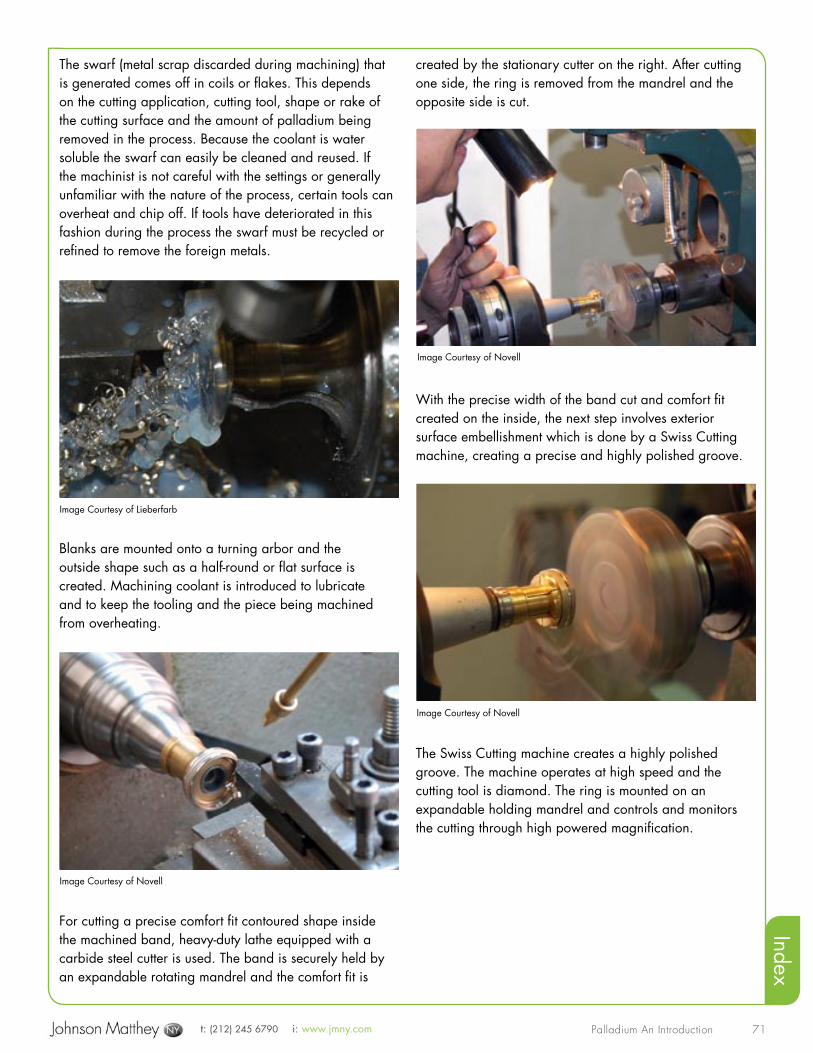
t: (212) 245 6790 i: www.jmny.com Palladium An Introduction
Index
71
The swarf (metal scrap discarded during machining) that is generated comes off in coils or flakes. This depends on the cutting application, cutting tool, shape or rake of the cutting surface and the amount of palladium being removed in the process. Because the coolant is water soluble the swarf can easily be cleaned and reused. If the machinist is not careful with the settings or generally unfamiliar with the nature of the process, certain tools can overheat and chip off. If tools have deteriorated in this fashion during the process the swarf must be recycled or refined to remove the foreign metals.
Blanks are mounted onto a turning arbor and the outside shape such as a half-round or flat surface is created. Machining coolant is introduced to lubricate and to keep the tooling and the piece being machined from overheating.
For cutting a precise comfort fit contoured shape inside the machined band, heavy-duty lathe equipped with a carbide steel cutter is used. The band is securely held by an expandable rotating mandrel and the comfort fit is
created by the stationary cutter on the right. After cutting one side, the ring is removed from the mandrel and the opposite side is cut.
With the precise width of the band cut and comfort fit created on the inside, the next step involves exterior surface embellishment which is done by a Swiss Cutting machine, creating a precise and highly polished groove.
The Swiss Cutting machine creates a highly polished groove. The machine operates at high speed and the cutting tool is diamond. The ring is mounted on an expandable holding mandrel and controls and monitors the cutting through high powered magnification.
Image Courtesy of Lieberfarb
Image Courtesy of Novell
Image Courtesy of Novell
Image Courtesy of Novell
t: (212) 245 6790 i: www.jmny.com Palladium An Introduction
Index
72
Holes for design embellishment or stone setting are systematically drilled using this machine. It is indexed and calibrated by the specialist and then allowed to drill the holes around the band with a minimum amount of operator attention.
Much of the finish work for machined bands such as diamond setting or final polishing is done by hand. Here diamond setters are pavé setting the side of a wedding band.
Examples:This 950 palladium wedding band features 4 rows of millgraining, a highly polished diagonal diamond pattern and other surface treatments which have all been machined. Hand polishing for this band was strictly limited to the inside and sides of the band.
This 950 palladium wedding band has 2 cut grooves into which rose gold is mechanically placed. In the next step a machined millgrain effect was applied. The recessed areas for the princess cut diamonds were also machined into the band, and then the setting done by hand.
Image Courtesy of Novell
Image Courtesy of Lieberfarb
Image Courtesy of Lieberfarb
Image Courtesy of Novell
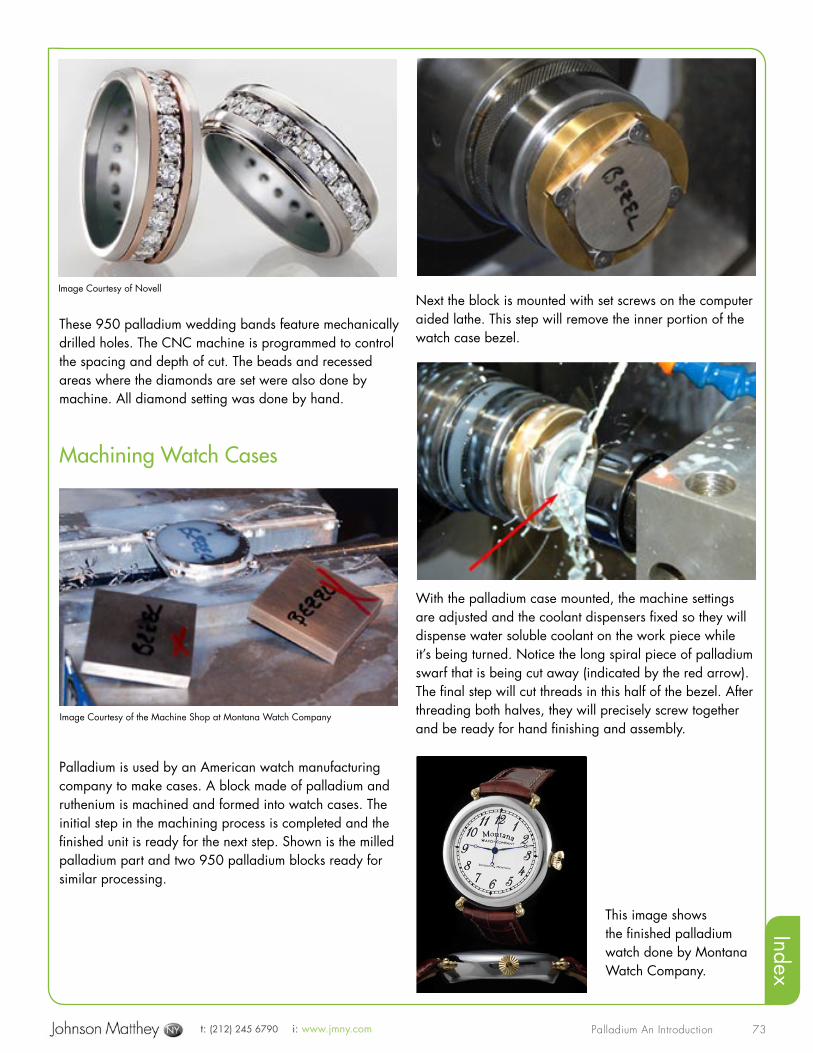
t: (212) 245 6790 i: www.jmny.com Palladium An Introduction
Index
73
These 950 palladium wedding bands feature mechanically drilled holes. The CNC machine is programmed to control the spacing and depth of cut. The beads and recessed areas where the diamonds are set were also done by machine. All diamond setting was done by hand.
Machining Watch Cases
Palladium is used by an American watch manufacturing company to make cases. A block made of palladium and ruthenium is machined and formed into watch cases. The initial step in the machining process is completed and the finished unit is ready for the next step. Shown is the milled palladium part and two 950 palladium blocks ready for similar processing.
Next the block is mounted with set screws on the computer aided lathe. This step will remove the inner portion of the watch case bezel.
With the palladium case mounted, the machine settings are adjusted and the coolant dispensers fixed so they will dispense water soluble coolant on the work piece while it’s being turned. Notice the long spiral piece of palladium swarf that is being cut away (indicated by the red arrow). The final step will cut threads in this half of the bezel. After threading both halves, they will precisely screw together and be ready for hand finishing and assembly.
This image shows the finished palladium watch done by Montana Watch Company.
Image Courtesy of Novell
Image Courtesy of the Machine Shop at Montana Watch Company

t: (212) 245 6790 i: www.jmny.com Palladium An Introduction
Index
74
Refining
Refining Palladium: The Six “C’s” Bring Best Return
Scrap Metal Retrieval Techniques
This following bench practices are suggested for the most efficient retrieval of metal from palladium jewelry manufacturing processes. Palladium scrap can be even more complex and costly to refine than platinum so for maximum returns, the process must begin long before you ‘box up’ the metal to send to the refiner.
Collect metals separately
Collect like metals separately. Do NOT mix palladium scrap with gold, silver, base metals, or even platinum - your return will be far greater with palladium-only submissions to your refiner. In addition, collect until you have a sufficient quantity to make refining cost effective per your refiner’s terms. Screen investment waste from any casting processes for hard metallic scrap.
Categorize your scrap
Keep separate: Hard metallic scrap - worn rings, failed castings, buttons and pieces from fabrication, Filings - bench filings, grinding scrap, machining swarf, Polishing Sweeps - dust from polishing machine and debris from dedicated pre-finishing stations).
Cleanliness = better returns
When beginning a palladium project at the bench, clean away the debris from previous projects. This will help you in avoiding working contamination and increase your palladium return on filings and hard metallic scrap.
Check your refiner’s terms
Understand refiners’ submission policies, pricing schedule and procedure for settlement, which should be clearly published, and follow their instructions carefully. You can maximize returns simply by following their guidelines (e.g. submitting sufficient quantity of scrap to avoid minimum handling costs). Check that they are following their
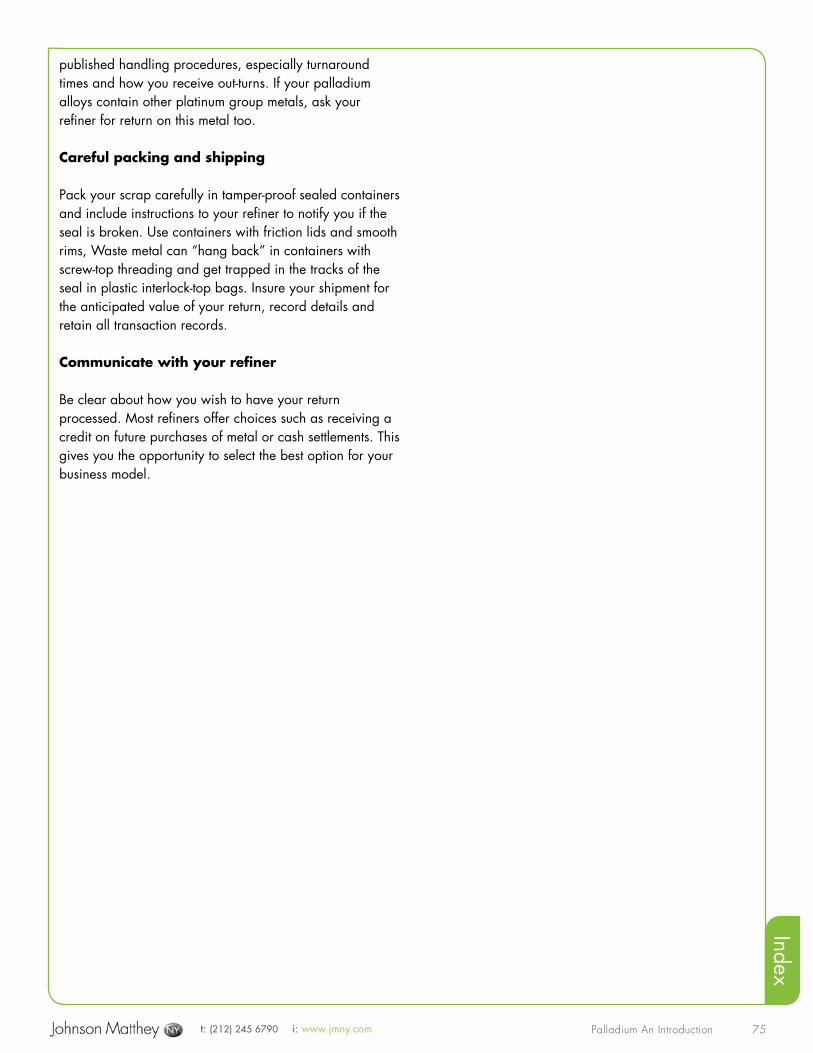
t: (212) 245 6790 i: www.jmny.com Palladium An Introduction
Index
75
published handling procedures, especially turnaround times and how you receive out-turns. If your palladium alloys contain other platinum group metals, ask your refiner for return on this metal too.
Careful packing and shipping
Pack your scrap carefully in tamper-proof sealed containers and include instructions to your refiner to notify you if the seal is broken. Use containers with friction lids and smooth rims, Waste metal can “hang back” in containers with screw-top threading and get trapped in the tracks of the seal in plastic interlock-top bags. Insure your shipment for the anticipated value of your return, record details and retain all transaction records.
Communicate with your refiner
Be clear about how you wish to have your return processed. Most refiners offer choices such as receiving a credit on future purchases of metal or cash settlements. This gives you the opportunity to select the best option for your business model.
t: (212) 245 6790 i: www.jmny.com Palladium An Introduction
Index
76
Die striking is a process used to form jewelry parts and findings. It is done by pressing or blanking sheet metal alloy between two dies using great pressure. The resulting compressed metal piece is finely detailed, hardened and shaped. There may be additional forming and production-soldering methods used after the initial blanking to complete jewelry components.
It is critical when die striking or blanking parts in palladium to consider its unique metallurgical characteristics such as its hardness, malleability and ductility. These features along with the intended use of the component (e.g. a setting, mechanical device, or bail) call for specific and unique engineering parameters of the parts to be made.
As one example, many of the parts die struck for jewelry use are settings for gemstones. These settings are typically 4 or 6 prong. After die striking, shaping and assembly these units are sold to jewelers who subsequently solder these components to jewelry and then set gemstones. If not properly designed, these settings can fail under the stress of normal wear. A costly example would be the twisting and deforming of a die struck setting during daily wear, allowing the gemstone it was holding to become dislodged.
Die Striking for Palladium
Settings:Here is a listing of considerations that are important when designing dies for striking palladium settings:
• Prong Thickness – The thickness of prongs must be adequate to hold a gemstone under the stress of normal wear. This thickness is proportionately greater than would be required for white gold parts due to the lower hardness and higher malleability of palladium.
• Total Height of the Setting – The height of settings should be proportional to the thickness of the prongs. If thin prongs are desired in a particular design style, lowering the setting height would create a good structural balance in the end product. Prongs of
substantial thickness could be made taller without compromising structural support.
• Taper of Settings – The taper from the base of a setting to the top of the prongs should be moderate. Settings that are tall and have narrow bases, or narrow prongs with large diameter tops (which is a common die struck design for white gold parts) will surely fail when made in palladium due to its malleability.
Earring Posts:Here is a listing of considerations that are important when designing dies for striking palladium earring posts:
• Post Diameter – the diameter of a palladium post must be greater than typically required for karat gold earring posts. This is due to the lower hardness and higher malleability compared to white gold alloys.
• Hardness of Palladium – The hardness of palladium after die striking is substantially greater than when cast. However, subsequent soldering operations— to attach these palladium parts to jewelry by torch soldering—will soften or anneal the metal. In die striking parts which will serve a structural or mechanical role in finished jewelry, it is advisable to use palladium alloys which possess greater hardness values over palladium alloys typically used for casting and other manufacturing procedures.
These die striking conventions apply for all palladium applications.
Die Striking
t: (212) 245 6790 i: www.jmny.com Palladium An Introduction
Index
77
Glossary
AnnealingThe process of heating work-hardened metals at a temperature targeted to cause recrystallization, which renders it soft and malleable.
AlloyA compound composed of two or more metals. Combinations of metals in calculated quantities result in alloys with qualities suitable for specific uses in manufacturing.
AssayThe process of analyzing and determining the amount of precious metal contained in ores, bullion and alloys.
BaguetteA small rectangular shaped diamond or other gemstone with parallel facets and a pavilion culminating in a keel.
BearingA seat or other supporting structure (for a gemstone) in a setting.
Bead SettingA setting method in which gemstones are set flush with the metal surface and secured by small, prong-like tabs of metal raised from the background with a graver and pushed down over the crown
Bezel SettingA type of setting in which the gemstone is seated in a frame that conforms to its shape, and secured by the thinner upper walls of the setting, which are pushed down around the perimeter of the gem’s crown. It is also referred to as a box setting for square and other geometric shaped stones.
BullionPrecious metal in the form of bars or ingots
BurnishingMaking a smooth, highly polished surface by rubbing (metal) with a polished steel burnishing tool. This process ‘moves’ metal rather than removing it. The technique is also used in setting to work metal over the edge of
gemstones to hold them.
CabochonA facet-less gem cutting style that produces single-surface, convex (usually domed) forms on the top surface. There is no pavilion on a cabochon, rather a flat or varied shaped back often depending on the gem material.
CaratThe carat is a unit of mass used for measuring gemstones and pearls equal to 200 milligrams.
CarborundumSilicon carbide (SiC), 9.5 hardness on Mohs scale made by fusing sand and coke in an electric furnace, grinding and grading. It is used as an abrasive material in granular form and made into grinding wheels and stones.
CastabilityThe ability of an alloy to be melted, poured into a mold, retain sufficient fluidity, take up an accurate detailed impression of the mold cavity and be extracted without cracking.
Casting GrainMetals, usually alloys, prepared for melting to cast. Small gravel sizes allow for more efficient weighing of metal and for faster, even melting
Casting TemperatureThe temperature at which a flask is held before casting. This hold temperature is determined by several factors including the mass, dimensions, detail, and structure of the mold, single or multiple pieces being cast and the casting alloy.
Cold-WorkedReduced (by rolling, forging or drawing) or worked (by bending or embossing) sufficiently below annealing temperature to cause strain-hardening.
ColletThe enclosing metal collar within which a gemstone is set. A collet may take the form of an open-ended cylinder or truncated cone.

t: (212) 245 6790 i: www.jmny.com Palladium An Introduction
Index
78
GlossaryCorundumAlumina (Al203), used finely ground as an abrasive/polishing compound and also as a refractory.
Crown (facets)The upper part of a faceted gemstone above the girdle, including the table and surrounding facets.
Crown HeightThe vertical distance between the girdle and the table of a gemstone.
CrucibleA vessel made of refractory material, used for melting (alloys) at high temperatures.
CuletThe small facet at the base of the pavilion of a (usually) brilliant cut stone parallel to the table.
Cure TimeThe period of time after a flask has been prepared and set aside to dry or harden. Cure time is determined by a number of factors which include flask size, mold volume and wax devesting method.
DomingHammering metal sheet or a pre-cut circle with a spherical ended punch down into a corresponding hemispherical hollow in a block to form a dome. Also called ‘dapping’, various degrees of convexity may be achieved through a series of punches and hollows.
Diamond BurAbrasive hand tools including burs, wheels and drills made with embedded diamond grains mounted on metal.
Diamond FileA copper filing tool into which diamond powder has been hammered.
Diamond LapAbrasive wheel or file, made of (usually) copper or other soft metal and charged with pulverized diamond.
Ductile (ductility)Capable of being drawn (usually cold) into wire or tube, hammered, rolled or die struck without fracture. Ductility is usually measured by the % of elongation and % of reduction in a tensile test.
Die StruckProduced by pressing or striking alloys in solid form between two dies using great pressure . The compressed metal piece is finely detailed, hardened and stronger.
EmeryAn impure granular form of natural corundum used for centuries as an abrasive material. Consisting of a mixture of corundum and magnetite or hematite, emery has been largely superceded by synthetic alumina (corundum) for more controlled grinding.
EmissivityThe rate of loss of heat from unit area in unit time at a given temperature (usually in the context of the surface of a melt). Very dependent on the principal wavelengths radiated and the character of the surface.
FeedingThe process of feeding still molten metal through gates, sprues and into the castings, to compensate for contraction as castings solidify. Can be gravity or otherwise pressurized.
FinenessPrecious metal content expressed in parts per thousand (ppt).
FlaskThe outer, open-ended cylindrical container of an investment casting mold from the investment process through to the retrieval of the finished casting.
FluidityThe ability of molten alloy to flow into and take up an accurate impression of a mold cavity before solidifying.
Flush SettingA specific style of burnish setting in which the tables of the gemstones are flush (on the same plane) with the background surface. The gemstone is set by burnishing metal around the edge(s) of the crown and usually accented by a bright-cut around the perimeter.
FluxInorganic mixture fusing at a lower temperature than melting/soldering/welding an alloy. Flux cleans exposed surfaces and protects against reactions such as oxidation that impair the melt or joint.
t: (212) 245 6790 i: www.jmny.com Palladium An Introduction
Index
79
Fusing PointThe temperature at which metal begins to melt.
GateAn opening in a mold to permit entry of molten alloy.
GirdleThe outermost series of flat perpendicular planes around the perimeter of a cut gemstone, the girdle divides the crown and pavilion of the faceting pattern and provides the surfaces by which the stone is held in a setting.
Grains (or beads)A decoration medium usually achieved by fusing tiny scraps of metal to form spheres by way of surface tension.
GranulationDecoration consisting of attaching tiny sphere-like granules in various lines, patterns and shapes by fusion to a surface.
GraverA cutting tool used for engraving metal.
Green GoldAn alloy containing a high proportion of silver.
HallmarkingApplicable only to gold, silver and platinum goods stamped as good by UK assay offices subject to the UK Hallmarking Act, but often applied unofficially to marking in other countries as well.
Hydrochloric AcidAn aqueous solution of hydrogen chloride gas.
Induction MeltingHeating to above the melting point by generating eddy currents within a conducting material surrounded by a water-cooled copper coil carrying an alternating current at medium (>150Hz) or high (>1kHz) frequency. Also creates a stirring effect.
InvestmentA refractory material composed of (usually) crystobalite, gypsum, silicus and modifying agents. It is mixed with water to form a slurry that is poured into a flask containing wax or plastic models then vacuumed to set around the models forming a mold.
Jewelers RougeFinely ground red to purple ferric oxide, often bonded with wax, polishing medium for jewelry metals which tends to burnish rather than cut.
JointThe area where two fitted ends or separate metal components align flush for joining
KaratA unit of purity or fineness of precious metals: 24 karat = 100% (pure). Therefore an 18 karat alloy has 18/24, or 75% precious metal content.
Keel (line)The long facet junction at the base of the pavilion of a (usually) step-cut stone, parallel to the table.
LaserLight amplification by stimulated emission of radiation results in brilliant beam of monochromatic light that is highly directional and may be focused.
Laser PulsingThe operating parameters of a laser machine are effectively controlled by the intensity length (duration) and frequency of repetition of pulses. Intensity is controlled by energizing voltage and the area targeted.
Laser WeldingThe light beam emitted by a laser is focused on a small area to generate heat at megawatts/cm_ with rapid pulsing. The focused energy is sufficient to cause welding (not necessarily needing to melt the metal) of thin sections.
LiquidusA line on an equilibrium or constitutional diagram (which plots the disposition of phases in an alloy with temperature and composition) above which the only stable phase is liquid (molten) metal.
t: (212) 245 6790 i: www.jmny.com Palladium An Introduction
Index
80
Lost-Wax (Investment) CastingA casting technique adapted from the centuries old method for sculpture, the lost-wax method can produce intricate jewelry castings to close tolerances. Wax models are set up in the investment along with a gate to the surface through which the melted wax will evacuate, leaving a mold cavity. By various casting processes, molten metal is forced into the mold cavity , cooled and removed from the investment—producing a metal replica of the original model.
MachinabilityA qualitative term suggesting the relative ability of a metal to be cut in a machining operation with minimum power, producing a good surface finish, clearing swarf efficiently, all at maximum speed.
MalleableCapable of being hammered or rolled extensively without excessive work-hardening and cracking. Malleability usually increases with temperature, except for hot-shortness (brittleness at high temperature during working).
Mandrel Tube-DrawingUses a hard straight rod or wire to form the inside cross-section of a tube during cold-drawing through a die, so reducing the wall thickness. Used for short lengths, as opposed to plug-drawing longer tubes.
MillegrainA setting tool consisting of a fine wheel used to roll a millegrain border around the edge of a box or bezel setting around a stone. The tool is also used to produce a decorative edging along bright cutting or to embellish engraved work.
Mokume Gane (“Wood-Eye Metal”)A 17th century technique of Japanese metal smiths who created laminated metal billets consisting of layers of various combinations of alloys, which were then forged, carved and finished to produce uniquely patterned metal stock—resembling a wood grain pattern—for use in adorning samurai swords. A handful of talented craftsmen now employ the traditional methods to create contemporary jewelry which highlights the unique beauty of the ‘married metals’.
PaillonsSmall pieces of solder clipped from foil, thin strip or sheet. They are ready to use, placed at intervals
across the targeted joint zone and progressively flowed by a controlled flame.
Pattern (model)A master (metal) or consumable (wax) model of a component to be reproduced by casting.
Pavilion (facets)The lower parts of a faceted gemstone below the girdle, including the culet on brilliant cuts or the bottom junction called the keel line on step cuts (e.g. the baguette).
Phosphate-Based InvestmentInvestment with acid-phosphate and magnesia, which first gels silica flour and then bonds it by subsequent dehydration. The working time is rapidly decreased by increasing temperature.
Platinum Group Metals (PGM’s)While platinum occurs native as the metal, it is rarely mined pure. It is often found alloyed with rhodium, osmium, palladium, iridium, and/or ruthenium—collectively the platinum group of metals.
Prong SettingPrecision cast or fabricated setting with prongs of various shape (suggested by the shape of the gem— round, bar, corner, V-shape, etc.) strategically positioned for holding gemstones.
QuenchingRapid cooling in a fluid which can be a cool air blast, but is more commonly water.
Reducing FlameA melting, annealing, soldering or welding torch flame with more gas than can combine with the injected oxygen or air.
Refractory (materials)High melting point materials used for furnace linings, crucibles and molds. Important considerations for these are a suitable binder to hold the refractory particles together, thermal shock resistance, acidity/basicity and surface finish.
t: (212) 245 6790 i: www.jmny.com Palladium An Introduction
Index
81
RollingThe most used cold-working process for jewelry alloys. Uses plain faced polished rolls for sheet and strip: grooved rolls for bar, rod, and simple sections; patterned rolls for continuous embossing.
RutheniumA rare polyvalent metallic element belonging to the platinum group of metals. Symbol: Ru; atomic weight: 101.07; atomic number: 44; specific gravity: 12.2 at 20 degrees C. SilicaSilicon dioxide selectively processed to form refractory and abrasive materials. Exits as quartz, tridymite or crystobalite crystalline phases in equilibrium at increasing temperatures.
SolderingJoining metal or alloy components by fusing together with a further lower melting point alloy known as a solder. Often uses capillary forces to draw the solder into the joint.
SpinningForming sheet metal into cups by pushing a smooth-ended tool against the spinning sheet to force it onto a form of the shape required.
Spot WeldingJoining process, usually on overlapping sheet and strip, by a short pulse of electric current led in through copper electrodes with punch pressure applied to weld a spot at the interface heated by local resistance to or near melting point.
SpringinessHaving a relatively high elastic limit. The alloy, usually cold-worked may be deformed elastically and springs back to the original shape with little loss of energy.
Sprue Wax wire feed system for wax patterns for the casting process. Forms the channel for the melt to be propelled from the gate to the casting cavity.
Stress RelieveLow temperature heat treatment reducing peak internal stresses (mainly after cold-work).
SwarfAn accumulation of metal cut or ground from work by a machine tool or grinder.
TripoliA jewelry polishing compound consisting of very fine diatomaceous silica whose texture is porous and absorptive, suspended in a waxy medium and loaded onto the face of a polishing wheel for medium and fine polishing stages. Wax ModelsWax replicas of a master model or pattern (made by injection of molten wax into rubber or metal molds).
WeldingJoining process in which no solder is used and the components are joined by mutual fusion with or without flux.
Wet and Dry PaperWaterproof paper coated with carefully graded and oriented silicon carbide particles (carborundum). Used for pre-finishing between the filing and polishing stages.
White RadiationMixed wavelength radiation in the visible light range of the spectrum.
Work-HardenThe increase in hardness which accompanies plastic deformation in a metal. Alloying usually increases the work-hardening rate of a pure metal and increasing working temperature decreases the rate.
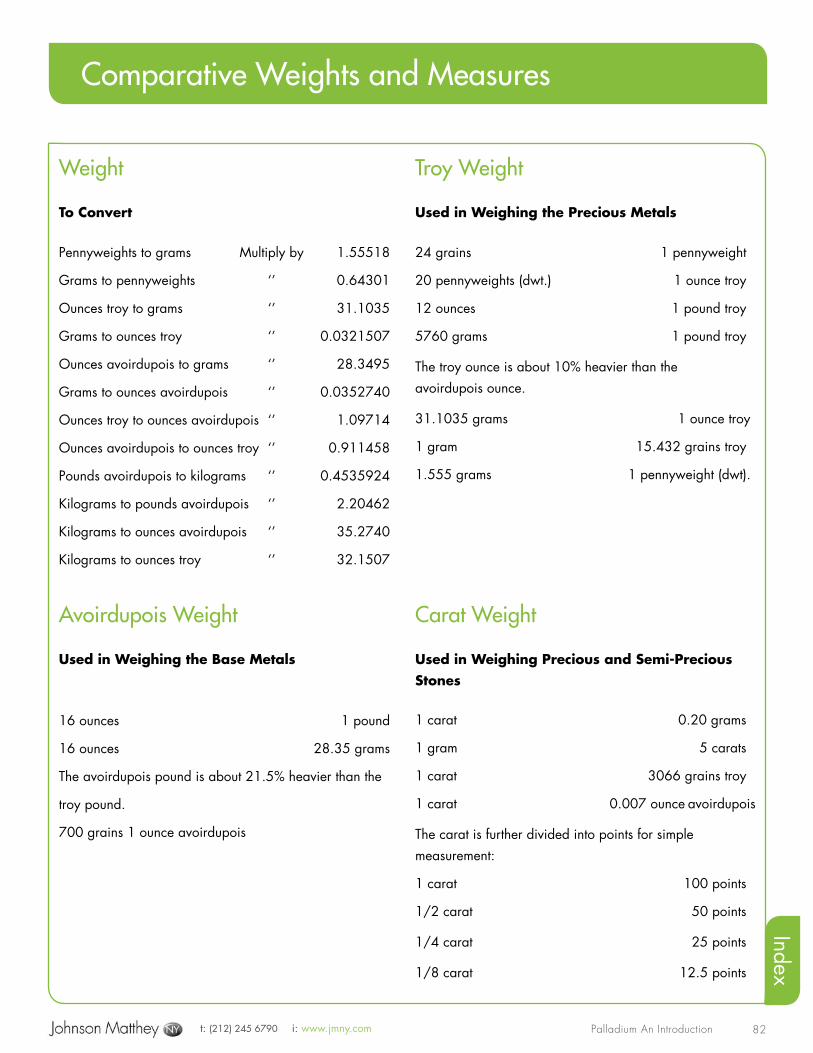
t: (212) 245 6790 i: www.jmny.com Palladium An Introduction
Index
82
Weight
To Convert
Pennyweights to grams Multiply by 1.55518
Grams to pennyweights ‘’ 0.64301
Ounces troy to grams ‘’ 31.1035
Grams to ounces troy ‘’ 0.0321507
Ounces avoirdupois to grams ‘’ 28.3495
Grams to ounces avoirdupois ‘’ 0.0352740
Ounces troy to ounces avoirdupois ‘’ 1.09714
Ounces avoirdupois to ounces troy ‘’ 0.911458
Pounds avoirdupois to kilograms ‘’ 0.4535924
Kilograms to pounds avoirdupois ‘’ 2.20462
Kilograms to ounces avoirdupois ‘’ 35.2740
Kilograms to ounces troy ‘’ 32.1507
Troy Weight
Used in Weighing the Precious Metals
24 grains 1 pennyweight
20 pennyweights (dwt.) 1 ounce troy
12 ounces 1 pound troy
5760 grams 1 pound troy
The troy ounce is about 10% heavier than the avoirdupois ounce.
31.1035 grams 1 ounce troy
1 gram 15.432 grains troy
1.555 grams 1 pennyweight (dwt).
Comparative Weights and Measures
Avoirdupois Weight
Used in Weighing the Base Metals
16 ounces 1 pound
16 ounces 28.35 grams
The avoirdupois pound is about 21.5% heavier than the
troy pound.
700 grains 1 ounce avoirdupois
Carat Weight
Used in Weighing Precious and Semi-Precious Stones
1 carat 0.20 grams
1 gram 5 carats
1 carat 3066 grains troy
1 carat 0.007 ounce avoirdupois
The carat is further divided into points for simple measurement:
1 carat 100 points
1/2 carat 50 points
1/4 carat 25 points
1/8 carat 12.5 points
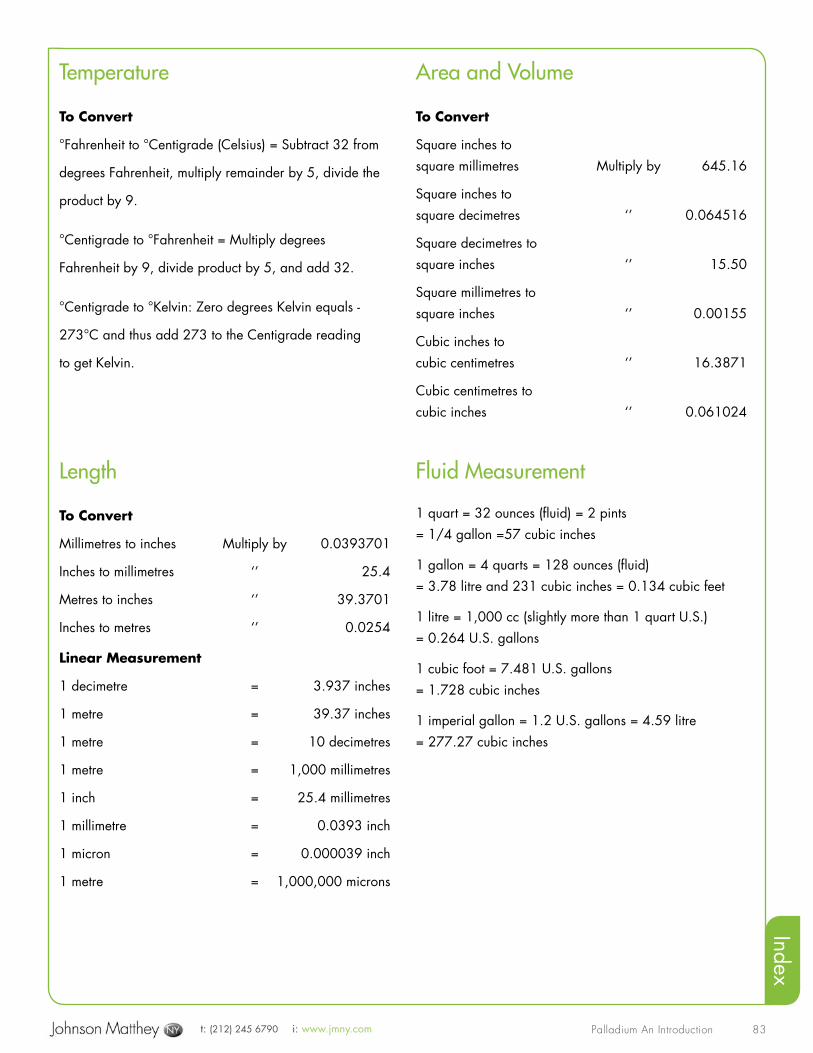
t: (212) 245 6790 i: www.jmny.com Palladium An Introduction
Index
83
Temperature
To Convert
°Fahrenheit to °Centigrade (Celsius) = Subtract 32 from
degrees Fahrenheit, multiply remainder by 5, divide the
product by 9.
°Centigrade to °Fahrenheit = Multiply degrees
Fahrenheit by 9, divide product by 5, and add 32.
°Centigrade to °Kelvin: Zero degrees Kelvin equals -
273°C and thus add 273 to the Centigrade reading
to get Kelvin.
Length
To Convert
Millimetres to inches Multiply by 0.0393701
Inches to millimetres ‘’ 25.4
Metres to inches ‘’ 39.3701
Inches to metres ‘’ 0.0254
Linear Measurement
1 decimetre = 3.937 inches
1 metre = 39.37 inches
1 metre = 10 decimetres
1 metre = 1,000 millimetres
1 inch = 25.4 millimetres
1 millimetre = 0.0393 inch
1 micron = 0.000039 inch
1 metre = 1,000,000 microns
Area and Volume
To Convert
Square inches to square millimetres Multiply by 645.16
Square inches to square decimetres ‘’ 0.064516
Square decimetres to square inches ‘’ 15.50
Square millimetres to square inches ‘’ 0.00155
Cubic inches to cubic centimetres ‘’ 16.3871
Cubic centimetres to cubic inches ‘’ 0.061024
Fluid Measurement
1 quart = 32 ounces (fluid) = 2 pints = 1/4 gallon =57 cubic inches
1 gallon = 4 quarts = 128 ounces (fluid) = 3.78 litre and 231 cubic inches = 0.134 cubic feet
1 litre = 1,000 cc (slightly more than 1 quart U.S.) = 0.264 U.S. gallons
1 cubic foot = 7.481 U.S. gallons = 1.728 cubic inches
1 imperial gallon = 1.2 U.S. gallons = 4.59 litre = 277.27 cubic inches
t: (212) 245 6790 i: www.jmny.com Palladium An Introduction
Index
84
Credits
Johnson Matthey wishes to acknowledge the following technical experts for their input and contributions:
1 Lainie Mann & Schuyler Mann, Mann Design Group, Corvallis, MT: Lainie - Jewelry designs and wax modeling used for example projects, jewelry design annotations, technical research and editing. Schuyler - 3D design layout and wax model making of projects cast and used for research.
2 Scott Kay, Scott Kay, Inc., Teaneck, NJ: Provision of palladium jewelry images.
3 Tom McLaughlin, Lennon’s Jewelers, Syracuse, NY: Jewelry designs, finished projects, stone setting and workmanship annotations.
4 Stephen Adler, Automated 3D Modeling, Rye, NH: Rapid prototype model for casting.
5 Teresa Frye, TechForm Advanced Casting, Portland, OR: Allowing on-site photography of casting facility, casting research and production of cast pieces for manufacturing research.
6 Steece Hermanson, Heirloom Hand Engraving, Sumter, SC: Hand engraving project and hand engraving annotations.
7 Brenda Warburton, Austin & Warburton, Ann Arbor, MI: Laser Welding research, jewelry design and palladium working characteristic annotations. Provision of images by Craig Warburton.
8 Vidi Beccera, Holman Design Group, Dallas, TX: Stone setting annotations.
9 William Holman, Holman Design Group, Dallas, TX: Stone setting, engraving and workmanship annotations.
10 Barney Jette & Rod Smith, Barney Jette Jewelry Design, Missoula, MT: Channel setting project and setting annotations.
11 Novell, Novell Design Studio, Roselle, NJ: Provision of palladium jewelry images and machining expertise of seamless extruded tubing.
Stewart Grice & Fred Klotz, Hoover and Strong, Richmond, VA: Loan provision of palladium mountings and mill products used for examples research and ongoing technical metallurgical annotations.
Leiberfarb, Orange, NJ: Provision of palladium jewelry images and maching expertise of seamless extruded tubing.
Thomas Dailing Designs: Provision of palladium jewelry design and manufacturing annotations and for supplying images for award winning palladium jewelry designs and workmanship. Dailing jewelry images taken by “Azad Photo”.
Johnson Matthey extruded and machining experts, Pennsylvania for sharing expertise with related content.
Some images or content from this manual was first published in Jewelers Circular Keystone (JCK).
All technical content produced by Mark B. Mann, President of Mann Design Group.
Content and images, copyright Johnson Matthey Public limited Company.
Photographs by Mark B. Mann, Mann Design Group except where noted.
This information is provided without warranty, either expressed or implied. The procedures can be harmful if not executed properly and are undertaken at the reader’s own risk. The author and publisher are not responsible for injuries, losses or other damages that may result form use of this information.