Embed Size (px)
Citation preview
092-100 PARALLEL TO SERIES CHANGEOVER SWITCH
LUDO McGURK SVELUDO McGURK SVELUDO McGURK SVELUDO McGURK SVE UNIT 3 CROSSFIELD ROAD, HANDFORTH, CHESHIRE, SK9 3LN.
TEL: +44 1625 527 673 WEB: www.ludomcgurk.co.uk
FAX: +44 1625 549 929 EMAIL: [email protected]
- 1 -
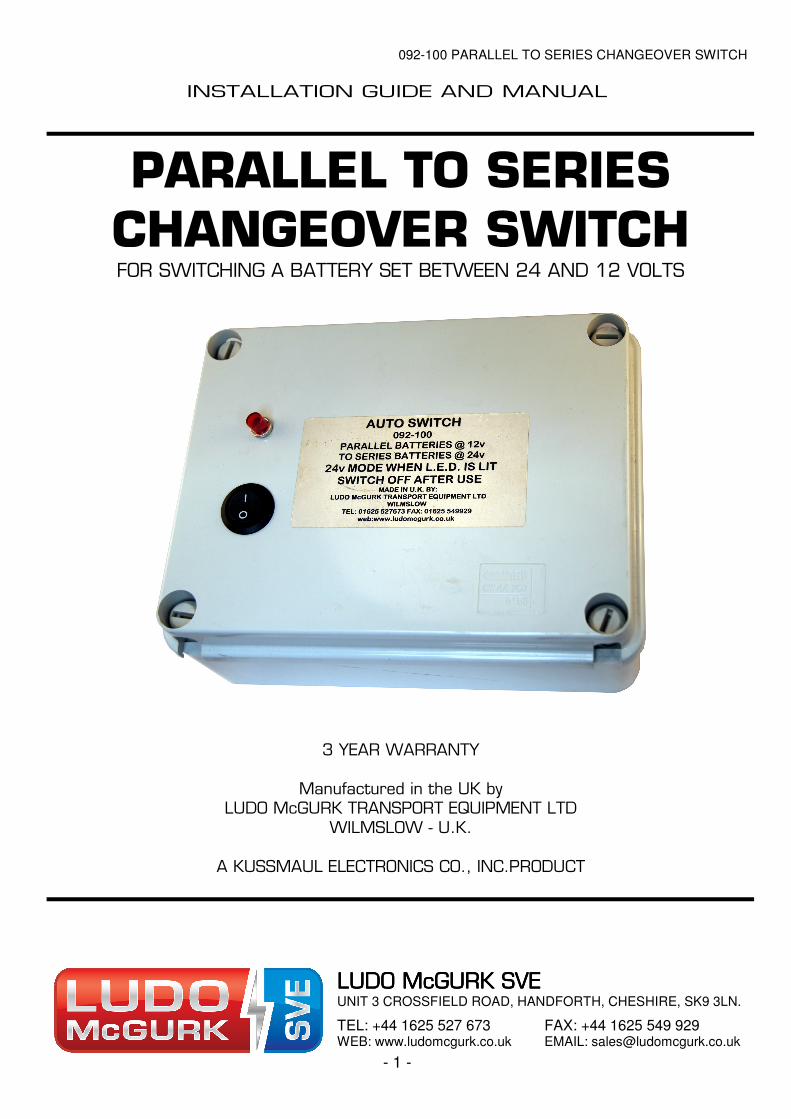
INSTALLATION GUIDE AND MANUAL
PARALLEL TO SERIES
CHANGEOVER SWITCH FOR SWITCHING A BATTERY SET BETWEEN 24 AND 12 VOLTS
3 YEAR WARRANTY
Manufactured in the UK by LUDO McGURK TRANSPORT EQUIPMENT LTD
WILMSLOW - U.K.
A KUSSMAUL ELECTRONICS CO., INC.PRODUCT
092-100 PARALLEL TO SERIES CHANGEOVER SWITCH
LUDO McGURK SVELUDO McGURK SVELUDO McGURK SVELUDO McGURK SVE UNIT 3 CROSSFIELD ROAD, HANDFORTH, CHESHIRE, SK9 3LN.
TEL: +44 1625 527 673 WEB: www.ludomcgurk.co.uk
FAX: +44 1625 549 929 EMAIL: [email protected]
- 2 -
1.INTRODUCTION
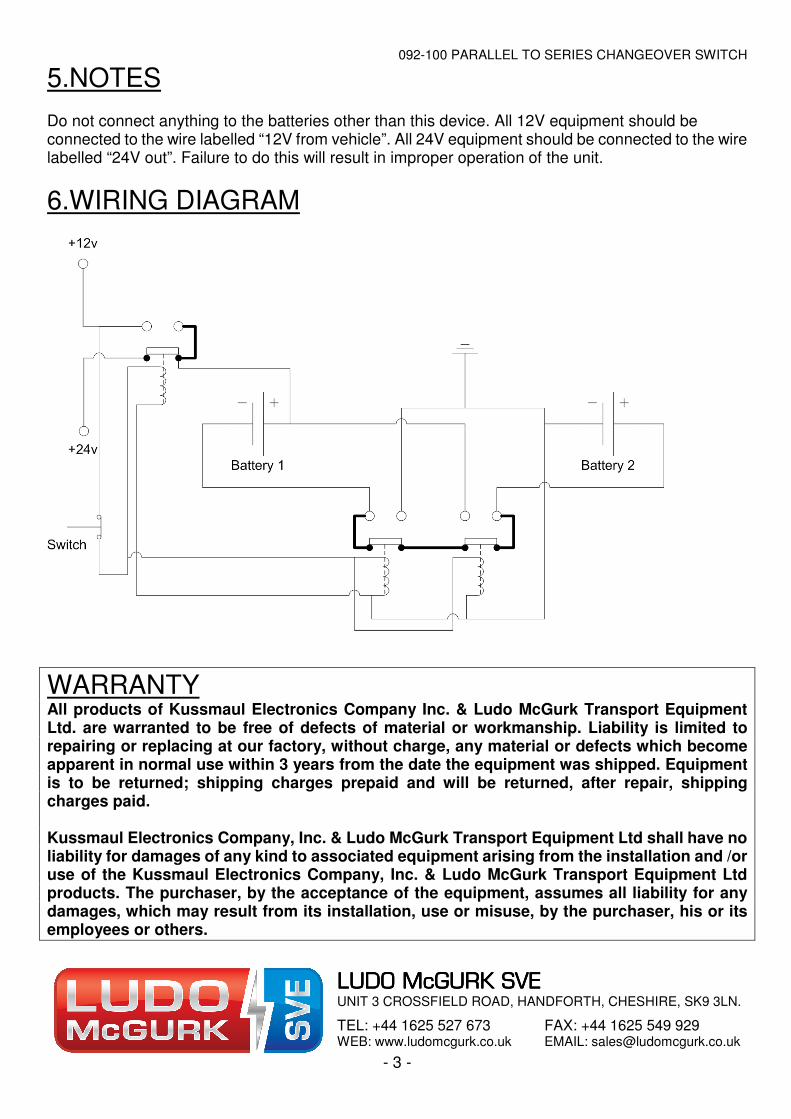
This document defines the installation and wiring for the 092-100 Parallel To Series Changeover Switch. The parallel to series changeover switch provides a momentary 24V power source from two batteries that are normally connected in Parallel. When the rocker switch on the front of the device is put in the ‘I’ position, the batteries are switched into a series configuration. The 12V power supply is disconnected and the unit supplies 24V.
2.SYSTEM SPECIFICATION
Max Current Rating: 30A Continuous
3.INSTALLATION To install the unit, complete the following steps:
1. Mount the unit in a suitable position using the four screw holes provided inside the case. 2. Connect the wire labelled “BAT1-“ to the negative terminal of the first battery. DO NOT
CONNECT THE NEGATIVE TERMINAL OF THIS BATTERY TO COMMON GROUND. 3. Connect the wire labelled “BAT1+” to the positive terminal of the first battery. 4. Connect the wire labelled “BAT2- + E” to the negative terminal of the second battery, and also
connect this wire to the common ground. This can be the chassis or the ground wires of all electrical equipment.
5. Connect the wire labelled “BAT2+” to the positive terminal of the second battery. 6. With the rocker switch in the ‘0’ position, and no charging source connected, a voltage of
approximately 12V should be present at the wire labelled “12V from vehicle”. A voltage of 0V should be present on the wire labelled “24V out”.
7. Switch the rocker switch to the ‘I’ position. The relays in the device should operate. With the switch still pressed, check that the wire labelled “12V from vehicle” has a voltage of 0V and the wire labelled “24V out” has a voltage of approximately 24V.
8. Connect the wire labelled “12V from vehicle” to the 12V charging source. This can be either a 12V battery charger or the trailer connector.
Connect the wire labelled “24V out” to the 24V equipment that is to be powered by this unit.
4.OPERATION
When a 12V charging source is connected both batteries will be charged in parallel. Upon switching the rocker switch to the ‘I’ position, the battery charger will be disconnected and the 24V equipment will operate.
092-100 PARALLEL TO SERIES CHANGEOVER SWITCH
LUDO McGURK SVELUDO McGURK SVELUDO McGURK SVELUDO McGURK SVE UNIT 3 CROSSFIELD ROAD, HANDFORTH, CHESHIRE, SK9 3LN.
TEL: +44 1625 527 673 WEB: www.ludomcgurk.co.uk
FAX: +44 1625 549 929 EMAIL: [email protected]
- 3 -
5.NOTES
Do not connect anything to the batteries other than this device. All 12V equipment should be connected to the wire labelled “12V from vehicle”. All 24V equipment should be connected to the wire labelled “24V out”. Failure to do this will result in improper operation of the unit.
6.WIRING DIAGRAM
WARRANTY
All products of Kussmaul Electronics Company Inc. & Ludo McGurk Transport Equipment Ltd. are warranted to be free of defects of material or workmanship. Liability is limited to repairing or replacing at our factory, without charge, any material or defects which become apparent in normal use within 3 years from the date the equipment was shipped. Equipment is to be returned; shipping charges prepaid and will be returned, after repair, shipping charges paid. Kussmaul Electronics Company, Inc. & Ludo McGurk Transport Equipment Ltd shall have no liability for damages of any kind to associated equipment arising from the installation and /or use of the Kussmaul Electronics Company, Inc. & Ludo McGurk Transport Equipment Ltd products. The purchaser, by the acceptance of the equipment, assumes all liability for any damages, which may result from its installation, use or misuse, by the purchaser, his or its employees or others.


![Product sheet extended€¦ · LTS - Load Transfer Switch [Accessories for ACP Automatic Control Panel] The Load Transfer Switch (LTS) panel operates the power supply changeover between](https://img.pdfslide.net/doc/110x75/604baa402bd4a154a6763b39/product-sheet-extended-lts-load-transfer-switch-accessories-for-acp-automatic.jpg)
![Other Switch Architectures Parallel Packet Switch 3 · 2015. 9. 10. · Parallel Packet Switch 4 Parallel Packet Switch (PPS) [Iyer and McKeown] 3-stage Clos network with K middle](https://img.pdfslide.net/doc/110x75/60f7f9e252b5b674262cc2b9/other-switch-architectures-parallel-packet-switch-3-2015-9-10-parallel-packet.jpg)