Embed Size (px)
Citation preview
See back page of this manual for Customer Service Numbers.
PRECAUTIONS• This disc contains software for the PlayStation®3 system. Never use this disc on any other system, as it could damage it. • This disc conforms to PlayStation®3 specifications for the PAL market only. It cannot be used on other specification versions of PlayStation®3. • Read the PlayStation®3 system Instruction Manual carefully to ensure correct usage. • When inserting this disc in the PlayStation®3 system always place it with the required playback side facing down. • When handling the disc, do not touch the surface. Hold it by the edge. • Keep the disc clean and free of scratches. Should the surface become dirty, wipe it gently with a soft dry cloth. • Do not leave the disc near heat sources or in direct sunlight or excessive moisture. • Do not use an irregularly shaped disc, a cracked or warped disc, or one that has been repaired with adhesives, as it could lead to malfunction.
3D HEAlTH WARNINgSome people may experience discomfort (such as eye strain, eye fatigue or nausea) while watching 3D video images or playing stereoscopic 3D games on 3D televisions. If you experience such discomfort you should immediately discontinue use of your television until the discomfort subsides.
Generally we recommend that you avoid prolonged use of your PlayStation®3 system and take 15 minute breaks during each hour of play. However, when playing stereoscopic 3D games or watching 3D video, the length and frequency of necessary breaks may vary from person to person – please take breaks that are long enough to allow any feelings of discomfort to subside. If symptoms persist, consult your doctor.
The vision of young children (especially those under six years old) is still under development. We recommend that you consult with your child’s doctor or optometrist before allowing young children to watch 3D video images or play stereoscopic 3D games. Adults should supervise young children to ensure they follow the recommendations listed above.
HEAlTH WARNINgAlways play in a well lit environment. Take regular breaks, 15 minutes every hour. Discontinue playing if you experience dizziness, nausea, fatigue or have a headache. Some individuals are sensitive to flashing or flickering lights or geometric shapes and patterns, may have an undetected epileptic condition and may experience epileptic seizures when watching television or playing videogames. Consult your doctor before playing videogames if you have an epileptic condition and immediately should you experience any of the following symptoms whilst playing: altered vision, muscle twitching, other involuntary movement, loss of awareness, confusion and/or convulsions.
PIRACYThe unauthorised reproduction of all or any game part of this product and the unauthorised use of registered trademarks are likely to constitute a criminal offence. Piracy harms consumers as well as legitimate developers, publishers and retailers. If you suspect this game product is an unauthorised copy, or have any other information about pirate product, please call your local Customer Service number given at the back of this manual.
SYSTEM SOFTWARE UPDATESFor details about how to perform System Software updates for the PlayStation®3 system, visit eu.playstation.com or refer to the PS3™ system’s instruction manual.
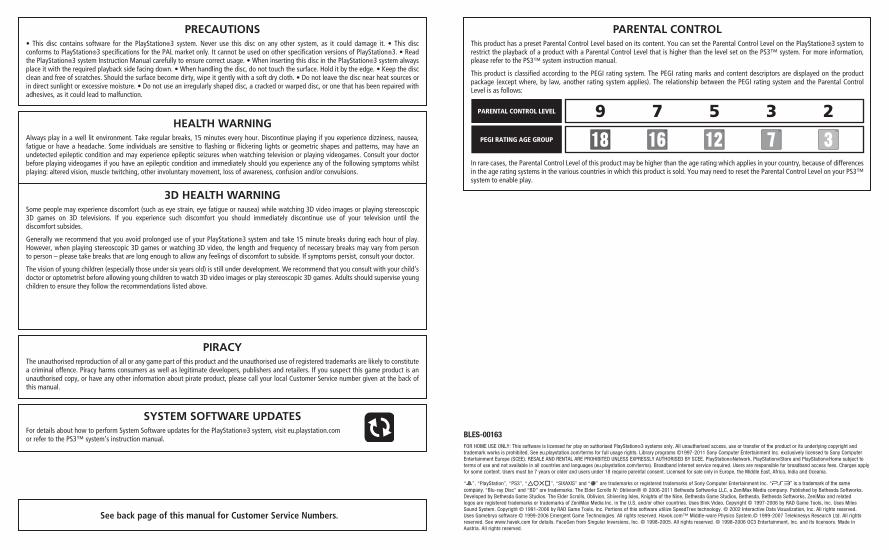
PARENTAl CONTROlThis product has a preset Parental Control Level based on its content. You can set the Parental Control Level on the PlayStation®3 system to restrict the playback of a product with a Parental Control Level that is higher than the level set on the PS3™ system. For more information, please refer to the PS3™ system instruction manual.
This product is classified according to the PEGI rating system. The PEGI rating marks and content descriptors are displayed on the product package (except where, by law, another rating system applies). The relationship between the PEGI rating system and the Parental Control Level is as follows:
In rare cases, the Parental Control Level of this product may be higher than the age rating which applies in your country, because of differences in the age rating systems in the various countries in which this product is sold. You may need to reset the Parental Control Level on your PS3™ system to enable play.
PEGI RATING AGE GROUP
PARENTAL CONTROL LEVEL 9 7 5 3 2
BLES-00163FOR HOME USE ONLY: This software is licensed for play on authorised PlayStation®3 systems only. All unauthorised access, use or transfer of the product or its underlying copyright and trademark works is prohibited. See eu.playstation.com/terms for full usage rights. Library programs ©1997-2011 Sony Computer Entertainment Inc. exclusively licensed to Sony Computer Entertainment Europe (SCEE). RESALE AND RENTAL ARE PROHIBITED UNLESS EXPRESSLY AUTHORISED BY SCEE. PlayStation®Network, PlayStation®Store and PlayStation®Home subject to terms of use and not available in all countries and languages (eu.playstation.com/terms). Broadband internet service required. Users are responsible for broadband access fees. Charges apply for some content. Users must be 7 years or older and users under 18 require parental consent. Licensed for sale only in Europe, the Middle East, Africa, India and Oceania.
“2”, “PlayStation”, “PS3”, “KHJL”, “SIXAXIS” and “À” are trademarks or registered trademarks of Sony Computer Entertainment Inc. “Ô is a trademark of the samecompany. “Blu-ray Disc” and “BD” are trademarks. The Elder Scrolls IV: Oblivion® © 2006-2011 Bethesda Softworks LLC, a ZeniMax Media company. Published by Bethesda Softworks. Developed by Bethesda Game Studios. The Elder Scrolls, Oblivion, Shivering Isles, Knights of the Nine, Bethesda Game Studios, Bethesda, Bethesda Softworks, ZeniMax and related logos are registered trademarks or trademarks of ZeniMax Media Inc. in the U.S. and/or other countries. Uses Bink Video. Copyright © 1997-2006 by RAD Game Tools, Inc. Uses Miles Sound System. Copyright © 1991-2006 by RAD Game Tools, Inc. Portions of this software utilize SpeedTree technology. © 2002 Interactive Data Visualization, Inc. All rights reserved. Uses Gamebryo software © 1999-2006 Emergent Game Technologies. All rights reserved. Havok.com™ Middle-ware Physics System.© 1999-2007 Telekinesys Research Ltd. All rights reserved. See www.havok.com for details. FaceGen from Singular Inversions, Inc. © 1998-2005. All rights reserved. © 1998-2006 OC3 Entertainment, Inc. and its licensors. Made in Austria. All rights reserved.
The Elder Scrolls IV: Oblivion2 The Elder Scrolls IV: Oblivion 3
Quitting a game: During gameplay, press and hold down the PS button on the wireless controller for at least 2 seconds. Then select “Quit Game” from the screen that is displayed.
HINT: To remove a disc, touch the eject button after quitting the game.
Trophies: Earn, compare and share trophies that you earn by making specific in-game accomplishments. Trophies access requires a PlayStation®Network account.
Saved data for PS3™ format software
Saved data for PS3™ format software is saved on the system’s hard disk. The data is displayed under “Saved Game Utility” in the Game menu.
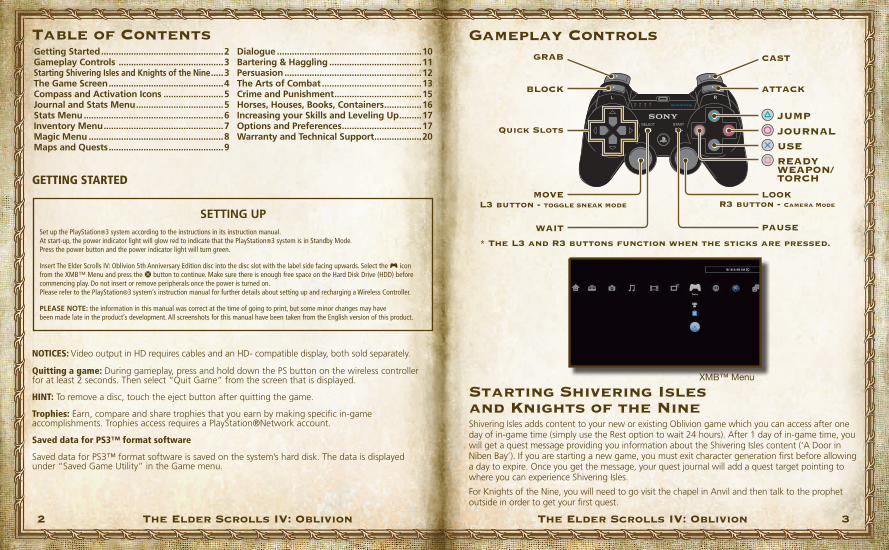
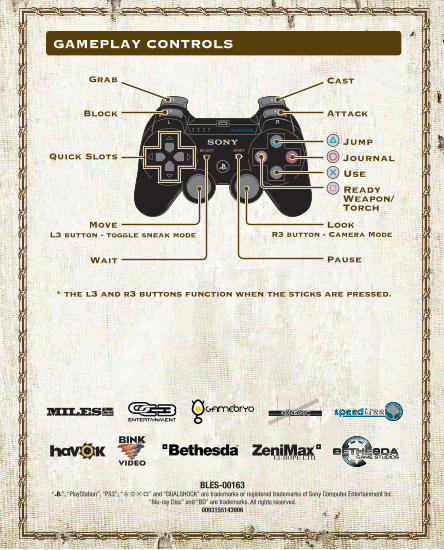
* The L3 and R3 buttons function when the sticks are pressed.
WAIT
GRAB
BLOCK
Quick Slots
MOVE
PAUSE
CAST
ATTACK
JUMP
USE READY WEAPON/ TORCH
JOURNAL
LOOKL3 button - TOGGLE SNEAK MODE R3 button - Camera Mode
Gameplay Controls
Starting Shivering Isles and Knights of the NineShivering Isles adds content to your new or existing Oblivion game which you can access after one day of in-game time (simply use the Rest option to wait 24 hours). After 1 day of in-game time, you will get a quest message providing you information about the Shivering Isles content (‘A Door in Niben Bay’). If you are starting a new game, you must exit character generation first before allowing a day to expire. Once you get the message, your quest journal will add a quest target pointing to where you can experience Shivering Isles.
For Knights of the Nine, you will need to go visit the chapel in Anvil and then talk to the prophet outside in order to get your first quest.
getting Started .................................................2gameplay Controls ..........................................3Starting Shivering Isles and Knights of the Nine .....3The game Screen ..............................................4Compass and Activation Icons ........................5Journal and Stats Menu ...................................5Stats Menu ........................................................6Inventory Menu ................................................7Magic Menu ......................................................8Maps and Quests ..............................................9
Dialogue ..........................................................10Bartering & Haggling .....................................11Persuasion .......................................................12The Arts of Combat ........................................13Crime and Punishment ...................................15Horses, Houses, Books, Containers ...............16Increasing your Skills and leveling Up .........17Options and Preferences ................................17Warranty and Technical Support ...................20
SETTINg UPSet up the PlayStation®3 system according to the instructions in its instruction manual. At start-up, the power indicator light will glow red to indicate that the PlayStation®3 system is in Standby Mode. Press the power button and the power indicator light will turn green.
Insert The Elder Scrolls IV: Oblivion 5th Anniversary Edition disc into the disc slot with the label side facing upwards. Select the Ç icon from the XMB™ Menu and press the S button to continue. Make sure there is enough free space on the Hard Disk Drive (HDD) before commencing play. Do not insert or remove peripherals once the power is turned on. Please refer to the PlayStation®3 system’s instruction manual for further details about setting up and recharging a Wireless Controller.
PlEASE NOTE: the information in this manual was correct at the time of going to print, but some minor changes may have been made late in the product’s development. All screenshots for this manual have been taken from the English version of this product.
Table of Contents
XMB™ Menu
NOTICES: Video output in HD requires cables and an HD- compatible display, both sold separately.
GETTING STARTED
The Elder Scrolls IV: Oblivion4 The Elder Scrolls IV: Oblivion 5
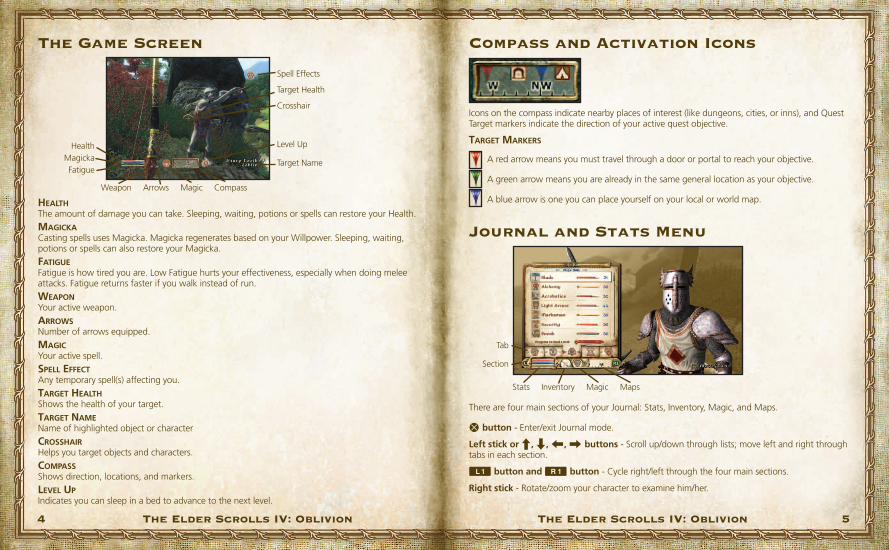
Icons on the compass indicate nearby places of interest (like dungeons, cities, or inns), and Quest Target markers indicate the direction of your active quest objective.
TargeT Markers
A red arrow means you must travel through a door or portal to reach your objective.
A green arrow means you are already in the same general location as your objective.
A blue arrow is one you can place yourself on your local or world map.
Compass and Activation IconsThe Game Screen
Health Magicka Fatigue
Weapon Arrows Magic Compass
Spell Effects
Target Health
Crosshair
Level Up
Target Name
Journal and Stats Menu
Stats Inventory Magic Maps
Tab
Section
There are four main sections of your Journal: Stats, Inventory, Magic, and Maps.
S button - Enter/exit Journal mode.
left stick or C, V, Z, X buttons - Scroll up/down through lists; move left and right through tabs in each section.
Q button and E button - Cycle right/left through the four main sections.
Right stick - Rotate/zoom your character to examine him/her.
HealTH The amount of damage you can take. Sleeping, waiting, potions or spells can restore your Health.
Magicka Casting spells uses Magicka. Magicka regenerates based on your Willpower. Sleeping, waiting, potions or spells can also restore your Magicka.FaTigue Fatigue is how tired you are. Low Fatigue hurts your effectiveness, especially when doing melee attacks. Fatigue returns faster if you walk instead of run. Weapon Your active weapon.
arroWs Number of arrows equipped.
Magic Your active spell.
spell eFFecT Any temporary spell(s) affecting you.
TargeT HealTH Shows the health of your target.
TargeT naMe Name of highlighted object or character
crossHair Helps you target objects and characters.
coMpass Shows direction, locations, and markers.
level up Indicates you can sleep in a bed to advance to the next level.

The Elder Scrolls IV: Oblivion6 The Elder Scrolls IV: Oblivion 7
Stats MenuThe Stats Menu has five tabs, from left to right:
cHaracTer - Basic info about your character.
aTTribuTes - Information on your eight Attributes.
skills - Information on your 21 skills.
FacTions - Shows the factions you belong to and your current rank in each.
accoMplisHMenTs - Lists your many accomplishments.
Skills TabYou have seven Major Skills and 14 Miscellaneous Skills. Under each skill is a bar indicating (in red) how close you are to increasing that skill. The more you use that skill, the faster it will increase.
Major skills The skills that define your character. You must increase any combination of your major skills by a total of 10 points to advance your character to the next level.
Minor skills Increasing these skills makes you better at them, but does not help you level up.
skill progress bar Tracks how close you are to raising that skill by another point.
posiTive skill ModiFier Values appearing in green are currently being modified by positive spells, abilities, powers, or other effects.
negaTive skill ModiFier Values appearing in red are currently being modified by negative spell effects, diseases, or other effects.
level progress bar How close you are to raising your character’s level.
Inventory MenuThe Inventory Menu has five tabs, from left to right:
all iTeMs - This list includes everything in your inventory.
Weapons - This displays only the weapon items in your inventory.
arMor - This displays only armor and clothing in your inventory.
alcHeMy - This lists all potions, alchemy apparatus, food, and alchemical ingredients.
Miscellaneous - This list displays Miscellaneous items, including Books, Notes, Gems, Keys, Torches, Lockpicks, Magic Stones, and other items.
S button – Equip or Use the selected item
F button – Drop the selected item.
HotkeysIn the Inventory Menu, define Hotkeys by pressing the D button and holding one of the four positions on the C, V, Z, X buttons while simultaneously selecting the weapon, armor, spell, or item you want in that slot. Note, you can still change menus with the Hotkeys open, and the item will be assigned when you release the C, V, Z, X buttons.
While playing, use the C, V, Z, X buttons to select any of your eight Hotkeyed items.
rigHT-Hand and leFT-Hand sloTs Weapons equip in your right hand, shields and torches in your left. Shields and torches each have their own slot, but will not be used with two-handed weapons like claymores, warhammers, bows, and magical staves, even though the slot is equipped. An equipped torch is always used when your weapon is sheathed; so pressing the F button is a good way to switch between your weapons and torch.
Your current Encumbrance compared to your Maximum Encumbrance. If you are carrying too much you will be Over Encumbered and you cannot move until you drop some items to reduce your encumbrance.
The combined effects of your physical armor and active magical armor effects. The higher the number, the better.
How much gold you have.
invenTory iTeMs Items in inventory are represented by an icon to the left of the name of the item. A number indicates a stack of more than one of the item. In addition, one or more of the following icons may appear on the item icon:
Magical Item Stolen Item Poisoned Weapon Broken Item

The Elder Scrolls IV: Oblivion8 The Elder Scrolls IV: Oblivion 9
S button – Fast Travel (when highlighting a discovered location) F button – Place your own marker on the map. Right stick – Move the cursor, scroll the map N button – Pan the map.
World Map This shows a map of Cyrodiil.
Your Position: The gold arrow shows your position on the map
Quest Target: The Quest Target is a red or green arrow on the World Map. The Quest Target is always determined by your Active Quest. To make a quest active, select it from the list in your Current Quest tab.
Your Target: The Blue Arrow. You can place, move, or remove this by pressing the F button.
Discovered location: Dark markers can be selected for fast travel. You cannot fast travel from interiors or while in combat. When you fast travel, time will move ahead according to how long it would have taken you to get there normally. If you have a horse, it will fast travel with you. When traveling to cities, your horse will be placed in the nearest stable.
Known location: Bright markers are known to you, but cannot be fast traveled to until you discover them on your own.
acTive QuesT This displays entries for your active quest. Select a quest in the Current Quests tab to make it your Active Quest. The Quest Targets displayed on maps and your Compass are the Quest Targets for your Active Quest. Press the S button to view the position of your Quest Target on your World Map.
currenT QuesTs This displays entries for all your quests that you have not yet completed. Select a Quest to make it your Active Quest.
coMpleTed QuesTs Lists all of the quests you have completed. Select an entry to display all the entries for that quest.
QuesTs and QuesT TargeTs When a quest is Active, Quest Target arrows are displayed on your Compass and on your Local and World maps (see previous page). You can use these markers to guide you to the next step in completing your Active Quest. On the World Map, Quest Targets indicate the general location of your next step. On the Local Map, the Quest Target will indicate the location of the next step, or the door you must go through to reach that location.
Magic MenuSuccessfully casting spells will raise your skill in that spell’s school. You can buy new spells from various people in the world who sell them. The Magic Menu has five tabs, from left to right: All Magic, Target Magic, Touch Magic, Self Magic, and Active Effects.
spell icon The magic effect of the spell.
spell naMe Name of selected spell.
Magicka cosT Indicated by the Lightning Bolt icon , this column provides the Magicka cost of casting the spell. This is dependent on your skill in the spell’s school.
Navigating to the listed spell displays more about the spell.
spell eFFecTiveness Wearing armor lowers the effectiveness of your spells. To increase your spell effectiveness, either wear less armor, or raise the appropriate armor skill (light or heavy). A lower spell effectiveness will reduce the magnitude and duration of your spells.
acTive eFFecTs Tab All spells, abilities, powers, and other magical effects currently affecting your character. It includes always-active birthsign abilities, powers, and diseases.
The combined magnitude of all magic using this effect on you.
racial abiliTies Inherent abilities that never need to be cast and are always active.
poWers Many races and birthsigns also provide special powers that can be used once a day but are readied and cast just like spells. Powers are not assigned to a school of magic, so using them will not improve your magic skills.
lesser poWers These are similar to Powers, but less powerful and can be cast more than once per day.
diseases While not actually magic, the effects of disease are similar to magical curses. You can get cured at chapels in towns and Wayshrines in the wilderness, or by using a Cure Disease spell or potion.
Maps and QuestsThe Maps Section has five tabs, from left to right: Local Map, World Map, Active Quest, Current Quests, and Completed Quests.
local Map This shows your immediate surroundings. Rollover icons display information about doors and their destinations, and quest targets indicate your quest objectives.
The Elder Scrolls IV: Oblivion10 The Elder Scrolls IV: Oblivion 11
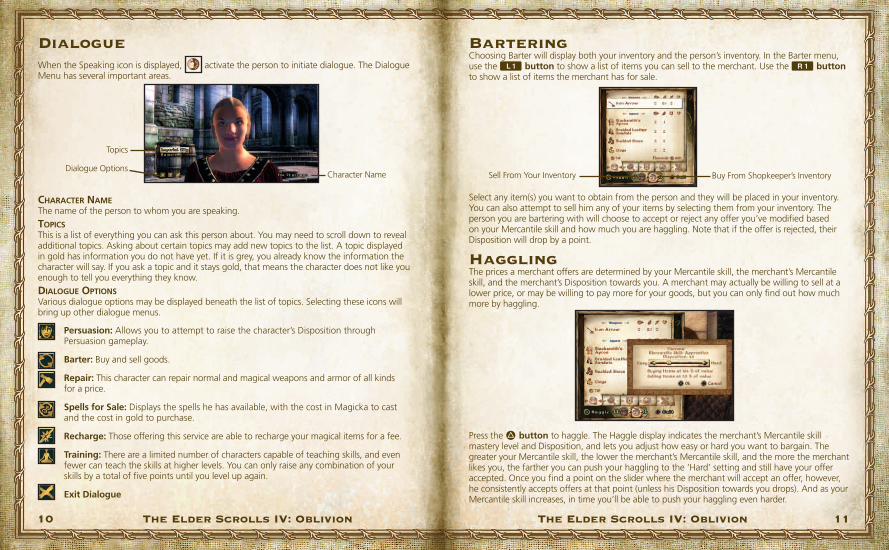
cHaracTer naMe The name of the person to whom you are speaking.
Topics This is a list of everything you can ask this person about. You may need to scroll down to reveal additional topics. Asking about certain topics may add new topics to the list. A topic displayed in gold has information you do not have yet. If it is grey, you already know the information the character will say. If you ask a topic and it stays gold, that means the character does not like you enough to tell you everything they know.dialogue opTions Various dialogue options may be displayed beneath the list of topics. Selecting these icons will bring up other dialogue menus.
Persuasion: Allows you to attempt to raise the character’s Disposition through Persuasion gameplay.
Barter: Buy and sell goods.
Repair: This character can repair normal and magical weapons and armor of all kinds for a price.
Spells for Sale: Displays the spells he has available, with the cost in Magicka to cast and the cost in gold to purchase.
Recharge: Those offering this service are able to recharge your magical items for a fee.
Training: There are a limited number of characters capable of teaching skills, and even fewer can teach the skills at higher levels. You can only raise any combination of your skills by a total of five points until you level up again.
Exit Dialogue
Topics
Dialogue OptionsCharacter Name
Dialogue When the Speaking icon is displayed, activate the person to initiate dialogue. The Dialogue Menu has several important areas.
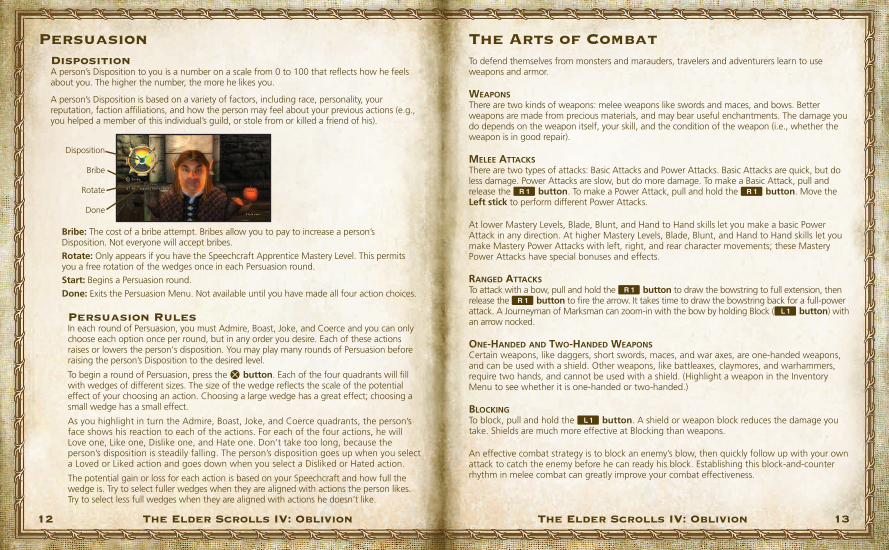
BarteringChoosing Barter will display both your inventory and the person’s inventory. In the Barter menu, use the Q button to show a list of items you can sell to the merchant. Use the E button to show a list of items the merchant has for sale.
Sell From Your Inventory Buy From Shopkeeper’s Inventory
Select any item(s) you want to obtain from the person and they will be placed in your inventory. You can also attempt to sell him any of your items by selecting them from your inventory. The person you are bartering with will choose to accept or reject any offer you’ve modified based on your Mercantile skill and how much you are haggling. Note that if the offer is rejected, their Disposition will drop by a point.
Haggling The prices a merchant offers are determined by your Mercantile skill, the merchant’s Mercantile skill, and the merchant’s Disposition towards you. A merchant may actually be willing to sell at a lower price, or may be willing to pay more for your goods, but you can only find out how much more by haggling.
Press the D button to haggle. The Haggle display indicates the merchant’s Mercantile skill mastery level and Disposition, and lets you adjust how easy or hard you want to bargain. The greater your Mercantile skill, the lower the merchant’s Mercantile skill, and the more the merchant likes you, the farther you can push your haggling to the ‘Hard’ setting and still have your offer accepted. Once you find a point on the slider where the merchant will accept an offer, however, he consistently accepts offers at that point (unless his Disposition towards you drops). And as your Mercantile skill increases, in time you’ll be able to push your haggling even harder.
The Elder Scrolls IV: Oblivion12 The Elder Scrolls IV: Oblivion 13
PersuasionDisposition A person’s Disposition to you is a number on a scale from 0 to 100 that reflects how he feels about you. The higher the number, the more he likes you.
A person’s Disposition is based on a variety of factors, including race, personality, your reputation, faction affiliations, and how the person may feel about your previous actions (e.g., you helped a member of this individual’s guild, or stole from or killed a friend of his).
Disposition
Bribe
Rotate
Done
Bribe: The cost of a bribe attempt. Bribes allow you to pay to increase a person’s Disposition. Not everyone will accept bribes.Rotate: Only appears if you have the Speechcraft Apprentice Mastery Level. This permits you a free rotation of the wedges once in each Persuasion round.Start: Begins a Persuasion round.Done: Exits the Persuasion Menu. Not available until you have made all four action choices.
Persuasion Rules In each round of Persuasion, you must Admire, Boast, Joke, and Coerce and you can only choose each option once per round, but in any order you desire. Each of these actions raises or lowers the person‘s disposition. You may play many rounds of Persuasion before raising the person’s Disposition to the desired level.
To begin a round of Persuasion, press the S button. Each of the four quadrants will fill with wedges of different sizes. The size of the wedge reflects the scale of the potential effect of your choosing an action. Choosing a large wedge has a great effect; choosing a small wedge has a small effect.
As you highlight in turn the Admire, Boast, Joke, and Coerce quadrants, the person’s face shows his reaction to each of the actions. For each of the four actions, he will Love one, Like one, Dislike one, and Hate one. Don’t take too long, because the person’s disposition is steadily falling. The person’s disposition goes up when you select a Loved or Liked action and goes down when you select a Disliked or Hated action.
The potential gain or loss for each action is based on your Speechcraft and how full the wedge is. Try to select fuller wedges when they are aligned with actions the person likes. Try to select less full wedges when they are aligned with actions he doesn’t like.
The Arts of CombatTo defend themselves from monsters and marauders, travelers and adventurers learn to use weapons and armor.
Weapons There are two kinds of weapons: melee weapons like swords and maces, and bows. Better weapons are made from precious materials, and may bear useful enchantments. The damage you do depends on the weapon itself, your skill, and the condition of the weapon (i.e., whether the weapon is in good repair).
Melee aTTacks There are two types of attacks: Basic Attacks and Power Attacks. Basic Attacks are quick, but do less damage. Power Attacks are slow, but do more damage. To make a Basic Attack, pull and release the E button. To make a Power Attack, pull and hold the E button. Move the left stick to perform different Power Attacks.
At lower Mastery Levels, Blade, Blunt, and Hand to Hand skills let you make a basic Power Attack in any direction. At higher Mastery Levels, Blade, Blunt, and Hand to Hand skills let you make Mastery Power Attacks with left, right, and rear character movements; these Mastery Power Attacks have special bonuses and effects.
ranged aTTacks To attack with a bow, pull and hold the E button to draw the bowstring to full extension, then release the E button to fire the arrow. It takes time to draw the bowstring back for a full-power attack. A Journeyman of Marksman can zoom-in with the bow by holding Block (Q button) with an arrow nocked.
one-Handed and TWo-Handed Weapons Certain weapons, like daggers, short swords, maces, and war axes, are one-handed weapons, and can be used with a shield. Other weapons, like battleaxes, claymores, and warhammers, require two hands, and cannot be used with a shield. (Highlight a weapon in the Inventory Menu to see whether it is one-handed or two-handed.)
blocking To block, pull and hold the Q button. A shield or weapon block reduces the damage you take. Shields are much more effective at Blocking than weapons.
An effective combat strategy is to block an enemy’s blow, then quickly follow up with your own attack to catch the enemy before he can ready his block. Establishing this block-and-counter rhythm in melee combat can greatly improve your combat effectiveness.
The Elder Scrolls IV: Oblivion14 The Elder Scrolls IV: Oblivion 15
arMor Each piece of armor you wear adds to your overall protection, or “armor rating.” The higher the armor rating, the better you are protected. The amount of protection you receive from a piece of armor depends on the armor itself, your skill with that type of armor, and whether the armor is in good repair.
Your Armor Rating is the percentage of damage done to you that your armor will absorb. As armor takes damage, its condition decreases. This also lowers how much protection the armor offers. Your armor rating is the total of all the armor you are wearing. Certain pieces contribute more towards your rating than others.
repairing Weapons and arMor Weapons and armor sustain damage as you use them. The lower the condition of the weapon, the less damage it does. When its condition goes to zero, the weapon or armor becomes unusable. Use repair hammers to repair your armor and weapons. The success of your repair depends on your Armorer skill.
Note: Only a Journeyman Armorer or higher can repair magic items. You can also find people who can repair these items as a service. It will cost you, but they always repair the item back to full condition (even magic items).
Other Combat Situations
geTTing knocked doWn You can be knocked down during combat as the result of a powerful blow from an opponent. Hitting someone who is knocked down does more damage.
dodging At Journeyman Mastery, a Journeyman gains the Dodge ability, and can hold block and jump in a direction to do a quick avoidance roll.
yielding If you get into a fight with a friend, you can yield to him to stop the combat by holding Block and activating that character. If he likes you enough, he will stop the fight.
Crime and PunishmentcriMes, bounTies, and jail In general, the following actions are considered crimes and are reported as such if you are detected:
• Stealing items, horses, etc.• Grabbing or picking up an owned item• Trespassing• Starting a fight (defending yourself is not a crime)• Killing a character (defending yourself is not a crime)
When a crime is reported, a Bounty of a value proportional to the seriousness of your crime is placed on your head. If you encounter guards while you have a Bounty on your head, they may approach and arrest you. If you run, they’ll chase you. If you manage to escape, you’ll find that the legal system is very efficient, and anywhere you encounter guards, they will attempt to arrest you. Once they catch you, you’ll have several options.
• If you have the money, you can pay off the Bounty on your head and avoid jail. If you have stolen items in your Inventory, they’ll be taken from you, including things you may have stolen without getting caught. Guards can always spot stolen merchandise.
• You can resist arrest, which is not really a high percentage move, since guards are very tough, attempt to kill those who resist arrest, and even if you do escape, you’re still held accountable for the Bounty on your head.
• You can agree to go to jail rather than pay the fine. When you are released, some skills will decrease due to your inactivity in prison. The number of skills, and the amount they deteriorate, depends on the length of your sentence. Any stolen items in your Inventory are taken from you. Occasionally certain skills increase, rather than decrease, during your confinement, thanks to the generous sharing of trade secrets among the criminal community. It’s also said that those interested in joining the secretive Thieves Guild can make helpful contacts in the collegial atmosphere of criminal offenders.
It is possible, but very difficult, to escape from jail. It is difficult to see the benefit of such an action, since you still have a Bounty on your head. But some members of the criminal community feel it is their obligation to escape from jail as a matter of principle.
It is also possible to recover stolen items that have been confiscated from you upon your incarceration. Such items are held in Stolen Goods containers near the jail cells. Stealing things out from under the noses of jail guards is very difficult, but, again, some criminals consider it a matter of principle to recover their ill-gotten goods.
The Elder Scrolls IV: Oblivion16 The Elder Scrolls IV: Oblivion 17
Increasing your Skills and Leveling Upincreasing skills There are three ways to increase a skill:
1. Use it over and over. The lower the skill score, the easier it is to increase it by using it. It takes much longer to raise a high skill by using it. Review your progress toward increasing a skill in the Skills Display of the Stats Menu.
2. Buy training from another character. You can only train 5 skills points per level.3. Learn more about the skill from special books.
raising your level Increase the Major Skills associated with your class to raise your level. In order to raise your level, you must improve any combination of your Major Skills by a total of 10 points. Review your progress toward increasing your level in the Skills Display of the Stats Menu.
You will receive a message and an Icon will appear on the screen when you have raised your skills enough to raise a level. You must use a bed to sleep and meditate on what you’ve learned in order to increase your level.
When you raise a level, you are given an opportunity to increase three of your eight Attributes. Certain attributes may receive a bonus modifier, which is determined by which skills you have increased since you last raised level. For example, if you improved several skills that have Personality as a governing attribute, then you will see an appropriate bonus modifier for Personality. Whether a skill is Major or Minor does not affect the modifier. In addition, when you raise a level, your Health is increased by one-tenth of your Endurance.
Options and PreferencesYou can access the Options Menu from the Main Menu when you load Oblivion or at any point during the game, by pressing the START button. The Options Menu allows you to adjust your gameplay, audio, video, and control settings, and gives you access to the Download option.
gaMeplay Using this menu, you can adjust the Difficulty slider and toggle certain features off or on, including: General Subtitles, Dialogue Subtitles, Crosshair, Save on Rest, Save on Wait, and Save on Travel.
video Adjust the Brightness slider with this menu. If you have certain TVs (e.g. DLP or LCD projection) or play in a bright room we recommend increasing the brightness.
audio Use this menu to adjust volume levels: Master, Voice, (Sound) Effects, Footsteps, and Music.
conTrols In this menu you can adjust Vertical and Horizontal Sensitivity, and Invert the Y Axis. You can also reassign the Action Mapping for the game’s controls.
Horses, Houses, Books, ContainersHorses To ride a horse, activate it. Use the left stick to steer the horse, and the Right stick to look around. Activating a horse that does not belong to you is horse stealing, a serious crime. To purchase your own horse, visit stables outside the towns. When you fast-travel to a city, your horse is left for you at the local stable, just outside the city gates.
Houses For sale Houses of varying qualities are for sale in each of the towns, and, once you own a house, you can also purchase furnishings for that house from local merchants. To learn more about houses for sale, visit the counts, countesses, or their agents in the town’s castle.
books and oTHer docuMenTs When you pick up a book or document to read, you can put it back where you got it (select ‘Exit’) or put it in your inventory (select ‘Take’). If a book is already in your inventory, navigate to it in your Inventory Menu and press the S button to open it. Use the Q button and the E button to flip back and forth through a book’s pages. Use left stick or the C, V, Z, X buttons to scroll up and down through a scroll’s text.
Special Skill Books improve your skills. Just opening these books produces a message indicating which skill has improved. A book only improves a skill once; repeat readings have no effect.
conTainers Containers include things like chests, sacks, crates, barrels, dead bodies, and more. To see what’s inside a container, direct your Crosshair over the object so the Purse icon appears, then press the S button. If the Purse icon is white, you’re free to take and use the contents of the container. If the Purse icon is red, someone else owns the container, and taking anything from the container is stealing, and a crime if you are detected. If the Purse icon is red, and the container is locked, any attempt to pick the lock is stealing, and a crime if you are detected.
Take things one at a time from a container by pressing the S button. Scroll up and down in lists with the left stick or the C, V, Z, X buttons; shift left and right through inventory tabs by moving the left stick or the C, V, Z, X buttons left and right. Press the Q button to display your own inventory; press the E button to display the container’s inventory. Press the F button to take all things in a container, and press the A button to exit a container. To place something in a container, press the Q button to display your own inventory, and select an item to place it in the container.
Warning! Don’t leave things in containers you don’t own! They may not be there when you come back for them!
The Elder Scrolls IV: Oblivion18 The Elder Scrolls IV: Oblivion 19
The Elder Scrolls IV: Oblivion® © 2006-2011 Bethesda Softworks LLC, a ZeniMax Media company. The Elder Scrolls, Oblivion, Shivering Isles, Knights of the Nine, Bethesda Game Studios, Bethesda, Bethesda Softworks, ZeniMax and related logos are registered trademarks or trademarks of ZeniMax Media Inc. in the U.S. and/or other countries. Uses Bink Video. Copyright © 1997-2006 by RAD Game Tools, Inc. Uses Miles Sound System. Copyright © 1991-2006 by RAD Game Tools, Inc. Portions of this software utilize SpeedTree technology. © 2002 Interactive Data Visualization, Inc. All rights reserved. Uses Gamebryo software © 1999-2006 Emergent Game Technologies. All rights reserved. Havok.com™ Middle-ware Physics System.© 1999-2007 Telekinesys Research Ltd. All rights reserved. See www.havok.com for details. FaceGen from Singular Inversions, Inc. © 1998-2005. All rights reserved. © 1998-2006 OC3 Entertainment, Inc. and its licensors. Dolby and the double-D symbol are trademarks of Dolby Laboratories. All rights reserved.
WARRANTy INfORMATIONZeniMax Europe Limited guarantees to the original purchaser of this computer software product that the disk/cartridge supplied with this product shall not show any fault during the first 90 days from the date of receipt of ownership. In the first instance please return the faulty product to the point of purchase, along with any proof of purchase. If for any reason this is not possible then please return the product to ZeniMax Europe Limited at the ad-dress below along with any proof of purchase, location of purchase, a statement describing the fault and any original packaging you may have. ZeniMax Europe Limited will reimburse the postage costs of returning any faulty products. This warranty is in addition to and does not affect your existing statutory rights regarding the product and your statu-tory rights are in no way restricted or affected by this warranty. If you require further advice regarding your statutory rights then please contact a citizen’s advice bureau, consumer affairs adviser or lawyer.
ZeniMax Europe Ltd.Skypark – 9th Floor8 Elliot PlaceGlasgow, G3 8EPUnited Kingdom
Technical and Customer Support
For technical and customer support, please call +44 20 3027 0982, UK opening hours: 8:00am to 7:00pm Monday to Friday with the exception of UK public holidays, and Saturday from 09:00 am to 5:00pm, email [email protected] or visit www.bethsoft.com. For warranty claims send your game disc to ZeniMax Europe Limited, Skypark – 9th Floor, 8 Elliot Place, Glasgow, G3 8EP, United Kingdom, together with a dated proof of purchase, your product number, a brief description of the error or defect, and your return address.
Where you see either symbol on any of our electrical products, batteries or packaging, it indicates that the relevant electrical product or battery should not be disposed of as general household waste in Europe. To ensure the correct waste treatment of the product and battery, please dispose of them in accordance with any applicable local laws or requirements for disposal of electrical equipment/batteries. In so doing, you will help to conserve natural resources and improve standards of environmental protection in treatment and disposal of electrical waste.
This symbol may be used on batteries in combination with additional chemical symbols. The chemical symbols for mercury (Hg) or lead (Pb) will appear if the battery contains more than 0.0005% mercury or more than 0.004% lead.
If your local telephone number is not shown, please visit eu.playstation.com for contact details.
Australia 1300 365 911 Calls charged at local rate
Österreich 0820 44 45 40 0,116 Euro/Minute
Belgique/België/Belgien 011 516 406 Tarif appel local/Lokale kosten
Česká republika 222 864 111 Po – Pa 9:00 – 17:00 Sony Czech. Tarifováno dle platneých telefonních sazeb.
Pro další informace a případnou další pomoc kontaktujte prosím www.playstation.sony.cz nebo volejte telefonní číslo +420 222 864 111
283 871 637 Po – Pa 10:00 – 18:00 Help Line
Tarifováno dle platneých telefonních sazeb
Danmark 70 12 70 13 [email protected] Man–fredag 18–21; Lør–søndag 18–21
Suomi 0600 411 911 0.79 Euro/min + pvm [email protected]
maanantai – perjantai 15–21
France 0820 31 32 33 prix d’un appel local – ouvert du lundi au samedi
Deutschland 01805 766 977 0,12 Euro/minute
Ελλάδα 00 32 106 782 000 Εθνική Χρααση
Ireland 0818 365065 All calls charged at national rate
Italia 199 116 266 Lun/Ven 8:00 – 18:30 e Sab 8:00 – 13:00:
11,88 centesimi di euro + IVA al minuto Festivi: 4,75 centesimi di euro + IVA al minuto Telefoni cellulari secondo il piano tariffario prescelto
Malta 23 436300 Local rate
Nederland 0495 574 817 Interlokale kosten
New Zealand 09 415 2447 National Rate
0900 97669 Before you call this number, please seek the permission of the person
responsible for paying the bill. Call cost $1.50 (+ GST) per minute
Norge 81 55 09 70 0.55 NOK i startavgift og deretter 0.39 NOK pr. Minutt
[email protected] Man–fredag 15–21; Lør–søndag 12–15
Portugal 707 23 23 10 Serviço de Atendimento ao Consumidor/Serviço Técnico
España 902 102 102 Tarifa nacional
Россия +7 (499) 238 36 32
Sverige 08 587 822 25 [email protected] Mån–Fre 15–21, Lör–söndag 12–15
Suisse/Schweiz/Svizzera 0848 84 00 85 Tarif appel national/Nationaler Tarif/Tariffa Nazionale
UK 0844 736 0595 Calls may be recorded for training purposes
For Help & Support please visit: eu.playstation.com or refer to the telephone list below.
BLES-00163“2”, “PlayStation”, “PS3”, “dasf” and “DUALSHOCK” are trademarks or registered trademarks of Sony Computer Entertainment Inc.
“Blu-ray Disc” and “BD” are trademarks. All rights reserved.0093155143906
GAMEPLAY CONTROLS
* the l3 and r3 buttons function when the sticks are pressed.
Wait
Grab
Block
Quick Slots
Move
Pause
Cast
Attack
Jump
Use
Ready Weapon/ Torch
Journal
LookL3 button - toggle sneak mode R3 button - Camera Mode