Embed Size (px)
Citation preview

Page 1 of 17
eLearning @ TEES | Department for Learning Development | Teesside University
PartHow-to-Guides
Part 2: Using Adobe Connect
This is a three part series of guides. You can find out more on how to deliver a successful webinar with Getting Started with Webinars and Part 1: Introduction to Adobe Connect.
During the Session
The following section will discuss and demonstrate the essential features that may be used during a session. This will include:
Share
As a host or presenter in a meeting, you can share windows, applications, or your entire desktop and you can give permission or promote a participants in a session, to share their screen.
❶ Presenter only area: The Presenter Only Area in Adobe Connect allows hosts to upload and
manage pods without interrupting a live session. It is an ideal area for you to queue your presentation material, for example keep your notes or questions, polls, chat pods. This section of Adobe Connect is only visible to hosts and presenters and appears on a black background.
❷ Enable and disable: To enable the Presenter Only Area, click ‘Meeting’ on the main menu, select ‘Enable Presenter Only Area’. You will see this section appear on the right side of the main meeting room. Click ‘Pods’ on the main menu and start uploading/selecting your presentation materials. The new pods will automatically appear in the ‘Presenter Only Area’ (with a pop-up indication).
Share Setting up your audio Using the webcam Chat Upgrading participants Using the breakout rooms

Page 2 of 17
Part 2: Using Adobe Connect Jan ’15
eLearning @ TEES | Department for Learning Development | Teesside University
To disable this feature, simply click ‘Meeting’ on the main menu and select ‘Disable Presenter
Only Area’.

Page 3 of 17
Part 2: Using Adobe Connect Jan ’15
eLearning @ TEES | Department for Learning Development | Teesside University
❸ Share screen: In order to share your screen activities click ‘Share My Screen’ from the share pod. You can choose to share your entire desktop or share a specific application or window. Select your share option and click the ‘Share’ button on the bottom right. If you wish to make the share full screen view for your attendees, tick the checkbox on the bottom left.
The pod will indicate that you are currently sharing your screen and to stop this action, click ‘Stop Sharing’.

Page 4 of 17
Part 2: Using Adobe Connect Jan ’15
eLearning @ TEES | Department for Learning Development | Teesside University
❹ Share document: Remember to upload your learning materials well ahead of the session. Larger files may take longer to load and it may look unprofessional having a ‘room’ full of attendees waiting for presentation material. To avoid this scenario, plan your session well and use the ‘Presenter Only Area’ to queue your presentation materials.
To share a document, click the ‘Share Document’ option from the drop down menu, this will
prompt a pop-up. If you are looking for a document that was shared/used in a previous session, you may find it listed in Share History or Uploaded Files.
To upload a new file, click ‘Browse My Computer’ and select your file and click ‘Open’. Adobe
Connect will convert and publish the document within the share pod. This file now will be listed within the Share History and Uploaded Files.

Page 5 of 17
Part 2: Using Adobe Connect Jan ’15
eLearning @ TEES | Department for Learning Development | Teesside University
❺ Share whiteboard: The whiteboard option within share allow hosts/presenters (and participants given the permission) to collaboratively use the text, drawing and annotation tools. In order to share a whiteboard, simply click the dropdown menu and select ‘Share Whiteboard’.
You will see a blank screen and drawing tool bar at the top.
❻ Drawing and annotation tools: The drawing and annotation is visible for share document and share whiteboard options.
❼ Rename: Remember to rename your pod to the appropriate title.
Pointer Stop Share Make it full screen
Selection, Pencil, Eraser, Text, Shape, Undo, Redo tool

Page 6 of 17
Part 2: Using Adobe Connect Jan ’15
eLearning @ TEES | Department for Learning Development | Teesside University
Audio Setup Wizard and Audio Rights
❶ Plug in: Make sure you plug in your headset or headphone and microphone to your computer. If this is a new device and you are plugging it in for the first time, please ensure you set up your device(s) as default Playback and Recording devices. Step 2 and 3 demonstrates an example of this set up on a Windows computer for a headset. This set up may vary depending on your computer and device(s). If your headset is already set as the default device, please skip to Step 4.
❷ Playback and Recording: Right-click on the speaker icon at the bottom right corner on the desktop. Click ‘Playback devices’. This will prompt the properties for current playback and recording devices.
❸ Set as default: Under the Playback tab, select speakers / your headset and click the ‘Set Default’ button. You will see a green tick and a bar indicator. Test by playing some music on your computer. You should be able to hear the music using the headphone/headset. Repeat the same step for the ‘Recording devices’ by clicking the Recording tab. Select your device and set it as default. Now test the device by speaking towards the microphone. The bar indicator should turn green.

Page 7 of 17
Part 2: Using Adobe Connect Jan ’15
eLearning @ TEES | Department for Learning Development | Teesside University
❹ Adobe Connect audio set up: Log in to Adobe Connect and click the Meeting menu and select the Audio Setup Wizard from the drop down menu. This will prompt the setup wizard. Please read the instructions and click the ‘Next’ button.
❺ Test sound: Set your speaker volume to an audible level. Click the ‘Play Sound’ button. You should be able to hear a background music playing. Click ‘Stop Sound’, then proceed by clicking ‘Next’.
❻ Select microphone: In order to broadcast audio in Adobe Connect, select your device (i.e. microphone) from the drop down menu and click the ‘Next’ button. The screen shot below is an example of this instance. If your device is not listed, check if the device is plugged in correctly and follow the default audio set up instructions in step 2 and 3.

Page 8 of 17
Part 2: Using Adobe Connect Jan ’15
eLearning @ TEES | Department for Learning Development | Teesside University
Alternatively you can skip this step and step 7, if you do not wish to broadcast audio in Adobe Connect by clicking the ‘Next’ button.
❼ Microphone volume: Next, test the microphone volume. Click the ‘Record’ button, the Adobe Flash Player Settings pop up will prompt for permission to access your camera and microphone (this prompt will appear only once per session). Click ‘Allow’. Read the script on the setup wizard or simply speak onto the microphone.
You will see a blue volume bar as you speak. Click ‘Stop’ and check the recording by clicking the ‘Play Recording’ button. This will playback your recording. Ensure that the recording volume is at an audible range. If the volume is too high or too low, adjust the volume accordingly and repeat the recording process. Once you are happy with the recording volume, click ‘Next’.

Page 9 of 17
Part 2: Using Adobe Connect Jan ’15
eLearning @ TEES | Department for Learning Development | Teesside University
❽ Tune silence: This stage of the set-up detects the amount of background noise around you. Follow the instructions on the setup wizard. Click ‘Test Silence’ and wait until the progress bar is filled. Click ‘Next’.
❾ Audio done: Once you have completed the setup it will report the devices in use, volume level and silence level. Click ‘Finish’ to complete the setup.

Page 10 of 17
Part 2: Using Adobe Connect Jan ’15
eLearning @ TEES | Department for Learning Development | Teesside University
Using the Webcam
❶ Stand alone or built-in: If you are using a stand-alone webcam, ensure that it is plugged in and is ready for use. If your laptop or desktop has an integrated or built-in webcam, make sure the lens is not covered or blocked.
❷ Allow access: In order to start using the webcam in Adobe Connect simply click on ‘Start My Webcam’ button in the Video pod. Or alternatively you can click the Webcam icon at the top. If the Video pod is not visible, go to the Pods main menu and select Video.

Page 11 of 17
Part 2: Using Adobe Connect Jan ’15
eLearning @ TEES | Department for Learning Development | Teesside University
Note: Adobe Flash Player Settings pop up will prompt for permission to access your camera and microphone, click ‘Allow’. (Ignore this note if you have already allowed access during the audio setup).
❸ Share: If you are the Host or Presenter, you can share your webcam view with the rest of the group. In order to do this, click ‘Start Sharing’ on the webcam viewport or use the webcam icon drop down and select Start Sharing.

Page 12 of 17
Part 2: Using Adobe Connect Jan ’15
eLearning @ TEES | Department for Learning Development | Teesside University
❹ Pause and close: Pause the video feed (i.e. during a break in the presentation) by clicking the Pause symbol at the bottom right corner of the webcam viewport and resume when you are ready. To close or to stop sharing your webcam video, click the Close button the top right hand corner of the video viewport, or alternatively you can click the ‘Stop My Webcam’ button on the video viewport.
When you assume the role of Host you have additional privileges like Enable Webcam for Participants.
Page 13 of 17
Part 2: Using Adobe Connect Jan ’15
eLearning @ TEES | Department for Learning Development | Teesside University
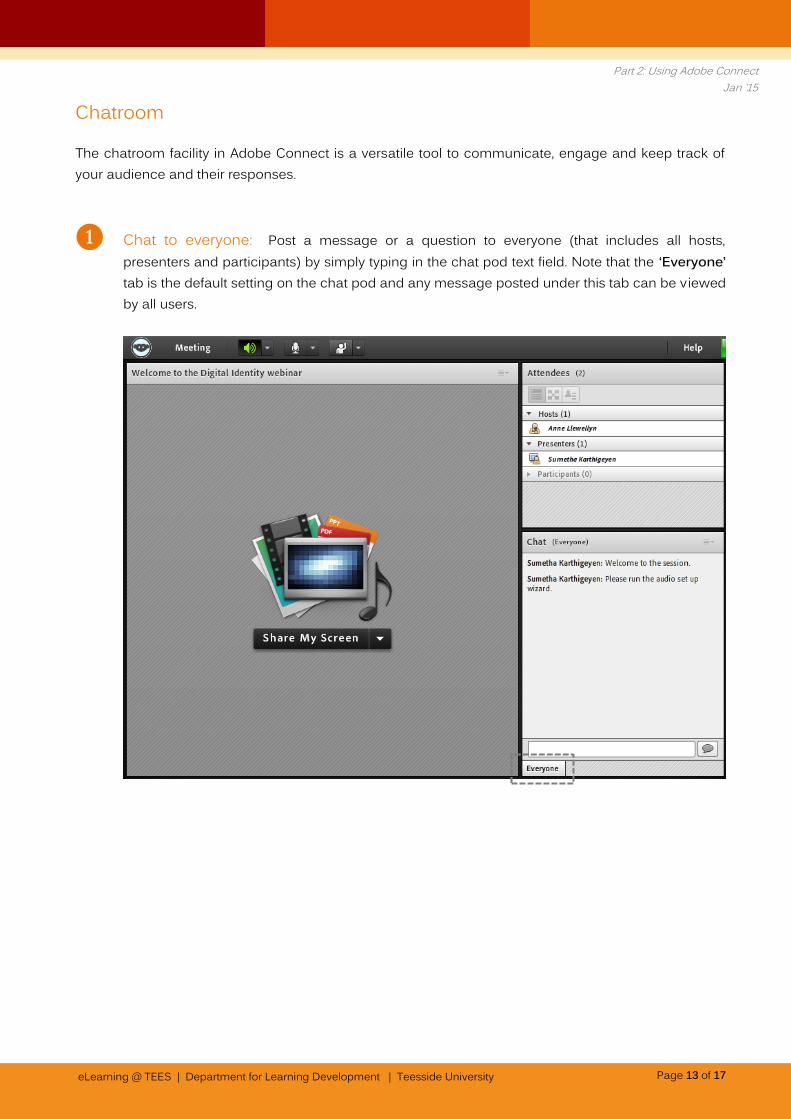
Chatroom
The chatroom facility in Adobe Connect is a versatile tool to communicate, engage and keep track of your audience and their responses.
❶ Chat to everyone: Post a message or a question to everyone (that includes all hosts, presenters and participants) by simply typing in the chat pod text field. Note that the ‘Everyone’ tab is the default setting on the chat pod and any message posted under this tab can be viewed by all users.

Page 14 of 17
Part 2: Using Adobe Connect Jan ’15
eLearning @ TEES | Department for Learning Development | Teesside University
❷ Group or individual chat: To start the chat with specific group (i.e. Hosts or Presenters) or individual users, click the (drop down) icon on the top right corner of the chat pod. Select ‘Start Chat With’ and select the group/individual from the list.
Notice that a new tab will appear under the chat pod text field. You can post messages that are only relevant for this group/individual without interrupting the main chat room. In order to navigate between chat rooms, simply click the appropriate tab (this can be a group or an individual). An indicator of which active group/individual chat will appear at the top in brackets. Always double check that you are on the right tab before posting your message.
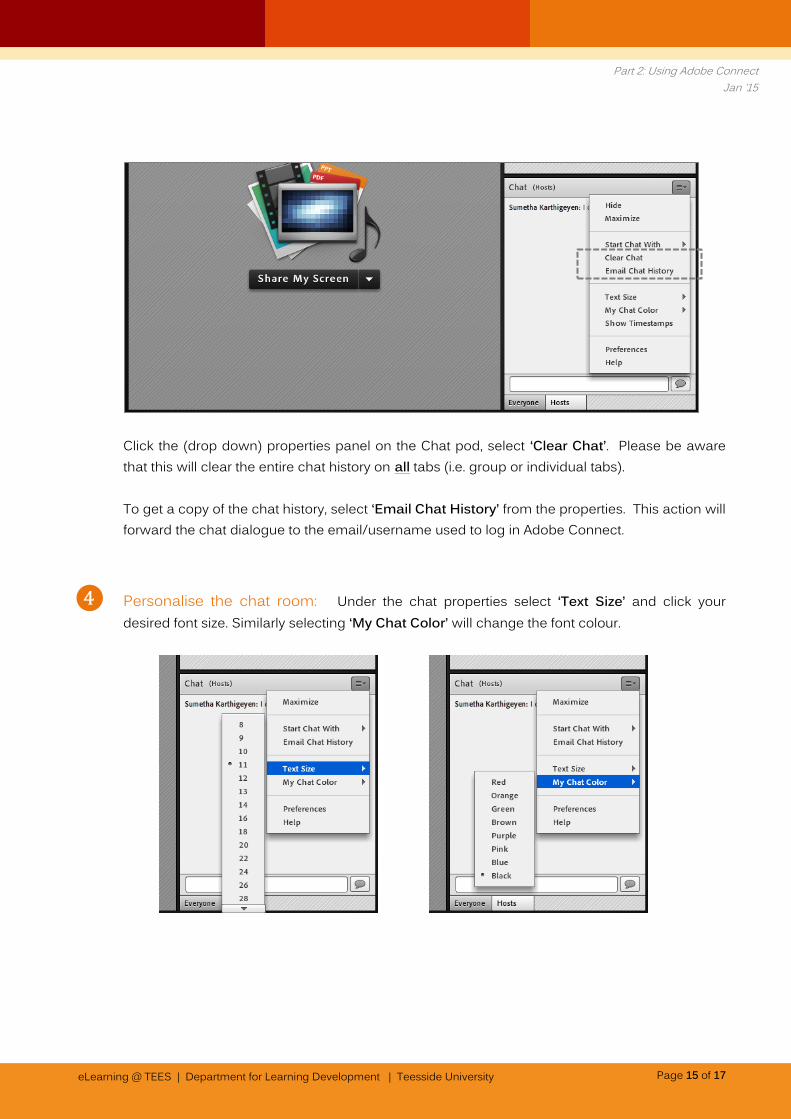
❸ Clear chat or email chat history: The Chat pod presents different properties depending on your role. As a Host you can send the entire chat history to your email or choose to clear it. But as a Presenter, you do not have the option to clear the chat history.
Page 15 of 17
Part 2: Using Adobe Connect Jan ’15
eLearning @ TEES | Department for Learning Development | Teesside University
Click the (drop down) properties panel on the Chat pod, select ‘Clear Chat’. Please be aware that this will clear the entire chat history on all tabs (i.e. group or individual tabs). To get a copy of the chat history, select ‘Email Chat History’ from the properties. This action will forward the chat dialogue to the email/username used to log in Adobe Connect.
❹ Personalise the chat room: Under the chat properties select ‘Text Size’ and click your desired font size. Similarly selecting ‘My Chat Color’ will change the font colour.

Page 16 of 17
Part 2: Using Adobe Connect Jan ’15
eLearning @ TEES | Department for Learning Development | Teesside University
Upgrading participants
As host you can upgrade participants to Presenter or Host to conduct a presentation, manage break out rooms or share screen or files.
❶ Promote : On the Attendees pod, click the on the participant icon to view the drop down menu of upgrading options. Select ‘Make Host’ or ‘Make Presenter’ to promote.
❷ Other options : You can use this drop down menu to enable or grant access to participants
microphone, video (webcam) and screen.
Page 17 of 17
Part 2: Using Adobe Connect Jan ’15
eLearning @ TEES | Department for Learning Development | Teesside University
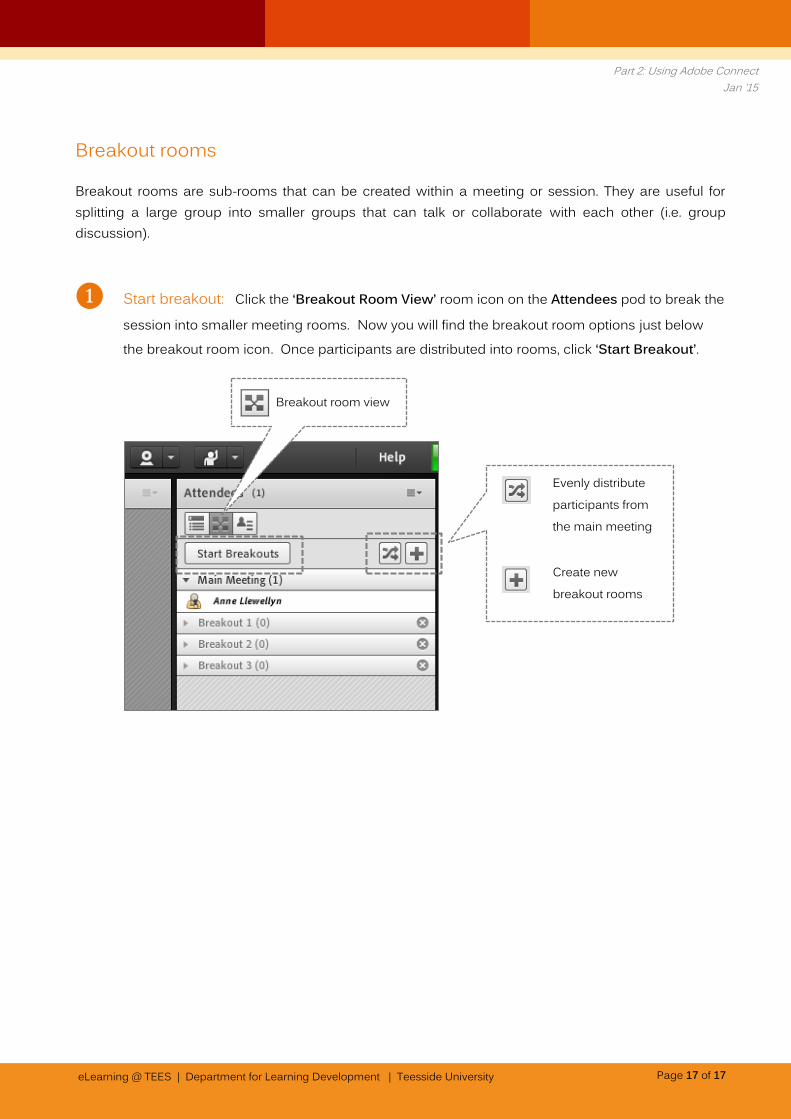
Breakout rooms
Breakout rooms are sub-rooms that can be created within a meeting or session. They are useful for splitting a large group into smaller groups that can talk or collaborate with each other (i.e. group discussion).
❶ Start breakout: Click the ‘Breakout Room View’ room icon on the Attendees pod to break the
session into smaller meeting rooms. Now you will find the breakout room options just below the breakout room icon. Once participants are distributed into rooms, click ‘Start Breakout’.
m
Evenly distribute participants from the main meeting
Create new breakout rooms
Breakout room view