Embed Size (px)
Citation preview


Parts list
1CP3 & O-Rings
3Mounting Plate Hardware
5 Fuel Temp Sensor Bracket
7 Fuel Rail Cap & plug
2CP3 Mounting Plate
4 3 Brass Sealing Washers
6 Fuel Temp Sensor Bracket Hardware
8 3/8” Bulb End Fuel Fitting

9 1/2” Bulb End Fuel Fitting
11High Pressure Feed Line
13 Injection Line Plug
10 Low Pressure Feed Line
12 Low Pressure Molded Hose

4 CP4 to CP3 Conversion | 2011 - 2016 LML Duramax
NO WARRANTY STATEMENTHigh performance parts & products no warranty policy: The purchaser understands and recognizes that high performance diesel products and services sold by INDUSTRIAL INJECTION SERVICE. INC. are exposed to many and varied conditions due to the manner in which they are installed and used. INDUSTRIAL INJECTION SERVICE. INC., makes no warranties either expressed or implied including any warranty of merchantability or fitness for a particular purpose.
No salesman, officer, agent or representative of INDUSTRIAL INJECTION SERVICE. INC., is authorized to waive or modify this warranty disclaimer and limitation of damages. Further, no representation, promise, description of goods or affirmation of fact made by any salesman, officer, agent or representative of INDUSTRIAL INJECTION SERVICE. INC., shall be effective to any extent whatsoever to waive or modify this warranty disclaimer and limitation of damages.
All cores due 30 days after invoice date - no credit after 60 days.
Purchasers of our product(s) agree to accept full responsibility for any loss of factory warranty and or loss of product life cycle attributable to the installation and use of said product(s).
ALL HIGH PERFORMANCE PARTS & PRODUCTS ARE MADE FOR COMPETITION AND RACE USE ONLY.
If you have any questions call us at 1-800-955-0476.
www.industrialinjection.com | 800-955-0476 5
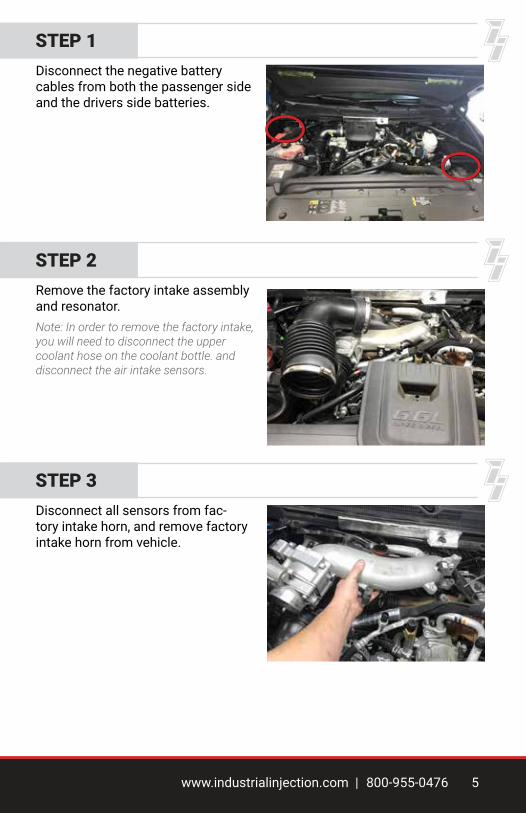
Disconnect the negative battery cables from both the passenger side and the drivers side batteries.
Remove the factory intake assembly and resonator. Note: In order to remove the factory intake, you will need to disconnect the upper coolant hose on the coolant bottle. and disconnect the air intake sensors.
STEP 1
STEP 2
Disconnect all sensors from fac-tory intake horn, and remove factory intake horn from vehicle.
STEP 3

6 CP4 to CP3 Conversion | 2011 - 2016 LML Duramax
Remove the plastic elbow that connects to the turbo, then continue to re-move the EGR system from the vehicle if still equipped.
Remove the factory Y bridge from the valley of the engine.
To gain access to the front of the engine, we recommend removing the fan shroud and fan. Start by disconnecting the upper radiator hose and moving it out of the way. Remove the upper fan shroud and unbolt the fan hub. Re-move the serpentine belt, unbolt the AC compressor and move it out of the way. Once that is out of the way you can continue to remove the fan shroud and fan hub from the vehicle. Note: you will need to remove the TCM from the shroud and set it out of the way before you remove the shroud from the vehicle.
STEP 4
STEP 5
STEP 6
Continued on next page »

www.industrialinjection.com | 800-955-0476 7
Remove the belt tensioner and the alternator in order to gain access to the front mounting belts of the CP4.
STEP 7
» Step 6 Continued

8 CP4 to CP3 Conversion | 2011 - 2016 LML Duramax
Remove both of the high pressure fuel lines that route from the top of the CP4 to the passenger side fuel rail.
Remove the low pressure fuel line in the valley of the engine to the fuel fil-ter housing. Disconnect the pressure fitting in the valley and loosen clamp at fuel filter housing to remove. Note: a new fuel line is supplied for in-creased pump clearance.
Disconnect and remove the low pressure fuel supply hose and the low pres-sure fuel return hose from the CP4. Disconnect and discard the hard line that goes from the CP4 to the 9th injec-tor. Be sure to remove the small rubber gasket on the 9th injector line and install it on the supplied block off. Insert the supplied block off into the 9th injector fuel supply.
STEP 8
STEP 9
STEP 10
Remove rubber gasket and re-use.
Remove low pressure hoses.
Continued on next page »

www.industrialinjection.com | 800-955-0476 9
In order to gain access to the CP4 mounting bolts you will want to remove the fan pulley and mount. Then twist the water pump outlet pipe to gain ac-cess to the CP4 mounting bolts.
STEP 11
Remove and discard 9th injector hard line.
» Step 10 Continued
Remove the four CP4 mounting bolts on the front of the engine, then remove the CP4 from the valley of the engine. Note: you may need to gently pry on the CP4 to help with removal.Note: make sure all electrical connections are disconnected from the CP4.
STEP 12

10 CP4 to CP3 Conversion | 2011 - 2016 LML Duramax
Remove the green temperature sensor on the bottom of the CP4. Install the sensor into the supplied mounting block and mount it to the empty hole on the drivers side of the AC compressor mounting location. Re-insert the con-nection.
Using the supplied plug and cap, install it onto the rail on the third port and tighten.
STEP 13
STEP 14

www.industrialinjection.com | 800-955-0476 11
With the CP4 removed from the truck, you can now proceed to remove the gear from the CP4 to re-use on the CP3. Note: you may need to use a gear puller in order to remove the gear.
STEP 15
Locate your new CP3 and hardware to prepare for installation. You will first remove the factory return and feed fittings. Replace them with the new sup-plied return and feed fittings using the supplied copper sealing washers.
STEP 16
3/8” Return 1/2” Feed

12 CP4 to CP3 Conversion | 2011 - 2016 LML Duramax
Install the CP4 gear onto the CP3 us-ing the factory CP4 nut. Note: when fully tightened, the nut will not be totally threaded onto the CP3 shaft.
Install supplied CP3 shaft o-ring seal and apply grease. Install supplied CP3 mounting bracket using supplied hardware and lock washers. Then install outer o-ring and apply grease.
STEP 18
STEP 17
Outer o-ring applied with grease.

www.industrialinjection.com | 800-955-0476 13
You can now install the new CP3 into the valley of the engine. Utilize the four factory CP4 mounting bolts to install.
STEP 19
Install the supplied 1/2” fuel feed hose from the filter housing to the CP3.
Re-using the factory 3/8” hose, in-stall fuel return hose to the CP3.
STEP 20
STEP 21
14 CP4 to CP3 Conversion | 2011 - 2016 LML Duramax
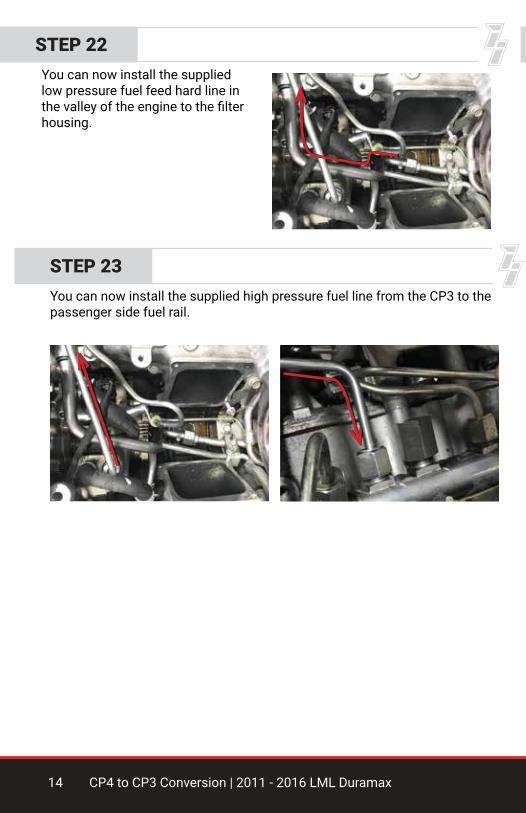
You can now install the supplied high pressure fuel line from the CP3 to the passenger side fuel rail.
STEP 23
You can now install the supplied low pressure fuel feed hard line in the valley of the engine to the filter housing.
STEP 22

www.industrialinjection.com | 800-955-0476 15
You can now re-assemble the remaining parts of the truck that were re-moved. Before starting your truck be sure to check all fluid levels and top them off if needed. Note: before attempting to start your truck, after changing the fuel filter, you will want to bleed the low pressure fuel system. Note: while truck is running, make sure to check all fuel fittings for leaks. Note: for this kit to work properly you must use EFI Live or EZ Lynk tuning.
STEP 24