Embed Size (px)
Citation preview

ABI 29/06 –11/13; ABI 29/07 –11/13
nf-validation.afnor.org/en
ALTERNATIVE ANALYTICAL METHODSFOR AGRIBUSINESS
For testing of Food and Environmental samples only.
Pathatrix™ Salmonella spp. Kits Linked toMicroSEQ™ PCR or Selective Agar DetectionUSER GUIDE
NF VALIDATION™-certified workflows for pooled or individualfood samples
for use with:
Pathatrix™ Salmonella spp. Pooling KitsPathatrix™ Salmonella spp. KitPathatrix™ Auto InstrumentMicroSEQ™ Salmonella spp. Detection KitApplied Biosystems™ 7500 Fast Real-Time PCR SystemRapidFinder™ Express Software v2.0 or later
Catalog Numbers APS250P, APS500P, APS50, 4403930
Publication Number MAN0009585
Revision F.0

The information in this guide is subject to change without notice.
DISCLAIMER: TO THE EXTENT ALLOWED BY LAW, THERMO FISHER SCIENTIFIC INC. AND/OR ITS AFFILIATE(S) WILL NOT BELIABLE FOR SPECIAL, INCIDENTAL, INDIRECT, PUNITIVE, MULTIPLE, OR CONSEQUENTIAL DAMAGES IN CONNECTION WITH ORARISING FROM THIS DOCUMENT, INCLUDING YOUR USE OF IT.
Revision history: Pub. No. MAN0009585 (English)
Revision Date Description
F.0 14 January 2022 • Pathatrix™ 5 Pooling Salmonella spp. Kit was added.
• RapidFinder™ Express Software version was updated.
• 7500 Fast Real‑Time PCR Instrument characteristics were added.
• The user guide template was updated with associated updates to the general documentorganization, limited license information, trademark statement, safety statements, and supportinformation.
E.0 01 March 2019 • Added Microbact GNB 24E Kit, which is required for confirmation testing.
• Updated references.
D.0 07 Sept 2017 • Corrected the enrichment time for chocolate or cocoa-based samples to 18–22 hours.
• Minor clarifications.
C.0 24 October 2016 • Added instructions for new validated matrices: cocoa and chocolates.
• Reorganized guidelines for PCR to align with current style and template.
• Corporate and legal updates.
B.0 September 2014 • In “Capture the Pathatrix™ beads” on page 19, corrected the wash procedure; now includes1X-PBS wash.
• Updated corporate trademark and copyright statements.
A.0 February 2014 New document.
Limited Use Label License No. 492: Environmental Testing, Quality Control/Quality Assurance Testing, Food and AgriculturalTesting: Notice to Purchaser: The purchase of this product conveys to the purchaser the limited, non-transferable right to use thepurchased amount of the product (a) to perform internal research for the sole benefit of the purchaser; and (b) for environmentaltesting, quality control/quality assurance testing, food and agricultural testing, including reporting results of purchaser's activities inenvironmental testing, quality control/quality assurance testing, food and agricultural testing for a fee or other commercial consideration.No other right is hereby granted expressly, by implication, or by estoppel. This product is for environmental testing, quality control/quality assurance testing, food and agricultural testing and research purposes only. The purchase of this product does not grantthe purchaser any additional rights, including (without limitation) the right to transfer or resell the product in any form or the right touse the product as a therapeutic agent or diagnostics test component. For information on obtaining additional rights, please [email protected] or Licensing and Commercial Supply, Thermo Fisher Scientific, 5823 Newton Drive, Carlsbad, California92008 USA.
Trademarks: All trademarks are the property of Thermo Fisher Scientific and its subsidiaries unless otherwise specified. AFNOR andNF VALIDATION are trademarks of Association Française de Normalisation (AFNOR).
©2022 Thermo Fisher Scientific Inc. All rights reserved.
For testing of Food and Environmental samples only.

Contents
■ CHAPTER 1 Overview .. . . . . . . . . . . . . . . . . . . . . . . . . . . . . . . . . . . . . . . . . . . . . . . . . . . . . . . . . . . . . 5
Procedure overview . . . . . . . . . . . . . . . . . . . . . . . . . . . . . . . . . . . . . . . . . . . . . . . . . . . . . . . . . . . . . 6
Contents and storage . . . . . . . . . . . . . . . . . . . . . . . . . . . . . . . . . . . . . . . . . . . . . . . . . . . . . . . . . . . . 8
Required materials . . . . . . . . . . . . . . . . . . . . . . . . . . . . . . . . . . . . . . . . . . . . . . . . . . . . . . . . . . . . . . 9Materials required for sample enrichment . . . . . . . . . . . . . . . . . . . . . . . . . . . . . . . . . . . . . . 9Materials for immunomagnetic separation . . . . . . . . . . . . . . . . . . . . . . . . . . . . . . . . . . . . 10Materials for PCR-ready DNA sample preparation . . . . . . . . . . . . . . . . . . . . . . . . . . . . . 10Materials for PCR detection . . . . . . . . . . . . . . . . . . . . . . . . . . . . . . . . . . . . . . . . . . . . . . . . . 11Materials for confirmation testing of PCR-positive samples . . . . . . . . . . . . . . . . . . . . . 12Materials for selective agar detection . . . . . . . . . . . . . . . . . . . . . . . . . . . . . . . . . . . . . . . . . 12
■ CHAPTER 2 Enrich food samples . . . . . . . . . . . . . . . . . . . . . . . . . . . . . . . . . . . . . . . . . . . . . . . . 13
■ CHAPTER 3 IMS capture of Salmonella spp. with the Pathatrix™ Kits . . . . . . . 14
Workflow . . . . . . . . . . . . . . . . . . . . . . . . . . . . . . . . . . . . . . . . . . . . . . . . . . . . . . . . . . . . . . . . . . . . . 15
Procedural guidelines . . . . . . . . . . . . . . . . . . . . . . . . . . . . . . . . . . . . . . . . . . . . . . . . . . . . . . . . . . . 15
Transfer the enriched culture to the Sample Vessel . . . . . . . . . . . . . . . . . . . . . . . . . . . . . . . . . 15
Load and run the sample . . . . . . . . . . . . . . . . . . . . . . . . . . . . . . . . . . . . . . . . . . . . . . . . . . . . . . . . 16
Unload the sample . . . . . . . . . . . . . . . . . . . . . . . . . . . . . . . . . . . . . . . . . . . . . . . . . . . . . . . . . . . . . 19
Capture the Pathatrix™ beads . . . . . . . . . . . . . . . . . . . . . . . . . . . . . . . . . . . . . . . . . . . . . . . . . . . . 19
■ CHAPTER 4 Perform PCR . . . . . . . . . . . . . . . . . . . . . . . . . . . . . . . . . . . . . . . . . . . . . . . . . . . . . . . 21
Prepare a PCR-ready DNA lysate from captured Pathatrix™ beads . . . . . . . . . . . . . . . . . . . 21
Overview . . . . . . . . . . . . . . . . . . . . . . . . . . . . . . . . . . . . . . . . . . . . . . . . . . . . . . . . . . . . . . . . . . . . . . 22Workflow . . . . . . . . . . . . . . . . . . . . . . . . . . . . . . . . . . . . . . . . . . . . . . . . . . . . . . . . . . . . . . . . . 22Important procedural guidelines for PCR . . . . . . . . . . . . . . . . . . . . . . . . . . . . . . . . . . . . . . 22Create or edit a run file in RapidFinder™ Express Software . . . . . . . . . . . . . . . . . . . . . . 24Prepare the assay beads . . . . . . . . . . . . . . . . . . . . . . . . . . . . . . . . . . . . . . . . . . . . . . . . . . . 24Set up the PCR reactions . . . . . . . . . . . . . . . . . . . . . . . . . . . . . . . . . . . . . . . . . . . . . . . . . . . 25Load and run the reactions . . . . . . . . . . . . . . . . . . . . . . . . . . . . . . . . . . . . . . . . . . . . . . . . . . 26View results and data analysis . . . . . . . . . . . . . . . . . . . . . . . . . . . . . . . . . . . . . . . . . . . . . . . 26
Retest individual samples after a positive pooled sample . . . . . . . . . . . . . . . . . . . . . . . . . . . . 27
Confirmation testing of PCR-positive individual samples . . . . . . . . . . . . . . . . . . . . . . . . . . . . 28
Pathatrix™ Salmonella spp. Kits Linked to MicroSEQ™ PCR or Selective Agar Detection User Guide 3

■ CHAPTER 5 Selective agar detection and confirmation testing . . . . . . . . . . . . . . . 29
Important procedural guidelines . . . . . . . . . . . . . . . . . . . . . . . . . . . . . . . . . . . . . . . . . . . . . . . . . 29
Detect Salmonella spp. by selective agar plating . . . . . . . . . . . . . . . . . . . . . . . . . . . . . . . . . . . 29
Retest individual samples after a positive pooled sample result . . . . . . . . . . . . . . . . . . . . . . 30
Confirmation testing of positive individual samples . . . . . . . . . . . . . . . . . . . . . . . . . . . . . . . . . 30
■ APPENDIX A Troubleshooting . . . . . . . . . . . . . . . . . . . . . . . . . . . . . . . . . . . . . . . . . . . . . . . . . . . . 32
General troubleshooting . . . . . . . . . . . . . . . . . . . . . . . . . . . . . . . . . . . . . . . . . . . . . . . . . . . . . . . . 32
Investigate warning results or failed runs in SDS Software . . . . . . . . . . . . . . . . . . . . . . . . . . . 34
Interpretation of the amplification plot for samples with a Result Warning . . . . . . . . . . . . . 36
■ APPENDIX B NF VALIDATION™ by AFNOR Certification . . . . . . . . . . . . . . . . . . . . . . 37
■ APPENDIX C Good laboratory practices for PCR .. . . . . . . . . . . . . . . . . . . . . . . . . . . . . 40
■ APPENDIX D Safety . . . . . . . . . . . . . . . . . . . . . . . . . . . . . . . . . . . . . . . . . . . . . . . . . . . . . . . . . . . . . . . 41
Chemical safety . . . . . . . . . . . . . . . . . . . . . . . . . . . . . . . . . . . . . . . . . . . . . . . . . . . . . . . . . . . . . . . . 42
Biological hazard safety . . . . . . . . . . . . . . . . . . . . . . . . . . . . . . . . . . . . . . . . . . . . . . . . . . . . . . . . . 43
■ APPENDIX E Documentation and support . . . . . . . . . . . . . . . . . . . . . . . . . . . . . . . . . . . . . . 44
Food Safety support . . . . . . . . . . . . . . . . . . . . . . . . . . . . . . . . . . . . . . . . . . . . . . . . . . . . . . . . . . . . 44
Customer and technical support . . . . . . . . . . . . . . . . . . . . . . . . . . . . . . . . . . . . . . . . . . . . . . . . . 44
Related documentation . . . . . . . . . . . . . . . . . . . . . . . . . . . . . . . . . . . . . . . . . . . . . . . . . . . . . . . . . 45
References . . . . . . . . . . . . . . . . . . . . . . . . . . . . . . . . . . . . . . . . . . . . . . . . . . . . . . . . . . . . . . . . . . . . . . . . . . . . . . . . 46
Contents
4 Pathatrix™ Salmonella spp. Kits Linked to MicroSEQ™ PCR or Selective Agar Detection User Guide

Overview
IMPORTANT! Before using this product, read and understand the information in the “Safety” appendixin this document.
CAUTION! Salmonella spp. is a Biosafety Level 2 (BSL-2) organism [excluding S. Typhi and S.Paratyphi, which are both Biosafety Level 3 (BSL-3)]. Care must be taken when handling samplesthat may contain salmonellae. Laboratory personnel must be adequately trained to handle pathogensbefore being permitted to analyze samples for Salmonella spp. Laboratory personnel must wearappropriate protective equipment, which includes but is not limited to: protective eyewear, faceshield, clothing/lab coat, and gloves. Waste should be disposed of in compliance with local andnational legislation as appropriate.
This guide describes the following NF VALIDATION™‐certified workflows for detection of Salmonellaspp. in food samples:
1. Enrichment of food samples.
2. Immunomagnetic separation (IMS) and capture of Salmonella spp. using the Pathatrix™
Auto Instrument and one of the following kits:
• The Pathatrix™ Salmonella spp. Pooling Kits (Cat. No. APS250P or APS500P) for pooledenriched cultures (up to 10 cultures).
• The Pathatrix™ Salmonella spp. Kit (Cat. No. APS50) for individual enriched cultures.
3. Detection of Salmonella spp. using one of the following methods:
• Real‐time PCR detection using the MicroSEQ™ Salmonella spp. Detection Kit andRapidFinder™ Express Software on the Applied Biosystems™ 7500 Fast Real‑Time PCRInstrument.
• Direct plating of captured Pathatrix™ bead-bacteria complexes on selective agar plates.
4. Retesting of individual samples following a positive pooled sample result, using the same detectionmethod as for the pooled samples.
5. Confirmation testing of individual positive samples as described for each detection method.
Ensure that all instruments and equipment are properly installed and calibrated. For calibrationinformation, see the documentation that is provided with your instruments.
See Appendix B, “NF VALIDATION™ by AFNOR Certification” for detailed information about thevalidated matrices and food categories.
Go to thermofisher.com/foodsafety for a list of certified workflows for detection of Salmonella spp.
1
Pathatrix™ Salmonella spp. Kits Linked to MicroSEQ™ PCR or Selective Agar Detection User Guide 5

Procedure overviewThe procedure is illustrated in Figure 1. A 25-g food sample is homogenized with 225 mL of enrichmentmedia and incubated for 18–22 hours at 37°C. For pooled samples, a 5-mL or 10-mL aliquot ofenriched culture is combined with up to 9 additional 5-mL aliquots or 4 additional 10-mL aliquots ofenriched culture of the same matrix type for a maximum pooled sample volume of 50 mL (see Table 11in Appendix B, “NF VALIDATION™ by AFNOR Certification”).
Pooled enriched cultures are then subjected to a ~15-minute Pathatrix™ Auto Instrument cycle withanti-Salmonella spp. antibody-coated Pathatrix™ beads, to separate Salmonella spp. from the samplematrix and background flora. The Salmonella-Pathatrix™ bead complexes are magnetically captured andresuspended in 120 µL of nuclease-free water.
• For PCR detection, 90 µL of the resuspended beads are mixed with 10 µL of Lysis Buffer andsubjected to heat lysis at 97°C for 10 minutes. Pathatrix™ beads are removed from the lysate usinga magnetic particle concentrator or magnetic plate. The resulting lysate undergoes PCR using theMicroSEQ™ Salmonella spp. Detection Kit.
• For selective agar detection, 10 µL of the (unlysed) resuspended Pathatrix™ bead-bacteriacomplexes are streaked onto XLD and Oxoid™ Brilliance™ Salmonella Agar.
Positive pooled samples are retested individually by reprocessing 10-mL samples of stored individualenriched cultures on the Pathatrix™ Auto Instrument with the APS50 kit, and continuing through thechosen detection procedure. Independent confirmation testing is performed only on positive individualsamples, according to the detection method chosen.
Samples can be individually tested without pooling using the APS50 kit starting from 10 mL of individualenriched culture, following the same detection and confirmation procedures as for pooled samples,according to the detection method chosen.
Chapter 1 OverviewProcedure overview1
6 Pathatrix™ Salmonella spp. Kits Linked to MicroSEQ™ PCR or Selective Agar Detection User Guide

• • •
• • •
5 mLto 10 mL
5 mLto 10 mL
NOTE: Retesting of individual samplesfrom a positive pooled samplemust use the same detection methodas for the pooled sample.
P o o l e d s a m p l e t e s t i n g I n d i v i d u a l s a m p l e t e s t i n g
Dilute chocolate or cocoa samples 1:6
If pooled sample is negative, then each sample in the poolis negative.
If pooled sample is positive, then individually retest each enriched culture from the pool.
For pooled samples
Agar plate PCR: 7500 Fast instrument &MicroSEQ
P a t h a t r i x
A u t o S y s t e m
50-mL pooled sample(1 × Pathatrix Test)
Individualsample
Enriched culture
10-mL individual sample
pathogen detection kits
Individualsamples(up to 10)
Individualsampleenrichment
Enriched cultures
Pooling(5 x 10-mL or 10 x 5-mL samples)
Retesting afterpositive pool: 10-mL individual sample
= Positive postenrichment
™
™
™
1 × Pathatrix Test™
5 mL5 mL
Confirmation testing
to 10 mLto 10 mL
Figure 1 Procedure overview
Chapter 1 OverviewProcedure overview 1
Pathatrix™ Salmonella spp. Kits Linked to MicroSEQ™ PCR or Selective Agar Detection User Guide 7

Contents and storageTable 1 Pathatrix™ 10 Pooling Salmonella spp. Kit (Cat. No. APS500P; 50 cartridge runs; 50 poolsof 10 samples; 500 samples) and Pathatrix™ 5 Pooling Salmonella spp. Kit (Cat. No. APS250P; 50cartridge runs; 50 pools of 5 samples; 250 samples)
Item Amount Storage
• Pre-sterilized Sample and Elution Vessel Packs
• Pre-sterilized Capture Phase Packs
• Pre-sterilized Flat Cap Lids
50 each[1] Roomtemperature
Anti-Salmonella spp. Antibody-Coated ParamagneticBeads[2]
2.5 mL 5±3°C[3]
Do not freeze.[4]
[1] The Pathatrix™ Auto Plastics Kit is also available as Cat. No. ZNACPT [2] The beads are available separately as Cat. No. ZBSQCAP500.[3] Refer to the product label for the expiration date.[4] Beads that have been subjected to freezing temperatures may be rendered inactive.
Table 2 Pathatrix™ Salmonella spp. Kit (Cat. No. APS50; 50 cartridge runs; 50 samples)
Item Amount Storage
• Pre-sterilized Sample and Elution Vessel Packs
• Pre-sterilized Capture Phase Packs
• Pre-sterilized Flat Cap Lids
50 each[1] Roomtemperature
Anti-Salmonella spp. Antibody-Coated ParamagneticBeads[2]
2.5 mL 5±3°C[3]
Do not freeze.[4]
[1] The Pathatrix™ Auto Plastics Kit is also available as Cat. No. ZNACPT. [2] The beads are available separately as Cat. No. ZBSQCA.[3] Refer to the product label for the expiration date.[4] Beads that have been subjected to freezing temperatures may be rendered inactive.
Table 3 MicroSEQ™ Salmonella spp. Detection Kit (96 reactions, Cat. No. 4403930)
Contents Amount Cap color Storage[1]
Salmonella spp. Assay Beads, 8‑tubestrips
12 strips (96 tubes)
1 rack
Green (rack) 5±3°C
Protect from lightand moisture.[2]
MicroAmp™ Optical 8-Cap Strips 12 strips (96 caps) N/A
Pathogen Detection Negative Control[3] 1.5 mL Red 5±3°C
[1] See the product label for the expiration date.[2] Excessive exposure to light may affect the fluorescent probes. To protect the beads from moisture, do not remove the desiccant
from the pouch, and seal the pouch tightly each time you remove assay bead strips. [3] The Pathogen Detection Negative Control is included in a separate box and may be shipped separately.
Chapter 1 OverviewContents and storage1
8 Pathatrix™ Salmonella spp. Kits Linked to MicroSEQ™ PCR or Selective Agar Detection User Guide

Required materialsUnless otherwise indicated, all materials are available through the Thermo Fisher Microbiology orderingprocess or thermofisher.com. MLS: Fisher Scientific (fisherscientific.com) or other major laboratorysupplier.
Note: Parts may ship separately depending on configuration and storage conditions.
Materials required for sample enrichment
Table 4 Materials for food samples
Item Source
Homogenizer laboratory blender or diluter, one of the following or equivalent:
• Homogenizer Laboratory Blender
• Diluflux™ Pro Automated Gravimetric Dilutor withsimple (non-robotic) dispensing arm
• Diluflux™ Pro Automated Gravimetric Dilutor withrobotic dispensing arm
DB5000A
DB4100A
DB4150A
Sample enrichment bags, one of the following or equivalent:
• BagFilter™ 400 (400 mL)[1]
• BagPage™ 400 (400 mL)[2]
• BagLight™ 400 (400 mL)[3]
• RollBag™ 1300 (1300 mL)[4]
DB4011A
DB4012A
DB4013A
DB4014A
Incubator, 37±1°C MLS
Enrichment media appropriate for the sample type:
Buffered peptone water (BPW) DF1049, CM1211B, or equivalent
Brilliant Green (CAS 633-03-4) Fisher Scientific™ B422-25 or equivalent
Ultra-high temperature (UHT) processed skim milk orNon Fat Dried Milk (NFDM)
Food retail store
[1] BagFilter™ 400 bags contain a non-woven side-filter with porosity of <250 microns.[2] BagPage™ 400 bags contain a non-woven full-surface filter with porosity of 280 microns.[3] BagLight™ 400 bags contain no filter. [4] RollBag™ 1300 bags have a wire-reinforced closure for a more secure closure with the larger sample volume.
Chapter 1 OverviewRequired materials 1
Pathatrix™ Salmonella spp. Kits Linked to MicroSEQ™ PCR or Selective Agar Detection User Guide 9

Materials for immunomagnetic separation
Table 5 Required materials not included in the Pathatrix™ kits
Item Source
Pathatrix™ Auto Instrument, including Sample VesselHolder[1] and Elution Vessel Holder[1]
PTXAUTOINS
(Optional) Pathatrix™ Cartridge Rack; holds 5Cartridges
ACARTRACK
PBS, 10X, pH 7.4
Dilute 1:10 in molecular biology-grade water (Cat.No. AM9932 or equivalent) prior to use.
AM9624 or AM9625
Nuclease-free water AM9932 or equivalent
Optional, for pooling high-particulate or high-fat-content samples:
Pathatrix™ Foam Filters PFF
Pathatrix™ 5 Pooling Kit [contains Straws (254 mm)and Syringes (10 mL)]
POOL510MLN
Pathatrix™ 10 Pooling Kit [contains Straws (254 mm)and Syringes (10 mL)]
POOL1010MLN
[1] Available separately as Cat. No. ATUBERACK.
Materials for PCR-ready DNA sample preparation
Table 6 Materials for PCR-ready DNA sample preparation
Item Source
Heating block, 97±2°C MLS
DynaMag™-2 Magnet (for use with microcentrifugetubes)
12321D
Sterile 1.5-mL microcentrifuge tubes MLS
Nuclease-free water AM9938 or equivalent
Lysis Buffer, FS 4480724
(Optional) For processing large numbers of samples in a 96-well plate format
(Optional) Thermal cycler SimpliAmp™ Thermal Cycler
(Optional) 96-well PCR plates and non-optical film 4346906 and 4306311, or equivalent
(Optional) Magnetic rack; for example, Pathatrix™
Magnetic Capture Plate or Magnetic Stand-96One of the following or equivalent:
• MAGNETICPLATE
• AM10027
Chapter 1 OverviewRequired materials1
10 Pathatrix™ Salmonella spp. Kits Linked to MicroSEQ™ PCR or Selective Agar Detection User Guide

Materials for PCR detection
Item Source
Instruments and equipment
Applied Biosystems™ 7500 Fast Real‑Time PCRInstrument
A30304 (desktop)
A30299 (laptop)
Contact your local microbiology sales representative.
RapidFinder™ Express Software v2.0 or later Download the latest version at thermofisher.com/rapidfinder-express-software
7500 Fast Precision Plate Holder for MicroAmp™
Tube StripsA29252
MicroAmp™ 96-Well Base N8010531
MicroAmp™ Cap Installing Tool 4330015
MicroAmp™ Multi-removal Tool 4313950
Benchtop microcentrifuge with 8-tube strip adapter
or
Plate centrifuge
MLS
Laboratory mixer (vortex mixer or equivalent) MLS
Pipettors:
• Positive-displacement
• Air-displacement
• Multichannel
MLS
Consumables
Aerosol-resistant pipette tips MLS
Disposable gloves MLS
MicroAmp™ Fast 8-Tube Strip, 0.1-mL[1] 4358293
MicroAmp™ Optical 8-Cap Strip, 300 strips[1] 4323032
Reagents
Nuclease-free water AM9938
[1] Required to evenly distribute the clamping load applied to the tube strips during PCR processing. Do not use other tube strips, which could result in crushed tubes.
Chapter 1 OverviewRequired materials 1
Pathatrix™ Salmonella spp. Kits Linked to MicroSEQ™ PCR or Selective Agar Detection User Guide 11

Materials for confirmation testing of PCR-positive samples
Table 7 Materials for confirmation testing of PCR-positive samples
Item Source
Incubator, 37±1°C MLS
Sterile, disposable 10-µL loops MLS
Xylose lysine deoxycholate (XLD) agar MLS
Oxoid™ Brilliance™ Salmonella Agar CM1092B
Oxoid™ Salmonella Selective Supplement SR0194E
Materials for additional confirmatory testing of characteristic colonies; see “Confirmation testing of PCR-positive individual samples” on page 28.
Materials for selective agar detection
Table 8 Materials for selective agar detection
Item Source
Incubator, 37±1°C MLS
Sterile, disposable 10-µL loops MLS
Xylose lysine deoxycholate (XLD) agar MLS
Oxoid™ Brilliance™ Salmonella Agar CM1092B
Oxoid™ Salmonella Selective Supplement SR0194E
Materials for confirmation after selective agar detection, according to the method chosen; see“Confirmation testing of positive individual samples” on page 30.
Chapter 1 OverviewRequired materials1
12 Pathatrix™ Salmonella spp. Kits Linked to MicroSEQ™ PCR or Selective Agar Detection User Guide

Enrich food samples
Refer to “Materials required for sample enrichment” on page 9.
For preparation of initial suspensions, follow instructions of EN ISO 6579-1 and 6887-1 standards.
IMPORTANT! Use proper aseptic technique while handling samples to avoid cross-contamination.
1. Prewarm 225 mL of enrichment media per sample to 37±1°C, as indicated in the following table.
Sample type[1] Enrichment media
Meat BPW
Dairy samples, including milk-derived products BPW + 0.002% Brilliant Green
Chocolate or cocoa-based samples Sterile UHT skim milk + 0.002% Brilliant Green
[1] See Table 11 in Appendix B, “NF VALIDATION™ by AFNOR Certification”.
2. Add 225 mL of prewarmed media to 25 g (or 25 mL) of food sample in a homogenizer bag.
3. Process for 1–2 minutes in a homogenizer.
Hand massage foods that cannot be processed in a homogenizer (Narang et al, 2006).
4. Incubate at 37±1°C under static conditions for the time indicated in the following table.
Sample type Enrichment time
Meat or dairy samples Total of 18–22 hours
Chocolate or cocoa-based samples
2
Pathatrix™ Salmonella spp. Kits Linked to MicroSEQ™ PCR or Selective Agar Detection User Guide 13
IMS capture of Salmonella spp. withthe Pathatrix™ Kits
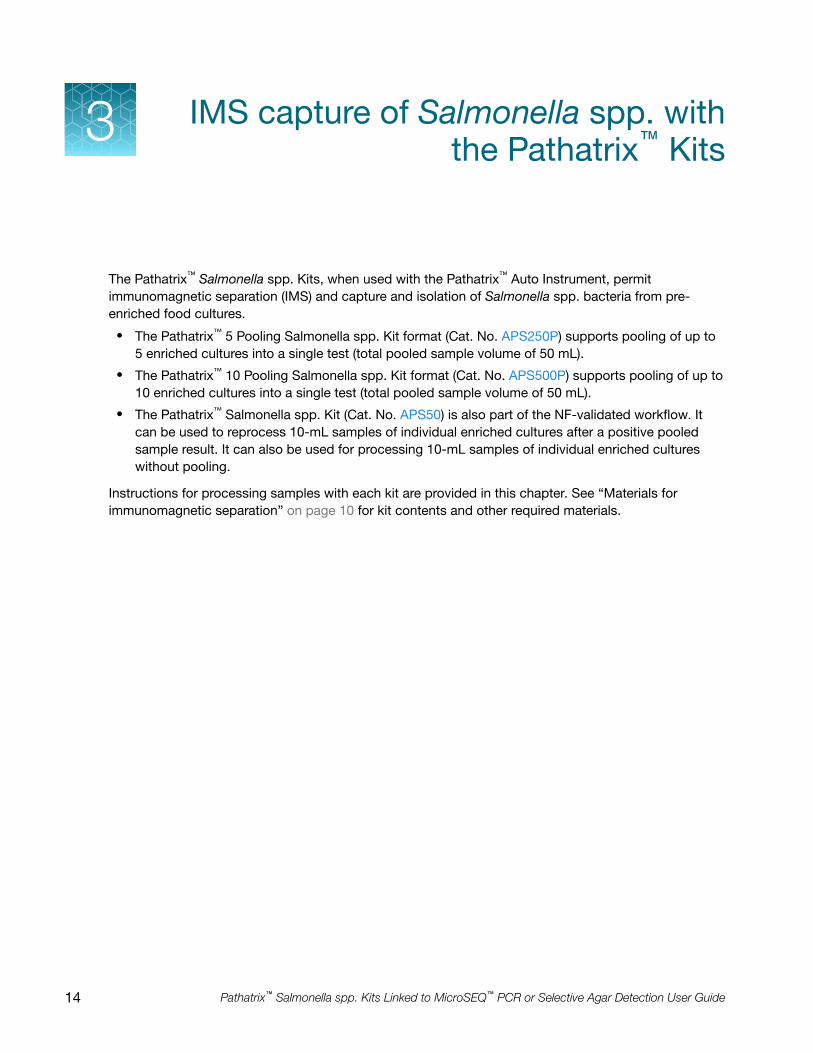
The Pathatrix™ Salmonella spp. Kits, when used with the Pathatrix™ Auto Instrument, permitimmunomagnetic separation (IMS) and capture and isolation of Salmonella spp. bacteria from pre-enriched food cultures.
• The Pathatrix™ 5 Pooling Salmonella spp. Kit format (Cat. No. APS250P) supports pooling of up to5 enriched cultures into a single test (total pooled sample volume of 50 mL).
• The Pathatrix™ 10 Pooling Salmonella spp. Kit format (Cat. No. APS500P) supports pooling of up to10 enriched cultures into a single test (total pooled sample volume of 50 mL).
• The Pathatrix™ Salmonella spp. Kit (Cat. No. APS50) is also part of the NF-validated workflow. Itcan be used to reprocess 10-mL samples of individual enriched cultures after a positive pooledsample result. It can also be used for processing 10-mL samples of individual enriched cultureswithout pooling.
Instructions for processing samples with each kit are provided in this chapter. See “Materials forimmunomagnetic separation” on page 10 for kit contents and other required materials.
3
14 Pathatrix™ Salmonella spp. Kits Linked to MicroSEQ™ PCR or Selective Agar Detection User Guide

Workflow
Transfer enriched culture to the Sample Vessel
(Pool up to 10 samples of enriched cultures at this step)
q
Load and run the samples
q
Unload the samples
q
Capture the Pathatrix™ beads
q
Proceed to PCR or selective agar detection
Procedural guidelines• Use aseptic technique and good laboratory practices at all times.
• Take care when handling vessels that contain microorganisms.
• Avoid generating aerosols, as pathogenic organisms may be present.
• Dispose of used or unused reagents, used media, sample enrichments, as well as othercontaminated disposable materials following procedures for infectious or potentially infectiousproducts.
• Treat all waste as biohazardous, and handle and dispose of using safe laboratory practices, inaccordance and compliance with all appropriate regulations.
Transfer the enriched culture to the Sample Vessel1. Remove the Sample and Elution Vessels from the Pathatrix™ consumable kit packaging and place
into the Sample Vessel Holder (included with the Pathatrix™ Auto Instrument; see Figure 2).
2. Partially remove the lids from both vessels, making an opening large enough to allow the additionof enriched culture and wash buffer to the vessels.
Chapter 3 IMS capture of Salmonella spp. with the Pathatrix™ KitsWorkflow 3
Pathatrix™ Salmonella spp. Kits Linked to MicroSEQ™ PCR or Selective Agar Detection User Guide 15

3. Transfer the enriched culture to the Sample Vessel as indicated in the following table.
Sample type Procedure
Pooled sample Prepare a 50 mL pooled sample by transferring 5-mL or 10-mLaliquots from up to 10 individually enriched cultures to a SampleVesselIf the samples are highly particulate and/or contain a high fatcontent, we recommend using Pathatrix™ Foam Filters with 10Pool Kit Straws and Syringes in this step.
Note: Pool enriched cultures only from the same matrix type[1].
Individual enriched culture forretesting after a positive pooledsample
Transfer 10 mL of stored individual enriched culture, rewarmedfor 1–2 hours at 37±1°C, to a Sample Vessel.
Individual enriched culture (nopooling)
Transfer 10 mL of enriched culture to a Sample Vessel.
(Optional but recommended)Negative extraction control
Transfer 10 mL of sterile enrichment media to a Sample Vessel.
[1] Table 11 in Appendix B, “NF VALIDATION™ by AFNOR Certification”
4. Store the remaining individual enriched cultures at 5±3°C for potential reanalysis until the testresult is confirmed.
Note: Do not store enriched cultures for more than 32 hours total.
Load and run the sample1. Add about 35 mL of 1X PBS to the fill line of the Elution Vessel.
2. Replace the lids on the Sample and Elution Vessels, making sure that the vessels are completelysealed.
3. Add 50 μL of the Pathatrix™ bead suspension from the indicated kit into the spout on the lid of theSample Vessel (Figure 2).
IMPORTANT! Fully resuspend the Pathatrix™ beads by agitating the bead vial (for example, byvortexing or inversion of sealed bead vial) before adding to the Sample Vessel.
Sample type Use Pathatrix™ beads from this kit
Pooled sample APS250P or APS500P
Individual enriched culture for retesting after apositive pooled sample
APS50
Individual enriched culture (no pooling) APS50
Chapter 3 IMS capture of Salmonella spp. with the Pathatrix™ KitsLoad and run the sample3
16 Pathatrix™ Salmonella spp. Kits Linked to MicroSEQ™ PCR or Selective Agar Detection User Guide
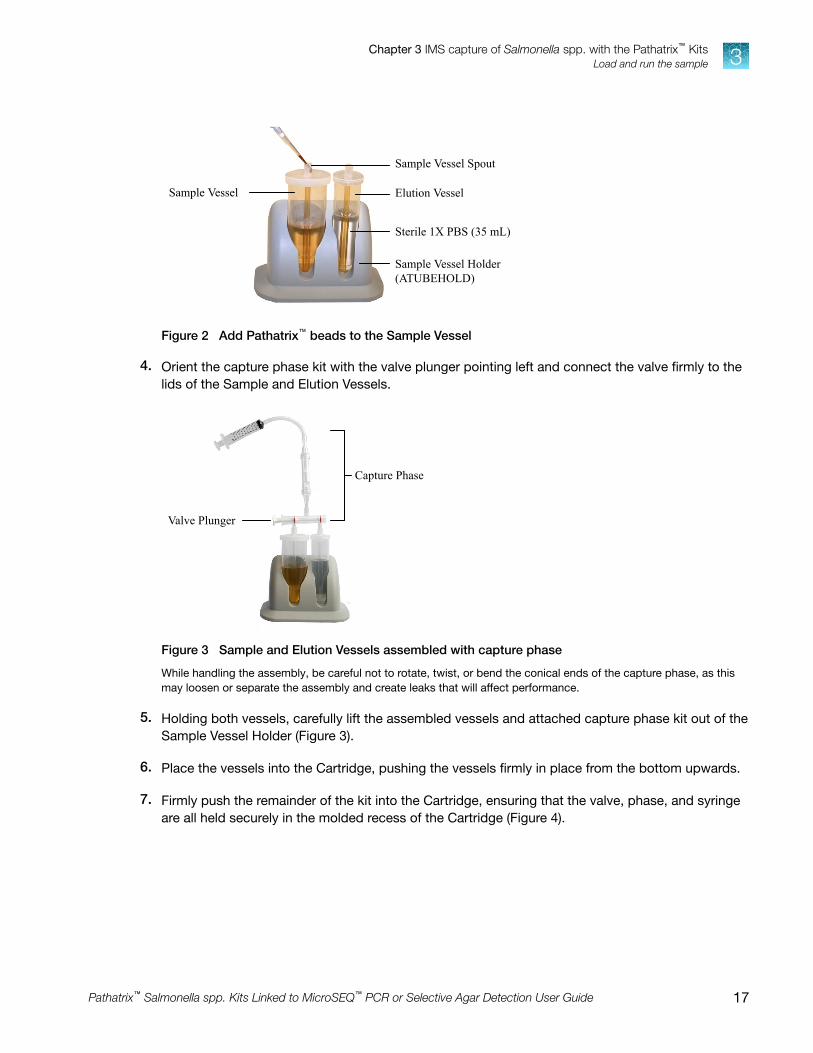
Sample Vessel Spout
Elution Vessel
Sterile 1X PBS (35 mL)
Sample Vessel Holder(ATUBEHOLD)
Sample Vessel
Figure 2 Add Pathatrix™ beads to the Sample Vessel
4. Orient the capture phase kit with the valve plunger pointing left and connect the valve firmly to thelids of the Sample and Elution Vessels.
Capture Phase
Valve Plunger
Figure 3 Sample and Elution Vessels assembled with capture phase
While handling the assembly, be careful not to rotate, twist, or bend the conical ends of the capture phase, as thismay loosen or separate the assembly and create leaks that will affect performance.
5. Holding both vessels, carefully lift the assembled vessels and attached capture phase kit out of theSample Vessel Holder (Figure 3).
6. Place the vessels into the Cartridge, pushing the vessels firmly in place from the bottom upwards.
7. Firmly push the remainder of the kit into the Cartridge, ensuring that the valve, phase, and syringeare all held securely in the molded recess of the Cartridge (Figure 4).
Chapter 3 IMS capture of Salmonella spp. with the Pathatrix™ KitsLoad and run the sample 3
Pathatrix™ Salmonella spp. Kits Linked to MicroSEQ™ PCR or Selective Agar Detection User Guide 17

8. Push the magnet slider across into the locking position and press the magnet release button on theside of the Cartridge to ensure the kit is positioned correctly and the magnets can freely disengagefrom the phase.
IMPORTANT! If the magnet slider is hard to close or does not release cleanly when the releasebutton is pressed, carefully reposition the capture phase and repeat this step. Failure to ensuresmooth release will cause magnetic beads to remain captured and reduce overall performance.
Syringe
Magnet Release Button
Valve Plunger
Phase
Sample Vessel
Elution Vessel
Cartridge Holder(ACARTHOLD)
Sliding Magnet Holder
Figure 4 Assembled Cartridge
9. Reset the magnets into the locked position.
10. Insert the Cartridge into the Pathatrix™ Auto Instrument until it clicks into position.
11. Press the numbered button above the appropriate Cartridge to start the run.The associated LED turns green to indicate the run has started.
After ~12 minutes, the LED flashes red and green alternately, prompting the user to unload the sample,as described in the next section.
Chapter 3 IMS capture of Salmonella spp. with the Pathatrix™ KitsLoad and run the sample3
18 Pathatrix™ Salmonella spp. Kits Linked to MicroSEQ™ PCR or Selective Agar Detection User Guide
Unload the sample1. Press the button above the appropriate Cartridge to initiate the draining step (approximately
2 minutes).
2. When the draining step is complete and the LED is illuminated red, remove the Cartridge by pullingit out, away from the instrument.
3. Remove the syringe from the Cartridge and carefully pull out the rest of the kit, starting at the topand working downwards.
When removing the Sample and Elution Vessels from the Cartridge, hold firmly by the vesselsthemselves to prevent spillage.
4. Place both vessels with the capture phase attached in the Sample Vessel Holder.
5. Remove the lid from the Elution Vessel to separate it from the rest of the consumable.
6. Leaving the Elution Vessel in the Sample Vessel Holder, lift away and discard the rest of theconsumable, including the Sample Vessel.
Note: The Elution Vessel contains approximately 200 µL of PBS and Pathatrix™ beads with thecaptured bacteria.
Capture the Pathatrix™ beadsIn this procedure, the Pathatrix™ beads are magnetically captured and washed using a Sample VesselHolder (holds 1 Elution Vessel) or an Elution Vessel Holder (holds up to 5 Elution Vessels). Both holderscontain magnets to capture beads along one side of the bottom of the Elution Vessels.
1. Leave the Elution Vessel in the Sample Vessel Holder for approximately 1 minute to allow captureof the Pathatrix™ beads.
2. For chocolate and cocoa-based samples only: after capture of the beads in step 1, pipet thesupernatant up and down very gently, to resuspend any cocoa sediment, without disturbing thecaptured beads.
This step optimizes removal of chocolate-matrix residue.
3. While the Elution Vessel is still in the Sample Vessel Holder, carefully remove and discard the PBSfrom the Elution Vessel, taking care not to disturb the captured Pathatrix™ beads.
4. Remove the Elution Vessel from the Sample Vessel Holder, add 120 µL of 1X PBS, and pipet upand down to completely resuspend the Pathatrix™ beads.
5. Place the Elution Vessel in the Sample Vessel Holder and allow it to remain there for approximately1 minute.
Chapter 3 IMS capture of Salmonella spp. with the Pathatrix™ KitsUnload the sample 3
Pathatrix™ Salmonella spp. Kits Linked to MicroSEQ™ PCR or Selective Agar Detection User Guide 19

6. While the Elution Vessel is still in the Sample Vessel Holder, carefully remove and discard the PBSwithout disturbing the captured Pathatrix™ beads.
7. Remove the Elution Vessel from the Sample Vessel Holder and completely resuspend thePathatrix™ beads in 120 µL of nuclease-free water by pipetting up and down.
The Pathatrix™ bead suspension is ready for detection by real-time PCR (Chapter 4, “PerformPCR”) or selective agar plating (Chapter 5, “Selective agar detection and confirmation testing”).
Chapter 3 IMS capture of Salmonella spp. with the Pathatrix™ KitsCapture the Pathatrix™ beads3
20 Pathatrix™ Salmonella spp. Kits Linked to MicroSEQ™ PCR or Selective Agar Detection User Guide

Perform PCR
Prepare a PCR-ready DNA lysate from captured Pathatrix™
beads1. Prefill the appropriate number of 1.5-mL centrifuge tubes or wells of a 96-well PCR plate with
10 µL of Lysis Buffer, FS for all samples being tested, including any needed negative controls.
2. Transfer 90 µL of the resuspended Pathatrix™ bead pellet to each prefilled tube or well.
Note: If you are retesting individual samples after a positive pooled result, concurrently streak10 µL of the remaining resuspended Pathatrix™ beads onto selective agar plates for confirmationtesting, as described in “Retest individual samples after a positive pooled sample” on page 27.
3. Incubate sample(s) at 97±2°C for 12±2 minutes in a heating block or thermal cycler.
4. Remove the sample(s) from the heating block or thermal cycler and allow the sample(s) to cool toroom temperature (23±5°C) for about 1 minute.
5. Proceed in one of the following ways:
• Proceed directly to PCR with the MicroSEQ™ kit, if storage of the DNA samples before PCR isnot required.
• Process further for long-term DNA sample storage as follows:a. Place the DNA samples in a magnetic particle concentrator (if using microcentrifuge
tubes) or magnetic plate (if using a 96-well plate).
b. Leave the sample in the concentrator for 2±1 minutes.
c. Remove up to 60 μL from the top of the sample and add it to a clean microcentrifugetube or well of a 96-well plate.Avoid the magnetic particle pellet and any lysis debris while removing the DNA sample.
d. Store the DNA sample below –18°C for up to 1 year.
IMPORTANT! Do not freeze the DNA samples with Pathatrix™ beads.
4
Pathatrix™ Salmonella spp. Kits Linked to MicroSEQ™ PCR or Selective Agar Detection User Guide 21
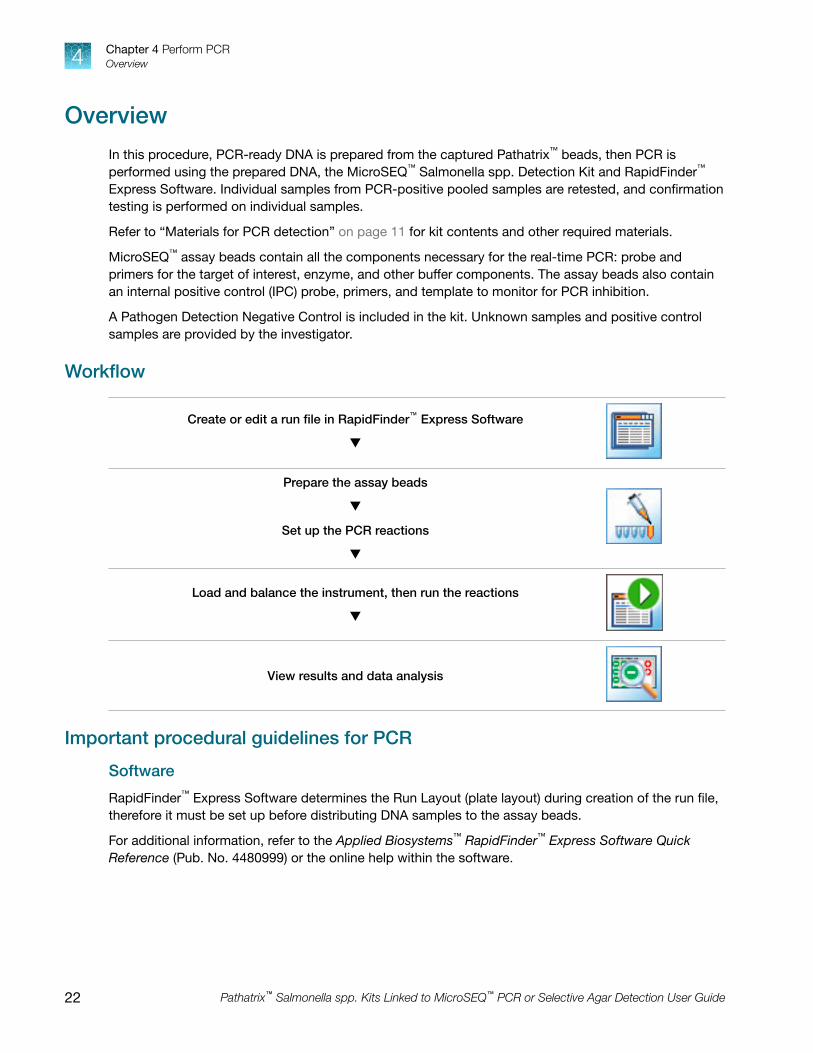
OverviewIn this procedure, PCR-ready DNA is prepared from the captured Pathatrix™ beads, then PCR isperformed using the prepared DNA, the MicroSEQ™ Salmonella spp. Detection Kit and RapidFinder™
Express Software. Individual samples from PCR-positive pooled samples are retested, and confirmationtesting is performed on individual samples.
Refer to “Materials for PCR detection” on page 11 for kit contents and other required materials.
MicroSEQ™ assay beads contain all the components necessary for the real-time PCR: probe andprimers for the target of interest, enzyme, and other buffer components. The assay beads also containan internal positive control (IPC) probe, primers, and template to monitor for PCR inhibition.
A Pathogen Detection Negative Control is included in the kit. Unknown samples and positive controlsamples are provided by the investigator.
Workflow
Create or edit a run file in RapidFinder™ Express Software
q
Prepare the assay beads
q
Set up the PCR reactions
q
Load and balance the instrument, then run the reactions
q
View results and data analysis
Important procedural guidelines for PCR
Software
RapidFinder™ Express Software determines the Run Layout (plate layout) during creation of the run file,therefore it must be set up before distributing DNA samples to the assay beads.
For additional information, refer to the Applied Biosystems™ RapidFinder™ Express Software QuickReference (Pub. No. 4480999) or the online help within the software.
Chapter 4 Perform PCROverview4
22 Pathatrix™ Salmonella spp. Kits Linked to MicroSEQ™ PCR or Selective Agar Detection User Guide

Sample handling
• Use a new pipette tip for each sample.
• If you mix the assay beads with the DNA samples by pipetting up and down, keep the pipette tip atthe bottom of the tube to minimize aerosol formation and cross-contamination.
• Follow the recommendations in Appendix C, “Good laboratory practices for PCR”.
MicroAmp™ tube strips
• Follow these instructions to ensure proper storage of the tube strips:– Cut the storage pouch at the notch above the resealable strip.
– Always reseal the storage pouch with desiccant, and replace at 5±3°C.
• 8-tube strips can be cut apart with scissors.If necessary, trim any remaining connector material from the cut to allow a better fit againstadjacent tubes in the 7500 Fast Precision Plate Holder for MicroAmp™ Tube Strips.
• MicroAmp™ Tube Strips are labeled 1–8 on the side of the tubes, to orient tube strips duringhandling.
11 22 33 44 55 66 77 88
Figure 5 MicroAmp™ Tube Strip labeling
The tube strip is shown with tinted dome caps, as shipped. For PCR, replace the dome caps with the optical capstrips provided in the kit.
If necessary for visual reference from above, mark the tab at one end of the cap strip. Do not markany of the caps (this could interfere with real-time PCR detection).
• Seal the tubes with the transparent, optical cap strips provided in the kit. Do not use colored capsor tubes for real-time PCR reactions, because they may affect dye-signal readings during real-timePCR.
• Always use intact 8-cap strips, even if empty tubes have been added next to reaction tubes.
• Use the MicroAmp™ 96-Well Base and the MicroAmp™ Cap Installing Tool to seal the assay tubeswith the optical cap strips. This avoids collapsing, bending, or misaligning the tubes.Confirm that the strips are straight and that each tube is in line with the adjacent tube.
• Use a plate adapter for vortexing the tube strips, or hold the strips in the MicroAmp™ 96-Well Basewhile vortexing.
Chapter 4 Perform PCROverview 4
Pathatrix™ Salmonella spp. Kits Linked to MicroSEQ™ PCR or Selective Agar Detection User Guide 23

Create or edit a run file in RapidFinder™ Express Software
The RapidFinder™ Express Software is designed for use on the Applied Biosystems™ 7500 Fast Real-Time PCR System and must be set up before aliquoting samples.
On the main page of the RapidFinder™ Express Software, select Create/Edit a Run File , and enterthe target pathogen, number of samples, replicates, and positive and negative controls for each targetat the prompts.The software determines the sample layout based on the information entered and creates a run file.
Prepare the assay beads
Follow the plate layout determined by the RapidFinder™ Express Software.
1. Transfer the appropriate number of individual tubes or 8-tube strips from the storage pouch to a96-well base at room temperature (23±5°C).
2. If required by the plate layout, place empty MicroAmp™ Fast 8‑Tube Strips (or partial strips) tobalance the tray when the assay tubes are placed in the instrument later.
Chapter 4 Perform PCROverview4
24 Pathatrix™ Salmonella spp. Kits Linked to MicroSEQ™ PCR or Selective Agar Detection User Guide

Set up the PCR reactions
For step-by-step instructions, select Pipette Samples on the main page in RapidFinder™ ExpressSoftware.
1. Following the layout determined by RapidFinder™ Express Software, distribute the DNA samplelysates to MicroSEQ™ assay beads as described in the following table.
DNA sample type Procedure
Frozen DNA samples (with Pathatrix™
beads removed and DNA frozen asdescribed in “Prepare a PCR-readyDNA lysate from captured Pathatrix™
beads” on page 21)
1. Just before use, completely thaw the DNA sample on ice.
2. Before opening, centrifuge briefly to remove condensation from thetubes or plates and avoid cross contamination.
3. Add DNA sample to the MicroSEQ™ assay bead:
• For samples from chocolate or cocoa matrices: combine 5 µL ofthe sample with 25 µL of nuclease-free water, mix, then add to anassay bead.
• For all other matrices: transfer 30 µL of the sample to an assaybead.
DNA samples that have not beenfrozen (with Pathatrix™ beads stillpresent)
1. Place the DNA samples in a magnetic particle concentrator (if usingmicrocentrifuge tubes) or magnetic plate (if using a 96-well plate).
2. Leave the sample in the concentrator for 2±1 minutes.
3. Add DNA sample to the MicroSEQ™ assay bead avoiding the magneticparticle pellet and any lysis debris at the bottom of the tube.
• For samples from chocolate or cocoa matrices: carefully remove5 µL from the top of the sample and combine with 25 µL ofnuclease-free water, mix, then add to an assay bead.
• For all other matrices: carefully transfer 30 µL from the top of thesample to an assay bead.
4. (Optional) Transfer 30 µL of the remaining sample to a cleanmicrocentrifuge tube, avoiding the magnetic particle pellet and anylysis debris at the bottom of the tube, and store the DNA sample below−18°C for potential reanalysis.
2. Following the layout determined by RapidFinder™ Express Software, add 30 μL of the PathogenDetection Negative Control and any positive control samples to the appropriate MicroSEQ™ assaybeads at room temperature (23±5°C), and mix by gently pipetting up and down a few times.
Assay beads dissolve in 1–5 seconds.Alternatively, vortex the assay tubes after they are capped, as described in step 5.
3. Cap the tubes, sealing each tube with the transparent optical strip caps provided in the kit.
4. Mark or label one end of the strip cap (but not directly over any one cap) to maintain the striporientation when transferring the tubes to the instrument tray.
Chapter 4 Perform PCROverview 4
Pathatrix™ Salmonella spp. Kits Linked to MicroSEQ™ PCR or Selective Agar Detection User Guide 25

5. Make sure that the reactions are thoroughly mixed: if reactions were not previously mixed duringthe pipetting step, vortex to mix.
6. Make sure that the reagents are at the bottom of tubes: briefly centrifuge the strip tubes at200–600 × g for about 20 seconds using a centrifuge with a plate adapter or a benchtopmicrocentrifuge with an 8-strip PCR tube adapter.
Load and run the reactions
In the RapidFinder™ Express Software, select Start Instrument Run on the main page, select theappropriate run file, and follow the software prompts.
1. Use the PCR carry plate to transfer the tubes to the instrument in the same configuration as the runlayout.
Use the 7500 Fast Precision Plate Holder for MicroAmp™ Tube Strips in the instrument.
Be sure to load empty low profile PCR tubes as directed by the software (Figure 6).
2. Close the tray to the instrument, and follow the RapidFinder™ Express Software prompts to startthe run.
Figure 6 7500 Fast instrument tube layout
RapidFinder™ Express Software directs the user to load empty strip tubes in column 1 (far left) and column 12 (far right),if needed. The empty capped 8-tube strips evenly distribute the clamping load applied to the sample tube strips duringprocessing, thereby minimizing the risk of collapsing any tubes.
View results and data analysis
Data analysis is automated by the software.
In the RapidFinder™ Express Software, select View Results on the main page, select theappropriate run file, and follow the prompts to view results.
To display a list of results in table format, click Table View. Select a sample, then click View Details tosee replicate information about samples.
Chapter 4 Perform PCROverview4
26 Pathatrix™ Salmonella spp. Kits Linked to MicroSEQ™ PCR or Selective Agar Detection User Guide

Next steps after viewing results
Proceed as indicated in the following table, according to the RapidFinder™ Express result.
Result icon[1] Result Action
Positive result Pooled samples: proceed to “Retest individual samples after apositive pooled sample” on page 27.Individual samples: proceed to “Confirmation testing of PCR-positive individual samples” on page 28.
Negative result No action required.
Result warning Dilute 5 µL of the retained DNA sample with 25 µL of Nuclease-free Water and repeat the PCR.
[1] RapidFinder™Express displays results pictorially.
Retest individual samples after a positive pooled samplePooled samples that test positive by PCR must be retested as individual samples, as follows:
1. Rewarm stored individual enriched cultures at 37±1°C for 1–2 hours.
2. Set up fresh Sample and Elution Vessels in a Sample Vessel Holder, and transfer 10 mL of thewarmed individual enriched culture to individual Sample Vessels.
3. Process the individual cultures on the Pathatrix™ Auto Instrument starting at “Load and run thesample” on page 16 through “Capture the Pathatrix™ beads” on page 19.
4. Follow the procedure “Prepare a PCR-ready DNA lysate from captured Pathatrix™ beads” onpage 21 with 90 µL of the Pathatrix™ bead suspension, through “Overview” on page 22.
5. Concurrently, streak the remaining unlysed Pathatrix™ bead suspension onto selective agar forconfirmation testing.
a. Streak 10 μL (one loopful) of the remaining unlysed Pathatrix™ bead suspension onto a well-dried XLD agar plate, and streak an additional 10 μL onto Oxoid™ Brilliance™ Salmonella Agar.
IMPORTANT! We recommend streaking, instead of spreading, to generate isolated colonies.
b. Allow the plates to dry for 10 minutes, then invert and incubate at 37±1°C for 18–24 hours.
Chapter 4 Perform PCRRetest individual samples after a positive pooled sample 4
Pathatrix™ Salmonella spp. Kits Linked to MicroSEQ™ PCR or Selective Agar Detection User Guide 27

Confirmation testing of PCR-positive individual samplesConfirmation testing is performed only on individual samples, not pooled samples.
In the context of NF VALIDATION™ Certification, all individual samples identified as positive by thePathatrix™ Auto Salmonella spp. Kit Linked to MicroSEQ™ Salmonella spp. Detection Kit method mustbe confirmed by one of the following tests:
• By using the conventional tests described in the methods standardized by CEN or ISO (includingthe purification step). The confirmation step must start from the enrichment broth (either BPW orUHT milk).
• By performing a confirmatory test on observed characteristic colonies from the plated unlysedPathatrix™ beads from the individual retested samples (“Retest individual samples after a positivepooled sample” on page 27), as described in the following table.
Characteristic colonies observed
Confirmatory testXLD agar
Oxoid™ Brilliance™
Salmonella Agar
No No None required
Yes No ISO CEN 6579:2017 confirmation procedure usingMicrobact™ GNB 24E Kit MB1131A or equivalent
No Yes Latex test (Oxoid™ DR1108)
Yes Yes Latex test (Oxoid™ DR1108) on colonies fromOxoid™ Brilliance™ Salmonella Agar
• Using any other method certified by NF VALIDATION™; the principle must be different from thatof the Pathatrix™ Auto Salmonella spp. Kit Linked to MicroSEQ™ Salmonella spp. Detection Kitmethod (immunomagnetic separation and PCR). The detection protocol of the second validatedmethod used for the confirmation shall be followed entirely. All steps which are before the stepfrom which the confirmation is started shall be common to both methods (that is, enrichment inBPW at 37°C).
In the event of discordant results (positive with the alternative method, non-confirmed by one of themeans described above, and in particular the latex test), the laboratory must follow the necessary stepsto ensure the validity of the result obtained.
Note: Some strains of Salmonella belonging to the serovar Dublin may show a weak to nil magentapigmentation, because of their low esterase activity.
Chapter 4 Perform PCRConfirmation testing of PCR-positive individual samples4
28 Pathatrix™ Salmonella spp. Kits Linked to MicroSEQ™ PCR or Selective Agar Detection User Guide

Selective agar detection andconfirmation testing
Refer to “Materials for selective agar detection” on page 12.
Important procedural guidelines• Wear a facemask when weighing out powders.
• Take care when boiling agar prior to autoclaving, and wear heat-resistant gloves when handling hotflasks of liquid.
Detect Salmonella spp. by selective agar plating
Note: We recommend streaking the sample out to generate individual colonies, as opposed to spreadplating.
1. Streak 10 μL of the unlysed Pathatrix™ bead suspension over a well‐dried XLD agar plate andanother 10 μL onto Oxoid™ Brilliance™ Salmonella Agar.
2. Allow the plates to dry for approximately 10 minutes, then invert and incubate at 37±1°C for 18–24hours.
A presumptive positive result is defined as the isolation of typical, suspicious, or atypicalSalmonella spp. colonies on the agar plates used.
If a negative result is obtained from a pooled sample, the individual enriched cultures can be discarded,as further testing is not required.
If a positive result is obtained from a pooled sample, retest the individual enriched cultures to allowidentification of which individual samples in the pool produced the positive result, as described in thenext section.
Note: Some strains of Salmonella belonging to the serovar Dublin may show a weak to nil magentapigmentation, because of their low esterase activity.
5
Pathatrix™ Salmonella spp. Kits Linked to MicroSEQ™ PCR or Selective Agar Detection User Guide 29
Retest individual samples after a positive pooled sampleresult
Pooled samples that test positive by selective agar must be retested as individual samples, as follows:
1. Rewarm stored individual enriched cultures at 37±1°C for 1–2 hours.
2. Set up fresh Sample and Elution Vessels in a Sample Vessel Holder, and transfer 10 mL of thewarmed individual enriched sample to the Sample Vessel.
3. Process the individual samples on the Pathatrix™ Auto Instrument, starting at “Load and run thesample” on page 16 through “Capture the Pathatrix™ beads” on page 19.
4. Follow the procedure “Detect Salmonella spp. by selective agar plating” on page 29.A presumptive positive result is defined as the isolation of typical, suspicious, or atypicalSalmonella spp. colonies on the agar plates used.
5. Proceed to “Confirmation testing of positive individual samples” in the next section.
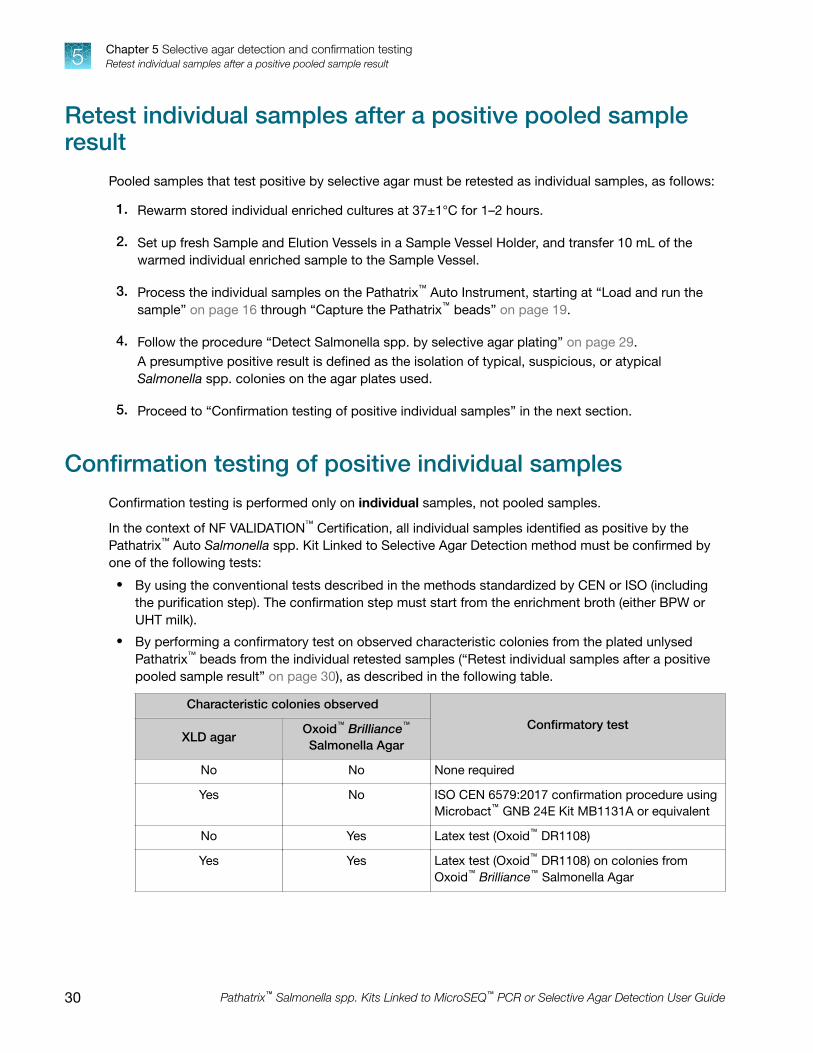
Confirmation testing of positive individual samplesConfirmation testing is performed only on individual samples, not pooled samples.
In the context of NF VALIDATION™ Certification, all individual samples identified as positive by thePathatrix™ Auto Salmonella spp. Kit Linked to Selective Agar Detection method must be confirmed byone of the following tests:
• By using the conventional tests described in the methods standardized by CEN or ISO (includingthe purification step). The confirmation step must start from the enrichment broth (either BPW orUHT milk).
• By performing a confirmatory test on observed characteristic colonies from the plated unlysedPathatrix™ beads from the individual retested samples (“Retest individual samples after a positivepooled sample result” on page 30), as described in the following table.
Characteristic colonies observed
Confirmatory testXLD agar
Oxoid™ Brilliance™
Salmonella Agar
No No None required
Yes No ISO CEN 6579:2017 confirmation procedure usingMicrobact™ GNB 24E Kit MB1131A or equivalent
No Yes Latex test (Oxoid™ DR1108)
Yes Yes Latex test (Oxoid™ DR1108) on colonies fromOxoid™ Brilliance™ Salmonella Agar
Chapter 5 Selective agar detection and confirmation testingRetest individual samples after a positive pooled sample result5
30 Pathatrix™ Salmonella spp. Kits Linked to MicroSEQ™ PCR or Selective Agar Detection User Guide

• Using any other method certified by NF VALIDATION™; the principle must be different from thatof the Pathatrix™ Auto Salmonella spp. Kit Linked to MicroSEQ™ Salmonella spp. Detection Kitmethod (immunomagnetic separation and PCR). The detection protocol of the second validatedmethod used for the confirmation shall be followed entirely. All steps which are before the stepfrom which the confirmation is started shall be common to both methods (that is, enrichment inBPW at 37°C).
In the event of discordant results (positive with the alternative method, non-confirmed by one of themeans described above, and in particular the latex test), the laboratory must follow the necessary stepsto ensure the validity of the result obtained.
Note: Some strains of Salmonella belonging to the serovar Dublin may show a weak to nil magentapigmentation, because of their low esterase activity.
Chapter 5 Selective agar detection and confirmation testingConfirmation testing of positive individual samples 5
Pathatrix™ Salmonella spp. Kits Linked to MicroSEQ™ PCR or Selective Agar Detection User Guide 31

Troubleshooting
General troubleshooting
Observation Possible cause Recommended action
Enriched culture is curdled. Samples may be slightlyacidic or alkaline (for example,milk powders, fermented milksamples, etc.).
Correct the pH of the sample-media mixturebefore enrichment.
1. Mix the food sample with appropriateenrichment media.
2. Incubate for 60±5 minutes at roomtemperature (23±5°C).
3. Homogenize the sample and determinethe pH.
4. Adjust the pH to 6.8±0.2, and mix wellbefore determining the final pH.
Use Pathatrix™ Foam Filters (Cat. No. PFF)and the Pathatrix™ 5 Pooling Kit (Cat. No.POOL510MLN) or Pathatrix™ 10 Pooling Kit(Cat. No. POOL1010MLN) when samplingcurdled enriched cultures.
In positive control wells, no IPCsignal is detected, but target-specific signal is detected.
A high copy number oftarget DNA exists in samples,resulting in preferentialamplification of the target-specific DNA.
No action is required. The result is consideredpositive.
In positive control wells,no target-specific signal isdetected.
Positive control was omitted(pipetting error).
Repeat the assay. Make sure to pipet thepositive control into all positive control wells.
In negative extraction controlwells, target-specific signalis detected. The result isconsidered invalid by thesoftware.
Carryover contaminationoccurred.
1. Repeat the assay using fresh aliquotsof all reagents and clean pipettingequipment.
2. If the negative extraction controlcontinues to show contamination, repeatthe assay using a new kit.
3. If the negative extraction controlcontinues to show contamination,contact Technical Support.
A
32 Pathatrix™ Salmonella spp. Kits Linked to MicroSEQ™ PCR or Selective Agar Detection User Guide

Observation Possible cause Recommended action
In negative control wells, noIPC signal is detected, buta target-specific signal isdetected
Carryover contaminationcaused target signal innegative control wells.
Additionally, no IPC signal innegative control wells can becaused by:
• A high copy numberof target DNA existsin samples, resulting inpreferential amplificationof the target-specific DNA.
• A problem occurred withIPC amplification.
To correct carryover contamination, repeat theassay using fresh aliquots of all reagents andclean pipetting equipment.
To determine whether IPC amplification isa problem, examine unknown wells for anIPC signal. If an IPC signal is present, IPCamplification is not a problem.
In unknown wells, no IPCor target-specific signal isdetected.
Inhibition of PCR occurred. Dilute the sample 1:5 with nuclease-free waterto dilute PCR inhibitors, and repeat the assay.If PCR remains inhibited, repeat the samplepreparation.
In unknown wells, no IPCsignal is detected, but target-specific signal is detected.
A high copy number oftarget DNA exists in samples,resulting in preferentialamplification of the target-specific DNA.
No action is required. The result is consideredpositive.
Multicomponent plot signalsfor FAM™, VIC™, and ROX™
detectors increase/decreaseduring cycles 1–15, butthe amplification curve andresult are not affected (thisobservation applies to View inSDS mode).
Incomplete mixing anddissolution of the lyophilizedbead with sample or control.
After addition of 30 µL of sample or PathogenNegative Control to the bead and capping thetubes:
1. Vortex strips at high speed for about10 seconds, and centrifuge the strips at200–600 × g for about 10 seconds.
2. Vortex the strips again on high speedfor about 10 seconds, and centrifuge thestrips at 200–600 × g for about 1 minute.
Ensure that all liquid is at the bottom of thetubes and the beads are fully dissolved beforeproceeding.
Replicate results for a sampleare inconsistent.
All replicate wells for a sampledo not have the same result.
If more than two replicates yield the sameresult (for example, 2 of 3 replicates arenegative, but 1 replicate is positive), refer toyour laboratory protocol to determine whetherto repeat the assay using fresh samples andreagents.
If only 2 replicates were run and the results arenot consistent, repeat the assay using freshsamples and reagents.
Appendix A TroubleshootingGeneral troubleshooting A
Pathatrix™ Salmonella spp. Kits Linked to MicroSEQ™ PCR or Selective Agar Detection User Guide 33

Observation Possible cause Recommended action
Amplicon contamination. • Contamination wasintroduced into thePCR clean area frompost-amplification reactiontubes that were eitheropened in the cleanarea or brought into thePCR clean area fromcontaminated gloves orsolutions.
• Contamination wasintroduced into the real-time PCR instrument fromcrushed and broken PCRreaction tubes.
To confirm amplicon contamination, performthe following experiment:
Prepare negative control samples using atleast one 8-tube strip of MicroSEQ™ AssayBeads.
1. Divide the assay beads into two sets.
a. To the first set of assay beads, add30 μL of nuclease-free water.
b. To the second set of assay beads,add 29 μL of nuclease-free waterplus 1 μL of 1 U/μL Uracil DNAGlycosylase (Cat. No. 18054-015).
2. Run samples on the 7500 Fast Real‑TimePCR Instrument using SDS software andselect Fast 7500 run mode.
3. Under the instrument tab:
• Select Add Step to stage 1 ofthe PCR cycle that consists of10 minutes at 50°C.
• Extend the 95°C step from20 seconds to 10 minutes.
Amplicon contamination is indicated by target-specific signal in the –UNG samples and notarget-specific signal in +UNG samples.
If the instrument block was contaminated,consult the Applied Biosystems™
7300/7500/7500 Fast Real‐Time PCR SystemGetting Started Guide: Absolute Quantitationusing Standard Curve (Pub. No. 4347825)and/or contact a service representative toclean the instrument.
Investigate warning results or failed runs in SDS Software
IMPORTANT! If you modify a RapidFinder™ Express Software run file in the SDS Software, you cannotopen the run file again in the RapidFinder™ Express Software. To avoid altering a RapidFinder™ ExpressSoftware run file, save the run file under a new name in the SDS Software before performing anyactions, as described below.
1. Open the run file in the SDS Software by one of the following methods:
• From View Results in the RapidFinder™ Express Software, select and open the run file, thenclick View in SDS.
• Open the run file in the SDS Software.
Appendix A TroubleshootingInvestigate warning results or failed runs in SDS SoftwareA
34 Pathatrix™ Salmonella spp. Kits Linked to MicroSEQ™ PCR or Selective Agar Detection User Guide

2. Select File4 Save As, then save the run file under a new name.
3. Select the Results tab.
4. Select the Amplification Plot tab.
5. Select all locations by clicking the top left corner of the layout.
6. Examine the Amplification Plot in Data mode of Delta Rn vs Cycle (displayed by default).
• To examine the signal for only tubes of interest, Ctrl + Click the locations below the plot.
• To examine the signal for only the IPC or a specific target, select the signal of interest from theDetector list at the top right of the plot.
• Refer to “Interpretation of the amplification plot for samples with a Result Warning” onpage 36.
7. When you finish viewing the run file, exit the SDS software:
• If you accessed the run file from the RapidFinder™ Express Software, in the SDS Software,select File4Return to RapidFinder™ Express Software.
• If you opened the run file directly in the SDS software, in the SDS Software, select File4Exit.
Appendix A TroubleshootingInvestigate warning results or failed runs in SDS Software A
Pathatrix™ Salmonella spp. Kits Linked to MicroSEQ™ PCR or Selective Agar Detection User Guide 35

Interpretation of the amplification plot for samples with aResult Warning
For the IPC and the pathogen target detector, observe if the curve displayed in the Amplification Plotcrosses the highlighted horizontal line, sometimes referred to as the "threshold" line.
IMPORTANT! The RapidFinder™ Express Software will automatically select the appropriate thresholdvalues for each detector. Unless advised by a Thermo Fisher Scientific representative, do not changethese values.
Additionally, the "highlighted horizontal line," as described above, will appear only when one of thedetectors is selected. If "All" detectors are selected, the horizontal line will not be in the correct locationfor proper visual identification of the sample(s).
Observation Possible cause Recommended action
IPC curve does not cross thethreshold line.
IPC in this sample wasinhibited.
Add 5 µL the stored DNA sample lysate to25 µL of nuclease-free water and repeat thePCR.
IPC and Target curves do notcross the threshold line.
PCR inhibition in the sample. Add 5 µL the stored DNA sample lysate to25 µL of nuclease-free water and repeat thePCR.
IPC curve does cross thethreshold line and target curvedoes not cross the thresholdline.
No PCR inhibition.
Sample is negative for targetdetection.
None needed; result is negative.
Appendix A TroubleshootingInterpretation of the amplification plot for samples with a Result WarningA
36 Pathatrix™ Salmonella spp. Kits Linked to MicroSEQ™ PCR or Selective Agar Detection User Guide

NF VALIDATION™ by AFNORCertification
Go to thermofisher.com/foodsafety for a list of certified workflows for detection of Salmonella spp.
Table 9 NF VALIDATION™ Certification of the workflow
Certification Expiration
ABI 29/06 –11/13; ABI 29/07 –11/13
nf-validation.afnor.org/en
ALTERNATIVE ANALYTICAL METHODSFOR AGRIBUSINESS
For information about the expirationdate of the NF VALIDATION™
certifications, refer to thecertificates, ABI 29/06‑11/13 andABI 29/07-11/13, available atnf-validation.afnor.org/en or atthermofisher.com[1].
[1] In the Product Literature section of the product web page.
The following methods have been certified by “NF VALIDATION™”:
• Pathatrix™ Auto Salmonella spp. Kit Linked to MicroSEQ™ Salmonella spp. Detection Kit (CertificateABI 29/07-11/13)
• Pathatrix™ Auto Salmonella spp. Kit Linked to Selective Agar Detection (Certificate ABI29/06-11/13)
The NF VALIDATION™ study was carried out according to the EN ISO 16140-2 standard against thereference method detailed in EN ISO 6579-1.
The validated workflow with PCR detection described in this user guide includes:
• Enrichment in BPW
• Pathatrix™ Salmonella spp. Pooling Kits
• Pathatrix™ Salmonella spp. Kit
• MicroSEQ™ Salmonella spp. Detection Kit
• Applied Biosystems™ 7500 Fast Real‑Time PCR Instrument
• RapidFinder™ Express Software, v2.0 or later
B
Pathatrix™ Salmonella spp. Kits Linked to MicroSEQ™ PCR or Selective Agar Detection User Guide 37

• Applied Biosystems™ 7500 Fast Real‑Time PCR Instrument and equivalents manufactured byThermo Fisher Scientific and/or subsidiaries (see Table 10 for characteristics) with RapidFinder™
Express Software v2.0 or later.
Table 10 7500 Fast Real‑Time PCR Instrument characteristics
Characteristics 7500 Fast Real‑Time PCR Instrument
Optics 12v 75w halogen bulb
Filters 5 excitation and 5 emission filters
Sample ramp rate Standard mode: ±1.6°C/secFast mode: ±3.5°C/sec
Thermal range 4-100°C
Thermal accuracy ±0.5°C
Thermal uniformity ±1°C
Format 96-well, 0.1-mL block
• Confirmation testing as described in “Confirmation testing of PCR-positive individual samples” onpage 28
The validated workflow with selective agar detection described in this user guide includes:
• Enrichment in BPW
• Pathatrix™ Salmonella spp. Pooling Kits
• Pathatrix™ Salmonella spp. Kit
• Selective agar plating on XLD and Oxoid™ Brilliance™ Salmonella Agar
• Confirmation testing as described in “Confirmation testing of positive individual samples” onpage 30
The workflows have been certified for use with the matrices described in the following table.
Note: Samples may be pooled only with samples of the same matrix type within a category.
Table 11 Validated matrices
Reference method Category Type Example food items
EN ISO 6579-1Horizontal method forthe detection ofSalmonella spp.
Heat-treated milk anddairy products
Sterilized or pasteurizedmilk and dairy products(UHT, canned orpasteurized)
• Fermented/acidified milks andyogurts
• Milks, desserts, ice cream
• Pasteurized cheeses, creams,butters
Dry • Milk powders
• Powders for dairy desserts
• Infant formula with and withoutprobiotic
Appendix B NF VALIDATION™ by AFNOR CertificationInterpretation of the amplification plot for samples with a Result WarningB
38 Pathatrix™ Salmonella spp. Kits Linked to MicroSEQ™ PCR or Selective Agar Detection User Guide

Table 11 Validated matrices (continued)
Reference method Category Type Example food items
EN ISO 6579-1Horizontal method forthe detection ofSalmonella spp.
Raw beef meats (freshand frozen, seasoned ornot)
Fresh raw beef meats Beef trim and ground beef
Frozen raw beef meats Beef trim and ground beef
Seasoned beef meats Bolognaise, carpaccios, tartars, etc.
Cocoa and cocoaproducts
Cocoa powders Cocoa powders
Cocoa-based productsand chocolates
Chocolates
Raw materials Cocoa beans
General remarks and recommendations:
• Comply with Good Laboratory Practices (GLP; refer to EN ISO 7218 standard and EN ISO 22174).
• In the context of NF VALIDATION™ Certification, samples of more than 25 grams have not beentested.
Appendix B NF VALIDATION™ by AFNOR CertificationInterpretation of the amplification plot for samples with a Result Warning B
Pathatrix™ Salmonella spp. Kits Linked to MicroSEQ™ PCR or Selective Agar Detection User Guide 39

Good laboratory practices for PCR
Note: Spin tubes/plates before performing PCR. Spinning of PCR tubes is most easily accomplishedby using a centrifuge designed for PCR tubes or plates. Follow manufacturer instructions for loadingtubes/plates.
To avoid amplicon contamination of samples, follow these guidelines when preparing or handlingsamples for PCR amplification:
• Wear clean gloves and a clean lab coat (not previously worn while handling amplified products orused during sample preparation).
• Change gloves whenever you suspect that they are contaminated.
• Maintain separate areas and dedicated equipment and supplies for:– Sample preparation and reaction setup.
– Amplification and analysis of products.
• Do not bring amplified products into the reaction setup area.
• Open and close all sample tubes carefully. Avoid splashing or spraying samples.
• Keep reactions and components capped as much as possible.
• Use a positive-displacement pipettor or aerosol-resistant barrier pipette tips.
• Do not open reaction tubes after PCR.
• Do not autoclave reaction tubes after PCR.
• Clean lab benches and equipment periodically with 10% bleach solution or DNAZap™ Solutions(Cat. No. AM9890). After cleaning with bleach we recommend a rinse with an ethanol solutionbecause bleach will rust stainless steel.
For additional information, refer to EN ISO 22174:2005 or www.thermofisher.com/us/en/home/life-science/pcr/real-time-learning-center/real-time-pcr-basics.html.
C
40 Pathatrix™ Salmonella spp. Kits Linked to MicroSEQ™ PCR or Selective Agar Detection User Guide

SafetyD
Pathatrix™ Salmonella spp. Kits Linked to MicroSEQ™ PCR or Selective Agar Detection User Guide 41
Chemical safety
WARNING! GENERAL CHEMICAL HANDLING. To minimize hazards, ensure laboratory personnelread and practice the general safety guidelines for chemical usage, storage, and waste providedbelow. Consult the relevant SDS for specific precautions and instructions:
· Read and understand the Safety Data Sheets (SDSs) provided by the chemical manufacturerbefore you store, handle, or work with any chemicals or hazardous materials. To obtain SDSs, seethe “Documentation and Support” section in this document.
· Minimize contact with chemicals. Wear appropriate personal protective equipment when handlingchemicals (for example, safety glasses, gloves, or protective clothing).
· Minimize the inhalation of chemicals. Do not leave chemical containers open. Use only withadequate ventilation (for example, fume hood).
· Check regularly for chemical leaks or spills. If a leak or spill occurs, follow the manufacturer'scleanup procedures as recommended in the SDS.
· Handle chemical wastes in a fume hood.
· Ensure use of primary and secondary waste containers. (A primary waste container holds theimmediate waste. A secondary container contains spills or leaks from the primary container.Both containers must be compatible with the waste material and meet federal, state, and localrequirements for container storage.)
· After emptying a waste container, seal it with the cap provided.
· Characterize (by analysis if necessary) the waste generated by the particular applications, reagents,and substrates used in your laboratory.
· Ensure that the waste is stored, transferred, transported, and disposed of according to all local,state/provincial, and/or national regulations.
· IMPORTANT! Radioactive or biohazardous materials may require special handling, and disposallimitations may apply.
AVERTISSEMENT ! PRÉCAUTIONS GÉNÉRALES EN CAS DE MANIPULATION DE PRODUITSCHIMIQUES. Pour minimiser les risques, veiller à ce que le personnel du laboratoire lise attentive‐ment et mette en œuvre les consignes de sécurité générales relatives à l’utilisation et au stockagedes produits chimiques et à la gestion des déchets qui en découlent, décrites ci-dessous. Consulterégalement la FDS appropriée pour connaître les précautions et instructions particulières à respecter :
· Lire et comprendre les fiches de données de sécurité (FDS) fournies par le fabricant avant destocker, de manipuler ou d’utiliser les matériaux dangereux ou les produits chimiques. Pour obtenirles FDS, se reporter à la section « Documentation et support » du présent document.
· Limiter les contacts avec les produits chimiques. Porter des équipements de protection appropriéslors de la manipulation des produits chimiques (par exemple : lunettes de sûreté, gants ou vête‐ments de protection).
· Limiter l’inhalation des produits chimiques. Ne pas laisser les récipients de produits chimiquesouverts. Ils ne doivent être utilisés qu’avec une ventilation adéquate (par exemple, sorbonne).
· Vérifier régulièrement l’absence de fuite ou d’écoulement des produits chimiques. En cas de fuiteou d’écoulement d’un produit, respecter les directives de nettoyage du fabricant recommandéesdans la FDS.
· Manipuler les déchets chimiques dans une sorbonne.
Appendix D SafetyChemical safetyD
42 Pathatrix™ Salmonella spp. Kits Linked to MicroSEQ™ PCR or Selective Agar Detection User Guide

· Veiller à utiliser des récipients à déchets primaire et secondaire. (Le récipient primaire contient lesdéchets immédiats, le récipient secondaire contient les fuites et les écoulements du récipient pri‐maire. Les deux récipients doivent être compatibles avec les matériaux mis au rebut et conformesaux exigences locales, nationales et communautaires en matière de confinement des récipients.)
· Une fois le récipient à déchets vidé, il doit être refermé hermétiquement avec le couvercle fourni.
· Caractériser (par une analyse si nécessaire) les déchets générés par les applications, les réactifs etles substrats particuliers utilisés dans le laboratoire.
· Vérifier que les déchets sont convenablement stockés, transférés, transportés et éliminés en res‐pectant toutes les réglementations locales, nationales et/ou communautaires en vigueur.
· IMPORTANT ! Les matériaux représentant un danger biologique ou radioactif exigent parfois unemanipulation spéciale, et des limitations peuvent s’appliquer à leur élimination.
Biological hazard safety
WARNING! Potential Biohazard. Depending on the samples used on this instrument, the surfacemay be considered a biohazard. Use appropriate decontamination methods when working withbiohazards.
WARNING! BIOHAZARD. Biological samples such as tissues, body fluids, infectious agents,and blood of humans and other animals have the potential to transmit infectious diseases.Conduct all work in properly equipped facilities with the appropriate safety equipment (for example,physical containment devices). Safety equipment can also include items for personal protection,such as gloves, coats, gowns, shoe covers, boots, respirators, face shields, safety glasses, orgoggles. Individuals should be trained according to applicable regulatory and company/institutionrequirements before working with potentially biohazardous materials. Follow all applicable local,state/provincial, and/or national regulations. The following references provide general guidelines whenhandling biological samples in laboratory environment.
· U.S. Department of Health and Human Services, Biosafety in Microbiological and BiomedicalLaboratories (BMBL), 6th Edition, HHS Publication No. (CDC) 300859, Revised June 2020; foundat:https://www.cdc.gov/labs/pdf/CDC-BiosafetyMicrobiologicalBiomedicalLaboratories-2020-P.pdf
· World Health Organization, Laboratory Biosafety Manual, 3rd Edition,WHO/CDS/CSR/LYO/2004.11; found at:www.who.int/publications/i/item/9789240011311
Appendix D SafetyBiological hazard safety D
Pathatrix™ Salmonella spp. Kits Linked to MicroSEQ™ PCR or Selective Agar Detection User Guide 43

Documentation and support
Food Safety supportWebsite: thermoscientific.com/foodmicro or thermofisher.com/foodsafety
Support email:
• Europe, Middle East, Africa: [email protected]
• North America: [email protected]
Phone: Visit thermofisher.com/support, select the link for phone support, and select the appropriatecountry from the dropdown menu.
Customer and technical supportVisit thermofisher.com/support for the latest service and support information.
• Worldwide contact telephone numbers
• Product support information– Product FAQs
– Software, patches, and updates
– Training for many applications and instruments
• Order and web support
• Product documentation– User guides, manuals, and protocols
– Certificates of Analysis
– Safety Data Sheets (SDSs; also known as MSDSs)
Note: For SDSs for reagents and chemicals from other manufacturers, contact themanufacturer.
E
44 Pathatrix™ Salmonella spp. Kits Linked to MicroSEQ™ PCR or Selective Agar Detection User Guide

Related documentation
Document Publication number
RapidFinder™ Express Software Quick Reference 4480999
Applied Biosystems™ 7300/7500/7500 Fast Real-Time PCR SystemInstallation and Maintenance Guide
4378657
Applied Biosystems™ 7500/7500 Fast Real‐Time PCR System: MaintenanceGuide
4387777
Appendix E Documentation and supportRelated documentation E
Pathatrix™ Salmonella spp. Kits Linked to MicroSEQ™ PCR or Selective Agar Detection User Guide 45

References
EN ISO 6579-1:2017. Microbiology of food and animal feeding stuffs – Horizontal method for thedetection of Salmonella spp.
EN ISO 6887-1:2017. Microbiology of the food chain — Preparation of test samples, initial suspensionand decimal dilutions for microbiological examination — Part 1: General rules for the preparation of theinitial suspension and decimal dilutions.
EN ISO 16140-2:2016. Microbiology of the food chain — Method validation — Part 2: Protocol for thevalidation of alternative (proprietary) methods against a reference method.
EN ISO 22174:2005. Microbiology of food and animal feeding stuffs—Polymerase chain reaction (PCR)for the detection of food-borne pathogens— General requirements and definitions.
EN ISO 7218:2007/Amd 1: 2013. Microbiology of food and animal feeding stuffs—General requirementsand guidance for microbiological examinations.
Narang, N. and Cray, W.C. 2006. Evaluation of hand mixing of ground beef and poultry samples as analternative to stomaching for the detection of Salmonella. Food Protection Trends. 26:14–19.
46 Pathatrix™ Salmonella spp. Kits Linked to MicroSEQ™ PCR or Selective Agar Detection User Guide


Pathatrix 10P Sal - MicroSEQ Sal_AFNOR_UG_MAN0009585-v18-GUID-9ED30F7B-ECBC-4711-B2CE-2AE152918198-2020/05/04 16:32:42 en21:18:38.743Zthermofisher.com/support | thermofisher.com/askaquestion
thermofisher.com
14 January 2022