Embed Size (px)
Citation preview

PathFinder ServerVersion 5.7
User Guide

NOTICE
© 2005-2008 RADVISION Ltd. All intellectual property rights in this publication are owned by RADVISION Ltd and are protected by United States copyright laws, other applicable copyright laws and international treaty provisions. RADVISION Ltd retains all rights not expressly granted. This publication is RADVISION confidential. No part of this publication may be reproduced in any form whatsoever or used to make any derivative work without prior written approval by RADVISION Ltd. No representation of warranties for fitness for any purpose other than what is specifically mentioned in this guide is made either by RADVISION Ltd or its agents. RADVISION Ltd reserves the right to revise this publication and make changes without obligation to notify any person of such revisions or changes. RADVISION Ltd may make improvements or changes in the product(s) and/or the program(s) described in this documentation at any time. If there is any software on removable media described in this publication, it is furnished under a license agreement included with the product as a separate document. If you are unable to locate a copy, please contact RADVISION Ltd and a copy will be provided to you. Unless otherwise indicated, RADVISION registered trademarks are registered in the United States and other territories. All registered trademarks recognized.For further information contact RADVISION or your local distributor or reseller.
PathFinder version 5.7, June 2008Publication 6
http://www.radvision.com
Contents iii
About This ManualRelated Documentation viiFeedback vii
1 Introducing PathFinder™PathFinder Solution Overview 2PathFinder Components 3Configuring Your Firewall to Work with PathFinder 3Enterprise Deployment 4Service Provider Deployment 5Role of the PathFinder Server 5Role of the PathFinder Client 6Direct Media Connection 6Key Benefits of the PathFinder Solution 9Features of the PathFinder Solution 9
2 Getting Started with the PathFinder ServerPhysical Description 14
Front Panel 14Rear Panel 15
Connecting to a PC 16Configuring PathFinder Server and Operating System Settings 17
PathFinder Administration Menu 20Network Administration Menu 21Backup/Restore Menu 22
CONTENTS
iv PathFinder Server User Guide
System Administration Menu 23Resetting the Secured Platform Administrator Password 26Upgrading the PathFinder Server 28
3 Configuring the PathFinder ServerLogging In 30User Interface Overview 30Viewing Connected Client Details 31Viewing Connected Endpoint Details 32Dialing Out to an IP Address 32Disconnecting PathFinder Clients 33Disconnecting an Endpoint 33Viewing Current Call Details 34Configuring General System Settings 35Configuring H.460 Settings 37Configuring Enterprise Gatekeepers 38Deleting an Enterprise Gatekeeper 40Configuring Neighbor PathFinder Servers 41Viewing a Neighbor PathFinder Server 41Adding a Neighbor PathFinder Server 43Deleting a Neighbor PathFinder Server 44Viewing PathFinder User Details 44Adding PathFinder User Details 45
Client Authentication 46Adding a User 46Deleting a User 46Viewing Topology Islands 47Adding a Topology Island 47Adding Sub-islands 47Deleting Sub-islands 48Adding Subnet Information 48Deleting Subnet Information 49

Contents v
Viewing Version and Licensing Information 49Updating the License 50
4 Technical SpecificationsTechnical Specifications Table 51
5 Compliance and CertificationsProduct Safety 53Electromagnetic Compatibility 54Ergonomics, Acoustics and Hygienics 55Import/Export Compliance Data 55

vi PathFinder Server User Guide
About This Manual vii
ABOUT THIS MANUAL
The PathFinder Server User Guide describes how to install, configure and use the RADVISION PathFinder Server.
RELATED DOCUMENTATION
The PathFinder documentation set is available on the RADVISION Utilities and Documentation CD-ROM supplied with the product and includes manuals and online helps. The manuals are in PDF format.
Note You require Adobe Acrobat Reader version 5.0 or later to open the PDF files. You can download Acrobat Reader free of charge from www.adobe.com.
FEEDBACK All the team at RADVISION constantly endeavors to provide accurate and informative documentation. If you have comments or suggestions regarding improvements to future publications, we would value your feedback.Please send your comments to [email protected] thank you for your contribution.

Introducing PathFinder™ 1
1INTRODUCING PATHFINDER™
PathFinder Solution OverviewPathFinder ComponentsConfiguring Your Firewall to Work with PathFinderEnterprise DeploymentService Provider DeploymentRole of the PathFinder ServerRole of the PathFinder ClientDirect Media ConnectionKey Benefits of the PathFinder SolutionFeatures of the PathFinder Solution
2 PathFinder Server User Guide
PathFinder Solution Overview
PATHFINDER SOLUTION OVERVIEW
Enterprises and Service Providers that want to secure network data and devices while taking advantage of H.323 communications across LANs, WANs and the public Internet must inevitably address the issue of firewall and Network Address Translation (NAT) device traversal.Firewalls block unsolicited incoming communications from outside the local network. Most firewalls are not designed to allow video conferencing scenarios where everyone is allowed to connect to everyone.Network Address Translation (NAT) is an Internet standard that enables a local-area network (LAN) to use one set of IP addresses for internal traffic and a second set of addresses for external traffic. A NAT box located where the LAN meets the Internet makes all necessary IP address translations. The NAT hides the internal native IP address and thus prevents incoming video calls to the devices on the private network.The RADVISION PathFinder solution maintains the security and advantages of firewall and NAT, requires no costly upgrade to the firewall or NAT for protocol awareness, handles both near-end (local) and far end (remote destination) firewall traversal and is easy to implement and deploy.The RADVISION PathFinder solution works with the PathFinder Client and H.323 endpoints which support the ITU H.460.18 and H.460.19 standards to enable traversal of firewalls. The PathFinder Client is necessary for the support of non-H.460 compliant endpoints.For firewall traversal, PathFinder supports a proprietary RADVISION protocol and H.460.18/H.460.19. The proprietary RADVISION protocol has been supported since the first release of PathFinder and should be used in conjunction with the PathFinder Client for endpoints which do not support the H.460 standard, or in cases where the H.460 traversal does not work.H.460.18 and H.460.19 are ITU standards which define protocols for the firewall traversal of signaling and media respectively.
Note Only H.460 traversal-enabled endpoints can register with a PathFinder Server. All other endpoints must use the PathFinder Client for registration requests.
Introducing PathFinder™ 3
PathFinder Components
PATHFINDER COMPONENTS
PathFinder contains two components—PathFinder Server and PathFinder Client.PathFinder Server—The core intelligent component of the solution. The PathFinder Server provides signaling and media processing for communications among private enterprise networks served by PathFinder Clients. When a PathFinder Client establishes an initial outbound connection with the PathFinder Server through a specific port of the firewall (the default port is 3089), the PathFinder Server is able to communicate with the PathFinder Client through that particular port.PathFinder Client—A light client application that is deployed at the different sites inside the protected network. PathFinder Client can be installed on any standalone computer with a Windows operating system. PathFinder Client supports non-H460 compliant endpoints. If all the deployed endpoints support the H.460 standard, there is no need for the PathFinder Client.
CONFIGURING YOUR FIREWALL TO WORK WITH PATHFINDER
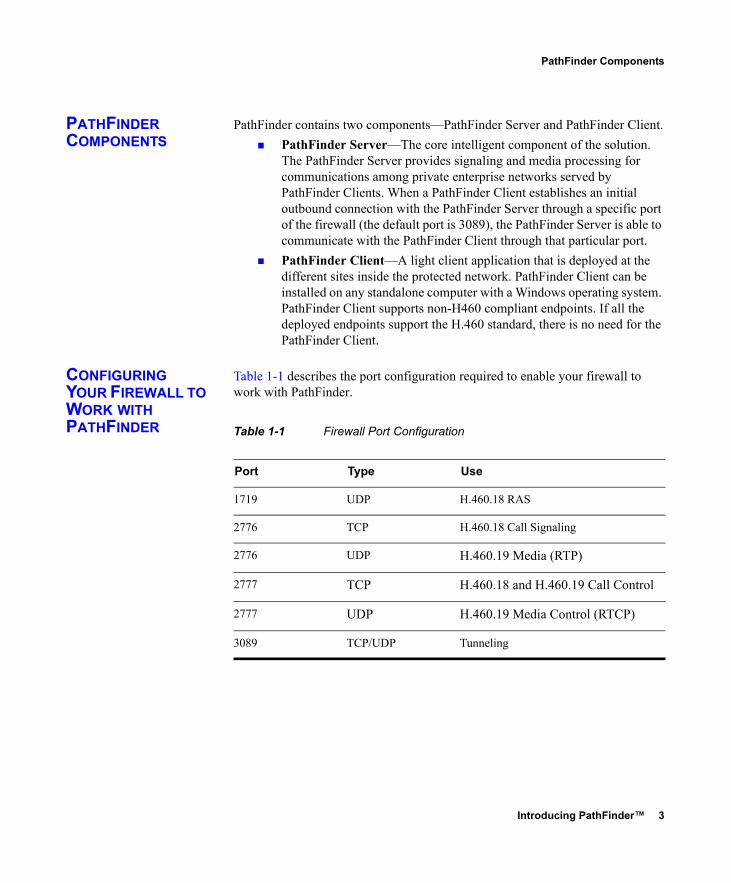
Table 1-1 describes the port configuration required to enable your firewall to work with PathFinder.
Table 1-1 Firewall Port Configuration
Port Type Use
1719 UDP H.460.18 RAS
2776 TCP H.460.18 Call Signaling
2776 UDP H.460.19 Media (RTP)
2777 TCP H.460.18 and H.460.19 Call Control
2777 UDP H.460.19 Media Control (RTCP)
3089 TCP/UDP Tunneling
4 PathFinder Server User Guide
Enterprise Deployment
ENTERPRISE DEPLOYMENT
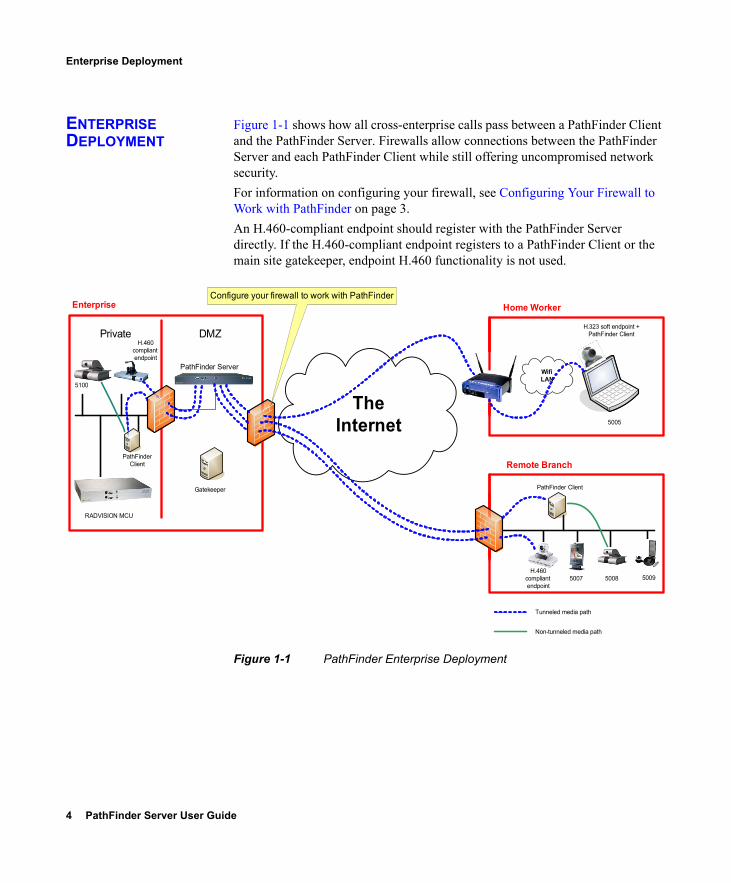
Figure 1-1 shows how all cross-enterprise calls pass between a PathFinder Client and the PathFinder Server. Firewalls allow connections between the PathFinder Server and each PathFinder Client while still offering uncompromised network security.For information on configuring your firewall, see Configuring Your Firewall to Work with PathFinder on page 3.An H.460-compliant endpoint should register with the PathFinder Server directly. If the H.460-compliant endpoint registers to a PathFinder Client or the main site gatekeeper, endpoint H.460 functionality is not used.
Figure 1-1 PathFinder Enterprise Deployment
TheInternet
Home Worker
H.323 soft endpoint +PathFinder Client
WifiLAN
Remote Branch
5005
H.460 compliant endpoint
5007 5008
PathFinder Client
Tunneled media path
Non-tunneled media path
DMZ
Enterprise
PathFinder Server
Private
RADVISION MCU
Gatekeeper
5100
PathFinderClient
Configure your firewall to work with PathFinder
5009
H.460 compliant endpoint
Introducing PathFinder™ 5
Service Provider Deployment
SERVICE PROVIDER DEPLOYMENT
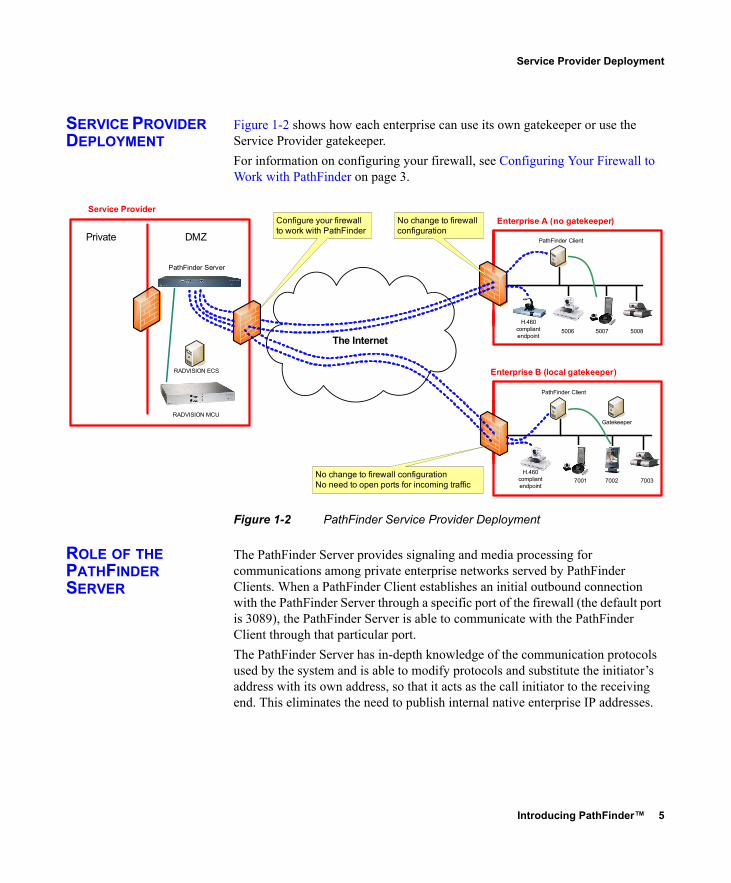
Figure 1-2 shows how each enterprise can use its own gatekeeper or use the Service Provider gatekeeper.For information on configuring your firewall, see Configuring Your Firewall to Work with PathFinder on page 3.
Figure 1-2 PathFinder Service Provider Deployment
ROLE OF THE PATHFINDER SERVER
The PathFinder Server provides signaling and media processing for communications among private enterprise networks served by PathFinder Clients. When a PathFinder Client establishes an initial outbound connection with the PathFinder Server through a specific port of the firewall (the default port is 3089), the PathFinder Server is able to communicate with the PathFinder Client through that particular port.The PathFinder Server has in-depth knowledge of the communication protocols used by the system and is able to modify protocols and substitute the initiator’s address with its own address, so that it acts as the call initiator to the receiving end. This eliminates the need to publish internal native enterprise IP addresses.
The Internet
RADVISION ECS
DMZ
Service Provider
PathFinder Server
Enterprise A (no gatekeeper)
Enterprise B (local gatekeeper)
7001 7002 7003
PathFinder Client
5006 5007 5008
PathFinder ClientPrivate
RADVISION MCU
Configure your firewall to work with PathFinder
No change to firewall configuration No need to open ports for incoming traffic
No change to firewall configuration
Gatekeeper
H.460 compliant endpoint
H.460 compliant endpoint
6 PathFinder Server User Guide
Role of the PathFinder Client
ROLE OF THE PATHFINDER CLIENT
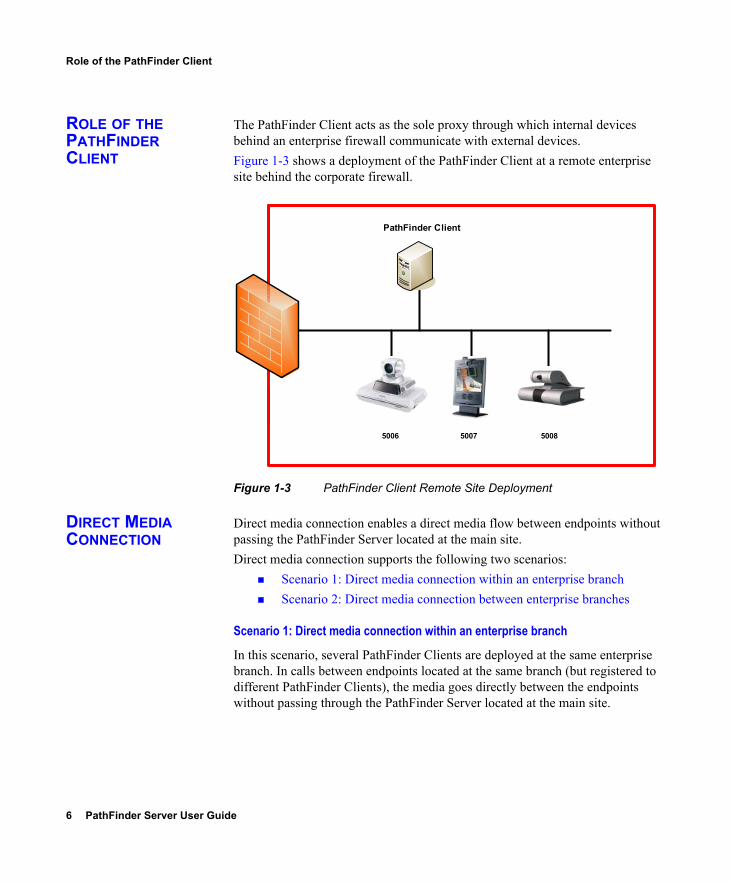
The PathFinder Client acts as the sole proxy through which internal devices behind an enterprise firewall communicate with external devices.Figure 1-3 shows a deployment of the PathFinder Client at a remote enterprise site behind the corporate firewall.
Figure 1-3 PathFinder Client Remote Site Deployment
DIRECT MEDIA CONNECTION
Direct media connection enables a direct media flow between endpoints without passing the PathFinder Server located at the main site.Direct media connection supports the following two scenarios:
Scenario 1: Direct media connection within an enterprise branchScenario 2: Direct media connection between enterprise branches
Scenario 1: Direct media connection within an enterprise branch
In this scenario, several PathFinder Clients are deployed at the same enterprise branch. In calls between endpoints located at the same branch (but registered to different PathFinder Clients), the media goes directly between the endpoints without passing through the PathFinder Server located at the main site.
5006 5007 5008
PathFinder Client
Introducing PathFinder™ 7
Direct Media Connection
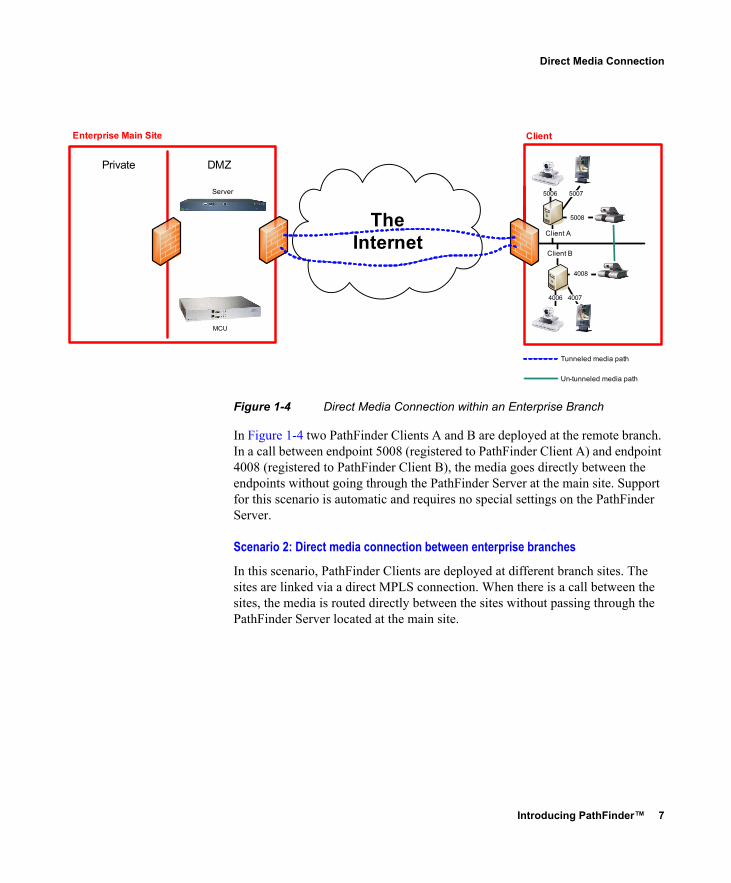
Figure 1-4 Direct Media Connection within an Enterprise Branch
In Figure 1-4 two PathFinder Clients A and B are deployed at the remote branch. In a call between endpoint 5008 (registered to PathFinder Client A) and endpoint 4008 (registered to PathFinder Client B), the media goes directly between the endpoints without going through the PathFinder Server at the main site. Support for this scenario is automatic and requires no special settings on the PathFinder Server.
Scenario 2: Direct media connection between enterprise branches
In this scenario, PathFinder Clients are deployed at different branch sites. The sites are linked via a direct MPLS connection. When there is a call between the sites, the media is routed directly between the sites without passing through the PathFinder Server located at the main site.
TheInternet
Tunneled media path
Un-tunneled media path
DMZ
Enterprise Main Site
Server
Private
MCU
5006 5007
5008
Client A
Client B
4006
4008
4007
Client
8 PathFinder Server User Guide
Direct Media Connection
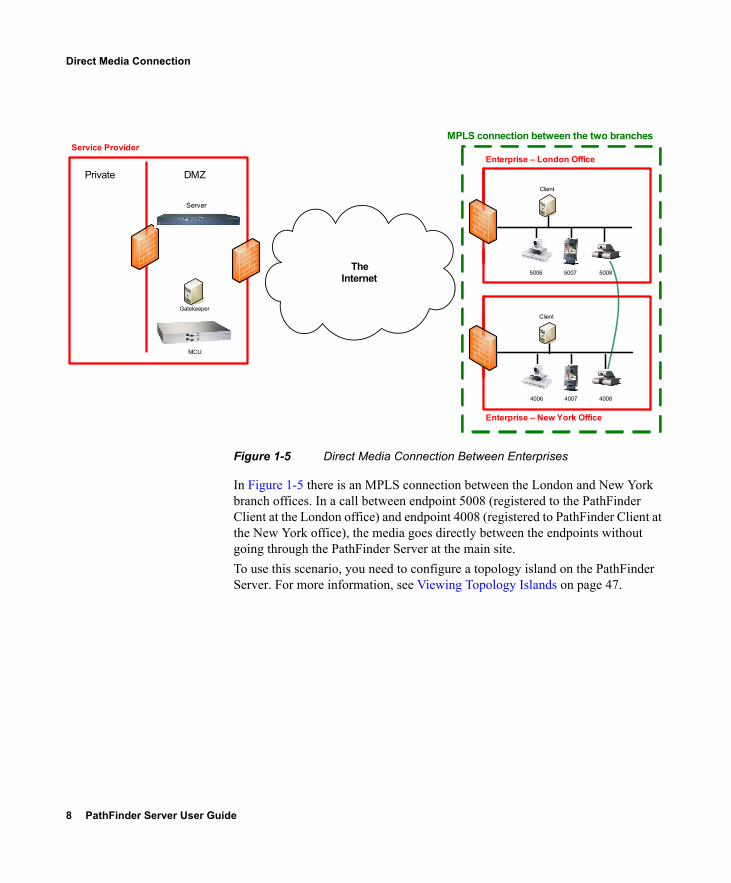
Figure 1-5 Direct Media Connection Between Enterprises
In Figure 1-5 there is an MPLS connection between the London and New York branch offices. In a call between endpoint 5008 (registered to the PathFinder Client at the London office) and endpoint 4008 (registered to PathFinder Client at the New York office), the media goes directly between the endpoints without going through the PathFinder Server at the main site.To use this scenario, you need to configure a topology island on the PathFinder Server. For more information, see Viewing Topology Islands on page 47.
TheInternet
Gatekeeper
DMZ
Service Provider
Server
Enterprise – London Office
Enterprise – New York Office
4006 4007 4008
Client
5006 5007 5008
Client
Private
MPLS connection between the two branches
MCU
Introducing PathFinder™ 9
Key Benefits of the PathFinder Solution
KEY BENEFITS OF THE PATHFINDER SOLUTION
The key benefits of the PathFinder solution include:Handles firewall and NAT problems without device upgrades or security compromises.Tunnels and transparently traverses firewalls and NAT devices, preserving security advantages.
No costly upgrade to firewalls or NAT devices for protocol awareness.
No publishing of enterprise IP addresses.
Both near-end (local) and far-end (remote destination) firewall traversal.
Thin PathFinder Client requires no knowledge of underlying communication protocols.
PathFinder Client requires no upgrade to support additional protocols.
PathFinder Client uses only one TCP or UDP port to connect to the PathFinder Server.Suitable for service providers and enterprises.Simplified Enterprise Gatekeeper configuration.Easy to implement and deploy.
FEATURES OF THE PATHFINDER SOLUTION
The key features of the PathFinder solution include:Status Check—The PathFinder Client checks the status of the connection to the PathFinder Server.Endpoint Calling—Support for calling endpoints far away from the PathFinder Client. Default extension for guest endpoint dialing into a private network.Concurrent Calls—Up to 80 concurrent calls.Registered Devices—Up to 480 registered devices.TCP or UDP—For media traversal.Web Server Timeout—Configurable web server timeout.Direct Media Connection—Between PathFinder Clients.ECS Integration—The PathFinder Client can be installed on the same machine as the ECS.Local Gatekeeper—Enterprise gatekeeper support allows deploying a local gatekeeper at the remote site.
10 PathFinder Server User Guide
Features of the PathFinder Solution
Interoperability—Based on the H.323 standard PathFinder provides a high degree of interoperability with other H.323-compliant gateways, gatekeepers, terminals and MCU products. Interoperability with the RADVISION ECS Gatekeeper to support calling external endpoints by dialing to an IP address from Enterprise Gatekeeper-registered endpoints.Aliases—H.460 endpoint aliases are displayed as “Client Name” under Client Status > Connected Clients.Web-based Management—All aspects of the PathFinder Server configuration can be viewed and modified from a remote location using a standard web browser.T.120 Data Collaboration—PathFinder supports data transfers in calls, for legacy endpoints which are registered through the PathFinder Client, using the T.120 standard. There is no support for H.460 endpoints.H.239 Support—PathFinder supports H.239.H.460.18 and H.460.19 Support—Standard firewall/NAT traversal support.Quality Of Service (QoS)—Configurable coding of media packets to achieve QoS routing priority on the IP network. The TOS bits of the IP datagram header can be configured for priority level.Dial Plan—PathFinder provides full dial plan support.Direct Media Connection—Ensures that media is routed directly between clients when possible.Access Control—Access to the PathFinder user interface is password controlled.Authentication—PathFinder Server runs on a hardened Linux Operating System (RADVISION customized kernel). The PathFinder Client must be authenticated in order to connect the server.Security Solution—PathFinder Client contains an access control list (ACL) for the administrator to define which devices are accessible via the client.Role Based User Management—Enables the allocation of suggested roles and default rights profiles.AES Encryption—PathFinder supports encryption for all client-server traffic for call privacy. This includes signaling and media encryption.

Introducing PathFinder™ 11
Features of the PathFinder Solution
Scalable Solution—One client serves many endpoints, PathFinder Servers can be neighbored. Clients hunt backup servers if a primary server is unavailable.Neighboring Server—The PathFinder Server can be neighbored thereby supporting large enterprises or firewall/NAT traversal between organizations.URI Dialing—Enables endpoints registered with different gatekeepers or PathFinder Servers to easily call each other. Without URI dialing, all systems must be neighbored to each other.

12 PathFinder Server User Guide
Features of the PathFinder Solution
Getting Started with the PathFinder Server 13
2GETTING STARTED WITH THE PATHFINDER SERVER
Physical DescriptionConnecting to a PCConfiguring PathFinder Server and Operating System SettingsResetting the Secured Platform Administrator PasswordUpgrading the PathFinder Server
14 PathFinder Server User Guide
Physical Description
PHYSICAL DESCRIPTION
The PathFinder Server comes pre-installed on an Intel server card and runs on the RADVISION secured platform, based on Linux kernel.
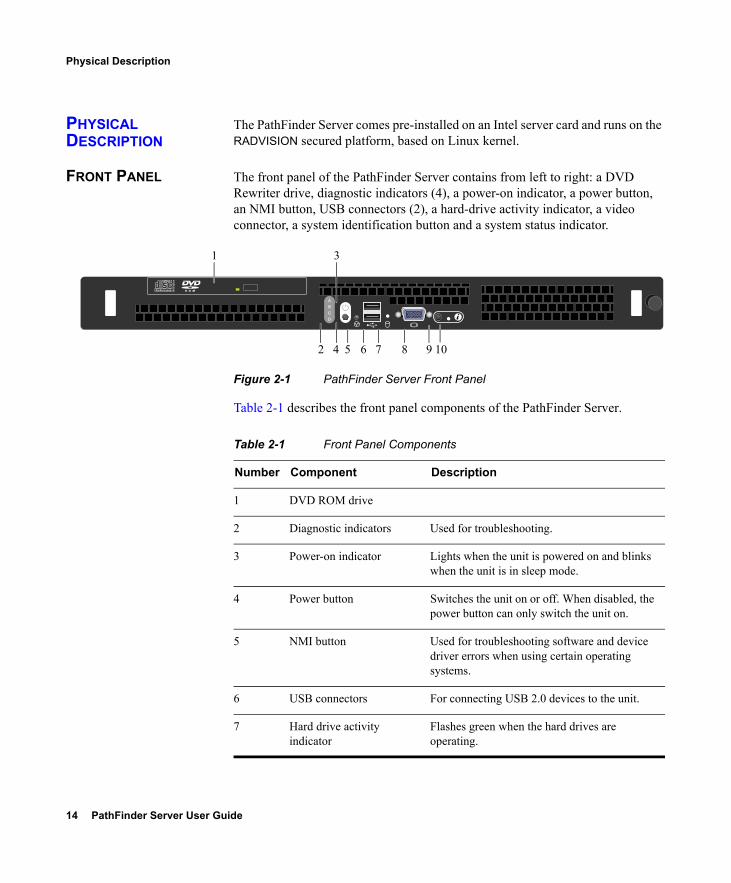
FRONT PANEL The front panel of the PathFinder Server contains from left to right: a DVD Rewriter drive, diagnostic indicators (4), a power-on indicator, a power button, an NMI button, USB connectors (2), a hard-drive activity indicator, a video connector, a system identification button and a system status indicator.
Figure 2-1 PathFinder Server Front Panel
Table 2-1 describes the front panel components of the PathFinder Server.
R O Mdisc
COMPACT
ReWritable Ult
ra S
pee
d
1 3
2 4 5 6 7 8 9 10
Table 2-1 Front Panel Components
Number Component Description
1 DVD ROM drive
2 Diagnostic indicators Used for troubleshooting.
3 Power-on indicator Lights when the unit is powered on and blinks when the unit is in sleep mode.
4 Power button Switches the unit on or off. When disabled, the power button can only switch the unit on.
5 NMI button Used for troubleshooting software and device driver errors when using certain operating systems.
6 USB connectors For connecting USB 2.0 devices to the unit.
7 Hard drive activity indicator
Flashes green when the hard drives are operating.
Getting Started with the PathFinder Server 15
Physical Description
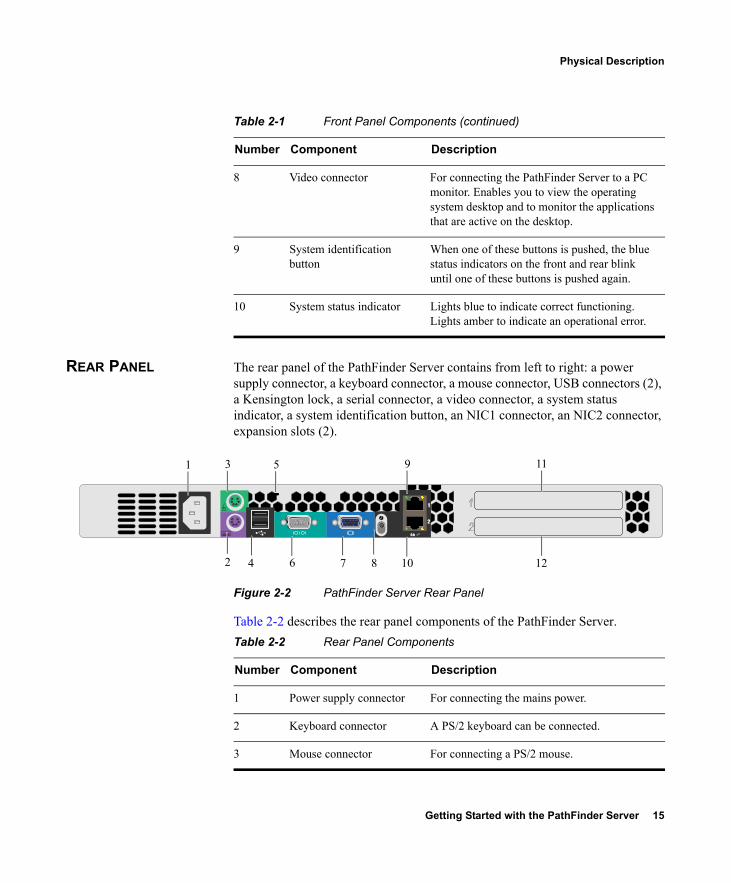
REAR PANEL The rear panel of the PathFinder Server contains from left to right: a power supply connector, a keyboard connector, a mouse connector, USB connectors (2), a Kensington lock, a serial connector, a video connector, a system status indicator, a system identification button, an NIC1 connector, an NIC2 connector, expansion slots (2).
Figure 2-2 PathFinder Server Rear Panel
Table 2-2 describes the rear panel components of the PathFinder Server.
8 Video connector For connecting the PathFinder Server to a PC monitor. Enables you to view the operating system desktop and to monitor the applications that are active on the desktop.
9 System identification button
When one of these buttons is pushed, the blue status indicators on the front and rear blink until one of these buttons is pushed again.
10 System status indicator Lights blue to indicate correct functioning. Lights amber to indicate an operational error.
Table 2-1 Front Panel Components (continued)
Number Component Description
1
2
Gb
1 3
2 4 6 7 8 10 12
1195
Table 2-2 Rear Panel Components
Number Component Description
1 Power supply connector For connecting the mains power.
2 Keyboard connector A PS/2 keyboard can be connected.
3 Mouse connector For connecting a PS/2 mouse.
16 PathFinder Server User Guide
Connecting to a PC
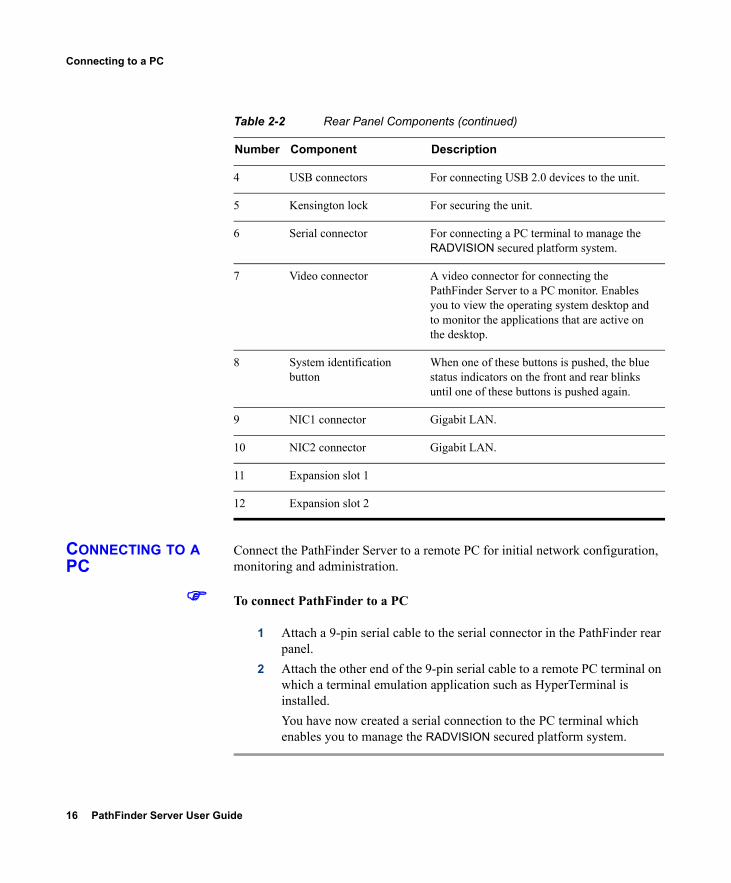
CONNECTING TO A PC
Connect the PathFinder Server to a remote PC for initial network configuration, monitoring and administration.
To connect PathFinder to a PC
1 Attach a 9-pin serial cable to the serial connector in the PathFinder rear panel.
2 Attach the other end of the 9-pin serial cable to a remote PC terminal on which a terminal emulation application such as HyperTerminal is installed.You have now created a serial connection to the PC terminal which enables you to manage the RADVISION secured platform system.
4 USB connectors For connecting USB 2.0 devices to the unit.
5 Kensington lock For securing the unit.
6 Serial connector For connecting a PC terminal to manage the RADVISION secured platform system.
7 Video connector A video connector for connecting the PathFinder Server to a PC monitor. Enables you to view the operating system desktop and to monitor the applications that are active on the desktop.
8 System identification button
When one of these buttons is pushed, the blue status indicators on the front and rear blinks until one of these buttons is pushed again.
9 NIC1 connector Gigabit LAN.
10 NIC2 connector Gigabit LAN.
11 Expansion slot 1
12 Expansion slot 2
Table 2-2 Rear Panel Components (continued)
Number Component Description
Getting Started with the PathFinder Server 17
Configuring PathFinder Server and Operating System Settings
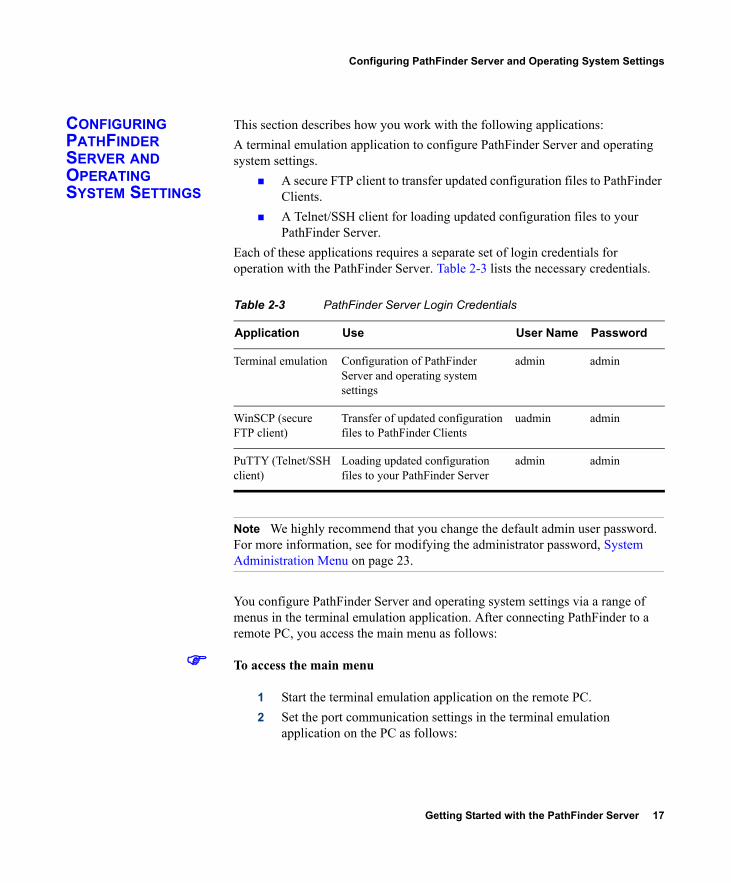
CONFIGURING PATHFINDER SERVER AND OPERATING SYSTEM SETTINGS
This section describes how you work with the following applications:A terminal emulation application to configure PathFinder Server and operating system settings.
A secure FTP client to transfer updated configuration files to PathFinder Clients.A Telnet/SSH client for loading updated configuration files to your PathFinder Server.
Each of these applications requires a separate set of login credentials for operation with the PathFinder Server. Table 2-3 lists the necessary credentials.
Note We highly recommend that you change the default admin user password. For more information, see for modifying the administrator password, System Administration Menu on page 23.
You configure PathFinder Server and operating system settings via a range of menus in the terminal emulation application. After connecting PathFinder to a remote PC, you access the main menu as follows:
To access the main menu
1 Start the terminal emulation application on the remote PC. 2 Set the port communication settings in the terminal emulation
application on the PC as follows:
Table 2-3 PathFinder Server Login Credentials
Application Use User Name Password
Terminal emulation Configuration of PathFinder Server and operating system settings
admin admin
WinSCP (secure FTP client)
Transfer of updated configuration files to PathFinder Clients
uadmin admin
PuTTY (Telnet/SSH client)
Loading updated configuration files to your PathFinder Server
admin admin
18 PathFinder Server User Guide
Configuring PathFinder Server and Operating System Settings
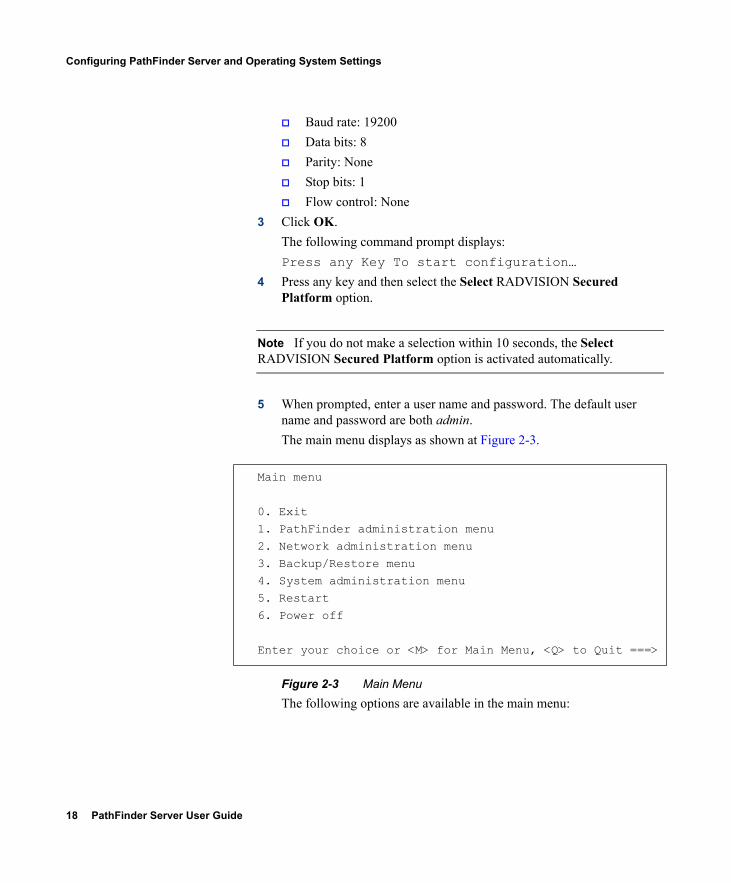
Baud rate: 19200Data bits: 8Parity: NoneStop bits: 1Flow control: None
3 Click OK.The following command prompt displays:Press any Key To start configuration…
4 Press any key and then select the Select RADVISION Secured Platform option.
Note If you do not make a selection within 10 seconds, the Select RADVISION Secured Platform option is activated automatically.
5 When prompted, enter a user name and password. The default user name and password are both admin.The main menu displays as shown at Figure 2-3.
Figure 2-3 Main MenuThe following options are available in the main menu:
Main menu
0. Exit1. PathFinder administration menu
2. Network administration menu
3. Backup/Restore menu4. System administration menu
5. Restart
6. Power off
Enter your choice or <M> for Main Menu, <Q> to Quit ===>
Getting Started with the PathFinder Server 19
Configuring PathFinder Server and Operating System Settings
6 Enter the number representing the required option to display the selected menu.
Table 2-4 PathFinder Administration Menu Options
Index Action
0 Returns display to the main menu (Figure 2-3).
1 Displays the PathFinder administration menu for viewing and modifying the status of your PathFinder Server. See PathFinder Administration Menu on page 20 for more information.
2 Displays the Network administration menu for viewing and modifying your PathFinder Server network settings. See Network Administration Menu on page 21 for more information.
3 Displays the Backup/Restore menu for backing up and restoring configuration settings for your operating system and PathFinder Server. See Backup/Restore Menu on page 22 for more information.
4 Displays the System administration menu for updating configuration settings for your operating system and PathFinder Server, for modifying the administrator password, and for restarting or turning off the PathFinder Server. See System Administration Menu on page 23 for more information.
5 Restarts the PathFinder Server.
6 Turns off the PathFinder Server.
20 PathFinder Server User Guide
Configuring PathFinder Server and Operating System Settings
PATHFINDER ADMINISTRATION MENU
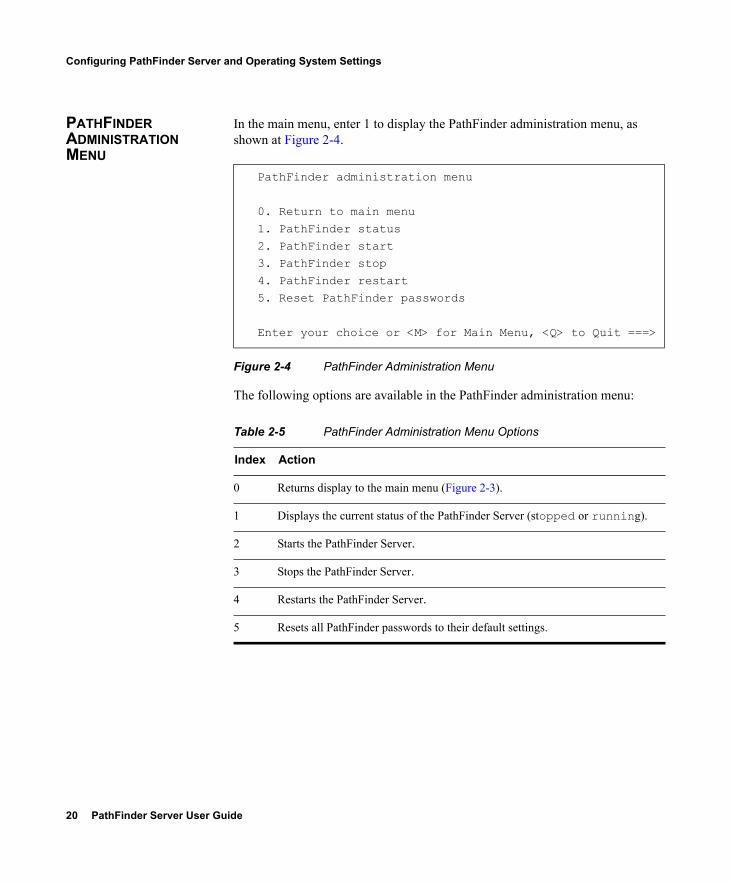
In the main menu, enter 1 to display the PathFinder administration menu, as shown at Figure 2-4.
Figure 2-4 PathFinder Administration Menu
The following options are available in the PathFinder administration menu:
PathFinder administration menu
0. Return to main menu
1. PathFinder status
2. PathFinder start3. PathFinder stop
4. PathFinder restart
5. Reset PathFinder passwords
Enter your choice or <M> for Main Menu, <Q> to Quit ===>
Table 2-5 PathFinder Administration Menu Options
Index Action
0 Returns display to the main menu (Figure 2-3).
1 Displays the current status of the PathFinder Server (stopped or running).
2 Starts the PathFinder Server.
3 Stops the PathFinder Server.
4 Restarts the PathFinder Server.
5 Resets all PathFinder passwords to their default settings.

Getting Started with the PathFinder Server 21
Configuring PathFinder Server and Operating System Settings
NETWORK ADMINISTRATION MENU
In the main menu, enter 2 to display the Network administration menu, as shown at Figure 2-5.
Figure 2-5 Network Administration Menu
Network administration menu
0. Return to main menu
1. Change network configuration
2. Change DNS servers3. Change host name
4. Change domain name
5. Show IP configuration6. Ping
7. Add/Remove static routes
Enter your choice or <M> for Main Menu, <Q> to Quit ===>
22 PathFinder Server User Guide
Configuring PathFinder Server and Operating System Settings
The following options are available in the Network administration menu:
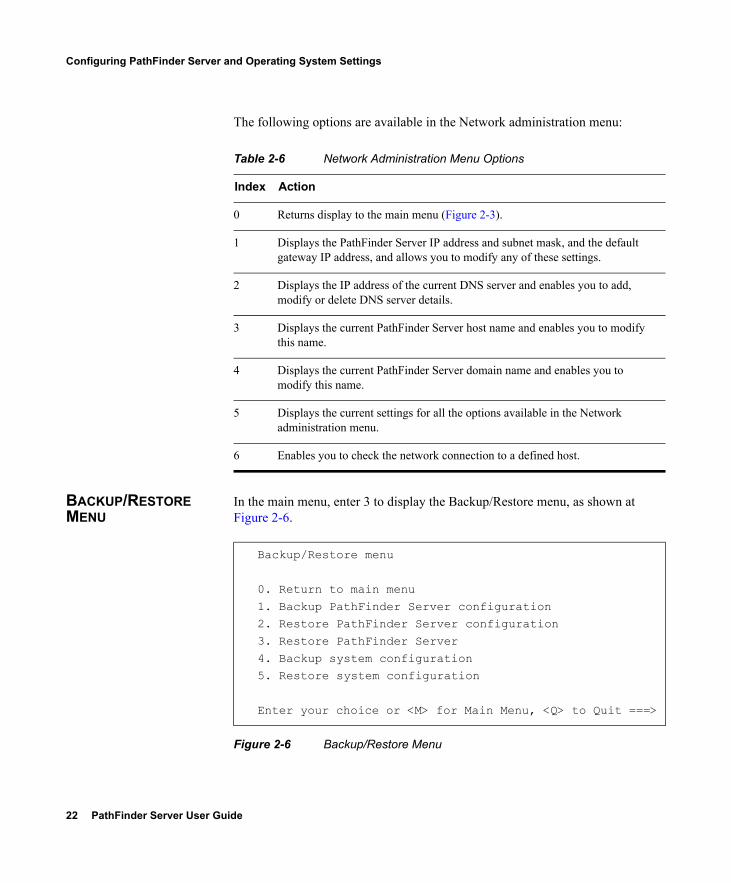
BACKUP/RESTORE MENU
In the main menu, enter 3 to display the Backup/Restore menu, as shown at Figure 2-6.
Figure 2-6 Backup/Restore Menu
Table 2-6 Network Administration Menu Options
Index Action
0 Returns display to the main menu (Figure 2-3).
1 Displays the PathFinder Server IP address and subnet mask, and the default gateway IP address, and allows you to modify any of these settings.
2 Displays the IP address of the current DNS server and enables you to add, modify or delete DNS server details.
3 Displays the current PathFinder Server host name and enables you to modify this name.
4 Displays the current PathFinder Server domain name and enables you to modify this name.
5 Displays the current settings for all the options available in the Network administration menu.
6 Enables you to check the network connection to a defined host.
Backup/Restore menu
0. Return to main menu
1. Backup PathFinder Server configuration2. Restore PathFinder Server configuration
3. Restore PathFinder Server
4. Backup system configuration5. Restore system configuration
Enter your choice or <M> for Main Menu, <Q> to Quit ===>
Getting Started with the PathFinder Server 23
Configuring PathFinder Server and Operating System Settings
The following options are available in the Backup/Restore administration menu:
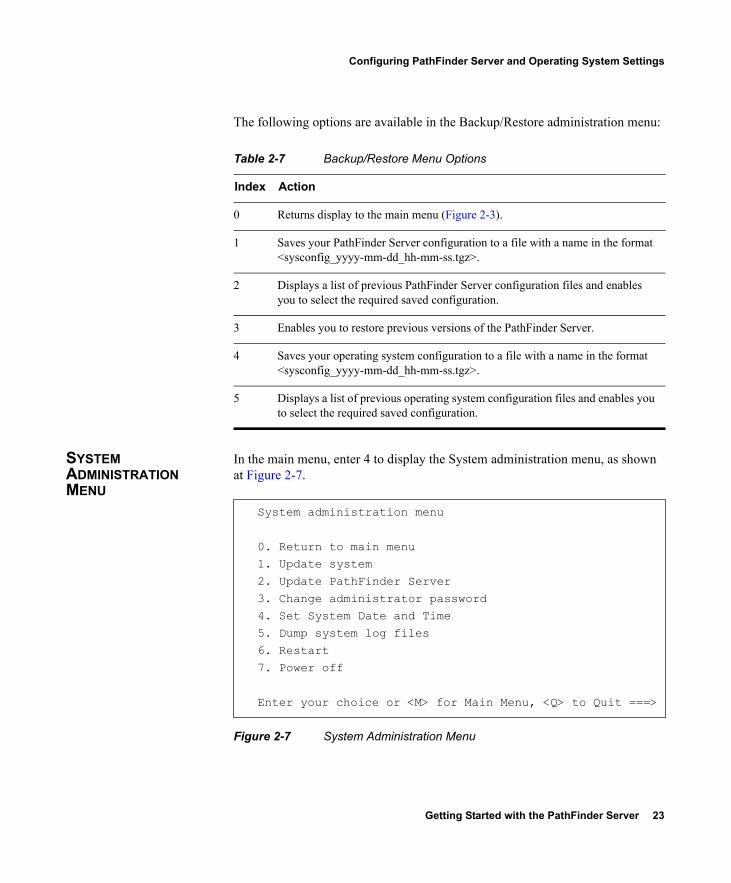
SYSTEM ADMINISTRATION MENU
In the main menu, enter 4 to display the System administration menu, as shown at Figure 2-7.
Figure 2-7 System Administration Menu
Table 2-7 Backup/Restore Menu Options
Index Action
0 Returns display to the main menu (Figure 2-3).
1 Saves your PathFinder Server configuration to a file with a name in the format <sysconfig_yyyy-mm-dd_hh-mm-ss.tgz>.
2 Displays a list of previous PathFinder Server configuration files and enables you to select the required saved configuration.
3 Enables you to restore previous versions of the PathFinder Server.
4 Saves your operating system configuration to a file with a name in the format <sysconfig_yyyy-mm-dd_hh-mm-ss.tgz>.
5 Displays a list of previous operating system configuration files and enables you to select the required saved configuration.
System administration menu
0. Return to main menu1. Update system
2. Update PathFinder Server
3. Change administrator password4. Set System Date and Time
5. Dump system log files
6. Restart7. Power off
Enter your choice or <M> for Main Menu, <Q> to Quit ===>
24 PathFinder Server User Guide
Configuring PathFinder Server and Operating System Settings
The following options are available in the System administration menu:
UPDATING PATHFINDER SETTINGS
From time to time, RADVISION will send you an updated configuration file for your PathFinder Server. The file name has the format <pfs-menu-0.x-yr.i586.rpm>.You need to transfer the update file to all PathFinder Clients using a secure FTP client, and then use a Telnet/SSH client to load the new file to your PathFinder Server.RADVISION recommends that you use the following freeware programs:
WinSCP (FTP client)—An open source SFTP client for Windows. Enables secure file transfer between a local and a remote computer, and basic file manager functionality. Uses Secure Shell (SSH) and supports Secure FTP and legacy SCP protocols.Available at http://winscp.net/eng/download.php.
Table 2-8 System Administration Menu Options
Index Action
0 Returns display to the main menu (Figure 2-3).
1 Displays a list of operating system update files to be installed and asks whether or not you wish to proceed with the update.
2 Displays a list of PathFinder Server update files and enables you to select the required update file for installation. For more information, see Updating PathFinder Settings on page 24.
3 Enables you to modify the existing PathFinder Server administrator password.
4 Enables you to set the system date and time.
5 Creates a log archive file with a name in the format <logs-yyyyddmmhhmmss.tgz>. You may copy the new log archive file using a secure FTP (SFTP) connection with user name uadmin.
6 Restarts the PathFinder Server.
7 Turns off the PathFinder Server.
Getting Started with the PathFinder Server 25
Configuring PathFinder Server and Operating System Settings
PuTTY (Telnet/SSH client)—A free implementation of Telnet and SSH for Win32 and Unix platforms.Available at http://www.chiark.greenend.org.uk/~sgtatham/putty/.
The following section describes how you work with WinSCP and PuTTY to update your PathFinder Server.
To transfer the update file from your PathFinder Server to PathFinder Clients using WinSCP
1 On the PathFinder Client host, download and run the winscp374.exe file.The WinSCP Login dialog box displays.
2 Enter the IP address of the PathFinder Server in the Host name field, and log in using the user name uadmin and the password admin.The WinSCP user interface displays.
3 Drag the new update file from the left panel to the right panel, and click Copy when prompted.
4 Close the application and confirm termination of the session to save the changes.
5 Run the PuTTY Telnet/SSH client as described at To load the update file to your PathFinder Server using PuTTY.
To load the update file to your PathFinder Server using PuTTY
1 On the PathFinder Client host, download and run the putty.exe file.The PuTTY Configuration dialog box displays.
2 Enter the IP address of the PathFinder Server in the Host Name (or IP address) field, and click Open.The PuTTY command line interface displays.
3 Log in using the user name admin and the password admin.The PathFinder main menu displays as shown at Figure 2-3 on page 18.
4 Enter 4 to access the System administration menu (Figure 2-7 on page 23), then enter 2 to select the Update Path Finder Server option.The PFS update menu displays, as shown at Figure 2-8.
26 PathFinder Server User Guide
Resetting the Secured Platform Administrator Password
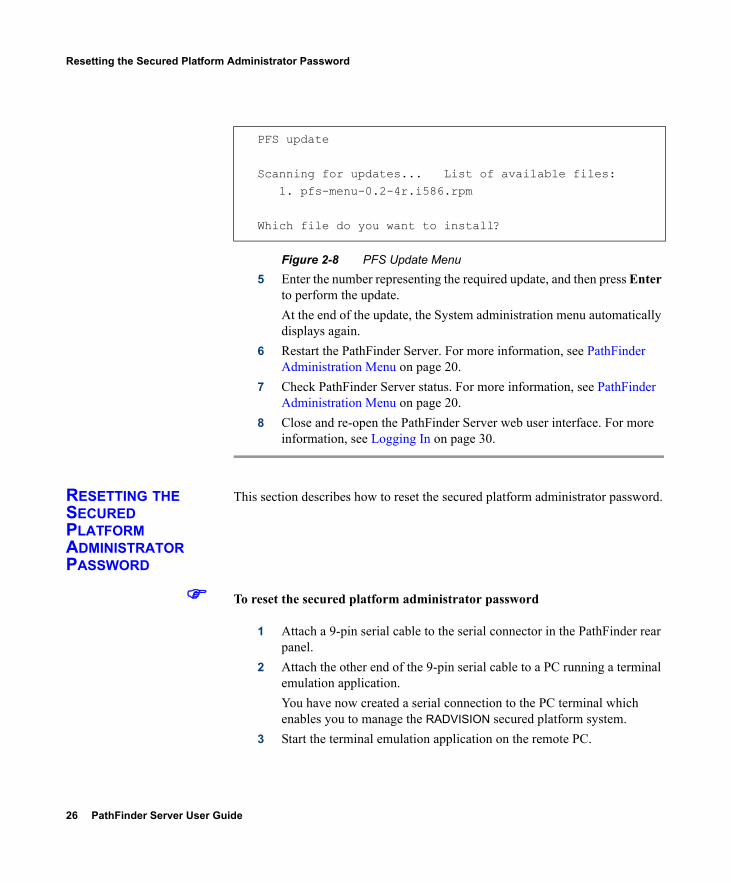
Figure 2-8 PFS Update Menu 5 Enter the number representing the required update, and then press Enter
to perform the update.At the end of the update, the System administration menu automatically displays again.
6 Restart the PathFinder Server. For more information, see PathFinder Administration Menu on page 20.
7 Check PathFinder Server status. For more information, see PathFinder Administration Menu on page 20.
8 Close and re-open the PathFinder Server web user interface. For more information, see Logging In on page 30.
RESETTING THE SECURED PLATFORM ADMINISTRATOR PASSWORD
This section describes how to reset the secured platform administrator password.
To reset the secured platform administrator password
1 Attach a 9-pin serial cable to the serial connector in the PathFinder rear panel.
2 Attach the other end of the 9-pin serial cable to a PC running a terminal emulation application.You have now created a serial connection to the PC terminal which enables you to manage the RADVISION secured platform system.
3 Start the terminal emulation application on the remote PC.
PFS update
Scanning for updates... List of available files:
1. pfs-menu-0.2-4r.i586.rpm
Which file do you want to install?
Getting Started with the PathFinder Server 27
Resetting the Secured Platform Administrator Password
4 Set the port communication settings in the terminal emulation application on the PC as follows:
Baud rate: 19200Data bits: 8Parity: NoneStop bits: 1Flow control: None
5 Click OK. 6 Turn on the PathFinder Server.
The following command prompt displays:Press any key to continue
7 Press any key and then select the Reset admin password option. 8 When prompted, enter the default secured platform administrator user
name and password. The default user name and password are both admin.The main menu displays, as shown at Figure 2-3 on page 18.
9 Enter 4.The System administration menu displays, as shown at Figure 2-7.
10 Enter 3The Change password screen displays.
11 Enter the new password and confirm, then press Enter to return to the System administration menu.
Note The new password must include a mixture of letters and numbers, and must contain at least six characters.
28 PathFinder Server User Guide
Upgrading the PathFinder Server
UPGRADING THE PATHFINDER SERVER
Procedure
1 Upload the new version RPM file to the PathFinder Server using WinSCP.
2 Log in using PuTTYThe PathFinder main menu displays as shown at Figure 2-3 on page 18.
3 Enter 4 to access the System administration menu (Figure 2-7 on page 23), then enter 2 to select the Update Path Finder Server option.The PFS update menu displays, as shown at Figure 2-8 on page 26.
4 Enter the number representing the required update, and then press Enter to perform the update.At the end of the update, the System administration menu automatically displays again.
5 Restart the PathFinder Server. For more information, see PathFinder Administration Menu on page 20.
6 Check PathFinder Server status. For more information, see PathFinder Administration Menu on page 20.
7 Close and re-open the PathFinder Server web user interface. For more information, see Logging In on page 30.
Configuring the PathFinder Server 29
3CONFIGURING THE PATHFINDER SERVER
Logging InUser Interface OverviewViewing Connected Client DetailsViewing Connected Endpoint DetailsDialing Out to an IP AddressDisconnecting PathFinder ClientsDisconnecting an EndpointViewing Current Call DetailsConfiguring General System SettingsConfiguring H.460 SettingsConfiguring Enterprise GatekeepersDeleting an Enterprise GatekeeperConfiguring Neighbor PathFinder ServersViewing a Neighbor PathFinder ServerAdding a Neighbor PathFinder ServerDeleting a Neighbor PathFinder ServerViewing PathFinder User DetailsAdding PathFinder User DetailsAdding a User
30 PathFinder Server User Guide
Logging In
Deleting a UserViewing Topology IslandsAdding a Topology IslandAdding Sub-islandsDeleting Sub-islandsAdding Subnet InformationDeleting Subnet InformationViewing Version and Licensing InformationUpdating the License
LOGGING IN Log in to your PathFinder Server by typing the PathFinder Server IP address followed by “:” and port 8080. For example, http://my_server_ip:8080.
USER INTERFACE OVERVIEW
The PathFinder Server user interface includes the following sections:Client Status—For viewing details of the PathFinder Clients that are connected to your PathFinder Server, and details of the endpoints connected to each PathFinder Client.Calls—For viewing details of all the calls currently in progress on your PathFinder Server.Settings—For configuring gatekeeper, NAT, DNS, Quality of Service, log level and encryption settings.Ent. Gatekeeper—For configuring an enterprise gatekeeper to work with PathFinder.Neighbor Servers—For configuring and adding neighbor servers to the PathFinder system.Users—For viewing, adding and modifying the details of users in the PathFinder system.Viewing Topology Islands—For configuring and adding topology islands to the PathFinder system. This is used to support direct media path between clients.About—For viewing PathFinder Server version and licensing information.
Configuring the PathFinder Server 31
Viewing Connected Client Details
VIEWING CONNECTED CLIENT DETAILS
The Client Status tab enables administrators to view details of the PathFinder Clients connected to your PathFinder Server, and details of the endpoints connected to each PathFinder Client.
Note You can disconnect a PathFinder Client by checking the box in the Disconnect column to the left of the PathFinder Client name.
The Client Status tab displays the following information:
Client Name
Displays the names of all PathFinder Clients connected to your PathFinder Server.H.460 endpoint aliases are displayed in the Alias column of the Calls tab when the endpoint is involved in a call.For more information about naming PathFinder Clients, see Configuring a Connection to a PathFinder Server in the PathFinder Client User Guide.Click the name of a PathFinder Client to view details of the endpoints connected to it. For more information, see Disconnecting an Endpoint on page 33.
Native IP Address
Displays the IP address of a connected PathFinder Client within its private network. Empty for H.460 endpoints.
Public IP Address (Organization)
Displays the public IP address of the PathFinder Client. This is the IP address through which all conferencing traffic will pass.
Media
Indicates whether a UDP or TCP connection is being used for media traversal between the PathFinder Client and the PathFinder Server.
# of Endpoints
Displays the number of endpoints connected to each listed PathFinder Client.
32 PathFinder Server User Guide
Viewing Connected Endpoint Details
Client Version
Displays the version number of each connected PathFinder Client. Empty for H.460 endpoints.
Refresh
Click to update the page view. This page does not automatically refresh if additional calls are initiated by connected endpoints.
VIEWING CONNECTED ENDPOINT DETAILS
This section describes how administrators can view details of the endpoints registered to PathFinder Clients.
Procedure
1 Click the Client Status tab. 2 Click on the desired Client Name link.
The Connected Endpoints list is displayed.
DIALING OUT TO AN IP ADDRESS
The PathFinder Server can work with the Enhanced Communication Server to offer firewall traversal support for inviting external participants to a video conference by dialing out to an IP address.
Procedure
1 Go to Client Status > Connected Endpoints > Registration Information > Q.931 Address.
2 Locate the Call Signaling IP address of a virtual endpoint on your public PathFinder Client.
The public PathFinder Client is identified by a green icon after the end of Client Version column on the Connected Clients page.The alias of the virtual endpoint is displayed on the Connected Endpoints page as “Agent-DialoutByIP”.
Configuring the PathFinder Server 33
Disconnecting PathFinder Clients
3 Check the Route IP calls to field in the Enhanced Communication Server user interface at Settings > Calls.
4 Copy the Call Signaling IP address of your virtual endpoint into the Route IP calls to field, and then click Upload.
DISCONNECTING PATHFINDER CLIENTS
This section describes how administrators can disconnect PathFinder Clients from your PathFinder Server.
To disconnect a PathFinder Client
1 Select the PathFinder Client(s) you wish to disconnect in the Disconnect column of the Client Status table.
2 Click the Disconnect button at the bottom of the page.
Note PathFinder does not prompt users to confirm their action. Clicking Disconnect immediately disconnects PathFinder Clients from the PathFinder Server.
DISCONNECTING AN ENDPOINT
Note You can disconnect an endpoint by checking the box in the Disconnect column to the left of the endpoint name.
Procedure
1 Click the Client Status tab. 2 Click on the desired Client Name link, the Connected Endpoints list is
displayed. You can disconnect an endpoint by checking the box in the Disconnect column to the left of the endpoint name.
34 PathFinder Server User Guide
Viewing Current Call Details
VIEWING CURRENT CALL DETAILS
The Calls tab enables administrators to view details of all calls currently in progress on your PathFinder Server.
Procedure
1 Click the Calls tab. 2 The current in calls are displayed.
The Calls tab displays the following information:
Source/Destination
Displays information about the endpoint which initiated the call currently in progress and about the endpoint receiving the current call.
Native Address—Displays the call signaling address of the source/destination endpoint within its private network.Public Address—Displays the public call signaling address of the source/destination endpoint.Alias—Displays the source/destination endpoint alias.Client—Displays the name of the PathFinder Client through which the source/destination endpoint registers.
H.460 endpoint client names are displayed in the format “tc”+<hexadecimal RAS address>.
Connection Time
Displays the date and time at which a specified call was initiated by the source endpoint.
Note All times logged are based on PathFinder Server time zone settings.
Duration (minutes)
Displays the current duration of a call still in progress.
Refresh
Click to update the page view. This page does not automatically refresh if additional calls are initiated by connected endpoints.
Configuring the PathFinder Server 35
Configuring General System Settings
CONFIGURING GENERAL SYSTEM SETTINGS
The General section of the Settings tab enables administrators to configure gatekeeper, NAT, DNS, Quality of Service and log level settings.
Procedure
1 Click the Settings tab and select General. 2 Enter a valid IP Address and port for the Gatekeeper with which you
want PathFinder to register. The Gatekeeper is deployed in the firewall’s DMZ together with the PathFinder Server. In most cases, there is no need to change the default port (1719).
Note Modifications to gatekeeper settings do not take effect until you restart the PathFinder Server.
3 Select a valid IP Address from the drop-down list which displays the IP address of your PathFinder Server. In most cases, there is no need to change the default port (3089).
4 If NAT support is required, check the Enabled checkbox to enable NAT support, and enter a valid IP Address and port for the NAT device with which you want PathFinder to register.NAT support is generally required when the PathFinder Server resides in the DMZ.
5 If URI dialing is required, enter the domain name of the local gatekeeper zone or the PathFinder Server in the Local Domain Name field.URI dialing makes it easier for endpoints registered with different gatekeepers or PathFinder Servers to call each other. Without URI dialing, all systems must be neighbored to each other.
6 Check Resolve on Server First to instruct the PathFinder Server to strip the domain name from the destination URI before forwarding an LRQ message to a destination outside the local gatekeeper zone, or before forwarding an ARQ message whose destination URI contains the domain name configured in the Local Domain Name field.
36 PathFinder Server User Guide
Configuring General System Settings
7 QoS support Enables Quality of Service (QoS) support and allows you to configure the TOS bits of the IP datagram header for Quality of Service priority level. Select from:
Normal—Sets the value of the DSCP field of the IP header to zero. This setting is commonly used in network communication.Low cost—Sets the value of the DSCP field of the IP header to 0x02 to inform the network to minimize packet flow monetary cost.Reliability—Sets the value of the DSCP field of the IP header to 0x04 to inform the network to maximize packet flow reliability.Throughput—Sets the value of the DSCP field of the IP header to 0x08 to inform the network to maximize the packet flow throughput.Low delay—Sets the value of the DSCP field of the IP header to 0x10 inform the network to minimize packet flow delay.
Note For more detailed information about QoS based on TOS, refer to RFC-1349.
8 Select Log Level which displays current logging settings, and allows service provider administrators to modify settings as needed. There are four levels of detail available for PathFinder system logs:
Detail—Saves call details, warnings and critical system errors to the log file.Warning—Saves warnings issued by the system and critical system errors to the log file.Error—Saves critical system errors only to the log file.Disabled—Disables PathFinder logging.
Note Logs are named rvpf.log.XXX by default and stored under /home/users/admin/log. Users can retrieve log files via SFTP using the “uadmin” user name and password “admin”.
9 Check AES Encryption to enable encryption of all traffic between the PathFinder Client and the PathFinder Server, and between two PathFinder Servers, including signaling, media and client/server commands.
Configuring the PathFinder Server 37
Configuring H.460 Settings
10 Enter the length of time (in seconds) for which the web can remain idle before disconnection in the Web Page Time Out field.
11 Click Save to commit changes to the system and to notify users that a system restart is necessary for changes to take effect.
12 Click Reboot to reboot the PathFinder Server.
Note Restarting the PathFinder Server terminates any in-session calls.
13 Click Cancel to discard any uncommitted changes made to the Settings table.
CONFIGURING H.460 SETTINGS
The H.460 section of the Settings tab allows administrators to enable the PathFinder Server to support the H.460 standard for firewall traversal.
Procedure
1 Click the Settings tab and select H.460. 2 Configure native and public ports for H.460.18 RAS communication,
H.460.18 Call Signaling communication, and H.460.18 and H.460.19 Call Control communication.
Note Public ports must match those configured on your external firewall or NAT device residing in the DMZ.
3 Enable the Multiplex option to reduce the number of required ports by sending media and media control communication (over RTP/RTCP) via UDP ports 2776 and 2777.
Note The Multiplex option is automatically selected when NAT support is enabled in the General section of the Settings tab.
4 Click Save to commit changes to the system and to notify users that a system restart is necessary for changes to take effect.
38 PathFinder Server User Guide
Configuring Enterprise Gatekeepers
5 Click Reboot to reboot the PathFinder Server.
Note Restarting the PathFinder Server terminates any in-session calls.
6 Click Cancel to discard any uncommitted changes made to the Settings table.
CONFIGURING ENTERPRISE GATEKEEPERS
The Ent. Gatekeeper tab enables administrators to configure an enterprise gatekeeper to work with PathFinder.
Procedure
1 Select the Ent. Gatekeeper tab. 2 Click Add. 3 In the Client Name field, enter the name of the PathFinder Client
through which the enterprise gatekeeper can send and receive packets.
Note When adding an enterprise gatekeeper, a PathFinder Client user name and password must also be added. For more information, see Client Authentication on page 46.
4 Enter the native IP address of the enterprise gatekeeper in the GK Native Address field.
Note In most cases there is no need to change the default Gatekeeper port (1719).
Configuring the PathFinder Server 39
Configuring Enterprise Gatekeepers
5 Enter the local port preserved by the PathFinder Server to simulate an enterprise gatekeeper in the Port field.The main site gatekeeper will use this port and the IP of the PathFinder Server to create a neighbor gatekeeper.
Note Different local ports must be preserved for different enterprise gatekeepers. These ports must also not be occupied by other programs or applications.
6 Click Save.Your changes appear in the Ent. Gatekeeper tab.The Public Address field displays the PathFinder Client IP address. If the PathFinder Client is behind a NAT or other device that could change the source address of an IP packet from the PathFinder Client, the modified IP address is displayed.
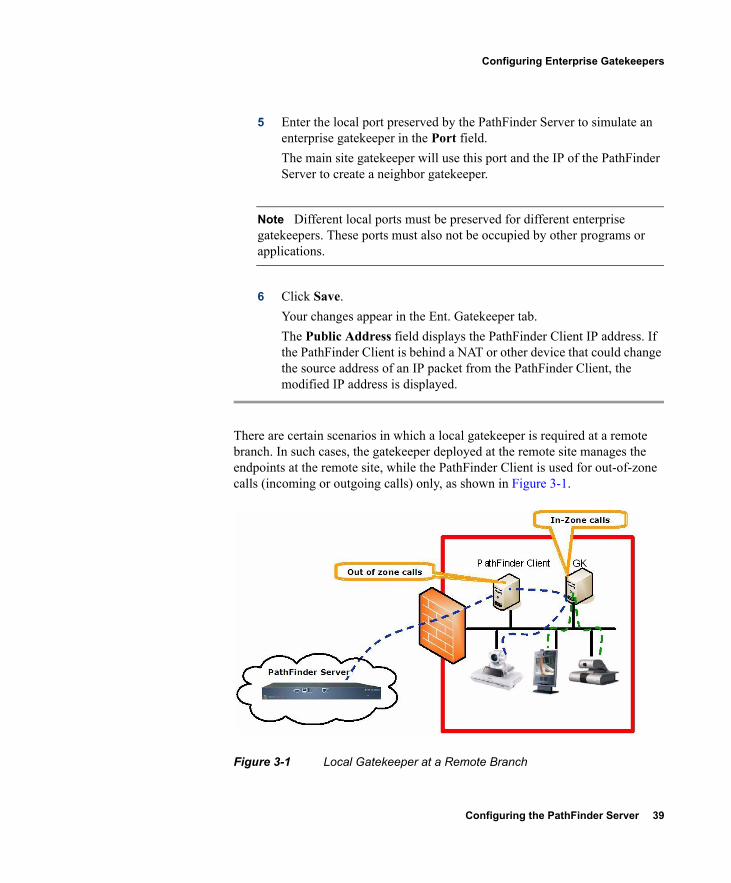
There are certain scenarios in which a local gatekeeper is required at a remote branch. In such cases, the gatekeeper deployed at the remote site manages the endpoints at the remote site, while the PathFinder Client is used for out-of-zone calls (incoming or outgoing calls) only, as shown in Figure 3-1.
Figure 3-1 Local Gatekeeper at a Remote Branch
40 PathFinder Server User Guide
Deleting an Enterprise Gatekeeper
Example
This section explains how to configure the enterprise gatekeeper in the deployment shown in Figure 3-1.
Defining the Enterprise Gatekeeper
1 Select the Ent. Gatekeeper tab. 2 Click Add. The Add Enterprise Gatekeeper dialog box displays. 3 Enter HK-Office in the Client Name field. 4 Enter 192.168.10.51 in the GK Native Address field. 5 Leave the default value (1719) in the Gatekeeper Port field unchanged. 6 Click Save. The Enterprise Gatekeeper is configured.
Note In most cases there is no need to change the default Gatekeeper port (1719).
Note When adding an enterprise gatekeeper, a PathFinder Client user name and password must also be added. For more information, see Client Authentication on page 46.
DELETING AN ENTERPRISE GATEKEEPER
This section describes how administrators can delete an enterprise gatekeeper from the PathFinder system.
To delete an enterprise gatekeeper
1 Select the enterprise gatekeeper(s) you wish to delete by checking the checkbox next to the name of the required gatekeeper in the Ent. Gatekeeper table.
2 Click the Delete button at the bottom of the page.
Configuring the PathFinder Server 41
Configuring Neighbor PathFinder Servers
CONFIGURING NEIGHBOR PATHFINDER SERVERS
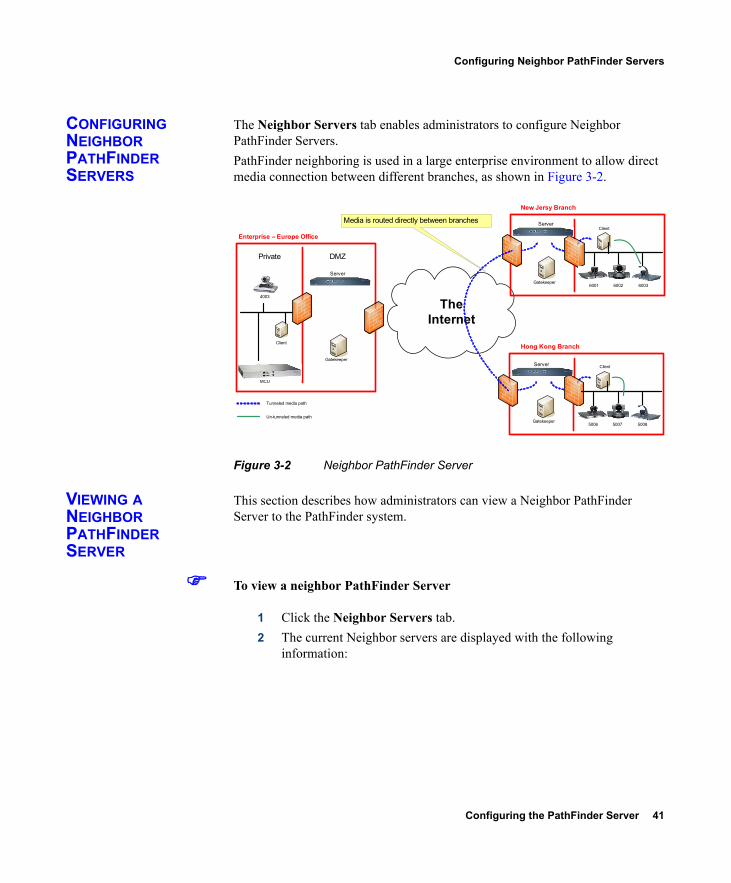
The Neighbor Servers tab enables administrators to configure Neighbor PathFinder Servers.PathFinder neighboring is used in a large enterprise environment to allow direct media connection between different branches, as shown in Figure 3-2.
Figure 3-2 Neighbor PathFinder Server
VIEWING A NEIGHBOR PATHFINDER SERVER
This section describes how administrators can view a Neighbor PathFinder Server to the PathFinder system.
To view a neighbor PathFinder Server
1 Click the Neighbor Servers tab. 2 The current Neighbor servers are displayed with the following
information:
TheInternet
Hong Kong Branch
5006 5007 5008
Client
Tunneled media path
Un-tunneled media path
DMZ
Enterprise – Europe Office
Server
Private
MCU
Gatekeeper
4003
Client
Server
Gatekeeper
New Jersy Branch
6001 6002 6003
ClientServer
Gatekeeper
Media is routed directly between branches
42 PathFinder Server User Guide
Viewing a Neighbor PathFinder Server
Call Prefix
The call prefix is required to access endpoints registered to the gatekeeper with which the Neighbor Server is associated. For example, if a Neighbor Server-side endpoint has an alias 5001, and the Neighbor Server has a call prefix 99, users must dial 995001 to reach the endpoint.
Server Address
Indicates the Neighbor Server IP address.
Server Port
Indicates the Neighbor Server port.
Connection Account
Indicates the user name used by the local Server to connect to the Neighbor Server.
Ras Port
Indicates the RAS port of the PathFinder Server native address. The RAS port is generated automatically.
Strip prefix
Indicates whether or not the local Server strips the prefix for outgoing calls to the Neighbor Server.
Pre-Start
Indicates whether or not your local Server will automatically connect to the Neighbor Server when the local Server is started or when the Neighbor Server is configured on the local Server.
Connection Timeout
Indicates the length of time (in seconds) that the Neighbor Server can remain idle before disconnection.
Configuring the PathFinder Server 43
Adding a Neighbor PathFinder Server
Media
Indicates whether a UDP or a TCP connection is used for media traversal between the local Server and the Neighbor Server.
Note Using a TCP connection reduces media quality and server capacity.
Connected
Indicates whether or not the Neighbor Server is currently connected. You can click on the connection indication to change the connection status of the Neighbor Server.
ADDING A NEIGHBOR PATHFINDER SERVER
This section describes how administrators can add a Neighbor PathFinder Server to the PathFinder system.
To add a neighbor PathFinder Server
1 In the Neighbor Servers tab, click Add. 2 The Add or Update Neighbor Server Settings dialog box displays. 3 Enter a value in the Call Prefix field. The call prefix is required to
access endpoints registered to the gatekeeper with which the Neighbor Server is associated. For example, if a Neighbor Server-side endpoint has an alias 5001, and the Neighbor Server has a call prefix 99, users must dial 995001 to reach the endpoint.
4 Indicate whether or not the local Server strips the prefix for outgoing calls to the Neighbor server in the Strip prefix field.
5 In the Connection Account field, enter the user name used by the local Server to connect to the Neighbor Server.
6 In the Password field, enter a password. Confirm the password in the Confirm Password field.
7 In the Server Address field, enter the Neighbor Server IP address. 8 In the Server Port field, enter the Neighbor Server port. 9 Embedded Client—When enabled, Pre-Start Indicates whether or not
your local Server will automatically connect to the Neighbor Server
44 PathFinder Server User Guide
Deleting a Neighbor PathFinder Server
when the local Server is started, or when the Neighbor Server is configured on the local Server.
10 Connection Timeout—The length of time (in seconds) that the Neighbor Server can remain idle before disconnection.
11 Media Traversal—Indicates whether a UDP or a TCP connection is used for media traversal between the local Server and the Neighbor PathFinder Server.
Note Using a TCP connection reduces media quality and server capacity.
DELETING A NEIGHBOR PATHFINDER SERVER
This section describes how administrators can delete a neighbor PathFinder Server from the PathFinder system.
To delete a neighbor PathFinder Server
1 Select the neighbor PathFinder Server(s) you wish to delete by checking the checkbox next to the name of the required gatekeeper in the Neighbor Servers table.
2 Click the Delete button at the bottom of the page.
VIEWING PATHFINDER USER DETAILS
The Users tab enables administrators to view and modify the details of the users currently configured in the PathFinder system, to assign roles to users, and to add new users.
Note After installation, the Users list contains a single Administrator user with “admin” as the default password. Once a new user is created, users are required to supply a valid login ID and password to view the PathFinder Server web interface.
Configuring the PathFinder Server 45
Adding PathFinder User Details
Procedure
1 Select the Users tab. The following information displays:User Name—Displays the name of the specified user.
Note A green icon to the left of a user name indicates the administrator who is currently viewing the Users tab.
User Role—Displays the role of the specified user. The following user roles are available:
Regular User—May access the PathFinder Server web interface, but may not change settings or create new users.Client User—Cannot access the PathFinder Server web interface. Users with this role may configure a PathFinder Client to connect to the PathFinder Server. See Client Authentication on page 46 for more information.Administrator—May view and modify the PathFinder Server web interface, and create and modify users.
Online—Indicates whether or not the specified user is currently logged in.
ADDING PATHFINDER USER DETAILS
Procedure
1 In the Users tab, click Add. The User Detail dialog box appears. 2 Enter the login ID. 3 Enter a password and confirm the password. 4 Select a user role from the drop-down list. 5 Click Save. A new user is added.

46 PathFinder Server User Guide
Adding a User
CLIENT AUTHENTICATION
If no users with the role of Client User exist, the PathFinder Server will accept connections from any PathFinder Client on the network. A valid login ID (which must not be used by other PathFinder Clients) and a null password are required.For added security, however, an administrator may wish to implement client authentication by assigning users the role of Client User. Once a user is created with this role, the PathFinder Server will only accept connections from PathFinder Clients that are configured with a valid login ID and password. All other PathFinder Client connections will be refused. For more information, see Configuring a Connection to a PathFinder Server in the PathFinder Server User Guide.
ADDING A USER This section describes how administrators can add a user to the PathFinder system.
Procedure
1 In the Users tab, click Add. The Add Users dialog box displays. 2 Enter a login ID and Password for the new user. 3 Confirm the Password. 4 Select the required User Role from the drop-down list, then click Save.
The new user displays in the Users tab.
Note For information on the available user roles, see Client Authentication on page 46.
DELETING A USER This section describes how administrators can delete a user from the PathFinder system.
Procedure
1 Select the user(s) you wish to delete by checking the checkbox next to the name of the user in the Users table.
2 Click the Delete button at the bottom of the page.
Configuring the PathFinder Server 47
Viewing Topology Islands
VIEWING TOPOLOGY ISLANDS
The Topology tab enables administrators to add or configure topology islands, which enables direct media connection between clients. For more information, see Direct Media Connection on page 6.
ADDING A TOPOLOGY ISLAND
This section describes how administrators can add topology islands to the PathFinder system.
Procedure
1 In the Topology Islands tab, click Add.The Topology Islands dialog box displays.
2 Enter the name of the topology island. 3 Enter a description of the topology island. 4 Click Save. The new topology island is added.
ADDING SUB-ISLANDS
This section describes how to add sub-islands.
Procedure
1 In the Topology Islands tab, click Add.The Topology Islands dialog box displays.
2 Enter the name of the topology island. 3 Click Add in the Sub-Islands section. 4 Enter the name and public address of the sub-island, then click OK. 5 Click Save. The new sub-island is added.
48 PathFinder Server User Guide
Deleting Sub-islands
DELETING SUB-ISLANDS
This section describes how administrators can delete a PathFinder sub-island.
Procedure
1 Select the sub-island that you wish to delete by checking the checkbox next to the name of the required sub-island in the Sub-Islands table.
2 Click the Delete button to the right of the sub-island.The sub-island is deleted.
ADDING SUBNET INFORMATION
This section describes how to add subnet information.
Procedure
Note In order to add subnet information, you need to select a sub-island first.
1 In the Topology Islands tab, click Add.The Topology Islands dialog box displays.
2 Click the name of the required sub-island. 3 In the subnet information section, click Add. The Add Subnet dialog
box is displayed. 4 Enter the IP address and subnet mask of the sub-island, then click OK.
Configuring the PathFinder Server 49
Deleting Subnet Information
DELETING SUBNET INFORMATION
This section describes how administrators can delete subnet information.
Procedure
1 Select the subnet information that you wish to delete by checking the checkbox next to the name of the required gatekeeper in the Topology Islands table.
2 Click the Delete button to the right of the subnet information for your sub-island.
VIEWING VERSION AND LICENSING INFORMATION
The About tab enables administrators to view PathFinder Server version and licensing information.
Procedure
1 Click the About tab. The following information is displayed: in the About tab:
Version Number—Displays the version number of the PathFinder Server.MAC Address— Displays the MAC address of the PathFinder Server.Serial Number—Displays the serial number of the PathFinder Server.Expiration Date—Displays the date on which your current license will expire. For demonstration versions only.Max Connected Endpoints—Displays the maximum allowed number of connected endpoints, as determined by your license.Max Concurrent Calls—Displays the maximum allowed number of concurrent calls, as determined by your license.

50 PathFinder Server User Guide
Updating the License
UPDATING THE LICENSE
The PathFinder Server comes with a temporary evaluation license which expires on a specified date. This section describes how you install a permanent license.
Procedure
1 Click Browse. In the Windows Explorer window, navigate to the file that you received when you purchased a full PathFinder license. Select the file and click Open.
2 Click the Update License button. The license file is installed on your server and PathFinder is fully licensed.
Note For information about obtaining a full permanent PathFinder license, contact RADVISION Customer Support at www.radvision.com.

Technical Specifications 51
4TECHNICAL SPECIFICATIONS
TECHNICAL SPECIFICATIONS TABLE
Table 4-1 PathFinder Server Unit Technical Specifications
Processor Quad-Core Intel® Xeon® 3210 at up to 2.13 GHz
Cache 2x4M
Front Side Bus 1066MHz
Memory 2GB DDR2, 667MHz, 2x1GB Dual Ranked DIMMs
Riser Card 2 slots: 1 PCI Express x8 slot and 1 PCI Express x4 slot
Primary Hard Drive
250 GB 7.2K RPM Serial ATA 3Gbps 3.5" Cabled Hard Drive
Hard Drive Configuration
Onboard SATA, 1 Drive connected to Onboard SATA Controller
Network Adapter On-Board Dual Gigabit Network Adapter
Power supply 345W non-redundant
Video Embedded ATI ES1000 with 16 MB memory
Remote Management
Standard BMC with IPMI 1.5 support; optional DRAC 4/p for advanced capabilities

52 PathFinder Server User Guide
Technical Specifications Table

Compliance and Certifications 53
5COMPLIANCE AND CERTIFICATIONS
Product SafetyElectromagnetic CompatibilityErgonomics, Acoustics and HygienicsImport/Export Compliance Data
PRODUCT SAFETY The product has been certified by the Product Safety authorities listed in Table 5-1.
Table 5-1 Product Safety Certifications
Country/Region Authority or Mark
Argentina IRAM
Canada SCC
China CNCA or CCC
European Union CE
Germany TUV
IECEE IECEE CB
Israel SII
Mexico NYCE or NOM
54 PathFinder Server User Guide
Electromagnetic Compatibility
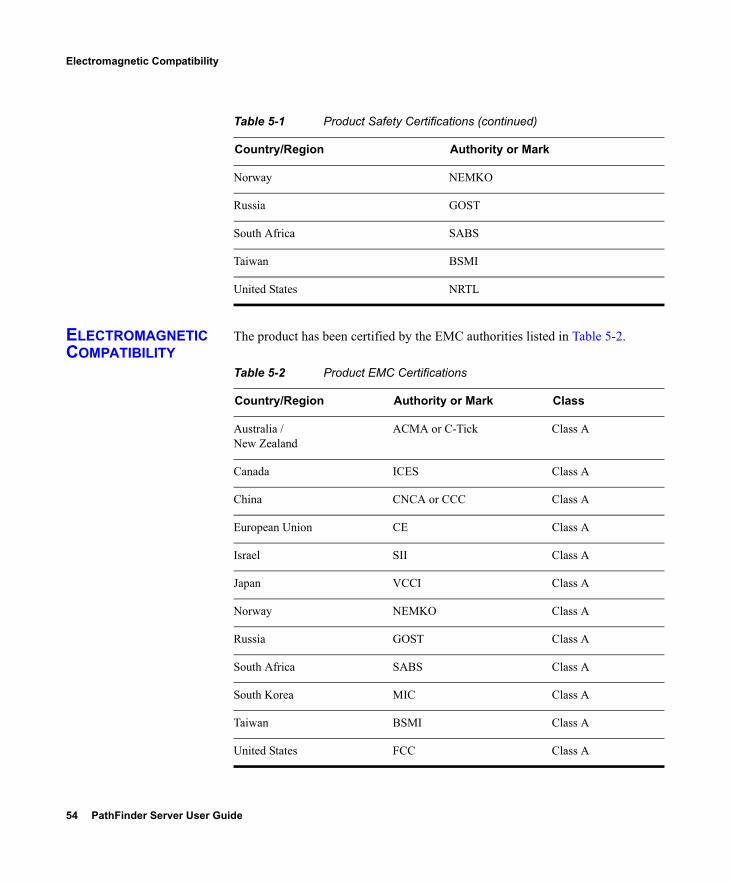
ELECTROMAGNETIC COMPATIBILITY
The product has been certified by the EMC authorities listed in Table 5-2.
Norway NEMKO
Russia GOST
South Africa SABS
Taiwan BSMI
United States NRTL
Table 5-1 Product Safety Certifications (continued)
Country/Region Authority or Mark
Table 5-2 Product EMC Certifications
Country/Region Authority or Mark Class
Australia /New Zealand
ACMA or C-Tick Class A
Canada ICES Class A
China CNCA or CCC Class A
European Union CE Class A
Israel SII Class A
Japan VCCI Class A
Norway NEMKO Class A
Russia GOST Class A
South Africa SABS Class A
South Korea MIC Class A
Taiwan BSMI Class A
United States FCC Class A
Compliance and Certifications 55
Ergonomics, Acoustics and Hygienics
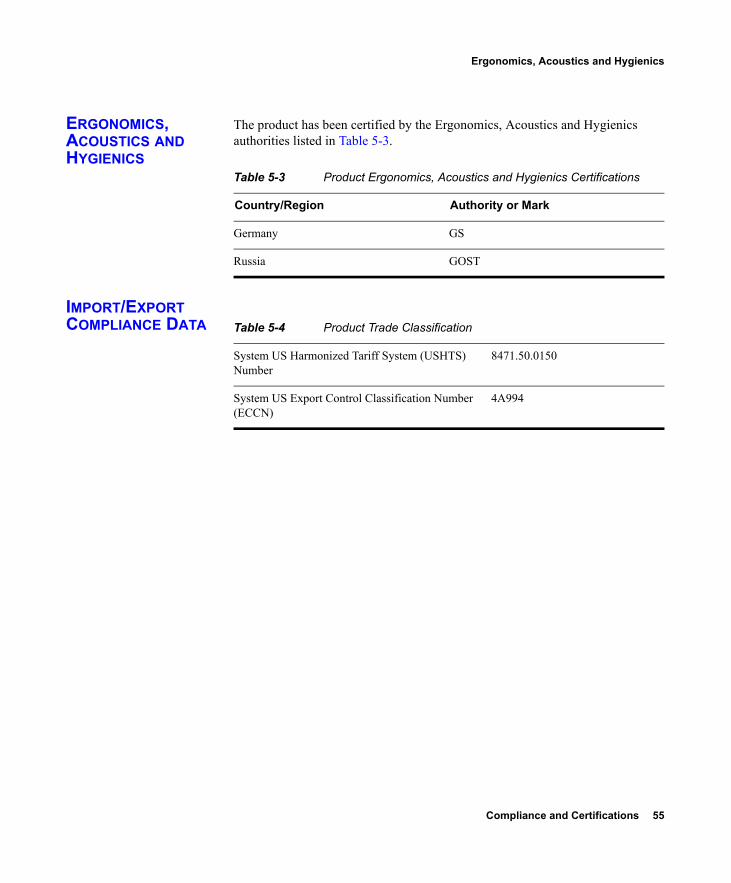
ERGONOMICS, ACOUSTICS AND HYGIENICS
The product has been certified by the Ergonomics, Acoustics and Hygienics authorities listed in Table 5-3.
IMPORT/EXPORT COMPLIANCE DATA
Table 5-3 Product Ergonomics, Acoustics and Hygienics Certifications
Country/Region Authority or Mark
Germany GS
Russia GOST
Table 5-4 Product Trade Classification
System US Harmonized Tariff System (USHTS) Number
8471.50.0150
System US Export Control Classification Number (ECCN)
4A994


![The Trove [multi]/1st... · PATHFINDER RPG CORE RULEBOOK , PATHFINDER RPG BESTI ARY , PATHFINDER RPG BESTIARY 2 , PATHFINDER RPG BESTIARY 3 , PATHFINDER RPG ADVANCED PLAYER S GUID](https://img.pdfslide.net/doc/110x75/60c7beb87d66ea6048574996/the-trove-multi1st-pathfinder-rpg-core-rulebook-pathfinder-rpg-besti-ary.jpg)