Embed Size (px)
Citation preview
Patient assessment - spirometry
STEP 1
Learning objectives
This module will provide you with an understanding of spirometry and the role it plays in aiding the
diagnosis of lung diseases, particularly COPD. It is recommended that a spirometry should be
performed during the initial assessment at pulmonary rehabilitation, however this may not be
necessary if recent spirometry results are available.
By the end of this module you will be able to:
• understand what measurements are provided by spirometry
• describe how to perform a spirometry
• understand how to interpret spirometry results
• outline common spirometric features of obstructive and restrictive lung diseases
• describe how spirometry can indicate disease severity in COPD.
This module will provide introductory information on spirometry and its important role in the
diagnosis of COPD. It will not include the practical aspects of spirometry or practice skills in conducting
spirometry. Information will be provided on where spirometry training can be assessed.
STEP 2
Spirometry
Spirometry means, ‘the measuring of breath’.
‘Spiro’ = breath + ‘Metry’ = measure
Spirometry is the most reproducible, standardised and objective way of measuring airflow
obstruction and FEV1 is the variable most closely associated with prognosis1. A spirometry test is a
vital component in the diagnosis and monitoring of COPD.
A spirometer measures the amount of air that can be expired (blown out). Spirometry is essential in
confirming a diagnosis of chronic lung disease2 and therefore an important requirement for assessing
patients for entry into a pulmonary rehabilitation program.
Spirometry is used in clinical practice to:
• aid the diagnosis of respiratory disorders
• assess the degree of disease or disability
• monitor disease progress
• monitor the effects of treatment - acute or chronic.
A spirometer can measure expired volumes and flows of air from the lungs3. Spirometry can give an
indication of underlying lung damage by comparing results with predicted normal values. In order
to compare results to predicted normal values, the patient’s date of birth, gender, height, weight
and ethnicity are entered into the spirometer data base prior to each test. For identification
purposes, the patient’s name is also entered. The patient is then instructed to inspire fully and then
blow into the spirometer.
STEP 3
Training is essential for operators to learn correct performance of spirometry and interpretation of
results. Poorly performed spirometry may give erroneous results and increases the risk of
misinterpreting the results. Spirometry training is available through:
• Lung Health Promotion Centre at The Alfred, http://www.lunghealth.org/
• National Asthma Council of Australia, http://www.nationalasthma.org.au/index.php
• State Asthma Foundations, http://www.asthmaustralia.org.au/intro/index.php
• some tertiary institutions.
STEP 4
Types of spirometers
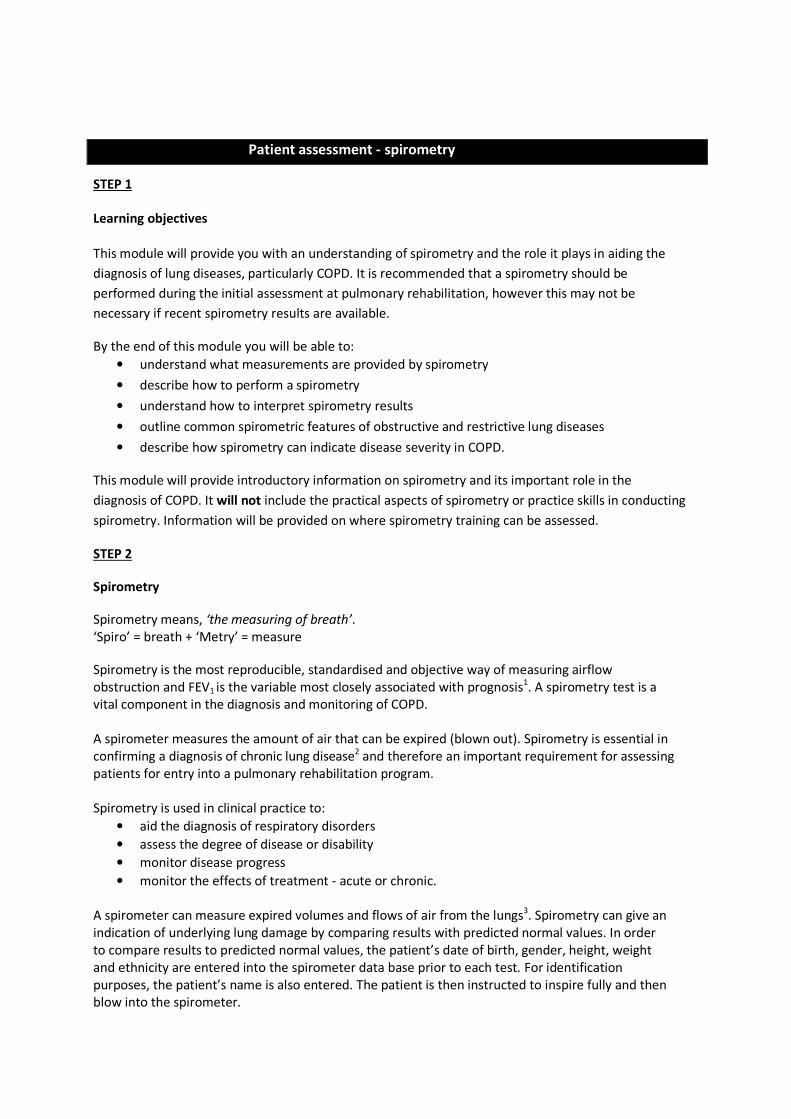
Volume displacement spirometers measure the volume (amount) of air expired from the lungs.
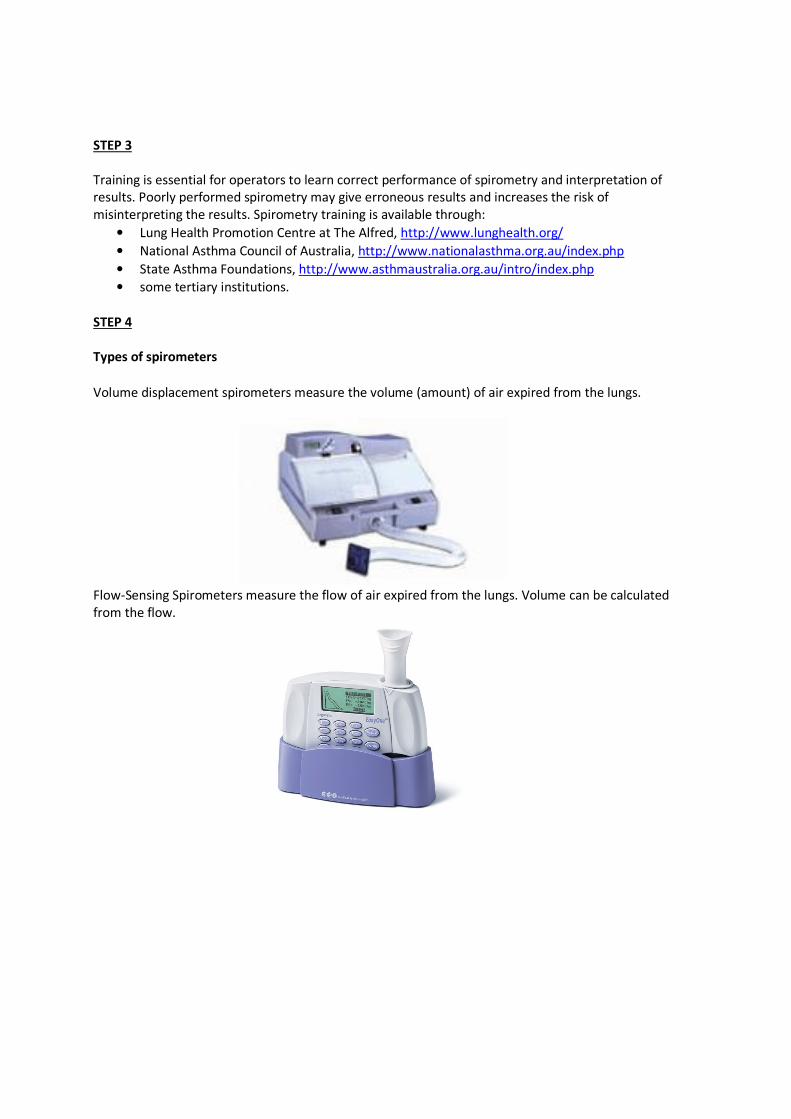
Flow-Sensing Spirometers measure the flow of air expired from the lungs. Volume can be calculated
from the flow.
Expiration
Inspiration
STEP 5
Spirometers measure1:
• FEV₁: (Forced Expiratory Volume in one second) is the volume of air expired in the first second of
a maximal expiration following a maximal inspiration. FEV₁ is used to measure how quickly air can
be expelled from the lungs.
• FVC: (Forced Vital Capacity) is the maximum volume of air that can be expired forcefully after a
maximal inspiration. Most adults with normal lung function are able to expire their vital
capacity in less than 6 seconds.
• FEV₁/FVC ratio: The volume of expired air in the first second (FEV₁) compared with the total
volume expired (FVC). Most healthy people with normal lung function can blow out
approximately 80% of their air out within the first second i.e. the FEV1/FVC ratio is 0.8. If the
FEV1/FVC ratio is less than 0.7 it means that there is airflow obstruction.
• FEF 25-75%: (Forced Expiratory Flow between 25-75% of vital capacity) is the mean forced
expiratory flow in the middle portion of the FVC. This is sometimes called MEF 25-75% (maximum
expiratory flow) 25-75%.
• PEF (peak expiratory flow). The PEF only provides limited information as it is mainly a measure of
flow from the large airways and is effort dependent. Factors influencing PEF include the
dimensions of the large airways, the force generated by the expiratory muscles (including patient
effort) and conditions which limit chest expansion.
STEP 6
Types of graphs
There are two types of graphs used to display results on a spirometer. These are:
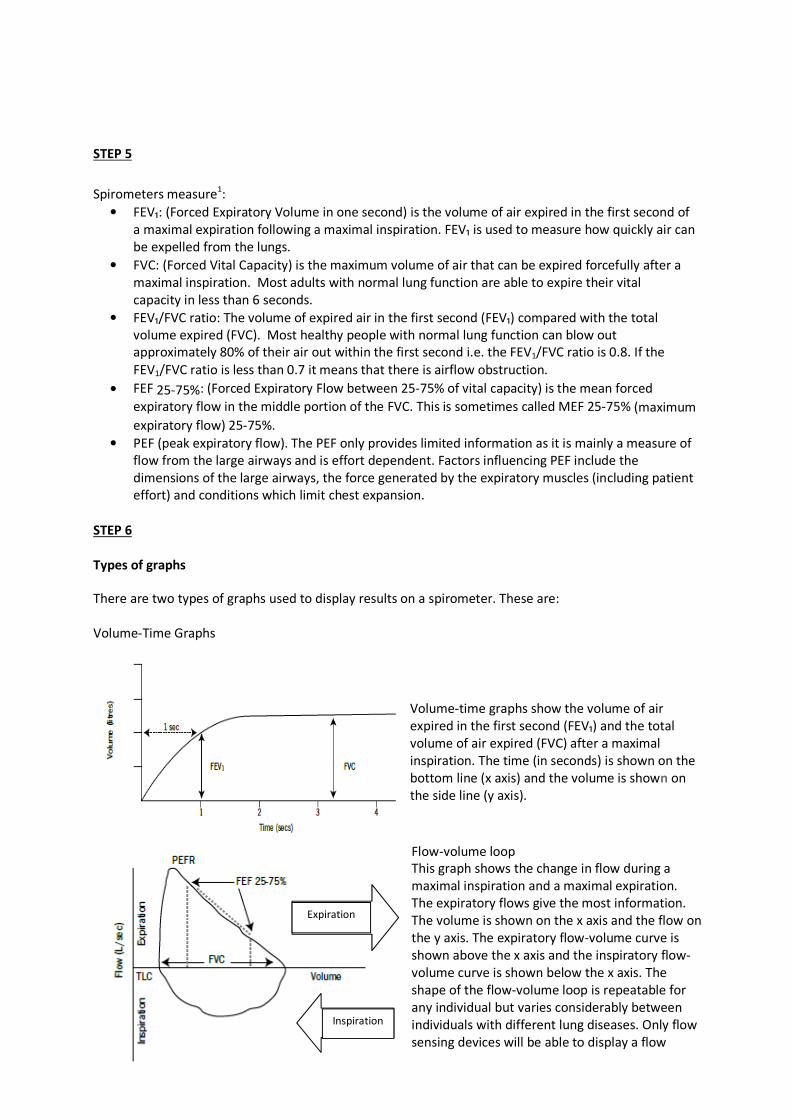
Volume-Time Graphs
Volume-time graphs show the volume of air
expired in the first second (FEV₁) and the total
volume of air expired (FVC) after a maximal
inspiration. The time (in seconds) is shown on the
bottom line (x axis) and the volume is shown on
the side line (y axis).
Flow-volume loop
This graph shows the change in flow during a
maximal inspiration and a maximal expiration.
The expiratory flows give the most information.
The volume is shown on the x axis and the flow on
the y axis. The expiratory flow-volume curve is
shown above the x axis and the inspiratory flow-
volume curve is shown below the x axis. The
shape of the flow-volume loop is repeatable for
any individual but varies considerably between
individuals with different lung diseases. Only flow
sensing devices will be able to display a flow
volume curve.
STEP 7
Performing spirometry
When performing spirometry there are three things you need to consider. These are:
Preparation
A health care provider must remember the following points when carrying out spirometry:
• explain the purpose of the test and demonstrate the procedure
• record and enter the patient’s age, height (bare foot), gender and ethnicity (non -
Caucasians have lower predicted values)
• note what type (short acting / long acting) and when bronchodilator was last used
• have the patient sitting comfortably
• suggest the patient loosen any tight clothing
• ask the patient to empty the bladder beforehand if needed.
Precautions
Spirometry is extremely safe but should be avoided in the presence of:
• pneumothorax
• increased intracranial pressure
• increased risk of syncope
• chest pain
• abdominal, thoracic or eye surgery within the previous eight weeks
• haemoptysis
• nausea, diarrhoea or vomiting.
Instructions
It is important to be consistent when giving instructions to your patient. Each time you perform a
spirometry test you should give the same type of instructions and a similar amount of encouragement.
The components of instructing a patient to perform spirometry are:
• maximum inspiration - “Big breath in!”
• “Put the mouthpiece in your mouth with lips well around” or “make a good seal with your lips”
• blow or blast the air out as hard and fast and as long as possible - “Blow out!”
• provide vigorous encouragement - “Keep blowing, Keep blowing until you feel that your lungs
are empty…”
Ensure lips are well sealed around the mouthpiece throughout the procedure and that the mouthpiece
is between the teeth. Check that the tongue does not impede the flow of air. A nose clip may be used to
prevent air escaping from the nose although this option is often left out as the amount of air that will
‘escape’ through the nose may not be considered significant enough to affect test outcomes.
Check the trace and repeat the procedure at least twice more until 3 acceptable readings are obtained.
Poor technique can often be easily corrected by demonstrating the procedure to the patient yourself.
STEP 8
How many attempts should the patient have?
The patient needs to have a minimum of three blows that meet acceptability criteria based on the test
quality. Almost all currently used spirometers provide feedback to the operator about the quality of the
test immediately after the blow5. It is essential that the patient has:
• a rapid start to expiration with no hesitation
• no artifacts in the trace
• a minimum of 6 seconds of expiration (although many healthy people will blow all their air out
in less than seconds). Patients with obstructive lung disease may take longer to get all the air
out of their lungs so should be encouraged to ‘keep blowing’ until all the air is exhaled. Modern
spirometers give feedback as to when the patient has fully exhaled.
The blows should be repeatable, as indicated by the best and the second best FVC being within 0.15L
(150mls) of each other.
STEP 9
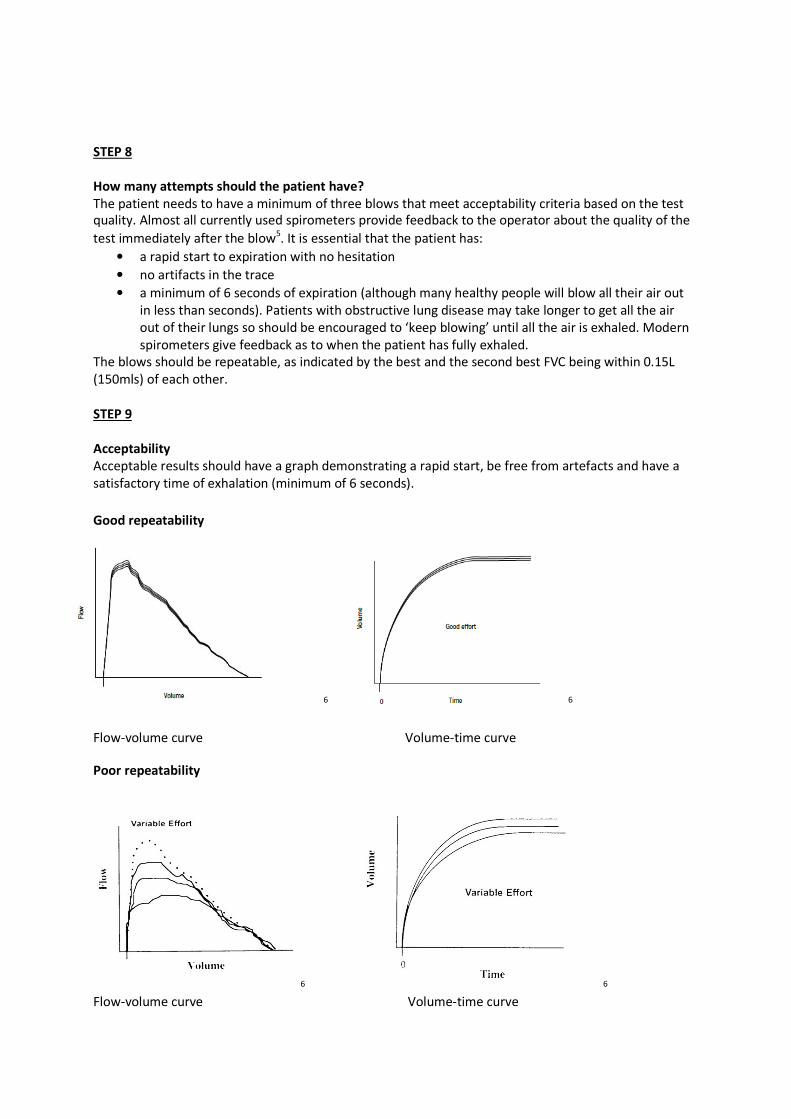
Acceptability
Acceptable results should have a graph demonstrating a rapid start, be free from artefacts and have a
satisfactory time of exhalation (minimum of 6 seconds).
Good repeatability
6 6
Flow-volume curve Volume-time curve
Poor repeatability
6 6
Flow-volume curve Volume-time curve

STEP 10
Potential problems
Patient-related
The most common patient-related problems when performing the spirometry are:
• sub-maximal effort
• leaks between the lips and mouthpiece
• incomplete inspiration or expiration (prior to, or during the forced manoeuvre)
• hesitation at the start of the expiration
• cough (particularly within the first second of expiration)
• obstruction of the mouthpiece by the tongue
• vocalisation during the forced manoeuvre
• poor posture
• additional breath during procedure
• glottic closure. This should be suspected if flow ceases abruptly during the test rather than being
a continuous smooth curve.
Recordings in which cough, particularly if this occurs within the first second, or hesitation at the start has
occurred should be rejected. Vocalisation during the test will reduce flows and must be discouraged.
Performing the manoeuvre with the neck extended often helps.
7
Instrument-related
These depend largely on the type of spirometer being used. On volume-displacement spirometers, look
for leaks in the hose connections. On flow-sensing spirometers, look for rips and tears in the flowhead
connector tube. On electronic spirometers, be particularly careful about calibration.
STEP 11
Other considerations
Procedures that need to be implemented in the use of spirometers include:
1. Maintaining the spirometer
Most spirometers are tough but use common sense and avoid treating the spirometer roughly such as
dropping it. Suspect a problem if the numbers and print outs do not make sense, or fit in with the clinical
picture or are variable, even if doing it correctly (this means you need to know how to do ‘good’
spirometry yourself).
2. Infection control
The risk of passing infection to others and staff is very low but it is very important to maintain high levels
of infection control at all times. Avoid using the spirometer if TB is suspected. At the very least
disposable mouth pieces with a one way valve should be used when performing spirometry with a
volume-time spirometer. If using a flow sensor spirometer, performing inspiratory flow measures using
a mouthpiece with a micro bacterial filter will facilitate optimal infection prevention, allowing the
performance of inspiratory and expiratory flow measurements. All mouthpieces are single use only.
Wipe down the spirometer after each patient, using an approved cleaning agent as per the
manufacturer instructions.
3. Calibration
Spirometry standards recommend checking the calibration regularly (see manufacturer instructions as
to the frequency required). A simple test of spirometer accuracy is to regularly perform spirometry on
the same healthy person (often you or a colleague) as this provides a good “biological control”.
STEP 12
Interpretation
Once spirometry has been performed the results need to be interpreted and compared with predicted
normal values. Predicted values are provided from equations within an auto spirometer or from charts
and are based on research studies measuring spirometry in healthy populations. Spirometry can reflect
two distinct patterns of lung disease i.e. obstructive lung disease and restrictive lung disease.
Patients with obstructive lung disease have difficulty expelling air. This is reflected in a low FEV1 whilst
maintaining near normal FVC. This results in a low FEV1/FVC ratio.
Patients with restrictive lung disease do not have difficulty expelling air although volumes are reduced
as the lungs are stiff and less compliant. This results in a normal or high FEV1/FVC ratio:
• COPD is an example of an obstructive lung disease.
• Pulmonary fibrosis is an example of a restrictive lung disease.
STEP 13
Obstructive lung disease
A patient with obstructive lung disease will have the following findings on spirometry:
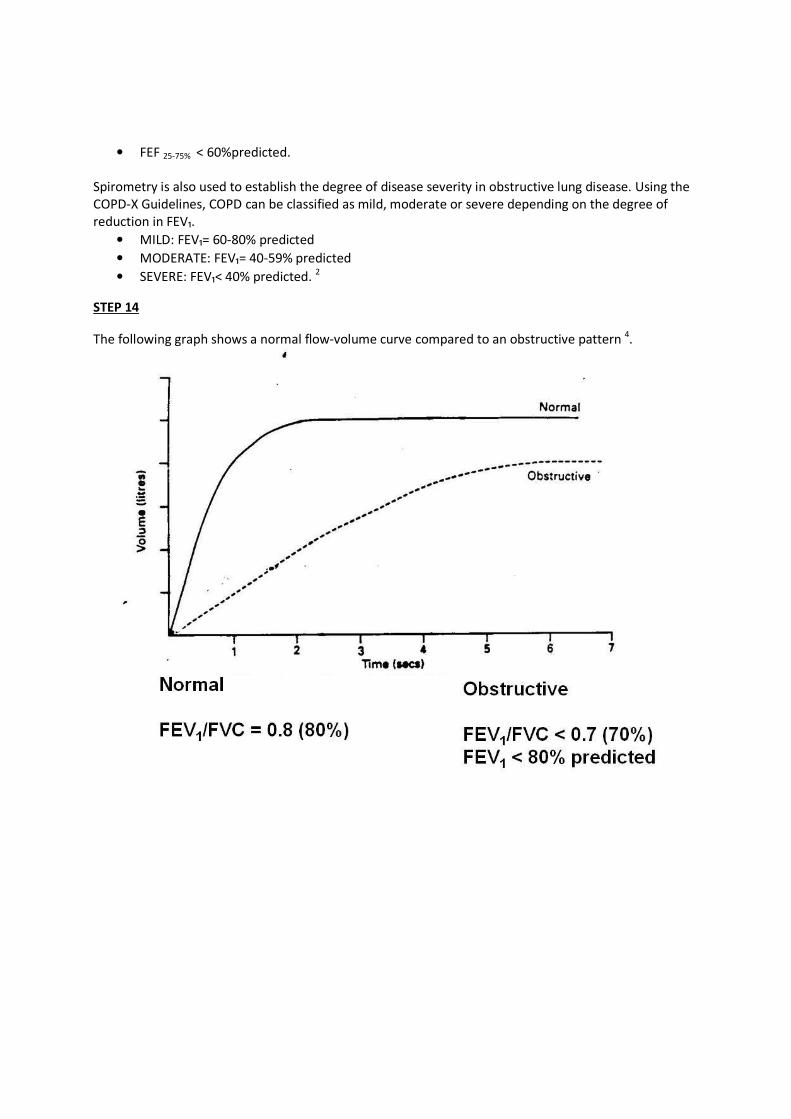
• FEV₁/FVC ratio < 0.7 (or 70%)
• FEV₁ < 80% predicted
• FEF 25-75% < 60%predicted.
Spirometry is also used to establish the degree of disease severity in obstructive lung disease. Using the
COPD-X Guidelines, COPD can be classified as mild, moderate or severe depending on the degree of
reduction in FEV₁.
• MILD: FEV₁= 60-80% predicted
• MODERATE: FEV₁= 40-59% predicted
• SEVERE: FEV₁< 40% predicted. 2
STEP 14
The following graph shows a normal flow-volume curve compared to an obstructive pattern 4.
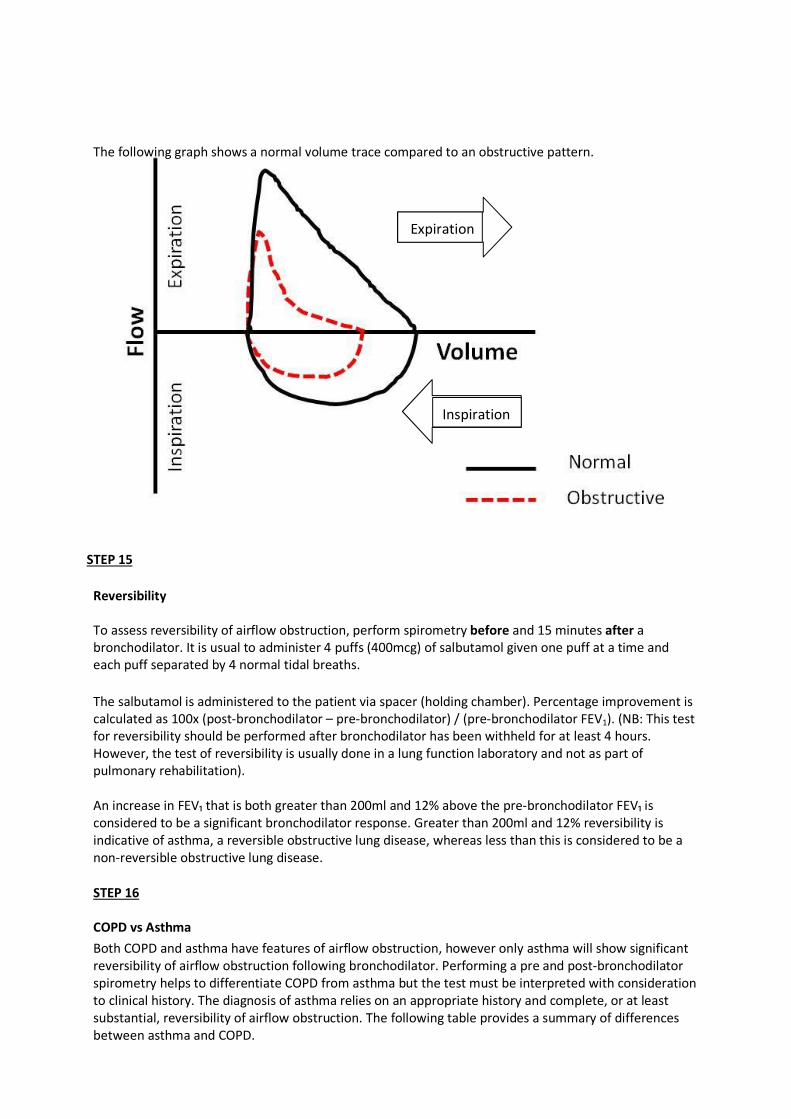
The following graph shows a normal volume trace compared to an obstructive pattern.
Expiration
Inspiration
STEP 15
Reversibility
To assess reversibility of airflow obstruction, perform spirometry before and 15 minutes after a
bronchodilator. It is usual to administer 4 puffs (400mcg) of salbutamol given one puff at a time and
each puff separated by 4 normal tidal breaths.
The salbutamol is administered to the patient via spacer (holding chamber). Percentage improvement is
calculated as 100x (post-bronchodilator – pre-bronchodilator) / (pre-bronchodilator FEV1). (NB: This test
for reversibility should be performed after bronchodilator has been withheld for at least 4 hours.
However, the test of reversibility is usually done in a lung function laboratory and not as part of
pulmonary rehabilitation).
An increase in FEV₁ that is both greater than 200ml and 12% above the pre-bronchodilator FEV₁ is
considered to be a significant bronchodilator response. Greater than 200ml and 12% reversibility is
indicative of asthma, a reversible obstructive lung disease, whereas less than this is considered to be a
non-reversible obstructive lung disease.
STEP 16
COPD vs Asthma
Both COPD and asthma have features of airflow obstruction, however only asthma will show significant
reversibility of airflow obstruction following bronchodilator. Performing a pre and post-bronchodilator
spirometry helps to differentiate COPD from asthma but the test must be interpreted with consideration
to clinical history. The diagnosis of asthma relies on an appropriate history and complete, or at least
substantial, reversibility of airflow obstruction. The following table provides a summary of differences
between asthma and COPD.
COPD Asthma
Age at onset of symptoms Normally > 40 years Typically early in life but can occur at
any stage
Causes (inhaled agents) Predominantly tobacco smoke8.
Affects smokers and ex-smokers.
Allergens5. Non-smokers and smokers
affected.
Symptoms Progressively worse with time Vary from day to day
Disease progression Chronic, progressive disease leading to
disability and death
Usually able to be well controlled,
rarely fatal.
Lung Function Airflow obstruction is not fully
reversible
Airflow obstruction is reversible
Site of inflammatory
response
Mainly affects the small airways and
lung parenchyma, although
inflammatory changes may also occur
in the large airways5.
Inflammation mainly located in the
larger conducting airways, although
small airways may also be involved in
more severe disease5.
2
Significant differences exist between asthma and COPD but these can be difficult to distinguish in
the older adult. There is substantial overlap between asthma and COPD in people over the age of 55
and for those aged over 65 with airway obstruction, most will have both asthma and COPD.9
STEP17
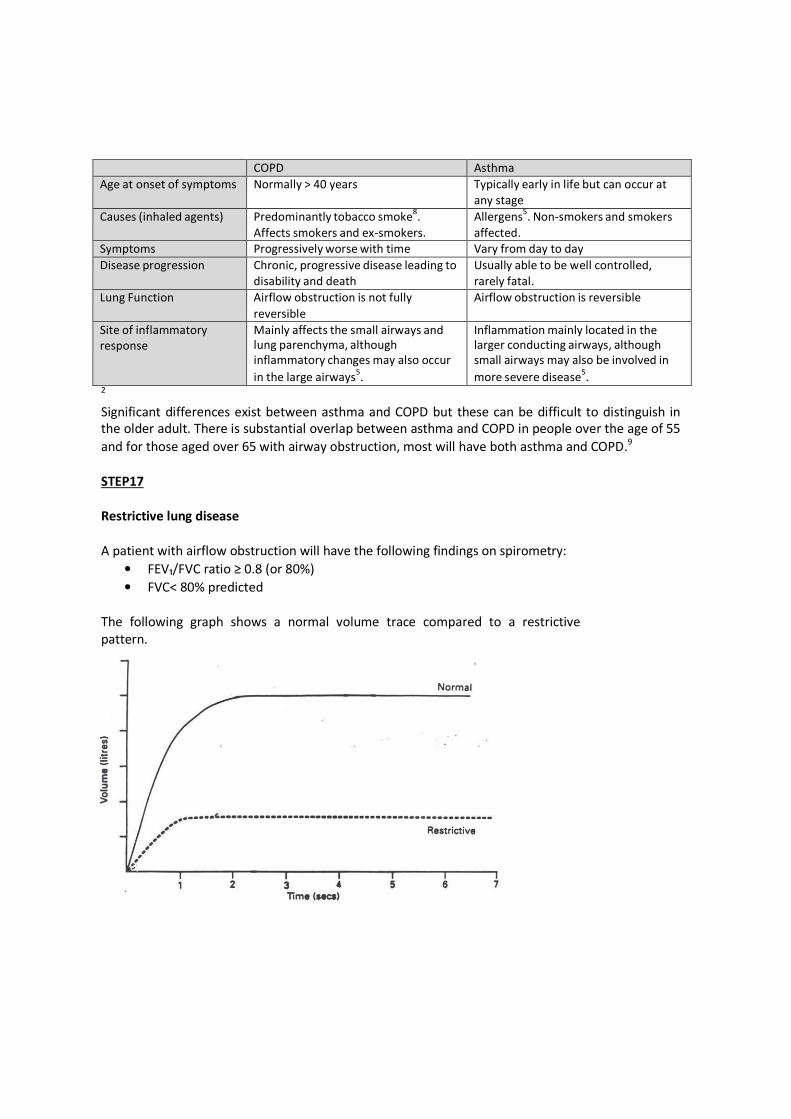
Restrictive lung disease
A patient with airflow obstruction will have the following findings on spirometry:
• FEV₁/FVC ratio ≥ 0.8 (or 80%)
• FVC< 80% predicted
The following graph shows a normal volume trace compared to a restrictive
pattern.
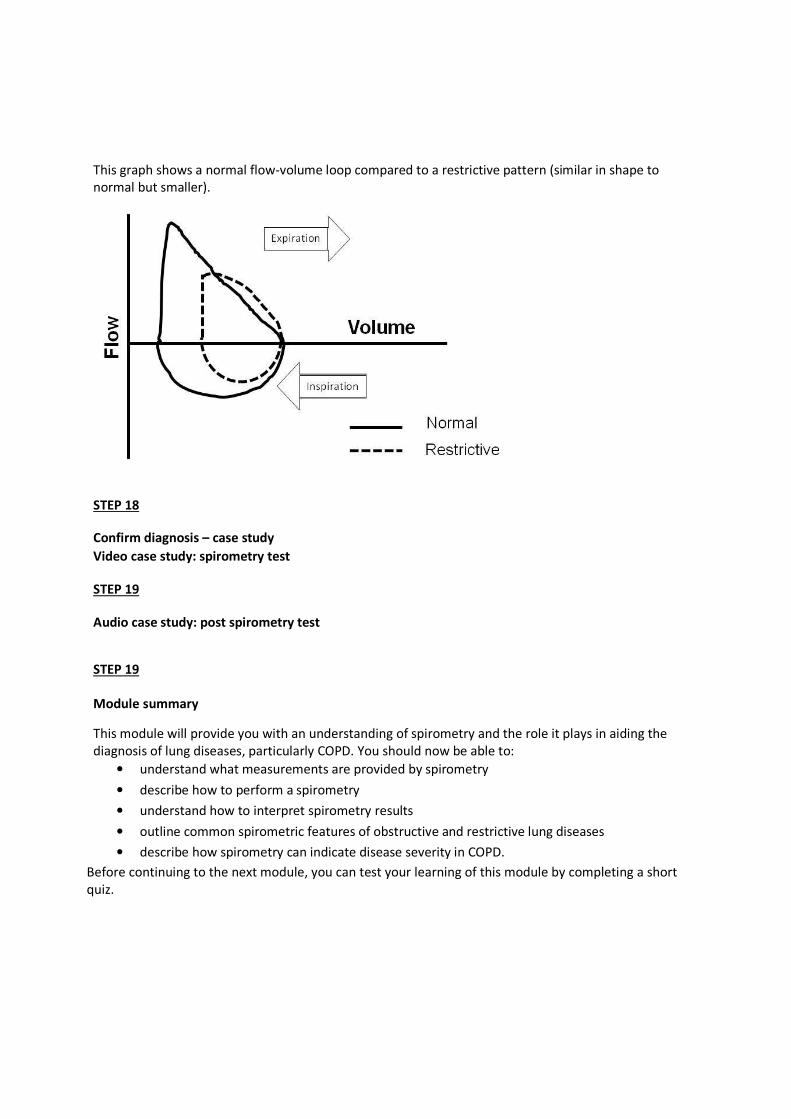
This graph shows a normal flow-volume loop compared to a restrictive pattern (similar in shape to
normal but smaller).
STEP 18
Confirm diagnosis – case study
Video case study: spirometry test
STEP 19
Audio case study: post spirometry test
STEP 19
Module summary
This module will provide you with an understanding of spirometry and the role it plays in aiding the
diagnosis of lung diseases, particularly COPD. You should now be able to:
• understand what measurements are provided by spirometry
• describe how to perform a spirometry
• understand how to interpret spirometry results
• outline common spirometric features of obstructive and restrictive lung diseases
• describe how spirometry can indicate disease severity in COPD.
Before continuing to the next module, you can test your learning of this module by completing a short
quiz.

REFERENCES
1 Peto R, Selzer FE, Cochrane AL, et al. The relevance in adults of air-flow obstruction, but not of mucus
hypersecretion, to mortality from chronic lung disease. Results from 20 years of prospective observation. Am. Rev.
Respir.Dis; 1983; 128; 491-500 2
Mckenzie DK, Abramson M, Crockett AJ, et al. The COPDX Plan: Australian and New Zealand Guidelines for the
Management of Chronic Obstructive Pulmonary Disease. Version 2.30 Revised 2011
< http://www.copdx.org.au/confirm-diagnosis-and-assess-severity/c2-diagnosis/c25-copd-screening-devices-for-
targeted-case-finding> Accessed: 01 June 2012
3 Gold. Global strategy for the diagnosis, management and prevention of chronic obstructive pulmonary disease.
Global initiative for Chronic Obstructive Lung Disease. Revised 2011.
< http://www.goldcopd.org/uploads/users/files/GOLD_Report_2011_Feb21.pdf> Accessed: 01 June 2012 4
Alison, J. Pulmonary Function Tests. [book auth.] E Ellis and J Alison. Key Issues in Cardiorespiratory
Physiotherapy. s.l. : Butterworth Heinneman, 1992. 5
Burton D, Johns DP, Swanney M. Spirometry Users and Buyers Guide. National Asthma Council Australia. Revised
2011; < http://www.nationalasthma.org.au/uploads/content/209-
Spirometer_Users_and_Buyers_Guide_12_2011.pdf> Accessed 06 June 2012 6
Johns DP, Pierce R. Pocket Guide to Spirometry; 2nd
edition; Sydney. Australia: Mcraw-Hill Australia Pty Ltd; 2007 7
Johns DP, Pierce R. Spirometry: The Measurement and Interpretation of Ventilatory Function in Clinical Practice.
National Asthma Council Australia. Revised 2008; < http://www.nationalasthma.org.au/uploads/content/211-
spirometer_handbook_naca.pdf> Accessed 06 June 2012 8
Barnes PJ. Similarities and differences in inflammatory mechanisms of asthma and COPD. Breathe; 2011, Vol. 7;
229-238 9
Gibson PG, McDonald VM, Marks GB. Asthma in older adults. The Lancet; 376; 2010; 803-813