Embed Size (px)
Citation preview
1
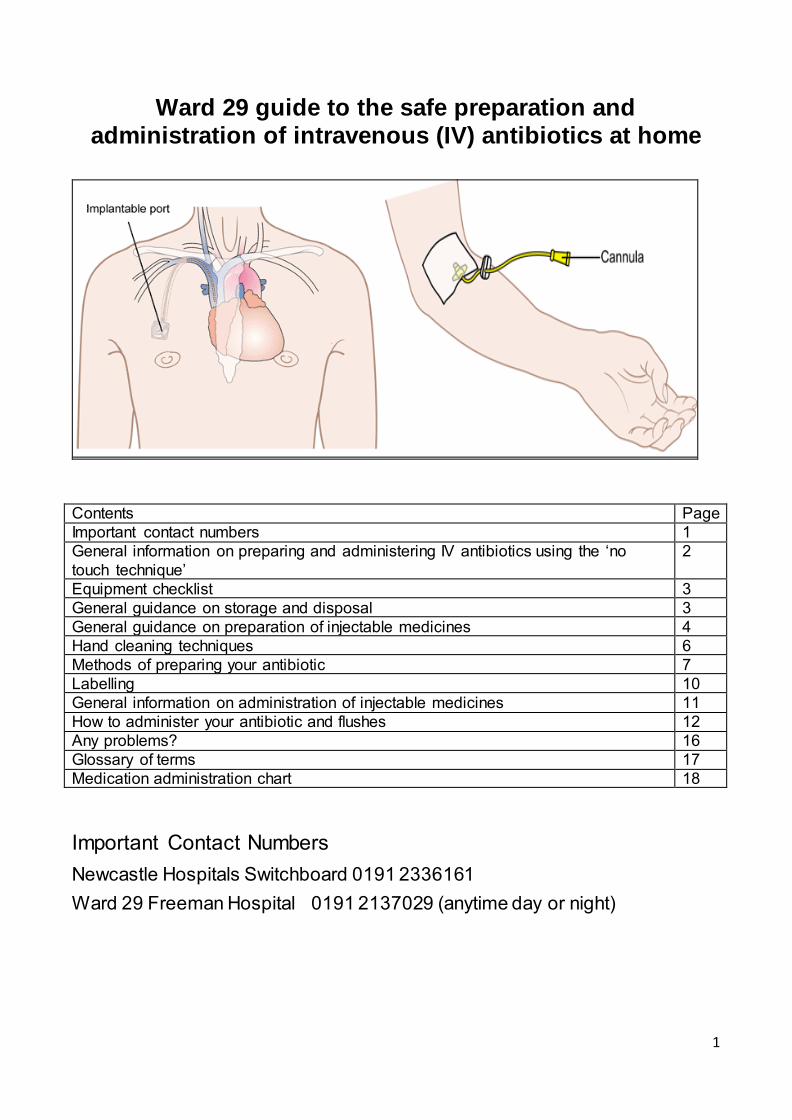
Ward 29 guide to the safe preparation and administration of intravenous (IV) antibiotics at home
Contents Page Important contact numbers 1 General information on preparing and administering IV antibiotics using the ‘no touch technique’
2
Equipment checklist 3 General guidance on storage and disposal 3 General guidance on preparation of injectable medicines 4 Hand cleaning techniques 6 Methods of preparing your antibiotic 7 Labelling 10 General information on administration of injectable medicines 11 How to administer your antibiotic and flushes 12 Any problems? 16 Glossary of terms 17 Medication administration chart 18 Important Contact Numbers Newcastle Hospitals Switchboard 0191 2336161 Ward 29 Freeman Hospital 0191 2137029 (anytime day or night)
2
General information on preparing and administering IV antibiotics using the ‘no touch technique’ This booklet is intended to support people who wish to use intravenous (IV) antibiotics at home. Included at the end is a glossary of terms which you may find helpful to refer to. Some people will administer their drugs via an IV line in their arm. Others who have had problems with their veins will have a portacath needle. Using the IV method ensures that accurate doses of an antibiotic can be given. This means that it will work faster and more effectively than an antibiotic tablet taken by mouth. The non-touch technique is a safe way of preventing accidental infection of a person’s bloodstream by not contaminating the key components used in the process of delivery (for instance the tip of a syringe connecting to the IV line when injecting). Through individual demonstration, education and training using a competency based assessment you will be enabled to:
• Minimise the risk of introducing infection into a vein by keeping everything very clean.
• Avoid touching the key parts of syringes, needles and extension sets and how to set up your tray or clean area
• Prevent injecting air into a vein by learning to prime syringes flushes and extension sets carefully.
• Minimise the risk of the collapse of a vein or reactions of rapidly injecting an antibiotic. Some antibiotics can be injected as a bolus over 3-5 minutes whereas some need to be given slowly over 20-30 minutes Wherever possible we will arrange for our pharmacy production unit to make up your IV courses so that there is less need to mix antibiotics at home. However this service may not be available and so you will therefore be shown how to mix up an antibiotic.
3
Equipment Checklist When you are prescribed a course of antibiotics you will be provided with
• Vials of antibiotic powder or solution • Diluents • Flushes • Syringes • Needles • Chlorhexidine Swabs • Clean re-usable plastic tray • Sharps Bin • Gloves
You may also be provided with:
• IV giving set • Alcohol gel
Arrangements will be made for enough equipment and medication to be given to you by the hospital to complete the course of treatment. If you need any further items during your treatment can be arranged by contacting your ward. General guidance on storage and disposal
• Store all IV medications correctly as directed by the packaging e.g. in a cool dry place.
• Store all equipment in a clean area. • A ‘sharps box’ will be supplied for the safe disposal of all sharps
including needles and glass vials. Boxes are almost always yellow and have a lid or flap. Don’t fill the container more than 2/3 full. Bring it back to your ward where staff will dispose of it for you.
• Most but not all local councils advise it is fine for used syringes, saline plastic bottles, paper and extension sets etc to be disposed of in your ordinary bins.
Needles must always be discarded in a sharps box which will be provided.
4
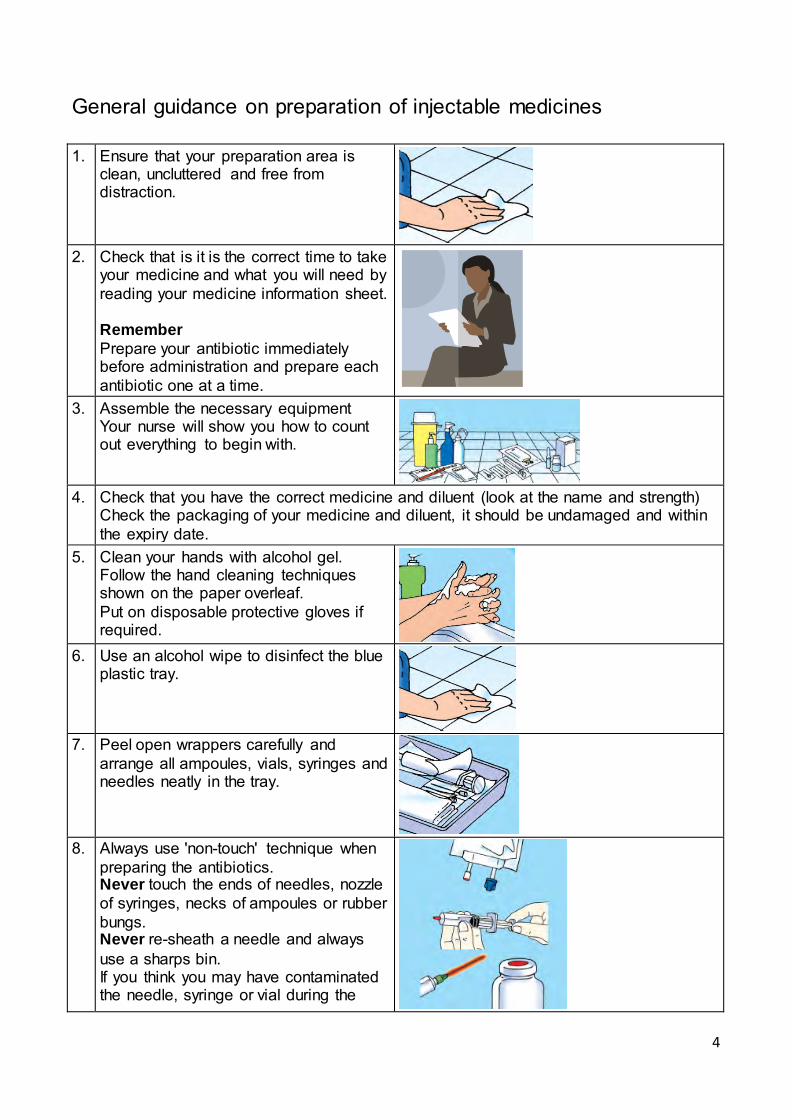
General guidance on preparation of injectable medicines 1. Ensure that your preparation area is
clean, uncluttered and free from distraction.
2. Check that is it is the correct time to take
your medicine and what you will need by reading your medicine information sheet. Remember Prepare your antibiotic immediately before administration and prepare each antibiotic one at a time.
3. Assemble the necessary equipment Your nurse will show you how to count out everything to begin with.
4. Check that you have the correct medicine and diluent (look at the name and strength)
Check the packaging of your medicine and diluent, it should be undamaged and within the expiry date.
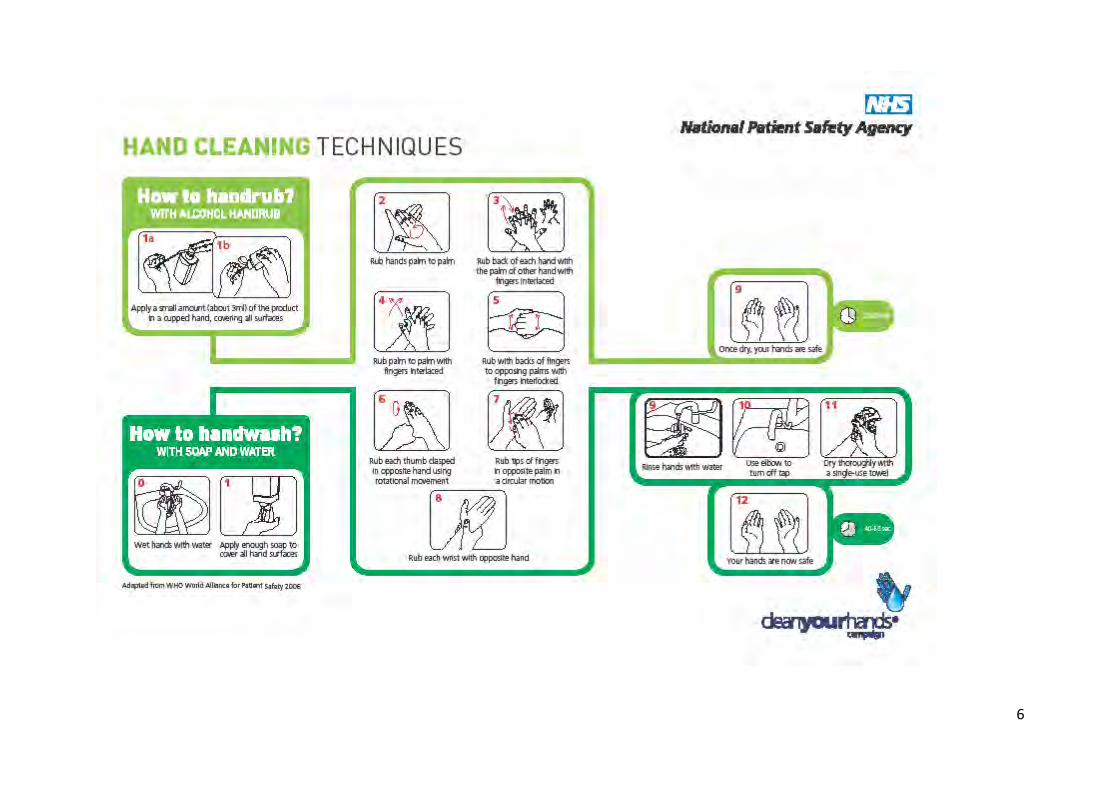
5. Clean your hands with alcohol gel. Follow the hand cleaning techniques shown on the paper overleaf. Put on disposable protective gloves if required.
6. Use an alcohol wipe to disinfect the blue plastic tray.
7. Peel open wrappers carefully and
arrange all ampoules, vials, syringes and needles neatly in the tray.
8. Always use 'non-touch' technique when
preparing the antibiotics. Never touch the ends of needles, nozzle of syringes, necks of ampoules or rubber bungs. Never re-sheath a needle and always use a sharps bin. If you think you may have contaminated the needle, syringe or vial during the
5
procedure (by touching or dropping) then discard it and start again.
9. Prepare your flushes and injectable medicine by the relevant method (see individual guidelines)
a) Drawing up a diluent (withdrawing solution from an ampoule into a syringe) b) Drawing up an antibiotic (withdrawing solution/suspension from a vial into a
syringe) c) Adding diluent to a powdered medicine vial and then drawing into a syringe
(reconstituting powder in a vial and drawing the resulting solution/suspension into a syringe)
d) Adding a medicine to an infusion bag.
6
7
Methods of preparing your antibiotic
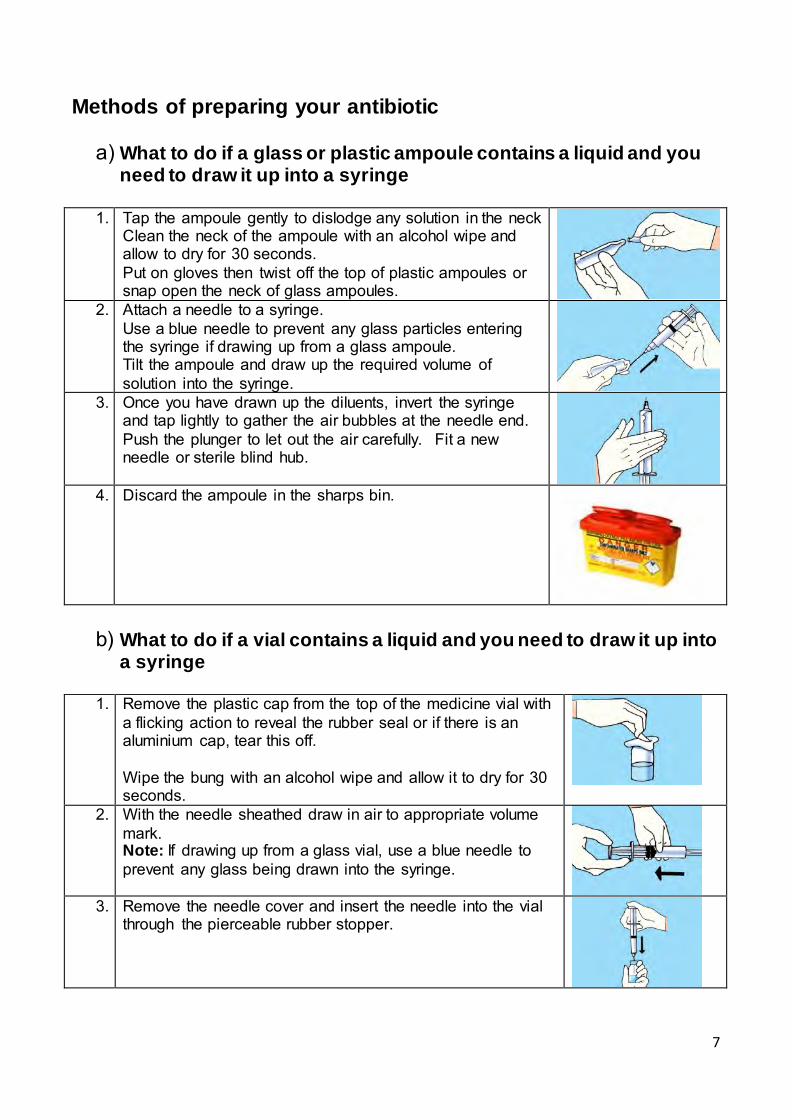
a) What to do if a glass or plastic ampoule contains a liquid and you need to draw it up into a syringe
1. Tap the ampoule gently to dislodge any solution in the neck Clean the neck of the ampoule with an alcohol wipe and allow to dry for 30 seconds. Put on gloves then twist off the top of plastic ampoules or snap open the neck of glass ampoules.
2. Attach a needle to a syringe. Use a blue needle to prevent any glass particles entering the syringe if drawing up from a glass ampoule. Tilt the ampoule and draw up the required volume of solution into the syringe.
3. Once you have drawn up the diluents, invert the syringe and tap lightly to gather the air bubbles at the needle end. Push the plunger to let out the air carefully. Fit a new needle or sterile blind hub.
4. Discard the ampoule in the sharps bin.
b) What to do if a vial contains a liquid and you need to draw it up into a syringe
1. Remove the plastic cap from the top of the medicine vial with a flicking action to reveal the rubber seal or if there is an aluminium cap, tear this off. Wipe the bung with an alcohol wipe and allow it to dry for 30 seconds.
2. With the needle sheathed draw in air to appropriate volume mark. Note: If drawing up from a glass vial, use a blue needle to prevent any glass being drawn into the syringe.
3. Remove the needle cover and insert the needle into the vial
through the pierceable rubber stopper.
8
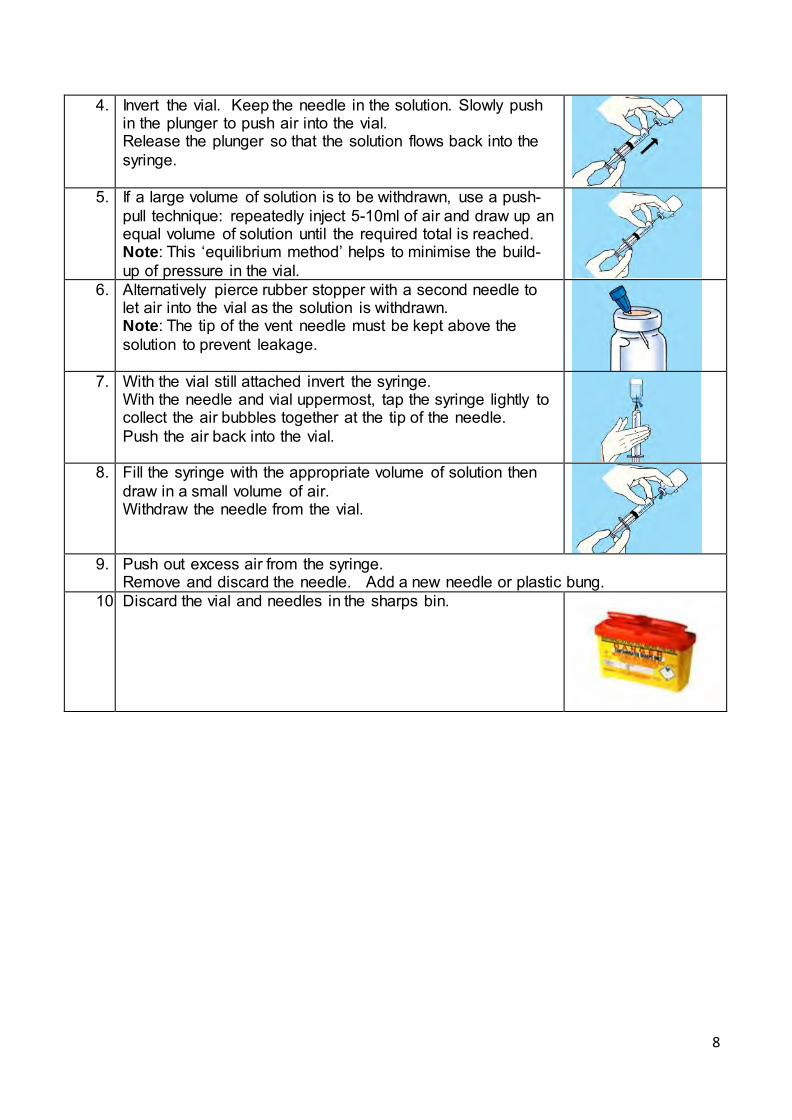
4. Invert the vial. Keep the needle in the solution. Slowly push in the plunger to push air into the vial. Release the plunger so that the solution flows back into the syringe.
5. If a large volume of solution is to be withdrawn, use a push-pull technique: repeatedly inject 5-10ml of air and draw up an equal volume of solution until the required total is reached. Note: This ‘equilibrium method’ helps to minimise the build-up of pressure in the vial.
6. Alternatively pierce rubber stopper with a second needle to let air into the vial as the solution is withdrawn. Note: The tip of the vent needle must be kept above the solution to prevent leakage.
7. With the vial still attached invert the syringe.
With the needle and vial uppermost, tap the syringe lightly to collect the air bubbles together at the tip of the needle. Push the air back into the vial.
8. Fill the syringe with the appropriate volume of solution then
draw in a small volume of air. Withdraw the needle from the vial.
9. Push out excess air from the syringe.
Remove and discard the needle. Add a new needle or plastic bung. 10. Discard the vial and needles in the sharps bin.
9
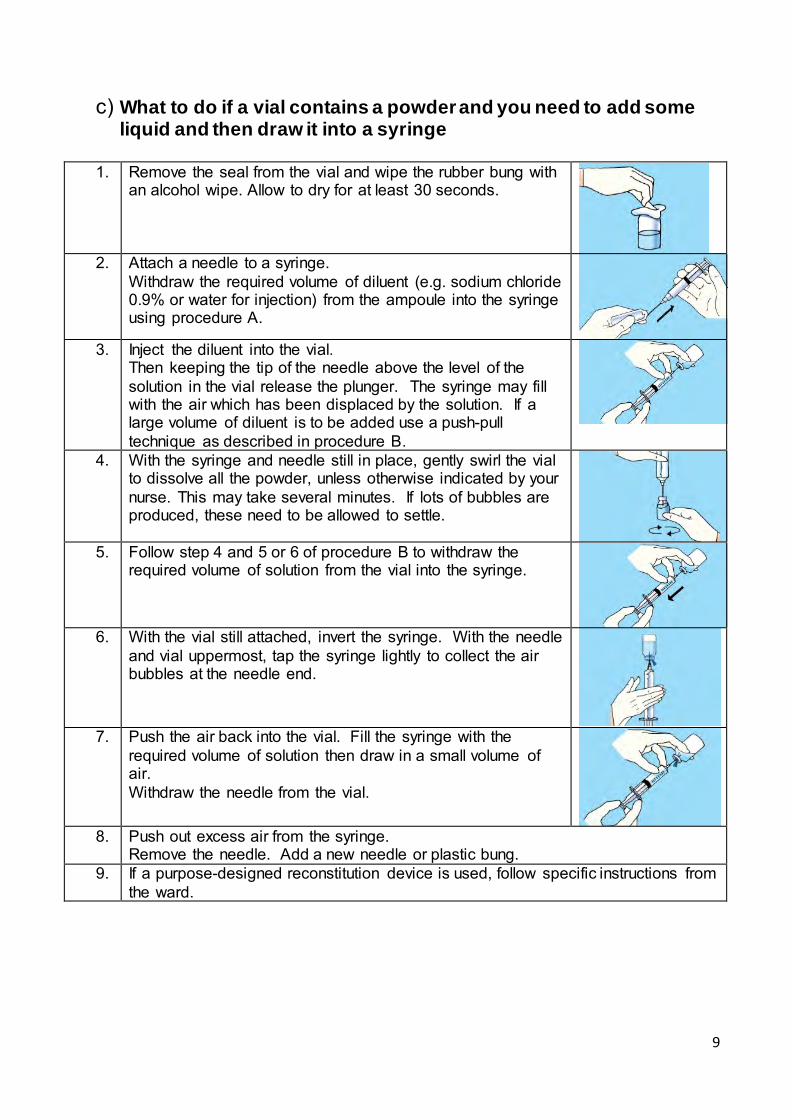
c) What to do if a vial contains a powder and you need to add some liquid and then draw it into a syringe
1. Remove the seal from the vial and wipe the rubber bung with an alcohol wipe. Allow to dry for at least 30 seconds.
2. Attach a needle to a syringe.
Withdraw the required volume of diluent (e.g. sodium chloride 0.9% or water for injection) from the ampoule into the syringe using procedure A.
3. Inject the diluent into the vial.
Then keeping the tip of the needle above the level of the solution in the vial release the plunger. The syringe may fill with the air which has been displaced by the solution. If a large volume of diluent is to be added use a push-pull technique as described in procedure B.
4. With the syringe and needle still in place, gently swirl the vial to dissolve all the powder, unless otherwise indicated by your nurse. This may take several minutes. If lots of bubbles are produced, these need to be allowed to settle.
5. Follow step 4 and 5 or 6 of procedure B to withdraw the
required volume of solution from the vial into the syringe.
6. With the vial still attached, invert the syringe. With the needle
and vial uppermost, tap the syringe lightly to collect the air bubbles at the needle end.
7. Push the air back into the vial. Fill the syringe with the
required volume of solution then draw in a small volume of air. Withdraw the needle from the vial.
8. Push out excess air from the syringe.
Remove the needle. Add a new needle or plastic bung. 9. If a purpose-designed reconstitution device is used, follow specific instructions from
the ward.
10
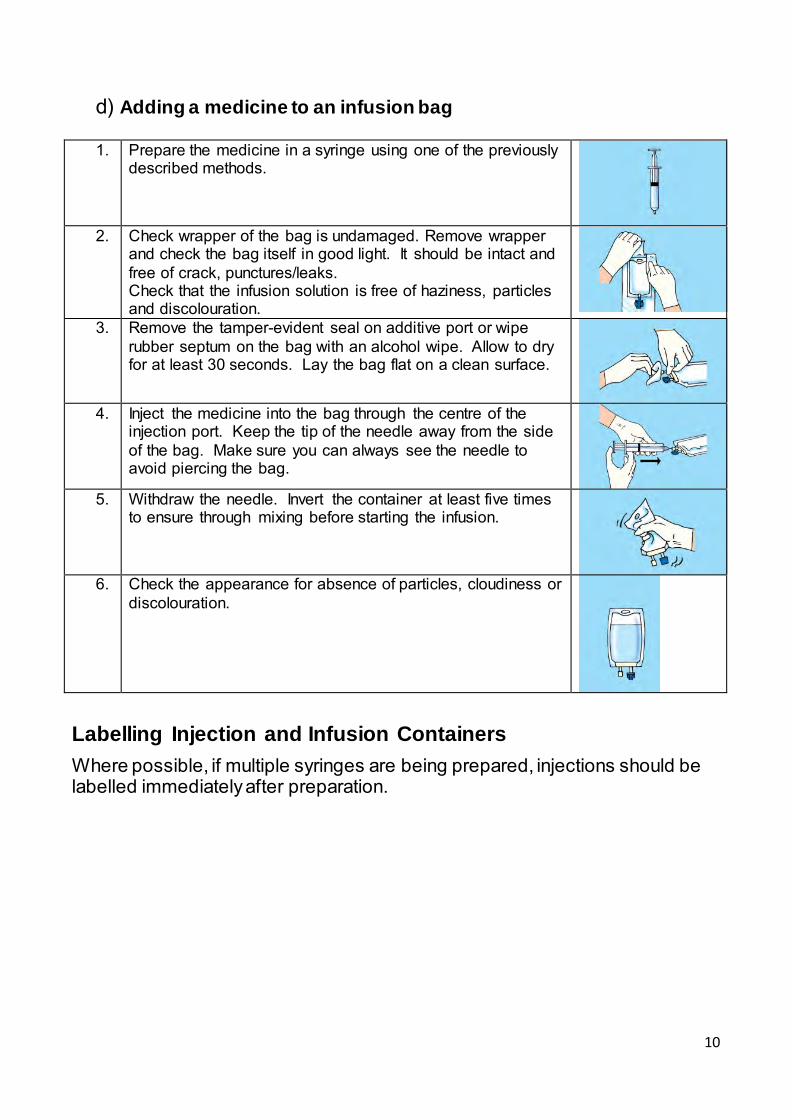
d) Adding a medicine to an infusion bag 1. Prepare the medicine in a syringe using one of the previously
described methods.
2. Check wrapper of the bag is undamaged. Remove wrapper
and check the bag itself in good light. It should be intact and free of crack, punctures/leaks. Check that the infusion solution is free of haziness, particles and discolouration.
3. Remove the tamper-evident seal on additive port or wipe rubber septum on the bag with an alcohol wipe. Allow to dry for at least 30 seconds. Lay the bag flat on a clean surface.
4. Inject the medicine into the bag through the centre of the
injection port. Keep the tip of the needle away from the side of the bag. Make sure you can always see the needle to avoid piercing the bag.
5. Withdraw the needle. Invert the container at least five times
to ensure through mixing before starting the infusion.
6. Check the appearance for absence of particles, cloudiness or
discolouration.
Labelling Injection and Infusion Containers Where possible, if multiple syringes are being prepared, injections should be labelled immediately after preparation.
11
General information on administration of injectable medicines • IV antibiotics can be given by either a ‘drip’ or ’push’ method. The method
you will be using is prescribed by your health care professional. • IV push is done by injecting the medicine from the syringe into the vein in
the amount of time advised by your healthcare professional. • IV drip is done by allowing a bag of diluted medication to drip through IV
tubing into the vein over 20 to 60 minutes. This method is used to prevent complications caused by giving the medicine too fast. This method must be used if the medicine is very irritating to the vein.
• Use the relevant procedures outlined below to administer your antibiotics (see your individual guide lines so you know which procedures to use).
1) Administration procedure via a slow push 2) Administration procedure via a drip
• You will usually be prescribed one or two antibiotics for treatment over 14 days.
• You may be required to have a blood test to check if you are being given the correct dose of medicine if you are taking gentamicin.
• Bionectors (needle-less system) used on the end of the portacath or long line may need to be changed. Your ward will provide you with information on how to do this.
• Flushes help keep the IV access device clear. The type of flush and how often they are administered depends on whether you have a portacath or peripheral line. Your ward will give you specific information on how to administer your flushes. You must use a 10ml or larger syringe to administer flushes.
12
How to administer your antibiotic and flushes
1) Administration procedure via a slow push You will need your tray containing syringe of flush solution and a syringe of prepared antibiotic.
1. Ensure the blue tray is clean and ensure that all the syringes are aligned in order in the tray. This will make it easier when you administer them.
2. Wash hands and use gloves (if required) or clean hands with alcohol hand rub.
3. Clean surfaces surrounding your access site with an alcohol wipe. Note individual requirements for cleaning a bionector and skin surrounding portal site. Staff on ward 29 will show you how to do this. If there is swelling and redness around the IV insertion site, contact your ward immediately for advice.
4. Take the first syringe of sodium chloride 0.9% (saline) flush off tray carefully avoiding touching the needle. Hold the syringe with needle pointed up. Tap the syringe gently to make air bubbles rise to the top. Gently push plunger up to force air bubble out. Ensure the tip of syringe has fluid droplet visible at top. Check the syringe to make sure it contains the correct dosage. Insert the syringe tip into your IV device.
5. Gently administer, pushing the plunger of the syringe forward flushing the saline to check line is patent (around 10mls or until you are satisfied that the line ‘feels’ clear). If any resistance is met stop and telephone Ward 29 (0191 2137029 anytime) for advice.
6. Disconnect this syringe and dispose of in the sharps bin. 7. Take the antibiotic syringe off the tray carefully, again avoid
touching the needle. Hold the syringe with the needle pointed up. Tap the syringe gently to make air bubbles rise to the top. Gently push plunger up to force air bubbles out. Ensure the tip of syringe has fluid droplet visible at top. Check the syringe to make sure it contains the correct dosage. Insert the syringe tip into your IV device. Give the antibiotic as a
13
slow push over the recommended time. 8. Whilst administering your drug, carefully observe for signs of
discomfort at IV site, redness, swelling or leakage. If any of these occur, stop administering. Contact Ward 29 (0191 2137029 anytime) for advice.
9. Once you have administered your antibiotic Take the second saline flush and administer 10ml of flush.
10. Repeat process for second antibiotic (if doing this time). 11. Repeat the saline flush with the next prepared syringe. 12. Finally, you may need to connect a heparin flush and administer
the ‘lock’. Note: Heparin should be the last syringe you use.
13. Dispose of the components carefully. 14. Record on medication administration chart.
14
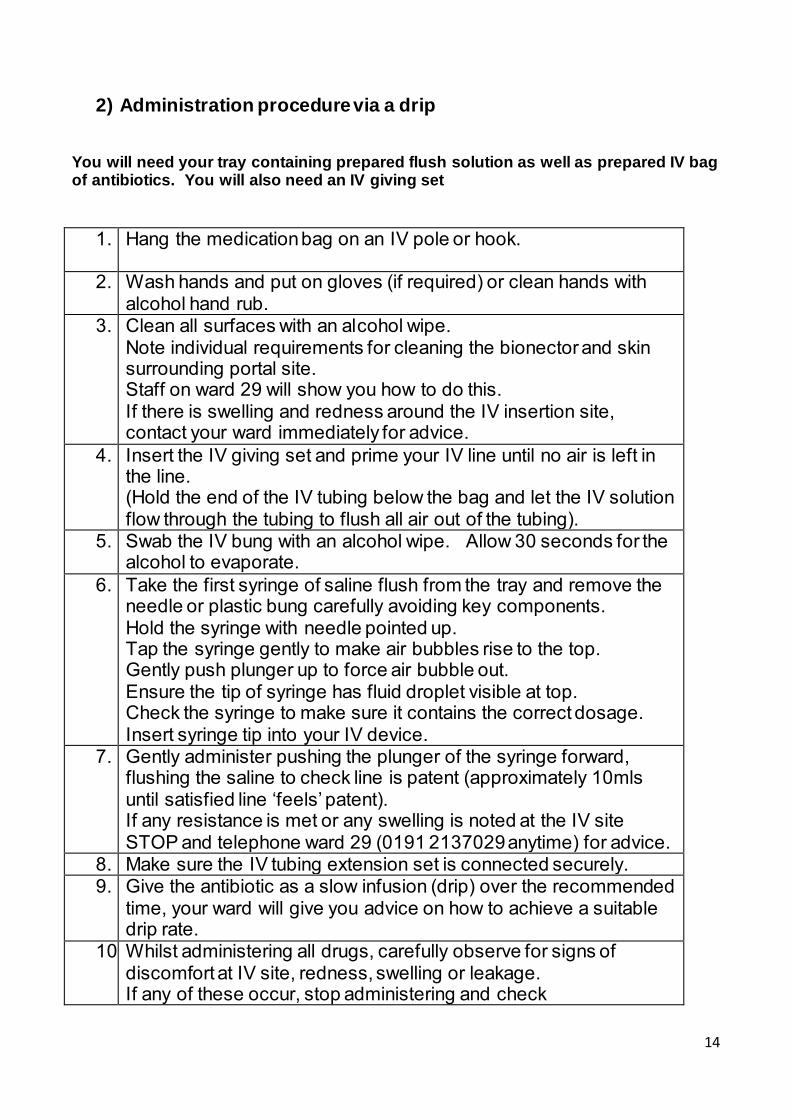
2) Administration procedure via a drip
You will need your tray containing prepared flush solution as well as prepared IV bag of antibiotics. You will also need an IV giving set
1. Hang the medication bag on an IV pole or hook.
2. Wash hands and put on gloves (if required) or clean hands with
alcohol hand rub. 3. Clean all surfaces with an alcohol wipe.
Note individual requirements for cleaning the bionector and skin surrounding portal site. Staff on ward 29 will show you how to do this. If there is swelling and redness around the IV insertion site, contact your ward immediately for advice.
4. Insert the IV giving set and prime your IV line until no air is left in the line. (Hold the end of the IV tubing below the bag and let the IV solution flow through the tubing to flush all air out of the tubing).
5. Swab the IV bung with an alcohol wipe. Allow 30 seconds for the alcohol to evaporate.
6. Take the first syringe of saline flush from the tray and remove the needle or plastic bung carefully avoiding key components. Hold the syringe with needle pointed up. Tap the syringe gently to make air bubbles rise to the top. Gently push plunger up to force air bubble out. Ensure the tip of syringe has fluid droplet visible at top. Check the syringe to make sure it contains the correct dosage. Insert syringe tip into your IV device.
7. Gently administer pushing the plunger of the syringe forward, flushing the saline to check line is patent (approximately 10mls until satisfied line ‘feels’ patent). If any resistance is met or any swelling is noted at the IV site STOP and telephone ward 29 (0191 2137029 anytime) for advice.
8. Make sure the IV tubing extension set is connected securely. 9. Give the antibiotic as a slow infusion (drip) over the recommended
time, your ward will give you advice on how to achieve a suitable drip rate.
10. Whilst administering all drugs, carefully observe for signs of discomfort at IV site, redness, swelling or leakage. If any of these occur, stop administering and check
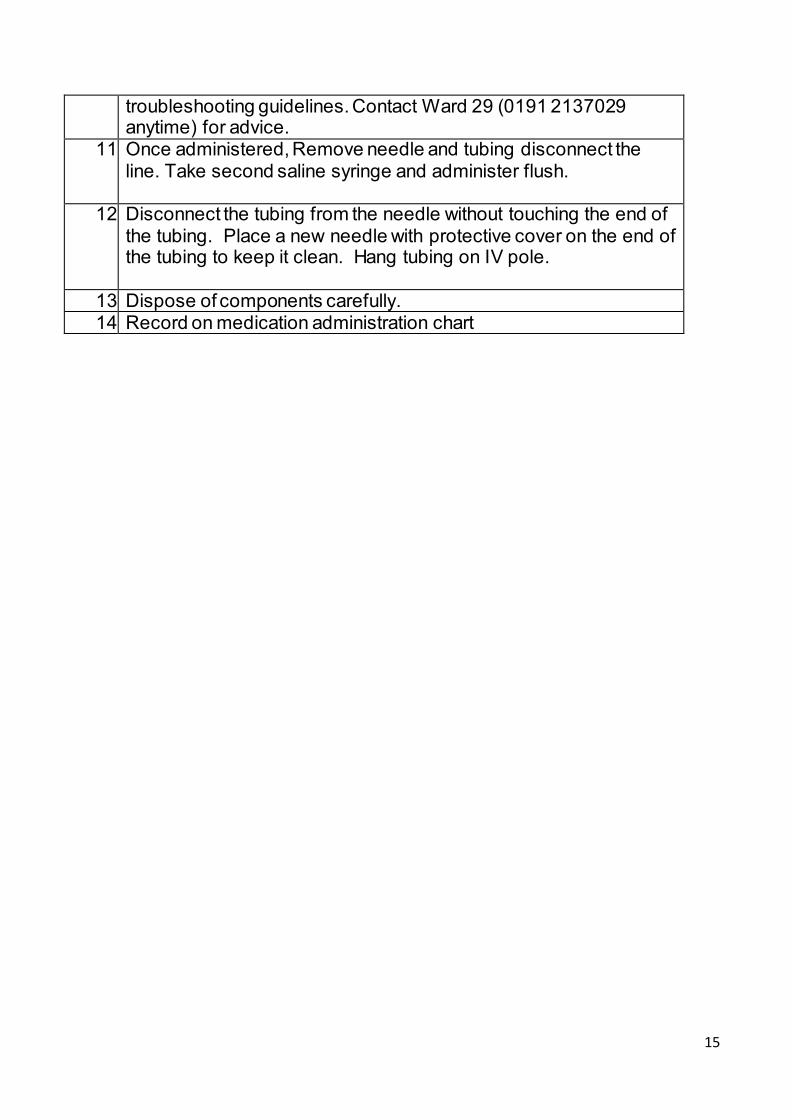
15
troubleshooting guidelines. Contact Ward 29 (0191 2137029 anytime) for advice.
11. Once administered, Remove needle and tubing disconnect the line. Take second saline syringe and administer flush.
12. Disconnect the tubing from the needle without touching the end of the tubing. Place a new needle with protective cover on the end of the tubing to keep it clean. Hang tubing on IV pole.
13. Dispose of components carefully. 14. Record on medication administration chart
16
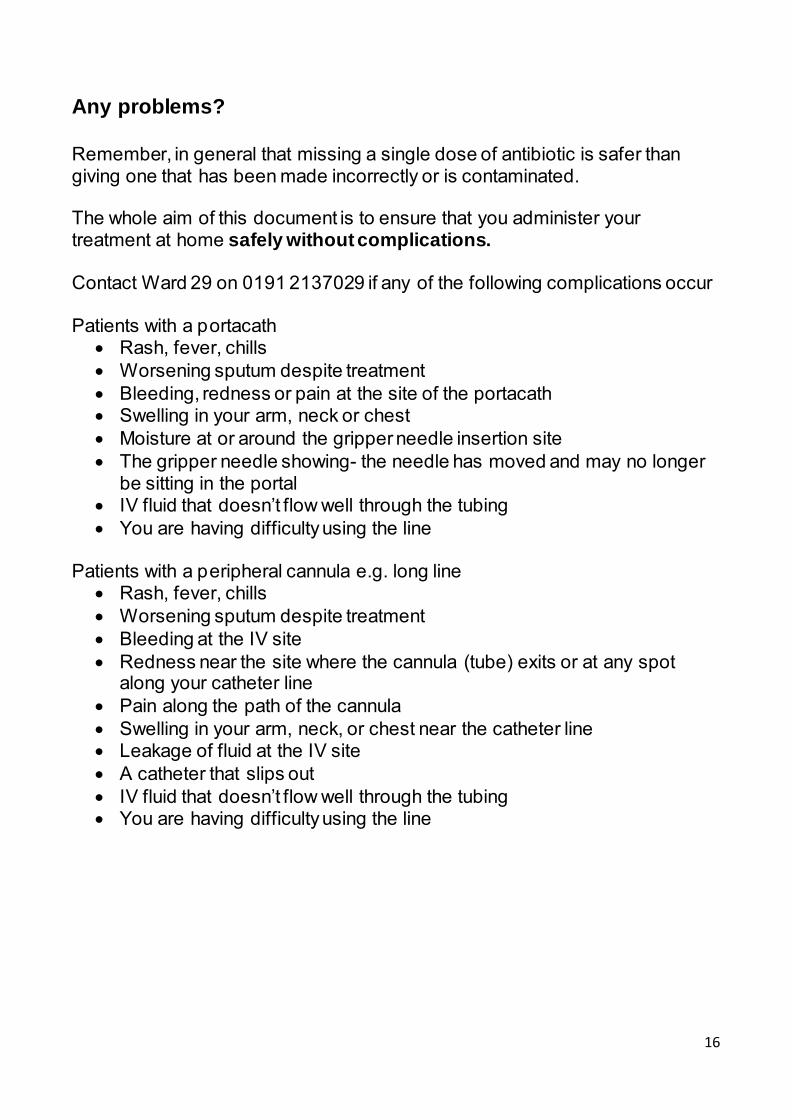
Any problems? Remember, in general that missing a single dose of antibiotic is safer than giving one that has been made incorrectly or is contaminated. The whole aim of this document is to ensure that you administer your treatment at home safely without complications. Contact Ward 29 on 0191 2137029 if any of the following complications occur Patients with a portacath
• Rash, fever, chills • Worsening sputum despite treatment • Bleeding, redness or pain at the site of the portacath • Swelling in your arm, neck or chest • Moisture at or around the gripper needle insertion site • The gripper needle showing- the needle has moved and may no longer
be sitting in the portal • IV fluid that doesn’t flow well through the tubing • You are having difficulty using the line
Patients with a peripheral cannula e.g. long line
• Rash, fever, chills • Worsening sputum despite treatment • Bleeding at the IV site • Redness near the site where the cannula (tube) exits or at any spot
along your catheter line • Pain along the path of the cannula • Swelling in your arm, neck, or chest near the catheter line • Leakage of fluid at the IV site • A catheter that slips out • IV fluid that doesn’t flow well through the tubing • You are having difficulty using the line
17
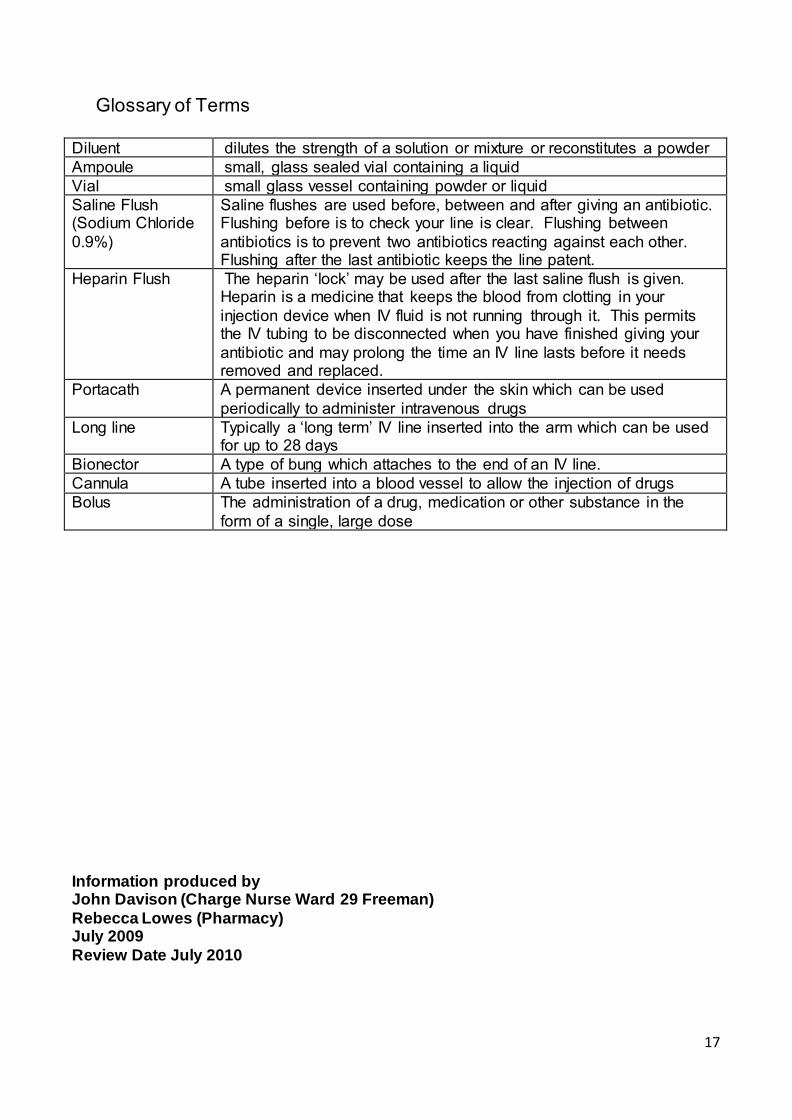
Glossary of Terms Diluent dilutes the strength of a solution or mixture or reconstitutes a powder Ampoule small, glass sealed vial containing a liquid Vial small glass vessel containing powder or liquid Saline Flush (Sodium Chloride 0.9%)
Saline flushes are used before, between and after giving an antibiotic. Flushing before is to check your line is clear. Flushing between antibiotics is to prevent two antibiotics reacting against each other. Flushing after the last antibiotic keeps the line patent.
Heparin Flush The heparin ‘lock’ may be used after the last saline flush is given. Heparin is a medicine that keeps the blood from clotting in your injection device when IV fluid is not running through it. This permits the IV tubing to be disconnected when you have finished giving your antibiotic and may prolong the time an IV line lasts before it needs removed and replaced.
Portacath A permanent device inserted under the skin which can be used periodically to administer intravenous drugs
Long line Typically a ‘long term’ IV line inserted into the arm which can be used for up to 28 days
Bionector A type of bung which attaches to the end of an IV line. Cannula A tube inserted into a blood vessel to allow the injection of drugs Bolus The administration of a drug, medication or other substance in the
form of a single, large dose Information produced by John Davison (Charge Nurse Ward 29 Freeman) Rebecca Lowes (Pharmacy) July 2009 Review Date July 2010
18
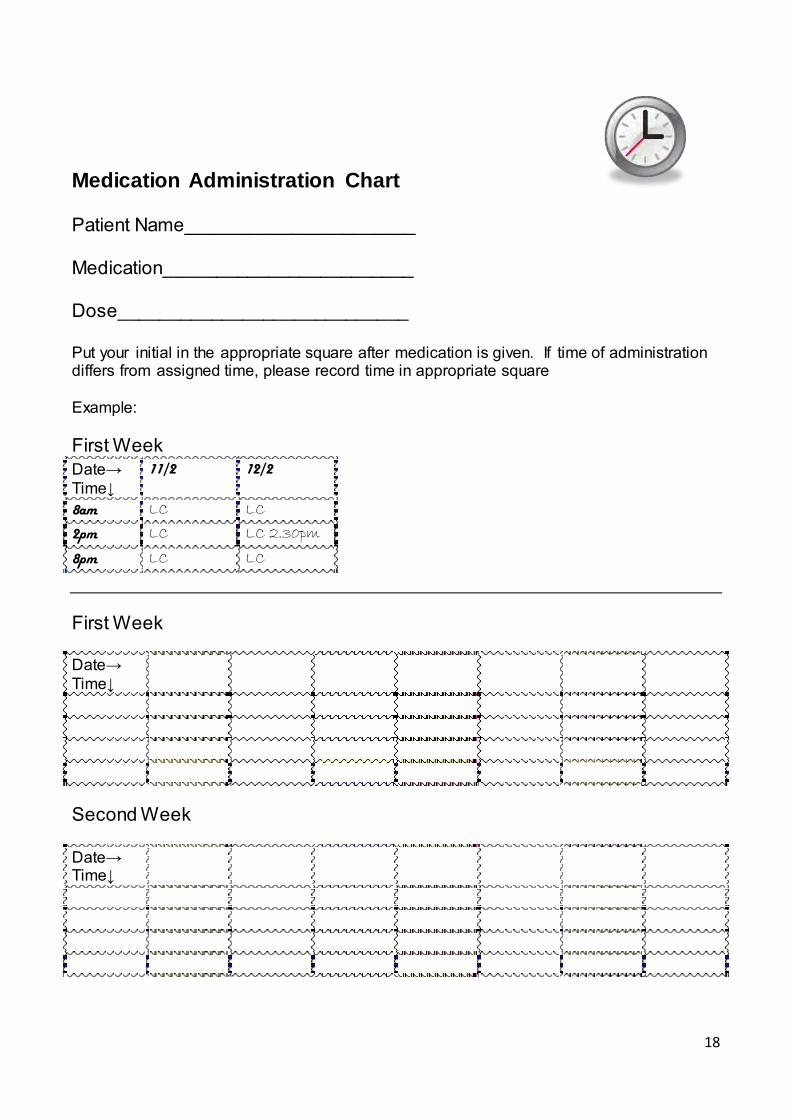
Medication Administration Chart Patient Name______________________ Medication________________________ Dose____________________________ Put your initial in the appropriate square after medication is given. If time of administration differs from assigned time, please record time in appropriate square Example: First Week Date→ Time↓
11/2 12/2
8am LC LC
2pm LC LC 2.30pm
8pm LC LC
First Week Date→ Time↓
Second Week Date→ Time↓