Embed Size (px)
Citation preview

Vision The Bread Factory 1a Broughton Street London SW8 3QJ
Registered No: 1788577 England
www.visionhealth.co.uk T +44(0) 20 7501 7000 F +44(0) 20 7501 7100
Patient Services Prescription User Guide
Version 2
11 December 2018

© 2018 Vision | All Rights Reserved.
No part of this document may be photocopied, reproduced, stored in a retrieval system or transmitted in any form or by any means, whether electronic, mechanical, or otherwise, without the prior written permission of Vision.
No warranty of accuracy is given concerning the contents of the information contained in this publication. To the extent permitted by law, no liability (including liability to any person by reason of negligence) will be accepted by Vision, its subsidiaries or employees for any direct or indirect loss or damage caused by omissions from or inaccuracies in this document.
Vision reserves the right to change without notice the contents of this publication and the software to which it relates.
Product and company names herein may be the trademarks of their respective owners.
Vision
The Bread Factory
1a Broughton Street London
SW8 3QJ
Website: www.visionhealth.co.uk

Contents
PATIENT SERVICES PRESCRIPTION USER GUIDE 1
PATIENT SERVICES - PRESCRIPTIONS USER GUIDE 5
Introduction 5 Overview 6
Enabling Patient Services 7 Global Configuration 8
Welcome Tab 9 Using the Message Editor 10 Formatting HTML Messages 11
Registration Tab 12 NHS Mail Tab 13
Email Setup - England and Scotland Only 14 Test Email Messaging - England 15 Email Signature - All Countries 15
Enabling Online Prescriptions 16 Configure Online Prescriptions 17
Prescription Message 17 History 19 Patient Message 19 Define Old Repeat Offset 20
Online Prescription Requesting (Practice) 21 Process Online Prescription Request 21
Processing Requests without Issuing All Items Requested 23 Manually Completing a Request 24 Rejecting an Online Prescription Request 24
Additional Medication (Acute) Requests 25 Receiving and Processing Additional Medication (Acute) Requests 25
Online Prescription Request Report 28 Troubleshooting 29 Online Prescription Requesting (Patient) 29
INDEX 31


5.
Patient Services - Prescriptions User Guide
Introduction This user guide details the set up and use of online Prescriptions.
Online prescriptions enable your patients to request acute and repeat medication at
their convenience. You are responsible for allowing patients access and you can
disable online services for patients you feel are abusing the service, you can also
customise how your patient's use the service.

6.
Overview
The following is an overview of the online prescription process:

7.
Enabling Patient Services
Note - You must have System Administrator rights to enable and
configure Patient Services (England only – see RBAC User Guide
(http://hive.visionhealth.co.uk/p/do/sd/sid=1240) for further
details).
To activate online services:
1. From Vision - Management Tools select Control Panel – File
Maintenance - Online .
2. The Vision Online Services screen is displayed.
3. Tick Enable Vision Online Services to enable Patient Services.
You now need to configure your global settings, see Global Configuration (page 7).

8.
Global Configuration
The following three global tabs require configuration:
Welcome Message – Enter the message you want displayed on the
Patient Services home page once your patients have logged in, see Welcome Message (page 8).
Registration – Set a time frame for unused registration letters and un-activated accounts, see Registration (page 11).
NHS Mail – For English and Scottish practices with NHS Mail, there is
a facility to add an NHS mail account, which is then used to send
confirmation and reminder email messages to patients; a global email signature can also be created, see NHS Mail (page 12).
9.
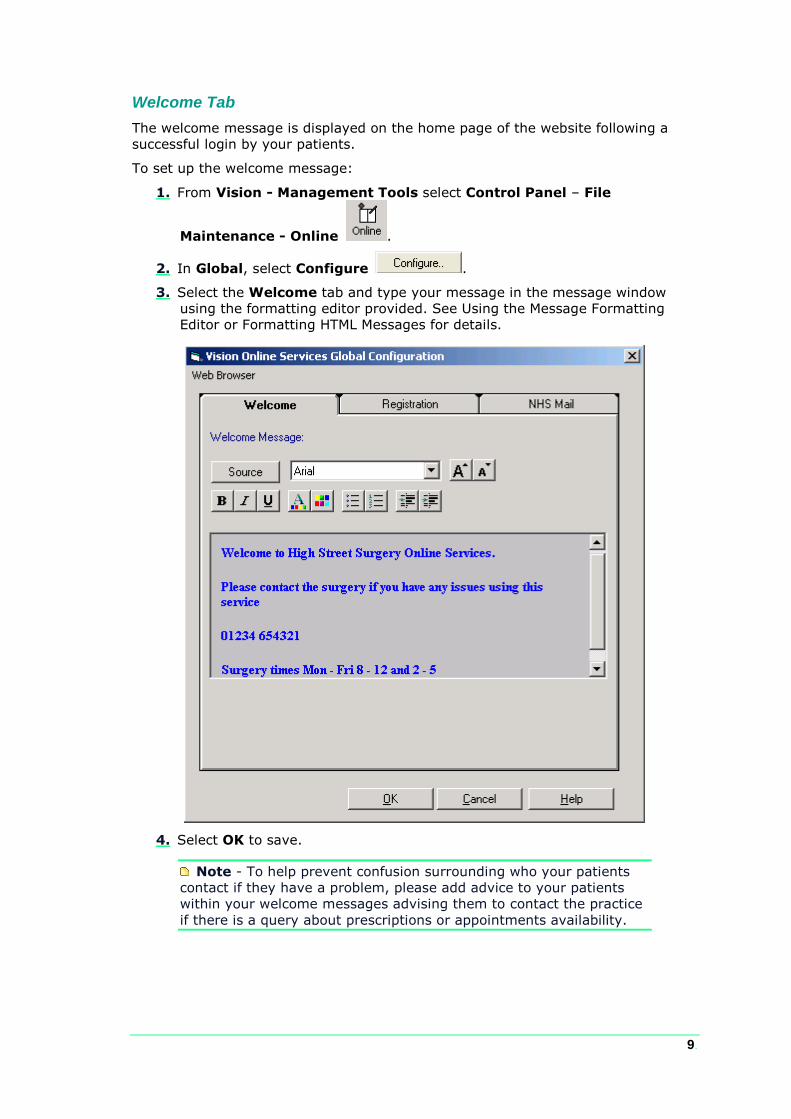
Welcome Tab
The welcome message is displayed on the home page of the website following a
successful login by your patients.
To set up the welcome message:
1. From Vision - Management Tools select Control Panel – File
Maintenance - Online .
2. In Global, select Configure .
3. Select the Welcome tab and type your message in the message window
using the formatting editor provided. See Using the Message Formatting
Editor or Formatting HTML Messages for details.
4. Select OK to save.
Note - To help prevent confusion surrounding who your patients
contact if they have a problem, please add advice to your patients
within your welcome messages advising them to contact the practice
if there is a query about prescriptions or appointments availability.

10.
Using the Message Editor
The message editor allows you to format messages displayed online. It is available
in the Welcome, Appointments and Prescription message configuration screens.
Type your message in the welcome message window using the following
formatting:
Welcome Message - Select a
language for this version, remember you should be adding both an
English version and a Welsh version.
Source - Displays the HTML source of the message and is
the only way you can add tables. If you are comfortable working with HTML tags, you may want to use this view to edit the HTML directly.
Font - Allows you to change the font.
Font size - Allows you to increase and decrease the text size of the highlighted text.
Bold, Italic, Underlined .
Text colour/ Background colour .
Bulleted/numbered list .
Decrease/increase indent .

11.
Formatting HTML Messages
Messages can be formatted using HTML formatting tags. HTML tags are:
Used either side of a keyword eg <html> you wish to format.
The tag always has angle brackets eg <html> denoting the starting
and closing of the tag.
HTML tags normally come in pairs eg <b> (the starting tag) and </b> (the closing tag)
You can use multiple tags, but each tag must have brackets at the
start and end of the tag eg <p><b>
This is a list of the most common codes:
Starting Tag
Closing Tag Description
<h1> </h1> First Heading.
Headings can be defined with <h1> to <h6> tags.
<h1> is the largest heading and <h6> is the smallest.
<p> </p> Paragraph
<b> </b> Bold text
<big> </big> Big text
<i> </i> Italic text
<small> </small> Small text
<sub> </sub> Subscript text
<sup> </sup> Superscript text
<br> This tag adds a single line break, it does not need
a closing tag.
For example applying the bold <B> tag to the 1st line of the message like this:
<B>Welcome to the Visionary Healthcare Practice</B>
Displays as:
Welcome to the Visionary Healthcare Practice
Note - If you want to add an image to your message, you must
link to an image which can be accessed over the Internet and not one
stored locally. Locally stored images cannot be displayed on the
website.

12.
Registration Tab
From the Registration tab, you can:
Invalidate unused Registration Letters after - Select a time frame
for unused registration letters to expire. The expiration date is printed
on the patients’ registration letter.
Invalidate Un-activated accounts after - Select a time frame for
un-activated accounts to expire. On registering patients are sent a
confirmation code which activates their account. If the account is not
activated by the expiry date, they need to re-register for online services.
Reminders - Tick to send activation reminders by email every n
(where n is the number of days you set). If an NHS Mail Account is
setup the following option is available:
Send Activation Reminders by SMS – Tick this to send a reminder
to patients by SMS (Text) message, to remind them to activate their
Online Account. This function requires the use of an NHS Mail
account, which are currently available to practices in England and
Scotland only.
Note - By default these services are ticked to enable the service.
If you do not want to send email and/or SMS messages remove the
tick from the appropriate box. If ticked to use the service, the NHS
Mail settings need to be configured, see NHS Mail.

13.
NHS Mail Tab
To remind your patients to set up their user account and to remind them of any
appointments they have booked, confirmation and reminder emails and SMS
messages can be sent to your patients via NHS Mail.
Important - SMS Messaging is available for practices in England
and Scotland with an NHS Mail Account only. For practices without
NHS Mail, confirmation emails continue to be sent to patients via the
Patient Services Gateway.

14.
Email Setup - England and Scotland Only
An NHSMail account is required to send emails, contact your Service Desk at the
CCG/HB to request a new account for Patient Services. Once you have the new
NHSMail Account:
1. From Online Services - Global Configuration, select the NHS Mail tab.
2. Type your practice email address in Email Address, and then add your
Password.
Note - NHSMail account passwords expire every 90 days. You
must reset the password, before it expires. If the password is not
reset, the mail account is locked, this prevents email messages being
sent to patients. When the NHSMail password is reset, go to Control
Panel - File Maintenance - Actions - Online Services Global
Configuration - NHS Mail and change the password there to match.
Any emails sent from your practice’s online service to patients via email have the
following email address as the sender:
Patient Services - [email protected].
VOS - [email protected].
Important - SMS Messaging is no longer a free option via NHS.net, therefore the Enable SMS option has been disabled.

15.
Test Email Messaging - England
Once setup you can test the details to make sure they are working.
To test email settings:
1. From Control Panel – Online Services Configuration – Global
Configure, select the NHS Mail tab.
2. Select Test Email and Send Test Email is displayed.
3. Enter the email address for the person you want to receive the test message,
and then select Send.
4. You are prompted 'An email has been sent using the setting you provided.
Please verify the email was received successfully'', select OK to close.
5. Check the email inbox that the test message was sent to, confirming that the
NHS Mail account is configured correctly.
Email Signature - All Countries
You can add an email signature to all emails send to patients for online services. To
create a signature type the details in the Email Signature box, select Preview to
check.
You have now activated online patient services and now need to configure the
individual modules.
To activate and configure Online Prescriptions, see Enabling Online Prescriptions (page 15).

16.
Enabling Online Prescriptions
To enable Online Prescriptions:
1. From Management Tools select Control Panel – File Maintenance -
Online .
2. Tick the Prescription options you require to enable the service:
Repeat - Tick to enable patients to order repeat prescriptions.
Acute - Tick to enable patients to order acute prescriptions.
3. Select Configure to customise how the service works for your practice, see
Configure Online Prescriptions (page 16).
Note - Patients already registered for Online Appointments do
not have to re-register to use Online Prescriptions. Patients not
registered need to complete the Online Services registration process.

17.
Configure Online Prescriptions
You need to configure how your patients see prescriptions within the Patient
Services website. There are four options that should be considered:
From Control Panel - Online:
Prescription Message (page 17)
History (page 18)
Patient Message (page 19)
And from Consultation Manager:
Define Old Repeat Offset (page 19)
Once you have finished configuring each option, select OK to save and close.
Prescription Message
The prescription message is displayed within the My Prescription section of the
Patient Services website.
From Online Services Prescriptions Configuration, type your prescription
message in the Prescriptions Message section of the General tab using either:
The formatting editor provided, see Using the Message Editor (page 9).
Or, HTML formatting tags, see Formatting HTML Messages (page 10).

18.
Note - To help prevent confusion surrounding who to contact if
your patients have a problem, we ask that you add the following to
your Prescription Welcome Message: 'In the case of a query
regarding a prescription please contact the surgery in the usual way'.

19.
History
You can set a time frame for the patient repeat request history displayed.
From Vision Online Prescriptions Configuration - General - History Use the arrows to select a from between 1 - 12 month(s).
Patient Message
You can allow your patients to contact you via their prescription request:
From Vision Online Services Prescriptions Configuration -
General - Patient Message tick Allow patients to submit a free-text message with their requests.
Note - When this option is selected, a warning message is
displayed advising the practice to ensure that the necessary
processes are in place to check any messages entered by the patient.

20.
Define Old Repeat Offset
Old Repeat Offset determines what repeat prescriptions can be ordered online.
To change the Old Repeat Offset:
1. From Consultation Manager, select Consultation - Options - Setup and
select the Therapy tab.
2. Add a time span into the Old Repeat Offset box, eg if the offset date is
‘4m’, patients can only be able to order repeat prescriptions which have
been issued within the last 4 months. Repeats not issued within this time
will be on the Unavailable list.
3. Select OK to save.

21.
Online Prescription Requesting (Practice)
Once your patient has requested a prescription via the Patient Services website:
Process Online Prescription Request
1. From the Vision front screen, select Mail Manager .
2. Select the Staff tab and then select the Incoming Mail folder.
3. Online prescription messages are displayed alongside other incoming Mail
Manager messages, however, you can filter for them by selecting Mail
Categories – Online Prescriptions.
4. The request messages are initially displayed with the status Available for
filing. Highlight the message you want to process, and check the request
details which are displayed in the message window. If the patient has added
a message you can also view it here.
Note – In order to be able to process online prescriptions, you
must have permission in Control Panel - Security to issue and print
a repeat master. English practices with Role Based Access enabled
must have this business function on their Smartcard.

22.
5. To process the request, double click or right click and select File All.
6. This opens Consultation Manager and starts a Repeat Issue consultation
for the selected patient. The patient Repeats screen is displayed and items
that the patient requested are highlighted.
Note – If Consultation Manager is already opened and a patient
selected, you are prompted to close the consultation and patient
record.
7. Check that the patient request is valid.
8. Select Print or press F9, check the details and if correct select Finalise
to print the prescription.
9. If prompted to preview the Drug Label details check the information and
select Continue.
10. You are then asked if you want to return to Mail Manager:
"The Vision Online Prescription request has been fulfilled, would you like to
return to Mail Manager? Remember my selection for this session (until
Consultation Manager is restarted)"
Select either:
Yes, to return to Mail Manager, or
No, to stay with Consultation Manager.

23.
If you tick the box, this selection is remembered and you are not prompted
again unless you close Consultation Manager.
11. Select Yes, you are returned to Mail Manager and the completed message
status is shown as Filed.
12. Select the next Online prescription request and repeat steps 2 - 8.
Processing Requests without Issuing All Items Requested
There may be occasions when you are unable to issue all the items requested by
the patient, for example, the medication has been recently changed, or the clinician
needs to review the patient.
1. From Mail Manager , go to Incoming Mail.
2. Select the Online Prescription message and double click, or right click and
select File All.
3. This opens Consultation Manager and displays the requested items.
4. Deselect (remove the tick from the box) the items you are not issuing.
5. Select Print or press F9, check the details and if correct select Finalise
to print the prescription.
6. Now, select the cross in the top right corner to close Consultation
Manager.
7. You are then prompted: "The additional Patient Prescription Request has not
been fulfilled. Do you want to mark the request as complete?" select Yes.
8. You then must give a reason for not issuing all the items. Type your message
in the window (this is Mandatory and is recorded in the Event Log).
9. Click OK.
10. The request is marked as Filed in Mail Manager and the patient is able to
view your message when they check their request details online.

24.
Manually Completing a Request
If you have already issued the prescription separately to the online prescription
request, you can mark the message as Read and Complete using the right click
menu.
1. From Mail Manager , go to Incoming Mail.
2. Select the online prescription request you wish to manually complete.
3. Right click and select Mark as Read.
4. Right click again and select Mark as Complete.
5. The Event Log window opens, you are prompted:
"Are you sure you wish to mark this message as complete? Please supply a
reason for marking this message as complete. The patient will be able to
view this text within Online Prescriptions".
6. Type the reason for manually completing the message in the window, then
select OK.
7. The request is now marked as complete, and the request is displayed as
Processed on the website for the patient.
Rejecting an Online Prescription Request
If you do not want to issue the Online Prescription request, you can reject the
message.
1. From Mail Manager , go to Incoming Mail.
2. Select the Online Prescription request you wish to cancel.
3. Right click and select Message – Cancel/Supersede from the menu.
4. You are then prompted:
"Are you sure you wish to mark this message as cancelled/superseded? (You
will not be able to reinstate this message) Please supply a reason for
cancelling this message."
5. Type a message if required, (optional, max 60 characters).
6. Select OK.
7. A confirmation message is displayed confirming the cancellation and showing
the reason (if added).
8. Select OK to close.
In Mail Manager the request is marked Cancelled/superseded. The request on
the patient website is updated to Rejected, so the patient knows that their request
has been rejected, the reason is also displayed.
Note - The patient can see the message that you type in here.

25.
Additional Medication (Acute) Requests
Once you have updated to Vision release DLM 510 and providing you have enabled
your patients to request acute medication via Patient Services (simply tick Acute
within Control Panel - Online), your patients can request additional medication.
Receiving and Processing Additional Medication (Acute) Requests
Additional Medication requests are received automatically into Mail Manager:
1. From Mail Manager , select Staff - Incoming Mail - Mail
Categories - Online Prescription.
2. Any online prescription requests are displayed:
3. To view the request, select the request and the detail is displayed in the
bottom half of the screen:
4. Right click on the message and select File.
5. Consultation Manager is automatically opened with the
correct patient selected and the Therapy tab displayed.
6. The free text request from your patient is now displayed on the yellow
Reminder:
Note - The request completed by your patient is free text.

26.
7. Add the medication in the usual way following your practice protocols.
8. The process should then be completed, double click on the reminder. If you
deselect the patient without double clicking the reminder, the Process
Additional Online Prescription Request is automatically triggered, see
below.
9. The Process Additional Online Prescription Request screen is displayed:
10. Complete as required:
Patient request entirely fulfilled - Select to record the request has been fulfilled in full.
Patient request partially fulfilled - Select to record the request has
only partially fulfilled.
No further actions will be taken to meet this request - If only
part of the request has been fulfilled, but the rest is not going to be
fulfilled tick to complete the process. If you do not tick this the
request remains outstanding on the reminder with a lined icon in
front of the reminder.
Patient request rejected - Select to refuse the request.
Supporting Notes - Comments entered here appear on the patient's
My Health Online account, they should inform the patient of action you have taken and reasons if appropriate.

27.
If you select Cancel, a 'The Additional Patient Prescription Request has not
been fulfilled. Do you want to mark the request as complete?' warning is
displayed:
Select:
Yes to complete the request
No to leave the request outstanding
11. Select OK.
12. In Mail Manager, the request is now shown as either:
Filed, if you selected to fulfilled or partially fulfilled the request
Rejected, if you rejected the request

28.
Online Prescription Request Report
A report can be run to count the number of online prescription requests within a
specific time frame.
1. From the Vision front screen, select Mail Manager .
2. Select Tools - Count Online Repeat Requests.
3. Select:
All dates for a count of all requests received to date.
From Date and To Date to search for a specific date.
4. Select Run and the results are displayed in the Results section of the Count
Online Repeat Requests screen.
5. Select Close.

29.
Troubleshooting
Patient Not Registered
Repeat requests for inactive patients, eg transferred out patients, cannot be
processed. if you select a message for an inactive patient, you are prompted
"Warning this message is assigned to an inactive patient". This is also displayed in
the message details window.
Event Log
An audit trail of all Prescription Request messages can be viewed in the Event Log.
From Management Tools - Event Log . The following Event
Types are available for online prescription requests:
Online Repeat Completed
Online Repeat Request Received
Online Prescription Requesting (Patient)
Full patient assistance is available from
http://help.visionhealth.co.uk/Patient_Services_-
_Patient_Help_Centre/v1.7/Content/Home.htm
To print any of the patient help topics, simply select the Print button in the
top right corner and follow the on-screen prompts.


Index
A
Additional Medication (Acute) Requests • 25
C
Configure Online Prescriptions • 16, 17
D
Define Old Repeat Offset • 17, 20
E
Email Setup - England and Scotland Only • 14 Email Signature - All Countries • 15 Enabling Online Prescriptions • 15, 16 Enabling Patient Services • 7
F
Formatting HTML Messages • 11, 17
G
Global Configuration • 7, 8
H
History • 17, 19
I
Introduction • 5
M
Manually Completing a Request • 24
N
NHS Mail Tab • 8, 13
O
Online Prescription Request Report • 28 Online Prescription Requesting (Patient) • 29 Online Prescription Requesting (Practice) • 21 Overview • 6
P
Patient Message • 17, 19 Patient Services - Prescriptions User Guide • 5 Prescription Message • 17 Process Online Prescription Request • 21 Processing Requests without Issuing All Items
Requested • 23
R
Receiving and Processing Additional Medication (Acute) Requests • 25
Registration Tab • 8, 12 Rejecting an Online Prescription Request • 24
T
Test Email Messaging - England • 15 Troubleshooting • 29
U
Using the Message Editor • 10, 17
W
Welcome Tab • 8, 9