Embed Size (px)
Citation preview
20171020 v1.3 1 PAX Technology® Customer Support [email protected]
(877) 859-0099 www.pax.us
PAX A920 QUICK SETUP GUIDE
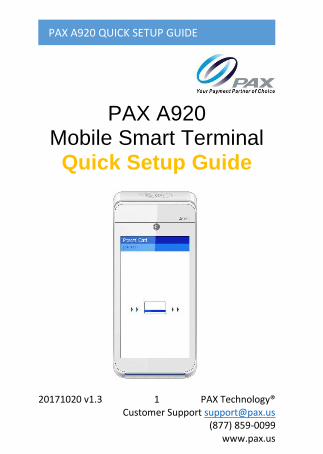
PAX A920 Mobile Smart Terminal
Quick Setup Guide
20171020 v1.3 2 PAX Technology® Customer Support [email protected]
(877) 859-0099 www.pax.us
PAX A920 QUICK SETUP GUIDE
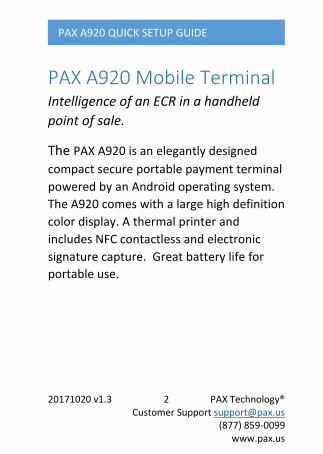
PAX A920 Mobile Terminal Intelligence of an ECR in a handheld
point of sale.
The PAX A920 is an elegantly designed
compact secure portable payment terminal
powered by an Android operating system.
The A920 comes with a large high definition
color display. A thermal printer and
includes NFC contactless and electronic
signature capture. Great battery life for
portable use.
20171020 v1.3 3 PAX Technology® Customer Support [email protected]
(877) 859-0099 www.pax.us
PAX A920 QUICK SETUP GUIDE
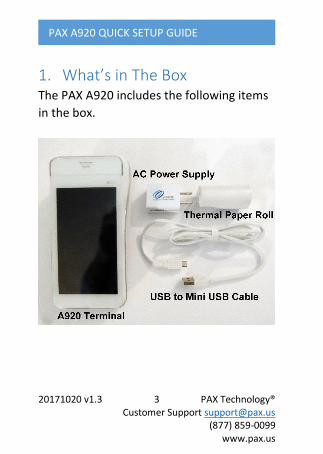
1. What’s in The Box The PAX A920 includes the following items
in the box.
20171020 v1.3 4 PAX Technology® Customer Support [email protected]
(877) 859-0099 www.pax.us
PAX A920 QUICK SETUP GUIDE
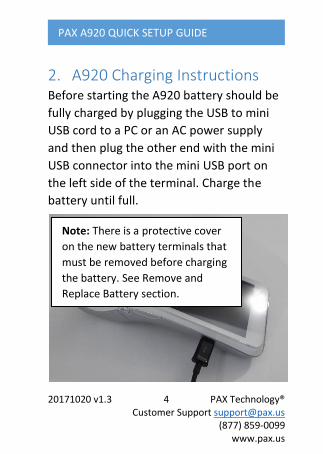
2. A920 Charging Instructions Before starting the A920 battery should be
fully charged by plugging the USB to mini
USB cord to a PC or an AC power supply
and then plug the other end with the mini
USB connector into the mini USB port on
the left side of the terminal. Charge the
battery until full.
Note: There is a protective cover
on the new battery terminals that
must be removed before charging
the battery. See Remove and
Replace Battery section.
20171020 v1.3 5 PAX Technology® Customer Support [email protected]
(877) 859-0099 www.pax.us
PAX A920 QUICK SETUP GUIDE
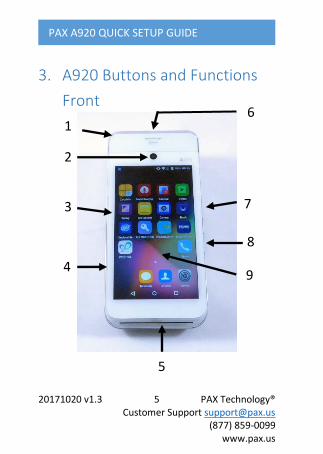
1
2
3
4
6
5
7
8
9
3. A920 Buttons and Functions
Front
20171020 v1.3 6 PAX Technology® Customer Support [email protected]
(877) 859-0099 www.pax.us
PAX A920 QUICK SETUP GUIDE
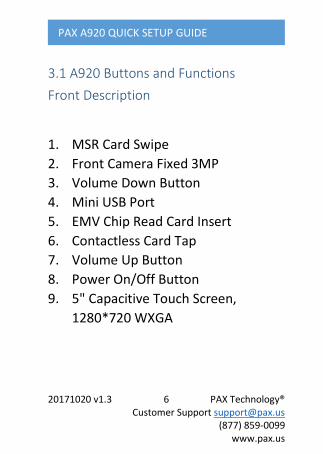
3.1 A920 Buttons and Functions
Front Description
1. MSR Card Swipe
2. Front Camera Fixed 3MP
3. Volume Down Button
4. Mini USB Port
5. EMV Chip Read Card Insert
6. Contactless Card Tap
7. Volume Up Button
8. Power On/Off Button
9. 5" Capacitive Touch Screen,
1280*720 WXGA
20171020 v1.3 7 PAX Technology® Customer Support [email protected]
(877) 859-0099 www.pax.us
PAX A920 QUICK SETUP GUIDE
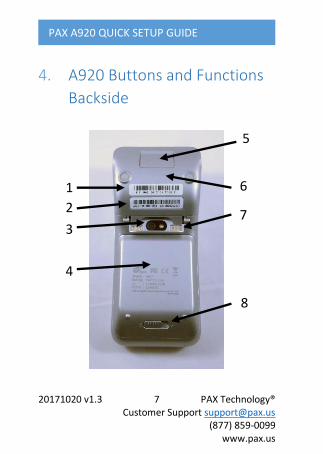
4. A920 Buttons and Functions
Backside
5
1
2
3
6
4
8
7
20171020 v1.3 8 PAX Technology® Customer Support [email protected]
(877) 859-0099 www.pax.us
PAX A920 QUICK SETUP GUIDE
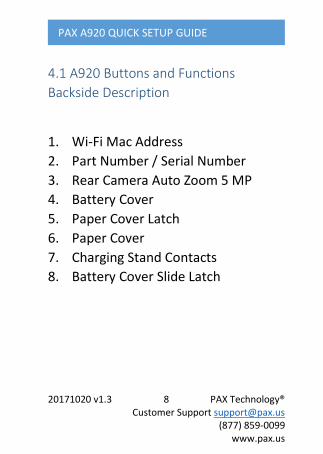
4.1 A920 Buttons and Functions
Backside Description
1. Wi-Fi Mac Address
2. Part Number / Serial Number
3. Rear Camera Auto Zoom 5 MP
4. Battery Cover
5. Paper Cover Latch
6. Paper Cover
7. Charging Stand Contacts
8. Battery Cover Slide Latch

20171020 v1.3 9 PAX Technology® Customer Support [email protected]
(877) 859-0099 www.pax.us
PAX A920 QUICK SETUP GUIDE
5. A920 Power On/Off Power up or power off the terminal by
pressing and holding the small rectangle
button on the right side of the terminal for
2-4 seconds and then release.
Power Button
20171020 v1.3 10 PAX Technology® Customer Support [email protected]
(877) 859-0099 www.pax.us
PAX A920 QUICK SETUP GUIDE
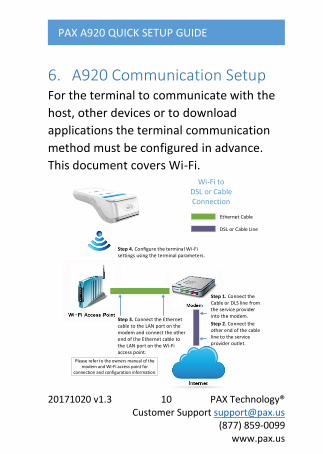
6. A920 Communication Setup For the terminal to communicate with the
host, other devices or to download
applications the terminal communication
method must be configured in advance.
This document covers Wi-Fi. Wi-Fi to
DSL or Cable Connection
Ethernet Cable
DSL or Cable Line
Step 3. Connect the Ethernet cable to the LAN port on the modem and connect the other end of the Ethernet cable to the LAN port on the Wi-Fi access point.
Step 4. Configure the terminal Wi-Fi settings using the terminal parameters.
Please refer to the owners manual of the modem and Wi-Fi access point for
connection and configuration information.
Step 1. Connect the Cable or DLS line from the service provider into the modem.
Step 2. Connect the other end of the cable line to the service provider outlet.
20171020 v1.3 11 PAX Technology® Customer Support [email protected]
(877) 859-0099 www.pax.us
PAX A920 QUICK SETUP GUIDE
7. A920 Wi-Fi Setup The A920 supports Wi-Fi for network and
internet access. Available access types are
DHCP, Static and Manual Proxy. The
following instructions include setting up for
each communication type.
Wi-Fi DHCP Setup 7.1.1 The Wi-Fi settings are located within
the Android Settings option.
Application
20171020 v1.3 12 PAX Technology® Customer Support [email protected]
(877) 859-0099 www.pax.us
PAX A920 QUICK SETUP GUIDE
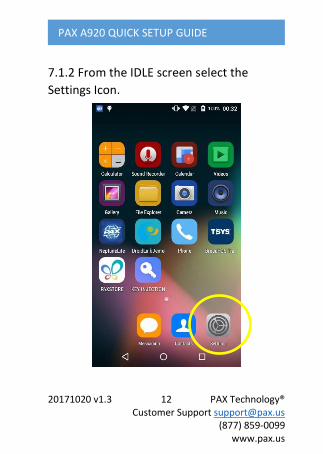
7.1.2 From the IDLE screen select the
Settings Icon.
20171020 v1.3 13 PAX Technology® Customer Support [email protected]
(877) 859-0099 www.pax.us
PAX A920 QUICK SETUP GUIDE
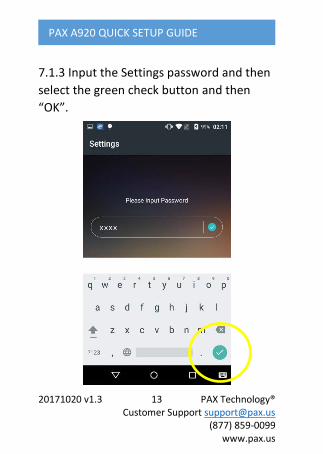
7.1.3 Input the Settings password and then
select the green check button and then
“OK”.
20171020 v1.3 14 PAX Technology® Customer Support [email protected]
(877) 859-0099 www.pax.us
PAX A920 QUICK SETUP GUIDE
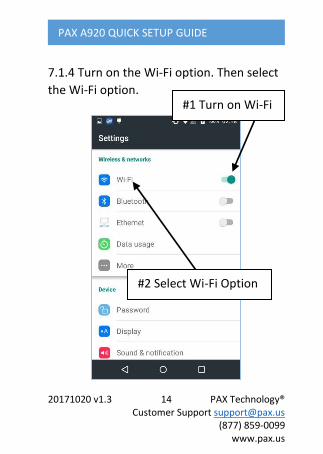
7.1.4 Turn on the Wi-Fi option. Then select
the Wi-Fi option.
#1 Turn on Wi-Fi
#2 Select Wi-Fi Option
20171020 v1.3 15 PAX Technology® Customer Support [email protected]
(877) 859-0099 www.pax.us
PAX A920 QUICK SETUP GUIDE
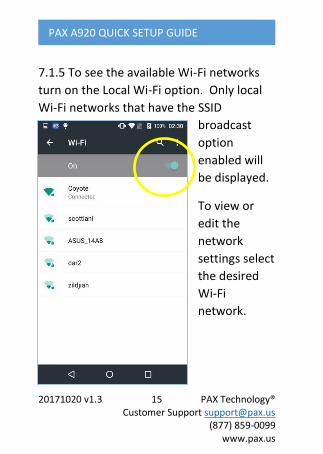
7.1.5 To see the available Wi-Fi networks
turn on the Local Wi-Fi option. Only local
Wi-Fi networks that have the SSID
broadcast
option
enabled will
be displayed.
To view or
edit the
network
settings select
the desired
Wi-Fi
network.
20171020 v1.3 16 PAX Technology® Customer Support [email protected]
(877) 859-0099 www.pax.us
PAX A920 QUICK SETUP GUIDE
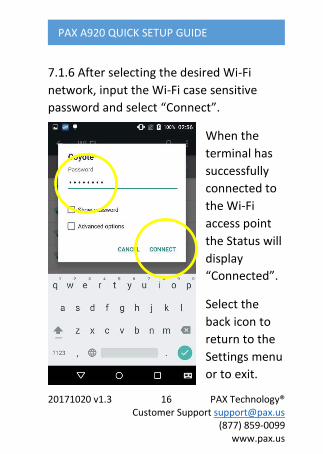
7.1.6 After selecting the desired Wi-Fi
network, input the Wi-Fi case sensitive
password and select “Connect”.
When the
terminal has
successfully
connected to
the Wi-Fi
access point
the Status will
display
“Connected”.
Select the
back icon to
return to the
Settings menu
or to exit.
20171020 v1.3 17 PAX Technology® Customer Support [email protected]
(877) 859-0099 www.pax.us
PAX A920 QUICK SETUP GUIDE
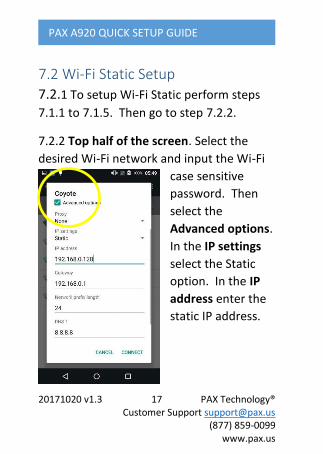
7.2 Wi-Fi Static Setup 7.2.1 To setup Wi-Fi Static perform steps
7.1.1 to 7.1.5. Then go to step 7.2.2.
7.2.2 Top half of the screen. Select the
desired Wi-Fi network and input the Wi-Fi
case sensitive
password. Then
select the
Advanced options.
In the IP settings
select the Static
option. In the IP
address enter the
static IP address.
20171020 v1.3 18 PAX Technology® Customer Support [email protected]
(877) 859-0099 www.pax.us
PAX A920 QUICK SETUP GUIDE
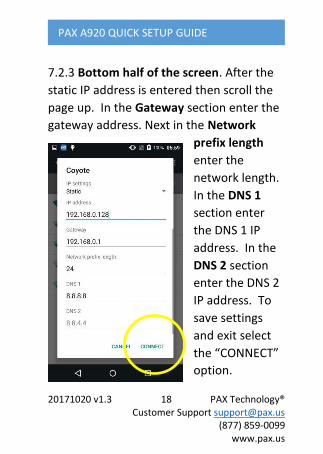
7.2.3 Bottom half of the screen. After the
static IP address is entered then scroll the
page up. In the Gateway section enter the
gateway address. Next in the Network
prefix length
enter the
network length.
In the DNS 1
section enter
the DNS 1 IP
address. In the
DNS 2 section
enter the DNS 2
IP address. To
save settings
and exit select
the “CONNECT”
option.
20171020 v1.3 19 PAX Technology® Customer Support [email protected]
(877) 859-0099 www.pax.us
PAX A920 QUICK SETUP GUIDE
7.3 Wi-Fi Manual Static Setup If SSID is disabled on the access point the
terminal will not display the SSID on the
available Wi-Fi network listings. It will be
necessary to manually configure the
terminal for Static connection types.
7.3.1 To setup Wi-Fi Manual Static perform
steps 7.1.1 to 7.1.5. Then go to step 7.3.2
20171020 v1.3 20 PAX Technology® Customer Support [email protected]
(877) 859-0099 www.pax.us
PAX A920 QUICK SETUP GUIDE
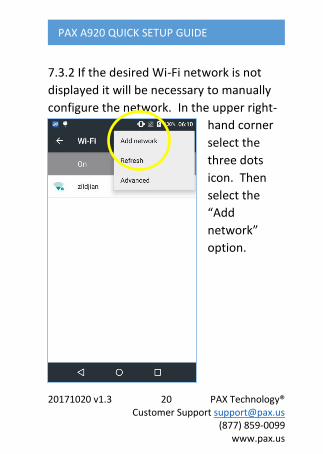
7.3.2 If the desired Wi-Fi network is not
displayed it will be necessary to manually
configure the network. In the upper right-
hand corner
select the
three dots
icon. Then
select the
“Add
network”
option.
20171020 v1.3 21 PAX Technology® Customer Support [email protected]
(877) 859-0099 www.pax.us
PAX A920 QUICK SETUP GUIDE
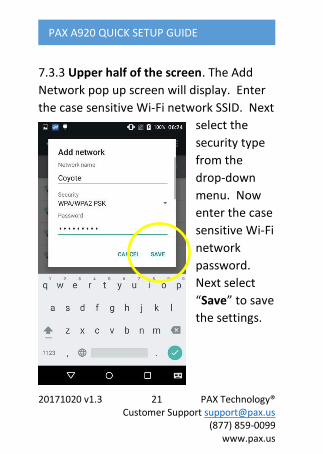
7.3.3 Upper half of the screen. The Add
Network pop up screen will display. Enter
the case sensitive Wi-Fi network SSID. Next
select the
security type
from the
drop-down
menu. Now
enter the case
sensitive Wi-Fi
network
password.
Next select
“Save” to save
the settings.
20171020 v1.3 22 PAX Technology® Customer Support [email protected]
(877) 859-0099 www.pax.us
PAX A920 QUICK SETUP GUIDE
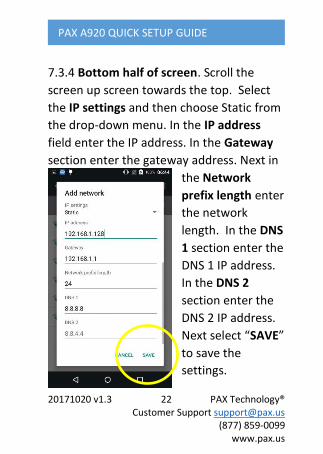
7.3.4 Bottom half of screen. Scroll the
screen up screen towards the top. Select
the IP settings and then choose Static from
the drop-down menu. In the IP address
field enter the IP address. In the Gateway
section enter the gateway address. Next in
the Network
prefix length enter
the network
length. In the DNS
1 section enter the
DNS 1 IP address.
In the DNS 2
section enter the
DNS 2 IP address.
Next select “SAVE”
to save the
settings.
20171020 v1.3 23 PAX Technology® Customer Support [email protected]
(877) 859-0099 www.pax.us
PAX A920 QUICK SETUP GUIDE
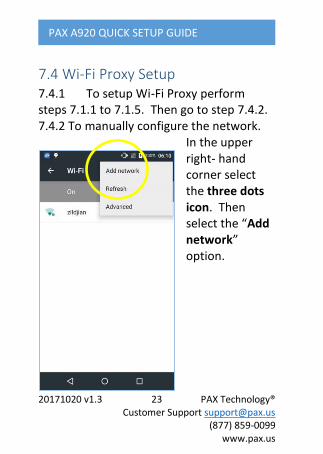
7.4 Wi-Fi Proxy Setup 7.4.1 To setup Wi-Fi Proxy perform steps 7.1.1 to 7.1.5. Then go to step 7.4.2. 7.4.2 To manually configure the network.
In the upper right- hand corner select the three dots icon. Then select the “Add network” option.
20171020 v1.3 24 PAX Technology® Customer Support [email protected]
(877) 859-0099 www.pax.us
PAX A920 QUICK SETUP GUIDE
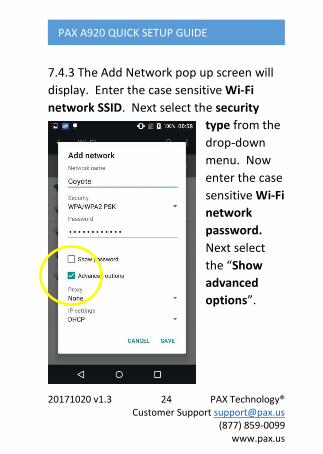
7.4.3 The Add Network pop up screen will
display. Enter the case sensitive Wi-Fi
network SSID. Next select the security
type from the
drop-down
menu. Now
enter the case
sensitive Wi-Fi
network
password.
Next select
the “Show
advanced
options”.
20171020 v1.3 25 PAX Technology® Customer Support [email protected]
(877) 859-0099 www.pax.us
PAX A920 QUICK SETUP GUIDE
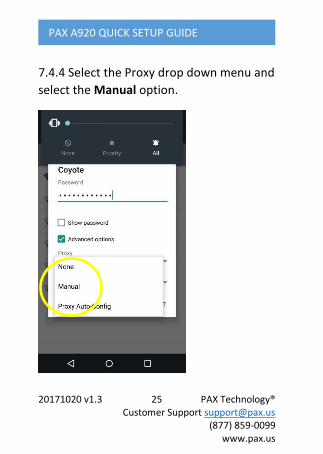
7.4.4 Select the Proxy drop down menu and
select the Manual option.
20171020 v1.3 26 PAX Technology® Customer Support [email protected]
(877) 859-0099 www.pax.us
PAX A920 QUICK SETUP GUIDE
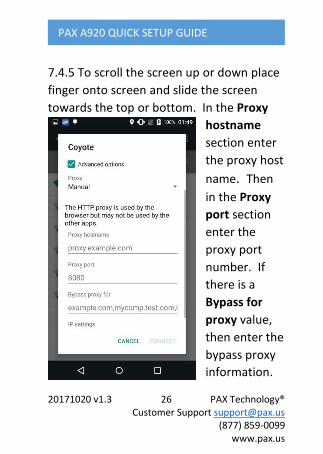
7.4.5 To scroll the screen up or down place
finger onto screen and slide the screen
towards the top or bottom. In the Proxy
hostname
section enter
the proxy host
name. Then
in the Proxy
port section
enter the
proxy port
number. If
there is a
Bypass for
proxy value,
then enter the
bypass proxy
information.
20171020 v1.3 27 PAX Technology® Customer Support [email protected]
(877) 859-0099 www.pax.us
PAX A920 QUICK SETUP GUIDE
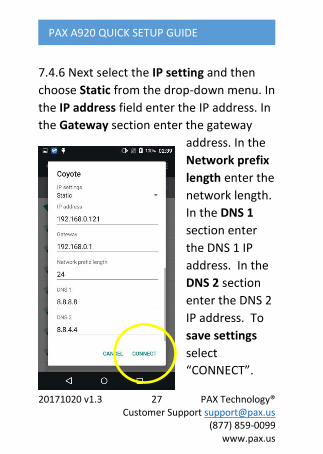
7.4.6 Next select the IP setting and then
choose Static from the drop-down menu. In
the IP address field enter the IP address. In
the Gateway section enter the gateway
address. In the
Network prefix
length enter the
network length.
In the DNS 1
section enter
the DNS 1 IP
address. In the
DNS 2 section
enter the DNS 2
IP address. To
save settings
select
“CONNECT”.
20171020 v1.3 28 PAX Technology® Customer Support [email protected]
(877) 859-0099 www.pax.us
PAX A920 QUICK SETUP GUIDE
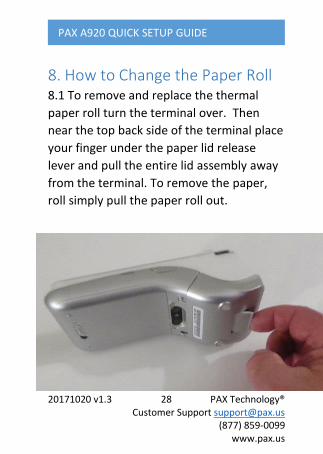
8. How to Change the Paper Roll 8.1 To remove and replace the thermal
paper roll turn the terminal over. Then
near the top back side of the terminal place
your finger under the paper lid release
lever and pull the entire lid assembly away
from the terminal. To remove the paper,
roll simply pull the paper roll out.
20171020 v1.3 29 PAX Technology® Customer Support [email protected]
(877) 859-0099 www.pax.us
PAX A920 QUICK SETUP GUIDE
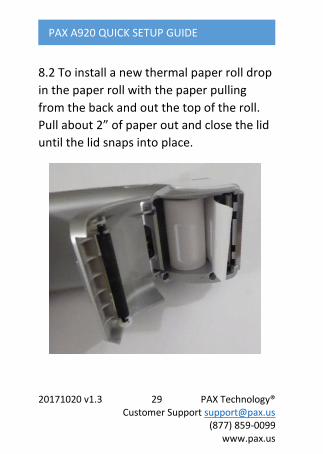
8.2 To install a new thermal paper roll drop
in the paper roll with the paper pulling
from the back and out the top of the roll.
Pull about 2” of paper out and close the lid
until the lid snaps into place.
20171020 v1.3 30 PAX Technology® Customer Support [email protected]
(877) 859-0099 www.pax.us
PAX A920 QUICK SETUP GUIDE
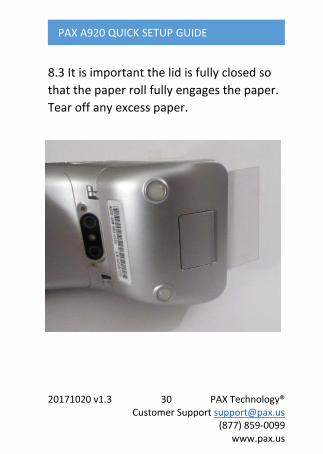
8.3 It is important the lid is fully closed so
that the paper roll fully engages the paper.
Tear off any excess paper.
20171020 v1.3 31 PAX Technology® Customer Support [email protected]
(877) 859-0099 www.pax.us
PAX A920 QUICK SETUP GUIDE
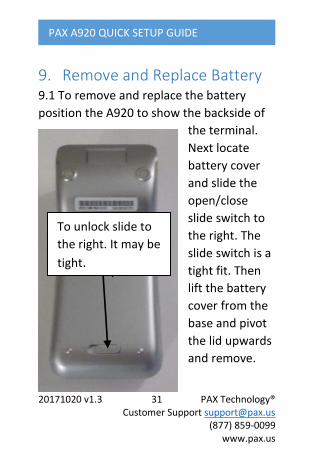
9. Remove and Replace Battery 9.1 To remove and replace the battery
position the A920 to show the backside of
the terminal.
Next locate
battery cover
and slide the
open/close
slide switch to
the right. The
slide switch is a
tight fit. Then
lift the battery
cover from the
base and pivot
the lid upwards
and remove.
To unlock slide to
the right. It may be
tight.

20171020 v1.3 32 PAX Technology® Customer Support [email protected]
(877) 859-0099 www.pax.us
PAX A920 QUICK SETUP GUIDE
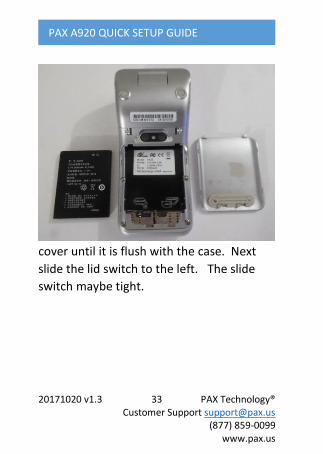
Next lift the battery from the bottom side
and swing it upwards from the bottom and
pull out.
9.2 To install a battery first remove the
protective cover over the battery
connectors. Then insert the battery with
the gold connectors towards the top right
side. Slide the battery upwards and then
carefully push the bottom into place. Next
insert the top of the battery lid into the lid
hinges and then lower the bottom of the lid
20171020 v1.3 33 PAX Technology® Customer Support [email protected]
(877) 859-0099 www.pax.us
PAX A920 QUICK SETUP GUIDE
cover until it is flush with the case. Next
slide the lid switch to the left. The slide
switch maybe tight.
20171020 v1.3 34 PAX Technology® Customer Support [email protected]
(877) 859-0099 www.pax.us
PAX A920 QUICK SETUP GUIDE
FCC Regulations This device complies with part 15 of the FCC
Rules. Operation is subject to the following two
conditions: (1) This device may not cause harmful
interference and (2) this device must accept any
interference received, including interference that
may cause undesired operation.
This equipment complies with Part 68 of the FCC
rules and the requirements adopted by the ACTA.
On the body of this equipment is a label that
contains among other information a product
identifier. If requested, this number must be
provided to the telephone company.
RF Exposure Information This device meets the government’s requirement
for exposure to radio waves. This device is
designed and manufactured not to exceed the
emission limits for exposure to radio frequency
(RF) energy set by the Federal Communications
Commission of the U.S. Government.
20171020 v1.3 35 PAX Technology® Customer Support [email protected]
(877) 859-0099 www.pax.us
PAX A920 QUICK SETUP GUIDE
PAX Customer Support For questions or help with the terminal
installation please contact your service
provider or PAX customer support.
PAX Technology Inc. E. [email protected] T. (877) 859-0099 W. www.pax.us
This document is provided to you for informational purposes only. All features and specifications are subject to change without notice. PAX are either trademarks or registered trademarks of PAX Technology Limited in China and/or other countries. All other trademarks or brand names are the properties of their respective holders. Copyright 2016, PAX Technology Limited, All Rights Reserved.