Embed Size (px)
Citation preview
Payroll Basics for ADP Workforce Now®
Activity Workbook
Automatic Data Processing, Inc. ES Canada
PAYROLL LEVEL 1 FOR WORKFORCE NOW
2014 ADP, Inc. ii W002_ILT_WFN51V01_0114
ADP’s Trademarks
The ADP Logo and ADP Workforce Now are registered trademarks of ADP, Inc. In the Business of Your Success is a service mark of ADP, Inc.
Third-Party Trademarks
Global Crossing and Ready-Access are registered trademarks of Global Crossing Holdings, Ltd. in the United States and other countries.
Microsoft, Excel, and Word are registered trademarks of Microsoft Corporation in the United States and/or other countries.
All other trademarks and service marks are the property of their respective owners.
© 2014 ADP, Inc. and its licensors. All rights reserved.
Payroll Level 1
for ADP Workforce Now®
Module 2: Processing a Basic Payroll
Automatic Data Processing, Inc. ES Canada
MODULE 2: PROCESSING BASIC PAYROLL HANDOUT MANUAL
PAYROLL LEVEL 1 FOR ADP WORKFORCE NOW®
2014 ADP, Inc. 2-5 W002_ILT_WFN51V01_0114 11
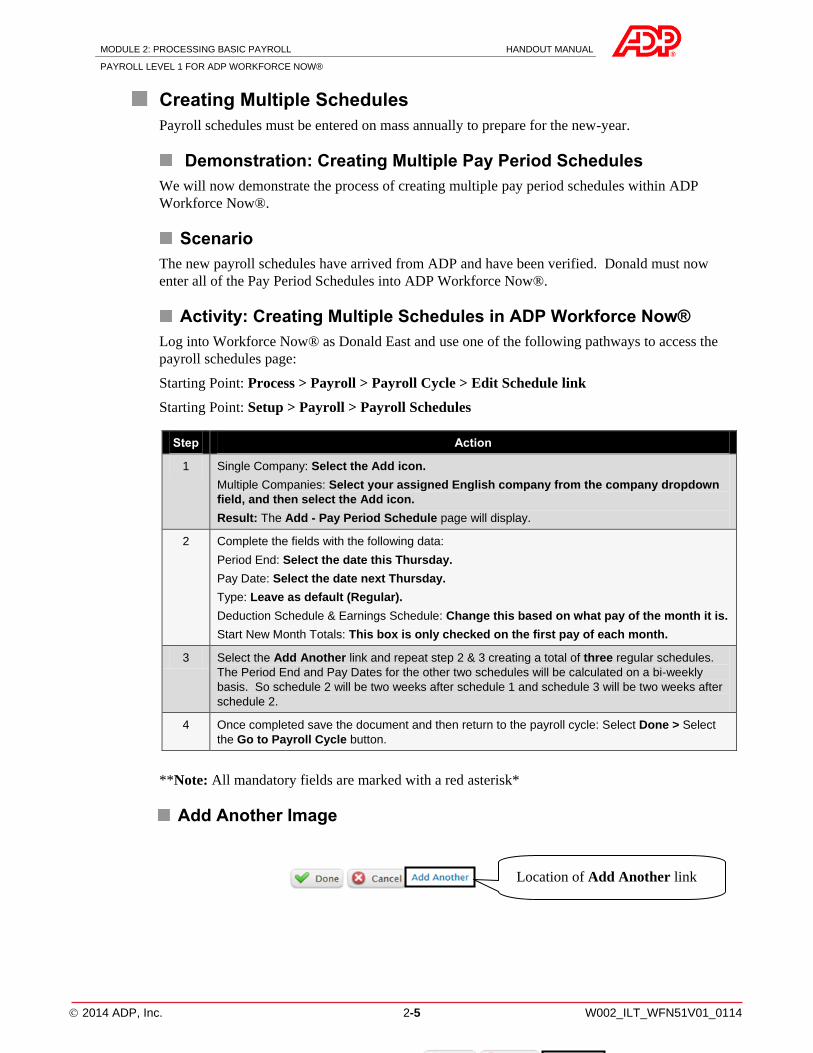
Creating Multiple Schedules
Payroll schedules must be entered on mass annually to prepare for the new-year.
Demonstration: Creating Multiple Pay Period Schedules
We will now demonstrate the process of creating multiple pay period schedules within ADP
Workforce Now®.
Scenario
The new payroll schedules have arrived from ADP and have been verified. Donald must now
enter all of the Pay Period Schedules into ADP Workforce Now®.
Activity: Creating Multiple Schedules in ADP Workforce Now®
Log into Workforce Now® as Donald East and use one of the following pathways to access the
payroll schedules page:
Starting Point: Process > Payroll > Payroll Cycle > Edit Schedule link
Starting Point: Setup > Payroll > Payroll Schedules
Step Action
1 Single Company: Select the Add icon.
Multiple Companies: Select your assigned English company from the company dropdown
field, and then select the Add icon.
Result: The Add - Pay Period Schedule page will display.
2 Complete the fields with the following data:
Period End: Select the date this Thursday.
Pay Date: Select the date next Thursday.
Type: Leave as default (Regular).
Deduction Schedule & Earnings Schedule: Change this based on what pay of the month it is.
Start New Month Totals: This box is only checked on the first pay of each month.
3 Select the Add Another link and repeat step 2 & 3 creating a total of three regular schedules.
The Period End and Pay Dates for the other two schedules will be calculated on a bi-weekly
basis. So schedule 2 will be two weeks after schedule 1 and schedule 3 will be two weeks after
schedule 2.
4 Once completed save the document and then return to the payroll cycle: Select Done > Select
the Go to Payroll Cycle button.
**Note: All mandatory fields are marked with a red asterisk*
Add Another Image
Location of Add Another link
MODULE 2: PROCESSING BASIC PAYROLL HANDOUT MANUAL
PAYROLL LEVEL 1 FOR ADP WORKFORCE NOW®
2014 ADP, Inc. 2-6 W002_ILT_WFN51V01_0114 13
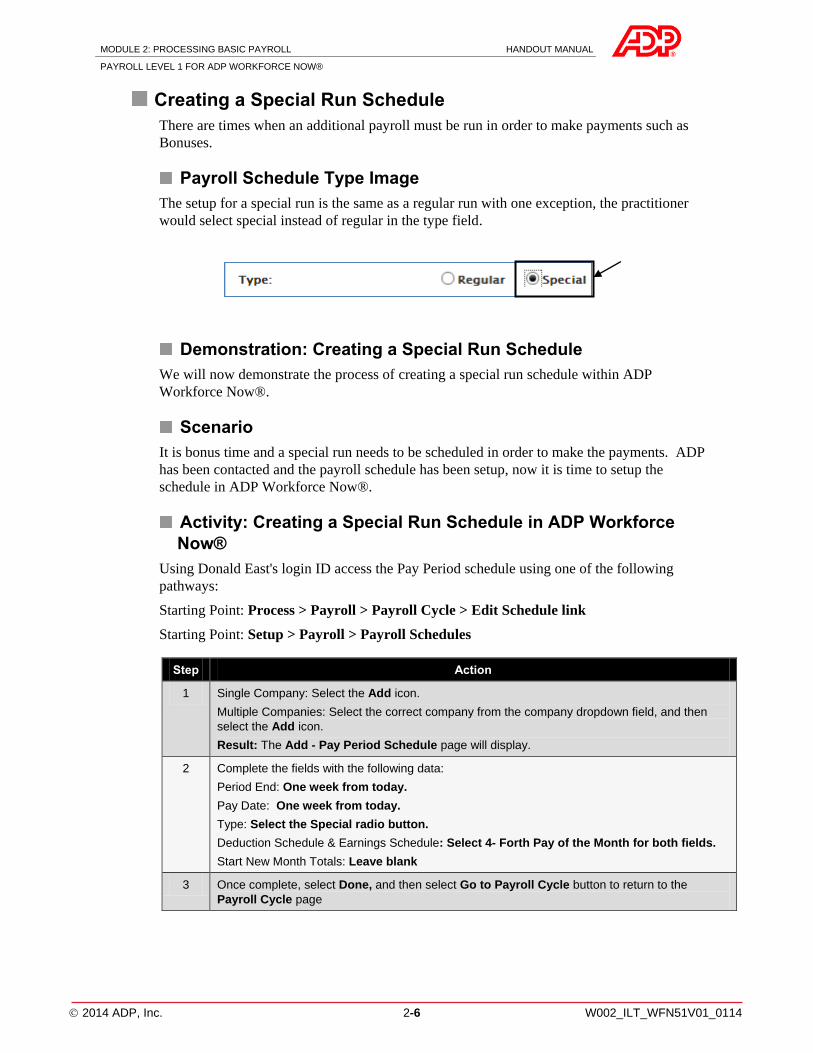
Creating a Special Run Schedule
There are times when an additional payroll must be run in order to make payments such as
Bonuses.
Payroll Schedule Type Image
The setup for a special run is the same as a regular run with one exception, the practitioner
would select special instead of regular in the type field.
Demonstration: Creating a Special Run Schedule
We will now demonstrate the process of creating a special run schedule within ADP
Workforce Now®.
Scenario
It is bonus time and a special run needs to be scheduled in order to make the payments. ADP
has been contacted and the payroll schedule has been setup, now it is time to setup the
schedule in ADP Workforce Now®.
Activity: Creating a Special Run Schedule in ADP Workforce
Now®
Using Donald East's login ID access the Pay Period schedule using one of the following
pathways:
Starting Point: Process > Payroll > Payroll Cycle > Edit Schedule link
Starting Point: Setup > Payroll > Payroll Schedules
Step Action
1 Single Company: Select the Add icon.
Multiple Companies: Select the correct company from the company dropdown field, and then
select the Add icon.
Result: The Add - Pay Period Schedule page will display.
2 Complete the fields with the following data:
Period End: One week from today.
Pay Date: One week from today.
Type: Select the Special radio button.
Deduction Schedule & Earnings Schedule: Select 4- Forth Pay of the Month for both fields.
Start New Month Totals: Leave blank
3 Once complete, select Done, and then select Go to Payroll Cycle button to return to the
Payroll Cycle page
MODULE 2: PROCESSING BASIC PAYROLL HANDOUT MANUAL
PAYROLL LEVEL 1 FOR ADP WORKFORCE NOW®
2014 ADP, Inc. 2-7 W002_ILT_WFN51V01_0114 15
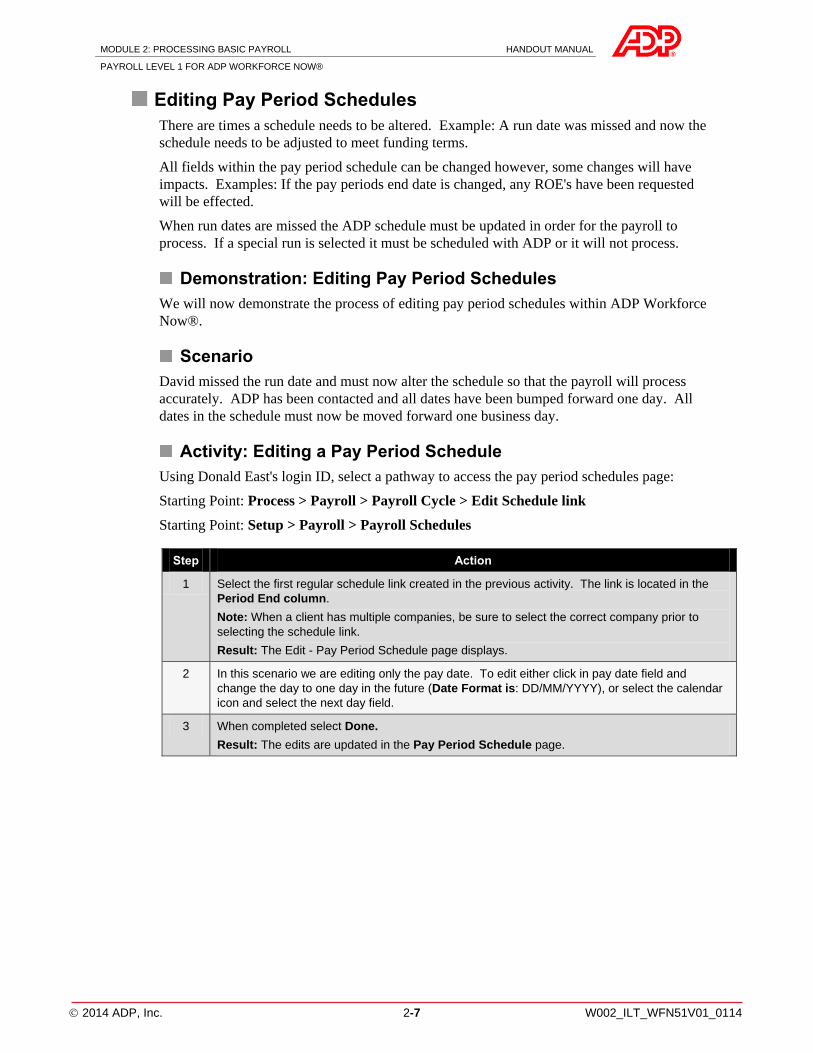
Editing Pay Period Schedules
There are times a schedule needs to be altered. Example: A run date was missed and now the
schedule needs to be adjusted to meet funding terms.
All fields within the pay period schedule can be changed however, some changes will have
impacts. Examples: If the pay periods end date is changed, any ROE's have been requested
will be effected.
When run dates are missed the ADP schedule must be updated in order for the payroll to
process. If a special run is selected it must be scheduled with ADP or it will not process.
Demonstration: Editing Pay Period Schedules
We will now demonstrate the process of editing pay period schedules within ADP Workforce
Now®.
Scenario
David missed the run date and must now alter the schedule so that the payroll will process
accurately. ADP has been contacted and all dates have been bumped forward one day. All
dates in the schedule must now be moved forward one business day.
Activity: Editing a Pay Period Schedule
Using Donald East's login ID, select a pathway to access the pay period schedules page:
Starting Point: Process > Payroll > Payroll Cycle > Edit Schedule link
Starting Point: Setup > Payroll > Payroll Schedules
Step Action
1 Select the first regular schedule link created in the previous activity. The link is located in the
Period End column.
Note: When a client has multiple companies, be sure to select the correct company prior to
selecting the schedule link.
Result: The Edit - Pay Period Schedule page displays.
2 In this scenario we are editing only the pay date. To edit either click in pay date field and
change the day to one day in the future (Date Format is: DD/MM/YYYY), or select the calendar
icon and select the next day field.
3 When completed select Done.
Result: The edits are updated in the Pay Period Schedule page.
MODULE 2: PROCESSING BASIC PAYROLL HANDOUT MANUAL
PAYROLL LEVEL 1 FOR ADP WORKFORCE NOW®
2014 ADP, Inc. 2-11 W002_ILT_WFN51V01_0114 23
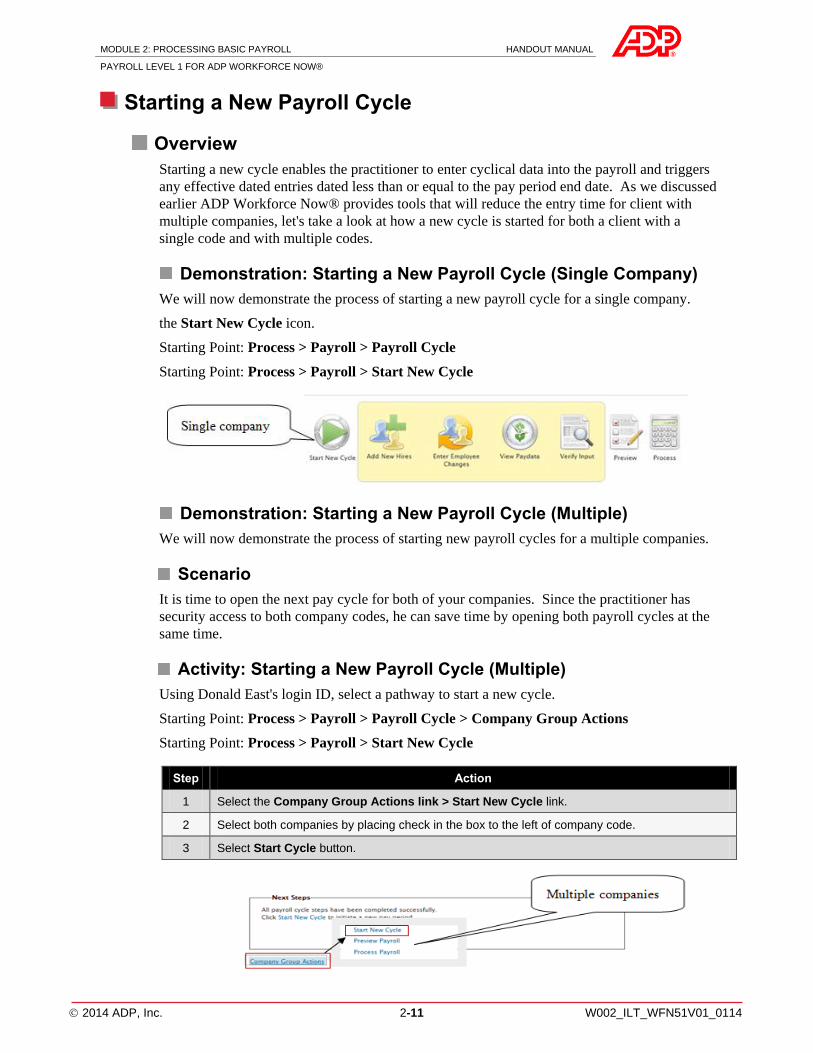
Starting a New Payroll Cycle
Overview
Starting a new cycle enables the practitioner to enter cyclical data into the payroll and triggers
any effective dated entries dated less than or equal to the pay period end date. As we discussed
earlier ADP Workforce Now® provides tools that will reduce the entry time for client with
multiple companies, let's take a look at how a new cycle is started for both a client with a
single code and with multiple codes.
Demonstration: Starting a New Payroll Cycle (Single Company)
We will now demonstrate the process of starting a new payroll cycle for a single company.
the Start New Cycle icon.
Starting Point: Process > Payroll > Payroll Cycle
Starting Point: Process > Payroll > Start New Cycle
Demonstration: Starting a New Payroll Cycle (Multiple)
We will now demonstrate the process of starting new payroll cycles for a multiple companies.
Scenario
It is time to open the next pay cycle for both of your companies. Since the practitioner has
security access to both company codes, he can save time by opening both payroll cycles at the
same time.
Activity: Starting a New Payroll Cycle (Multiple)
Using Donald East's login ID, select a pathway to start a new cycle.
Starting Point: Process > Payroll > Payroll Cycle > Company Group Actions
Starting Point: Process > Payroll > Start New Cycle
Step Action
1 Select the Company Group Actions link > Start New Cycle link.
2 Select both companies by placing check in the box to the left of company code.
3 Select Start Cycle button.
MODULE 2: PROCESSING BASIC PAYROLL HANDOUT MANUAL
PAYROLL LEVEL 1 FOR ADP WORKFORCE NOW®
2014 ADP, Inc. 2-15 W002_ILT_WFN51V01_0114 31
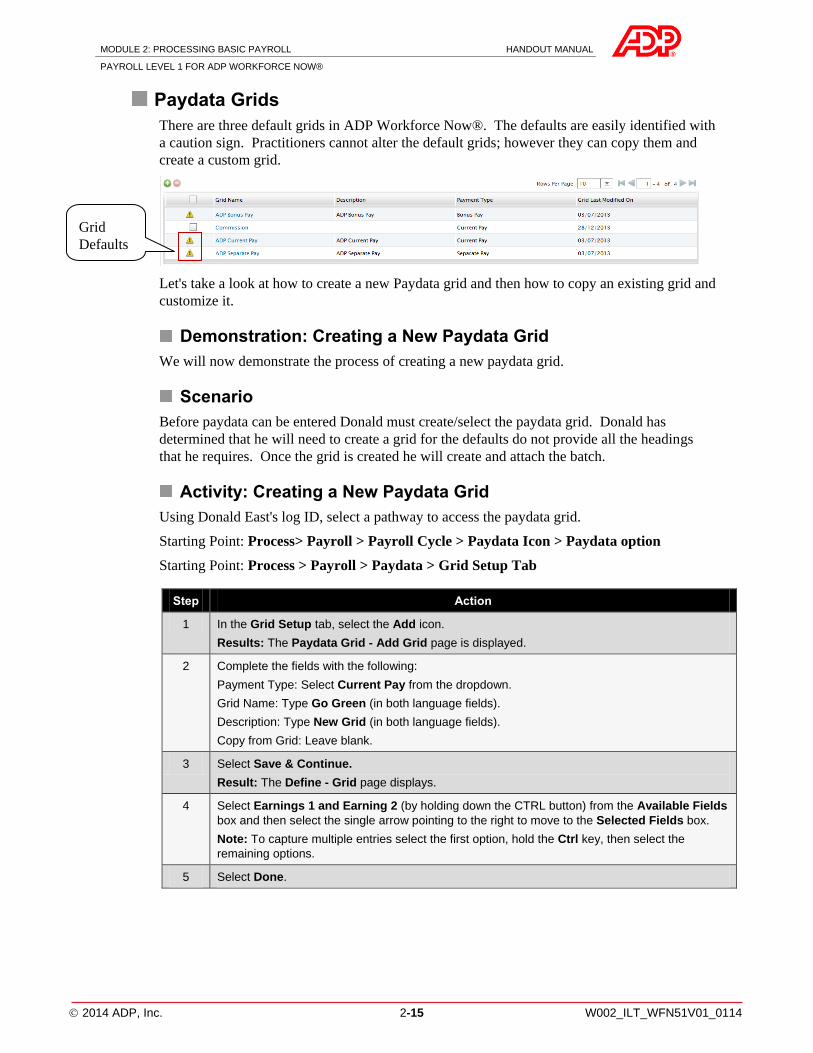
Paydata Grids
There are three default grids in ADP Workforce Now®. The defaults are easily identified with
a caution sign. Practitioners cannot alter the default grids; however they can copy them and
create a custom grid.
Let's take a look at how to create a new Paydata grid and then how to copy an existing grid and
customize it.
Demonstration: Creating a New Paydata Grid
We will now demonstrate the process of creating a new paydata grid.
Scenario
Before paydata can be entered Donald must create/select the paydata grid. Donald has
determined that he will need to create a grid for the defaults do not provide all the headings
that he requires. Once the grid is created he will create and attach the batch.
Activity: Creating a New Paydata Grid
Using Donald East's log ID, select a pathway to access the paydata grid.
Starting Point: Process> Payroll > Payroll Cycle > Paydata Icon > Paydata option
Starting Point: Process > Payroll > Paydata > Grid Setup Tab
Step Action
1 In the Grid Setup tab, select the Add icon.
Results: The Paydata Grid - Add Grid page is displayed.
2 Complete the fields with the following:
Payment Type: Select Current Pay from the dropdown.
Grid Name: Type Go Green (in both language fields).
Description: Type New Grid (in both language fields).
Copy from Grid: Leave blank.
3 Select Save & Continue.
Result: The Define - Grid page displays.
4 Select Earnings 1 and Earning 2 (by holding down the CTRL button) from the Available Fields
box and then select the single arrow pointing to the right to move to the Selected Fields box.
Note: To capture multiple entries select the first option, hold the Ctrl key, then select the
remaining options.
5 Select Done.
Grid
Defaults
MODULE 2: PROCESSING BASIC PAYROLL HANDOUT MANUAL
PAYROLL LEVEL 1 FOR ADP WORKFORCE NOW®
2014 ADP, Inc. 2-16 W002_ILT_WFN51V01_0114 33
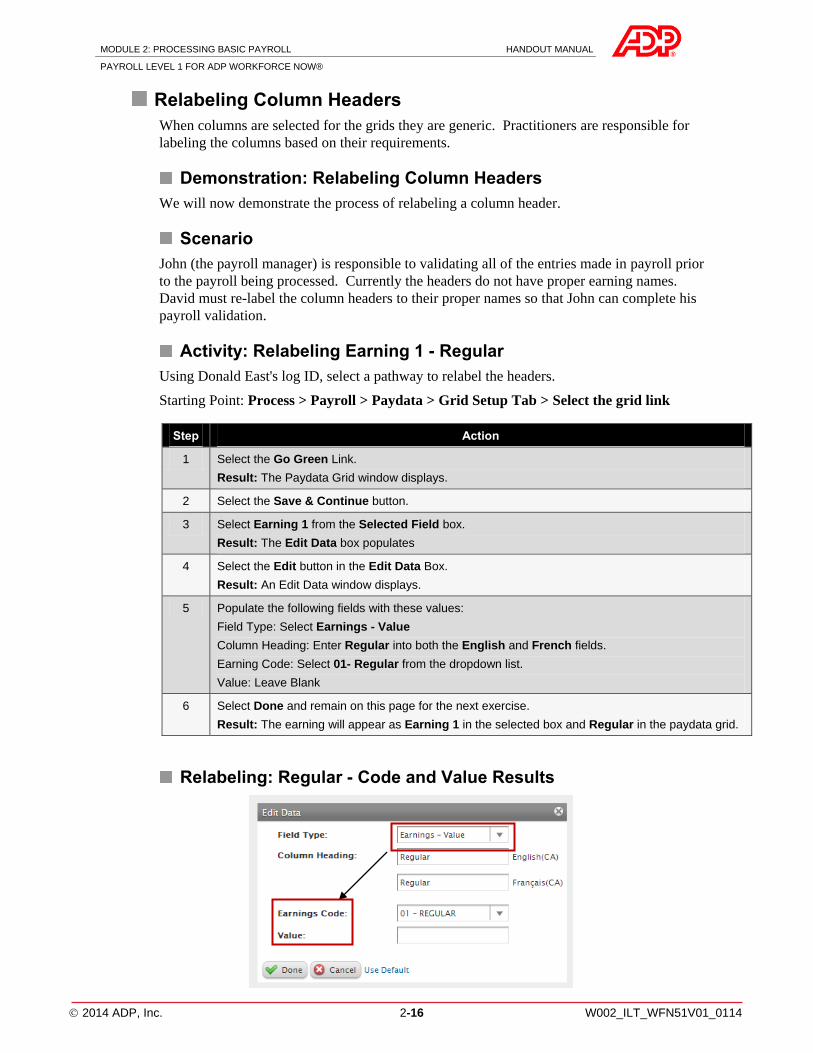
Relabeling Column Headers
When columns are selected for the grids they are generic. Practitioners are responsible for
labeling the columns based on their requirements.
Demonstration: Relabeling Column Headers
We will now demonstrate the process of relabeling a column header.
Scenario
John (the payroll manager) is responsible to validating all of the entries made in payroll prior
to the payroll being processed. Currently the headers do not have proper earning names.
David must re-label the column headers to their proper names so that John can complete his
payroll validation.
Activity: Relabeling Earning 1 - Regular
Using Donald East's log ID, select a pathway to relabel the headers.
Starting Point: Process > Payroll > Paydata > Grid Setup Tab > Select the grid link
Step Action
1 Select the Go Green Link.
Result: The Paydata Grid window displays.
2 Select the Save & Continue button.
3 Select Earning 1 from the Selected Field box.
Result: The Edit Data box populates
4 Select the Edit button in the Edit Data Box.
Result: An Edit Data window displays.
5 Populate the following fields with these values:
Field Type: Select Earnings - Value
Column Heading: Enter Regular into both the English and French fields.
Earning Code: Select 01- Regular from the dropdown list.
Value: Leave Blank
6 Select Done and remain on this page for the next exercise.
Result: The earning will appear as Earning 1 in the selected box and Regular in the paydata grid.
Relabeling: Regular - Code and Value Results
MODULE 2: PROCESSING BASIC PAYROLL HANDOUT MANUAL
PAYROLL LEVEL 1 FOR ADP WORKFORCE NOW®
2014 ADP, Inc. 2-17 W002_ILT_WFN51V01_0114 35
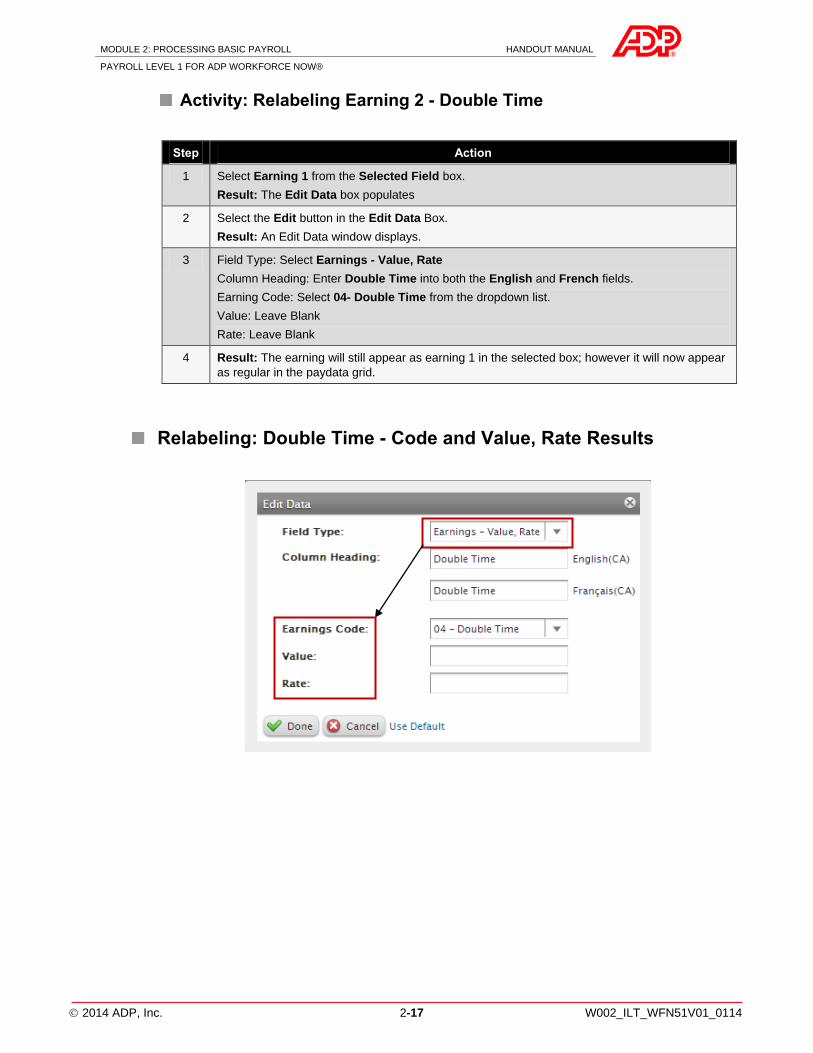
Activity: Relabeling Earning 2 - Double Time
Step Action
1 Select Earning 1 from the Selected Field box.
Result: The Edit Data box populates
2 Select the Edit button in the Edit Data Box.
Result: An Edit Data window displays.
3 Field Type: Select Earnings - Value, Rate
Column Heading: Enter Double Time into both the English and French fields.
Earning Code: Select 04- Double Time from the dropdown list.
Value: Leave Blank
Rate: Leave Blank
4 Result: The earning will still appear as earning 1 in the selected box; however it will now appear
as regular in the paydata grid.
Relabeling: Double Time - Code and Value, Rate Results
MODULE 2: PROCESSING BASIC PAYROLL HANDOUT MANUAL
PAYROLL LEVEL 1 FOR ADP WORKFORCE NOW®
2014 ADP, Inc. 2-18 W002_ILT_WFN51V01_0114 37
Copying and Customizing a Paydata Grid
The copy feature provides user with the ability to customize the grid as business needs require.
Demonstration: Copying and Customizing an Existing Paydata
Grid
We will now demonstrate the process of copying and then customizing an existing a paydata
grid.
Scenario
David must create a customized paydata grid to pay the Commission + Salary employees with
the following headers; File #, name, home department, regular and commissions. Since the
default ADP Current Pay grid contains four out of five of the predefined fields, David will
copy this grid and then customize.
Activity: Copying and Customizing an Existing Paydata Grid
Using Donald East's log ID, select a pathways to access the paydata grid.
Starting Point: Process> Payroll > Payroll Cycle > Paydata Icon > Paydata option
Starting Point: Process > Payroll > Paydata
Step Action
1 In the Grid Setup tab, select the Add icon.
Results: The Paydata Grid - Add Grid page displays.
2 Complete the fields with the following:
Payment Type: Select Current Pay from the dropdown.
Grid Name: Key Salary + Commission (in both language fields).
Description: Type New Grid (in both language fields).
Copy from Grid: Select ADP Current Pay
3 Select Save & Continue.
Result: The Define - Grid page displays with the following default fields in the Selected Fields box:
File #, Name, Associate ID, Home Department, Earnings 1.
4 Click on Associate ID in the Selected Field box, and select the single arrow pointing to the left.
Click on the Earnings 2 in the Available Fields box, and then select the single arrow pointing to the
right.
Result: The Associate ID option is not longer part of the selection and the Earnings 2 option has
been added to the selection.
5 Rename Earning 1 to Regular and Earning 2 to Commission.
Reference Relabeling Column Headings activity for assistance, and then select Done.
Result: The paydata grid displays.
MODULE 2: PROCESSING BASIC PAYROLL HANDOUT MANUAL
PAYROLL LEVEL 1 FOR ADP WORKFORCE NOW®
2014 ADP, Inc. 2-19 W002_ILT_WFN51V01_0114 39
Editing a Paydata Grid
When changes occur, practitioners can use the edit feature to make changes to the paydata grid.
Demonstration: Editing a Paydata Grid
We will now demonstrate the process of editing a paydata grid.
Scenario
John the payroll manager notified David that he does not require Home Department in the grid,
but he does need double time added. David must now make the edits to the paydata grid that
was just created.
Activity: Editing a Paydata Grid
Using Donald East's log ID, select a pathway to access a paydata grid.
Starting Point: Process> Payroll > Payroll Cycle > Paydata Icon > Paydata option
Starting Point: Process > Payroll > Paydata
Step Action
1 In the Grid Setup tab, select the Commission grid link from the Grid Name column.
Results: The Edit - Grid page will display.
2 Select the Save & Continue button.
Result: The Define - Grid page displays.
3 To remove the Home Department highlight the field in the Selected Fields box and move to the
Available Fields box using the single arrow pointing to the left.
Adding Double Time:
1. Highlight the field Earning 3 in the Available Fields box and move to the Selected Fields
box using the single arrow pointing to the right.
2. Select the Edit button in the Edit Data box
3. Type Double Time into the English and French Column Heading field.
4. Select 04 - Double Time from the dropdown in field Earning Code.
4 Select Done.
5 In the Grid Setup tab, select the Commission link from the Grid Name column.
Results: The Edit - Grid page will display.
Note: In both of these scenarios the Define - Grid page will contain options in the Selected
Fields box. All options in the Selected Fields box can be returned to the Available Fields box
with the exception of Name.
Batch Pre-work (First time only)
Now that our headers have been created within the grid setup, it is time to create the batches.
The batches determine the payment type and which employee's will appear in the payment
batch. Part of the batch process the practitioner must select the employees one by one. ADP
Workforce Now® contains a tool called Manage My lists which allows the practitioner to
create custom employee lists which they can select in place of the individual selection process.
Let's see how these lists are setup.
MODULE 2: PROCESSING BASIC PAYROLL HANDOUT MANUAL
PAYROLL LEVEL 1 FOR ADP WORKFORCE NOW®
2014 ADP, Inc. 2-20 W002_ILT_WFN51V01_0114 41
Managing My Lists
Creating customized lists is very beneficial when creating batches. Selecting a list from a
dropdown reduces time, especially when this process is required each pay period. The
alternative is to individually search and select all employees that are to appear in a batch.
Multiple lists can be created and reused as required for batches and in many other areas within
ADP Workforce Now®. Let's review the process of creating a list.
Demonstration: Manage My List
We will now demonstrate how to create a Manage My List.
Scenario
David is a proactive individual who will use the Manage My Lists feature to reduce the amount
of time that he spends selecting employees for a variety of features within ADP Workforce
Now®.
Activity: Creating Managed Lists
Using Donald East's log ID, follow this pathway to create a list.
Starting Point: People > Personal Information > Employee Profile > Select the magnifying
glass > Select the Manage My Lists link
We will create a list that will be used in the next exercise; we will name them: Hourly
Employees.
Step Action
1 Select the Add icon
2 Populate the following data in these fields:
List Name: Hourly Employees.
List Privacy: Select Public from the dropdown
Field Name: Select Rate Type from the dropdown.
Comparison: Select is equal to from the dropdown.
Field Value: Select Hourly from the dropdown.
3 When complete select Done.
Results: When this list is selected all Hourly Employees will appear.
MODULE 2: PROCESSING BASIC PAYROLL HANDOUT MANUAL
PAYROLL LEVEL 1 FOR ADP WORKFORCE NOW®
2014 ADP, Inc. 2-22 W002_ILT_WFN51V01_0114 45
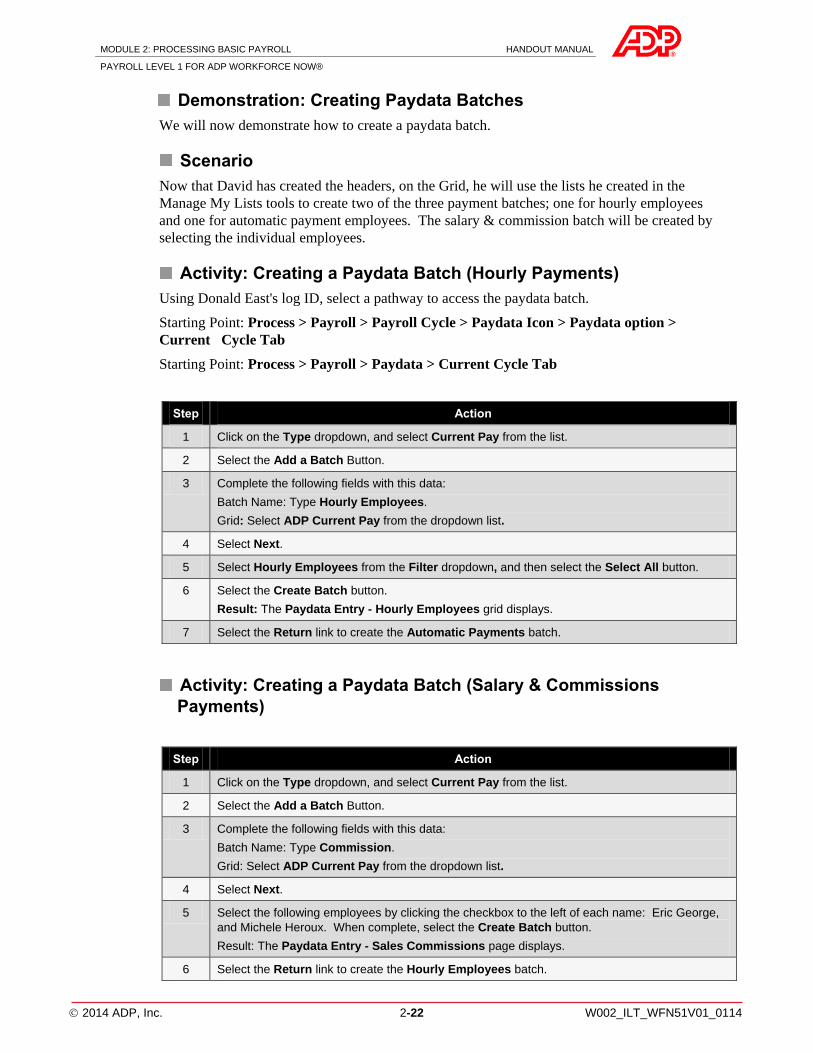
Demonstration: Creating Paydata Batches
We will now demonstrate how to create a paydata batch.
Scenario
Now that David has created the headers, on the Grid, he will use the lists he created in the
Manage My Lists tools to create two of the three payment batches; one for hourly employees
and one for automatic payment employees. The salary & commission batch will be created by
selecting the individual employees.
Activity: Creating a Paydata Batch (Hourly Payments)
Using Donald East's log ID, select a pathway to access the paydata batch.
Starting Point: Process > Payroll > Payroll Cycle > Paydata Icon > Paydata option >
Current Cycle Tab
Starting Point: Process > Payroll > Paydata > Current Cycle Tab
Step Action
1 Click on the Type dropdown, and select Current Pay from the list.
2 Select the Add a Batch Button.
3 Complete the following fields with this data:
Batch Name: Type Hourly Employees.
Grid: Select ADP Current Pay from the dropdown list.
4 Select Next.
5 Select Hourly Employees from the Filter dropdown, and then select the Select All button.
6 Select the Create Batch button.
Result: The Paydata Entry - Hourly Employees grid displays.
7 Select the Return link to create the Automatic Payments batch.
Activity: Creating a Paydata Batch (Salary & Commissions
Payments)
Step Action
1 Click on the Type dropdown, and select Current Pay from the list.
2 Select the Add a Batch Button.
3 Complete the following fields with this data:
Batch Name: Type Commission.
Grid: Select ADP Current Pay from the dropdown list.
4 Select Next.
5 Select the following employees by clicking the checkbox to the left of each name: Eric George,
and Michele Heroux. When complete, select the Create Batch button.
Result: The Paydata Entry - Sales Commissions page displays.
6 Select the Return link to create the Hourly Employees batch.
MODULE 2: PROCESSING BASIC PAYROLL HANDOUT MANUAL
PAYROLL LEVEL 1 FOR ADP WORKFORCE NOW®
2014 ADP, Inc. 2-24 W002_ILT_WFN51V01_0114 49
Adding a Column
Columns are added when additional payment types are required in the paydata grid.
Demonstration: Adding an Column
We will now demonstrate how to add a column (an additional payment type) into the paydata
grid.
Scenario
David is required to pay out the $150.00 car allowance payments to all employees in the Sales
Commissions batch. David can enter these payments using one of two methods: By adding a
second payment row to each employee or by adding a payment column. David will use the
Add Column feature to create a payment column, and then he will change the title to Car
Allowance.
Activity: Add a Column
Using Donald East's log ID, select a pathway to access the add column feature.
Starting Point: Process > Payroll > Payroll Cycle > Paydata > Paydata > Current Cycle
Tab > Select the Sales Commission batch link.
Starting Point: Process > Payroll > Paydata > Current Cycle Tab > Select the Sales
Commission batch link.
Step Action
1 Select the Other Actions link, and then select Add Column.
2 Select Earning 3 and move the field to the Selected Fields box using the single arrow pointing
to the right.
Note: The file # and name fields are defaults and cannot be altered.
3 Select the Earnings 3 field from the Selected Fields column.
4 Click in the Edit button.
5 Use these entries in the edit field:
Field Type: Earnings - Value
Column Heading: Type in Car Allowance (in English and French fields)
Earning Code: 30 - Car Allowance
Value: 150.00
Result: The column will appear with a payment of $150.00 for each employee.
MODULE 2: PROCESSING BASIC PAYROLL HANDOUT MANUAL
PAYROLL LEVEL 1 FOR ADP WORKFORCE NOW®
2014 ADP, Inc. 2-25 W002_ILT_WFN51V01_0114 51
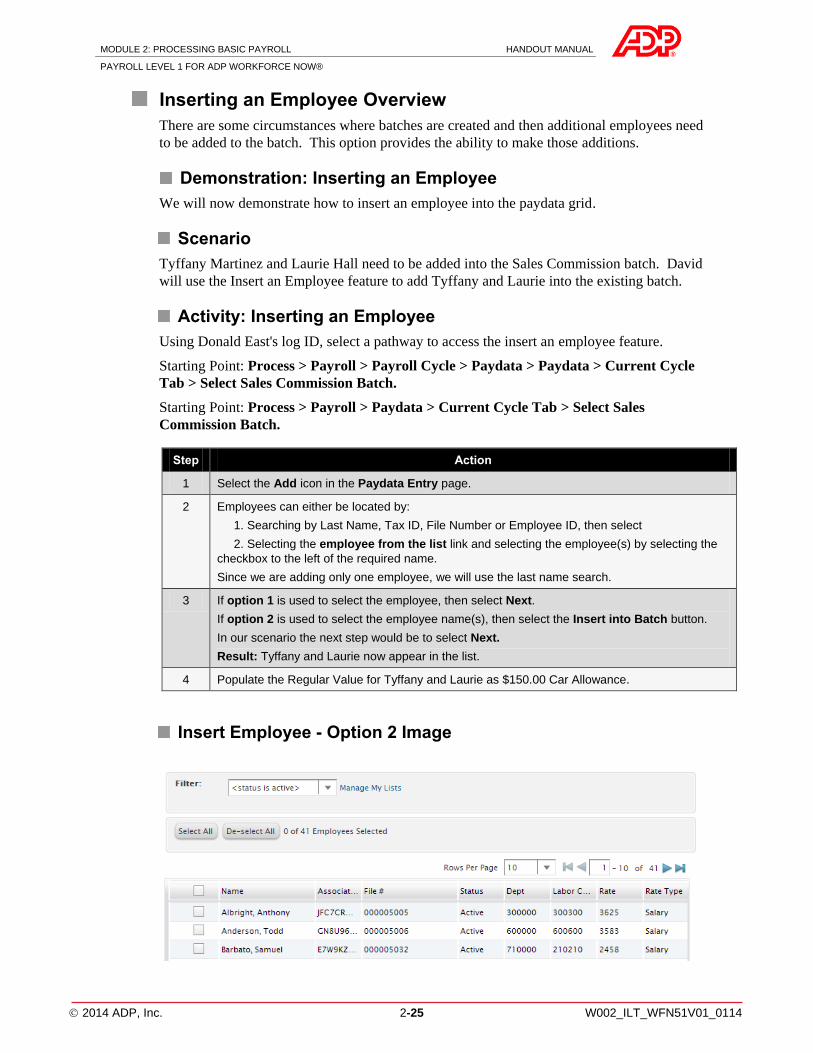
Inserting an Employee Overview
There are some circumstances where batches are created and then additional employees need
to be added to the batch. This option provides the ability to make those additions.
Demonstration: Inserting an Employee
We will now demonstrate how to insert an employee into the paydata grid.
Scenario
Tyffany Martinez and Laurie Hall need to be added into the Sales Commission batch. David
will use the Insert an Employee feature to add Tyffany and Laurie into the existing batch.
Activity: Inserting an Employee
Using Donald East's log ID, select a pathway to access the insert an employee feature.
Starting Point: Process > Payroll > Payroll Cycle > Paydata > Paydata > Current Cycle
Tab > Select Sales Commission Batch.
Starting Point: Process > Payroll > Paydata > Current Cycle Tab > Select Sales
Commission Batch.
Step Action
1 Select the Add icon in the Paydata Entry page.
2 Employees can either be located by:
1. Searching by Last Name, Tax ID, File Number or Employee ID, then select
2. Selecting the employee from the list link and selecting the employee(s) by selecting the
checkbox to the left of the required name.
Since we are adding only one employee, we will use the last name search.
3 If option 1 is used to select the employee, then select Next.
If option 2 is used to select the employee name(s), then select the Insert into Batch button.
In our scenario the next step would be to select Next.
Result: Tyffany and Laurie now appear in the list.
4 Populate the Regular Value for Tyffany and Laurie as $150.00 Car Allowance.
Insert Employee - Option 2 Image
MODULE 2: PROCESSING BASIC PAYROLL HANDOUT MANUAL
PAYROLL LEVEL 1 FOR ADP WORKFORCE NOW®
2014 ADP, Inc. 2-26 W002_ILT_WFN51V01_0114 53
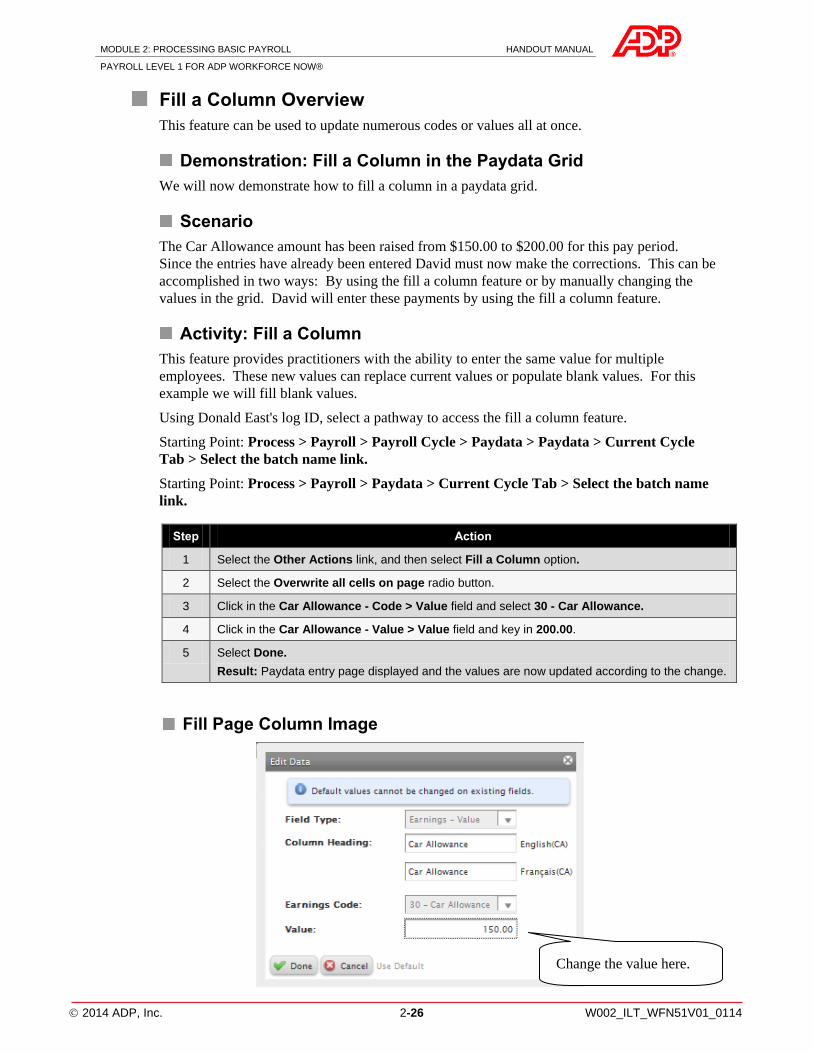
Fill a Column Overview
This feature can be used to update numerous codes or values all at once.
Demonstration: Fill a Column in the Paydata Grid
We will now demonstrate how to fill a column in a paydata grid.
Scenario
The Car Allowance amount has been raised from $150.00 to $200.00 for this pay period.
Since the entries have already been entered David must now make the corrections. This can be
accomplished in two ways: By using the fill a column feature or by manually changing the
values in the grid. David will enter these payments by using the fill a column feature.
Activity: Fill a Column
This feature provides practitioners with the ability to enter the same value for multiple
employees. These new values can replace current values or populate blank values. For this
example we will fill blank values.
Using Donald East's log ID, select a pathway to access the fill a column feature.
Starting Point: Process > Payroll > Payroll Cycle > Paydata > Paydata > Current Cycle
Tab > Select the batch name link.
Starting Point: Process > Payroll > Paydata > Current Cycle Tab > Select the batch name
link.
Step Action
1 Select the Other Actions link, and then select Fill a Column option.
2 Select the Overwrite all cells on page radio button.
3 Click in the Car Allowance - Code > Value field and select 30 - Car Allowance.
4 Click in the Car Allowance - Value > Value field and key in 200.00.
5 Select Done.
Result: Paydata entry page displayed and the values are now updated according to the change.
Fill Page Column Image
Change the value here.
MODULE 2: PROCESSING BASIC PAYROLL HANDOUT MANUAL
PAYROLL LEVEL 1 FOR ADP WORKFORCE NOW®
2014 ADP, Inc. 2-27 W002_ILT_WFN51V01_0114 55
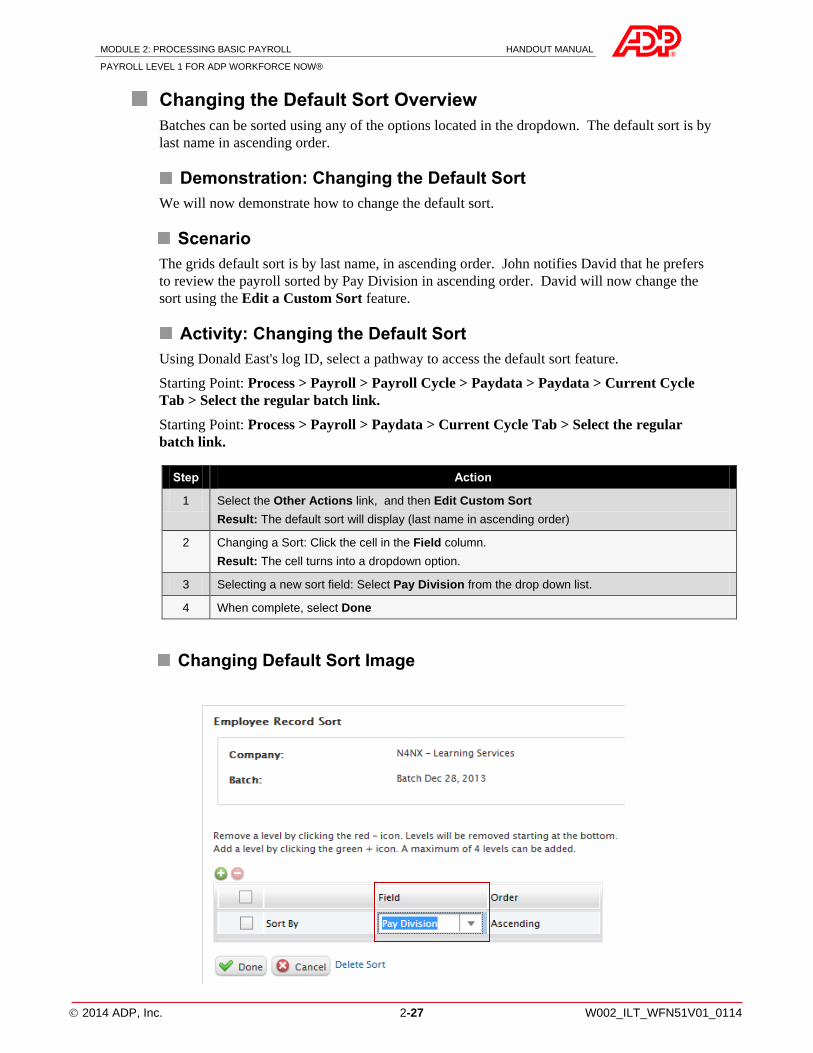
Changing the Default Sort Overview
Batches can be sorted using any of the options located in the dropdown. The default sort is by
last name in ascending order.
Demonstration: Changing the Default Sort
We will now demonstrate how to change the default sort.
Scenario
The grids default sort is by last name, in ascending order. John notifies David that he prefers
to review the payroll sorted by Pay Division in ascending order. David will now change the
sort using the Edit a Custom Sort feature.
Activity: Changing the Default Sort
Using Donald East's log ID, select a pathway to access the default sort feature.
Starting Point: Process > Payroll > Payroll Cycle > Paydata > Paydata > Current Cycle
Tab > Select the regular batch link.
Starting Point: Process > Payroll > Paydata > Current Cycle Tab > Select the regular
batch link.
Step Action
1 Select the Other Actions link, and then Edit Custom Sort
Result: The default sort will display (last name in ascending order)
2 Changing a Sort: Click the cell in the Field column.
Result: The cell turns into a dropdown option.
3 Selecting a new sort field: Select Pay Division from the drop down list.
4 When complete, select Done
Changing Default Sort Image

MODULE 2: PROCESSING BASIC PAYROLL HANDOUT MANUAL
PAYROLL LEVEL 1 FOR ADP WORKFORCE NOW®
2014 ADP, Inc. 2-28 W002_ILT_WFN51V01_0114 57
Deleting Sorting Criteria
Once criteria have been set up it can also be deleted as required. Let's see how this is done.
Demonstration: How to Delete Sort Criteria
We will now demonstrate how to delete sort criteria.
Scenario
The payroll practitioner prefers to have a specific sort when they are entering the data and the
director required a different sort when reviewing the entries for approval. The entries are
complete and the practitioner sort must be deleted.
Activity: Deleting Sort Criteria
Using Donald East's log ID, select a pathway to access the default sort feature.
Starting Point: Process > Payroll > Payroll Cycle > Paydata > Paydata > Current Cycle
Tab > Select the regular batch link.
Starting Point: Process > Payroll > Paydata > Current Cycle Tab > Select the regular
batch link.
Step Action
1 Select the Other Actions link, and then Edit Custom Sort.
Result: The default sort will display.
2 Deleting a Row of Search Criteria: Click the checkbox to the left of the row(s) to be deleted.
3 Select the subtract icon.
Result: The selected row(s) are deleted.
4 When complete, select Done.
Deleting Sort Rows Image
MODULE 2: PROCESSING BASIC PAYROLL HANDOUT MANUAL
PAYROLL LEVEL 1 FOR ADP WORKFORCE NOW®
2014 ADP, Inc. 2-29 W002_ILT_WFN51V01_0114 59
Paydata Entries
We now have a tool kit and a paydata batch; it is time to key in the paydata entries. The next
several activities will show how to enter the most common payment types. Let's take a look at
the first scenario.
Entering Hourly Paydata
Hourly payments require hours to be entered to complete the payment. The hours are then
multiplied by the rate located in the employee profile.
Demonstration: Entering Hourly Paydata
We will now demonstrate how to enter hourly paydata.
Scenario
The paydata grids are now created. David will begin the paydata entry process by keying the
hours for the hourly employees.
Activity: Entering Hourly Paydata
Using Donald East's log ID, use this pathway to enter hourly paydata.
Starting Point: Process > Payroll > Paydata > Select Hourly Employees batch
Step Action
1 Click into the cell in the Code column.
2 Select 01 - Regular from the dropdown.
3 Click in the cell in the Value column and type in the following hours:
Peter Biggins: 35 hrs
Edward Bonner: 20 hrs
Albert Delaney: 23hrs
Bradley Thomas: 15 hrs
Note: If a onetime rate change is required the new rate change must be keyed into the Rate
column.
4 Select Save.
MODULE 2: PROCESSING BASIC PAYROLL HANDOUT MANUAL
PAYROLL LEVEL 1 FOR ADP WORKFORCE NOW®
2014 ADP, Inc. 2-30 W002_ILT_WFN51V01_0114 61
Creating a New Payment Row
There are different ways of capturing multiple payments: Creating a payment column (When
multiple employees have the same payment) or by creating a payment row (for a single
employee payment.)
Demonstration: Create a New Payment Row
We will now demonstrate how to create a new payment row.
Scenario
David must now enter in two new payments other than regular for Norman Gerry. To prepare
the paydata grid for these entries he will create two new payment rows for Norman. David
will begin by opening the Automatic Payment batch.
Activity: Creating New Payment Rows
Using Donald East's log ID, use this pathway to create a new payment row.
Starting Point: Process > Payroll > Paydata > Select Automatic Payments batch
Step Action
1 Select the Add icon.
Result: The MEI Insert Employee page appears.
2 Enter Gerry into the Enter a Last Name field, and then select Next.
Note: If there are multiple results, the user must select the correct employee, and then select the
Insert into Batch.
3 Select Save.
4 Repeat steps 1-4 to create the second payment row.
**Note: Once a column, employee or payment row is added to the grid the practitioner will not
be able to proceed anywhere until the codes and values have been populated. Let's move on to
the next exercise to see how that is done.
MODULE 2: PROCESSING BASIC PAYROLL HANDOUT MANUAL
PAYROLL LEVEL 1 FOR ADP WORKFORCE NOW®
2014 ADP, Inc. 2-31 W002_ILT_WFN51V01_0114 63
Entering Overtime and Double Time Payments
Overtime and double time payments are payments that require hours to be entered. The hours
are then multiplied by the rate applied to the employee in their profile.
Demonstration: Create a Overtime and Double Time Payment
We will now demonstrate how to create overtime and double time payments.
Scenario
Norman Gerry's additional payment rows have now been created. David will now key in 10
hours of overtime and 4 hours of double time.
Activity: Entering Overtime Payments
Using Donald East's log ID, use this pathway to enter overtime payments.
Starting Point: Process > Payroll > Paydata > Select Automatic Payments batch
Step Action
1 Click in the cell in the Code column, and then select Overtime from the dropdown list.
2 Click in the cell in the Value column, and then key in 10 (hrs)
Activity: Entering Double Time Payments
Using Donald East's log ID, use this pathway to enter double time payments.
Step Action
1 Click in the cell in the Code column, and then select Double Time from the dropdown list.
2 Click in the cell in the Value column, and then key in 4 (hrs).
3 Select Save.
MODULE 2: PROCESSING BASIC PAYROLL HANDOUT MANUAL
PAYROLL LEVEL 1 FOR ADP WORKFORCE NOW®
2014 ADP, Inc. 2-33 W002_ILT_WFN51V01_0114 67
Demonstration: Verify Input
We will now demonstrate how to verify payroll entries.
Scenario
All Paydata entries are now complete. David must now valid all of the entries. To complete
this task he will select the Verify Input icon in the payroll cycle.
Activity: Verify Input
Using Donald East's log ID, select a pathway to access verify input.
Starting Point: Process > Payroll > Payroll Cycle > Verify Input icon
Starting Point: Process > Payroll > Verify Input
Complete the following in order to review and mark your entries/changes as Inspected:
Step Action
1 Use the action button to the right of Payroll Overview to access and explore the different sections:
Employee Changes, Payments & Adjustments, and Status Changes.
2 Within each section there are several hyperlinks. Select each of the hyperlinks one by one:
If no entries appear: move to the next subsection by selecting the action button.
If entries exist: Validate and select each entry as you approve.
Note: The number of rows per page defaults to 10. This value can be increased to 30 rows per page
using the dropdown field.
3 Practitioners can:
Validate the entries and mark them inspected one by one.
Procedure: Click the checkbox of the validated entry, then select the Mark As link > Inspected.
Procedure: Repeat the process for each row.
OR
Validate all entries in listed on a page, and then mark them all Inspected at once.
Procedure: Click the checkbox in the header bar (Results: All rows displayed on the page are
selected), then select the Mark As link > Inspected.
Note: When the select all box is checked only the rows displayed will be selected not other pages.
For example when the select all feature is used:
And the page default is 10 rows per page, only the first 10 rows will show as selected.
And the page default is 20 rows per page, only the first 20 rows will show as selected.
And the page default is 30 rows per page, only the first 30 rows will show as selected.
Note: The user must mark each default group as inspected before switching the page.
For example: The page default is 30 rows per page. The practitioner must validate the 30 rows,
mark as Inspected and then they can select the next page and move onto the next groups of 30
rows.
MODULE 2: PROCESSING BASIC PAYROLL HANDOUT MANUAL
PAYROLL LEVEL 1 FOR ADP WORKFORCE NOW®
2014 ADP, Inc. 2-35 W002_ILT_WFN51V01_0114 71
Demonstration: Request Preview Reports
We will now demonstrate how to request preview payroll.
Scenario
The entries are now validated and it is time for David to request and review the preview
reports. To complete this process David will select the Preview Icon in the payroll cycle.
Activity: Requesting Preview Reports
Using Donald East's log ID, select a pathway to access preview reports.
Starting Point: Process > Payroll > Payroll Cycle > Select the Preview icon > Preview
Payroll option
Starting Point: Process > Payroll > Preview Payroll
Step Action
1 Single Company: Select the Preview icon > Preview Payroll
Result: A request options page will appear.
Multiple Companies: Select Process > Payroll > Preview Payroll
Result: A grid will appear requiring the user to select either a single or multiple companies.
2 Multiple Companies: Select the codes that you would like to preview by checking the box to the
left of the company code, then select Continue.
Results: The Preview Payroll page displays.
3 Select Optional Report or Files (if applicable), then select Done
Results:
Single Company: A following message appears: 1 company processed successfully
Multiple Companies: A following message appears: 2 company(ies) processed successfully
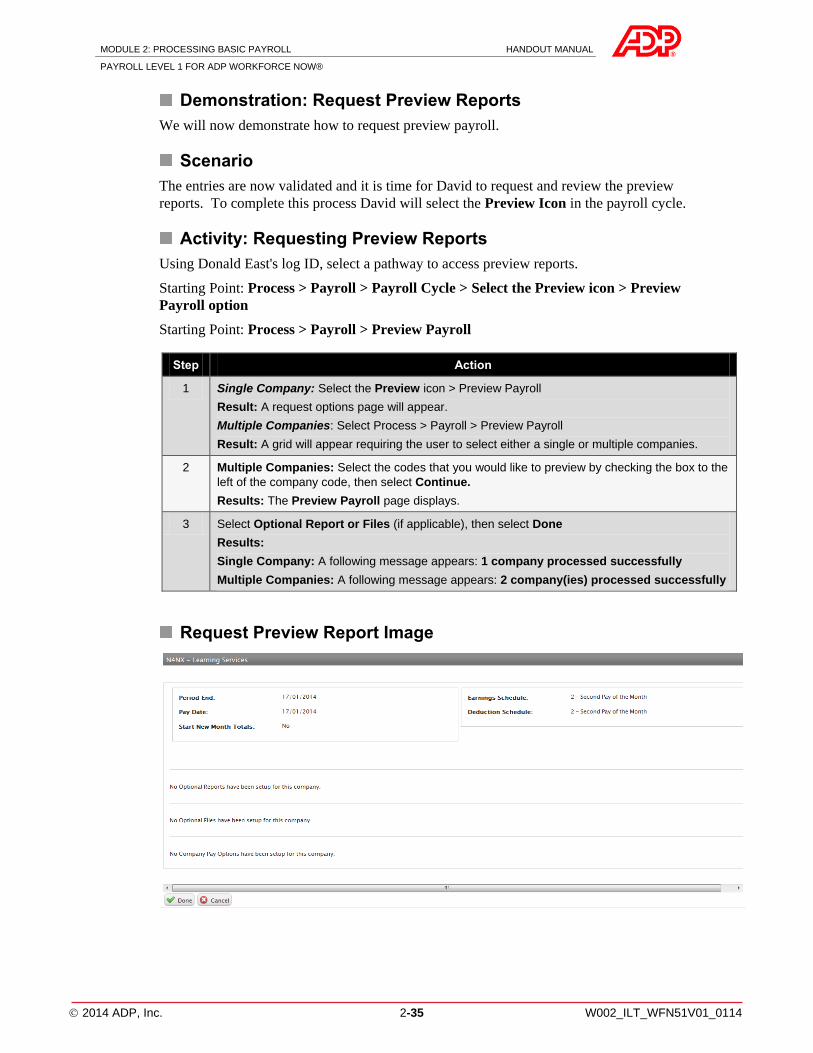
Request Preview Report Image
MODULE 2: PROCESSING BASIC PAYROLL HANDOUT MANUAL
PAYROLL LEVEL 1 FOR ADP WORKFORCE NOW®
2014 ADP, Inc. 2-36 W002_ILT_WFN51V01_0114 73
Viewing Preview Reports
Demonstration: Viewing Preview Reports
We will now demonstrate how to view preview reports.
Scenario
The reports have now returned, David will now review the reports and correct any errors.
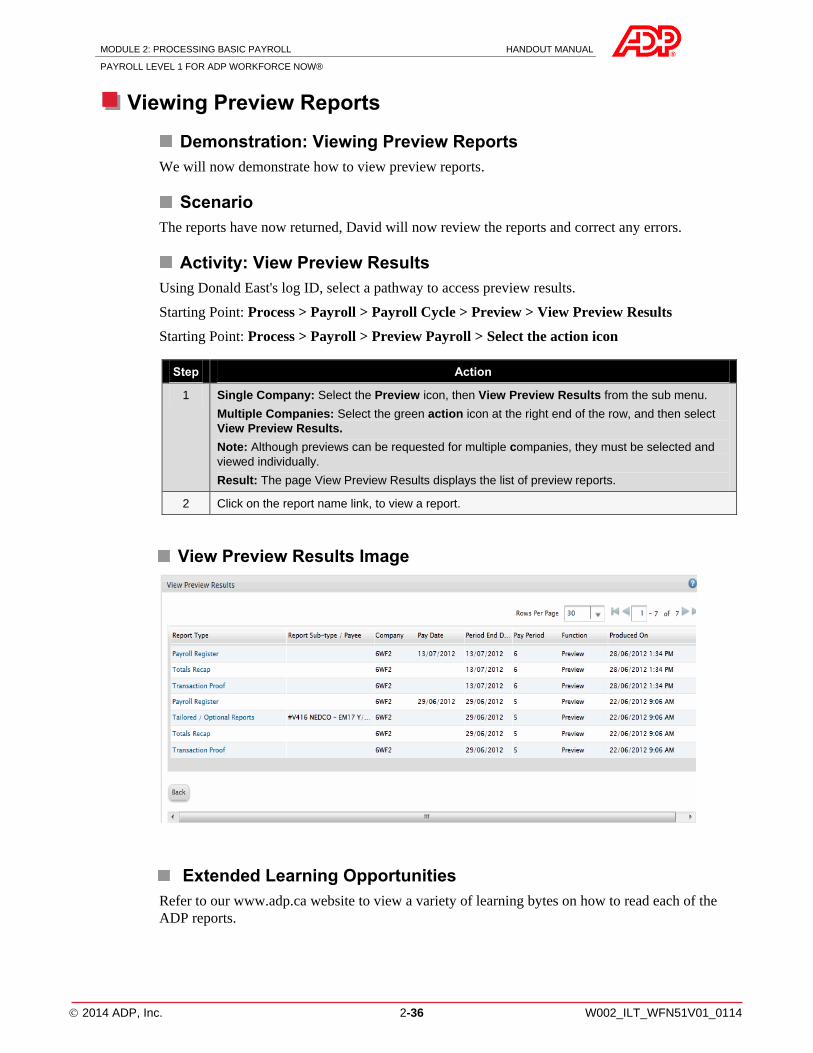
Activity: View Preview Results
Using Donald East's log ID, select a pathway to access preview results.
Starting Point: Process > Payroll > Payroll Cycle > Preview > View Preview Results
Starting Point: Process > Payroll > Preview Payroll > Select the action icon
Step Action
1 Single Company: Select the Preview icon, then View Preview Results from the sub menu.
Multiple Companies: Select the green action icon at the right end of the row, and then select
View Preview Results.
Note: Although previews can be requested for multiple companies, they must be selected and
viewed individually.
Result: The page View Preview Results displays the list of preview reports.
2 Click on the report name link, to view a report.
View Preview Results Image
Extended Learning Opportunities
Refer to our www.adp.ca website to view a variety of learning bytes on how to read each of the
ADP reports.
MODULE 2: PROCESSING BASIC PAYROLL HANDOUT MANUAL
PAYROLL LEVEL 1 FOR ADP WORKFORCE NOW®
2014 ADP, Inc. 2-38 W002_ILT_WFN51V01_0114 77
Demonstration: Processing Payroll
We will now demonstrate how to process payroll.
Scenario
David has now completed reviewing the preview reports and is now ready to process payroll.
He will now process the payroll for both companies (use companies assigned)
Note: This is a training database; therefore the processing will show simulated results.
Activity: Processing Payroll
Using Donald East's log ID, select a pathway to access payroll processing.
Starting Point: Process > Payroll > Payroll Cycle > Process Icon > Process Payroll
Starting Point: Process > Payroll > Process Payroll
Step Action
1 Single Company: Select the Process icon > Process Payroll
Results: The Payroll Process screen displays.
Multiple Companies: Select Process > Payroll > Process Payroll. Select all companies to be
processed by clicking in the box to the left of the company code.
Results: The Process Payroll page appears. If applicable, select any Optional Reports or Files
you wish to have processed with his Payroll Cycle.
Note: If Labour Cost reporting is used, select the Labour Cost Report or indicate if a new
accounting period needs to be started.
2 Single Company: If applicable, select any optional reports or files to be produced with the
payroll, and then select Done.
Results: Message returned: 1 company(ies) processed successfully
Multiple Companies: Select Continue.
Results: The Process Payroll page appears.
3 Multiple Companies: If applicable, select any optional reports or files to be produced with the
payroll, and then select Done.
Results: Message returned: 2 company(ies) processed successfully
MODULE 2: PROCESSING BASIC PAYROLL HANDOUT MANUAL
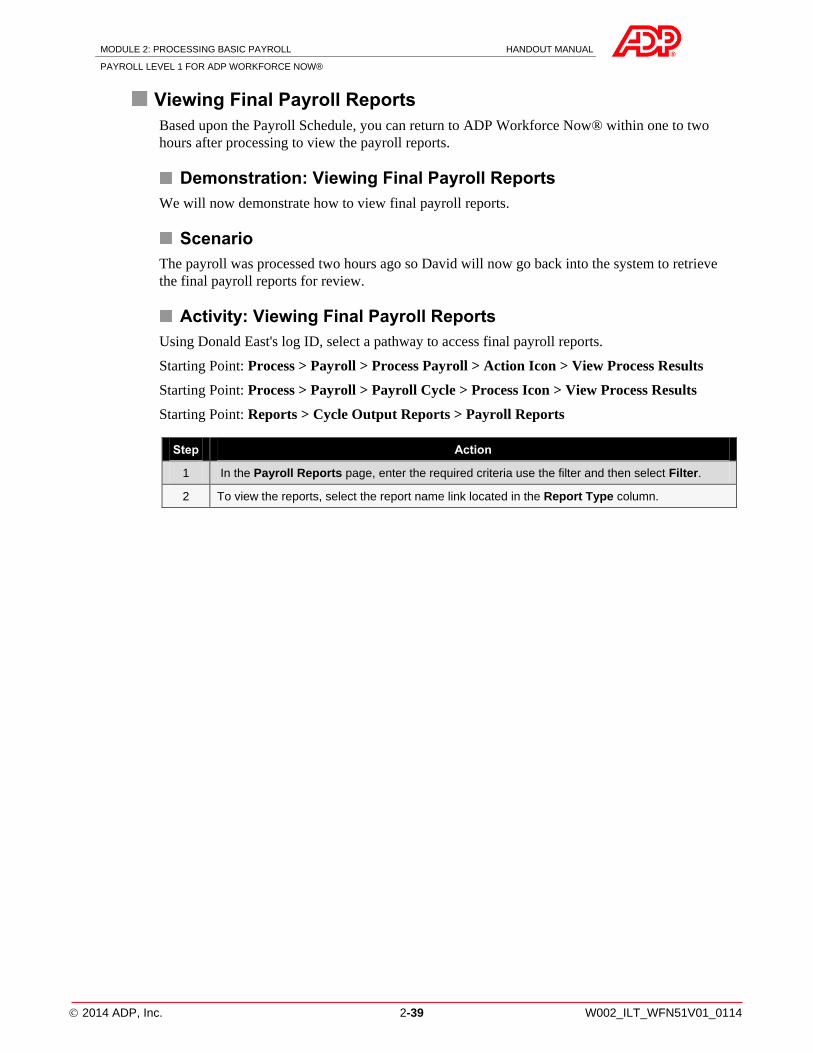
PAYROLL LEVEL 1 FOR ADP WORKFORCE NOW®
2014 ADP, Inc. 2-39 W002_ILT_WFN51V01_0114 79
Viewing Final Payroll Reports
Based upon the Payroll Schedule, you can return to ADP Workforce Now® within one to two
hours after processing to view the payroll reports.
Demonstration: Viewing Final Payroll Reports
We will now demonstrate how to view final payroll reports.
Scenario
The payroll was processed two hours ago so David will now go back into the system to retrieve
the final payroll reports for review.
Activity: Viewing Final Payroll Reports
Using Donald East's log ID, select a pathway to access final payroll reports.
Starting Point: Process > Payroll > Process Payroll > Action Icon > View Process Results
Starting Point: Process > Payroll > Payroll Cycle > Process Icon > View Process Results
Starting Point: Reports > Cycle Output Reports > Payroll Reports
Step Action
1 In the Payroll Reports page, enter the required criteria use the filter and then select Filter.
2 To view the reports, select the report name link located in the Report Type column.